

Page 1
EB800MSV2
www.proavio.com
Quick start guide
PROFESSIONAL 12G SAS STORAGE ARRAY FOR 4K WORKFLOWS
© Copyright 2014. Proavio, U.S.A. Proudly Assembled in the U.S.A.
Page 2

Quick start guide
1
2
Welcome
Thank you for choosing Proavio
Thank you for choosing Proavio V2 , the rst professional 12G SAS desktop
solution designed for 4K media production and high performance/capacity
desktop storage requirements.
In the Box
Carefully unpack your V2 storage system and inventory the accessories
according to your model/bundle type.
NOTE:
Product bundles may include additional pieces of hardware or software.
WWW.PROAVIO.COM
MiniSAS
Year
Designed and Assembled in the USA
3
12Gb/s
HD
LIMITED WARRANTY
HIGH PERFORMANCE
NEXT GENERATION
®
Windows / Mac OS / Linux
PROAVIO
P
Drive Your Creativity
TM
PROAVIO
HIGH PERFORMANCE 12G SAS DESKTOP STORAGE ARRAY
PROAVIO
HIGH PERFORMANCE 12G SAS DESKTOP STORAGE ARRAY
TM
Drive Your Creativity
P
PROAVIO
®
Windows / Mac OS / Linux
LIMITED WARRANTY
HIGH PERFORMANCE
NEXT GENERATION
HD
3
12
Designed and Assembled in the USA
Year
Gb/s
MiniSAS
WWW.PROAVIO.COM
Double-box Package - Qty 1
1
2
ASS
CTL
ON
ASS
Hard Disk Modules .- Qty 8
+
+
+
+
HDD Key Set - Qty 2
Quick Start Guide - Qty 1
Disk Installation
4
Hard Disk
Disk Tray
NOTE: Push to unlock
Compatibility: Your EB800MS V2 supports 3.5” and 2.5” SATA, SAS & SSD Disk Drives.
L
If your V2 was purchased as part of a bundle, please skip this section and
immediately go to section 6. If your V2 was purchased without disk drives,
install each disk into the provided disk modules and fasten using the supplied
hdd screws. Do not use any other mounting screws other than the ones provided
with your EB800MS V2 storage array.
+
+
Figure 1. Figure 2.
Disk tray - Bottom view
+
+
Insert Disk Module
Insert the disk modules and into your V2. For added security, your EB800MS V2 is
5
equipped with locking disk bays to prevent accidental or malicious disk removal.
EB800MS V2
+
+
External SFF8644 Cable - Qty 2*
*Bundles Only
+
+
Unpack your V2
3
V2 | Professional 12G SAS Storage Array for 4K Workows
Unpack all components including the HDD mounting screws, key sets and
cables. If you are missing any of the items mentioned above, please contact
your dealer or contact Proavio at by visiting us at www.proavio.com.
Standard IEC Power Cable - Qty 1
V2 Disk Drive Key
Gently “press” tray handle to insert HDD
C
C
1
2
Figure 3.
PROAVIO
TM
Page 3
Quick start guide
2
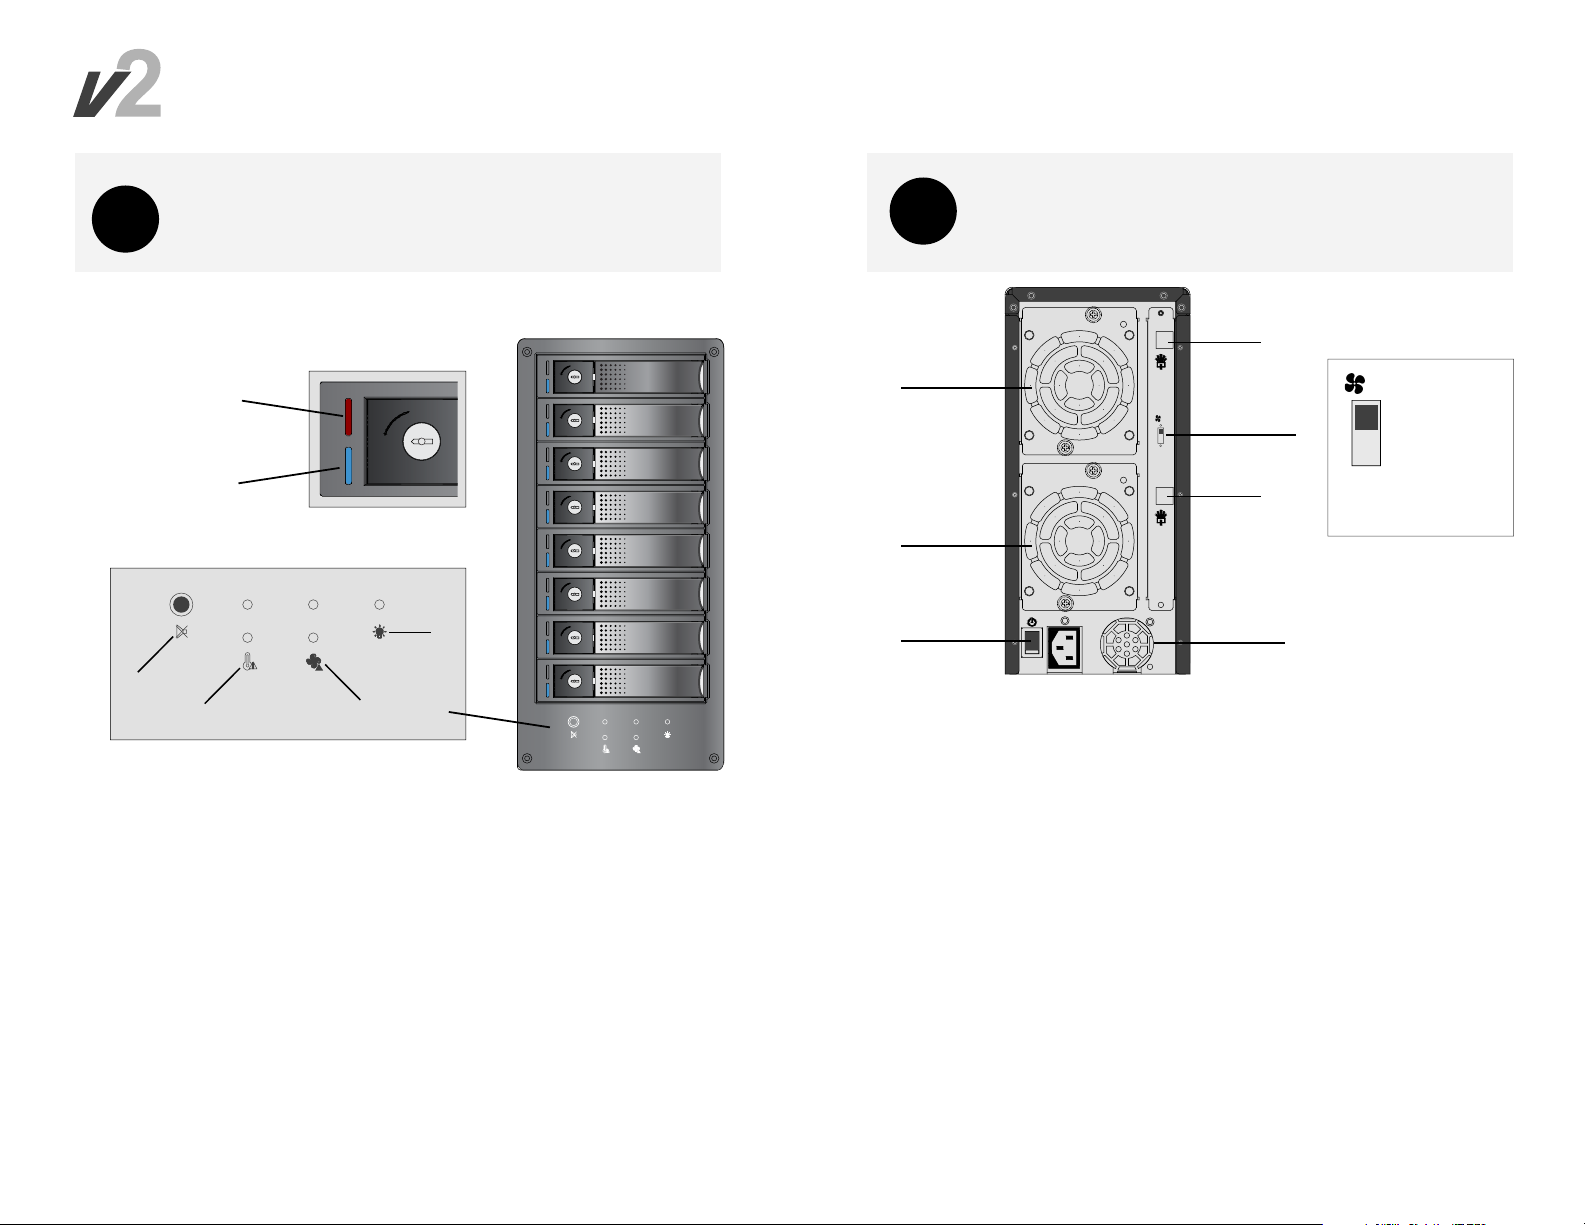
V2 System Overview - Front
6
Disk Status
OFF - Disk is idle & healthy
SOLID RED - Faulty disk
Disk Power Status LED
BLUE - Disk is idle
AMBER* - Disk activity (read/write)
*NOTE: Activity appears as Purple
V2 | Professional 12G SAS Storage Array for 4K Workows
This section provides information on the front features of your EB800MS V2.
Figure 4
1
Alarm MUTE Button
Press to mute fault notification alarm.
Temperature/Overheat Indicator
Thermal Fault Indicator 1(disk 1-4), Thermal Fault Indicator 2 (disk 5-8).
Fan Module Status/ASC Mode Indicator
Cooling fan module status for FAN 1(top) & FAN 2 (bottom).
Indicators will flash RED as a reminder when ASC mode is engaged.
System Power Indicator
System Power LED.
V2 System Overview - Rear
8
1
2
This section provides information on the rear features of your EB800MS V2.
Figure 5
ASC Mode
ASS
CTL
ON
ASS
(Advanced Sound Control)
CTL
ON*
ASC (Quiet Mode)
OFF
Auto Control
NOTE:
*
FAN LED indicators will flash when
ASC mode is engaged. Fan speed
will lock at 1200RPM (<20dBA).
As a safety precaution, your EB800MSV2 will
generate an Alert reminder if the array
o
exceeds 140
F (60oC).
Hot-swap Fan Module 1
Studio-quality low noise cooling module.
Hot-swap Fan Module 2
Studio-quality low noise cooling module.
Power Switch
ON/OFF system power switch
12G SAS Host Port 1 (Disk 1-4)
4x 12Gb/s SAS host connection (SFF8644). Connects to RAID controller Port 1.
Controls disks 1 through 4.
ASC Control Switch
Advanced Sound Control switch. Select ASC mode (ON=Ultra Quiet)
or Auto mode (OFF). Auto mode is recommended for most environments.
Engage ASC mode when critical listening or sound control is required. Turn ASC
OFF during breaks or during normal operation. Running ASC mode for extended
periods can potentially overheat your array or damage the your drives.
12G SAS Host Port 2 (Disk 5-8)
4x 12Gb/s SAS host connection (SFF8644). Connects to RAID controller Port 2.
Controls disks 5 through 8.
Universal Auto-Switching Power Supply
Power supply.
PROAVIO
TM
Page 4
Quick start guide
9
10
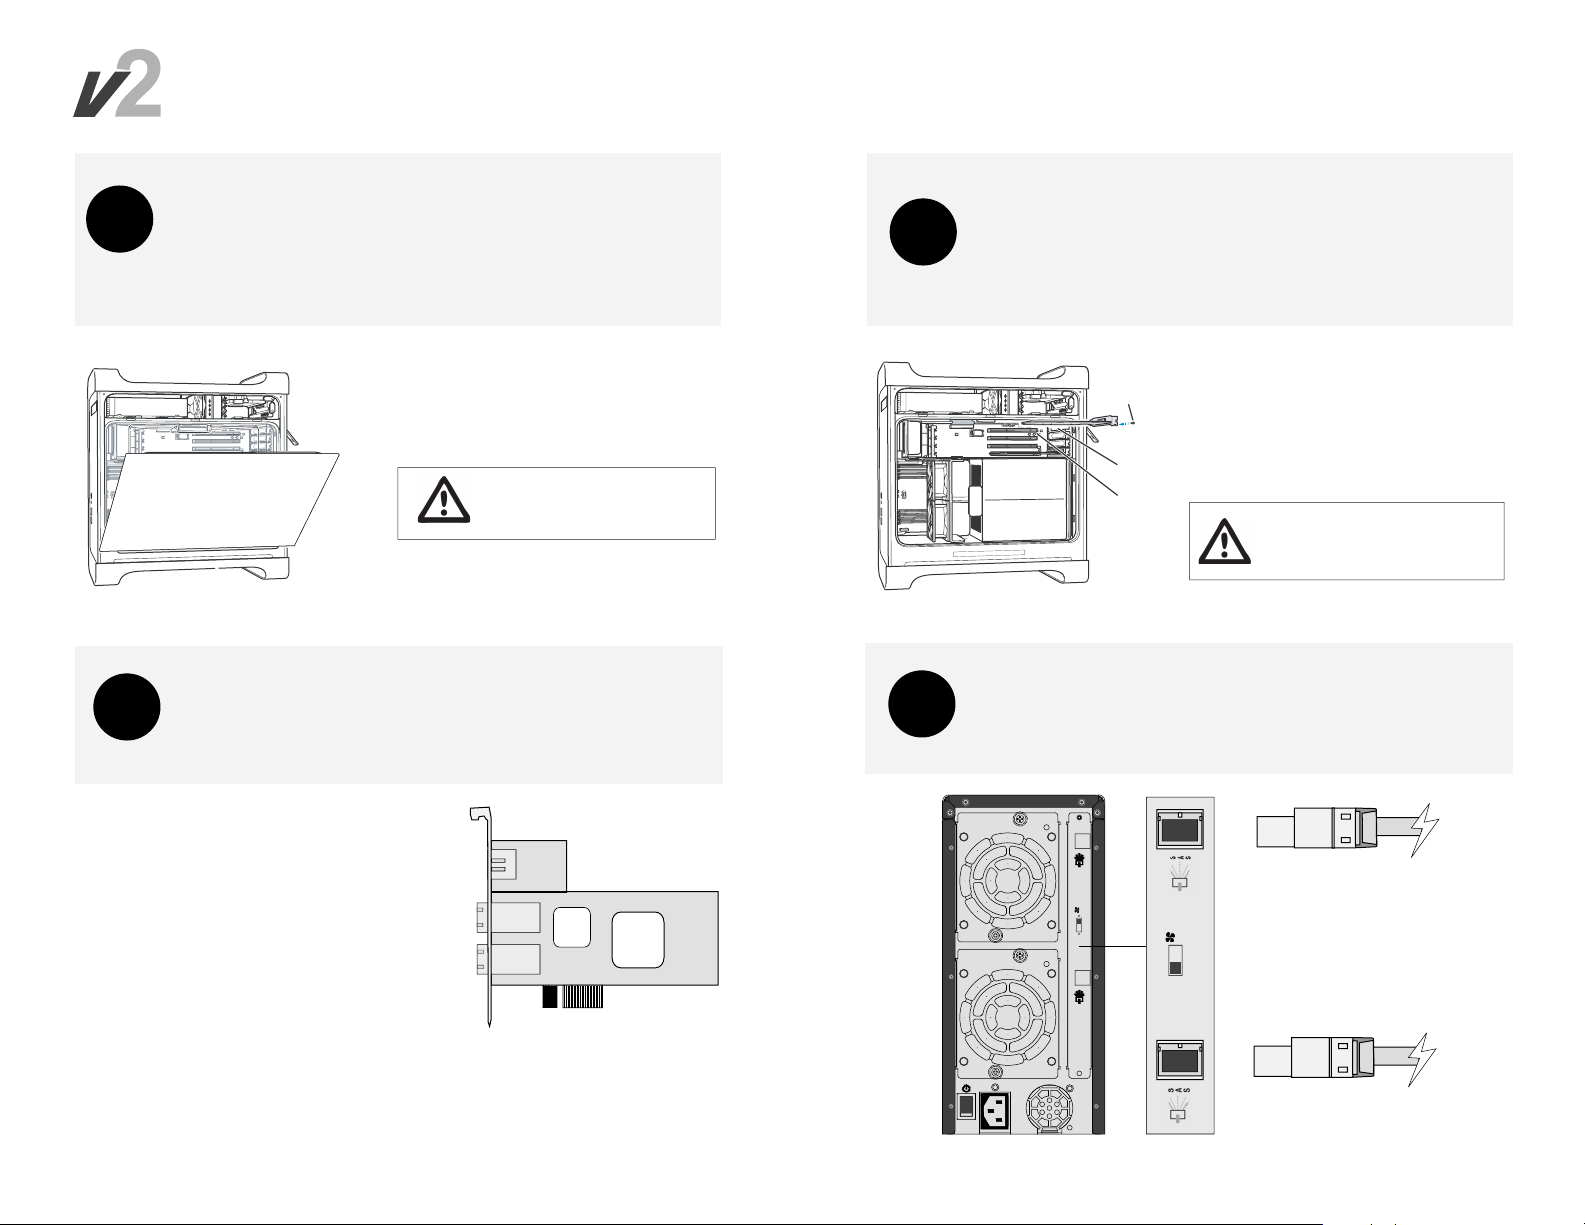
PCi-e RAID Controller Installation
V2 has been designed to support high data rates required by today’s non-linear
editing, color grading and VFX systems. Proavio recommends installing your RAID
controller in a 16x PCI-e slot for optimal performance. If your system does not have
an available 16x PCI-e slot - a 8x slot may be used.
*NOTE: PCI-e x8 Slots will reduce overall performance.
Figure 6
1. Touch the metal PCI slot covers on the back
of your computer to discharge any static electricity.
2. Unplug ALL cables from your computer, and remove
the side access panel according to your system type.
WARNING: Allow a few minutes for the internal
computer components to cool down before
opening your computer system.
PCI-e RAID Controller Installation - Cont’d
Your V2 features a RAID-ready JBOD architecture. This oers the best support
for a wide range of host bus adapters & PCI-Express RAID controllers. Always follow
your HBA/RAID controller’s installation procedure to ensure proper operation.
11
12
HBA/RAID Controller Installation - Cont’d
Please follow your RAID controller’s software driver installation process
to ensure proper operation & a hassle free installation. Installation may require
multiple software les such as product driver, Web UI, etc. Please read the
included RAID controller installation manual carefully.
Reinstall the screw
to secure the card
in place.
Port access opening
PCI slot
Figure 8
1. Remove the PCI-e slot cover plate from an available
PCI-e slot. Consult your HBA or video capture card
for recommended slot positions.
2. Install & secure your PCI-e controller into the
card slot and rmly press the card into place.
3. Fasten the card in place and close your system panel.
WARNING: To minimize the chance of electrical
shock, always follow proper safety rules when
working with electrical components.
Connecting Your V2- Cable Connections
Ensure that both connectors are properly secured & fastened (locked).
Most initial problems are related to poor cable connections.
Figure 7
AC-1883x Shown
Recommended PCI-e Slot Options Installation
x16, PCI-e 3.0 (When using AC-1883x)
x8 PCI-e 3.0 (When using AC-1883x)
L Compatibility: EB800MS V2 supports PCI-e 2.0 configurations, when used with a qualified controller.
V2 | Professional 12G SAS Storage Array for 4K Workows
Host Port 1 (Disks 1-4)
ASS
CTL
ON
ASS
CTL
ON
Host Port 2 (Disks 5-8)
Figure 9
PROAVIO
TM
Page 5
Quick start guide
13
14
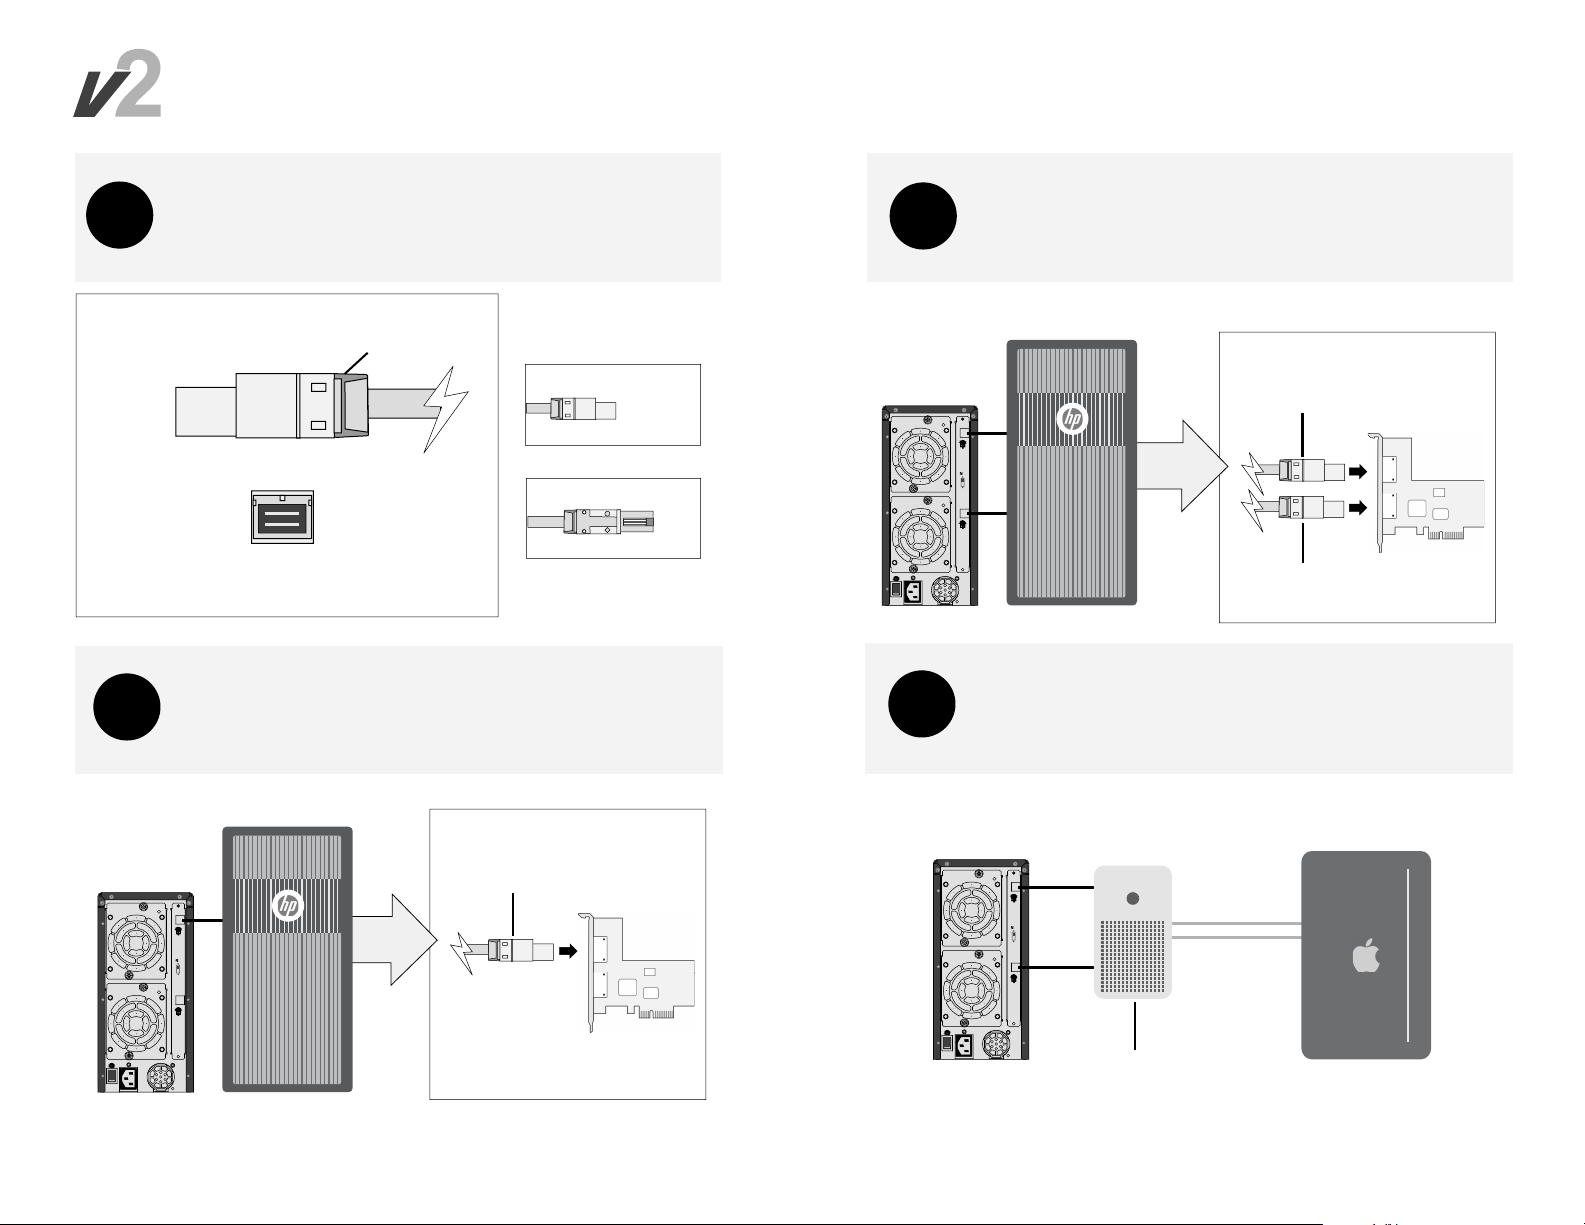
12G SAS Cable Overview
Your EB800MS V2 features a next generation 12G SAS interface, using the new
SFF8644 HD Mini-SAS connector. For 6G SAS/SATA congurations, please use
a 12G-to-6G cable (SFF8644 to SFF8088).
SFF8644 [HD MiniSAS]
SFF8088 [Receiving Connector View]
Release Clip or Pull-Tab
Available Cable Options
PN. CB-HDMS/HDMS-1M
1-Meter 12G SAS Cable
PN. CB-HDMS/MS-1M
+
+
1-Meter 12G SAS-to-6G SAS Cable
Figure 10
Connecting Your V2 - 4 Disk Conguration
EB800MS V2 features a 2-port, direct-connect, 8-channel I/O controller board.
Port 1 carries disk channels 1 through 4, Port 2 carries disk channels 5 through 8.
Connect Port 1 to your RAID adapter’s Port 1 for a four-disk RAID conguration.
15
Figure 12
16
Connecting Your V2 - 8 Disk Conguration
Connect both data ports from your V2 to your RAID adapter’s Port 1 and Port 2
inputs for eight-disk RAID congurations. Port 1 carries disk channels 1 through 4,
Port 2 carries disk channels 5 through 8.
ASS
CTL
ON
ASS
Host Port 1
Disks 1-4
Host Port 2
Disks 5-8
8-Disks
Connecting Your V2 - Thunderbolt
EB800MS V2 supports Thunderbolt 2 connectivity through the use of external
SAS-to-Thunderbolt RAID Adapters such as the Highpoint Rocketstor 6328.
Figure 11
Host Port 1
Disks 1-4
ASS
CTL
ON
ASS
V2 | Professional 12G SAS Storage Array for 4K Workows
4-Disks
Host Port 1
Disks 1-4
ASS
CTL
ON
ASS
Host Port 2
Disks 5-8
SAS-to-Thunderbolt RAID Adapter
Figure 13
Thunderbolt Port 1
Thunderbolt Port 2
PROAVIO
TM
Page 6
Technical Support
17
Connection Problems:
Always double check for loose cable connections or improperly seated disk drives.
If the problem persists, please contact your dealer or contact Proavio’s support department
at 866-537-5140. If you are outside the US, please call us at +1 (562) 777-3488.
Support On the Web
Visit us online at www.proavio.com/index.php/support/technical-support/contact-support
or go to www.proavio.com and click on the LIVE HELP button for assistance.
Our highly trained support team will help you find solutions to your technical questions.
We are ready to help you with any product issues or hardware assistance.
Before You Call
Access to phone support for assistance with installation, setup, and product troubleshooting
requires a valid product serial number.
Registering your product prior to calling support will help expedite your support issue. To
register your product, please visit our registration area at:
www.proavio.com/productregistration/
Customers without a valid serial number may receive limited support. Service and support
options are still available for customers without a valid serial number.
13
NOTE: Please have your product model and serial number (if available) ready when calling
support.
If you are experiencing an urgent issue, please contact
your dealer or visit us online at www.proavio.com
World-wide Support Oces
Proavio/Enhance Technology USA
Phone: 1+562-777-3488
Hours: Monday - Friday 8:30AM - 5:30PM PST
Proavio/Enhance Technology UK
Phone: +44-(0) 1952 260900
Hours: Monday - Friday 8:30AM - 5:30PM GMT
Proavio/Enhance Technology Italy
Phone: +39-039-6260916
Hours: Monday - Friday 8:30AM - 5:30PM CET
V2 | Professional 12G SAS Storage Array for 4K Workows
Page 7
 Loading...