

Page 1
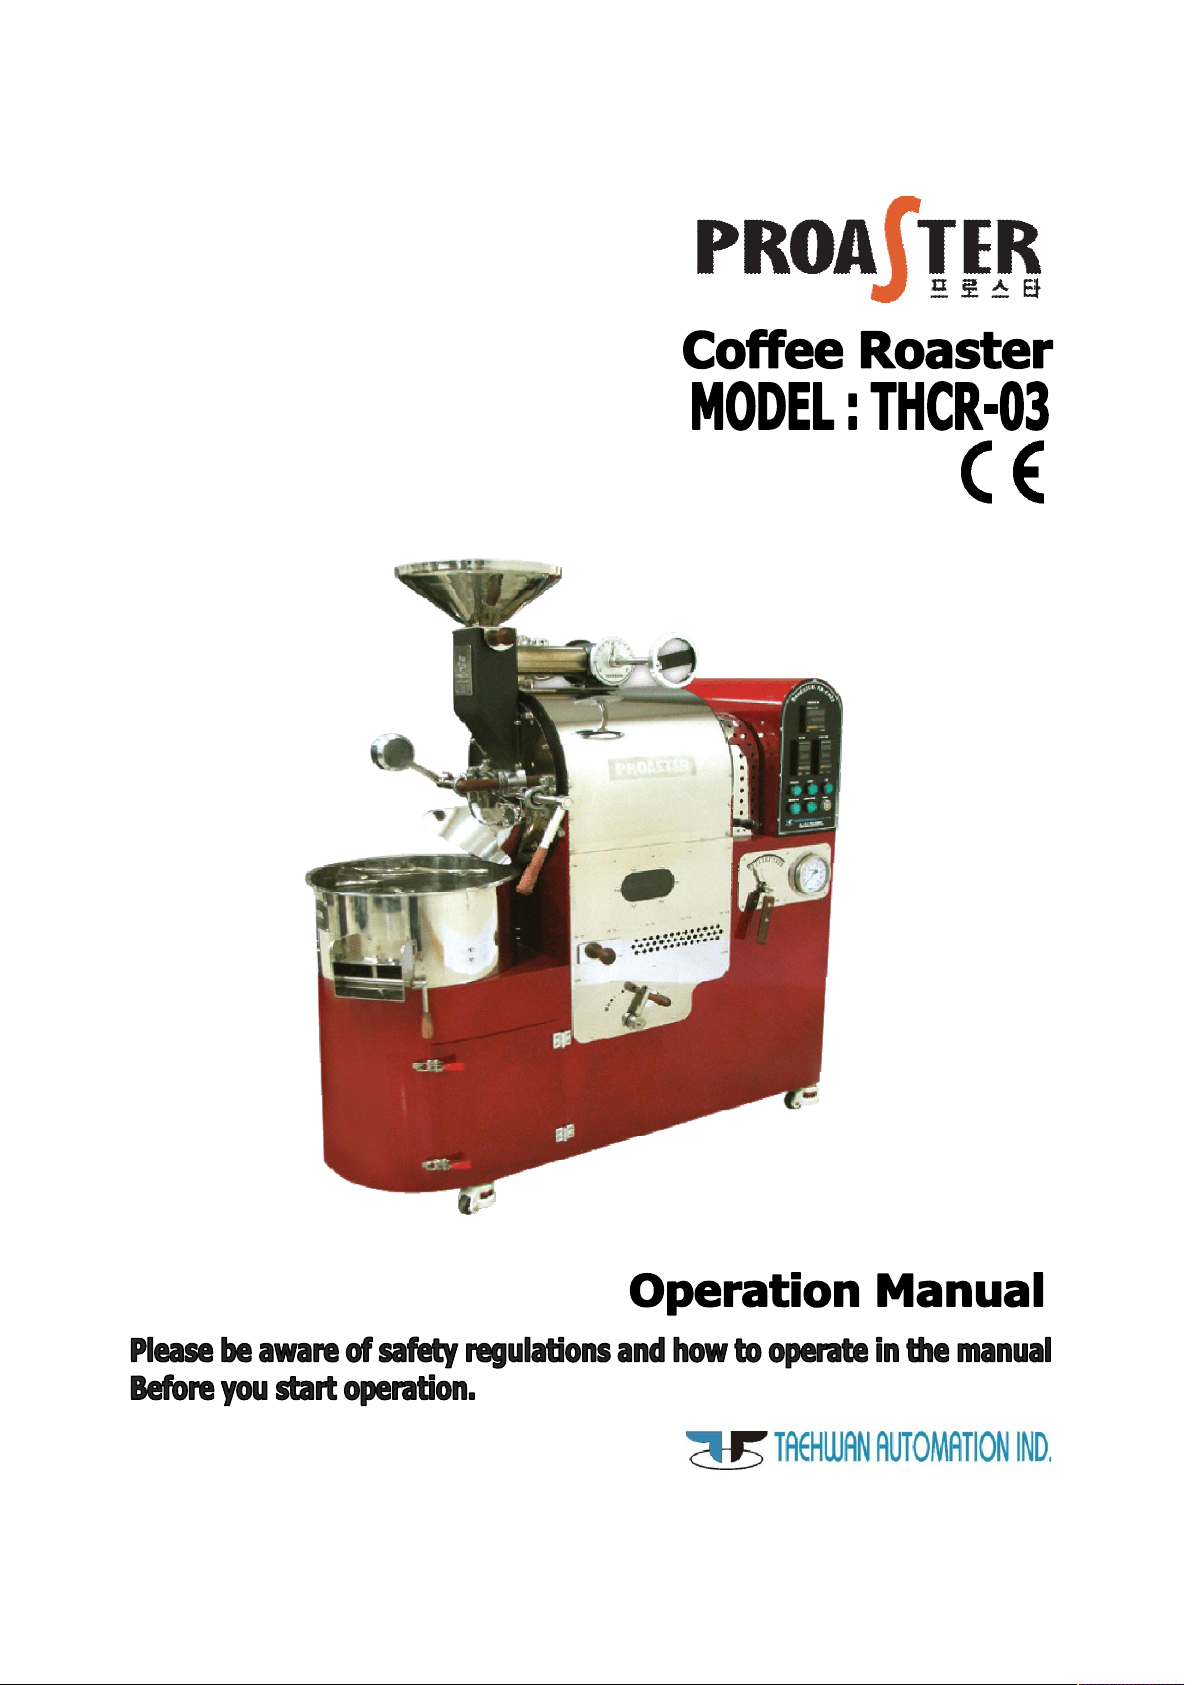
Document No. : THCR03-M02
Revision No : Rev. 02
Date : 2011.2.28
Manufacturer / Seller :
Taehwan Automation Industry Co., Ltd
Page 2

0
1. General Information
(1) Purpose
(2) Features
2. Safety Regulations
(1) General Safety Regulations
(2)-1 Safety Label
(2)-2 Safety device
3. Installation
(1) Carriage
(2) Preparation for installation
(3) Installation
4. Use of the product
(1) General Information
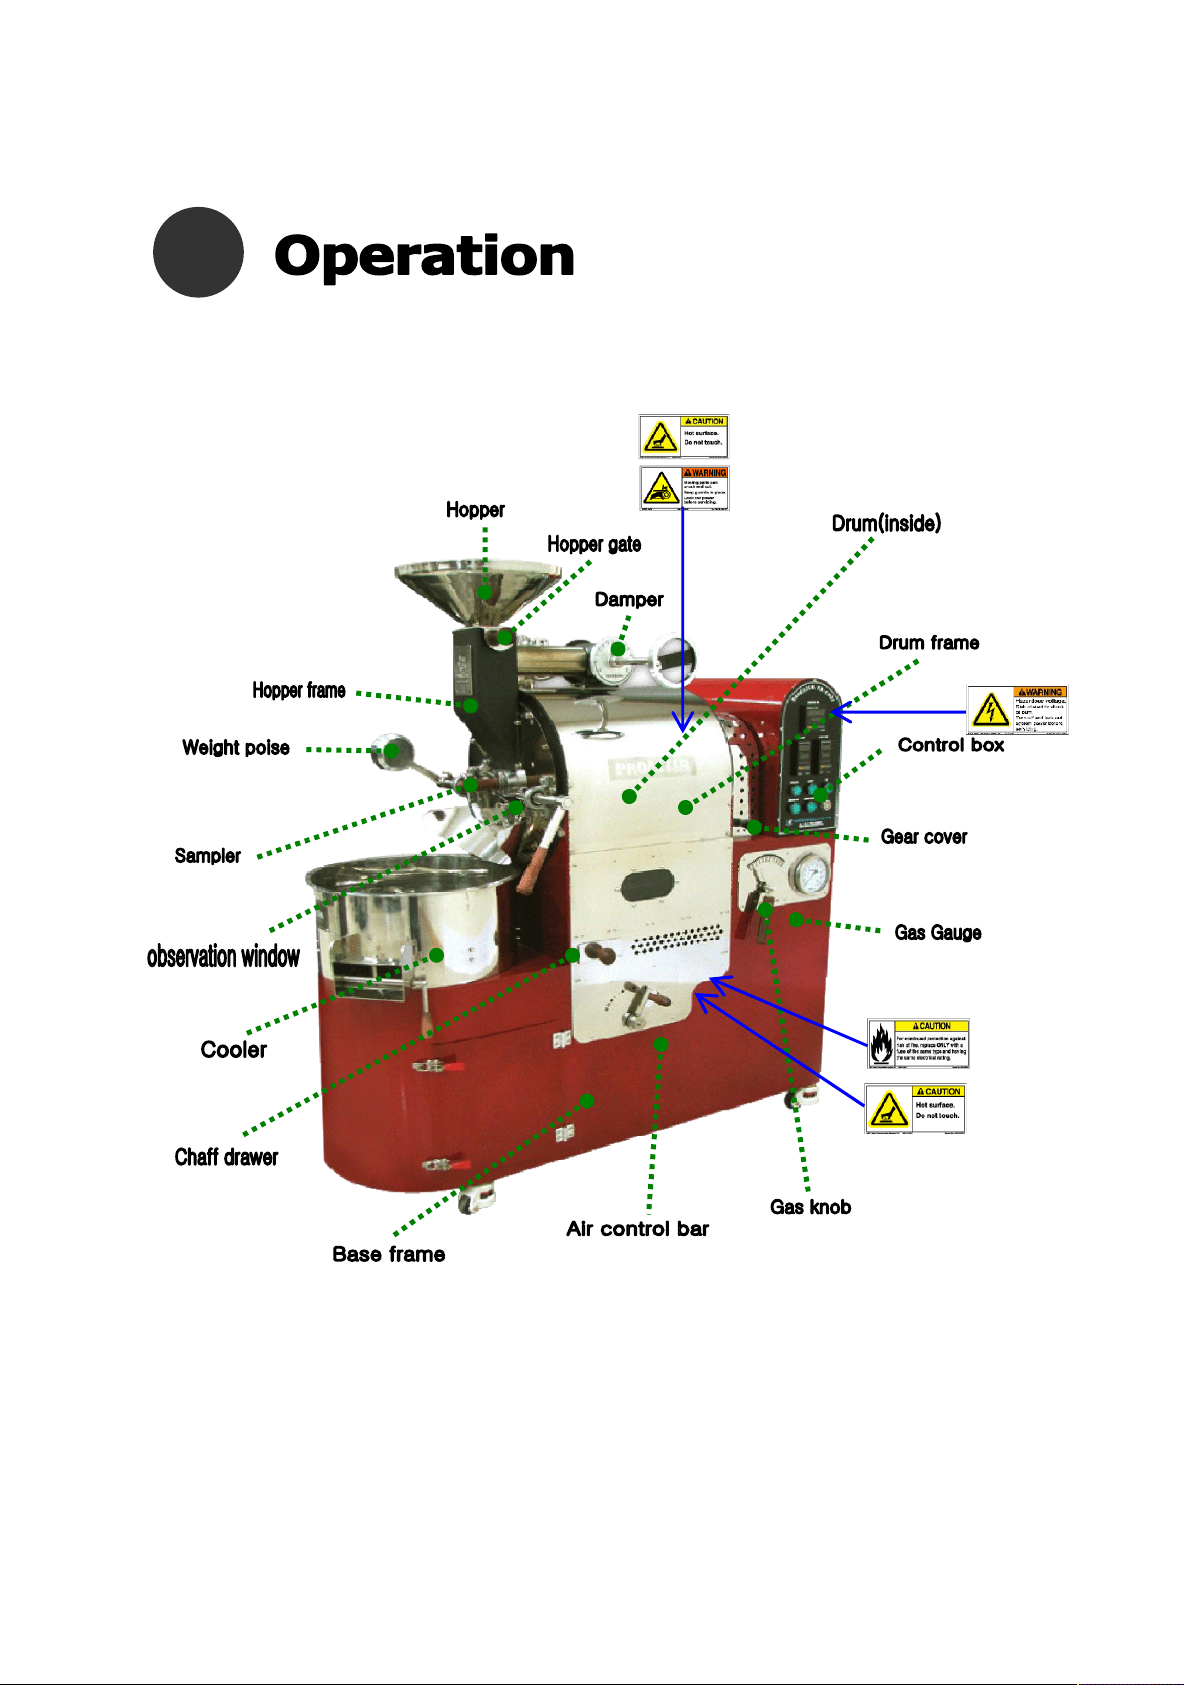
(2) Components
(3) How to Roast
P 3
P 4
P 5
P 5, 6
P 6
P 7
P 7, 8
P 8
P 9~11
P 12~15
5. Cleaning and Maintenance
(1) How to clean – Procedure
(2) Maintenance – Disassembly
(3) After cleaning
(4) Poor Management Example
(5) Trouble Shooting
6. Disposal information
(1) Disposal instructions
7. List of replacement parts
8. Product warranty and A/S
<Reference > Equipment maintenance
P 15
P 16~19
P 20
P 20, 21
P 21
P 22
P 22
P 23, 24
P 25, 26
Page 3

1
• Place your manual close to the machine for your easy access.
• Read the manual before starting the operation.
• Wear safety gloves to prevent from injuries.
• Do not self-repair.
• Start and stop the machine only after giving it enough time to heat and cool
down.
• Do not touch the hot surface of the machine.
(1) Purpose
• This coffee roaster is manufactured as an commercial roaster to roast coffee
beans.
• This roaster is manufactured for indoor use (Using the machine outdoors can
cause roasting failure, troubles, damages, accidents or injuries)
• different use of the machine (cooking grains, foods, etc.) is prohibited.
• Review safety regulations carefully before you use the coffee roaster.
* NOTICE: Warranty is not valid in case of any damages caused by the
followings:
- Inappropriate use of the product
- Self disassembly or remodeling
- Repairs done by unauthorized personnel
- Use of different type of power or gas
(2) Features
• The product uses radiation and how-air flowing for coffee roasting.
• Designed to maximize heat efficiency for quick roasting up to 15 minutes
faster, preserving the unique flavor and aroma of the beans.
• It realizes its own taste and aroma from the origin by controlling air with the
damper control
• Strong blower allows to complete cooling in 2~3 minutes.
• The safety system automatically shuts the gas supply if the temperature
reaches Set temperature for anti-overheating system.
3
Page 4

2
(1) General Safety Regulations
1) Burns and injury
- Do not touch the hot surface, handle, or pipes.
- Be cautious about injuries from the moving part include bearings and motors.
2) Fire
- Do not put any foreign objects in the machine
- Do not place any unnecessary flammable material, cloth, paper, or other
accessories near the machine
- Do not repair or disassemble the machine while you are operating the machine.
(shut off electricity and gas supply for maintenance or cleaning )
3) Electricity and gas
- Do not touch the power cable with wet hands to prevent from electric shock
- Make sure that you keep power cable and gas hose away from the hot surface of
the machine.
- Close the gas valve, switch off the power at the back and unplug the power cord
after finishing the operation
- Check gas leakage regularly with soapy water before and after use
4) Cleaning and general care
-Avoid the environment with high humidity. Always follow the disassembling or
cleaning process in the manual. Clean the machine regularly to ensure trouble –
free functioning.
5) Damages
Warranty is not valid damages caused by the followings:
- Inappropriate use
- Damage caused by self disassembly, repair, manipulation
- Use of the wrong voltage or gas pressure
- Breakdown from insufficient cleaning and general care
* Taehwan Automation IND is not be responsible for damages caused by the
result of not following safety regulations
4
Page 5
2
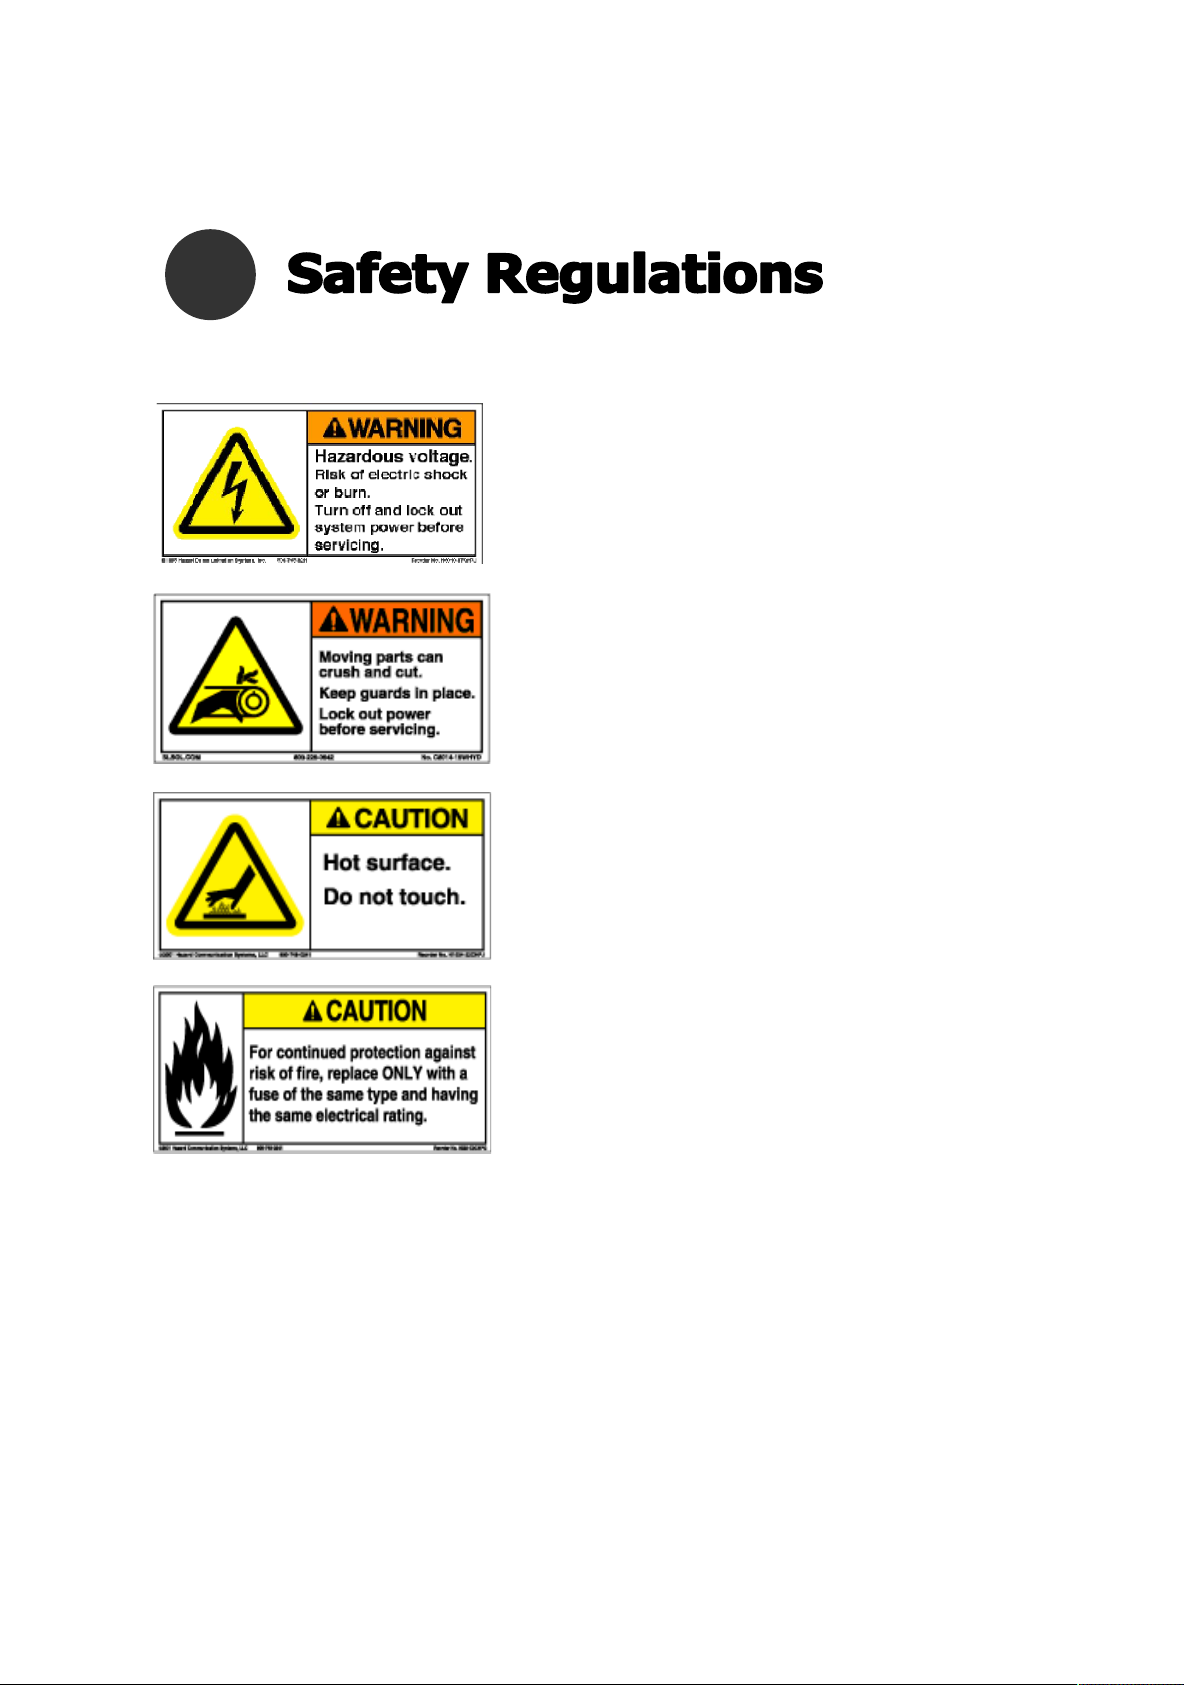
(2)-1 Safety mark
1) Electric Shock
Turn off the power to avoid any electric
shock or burns before using
2) Moving parts
This label is to warn of its moving parts. Use
the safety cover to avoid any injuries. Always
turn off the power before starting any
Maintenance
3) Burns
This label is to warn possible burns. Do not
touch the hot surface of the machine
4) Fire hazard
This label is to warn of Fire hazard. Especially,
watch out for short circuit or gas leakage,
and flammable objects near the product
(2)-2 Safety device
1) Safety gear cover : the safety cover is attached for user’s safety against the moving
pulley and bearings
- Put the gear cover down before you start the operation
- Make sure that the machine is cooled down before you open and perform maintenance
5
Page 6
2
2) Emergency Stop Switch
- This button is used to prevent exposure to heat and electricity in case of emergency
- Do not stop the drum or blower when the machine is overheated. Doing so may
cause a fire or breakdown (turn off the gas supply with gas knob only)
3) Anti-Overheating device
- Once roasting temperature reaches the preset temperature, the gas supply is cut off
to avoid overheating automatically
- Do not adjust or reset the temperature above the originally pre-programmed
temperature.
4) Overflowing voltage protection system
- Power shuts off in the event of electrical malfunctions (short circuit, etc.)
5) Fire extinguishing safety system : safety device prevents overheating and
automatically shuts off gas when the power gets cut off
6) Gas Alarm*: You must install the gas leakage alarm by contacting your gas
company
3
(1) Carriage
1) Package
- For exported machines : Remove nails from the wooden container and take out
slats and boards. Please recycle packaging materials in accordance with your
country’s regulations.
- Please confirm that the roaster unit, filter cyclone, instruction manual, and tool kit
have been included.
2) How to carry
- Weight: about 200 kg
- Method: use a forklift
- Otherwise, six people may move it using a belt sling
- Be careful when placing machine on table. Be sure to keep a close, firm hold on the
bottom part of the machine.
6
Page 7

3
(2) Preparation for installation
1) Preparation
1)-1 Electricity
This machine is designed to be connected to a standard wall socket
Install regarding your country’s voltage system
* Use the transformer as needed.
1)-2 Gas pressure
The machine was manufactured using low pressure gas. Install according to the
requirements of your gas system. Use gas leakage alarm for your safety
1)-3 Ventilation
For the best roasting condition, make the exhaust pipe as short as possible.
In case of using ventilation duct, adjust exhaust strength with the extra damper.
(3) Installation
1) Installation
- The machine is for indoor use. (using outdoor can cause troubles or roasting failure)
- Make sure that you install the machine where has a good ventilation system.
- Poor ventilation can affect quality and evenness of roasting.
- Table: must be able to bear the listed weight. Use a table with wheels for
convenience when cleaning.
- Exhaust: exhaust condition (length of vent pipe, moisture etc.) can affect roasting
results.
- For your safety and optimal roasting, do not place the machine any closer than
20cm from a wall or window. Avoid moisture (do not install the machine near a sink,
espresso machine, etc.)
7
Page 8

2) POWER
-Power connection: plug power cord only into wall sockets with correct voltage
-Power requirements are listed on the machine’s label
-AC 230V (1PH) 60Hz 3.5A 820kw
2)-1 Supply condition
Gas pressure: Low pressure for home use. Follow proper specifications for gas supply.
Gas pressure varies with region/location. Please contact your local gas supply company.
2)-2 How to connect
- Electricity: Manufactured for general wall sockets
- Gas: inquired gas supply hook-up by your gas supply company. Always follow proper
gas supply procedures.
4
(1) General Info
1) Operator must have roasting experience and trained by specialized roasting institute.
2) Before operating machine
Check if the machine is plugged in the wall socket and the power switch
is ON.
- Do not let touch power cord or surface of the machine when it is hot.
- Check the ventilation.
- For trouble-free roasting, always make sure the chaff drawer, pipe and cyclone are
emptied and clean.
8
Page 9
4104114
(2) Components
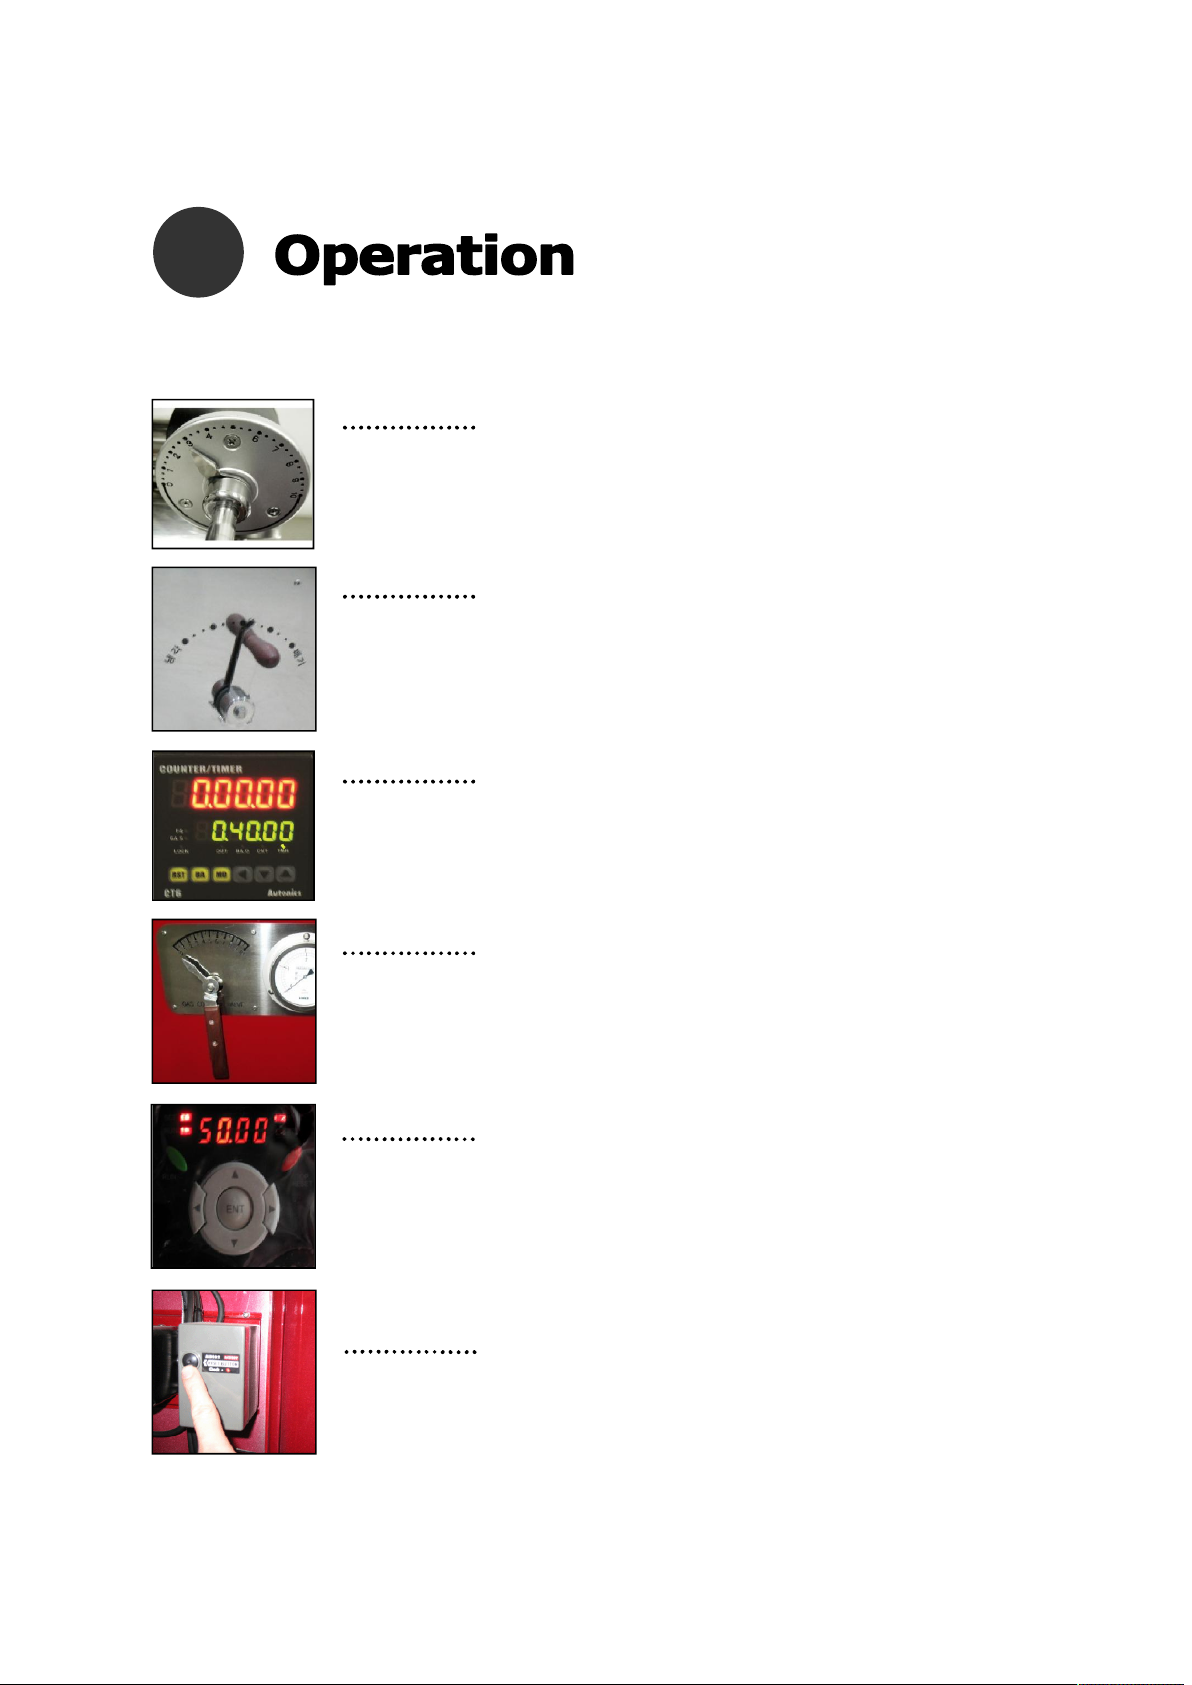
Damper
Air Control Bar
Timer
Gas Knob
Controls the amount and speed of hot air coming
into the drum
“0” close < “10” open
1) Control the amount of heat inside the drum
2) Discharge smoke and chaff out of the drum during
roasting
3) Control the aroma during roasting
Equipment to select Exhaust(roasting) /cooling
mode
1) Right : Discharging mode when “10” is marked
(Cooling 0% Discharging 100%)
2) Left : Cooling mode when “0”is marked (Cooling 100%
Discharging 0%)
Equipment to program pre-heat time or roasting
time
The upper number shows the current time and the one
below shows set time
How to set: Press ◀ to move the cursor and ▲ ▼ to
increase / decrease numbers
Complete the setting by pressing MD button
To control heating power during roasting
Control the heat supply observing flame and gas
gauge
(control the heat observing Flame / Gas Gauge /
Temperature change)
Inverter
Ignition
Reset Button
Equipment to control exhaust displacement
Press ‘ENT ‘ then move the digit you would like to change .
Press ◀ to move the number set ▲ ▼ to increase /
decrease
Complete your setting by pressing ENT button
* Warning, cooling power could be lacked when you set
below 40
to Reset ignition starter automatically
Press reset button when the red light is on due to full of air in the
gas pipe, which make the ignition not working
※ Repeat as needed to remove the air inside the gas supply pipe
9
Page 10
Page 11
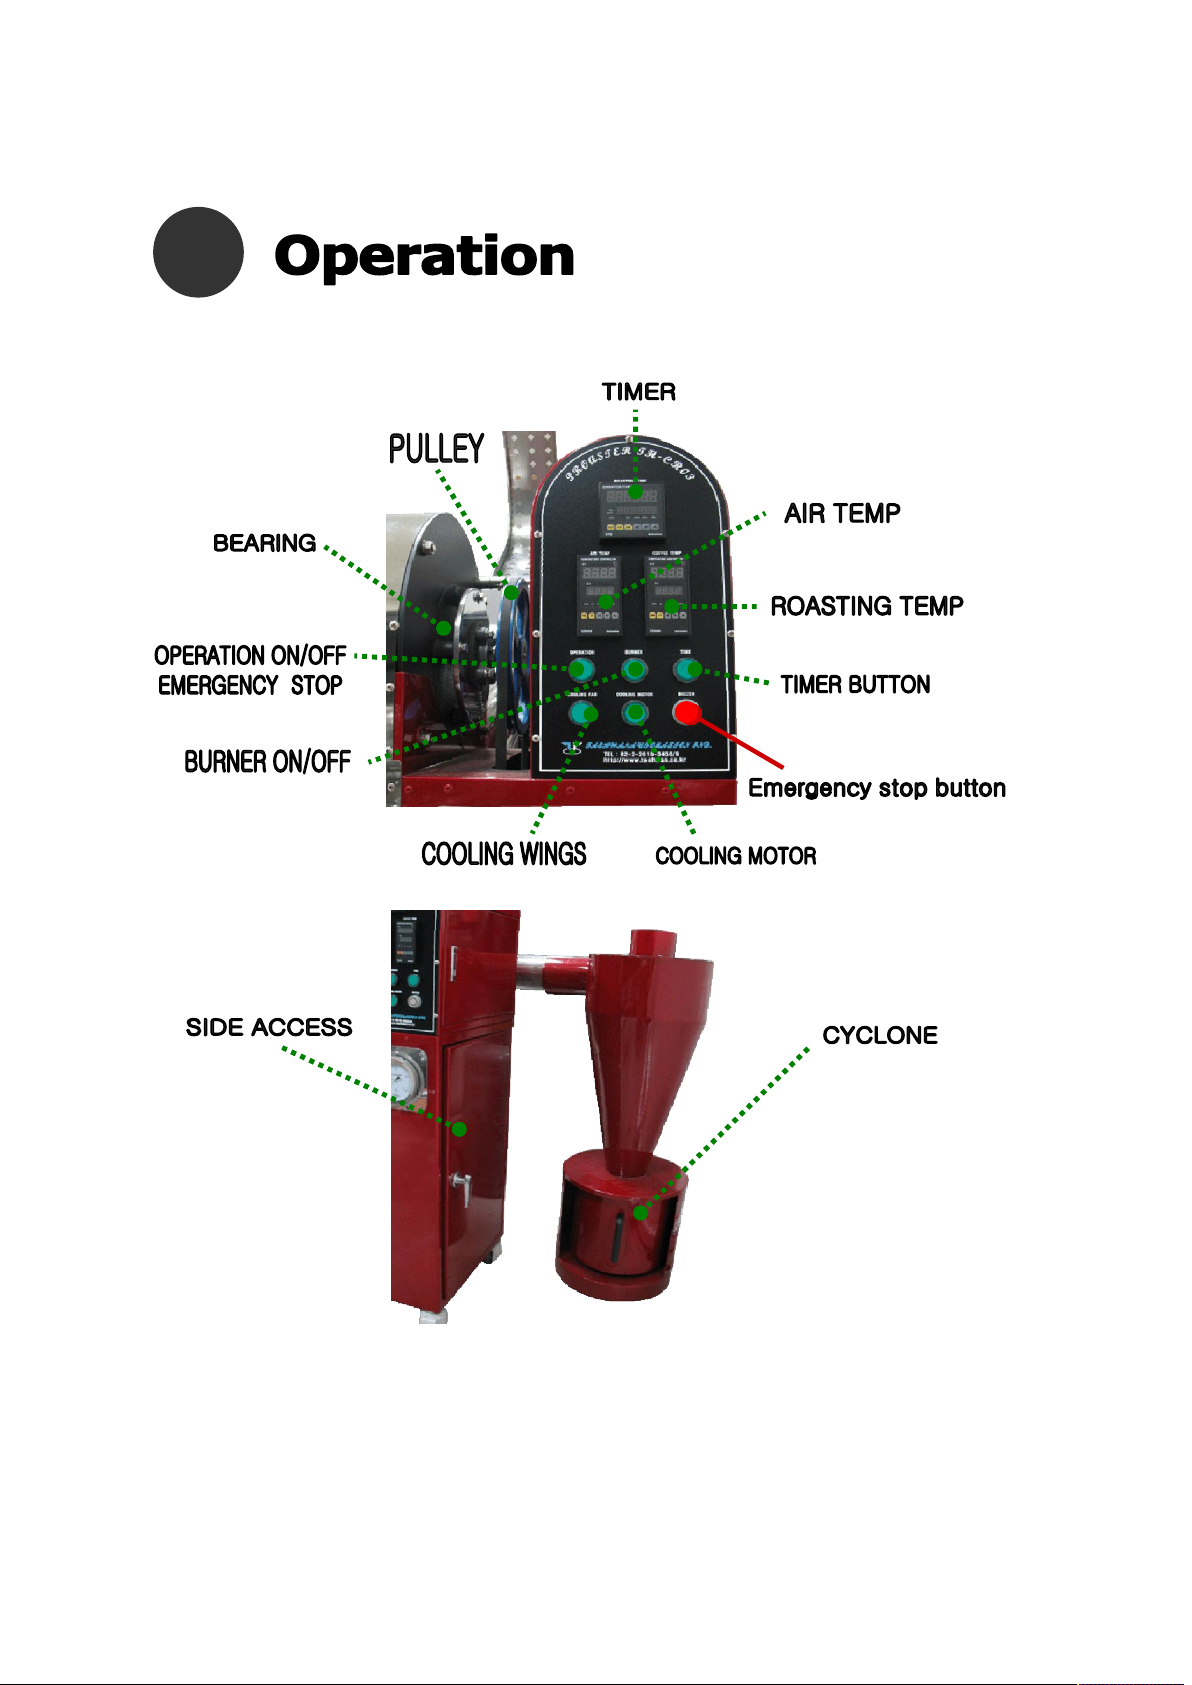
* Note: Emergency stop button must be pulled out to operate the machine
Page 12
4
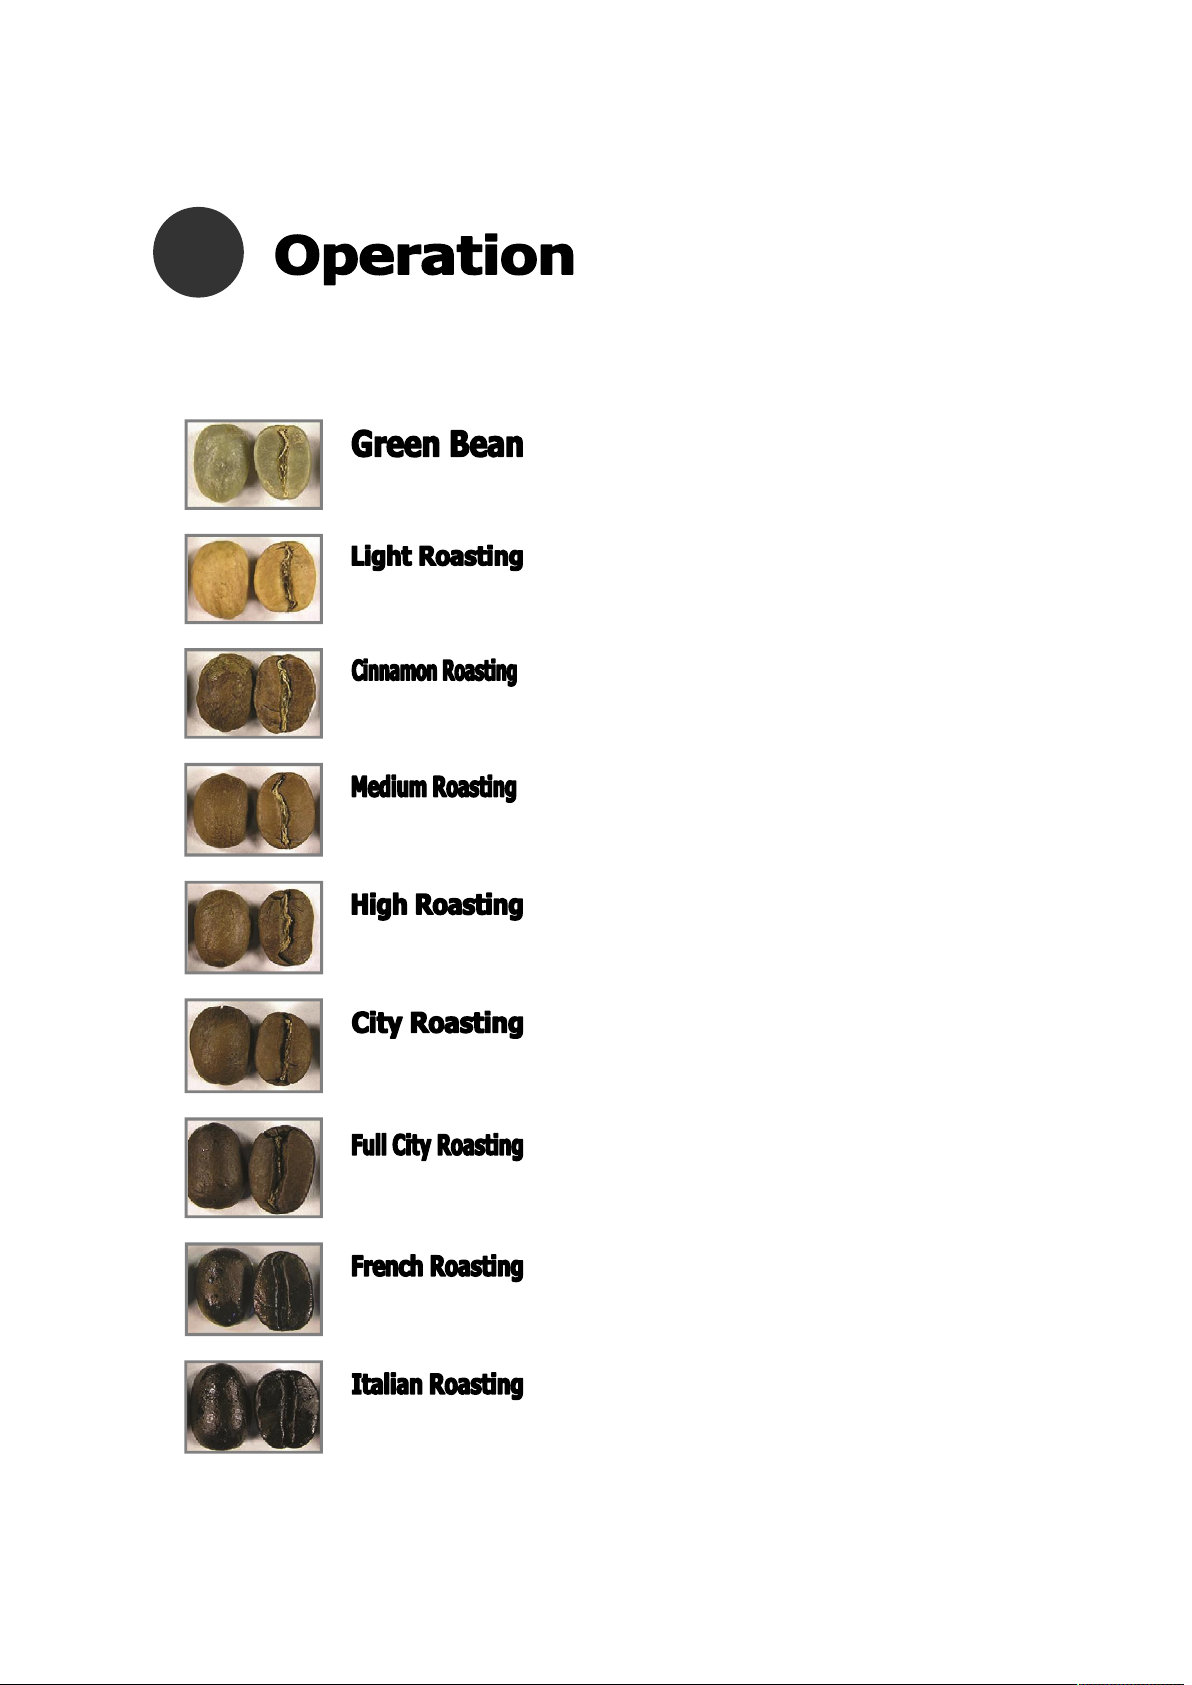
(3) How to Roast – Roasting level
has various colors depending on the origin,
freshness, altitude, environment condition
Sweet aroma but it does not have enough
tasty substances to brew *(yellow bean)
Sour taste. The chaff starts to be peeled off .
Cinnamon color
Called American roast. Good for tasting fresh
sour taste. Initial extracting stage. Brown
color
Sour taste, shows unique character from the
origin. the body gets developed, Brown color
Sour, sweet, bitter tastes are all balanced .
Heavy body. Dark brown color
Less sour taste and more sweet and bitter
taste. Heavier body . Very dark brown color
with some oils on surface . Espresso standard.
Shining surface. Bitter taste with lighter body .
Dark brown color
Surface of the beans are covered with oil . It
tastes like charcoal
12
Page 13

4
(3)-1 How to Roast – Check-points
1) Fresh beans
- Be aware of the moisture content and the quality of the beans
* Dried or old beans will not give you the best result.
2) Preheating
To prevent from coffee dust scale accumulation or roasting failure, make sure
you have enough preheating time to make your roaster is completely dried
and evenly heated.
3) Environment
- Weather: when it is Cold, Hot and humid or Before Raining or snow, have
longer heating time using lower heat for the start
- Ventilation: Roasting is a combustion process requiring adequate amounts of
oxygen. Please check ventilation conditions.
4) Exhaust
- Cleaning: Poor cleaning can cause poor cooling due to exhaust pipe
blockage and decreased air flowing. Poor cleaning can change the taste and
aroma. Please make sure the blower, pipes.
5) Roasting level
- Roast considering the final use (home brew, hand drip, espresso, etc.)
ATTENTION
① IN CASE OF IGNITION FAILURE : turn on and off OPERATION button
and then press the reset switch (in easy access door). In about 15
minutes, the sparker starts the ignition.
② Make sure that the sparker contacts right on the top of gas nozzle
(about 3~5mm close)
③ Make sure that the flame sensor touches the flame(about 5~7mm
close)
13
Page 14
4
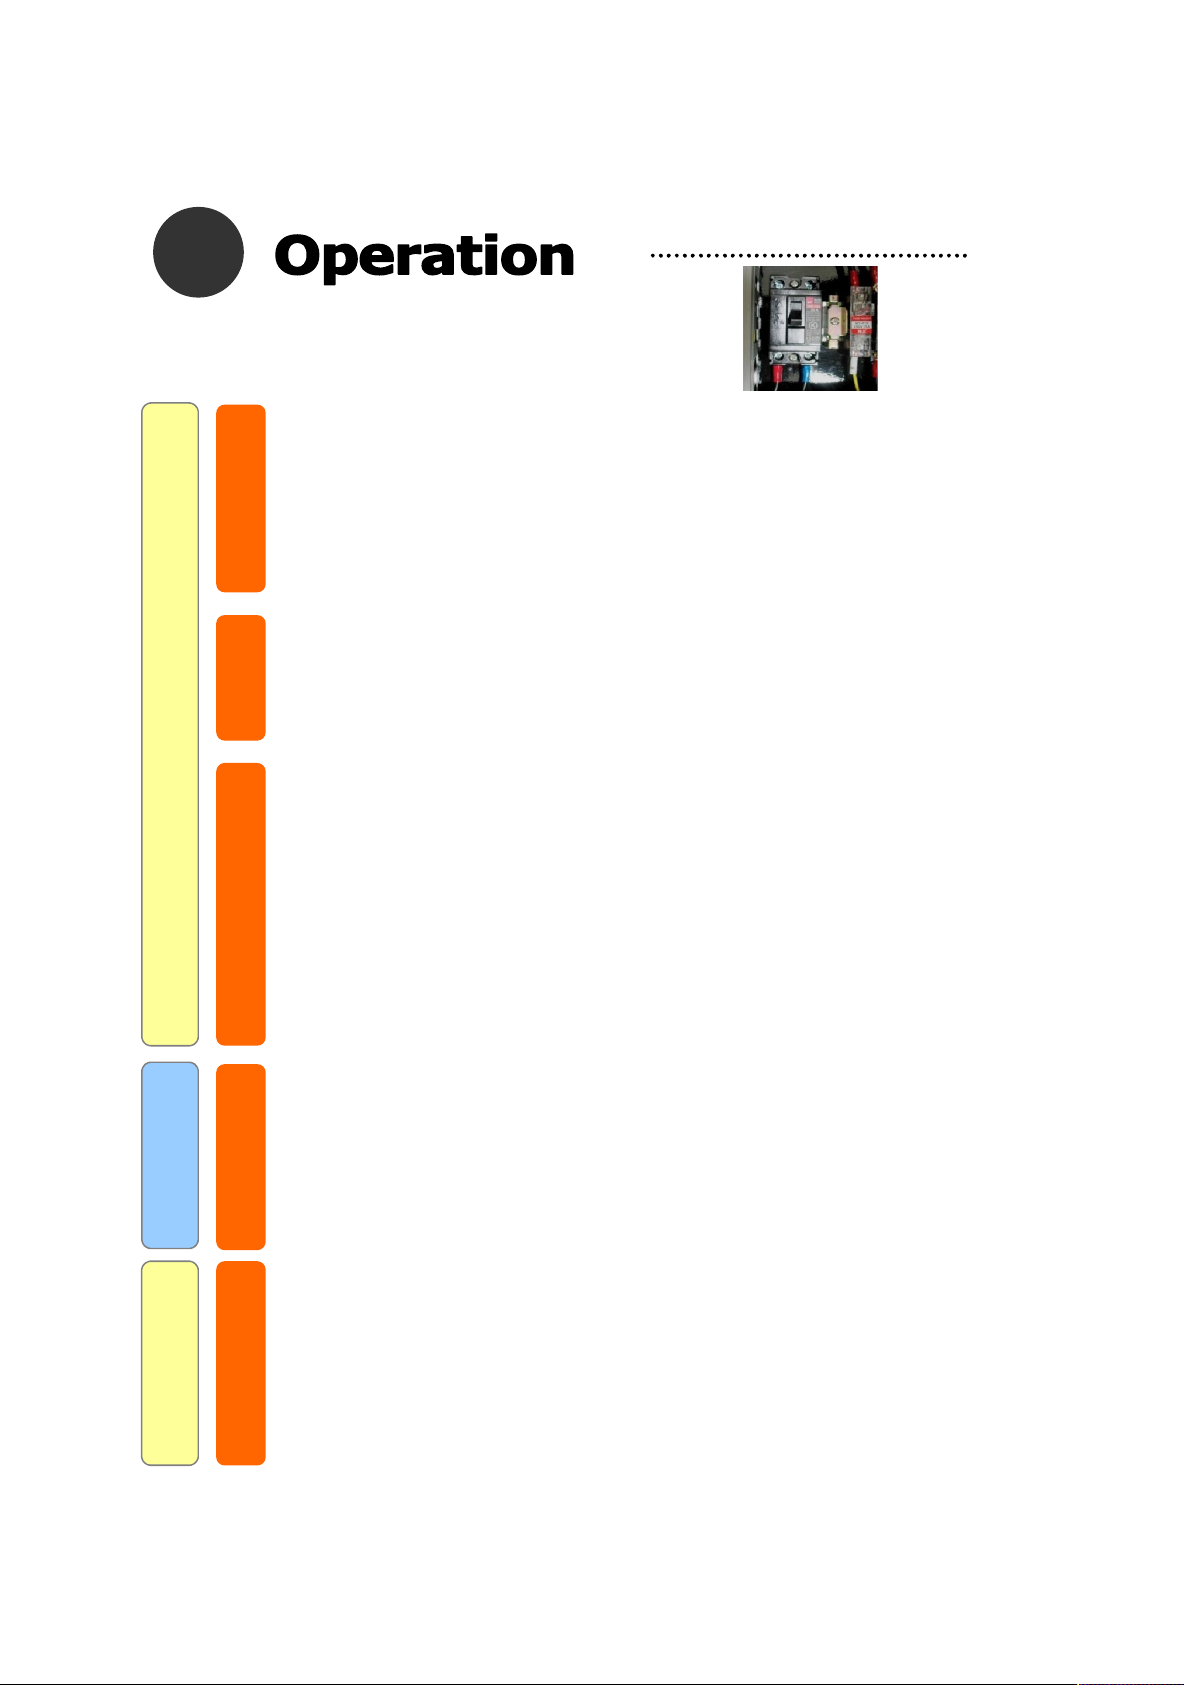
(3)-2 How to roast
Preparation Preheat Roasting
1) Connect the power cable. Turn on the switch of circuit breaker power ON
2) OPEN the gas valve
3) Open the damper to 10, turn the air control to the right (exhaust mode)
4) OPERATION button - > BURNER button
(for the safety, ignition starts in 15 minutes after pressing the operation button).
* If ignition fails, check if the red light is on the reset box .
In that case, restart burner and press the reset button. Once the air comes out
completely, the ignition will start soon. Repeat if necessary.
Circuit breaker in control box
Exhaust mode
5) After reheating at Damper 10/low flame (about 30% of the gas gauge’s maximum
firing capacity)
6) After 110 degrees is exceeded, adjust to moderate flame (50% or more) and
close the damper to 1
7) Put beans in the hopper before the temperature reaches the appropriate
temperature
8) Press time button after putting in beans when the temperature reaches around
200 degrees (Start timing)
Adjust the heating power to 70~80% once the temperature starts increasing
9) 1stcrack (yellow bean)
Tighten the damper approximately one space, increase pressure a little, and raise the
endothermic reaction to maximum before 1stcrack.
10)1stcrack
Slowly open the damper from 2 to 8 an maintain the heat at 50%~80%
11) A point right after 1stcrack
Adjust the heat by 15%~30% and close the damper (3 ~ 6)
12) Just before discharging (empty just a little before reaching the desired temperature!!)
Discharge After use
Damper 10 discharge lower damper at cooling mode (left) press the BURNER
button and close after confirming the timer, press the TIME button and close
* Do not put your hand in before fully cooling down!
* After cooling is completed, check the cooling fan!!
Exhaust modeCooling mode
13) Cooling machine (Idling)
Fully open the damper till the temperature decreases below 100 degrees
(Damper10), Press stop button to turn off after idling with the vent closed ->
OPERATION BUTTON(STOP) ->TURN OFF THE CONTROL BOX
14) After roasting!! Important!!.
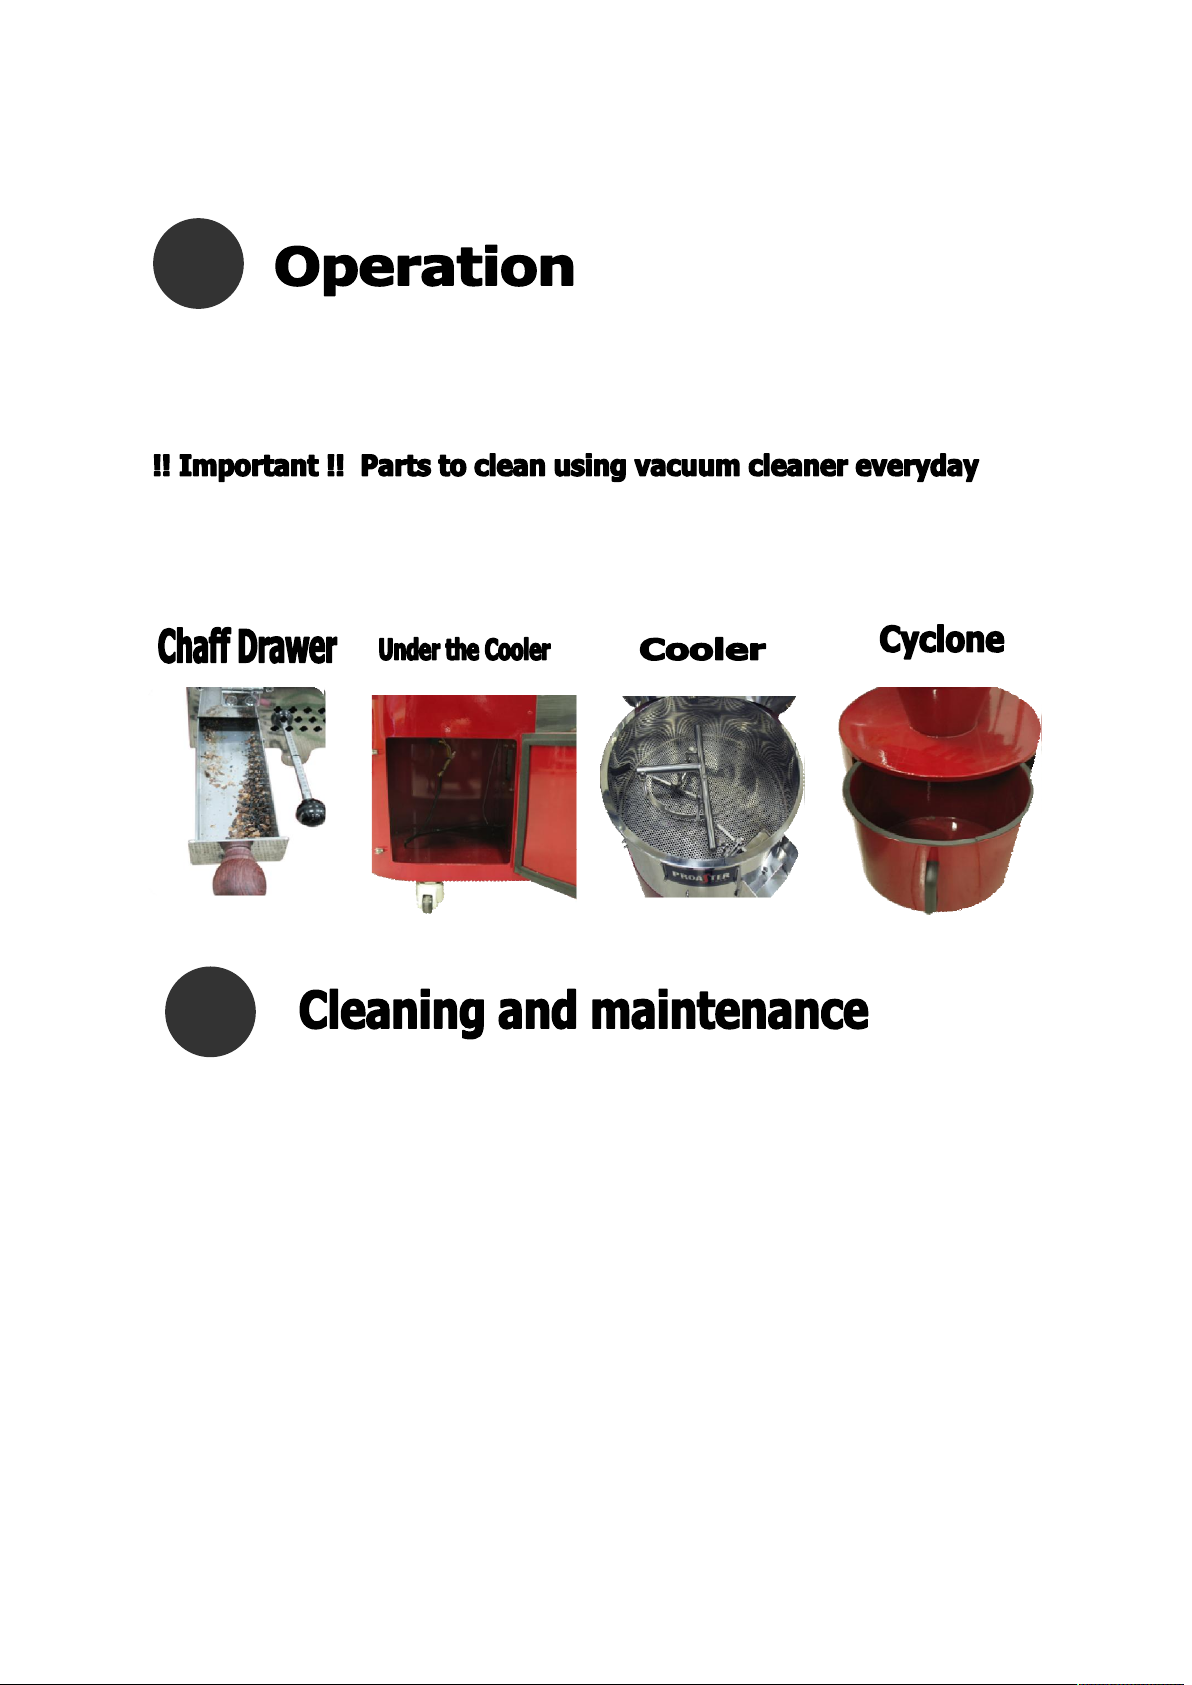
Use vacuum cleaner to clean the cyclone, inside the cooling unit, grounds (waste)
drawer, hopper, and confirmation door
(There is a charge incurred when service is requested due to neglect in cleaning and
maintenance
14
Page 15
4
(3)-3 How to roast – After roasting
Cleaning is the most important factor to uniformly ensure against
malfunctions and the quality taste and aroma of your coffee.
5
(1)Cleaning method –before you start
-Tool kit, mask, cotton gloves, vacuum cleaner, beans for cleaning
(used to remove dust after cleaning)
-Tool kit is for use when installing
-When cleaning machine, always wear mask and gloves to avoid
accidental injury
-Refer to manual when cleaning, and follow the directions carefully.
15
Page 16
5
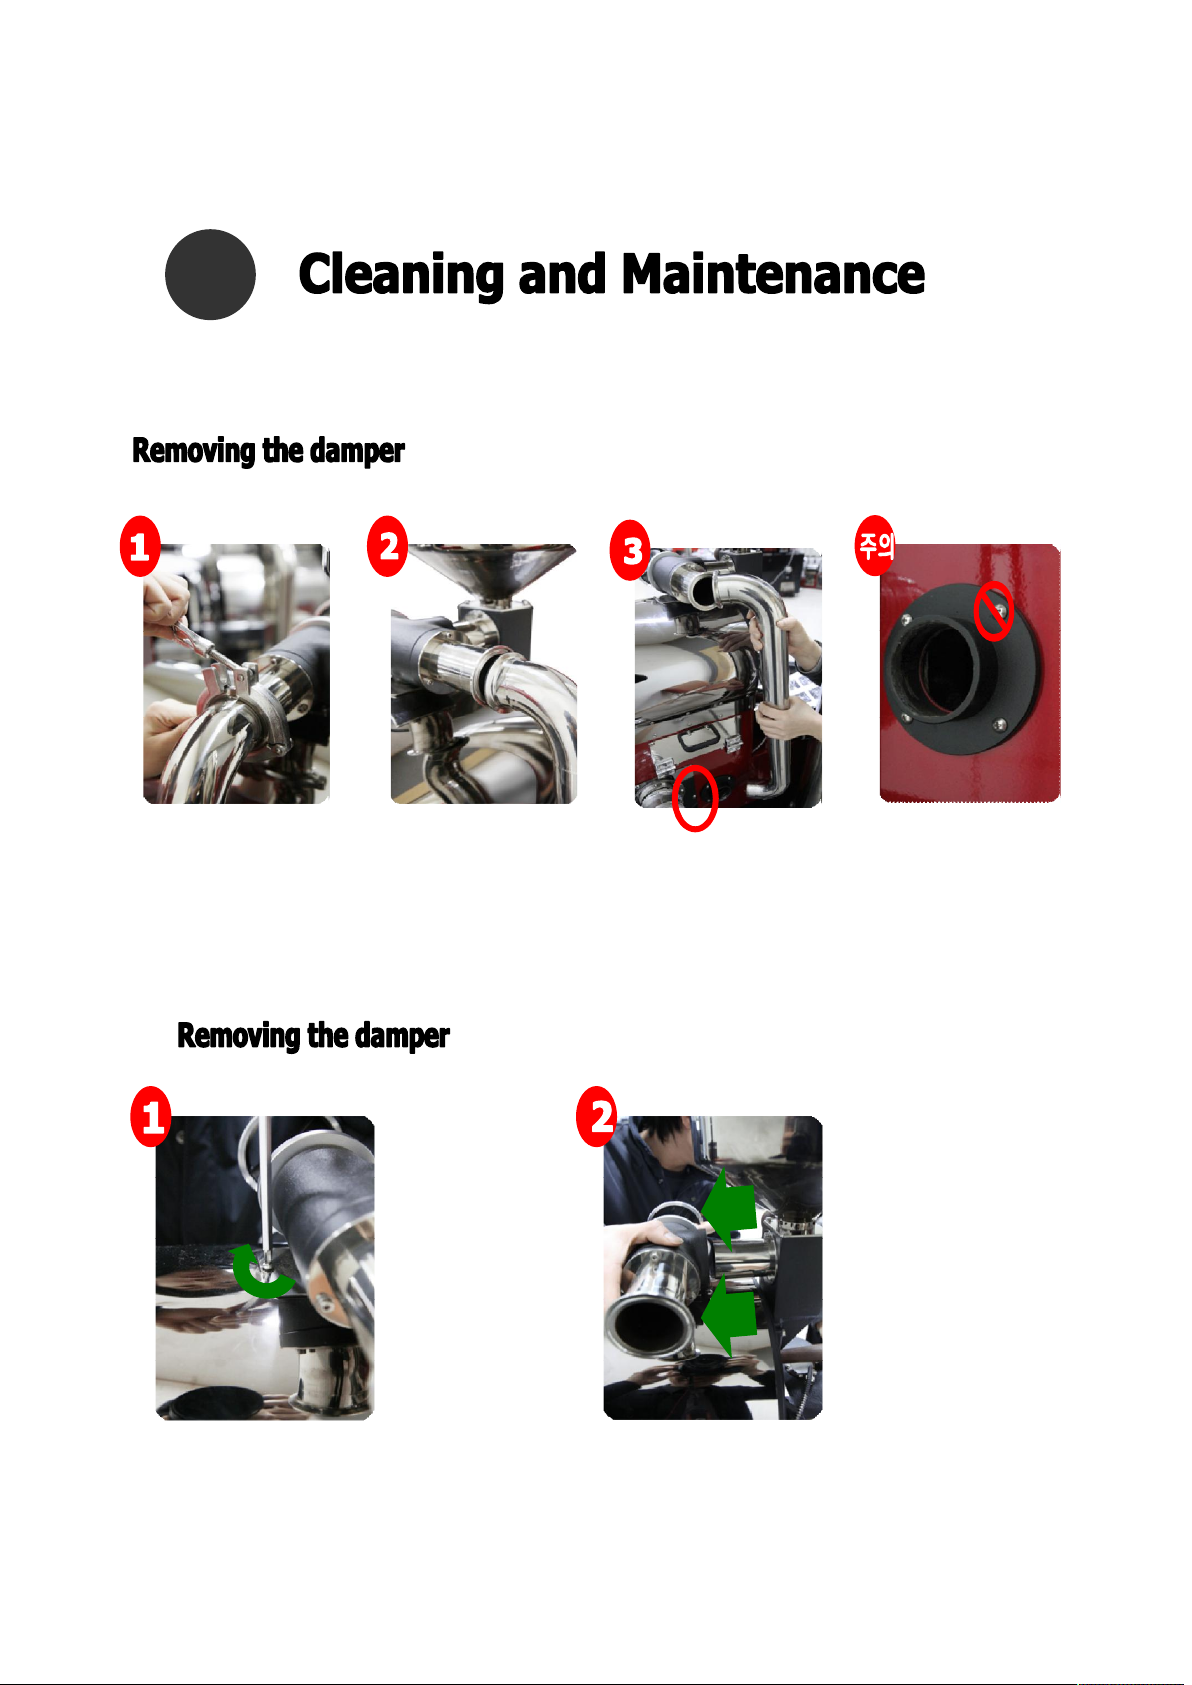
(2) Cleaning and Maintenance – Disassembly before cleaning
Manually turn the
clamp connecting
the damper and
the u-shaped pipe
and remove.
Remove the pipe
from the body by
manually moving
the pipe back and
forth.
Use a Phillips
screwdriver to
remove the 4 screws
connecting the
damper and drum.
!!Warning!! Do not remove the lower
bolts.
(Doing so creates difficulties when
reassembling)
Removal is possible without removing
the bolts.
Grasp the damper
and pull it out in
the direction of the
arrows (as shown)
to remove.
16
Page 17
5
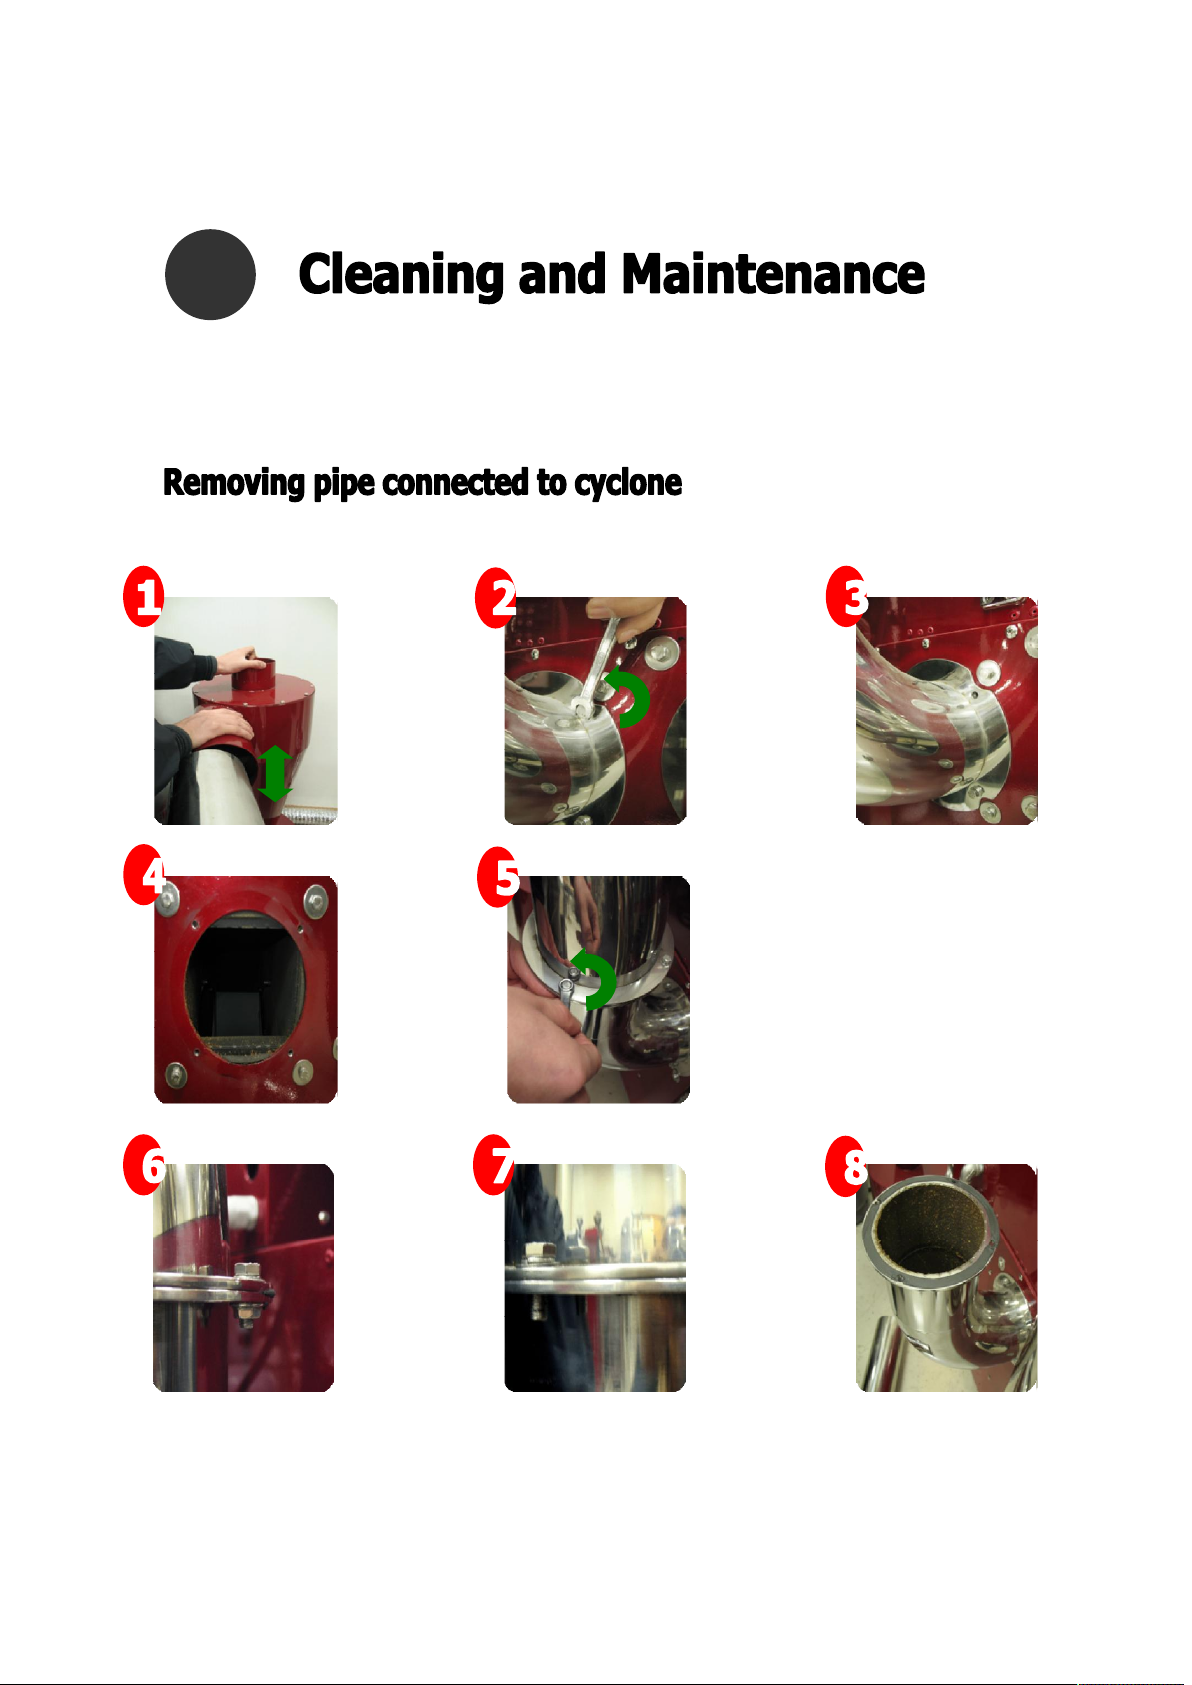
(2) Cleaning- Separating the parts before cleaning Removing the
piping connecting the cyclone
Remove pipe
from the
cyclone
Use the 10-inch
spanner
included in
product
packaging to
loosen the 4
hexagonal
bolts.
Use the 8inch wrench
to loosen the
parts
connecting
the pipe
Before
loosening
After
loosening
17
Page 18
5
(2) Cleaning and maintenance
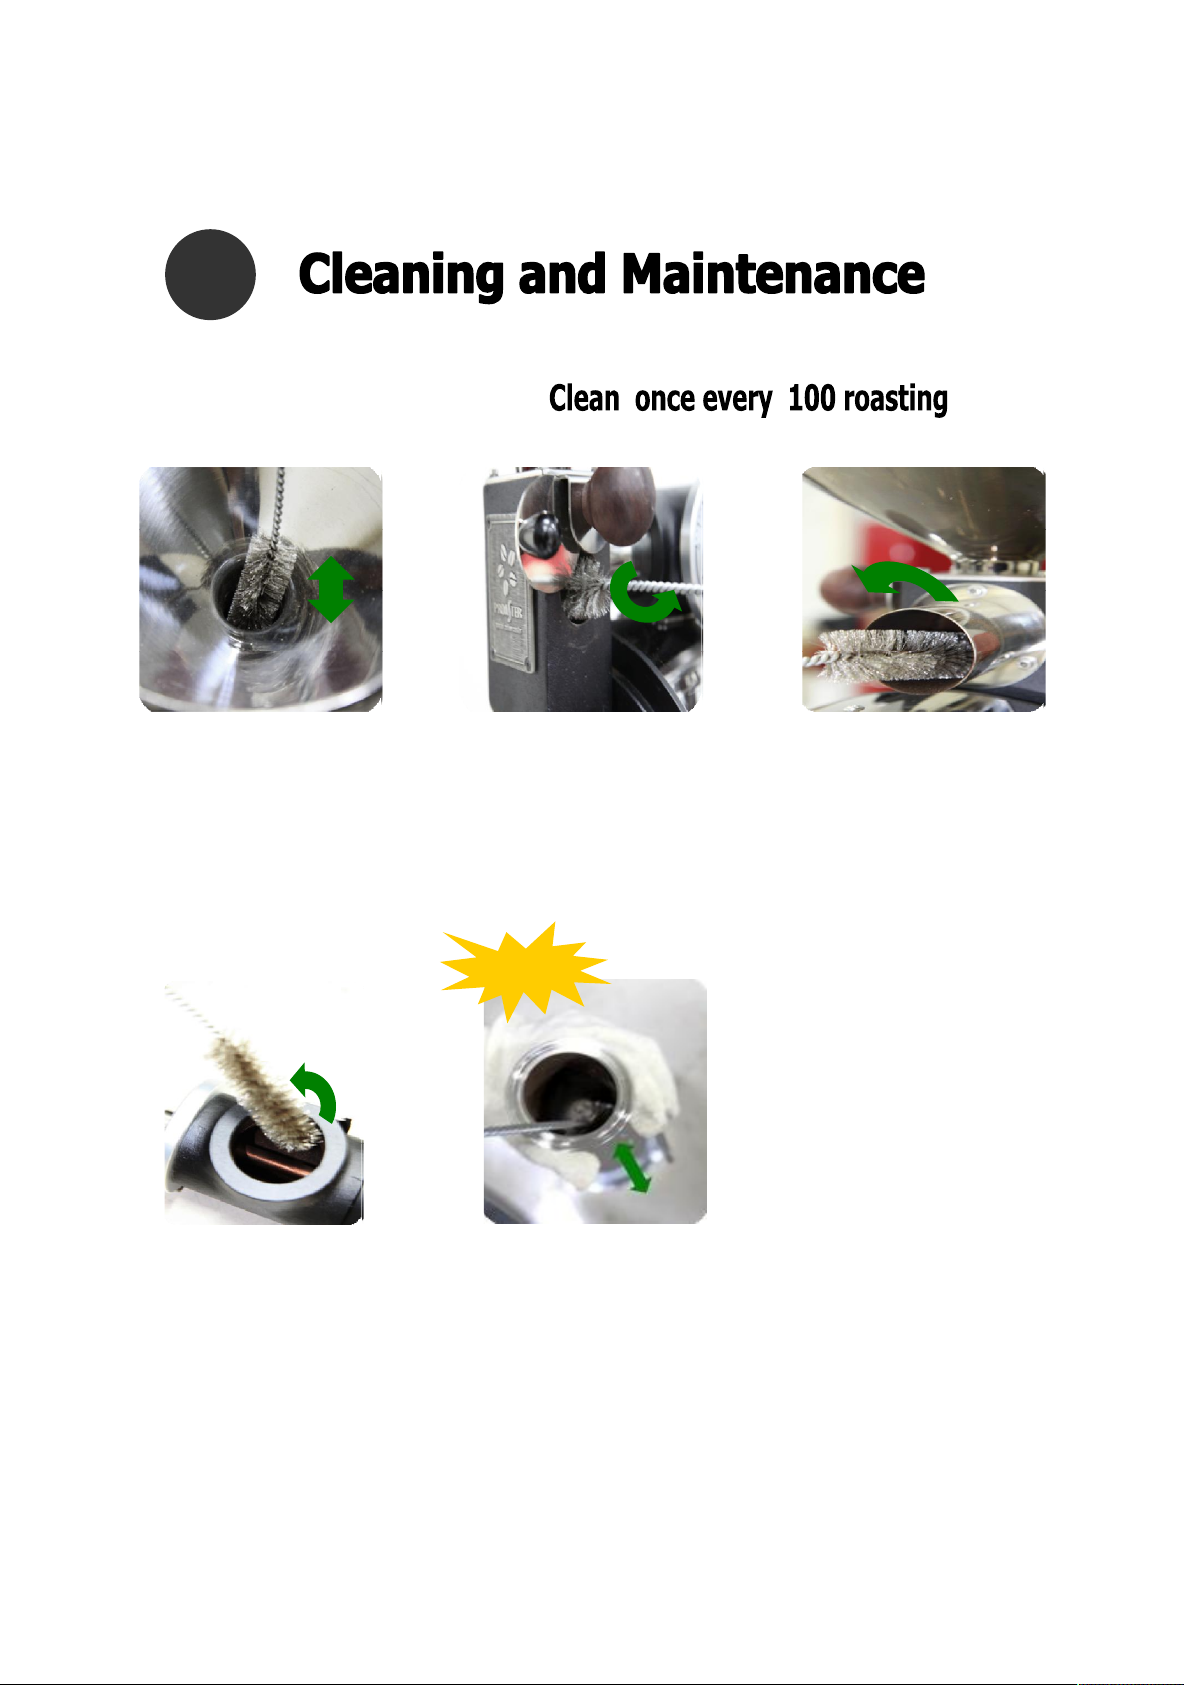
Cleaning hopper
Remove sediment inside
the solo hopper
with a brush then use
vacuum
Cleaner
Cleaning inspection door
Remove sediment inside the
solo hopper
with a brush then use vacuum
Cleaner
Clean once in every
100 roasting
Clean once in every
100 roasting
Important!!
Cleaning damper
Adjust damper gradation at 10 to fully open the damper and
Remove sediment inside the solo cooler pipe with a brush .
Pipe connected between
hopper and damper
Remove sediment inside
the solo hopper
with a brush then use
vacuum
Cleaner
Clean once in
every 100 roasting
Clean once in every 100 roasting
18
Page 19
5
Important!!
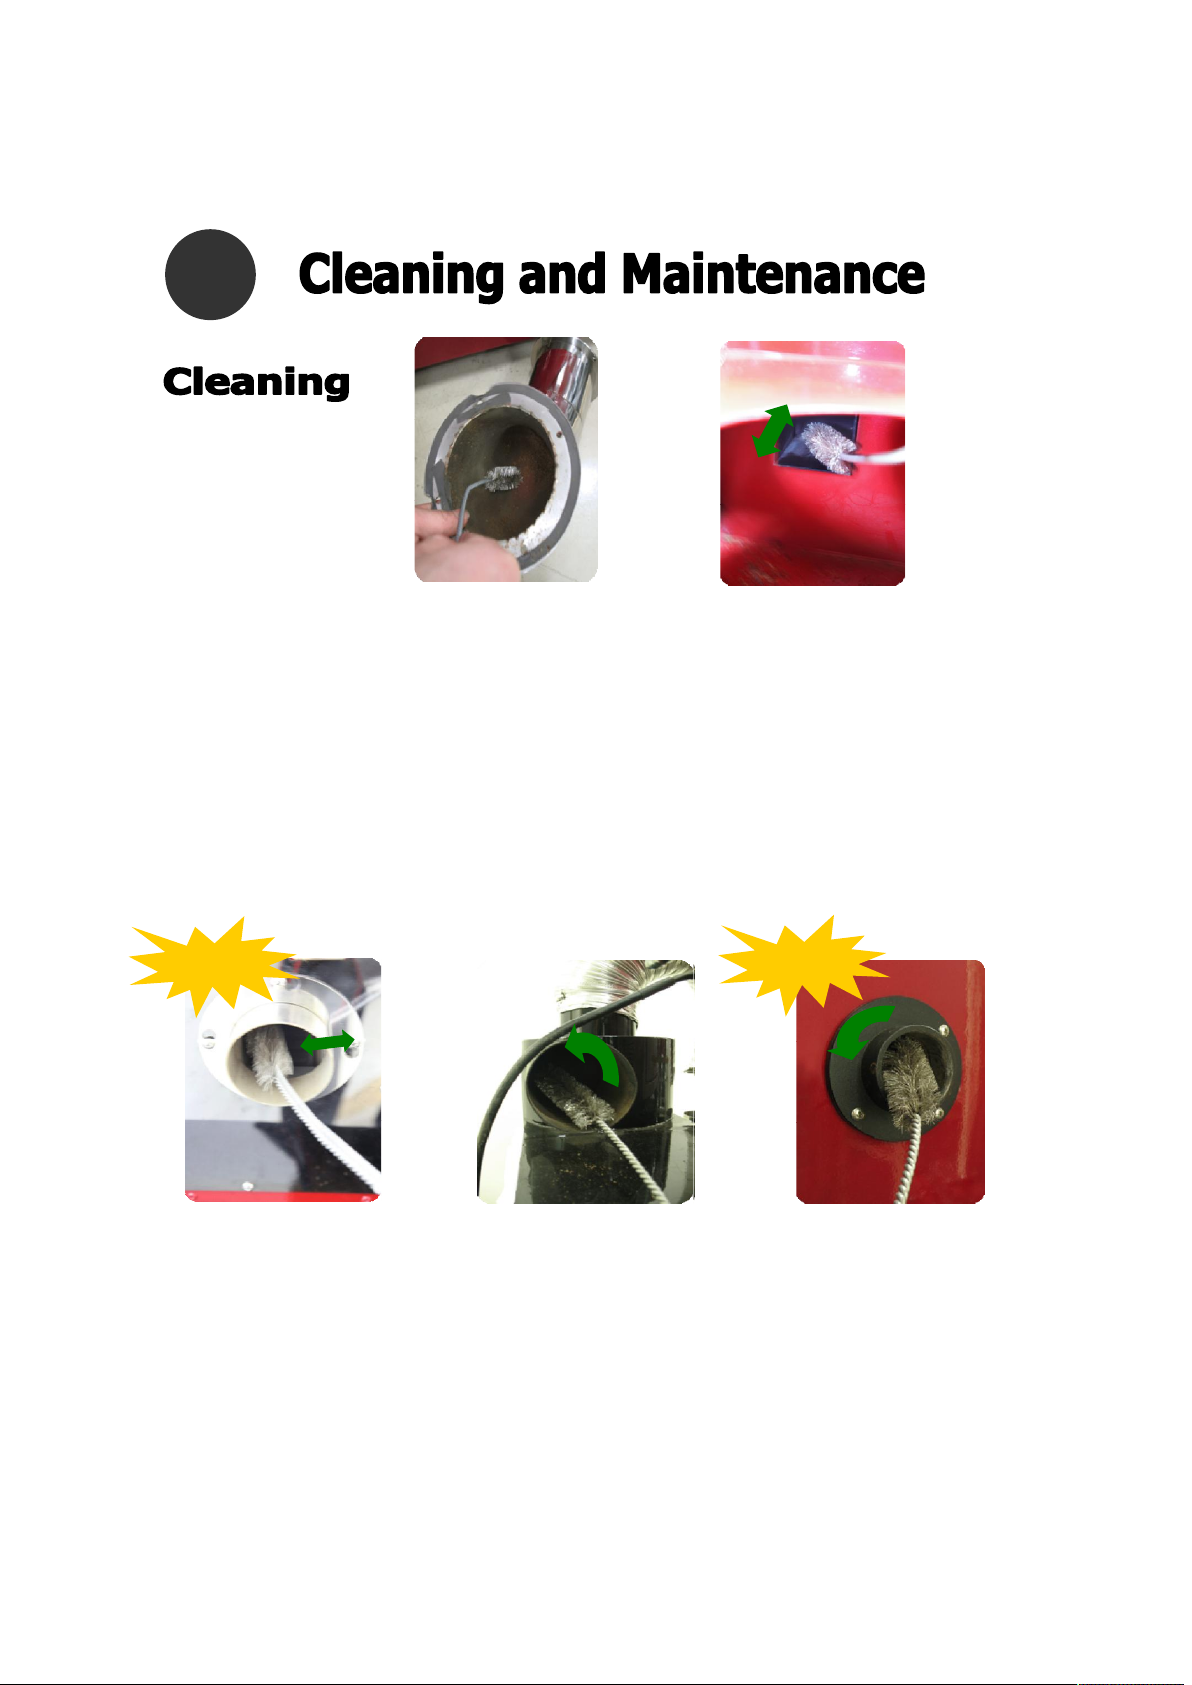
Cleaning pipe
Bend the brush and use it
to thoroughly clean deep
inside the pipe
It is difficult to perform a
thorough cleaning inside
the pipe if cleaning has
been neglected for a long
time resulting in the
forming of hardened
sediment layers.
Once every 100 uses
Inside the cooler
Requires extra care
because the cooling tunnel
in the cooler directly
affects the blower.
Use a brush to remove
coffee grounds (waste) and
dust. Then do a thorough
‘touch-up’ cleaning using
the vacuum cleaner.
Once every 100 uses
Important!!
Cleaning the blower
Use the brush to scrub in
back and forth motions to
remove dust. Please
observe good maintenance
to continue achieving
maximum performance of
exhaust and cooling
functions.
Once every 100 uses
Cleaning the cyclone
Use the brush to scrub
back and forth or in
circular motions to
remove dust.
Once every 100 uses.
Cleaning
inside
the
lower damper
It is very important to
clean the lower
damper because good
exhaust circulation is
essential to the
roasting process.
Once every 100
uses
19
Page 20
(3) After cleaning
After cleaning, remove any dust around the machine with the
vacuum cleaner. To remove dust inside the machine, use spare
coffee beans in a no-load rotation without turning on heat.
and roasting failure. Company will not assume responsibility for
accidents, operation failure or roasting problems caused by user’s
neglect to clean machine.
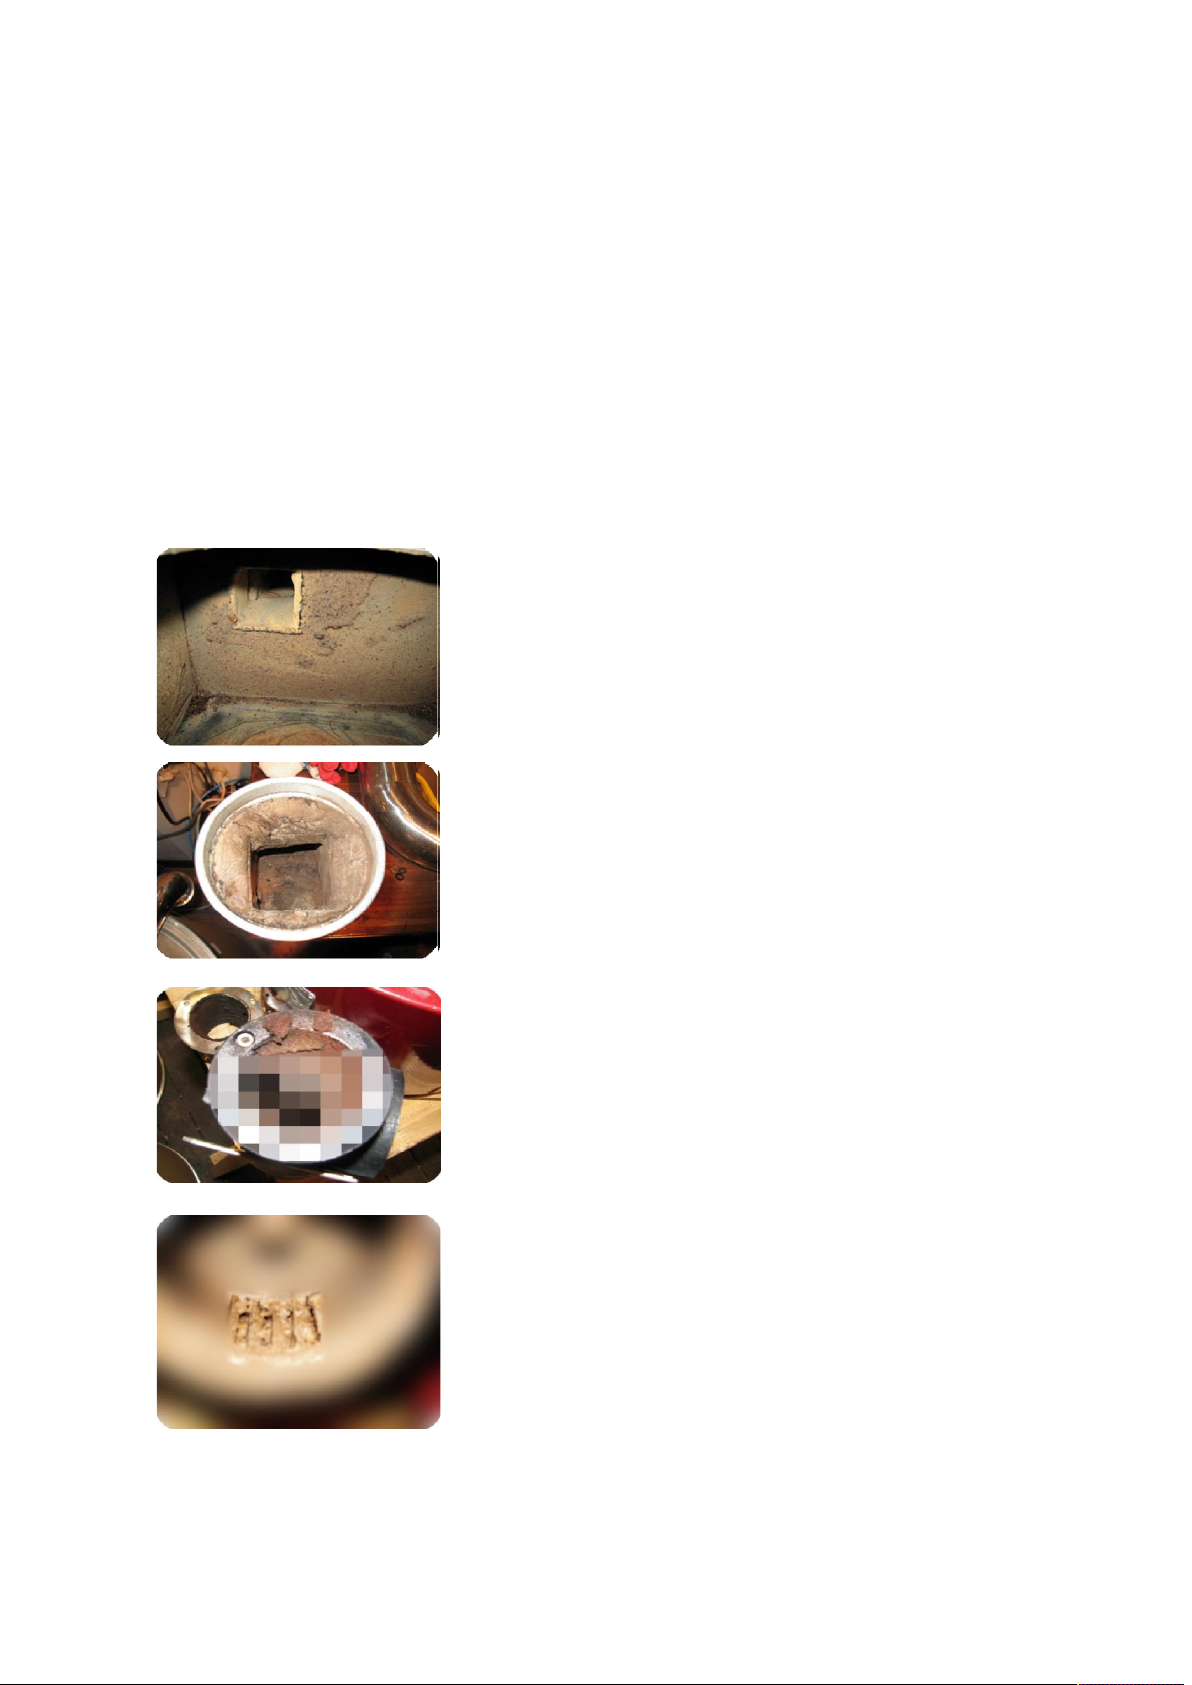
(4) Poor management
Neglected maintenance of cooler
Neglected maintenance of the cooler causes
moisture and dusts inside the cooler resulting
poor performance of blower and cooler causing
charcoal taste or aroma
Neglected maintenance of lower damper
Neglected maintenance of lower damper causing
the low damper bar not being turned to 0
resulting poor taste as well as poor cooling
performance
Neglected maintenance of
damper
Neglected maintenance of
the damper causes moisture
and dusts inside the damper
resulting the damper not
being rotated and controlled
Inappropriate management of blower
Neglected cleaning and maintenance of preheat
and cooling units and pipes cause moisture and
dust worsening cooling performance
Poor exhaust results when damper is fully opened
20
Page 21

(5) Trouble Shooting
Ignition/Flame
Cause Actions to take
① After turning the burner switch ON, confirm that sparks are flying at a
high intensity from the nozzle of the high pressure rod (maintain a space
Location of the high
pressure sensor
of 3~5mm)
② After igniting, confirm that the sparks are reaching the heat sensor
(maintain a space of 5~7mm)
③ Confirm that there is no movement of the high pressure, sensor,
breakage to the insulator, grazing or disconnection of wires, etc.
Temperature display
error
Flame
Flying sparks
Noise
Cause Actions to take
Noise in the drum
vibrations, noise
There must be no damage, breakage, dislocation or presence of foreign
matter in the sensor, and no errors due to malfunction of the
temperature adjuster
① Scale accumulation on the upper cap of the nozzle
② Distortion in shape of nozzle hole due to over-aggressive cleaning
(LPG Ф0.65, LNG 1.0)
③Confirm that gas type is identical with gas type indicated on the name
plate
① Occurs due to insufficient oxygen supply because exhaust damper is
set too low, etc.
②There must be no debris such as coffee grounds or other waste in the
exhaust conduit path
① contact between drum and front plate (maintain a space of
1.5~2.0mm)
②Insufficient access of grease to the bearings in the drum
① Check if volt and nut are loosen
② Disassemble service pipe and discharge pipe of exhaust and
cooling bro and part and dust accumulated in the inside of case
like wing
③ Check oil in the gear head of drive motor and tension of V belt
21
Page 22
6
(1) Disposal
1. Box container and wrapping materials should be recycled or disposed of in
accordance with the rules set by your country.
2. The machine and power cord may be recycled. Please contact recycling center.
3. Machine must not be disposed of together with regular trash. Dispose of
machine according to the recycling method established for electrical products.
-Detailed information about recycling is available at recycling center and store of
purchase.
4. Dispose of waste (grounds) from coffee beans in accordance with your country’s
regulations for food disposal or environmental policy.
7
Detail Durability
Heater None
Nozzle
Belt
Bearing
Sensor Ф2.3 x 20ℓ x 1/8”x 3.0m 2ea 2~3years
Exchange period for machines applies to new machines only. Exchange
period may vary depending on how the machine was handled or
conditions related to the machine and the environment of its use.
Exchange policy does not apply to used machines.
Nozzle Ass’y 1set
A type 87” 1ea
UCFC208-EN2 1ea
UCFC207-EN2 lea
10years
3~5years
5years
22
Page 23
8
1) Damage caused by natural disasters
2) Damage resulting from user negligence
• Inappropriate use
• Using machine for purposes other than those intended by user’s
Intentional negligence, remodeling, damage from impact, use of excessive force
while
operating, disassembly, private repairs
• Use of supplies other than those made by manufacturer, improper cleaning,
negligence in cleaning
• Failure to follow safety and operation warnings
3) Installing additional parts to machine’s interior or piping, use in an improper operation
environment
4) Reinstalling following simple cleaning or initial installation when damage has been
caused by
user’s failure to clean machine
5) Consumable goods replacement
23
Page 24
Model name :
Used period :
Problem
description:
Contact name :
Phone :
Model THCR-03 Capacity 800g ~ 5kg
Power Single 230V(60HZ)
Consu
ming
voltag
e
Size
800w
600*1300*1540
m/m
Gas
consumption
Power
Max. LNG 15,200kcal/h LPG 1.3kg/h
Motor : AC / 220V / 200W / 60HZ
Gearhead : Decreased rate 1/10
Blower : AC / 220V / 1/4hp / 60HZ
Gas
pressure
Low pressure
(For home use)
24
Page 25
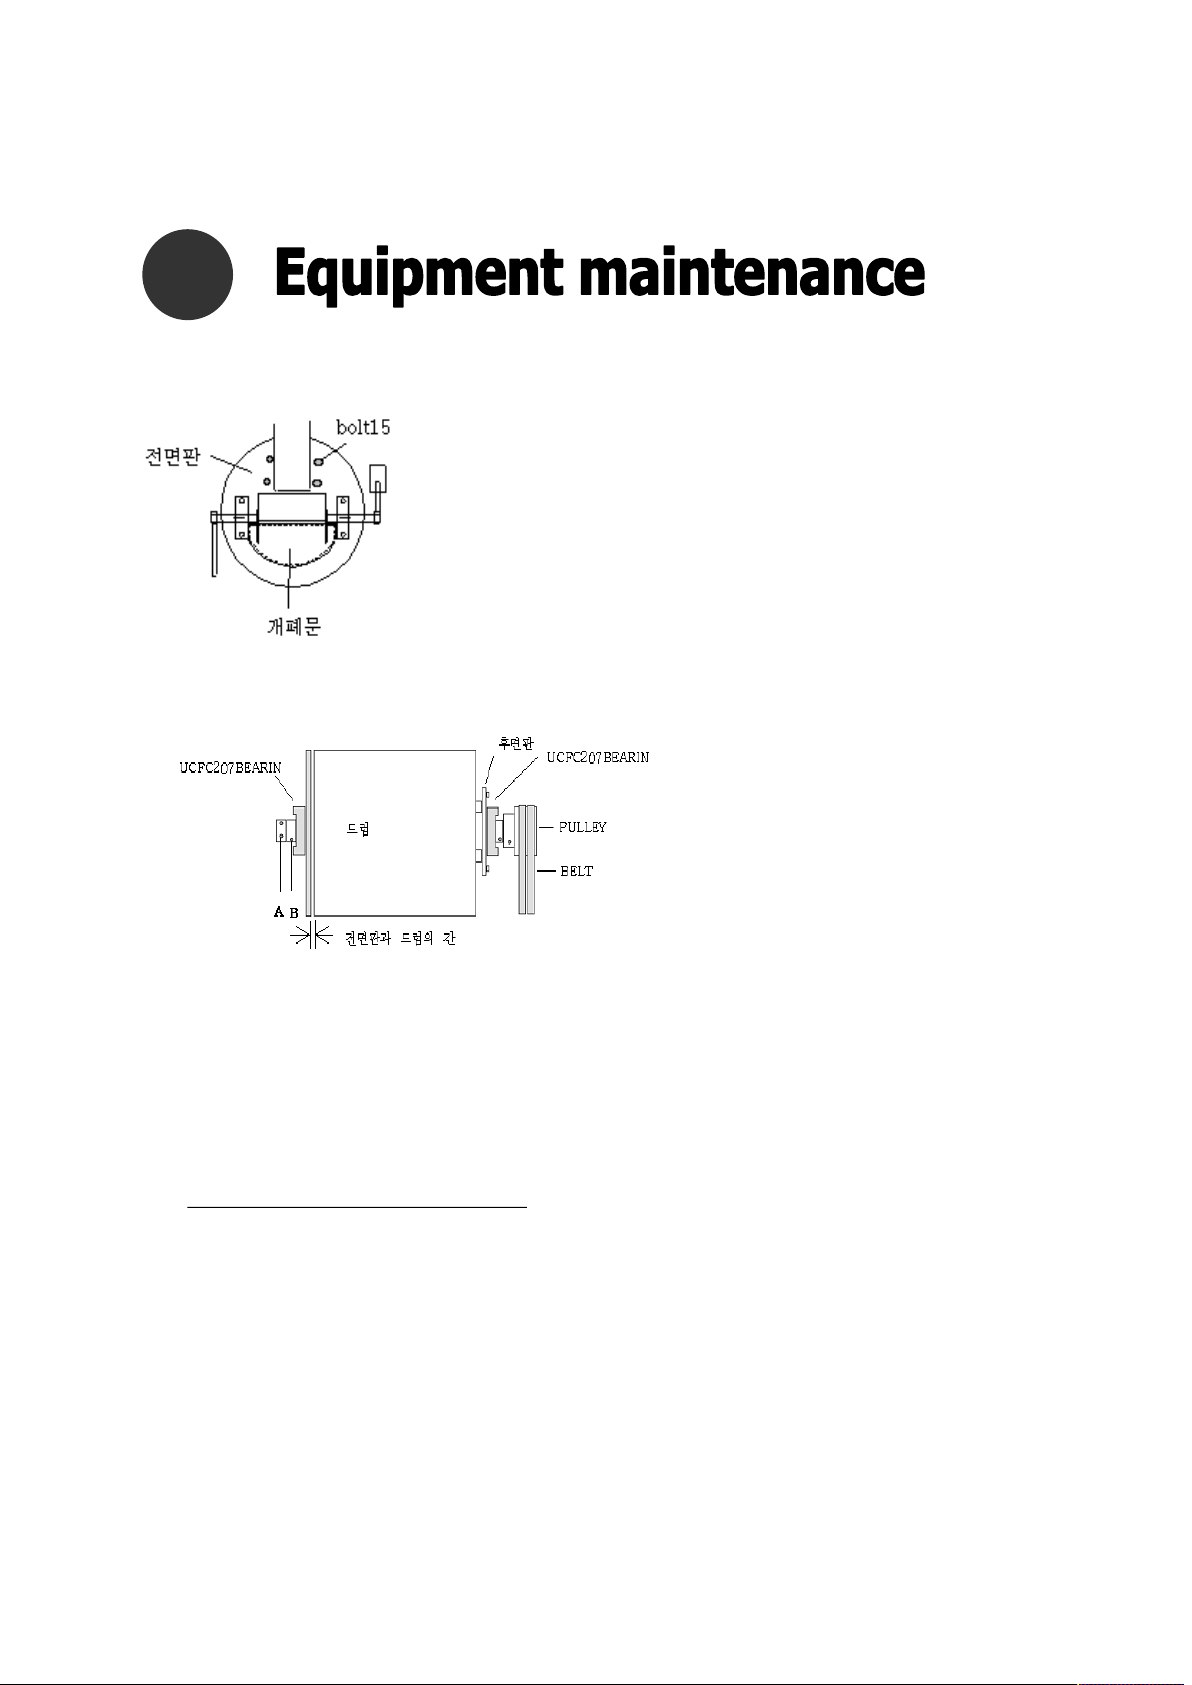
1. Front plate, hinged door
① Maintain a distance of about 0.5m/m between
the front plate and hinged door, and adjust so that
coffee grounds do not leak out
②The fixed bolt and washer on the front plate must
be the same make as the original ones.
Friction between drum and front plate results in
noise and malfunctioning of the drum
2. Distance between front plate and drum
How to adjust the front plate and drum
The appropriate distance
between the front plate and
drum is 1.2m/m
Closure of the space between
the drum and front plate may
occur due to heat expansion.
If noise coming from the drum
during operation is severe, it
means the space between
them is too narrow.
Warning: Any adjustment must be performed while power is OFF. If you encounter
difficulties, please request service from the manufacturer.
① After inserting the range bolt into the hole of the front plate’s A stopper, turn the
stopper to the left enough to loosen it.
② Loosen the fixed bolt of the B stopper (the entire bearing unit) just a little.
●To reduce distance from the drum hold the B stopper firmly in place with one hand
while turning the drum to the left with the other hand to make narrower
(Or, you can hold the drum in place with one hand and turn the B stopper to narrow
the space.
●To increase distance from the drum, hold the B stopper in place and turn the drum to
the right.
③ After adjustment is completed, tighten the fixed bolt on the B stopper, then
tighten the A stopper.
25
Page 26
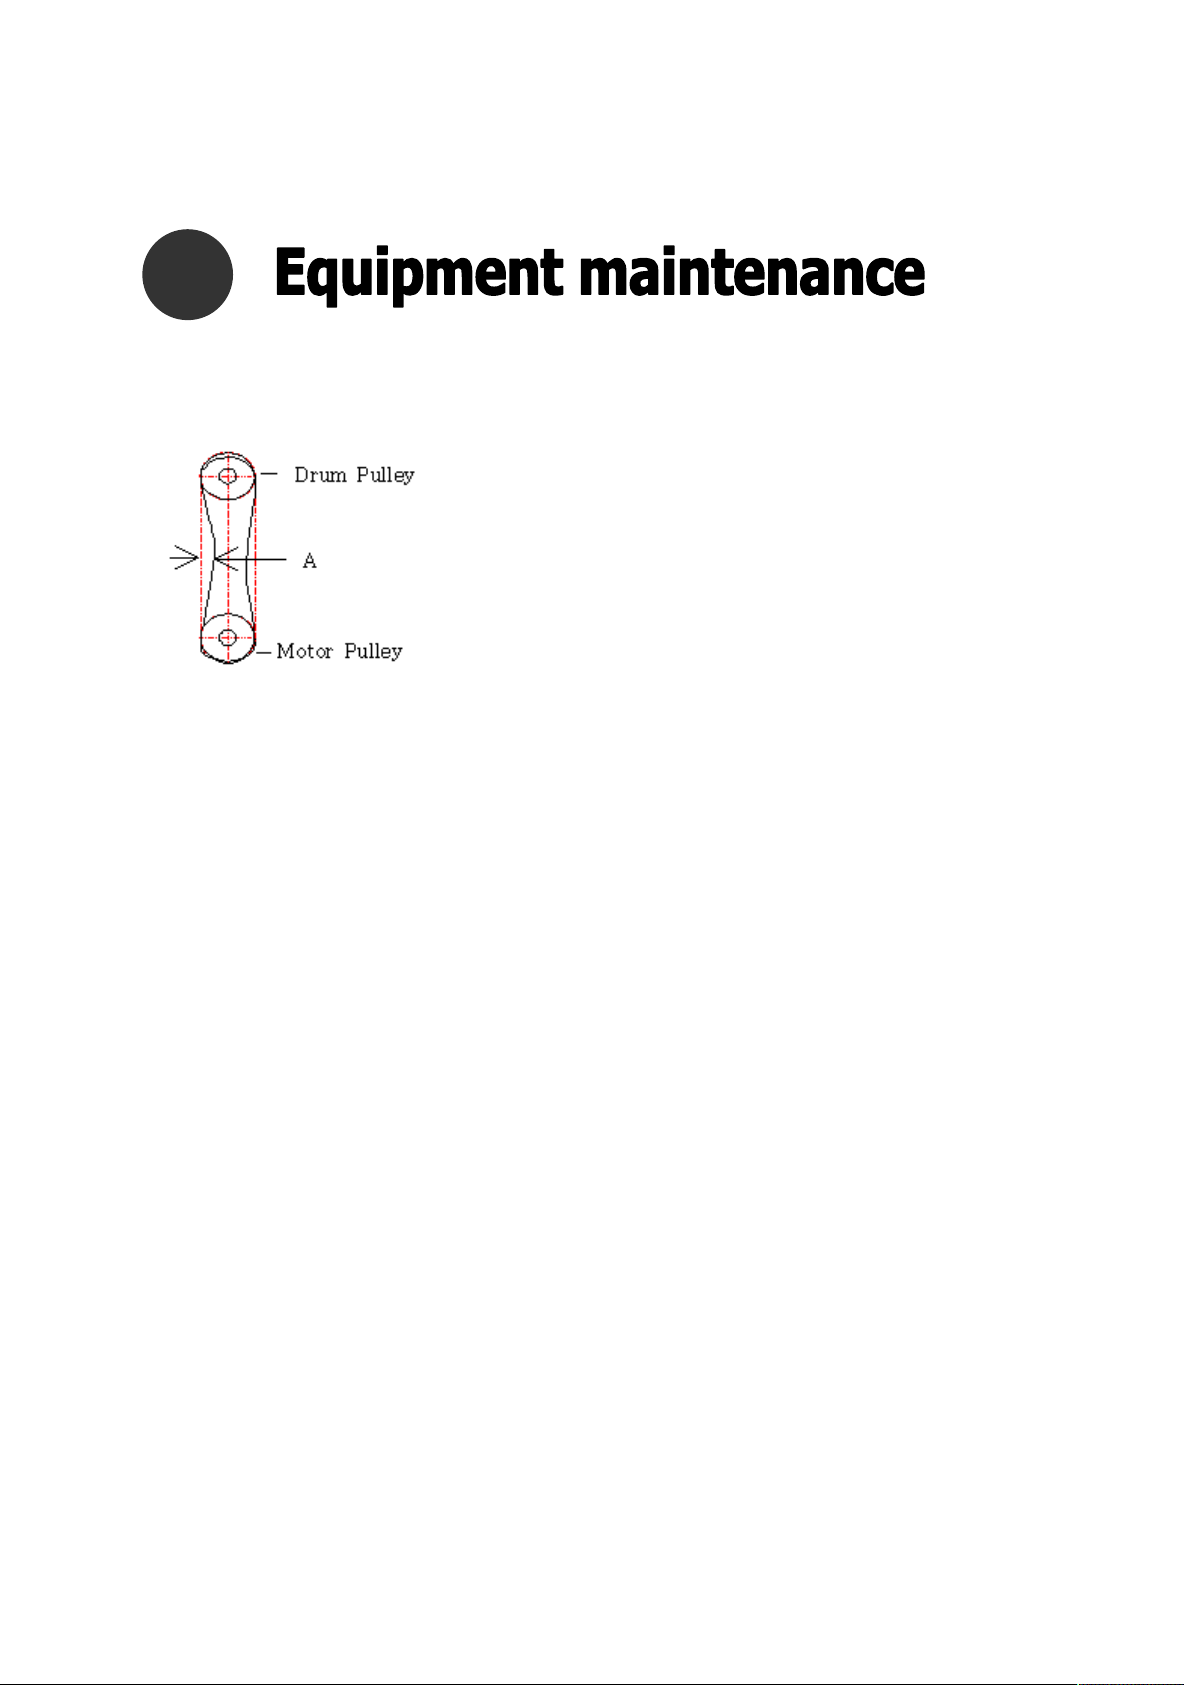
3. Tension of V-Belt
① Hold the V-Belt down and adjust tension of A to
5~10mm
(Replace the Belt if it’s broken or stretched)
② Adjust its tension by adjusting nut of motor fixing belt
4. DRUM rotation
① In case if DRUM is not properly rotating / operating
- Loosen the V-Belt and turn the drum with your hand to see if it rotates smoothly
-Hold down operating s/w to check the rotation condition of the Motor
26
 Loading...