

Page 1
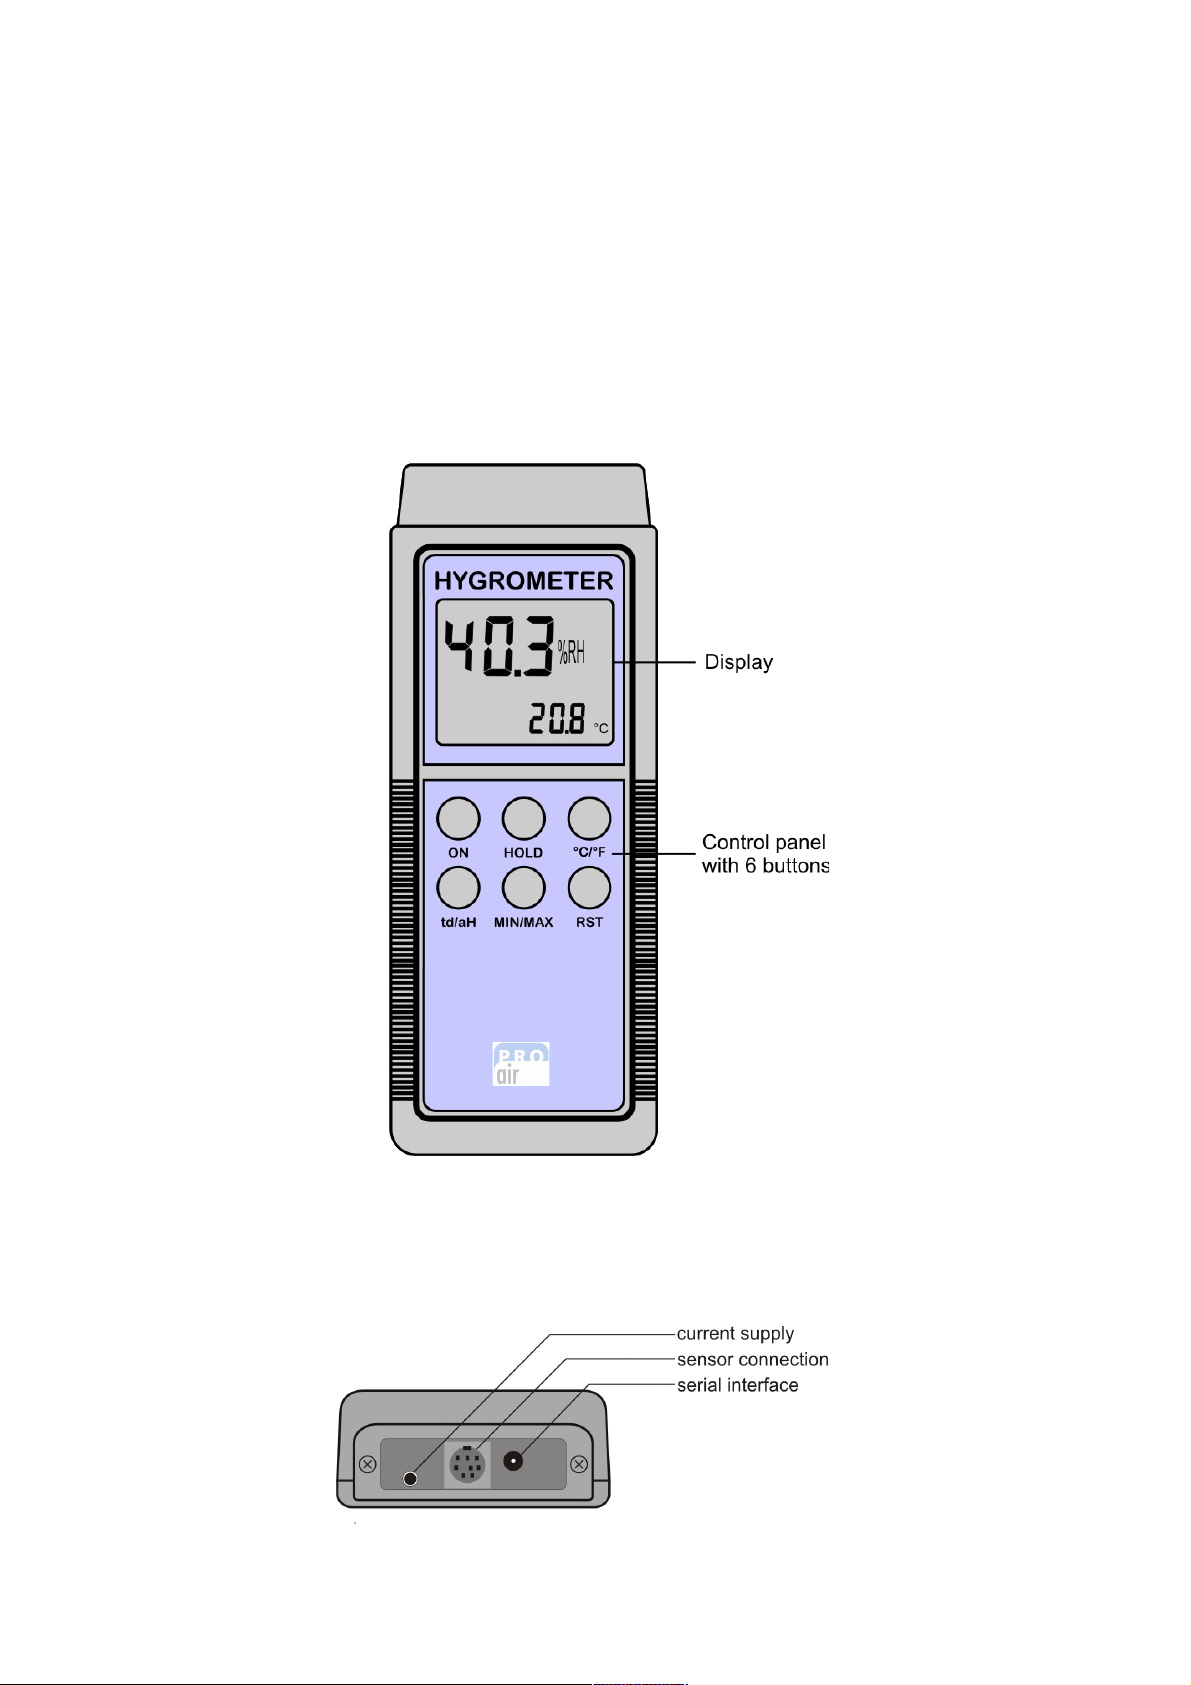
Brief des cri ption of the Han dy measurin g
instrument T PW portable
Pi ctu re of the in str ume nt
Conn ect ion s of the i nst rume nt
The hygro-thermometer TPW portable is provided with various connection points on
the top side:
Page 2
Page 1
1 Operating in s tru ction s
1.1 Use r’s ma nual
For detailed operating instructions of the instrument, please go through the user’s
manual, which is provided with the instrument.
The manual also contains instructions for calibration of the instrument.
1.2 Ope rat ing th e ins trum ent
Caution ! Connect the probe only after switching off the instrument. Even if you want
to change the probe, first turn off the device. During plugging in activity, either the
probe or the instrument can get damaged!
The instrument is supplied in calibrated and ready to operate condition. For using the
measuring instrument for the first time, please open the battery compartment with a
screw driver and put batteries in it..
Connect the sensor connection cable of the measuring probe at the corresponding
socket on the front side of the instrument. The relevant arrow mark on the flat side of
the plug must point downwards.
Avoid static charge and touching the electric contacts. The instrument or the probe
can get damaged by electrostatic discharges!
Switch on the device with the ON button. The current humidity and temperature values
are shown on the display.
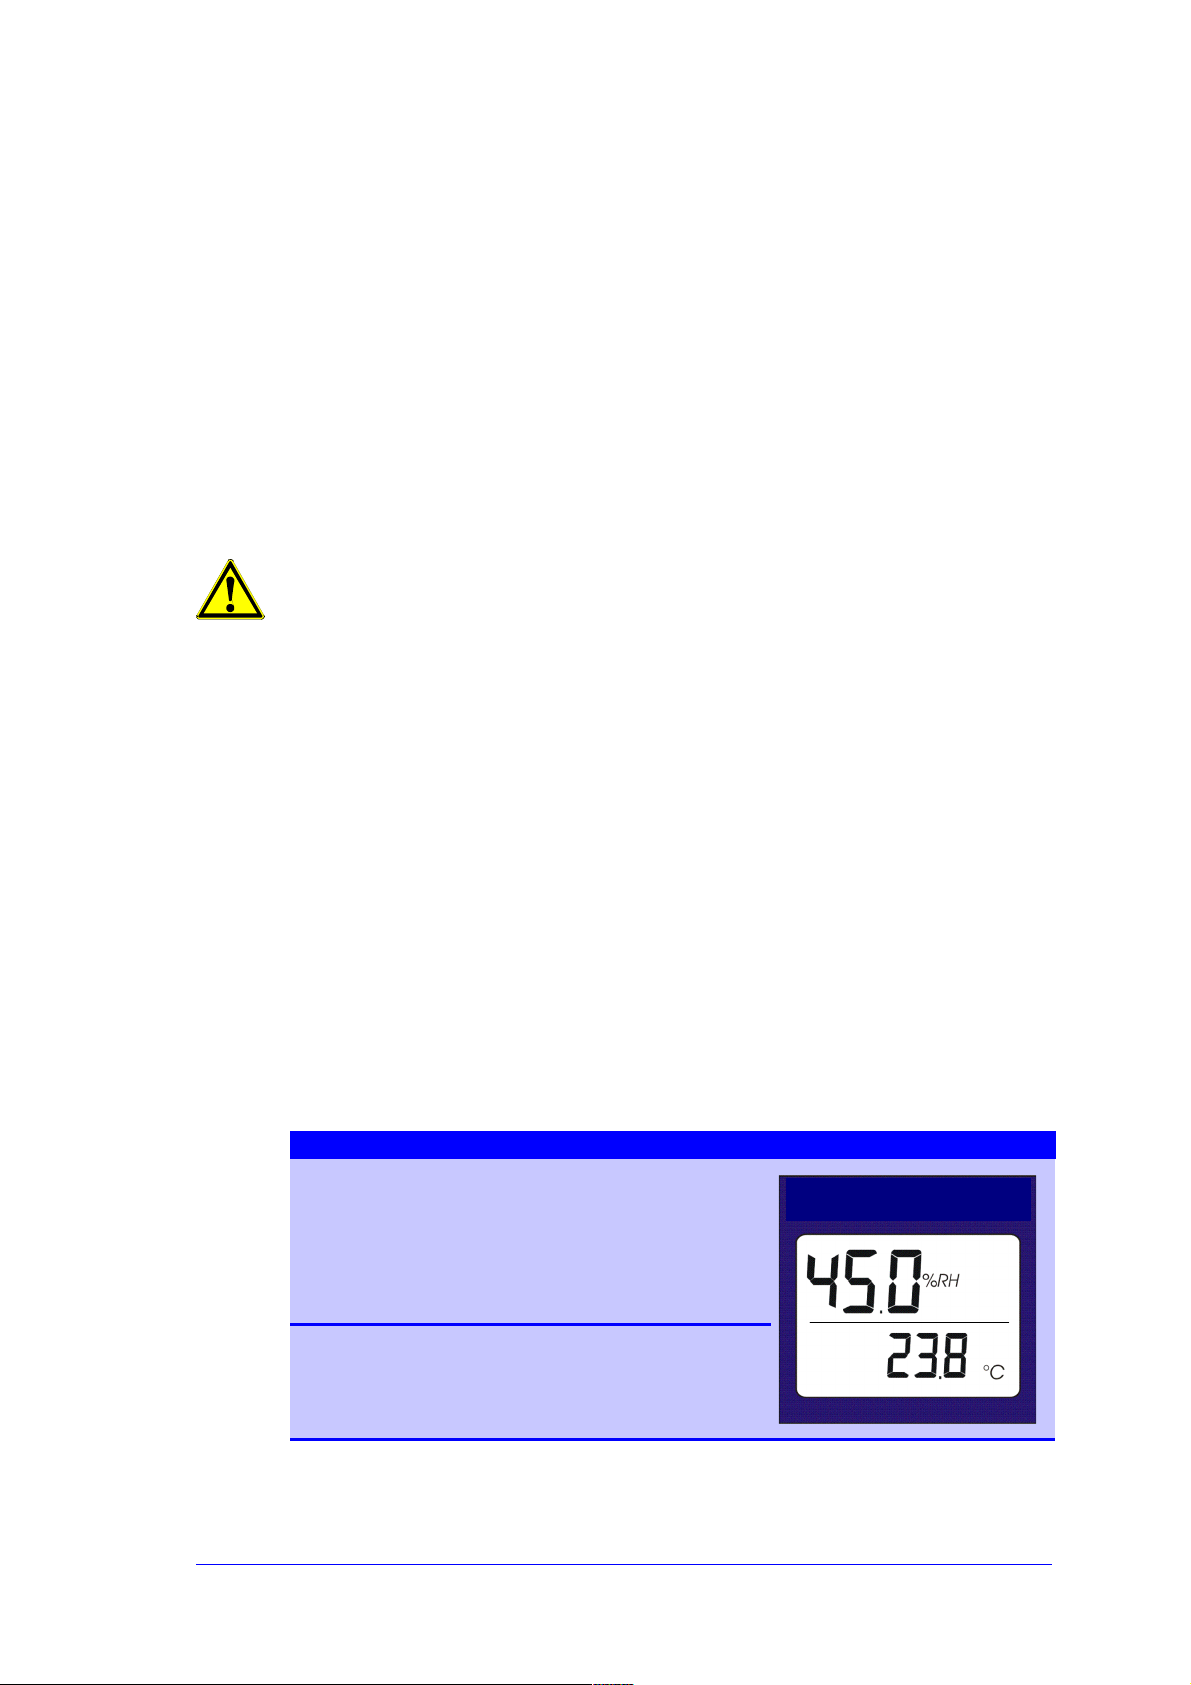
1.3 Displ ay fo rma t
During normal operation, the double line LC-Display of the operating panel is used to
display the currently measured temperature and humidity values.
Functions under Normal operation
Display contents
Relative Humidity in % rH
Temperature in °C
Page 3

Page 2
2 Operation of the Hand y mea sur ing instru m ent
TP W por t able
2.1 Funct ion of t he but ton s
The buttons perform the following basic functions:
Name
Function
Switching ON/ OFF the instrument
Hold value in the display
Toggle between °C and °F
Display Dew point and Absolute humidity
Display of determined minimum and maximum values
Reset minimum and maximum values
Page 4
Page 3
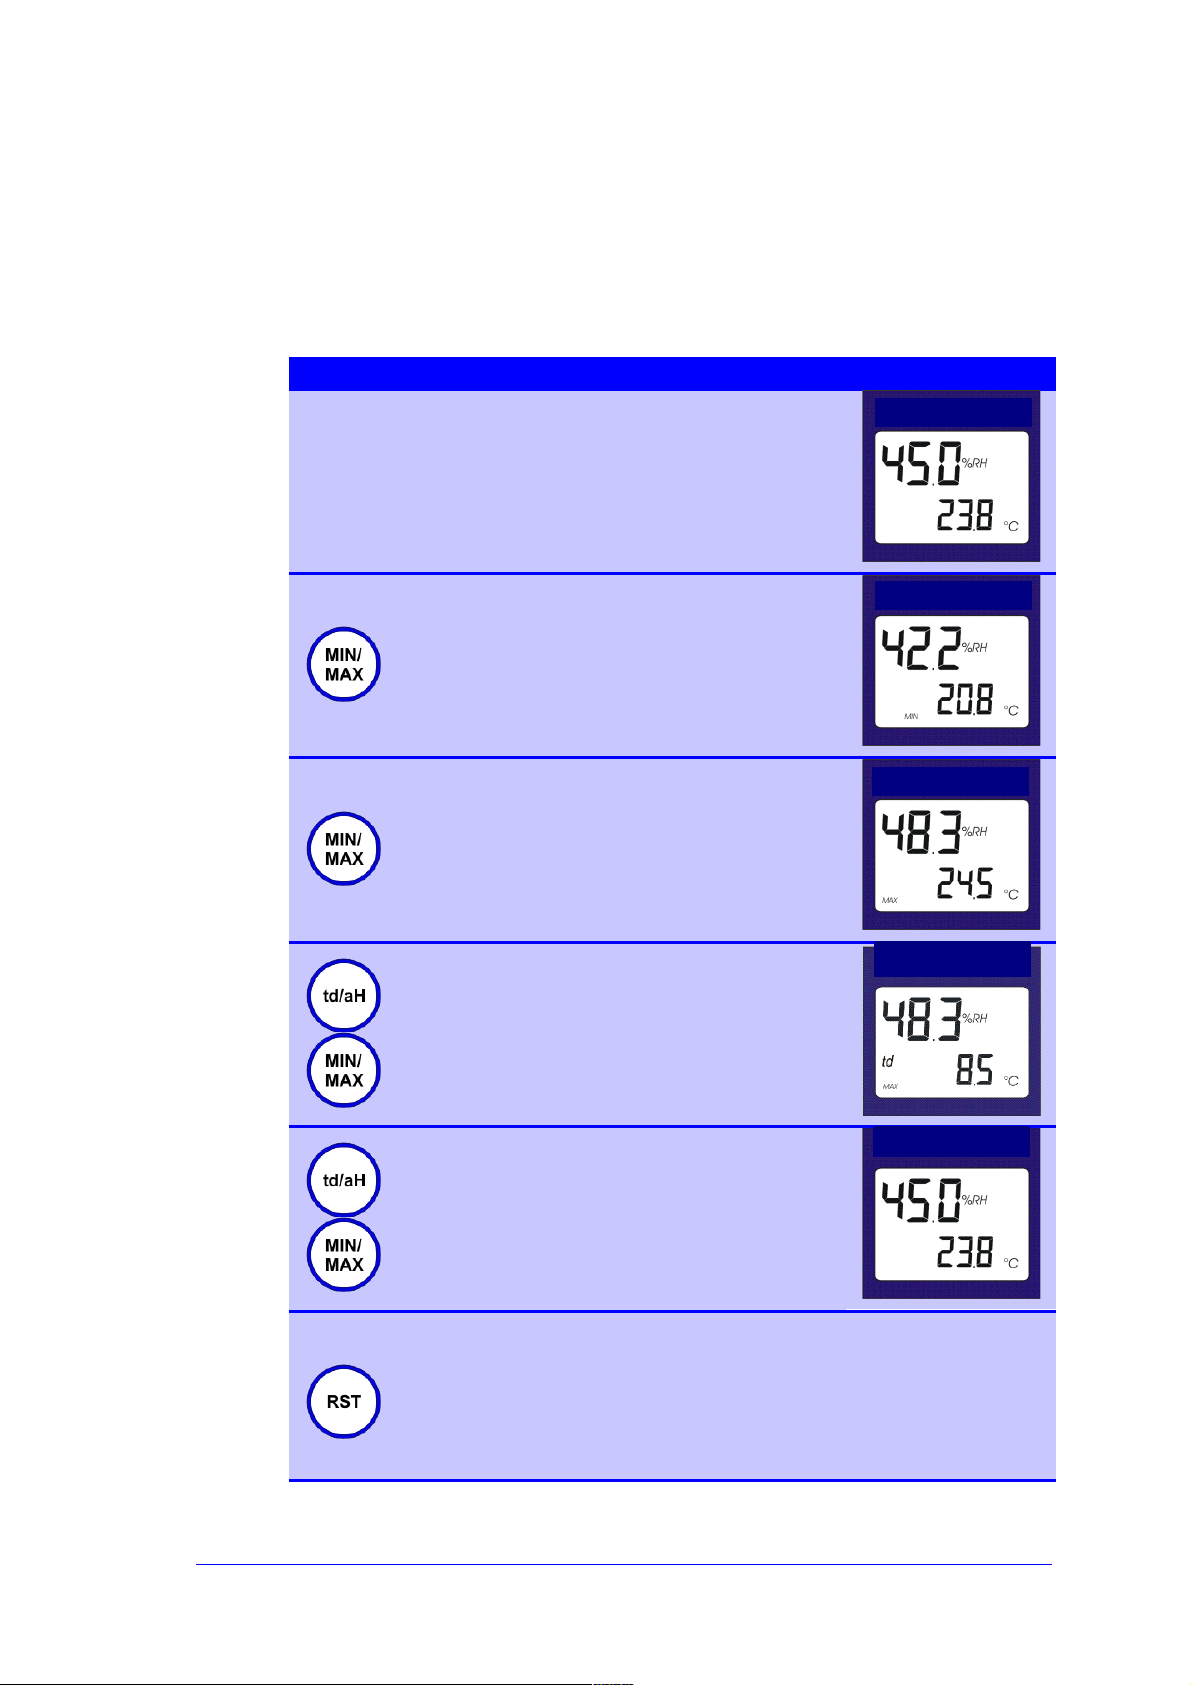
2.2 Displ ay of me asu red Mi ni mum an d M axi mum va lue s
The instrument automatically determines the highest and lowest values. These
“MIN/MAX“ values can be displayed, as desired.
Operation of button
Action
Display contents
The instrument is in normal operation
MIN/MAX-button is
pressed
Minimum of measured
values is displayed
“MIN“ sign appears in
the display
MIN/MAX-button is
pressed again
Maximum of measured
values is displayed
“MAX“ sign appears in
the display
On request: The Dew point or Absolute humidity
value can be shown on display by pressing the
td/aH-button
By pressing the MIN/MAX-button, the Min/Max
value of the selected parameter can be
displayed.
Operate the td/aH-button and MIN/MAX-button
again and again till the instrument comes back
into normal operation
RST-button can be
pressed anytime
The measured Min/Max-values are reset by this
button
Page 5
Page 4
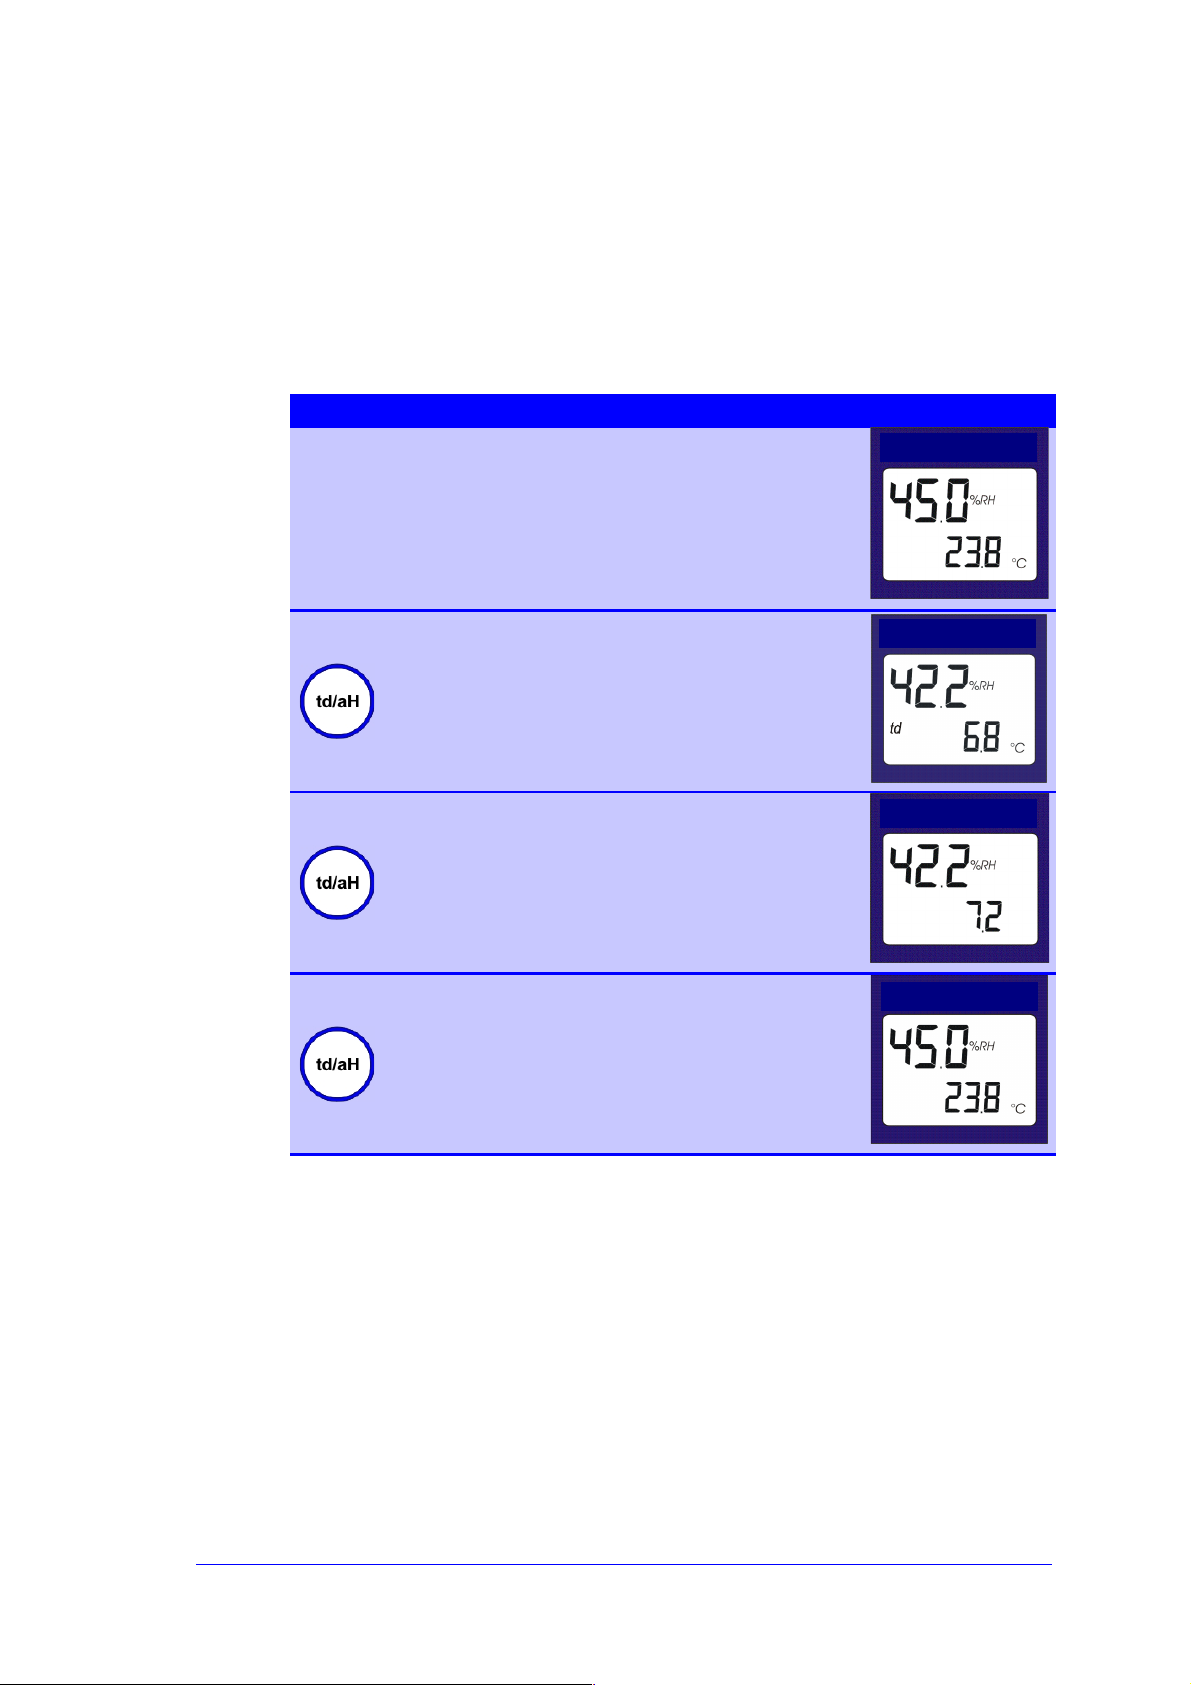
2.3 Displ ay of De w poi nt and Ab sol ute h umid ity va lu es
The Dew point temperature or Absolute humidity can be alternatively displayed in
place of temperature value.
Operation of button
Action
Display contents
The instrument is in normal operation
[td/aH]-button is pressed
Dew point is displayed.
“td“ sign appears in the
display
[td/aH]-button is pressed
again
Absolute humidity value is
displayed.
Absolute humidity value is
shown in g/m3
[td/aH]-button is pressed
again
Normal operation. Display
of temperature and
relative humidity values
Page 6
Page 5
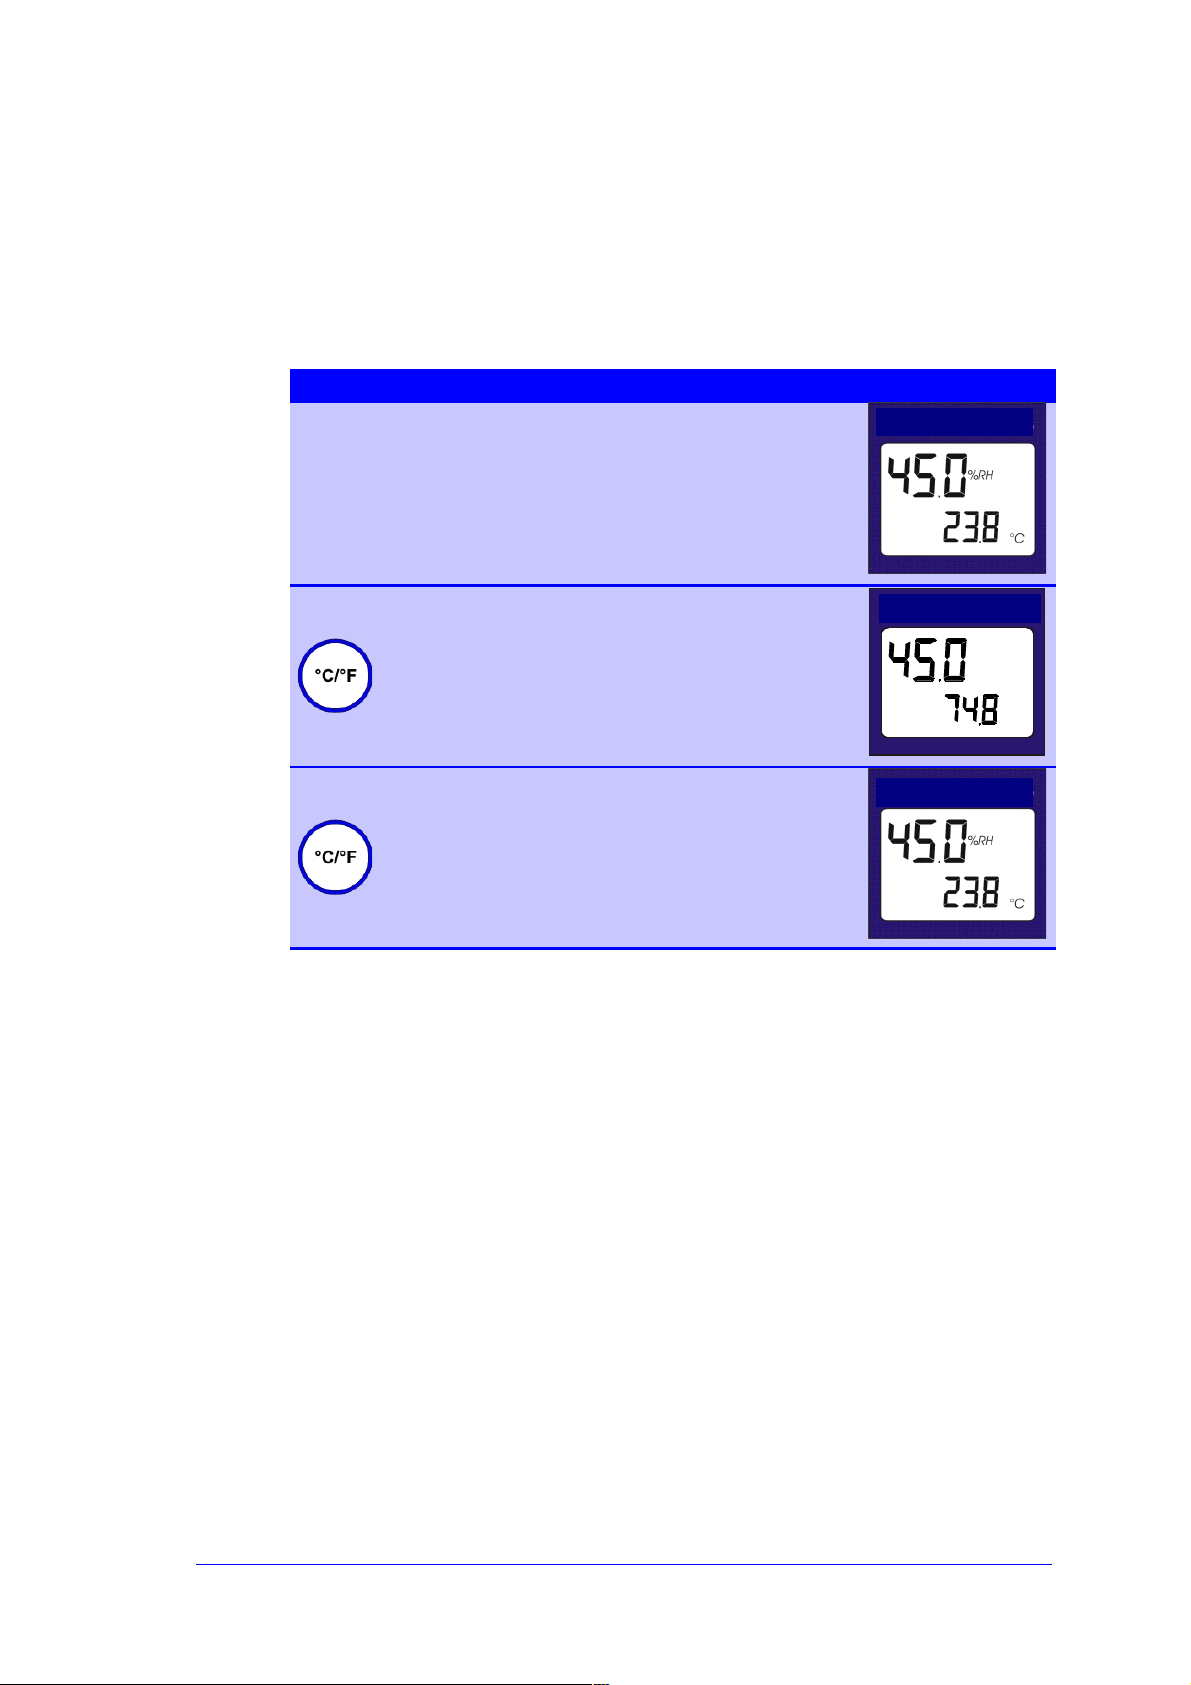
2.4 Chang e o f tem per atu re sca le
The temperature display scale can be changed between the physical units °C and °F.
Operation of button
Action
Display contents
The instrument is in normal operation
°C / °F-button is
pressed
Temperature scale changed
to °F
In display, the measured
value is shown in “°F“
HYGROSENS
%RH
° F
°C / °F-button is
pressed
Temperature scale is
changed back to °C
In display, the measured
value is shown in “°C“
Note: The selected temperature scale is applicable for all temperature
parameters;hence it is also valid for Dew point temperature.
The output format of serial interface does not change. The output is always in °C.
Page 7
Page 6
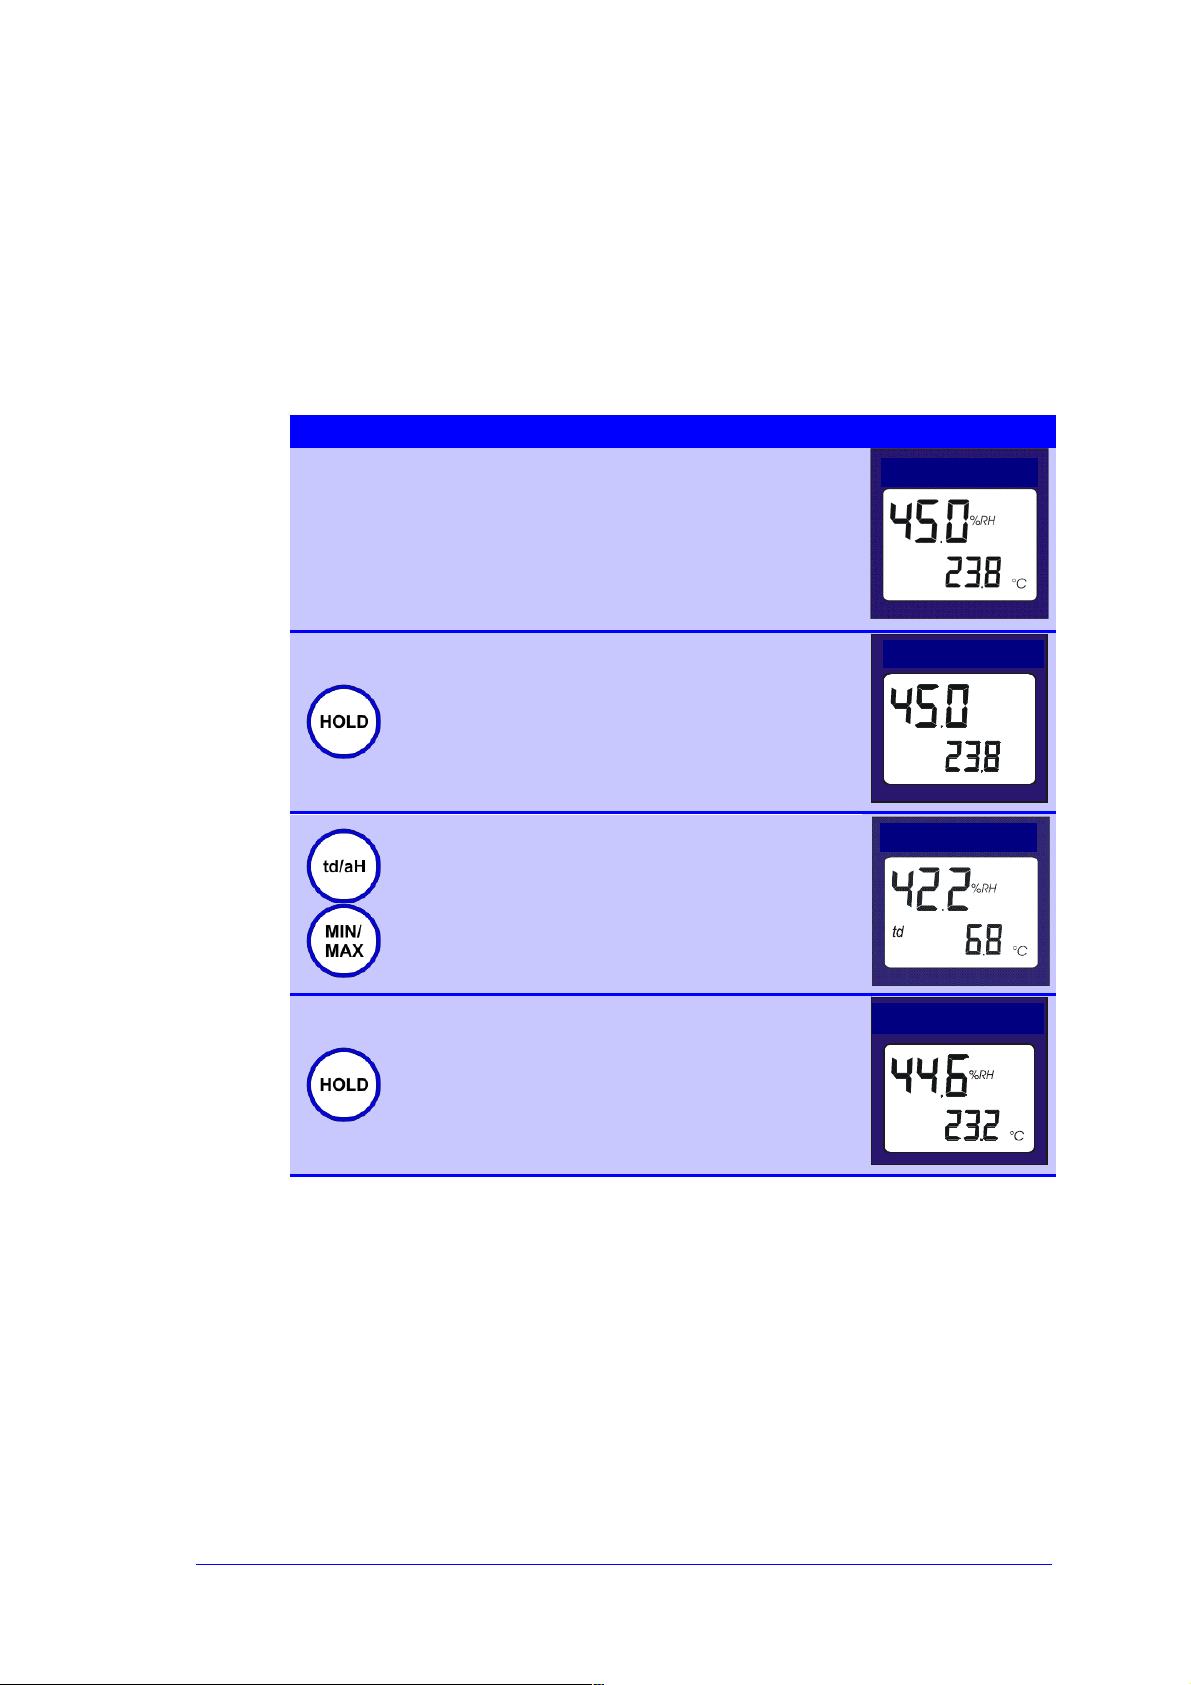
2.5 HOLD- Fun cti on
The device has the facility to hold the measured values in display. Hence, for
example, under unfavourable lighting conditions, the measured values can be read out
at some other place.
Operation of button
Action
Display contents
The instrument is in normal operation
HOLD-button is
pressed
Display of current
measured value is fixed
“HOLD“ sign appears in
the display
HYGROSENS
%RH
°C
HOLD
On request: The finally measured Dew point or the
finally measured Absolute humidity value can also
be shown with the td/aH-button
With the help of MIN/MAX-button, the desired
minimum/maximum value of the selected
parameter can be displayed.
HOLD-button is
pressed again
Display shows the current
measurements again
HYGROSENS
Page 8

Page 7
2.6 Repa ir a nd C al ibr ati on ser vic e
We are always at your disposal with our service support. For any malfunctioning, you
can simply send the product back to us with a short description of the problems
observed. Please don’t forget to mention your telephone number so that we can
contact you for any possible queries.
We shall inform you about the likely amount of repair charges before taking up the
repair activity. The cost estimate is provided free. The postage and packing charges
for return are to be added over and above the repair costs.
In our calibration laboratory, we can also calibrate your measurement and test
equipment of other makes with repeatability of National standards. Please send your
enquiries to us; we shall prepare an offer for you without any order commitment!
Service address:
Pro air GmbH
- calibration service Peter-Müller Strasse 29a
80997 München, Germany
Telefon 0049 - 89 / 81888-234
Telefax 0049 - 89 / 81888-236
Email [email protected]
Internet www.pro-air.eu
The technical information in this document has been checked with adequate care at our end and in intended
to inform about the product and its applications. The descriptions are not to be understood as assurance of
the defined characteristics of the product and should be checked by the user for the intended application.
Any possible industrial third party patent rights are to be considered.
Issued July 2005 - This documentation supersedes all previous editions.
© Copyright 2004 Pro air GmbH. All rights reserved.
No part of this documentation is allowed to be stored, reproduced, processed, duplicated or published in
any form without prior written permission from the company Pro air GmbH.
 Loading...