

Page 1

Operation ManualOperation Manual
Page 2
T625-2
Pro1 Technologies
P.O. Box 3377
Springeld, MO 65808-3377
Toll Free: 888-776-1427
Web: www.pro1iaq.com
Hours of Operation: M-F 9AM - 6PM Eastern
U.S. Registered Trademark. Patents pending
Copyright 2018 All Rights Reserved.
Table of Contents
Table of Contents
Thermostat Operation
Thermostat Quick Reference
Programming
Warranty Information
Rev. 1823
Page
1
2-3
4-7
8-10
11
Caution:
Equipment damage hazard.
Do not operate the cooling
system if the outdoor
temperature is below 50 ˚F
(10 ˚C) to prevent possible
compressor damage.
Una version en español
de este manual se puede
descargar en la pagina web
de la compañia.
Page 3
Thermostat OperationThermostat Operation
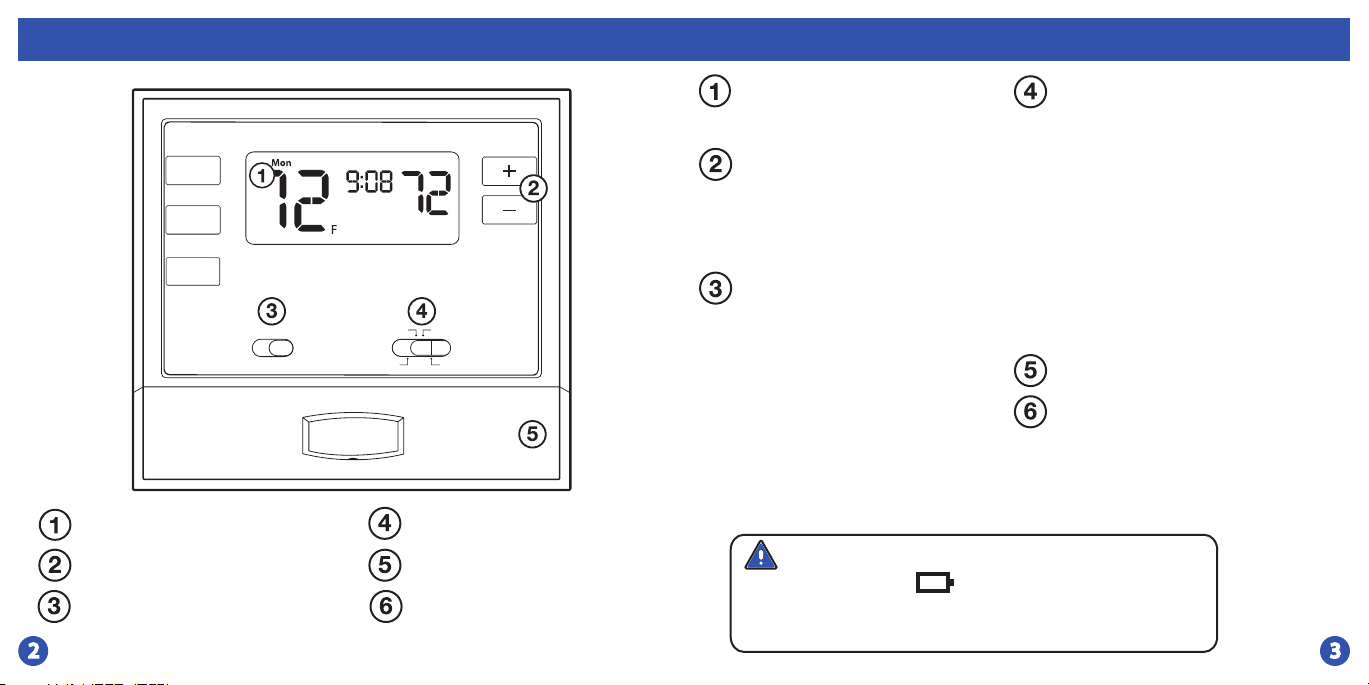
Program
Time
Hold/Run
FAN
ON AUTO
LCD Display
Temperature Setpoint Buttons
Fan Switch
Set At
AM
LEAVE
OFF HEAT
EmHCOOL
System Switch
Easy change battery door
User Buttons
LCD Display
See page 4 for details about
this display read out.
Temperature Setpoint Buttons
Press the + or - buttons to
select the desired room
temperature.
System Switch
Selects the operation mode
on your HVAC system.
Selecting HEAT turns on
the heat mode. Selecting
COOL turns on the cool
mode. Selecting OFF turns
both heating and cooling
o. Selecting EmH (for heat
Fan Switch
Select ON or AUTO. ON will run
the fan continuously. AUTO will
cycle the fan on only when the
heating or cooling system is on.
pumps with auxiliary heat)
will lockout the compressor
and control emergency/
auxiliary heat.
Easy Change Battery Door
User Buttons
Use these buttons to set up
your programming options.
Refer to the next page for
detail.
Caution:
When the battery icon appears replace your AA
batteries immediately. Failure to do so may result in your heating & cooling system becoming inoperable. Freezing or over
heating can occur.
LOW
Page 4
Thermostat Quick Reference
Thermostat Quick Reference
Sun Mon Tue Wed Thu Fri Sat
HOLD
1
RETURNSLEEP
8
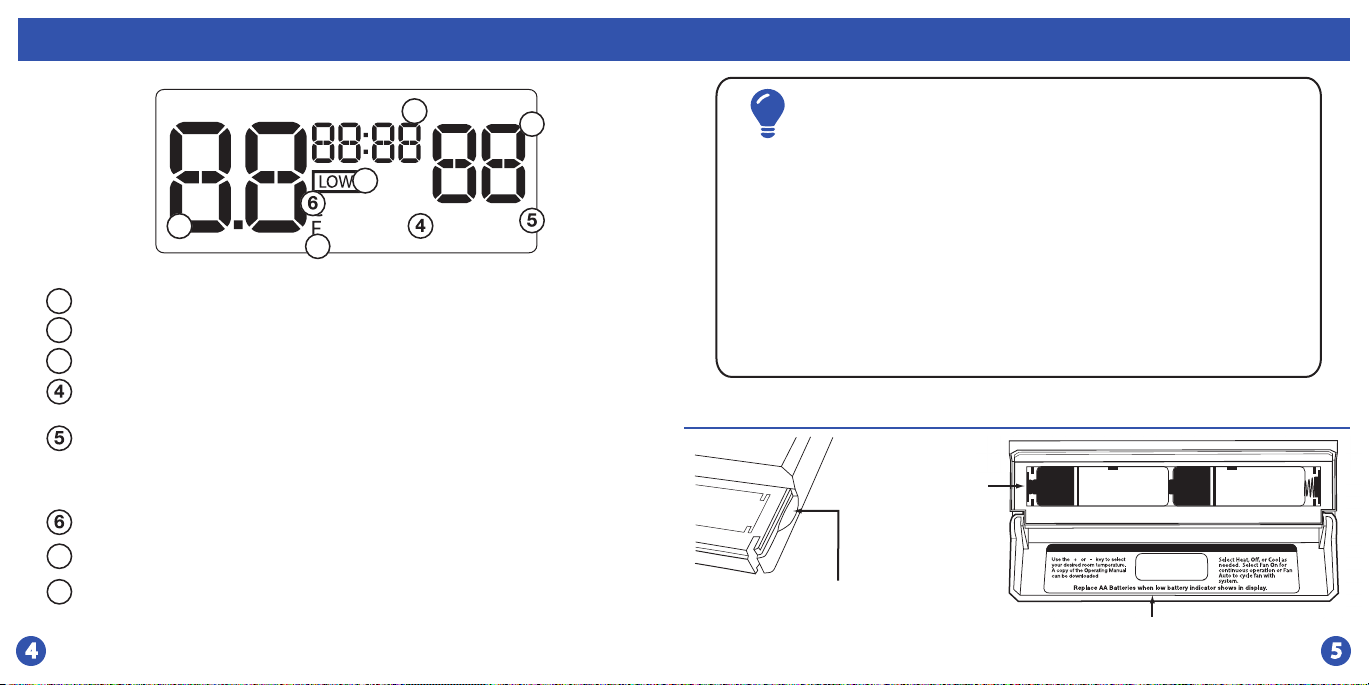
Indicates the current room temperature
1
Time and day of the week
2
Low Battery Indicator: Replace batteries when this indicator is shown.
3
Program Time Periods: This thermostat has 4 programmable time periods
per day.
System Operation Indicators:
The COOL ON, HEAT ON will display when COOL or HEAT is on.
Note: The Compressor delay feature is active if these are ashing.
Hold is displayed when the thermostat program is permanently overridden.
Setpoint: Displays the user selectable setpoint temperature.
7
8
Stages: Indicates the stages of heat that are active.
AMPM
3
WAKE
LEAVE
2
Set At
COOL ON
EmHEAT ONSTAGE 1&2
7
Important:
The low battery icon is displayed when the AA battery power is low. Whenever the
thermostat detects low battery voltage from the AA batteries, the low battery icon
will begin ashing on the screen for 21 days (if the batteries are not changed). If the
batteries are not changed 22 days after the thermostat detects low battery voltage, the
thermostat screen will only show the ashing battery icon until buttons are pressed. If
the batteries are not changed 43 days after the thermostat detects low battery voltage,
the thermostat screen will only show the ashing battery icon until buttons are pressed
and the set points will oset to 85°F/29°C in cooling and 55°F/13°C in heating. At this
stage, set point changes can be made temporarily but, the set points will change back
to defaulted values after a 4-hour period. The thermostat will continue to perform this
low battery ashing, temperature oset condition until the internal voltage threshold
is reached. When the thermostat internal voltage threshold is reached, all relays will be
opened and the thermostat will become inoperable until new batteries are installed.
Battery Door Information
Replace with
2 AA Alkaline
Batteries. High
quality Alkaline
batteries are
recommended.
Use the nger bevel on
the lower portion of the
thermostat to open the
easy access battery door.
Simple operating instructions are
found on the back of the battery door.
Page 5
Thermostat Quick ReferenceThermostat Quick Reference
Temporary and Permanent Hold Feature
Temporary Hold: If you press the or at this time until the
next scheduling period starts. The temperature will remain at this
setpoint temporarily until next time period.
Permanent Hold: If you press the HOLD button on the left of your
screen, you will see HOLD appear to the right of the ambient
temperature in the display. The thermostat will now permanently
stay at this setpoint and can be adjusted using the or keys.
To Return to Running Schedule: Press the RUN button on the left
of your screen to exit either temporary or permanent hold.
(If using programming)
Understanding Your Thermostats Staging:
This thermostat controls 2 stages of heating. For reasons of energy
eciency the thermostat will try to maintain your comfort setting
using only 1 stage. If the 2nd stage is necessary it will be used and
you will see Stage 2 in the display.
Page 6
Programming The Thermostat
Programming The Thermostat
Set Time
1. Press TIME
2. Day of the week will be ashing. Use the or key
to select the current day of the week.
3. Press PROGRAM
4. The current hour is ashing. Use the or key to
select the current hour. Make sure the correct a.m. or p.m.
choice is selected.
5. Press PROGRAM
6. Minutes are now ashing. Use the or key to
select current minutes.
8. Press the TIME button in order to go back a step.
7. Press HOLD/RUN when completed.
Set Program Schedule 5+1+1 or 7 Day
To customize your program schedule, follow these steps
Weekday:
1. Select HEAT or COOL with the system switch. Note: You have
to program heat and cool each seperately.
2. Press PROGRAM
3. Monday-Friday is displayed and WAKE is shown. You are now
programming the wake time period for the weekday setting.
4. Time is ashing. Use the or key to make your time
selection for the weekday WAKE time period.
5. Press PROGRAM
6. The setpoint temperature is ashing. Use the or key
to make your setpoint selection for the weekday wake period.
7. Press PROGRAM
8. Repeat steps 4 thru 7 for weekday LEAVE time period, for
weekday RETURN time period, and for weekday SLEEP time
period.
Continued on next page...
Page 7
Programming The Thermostat
Set Program Schedule 5+1+1 or 7 Day (Continue...)
Saturday:
Repeat steps 4 thru 7 for the Saturday WAKE time period, LEAVE
time period, RETURN time period, and for the Saturday SLEEP
time period.
Sunday:
Repeat steps 4 thru 7 for the Sunday WAKE time period, LEAVE
time period, RETURN time period, and for the Sunday SLEEP
time period.
Warranty Information
Warranty Registration
Your new thermostat has a 2 year limited warranty. You must register
your thermostat within 60 days of installation. Without this
registration the warranty period will begin on date of manufacture.
For warranty issues please contact the HVAC professional that
installed this product. You can register your new thermostat in 2 ways:
Online
Go to the company website, select warranty registration and
ll out a short registration form.
Mail
Complete the form below and mail it to the address shown.
Warranty Registration
If using 7-Day Programming use previous steps for
every individual day.
Name:
Address:
City:
State:
Zip:
Thermostat Model:
Date Installed:
Complete form and mail to:
Thermostat Warranty Registration
Pro1iaq
P.O. Box 3377
Springeld, MO 65808-3377
Page 8

Cut Out For
Warranty Registration
www.pro1iaq.com
 Loading...