

Page 1

Operation ManualOperation Manual
Page 2
T855iSH
Pro1 Technologies
P.O. Box 3377
Springeld, MO 65808-3377
Toll Free: 888-776-1427
Web: www.pro1iaq.com
Hours of Operation: M-F 9AM - 6PM Eastern
U.S. Registered Trademark. Patents pending
Copyright 2020 All Rights Reserved.
Table of Contents
Table of Contents
Thermostat Operation
Thermostat Quick Reference
Setting the Humidity
Programming
Features
Warranty Information
Una version en español de este
manual se puede descargar en la
pagina web de la compañia.
Rev. 2028
Page
1
2-3
4-5
6-9
10-14
15-17
18-19
Caution
Equipment damage hazard.
Do not operate the cooling
system if the outdoor
temperature is below 50 ˚F
(10 ˚C) to prevent possible
compressor damage.
Page 3
Thermostat OperationThermostat Operation
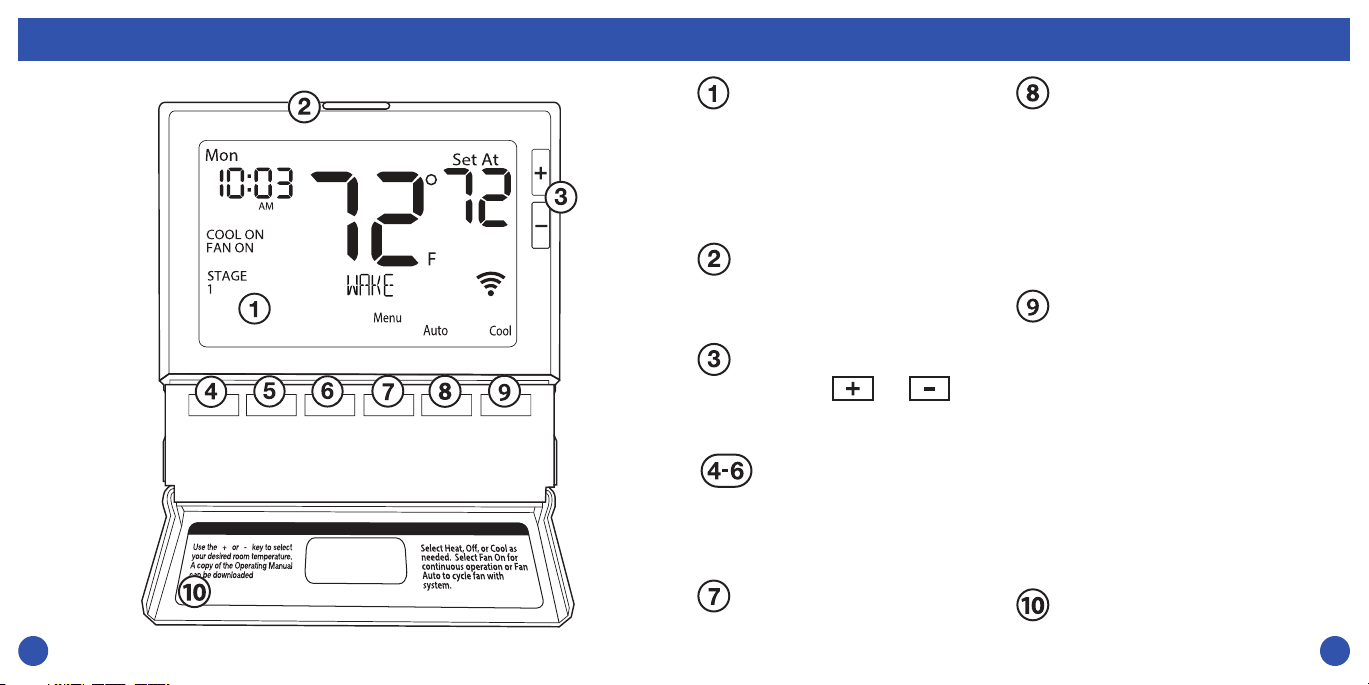
Glow in the dark light button
The glow in the dark light
button will self illuminate
for several hours after
exposure to ambient light.
This button turns on the
display light when pressed.
LCD Display
See page 6 for details about
this display readout.
Temperature Setpoint Buttons
Press the or
buttons to select the
desired room temperature.
Program Buttons
Program Buttons
See pages 10-15 for
details about setting the
time and program.
Program Menu Button
Shows dierent options
during programming.
Fan Button
Select ON, AUTO or IAQ. The
ON setting will run the fan
continuously. The AUTO
setting will cycle the fan on
only when the heating or
cooling system is on. IAQ will
enable IAQ FAN MODE, if
selected..
System Button
Selects the operation mode on
your HVAC system. Selecting
HEAT turns on the heat mode.
Selecting COOL turns on the
cool mode. Selecting OFF turns
both heating and cooling o.
Selecting AUTO will turn the
HEAT or COOL on as needed.
(EM HEAT will appear as an
option if operating a heat
pump. EM HEAT setting will
turn on emergency heat.)
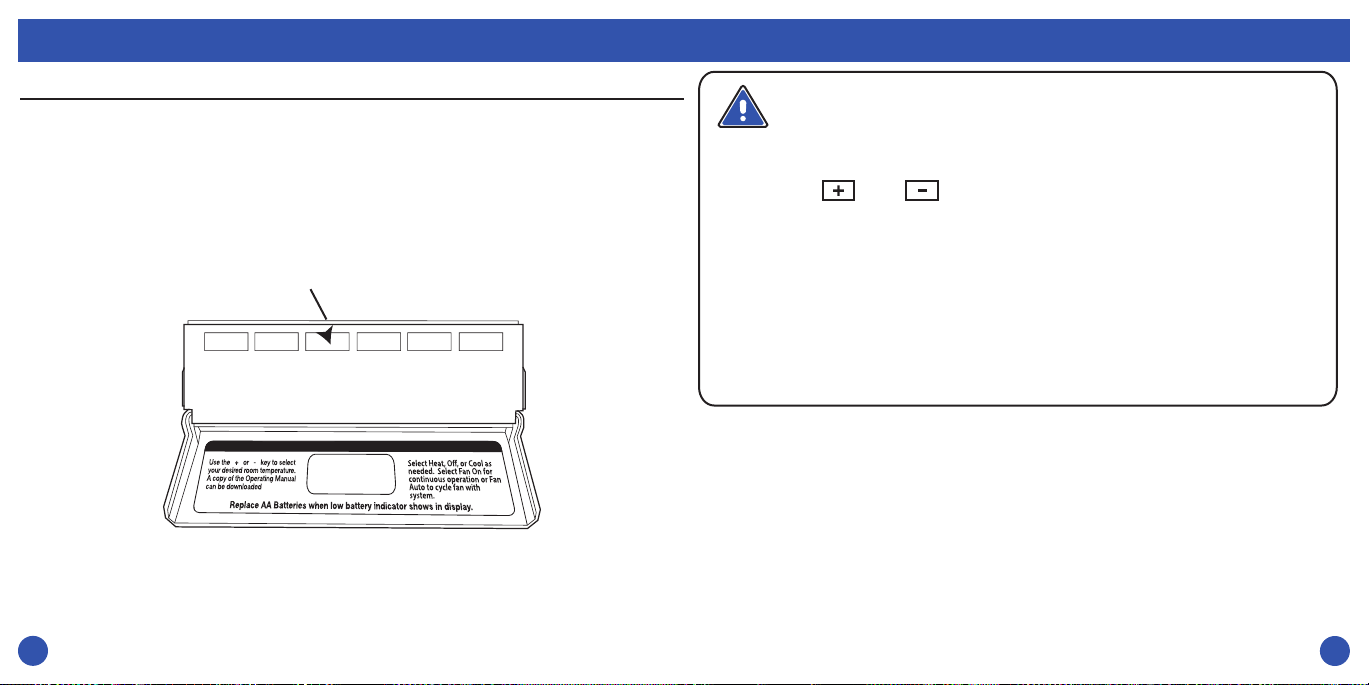
Button Door
See page 4 for further
information.
Page 4
Thermostat Quick Reference Thermostat Quick Reference
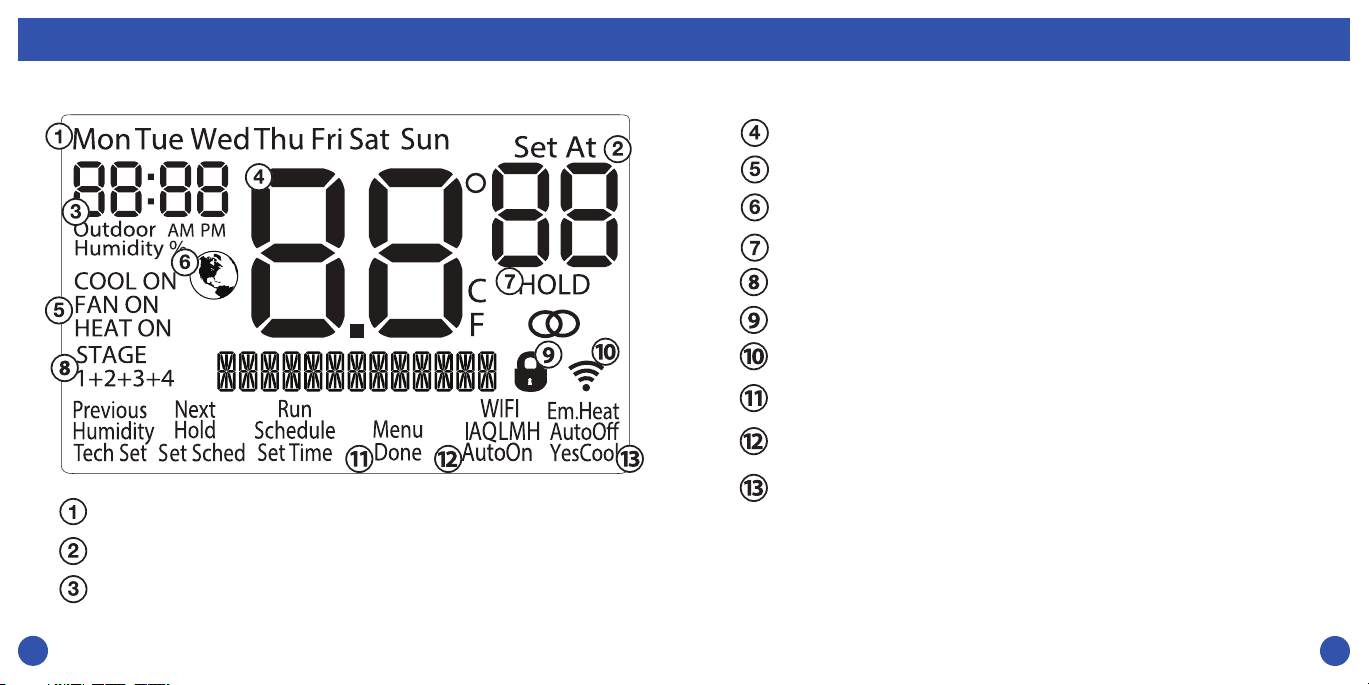
Indicates current room temperature
Indicates if heating or cooling equipment is running
Energy Ecient Globe: Indicates the setpoint temperature chosen is a
ecient choice.
Hold Indicator: Displayed when the thermostat is in permanent hold
Indicates the number of heating or cooling stages running
Keypad Lockout: Indicates the thermostat is in keypad lockout
WIFI Indicator: Indicates if WIFI is connected.
Program Menu Buttons: Shows dierent options during
programming.
Fan Button: Changes the fan operation between Auto, IAQ,
and On.
System Button: Changes the system operation between O,
Day of the Week
Setpoint Indicator: Displays the user selectable setpoint temperature.
Time of Day / Outdoor Temp / % Humidity
Cool, Auto, Heat, and Emergency Heat based on system tech
setting.
Page 5
Setting the Humidity Setting the Humidity
Setting Target Humidity Setpoint
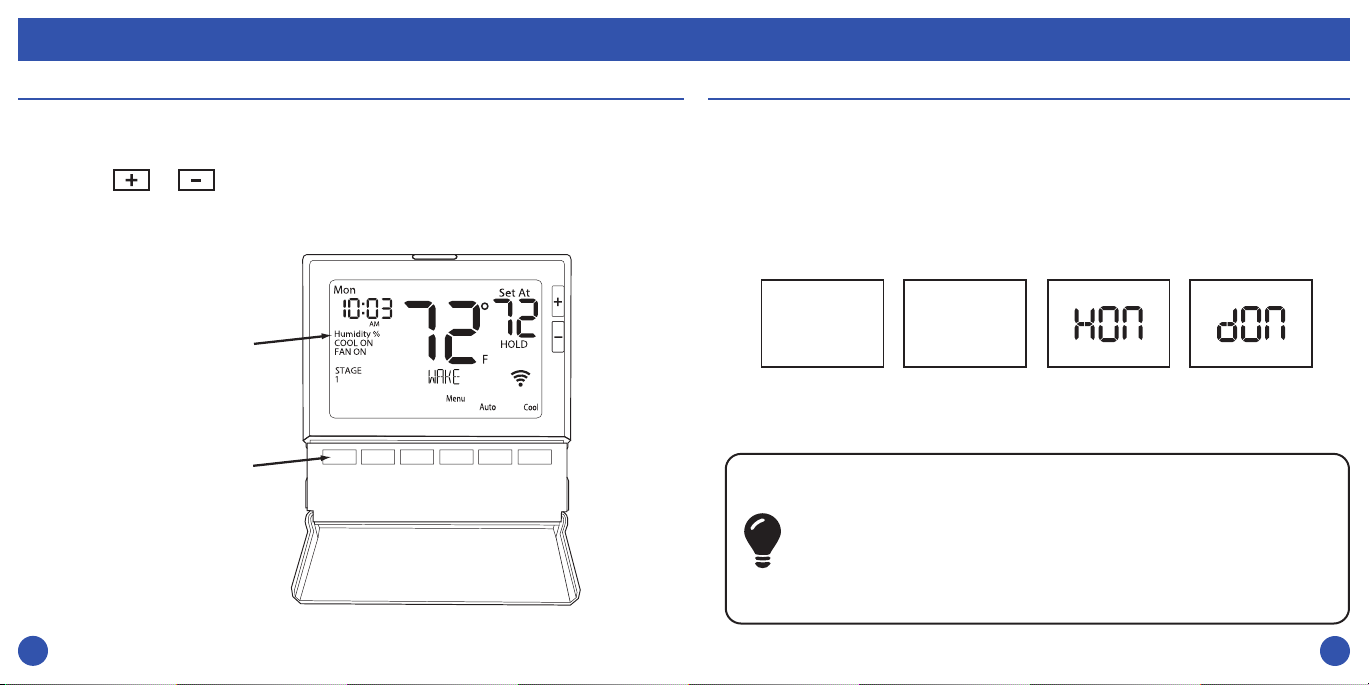
Follow the steps below to change your target humidity setpoint.
Press the HUMIDITY key
Use the or key to select the target humidity setpoint.
Press DONE when completed.
Humidity Reading
Press key for
Humidity Reading
Setting Target Humidity Setpoint
Ambient humidity will ash in the time eld when Humidify or
De-Humidify is set to ON.
HON will also ash when the Humidity terminal is energized. dON
will also ash when the De-Humidify terminal is energized.
36
10:03
DAY AND TIME AMBIENT HUMIDITY HON
Humidity
%
(Humidity Energized)
(De-Humidity Energized)
Note:
The target humidity setpoint is not programmable. Unlike
temperature, humidity does not change quickly and should not
be programmed.
Humidity is only energized during heat. Dehumidify is only
energized during cool. Heat and Cool each have their own target
setpoints.
dON
Page 6
Setting the Humidity Setting the Humidity
Recommended Heating Settings:
The table on page 11 shows recommended indoor humidity levels in relation
to outdoor temperatures during heating (adding humidity).
Recommended Cooling Settings:
Outside
Temperature (0˚F)
Recommended
Relative Humidity
+20˚ and above 35% to 40%
+10˚ 30%
Consult your professional HVAC technician for recommended settings for
your climate.
0˚ 25%
-10˚ 20%
-20˚ 15%
Page 7
Programming Programming
Set Time
Follow the steps below to set the day of the week and current time:
1. Press the MENU button.
2. Press SET TIME.
3. Day of the week will be ashing. Use the or key to
select the current day of the week.
4. Press NEXT.
5. The current hour is ashing. Use the or key to
select the current hour. When using 12-hour time, make sure
the correct a.m. or p.m. choice is selected.
6. Press NEXT.
7. Minutes are now ashing. Use the or key to
select current minutes.
8. Press DONE when completed.
(If using programming)
Important:
You will see a TECH SETUP option after the MENU key is pressed.
This TECH SETUP key is for installer conguration and should NOT
be changed unless you consult your professional heating and air
conditioning technician.
To customize your 7 day 4 time period Program schedule, follow
these steps:
Monday:
1. Select HEAT or COOL with the SYSTEM key.
Note: You have to program heat and cool each separately.
2. Press the MENU button (If menu does not appear rst, press
RUN SCHED).
3. Press SET SCHED. Note: Monday is displayed and the
WAKE/OCC1 icon is shown. You are now programming the
WAKE/OCC1 time period for that day.
4. Time is ashing. Use the or key to make your time
selection for that day’s WAKE/OCC1 time period.
Note: If you want the fan to run continuously during this time
period, select ON with the FAN key. If you want to use IAQ
mode during this time period, select IAQ with the FAN key.
5. Press NEXT.
6. The setpoint temperature is ashing. Use the or key
to make your setpoint selection for that day’s WAKE/OCC1
period.
7. Press NEXT.
8. Repeat steps 4 through 7 for that day’s LEAVE/UNOCC1
time period, for that day’s RETURN/OCC2 time period,
and for that day’s SLEEP/UNOCC2 time period.
Repeat steps 4 through 8 for the remaining days of the week.
Page 8
Programming Programming
A Note About Auto Changeover:
When in Auto you have the ability to switch between auto heat or auto
cool by pressing the system key. This can be done once the current
mode has reached its setpoint. For example: if in auto heat, the heat
setpoint must be satised before the thermostat will allow you to switch
to auto cool. You can switch out of auto by holding down the system
key. To get back into auto, you must toggle the system key to auto.
Set Program Schedule For Two Time Periods
(OCCUPIED, UNOCCUPIED)
Monday:
1. Select HEAT or COOL with the SYSTEM key.
Note: You have to program heat and cool each seperately.
2. Press the MENU button (If menu does not appear rst press
RUN SCHED).
3. Press SET SCHED. Note: Monday is displayed and the
OCCUPIED text is shown. You are now programming the
OCCUPIED time period for that day.
4. Time is ashing. Use the or key to make your time
selection for that day’s OCCUPIED time period.
Note: If you want the fan to run continuously during this time
period, select ON with the FAN key. If you want to use IAQ
mode during this time period, select IAQ with the fan key.
5. Press NEXT.
6. The setpoint temperature is ashing. Use the or key
to make your setpoint selection for that day’s OCCUPIED
period.
7. Press NEXT.
8. Repeat steps 4 through 7 for that day’s UNOCCUPIED
time period.
Repeat steps 4 through 8 for the remaining days of the week.
Page 9
Programming Features
A Note About Programmable Fan:
The programmable fan feature will run the fan continuously during
any time period when it is programmed to be on. This is the best way to
keep the air circulated and to eliminate hot and cold spots in your
building. If using IAQ mode, set fan to IAQ for any time period.
Temporary & Permanent Hold Feature
Temporary Hold: The thermostat will display HOLD and RUN SCHED
on the bottom of your screen when you press the or
key. If you do nothing, the temperature will remain at this setpoint
temporarily for a selected amount of time. After this, the program
setpoint will then replace your temporary setpoint.
Permanent Hold: With a temporary hold set, if you press the HOLD
key at the bottom of your screen, you will see HOLD appear below
the setpoint temperature in the display. The thermostat will now
permanently stay at this setpoint and can be adjusted using the
or keys.
To Return To Program: Press the RUN SCHED key at the bottom of
your screen to exit temporary and permanent holds.
Page 10
Features
Filter Change & Other Reminders
If your HVAC contractor has congured the thermostat to remind
you when the air lter needs changed, you will see a reminder in the
display when your air lter needs to be changed.
Resetting The Filter Change Reminder: When the reminder
is displayed, you should change your air lter and reset the reminder
by holding down the Set Time/Run Schedule button of the
thermostat for 3 seconds.
This thermostat also has other maintenance reminders (Humidity
Pad, UV lamp, and IAQ Cell), that are reset with the same procedure.
Features
Keypad Lockout Note:
Keypad lockout provides the option to disable some or all of the
buttons on the thermostat. This feature is activated by pressing and
holding the and buttons for 3 seconds. On this model, the
keypad lockout feature has a selectable option to create a custom
code for keypad lockout operations. Also, if a code is not created for
keypad lockout, this feature will still perform keypad lockout
functions without a custom created code. If a custom keypad
lockout code is enabled, the custom created code will need to be
entered in order to disable the keypad lockout on the screen. If the
custom code is created and the occupant forgets the custom lockout
code, the master keypad lockout code will always override any
custom created code. The master keypad lockout code is 7761.
Page 11

Warranty Information
Warranty Registration
Your new thermostat has a 5 year limited warranty. You must register
your thermostat within 60 days of installation. Without this
registration the warranty period will begin on the date of manufacture.
For warranty issues please contact the HVAC professional that
installed this product. You can register your new thermostat in 2 ways:
Online
Go to the company website, select warranty registration and
ll out a short registration form.
Mail
Complete the form below and mail it to the address shown.
Warranty Registration
Name:
Address:
City:
State:
Zip:
Thermostat Model:
Date Installed:
Complete form and mail to:
Thermostat Warranty Registration
Pro1iaq
P.O. Box 3377
Springeld, MO 65808-3377
Page 12

Cut Out For
Warranty Registration
www.pro1iaq.com
 Loading...