

Page 1
PR5000 Spot
This product manual contains important information about the safe installation and use of this
projector. Please read and follow these instructions carefully and keep this manual in a safe place
for future reference.
PR LIGHTING LTD.
http://www.pr-lighting.com
Page 2
2/24
INDEX
SAFE USAGE OF THE PROJECTOR 3
INSTALLING THE PROJECTOR 4
FITTING THE LAMP 4
POWER SUPPLY – MAINS 5
CONTROL CONNECTIONS 5
DMX TERMINATOR 6
SETUP OPTIONS-PROJECTOR CONFIGURATION 6
TO SET THE DMX START ADDRESS 6
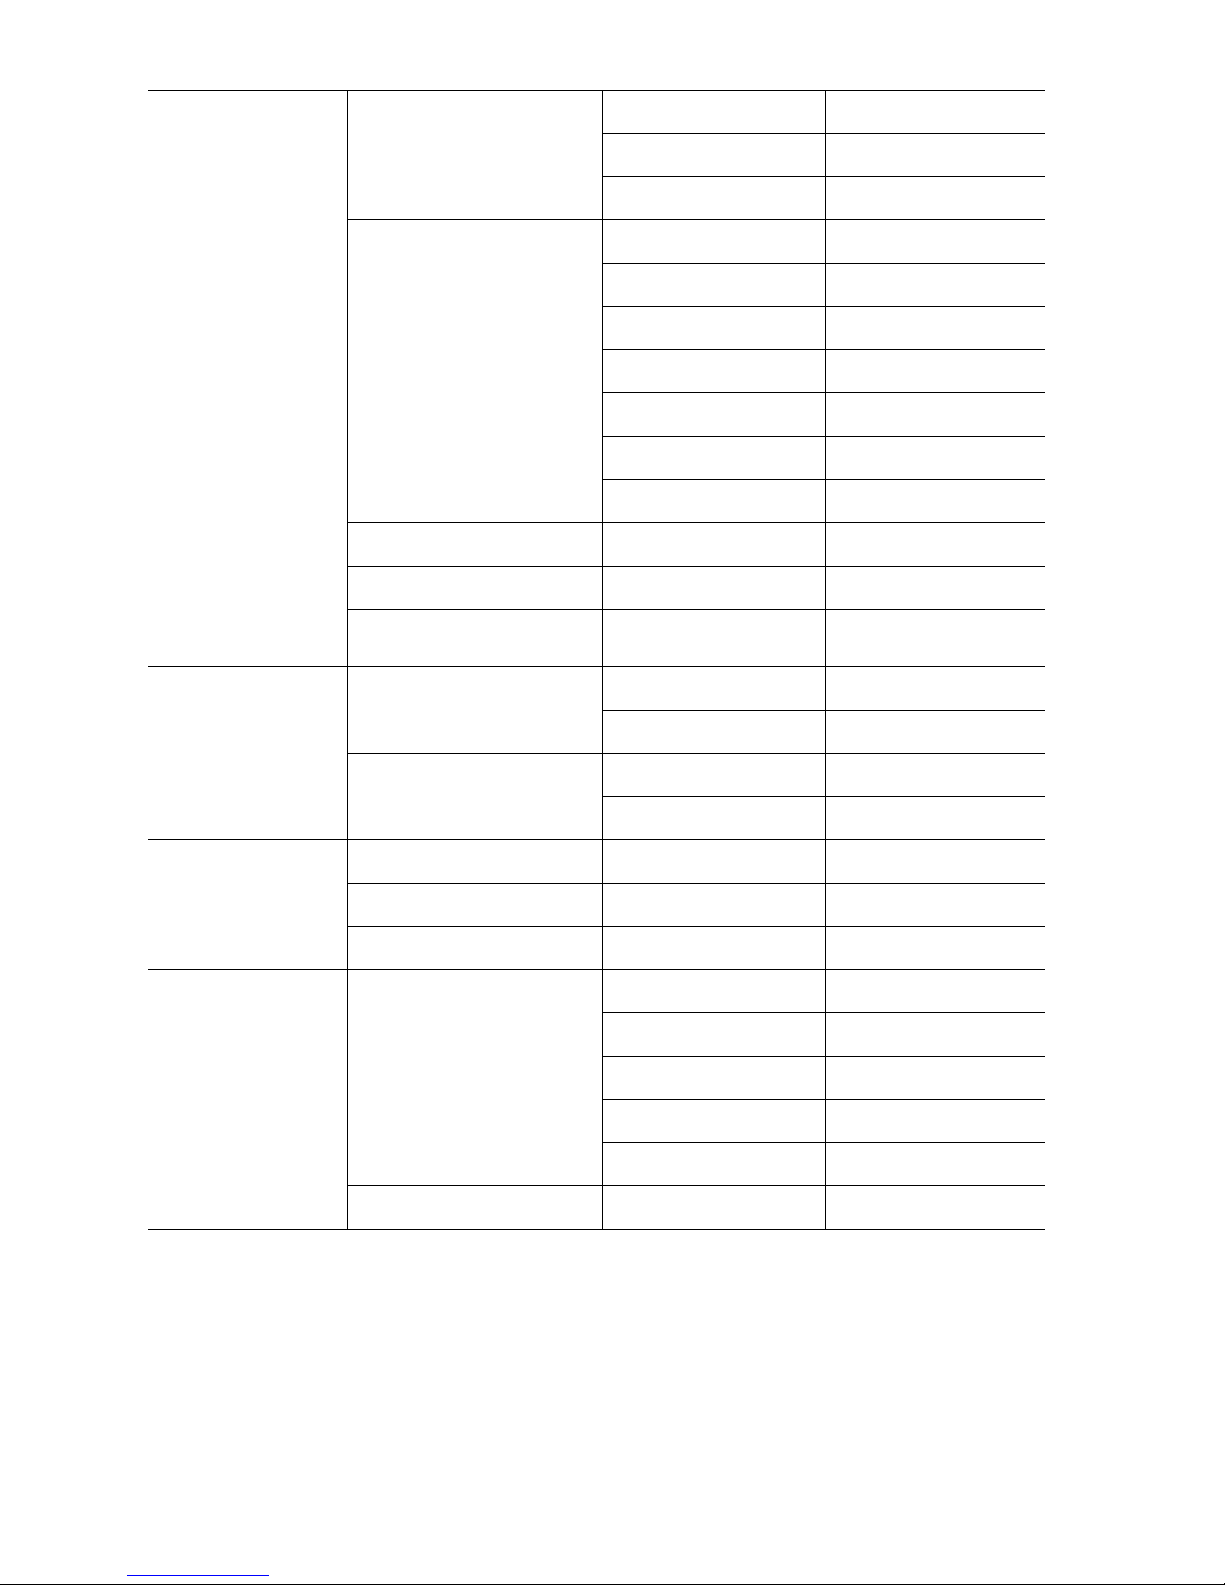
OPERATION MENU 8
ERROR MESSAGES 11
REPLACING GOBOS 11
DMX PROTOCOL 13
LED INDICATION 16
MAINTENANCE 16
LUBRICATION 16
KEEPING THE PROJECTOR CLEAN 16
TROUBLESHOOTING 17
TECHNICAL DATA 19
ELECTRICAL DIAGRAM 20
COMPONENT ORDER CODES 23
Please note that as part of our ongoing commitment to continuous product development, specifications are subject to change without
notice. Whilst every care is taken in the preparation of this manual we reserve the right to change specifications in the course of
product improvement. The publishers cannot be held responsible for the accuracy of the information herein, or any consequence
arising from them.
Every unit is tested completely and packed properly by the manufacturer. Please make sure the packing and / or the unit are in good
condition before installation and use. Should there be any damage caused by transportation, consult your dealer and do not use the
unit. Any damage caused by improper use will not be assumed by the manufacturer and / or dealer.
ACCESSORIES
These items are packed together with the projector:
Name Quantity Unit Remark
G clamps 2 Pcs
XLR cable 1 Pc 5-pin plug
Safety cord 2 Pcs
Spare gobos 4 Pcs
This manual 1 Pc
Ω clamps 2 Pcs Options
Page 3
3/24
SAFE USAGE OF THE PROJECTOR
When unpacking and before disposing of the carton check there is no transportation damage before using the projector.
Should there be any damage caused by transportation, consult your dealer and do not use the apparatus.
The projector is for indoor use only, IP20. Use only in dry locations. Keep this device away from rain and moisture,
excessive heat, humidity and dust. Do not allow contact with water or any other liquids.
The projector is not designed or intended to be mounted directly on to inflammable surfaces.
The projector is only intended for installation, operation and maintenance by qualified personnel.
The projector must be installed in a location with adequate ventilation, at least 50cm from adjacent wall surfaces. Be sure
that no ventilation slots are blocked.
Do not project the beam onto inflammable surfaces, minimum distance is 5m. 5m
Avoid direct exposure to the light from the lamp. The light is harmful to the eye.
Do not attempt to dismantle and/or modify the projector in any way.
Electrical connection must only be carried out by qualified personnel.
Before installation, ensure that the voltage and frequency of power supply match the power requirements of the projector.
It is essential that each projector is correctly earthed and that electrical installation conforms to all relevant standards.
Do not connect this device to any other types of dimmer apparatus.
Make sure that the power-cord is never crimped or damaged by sharp edges. Never let the power-cord come into contact
with other cables. Only handle the power-cord by the plug. Never pull out the plug by tugging the power-cord.
Keep the lamp clean. Do not touch the lamp glass with bare hand.
The projector should always be installed with a secondary safety fixing. A safety cord is supplied for this; it should be
attached as shown in “installing the projector” section.
The lamp used in this projector is a discharge lamp. After switching off don’t attempt to restart the projector until lamp has
cooled, this will require approx 15 minutes. Switching the lamp on and off at short intervals will reduce the life of both the
lamp and the projector. But occasional breaks will prolong the life of the lamp and projector.
Never run the projector without a lamp.
The lamp shall be changed if it has become damaged or thermally deformed.
Shields and lens shall be changed if they have become visibly damaged to such an extent than their effectiveness is
impaired, for example by cracks or deep scratches.
Exterior surface temperatures of the luminaire after 5 minutes operation is 80℃, when steady state is achieved 120℃,
There is no user serviceable parts inside the projector, do not open the housing and never operate the projector with the
covers removed.
Always disconnect from the mains, w hen the device is not in use or before cleaning it or
before attempting any maintenance work !
If you have any questions, don’t hesitate to consult your dealer or manufacturer.
Page 4
4/24
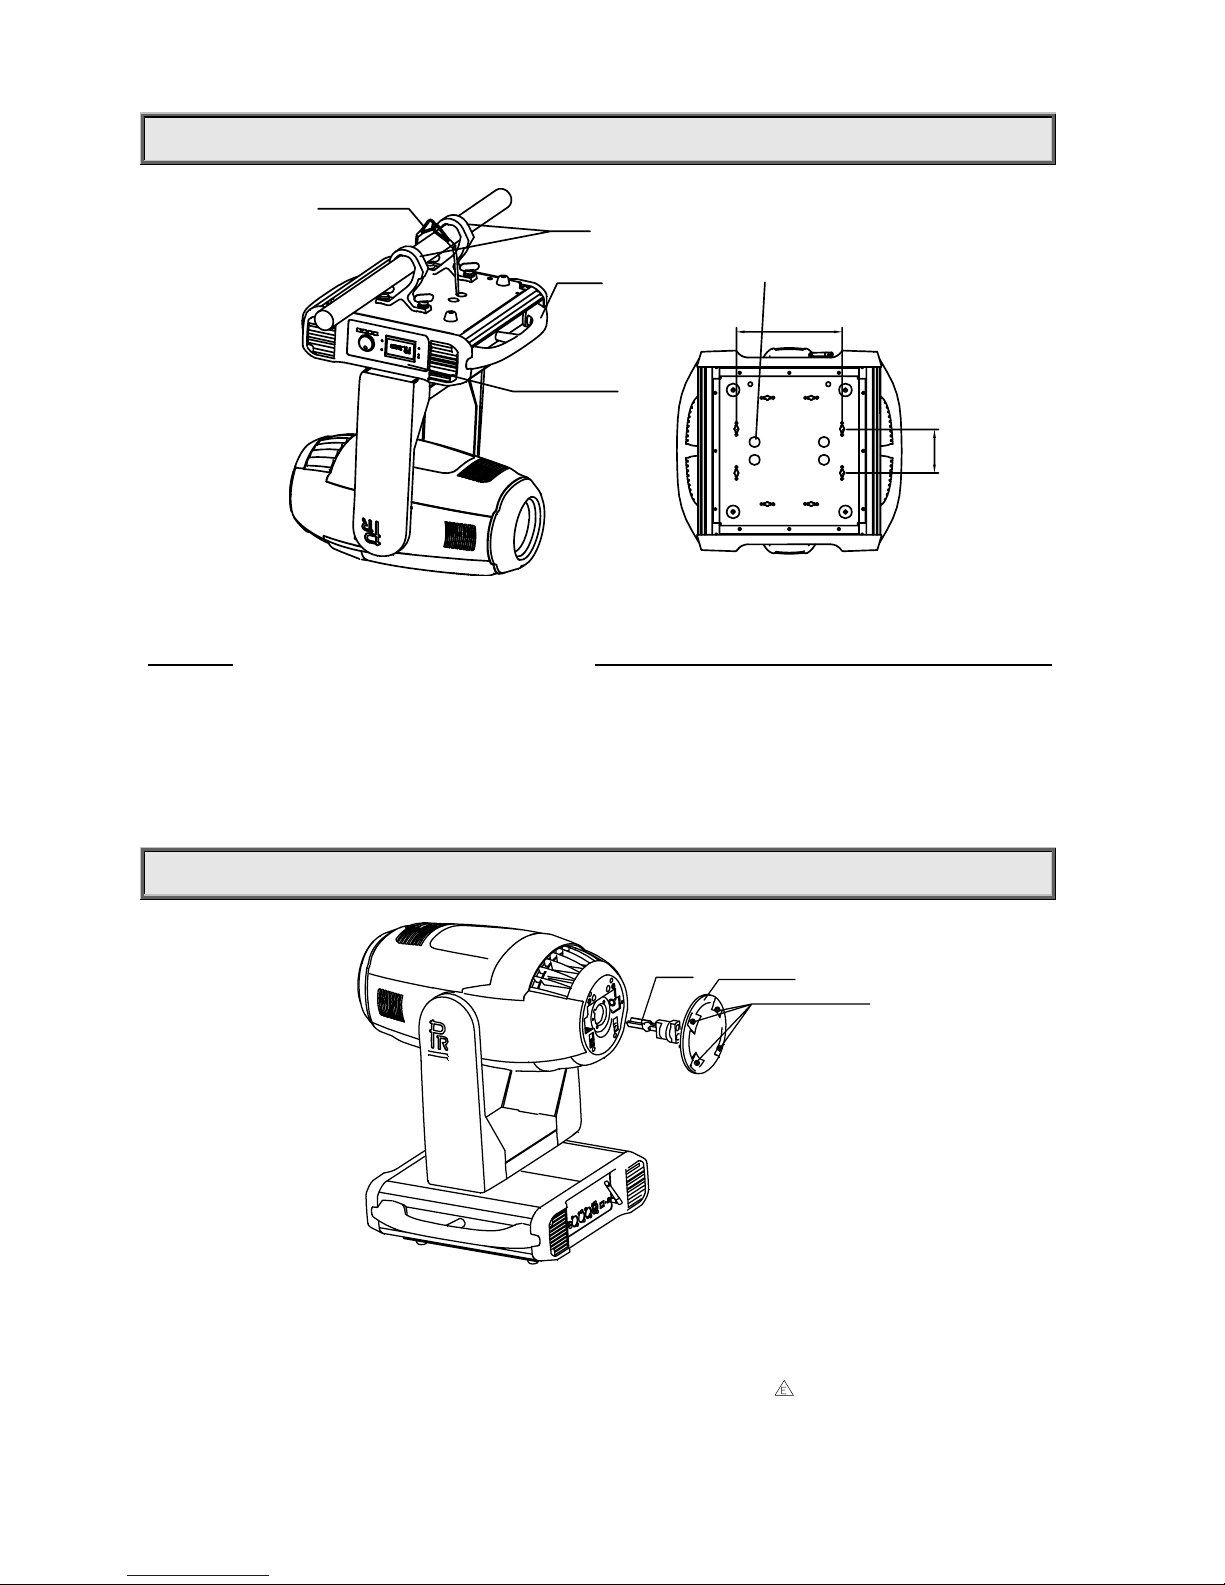
INSTALL THE PROJECTOR
106
257
HANDLE
To pass 2 SAFETY CORDS
through 4 HOLES for safety!
WARNING
CONTROL PANEL
CLAMP
SAFETY CORD
Take 2 clamps and 2 safety cords out from the package and mount 2 clamps on the underside of fixture with 2 retainers
attached to each clamp. Hang the fixture on the structure and fasten the screws attached to each clamp. (See the
WARNING
on the underside of the base as shown above) To pass 2 SAFETY CORDS through 4 HOLES for safety!
Always ensure that the projector is firmly anchored to avoid vibration and slipping whilst functioning. Always ensure that
the structure that you are going to mount the projector is secure and is strong enough to support a weight of PR5000
Spot.
WARNING:
1. Unlock the P AN and TILT be fore the 1
st
application of projector for safety .
2. The projector MUST be lifted or carried by the HANDLES instead of clamps.
3. For safety the safety cord should afford 10 times of the unit’s weight.
FITTING THE LAMP
LAMP
BACK COVER
FAST-FIT SCREWS
Lock the yoke before fitting/replacing the lamp.
Loosen 4 fast-fit screws and remove the back cover, you can see the structure as shown in the figure above.
Rotate the lampholder to the left and take out the worn-out lamp.
Fit new lamp and close the back cover by fastening 4 fast-fit screws. Note: don’t touch the bulb of the new lamp with
bare hand so as not to influence the beam output;
WARNING: The MSR series are high-pressure lamps with external igniters (
). Care should always be taken
when handling these lamps. Always read the manufacturers "Instructions for use" enclosed with the lamp.
Page 5
5/24
POWER SUPPL Y-MAINS
Connect the power cord as follows:
L (live) =brown
E (earth) =yellow/green
N (neutral) =blue
Use the plug provided to connect the mains power to the projector paying attention to the voltage and frequency marked
on the panel of the projector. It is recommended that each projector be supplied separately so that they may be
individually switched on and off.
IMPORT ANT
It is essential that each projector is correctly earthed and the electrical installation conforms to all re levant
standards.
CONTROL CONNECTION
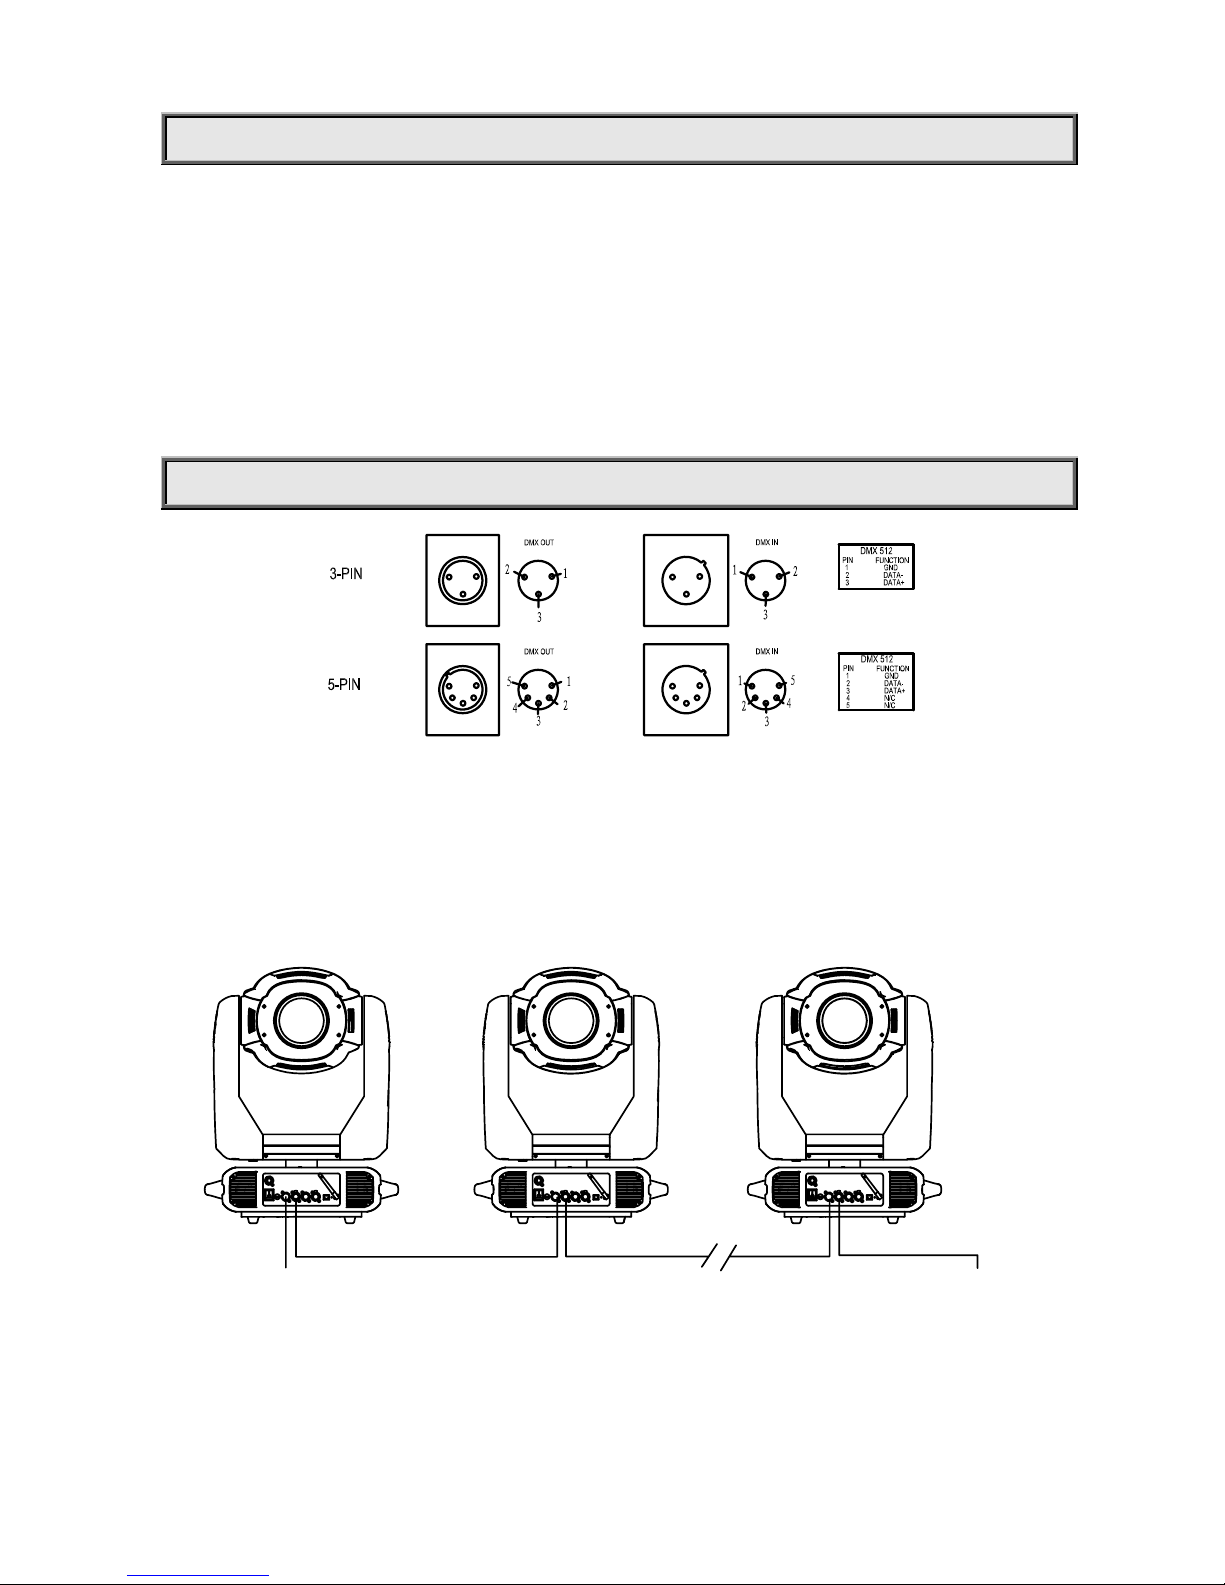
Connection between controller and projector and between one projector and another must be made with a 2
core-screened cable, with each core having at least a 0.5mm diameter. Connection to and from the pro jector is via
cannon 3 pin (which are included with the projector) or 5 pin XLR plugs and sockets. The XLR's are connected as shown
in the figure above.
Note: care should be taken to ensure that none of the pins touch the metallic body of the plug or each other. The body of
the plug is not connected in any way. The projector accepts digital control signals in protocol DMX512 (1990).
Connect the controller’s output to the first fixture’s input, and connect the first fixture’s output to the second fixture’s input
and connect the rest fixtures in the same way. Eventually connect the last fixture’s output to a DMX terminator as shown
in the figure below.
DMX IN
DMX OUT
DMX IN
DMX OUT
DMX IN
DMX OUT
TO CONTROLLER
TO TERMINATER
Page 6
6/24
DMX TERMINA T OR
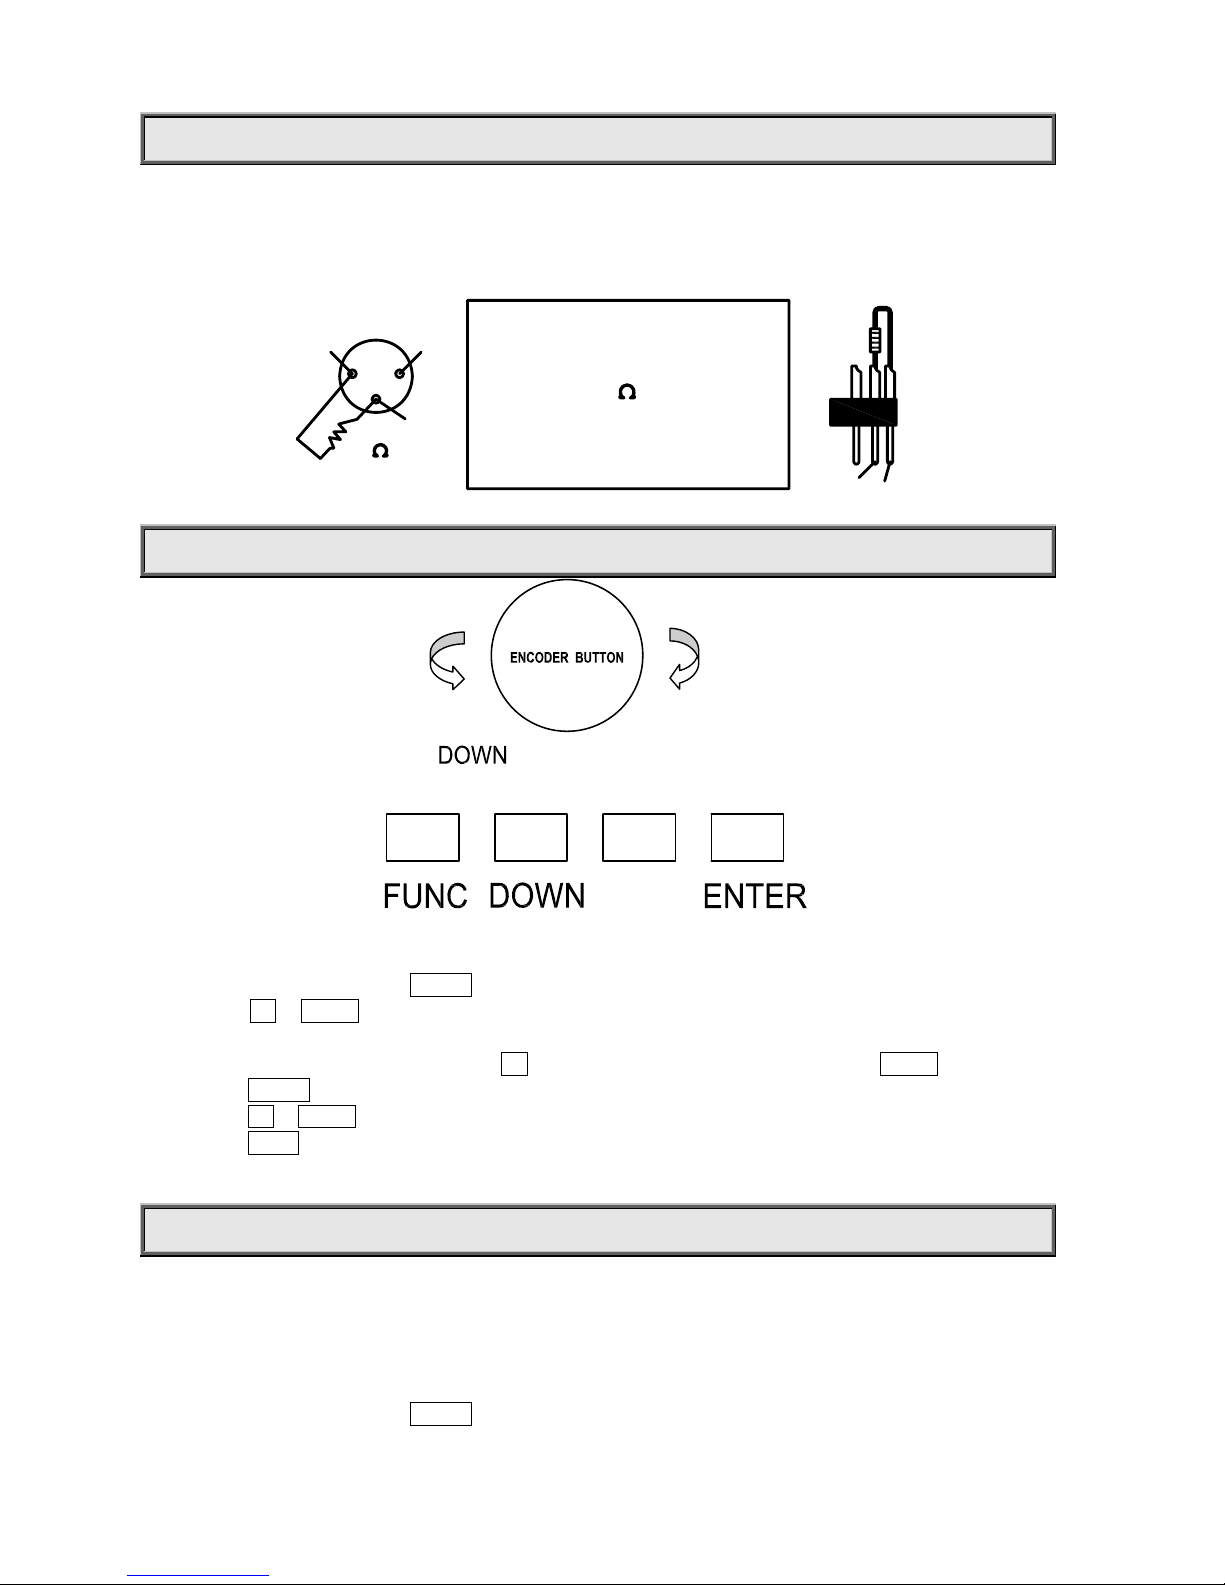
In the Controller mode, at the la st fixt ur e in th e chai n, th e DMX output has to be connected with a DMX terminator. This
prevents electrical noise from disturbing and corrupting the DMX control signals.
The DMX terminator is simply an XLR connector with a 120Ω (ohm) resistor connected across pins 2 and 3, which is
then plugged into the output socket on the last projector in the chain. The connections are illustrated below.
2
1
3
120
DMX TERMINATOR
CONNECTION
Connect a 120 (OHM) resistor
across pins 2 and 3 in an XLR plug
and insert into the DMX out socket
on the last unit in the chain.
PIN 3
PIN 2
SETUP OPTIONS-PROJECTOR CONFIGURATION
UP
UP
Projector configuration can be set conveniently via pressbutton switch and LCD display. Turn the projector on and the
LCD display will show DMX address you set and save last time and it can be reset and saved again as you please.
Launch the projector. Press button ENTER more than 5 seconds to unlock panel.
Press button UP or DOWN if you want to browse through the various Setup Options. There are 10 option codes
from DMX Address to Wireless options, and each code has a specific function. If you turn the encoder
knob clockwise, the function like as button UP . On the contrary, the function like as button DOWN .
Press button ENTER to save your settings or enter the next menu. There is same function if you push the encoder knob.
Press button UP or DOWN to shift.
Press button FUNC, it will return to the upper menu one by one. If you stay for minutes defaulted will show display status
automatically.
TO SET THE DMX START ADDRESS
Each projector must be given a DMX start address so that the correct projector responds to the correct control signals.
This DMX start address is the channel number from which the projector starts to “listen” to the digital control information
being sent out from the controller. PR5000 Spot have 3 DMX modes. There are standard mode, extended mode and
short mode. For example standard mode have 31 channels, so set the No. 1 projector’s address 001, No. 2 projector’s
address 032, No. 3 projector’s address 063, No. 4 projector’s address 094, and so on.
Launch the projector. Press button ENTER or encoder knob more than 5 seconds to unlock panel.
Page 7

7/24
Press button FUNC to display DMX address;
Press button UP and DOWN, you can set the address;
Press button ENTER to confirm; In the same time. The GREEN LED will flash one time. It means the setting has
been enabled.
Press button FUNC, it will return to the upper menu one by one.
Page 8
8/24
OPERATION MENU
1st LEVEL 2nd LEVEL 3rd LEVEL 4th LEVEL
PR LIGHTING
PR5000 SPOT
DMX Address=XXX
DMX Address
DMX Address
Short Mode
Standard Mode
Extended Mode
Reset
Rese
t
A
re You Sure?
Config Settings
DMX Mode
DMX Mode
Standard
DMX Mode
Extended
DMX Mode
Short
Lamp Control
Lamp Control B
y
Control Channel
Lamp Control B
y
Power On
Lamp Control B
y
DMX Presen
t
Loss of DMX
When DMX is Los
t
Normal Time Ou
t
When DMX is Los
t
Hold Last Value
Factory Settings
(Press button
DOWN/UP/ENTER at the
same time to enter the
sub-menu)
Fixture type
(WARNING:Never
change the fixture ty pe
or the system will be
damaged!)
Option Settings
Colour Positions
Colour Positions
STEPPED
Colour Positions
LINEAR
F-Gobo Positions
F-Gobo Positions
STEPPED
F-Gobo Positions
LINEAR
Pan DMX Invert
Pan DMX Invert
OFF
Pan DMX Invert
ON
Tilt DMX Invert
Tilt DMX Invert
OFF
Tilt DMX Invert
ON
Pan Tilt Swap
Pan Tilt Swap
OFF
Pan Tilt Swap
ON
Dimmer Invert
Dimmer Invert
OFF
Dimmer Invert
ON
Iris Invert
Iris Invert
OFF
Iris Invert
ON
Zoom Invert
Zoom Invert
OFF
Page 9
9/24
Zoom Invert
ON
CMY Invert
CMY Invert
OFF
CMY Invert
ON
CTO Invert
CTO Invert
OFF
CTO Invert
ON
Defaults
Defaults
OFF
Defaults
Restore Defaults
Display Options
Display Mode
Display
On Always
Display
Off After Delay
Display Invert
Display Invert
OFF
Display Invert
ON
Display Dimming
Disp Dim Level
Min
Disp Dim Level
1
Disp Dim Level
2
Disp Dim Level
3
Disp Dim Level
4
Disp Dim Level
5
Disp Dim Level
6
Disp Dim Level
7
Disp Dim Level
8
Disp Dim Level
9
Disp Dim Level
Full
Display Contrast
Display Contrast
XXX(1~36, Default is 16)
Display Language
Language =
English
Language =
Chinese
Information
Lamp Hours
Lamp Hours =
XX
Reset Lamp Hours
Are You Sure?
Total Hours
Total Hours =
XX
Temperature
Display Board
Display Board =
XX℃
Driver Board 1
Driver Board 1 =
XX ℃
Driver Board 2
Driver Board 2 =
XX ℃
Driver Board 3
Driver Board 3 =
XX ℃
Page 10
10/24
Driver Board 4
Driver Board 4 =
XX ℃
Pan and Tilt
Pan and Tilt =
XX ℃
Head Sensor
Head Sensor=
XX ℃
Software Version
Display Board
Display Board =
X.X.X
Driver Board 1
Driver Board 1 =
X.X.X
Driver Board 2
Driver Board 2 =
X.X.X
Driver Board 3
Driver Board 3 =
X.X.X
Driver Board 4
Driver Board 4 =
X.X.X
Pan and Tilt
Pan and Tilt =
X.X.X
Power Board
Power Board =
X.X.X
View DMX values
DMX Channel
1=XXX
Electronic SN
Electronic SN=
************
RDM Device Label
RDM Device Label
ANSI E1.20 RDM
Version
Tes t Mo d es
Factory Setup
Factory Setup
OFF
Factory Setup
ON
Self Test
Self Test
OFF
self test
ON
Lamp Manual
Control
Lamp Status
Status = XXX
Control = X
Turn Lamp On
Turn Lamp Off
Wireless Options
Wireless Mode
Wireless Mode
Wireless First
Wireless Mode
XLR First
Wireless Mode
Wireless Only
Wireless Mode
XLR Only
Wireless Mode
Wireless To XLR
Un Link Wireless
Really Un Link
Enter = Yes
Page 11
11/24
ERROR MESSAGES
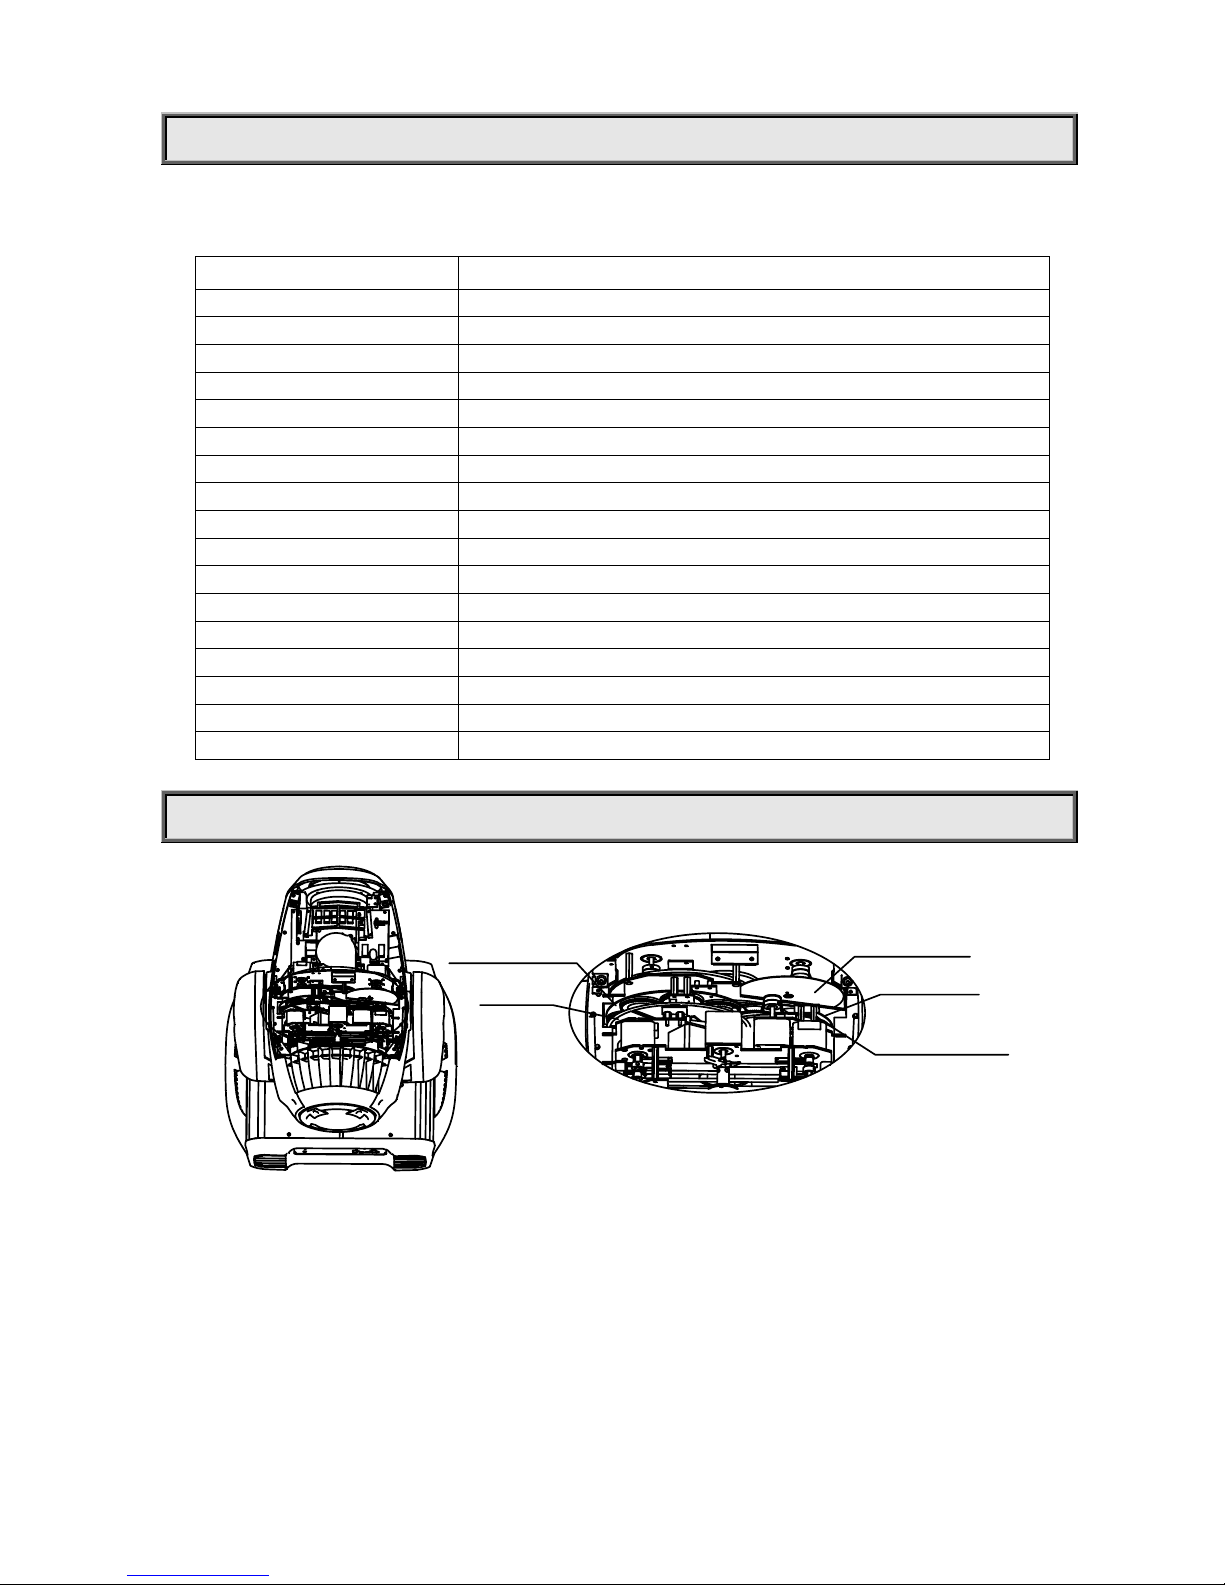
In the course of launch, PR5000 Spot examines automatically whether there are errors and if there are, it will display
information as follows:
Display
Message
Sensor Err S1-M1 Colour wheel (1# drive board motor 1) error
Sensor Err S1-M2 CTO (1# drive board motor 2) error
Sensor Err S1-M3 CYM-cyan (1# drive board motor 3) error
Sensor Err S1-M4 CYM-yellow (1# drive board motor 4) error
Sensor Err S1-M5 CYM-magenta (1# drive board motor 5) error
Sensor Err S2-M2 Fixed Gobo wheel (2# drive board motor 2) error
Sensor Err S2-M3 Rotating Gobo wheel 1 (2# drive board motor 3) error
Sensor Err S2-M4 Gobo rotation 1 (2# drive board motor 4) error
Sensor Err S3-M1 Rotating Gobo wheel 2 (3# drive board motor 1) error
Sensor Err S3-M2 Gobo rotation 2 (3 drive board motor 2) error
Sensor Err S3-M3 Effect wheel (3 drive board motor 3) error
Sensor Err S3-M4 Effect wheel rotation (3 drive board motor 4) error
Sensor Err S3-M5 Focus (3# drive board motor 5) error
Sensor Err S3-M6 Zoom(3# drive board motor 6) error
Sensor Err S4-M1 Prism (4# drive board motor 1) error
Sensor Err S4-M2 Prism rotation (4# drive board motor 2) error
Sensor Err S4-M3 Frost (4# drive board motor 3) error
REPLACING GOBOS
ROTATING GOBO WHEEL2
FIXED GOBO WHEEL
METAL EFFECT WHEEL
ROTATING GOBO WHEEL 1
COLOUR WHEEL
Disconnect the fixture from power. Lock Tilt. Carefully lift off the cover by undoing the 6 screws.
For gobos replacement on the fixed gobo : Remove the gobo and insert the new one into the position by h ands .
For gobos replacement on the rotating gobo wheel: Remo ve the gobo hold er with gobo from gobo wheel by
hands.
Pull out the spring and drop the old gobo out of the holder.
Insert the new gobo into the holder, and then insert the spring with the narrow end against the gobo.
Push the end of the spring in under lip of the holder.
Pick the spring clip up and put the gobo holder back into the position, if necessary, a small screwdriver will be
helped.
Page 12

12/24
Note: If the gobo is a glass one, it should be touched with glabrous, clean and soft tissue or cloth matted between hand
and glass instead of with bare hand.
Close the rear cover and fasten 6 screws.
Page 13
13/24
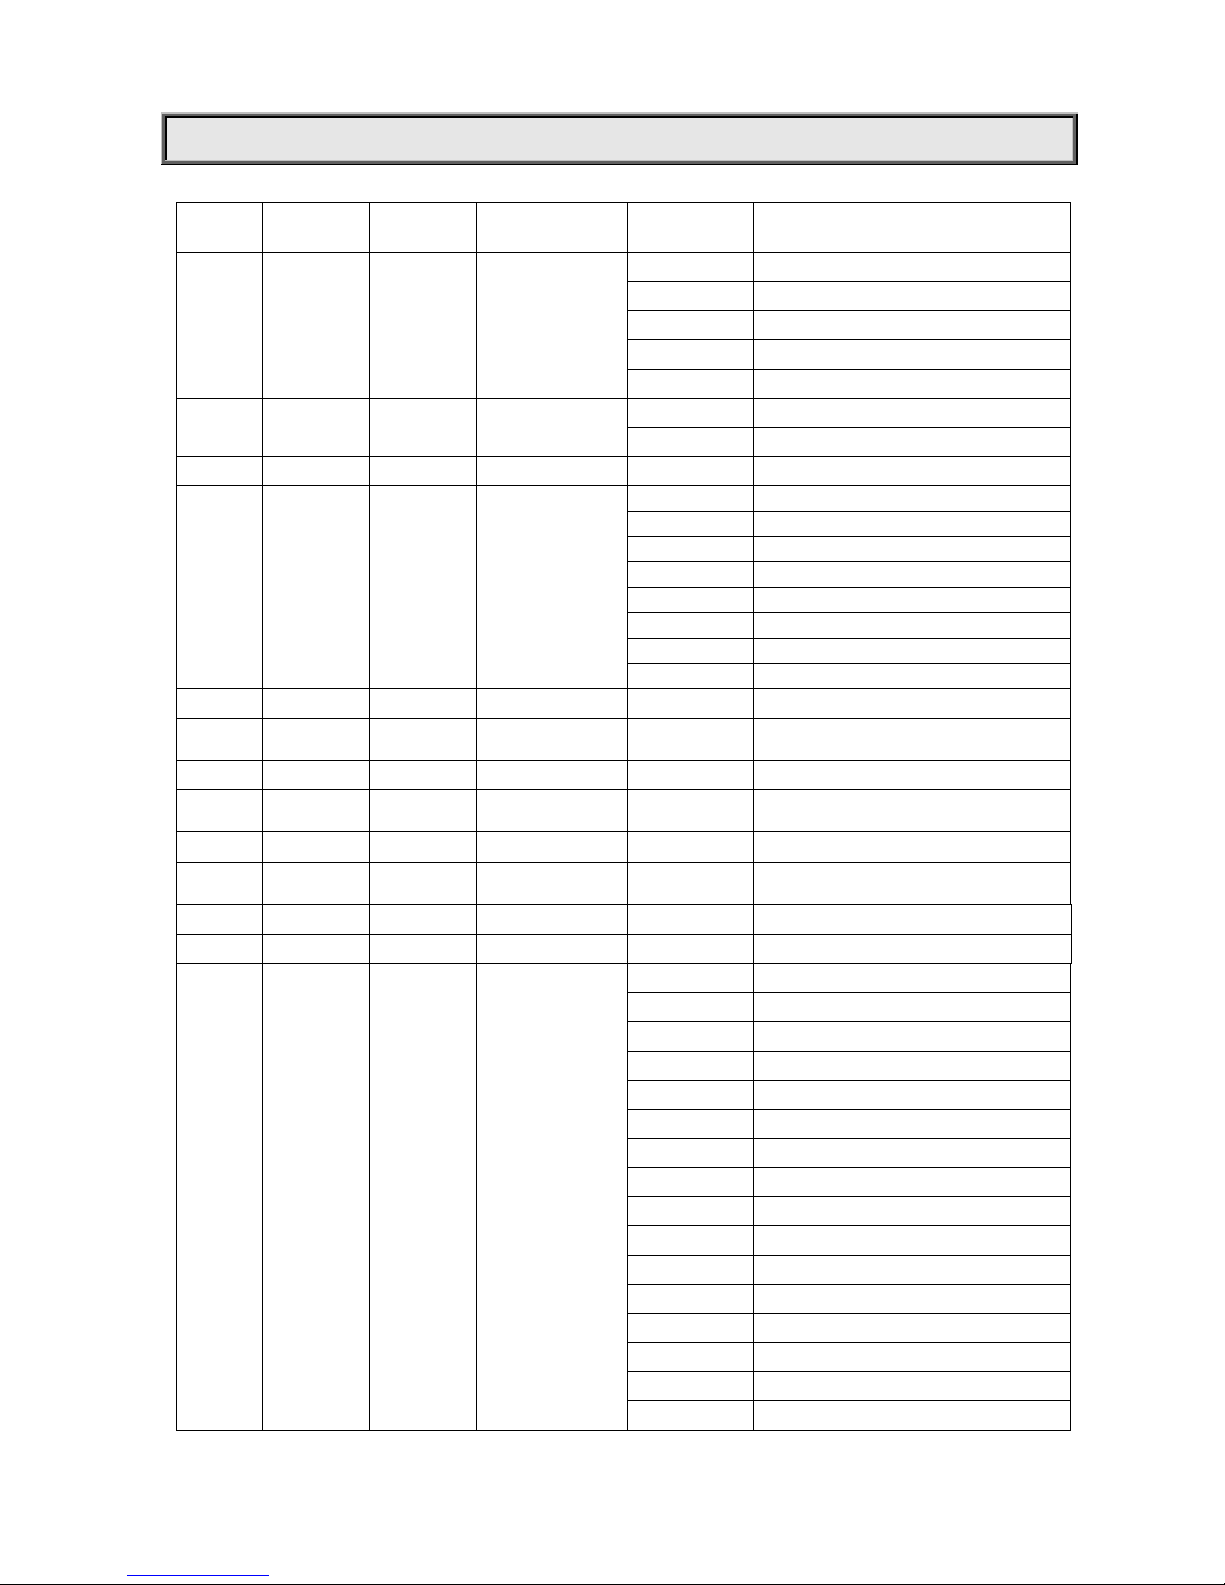
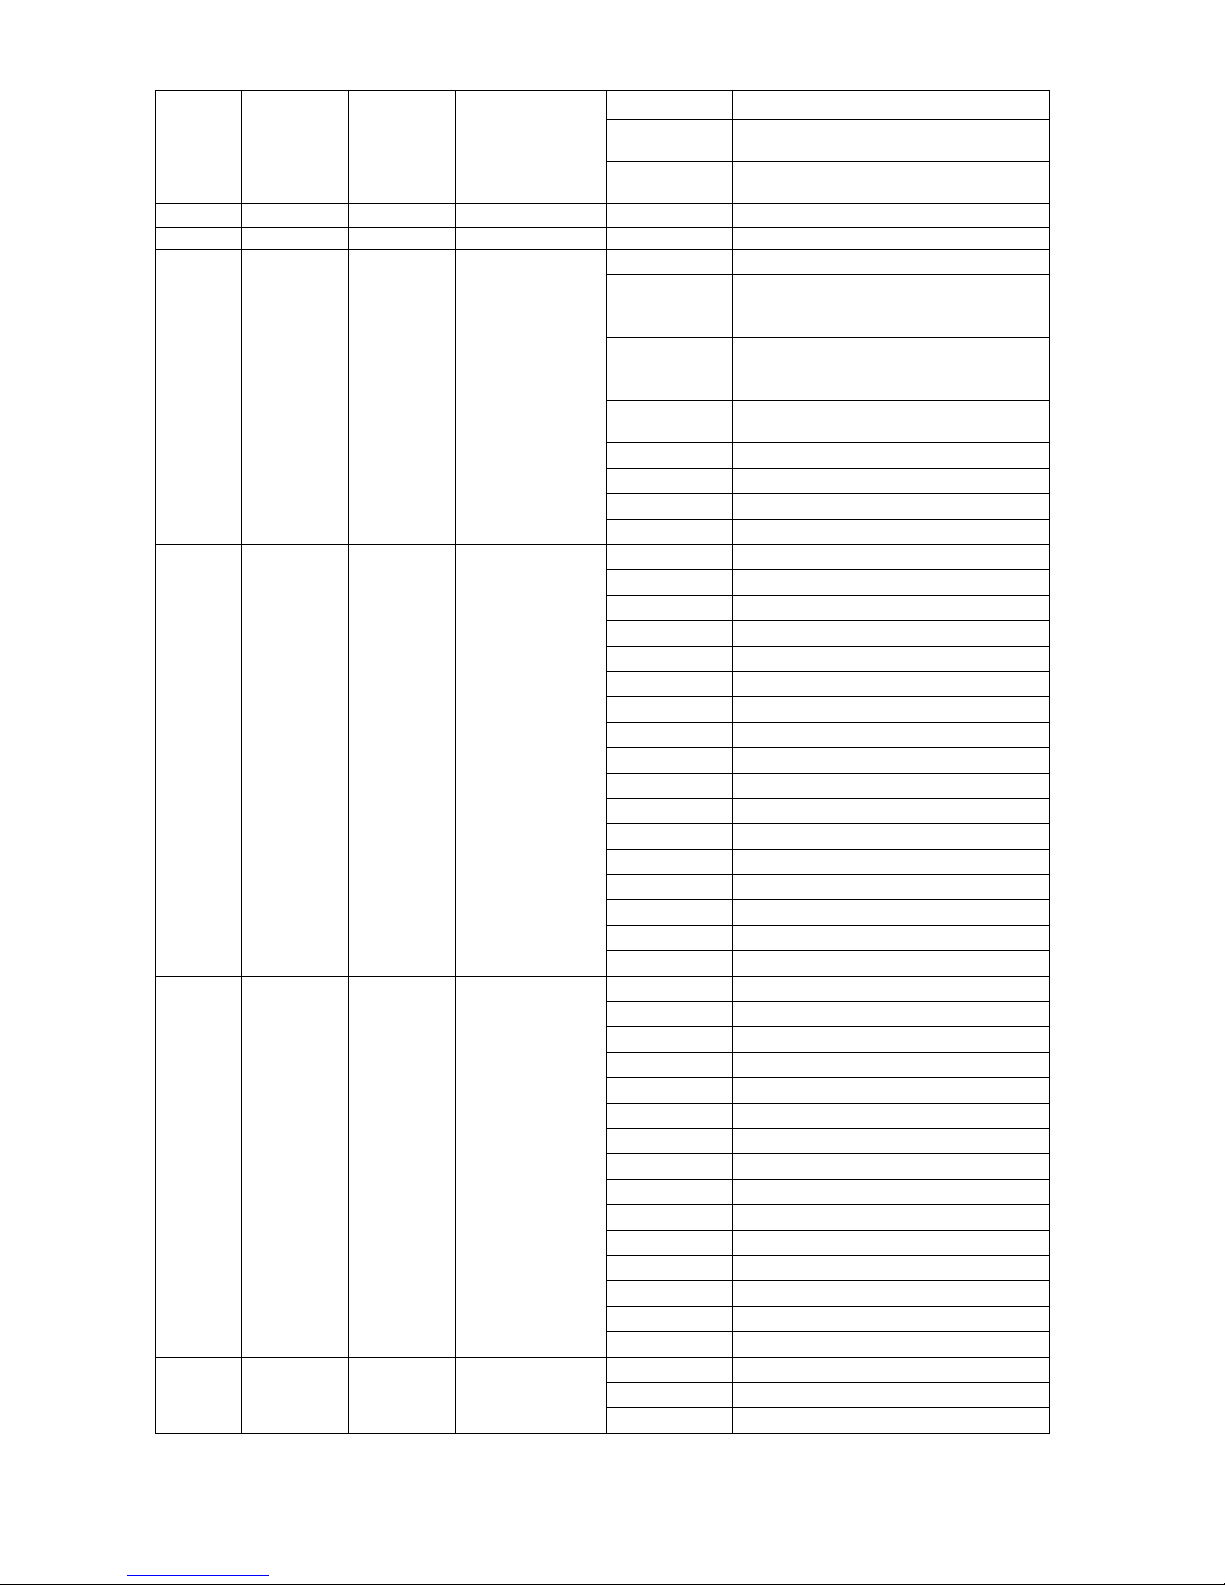
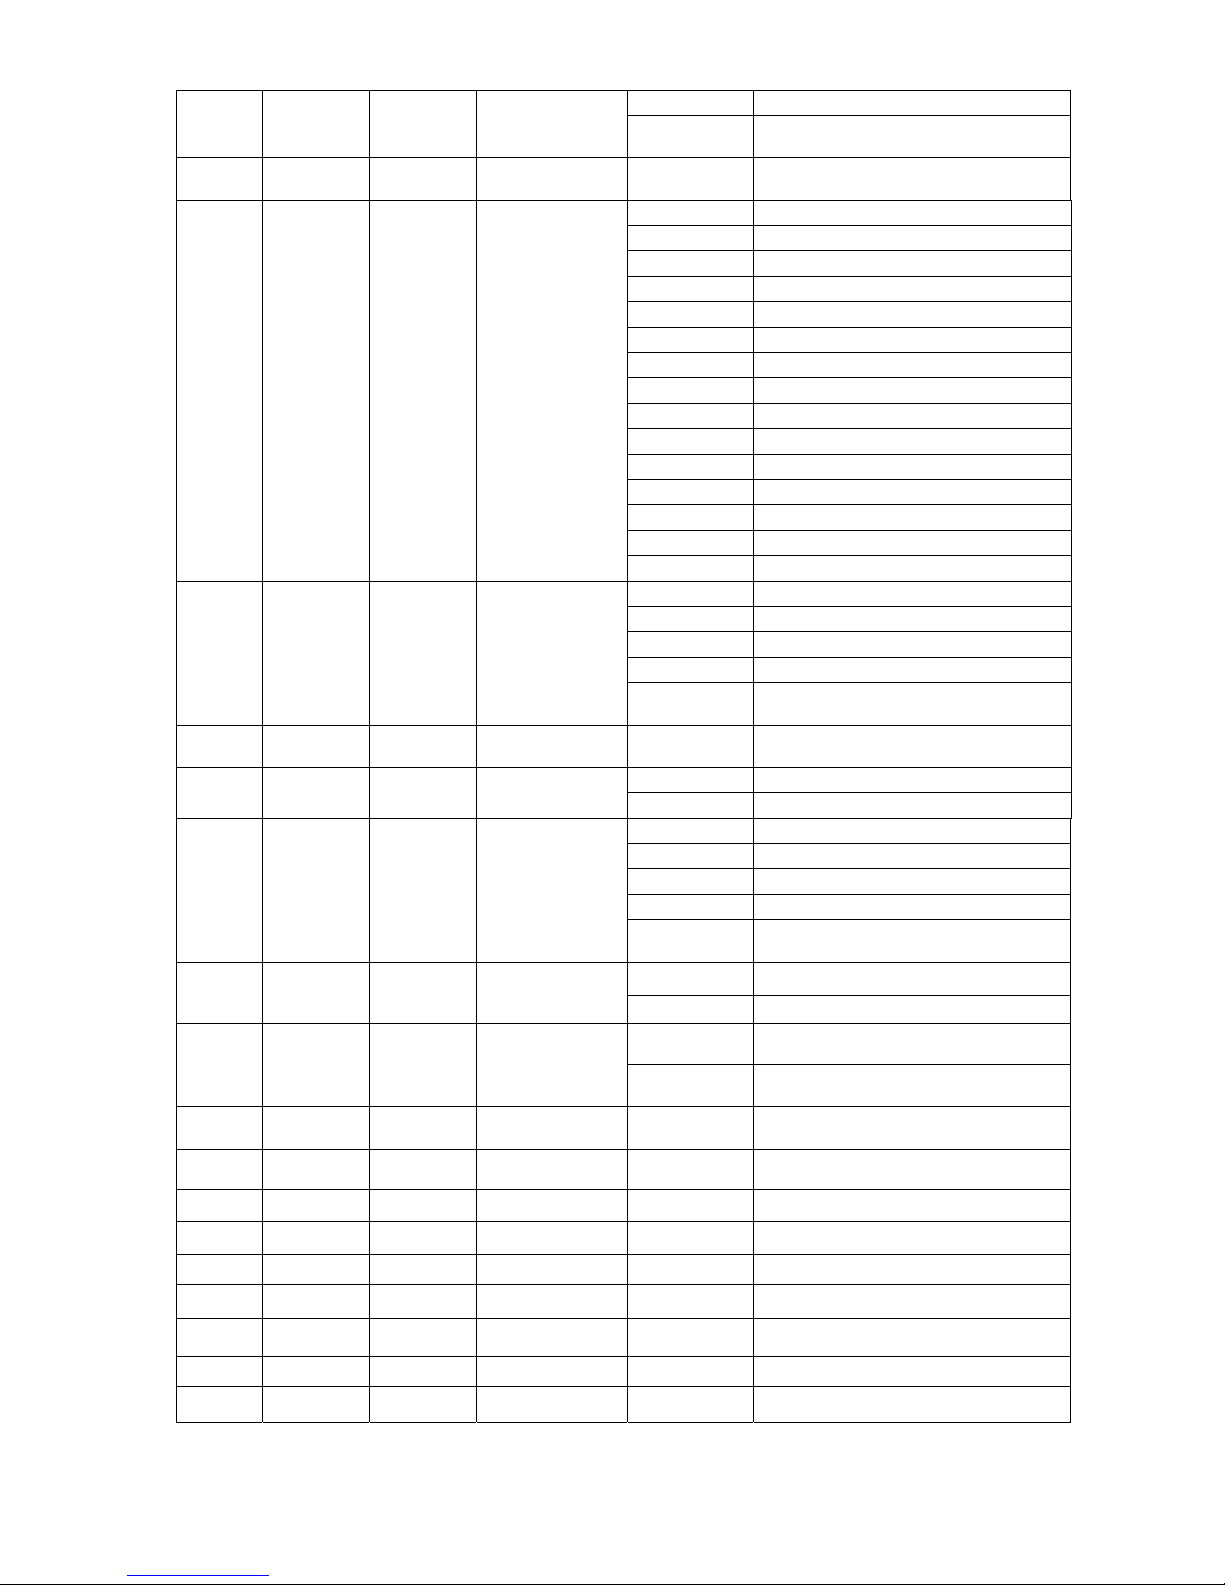
DMX PROTOCOL
Short
mode
Standard
mode
Extended
mode
FUNCTION DMX DESCRIPTION
1 1 1 Strobe
000-010 Black
011-025 Open
026-225 Strobe speed from slow to fast
226-246 Macro
247-255 Open
2 2 2 Dimmer
000-003
Black
004-255
Dimming from dark to light (0-100%)
3 3 Dimmer Fine 000-255 Dimmer in 16 Bit precision
3 4 4 CYM Macro
000-016
White
017-035
Yellow+ Magenta=Red
036-054
Ye ll ow
055-073
Yellow+ Cyan=Green
074-092
Cyan
093-110
Cyan+ Magenta=Blue
111-12 8
Magenta
129-255
CYM colour mixing from slow to fast
4 5 5 CYM-Cyan 000-255 Cyan (Linear 0-100%)
6
CYM-Cyan
Fine
000-255 Cyan in 16 Bit precision
5 6 7 CYM-Yellow 000-255 Yellow (Linear 0-100%)
8
CYM-Yellow
Fine
000-255 Yellow in 16 Bit precision
6 7 9 CYM-Magenta 000-255 Magenta (Linear 0-100%)
10
CYM-Magenta
Fine
000-255 Magenta in 16 Bit precision
7 8 11 CTO 000-255 Linear adjust from high to low
12 CTO Fine 000-255 CTO in 16 Bit precision
8 9 13 Colour Wheel
000-008
White
009-015
White/colour 1
016-023
Colour 1
024-030
Colour 1/colour 2
031-038
Colour 2
039-045
Colour 2/colour 3
046-053
Colour 3
054-060
Colour 3/colour 4
061-068
Colour 4
069-075
Colour 4/colour 5
076-083
Colour 5
084-090
Colour 5/colour 6
091-098
Colour 6
099-105
Colour 6/ white
106-113
Colour 7
114-120
Colour 7/white
Page 14
14/24
121-127
white
128-191
Rainbow rotation speed from fast to
slow
192-255
Rainbow reverse rotation speed from
fast to slow
9 10 14 Iris 000-255 Iris from large to small (0-100%)
1
5
Iris Fine 000-25
5
Iris in 16 Bit precision
10 11 16 Iris Macro
000-010
Iris macro function is invalid
011-072
Macr
o
function 1: Iris from large to
small change with speed from slow to
fast
073-136
Macro function 2: Iris from small to
large change with speed from slow to
fas
t
137-206
Macro function 3: Iris retractable
speed from slow to fas
t
207-214
Macro function 4
215-222
Macro function 5
223-230
Macro function 6
231-255
Full-open
11 12 17
Fixed Gobo
Wheel
000-016
White
017-032
Gobo1
033-048
Gobo 2
049-064
Gobo 3
065-080
Gobo 4
081-096
Gobo 5
097-112
Gobo 6
113-127
Gobo 7
128-149
Rotation speed from slow to fast
150-171
Reverse rotation from slow to fast
172-183
Gobo 1 shake speed from slow to fast
184-195
Gobo 2 shake speed from slow to fast
196-207
Gobo 3 shake speed from slow to fast
208-219
Gobo 4 shake speed from slow to fast
220-231
Gobo 5 shake speed from slow to fast
232-243
Gobo 6 shake speed from slow to fast
244-255
Gobo 7 shake speed from slow to fast
12 13 18
Rotating Gobo
Wheel 1
000-018
white
019-036
Gobo1
037-054
Gobo 2
055-073
Gobo 3
074-091
Gobo 4
092-109
Gobo 5
110-127
Gobo 6
128-156
Rotation speed from slow to fast
157-185
Reverse rotation from slow to fast
186-196
Gobo 1 shake speed from slow to fast
197-208
Gobo 2 shake speed from slow to fast
209-220
Gobo 3 shake speed from slow to fast
221-232
Gobo 4 shake speed from slow to fast
233-244
Gobo 5 shake speed from slow to fast
245-255
Gobo 6 shake speed from slow to fast
13 14 19 Gobo rotation 1
000-127
Index
128
Stop rotating
129-188
Rotation speed from slow to fast
Page 15
15/24
189-195
Stop rotating
196-255
Reverse rotation speed from slow to
fas
t
15 20
Gobo ro
t
ation 1
Fine
000-255 Gobo rotation in 16 bit precision
14 16 21
Rotating Gobo
Wheel 2
000-018
white
019-036
Gobo1
037-054
Gobo 2
055-073
Gobo 3
074-091
Gobo 4
092-109
Gobo 5
110-127
Gobo 6
128-156
Rotation speed from slow to fast
157-185
Reverse rotation from slow to fast
186-196
Gobo 1 shake speed from slow to fast
197-208
Gobo 2 shake speed from slow to fast
209-220
Gobo 3 shake speed from slow to fast
221-232
Gobo 4 shake speed from slow to fast
233-244
Gobo 5 shake speed from slow to fast
245-255
Gobo 6 shake speed from slow to fast
15 17 22 Gobo rotation 2
000-127
Index
128
Stop rotating
129-188
Rotation speed from slow to fast
189-195
Stop rotating
196-255
Reverse rotation speed from slow to
fas
t
18 23
Gobo rotation 2
Fine
000-255 Gobo rotation in 16 Bit precision
16 19 24 Prism
000-016
Frosting from slight to strong
017-255
3 x facet prism
17 20 25 Prism rotation
000-127
Prism index
128
Stop rotating
129-191
Rotation speed from slow to fast
192
Stop rotating
193-255
Reverse rotation speed from slow to
fas
t
18 21 26 Effect wheel
000-020 No effect wheel
021-255 Rotation speed is slow
19 22 27
Effect wheel
rotation
000-127 Rotation speed from slow to fast
128-255
R
everse rotation speed from slow to
fast
20 23 28
Frost effect
wheel
000-255 Effect wheel insert in gradually
21 24 29 Focus 000-255 Linearly focusing
30 Focus Fine 000-255 Focus in 16 precision
22 25 31 Zoom 000-255 Linearly zooming
32 Zoom Fine 000-255 Zoom in 16 Bit precision
23 26 33 Pan 000-255 Pan rotation
27 34 Pan Fine 000-255 Pan rotation in 16 bit precision
24 28 35 Tilt 000-255 Tilt rotation
29 36 Tilt Fine 000-255 Tilt rotation in 16 bit precision
Page 16

16/24
30 37
Pan & Tilt
speed
000-255 Pan&Tilt speed from fast to slow
25 31 38 Control
000-047
Reserved
048-080
Reset
081-112
Reserved
113-144
Lamp off ( stop in DMX value for 10 s)
145-168
Reserved
169-200
Lamp power reduced to 50%
201-223
Reserved
224-255
Lamp on (See remark below)
Remark:
If you intend to turn on/off the lamp via the last channel of the controller, don’t attempt to push the channel to value
224-255 immediately after turning it off, or push the slide bar to value 224-255 to wait it cooling. Under these 2
circumstances, the lamp can not be turned on. The right operation is: turn it off---cool down---push the slide bar to turn it
on.
Page 17
17/24
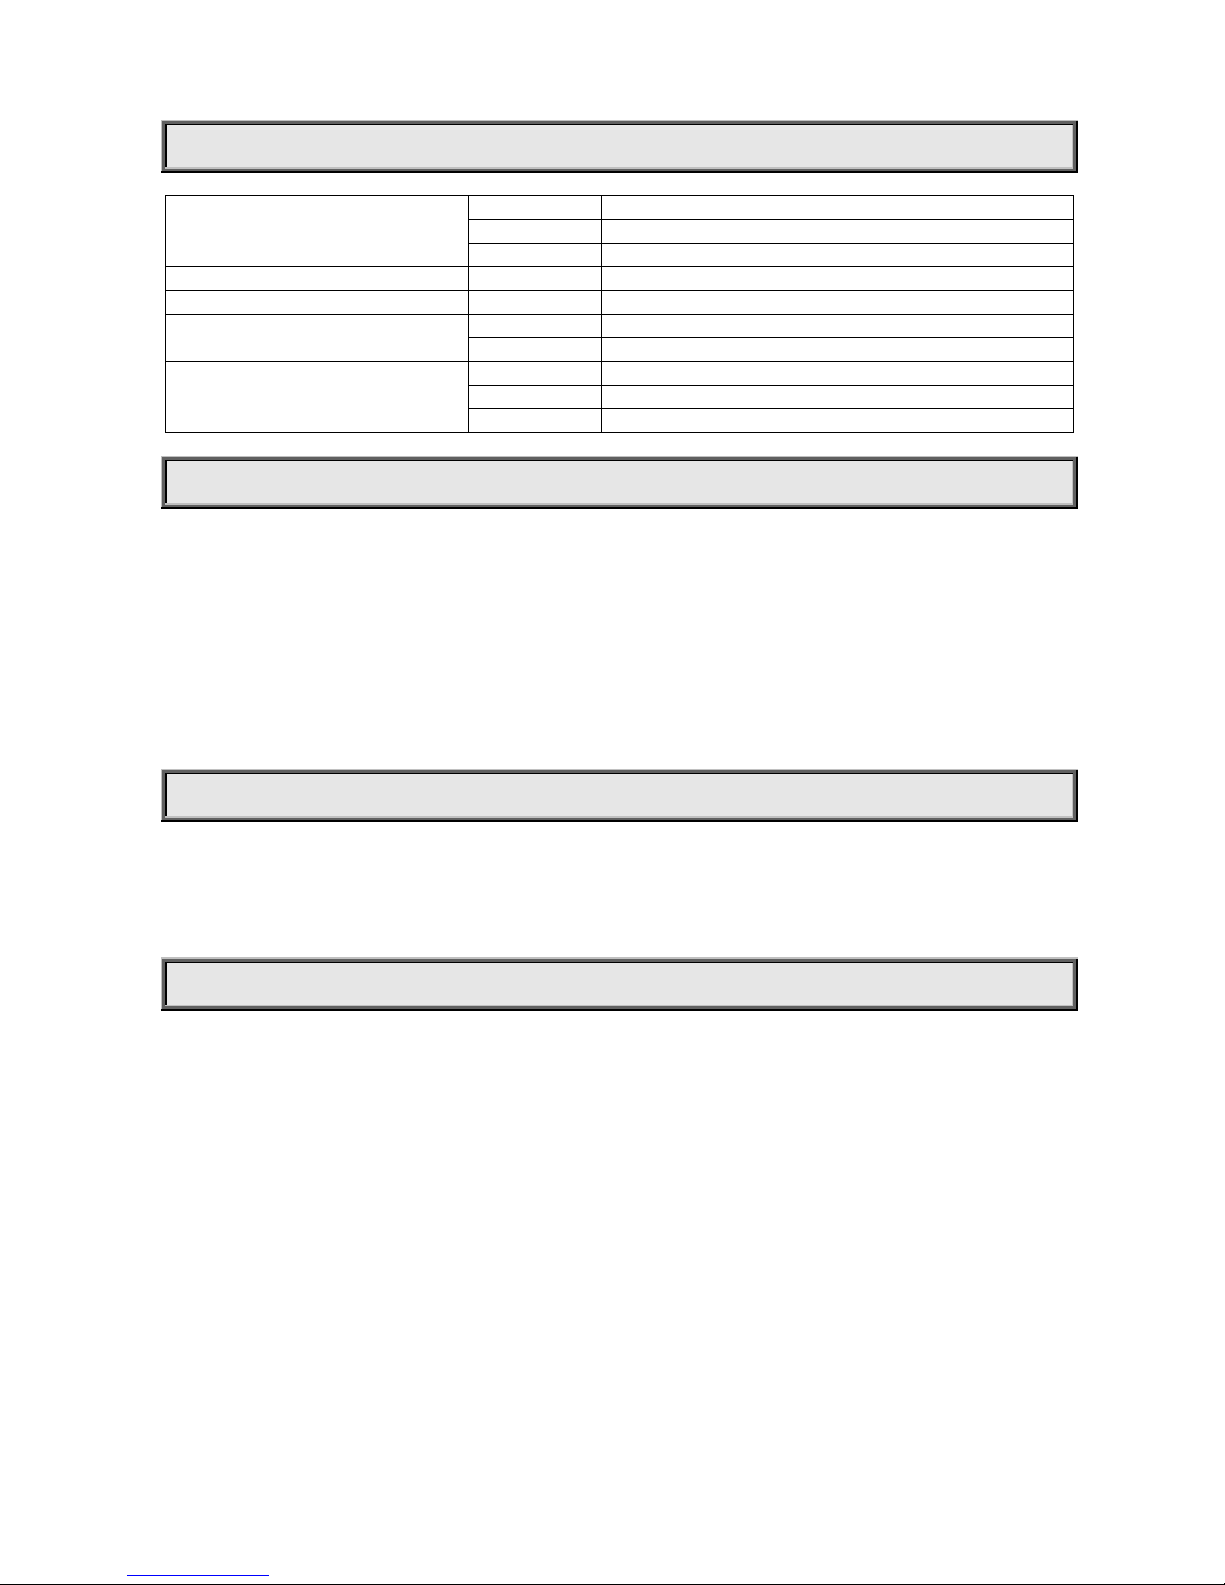
LED INDICATION
Green
On
DMX signal OK
Off
No DMX signal
Flash
DMX signal error
Yellow On
Setting the panel
Blue On Power
Red/Green
Red
Running self test mode
Green
Reserved
Green
On
Wireless signal OK
Off
Not connection to any transmitter
Flash
Lost contact with the transmitter or linking transmitter
MAINTENANCE
If the projector’s lens becomes damaged or broken it should be replaced. If the lamp becomes damaged or deformed in
any way it must be replaced. If the light from the lamp appears dim this would normally indicate that it is reaching the end
of its life and it should be changed at once, aged lamps run to the extremity of their life might explode. If the projector
does not function, check the fuses on the power socket of the projector, they should only be replaced by fuses of the
same specification. Should these be damaged call a qualified technician before replacement. The projector has thermal
protection device that will switch off the projector in case of overheating, should either of these operate, check that the
fans are not blocked, and if they are dirty clean them before switching on the projector again. Check that the fans are
operational, if not call a qualified technician.
Any maintenance work sh ould only be carried out by qualified tec hnicians.
LUBRICATION
To ensure the continuous rotation of the rotating gobos and linear motion of the lens for focusing, it is recommended that
the bearings for the rotating gobos and the 2 shafts for the focusing lens holder be lubricated periodically, preferably
every two months. Use only high quality, high-temperature resistant grease instead of any type of oil. When lubricating
the bearings, a syringe with a fine needle is the easiest way to introduce the grease to the bearings around each gobo.
KEEPING THE PROJECTOR CLEAN
To ensure the reliability of the projector it should be kept clean. It is recommended that the fans should be cleaned every
15 days. The lens and dichroic colour filters should also be regularly cleaned to maintain an optimum light output.
Do
NOT use any type of solvent on dichroic colour filters.
Cleaning frequency depends on the environment in which the fixture operates: damp, smoke or particularly dirty
surroundings can cause greater accumulation of dirt on the unit’s optics. A soft cloth and typical glass cleaning products
should be used in cleaning. It is recommended to clean the external optics at least once every 20 days and clean the
internal optics at least once every 30 / 60 days.
Do not use any organic solvent, e.g. alcohol, to clean the reflecto r mirror, dichroic colour filters or housing of
the apparatus.
Page 18
18/24
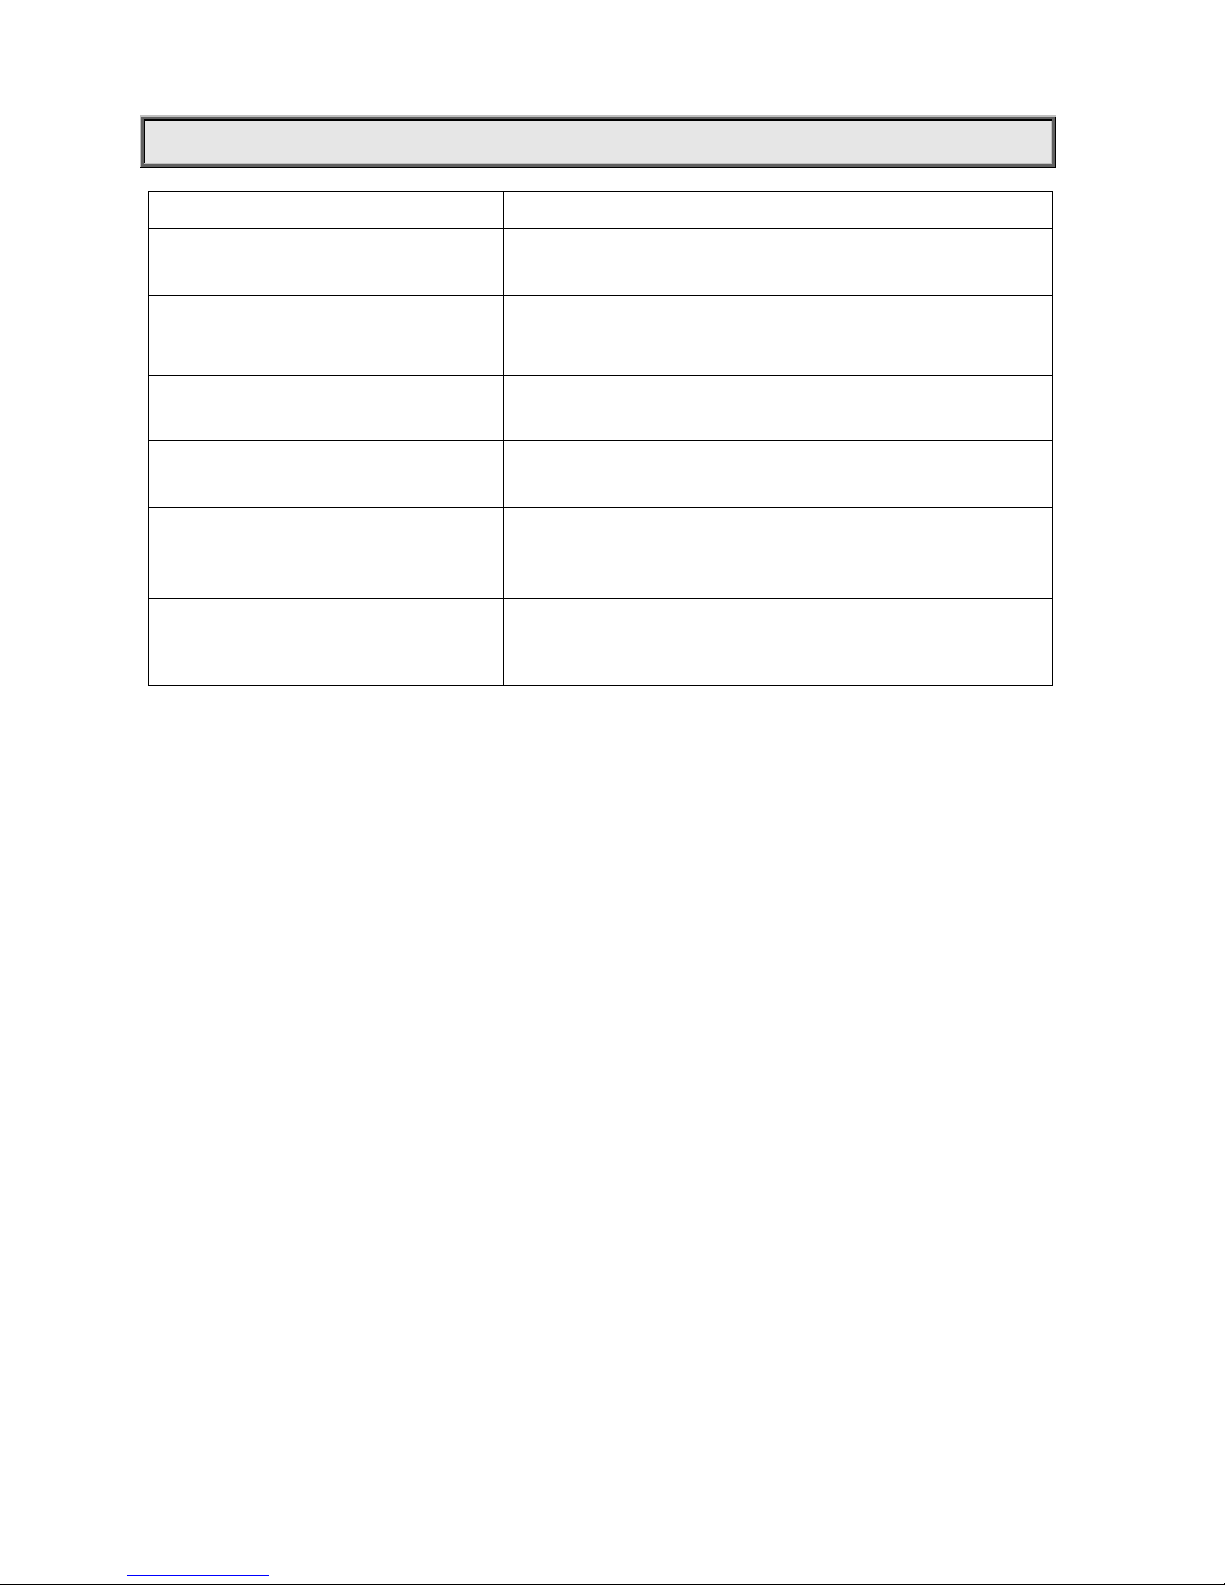
TROUBLESHOOTING
PROBLEM ACTION
The projector doesn’t switch on
¾ Check the fuse on the power socket.
¾ Replace the lamp.
The lamp comes on but the projector
doesn’t respond to the controller
¾ Make sure that the projector is correctly configurated.
¾ Replace or repair the DMX cable.
The projector only functions intermittently ¾ Make sure the fan is working and not dirty.
Defective projection
¾ Check the lenses are not broken.
¾ Remove dust or grease from the lenses.
The project image appears to have a halo
¾ Make sure the lamp is installed correctly.
¾ Carefully clean the optical group lenses and the projector
components.
The beam appears dim
¾ Check the optics is clean.
¾ Replace with a new lamp of the specified type and rating.
Page 19

19/24
TECHNICAL DATA
VOLTAGES:
200V/220V/230V/240V AC,50/60Hz
POWER CONSUMPTION:
1800W@220V
LAMP:
OSRAM
HTI 1500W/60/P50
Colour Temperature 6000°K
Socket
PGJX50,single ended
Manufacturers Rated Lamp Life 750 Hours replacement
Or
PHILIPS
MSR Gold 1500FastFit
Colour Temperature 6000°K
Socket
PGJX50,single ended
Manufacturers Rated Lamp Life 750 Hours replacement
COLOURS:
Smooth CYM colour mixing system with macro
1 wheel with 7 dichroic colour filters plus white
With variable speed bi-directional rainbow effect
Step/linear colour changing is available
COLOUR TEMPERA TURE CORRECTION:
Linearly colour temperature correction
GOBOS:
2 Rotating gobo wheel:
6 interchangeable gobos+ white, glass or metal gobos can be fixed
Indexable, bi-directionally rotatable at variable speeds
1 Fixed gobo wheel :
7 interchangeable gobos+ white
bi-directional wheel scrolling at variable speeds
Gobo diameter: Φ36.3mm
Gobo image diameter: Φ26mm
PRISM:
1x3 facet prism, Indexable, bi-directionally rotatable at variable speeds
FROST :
0-100% linearly adjustable
Page 20

20/24
EFFECT WHEEL:
1 interchangeable effect wheel, bi-directionally rotatable at variable speeds
FOCUS:
DMX linear focus
DIMMER:
0-100% linearly adjustable
IRIS:
5-100% linearly adjustable
Macro
SHUTTER:
Double shutter blades, 0.3~25 F.P.S
HEAD MOVEMENT :
Pan 540º, Tilt 270º with auto position correction
BEAM ANGLE:
10°~68°, Linear zoom in 16 bit precision
CONTROL:
DMX512, 3 pin and 5 pin interfaces
RDM control protocol
25 channels in short mode, 31 channels in standard mode, and 38 channels in extended mode.
Self-test mode
OTHER FUNCTIONS:
Adjustable Pan & Tilt speed
Fixture and lamp usage time display
LCD display with English and Chinese language menu
Energy saving function of the ballast
Built-in analyzer for easy fault finding, error messages
Modular construction for easy maintenance
Setup options by chargeable battery inside without power connection.
Input signal isolating protection
Network interface
DMX512 wireless receiver
DMX512 wireless transmitter (optional)
HOUSING:
Composite plastic, IP20
Page 21
21/24
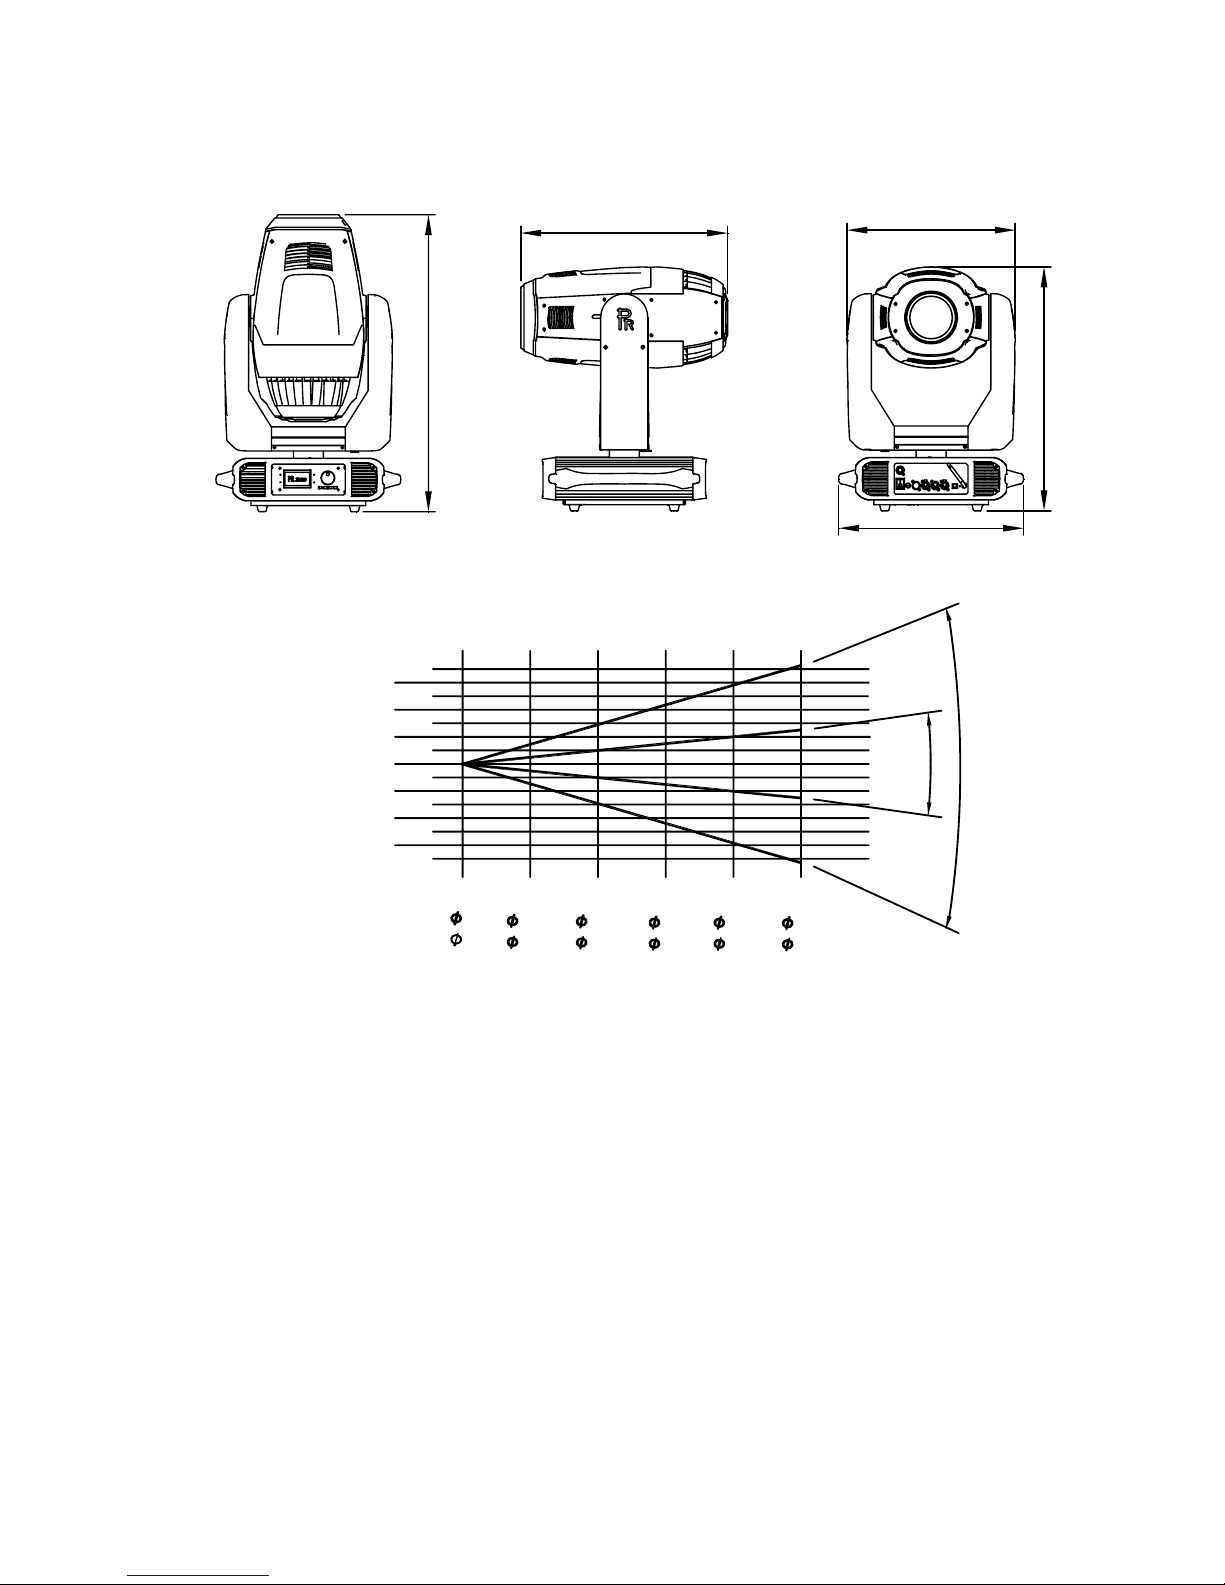
WEIGHT:
48Kg
SIZES:
873
609
544
717
495
LIGHT OUTPUT :
DISTANCE(m)
8m
10m
12m
14m
8m
4m
4m
0m
2m
2m
6m
10m
0m 5m 10m 15m 20m 25m
0
DIAMETER(m)10°
10° lux
0.87
1.74
2.61
3.48
4.36
93385
23346
10376
5837
3735
0
DIAMETER(m)
68°
5.93
11.86
17.79
23.72
29.65
68° lux 1816
454
202
113
73
6m
14m
12m
68°
10°
Page 22
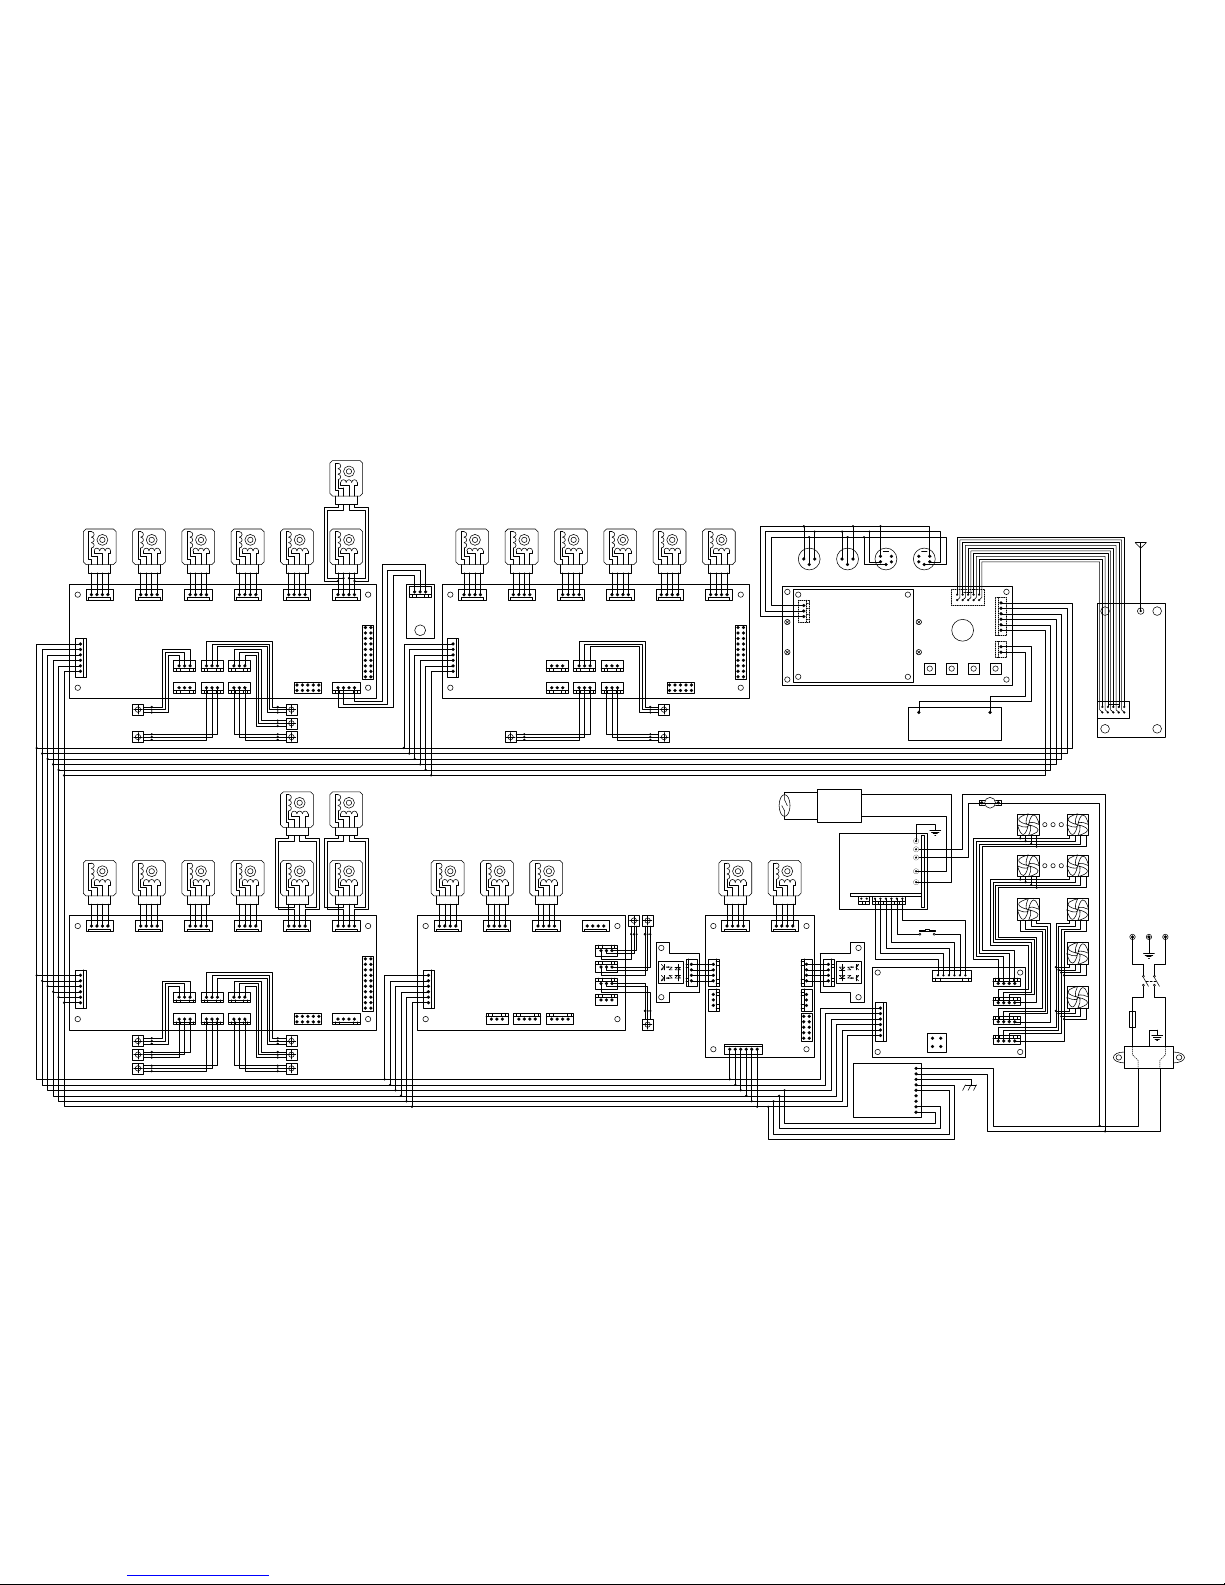
SENS1
SENS2
SENS3
SENS4
SENS5
SENS6
MOTOR1 MOTOR2 MOTOR3 MOTOR4 MOTOR5 MOTOR6
SLAVE #1 PCB
SENS1
SENS2
SENS3
SENS4
SENS5
SENS6
MOTOR1 MOTOR2 MOTOR3 MOTOR4 MOTOR5 MOTOR6
SLAVE #2 PCB
PAN & TILT PCB
GND
GND
VCC
VCC
DMX-SENS1
DMX-SENS2
GND
GND
VCC
VCC
DMX-SENS1
DMX-SENS2
+
-
TILT ENCODE
+
-
PAN ENCODE
3
12
DMX-IN DMX-OUT
12
3
1
2
3
4
51
234
5
DMX-IN DMX-O UT
VGS
AC INPUT
NL
Filter
E
VGS VGS
VGS VGSVGS VGS VGS VGS
VGSVGS VGS
RS232
MOTOR1 MOTOR2 MOTOR3 MOTOR4
SLAVE #4 PCB
GND
GND
VCC
VCC
DMX-SENS1
DMX-SENS2
G
HALL 1-5
View of mark side
HALL 1-3
View of mark side
HALL 1-1
View of mark side
HALL 1-4
View of mark side
HALL 2-4
View of mark side
PAN TILT
GND
GND
VCC
VCC
DMX-SENS1
DMX-SENS2
V
G
S
V
G
V
G
S
V
G
S2
S1
S1
S2
HALL 1-2
View of mark side
LED1
LED2LED3
LED4
LCD DISPLAY
FUNCTION DOWN UP ENTER
GND
GND
VCC
VCC
DMX-SENS1
DMX-SENS2
GND
DATA-
DATA+
FEMALE FEMALEMALEMALE
DC6V
GND
+-
Battery
SWITCH
View side of no axletree
M2-6
STROBE 2
ABC
D
ABC
D
View side of no axletree
M1-6B
DIMMER
ABC
D
ABC
D
View side of no axletree
J1
PAN
ABC
D
ABC
D
View side of no axletree
J2
TILT
ABC
D
ABC
D
View side of no axletree
M1-6A
DIMMER
ABC
D
ABC
D
HEAD FAN 1 HEAD FAN n
HEAD FAN
Thermostat
GND
GND
DMX-SENS1
DMX-SENS2
+
-
FAN1
FAN2
FAN3
FAN4
DC
FAN & LIGHTING PCB
GG
PWM
PWM
FAN
FAN
View side of no axletree
M1-5
MAGENTA
ABC
D
ABC
D
View side of no axletree
M1-4
YELLOW
ABC
D
ABC
D
View side of no axletree
M1-3
CYAN
ABC
D
ABC
D
View side of no axletree
M1-1
COLOUR
ABC
D
ABC
D
View side of no axletree
M1-2
CTO
ABC
D
ABC
D
View side of no axletree
M2-5
STROBE 1
ABC
D
ABC
D
View side of no axletree
M2-4
GOBO1 ROTATING
ABC
D
ABC
D
View side of no axle tree
M2-3
ROTATING-GOBO1
ABC
D
ABC
D
View side of no axletree
M2-2
FIXED GOBOS
ABC
D
ABC
D
View side of no axletree
M2-1
IRIS
ABC
D
ABC
D
View side of no axletree
M4-3
FROST
ABC
D
ABC
D
View side of no axletree
M4-2
PRISM ROTATING
ABC
D
ABC
D
View side of no axletree
M4-1
PRISM
ABC
D
ABC
D
SSG
V
VSG
HEAD FAN 1 HEAD FAN n
GV
Fuse
TRANSFORMER
ELECTRONIC
G
G
+24V
+24V
FG
ACL
ACN
G
+24V
VCC
VCC
SW-PB
162345
IGNITOR
GROUND
N
L
TO IGNITOR
ELECTRONIC
BALLAST
LAMP
12 1 62345
HALL 2-3
View of mark side
HALL 2-2
View of mark side
SENS1
SENS2
SENS3
SENS4
VGS
VGS2S1VGS2
S1
HALL 4-1
View of mark side
HALL 4-2
View of mark side
PS
BOX FAN 3
BOX FAN 2
BOX FAN 1
SENS1
SENS2
SENS3
SENS4
SENS5
SENS6
MOTOR1 MOTOR2 MOTOR3 MOTOR4 MOTOR5 MOTOR6
SLAVE #3 PCB
GND
GND
VCC
VCC
DMX-SENS1
DMX-SENS2
VGS VGS VGS
VGS VGSVGS
HALL 3-5
View of mark side
HALL 3-3
View of mark side
HALL 3-1
View of mark side
HALL 3-4
View of mark side
HALL 3-2
View of mark side
View side of no axletree
M3-6B
ZOOM-2
ABC
D
ABC
D
View side of no axletree
M3-6A
ZOOM-1
ABC
D
ABC
D
View side of no axletree
M3-4
EFFECT ROTATING
ABC
D
ABC
D
View side of no axletree
M3-3
EFFECT
ABC
D
ABC
D
View side of no axletree
ABC
D
ABC
D
View side of no axletree
ABC
D
ABC
D
SSG
V
M3-2
GOBO2 ROTATING
M3-1
ROTATING-GOBO2
View side of no axletree
M3-5B
FOCUS-2
ABC
D
ABC
D
View side of no axletree
M3-5A
FOCUS-1
ABC
D
ABC
D
HALL 4-3
View of mark side
HALL 3-6
View of mark side
RF
Antenna
Page 23
23/24
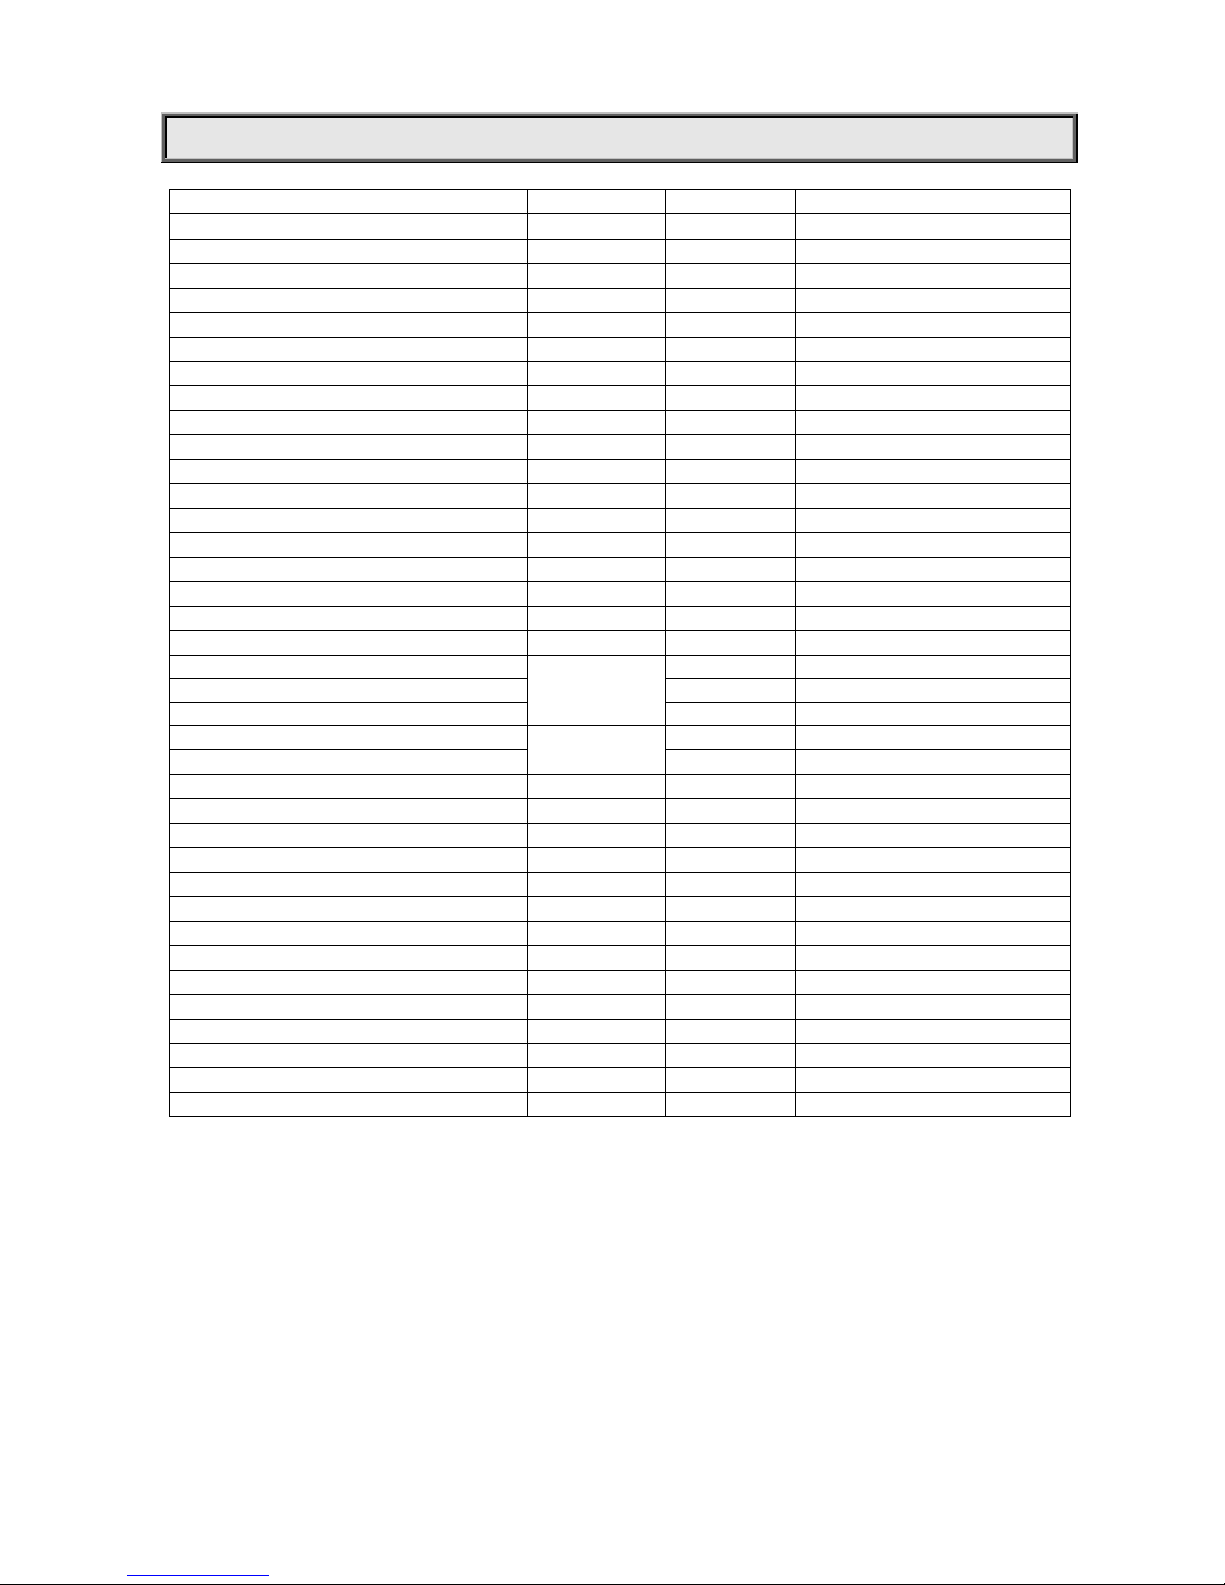
COMPONENT ORDER CODES
NAME PART NO. QUANTITY REMARK
POWER SUPPLY
192010136 1 S-350-24
MAINS FILTER 193020008 1 20A 115/250VAC
THERMOSTAT
190010150 1 250V-16A
ELECTRIC BALLAST 040070100 1 1500W
IGNITOR 040090052 1 IGN40C12E
LAMP
100050087 1 HTI 1500W/60/P50
TILT DRIVE BELT 290151320 1
PAN DRIVE BELT 290151321 1
FAN NEAR GOBO
030060064 1
FAN NEAR THE LAMP 030060065 2
FAN IN FRONT SIDE 030060065 2
FAN IN BASE
030060066 1
FAN NEAR THE ELECTRIC BALLAST 030060066 2
FOCUS MOTOR 030040073 2
ZOOM MOTOR
030040073 2
ROTATING GOBO WHEEL MOTOR 030040085 1
IRIS MOTOR 030040088 1
PAN &TILT MOTOR
030040156 2
SHUTTER BLADE MOTOR
030040095
1
COLOUR WHEEL MOTOR 1
PRISM ROTATION MOTOR 1
ROTATING PRISM WHEEL 1 MOTOR
030040112
1
ROTATING EFFECT WHEEL MOTOR 1
FROST MOTOR
030040132 1
CYM MOTOR 030040152 2
CTO MOTOR 030040152 2
DIMMER MOTOR
030040153 2
FIXED GOBO WHEEL MOTOR 030040154 1
EFFECT WHEEL ROTATION MOTOR 030040155 1
GOBO ROTATION MOTOR
030040084 3
PAN/TILT DRIVE PCB 230020592 1
MOTOR DRIVE PCB 1 230020584 1
MOTOR DRIVE PCB 2
230020585 1
MOTOR DRIVE PCB 3 230020586 1
MOTOR DRIVE PCB 4 230020587 1
DISPLAY PCB
230020580 1
POWER BOARD 230020590 1
Page 24

24/24
PR LIGHTING LTD.
1582 Xingye Avenue, Nancun Panyu
Guangzhou, 511442 China
TEL: +86-20-3995 2888
FAX: +86-20-3995 2330
P/N: 320020024
Version: 20110517
 Loading...