

Page 1
PRO-PAR D
PR-3040 D
This product manual contains important information about the safe installation and use of this
projector. Please read and follow these instructions carefully and keep this manual in a safe
place for future reference.
PR LIGHTING LTD.
Yingbin Road, Dashi Panyu, Guangzhou, 511430 China
http://www.pr-lighting.com
Page 2
2/10 PRO-PAR D manual_Last Revision_en .doc
SAFE USAGE OF THE PROJECTOR 3
INSTALLING THE PROJECTOR 4
FITTING THE LAMP 5
CHANGING THE LENS 5
KEEPING THE PROJECTOR CLEAN 6
POWER CONNECTIONS 6
TECHNICAL SPECIFICATIONS 7
Please note that as part of our ongoing commitment to continuous product development, specifications are subject to change without notice. Whilst
every care is taken in the preparation of this manual we reserve the right to change specifications in the course of product improvement. The publishers
cannot be held responsible for the accuracy of the information herein, or any consequence arising from them.
Every apparatus has been tested completely and packed properly by the manufacturer. Please make sure the packing and / or the apparatus is in good
condition before your installation and use. Should there be any damage caused by transportation, consult your dealer and do not use the apparatus. But
any damage caused by improper use will not be assumed by the manufacturer and / or dealer.
THESE ITEMS ARE PACKED TOGETHER WITH THE PROJECTOR
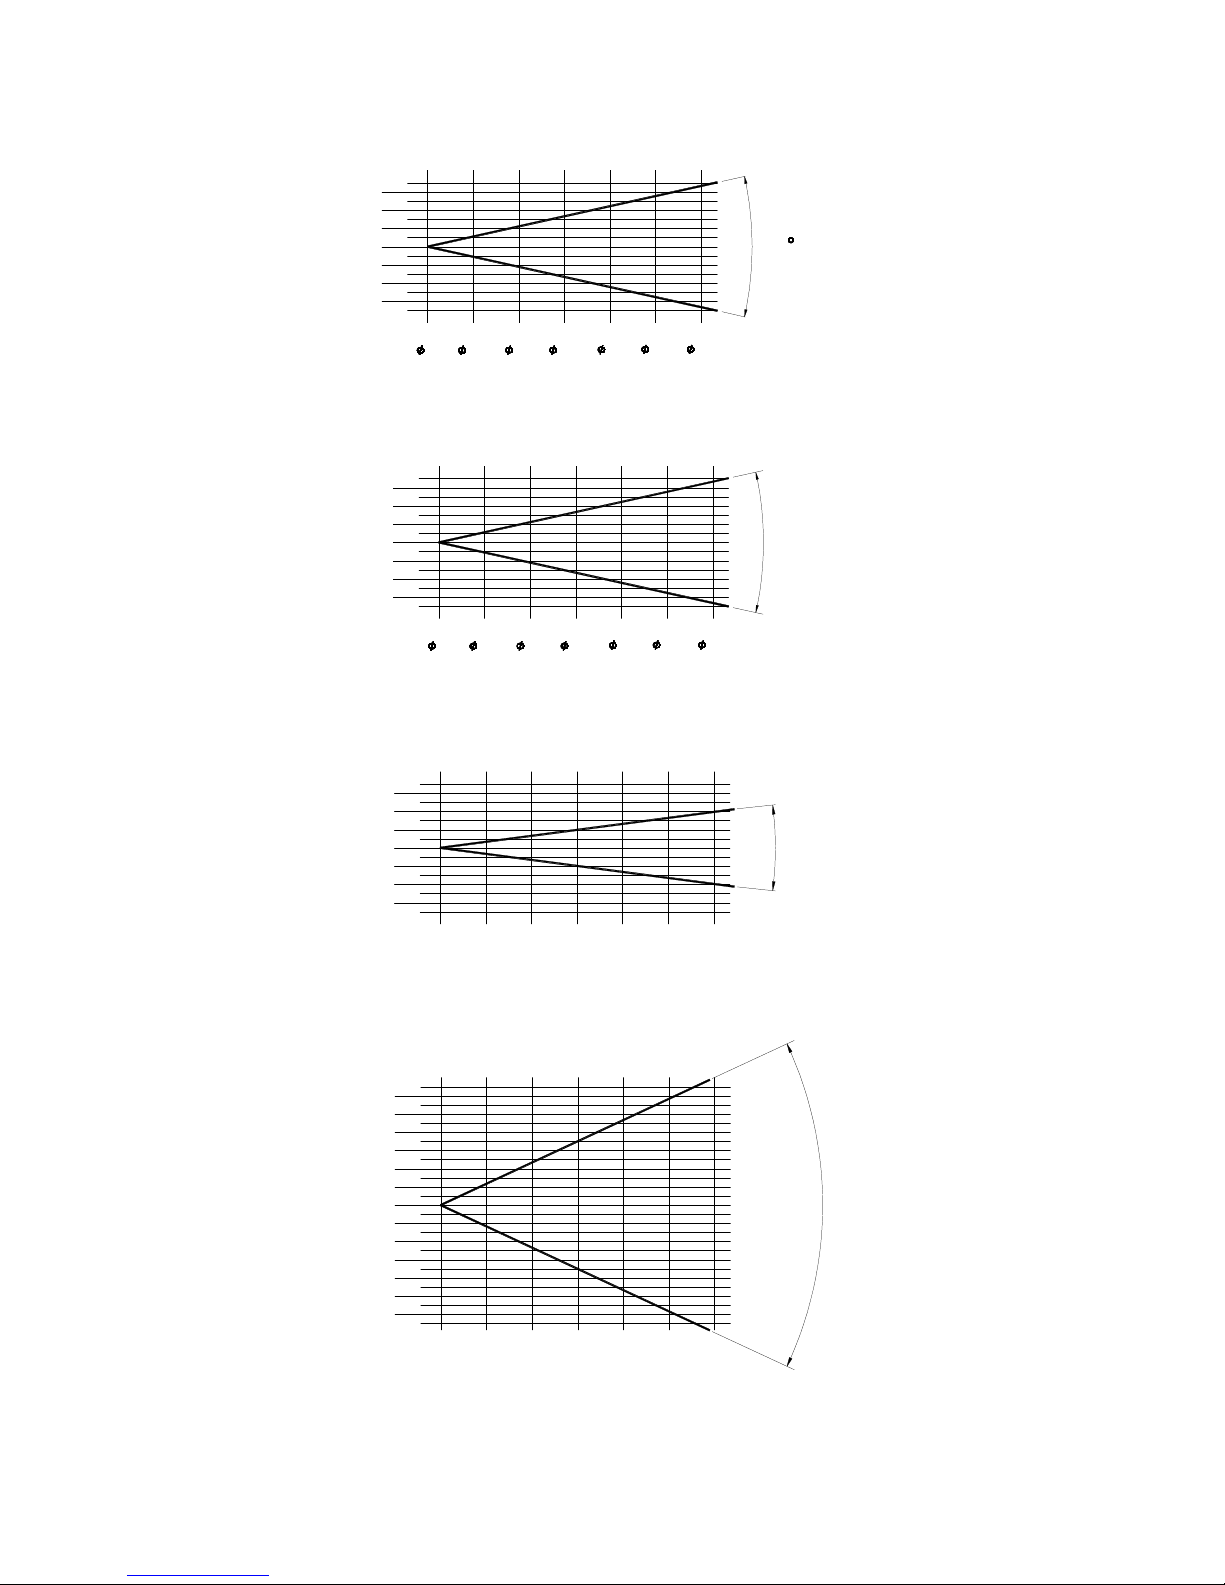
Clear, flat lens (14° Round beam shape) (1 PCS) (Order code: 070050017)
Stipple lens (19° Round beam shape) (1 PCS) (Order code: 070050016)
Fewer facets lens (21° x 34° Oblong beam shape) (1 PCS) (Order code: 070050014)
Many facets lens (30° x 51° Oblong beam shape) (1 PCS) (Order code: 070050015)
Gel frame (For installing the paper filter colour) (1 PCS)
Barndoors (1 SET)
G-bracket (1 PCS)
Locking knob (1 PCS)
Tool for uninstalling the lens (1 PCS)
Safety cord (1 PCS)
This manual (1 PCS)
Thank you for purchasing the product PRO-PAR D, PR-3040 D.
This product manual contains important information about the safe installation and use of this projector. Please read
and follow these instructions carefully and keep this manual in a safe place for future reference.
The PRO-PAR D is an innovative projector with an elegant housing made of high quality aluminiun-alloy with an
insulating painting finish. The product complies to CE norms and standards. It can be hung easily and safely. The
angle of inclination for the projector-body is convenient to be adjusted. The light beam can reach a long distance and
there are various kinds of lenses for your choice to produce different light beam effects. You can also use colour filter
which is installed inside the gel frame to produce the desirable beam colour. The projector is suitable for use in stage,
disco, or artistic applications.
ACCESSORIES
INDEX
INTRODUCTION
Page 3

3/10 PRO-PAR D manual_Last Revision_en .doc
The following points are important for safety as well as for the smooth installation and
performance of the unit.
When unpacking and before disposing of the package check there is no transportation damage before using the
projector. Should there be any damage caused by transportation, consult your dealer and do not use the apparatus.
Keep the package well for your possible future transportation.
The projector is for indoor use only, IP20. Use only in dry locations. Keep this device away from rain and moisture,
excessive heat, humidity and dust. Do not allow contact with water or any other fluids, or metallic objects.
The projector is only intended for installation, operation and maintenance by qualified personnel.
The projector must be installed in a location with adequate ventilation, at least 50cm from adjacent surfaces.
Do not project the beam onto inflammable surfaces, minimum distance is 5m. 5m
Avoid direct exposure to the light from the lamp. The light is harmful to the eye.
Do not attempt to dismantle and / or modify the projector in any way.
Electrical connection must only be carried out by qualified personnel.
It is essential that each projector is correctly earthed and that electrical installation conforms to all relevant standards.
Hot housing surface! It can reach above 200℃! Do not touch the housing of the projector with your hand during
operation.
Make sure that the power-cord is never crimped or damaged by sharp edges. Never let the power-cord come into contact
with other cables. Only handle the power-cord by the plug. Never pull out the plug by tugging the power-cord.
Keep the lamp and lens clean.
Do not touch the lamp-glass and lens with bare hand.
The lamp used in this projector is a Philips MSR575/2 discharge lamp. After switching off don’t attempt to restart the
projector until lamp has cooled, this will require approx 15 minutes. Switching the lamp on and off at short intervals will
reduce the life of both the lamp and the projector. But occasional breaks will prolong the life of the lamp and projector.
Always replace the lamp if it becomes damaged or deformed.
Always replace the lens if it becomes cracked or badly scratched.
Never run the projector without a lamp and a lens in place.
Always disconnect from the mains, when the device is not in use or before cleaning it or before
attempting any maintenance work.
If you have any questions, don’t hesitate to consult your dealer or manufacturer.
SAFE USAGE OF THE PROJECTOR
Page 4
4/10 PRO-PAR D manual_Last Revision_en .doc
Fixing Holes
Gel Frame
Barndoors
Handle
Locking Knob
Electric Box Projector
Ring
Handle
Locking Knob
Lens Rotation Ring
Handle
Safety Cable
MSR Lamp
Fixing Holes
Bracket
Lamp Housing
With the Retaining Clip
in Locked Position
Gel Frame
Lens
Barndoors
Locking Screw
Main Power Cord
Projector's Power Cord
G-clamp
Safety Cord
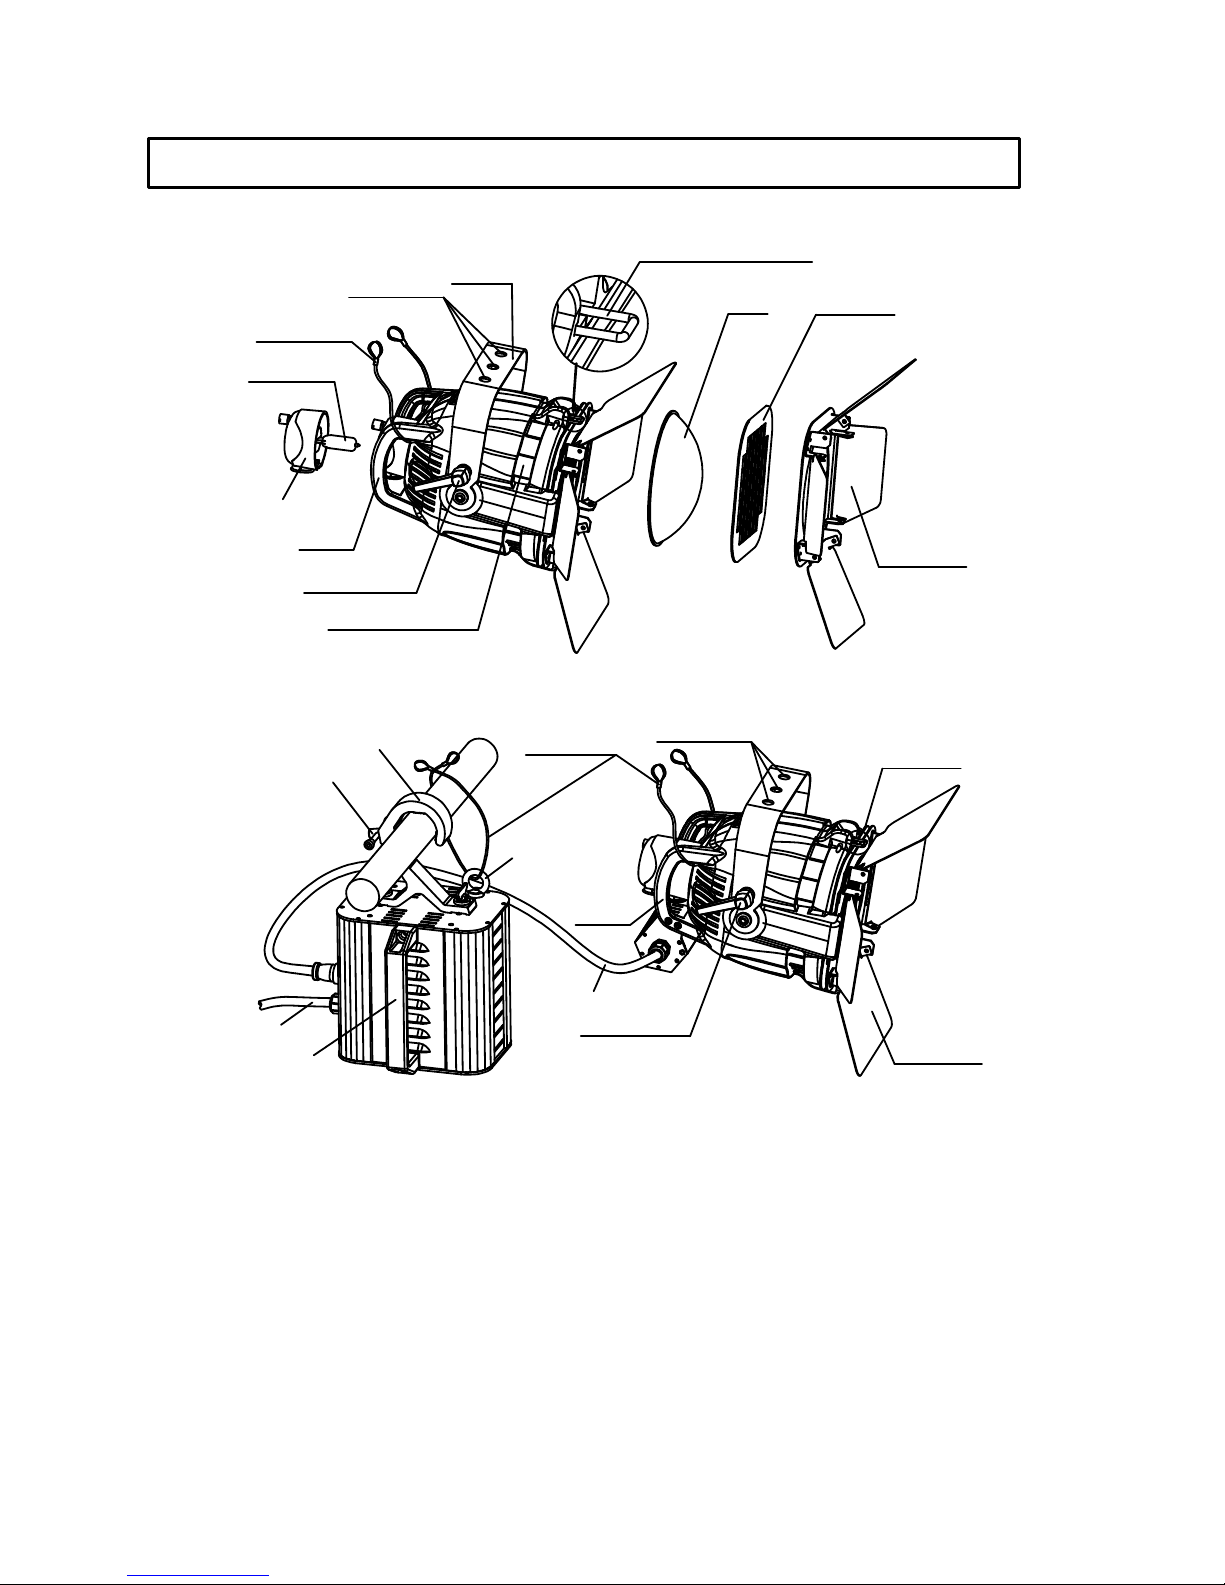
This unit has been designed to be hung. Please check that all accessories are found.
Beforehand mount the G-bracket, locking knob and lens in their positions. And mount the Gel Frame and Barndoors if
needed.
Hang the projector via the fixing holes of its bracket using M12 size bolts. Hang the electric box and fasten the locking
screw.
For safety the projector and the electric box should have secondary mounting respectively with a safety cord through
the two handles on the back of the projector and another through the ring on the electric box. Always ensure that the
projector is firmly positioned to avoid vibration and slipping, and always ensure that the structure to which you are
attaching the projector is secure and is able to support 10 times of the weight of each PRO-PAR D.
Connect the projector’s power cord to electric box before connecting the main power cord.
Loosen the locking knob to adjust the angle of the projector.
WARNING: The electric box MUST be lifted or carried by the HANDLE instead of G-clamp.
INSTALLING THE PROJECTOR
Page 5
5/10 PRO-PAR D manual_Last Revision_en .doc
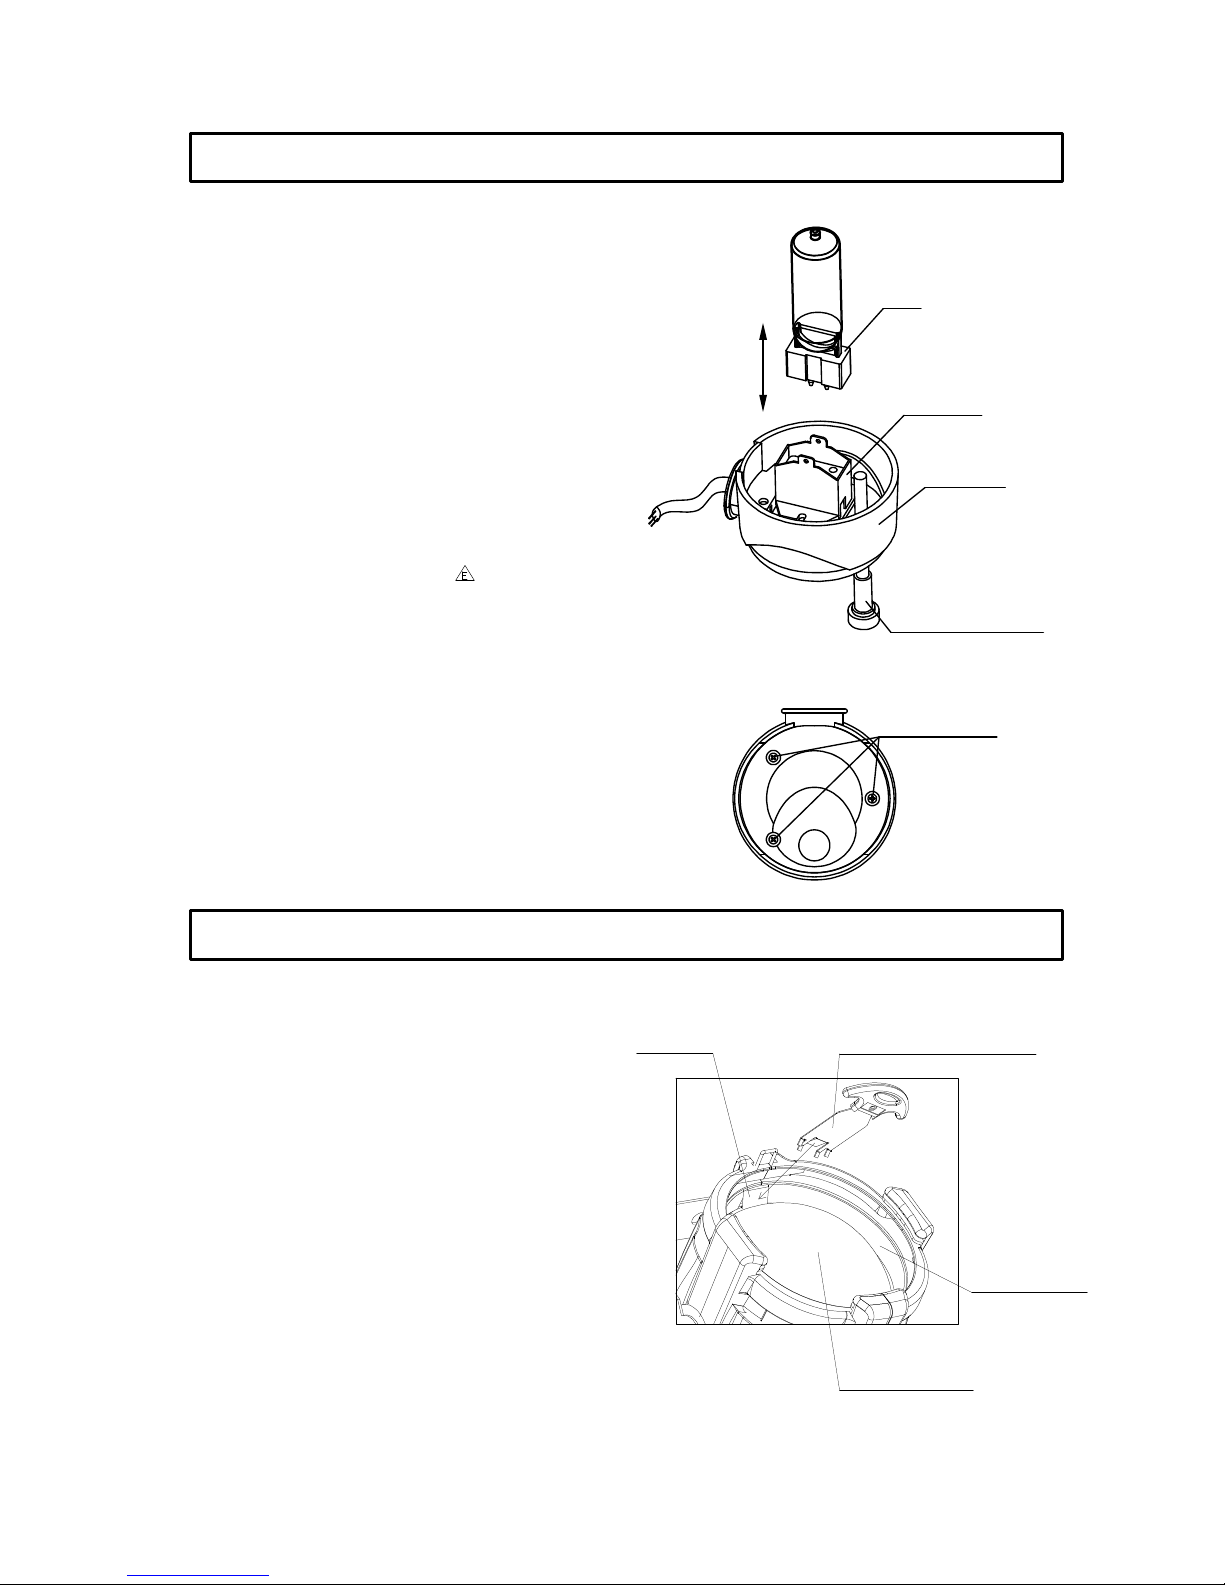
Important: Before installation the MSR lamp
verify that the MSR lamp you use is suitable for
the voltage at your facility.
Loosen the cover’s locking screw on the back of the
lamp housing and pull the rear cover straight out from
the back of the projector.
Remove the old MSR lamp from lampholder, holding it
by the base.
Push down on the lamp base until the new MSR lamp
is firmly seated. Make sure that the lamp is fully seated.
Reinstall the rear cover. Center it on the reflector and
the screw hole. Then tighten the locking screw to
secure the rear cover in place.
Notes: don’t touch the bulb of the new lamp with
bare hand so as not to influence the beam output.
WARNING: The MSR series are high-pressure
lamps with external igniters ( ). Care should
always be taken when handling these lamps.
Always read the manufacturers "Instructions for
use" enclosed with the lamp.
After the fitting is done, turn the projector on and 5
minutes later adjust 3 adjusting screws to focus for the
optimum light output.
REMOVING A LENS
Unplug the fixture and let the fixture cool sufficiently
before handling the lens.
Place the fixture on a flat, stable work surface. Do not
install or remove lens with the unit hanging.
It is easy to use the lens tool provided to remove the
lens. When uninstalling the lens, let the middle tooth of
the tool push down the spring clip and the other teeth
will lift the edge of the lens from the lens rotation ring.
INSTALLING A LENS
Hold the lens by the edge, and position the convex side
facing the front of the fixture.
Position the edge of the lens behind the tabs of the
lens-rotation-ring and gently push the lens inward until it snaps behind the spring clip.
FITTING THE LAMP
CHANGING THE LENS
Tool for Uninstall the Lens
Lens With the
Convex Side Out
Spring Clip
Lens Rotation
Ring
Adjusting Screws
Cover's Locking Screw
Rear Cover
Lampholder
Lamp
Page 6

6/10 PRO-PAR D manual_Last Revision_en .doc
To ensure the reliability of the projector it should be kept clean. The lens and reflector should be always cleaned to
maintain an optimum light output.
Do NOT use any glass cleaner or any type of solvent on the reflector. Before cleaning the reflector remove the
lens so you can access the reflector from the front of the fixture. When cleaning the reflector use a damp, clean, soft,
lint-free cotton cloth with mild, soapy water solution and gently wipe the reflector, and then remove any soapy water
residue with a clean, soft, lint-free cotton cloth dampened with water. Do not use paper towels or harsh materials to
wipe the reflector.
Cleaning frequency depends on the environment in which the fixture operates: damp, smoke or particularly dirty
surroundings can cause greater accumulation of dirt on the unit’s optics. A soft cloth and typical glass cleaning
products should be used in cleaning. It is recommended to clean the lens at least once every 20 days and clean the
reflector at least once every 30 / 60 days.
Do not use any organic solvent, e.g. alcohol, to clean the housing of the projector.
The unit is supplied with a power cord. Should any other connections be required they must be carried out with the
following configuration: Earth = Green/Yellow cord.
KEEPING THE PROJECTOR CLEAN
POWER CONNECTIONS
Page 7
7/10 PRO-PAR D manual_Last Revision_en .doc
Power supply: 230V AC 50Hz
Optional: 240, 220, 120, 100V AC 50/60Hz
Power consumption: 575W at 220V
Lamp: Type: Philips MSR 575/2 discharge lamp
Colour Temperature: 7200ºK
Socket: GX9.5, single end
Manufacturers Rated Lamp Life: 1000 Hours
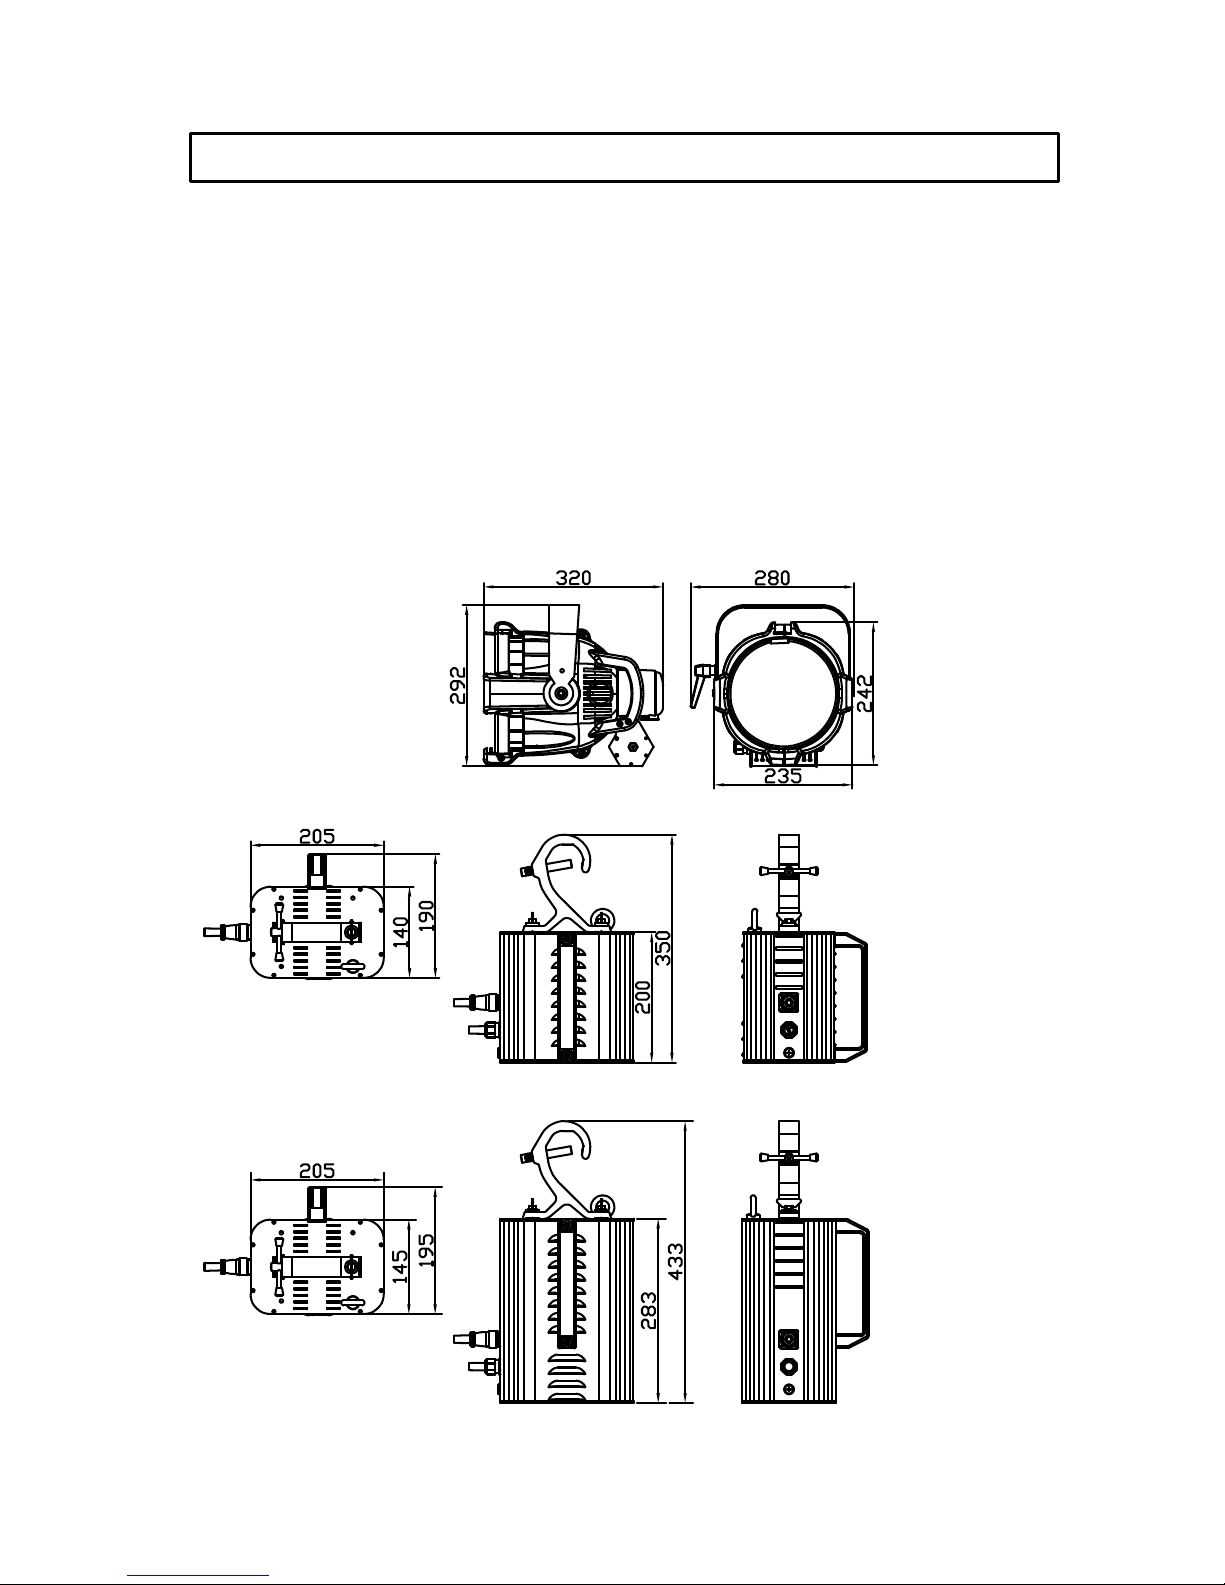
Net Weight: Eu mode: 16kg (include electric box 11kg)
US mode: 20Kg (include electric box 15kg)
EU mode
US mode
TECHNICAL SPECIFICATIONS
Page 8
8/10 PRO-PAR D manual_Last Revision_en .doc
2m
0m
1m
7m
0
0
2.2
5
4m
2m
6m
5m
1m
3m
6.6
15 20
4.4
10
8.8 112513.3
30
6m
4m
2m
5m
3m
7m
Stipple lens:19° round beam
11500
Lux
2875 1277 700 310460
10.7x18.62.7x4.7
0
8.0x13.95.4x9.3 16.0x27.913.3x23.3
13m
2m
25°
9m
5
11m
10m
12m
13m
0 10 15
8m
4m
6m
5m
3m
7m
6m
5m
4m
0m
2m
3m
1m
1m
12m
11m
10m
9m
8m
7m
302520
30°x50°
2.8x5.3
Fewer facet lens:21°X34° retangle beam
3250 360810
6m
0.7x1.3
0
7m
0
155 10
1.4x2.6 2.1x3.9
0m
2m
4m
3m
1m
1m
5m
130 90200
4.2x7.9
3025
3.5x6.6
20
8°x15°
Clear, flat lens:14° round beam
6m
7m
3m
5m
4m
Many facet lens:30°X51° oblong beam
6750 7501680 270 180420
DIAMETER
DISTANCE
5m
6m
5m
6m
7m
4m
2m
4m
2m
0m
1m
1m
3m
3m
7m
25
0m
0m
2.2m5m4.5m
10m
6.6m
15m
8.8m
20m
11m
25m
13m
30m
15000 lux
3750 lux 1660lux 930 lux 600 lux 410 lux
Lux
Lux
Lux
DISTANCE
DIAMETER
DISTANCE
DIAMETER
DISTANCE
DIAMETER
Page 9

9/10 PRO-PAR D manual_Last Revision_en .doc
Page 10

10/10 PRO-PAR D manual_Last Revision_en .doc
PR LIGHTING LTD.
Add: Yingbin Road, Dashi, Panyu, Guangzhou, China
Post-Code:511430
TEL:( 020)8478 1888
FAX:( 020)8478 6023
P/N: 321010078
Last Revision: 24:02:2004
 Loading...