

Page 1

SALT FX® Pro Halogenerator
User Manual
Page 2

Thank you for purchasing this PRIZMA's device. Be sure to read this instruction
Dear customer,
manual thoroughly before using the product so that you can use it safely and
correctly. Please keep this instruction manual always at hand for future reference.
Be sure to use the device properly according to this instruction manual.
Page 3

Version
Date:
Description of changes:
1.0
Dec 2015.
Initial version
2.0
Jun 2017.
Section “Installation”
3.0
Sep 2018.
Illustrations
Index
Revision list
MAKE SURE TO READ THIS SECTION
Exemption from liability........................................................................... ... 1
Notes on safety ..................................................................................... ... 2
ABOUT THE DEVICE
Device features ........................................................................................ 8
Principle of operation ................................................................................ 9
Parts of the device.................................................................................... 10
INSTALLATION
Installation ............................................................................................. 11
HOW TO USE THE DEVICE
How to prepare session............................................................. ................. 18
How to work ............................................................................................ 20
At the end of the work day ........................................................................ 23
HOW TO TAKE CARE OF THE DEVICE
Cleaning.......................................................................................... ............ 24
Storing ............................................................................................... ...... 28
TROUBLESHOOTING
Troubleshooting ........................................ .............................................. 29
SAFE DISPOSAL
Proper disposal of electronic waste ......................................... .................. 30
Symbols ........................................... .................................................... 30
SPECIFICATIONS
Specifications ......................................................................................... 31
Salt consumption ................................................................................... 31
Document revisions
Page 4

Please understand that PRIZMA is not liable for the following:
1. Any trouble and/or damage caused by the maintenance and/or repair
conducted by other than PRIZMA or PRIZMA's authorized dealer.
2. Trouble and/or damage of PRIZMA's product caused by the product of other
manufacturer not delivered by PRIZMA.
3. Trouble and/or damage caused by maintenance and/or repair using the
repair part(s) not authorized by PRIZMA.
4. Trouble and/or damage caused as a result of not observing the Notes on
Safety or operating method mentioned in this Instruction manual.
5. Deviation from the operating conditions of the product mentioned in this
Instruction manual including the power source and installation environment.
6. Trouble and/or damage caused as a result of modifying and/or improper
repair of the product.
7. Trouble and/or damage caused by natural disasters such as fire, earthquake,
flood or lightning.
1. The content of this Instruction manual are subject to change for improvement
without prior notice.
2. The content of this Instruction manual has been prepared with care and
attention. However, if you find any omission or error, please inform your local
PRIZMA representative or dealer.
3. It is prohibited to copy all or a part of this Instruction manual without getting
PRIZMA's permission. Unless you use this Instruction manual for your
personal (corporate) purpose, you are not allowed to use it without PRIZMA's
permission in accordance with the Copyright Act.
Exemption from liability
Page 5

Warning sign
Contents
Warning
Indicates situations in which the possibility of death or severe
body injury may arise as a result of incorrect handling.
Caution
Indicates situations in which body injury or material damage*
may arise as a result of incorrect handling.
Examples of signs
The icon indicates caution
(including warning and
danger). Situations involving
actual caution are indicated
by statements or pictures in
or near .
The sign
refers to
“caution for
flammability”.
The sign
refers to
“caution for
electric
shock”.
The icon indicates
prohibitions (what you
cannot do). Matters involving
specific prohibitions are
indicated by text or pictures
shown in or near .
The sign
refers to
“prohibition
to
disassemble”.
The sign
refers to
“general
prohibition”.
The icon indicates
something that is compulsory
(must be observed at any
time). Situations involving
specific compulsory actions
are indicated by statements
or pictures shown in or near
.
The sign
refers to
“general
compulsion”.
The sign
refers to
“unplugging
the power
plug”.
Notes on safety
The warning signs and the sample icons shown here are listed for you to use this
product safely and correctly as well as to prevent the risk of injury to you and
others.
The icons and meanings are as follows:
* Material damage refers to a wide range of damage involving your house,
household goods, domestic animals and pets.
Page 6

IMPORTANT SAFETY
INSTRUCTIONS
WANING - When using electric appliances, basic precautions
should always be followed, including the following:
Read all the instructions before using the appliance.
To reduce the risk of injury, close supervision in
necessary when an appliance is used near children.
Do not contact moving parts.
Only use attachments recommended or sold by the
manufacturer.
Do not use outdoors.
To disconnect, turn all controls to the off (“O”) position,
then remove plug from outlet.
Do not unplug by pulling on cord. To unplug, grasp the
plug, not the cord.
Unplug from outlet when not in use and before servicing
or cleaning.
Do not operate any appliance with a damaged cord or
plug, or after the appliance malfunctions or is dropped or
damaged in any manner. Return appliance to the nearest
authorized service facility for examination, repair, or
electrical or mechanical adjustment.
Connect to a properly grounded outlet only. See
Grounding Instructions. Do not use grounding adaptor.
SAVE THESE INSTRUCTIONS
Notes on safety
Page 7

WARNING
Use only salt approved for medical purposes,
Subject of session physical condition may get worse.
This appliance can be used by children aged from 8 years
and above and persons with reduced physical, sensory or
mental capabilities or lack of experience and knowledge if
they have been given supervision or instruction concerning
use of the appliance in a safe way and understand the
hazards involved. Children shall not play with the appliance.
Cleaning and user maintenance shall not be made by
children without supervision.
Clean the device after use.
Salt is deposited inside the device while working. Salt is a
corrosive substance. Corrosion can occur and damage
some parts of the device.
In case of a problem with this device please, contact your
local PRIZMA service representative (address on/ inside
package).
Do not use this device in the vicinity of flammable gases or
in areas with high risk of explosion.
Only salt can be used.
Do not disassemble the device while plugged into an
electric outlet.
You may suffer an electric shock or injure yourself.
Do not operate the device with wet hands.
You may suffer an electric shock or injure yourself.
Do not wash the device with water, or pour water over it.
You may suffer an electric shock in the event of a short
circuit.
Notes on safety
Page 8

WARNING
The device is intented for operation with dry salt NaCl.
If you use other substances, malfunction may occur or the
device may be damaged.
Relative humidity must be up to 40%.
If the device is used at higher relative humidity, the
degradation of its performance may occur.
If the product parts have already become dirty before using
the device, clean them first before use.
If the salt remains in the device, the degradation of its
performance may occur.
Disposal of this device should be carried out in accordance
with national regulations for disposal of electronic products.
WARNING
If you are not going to use the device for a long time, be
sure to unplug the power plug from the electric outlet.
You may suffer an electric shock or the device may ignite
due to electric leakage.
Be sure to turn off the power and unplug power supply
when you install, remove, clean, or repair the device or take
care of the parts.
You may suffer an electric shock or injure yourself.
This equipment must be connected only to a supply mains
with protective earth.
You may suffer an electric shock or injure yourself.
Mains plug is considered as disconnecting device. Mains
power outlet used for connection of the halogenerator to
the mains should be easily reachable to the operator.
Do not look into the output air flow during nebulisation.
Large amounts of salt can reach your eyes and cause
Notes on safety
Page 9

damage.
Do not fill the tank with any substances other than pure dry
salt approved for medical use.
Damage to the device or performace degradation may
occur.
Do not use the power cord or plug if it is damaged, or do not
plug into a loose electric outlet.
You may suffer an electric shock or short circuit may occur
and cause ignition.
Do not scratch, tear, modify, bend by using force, pull, twist,
or bundle the power cord. Do not place heavy objects on the
power cord. Keep power cord away from heated or hot
surfaces.
You may suffer an electric shock or the device may ignite
due to short circuit caused by deteriorated insulation.
Do not perform disassembly, repairs or modifications of any
kind.
It may cause malfunction of the device or human injury.
There are no parts serviceable by user inside the device.
Contact your nearest PRIZMA service representative.
Do not use a power cord other than the supplied one.
The device may ignite or you may suffer an electric shock.
Be sure to use the specified power source.
The device may ignite or you may suffer an electric shock.
Do not share the electrical socket with other electrical
devices.
The device may ignite or you may suffer an electric shock.
To unplug, do not pull the power cord. Instead, hold the
power plug with your hand.
The power cord may be damaged, short circuit may cause
fire, or you may suffer electric shock.
Do not open the door of the halogenerator when session
session is in progress.
There are rotating parts inside the halogenerator. They
can cause human injury.
Notes on safety
Page 10

General advice
Do not use the product for the purpose other than for producing dry salt NaCl
aerosol generation.
Do not use any parts other than the accessories or optional parts listed in this
Instruction Manual.
Do not fill the tank with more than 150g of dry salt.
Do not block the air ventilation holes at the bottom side of the device.
Do not operate if the deflector plate is removed.
Large amount of salt can reach your skin or eyes.
After cleaning the parts, dry completely before re-assembling.
Do not wipe the device with volatile chemicals, such as benzene or thinners.
Although this device fulfils the provisions of the EMC (Electromagnetic
Compatibility) directive, the use of it should be avoided in direct vicinity of other
electric devices.
Do not allow unsupervised children or infirm persons to use the device.
This appliance shall be installed in accordance with national wiring regulations.
This appliance shall not be accessible to general public.
Notes on safety
Maintenance
Before using the device, make sure to confirm that the device operates normally
and safely.
How to deal with faults or accidents
If an error occurs, immediately take the following measures:
1) Turn power to the unit OFF and unplug from the electrical outlet.
2) Place a notice on the device “Faulty-Do not use”.
3) Contact the store where you purchased the product or the nearest PRIZMA
dealer.
Page 11

Device features
About the device
All mechanical parts and electronics are located inside one cabinet. Device is
powered from the mains, via power cord.
Touch screen displays program number, salt dispensing mode during session,
fan speed, remaining time of session and indication of problems during
session. The back-light illuminates the display in darkness.
There is a touch-sensitive surface on the display. It allows easy interactive
device operation. The unit has a notification buzzer. The buzzer makes a
sound when some of the commands on display are touched.
This device operates in the unlicensed ISM band at 2.4GHz,
using BLUETOOTH communication. In case this product is used
nearby other wireless devices, including microwave and
wireless LAN, operating in the same frequency band, there is a
possibility that interference occurs between this product and
such other devices. If interference occurs, please stop the operation of other
devices.
Page 12

Principles of operation
About the device
1) The dispenser works in programmed time intervals and drops small amounts
of salt from the salt tank down to grinder.
2) Grinder breaks salt grains to salt dust particles of various size, from few
microns to parts of millimeter.
3) Air flow pulls small and light salt particles from the grinder and blows them
out.
4) Output airflow containing salt particles hits the deflector plate. Coarse and
heavy salt particles are not able to follow sudden change of airlow, they hit
the deflector plate and drop down. Fine and light particles can follow the
airflow, pass the deflector plate and get inside the salt room.
5) It is assumed that the device is mounted outside the salt room, with user
being inside and operator in the vicinity of the device.
Page 13

Parts of the device
About the device About the device
Power cord
NEMA 5-15P plug
Brush
4 pcs
Extension
sleeve and
deflector
Grinder
power plug
Salt filling
orifice
Dispenser
Fan
Grinder
Fan power
plug
Display
Dispenser
power plug
Dispenser
fuse
Grinder
fuse
Page 14

Installation Instructions
Clean room
Salt room
Wall
Halogenerator
Outlet hole
INSTALlATION INSTRUCTIONS
Choose appropriate position for halogenerator on wall between clean room
and salt room. Center of the outlet hole should be about 1m above floor level.
Drill a 110 mm diameter hole for outlet in the wall, between clean room and
salt room.
Put halogenerator against drilled 110 mm hole. Mark 4 holes for anchors
(holes are at rear side of halogenerator case) and remove halogenerator from
the wall.
Drill four 8mm diameter holes for nylon anchors, and insert the anchors into
the holes.
Mount the halogenerator on the wall selecting four 5.5x60mm-DIN7997 metal
screws.
Note: For detailed montage instructions, refer to accompanying documents.
Insert power cable to power plug.
WARNING: Do not use a power cord other
than the supplied one.
Page 15

Installation Instructions
Power plug
Ventilation/light
control plug
Fuse holder
Main switch
Note: Power plug is on the bottom side of the halogenerator.
Note: Mains plug is considered as disconnecting device. Mains power outlet
used for connection of the halogenerator to the mains should be easily
reachable to the operator.
If you use an external circuitry for ventilation and light control, insert jack in
plug for control of external circuitry (central jack conductor always carry
+24VDC, shield is connected to 0V when session is in progress, and
disconnected when session is not in progress. Plug can carry current for one
control relay operating on 24VDC (max 100mA).
Note: Plug for control of external circuitry is on the bottom side of the
Connect power cord to grounded mains power inlet. Do not use grounding
halogenerator.
adaptor.
Page 16

Installation Instructions
Installation Instructions
GROUNDING INSTRUCTIONS
This appliance must be grounded. In the event of malfunction or breakdown,
grounding provides a path of least resistance for electric current to reduce the risk of
electric shock. This appliance is equipped with a cord having an equipment-grounding
conductor and a grounding plug.
The plug must be plugged into an appropriate outlet that is properly installed and
grounded in accordance with all local codes and ordinances.
DANGER - Improper connection of the equipment-grounding conductor can result in a
risk of electric shock. The conductor with insulation having an outer surface that is
green with or without yellow stripes is the equipment-grounding conductor. If repair
or replacement of the cord or plug is necessary, do not connect the equipmentgrounding conductor to a live terminal. Check with a qualified electrician or
serviceman if the grounding instructions are not completely understood, or if in doubt
as to whether the appliance is properly grounded. Do not modify the plug provided
with the appliance - if it will not fit the outlet, have a proper outlet installed by a
qualified electrician.
This appliance is for use on a nominal 120 V circuit, and has a grounding plug. A
temporary adaptor, may be used to connect this plug to a 2-pole receptacle if a
properly grounded outlet is not available. The temporary adaptor should be used only
until a properly grounded outlet can be installed by a qualified electrician. The green
colored rigid ear, lug, and the like, extending from the adaptor must be connected to
a permanent ground such as a properly grounded outlet box cover. Whenever the
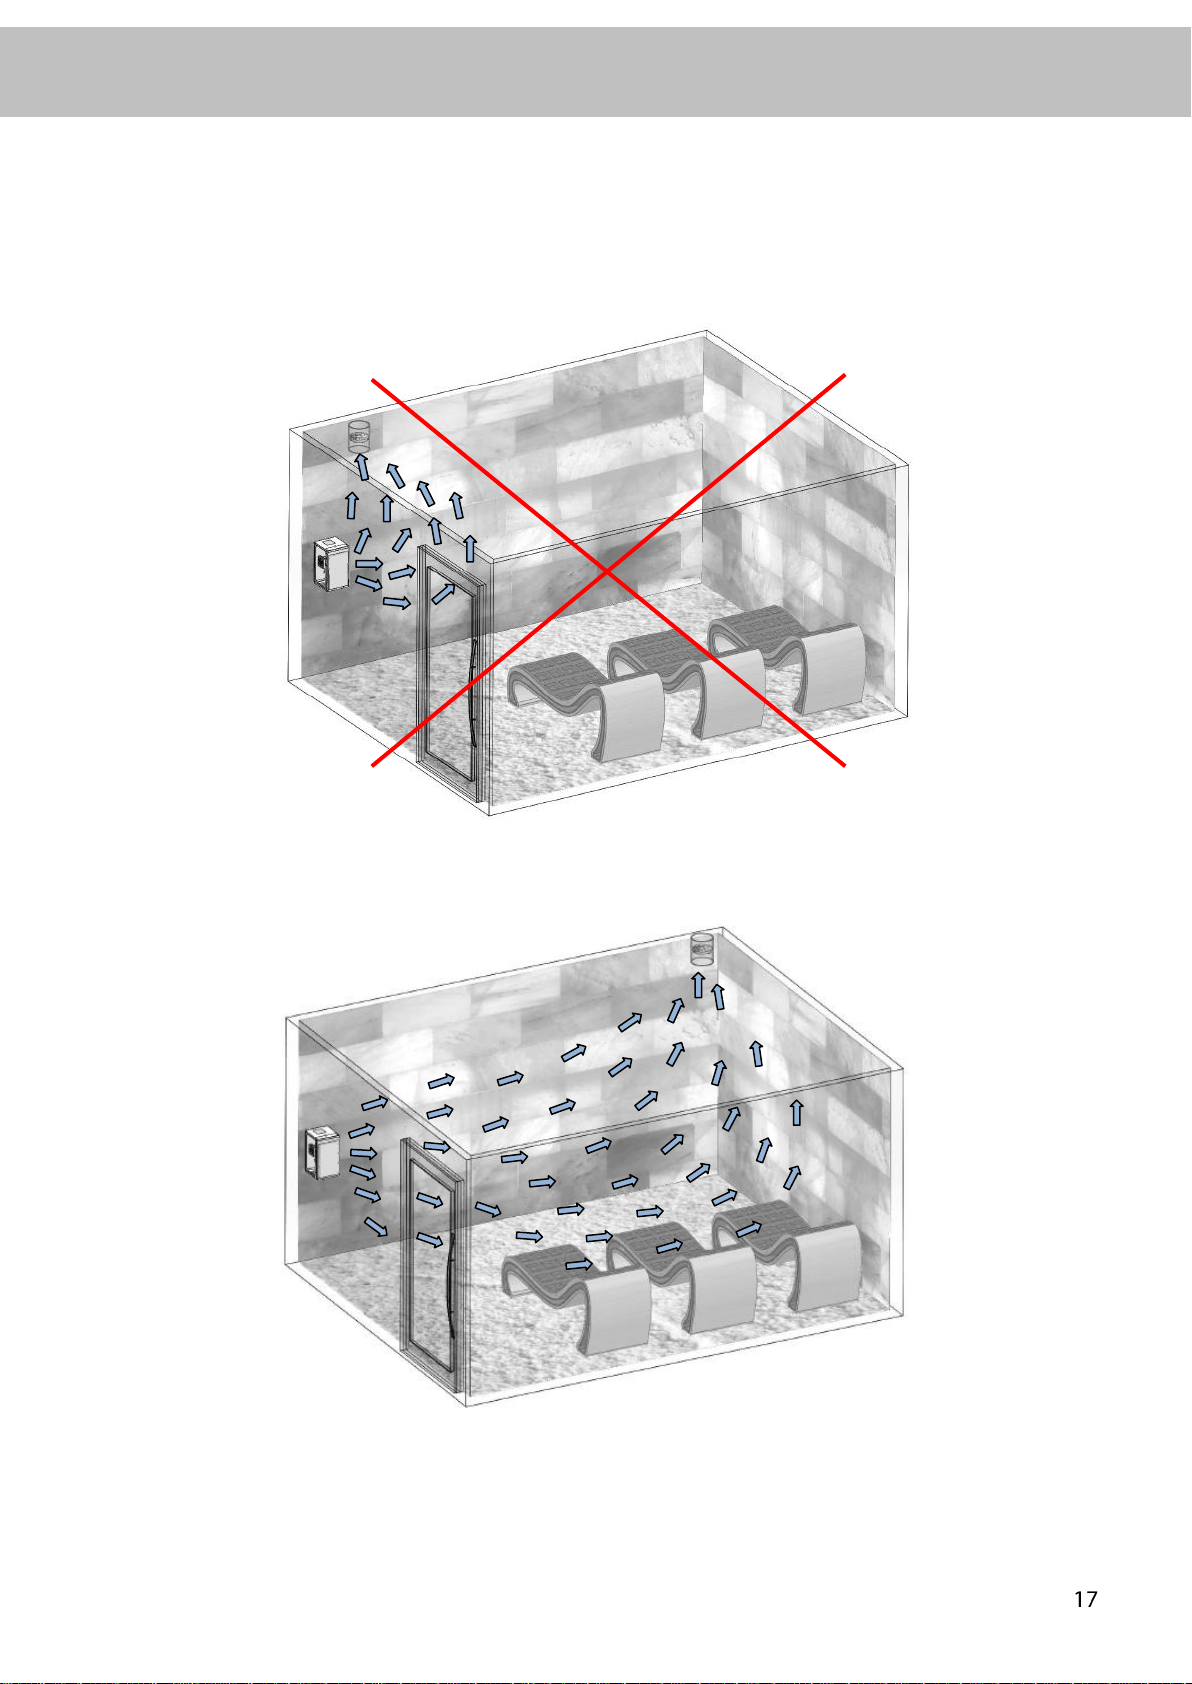
adaptor is used, it must be held in place by the metal screw.
Page 17

Installation Instructions
Instruction for positioning of the halogenerator in salt room
For proper operation of the halogenerator and salt room essential influence has:
Position of the halogenerator.
Supply of fresh air to the halogenerator.
Position of exhaust ventilation orifice.
Air exhaust from salt room.
Humidity of air.
Basically, halogenerator should create salt dust and mix it with air. Salt dust is
generated inside grinder of halogenerator. Air flow for mixing of salt with air creates
fan inside halogenerator. Flow of air created by fan strongly depends on difference of
air pressure before halogenerator and air pressure inside salt room. Decrease of size
of ventilation orifices, and cross section of ventilation ducts and increase of length of
ventilation ducts will result in increase of air pressure difference and decrease of air
flow. If air flow is not sufficient, salt dust will not go to salt room and will deposit
inside the halogenerator.
Page 18

Salt room
Halogenerator
Space for
halogenerator
Long, small cross area intake
and exhaust air ducts
Installation Instructions
Salt room
Halogenerator
Space for
halogenerator
Very short, big cross area
intake and exhaust air ducts
Installation examples
If ventilation system is perfect, and air pressure after halogenerator is 0.0 mm
H2O (0.0 inch H2O), fan can produce maximum air flow of 2.3 m3/min (80
CFM/min).
If air pressure inside salt room is 4.0 mm H
O (0.16 inch H2O) higher than air
2
pressure before halogenerator, fan can produce produce air flow of 1.0 m3/min
(35 CFM/min).
If air pressure inside salt room is more than 8.7 mm H
air pressure before halogenerator, fan will not produce air flow at all. Fan
blades will rotate, but there will be no air flow.
O (0.35 inch H2O) above
2
Page 19

Salt room
Halogenerator
Space for halogenerator
External "aiding" fan
circumventing halogenerator
Installation Instructions
Salt room
Halogenerator
Space for halogenerator
External aiding fans
Therefore, it is essential to have good supply of fresh air before halogenerator and
good air exhaust system from the salt room.
If air supply is not good enough (meaning high air pressure drop after halogenerator),
fan inside halogenerator will need help of additional fan/fans located in external air
installation. It can be fan that increase supply of fresh air before halogenerator or fan
that increase exhaust of air from salt room or both. Goal is to have air flow up to 3
m3/min (110 CFM/min).
It is prohibited that external fan supply air in salt room circumventing
halogenerator! In this case fan inside halogenerator must fight pressure drop created
by air ducts plus pressure drop created by "aiding" fan. Effective air flow through
halogenerator will be small and there will be no transport of salt dust from
halogenerator to salt room. In extreme situations, if external fan is stronger than fan
inside halogenerator, air flow through halogenerator can be reversed!
Page 20
Installation Instructions
To have good distribution of salt dust inside salt room, halogenerator and exhaust
orifice must be separated as much as possible. If they are close to each other, salt
dust will mainly go to exhaust orifice, instead to spread across salt room.
Picture bellow is example of good configuration of halogenerator and exhaust orifice.
Page 21

1. Intake of salt.
Remove the salt tank cover.
Prepare the salt for use. For proper operation of the
device, salt must be dry.
If the salt is wet, it is necessary to heat it up for 5-10
minutes to 80°C in order to remove moisture.
Pour the salt into the salt tank. Maximum allowable
quantity of salt is 150g.
Salt consumption
Rough estimation of salt consumption is 50g/h for each 10% of program setting, if
duration of inhalation is 1 hour.
If duration of inhalation is shorter than 1 hour, dependency will be more nonlinear.
How to prepare session
Page 22

2. Switching on the device.
Close the door of halogenerator.
Lock the door of halogenerator.
Turn the main switch on (position "1").
Note: The main switch is on the bottom of the control
unit.
How to prepare session
Page 23

Description of icons on screen
Session duration setup. Session duration is displayed next to
the button.
Program selection.
Air volume setup.
Choosing session steps.
Bar graph showing salt dispensing status during session.
Start the session.
Pause the session.
Quit the session.
Increase the value of the selected parameter.
Decrease the value of the selected parameter.
Confirm settings.
How to work
The unit is operated by pressing the command buttons on screen touch display. If you
touch a command button, the unit will produce a short sound. This way, a user has
both tactile and audible signs of operation.
Note: To avoid damaging the screen, please do not touch it with your fingernails or
sharp objects, only with finger tip.
Page 24

How to work
1. To set up duration of session
Press button or displayed number for session duration. Device will enter session
duration setup menu. Duration of session can be set by pressing or .
Maximum duration of session is 99 minutes. Duration of session is displayed in the
middle of screen.
2. To set session program
Duration of session and salt dispensing mode can be stored among nine programs.
Press button to select the program. Choose a program from 1 to 9 by pressing
button . Each pressing button will advance selected program number to one, in
sequence P1 - P2 - P3 - P4 - P5 - P6 - P7 - P8 - P9 - P1.
3. To set salt dispensing mode
Salt dispensing mode is displayed in the bar graph . Duration of session is
divided into 10 equal time intervals. Each time interval is assigned to a bar graph
column. Amount of dispensed salt may be adjusted from 0 to 100% of the capacity
separately for each time interval.
Press displayed bar graph. Cursor can be moved left or right bellow the bar
graph by pressing the buttons . Cursor must be placed bellow the bar graph
whose value should be set. By pressing and it is possible to set the salt
dispensing value from 0% to 100% in 10% steps. Press to confirm.
Page 25

Grinder is
blocked
Dispenser
is blocked
Dispenser
fuse is
blown
Grinder
fuse is
blown
How to work
4. To set air volume
Press button or displayed number above. Device will enter air volume setup
menu. Air volume can be set by pressing or . Air volume value may be
adjusted from 1 to 9. Press to confirm.
5. To start up the session
Press button to start the session. It will start if the door of the halogenerator is
closed and locked and grinder is not blocked. The button will change into ,
and button will appear on screen. The countdown of the session starts. Cursor
below the bar graph is moving during the session and shows the current step.
When the time of session has expired, nebulisation will stop and notification
buzzer will sound.
It is possible to adjust the salt dispensing mode and fan speed during the session. It
is not possible to change the session duration if it is in progress.
If the grinder is blocked or some of fuses are blown, the session will not start and
error description symbol will be displayed on the screen.
6. To pause the session
7. To quit the session
After fixing errors press button and start the session again.
Session can be paused by pressing button . It will change into . Nebulisation
and countdown will stop. Session will continue at any moment by pressing the
same button. The session countdown will start from the current value.
Session can be interrupted at any moment by pressing the button . A splash
screen will appear on the display. The latest settings of air volume and nebulisation
rate will be displayed. Duration of session will return to the start value before the
session.
Page 26

WARNING
Before disassembly and cleaning, turn off the main switch and
unplug the power cord from the electrical outlet.
You may suffer an electric shock or injure yourself.
At the end of the work day
At the end of the workday:
1 Turn off the main switch (position "0").
2 Unplug the power plug from the electrical outlet.
3 Clean the halogenerator.
Note: It is important that you clean the halogenerator thoroughly at the end of
the work day. Otherwise, salt will deposit on parts of device and will
decrease the efficacy of the session and salt aerosol concentration.
In environments with increased humidity and/or air-conditioner
deposition of salt may be increased than normally. In such circumstances,
it is necessary to clean the device several times during the working day.
Salt deposits can cause malfunction or defects in the device.
In extreme cases salt deposits may obstruct the dispenser, fan or grinder
and may damage the product parts (dispenser motor, dispenser gearbox,
fan or grinder motor).
Page 27

General advice
Do not wipe the main unit with volatile chemicals, such as benzene or thinners.
1.
Preparing for cleaning
Turn off the main switch (position "0")
on the bottom side of device.
Unlock the door, take them by hand
and open it.
Locate positions of power plugs for
dispenser, fan and grinder.
2.
Disconnection of power plugs
Disconnect dispenser, fan and grinder power plugs.
Plug disconnection is a two-step process.
1. At the top of the plug is securing ring,
preventing plug disconnection. Take securing ring
by fingers and rotate it GENTLY counterclockwise
until you feel resistance.
2. Pull the plug gently.
When you disconnect the plug, observe the keyhole
at the top of the connector.
Keyhole prevents wrong assembly of the plug.
Plug assembly should be made in reverse order of
disassembly. Align keyhole of plug, GENTLY push plug
in place and rotate securing ring clockwise until you
feel resistance.
How to take care of the device
Dispenser
power plug
Fan
power plug
Grinder
power plug
Keyholes
Securing
ring
Page 28

3.
Dispenser cleaning
Rotate the dispenser screw nut until it is
possible to pull it outside the dispenser body.
Pull the dispenser parts out of the dispenser
body.
Wipe any salt remaining inside, on the surface
of the salt tank.
Wipe out salt from all surfaces and blind holes
of the dispenser plug.
Wipe any salt on the inner surfaces of the
dispenser to the dispenser tube inside body
with a dry brush.
Take the dispenser by hand and move it up.
Rotate the dispenser and take it out of the
halogenerator.
How to take care of the device
Dispenser
screw nut
Page 29

4.
Fan cleaning
Take the fan cage by hand.
Pull the fan cage up and remove it from the
halogenerator case.
Remove the remaining salt inside the dispenser
body and rotating part with a dry brush.
Use the bottle brush to remove the remaining
salt inside the dispenser tube.
Put bottle brush inside dispenser tube, through
Remove the remaining salt inside the dispenser
tube.
How to take care of the device
Page 30

Wipe out any remaining salt on all fan surfaces
with a dry brush.
5.
Grinder cleaning
Hold the grinder flange by hand and slightly
rotate the flange.
Pull the grinder down and take it out of
halogenerator.
Clean all the surfaces of the grinder.
Do not forget to clean all the surfaces between
the grinder and grinder flange.
Use a long-stick dry brush to get rid of the
remaining salt inside the outer vertical tube.
Sweep up the salt collected on the bottom of
the halogenerator case through the holes.
6.
Assembly
Assemble all the parts in reverse order of disassembly.
How to take care of the device
Page 31

WARNING
Dry up all metal parts immediately if they get wet during
cleaning.
Metal parts may corrode.
Do not wash the product with water, or let water get into the
power supply.
Electrical leakage may occur in the unit or you may suffer an
electric shock.
Be sure to turn off the power and unplug the power supply
when you install, remove, clean, or repair the device or take
care of the parts.
You may suffer an electric shock or injure yourself.
Be sure that the plug can be easily removed from a socket
outlet!
How to take care of the device
Storing
If you do not intend to use the device for a period of time:
1. Be sure salt is thoroughly cleaned from the device.
2. Put a plastic cover over the salt filling hatch
3. Close the device.
Page 32

Trouble
Where to inspect
How to correct
The display does not
light up.
Is the power plug plugged
into a socket?
Plug the device into the
socket correctly.
Is the main switch in
position "1"?
Turn on the power switch
(position "1").
Have the switch fuses
blown?
Replace the fuses.
Product does not
produce aerosol.
Is there salt in the salt
tank?
Pour salt in the salt tank.
Is the dispenser power
plug connected?
Connect the dispenser
power plug.
Is the dispenser clean?
Clean the dispenser.
Is the fan power plug
connected?
Connect the fan power plug.
Is the grinder power plug
connected?
Connect the grinder power
plug.
Is the grinder clean?
Clean the grinder.
Is the halogenerator door
open or unlocked?
Close the halogenerator
door or lock them.
The display shows
alarm "Grinder is
blocked"
Inspect salt silts around
and beneath rotating part
of the grinder.
Use a small brush to
carefully remove salt from
the grinder and salt deposits
collected beneath the
grinder.
The display shows
alarm "Dispenser is
blocked"
Is the dispenser clean?
Use a small brush to
carefully remove salt from
the dispenser.
The display shows
alarm "Dispenser fuse
is blown"
Has the dispenser fuse
blown?
Replace the fuse.
The display shows
alarm "Grinder fuse is
blown"
Has the grinder fuse
blown?
Replace the fuse.
Troubleshooting
Troubleshooting
If the unit does not operate normally after the above-mentioned measures, do not
touch the internal mechanism and consult the store where you purchased the
device or the nearest PRIZMA dealer.
Page 33

Proper disposal of electronic waste
(Waste electrical & electronic equipment)
This marking shown on the product or its labels indicates that it should not be
disposed of with other household wastes at the end of its lifespan. To prevent
possible damage to environment or human health from an uncontrolled
waste disposal, please separate this from other types of waste and recycle it
responsibly, to promote the sustainable re-use of material resources.
Household users should contact either the retailer where they purchased this
product, or their local government office, for details of where and how they
can take this item for environmentally safe recycling.
Business user should contact their supplier and check the terms and
conditions of purchase contract. This product should not be mixed with other
commercial waste for disposal.
This product does not contain any hazardous substances.
Safe disposal
Symbols
= Warning: read the instruction manual carefully
= Correct disposal of This Product
= Do not open! Session in progress!
Kumanovska 8
34000 Kragujevac, Serbia
Manufacturer : PRIZMA Kragujevac d.o.o.
Page 34

Product name
:
PRIZMA Dry Salt Aerosol Generator
Model
:
PRIZSALT+S
Power source
:
120 V , 60Hz
Power consumption
:
25-35 W
Fuses
:
Switch: 2 x T2AH/250VAC;
Dispenser: T0. 5AL250VAC; Grinder: T1AL250VAC
Salt consumption
:
0 - 500g/h, adjustable
Air volume
:
2.3 m3/min (80 CFM/min)
Salt tank capacity
:
150g
External dimensions of
device
:
270 (W) x 480 (H) x 260 (D) mm
Net weight
:
13,5 kg
Operating conditions
:
20 - 40°C (68 - 104°F), 15 - 40% RH, 700 - 1060 hPa
Storage and transport
conditions
:
-25 - 70°C (-13 - 158°F), 20 - 93% RH
Accessories included
:
User manual (with warranty), deflector, extender
sleeve, brushes (4 pcs) and Power cord with NEMA
5-15P plug.
Specifications
Technical data
This device fulfils the provisions of the standard EN 60335-1.
- Specifications and appearance are subject to change without prior notice
Salt consumption
Measurement description:
Duration of measurement: 1 hour
Program settings: Settings in all time intervals was set to the same value (10%,
30%, 60% and 100%.).
Rough estimation of salt consumption is 50g/h for each 10% of program setting, if
duration of inhalation is 1 hour. If duration of inhalation is shorter than 1 hour,
dependency will be more nonlinear.
 Loading...