

Prism Medical UK Hammock Sling Child, Hammock Sling Junior, Hammock Sling Small, Hammock Sling Medium, Hammock Sling Large User Manual
...
Prism Hammock User Guide Rev 6 - Feb 2015 page 1
© Prism Medical UK 2015
User Manual
Prism Hammock Sling Range
Prism Hammock User Guide Rev 6 - Feb 2015 page 2
© Prism Medical UK 2015
Prism Hammock Sling
Application
The Hammock Sling provides maximum support to the sacral area and is used in
cases where the Universal Sling is unsuitable because the individual has poor lower
body tone. It can be used to transfer from the seated to recumbent position or from
recumbent to seated. The person must be assessed by a competent person who
must be fully trained in the suitability, application and fitting of the sling. Carers
should always be trained in the use of hoists and slings.
This sling is usually used in a divided leg position however can be used in a cross
over position for amputees or other people following an accurate risk assessment.
Sling Inspection
All Prism slings are manufactured to meet and exceed the requirements of
BS EN 10535:2006 ’Hoists for the transfer of disabled persons– Requirements and
test methods’. Slings should be inspected prior to use and after washing. Damaged
or badly worn slings should be discarded… The label on the sling contains vital
information to identify the sling - if any part of the label becomes illegible, then it
must be removed from service and replaced.
The sling should be visually inspected with regard to the following items:-
Any signs of damage (i.e. cuts, frays, tears, burns) to the sling straps
Any signs of stitching becoming undone on any part of the sling
Any signs of the fabric being stretched, tearing or undue wear
Any signs of discolouring or bleaching on the material
Is the sling complete? i.e. all straps present, stiffeners in place - where
applicable, etc
Label clearly legible
Compatibility
The issue of sling compatibility with various manufacturers’ hoists has been a
concern for specifiers for a number of years, an issue that is compounded by the
increased number of companies supplying hoists and slings.
Some hoist/sling manufacturers will state that only slings manufactured by them can
be used on their hoists and vice versa. This is their policy only and is NOT a legal
requirement. A risk assessment must still be completed even if the same
manufacturer of hoist and sling are to be used, and the specifier simply has to state
that the carry bar is of a similar design and that the sling manufacturer has authorised its use on it.
A comprehensive list is available separately and your local agent will be able to
provide assistance with compatibility issues.
Maximum Load (Safe Working Load - SWL)
The maximum load for the sling is clearly marked on the label of the sling. The
maximum load will also be displayed on the hoist and any detachable elements of
the hoisting system.
DO NOT exceed the maximum load stated on any of the equipment.
Prism Hammock User Guide Rev 6 - Feb 2015 page 3
© Prism Medical UK 2015
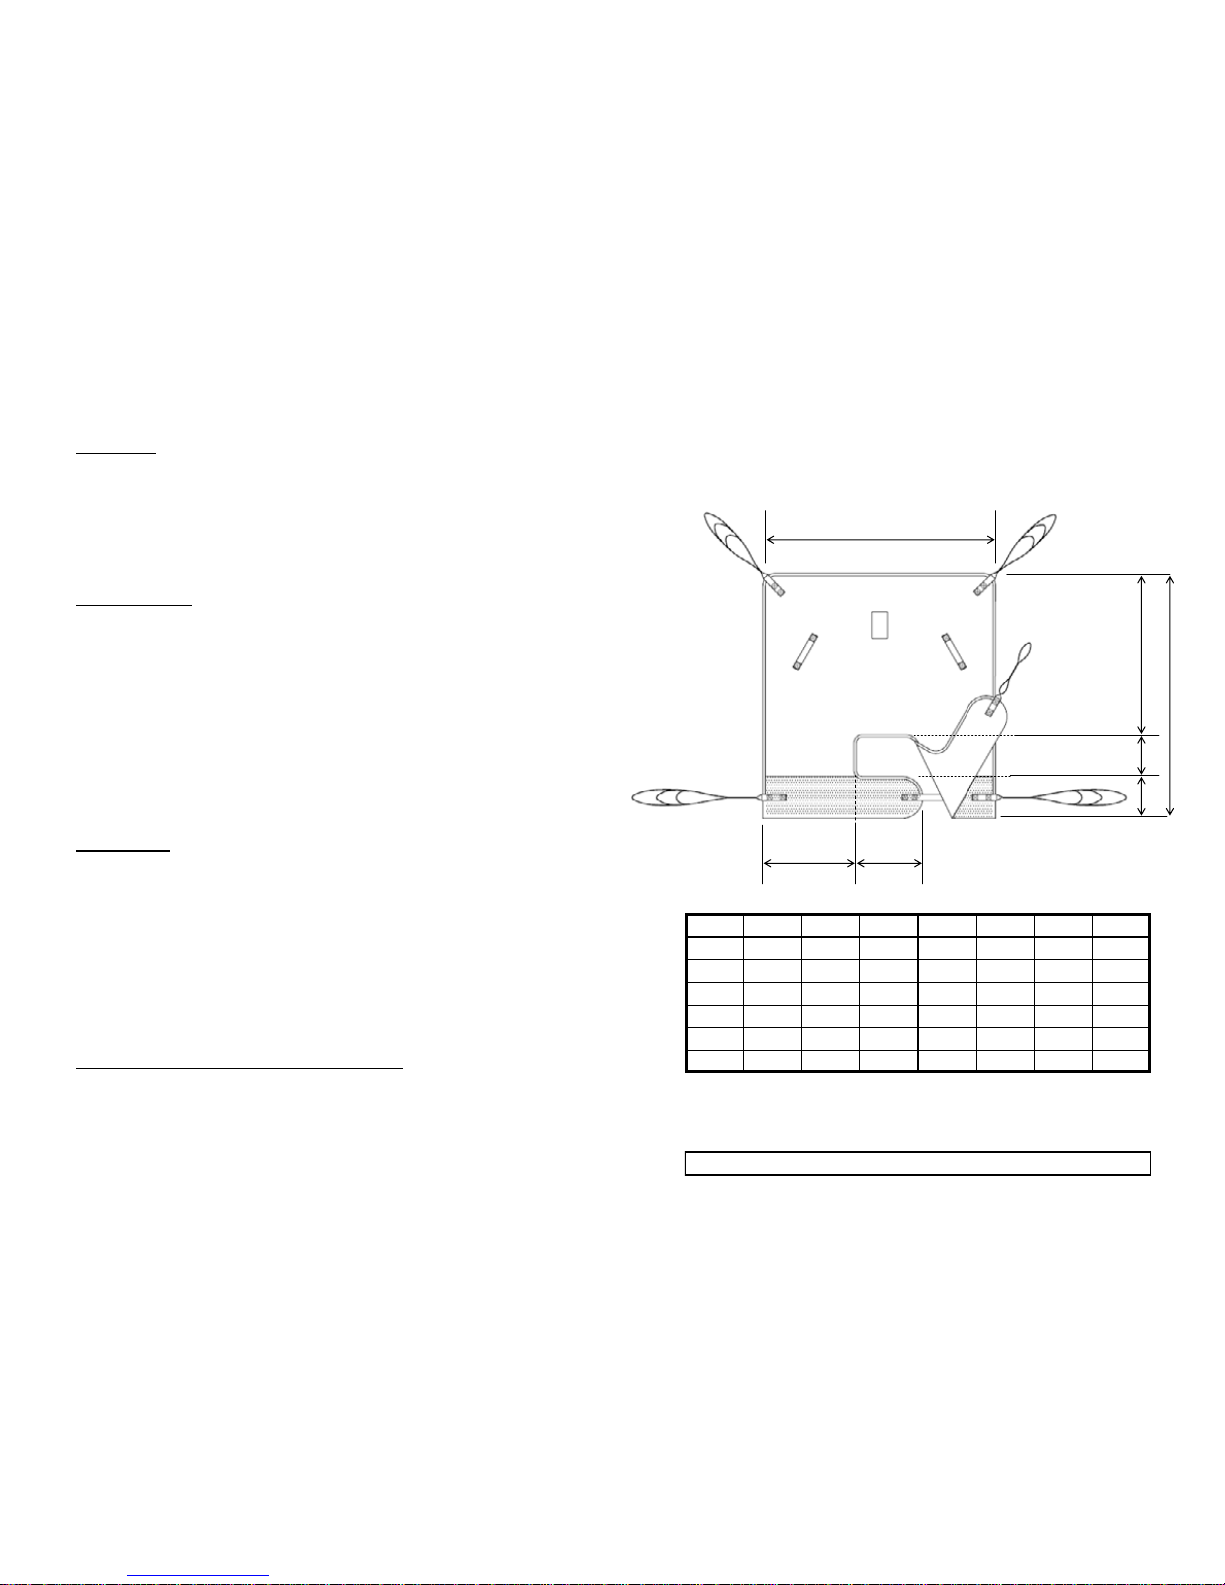
A B C D E LF1 LF2
Child 640 670 115 450 105 245 200
Junior 750 850 150 580 120 310 240
Small 850 950 160 630 160 310 350
Medium 960 1060 185 700 175 370 360
Large 1050 110 200 700 200 390 430
X Large 1180 1180 250 730 200 400 495
Sling Dimensions
A
C
D
E
LF1 LF2
B
All dimensions have a tolerance of +/- 20mm
Note : All slings are available either with or without Head Support
Prism Hammock User Guide Rev 6 - Feb 2015 page 4
© Prism Medical UK 2015
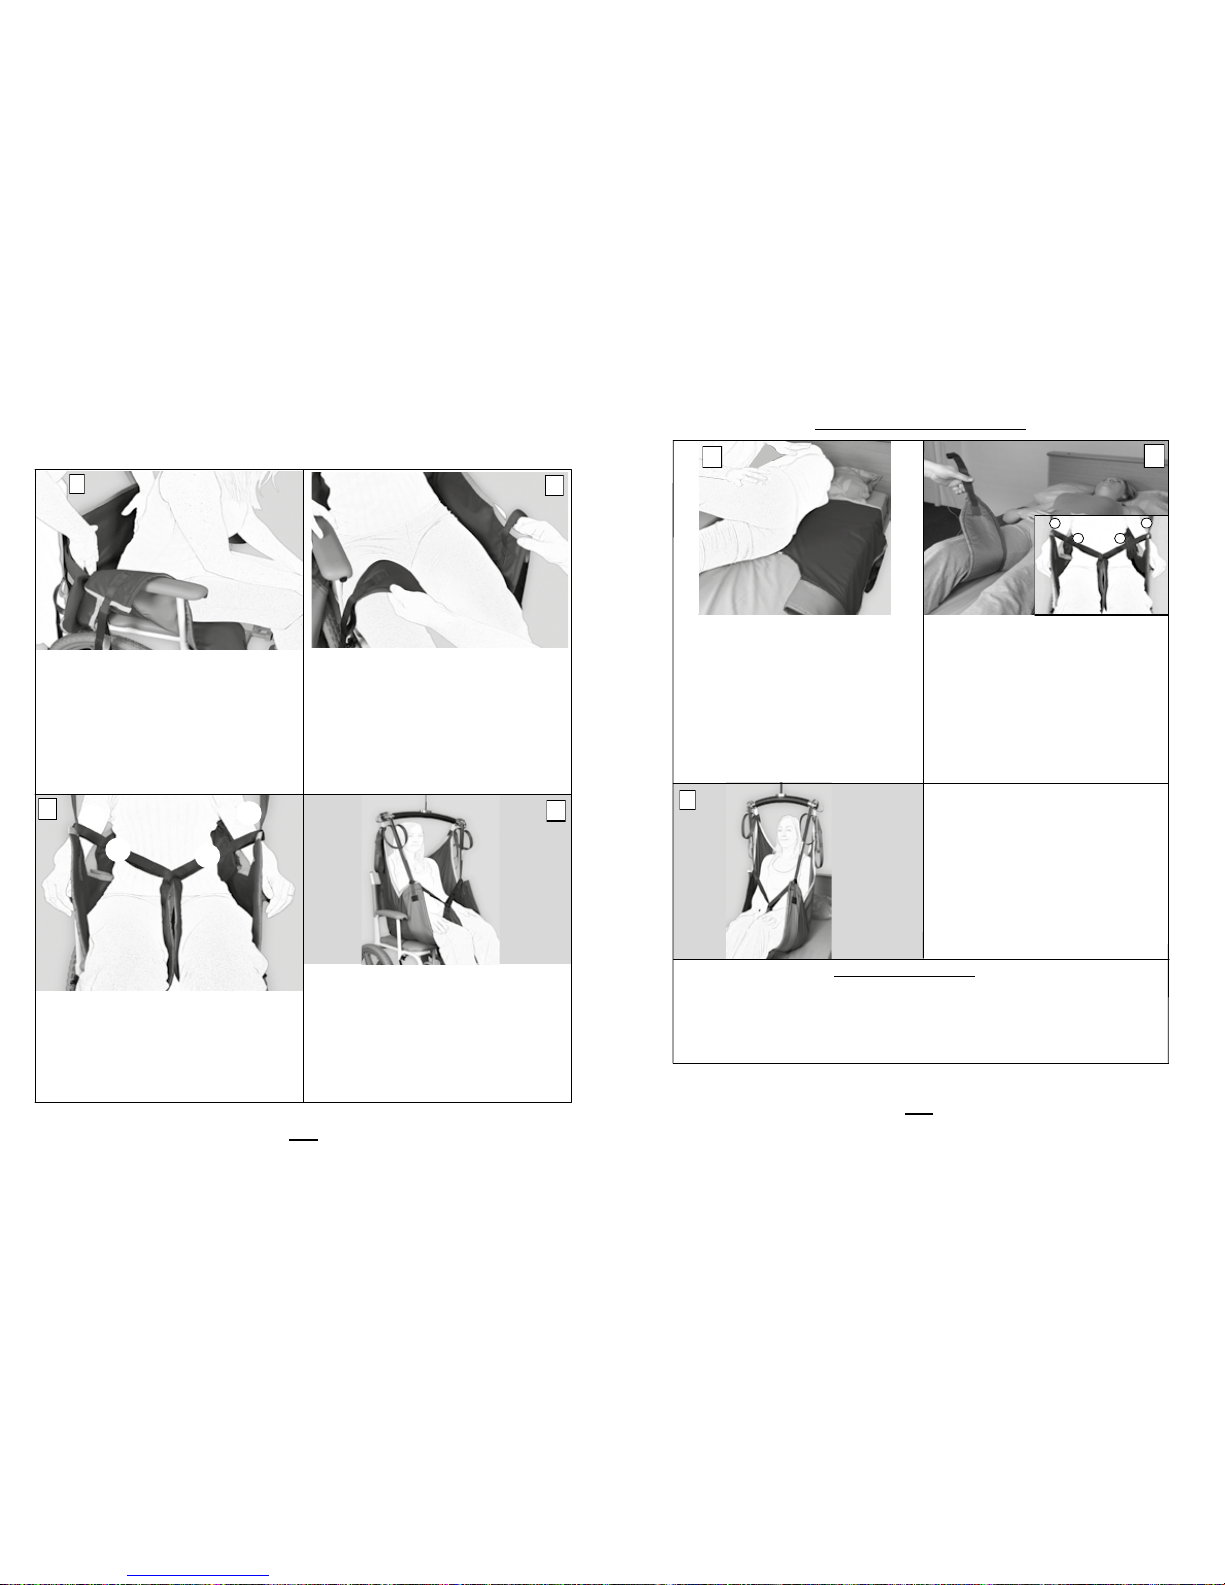
Hoisting from a chair
Introduce the sling by sliding it down between
the chair backrest and the person’s back until
the top of the commode aperture reaches the
base of the spine. If the sling can not be
introduced from behind , apply the sling in a
position level with the person. Leave the sling
half way down the persons back (at this stage
don’t bring the sling to shoulder level).
Bring the leg sections along-side the person’s
thighs and pull lightly to ensure that they are of
equal length. Using good manual handling
techniques, raise the persons leg and feed the
leg sections under the person’s thighs.
Cross strap A through the loop at the base of
strap B. Pass strap C through loop A and pass
strap D through loop B. Now raise the top of the
sling level with the person’s shoulders. The
fitting of the sling is now complete.
The four straps should now be attached to the
carry bar hooks. Raise the carry bar just
enough to tension the straps and ensure that
they are still securely attached. The person
can now be lifted as required. To remove the
sling, carry out the fitting procedure in reverse.
Important - always peel the sling away from
the person - this avoids skin friction and
movement.
To remove the sling, carry out the fitting procedure in reverse.
Important - always peel the sling away from the person to avoid skin friction and movement.
Notes
The above techniques are for guidance only and you must comply with your loca l policies
If in doubt, consult your moving and handling advisor
Note: The person to be transferred shall be referred to as “the person”.
C
A
B
D
3
1
2
4
Prism Hammock User Guide Rev 6 - Feb 2015 page 5
© Prism Medical UK 2015
Using good manual handling techniques
roll the person towards you so that they
are positioned on their side . To introduce
the sling, roll half of the sling up
underneath itself so that when the person
is rolled onto their opposite side, the sling
can be unrolled until it is flat. Use the
centre markers to ensure the base of the
back section is in line with the base of the
person’s spine. Ensure that handle loops
Pass the leg section under and up between
the thighs. Ensure that as much section as
possible is pulled under the leg and that all
creases are eliminated to achieve maximum comfort.
Cross strap A through the loop at the base
of strap B Pass strap C up through strap A
and pass strap D through strap B. The
fitting of the sling is now complete.
The four straps should now be attached to
the carry bar hooks. Raise the carry bar
just enough to tension the straps and
ensure that they are still securely
attached. The person can now be lifted as
required.
2
3
C
A
B
D
Hoisting from the floor
Before commencing the manoeuvre, introduce a pillow to ensure the client is
comfortable. Follow the procedures 1-2 as above to fit the sling. If using a mobile hoist,
introduce the hoist using the method approved in your local area so that the carry bar is
positioned correctly above the client.
Procedure 3 can now begin.
Hoisting from a lying position
To remove the sling, carry out the fitting procedure in reverse.
Important - always peel the sling away from the person to avoid skin friction and movement.
Notes
The above techniques are for guidance only and you must comply with your local po licies
If in doubt, consult your moving and handling advisor
1
 Loading...