

Page 1
PrismCut
Cutter/Plotter
with WiFi
USER MANUAL
Version 1.6 Sept 20, 2019
Page 2

www.prismcut.com
www.prismcut.com
SAFETY INFORMATION
IMPORTANT - READ THIS SECTION IN FULL BEFORE PROCEEDING
This product is designed for use as a cutter/plotter for vinyl and similar density
materials. Use of the product in ways for which it was not designed can be very
dangerous and will void the warranty
The product has fast moving parts and uses sharp blades. To avoid injury, keep
fingers, hands, hair, loose clothing and other body parts away from the carriage
head, rollers and other moving parts when the cutter is powered on.
Keep small children and pets away from the cutter whenever it is on.
Do not disassemble, repair, or remodel the plotter unless specifically instructed
to do so by a qualified technician. Such action may cause electric shock or a
fire hazard due to current leakage.
Use only the provided power supply and connect only to a properly grounded
three prong wall outlet. Failure to do so may result in electrical shock or fire.
Do not use the cutter in an area where it will be exposed to water, rain, snow
or other liquids that may get into the cutter. Fluids falling into the cutter may
cause electrical shock.
If the cutter generates sparks, smoke, strange odor or otherwise functions
abnormally, discontinue use, disconnect the cutter from the wall socket and
contact the dealer from which you purchased the product. Never attempt to
perform repair work yourself unless under the direction of the qualified service
technician.
Do not use the optional accessories without first reading and understanding all
the safety instructions for that accessory. Failure to do so may cause a hazard
and injury to you or others.
2
Page 3

www.prismcut.com
www.prismcut.com
TABLE OF CONTENTS
Section 1 - GETTING STARTED
1.1 Training videos..........................................................................page 4
1.2 Hardware setup........................................................................page 4
1.3 Understanding vectorized vs. rasterized images........page 6
1.4 Connecting your cutter via WiFi.......................................page 7
1.5 Software installation: Sure Cuts a Lot (MAC)...............page 8
1.6 Software installation: Vinyl Master (Windows PC).....page 10
.
Section 2 - MAKING YOUR FIRST CUT
2.1 Overview of materials that can be cut...........................page 12
2.2 Loading material in the cutter..........................................page 12
2.3 Using the pen tool to test your design.........................page 13
2.4 Understanding blades and the blade holder..............page 13
2.5 Speed and Force settings..................................................page 14
2.6 Tips for achieving optimal results...................................page 14
2.7 Connecting your cutter via USB cable..(optional)....page 15
Section 3 - ADVANCED TECHNIQUES
3.1 Moving from Basic Menu to Advanced Menu..............page 16
3.2 Advanced settings options.................................................page 16
3.3 Configuring Presets...............................................................page 17
3.4 U-disk (cut from thumb drive without PC)..................page 18
3.5 Contour cutting (print and cut with reg marks)........page 19
3.6 Using the (optional) embossing tool.............................page 24
3.7 Using the (optional) engraving tool...............................page 24
3.8 Using the (optional) laser attachment..........................page 25
3.9 Connecting cutter via point to point WiFi...................page 25
Section 4 - MAINTENANCE AND TROUBLESHOOTING
4.1 Care and maintenance of your cutter.............................page 26
4.2 Calibration/Settings..............................................................page 27
4.3 Troubleshooting cutter issues...........................................page 29
4.4 Warranty and support..........................................................page 31
Also, see PrismCut online video training to view the most current updates.
www.prismcut.com/videos
3
Page 4
www.prismcut.com
www.prismcut.com
Section 1 - GETTING STARTED
1.1 Training videos
If you prefer to watch instead of read, you can find training videos that match
the material presented in the manual at: www.prismcut.com/videos
1.2 Hardware setup
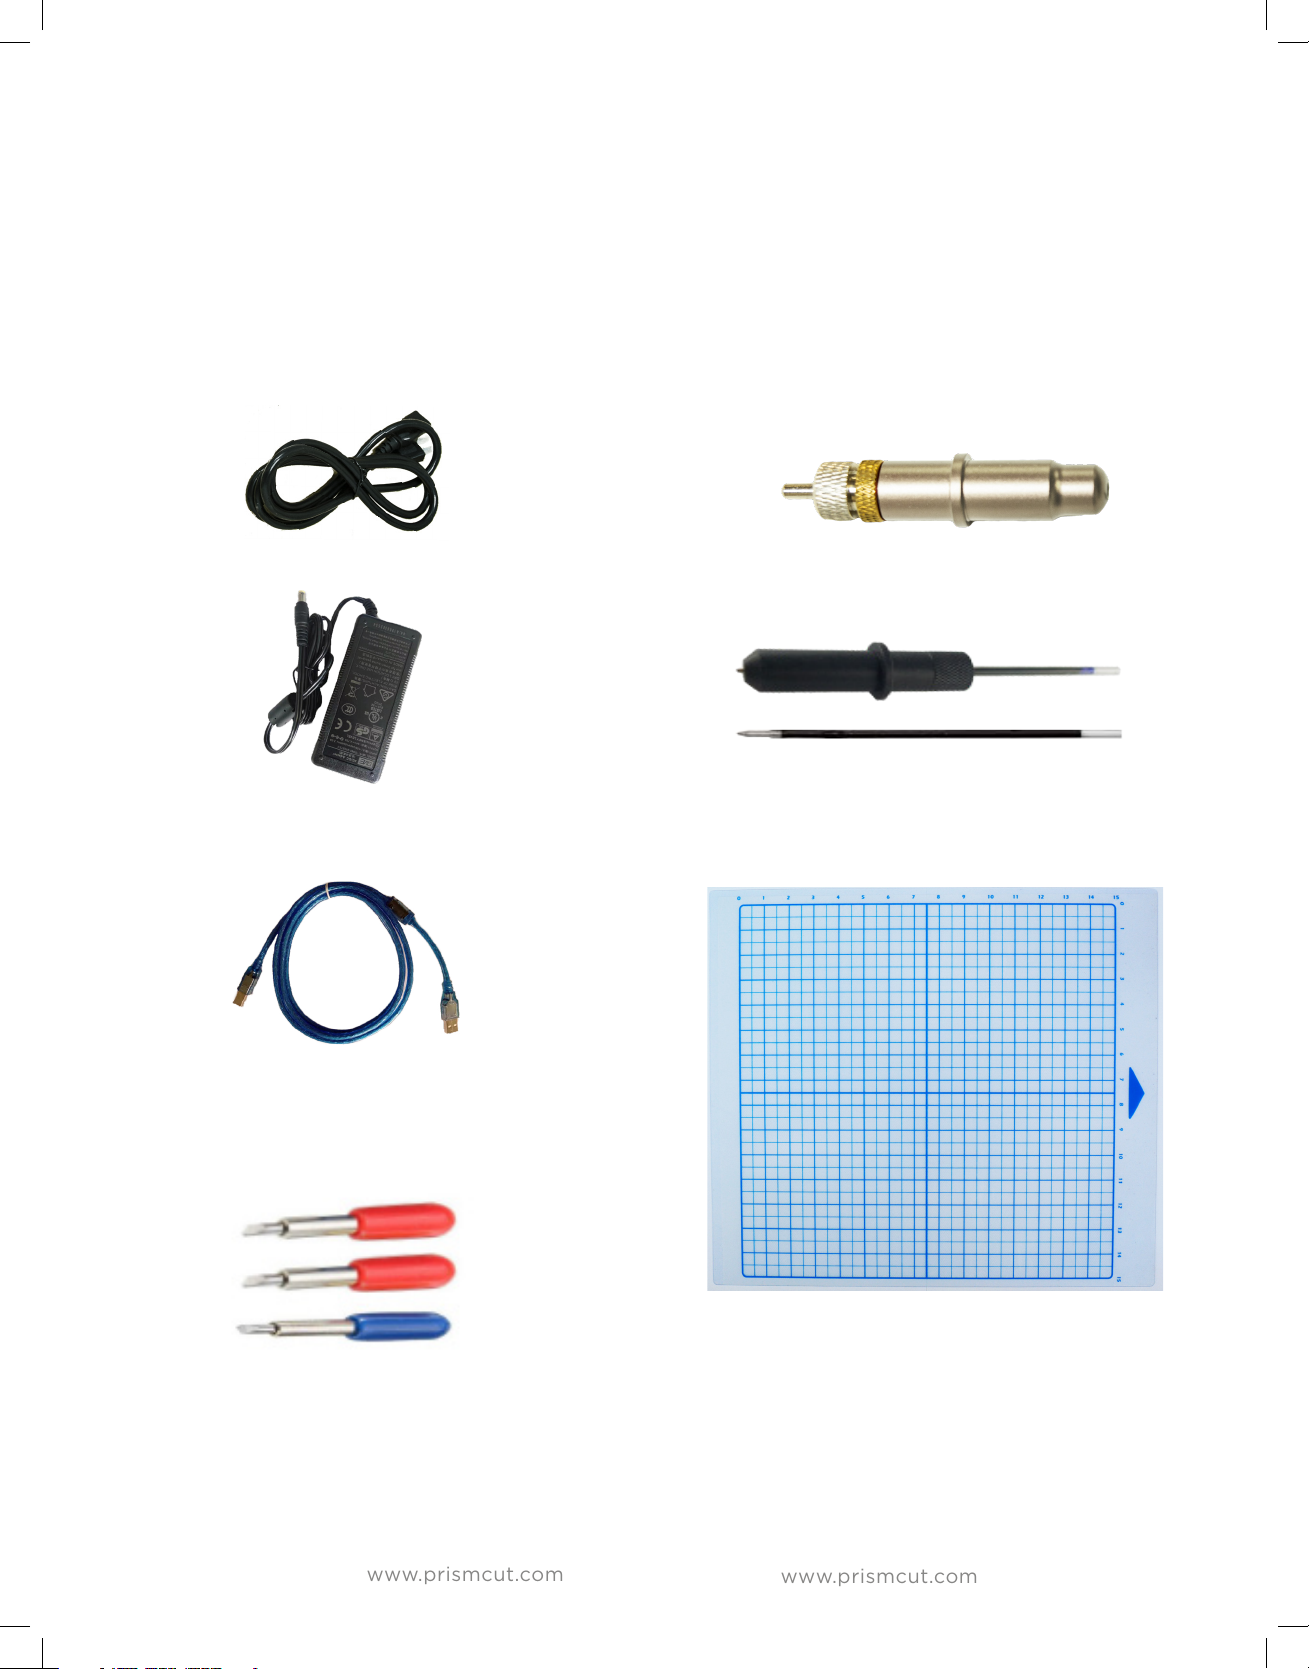
Your PrismCut cutter/plotter ships with the following standard accessories:
POWER CABLE
POWER ADAPTOR
USB CABLE
BLADE HOLDER
PEN & REFILL
Optional accessories available for purchase are described in Section 3 of this user manual
CUTTING MAT
15” x 15”
BLADE SET
2 x 45 degree
1 x 60 degree
4
Page 5
www.prismcut.com
www.prismcut.com
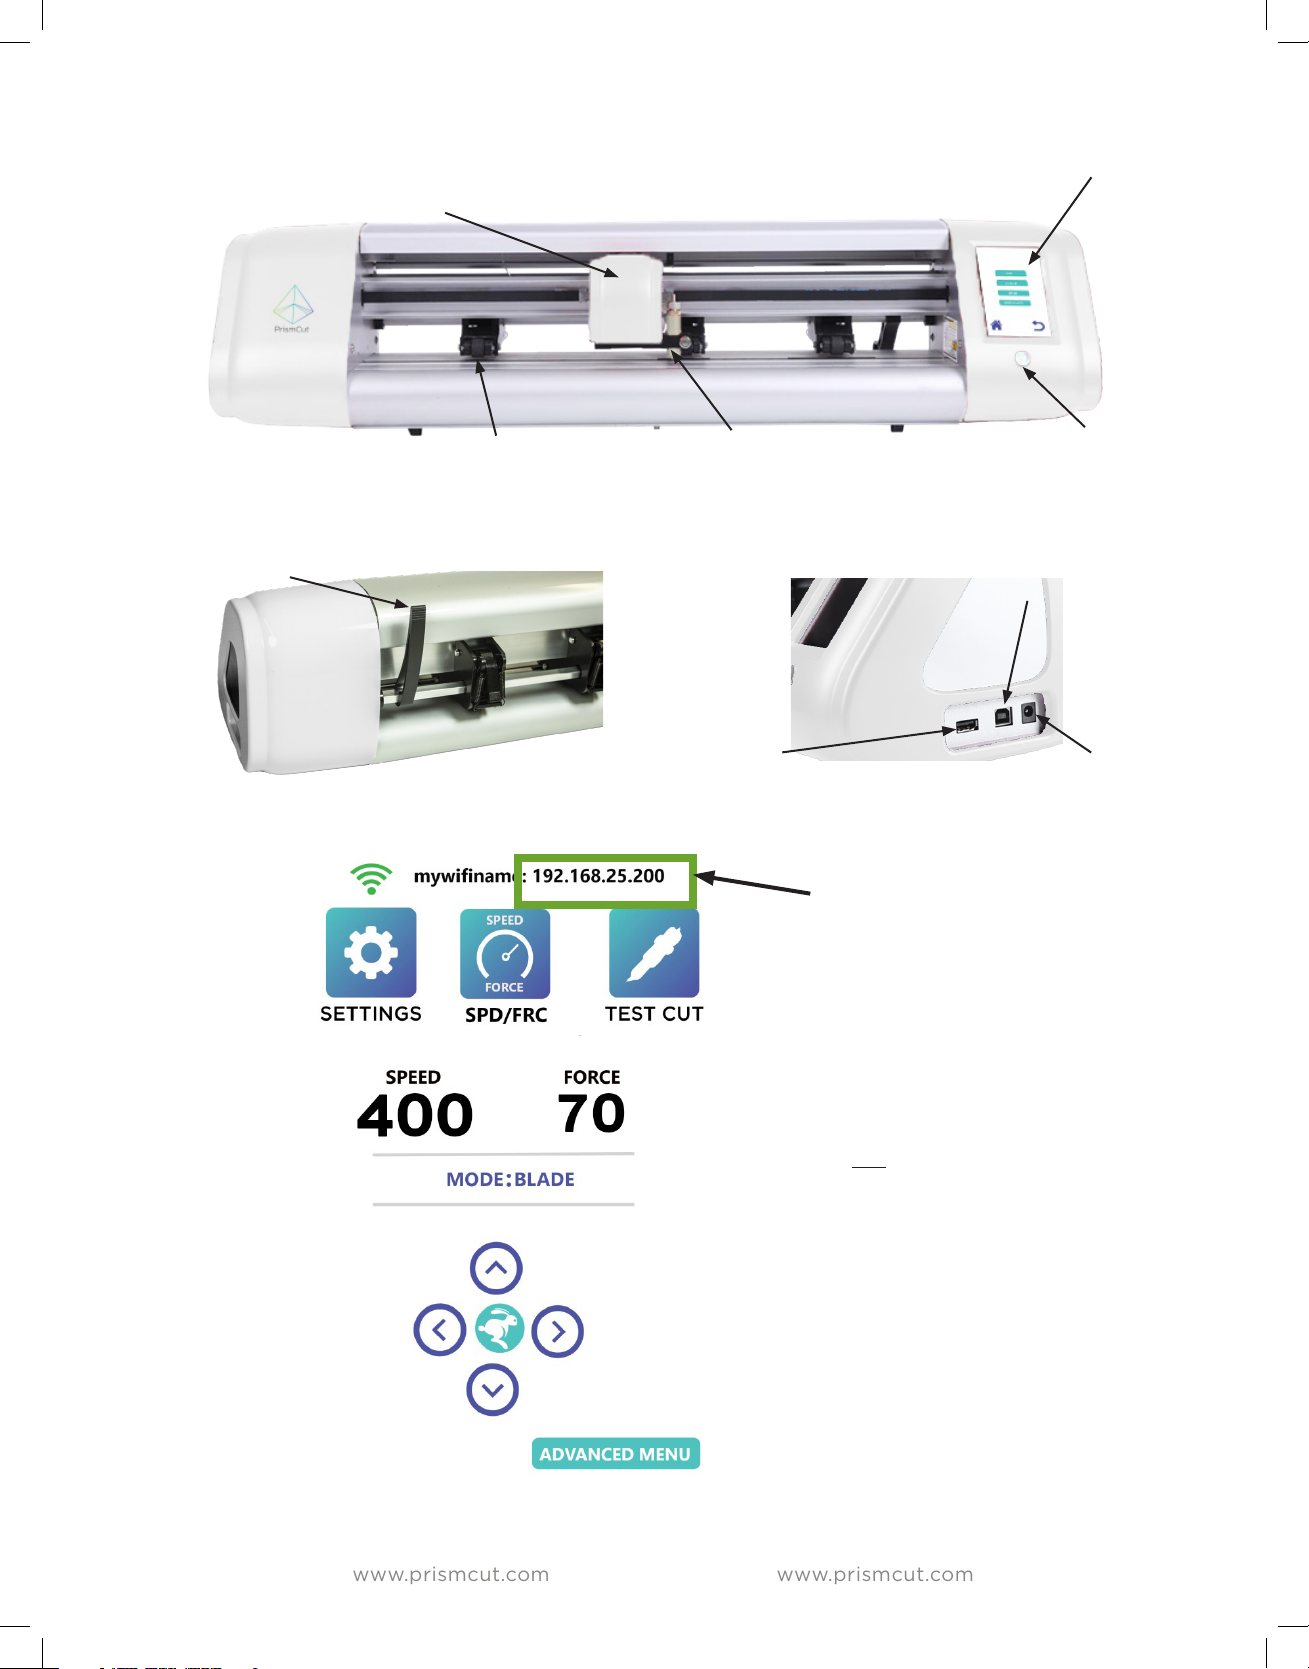
CARRIAGE HEAD (white)
moves the blade across cutting area
CONTROL PANEL
touch screen
PINCH ROLLERS (black)
position pinch rollers under arrows
PINCH ROLLER LEVER
Up/Down pinch rollers
BLADE HOLDER
(silver, bronze ring)
U-DISK SLOT
cut files without PC
The IP address will display at the
top of the cutter’s screen after
you have connected to your home
WiFi (see Section 1.4).
The IP address must match on
your cutter and your computer for
wireless communications to work.
POWER SWITCH
USB CABLE PORT
connect to PC only if
not using WiFi
POWER PLUG
If the top line of your cutter
screen shows “HI-LINK_xxx” you
are not yet connected to your
home WiFi. Click on the SETTINGS
icon and then go to the WIFI
menu to connect the cutter to
your home WiFi.
5
Page 6

www.prismcut.com
www.prismcut.com
1.3 Understanding Rasterized vs. Vectorized images
There are two main ways that an image can be represented:
1) Rasterized images are composed of individual dots (pixels) as you might find
in a photograph. These images have filename extensions such as .JPG .PNG .GIF
2) Vectorized images are made from lines (paths) between points as you might
find in a scaled vector graphic drawing. These images have filename extensions
such as .AI .SVG .EPS
Raster Ve c t o r
If you try to zoom in and enlarge a (rasterized) photo, you will eventually see the
individual dots (pixels) and the edges will not appear smooth. With vectors this
is not a problem and you can enlarge the image to any size you want
Your PrismCut requires vectorized artwork. If you are using Vinyl Master or Sure
Cuts a Lot as your design software program, new designs you create will be in
vector format. For raster images, both software programs have vectorization and
tracing features that allow you to import many dierent types of pixel images
that can be converted to vectorized artwork. For images with strong contrast
between the subject and the background typically work best. Please consult the
training materials for Sure Cuts a Lot 4 or VinylMaster to use the vectorization
features in each software.
6
Page 7
www.prismcut.com
www.prismcut.com
1.4 Connecting your PrismCut cutter via WiFi
WiFi is the recommended connection method for your PrismCut. Other than the
power cord, there is no need for any other wires if using WiFi communications.
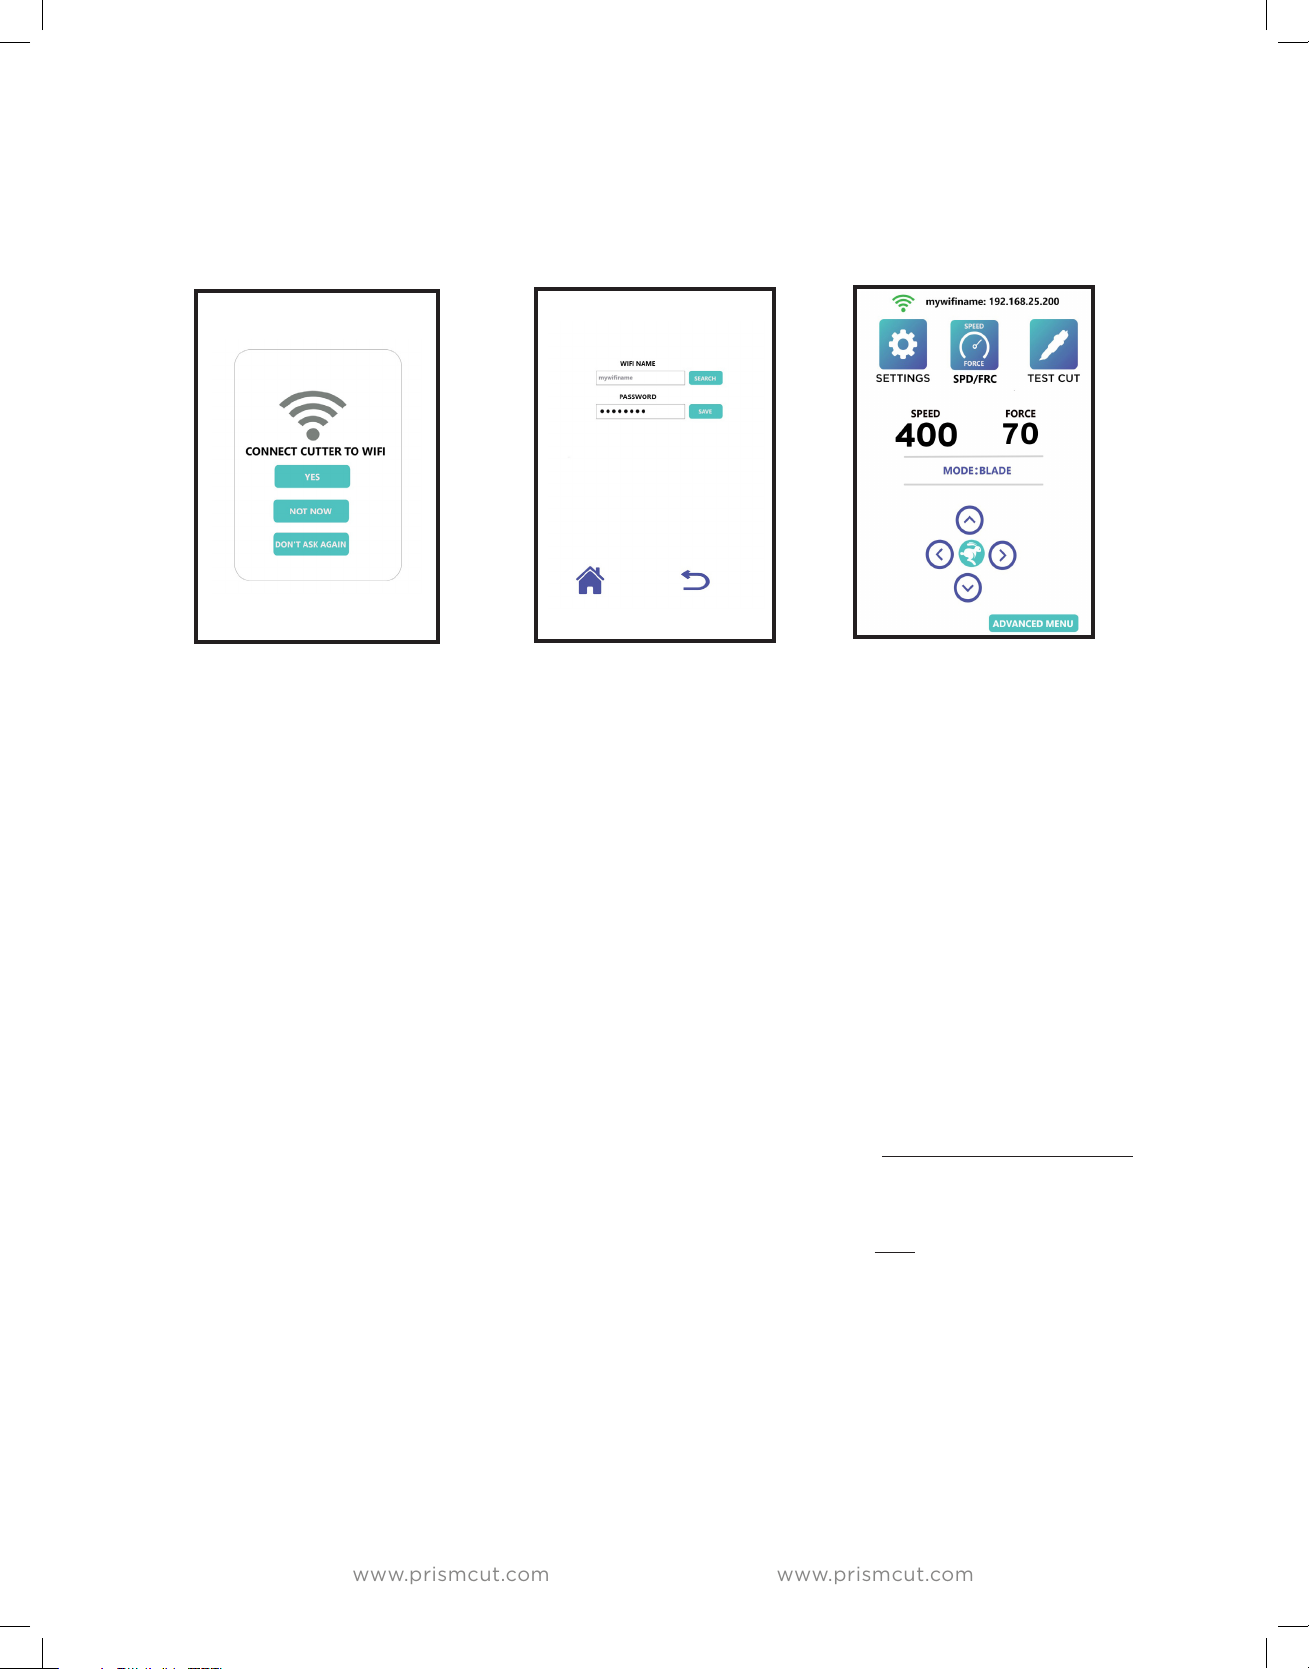
When your PrismCut powers on for the first time, you will see a message asking
you to connect it to your home WiFi (same as you would connect your laptop or
wireless printer). Before powering on, make sure you know the name and password of your home WiFi router and that you are in range of the WiFi signal. If
you connect via WiFi, there is no need to connect any other wires, except power.
Press the SEARCH button and the PrismCut will display the name of nearby WiFi
routers. Select your router from the list and enter your password. (Sometimes
the password is printed on a label that is on your home router). It should be the
same WiFi password you use to connect your laptop to your home WiFi.
Once connected, your PrismCut will display your router name and an IP address
at the top of the cutter’s home screen. The IP address on the cutter and the IP
address used by the software program in your computer must be the same in
order for both sides to communicate.
If the top line of your cutter’s screen says “HI-LINK_xxxx” you are not yet connected to your
home WiFi router. On your cutter screen look under SETTINGS->WIFI to connect the cutter to
your WiFi using the same WiFi password you use to connect WiFi for other home devices.
For advanced users, it is possible to configure the PrismCut to connect via point-to-point WiFi as might be the
case if you are selling at an outdoor craft fair where there is no internet. This technique is discussed in section 3.9
of this manual and is intended for advanced users.
7
Page 8

www.prismcut.com
www.prismcut.com
1.5 Software setup: Sure Cuts a Lot (MAC)
If you purchased Sure Cuts a Lot 4 Pro with your cutter, you should have a card
that says Sure Cuts A Lot on the front. The back of the card contains a software
serial number (see the red oval below). You will need this software serial number
to register and download your Sure Cuts A Lot software. Note that the software
serial number is dierent than the hardware serial number of the cutter itself.
DO NOT LOSE THE CARD OR ACTIVATION CODE - KEEP IN A SAFE PLACE
Download software at: http://www.craftedge.com/register/scal4pro
SW Serial Number
Follow the instructions on the card that point you to the link where to enter your name, email
address and the Software Serial Number from the card. You will then be able to download the
software. Install the software on your computer as you would any other software.
Write down the email that you used for this activation as it may be needed in the future!
8
Page 9

www.prismcut.com
www.prismcut.com
Sure Cuts a Lot (MAC) - configure WiFi connection
WiFi is the recommended communication method for your MAC.
In Sure Cuts a Lot, click on the Cutter icon (red circle) to open the Cut Settings menu.
Select Model=PrismCut, Connection=TCP/IP and enter the IP address that will appear at the
top of your cutter’s home screen after you connect the cutter to WiFi.
The IP number on the cutter and the IP number on the computer must match for WiFi to work.
(note: If you see HI-LINK_xxxx on your cutter it is not yet set up for WiFi)
Tip: Press TEST button to verify
your IP communications work
If you do not see PrismCut as a selection under Model, look at the top line of your MAC screen
and select Cutter->My Cutter->Manage Cutters and add PrismCut
Click on Help->About Sure Cuts A Lot 4 Pro to ensure that your software version is 4.080 or
higher. Otherwise you may need to download and re-install the most current version of SCAL4
software. Older versions of software will not yet have the driver.
9
Page 10
www.prismcut.com
www.prismcut.com
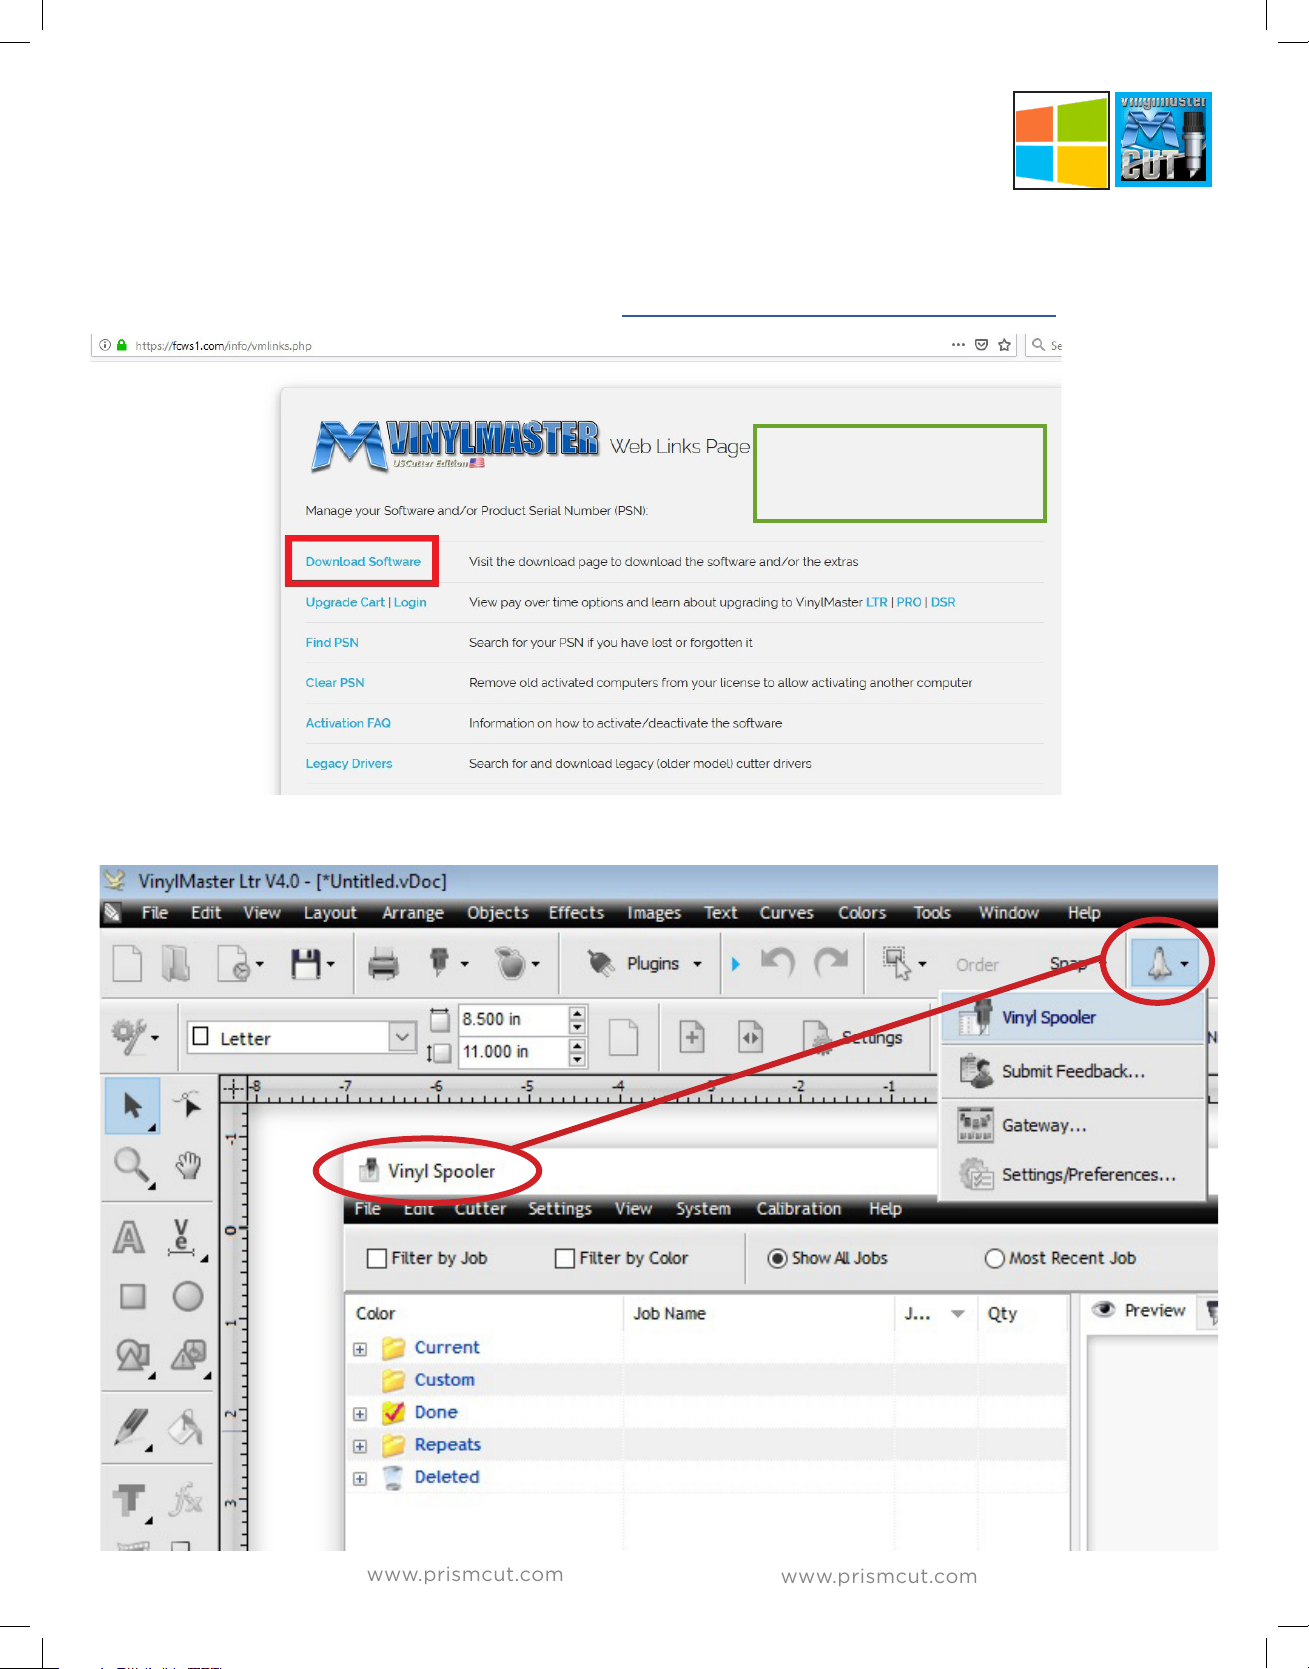
1.6 Software setup: Vinyl Master (Windows PC)
If you purchased Vinylmaster with your cutter, you will have a card
with an activation PSN to allow download of the software for a Windows PC.
DO NOT LOSE THE CARD AND ACTIVATION CODE (PSN) - KEEP IN A SAFE PLACE
Download Vinylmaster software at: https://fcws1.com/info/vmlinks.php
After downloading, click on
the file you downloaded.
Follow the prompts to install
the software
On your Windows PC within VinylMaster software, click on shuttle icon and select Vinyl Spooler
10
Page 11
www.prismcut.com
www.prismcut.com
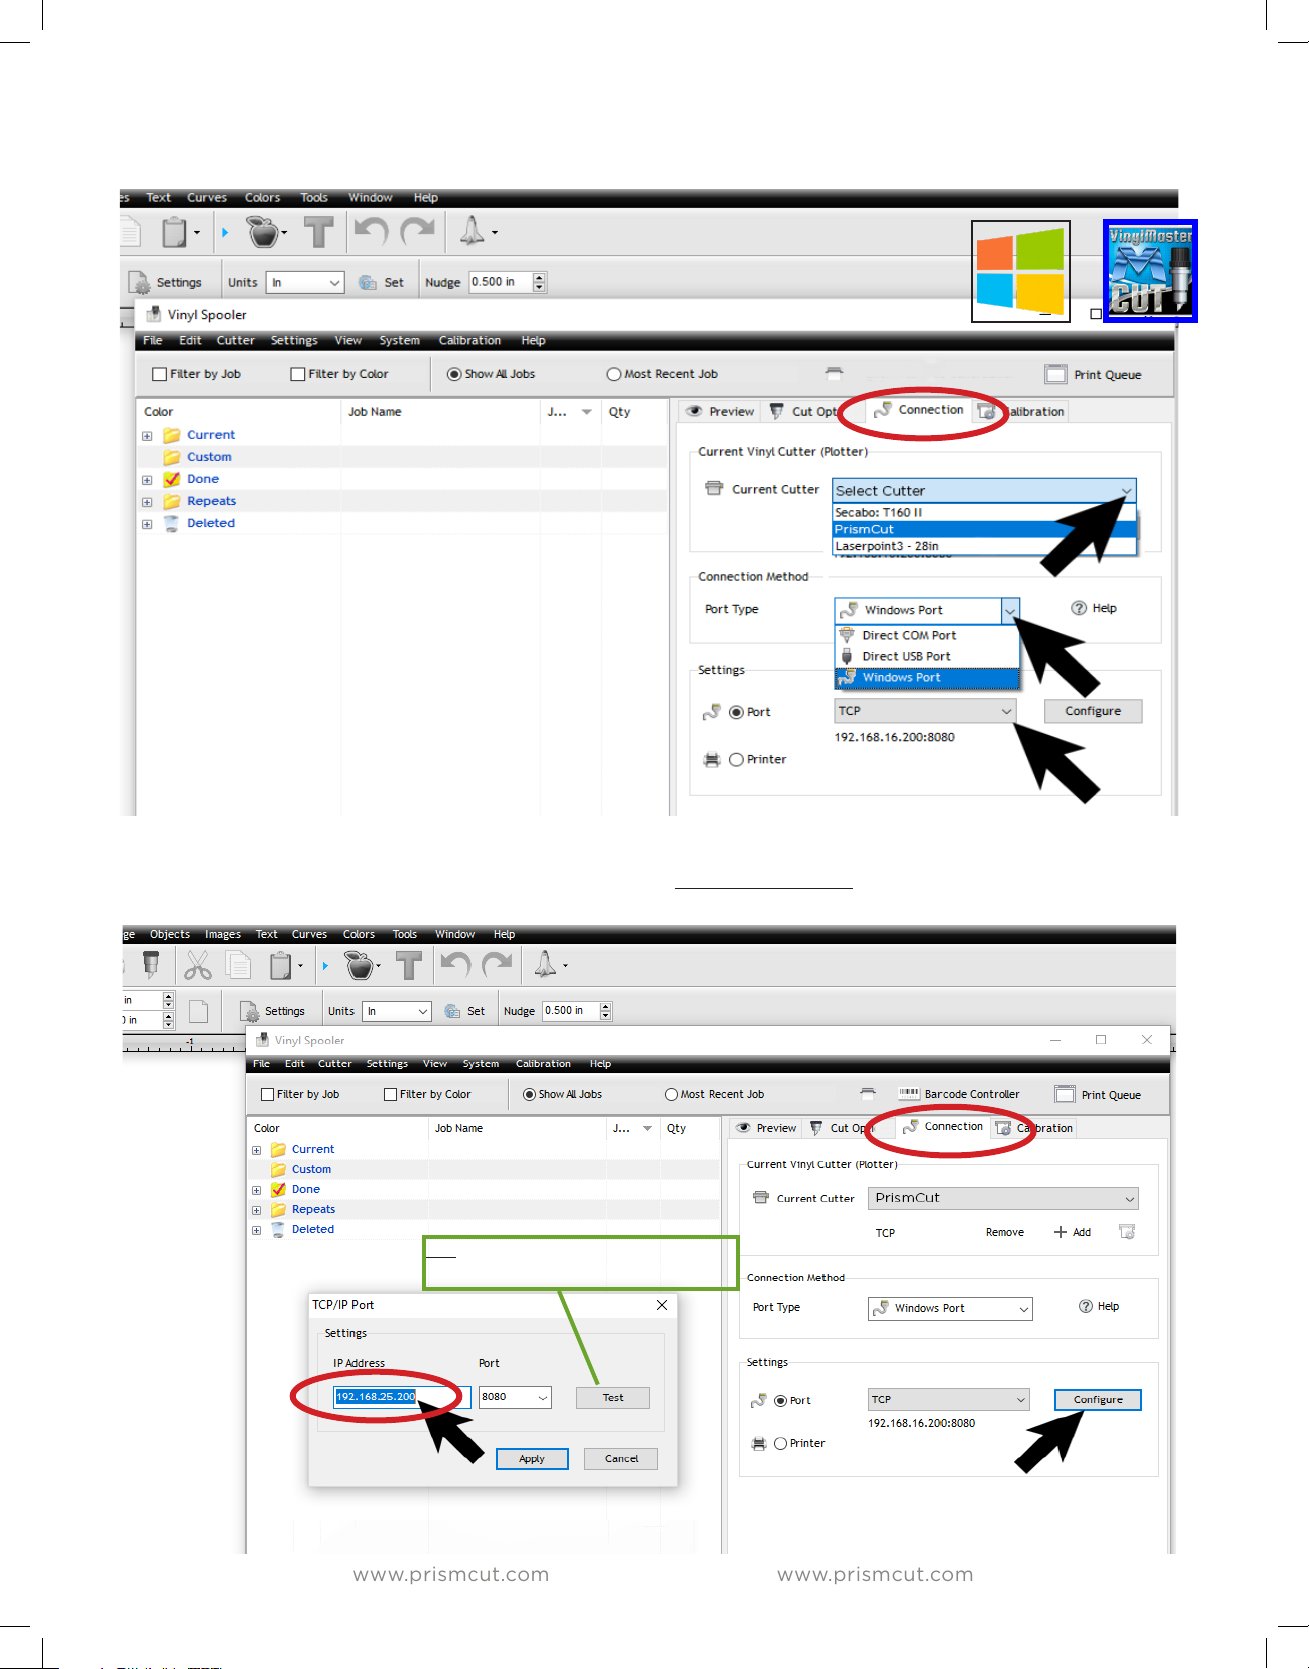
Click on the Connection tab within the Vinyl Spooler menu to display cutter Connection Settings.
In Current Vinyl Cutter section click on the pull down menu for Current Cutter and select PrismCut.
In Connection Method section click on the pull down menu for Port Type and select Windows Port.
(if you do not see PrismCut as a pull down menu option for Current Cutter, see Troubleshooting on page 30)
In Connection tab Settings section click on the Configure button to open the TCP/IP Port Settings menu
In TCP/IP Settings menu enter the IP address that appears at the top of your PrismCut cutter’s home screen
The IP address (starts with 192.168.....or 172.... or 10......) must be the same on both cutter and PC to work.
Ignore the port number (leave at 8080) since this is not part of the IP address.
Tip: Press TEST button to verify
your IP communications work
11
Page 12
www.prismcut.com
www.prismcut.com
Section 2 - MAKING YOUR FIRST CUT
2.1 Overview of Materials That Can Be Cut
There are lots of dierent materials you can use with your PrismCut including:
paper, cardstock, photos, vinyl, stencil, poster boards, labels, fun foam, balsa
wood, leather, acetate, styrene, chipboard, shrink film and much more. The key
thing to consider is how dense the material is. Some very dense materials such
as metal, sandblast mask, magnet etc. are not recommended as they may yield
unsatisfactory results. As a general rule you should be able to cut any material
that is less than 2.5 mm thick and at the approximate density of 1 g/cm3.
Always start with a test cut, especially when changing materials
You can etch designs onto metals and other dense materials or make creases on
cardstock, leather etc. by using the optional etching and embossing tools.
2.2 Loading material in the cutter
Materials that have no backing (such as thin card stock) should be placed on the
cutting mat and then loaded. Materials such as vinyl, which have a backing, can
be placed directly in the PrismCut without using the cutting mat.
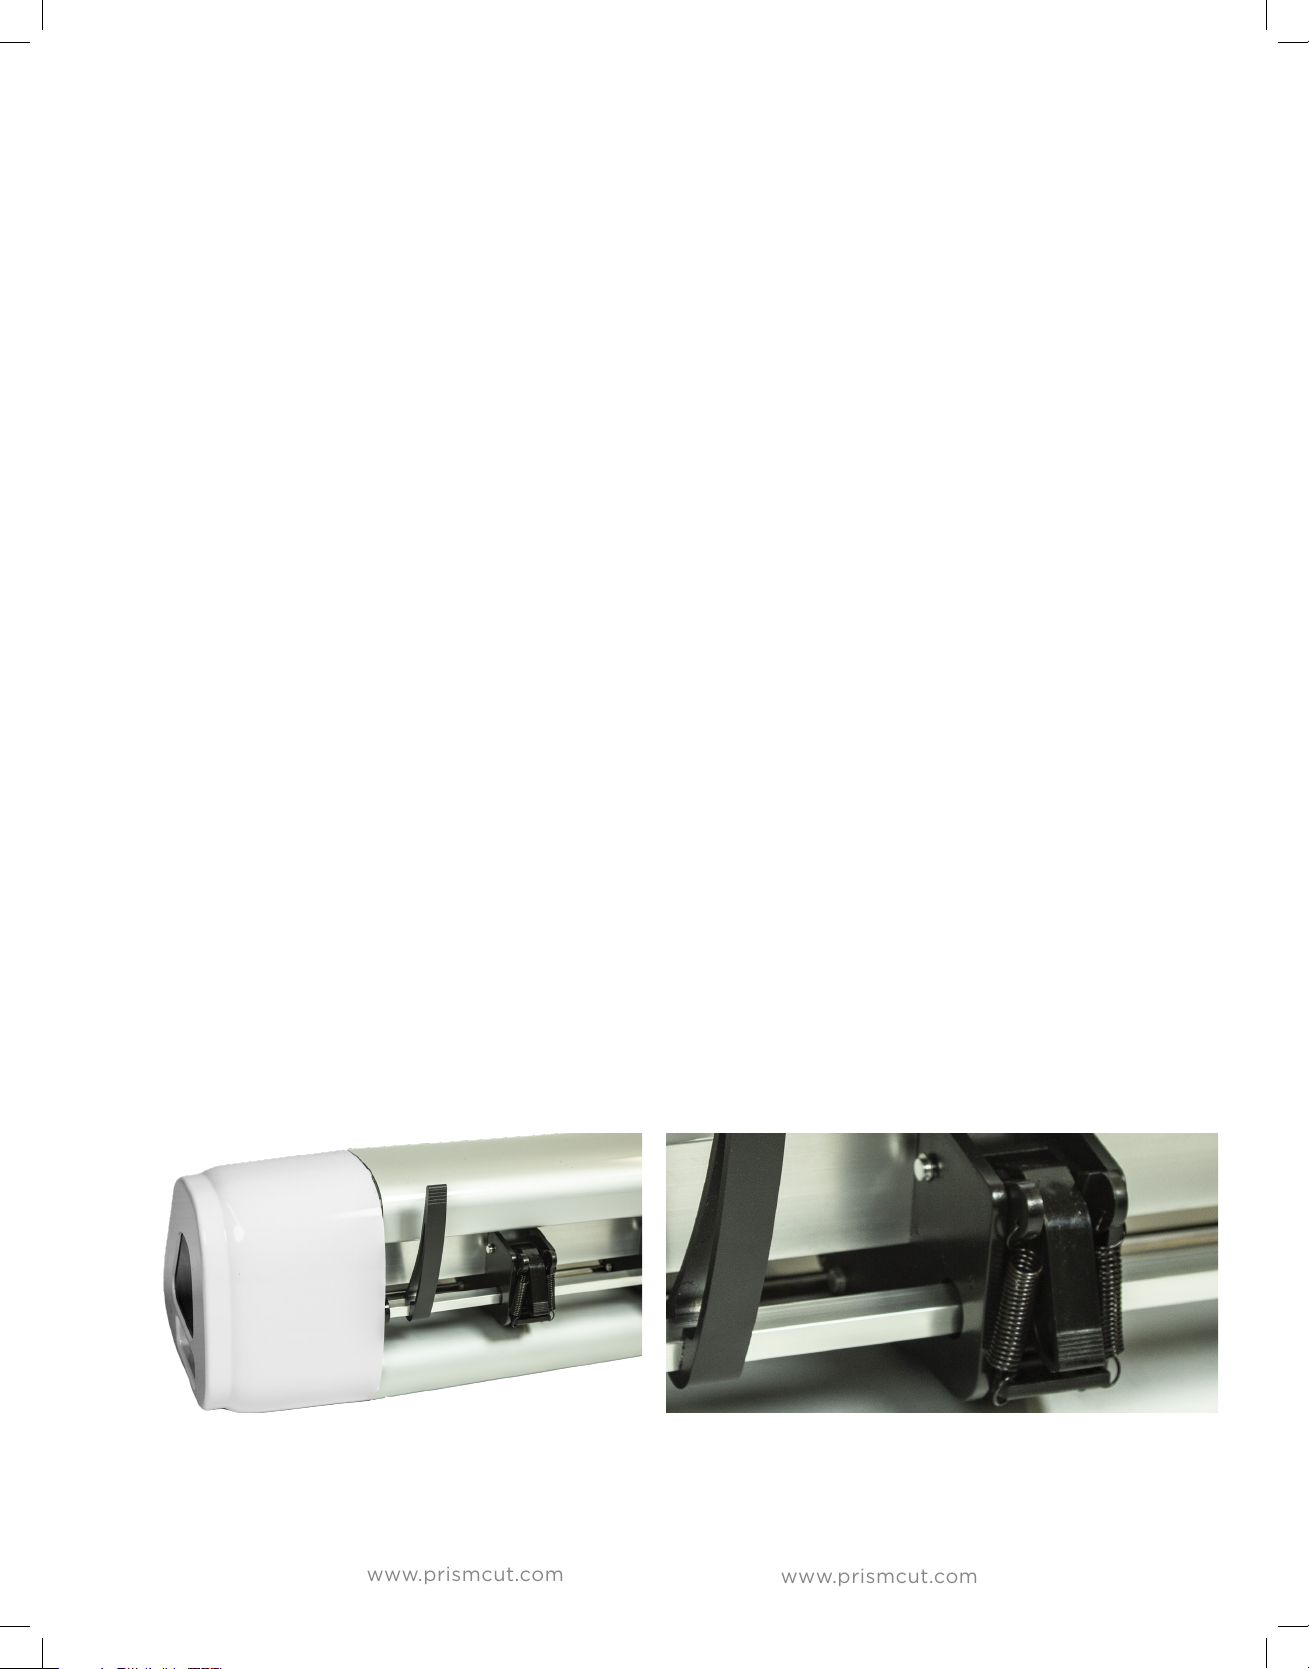
First, make sure the pinch rollers are lined up directly above the grit rollers on the
axle. The black arrows on the cutter are there to help identify the correct pinch
roller positioning. Place the material to be cut in the PrismCut so that the rollers
are at the edges and will not touch the design as it is being cut. In some cases,
such as with wide jobs it cannot be avoided and rollers will go over the design,
however this is typically not a problem even if the rollers touch the design.
Lower the pinch rollers by raising the pinch roller lever at the back of the cutter.
Note that the small levers on each pinch roller should be down in most cases, and
only positioned up when extra pressure is needed.
When cutting, the vinyl will move outwards from the cutter towards you. In most
cases, vinyl on rolls is loaded from the back of the cutter and other materials on
the cutting mat can be loaded from the front of the cutter.
12
Page 13
www.prismcut.com
www.prismcut.com
2.3 Using the pen tool to test your design
Before cutting valuable material, it is recommended that you first work with the
pen tool on some blank paper. The pen tool will follow the same path that the
blade will so you can be sure you will be cutting the exact design you thought
you would be cutting. Simply place the pen tool in the blade/tool bracket on the
carriage head, tighten the screw and you are ready to start. Note that the pen
has a small cap on the tip that needs to be removed prior to use.
2.4 Understanding blades and the blade holder
Your PrismCut ships with two 45 degree (red tip) and one 60 degree (blue tip)
blades. For most needs the 45 degree (red tip) blade is best. 60 degree blades
are only required for thicker materials or when a higher degree of precision is
needed. Note that 60 degree blades might get dull sooner or chip easier. For
very thin materials and thin fabrics a 30 degree blade is recommended (yellow
tip, purchased separately). You may need to place thinner materials on the sticky
part of the cutting mat so they do not tear as easily when being cut.
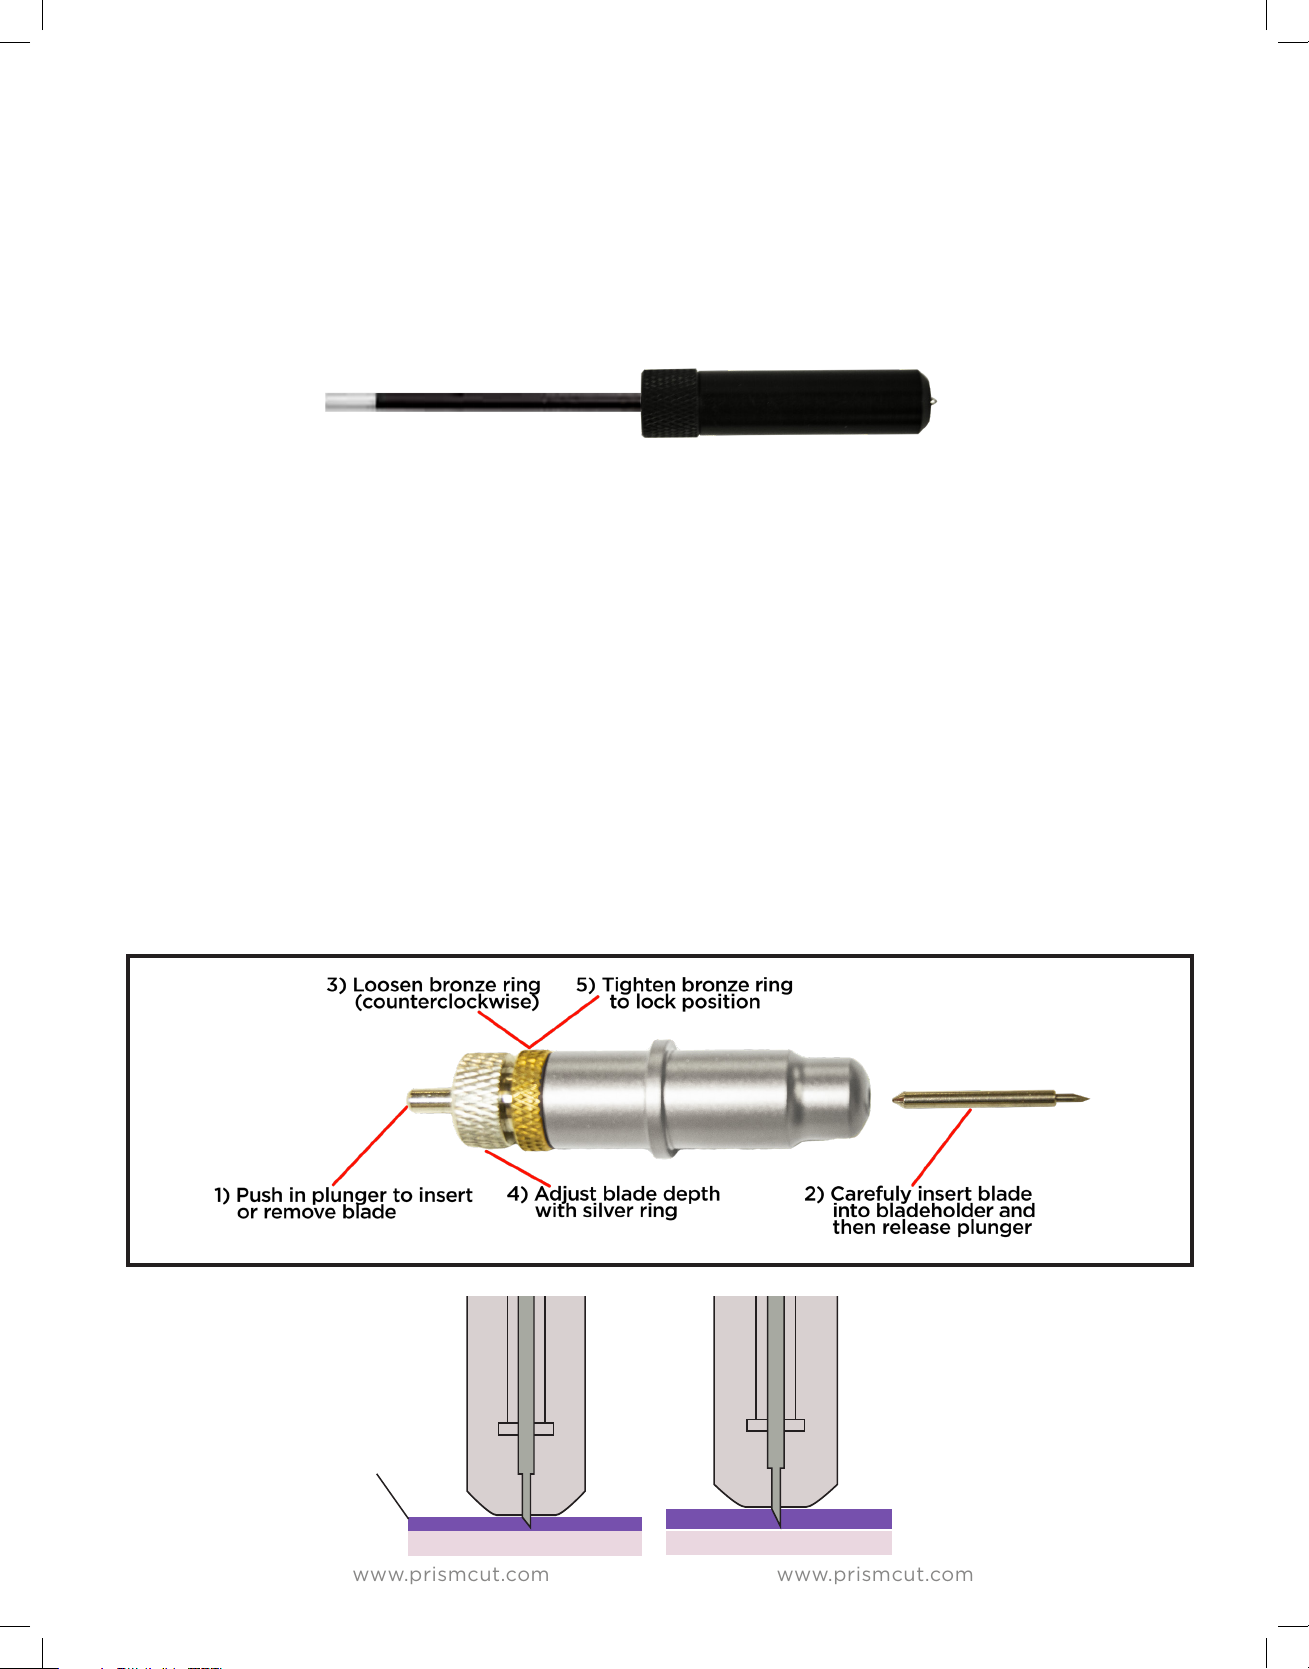
The diagrams below show how to insert a blade, as well as the correct way to set
the blade depth so that it cuts all the way through the top layer but only lightly
scratches the backing layer.
Use 45 degree blade for
most common uses
Set blade depth to cut only
the material not the backer
45°
60°
Use 60 degree blade for
thicker materials
13
Page 14

www.prismcut.com
www.prismcut.com
2.5 Speed and Force settings
A good starting value for speed is 400
A good starting value for force is 70
To achieve more precise results, you should start with moderate speed and force
settings (400 and 70) and then increase speed only if the job is less complex.
Increase pressure if the cut is not making it all the way through the top layer of
the material being cut. As a general rule, you will try increasing pressure before
you extend the blade length. Note that dierent brands of the same material
(eg. glitter) may need to use more or less pressure, depending on the specifics of
each manufacturer’s brand.
Refer to section 4.2 for additional speed/force values for various materials
2.6 Tips for achieving optimal results
• Use a short blade depth. In most cases the blade should be exposed no more than 1/2
the thickness of a credit card. New users tend to expose too much blade. The idea is to
cut through only the top layer of the vinyl and to leave the backing layer with only minimal
scratches. This allows you to weed the top layer o the backing easily. If corners or small detail do not cut all the way through, consider increasing the force before extending the blade
depth. You only need to extend the blade depth or use the 60 degree (blue tip) blade for
thicker materials.
• Align the pinch rollers so that they are under the guide arrows. The pinch rollers must align
with the gritted sections on the bottom roller. Note that the levers at the top of each individual
pinch roller should be in the down position unless extra strong roller pressure is needed.
• The cutting mat is used when cutting materials that do not have their own backing. Place
your material on the cutting mat so that the pinch rollers roll on the mat, not the material.
Move unused pinch rollers out of the way so they don’t touch the parts of the material being
cut. Use a brayer roller to flatten your material on the sticky part of the cutting mat or tape the
edges of thicker materials to the cutting mat. For wider jobs it sometimes cannot be avoided
and the pinch rollers will need to roll over areas of the material being cut. Typically this is not a
problem. If cutting very thick materials you may want to consider purchasing a thinner mat.
• When cutting long pieces of material it is important to carefully position the material so that
it is completely straight and doesn’t drift to one side when cutting.
• Cutting tiny lettering and small details from heat transfer vinyl (HTV) is best achieved by
using a 60° blade at a relatively low force setting so that the HTV backing is barely scratched
during the cut. However be sure that the blade is able to cleanly cut all the corners. To help
weeding, place the HTV on the warm (but not hot) bottom platen of a heat press which will
help loosen the vinyl from the backer.
14
Page 15
www.prismcut.com
www.prismcut.com
2.7 Connecting your PrismCut cutter via USB cable (optional)
There is no need to connect your PrismCut via USB cable if you are already
connecting via WiFi. USB is provided as a backup in case you are in an area
that is not served by WiFi. WiFi is the recommended connection method.
To connect via USB, connect one cable end to USB cable port on the cutter
and connect the other cable end to an available USB port on your computer.
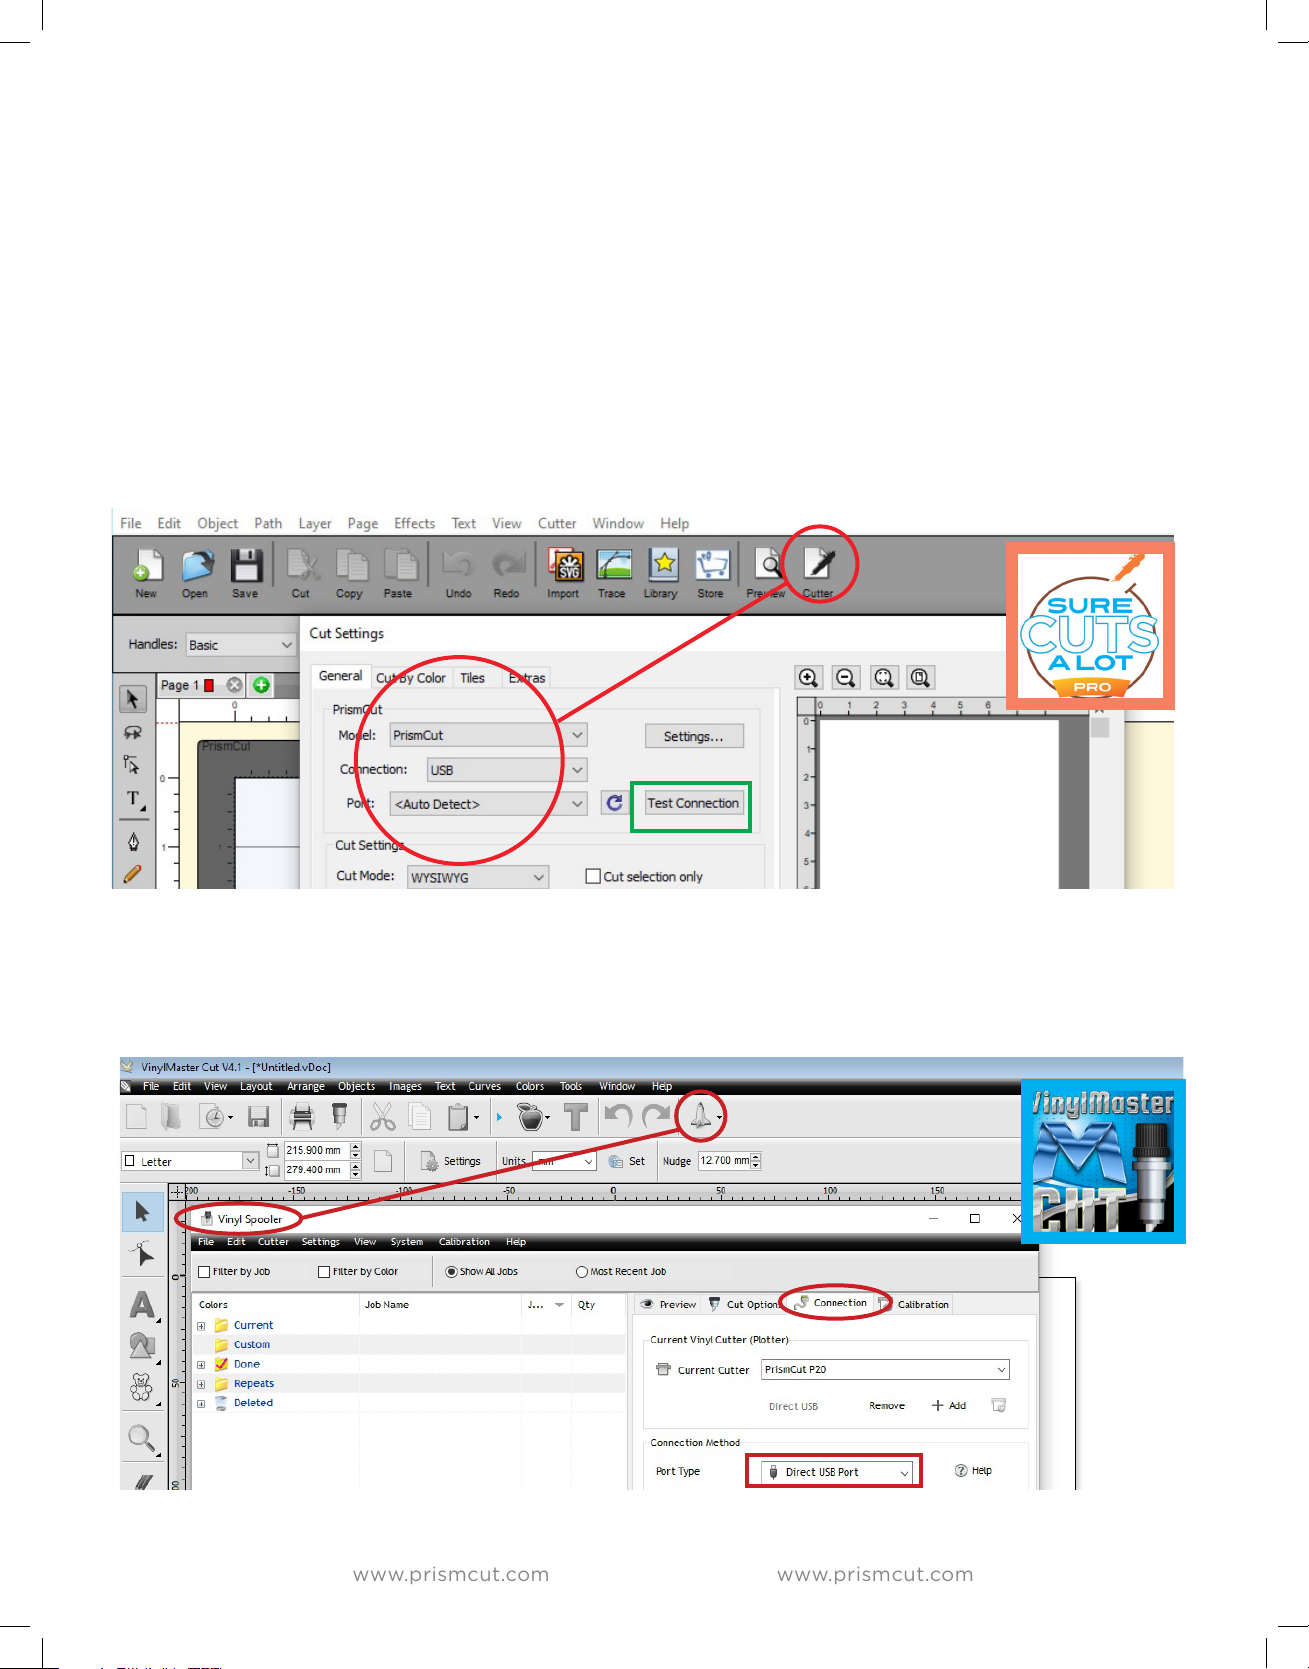
Sure Cuts A Lot (MAC) users can enable USB communications by clicking on the
Cutter icon to open the Cut Settings window and selecting USB and Auto Detect
as the Connection method and Port type.
VinylMaster (Windows) users can enable USB communications by clicking on the
Shuttle icon and then select the Connection Tab within the VinylSpooler window.
Under Connection method select Direct USB Port from pull down menu
15
Page 16
www.prismcut.com
www.prismcut.com
Section 3 - ADVANCED TECHNIQUES
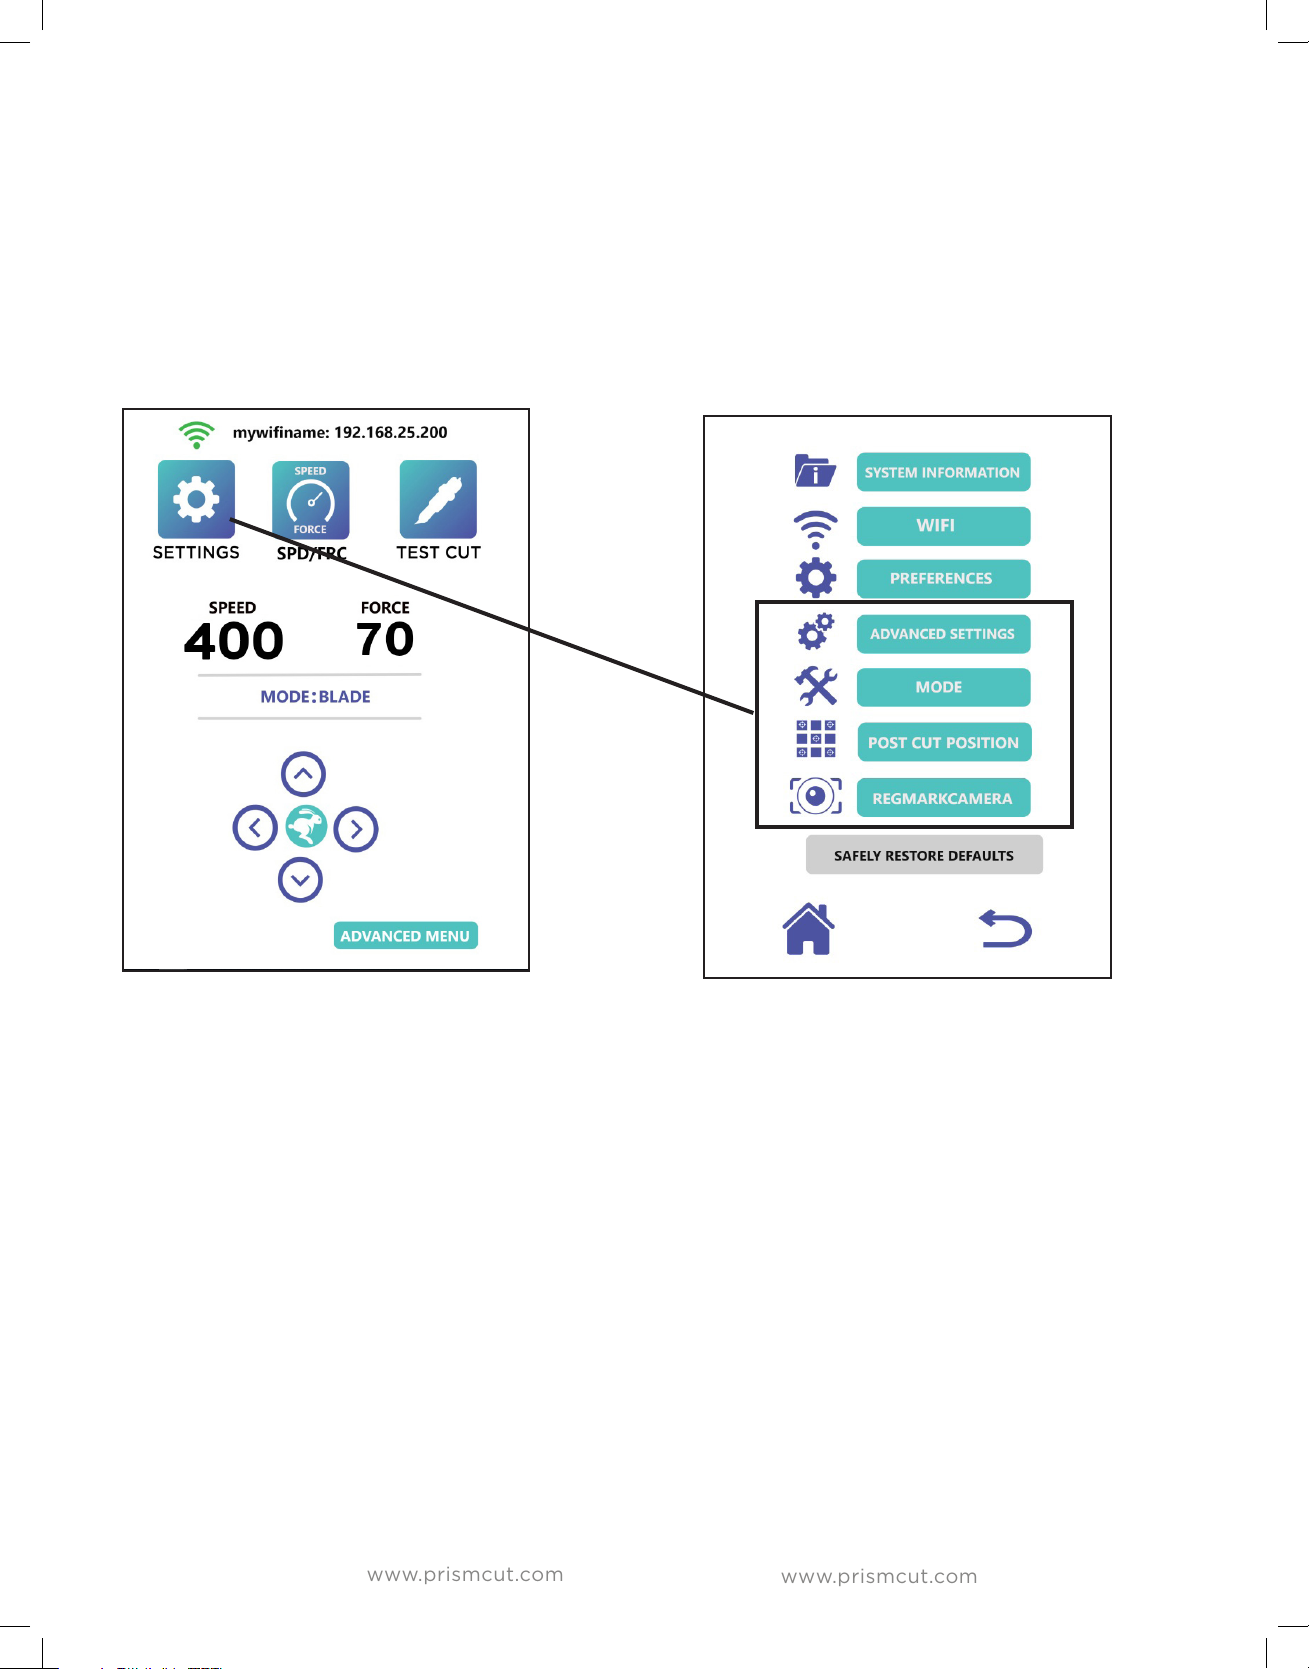
3.1 Moving from Basic Menu to Advanced Menu
This is as simple as pressing the Advanced Menu button at the bottom right of
the PrismCut home screen. Perhaps more important, is knowing that you can
always get back to the Basic Menu if you prefer a more minimalist approach to
cutting. You will see that icons that appear in both menu modes (eg. Settings)
may now contain more options in the Advanced Menu mode.
3.2 Advanced settings options
Under the settings icon, you will now see an option for Advanced Settings.
- Move right on power will cause the carriage to go home when powered on.
- Inverted Y axis swaps the media feed direction of the up/down arrows
- RegMarkTracking is used when contour cutting (see Sections 3.4 and 3.5)
- Calibration is used when servicing the cutter. (see Section 4.2)
16
Page 17
www.prismcut.com
www.prismcut.com
3.3 Configuring Presets
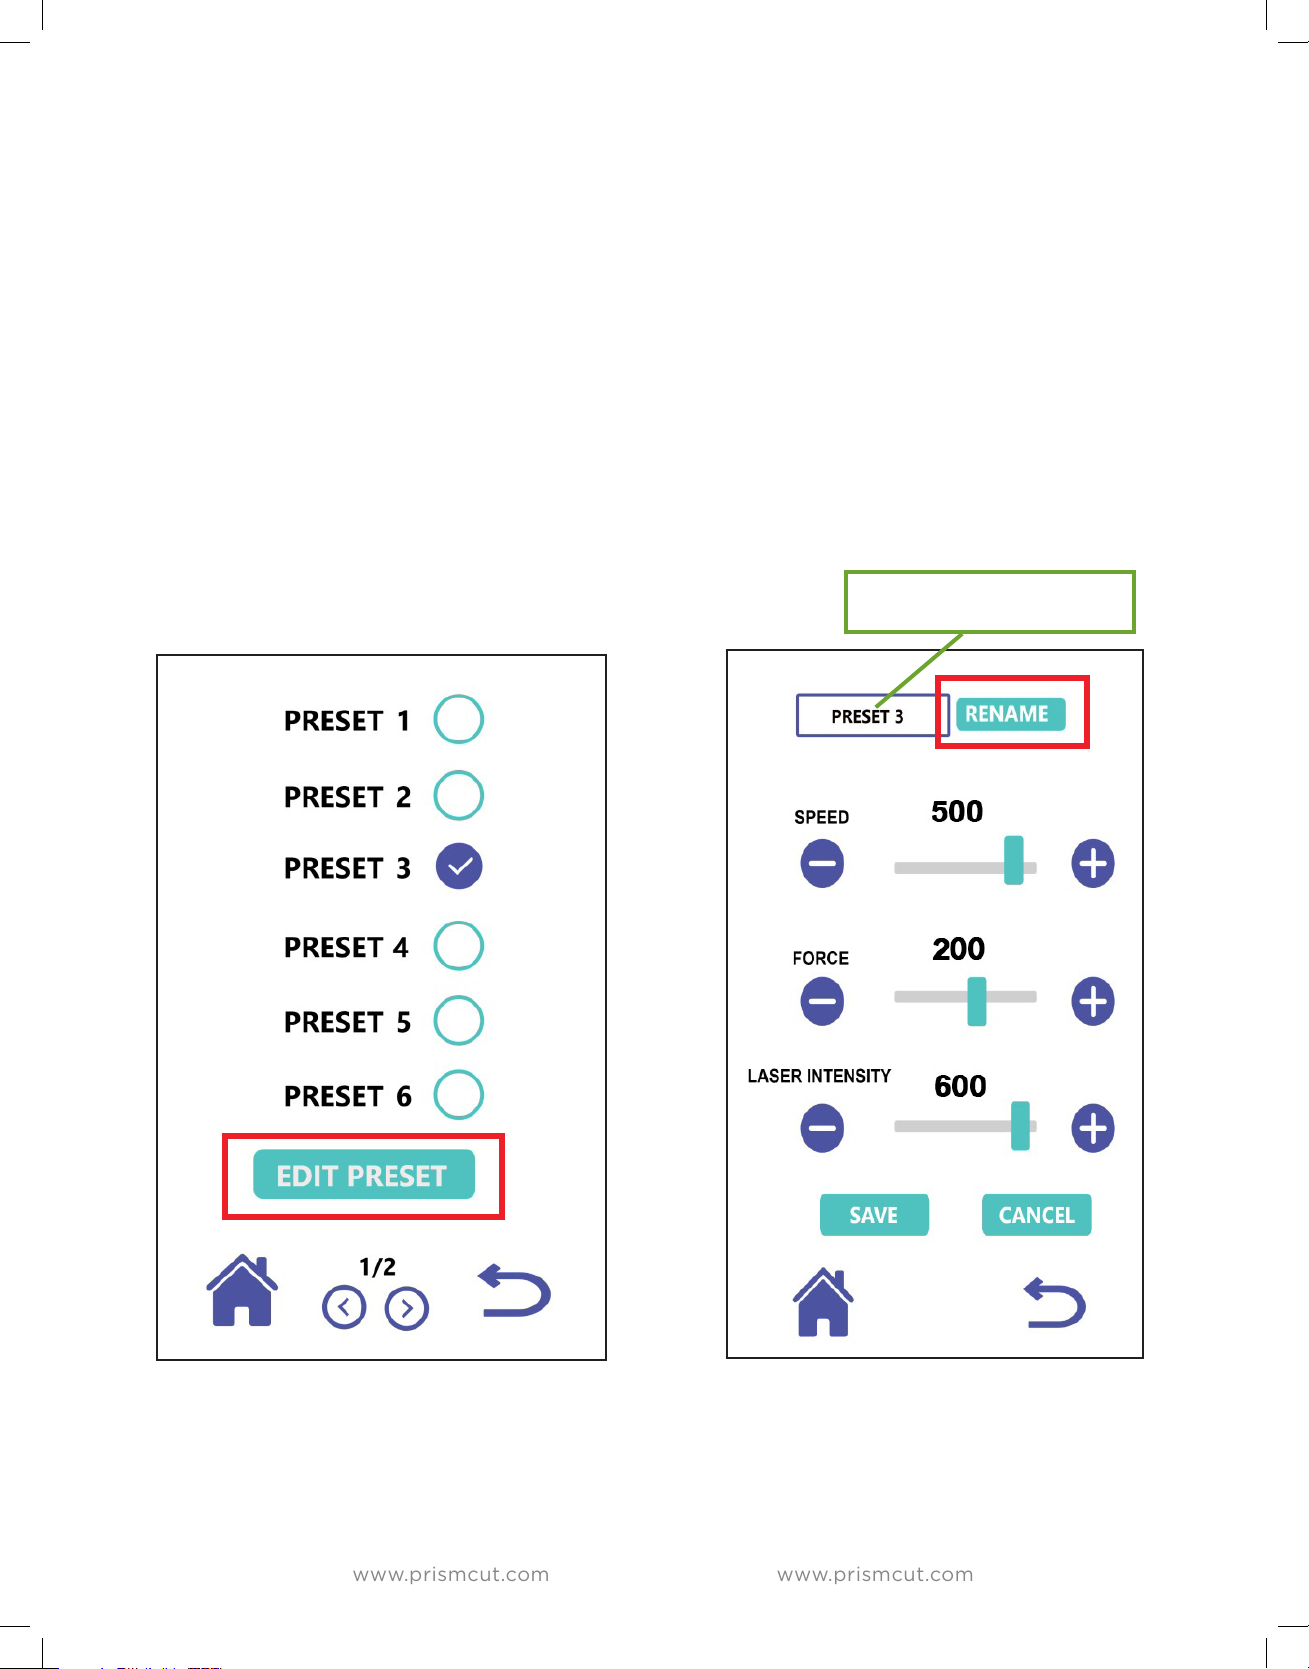
Presets are stored speed/force settings that you can rename with the product
names or job names you use most often. The PrismCut will display the name of
the preset it is using so you know that the settings are exactly as you wanted
them. The Presets icon appears on the Advanced Menu Home Screen.
Press the Presets icon to see a list of presets and highlight the circle beside the
preset you want to work with. To edit preset values or to edit the name of the
preset, just press the EDIT PRESET button, make your changes and press SAVE.
To give your preset a custom name, press the RENAME key which will bring up a
keypad. Press a key multiple times quickly to cycle to other letters if the keypad
displays more than one letter.
RENAME PRESETS TO
ANY NAME YOU WANT
17
Page 18
www.prismcut.com
www.prismcut.com
3.4 U-disk (cut from thumb drive without PC)
Your PrismCut can cut jobs stored on a U-disk, also known as a thumb drive,
without being connected to a host computer (purchase thumb drive separately).
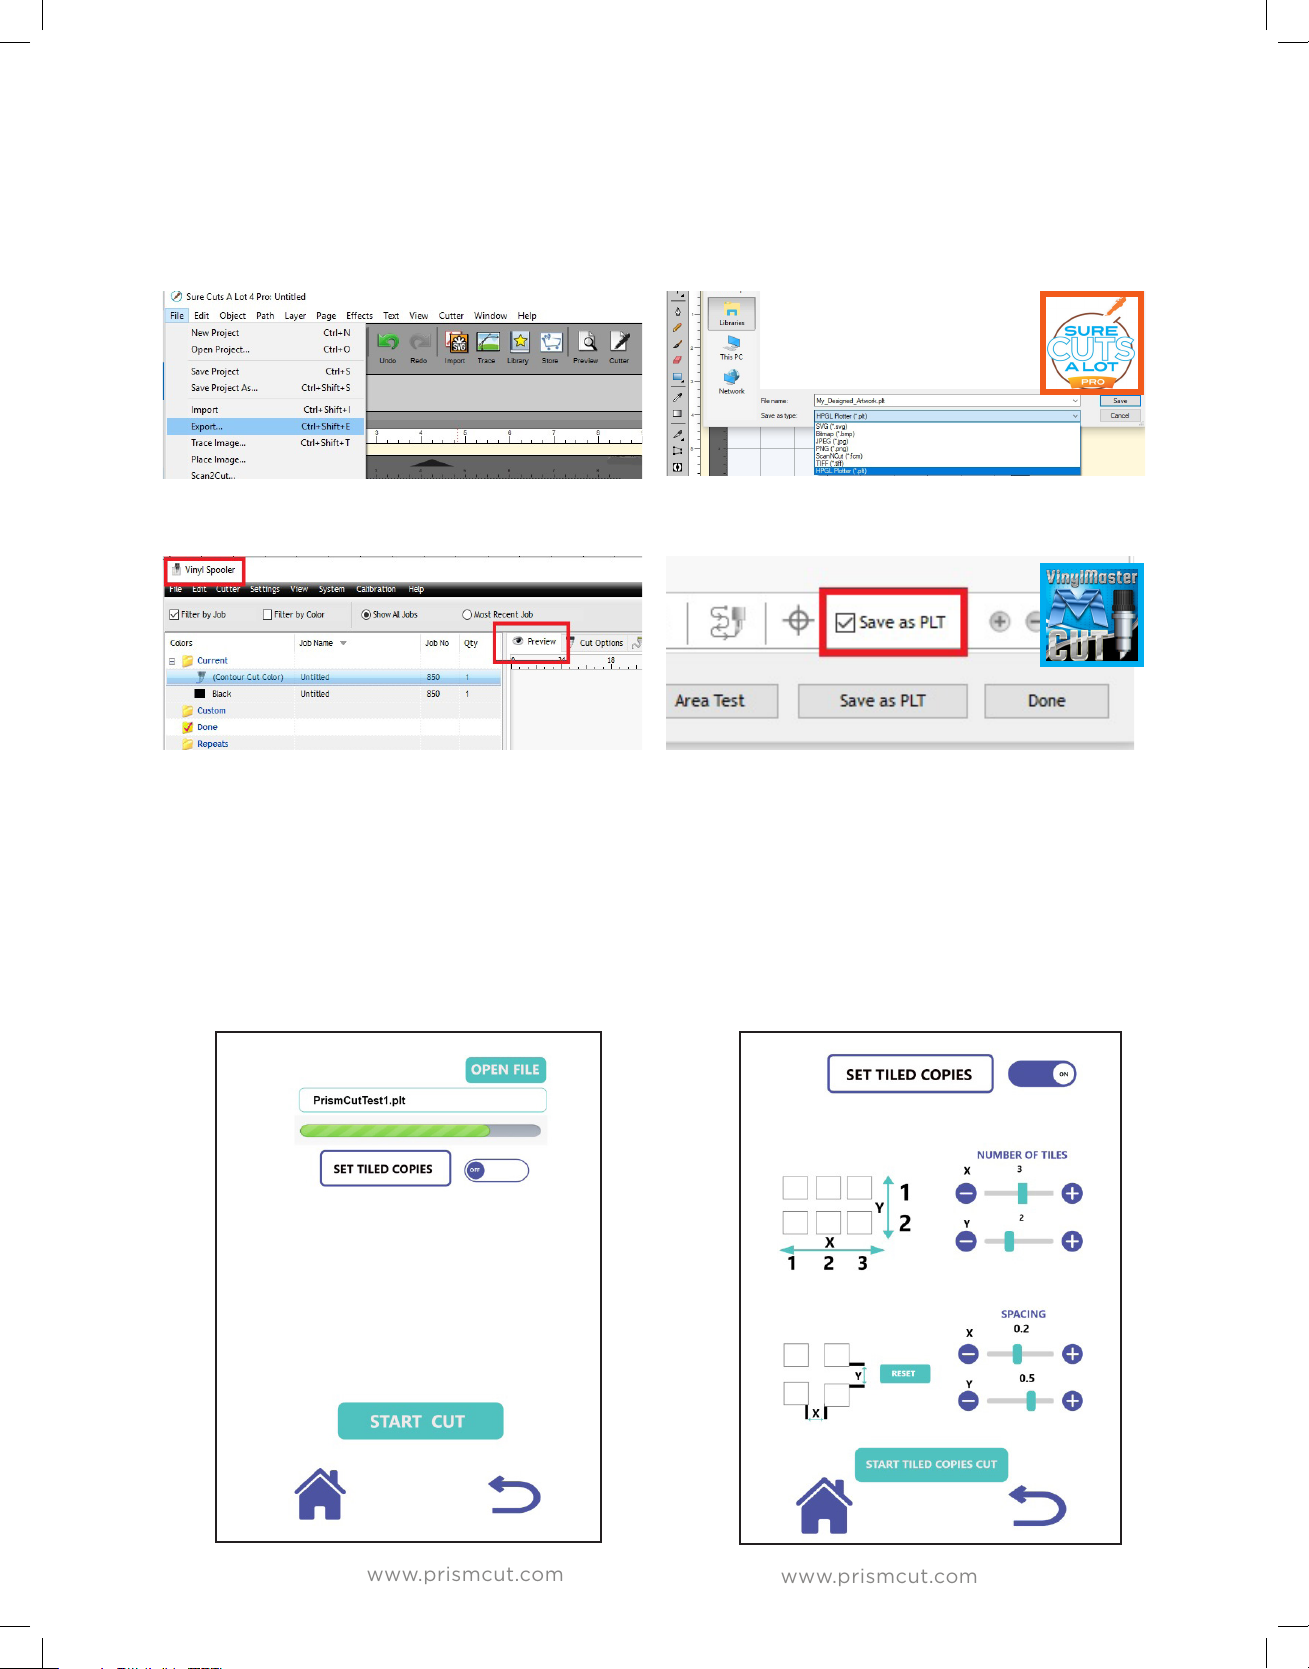
First, save and export your design to the thumbdrive in .PLT format.
SCAL 4 Pro: File->Export, then save as file type HPGL Plotter (.plt)
Vinylmaster: Within the preview tab of the Vinyl Spooler
Check the box “Save as PLT” to toggle button from Cut Now to Save
Once you have exported and saved your .PLT file to a thumb drive, connect the
thumbdrive to the USB port of the PrismCut and click on the U-drive icon on the
home screen of the PrismCut. Scroll to the desired filename and click on it to
load it into the PrismCut memory. You have the option of cutting multiple copies
of your design at once by enabling the multiple tiled copies option which allows
you to set up a grid and add additional registration marks. Otherwise just ignore
the Set Tiled Copies option and print only one copy of your design at a time.
18
Page 19

www.prismcut.com
www.prismcut.com
3.5 Contour Cutting (Print & Cut) with registration marks
Contour Cutting (also known as Print & Cut) involves printing a design that has
special registration marks in the outside corners. The registration marks are read
by the cutter to allow precise cutting around the outside contours of the design.
Common uses for contour cutting are to create peelable stickers or cutting out
printed designs from printable heat transfer vinyl.
You may see the term ARMS (Automatic Registration Mark Sensor) being used
to refer to Contour Cutting. This is just a more technical term for achieving the
same type of results as Contour Cutting, also known as Print & Cut.
In order for the software to be able to find the outside edges of your artwork
and draw a contour, ideally you want to use vectorized files with no background
such as SVG/AI/EPS vector files.
If working with pixel based images such as photos, JPEG files with a background
or images with a solid white background, you should remove the background
and save as a PNG whenever possible. In general, images with a complex background are likely to need modification to remove the background prior to proper
vectorization and contour cut use.
PDF files can contain both vector and raster images, but usually these are on
separate pages within a PDF document. Zoom in on the image to see if it starts
to pixelate when magnified (raster) or keeps lines smooth (vector).
Refer to section 1.3 on page 6 of this manual to learn more about pixel based and
vector based images.
Before creating your first contour cut, you may have to calibrate the camera, but
this only needs to be done once. Refer to the Calibration instructions in Section
4.2 of this manual if your camera has never been calibrated.
Another advanced contour cutting feature is RegMarkTracking which means
adding additional registration marks in addition to the 4 corners to help keep
alignment straight over a very long job run length. It is even possible to use the
RegMarkTracking in conjunction with Udisk so you can run repeat jobs without a
PC being attached.
19
Page 20
www.prismcut.com
www.prismcut.com
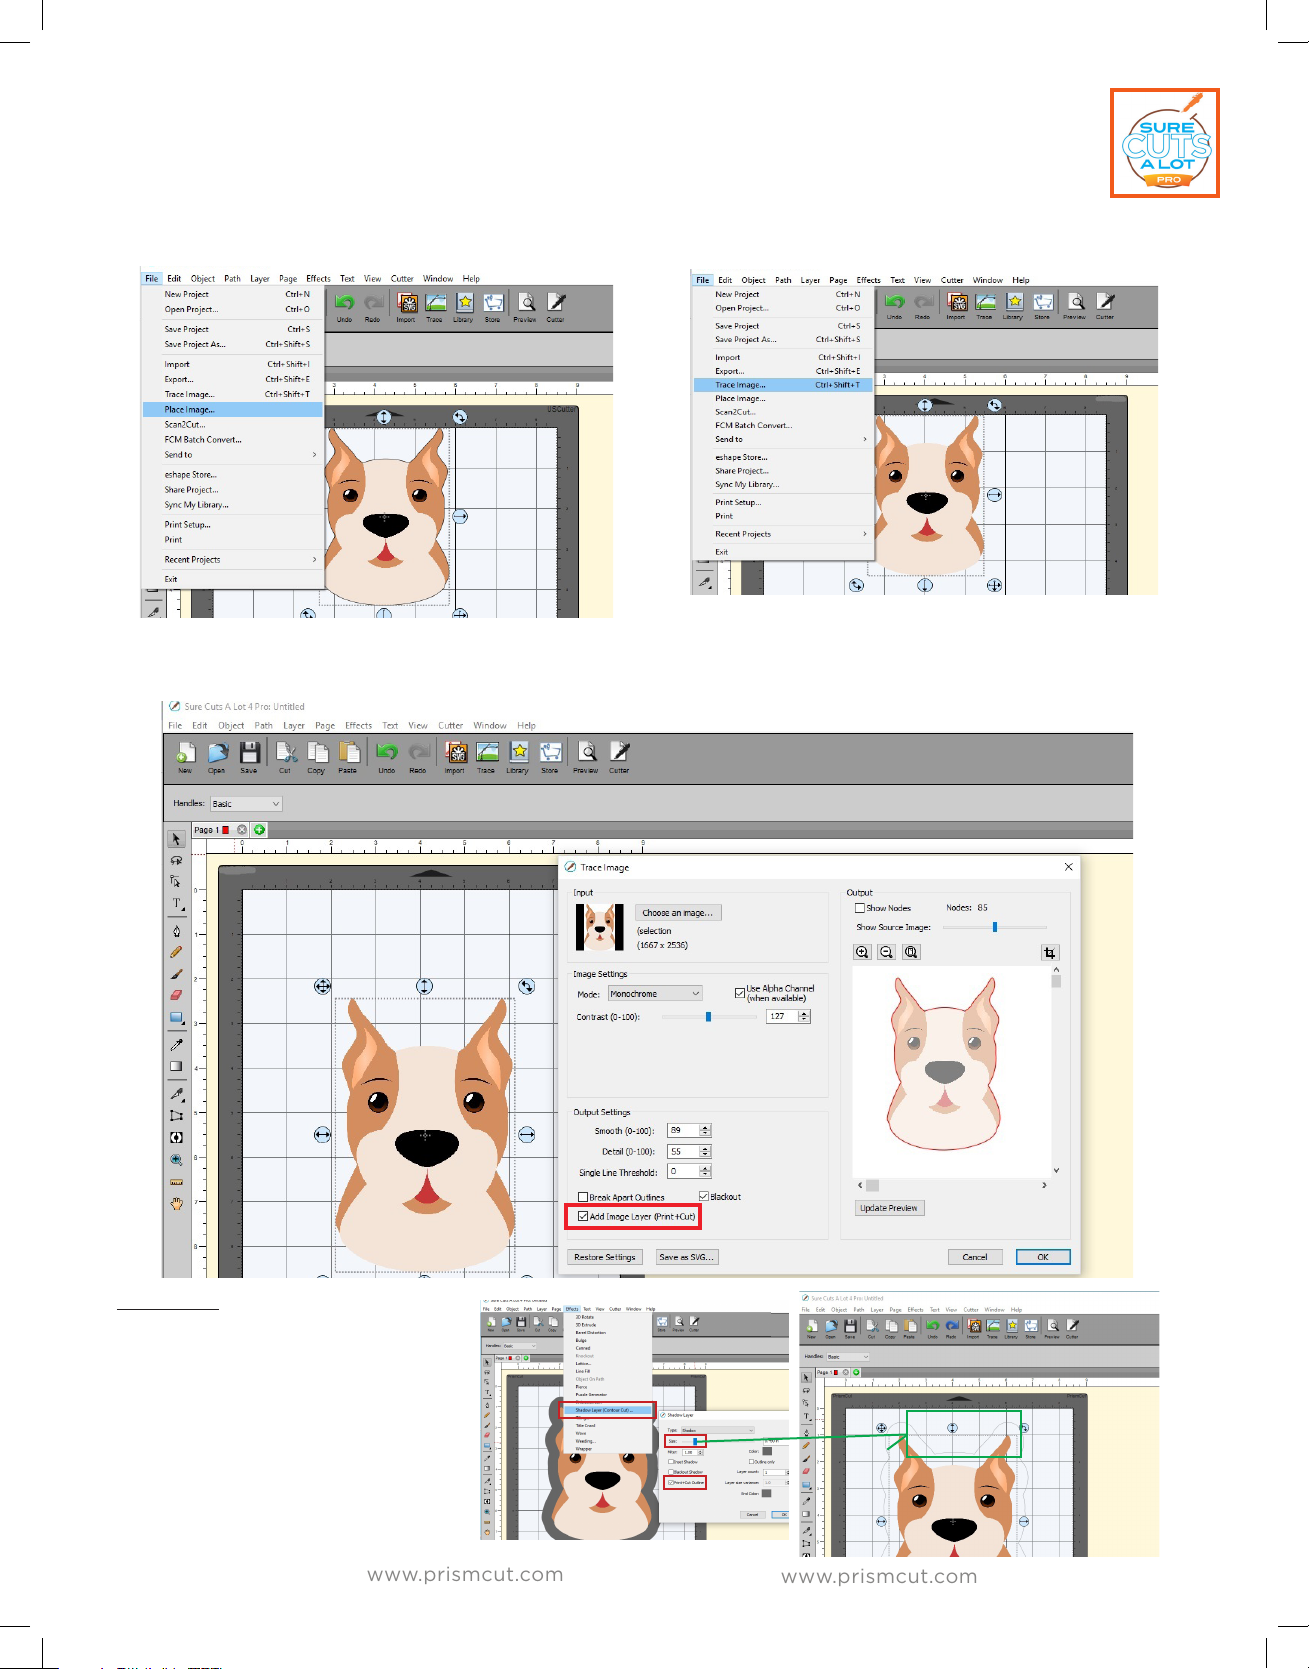
3.5.1 Contour Cutting / Print & Cut with Sure Cuts A Lot 4 (MAC)
Use File->Import when working with vector files (SVG, AI, EPS etc.)
Use File->Place_Image when working with raster files (JPEG, TIFF, PNG etc.)
Once you have put your image on the design mat, go to File->Trace_Image.
The Trace_Image pop-up window will appear. Make sure to check the box to
“Add Layer for Print & Cut” and then press OK to continue.
Optional (PNG): You can use
File->Import and then
select Eects->ShadowLayer
which allows adjusting the
distance of the outline. This
is useful in cases where you
are cutting stickers or when
you want distance between
the image and the cutline.
Move Size slider
to adjust distance
of cut from image
20
Page 21
www.prismcut.com
www.prismcut.com
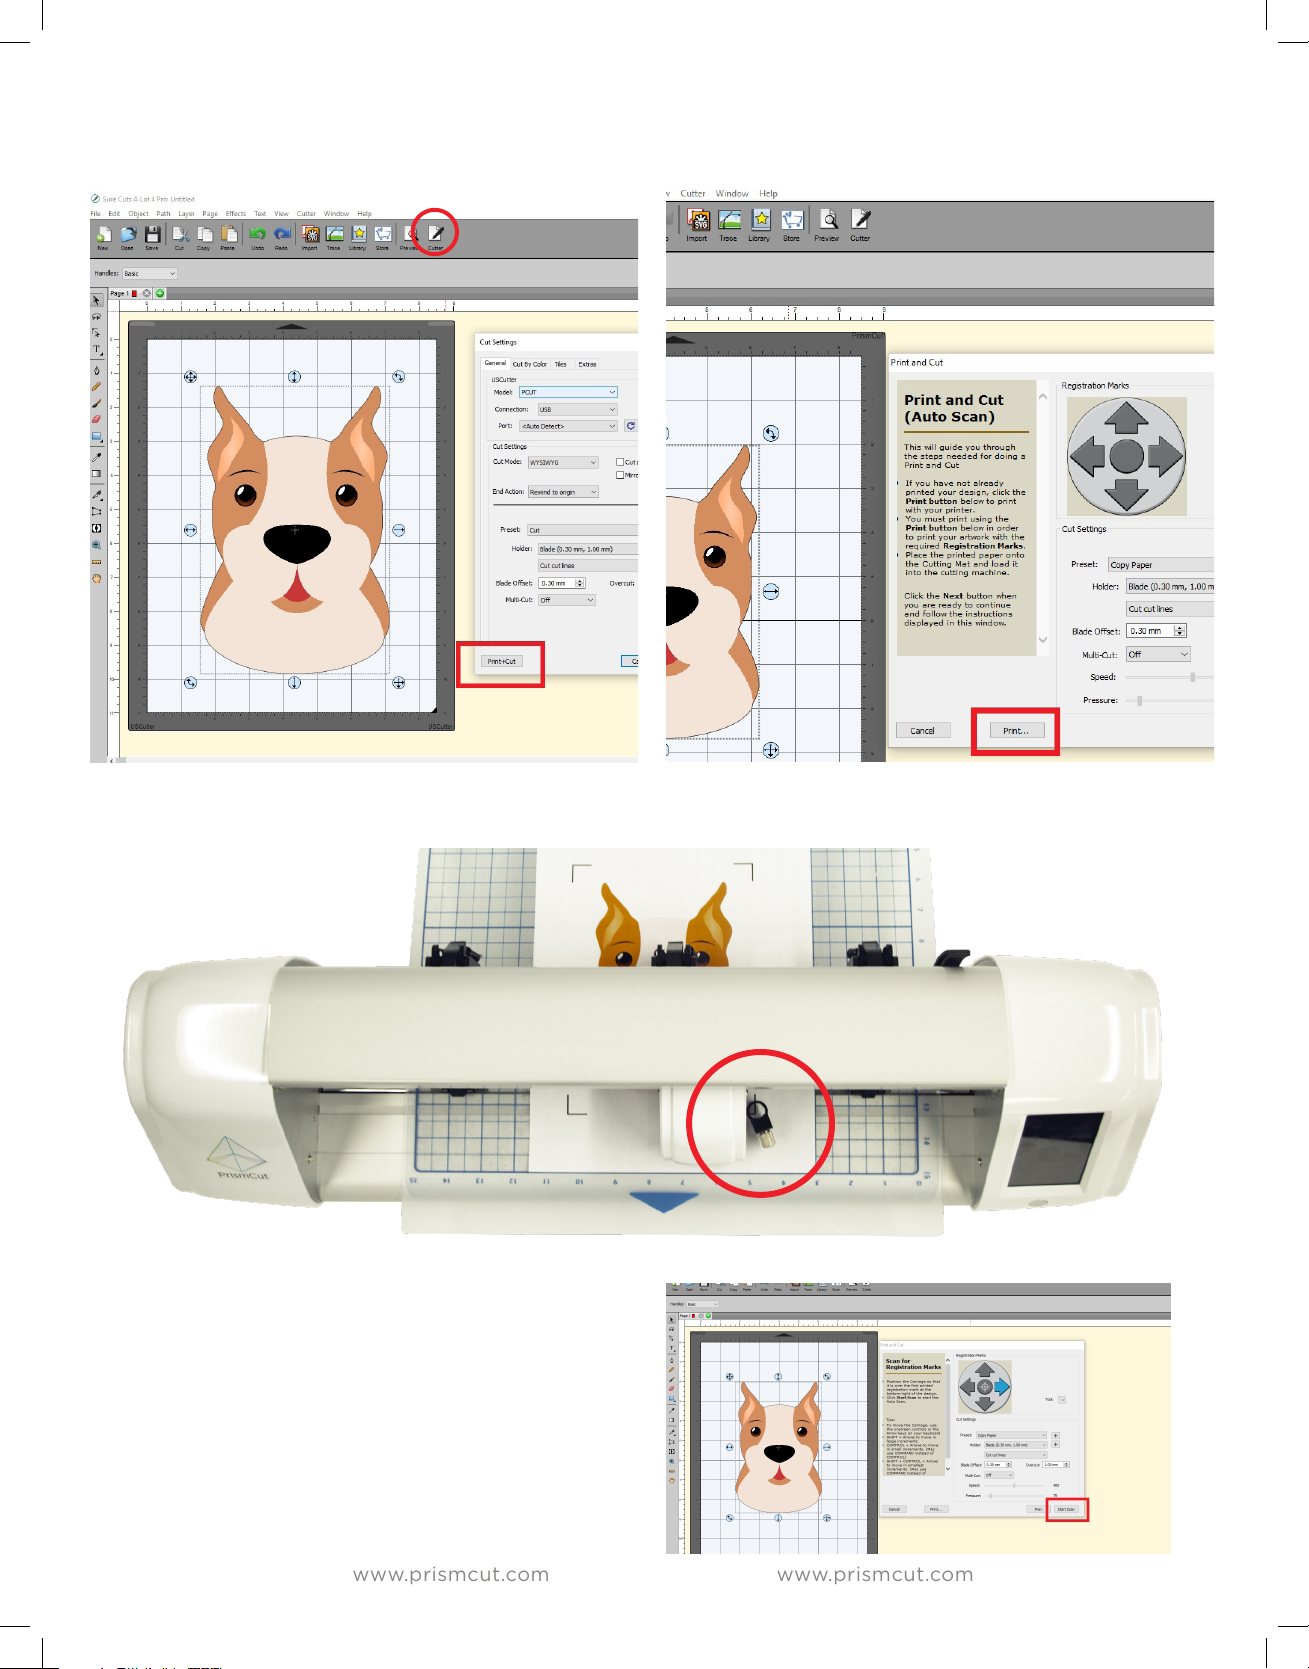
Click on Cutter and then select the Print&Cut option. This opens another window
where you can click on Print to print your artwork with the contour marks
Place the printed artwork into the cutter so that the lower right registration mark is directly
below where the blade would touch if pressed down.
On your computer, press NEXT and then
START. The camera will then inspect all 4
registration marks and then the cutter will
cut along the contour lines.
Tip: Click the preview button at the top of the
screen to see what will actually be cut and what will
be printed. This avoids unwanted surprises.
21
Page 22
www.prismcut.com
www.prismcut.com
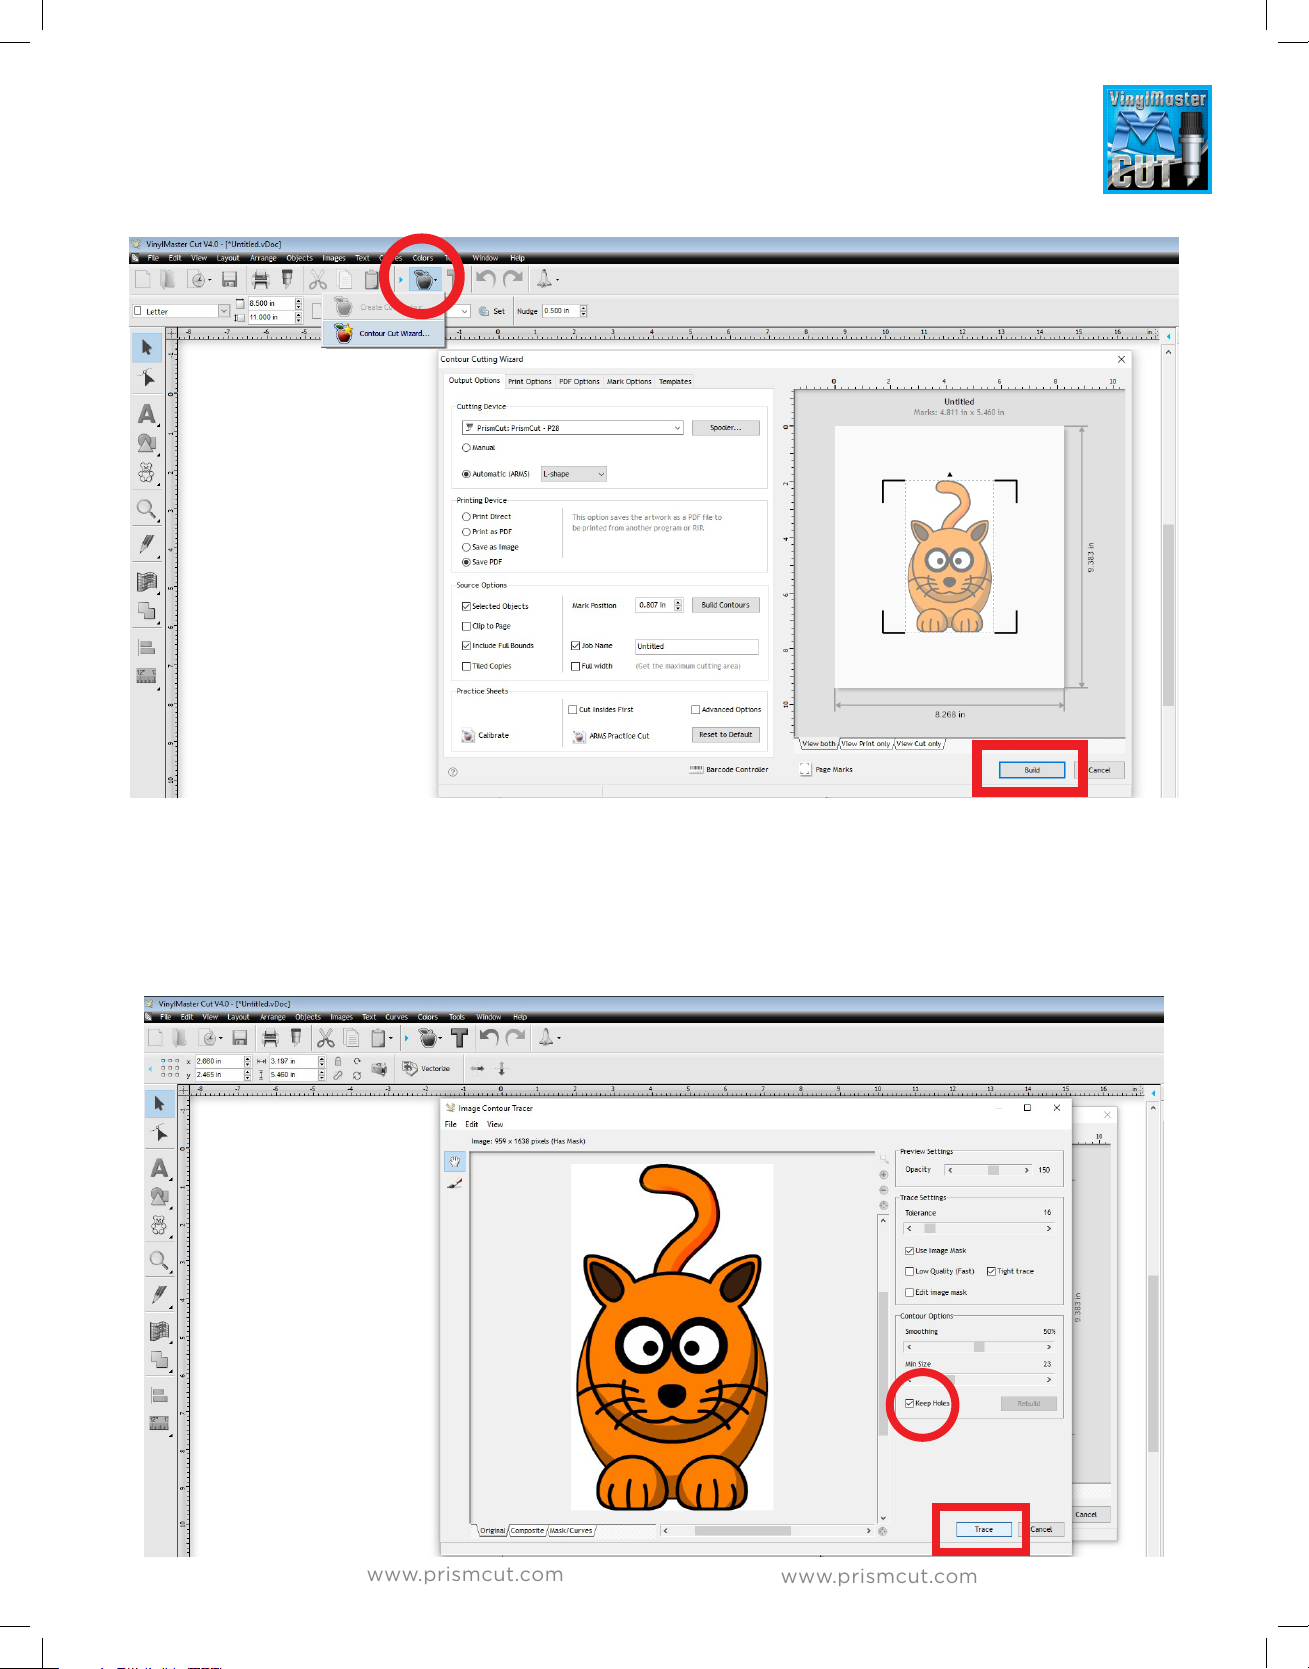
3.5.2 Contour Cutting / Print & Cut with VinylMaster (Windows PC)
To create a contour, open the Contour Cut Wizard by clicking on the
apple icon at the top of the page. Next click the Build button to build a contour.
If you are using a photo, the software will ask to include auto-traced contours.
For vector based artwork it will do this by itself. In any case, say Yes/Accept so
that the software can Trace a contour around the outside of your image. The
Trace settings allow you to adjust for poor contrast artwork. Note the “keep
holes” checkbox which allows/denies contour cut lines inside the main outline.
22
Page 23
www.prismcut.com
www.prismcut.com
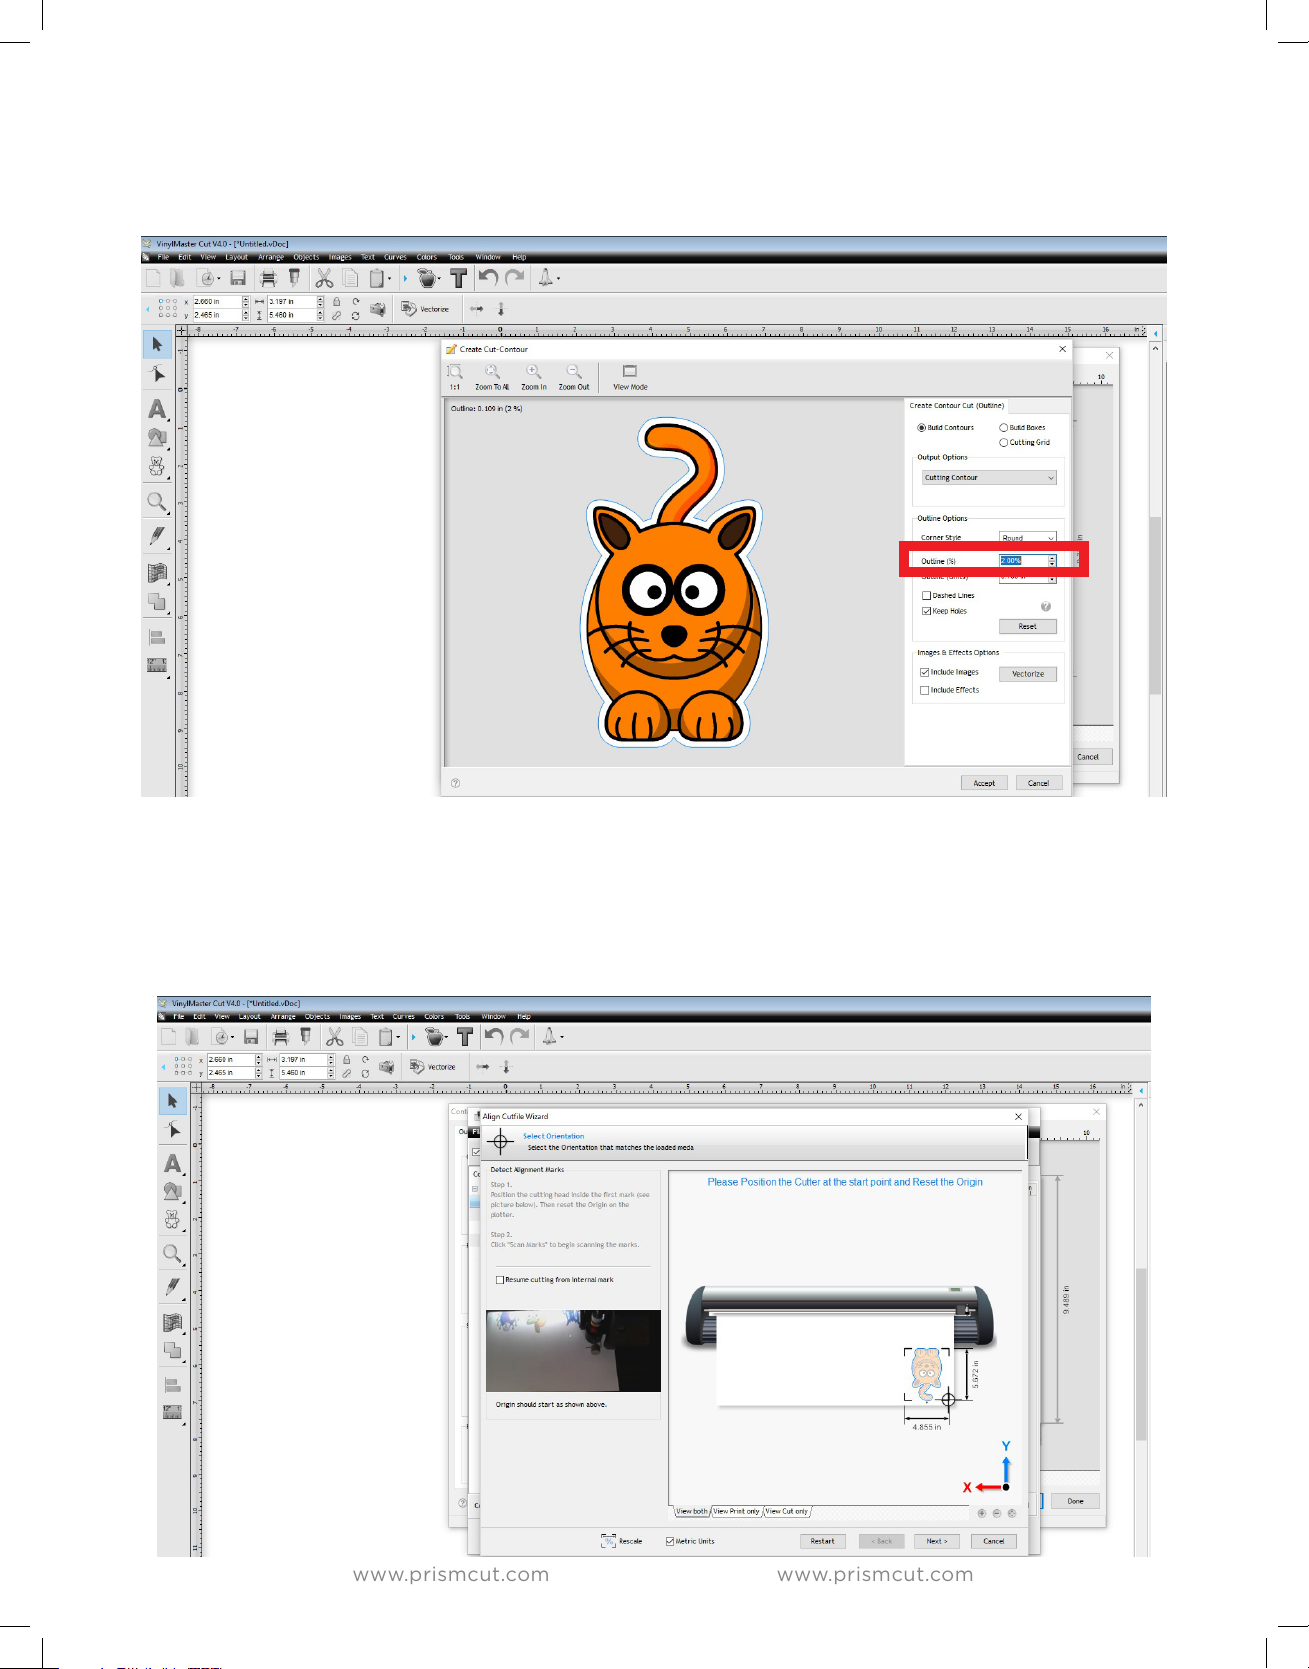
You can modify the space between the edge of your design and where the cut
will be made by adjusting the Outline distance. Note that negative values are
possible in case you want to eliminate any extra white space around the image.
You can either print your design directly, or save to .PDF and print at a dierent
location. The printed artwork will now have registration marks. Place the artwork
in the cutter so that the cutter blade is directly above the registration mark in the
lower right hand (as shown by the target icon in the below image). The cutter
will then search for all registration marks, align itself and cut along the contour.
23
Page 24
www.prismcut.com
www.prismcut.com
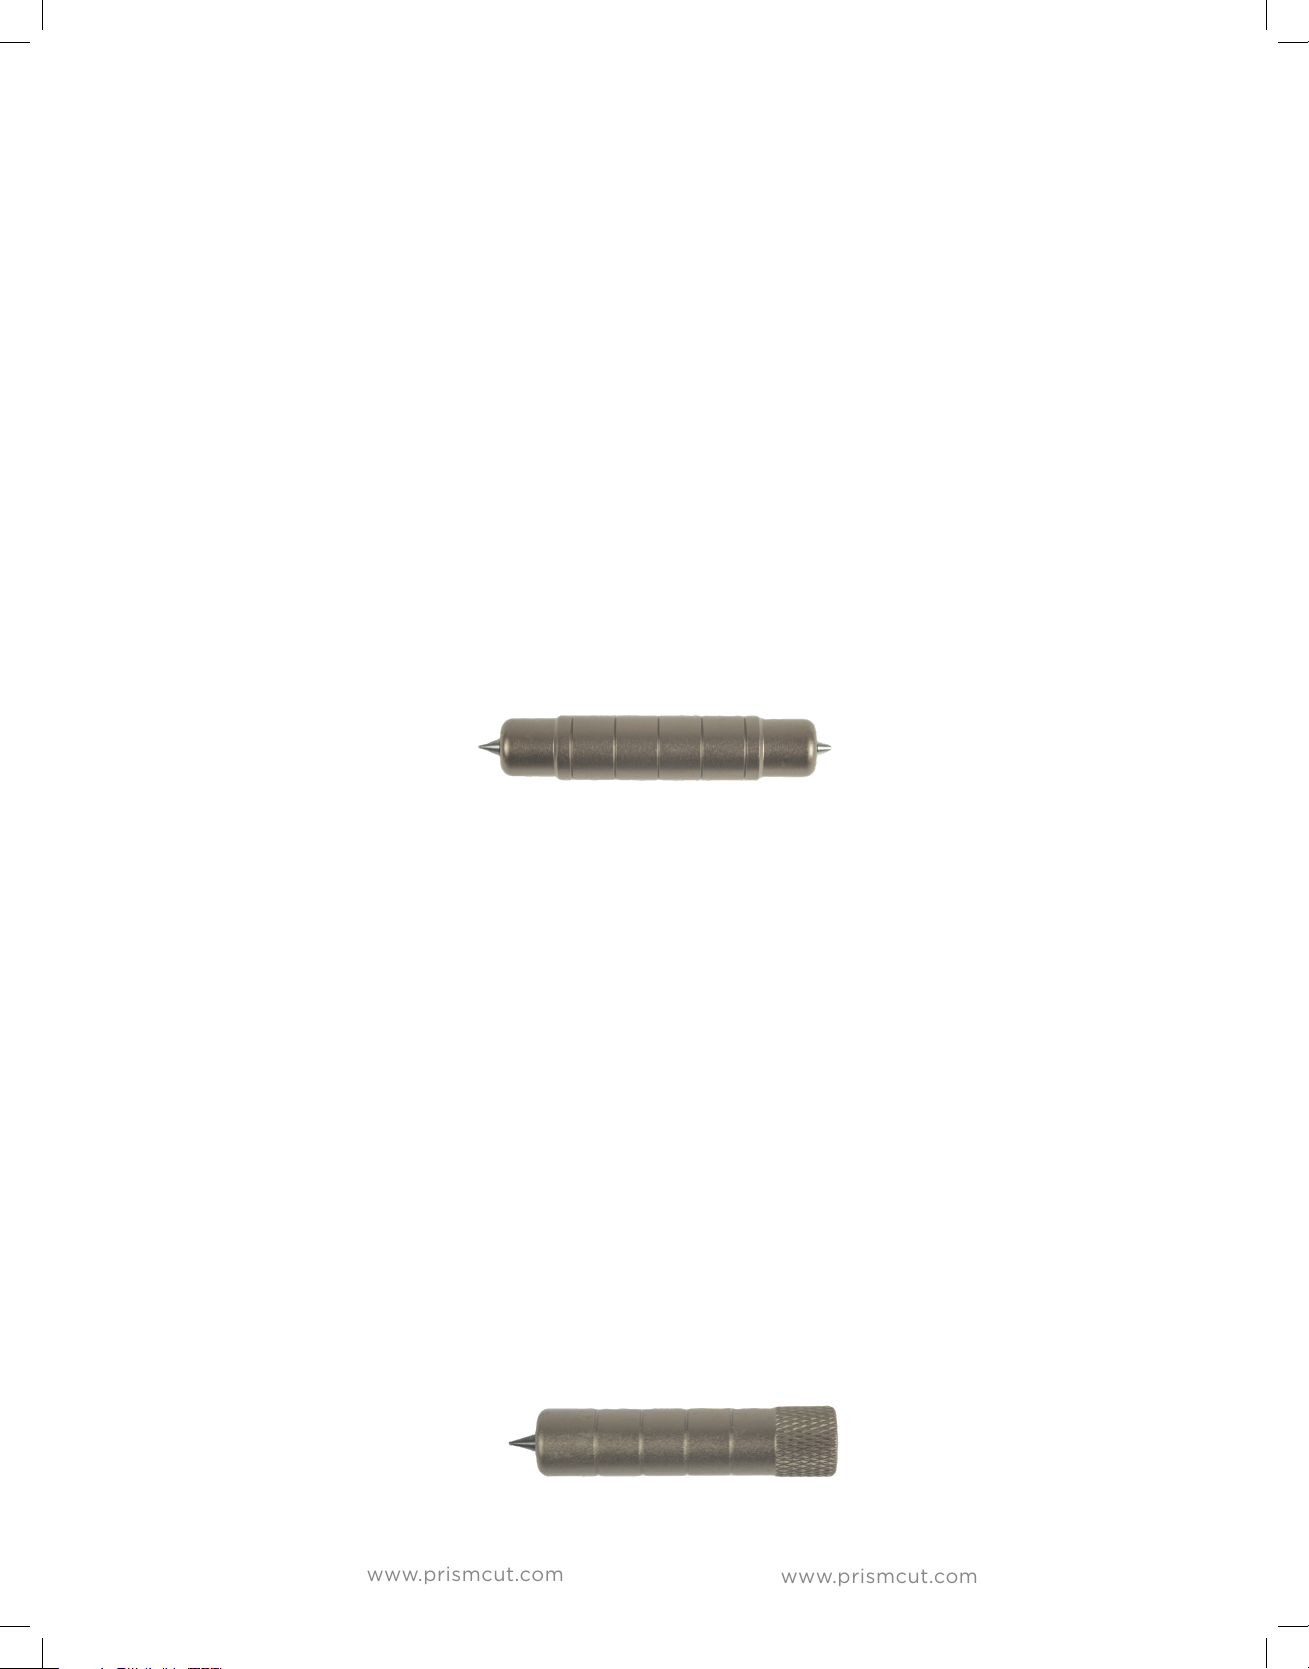
3.6 Using the (optional) embossing/scoring tool
If you choose to purchase the optional embossing tool, you can use it to make
creases, or indents in cardstock and other thin malleable materials. Place the
card stock on a surface with some “give” (felt, foam, rubber), so that it allows the
back side of the card stock to become indented when pressed from above with
the embossing tool. Turning the card over will show elevated/embossed lines
where the tool has been used. The embossing tool can also be used to score
creases when creating gift boxes where the sides fold up into a box.
To use the embossing tool, simply replace the blade holder with the embossing
tool and set your software to use a blade oset and overcut of zero. Next adjust
the speed and force to match the needs of the material being embossed. For
card stock, a typical embossing speed setting is 200 and a typical value for force
is 500. Note that the tool has two dierent sized heads allowing you to choose
width of the score. Setting software to multiple passes allows a deeper mark.
3.7 Using the (optional) engraving tool
If you choose to purchase the optional engraving tool, you can use it to create
scratches, or engravings into trophy plaques, dog tags, charm bracelets, plastic
and soft metals. First, securely attach the material to be etched to the cutting
mat using tape or adhesive so that the item does not move at all. Any movement
will likely result in a failed etching.
Typical artwork uses diagonal lines within the design being etched, but other
patterns can be used as well - whatever looks best to you. Setting the cutter
software to use a lower speed and force with multiple passes allows you to etch
away a little bit at a time if you are concerned about leaving pock marks. In your
software, blade oset and overcut values should be set to zero when engraving.
24
Page 25

www.prismcut.com
www.prismcut.com
3.8 Using the (optional) laser tool
If you choose to purchase the optional laser tool, you can use it to laser etch
leather, wood and other materials. It is critically important to full understand all
safety related precautions that you need to know before considering using the
laser attachment. Always wear protective lenses - even when aligning the laser
before starting to cut, to be sure a reflection does not cause a stray beam to
reach your eyes. The laser attachment fits on top of the carriage head and it is
designed for use only in a well ventilated area.
Typical artwork uses diagonal lines when the design is being laser etched, but
other patterns can be used as well - whatever looks best to you. The item to be
laser etched should be securely fastened to the cutting mat with tape so that is
does not move. Make sure that the atwork does not allow the laser to ever shine
on the cutting mat. In your software, blade oset and overcut values should be
set to zero
Using the laser tool requires passing a training course to receive the password to
access the feature.
Note: Laser tool is not
available in all regions
3.9 Connecting via Point-to-Point WiFi
In situations where there is no WiFi service available, as may be the case where
you want to use your cutter at a street fair or in a remote location, it is possible
to connect to your cutter in a Point-to-Point configuration. Note that this will
mean that your host computer is not able to connect wirelessly to the internet
at the same time when using a Point-to-Point connection to the cutter.
In the cutter’s WiFi menu, delete (reset) any current WiFi settings and the cutter
will display a value of HI-LINK_XXXX where the value of XXXX will be dierent
for each cutter. The cutter now acts the same as your home router, but does not
have an internet connection.
On your computer scan for available networks to find HI_LINK_XXXX and then
connect to HI_LINK the same way that you would connect to your home router.
The password for Point-to-Point is 12345678
The IP address for Point-to-Point is 192.168.16.254
25
Page 26

www.prismcut.com
www.prismcut.com
Section 4 - MAINTENANCE/TROUBLESHOOT
4.1 Care and Maintenance of Your Cutter
There is no need to oil or lubricate your cutter - simply keeping it clean should
be enough to provide you with many years of service.
Keep the grit rollers and pinch rollers clean. The combination of pinch roller from
above and grit roller from below is what makes your cutting mat or material
move back and forth in a straight line. If one of these parts is greasy or sticky,
you will see the material pull to one side, causing incorrect cutting.
At the same time, you want to be sure that the downward pressure of the
pinch rollers is the same for every roller. Once again, this is to keep the material
straight as it goes through the cutter. Note that the small levers on each pinch
wheel should be in the down position except when extra pressure is needed.
Over time, your cutting strip (the white strip located directly below the path of
the blade) may need to be replaced. Use a flathead screwdriver, putty knife or
other flat blade instrument to pry out the old cutting strip from the groove in
which it sits. You may also need to clean out any old glue or adhesive tape so
that the new replacement strip sits completely flat in the groove. You can order
a new cutting strip from your local PrismCut dealer.
Blades can get dull or chipped over time. In order to maintain precision cuts, it is
recommended that you change to a fresh blade every 6 months, after any major
use period or whenever the blade is dull, chipped or damaged.
26
Page 27
www.prismcut.com
www.prismcut.com
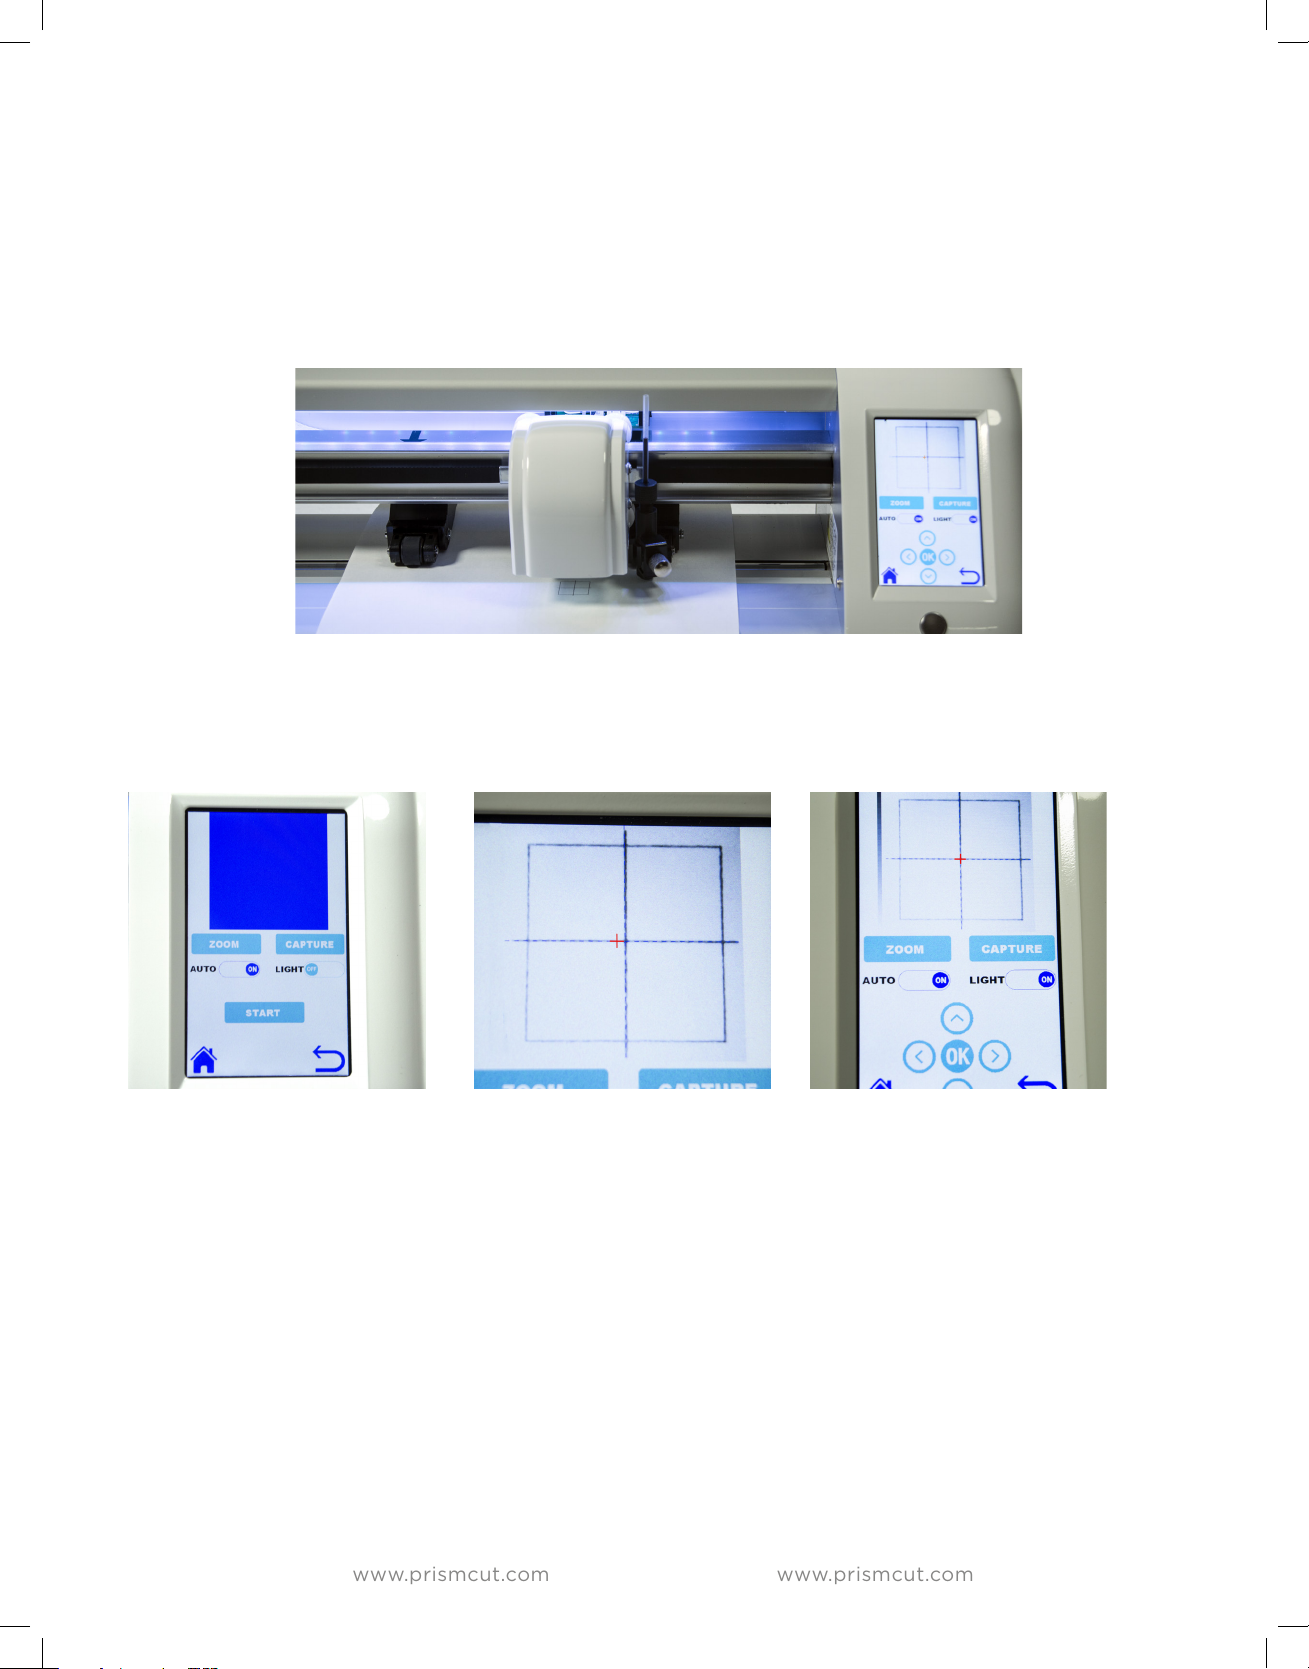
4.2 Calibration
The most common calibration is for the RegMarkCamera. This involves making
sure that the exact distance between the camera lens and the blade is known to
the cutter.
You need to be in the Advanced Menu to perform calibration
Note that the tip of the pen has a small cap that needs to be removed if using it for the first time
1) Remove the blade holder and replace with a pen.
2) Insert a piece of plain white paper and position the pen over the paper
3) Select SETTINGS->ADVANCED->REGMARKCAMERA->CALIBRATION
4) Under CALIBRATION, select REGMARKCAMERA and press START
5) The cutter will then draw a square on the paper and take a picture of it.
6) Use the arrow keys to move the red cross to match the center of the square.
7) Press OK and the cutter will take another picture to show closer alignment.
8) Repeat the process until the red cross matches the center of the square.
CAUTION: Calibrating other functions such as SCALE and OFFSET will erase
factory calibrations and should only be made under the guidance of a qualified
technician.
27
Page 28
www.prismcut.com
www.prismcut.com
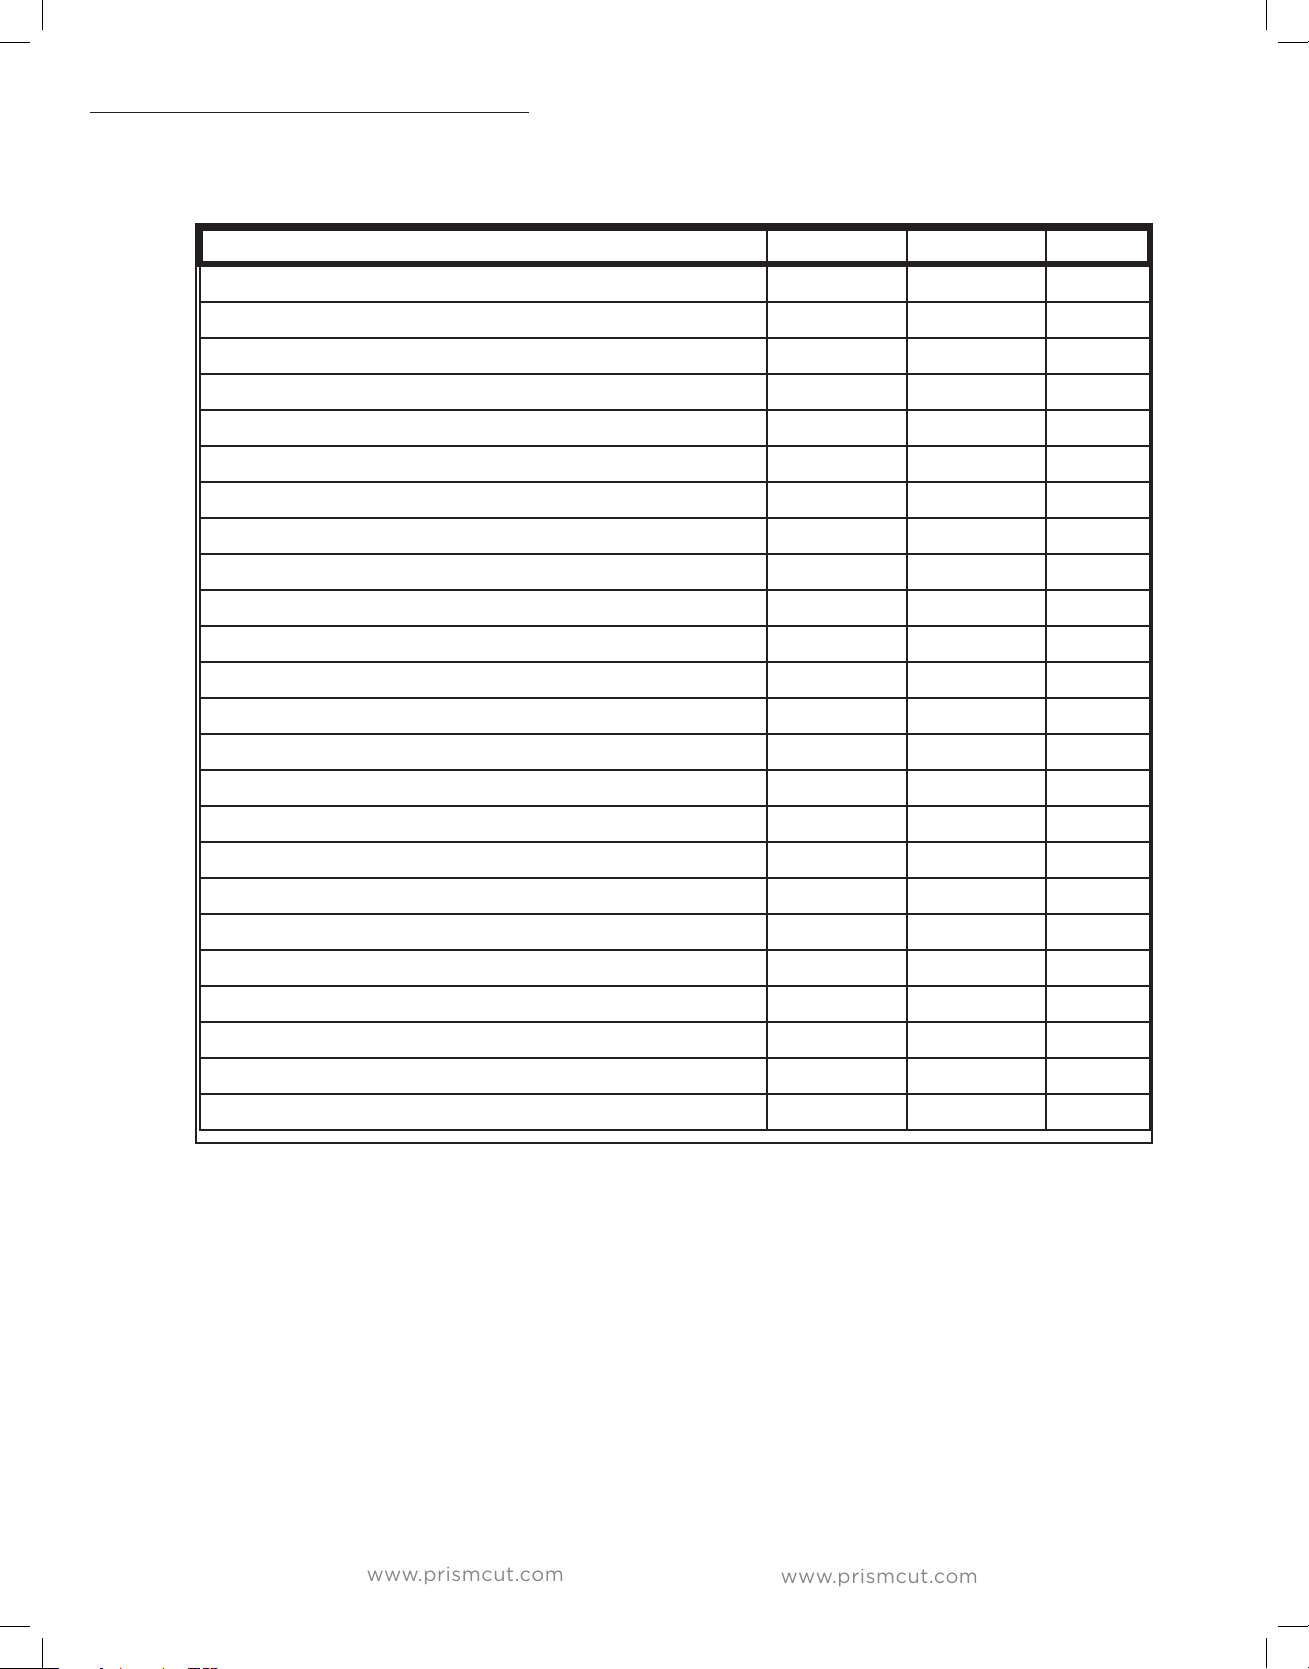
RECOMMENDED CUTTER SETTINGS
Below items cut within material thickness limits of 2.5mm and density of approx 1 g/cm
Note that thicker materials may need multiple repeat passes to cut all the way through.
MATERIAL SPEED FORCE BLADE
Heat Transfer Vinyl 400 70 45°
Pressure Sensitive Vinyl 400 70 45°
Stencil Material 350 160 45°
Paper (75 gsm) 200 50 45°
Labels/Decals 500 80 45°
Cardstock (160 gsm) 500 500 45°
Icing Sheets 250 160 60°
Shrink Film 300 250 60°
Wood Veneer 200 450* 60°
Magnetic Sheets (thin) 200 600* 60°
Rhinestone Templates 200 600* 60°
Foils 200 100 60°
Posterboard (250 gsm) 350 500* 60°
3
EVA Fo am 300 100* 60°
Mylar 300 450* 60°
in Chipboard 200 500* 60°
Paint Mask 350 200 60°
Styrene 450 400 60°
Leather 100 750 60°
Felt 200 300* 30°
Denim 100 750* 30°
Cotton 250 350 30°
Woo l 250 750 30°
* force settings with an asterisk may need multiple passes
The above settings should be considered as starting points and may need to be modified depending
on the characteristics of the specific brand and nature of material you are using.
When considering how to cut a material that you are encountering for the first time, look at
the thickness vs. density of the material. Materials with a high density will typically need more
force and a slower speed. In cases where the material is thicker, multiple passes is often a
good place to start before increasing force. You may also need to raise the blade holder so
that it sits higher in the jaw when cutting thicker materials to allow the blade some distance to
drop. If there is no distance between blade and material, the downforce can be compromized.
Thin materials, and especially fabrics are best addressed with a 30° blade. Fabrics often require
the use of starch or backing material to stien the fabric before cutting and/or using a brayer
roller to get the fabric to stick and lay flat on the sticky part of the cutting mat.
28
Page 29

www.prismcut.com
www.prismcut.com
4.3 Troubleshooting cutter issues
Before contacting support, you may want to try basic troubleshooting.
1) Unit will not power on.
- Make sure power cord is securely plugged into the power adapter.
- The power adaptor shows a small green light when it is working correctly
- Check the exact outlet you are using by plugging in a lamp. Note that sometimes the bottom outlet in a two outlet wall plate is controlled by a light switch.
2) The mat/vinyl pulls to one side when it goes through the cutter
- Proper alignment when placing the mat/vinyl in the cutter is most important
- Also, make sure the pinch rollers are directly under the black arrows
- Make sure the grit rollers on the bottom bar are clean of any sticky residue
- Place your mat/vinyl so that the pinch rollers are near the outside edges
(note that pinch rollers must always match up with grit rollers below)
- You may have better results by adding (or removing) a middle pinch roller
- Make sure the small levers on the back of pinch rollers are all down (or all up)
- You might be using too much downforce on the blade. Increase passes instead
3) The blade does not cut all the way through the material
- Some materials need multiple passes to cut all the way through (set in SW)
- Check that blade oset and overcut settings are set correctly in software
- Try increasing pressure before considering extending exposed blade length
4) Cutter stops/stalls when cutting very thick materials
- Try decreasing speed/force and increasing number of passes
- Place the bladeholder in the jaw slightly higher to allow blade to drop more
5) I cannot get WiFi to connect
- Make sure that the home screen does NOT say HI_LINK_xxxx
- Make sure the home screen shows the IP address of your home/oce router
(typical home IP addresses may start with 192.xxx or 172.xxx or 10.xxx)
- The IP address on the cutter and in the software MUST be the same
- Check that you are using the correct WiFi password for your home router
- Try moving the cutter closer to the WiFi router. Ideally right next to the router
6) I cannot get USB to connect
- Note that USB is not needed if you are using WiFi
- Test the USB port on the computer with a dierent USB device
- Make sure the connection settings on your computer show USB in the software
- With computer on, remove and re-insert the USB cable to re-initialize the port
29
Page 30

www.prismcut.com
www.prismcut.com
7) The camera does not see the registration marks when contour cutting
- The camera may need calibration, please see section 4.2 for the procedure
- Turning the camera light on/o may help the contrast at the edge of the mark
- Turning the room lights o or moving the cutter to a less bright area may help
- Make sure the registration marks have printed solidly with no missing ink areas
- Make sure your printer is set to print at “actual size” or it will not work
- Make sure that the printed artwork file matches the contour cutting file
- Ensure that the printed design is placed in the cutter as straight as possible
- Position the blade over the lower right registration mark just outside the mark
8) My cuts show tearing
- Check to see that your blade is not exposed more than 1/2 credit card thickness
- Try reducing the down force. Too much force can impede material movement.
- Blade may be chipped or dull and needs to be replaced
9) The corners of my cuts are not cutting completely
- Check to see that you have the correct overcut setting in your software
- A typical overcut setting is 1 mm but may be more/less for dierent blades
- When using the pen, etching tool or engraving tool overcut will be zero
10) I do not see PrismCut as a pull down menu option in Sure Cuts A Lot
- This is likely due to not having the PrismCut Driver installed
- For Sure Cuts A Lot 4 Pro, make sure you have version 4.080 or later installed
11) I do not see PrismCut as a pull down menu option in VinylMaster
- This is likely due to not having the PrismCut driver installed
- On the top line of VinylMaster software select Help->About to see your PSN
- Go to https://fcws1.com/info/vmlinks.php and select Download Software
- Input your Vinylmaster PSN to allow download (or click the Don’t Know link)
- Re-install the software and select PrismCut as the cutter during install.
12) How do I manually install the PrismCut driver for VinylMaster
- On the top line of VinylMaster software select Help->About to see your PSN
- Go to https://fcws1.com/info/vmlinks.php and select Legacy Drivers
- Input your Vinylmaster PSN into the legacy Drivers page to see drivers list
- Download the PrismCut driver to a known location on your computer
- In VinylMaster, open the Spooler and select Cutter->Install_Cutter_Driver
- You should now be able to ADD the PrismCut in the Spooler->Connection
30
Page 31
www.prismcut.com
www.prismcut.com
4.4 Warranty and Support -
PrismCut comes with a limited 1 year warranty as provided by your dealer.
In the USA, your warranty and support are provided by:
USCutter oers a limited 1 year warranty on this cutter.
Details of our standard warranty policy can be viewed on-line at the following link:
www.uscutter.com/Warranty-And-Returns-Policy
For support for your equipment, contact USCutter at:
Sales & Support: 1-425-481-3555 M-F 7:30-11:30am, 12:30-4pm PST
support.uscutter.com
31
Page 32

 Loading...