

Page 1
MANUALE ISTRUZIONI
Macchina:
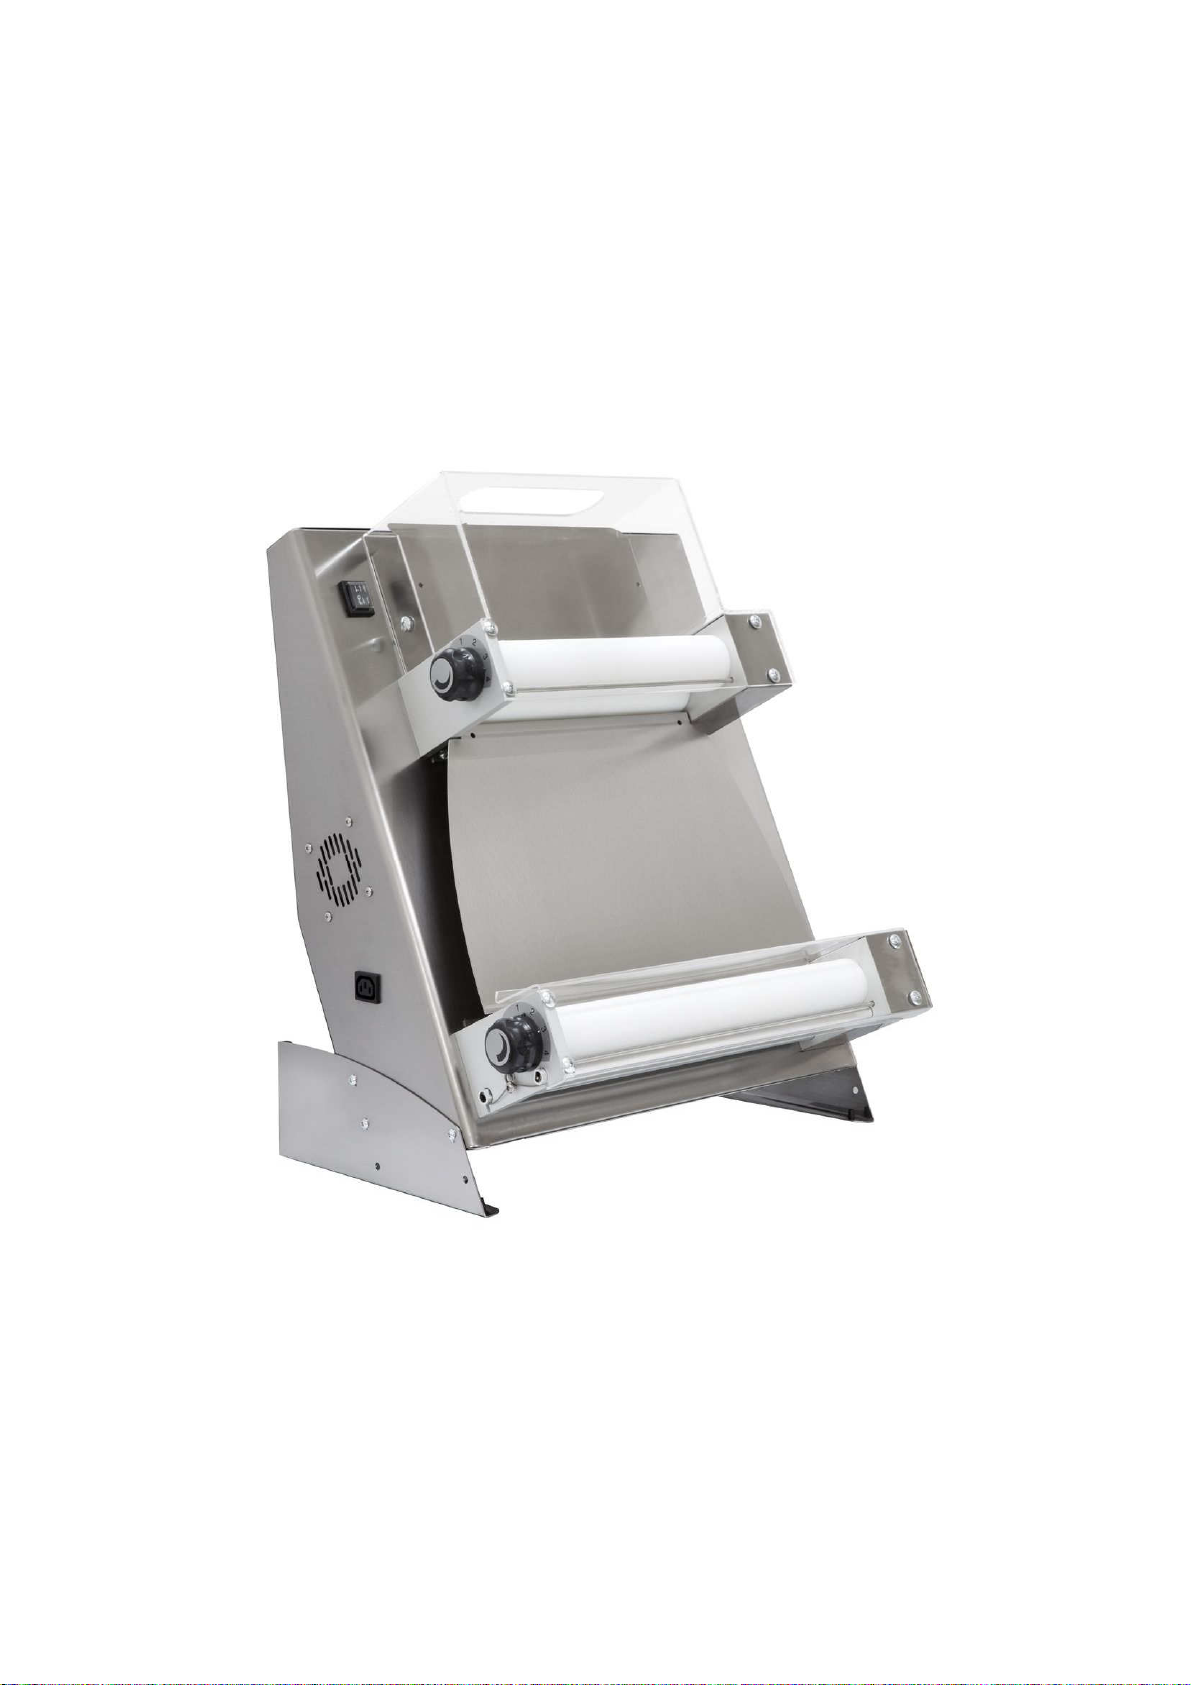
ROLLING MACHINE DSA 500 RP
DILAMINATRICE DSA 500 RP
Page 2
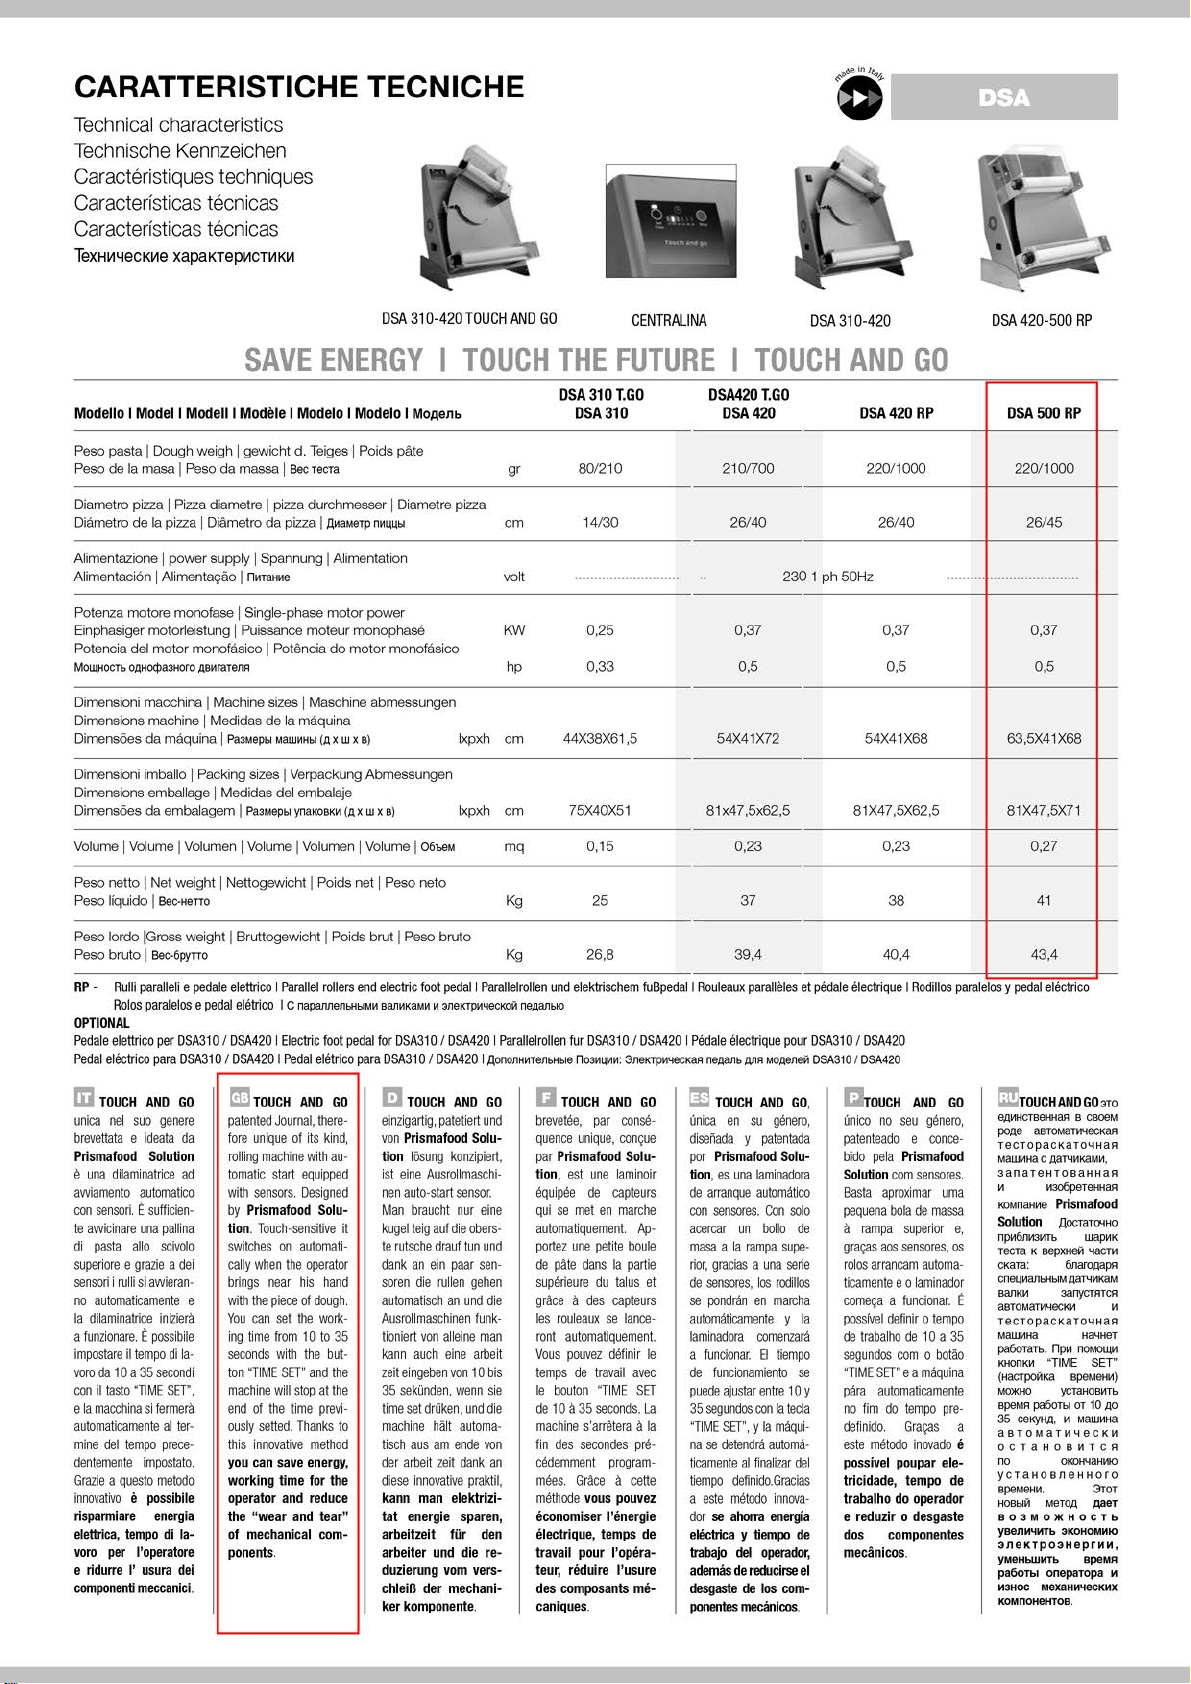
CARATTERISTICHE TECNICHE
Techn ical characteristics
Technische Kenn zeichen
Ceractertsnqoes techniques
Caracte rfsticas teco icas
Caracte rfsticas tecn cas
TeXHI14eCKI1e xapaKTepl1CTI1KI1
DSA 310 -420 TOU CHA N D G O
CE N TRALI NA
DS A 31 0-420
DSA 420 -500 R P
SAVE ENERGY I TOUCH THE FUTURE I TOUCH AND GO
Mod ello I Mod ell M od ell I Modele I Mod elo I M odelo I
Peso pas taIDo ugh w eighIge wicht d. TeigesIPo ids pil te
Pesodela
Diame tro pizzaIPizza diametreIpizza du rch messe rIDiam etre p izza
Diarnetro
Alim ent azioneIpow er supp lyISp ann ungIAlim en tation
Alim entac i6nIAlimen taQ80In"TaHlle
Pote nza mo tore m onofaseISingle-ph ase mo tor po wer
Einphasige r mo tor le istu ng
Pote ncia d el m otor
MolUHOCTbo,Q H cxps:mo ro,QB"I'8Ten A h p 0,33 0,5 0,5 0,5
Dim ension i m acc hinaIMach ine s iz esIMa sch ine abm ess un gen
Dim ensions mac hineIMed idas de la
Dim ensc5e s da
Dim ension i im balloIPacking s izesIVerpac kung A bmessunge n
Dim ensions em ba llageIMedidas de l em bala je
Dim ensc5e s da e mba lage mIPa3IAe p blynaKOB K H(,QxW
VolumeIVolumeIVolu m enIVolumeIVolume nIVolum eIOObBIA
Peso ne ttoINet weigh tINe ttogew lchtIPoids ne tIPeso ne to
Peso liqu idoIBeC 'HeTTO
rna sa I
Peso da m asse
de fa p izz aIDiam etrodapizzaIA" alA eT pn"U UbI cm
mo n o ras tcc I
I sec
TeCTa g r
I Puissance
mo teur
Pot~n ciadomotor
monop hase
rn aq um a
ma q ui n a I
Pa3IAePbl M 8W "Hbi( ,QxW
x
8)
x
MOAenb
monotaslcc
8)
Ixpxh
Ixpxh cm 7 5X40 X51 81 x47,5 x62 ,5 81 X4 7,5 X 62,5 81 X4 7,5X 71
DSA 310T .GO D SA420T.G O
DSA310 D SA4 20 DSA420 RP D SA500 RP
80/210 2101700 220/1000 220/1000
14/30 26140 26140 26145
volt
f<W
cm 44X 38 X61,5 54 X41 X72 54X4 1X 68 63 ,5X4 1X 68
mq 0,15 0,23 0,23
Kg
........................... ..
0,25 0,3 7 0,37 0,3 7
25 37
23 01 ph 50 Hz
........ ..
.......... ... ..........
0.27
38
41
Peso lordo
Peso b ru toIBe<:·Opyno Kg
R P -
OPTIO NAl
Pe dale ele ttric o per OSA3 101DSA4 20 I Elec tric fo ot ped al fo r D SA3 10IDS A4 20 I Paralle lrollen fur D SA3 10IDS A4 20 I Pe dale elec triq ue po ur D SA310IDS A4 20
Pe dal elec trlco p ara DS A310IDS A420 I Pedal elet rlco para DSA3 10IDS A4 20 I AononH H Tenb H blBn03" U H": 3nBK TpiNecK8 Ane,Q8 nbAnA M O,QB nell
Iii
unlea ne l suo genere
breve ttata e Ideata d a
Prisma food Sol utio n
e
awiame nto a utomat ico
coo
te aw icinare una pallina
dl pas ta ail o seivalo
supe rlore e gra zi e a d el
se nsoli i rulli s i aw ie ran·
no
la dilam in atlice Inlzlera
a funz lona re .Eposs ibll e
im pos ta reiItempo d i
vo ro da 10 a35seco ndi
conIItas to 'TIM E
e la ma cch ina s i f emnera
au toma ticame nte a l
mine del tem po p rec e ·
de nteme nt e im posta to .
Grazi e a ques to metodo
inno vativoIIposs ibile
risparml are ener g ia
elettrica , tem po dl l a-
voro
e r idurre I' u sura de i
co m po nent! mecca n ici.
IGross
we ightIBrutt ogew ichtIPoids brutIPeso b ru to
Ru lli parallell e pedale e lettr lco I Parallel rolle rs e nd elect ric foot pedal I Parallelrollen und elektrische m fuBpe dal1 Rouleau x para ll~les e t p edale etectr lque I R odillos paralel osypedal elec trlco
Ro los
pa reie ros
e pedal eletr lco ICnapannenbHbl M "Ban"Ka lA"H3neKTp"4G cKOlInB ,Q anblO
III
TO UCH AN D GO
una d llam inat rlce ad
se n son ~
suH icie n-
automat ica me nte e
SET ',
ie r-
pe r I'ope rator e
t:Il
pat ented Joumal , there ·
fore un iqu e of Its kind,
roili ng m ac hine w ith au-
tomatic s tart equ ipped
with se nsors . Des igned
by Prl smafood So lu -
tion.
sw itches on auto ma ti-
ca lly wh en the opera tor
brt ng s ne ar his ha nd
wit h the pie ce of do ugh .
You ca n set the wO il< -
ing tim e fro m10to
la -
sec onds w ith the but-
ton "T IM E
mac hine will s top a t t he
end of t he t ime pre vi-
ously se tted . Tha nk s to
this innova tiv e me thod
yo u ca n sav e en erg y,
wo rking tim e for the
ope rator a nd re duce
the "w ear a nd tea r"
of m echa n ica l com -
pone nts.
TO UC H AND G O
louch -se nslt ve
35
SET "
and the
It
TOUC H AN D GO
einzlgart ig,p ate ts rt un d
von Prl sma foo d Sol u-
tio n los un g ko n zlplert ,
1st eine Alis rolimase h l·
nen auto-sta rt sensor .
M an
bra uch t nu r ei ne
ku gel te ig auf die
te rut sche d ra uf tu n lin d
dan k an ein paar sen-
so ren die ru llen gehen
autom at lsch a n und d ie
Aus rollm ase hinen fu nk-
tlonlert v oo a ilelne ma n
kan n a uch ei ne
zeit ein gebe n von 10 bis
35
se kO nden. w enn sle
time se t drO ke n,und die
mac hin e ha lt
tisch aus am ende vo n
der a rbe it zeit da nk
diese Inno vat iv e p rak til,
kann man elek tri zi-
tat ene rgie s paren,
arbeit zeit fUr de n
arbeiter u nd die re-
duzierung vom ve rs-
chl eifl de r m ec han i-
ker ko mp one nte .
ob ers -
arte it
au toma -
an
26,8
II
TO UC H A ND GO
brevetee , par co nse -
que nce uniqu e,
pa r Prismafood Solu -
tio n, es t un e lam lflO ir
eq ulpeedecapte u rs
qu i se m et en ma rche
auto ma tlqu ement. Ap -
po rtez un e pet ite bo u le
de
pa te da nsIapart ie
supeneurecutalus e t
grAceades capte urs
les rou lea ux se lanoe -
ro nt a utomatiq u em ent.
Vous p OINez d8 tinir Ie
tem ps de trav ail a ve c
Ie bo uto n "TI ME S ET
de
lOa
ma chine
fin des secondes p re-
cM em men t p rog ram -
moos . G rAce11cette
me thod e vous po uvez
eco nomiser I'ene rgie
electr ique, tem ps de
t.ra vall p ou r I'opera -
teu r, r&<luire I'usu re
des compos ants me-
can iques .
co n coe
35
seco nds . La
s'a rr ete ra11fa
39,4
[I
TOUC H AND G O,
unica e nsoge nero,
dlse na daypa tentad a
po r P rism afood So lu -
tio n, es una fam lnad ora
de
arranQlI8a u tom ati co
con
sensores .
Con
del
con
la t ec la
operador ,
so lo
supe -
lOy
acer ca r un bo llo de
masa a la ra mpa
rio r, gracias a una se ri e
de sensores , los rodil los
se pond ran en ma rc ha
au toma tica me nte y la
lam lnador a co me nzar a
a fun cio nar .8tie m po
de funciooam iento se
pue de ajusta r e ntre
35
seg und OS
"T IM ES ET".yfa m aqul-
na se de tendra a utoma -
tica m en teaJfina lizar de l
tiem po d efi nid o.G ra clas
a este m e tod o innova -
do rseahornl ene rgia
eJectrica y tlempo de
trabajo
adem as de r educ irse el
desgastedelos com-
ponentes meca nicos .
40,4
OSA3 1 0IOSA 420
Cr OUC H AND GO
lin lco no seu gene ro ,
pat en tead o
bid o pe la Prl sma food
So lutio n co m senso res .
Basta a pro xim ar u m a
pe quena boladema ssa
II
ra mpa su pe rior e,
graca s a os se nso res ,os
ro los arrancam
tleam ente e0lam inad or
corneca
a fu ncioo ar. ~
pos sivel de fin ir0tempo
de traba lho de loa
seg un Clos com0botao
"T IM ES ET" e a maqu ina
para a ut om ati cam ent e
no tim do temp o pre-
de flnido. G racas a
este
me tooo
possive l pou par ele-
trlc ida de, tempo de
trab a lho do ope rador
e redu zir0desgas te
dos co mp onentes
meca nicos .
e co n ce -
a uio m a-
35
inovado e
43,4
Cl!l TO UCH A NDGO 3TO
e.II HH CT BBllHaR8CBOe fll
po,Qe aBTOfll8TII'I BC KaA
TeC TopaC K aT0 4HaA
fIIa W HHBC ,Qal'l"KaIA H.
3anar9HTOSBHHaA
H H306 pereHHaA
KOM n aH H BPris m afood
So luUon A OC T8T O'l H O
npH 6Jl10131o1Tb wa pH K
TeCTaKeepXllell
CK aTa : 6na ro,QaPA
Cn Blt "anbHb lfll,QaT 4Io1Kafll
BanKH
8arO M aT H4 BC KH II
TeCTopaC K8T04H aR
MaWVlHa Ha"'II·t9T
pa60TaTb.np H nOMOUlH
KHO nKH
(H aCTpOil K8 B PBMetM)
fIIOlKHO
apefll A pa 60TblOT10,Q O
35 CBKyl\Q, II
aSTOMa TH"I eCKH
oc raH OBIITCR
no ot«lH'I8 HHIO
yCTaHoBne H Horo
apefllB HII.
HO Bbl iI fIIB roA ABeT
B03MO)l(HOCTb
yoenll411Tb3KOHOMllIO
3neKTp03HeprMH,
YM BHbW "Tb BpeMFI
pa60T b l onepaTopa II
M3HOC MeXBHlot't8CKMX
KOMnOHBHTOB .
'lacTII
sanycTRTCA
'TIME SET"
~H oBHrb
MaW HH a
3TOT
Page 3

EMISSIONE: 2010
Il costruttore non si assume l'obbligo di notificare
eventuali successive modifiche del prodotto.
Inoltre si riserva a termini di legge la proprietà del
presente documento con divieto di manomissione,
riproduzione e trasmissione a terzi senza la sua
autorizzazione.
PREFAZIONE
Questo manuale è diretto a tutti coloro che sono
preposti all'installazione, l'uso e alla manutenzione
della Dilaminatrice in modo che possano sfruttare
nel migliore dei modi le carat-teristiche del prodotto.
E' importante che questo manuale sia conservato e
segua la macchina in tutti i suoi eventuali
trasferimenti, cambio di proprietà compreso, allo
scopo di poter essere consultato all'occorrenza e
disporre quindi delle informazioni necessarie per
operare in condizioni di sicurezza.
Il manuale è composto di:
- Capitoli
- Paragrafi
- Note
Il manuale è suddiviso nei seguenti capitoli:
CAPITOLO 1:
Informazioni
generali
CAPITOLO 2:
Installazione
CAPITOLO 3:
Messa in funzione
CAPITOLO 4:
Uso della macchina
CAPITOLO 5:
Manutenzione
CAPITOLO 6:
Demolizione della macchina
CAPITOLO 7:
Servizio post-vendita
EMISSION: 2010
The manufacturer is not under any obligation to
notify of any future modifications of the product.
All rights of this document are reserved and no
alteration or reproductions can be made without
permission of the manufacturer.
INTRODUCTION
This manual is specifically for the installation, use
and maintenance of Rolling machine, so you are
able to use the product in the best way.
It is important that the manual is kept in good
condition and should stay with the machine at all
times, including sale to another person, for security
in the use of the machine.
The manual includes:
- Chapters
- Paragraphs
- Notes
The manual is divided in the following chapters:
CHAPTER 1:
General
information
CHAPTER 2
Installation
CHAPTER 3
Functioning
CHAPTER 4:
Usage
CHAPTER 5:
Maintenance
CHAPTER 6
Demolition of the macchine
CHAPTER 7:
After sale service
3
Page 4

CAPITOLO 1
INFORMAZIONI
GENERALI
1.1
Garanzia
La durata della garanzia è di un anno e decorre
dalla data della ricevuta fiscale rilasciata all'atto dell'acquisto.
Entro tale periodo saranno sostituiti o riparati gratuitamente e solo franco ns. stabilimento i particolari che per cause ben accertate ed inequivocabili risultino difettosi di fabbricazione, eccetto i
componenti elettrici e quelli soggetti ad usura.
Dalla garanzia sono escluse le spese di spedizione
e il costo della manodopera.
La garanzia decade nei casi in cui si accerti che il
danno sia stato provocato da: trasporto, errata o
insufficiente manutenzione, imperizia degli operatori, manomissioni, riparazioni eseguite da personale non autorizzato, inosservanza delle prescrizioni del manuale.
Si esclude ogni rivalsa nei confronti del costruttore
per danni diretti o indiretti conseguenti al tempo in
cui la macchina rimarrà inoperosa causa: avaria, in
attesa per le riparazioni, o comunque riferibile alla
non presenza fisica dell'apparecchiatura.
1.2
Caratteristiche della macchina
La Dilaminatrice è stata progettata e realizzata ad
esclusivo uso alimentare per la laminazione a
freddo di pasta per panifi-cazione o dolci allo scopo
di facilitare la formatura di dischi, rettangoli e quadrati per la preparazione di: pizze, pane, focacce,
tortine ecc. mantenendo inalterate le caratte-ristiche
fondamentali dell'impasto.
Ogni Dilaminatrice è costituita da: una struttura
metallica, da due scivoli in acciaio, due coppie di
rulli con relative protezioni, i quali sono azionati
tramite cinghie, da un motoriduttore elettrico,
comandato da un interruttore d’avviamento,
alimentatato tramite cavo con tensione di rete. integrati da un comando a pedale d’avviamento-
arresto collegato all'apposita presa.
CHAPTER 1
GENERAL
INFORMATION
1.1
Warranty
Guaranteed for one year from date of purchase.
The date must be stamped on the guarantee on the
day of purchase.
Parts of the machine found to be a production
defect except electrical components or parts worn
out, will be changed and serviced free by us in our
company but only ex -works within this period.
Delivery expenses and costs of labour are excluded
from the warranty.
The warranty will not be valid when the damage is
due to: transportation, mistaken or insufficient
maintenance, unskilled operators, damaging,
repairs made by unauthorised personnel, nonobservance of the instructions of the manual.
All reimbursements from the manufacturer are
excluded for direct and indirect damages caused in
the time the machine is inactive for the following
reasons: breakdown, waiting to be repaired, or
anyway the non presence of the machine.
1.2
Characteristics of the machine
The machine was made with the intention for food
usage only for rolling out dough, to make bread
and cakes to help make easier the shaping of disks,
rectangles and squares for: pizzas, bread, tarts and
cakes etc. maintaining the essential characteristics
of the mixture.
Every machine is composed of: a metal structure,
two steel slides, two couples of rollers with relative
covers, which are driven by belts, an electrical
motor with roller controller, fed by a power cable to
the outlet. The metal toggle switch on the front is
used to turn the machine on (up position), off (
middle), and manual (down). Operators use the
pedal-control to start-stop the machine for manual
control.
4
Page 5

1.3
Caratteristiche
tecniche
1.3
Technical
characteristics
Descrizione - Description
Dimensioni macchina
Dimensions machines
Peso netto
Net weight
Temperatura d’esercizio
Operating temperature
Peso pasta
Dough weight
Diametro pizza
Pizza diameter
Larghezza pasta max
Max dough width
U.M.
cm
Kg 41 kg
°C + 15 ÷ +45
gr 220 ÷ 1400
cm 26 ÷ 40
cm
DSA420RP
63.0 x 42.0 x 67.0
40 cm
Tensione d’alimentazione
Alimentation tension
Potenza assorbita
Absorbed power
Potenza motore
Motor power
Vac 230 ( 1 Ph + N + T ) 50 Hz
W 375
W 370
5
Page 6

M
I
MOTOR
SWITCH
FEMALE PLUG
MALE PLUG
1.4
Schemi elettrici
1.4
Electricalschemes
ALIM. 230 VAC
MOTORE
INTERRUTTORE
E N
CONN. FEMMINA
O
II
CONN. MASCHIO
PEDALE
TREADLE
6
Page 7

1.6
Informazioni sulla rumorosità
Il livello di pressione acustica ponderato A misurato
su un’identica macchina campione è risultato
costante ed inferiore a 70 dB (A).
1.7
Avvertenze generali per la sicurezza
La macchina pur essendo conforme ai requisiti di sicurezza previsti dalle norme di riferimento, elettriche, meccaniche, igieniche, può costituire pericolo
se:
- usata per scopi e condizioni diverse da quelle
previste dal costruttore
- manomissione delle protezioni
- inosservanza delle prescrizioni previste per:
installazione - messa in funzione - uso - manutenzione.
IMPORTANTE
Tutte le operazioni d’installazione e manu-
tenzione devono essere eseguite da personale
qualificato ed autorizzato dal costruttore, il
quale declina ogni responsabilità derivante da
errata installazione o da manomissioni.
1.8
Avvertenze per la sicurezza
IMPORTANTE
Leggere attentamente queste istruzioni prima di
utilizzare la macchina.
ATTENZIONE
Allo scopo di prevenire condizioni di pericolo
e/o possibili ferimenti causati da:
corrente elettrica, organi meccanici, incendio, o
di natura igienica, devono essere osservate le
seguenti avvertenze per la sicurezza:
.
1.6
Information regarding acoustic noises
The acoustic pressure level wellpondered A
measured on an equal machine, turned out to be
steady and lower of 70 dB (A).
1.7
General security indications
Although the machine is built in conformity to the
required security rules regarding electrical,
mechanical and hygienic regulations, it can be
dangerous if:
- used in cases and conditions different to those
described by the manufacturer
- modifications of the covers
- inattention to the instructions of:
installation - functioning - usage - maintenance.
IMPORTANT
Installation and maintenance have to be done by
qualified personnel authorised by the
manufacturer, who is not responsible for any
mistaken installation or manumission.
1.8
Security indications
IMPORTANT
Carefully read the instructions before using the
machine
WARNING
To avoid dangerous conditions and/or possible
injuries caused by electric current, mechanical
parts, fire or hygiene problems, you must follow
the security indications step by step:
7
Page 8

a - Mantenere in ordine il proprio posto di lavoro.
Il disordine comporta pericolo d’incidenti.
b - Valutare le condizioni ambientali.
Non utilizzare la macchina in ambiente umido,
bagnato o insufficientemente illuminato, in vicinanza di liquidi infiammabili o gas.
c - Tenere lontano i bam-bini e i non addetti.
Non permettere che si avvicinino alla macchina o al
posto di lavoro.
d - Utilizzare la macchina nell'ambito della potenza
di targa e per il solo uso consentito.
Senza sovraccarico lavorerà meglio e in modo più
sicuro.
e - Vestire in modo adeguato.
Non indossare abiti o accessori penduli che possano impigliarsi negli organi in movimento.
Usare scarpe antiscivolo. Per motivi igienici oltre
che di sicurezza per i capelli lunghi usare l'apposita
rete e per le mani i guanti.
f - Proteggere il cavo d’alimentazione.
Non tirare il cavo per staccare la spina dalla presa.
Non esporre il cavo ad elevate temperature, a
contatto con spigoli ta-glienti, acqua, o solventi.
g - Evitare posizioni insi-cure.
Ricercare la posizione più idonea che assicuri sempre l'equilibrio.
h - Prestare sempre la massima attenzione.
Osservare il proprio lavoro. Non usare la macchi-na
quando si è distratti.
i - Staccare la spina dalla presa.
Alla fine d’ogni utilizzo, prima delle operazioni di
pulizia, di manutenzione o spostamento della macchina.
l - Cavi di prolungamento in aria aperta.
Non devono essere usati.
m - Controllare che la macchina non sia danneggiata.
Prima di usare la mac-china controllare attentamente l'efficienza dei dispositivi di sicurezza.
Verificare che: le parti mobili non siano bloccate,
che non vi siano componenti danneggiati, che tutte
le parti siano state correttamente montate e che
tutte le condizioni che potrebbero influenzare il
regolare funzionamento della macchina siano ottimali.
n - Far riparare la macchina da personale qualificato.
Le riparazioni devono essere eseguite esclusivamente da persone qualificate usando parti di ricambio originali. L'inosservanza di queste prescrizioni può costituire elemento di pericolo per
l'utilizzatore.
a - Keep in order your working area.
Disorder can cause dangerous accidents.
b - Consider environ-mental conditions.
Do not use the machine in humid, wet or badly lit
environments, close to inflammable liquids or gas.
c - Keep away from children and non authorised
personnel.
Do not permit them to go near the machine or the
working area.
d - Only utilise the machine with the correct voltage.
Normal usage gives better results.
e - Dress in adequate way.
Do not wear hanging clothes or any items which can
be caught in the machine.
Use nonslip shoes.
For hygiene and safety, keep your hair tied back
and wear protective gloves.
f - Protect the cable.
Do not put the cable to extract the plug.
Do not leave the cable near high temperatures,
sharp objects, water or solvents.
g - Avoid insecure position.
Find the best surface to ensure the machine is
balanced.
h - Always pay maximum attention.
Do not be distracted when using the machine.
i - Take the plug out.
When the machine is not in use, before cleaning,
maintenance and moving it.
l – Do not use further extensions.
m - Check that the machine is not damaged.
Before using the machine, carefully check that all
security devices are working.
Check that: the mobile parts are not blocked, there
are not any parts damaged, all the parts have been
setup correctly and all the conditions that could
influence the regular functioning of the machine, are
in working order.
n - Repairing the machine by qualified personnel.
The repairs can only be done by qualified people,
using original spare parts.
The non- compliance with these rules can represent
danger for the user.
8
Page 9

CAPITOLO 2
INSTALLAZIONE
2.1
Prescrizioni a carico dell'utente
Il luogo dove viene installata la macchina deve
avere le seguenti caratteristiche ambientali:
- essere asciutto
- fonti idriche e di calore adeguatamente distanti
- ventilazione ed illuminazione adeguata rispondenti alle norme igieniche e di sicurezza previste
dalle leggi vigenti.
Il piano d’appoggio deve essere orizzontale, non
devono essere posti nelle immediate vicinanze della
macchina ostacoli di qualunque natura che possano condizionare la normale ventilazione della
stessa.
IMPORTANTE
La rete elettrica deve essere dotata di un
interruttore automatico differenziale con caratteristiche adeguate a quelle della macchina, nel
quale la distanza d’apertura tra i contatti sia di
almeno 3 mm. in particolare è indispensabile
un’efficiente impianto di terra
Verificare che la tensione d’alimentazione e la frequenza dell'impianto, siano compatibili con i valori
riportati sia nelle caratteristiche tecniche (1.3) che
nella targhetta apposta nel retro della macchina.
2.2
Modalità d'installazione
La macchina viene fornita in un imballo chiuso.
Dopo aver estratto dall'imballo la macchina
procedere nel modo seguente:
- posizionare la macchina nella dislocazione prevista
- asportare il film protettivo evitando di usare
utensili che possano danneggiare le superfici
CHAPTER 2
INSTALLATION
2.1
Instructions for the User
The place where the machine is installed, must
have the following environmental characteristics:
- be dry
- water and heat sources at safe distance
- adequate ventilation and lighting (corresponding to
hygiene and security rules following the existing
laws).
The surface must be horizontal. For normal
ventilation of the machine no objects should
obstruct.
IMPORTANT
The electric net must be provided with an
automatic differential switch and this has to be
suitable to the machine and have a distance
between the contacts of at least 3mm. It is
particularly important to have a good ground
system.
Verify that the electrical set-up corresponds with the
numbers of the technical characteristics (1.3) and
on the small plate at the back of the machine.
2.2
Installation methods
The machine is supplied in a closed package.
After taking out of box the two covers and the
machine proceed as follows:
- Position the machine in the desired location.
- Remove the protection film, avoid contact with
utensils that can damage the surfaces.
9
Page 10

NOTA
Tutti i particolari relativi all’imballo devono es-
sere smaltiti secondo le leggi vigenti.
2.3
Collegamento elettrico
Il collegamento della macchina alla rete elettrica
viene effettuato tramite cavo d’alimentazione dotato
di spina.
2.4
Posizionamento della macchina
La presa della rete elettrica deve essere facilmente
accessibile, non deve ri-chiedere alcuno spostamento.
La distanza tra la macchina e la presa deve essere
tale da non provocare la tensione del cavo
d’alimentazione, inoltre detto cavo non deve mai
trovarsi sotto gli appoggi della macchina.
CAPITOLO 3
MESSA IN FUNZIONE
3.1
Dispositivi di comando
La macchina è dotata dei seguenti dispositivi di comando e segnalazione luminosa:
Sul frontale:
interruttore 1-0-2
Posizione 1 macchina avviata.
Posizione 2 funzionamento a pedale.
NOTE
All the particulars about the packaging must be
disposed of following the laws in force.
2.3
Electrical connection
The connection of the machine to the electric net is
made by means of a feeding cable provided with
plug.
2.4
Positioning of the machine
The plug must be accessible and it does not have to
require any kind of movement.
The cable from the machine to the wall plug must
not be pulled tightly, also do not rest the machine on
the cable.
CHAPTER 3
FUNCTIONING
3.1
Control devices
The machine has the following control devices and
lights:
On the front control panel:
Toggle switch:
Position 1 (Up): On automatic mode
Position 0 (middle): Off
Position 2 (Down): Manual operation mode (use
foot-pedal in this mode).
10
Page 11

3.2
Verifica funzionale
Dopo aver inserito le spine del cavo d’alimentazione
nella presa della rete elettrica, la macchina è pronta
per la verifica funzionale.
Avviamento manuale:
premere l’interuttore in posizione 1, la macchina si
avvia.
Arresto manuale:
premere l’interuttore in posizione 0, la macchina si
arresta.
Avviamento a pedale:
Premendo l’interuttore in posizione 2, la macchina
non si avvia, ma rimane in attesa. Esercitando una
leggera pressione sul comando a pedale, i rulli
iniziano a girare e la macchina è pronta per l'uso.
Arresto a pedale:
Sollevando il piede dal comando a pedale la
macchina si arresta.
Avviare la macchina a vuoto per un minuto,
verificare che il funzionamento sia regolare.
NOTA
La macchina funziona regolarmente anche
senza l’ausilio del comando a pedale.
CAPITOLO 4
USO DELLA MACCHINA
Prima di iniziare ogni ciclo di lavoro accertarsi che la
macchina sia perfettamente pulita in particolare le
superfici a contatto con la pasta. Qualora
necessario procedere alla pulizia secondo le
modalità 5.1
4.1
Funzioni ed uso del comando a pedale
Il comando a pedale assolve funzioni integrative ai
comandi frontali consentendo inoltre di azionare i
rulli passo-passo e di mantenere la macchina in
funzione per il tempo strettamente necessario
all'uso.
Detto comando va collegato alla macchina
inserendo la spina terminale del cavo pedale nella
presa a lato della macchina stessa.
3.2
Functional test
Plug the electrical cord into an electrical socket.
To turn on:
Flip toggle switch up to on-position 1.
To stop:
Flip toggle switch to middle (off) position.
To Start:
In the (manual) position 2 (toggle switch down), the
machine doesn't start but it is on hold.
Pressing slowly the foot pedal, rollers start moving
and the machine is ready for use.
To Stop:
Taking your foot of the foot pedal the machine will
stop working.
Start the machine without using it, let it run for one
minute and make sure it is functioning perfectly.
NOTE
The machine works regularly also without the
pedal control (provided that this is not plugged
in) by using in the position 1 (toggle switch up).
CHAPTER 4
USAGE OF THE MACHINE
Before every work- cycle, always make sure the
machine is perfectly clean, in particular those
surfaces that get in touch with the dough. if
necessary clean the machine following point 5.1.
4.1
Functions and usage of the foot pedal
The foot control device controls the rollers to move
depending on desired speed and keeping the
machine on during the time needed.
This device is connected to the machine by plugging
the foot pedal into the main machine.
11
Page 12

4.2
Uso per la formatura di dischi
Dopo aver acceso la macchina manualmente con
l’interuttore in pos.1, o a pedale interruttore in pos.2
si può procedere alla fase operativa.
Prima d'introdurre nell'apertura della protezione
superiore la pallina di pasta leggermente infarinata
e precedentemente lievitata (almeno 6-8 ore),
schiacciare a cuneo parte del bordo della stessa
allo scopo di favorirne l'ingresso nella coppia di rulli
superiori nel cui passaggio la pasta subisce una
prima riduzione dello spessore assumendo una
forma ovale.
Quando il passaggio sta per essere ultimato,
accompagnare con una mano la discesa della pasta facendola avanzare passopasso fino alla fuoriuscita, completata la quale, i rulli vanno arrestati.
Ruotare la pasta in senso trasversale di circa 90°
disponendola per il successivo passaggio nella
coppia di rulli inferiori , dai quali una volta riavviati,
uscirà un disco la cui formatura, buona ma non
ottimale, necessita di qualche ritocco manuale.
4.3
Uso per la formatura di rettangoli
Posizionare sotto la macchina una teglia ben pulita
e di dimensioni compatibili con la larghezza dei
piedini d’appoggio.
Accendere la macchina, avviare i rulli, quindi
introdurre nell’apertura della protezione superiore la
pasta leggermente infarinata e precedentemente
lievitata (almeno 6-8 ore), formare a cuneo il bordo
della stessa allo scopo di favorirne l’ingresso nella
coppia di rulli nel cui passaggio la pasta subisce
una prima riduzione dello spessore.
Dopo l’uscita, è indispensabile per le medie ed
elevate grammature procedere, con avanzamenti
passo-passo, ad un ulteriore e costante
allargamento manuale della pasta, disponendola
per il successivo passaggio nei rulli dai quali la
pasta così formata si depositerà nella teglia .
4.2
Usage for the shaping of the disks
After turning on the machine with the toggle switch
in position 1 or 2, and starting the movement of
rollers with the foot pedal, you can start working.
Before introducing in opening of the highest cover
the small ball of dough previously left to rise (at
least 6 to 8 hours), squash the sides slightly so it
can easily go through the highest rollers When the
dough comes out, you will see a reduction of
thickness , with an oval sAt the end of the trial,
support on exit the dough with your hand letting it
advance slowly till it comes out, at the end of this
the rollers must be stopped. Turn the dough to 90°
placing it in the lowest rollers ready for the next
trial. Out of these rollers it will have a disk shape,
this shape is not perfect so it needs the finishing
touches by hand.
4.3
Usage for the shaping of rectangles
Position a baking pan under the machine clean and
big enough to fit underneath.
Turn on the machine ,start rollers, then introduce in
the opening of the highest cover the small ball of
dough previously left to rise (at least 6 to 8 hours),
squash sides slightly to facilitate entrance in the
rollers through which , on the first trial the dough
becomes thinner.
At the end of trial, it is necessary for medium or big
weights to proceed as follows: go forward step by
step , for another constant manual widening of the
dough , positioning for the next trial trough the
rollers , from here the shaped dough will fall down
into the baking pan.
12
Page 13

IMPORTANTE
Spegnere la macchina a conclusione della fase
operativa.
4.4
Regolazioni dello spessore
Le regolazioni consigliate hanno carattere puramente indicativo in quanto per la presenza delle
seguenti variabili: caratteristiche dell’impasto,
grammatura, spessore e forma della pasta, le
regolazioni vanno definite sperimentalmente.
La macchina viene fornita con regolazioni di massima idonee per pizze di media grammatura.
IMPORTANTE
Tutte le regolazioni devono essere eseguite con
macchina ferma.
Per soddisfare le singole esigenze la macchina
consente di ottenere diversi spessori della pasta
regolando lo spazio tra i rulli tramite la rotazione
della manopola, il cui bloccaggio si ottiene tirando il
pomello nero.
Per ottenere il miglior risultato si consiglia di differenziare le regolazioni.
Lo spessore è modificato in funzione del senso di
rotazione del pomello:
-spessore minimo (0) ruotare in senso
antiorario
-spessore massimo (4) ruotare in senso
orario.
NOTA
Onde evitare la frastagliatura della pasta,
eseguire un unico passaggio attraverso i rulli.
CAPITOLO 5
MANUTENZIONE
ATTENZIONE
Prima di eseguire qualsiasi intervento di
manutenzione, pulizia compresa, si deve
staccare la spina dalla presa della rete di alimentazione.
In caso di malfunzionamento o di guasto della
macchina rivolgersi esclusivamente ai centri di assistenza autorizzati dal costruttore (vedi cap. 7).
IMPORTANT
Turn off the machine when you have finished
working.
4.4
How to regulate the thickness
Regulating the machine can only be recommended
as there are different characteristics of: the dough,
the weight, the thickness, the size and the shape of
the disk.
Therefore the correct regulating of the machine
must be made by experimenting.
The machine is provided with a medium size regulation for the shapes of pizza.
IMPORTANT
All regulations have to be made when machine
is on hold.
With this machine you can have different thickness’
of dough to suit all requirements by just by turning
and turning the knob. Pull the black knob in order to
release the levers.
To obtain the best results, we recommend to
change the regulations.
The thickness can be modified turning the knob:
- (0) turning counter-clockwise for minimum
thickness
- (4)turning clockwise for maximum thickness
NOTE
To avoid the dough braking, it must pass
through the rollers only once.
CHAPTER 5
MAINTENANCE
ATTENTION
Before effecting any kind of maintenance or
cleaning you must take out the plug and wait for
complete cooling of the disks.
In any case of malfunctioning or damage of the
machine you must apply for authorised assistance
from the manufacturer (see chapter 7).
13
Page 14

5.1
Pulizia
La pulizia deve essere eseguita alla fine di ogni
utilizzo in osservanza delle norme igieniche e a
tutela della funzionalità della macchina.
Con l'ausilio di un pennello idoneo procedere a una
prima rimozione dei residui di farina e pasta.
Togliere dalle loro sedi le due protezioni, i due
scivoli, sganciare le molle,
sfilare i raschiapasta quindi ruotare la manopola
posizione di massima apertura dei rulli.
Pulire accuratamente la macchina e tutti i particolari compresi quelli smontati usando una spugna o
un panno inumiditi con acqua e detergente.
Risciacquare quanto basta per la completa rimozione del detergente. Asciugare con carta
assorbente per uso alimentare, quindi ripassare
prima le superfici a contatto con la pasta e poi tutta
la macchina con un panno morbido e pulito
imbevuto con disinfettante specifico per macchine
alimentari.
ATTENZIONE
Si raccomanda di non utilizzare in nessun caso
prodotti chimici non alimentari, abrasivi o
corrosivi. Evitare nel modo più assoluto di usare
getti d’acqua utensili vari, mezzi ruvidi o
abrasivi quali pagliette d’acciaio, spugne ecc.,
che possano danneggiare le superfici ed in particolare compromettere la sicurezza sotto il
profilo igienico.
Rimontare nell'ordine: i raschiapasta, le molle, gli
scivoli e le protezioni.
Verificare che tutti i particolari siano correttamente posizionati e fissati.
5.1
Cleaning
The cleaning must be done every time the machine
has been used following all the rules to prevent
malfunctioning of the machine and for hygienic
purposes.
Using a proper brush and a wooden palate, first
clean the residue of flour and dough. Take away
from their places the covers, the two slides, release
springs,
remove the scraping-dough pieces then turn the
regulating knobs in position of maximum opening of
rollers.
Accurately clean all the machine and in particular
the disassembled parts using a sponge or cloth
damped with water and detergent.
Rinse thoroughly and dry with an absorbing foodpaper, wipe again all the surfaces that get in touch
with the dough and than clean the whole machine
with a smooth cloth and specific disinfectant for
food-machines.
WARNING
It is important not to use chemical, abrasive or
corrosive products. Absolutely do not use
running water, abrasive and not smooth tools,
such as metal wool etc; these can damage the
surfaces and compromise the hygienically
safety.
Mount everything in this order: the scrapingdough
pieces, the springs, the slides and the pro-tections.
Verify that all pieces have been correctly
positioned and fixed.
14
Page 15

Anomalia
Causa
Soluzione
Anomaly
Cause
Solution
5.2
Lubrificazione alberi e rulli
Con frequenza annuale è indispensabile procedere
alla lubrificazione degli alberi e dei rulli.
Dopo aver smontato: le protezioni, gli scivoli, le
molle e i raschiapasta, svitare le viti di fissaggio e
smontare prima lo schienale e successivamente i
sup-porti, sfilare i rulli e i giunti. Pulire
accuratamente tutti i particolari con l’ausilio di una
spugna, acqua tiepida e detergente per uso
alimentare, risciacquare quanto basta ed asciugare
con carta assorbente. Lubrificare sia gli alberi sia i
fori dei rulli con una ragionevole quantità d’olio di
paraffina. Rimontare e fissare tutti i particolari
procedendo in ordine inverso rispetto alla sequenza
di smontaggio.
5.4
Possibili anomalie
5.2
Lubrication of shafts and rollers
It is necessary to grease shafts and rollers every
year. Take off the protections, the slanted wall, the
springs and the doughscrapers; unscrew the fixing
screws and take off first the back-panel and then
the stands and; Take off the rollers and the joints .
Clean all these parts accurately by means of a
sponge, warm water and food detergent, rinse thoroughly and dry it with absorbing paper. Grease
both the shafts and the rollers’holes with a sufficient quantity of paraffin oil. Put back on and fix all
the parts, starting from the last taken-off piece.
5.4
Possibles anomalies
-La macchina
non si avvia
-Mancanza
d’energia
elettrica nella
rete
-Il comando a
pedale è
collegato alla
macchina.
-Verificare: il
contattore
generale, la
spina e il cavo
d’alimentazione
-The macchine
does not start
-Electrical power
is missing
-The foot-control
is on
-Check the
general
contactor, the
pulg and the
feeding calbe
-Push the foot
pedale
15
Page 16

CAPITOLO 6
DEMOLIZIONE DELLA MACCHINA
In caso di smantellamento e demolizione della
macchina, i particolari che la compongono non
presentano un grado di pericolosità tale da richiedere l'adozione di particolari cautele.Per
facilitare le operazioni di riciclaggio dei materiali
vanno separate dalla macchina tutte le parti che
compongono l'impianto elettrico, i componenti
termoplastici e le cinghie di trasmissione.
CAPITOLO 7
SERVIZIO POST-
VENDITA
7.1
Parti di ricambio
Per la richiesta di parti di ricambio riferirsi alle figure.
Italia
Prismafood s.r.l.
Via Tabina,18
33098 Valvasone (PN)
Tel.(+39)0434-85081
Fax(+39)0434-857878
Stati CEE:
Rivolgersi esclusivamente al proprio rivenditore.
CHAPTER 6
DEMOLITION OF THE MACHINE
If the demolition of the machine is necessary note
that its components are not dangerous and do not
require any particular procedure. In order to
facilitate the recycling of the materials it is
necessary to separate electrical and thermoplas-tic
components and the transmission chains.
CHAPTER 7
AFTER SALE SERVICE
7.1
Spare parts
For a demand of spare parts, see the pictures.
Italia
Prismafood s.r.l.
Via Tabina,18
33098 Valvasone (PN)
Tel.(+39)0434-85081
Fax(+39)0434-857878
EEC Countries:
Contact exclusively place of purchase.
16
 Loading...