

Page 1
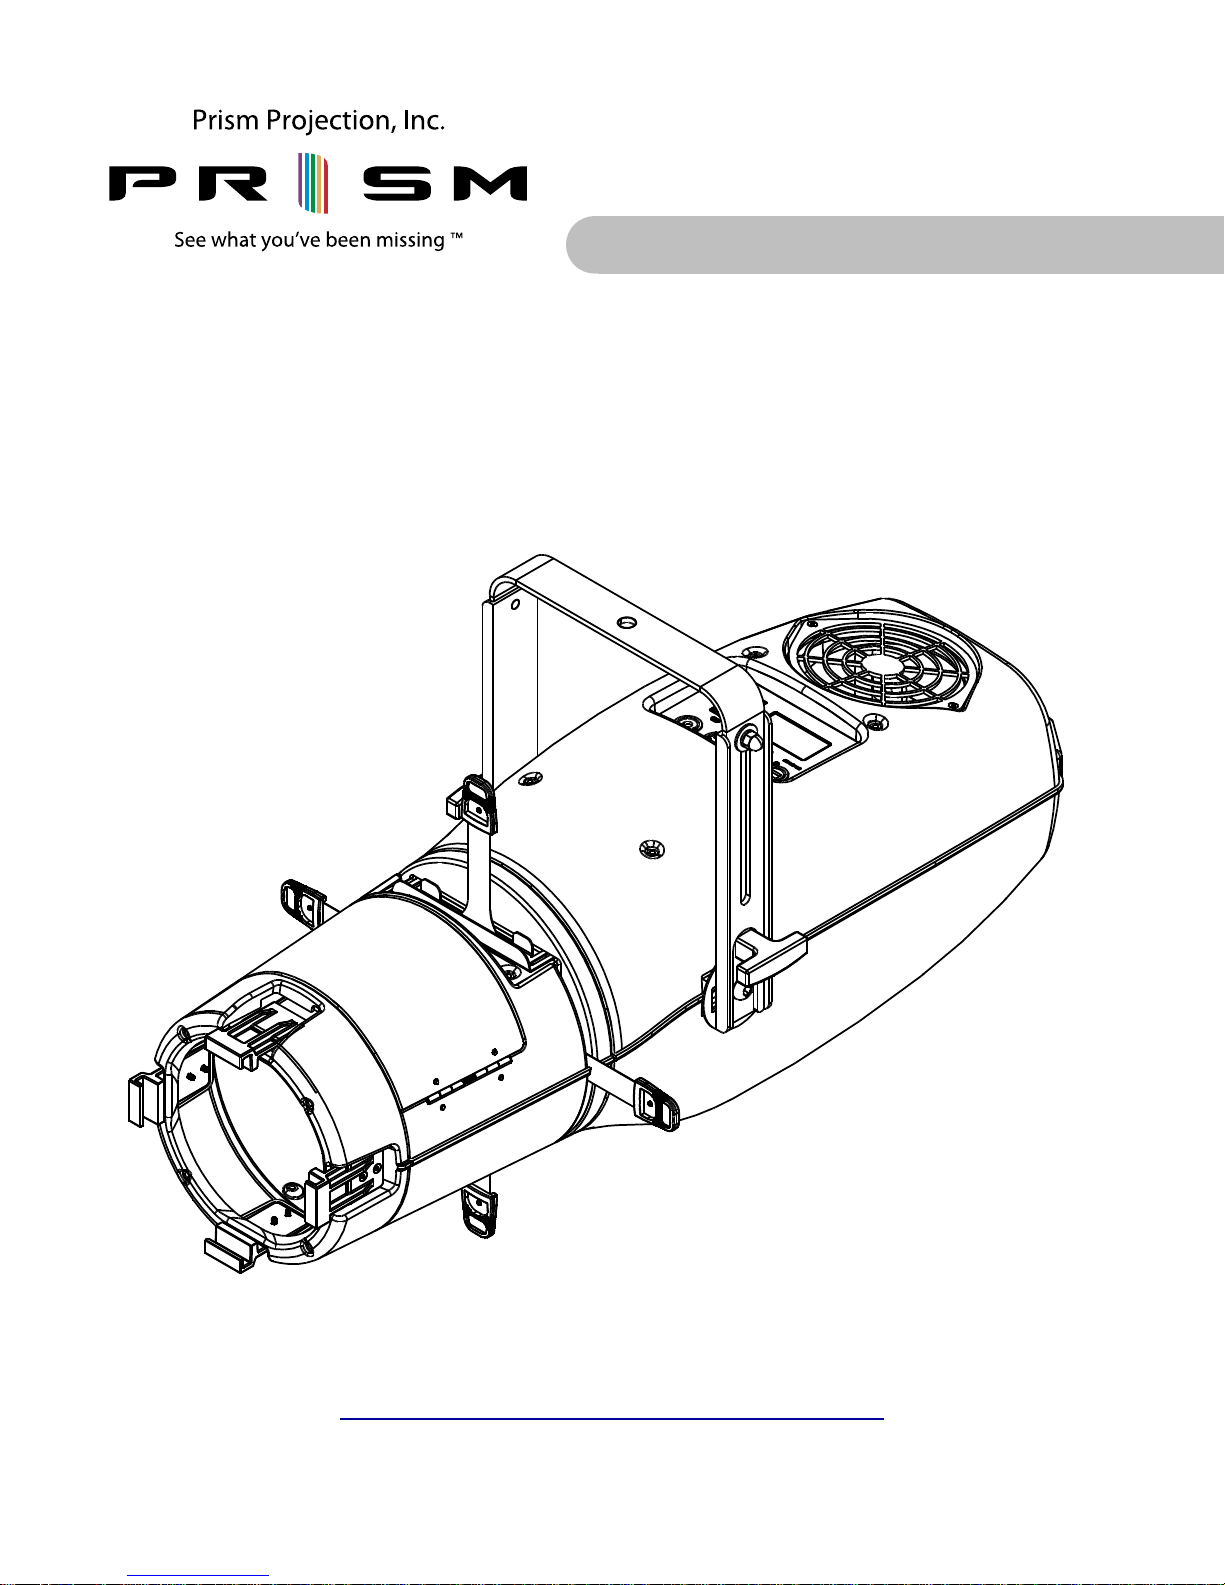
RevEAL Profile with TrueSource®
Operating Manual
DRAFT - SUBJECT
TO CHANGE
www.prismprojection.com
Page 2

Prism Projection Inc. - RevEAL Studio Operating Manual
This Manual applies to the following products:
RevEAL Profile - Dynamic Color, Standard Definition Lens -!P1-16K5-LXX-001
RevEAL Profile - Dynamic Color, High Definition Lens -!P1HD-16K5-LXX-001
Copyright © 2011. Prism Projection Inc. All Rights Reserved
Product Specifications and Information Subject to Change
The Product(s) and technologies described herein are protected by multiple issued and
pending patents.
“RevEAL” and “RevEAL - Revolutionary Entertainment and Architectural Lighting™” are
trademarks of Prism Projection Inc.
TrueSource ® and “Prism Projection - See what you’ve been missing. ®” are registered
trademarks of Prism Projection Inc.
Product, Service or Company names mentioned herein may be trade or service marks of
their respective owners.
Revised October 2011
Prism Projection, Inc.
8228 East 124th St. South
PO Box 448
Sully, IA 50251-0448
p: 641.594.3356
1
Page 3

Prism Projection Inc. - RevEAL Studio Operating Manual
Table of Contents
Warnings & Product Specifications! 4
TrueSource® Technology! 5
Live Color Metering
Full Spectrum
Interfacing with Color
Optics
TrueSource at a Glance
Basic Installation! 7
Mounting the product
Attaching Data and Power Cables
Beam Shaping! 10
Adjusting Focus
Using Shutters
Rotating the Barrel
Pattern Projection! 12
Pattern Image Size
Pattern Holders
Iris and Accessory Slot
Changing Beam Angles! 14
Standard Lenses
High Definition Lenses
Interface Panel! 15
Menu Tree
Fixture Address! 17
Modes and DMX Channels! 18
Color Modes
White (CCT)
Intensity
Advanced Settings! 22
Energy
Algorithm
Reset to Factory Defaults
Channel Map
2
Page 4

Prism Projection Inc. - RevEAL Studio Operating Manual
Standalone Control! 24
TrueSource Screen! 25
RevEAL Profile Assorted Recommended DMX Settings (8 bit
control)! 26
Whites
All Colors
xy, CCT, ECO
RGB, CCT, ECO
HSI, CCT, ECO
RevEAL Profile CCT Channel Value Lookup Chart
3
Page 5

Prism Projection Inc. - RevEAL Studio Operating Manual
Warnings & Product Specifications
Read This Manual Prior To Use
This product is NOT for residential use.
•
This product is intended for use by qualified individuals in the field of entertainment
•
lighting.
This product is NOT to be used in wet locations.
•
Due to risk of injury the safety cable MUST be attached while the product is
•
suspended.
The product MUST be attached to the appropriate power, which meets the following
•
conditions:
90-264 VAC
•
47-63 Hz
•
NOT for use on dimming circuits.
•
Any attempt to disassemble or service the product other than described in this user
•
manual will void the warranty and may result in injury.
4
Page 6

Prism Projection Inc. - RevEAL Studio Operating Manual
TrueSource® Technology
After significant research and development efforts, Prism Projection has solved many of
the problems associated with LED based lighting devices developing the TrueSource®
system. TrueSource assures color consistency by utilizing active live color metering,
achieves a full spectral response by using carefully selected multiple primary emitters
and provides a consistent flat field with next generation optics and reflector systems.
Live Color Metering
At the heart of every TrueSource system is a Tristimulus color sensor. Tristimulus
sensors, while electronic, actually “see” in a way that mimics the human eye’s response
to color. Even though every human sees color differently, there are well established
base lines for normal color response. By taking live measurements and adjusting how
each LED or group of LEDs is being driven, the problems of color shift during use are
removed. Tristimulus values are referenced to the well established CIE 1931 2°
observer color space. By referencing a standard, TrueSource systems are inherently
calibrated to each other. The problems of using only an initial calibration and predictive
algorithms are not an issue with TrueSource systems.
Full Spectrum
TrueSource systems use several colors of primary emitters. At the minimum each
TrueSource system will use 5 primary colors. These primaries are carefully chosen to
minimize the valleys of the SED curve. When outputting 3200k “white”, TrueSource
systems have a CRI of 95+. With deep understanding of how to drive each individual
LED, TrueSource is not locked into only using a fixed number of primary emitters.
TrueSource is also flexible enough to utilize LEDs from several manufacturers at once.
With this discreet control, TrueSource systems can pick from the best available LEDs on
the market.
Since all TrueSource enabled instruments are structured to provide a full spectral
response, they have a very wide gamut.
Interfacing with Color
TrueSource systems allow the designers and operators to ask for and interface with
color in very specific ways not normally seen in current lighting equipment.
Instead of asking designers to describe color in a non-standardized way, ie. unknown
RGB values, RGBW, RGBA, RGBCA, or seven discreet primaries. TrueSource
5
Page 7

Prism Projection Inc. - RevEAL Studio Operating Manual
instruments can be configured to respond directly to x,y coordinates on the CIE 1931 2°
color space. An RGB mode that is based on the NTSC gamut, but slightly wider is
available. The designer may also elect to use Hue and Saturation to describe the
desired color. Each of these modes uses a dedicated dimmer channel that does not
shift the color. Designers may also add a specific Correlated Color Temperature channel
(CCT). The CCT channel takes over from the other color channels, not by adding white,
but producing specific white points along the black body curve.
Optics
The TrueSource optical systems are truly the next generation of optical design. The
beams are flat, and fully collimated.
Each unit produces one shadow. A shadow that would be expected from a traditional
source or natural sunlight. Of course diffusion can be added to soften or adjust the
shadow, instead of starting from an unfamiliar shadow.
TrueSource at a Glance
References international standards to describe color, CIE 1931 2° observer
•
Uses multiple primary emitters to ensure full spectrum response
•
Live color monitoring using Tristimulus sensor, sensing color similar to the
•
human eye
Wide gamut from one lighting instrument
•
CRI above 95
•
CCT Channel (as low as 1,800k up to 10,000k)
•
Independent dimmer channel with no color shift
•
A shadow that matches conventional sources
•
5 year warranty that includes color
•
6
Page 8

Prism Projection Inc. - RevEAL Studio Operating Manual
Basic Installation
Before installing this product please make sure that you have read all warnings and
safety information provided in this manual.
Caution: The product must be placed/mounted on a rack, shelf, or other suitable
surface that is rated to support the weight of the product.
The product must also be placed such that the safety cable can be attached. The safety
cable must be attached in such a way that it can not be removed without releasing the
clip.
The safety cable should be attached at all times during both installation and removal of
the product. Attaching the safety cable should be the first step before installing the
product and the last step after removing the product.
Mounting the product
Step 1:Install a c-clamp or other appropriate rated pipe coupling device to the steel
yoke of the RevEAL Studio Instrument.
Step 2: Loop the safety cable through your support, such that after clipping the
carabiner the loop cannot slip off of your support.
Step 3: After ensuring that the loop cannot slip off of the support, clip the carabiner to
the safety cable.
Step 4: Position the mouth of the c-clamp over your intended mounting surface. Once
you are happy with the location, tighten the clamp until the product is secured to the
surface.
Caution: The product should never be installed without the proper use of the safety
cable.
7
Page 9
Prism Projection Inc. - RevEAL Studio Operating Manual
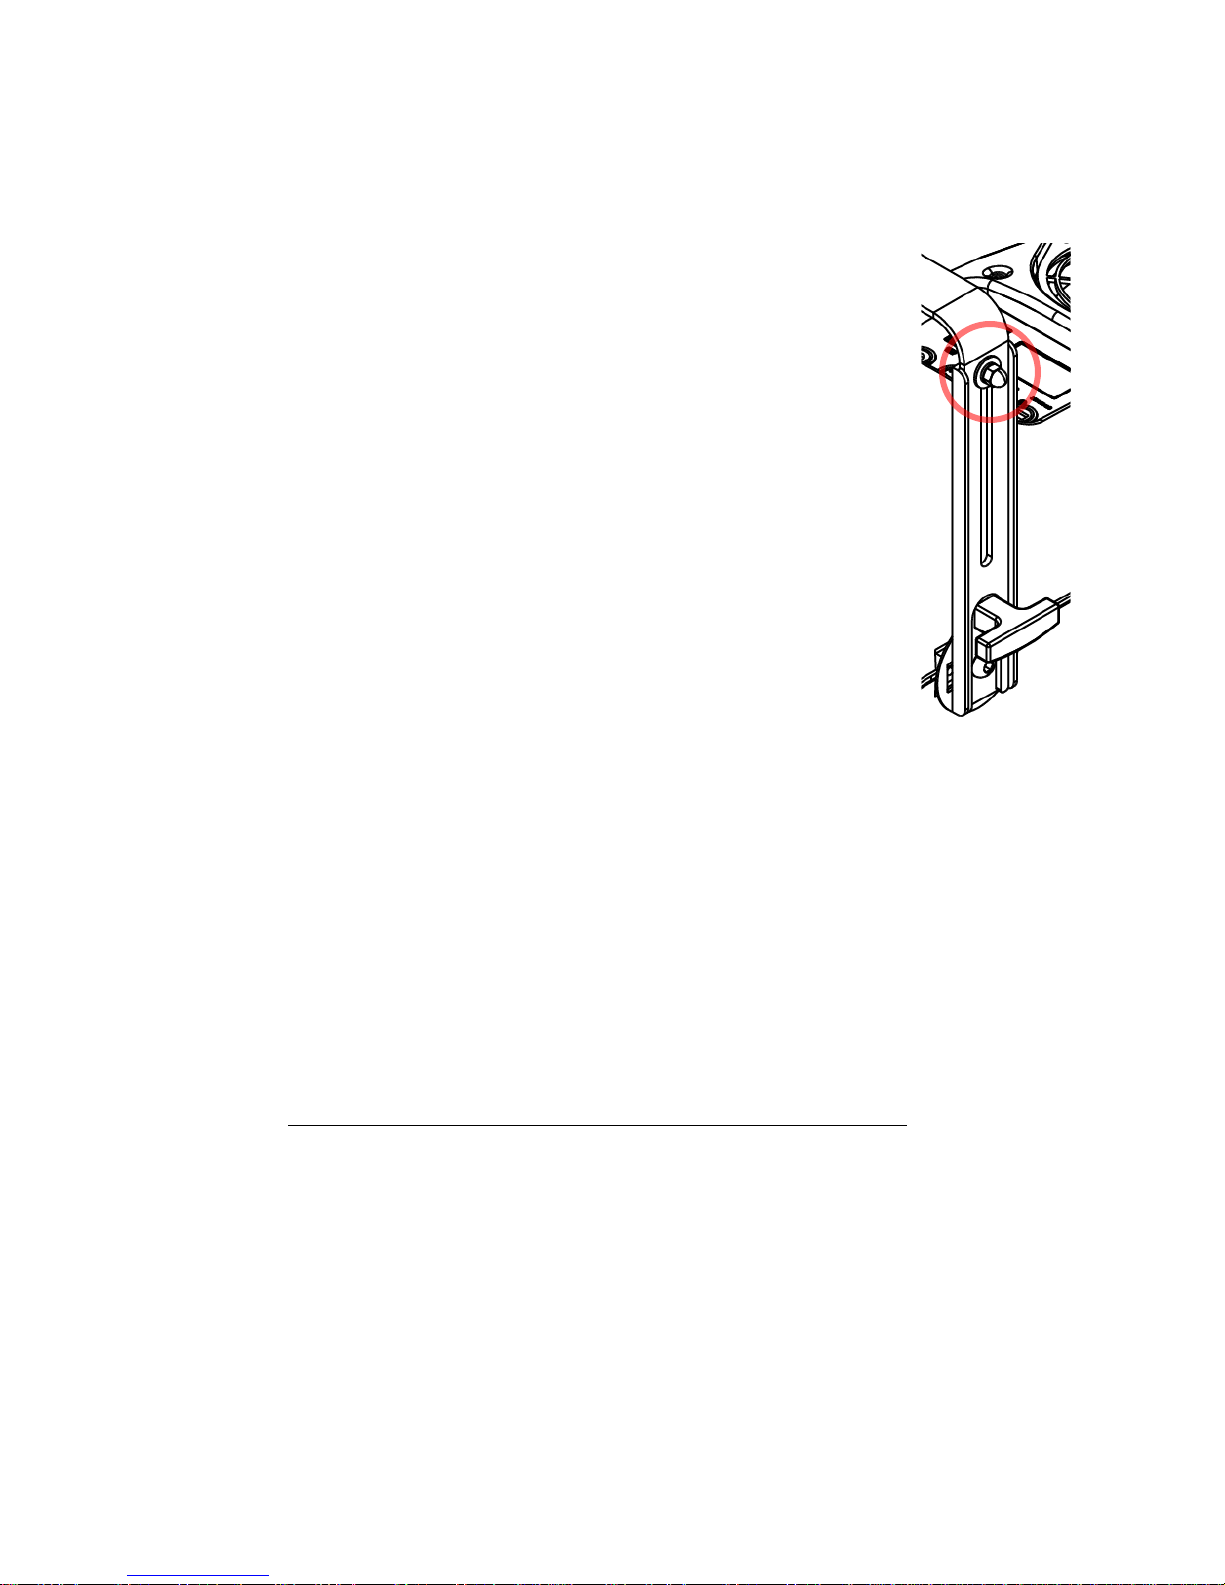
Adjusting Yoke Height
To facilitate some mounting orientations, it may be necessary to
extend the yoke. DO NOT ATTEMPT WHILE THE INSTRUMENT IS
HANGING.
1. Loosen the lock nuts on either side of the yoke.
2. Slide the yoke to desired extension.
3. Be sure to tighten lock nuts on both sides of the yoke.
Attaching Data and Power Cables
Note: This lighting fixture can be used individually or modules can be daisy chained. In a chain
of fixtures each module can be individually addressed, or each can have its own address
wherein each fixture is independent of the others.
Step 1: If Needed attach an appropriate connector to the end of the power cord
included with the product. Any connector you attach to the end of the product must be
rated for 15 Amperes and 250VAC, and of the grounding type. The conductors in the
power cable are color coded for ease of assembly.
Wire Color! Conductor function
Green or Green with Yellow Stripe" GROUND
Blue or White" NEUTRAL
Brown or Black" LINE
Step 2: After attaching the appropriate connector to the power cord you can attach the
power cord to the fixture. The power cord will go into the power-in port (blue). Slide the
connector into the port and twist the connector clockwise.
Step 3: Now that the unit has power you need to provide data to the unit. This is done
by plugging in an approved 5 pin DMX cable. The data-in port is found on the rear, of
the fixture. If you have daisy chained your units, data-in from your second unit should
8
Page 10
Prism Projection Inc. - RevEAL Studio Operating Manual
come from the data-out port of the first unit. Continue attaching cables in this fashion, 1
to 2, 2 to 3, and so on. Follow best practices for DMX wiring, Do not exceed
recommended cable lengths or number of receivers on a chain.
The unit may also be controlled via ArtNet. Contact Prism Projection for details.
9
Page 11

Prism Projection Inc. - RevEAL Studio Operating Manual
Beam Shaping
Adjusting Focus!
The lens focus of the profile is adjusted by the focus knob on the bottom of the lens
area, towards the front of the instrument. Loosen the focus knob then slide the lens sled
to the desired focus. Be sure to tighten the focus knob once you are satisfied with the
focus.
Using Shutters
RevEAL Profiles have a tri-plane shutter system. The top and bottom shutters are on
the same plane, while the side shutters are on independent planes. The top and bottom
shutters may be inserted far enough to touch each other and block all light.
Each shutter has a wide enough opening to be inserted at 45° allowing for most
“racked” cuts. Some caution should be used when inserting cuts at extreme angles, it is
possible to dislodge the shutter from it plane.
10
Page 12

Prism Projection Inc. - RevEAL Studio Operating Manual
Rotating the Barrel
The lens train, shutters and gobos may be rotated to achieve the desired position. Use
the knob located on the right hand side, when looking down on the instrument, to front
of the yoke. Loosen the barrel rotation knob, rotate the front of the instrument to desired
position and retighten the barrel rotation knob.
11
Page 13

B
O
u
t
e
r
D
i
a
m
e
t
e
r
M
O
u
t
e
r
D
i
a
m
e
t
e
r
B
I
m
a
g
e
A
r
e
a
M
I
m
a
g
e
A
r
e
a
Prism Projection Inc. - RevEAL Studio Operating Manual
Pattern Projection
Pattern Image Size
The RevEAL Profile uses the M sized Gobos or patterns. B sized gobos may be used
but only the middle area will be projected.
Pattern Holders
RevEAL Profiles, ship with a steel holder in the initial gobo slot. This holder may be
used for steel gobos, not glass. Without the holder the profile will project a square field.
Prism recommends the use of a glass holder designed to fit into the accessory slot.
12
Page 14

Prism Projection Inc. - RevEAL Studio Operating Manual
Iris and Accessory Slot
RevEAL Profiles may use irises and other accessories designed for the Source Four.
Remember that only the middle area of a B sized gobo will be projected. The accessory
slot is covered by a sliding panel to reduce light leaks. To move the panel forward,
loosen the two philips screws, slide the panel and retighten the screw.
13
Page 15

Prism Projection Inc. - RevEAL Studio Operating Manual
Changing Beam Angles
Standard Lenses
RevEAL Profiles are available with 14°, 19°, 26° and 36° beam spreads. To change the
beam spread of your Profile;
1) Locate the Lens Sled door on the front of the instrument.
2) Loosen philips screw and open the door.
3) Loosen philips screws on the top retention plate of the lens sled.
4) Remove existing lens.
5) Place new lens in the desired slot (labelled).
6) Replace retention plate, and retighten screws.
High Definition Lenses
High Definition Lenses occupy two slots on the lens sled. See instructions included with
the HD lens for details.
14
Page 16

Prism Projection Inc. - RevEAL Studio Operating Manual
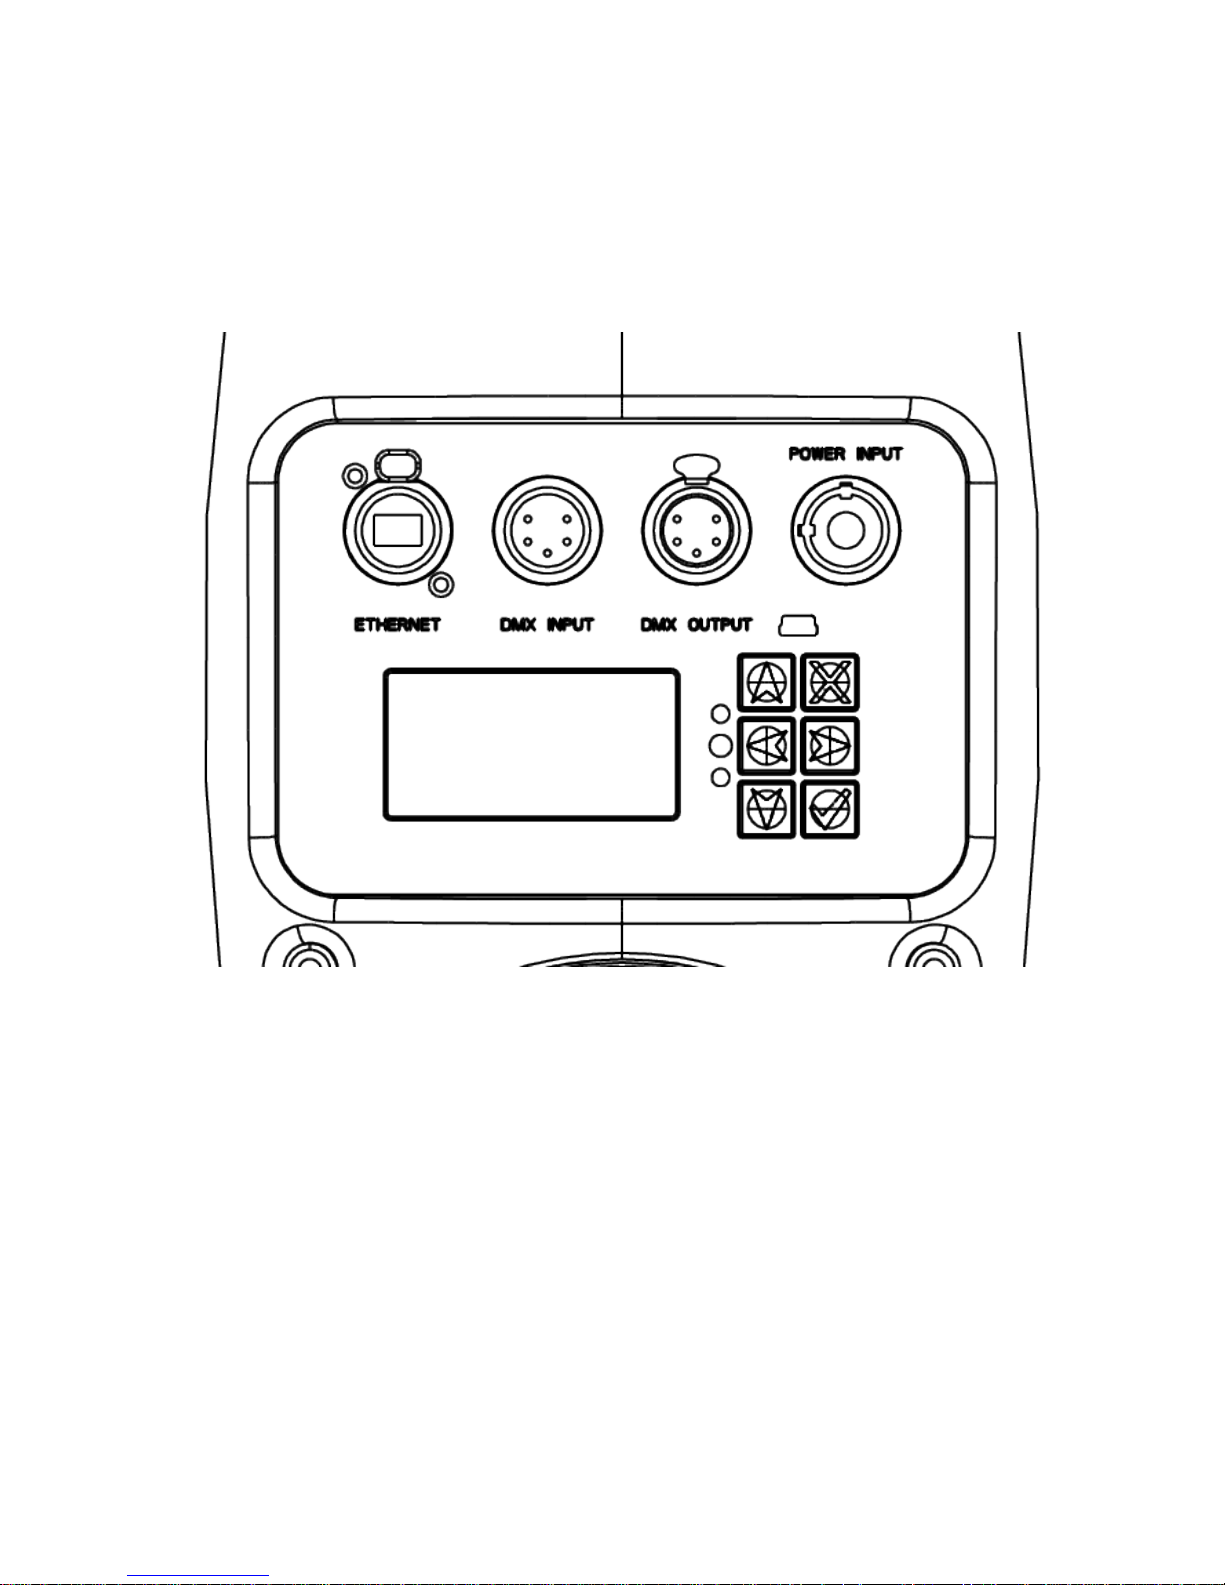
Interface Panel
Located on the rear of the instrument, all settings and options can be accessed by using
the button pad and LCD on the Interface Panel.
From startup the LCD will be illuminated and cycle to the Home Screen. Pressing either
the up or down keys will take the user to the other screens.
If the display is blacked out, pressing any button will illuminate the display’s backlight.
The Home screen provides an at a glance view of the instrument’s configuration and
current settings. Including if the fan is spinning, theDMX start address, how many
channels the configuration occupies, if DMX is being received, and the current values of
each control parameter.
All settings can be accessed by using the up, down, left and right buttons. When a
screen is highlighted use the check button to go to the highlighted section. Using the x
button will always go back up one level. If a selection allows for multiple choices, left
and right buttons will cycle through available options.
15
Page 17

Prism Projection Inc. - RevEAL Studio Operating Manual
Menu Tree
Home Screen
" Fixture Address
" " DMX Address (1 to 512)
" " Art-Net Universe (0-0 to 15-15)
" " Encoding (8-bit, 16-bit)
" Channel Personality
" " Color (None, Cie XY, RGB, Hue+Sat, Dynamic)
" " White (Disabled, Enabled, Correction)
" " Intensity (Standard, Linear)
" " Advanced Settings
" " " Energy (Full Power, Remote, Eco/Fanless)
" " " Refresh Rate (Medium, High, Remote, Low)
" " " Algorithm (Brightness, Color)
" " Reset to Factory Defaults
" Standalone Control
" TrueSource!
" " Demo Mode
16
Page 18

Prism Projection Inc. - RevEAL Studio Operating Manual
Fixture Address
Step 1: Using the up and down arrows select either “DMX Address”, “Art-NetUniverse”
or “Encoding”.
Step 2: Use the left and right arrow buttons to change the value of the selection.
DMX address may be 1-512, remember to leave enough room for the channels
contained in the block as defined by the features enabled.
When setting Art-Net universes, hold down an arrow key until the sub net changes.
17
Page 19

Prism Projection Inc. - RevEAL Studio Operating Manual
Modes and DMX Channels
RevEAL Instruments with TrueSource offer unparalleled options in how they are
controlled. Ranging from simple one channel dimmed white light operation to obsessive
control of almost every aspect of the fixture. There are over 1900 possible personalities,
however determining which one is right for your show is straightforward and quick to
set.
Operating modes are set by using the button pad to navigate to the Fixture Personality
Menu. This menu allows the user to adjust; Color Mode, Color Temperature, Intensity
(dimmer curve) and select Advanced Features.
If advanced features are not set to remote, the color channels will be the first channels
available on the instrument.
Color Modes
Available Options: CIE xy, RGB, Hue + Sat, Dynamic, None
RevEAL instruments have 3 calibrated color modes, a dynamic color space mode and
the option to only use white. Use the up and down buttons to select “Color” then use
the left and right buttons to scroll through the available modes.
While RevEAL instruments contain 5 base colors of LEDs, they are controlled within
calibrated color systems. This ensures that the TrueSource TriStimulus sensor can
guarantee color match between instruments, over the life of the instrument.
Users may elect to use 16 bit control for color and intensity channels, from Advanced
Settings. 16 bit control is only recommended for users with advanced lighting consoles.
CIE xy
CIE x,y allows the user to select color from the CIE 1931 2° Observer color space.
Many Gel Manufactures have available CIE coordinates measured in the 1964 10°
Observer color space. These values will not generate the same colors as the 1931 2°
Observer color space. 2° values may be obtained with a color sampling device.
To determine the DMX decimal values for a given coordinate, simply multiply the
coordinate by 255. For example 3200K white light has an x value of 0.4254 and a y of
0.4044.
x value: 0.4254 x 255 = 108 (42%)
y value: 0.4044 x 255 = 103 (40%)
18
Page 20

1st Color Channel
2nd Color Channel
x coordinate
y coordinate
1st Color Channel
2nd Color Channel
3rd Color Channel
4th Color Channel
x course
x fine
y course
y fine
1st Color Channel
2nd Color Channel
3rd Color Channel
Red
Green
Blue
1st Channel
2nd Channel
3rd Channel
4th Channel
5th Channel
6th Channel
Red Course
Red Fine
Green Course
Green Fine
Blue Course
Blue Fine
Prism Projection Inc. - RevEAL Studio Operating Manual
In 16 bit mode, the multiplier is 65535;
x value: 0.4254 x 65535 = 27878 (42%)
y value: 0.4044 x 65535 = 26502 (40%)
If the Color Temperature channel is enabled, the color temperature channel will “take
over” color control from the color channels. Generating white light in the Kelvin value
specified by the Color Temperature channel. To transition from a specific color
temperature to a specific color, use the x,y values for color temperatures found in the
Appendix.
CIE x,y DMX Map (8 bit control):
CIE x,y DMX Map (16 bit control):
RGB
RGB mode allows for familiar Red, Green and Blue control channels. With all channels
full, white light will be produced. Unless changed in advanced settings or the color
temperature channel is set to remote, the default white point is 3200K. With all channels
at 0 no light will be produced regardless of the intensity channel’s state.
To translate from CMY values a general rule of thumb is to invert the values. ie:
Cyan = Red @ 0, Green @ Full, Blue @ Full
Magenta = Red @ Full, Green @ 0, Blue @ Full
Yellow = Red @ Full, Green @ Full, Blue @ 0
While not completely accurate, because of subtractive filter technology, this will help get
RevEAL instruments to a color near CMY based fixtures.
RGB DMX Map (8 bit control):
RGB DMX Map (16 bit control):
Hue + Sat
Hue + Saturation mode is easiest to think of as common color pickers on photo editing
software, commonly abbreviated to HSI or HSL. The Hue channel defines an angle on
19
Page 21

1st Color Channel
2nd Color Channel
Hue Angle
Saturation
1st Color Channel
2nd Color Channel
3rd Color Channel
4th Color Channel
Hue Course
Hue Fine
Sat Course
Sat Fine
1st Color Channel
2nd Color Channel
3rd Color Channel
4th Color Channel
Control @ 0
xyempty
Control @ 50%
Red
Green
Blue
Control @ Full
Hue
Sat
empty
1st Channel
2nd Channel
3rd Channel
4th Channel
5th Channel
6th Channel
7th Channel
Control @ 0
x course
x fine
y course
y fine
empty
empty
@ 50%
Red course
Red Fine
Green Course
Green Fine
Blue Course
Blue Fine
@ Full
Hue Course
Hue Fine
Sat Course
Sat Fine
empty
empty
Prism Projection Inc. - RevEAL Studio Operating Manual
the color wheel, and saturation defines how far from white (the center) of the wheel the
color is. Red is at 0° (DMX @ 0) and 360° (DMX @ Full). Green is at 120°, Blue at 240°.
The Saturation channel, moves the color closer to the center, creating white. The white
point is set either in advanced settings or controlled remotely by the Color Temperature
channel, the default is 3200k.
Hue + Sat DMX Map (8 bit control):
Hue + Sat DMX Map (16 bit control):
Dynamic
Dynamic Color mode allows remote DMX control of which color mode the instrument is
in. Dynamic mode will add one channel at the beginning of the color block. the position
of this channel determines the color mode used. Because not all color modes use the
same number of channels, in Dynamic there may be empty channels.
The Dynamic color channel is broken up into 5 zones. DMX 0-51(20%) sets the color
channels into CIE x,y. DMX 102(40%)-153(60%) set the color channels into RBG. DMX
204(80%)-Full sets the color channels into Hue + Sat.
Dynamic DMX Map (8 bit control):
Dynamic DMX Map (16 bit control):
None
If None mode is selected, the instrument will not include color channels. In its simplest
settings, this mode may be used to only have a CCT and intensity channel on the
instrument. RevEAL fixtures do not shift color while dimming. If you are attempting to
match white with tungsten based lamps that are dimmed, make sure to enable remote
control of Color Temperature.
20
Page 22

Prism Projection Inc. - RevEAL Studio Operating Manual
White (CCT)
Available Options: Enabled, Disabled, Correction
When enabled the White setting creates a Correlated Color Temperature
(CCT)Channel. If the CCT channel is at any value other than 0, white colors will be
produced by the instrument. At full the color generated will be 8000K white, at 11% the
color generated will be ~3200K white. As the channel value is raised the color
temperature will go up.
If CCT is at any value other than 0 and the Color Mode is any setting other than
None, the instrument will ignore the color channels and only create white light.
Moving the CCT channel to 0 will bump the instrument to wherever the color
channels are set.
If the Correction option is selected, a channel will be added following the CCT channel
that allows for the adjustment of green and magenta in the CCT output. The Correction
channel should be defaulted to 50% (127) for no correction. Raising the Correction
channel will add up to 5 units of green. While lowering the Correction channel will add
up to 5 units of magenta. This feature is important of the user is attempting to balance to
sources that may have color shift towards green or magenta, such has fluorescents or
only white LED devices.
If using the Correction option, ensure that Color is selected for the Algorithm
found in Advanced Settings.
If enabled, in 8 bit mode 1 channel will be added after the color channels, 2 channels
will be added if 16 bit control is being used.
If Correction is selected, in 8 bit mode 2 channels will be added after the color channels,
4 channels will be added if 16 bit control is being used. CCT channel(s) then Correction
channel(s).
Intensity
Available Options: Linear, Standard
Users may select either from a linear dimming curve or square law dimming. Square law
dimming is frequently used in television production with the low end and top end of the
dimming curve are smoothed out.
RevEAL instruments always use an intensity channel, in 16 bit operation 2 channels are
used.
21
Page 23

Prism Projection Inc. - RevEAL Studio Operating Manual
Advanced Settings
Advanced Settings are available in the Channel Personality screen.
Energy
Available Options: Full Power, Remote, ECO / Fanless
Full Power
With Full Power Selected the instrument will use all active cooling including the fan and
produce the brightest possible output.
Remote
If Remote is selected a control channel will added at the beginning of the DMX address
block. At full this channel will turn off the fan, output of the instrument will be diminished.
The amount that output will be diminished is dependent on the color being produced. In
general it is between 40-50%. A value other than full will put the fixture in full power
mode.
ECO / Fanless
ECO mode turns off the fan, the instrument will operate virtually silently, with diminished
output. ECO mode will run the instrument with incredibly high efficiency. The total
wattage draw of the instrument will be significantly reduced depending on color. The
output of the fixture will also be reduced.
Algorithm
Available Options: Brightness, Color
Brightness
Brightness algorithm will force the fixture to generate the brightest possible output.
When changing color the user may notice slight jumps in brightness.
Color
The color algorithm smoothes transitions between colors, and allows for some improved
subtly of color.
Color algorithm should be used when the Correction option in the White setting is
selected.
22
Page 24

Prism Projection Inc. - RevEAL Studio Operating Manual
Reset to Factory Defaults
Setting to factory defaults will put the fixture at address 1 with the following channel
assignments:
1) x
2) y
3) CCT
4) Dimmer
Channel Map
The DMX channel map will change based on user selected settings. There are four
potential blocks of channels.
Advanced Settings | Color Mode | White | Dimmer
The first is for advanced settings, ECO in channel 1, Beam Angle in Channel 2. If either
options are at a setting that does not use DMX channels, the channel slot will not be
occupied.
The color block may contain no channels or up to 7 if dynamic mode in 16 bit is
enabled.
The white block may contain no channels or 2 if 16 bit is enabled. One channel is used
in 8 bit mode.
The dimmer channel block is always present.
For example a common set up is: Beam = Remote, Color = Dynamic, White = Remote
operating in 8 bit. Below is the channel block for the fixture:
1) Beam
2) Color Mode Selector
3) x, R, Hue
4) y, G, Saturation
5) unused, B, unused
6) CCT
7) Dimmer
23
Page 25

Prism Projection Inc. - RevEAL Studio Operating Manual
Standalone Control
Navigating to Standalone Control allows the user to create light without DMX present.
To ensure there is no change in the light being produced it is recommended that DMX
cables be removed while using standalone control.
Use the up and down arrows to select the parameter to change, then use the left right
arrows to change the parameter.
Pressing the X button will return to the previous screen.
To ensure that the light settings established in the Standalone Control mode are
maintained through power cycles, always power off the unit from the Standalone Control
screen display.
24
Page 26

Prism Projection Inc. - RevEAL Studio Operating Manual
TrueSource Screen
The TrueSource screen allows the user to verify that the TrueSource system is
functioning properly. Target and Measured x,y values are shown.
A demo loop may also be triggered from this screen.
25
Page 27

Chan
Control Item
Default
Range
Function
1nEco / Fan
0
0, 255
0 = fan at full & full brightness
255 = fan off, limited brightness
~60%2n+1
CCT
0
0-255
2,600K - 6,500K (See Chart)
3
n+2
Correction
127
0-255
+5 Magenta - +5 Green
127 = no correction
4
n+3
Intensity
0
0-255
0% - 100%
Prism Projection Inc. - RevEAL Studio Operating Manual
RevEAL Profile Assorted
Recommended DMX Settings
(8 bit control)
Whites
" Menu Settings:
" " Color (None)
" White (Correction)
" Intensity (Standard)
Advanced Settings:
" Energy (Remote)
" Refresh Rate (Medium)
" Algorithm (Brightness)
"
26
Page 28

Chan
Control Item
Default
Range
Function
1nEco / Fan
0
0, 255
0 = fan at full & full brightness
255 = fan off, limited brightness
~60%
2
n+1
Color Control
0
0,127,255
0 = x,y
127 = RGB
255 = HSI
3
n+2
n+2@0 = x
n+2@127 = Red
n+2@255 = Hue
0
0-255
0.000 - 0.999
0% - 100%
0° - 360°
4
n+3
n+2@0 = y
n+2@127 = Blue
n+2@255 = Sat.
0
0-255
0.000 - 0.999
0% - 100%
0% - 100% (lower = lighter)
5
n+4
n+2@0 = unused
n+2@127 = Green
n+2@255 = unused
0
0-255
unused
0% - 100%
unused6n+5
CCT
0
0-255
2,600K - 6,500K (See Chart)
7
n+6
Correction
127
0-255
+5 Magenta - +5 Green
127 = no correction
8
n+7
Intensity
0
0-255
0% - 100%
Prism Projection Inc. - RevEAL Studio Operating Manual
All Colors
" Menu Settings:
" " Color (Dynamic)
" White (Correction)
" Intensity (Standard)
Advanced Settings:
" Energy (Remote)
" Refresh Rate (Medium)
" Algorithm (Color)
" *CCT Channels at any value other than 0(0%) will override channels 3 through 5.
27
Page 29

Chan
Control Item
Default
Range
Function
1nEco / Fan
0
0, 255
0 = fan at full & full brightness
255 = fan off, limited brightness
~60%2n+1x0
0-255
0.000 - 0.999
3
n+2y0
0-255
0.000 - 0.999
4
n+3
CCT
0
0-255
2,600K - 6,500K (See Chart)
5
n+4
Correction
127
0-255
+5 Magenta - +5 Green
127 = no correction
6
n+5
Intensity
0
0-255
0% - 100%
Prism Projection Inc. - RevEAL Studio Operating Manual
xy, CCT, ECO
" Menu Settings:
" " Color (x,y)
" White (Correction)
" Intensity (Standard)
Advanced Settings:
" Energy (Remote)
" Refresh Rate (Medium)
" Algorithm (Color)
" *CCT Channels at any value other than 0(0%) will override channels 2 and 3.
28
Page 30

Chan
Control Item
Default
Range
Function
1nEco / Fan
0
0, 255
0 = fan at full & full brightness
255 = fan off, limited brightness
~60%2n+1
Red
0
0-255
0% - 100%
3
n+2
Green
0
0-255
0% - 100%
4
n+3
Blue
0
0-255
0% - 100%
5
n+4
CCT
0
0-255
2,600K - 6,500K (See Chart)
6
n+5
Correction
127
0-255
+5 Magenta - +5 Green
127 = no correction
7
n+6
Intensity
0
0-255
0% - 100%
Prism Projection Inc. - RevEAL Studio Operating Manual
RGB, CCT, ECO
" Menu Settings:
" " Color (RGB)
" White (Correction)
" Intensity (Standard)
Advanced Settings:
" Energy (Remote)
" Refresh Rate (Medium)
" Algorithm (Color)
" *CCT Channels at any value other than 0(0%) will override channels 2 through 4.
29
Page 31

Chan
Control Item
Default
Range
Function
1nEco / Fan
0
0, 255
0 = fan at full & full brightness
255 = fan off, limited brightness
~60%2n+1
Hue
0
0-255
0° - 360°
3
n+2
Saturation
0
0-255
0% - 100%
4
n+3
CCT
0
0-255
2,600K - 6,500K (See Chart)
5
n+4
Correction
127
0-255
+5 Magenta - +5 Green
127 = no correction
6
n+5
Intensity
0
0-255
0% - 100%
Prism Projection Inc. - RevEAL Studio Operating Manual
HSI, CCT, ECO
" Menu Settings:
" " Color (Hue + Sat)
" White (Correction)
" Intensity (Standard)
Advanced Settings:
" Energy (Remote)
" Refresh Rate (Medium)
" Beam Angle (Remote)
" Algorithm (Color)
" *CCT Channels at any value other than 0(0%) will override channels 2 and 3.
30
Page 32

DMX
Kelvin
1
2600.1
2
2606.3
3
2612.5
4
2618.7
5
2624.9
6
2631.2
7
2637.5
8
2643.8
9
2650.2
10
2656.6
11
2663.0
12
2669.5
13
2676.0
14
2682.5
15
2689.1
16
2695.6
17
2702.3
18
2708.9
19
2715.6
20
2722.3
21
2729.1
22
2735.8
23
2742.7
24
2749.5
25
2756.4
26
2763.3
27
2770.3
28
2777.3
29
2784.3
30
2791.3
31
2798.4
32
2805.6
33
2812.7
34
2819.9
35
2827.2
36
2834.5
37
2841.8
38
2849.1
39
2856.5
40
2864.0
41
2871.4
42
2878.9
43
2886.5
44
2894.1
45
2901.7
46
2909.4
47
2917.1
48
2924.8
49
2932.6
50
2940.5
51
2948.3
52
2956.3
53
2964.2
54
2972.2
55
2980.3
56
2988.4
57
2996.5
58
3004.7
59
3012.9
60
3021.2
61
3029.5
62
3037.9
63
3046.3
64
3054.7
65
3063.2
66
3071.8
67
3080.4
68
3089.0
69
3097.7
70
3106.4
71
3115.2
72
3124.1
73
3133.0
74
3141.9
75
3150.9
76
3159.9
77
3169.0
78
3178.2
79
3187.4
80
3196.6
81
3206.0
82
3215.3
83
3224.7
84
3234.2
85
3243.7
86
3253.3
87
3263.0
88
3272.7
89
3282.4
90
3292.3
91
3302.1
92
3312.1
93
3322.1
94
3332.1
95
3342.2
96
3352.4
97
3362.7
98
3373.0
99
3383.3
100
3393.8
101
3404.3
102
3414.8
103
3425.4
104
3436.1
105
3446.9
106
3457.7
107
3468.6
108
3479.6
109
3490.6
110
3501.7
111
3512.9
112
3524.1
113
3535.5
114
3546.9
115
3558.3
116
3569.9
117
3581.5
118
3593.2
119
3604.9
120
3616.8
121
3628.7
122
3640.7
123
3652.8
124
3664.9
125
3677.2
126
3689.5
127
3701.9
128
3714.4
129
3727.0
130
3739.7
131
3752.4
132
3765.2
133
3778.2
134
3791.2
135
3804.3
136
3817.5
137
3830.8
138
3844.1
139
3857.6
140
3871.2
141
3884.8
142
3898.6
143
3912.4
144
3926.4
145
3940.5
146
3954.6
147
3968.9
148
3983.2
149
3997.7
150
4012.3
151
4027.0
152
4041.7
153
4056.6
154
4071.6
155
4086.8
156
4102.0
157
4117.3
158
4132.8
159
4148.4
160
4164.1
161
4179.9
162
4195.8
163
4211.9
164
4228.0
165
4244.3
166
4260.8
167
4277.3
168
4294.0
169
4310.8
170
4327.8
171
4344.9
172
4362.1
173
4379.4
174
4396.9
175
4414.6
176
4432.3
177
4450.2
178
4468.3
179
4486.5
180
4504.9
181
4523.4
182
4542.1
183
4560.9
184
4579.9
185
4599.0
186
4618.3
187
4637.7
188
4657.4
189
4677.2
190
4697.1
191
4717.2
192
4737.6
193
4758.0
194
4778.7
195
4799.5
196
4820.5
197
4841.7
198
4863.1
199
4884.7
200
4906.5
201
4928.5
202
4950.6
203
4973.0
204
4995.6
205
5018.3
206
5041.3
207
5064.5
208
5087.9
209
5111.5
210
5135.4
211
5159.5
212
5183.8
213
5208.3
214
5233.0
215
5258.0
216
5283.3
217
5308.8
218
5334.5
219
5360.5
220
5386.7
221
5413.2
222
5439.9
223
5467.0
224
5494.2
225
5521.8
226
5549.6
227
5577.8
228
5606.2
229
5634.9
230
5663.9
231
5693.2
232
5722.8
233
5752.7
234
5782.9
235
5813.4
236
5844.3
237
5875.5
238
5907.0
239
5938.9
240
5971.1
241
6003.7
242
6036.6
243
6069.9
244
6103.5
245
6137.6
246
6172.0
247
6206.8
248
6242.0
249
6277.6
250
6313.6
251
6350.0
252
6386.9
253
6424.1
254
6461.8
255
6500.0
Prism Projection Inc. - RevEAL Studio Operating Manual
RevEAL Profile CCT Channel Value Lookup Chart
31
 Loading...