

Page 1
3
4
1
2
7
8
1
2
4
3
Regular use
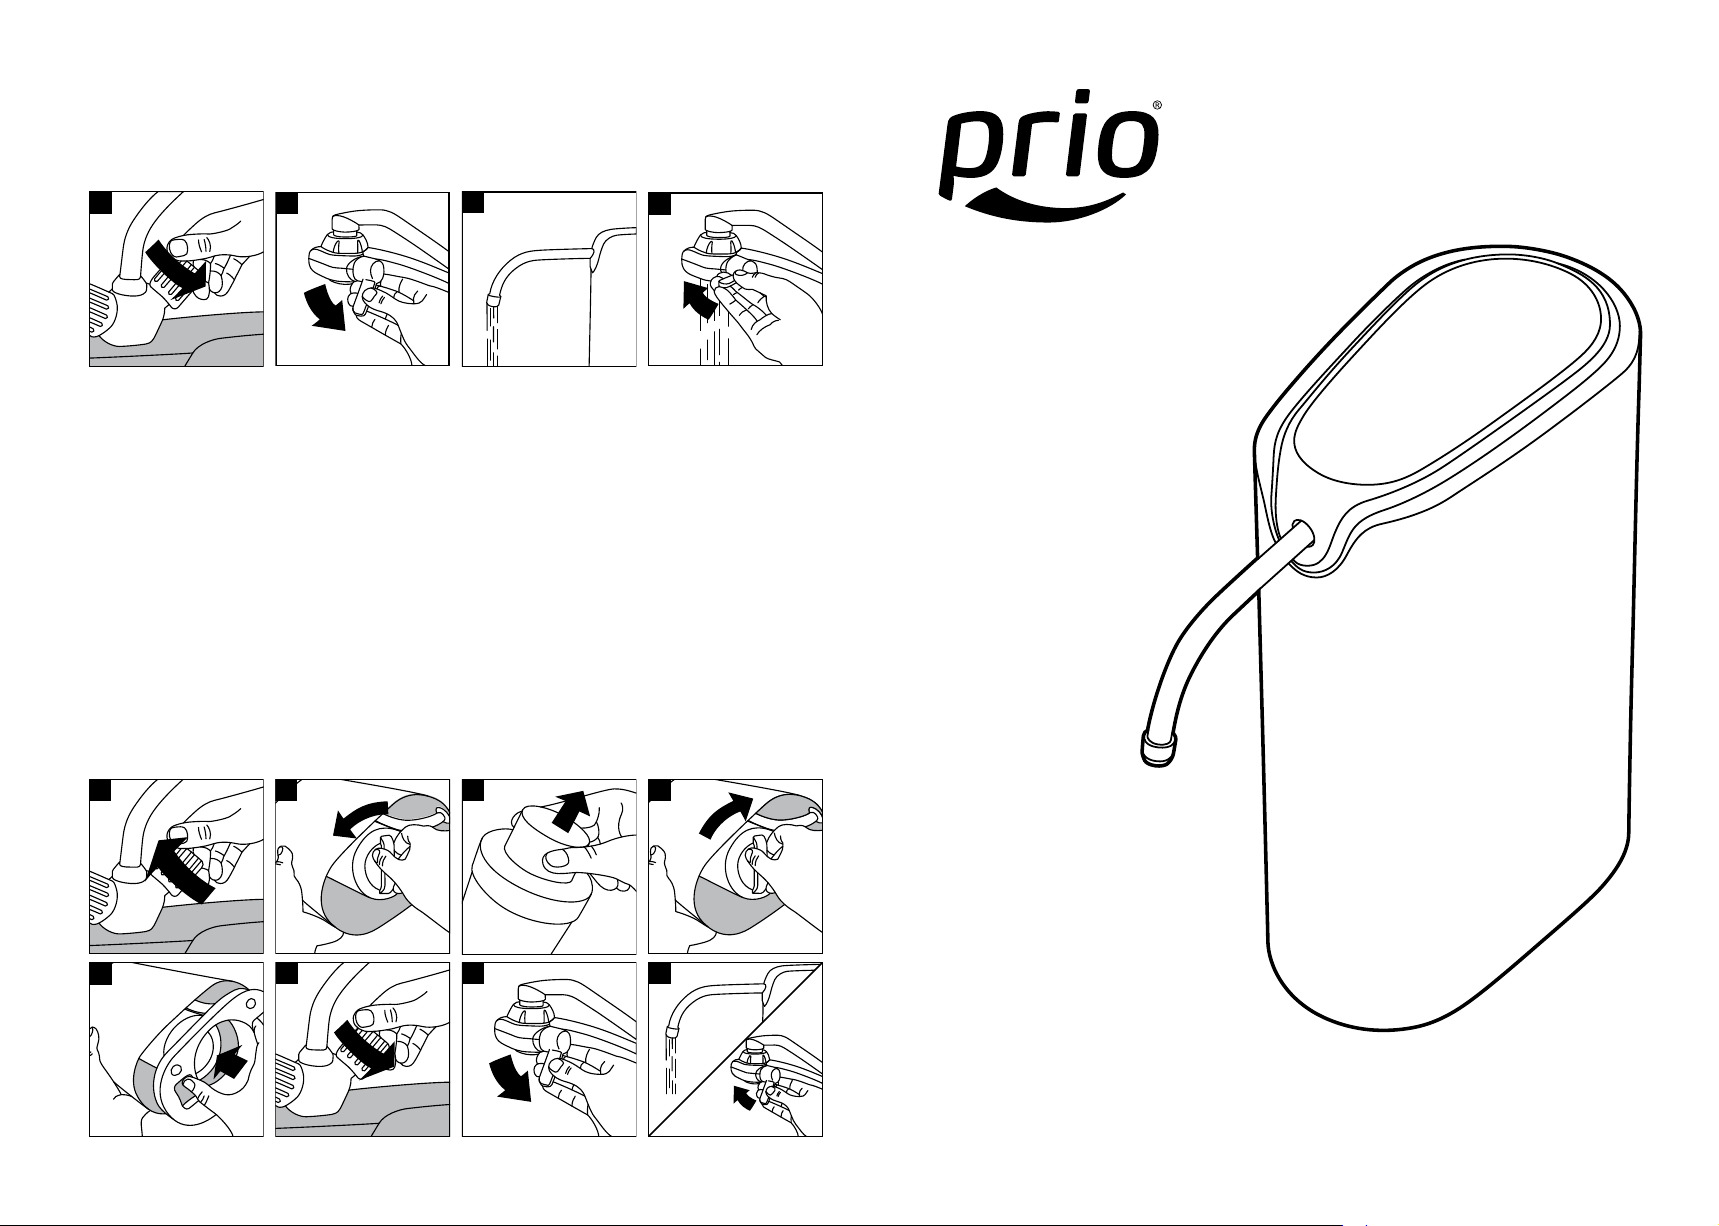
1. To get purified water open the kitchen faucet (cold water only!). For optimal Bravo water filter performance
maintain the c
2. Turn divertor valve handle and filtered water will go
out from the Bravo water filter.
H C
old water flow rate not above 2 l/min.
3. High quality drinking water is ready for use.
4. To stop purified water supply just turn the diverter
valve off. Tap water will go from the faucet bypass
ing the Bravo water filter. You can use the faucet as
usual, c
old and/or hot wat
er as you want.
-
Prio® Bravo
Changing filter element
This water filter contains the disposable filter element (Prio
system. Replacement of the filter element should
be with one of identical specifications, as defined
by the manufacturer, to assure the same efficiency
and contaminant reduction performance.
To ensure optimal filtration performance change
the disposable filter element every 6 months
or sooner if you observe a noticeable reduction
To change filter element:
1. Shut off your kitchen sink faucet.
2. Take filter hanging it above the sink. Take off the bottom lid, then turn the filter element counter-clockwise. Remove the disposable filter element.
3.
Take new K898 filter element, remove packag-
ing and cap.
4.
Install new filter element: plug it into the hous-
ing and turn clockwise.
H C
®
K898) critical to the efficiency of the
in water flow rate or chlorine or other tastes or
smells. Please note the capacity of the filter el
ement is limited. Its service life depends on the
degree
of contamination of the water supply and
filter usage. All terms apply to normal household
use. Actual performance may vary.
To prevent leakage or cracks and ensure the safe
ty of operation and top performance do not disassemble the filter element or try to regenerate it.
5.
Replace the bottom lid. Place the filter near the
sink.
6. Open the kitchen sink faucet (cold water only!).
7. Open the diverter valve and check for leaks.
8. Perform the initial washing for 2-3 minutes.
Shut off the diverter valve and kitchen faucet.
Your Bravo water filter is ready to use!
-
-
Countertop
Water Filter
5
6
4-6 l
H C
User’s Guide
Prio, Prio logo arethetrademarks of DWTDeutsche Wassertechnologien GmbH, Germany.
As used herein, ® denotes registered trademark status inGermany only.
Copyright © DWT Deutsche Wassertechnologien GmbH, Germany, 2019. Rev. 0419.
Page 2
3
4
5
2
1
7
8
9
10
6
6c6a
Before operating this appliance, please read the
instructions carefully. You may want to save this
guide for your future reference. Failure to follow
the instructions or meet the operating requirements may lead to the product’s failure, malfunction, property damage or personal injury.
Safety Warning
■
Do not use the appliance if operating requirements such as water
temperature/water pressure, etc.
are not met. There may be other local regulations to comply with.
■
Do not use the appliance with water that
is microbiologically unsafe or of unknown
quality without adequate disinfection before
or after the system.
■
Never store or operate the appliance in direct sunlight.
■
Keep the appliance out of reach of pets or
other animals.
■
This appliance is not intended for use by persons (including children) with reduced physical, sensory or mental capabilities, or lack
of experience and knowledge, unless they
have been given supervision or instruction
concerning use of the appliance by a person
responsible for their safety.
■
Children should be supervised to ensure that
they do not play with the appliance.
■
At the end of its life, the appliance should be
disposed off in an appropriate manner.
Disposal
Old appliances still contain many
recyclable materials. Therefore,
please take used unit to your retailer or recycling center so that it can
be recycled.
Description
Congratulations on your purchase of the Prio
Bravo Countertop Water Filter! With proper installation and maintenance, it will provide you with
high quality drinking water for many years.
This water filtration system removes sediments,
including 10-100 nanometer-scale sediments
such as pollen and microplastics, protists, odor
Key features
■
Multi-stage filtration:
- sediment poly pre-filter
- coconut shell granular activated carbon
- ultrafiltration hollow fiber membrane
■
Quarter-turn bayonet easy-change filter
element
■
Quick setup without tools
■
Multi-mode diverter valve included
■
Fits virtually any kitchen sink faucet
■
Modern look that matches any kitchen style
Technical specification
■
Recommended production rate:
up to 0.5gpm (2 l/min)
■
Size (WDH), body only, excluding
protrusions: 6.89 x 3.70 x 10.43ʺ
(175 x 94 x 265mm)
■
Weight, without water and tubing: 2.6 lbs
(1.2kg)
Operating requirements
■
Minimum supply water pressure: 15 psi
(0.10MPa)
■
Maximum supply water pressure: 100 psi
(0.69 MPa)
■
Minimum water temperature: 41 °F (5 °C)
■
Optimal water temperature: 50–68 °F
(10–20°C)
■
Maximum water temperature: 95 °F (35 °C) /
up to 105 °F (40.5 °C) short-term
■
Ambient air temperature: 41–105 °F
(5–40.5°C)
■
Water source: tap water supply, chlorinated
or non-chlorinated, bacteriologically safe
■
Indoor use only
Package contents
(1) Bravo water filter with installed
filter element
(1) Filtered water faucet
®
(1) On-tap diverter valve
(1) Universal adapters kit
(1) User’s guide
Warranty
1 year worldwide limited warranty
(+ local regulations if applicable)
Installation
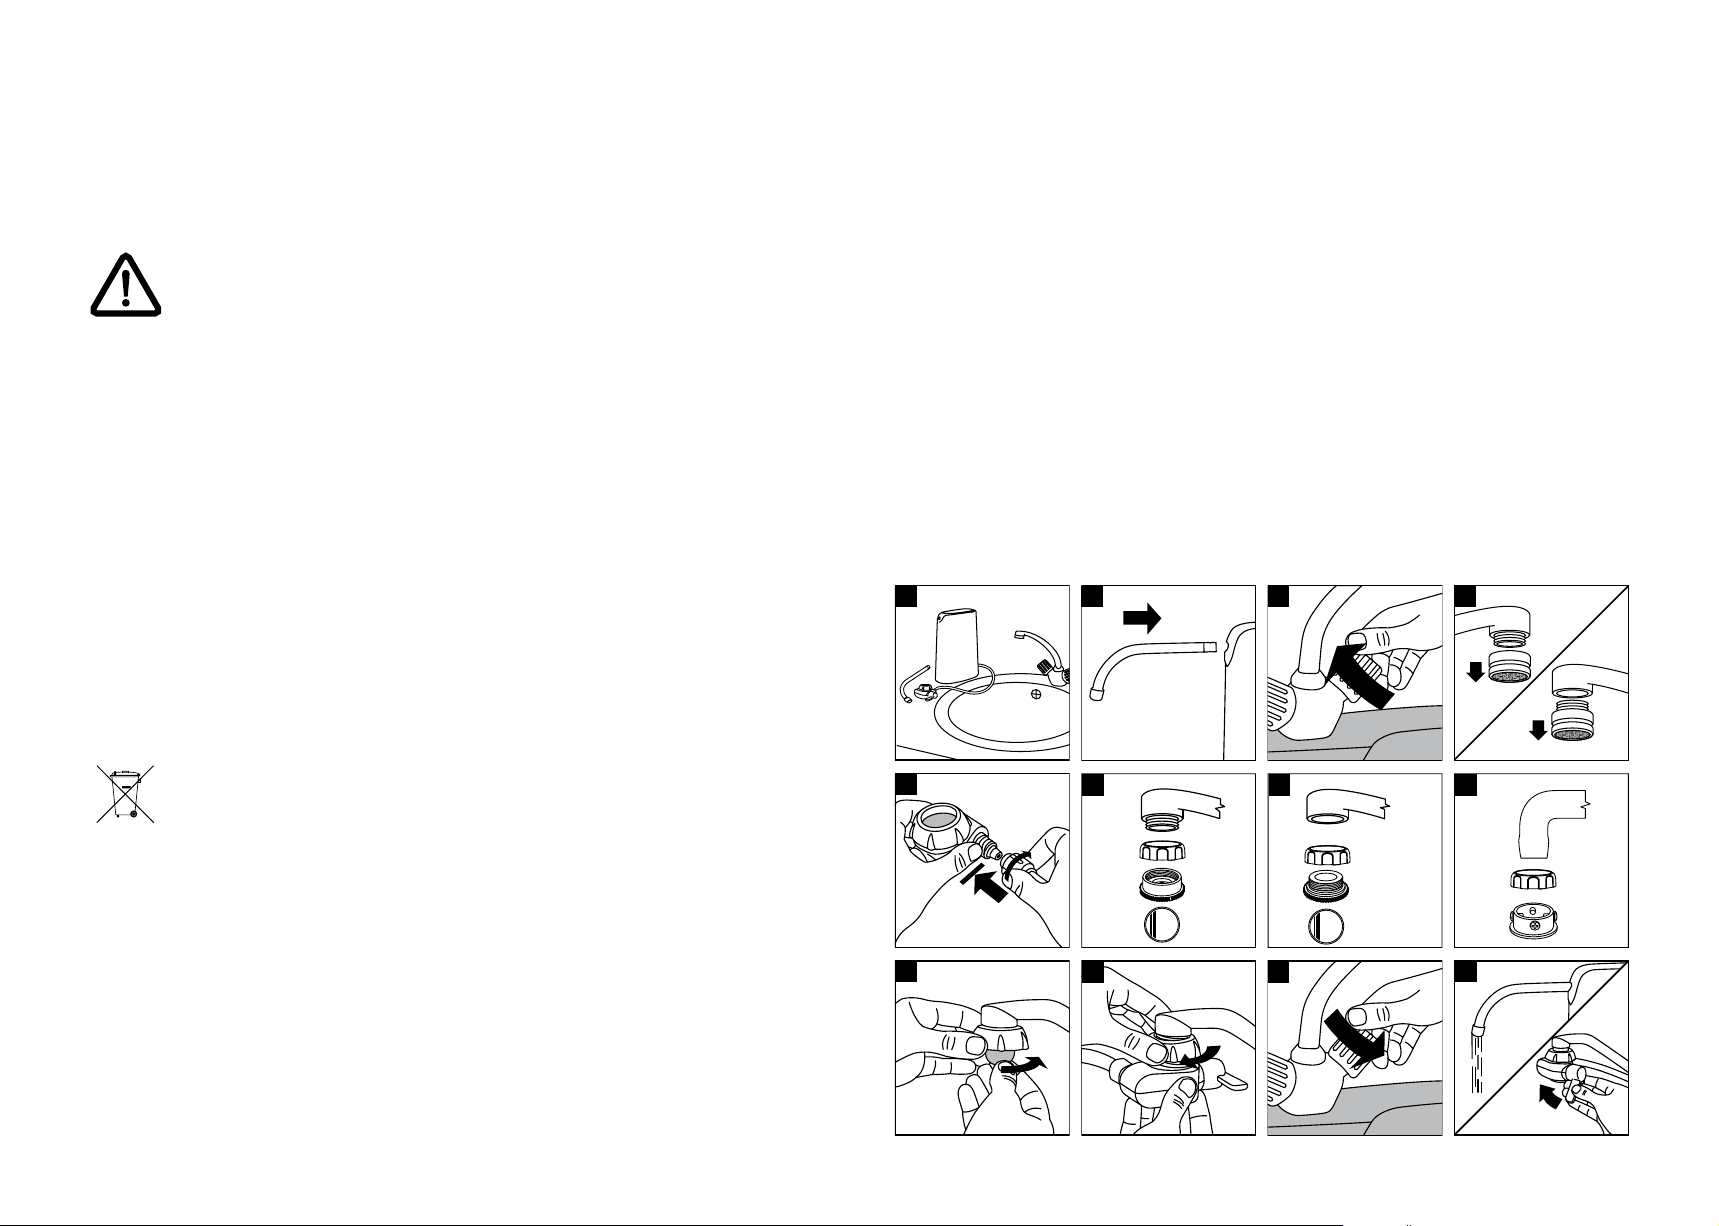
1. Place filter in a convenient location on the counter where you have enough water line length to
attach diverter t
o your kitchen sink faucet.
2. Insert filtered water faucet into the filter
housing.
3. Shut off your faucet where filter will be
installed.
4. Remove aerator from the faucet.
5. If needed, connect plastic tubing to the divert
er valve.
6.
Included adapters kit fits virtually any faucet
and needs no tools. Determine type of thread
on your sink faucet:
6a. Outside Thread: Select the proper adapter and
washer (included) and screw it into the sink
faucet. Tighten by hand or coin.
6b. Inside Thread: Select the proper adapter and
washer (included) and screw it into the sink
faucet. Tighten by hand or coin.
6c. No Thread: Use a special included 4-screws
adapter.
Note: Adapters are included which will fit most
sink faucets, except non-standard faucets.
20
To create a tight seal, you may need to use a
gasket from your sink faucet’s aerator in ad
dition to the washers included with the adapters. If the adapters do not fit, consult your local
plumbing or har
dware supplier f
or assistance
in obtaining the correctly threaded adapters.
7. Take off a swivel collar from the diverter valve
and connect it to your kitchen faucet, using
suitable adapter.
-
8. Attach diverter valve to the sink faucet, turn
ing swivel collar to tighten. Make sure that
gasket inside diverter is positioned secur
between the diverter valve and the faucet. Ro
tate diverter valve to a desired position. Swivel
collar may need to be re-tight
ened.
9. Turn on cold water, it will go through the sink
faucet as usual. To get purified water turn divert
er handle, this will cause water to go through
the filt
er. Check all connections f
or leaks.
10. Perform the initial washing for 2-3 minutes.To
stop water flow through the filter, turn divert
er handle off, then turn off water at the sink
f
aucet. Your Br
avo water filter is ready to use!
H C
4-6 l
-
-
ely
-
-
-
and most harmful substances such as chlorine
from tap water making it safe, tasty, fresh and vital.
Please familiarize yourself with the general
concept behind the product and main modes of
H C
operation.
 Loading...