

Page 1
®
M4L Mobile Printer
Administrator’s Manual
Page 2

Page 3

READ THIS SOFTWARE LICENSE AGREEMENT BEFORE USING THIS PRINTER
Software License Agreement
CAREFULLY READ THE FOLLOWING TERMS AND
CONDITIONS BEFORE USING THIS PRINTER. USING THIS
PRINTER INDICATES YOUR AC CEPTANCE OF T HESE
TERMS AND CONDITIONS. IF YOU DO NOT AGREE TO
THESE TERMS AND CONDITIONS, PROMPTLY RETURN
THE PRINTER AND ALL ACCOMPANYING HA RD WARE
AND WRITTEN MATERIALS TO THE PLACE YOU
OBTAINED THEM, AND YOUR MONEY WILL BE
REFUNDED.
Definitions.
“Software” shall mean the digitally encoded, machine-readable
data and program. The term “Software Product” includes the
Software reside nt in th e pr in te r and its documentation. T he
Software Product is licensed (not sold) to you, and Printronix,
Inc. either owns or licenses from other vendors who own, all
copyright, trade secret, patent and other proprietary rights in
the Software Prod uct.
License.
1.
Authorized Use. Y o u ag re e to ac ce p t a no n -ex c lus ive
license to use the Software resident in the printer solely
for your own customary business or personal purposes.
2.
Restrictions.
a.
To protect the pro prietary rights of Printro nix, Inc.,
you agree to maintain the Software Product and
other proprietary information concerning the
typefaces in strict confidence.
b.
You agree not to duplicate or copy the Software
Product.
c.
You shall not sublicense, sell, lease, or otherwise
transfer all or any portion of the Software Product
separate from the printer, without the prior written
consent of Printro ni x , In c.
d.
You may not modify or prepare derivative works of
the Software Prod uct.
e.
You may not transmit the Software Pro duct over a
network, by telephone, or electronically using any
means; or reverse engineer, decompile or
disassemble the Software.
f.
You agree to keep confidential and use your best
efforts to preven t an d pr ote c t th e co n ten ts o f th e
Software Product f rom un au th or ize d disc lo su r e or
use.
3.
Transfer. You ma y transfe r the Softw are Prod uct with th e
printer, but only if the recipient agrees to acc ep t the
terms and conditions of this Agreement. Your license is
automatically te rm ina te d if y ou t ra nsf er th e S oftware
Product and printer.
Limited Software Prod uct Warr anty
Printronix, Inc. warrants that for ninety (90) days after delivery,
the Software will perfo rm in acc ord a nc e w ith sp e cific at ion s
published by Prin troni x , In c. P rin tr on ix , Inc. d oe s no t warr a nt
that the Software is free from all bugs, errors and omissions.
Remedy
Your exclusive remed y and th e so le lia bi lity o f Print ro n ix , In c.
in connection with the Software is replaceme nt of defective
software with a copy of the same v er sion and revision le vel.
Disclaimer of Warranties and Limitation of Remedies
1.
THE PARTIES AGREE THAT ALL OTHER
WARRANTIES, EXPRESS OR IMPLIED, INCLUDING
WARRANTIES OF FITNESS FOR A PARTICULAR
PURPOSE AND MERCHANTABILITY ARE EXC LUDED.
Printronix, Inc. do es n ot w ar ra nt th a t the f un cti on s
contained in the Softw are w ill meet y o ur req uir eme nt s or
that the operation of the Software will be uninterrupted or
error free. Printro nix, Inc. reserves the right to ma ke
changes and/or improvements in the Software without
notice at any time.
2.
IN NO EVENT WILL PRINTRONIX, INC. BE LIABLE
FOR LOST PROFITS, LOST DATA, BUSINESS
INTERRUPTIONS, OR ANY OTHER DIRECT,
INDIRECT, INCIDENTAL OR CONSEQUENTIAL
DAMAGES ARISING OUT OF THE USE OF OR
INABILITY TO USE THIS PRODUCT, EVEN IF
PRINTRONIX, INC. HAS BEEN ADVISED OF THE
POSSIBILITY OF SUCH DAMA GES, OR ANY
DAMAGES CAUSED BY THE ABUSE OR
MANIPULATION OF THE SOFTWARE. SOME STATES
DO NOT ALLOW THE EXCLUSION OR LIMITATION OF
LIABILITY FOR CONSEQUENTIAL OR INCIDENTAL
DAMAGES, SO THE ABOVE LIMITATION MAY NOT
APPLY TO YOU.
3.
Printronix, Inc. will not be liable for any loss or damage
caused by delay in furnis h in g a S oft ware Product or any
other performance under this Agreement.
4.
Our entire liability and your exclusive remedies for our
liability of any kind (including liability for negligence
except liability for personal injury caused solely by our
negligence) for the Software Product covered by this
Agreement and all other performance or nonperformance
by us under or rela ted to this A greement are limited to t he
remedies specified by this Agreement.
5.
California law governs this Agreement.
Termination of License Agreement
This License shall continue until terminated. This license may
be terminated by agre em e nt be tween you and Printronix, Inc.
or by Printronix, In c. If y ou fa il to co mply w ith th e terms of this
License and such failure is not corrected within thirty (30) days
after notice. When this License is terminated, you shall return
to the place you obt ained them , the printe r and all copi es of the
Software and document atio n.
U.S. Governmen t Re stri cted Rig hts
Use, duplication or disclosure by the Government is subject to
restrictions as set forth in the Rights in Technical Data and
Computer Software clause at FAR 242.227-7013, subdivision
1
(3) (ii) or subparagraph (c) (1) (ii), as appropriate. Further
use, duplication or disclosure is subject to restrictions
applicable to restricted rights software as set forth in FAR
52.227-19 (c) (2).
Acknowledgement of Terms and Conditions
YOU ACKNOWLEDGE THAT YOU HAVE R EAD TH IS
AGREEMENT, UNDERSTAND IT, AND AGREE TO BE
BOUND BY ITS TERMS AND CONDITIONS. NEITHER
PARTY SHALL BE BOUND BY ANY STATEMENT OR
REPRESENTATION NOT CONTAINED IN THIS
AGREEMENT. NO CHANGE IN THIS AGREEMENT IS
EFFECTIVE UNLESS WRITTEN AND SIGNED BY
PROPERLY AUTHORIZED REPRESENTATIVES OF EACH
PARTY. BY USING THIS PRINTER, YOU AGREE TO
ACCEPT THE TERMS AND CONDITIONS OF THIS
AGREEMENT.
Page 4

This document contains proprietary information protected by cop yright. No
part of this document may be reproduced, copied, translated, or incorporated
in any other material in any form or by any means, whether manual, grap hic,
electronic, mechanical, or otherwise, without the prior written consent of
Printronix.
Printronix makes no representations or warranties of any kind regarding this
material, including, but not limited to, implied warranties of merchantability
and fitness for a particular purpose. Prin tronix shall not be held re sponsibl e
for errors contained herein or any omissio ns from this material or for any
damages, whether direct or indirect, incidental or consequential, in connection
with the furnishing, distribution, performa nce, or use of this material. The
information in this manual is subject to change witho ut notice.
COPYRIGHT 2013 PRINTRONIX, INC.
Trademark Acknowledgements
ANSI is a registere d tradema rk of the A merican Natio nal S tandards In stitute,
Inc.
Artifex, the Artifex logo , Ghostscript, and the Ghostscript logo
are registered trademarks of Artifex Software, Inc.
PostScript is a trademark of Adobe System s Incorporated.
Centronics is a registered trademark of Genicom Corp oration.
CSA is a registered certification mark of the Canadian Standards Associa tion.
Dataproducts is a registered trademark of Dataproducts Corporation.
EIA is a registered service mark of the Electronic Industries Association.
Epson is a registered trademark of Seiko Epson Corporation.
Ethernet is a trademark of Xerox Corporation.
IBM, AS/400, and Proprinter are registered tradem arks, and Intelligent Printer
Data Stream and IPDS are trademarks of International Business Machine s
Corporation.
IEEE is a registered servi ce mark of the Inst itute of E lectrical and El ectronic s
Engineers, Inc.
Printronix, PGL, LinePrinter Plus, and IGP are registered trademarks, and
P8005, P8010, P8015, P8205, P8210, P8215, P82 20, and SureStak are
trademarks of Printronix, Inc.
QMS is a registered trademark, and Code V is a trademark of Quality Micro
Systems, Inc.
TUV is a registered certification mark of TUV Rhein land of North America, Inc.
UL is a registered certification mark of Underwrite rs La boratories, Inc.
Page 5

TableofContents
Product Introduction
Printer Features .................................................................................................................................. 8
Standard Features
General Specifications
Print Specifications
Media Specifications
LCD Display
Installing the Belt Clip and Battery
Charging the Battery
Loading the Media
Loading Media in Peel-Off Mode
Loading Fan-fold/External Media
Connecting the Printer
Cable Communications
Wireless Communication with Bluetooth
Wireless Communication with WiFi
Power-On Utilities
Media Sensor Calibration
Self Test and Dump Mode
Printer Initialization
Self Test
Dump Mode
Printer Defaults
Start the Configuration Utility ..................................................................................................... 25
Setting Bluetooth by Configuration Utility ................................................................................... 27
Setting WiFi by Configuration Utility ........................................................................................... 28
Using the LCD to Set the Printer ................................................................................................ 29
............................................................................................................................... 7
.......................................................................................................................... 8
................................................................................................................... 9
...................................................................................................................... 10
.................................................................................................................... 10
................................................................................................................................ 13
................................................................................................ 15
.................................................................................................................... 15
....................................................................................................................... 16
.................................................................................................. 17
.................................................................................................. 19
................................................................................................................. 20
................................................................................................................ 20
....................................................................................... 20
............................................................................................... 20
........................................................................................................................ 21
............................................................................................................. 22
............................................................................................................ 22
...................................................................................................................... 22
...................................................................................................................................... 23
................................................................................................................................. 24
............................................................................................................................ 24
Using the LCD to Set the Printer ...................................................................................................... 31
Printer Setup for EPL2 ...................................................................................................................... 31
Sensor ............................................................................................................................................... 33
Serial Comm. .................................................................................................................................... 34
Wireless LAN .................................................................................................................................... 35
Bluetooth ........................................................................................................................................... 35
Date Time ......................................................................................................................................... 35
Display .............................................................................................................................................. 36
File Manager ..................................................................................................................................... 36
Page 6

Diagnostics ....................................................................................................................................... 37
Print Config ....................................................................................................................................... 37
Dump Mode ...................................................................................................................................... 37
Battery ............................................................................................................................................... 37
Printhead........................................................................................................................................... 37
Display Languages ........................................................................................................................... 38
Service .............................................................................................................................................. 38
Contact Information
Printronix Customer Support Center
Printronix Supplies Department
Corporate Offices
Communication Statements .............................................................................................................. 48
................................................................................................................................. 43
................................................................................................... 43
......................................................................................................... 43
............................................................................................................................ 44
Page 7

Product Introduction
1
Introduction
Printronix® has been the global leader in industrial printing solutions for over 30 years, earning a
reputation for designing and manufacturing leading edge products and delivering them to market
with unsurpassed service and support.
The M4L is a comfortable, light-weight printer capable of working with any mobile receipt printing
application where you need quick, simple receipts on demand. Our M4L is designed for a rough
life, inside the IP54-rated environmental case to resist dust and water and with its rubbe r overmold design prepared to take up to a five foot fall and keep printing. These small and light printers
can be worn comfortably for a full shift, without interfering with the user’s tasks. Use USB,
Bluetooth, optional 802.11 b/g/n Wireless or serial to connect to a mobile computer or even a
smart phone and produce clear easy-to-read receipts hour after hour
To print label formats, please refer to the instructions provided with your labeling software; if you
need to write the custom programs, please refer to the ZPL/CPCL programming manual that can
be found on the accessories CD-ROM or on PRINTRONIX website at http://www.printronix.com.
Applications
Portable point of sale
Retail item marking, markdowns, shelf labeling & shelf talkers
Labels for shipping & receiving
Inventory control
Cross-docking
Pick, pack & apply operations
Print pick tickets
Logistics receipts
Page 8
Printer Features
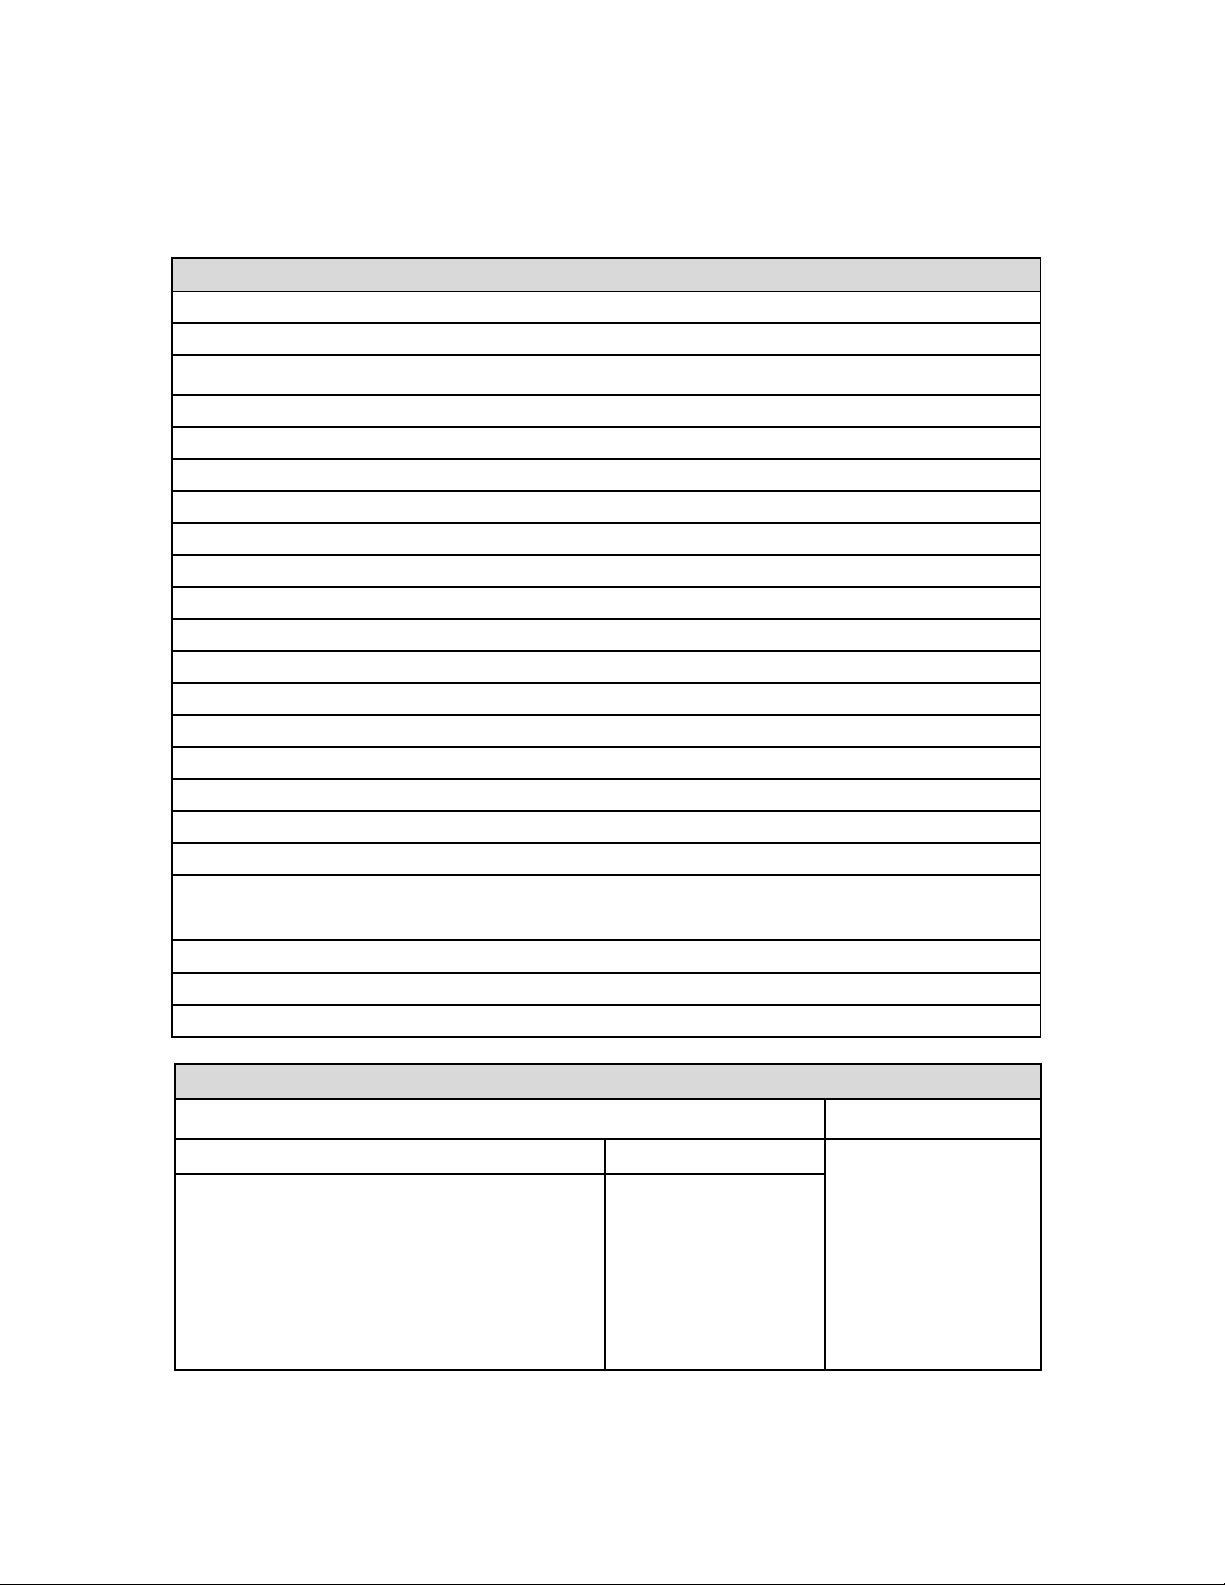
Standard Features
Your M4L offers the following standard features:
Standard Feature
Direct thermal printing
Black mark reflective sensor (center position , black mark in back side)
Gap transmissive sensor (Fixed, center of offset 2.75 mm to right from center) 203 Print Density
203 Print Density
Cover open sensor
Label Taken sensor
4 operation buttons (On/off, menu, info, and feed)
2 LEDs for printer status and battery status
USB 2.0 (full speed) interface
Class 2 Bluetooth 2.1 module
32 MB SDRAM memory
16 MB FLASH memory
Micro SD card reader for memory expansion up to SDHC 4G (max.)
DC 7.2V/5800 mAh Li-ion rechargeable battery
Real time clock
Powerful 32 bit 200 MHz RISC processor
Zebra® CPCL and Zebra® ZPL emulation languages support
Internal 8 alpha-numeric bitmap fonts
Internal Monotype Imaging® true type font engine with one CG Triumvirate Bold Condensed
scalable font
Fonts and bar codes can be printed in any one of the four directions (0, 90,180, 270 degree)
Downloadable fonts from PC to printer memory
Downloadable firmware upgrades
Bar code, graphics/image printing
Supported bar code Supported image
1D bar code 2D bar code
Code 128 subsets A, B, C; Code 128UCC;
EAN 128; Interleave 2 of 5; Code 39; Code
93; EAN-13; EAN-8; Codabar; POSTNET;
UPC-A; UPC-E; EAN and UPC 2(5) digits;
MSI; PLESSEY; China Post, ITF-14; EAN14;
Code 11; TELPEN; PLANET, Code 49;
Deutsche Post Identcode; Deutsche Post
Leitcode; LOGMARS
CODABLOCK F
mode; DataMatrix,
Maxicode, PDF-417;
Aztec; MicroPDF417;
QR code; RSS
Barcode (GS1
Databar)
BITMAP; BMP; PCX
(Max. 256 color
graphics
Page 9
Code page
Codepage 437 (English-US) Codepage 869 (Greek 2) Codepage 1258 (Vietnam)
Codepage 737 (Greek)
Codepage 850 (Latin-1)
Codepage 852 (Latin-2) Codepage 932 (Japanese)
Codepage 855 (Cyrillic) Codepage 949 (Korean)
Codepage 857 (Turkish) Codepage 1250 (Latin-2) ISO-8859-5: Cyrillic
Codepage 860 (Portuguese) Codepage 1251 (Cyrillic) ISO-8859-6: Arabic
Codepage 861 (Icelandic) Codepage 1252 (Latin-1) ISO-885 9-7: Greek
Codepage 862 Hebrew) Codepa ge 1253 (Greek) ISO-8859-8: Hebrew
Codepage 863 (French
Canadian)
Codepage 864 (Arabic) Codepage 1255 (Hebrew) ISO-8859-10: Nordi c
Codepage 865 (Nordic) Codepage 1256 (Arabic) ISO-8859-15: Latin-9
Codepage 866 (Russian) Codepage 1257 (Baltic) UTF-8
Codepage 950 (Traditional
Chinese
Codepage 936 (Simplified
Chinese)
Codepage 1254 (Turkish) ISO-8859-9: Turkish
ISO-8859-1: Latin-1 (Western
European)
ISO-8859-2: Latin-2 (Central
European)
ISO-8859-3: Latin-3 (South
European)
ISO-8859-4: Latin-4 (North
European)
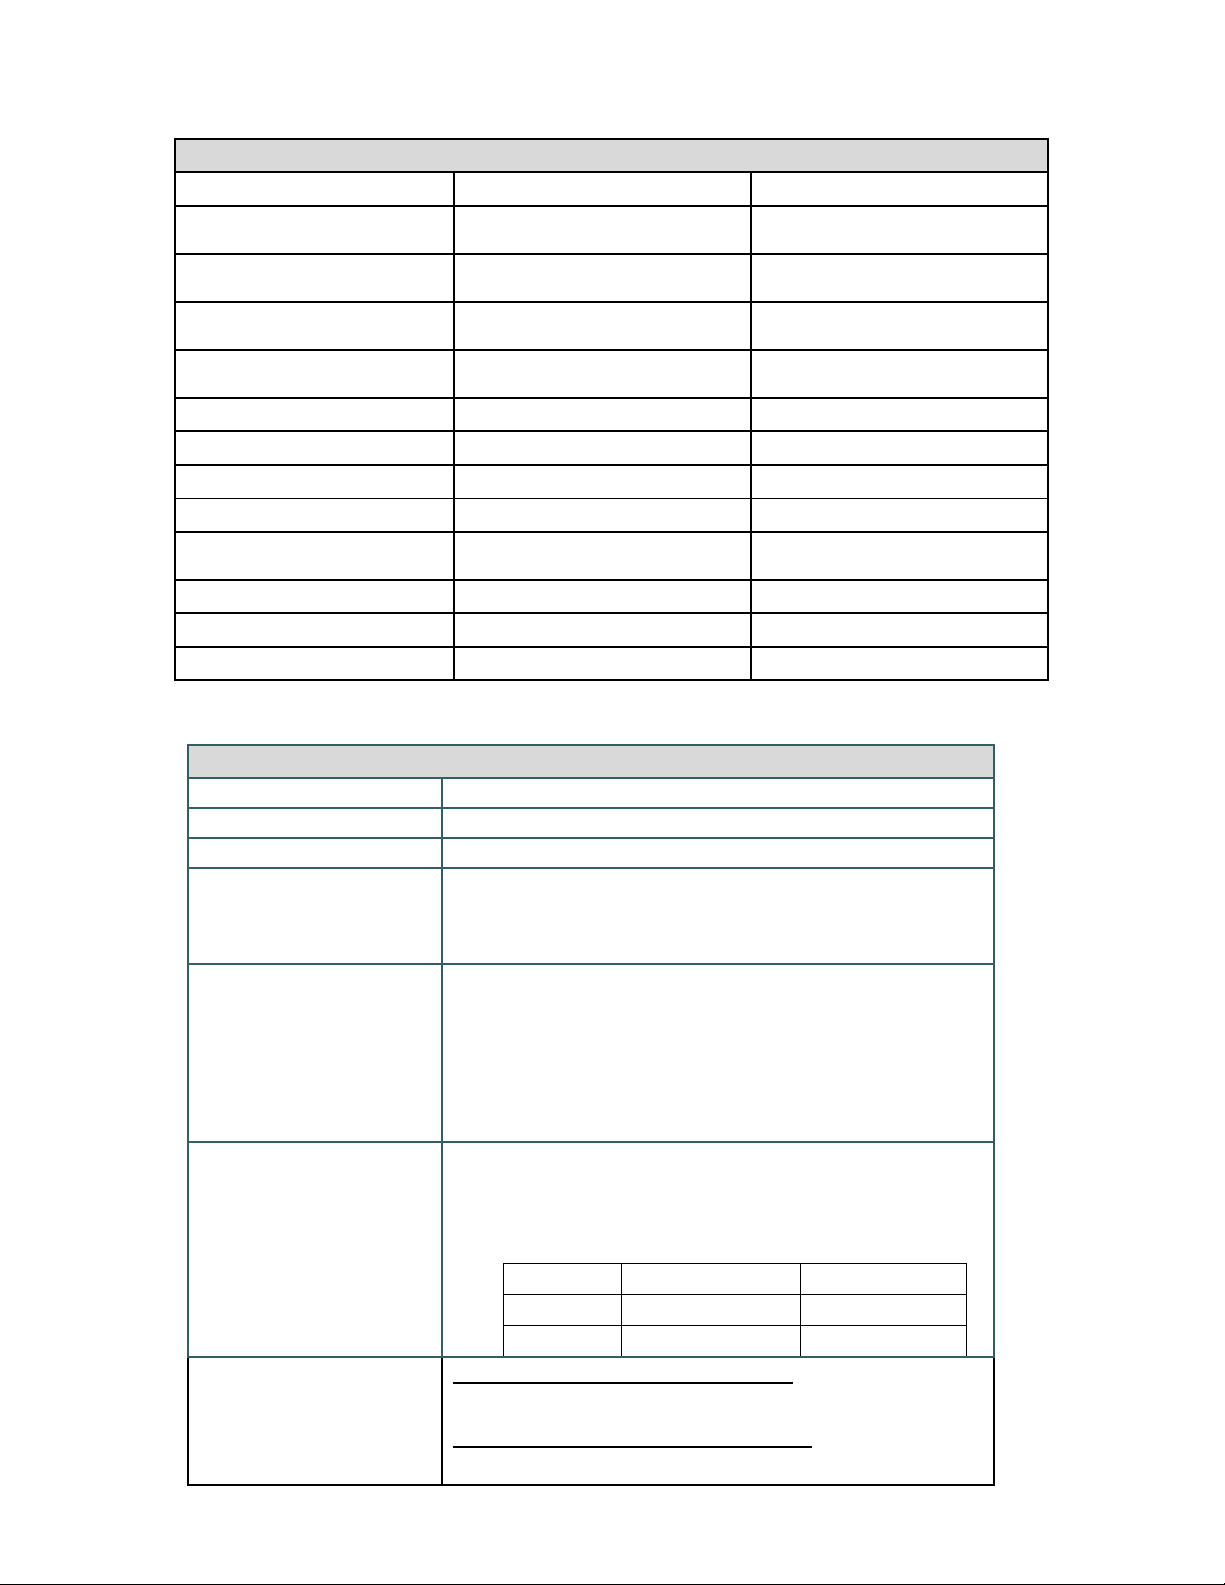
General Specifications
General Specifications
Physical dimensions 160 mm (W) x 191.6 mm (H) x 79 mm (D)
Mechanism Plastic with rubber over molded
Weight 0.945 kg (w/o battery)
Single Unit Charger (optional)
Power
Environmental condition
Battery Spec
Charging capability
Input: AC 100-240V
Output: DC 12V 1A
Operation: -10 ~ 50˚C (14 ~ 122˚F)
Storage: -40 ~ 60 ˚C (-40 ~ 140˚F)
Relative humidity: 10 ~ 90% non-condensing IP54 w/ IP54rated environmental case
Drop 1.5m (5ft)
Drop 1.8m (6.5ft) w/ IP54-rated environmental case
Charging time: 5 hr
Standby mode (Bluetooth): up to 32 hr
Standby mode (Wi-Fi): up to 18 hr
Printing: one label per 2 minutes,
Density 3 26 780
Density 8 21 650
Internal charging capability (battery-in)
Single Unit Charger (optional)
External charging capability (battery-out)
Condition Endurance (hr) 4" x 6" Labels
Chargingstations(4bayorsinglebay)(optional)
Page 10
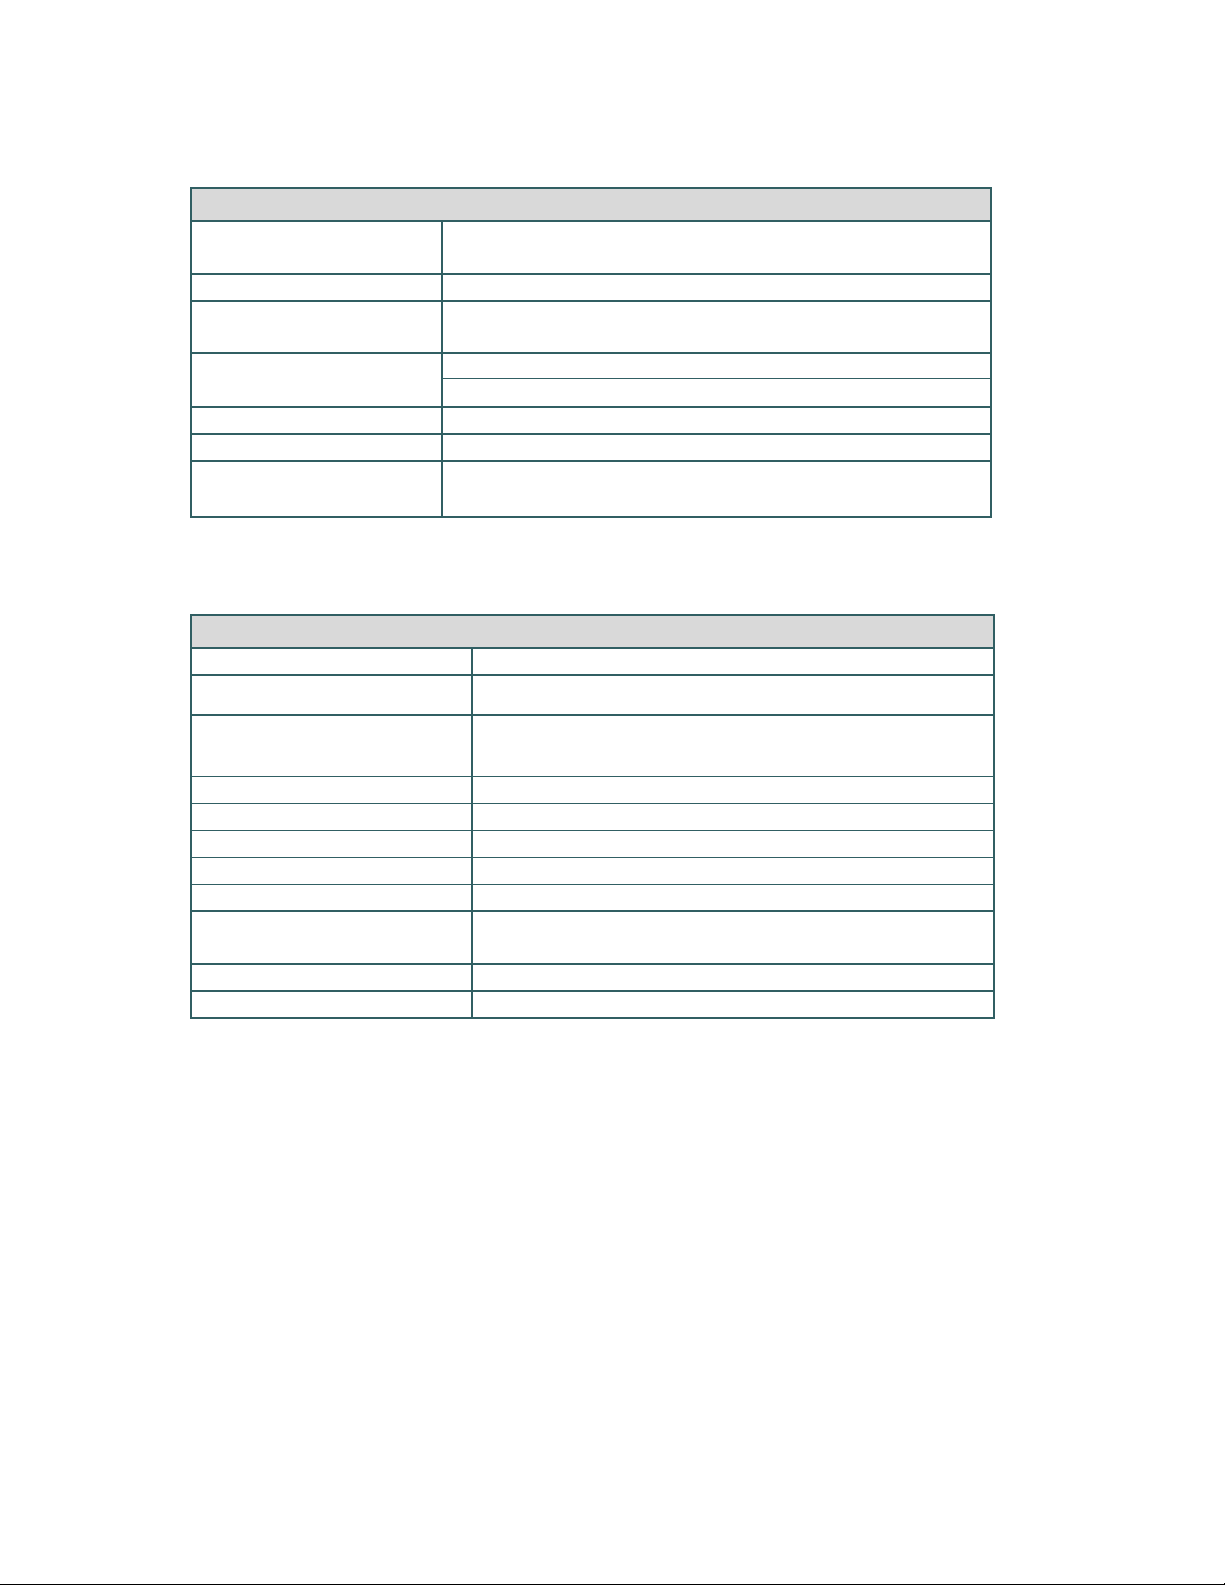
Print Specifications
Print head resolution
(dots per inch/mm)
Printing method Direct thermal
Dot size 0.125 x 0.125 mm
(width x length) (1 mm = 8 dots)
Print speed Max. 4 ips (100 mm/sec)
(inches per second) 2,3 ips for Peel-Off mode
Max. print width 4.09” (104 mm)
Max. print length 90” (2286 mm)
Printout bias
Media Specifications
Media roll capacity Max. 2.65” (67.3 mm) OD
Media core diameter 0.5 ~ 1” (12.7 mm ~ 25.4 mm) ID core
Print Specifications
203 dots/inch (8 dots/mm)
Vertical: 1 mm max.
Horizontal: 1 mm max.
Media Specifications
Media type
Media wound type Outside wound
Media width 2” ~ 4.41” (50.8 mm ~ 112 mm)
Media thickness 0.0020”~0.0065” (0.055 mm ~ 0.165 mm)
Label length 0.500”~90” (12.7 mm ~ 2286 mm)
Label length (peeler mode) 1” ~ 6” (25.4 ~ 152.4 mm)
External fan-fold media
Black mark Min. 0.3150” (8 mm) (W) x 0.0785” (2 mm) (H)
Gap height Min. 0.0785” (2 mm)
Continuous, die-cut, gap/black mark, External fan- fold,
receipt
Stack height: 2.75” (70 mm)
Page length: 6” ~ 12” (152 mm ~ 305 mm)
Page 11
Note:
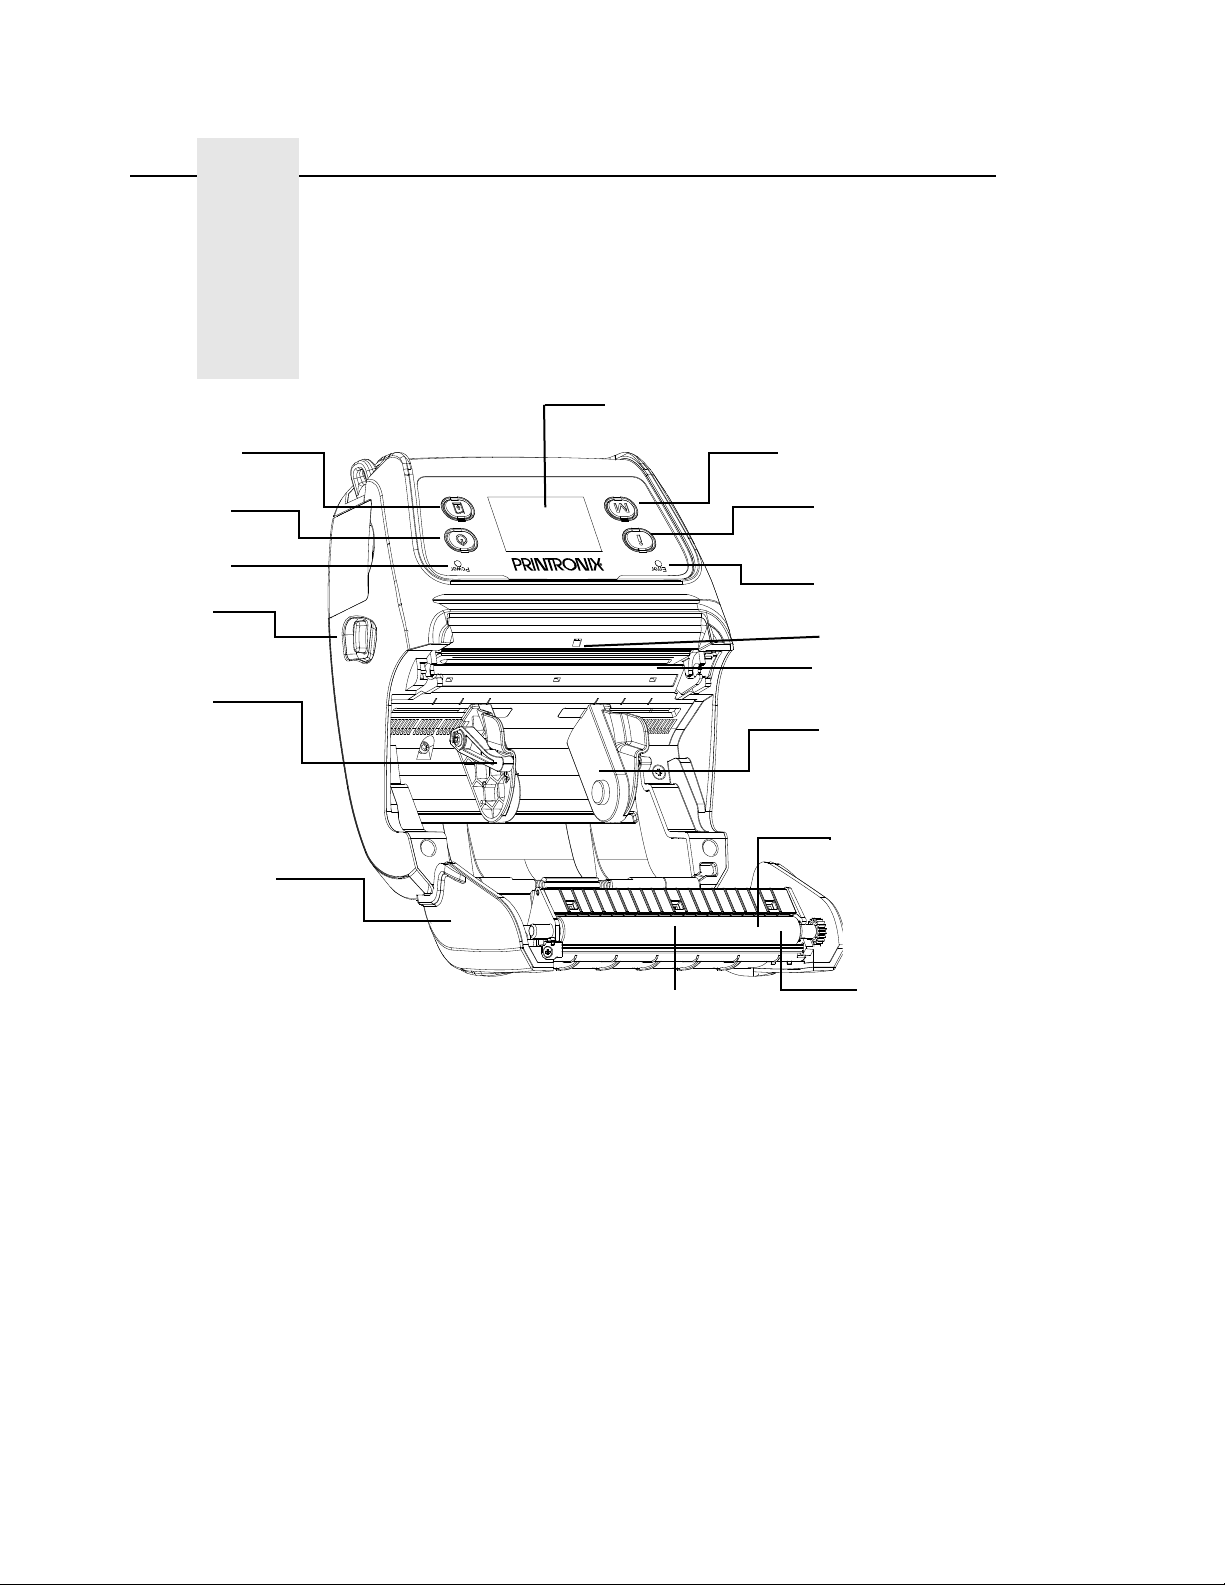
2
Printer Overview
1
2
4
3
5
6
7
8
9
10
11
12
14
13
1. LCD Display
2. Feed
3. Menu
4. Power On/Off
5. Info Setting
6. Battery Status Indicator
7. Error Indicator
8. Media Cover Release Latch
9. Peel-off Sensor
10. Printhead
11. Media Holder Lock Lever
12. Media Holder
13. Media Cover
14. Platen Roller
15. Label Peeler Cover
16. Tear/Peeler Bar
1 The media sensor position is selectable by factory adjustment. Please refer to this figure for default settings.
(Default – center position)
2 For LCD panel, please refer to section 2.3.2 for more details
15
16
Page 12
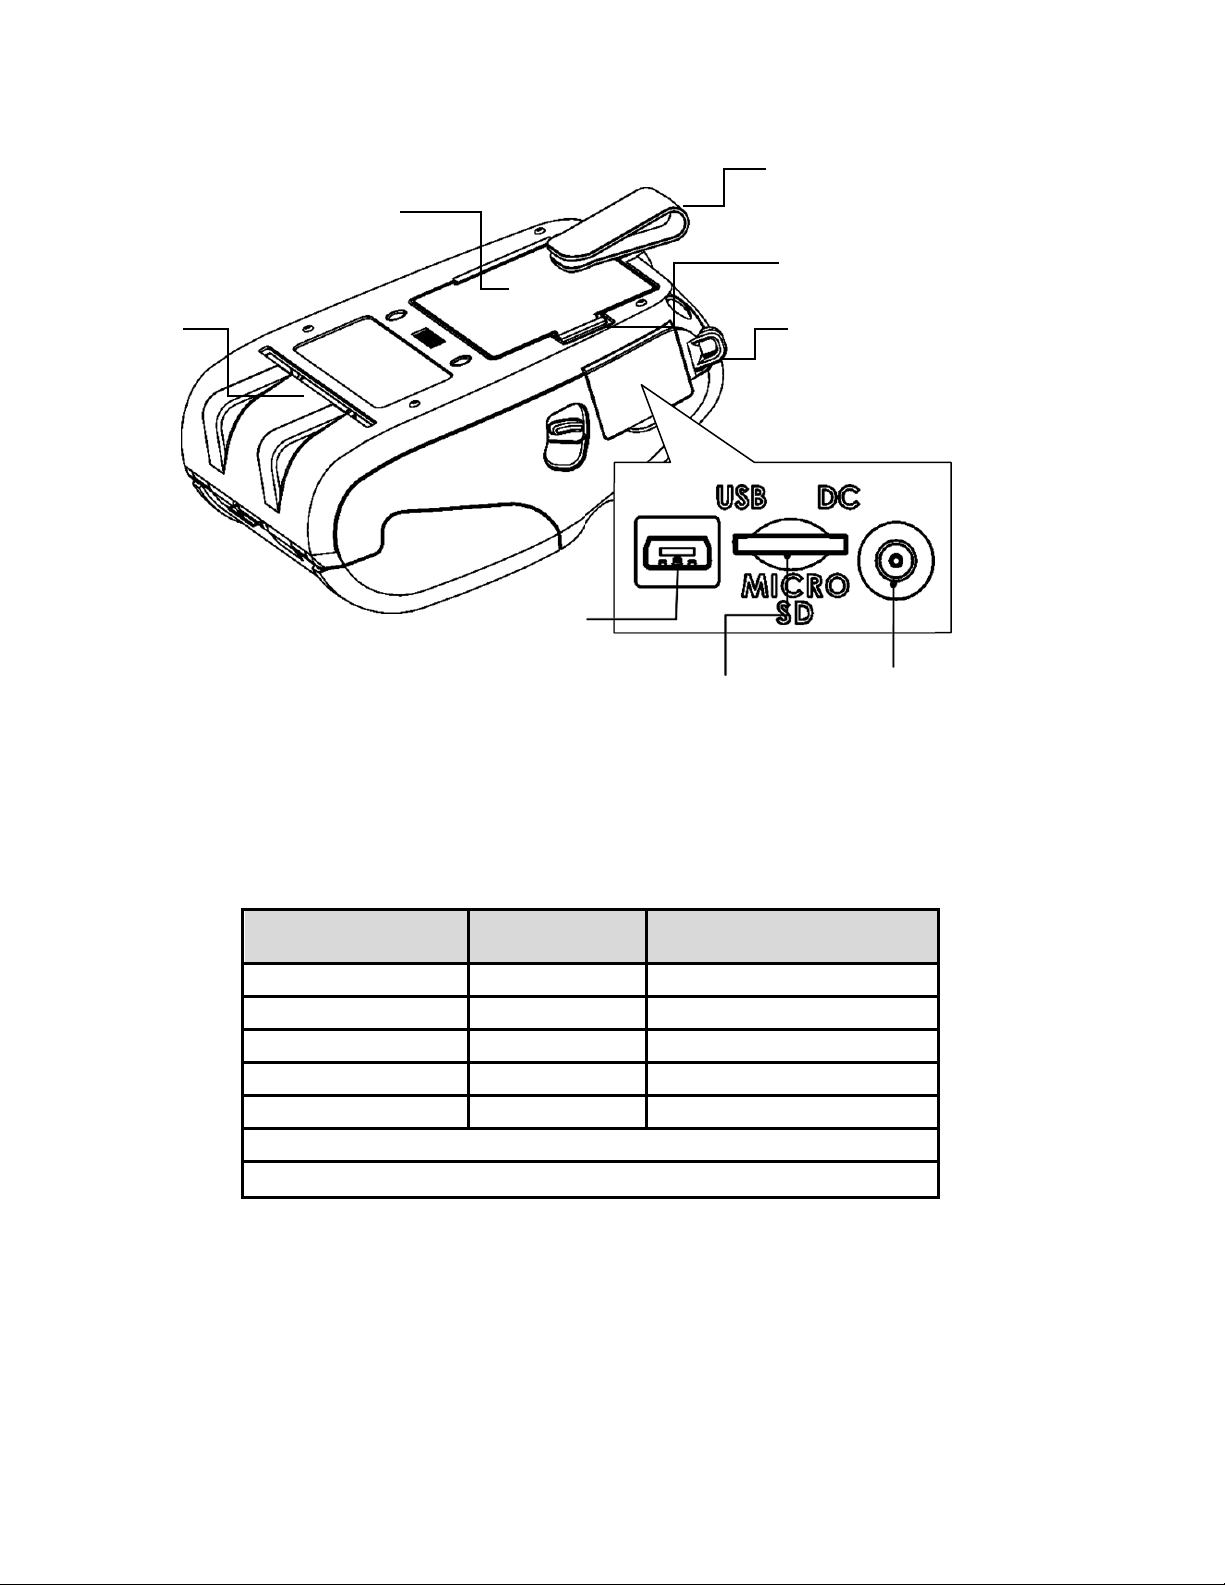
4
1. Belt Clip
2. Li-ion Battery
3. Battery Open Clasp
4. External Label Entrance Slot
5. Hanger for Shoulder Strap
6. USB Interface
7. Micro SD Card Socket
8. Power Jack
Note: Recommended Micro SD card specification
SD card spec
V1.0, V1.1 MicroSD 128 MB Transcend, Panasonic
V1.0, V1.1 MicroSD 256 MB Transcend, Panasonic
V1.0, V1.1 MicroSD 512 MB Transcend, Panasonic
V1.0, V1.1 MicroSD 1 GB Transcend, Panasonic
V2.0 SDHC CLASS 6 MicroSD 4 GB Transcend
-
The DOS FAT file system is supported for the SD card.
2
6
SD card
capacity
1
3
5
7
Approved SD card
manufacturer
8
-
Folders/files stored in the SD card should be in the 8.3 filename format
Page 13
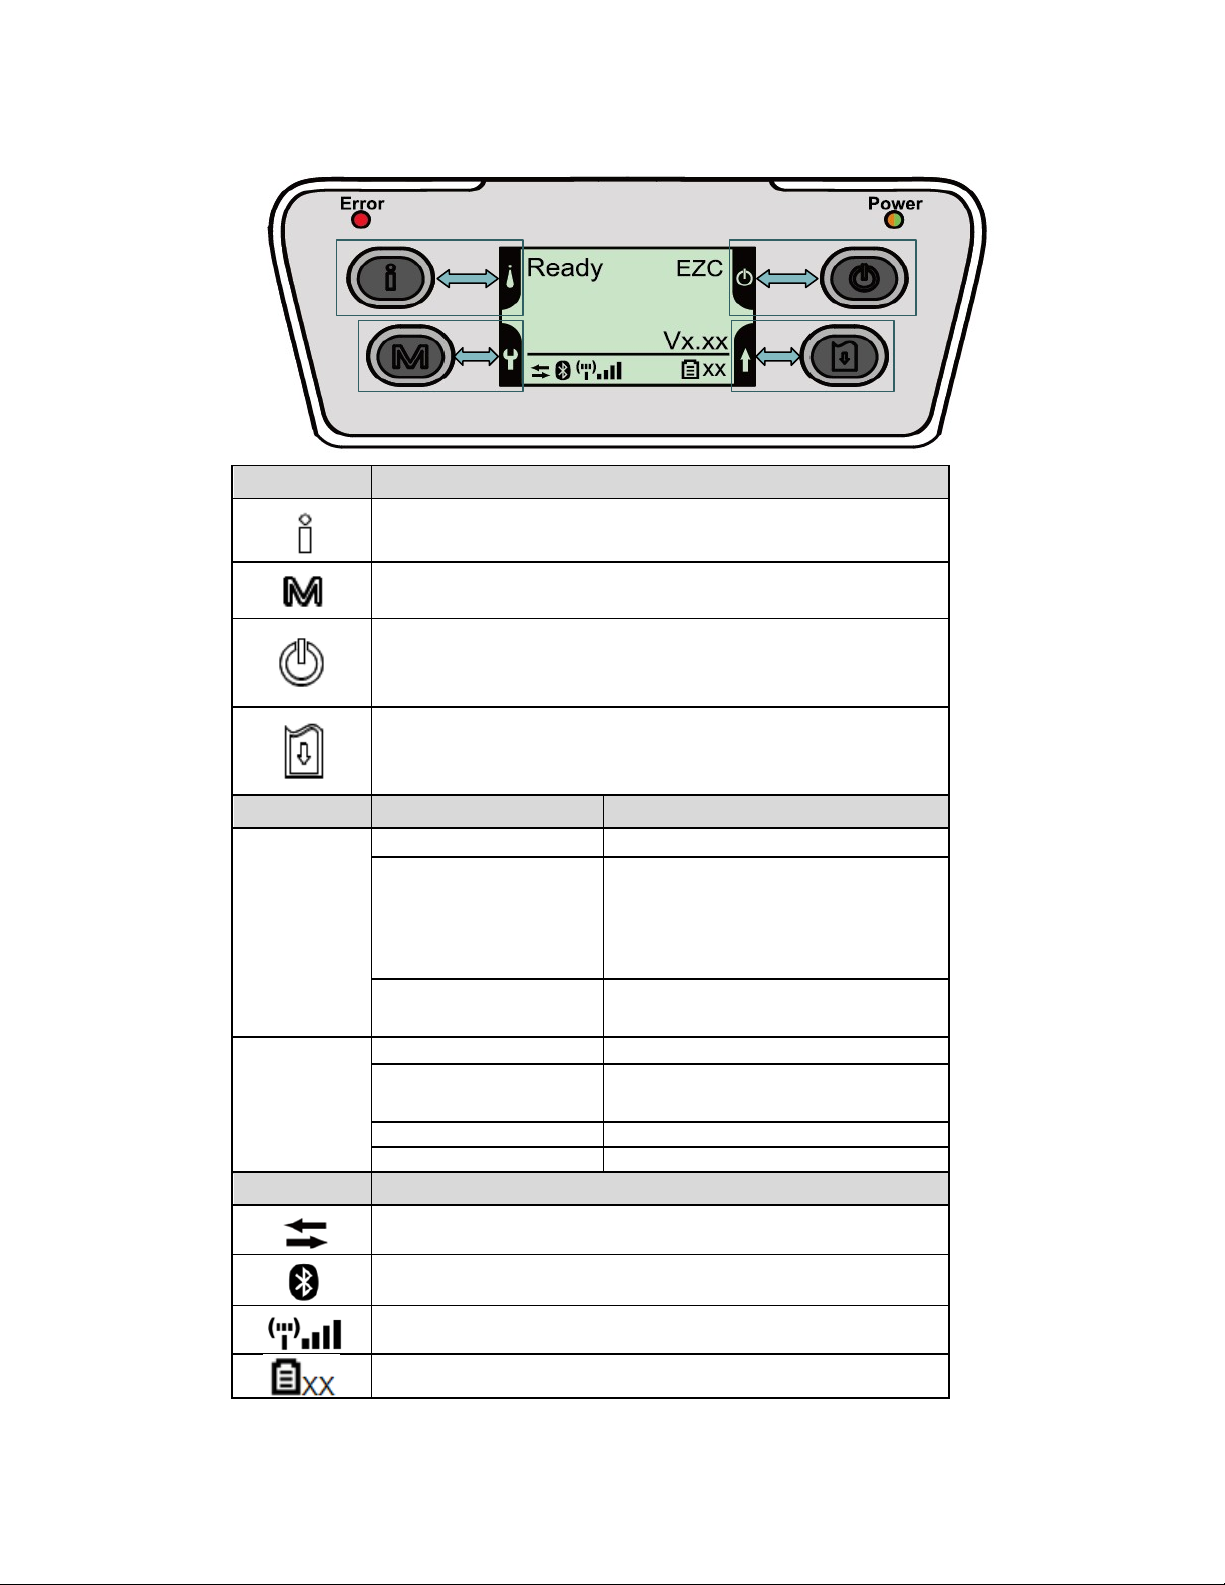
LCD Display
Keys Function
−Display the printer information
−Button for setting LCD configuration menu
−Enter the printer configuration menu
−Button for setting LCD configuration menu
−Press and hold for 2-3 seconds to turn on the printer
−Press and hold for 2-3 seconds to turn off the printer
−Button for setting LCD configuration menu
−Ready status: Feed one label
−Printing status: Pause the print job
−Button for setting LCD configuration menu
LEDs Status Indication
Off Printer is ready
−Media cover is open
−Out of memory
−Clean data
Error
Red (solid)
−Printer is busy
Red (blinking)
−No paper
−Paper jam
Off Printer power is turned off
−Printer power is turned on
−Battery is full charged
Power
Green (solid)
Green (blinking) Low battery
Amber (solid) Battery is charging
LCD Indication
Printer has been connected with cable
Bluetooth devices have been paired
Wi-Fi device has been connected
Battery capacity %
Note: Refer to Section 6 for additional LCD Display details
Page 14

Page 15
3
Printer Setup
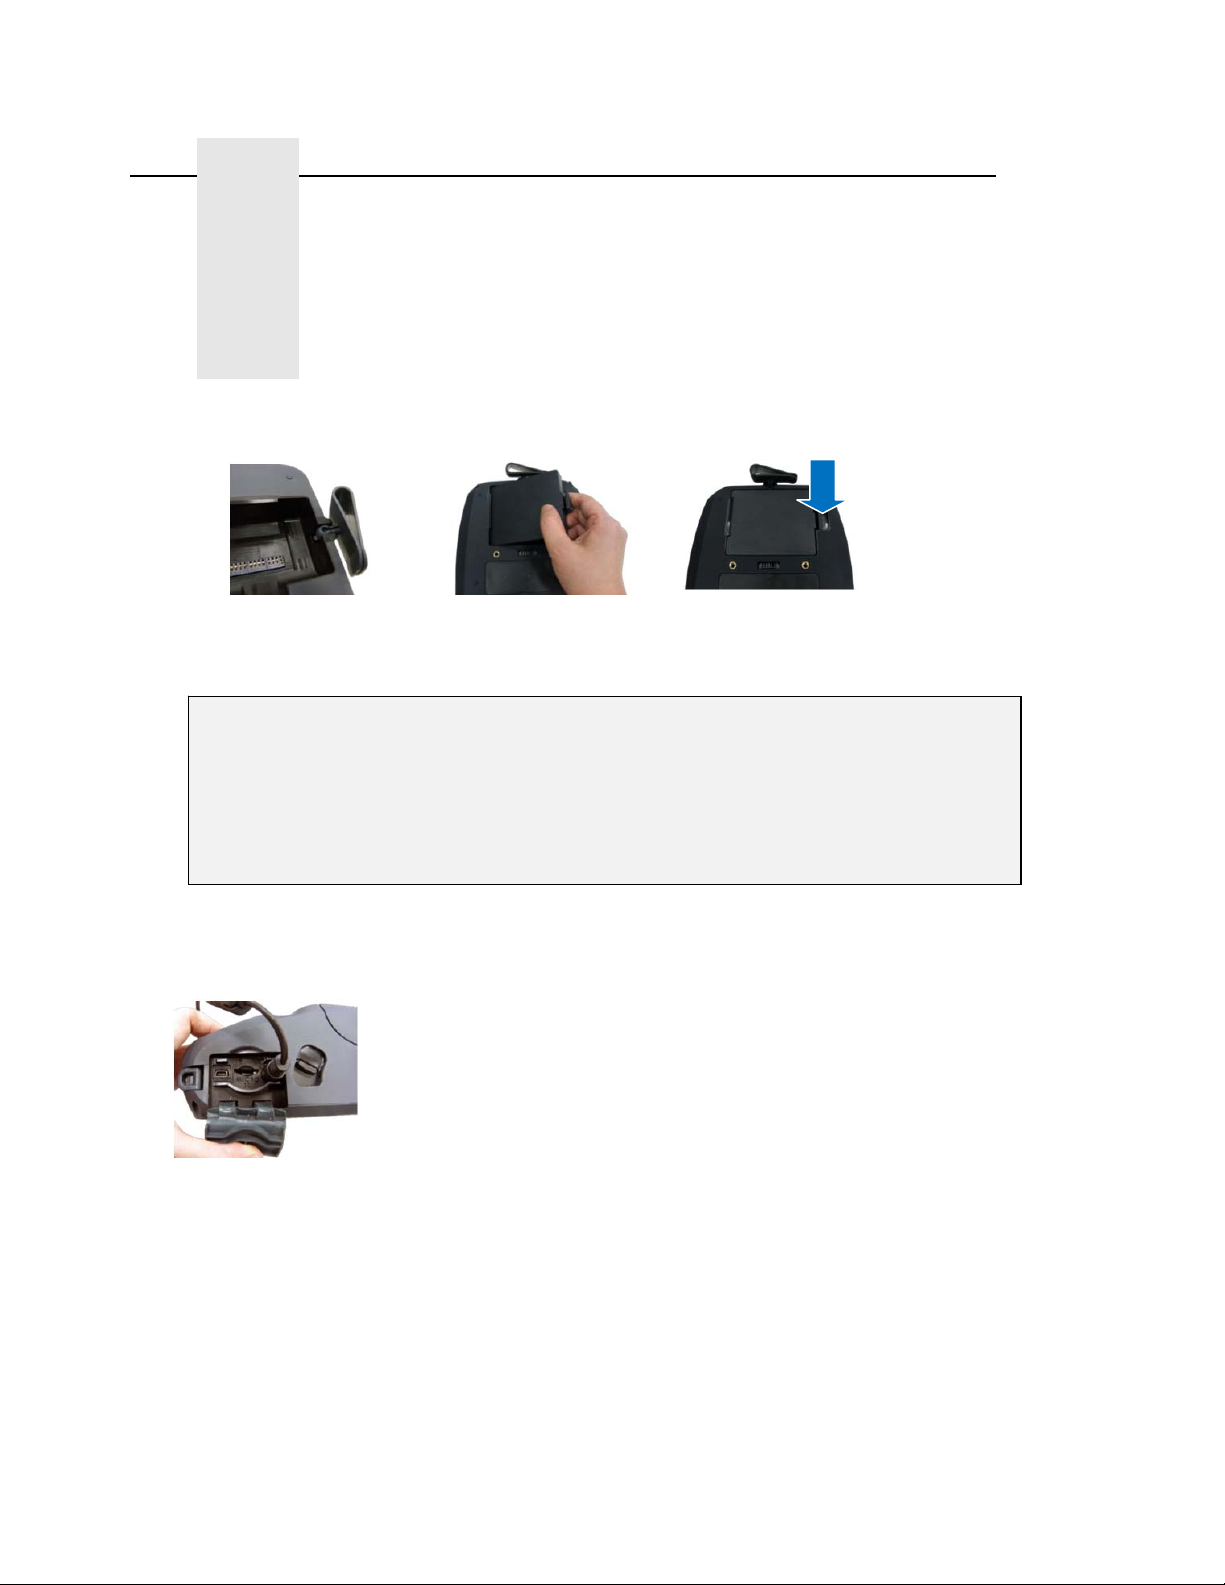
Installing the Belt Clip and Battery
Insert the Belt Clip first
Insert the left side to install the battery on the underside of the printer, and then push the right side
of the battery down until the clasp locks
DO NOT throw the battery in fire. DO NOT short circuit the contacts.
DO NOT disassemble the battery. DO NOT throw the battery in municipal waste
CAUTION: Danger of explosion if battery is incorrectly replaced. Replace only
with the same or equivalent type recommended by the manufacturer. Dispose of
used batteries according to the manufacturer’s instructions
Battery Safety Warning:
Charging the Battery
It takes 5 hours to fully charge the battery before first time usage. The lifetime of the battery is 300
charge/discharge cycles.
After installing the battery into the printer open the interface cover and plug the Charger power
cord into the printer power jack
Plug the Charger into a compatible power outlet
Note: Switch OFF printer power prior to plugging the power cord into the printer power ja ck
Do not remove the battery from the printer while it is charging or you will need to re-plug the
charger into the power outlet
When the battery is charging, the color of the Power LED Indicator is solid amber.
The battery is fully charged when the Power LED Indicator turns from amber to green
Page 16
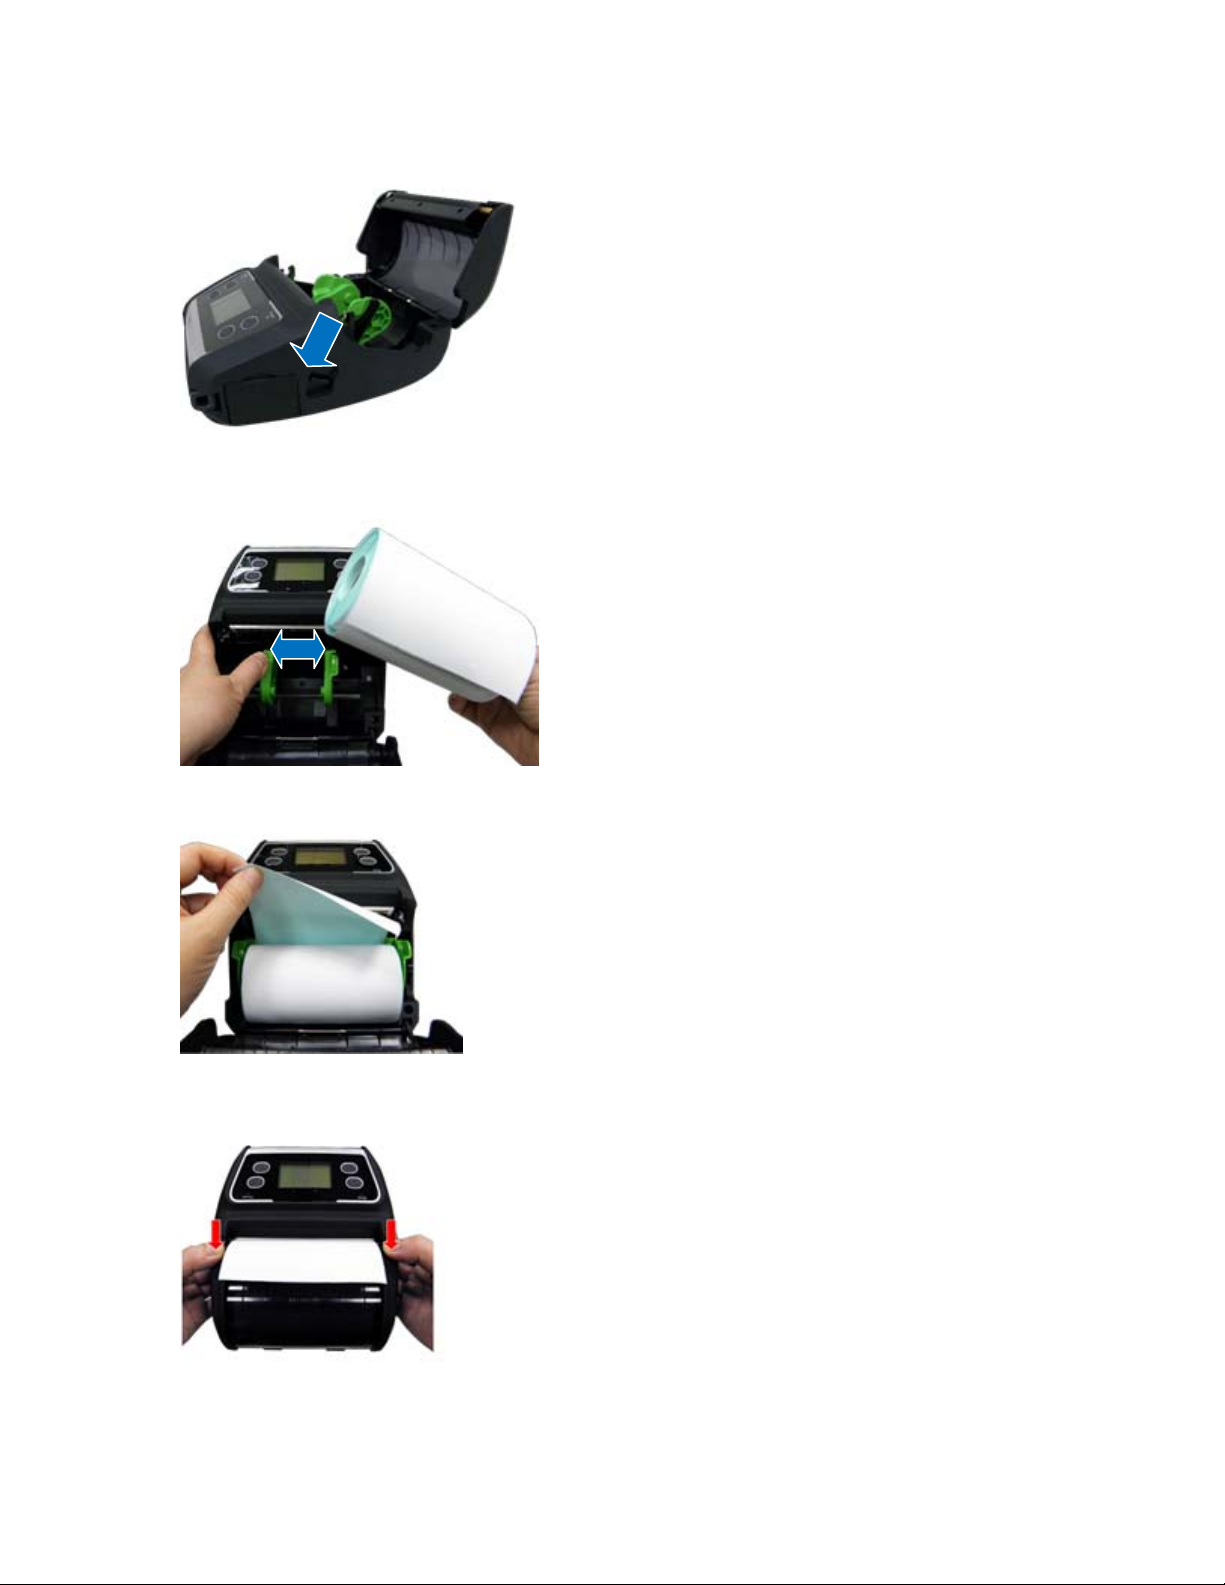
Loading the Media
Open the printer media cover by pressing down on the media cover release latch.
Pull the media holders apart far enough to fit the width of the label roll you are installing
Place the roll, printing side face-out, between the media holders and insert hub into the core. Pull
out enough paper above the printhead
Press down on both sides of the media cover to ensure it is closed correctly.
Note: Calibrate the gap/black mark sensor when changing media using the Configuratio n Utility –
Printer Function – Calibrate Sensor
Page 17
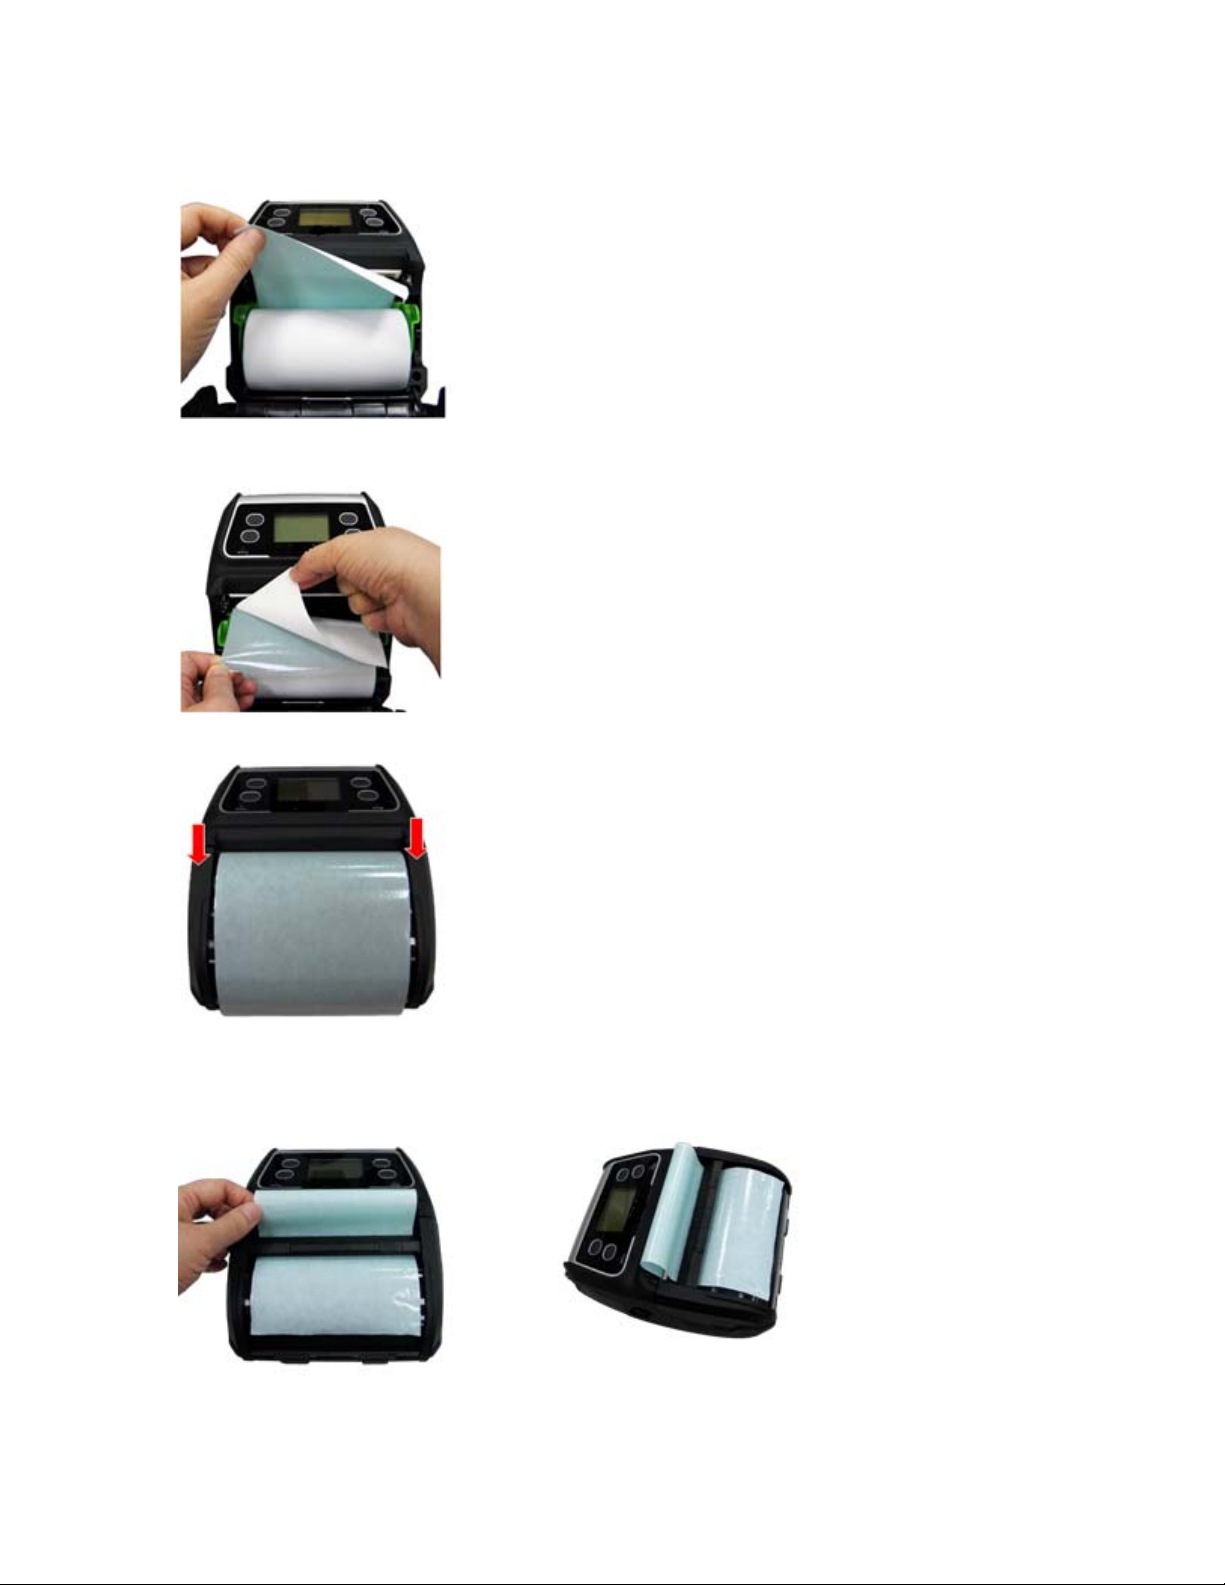
Loading Media in Peel-Off Mode
Load Media as defined in Loading the Media section on previous page
Remove 1 ~ 2 die cut labels from the liner
Press down on both sides of the media cover to ensure it is closed correctly.
Note: Calibrate the gap/black mark sensor when changing media using the Configuratio n Utility –
Printer Function – Calibrate Sensor
Route the liner under the label peel cover as shown
Page 18
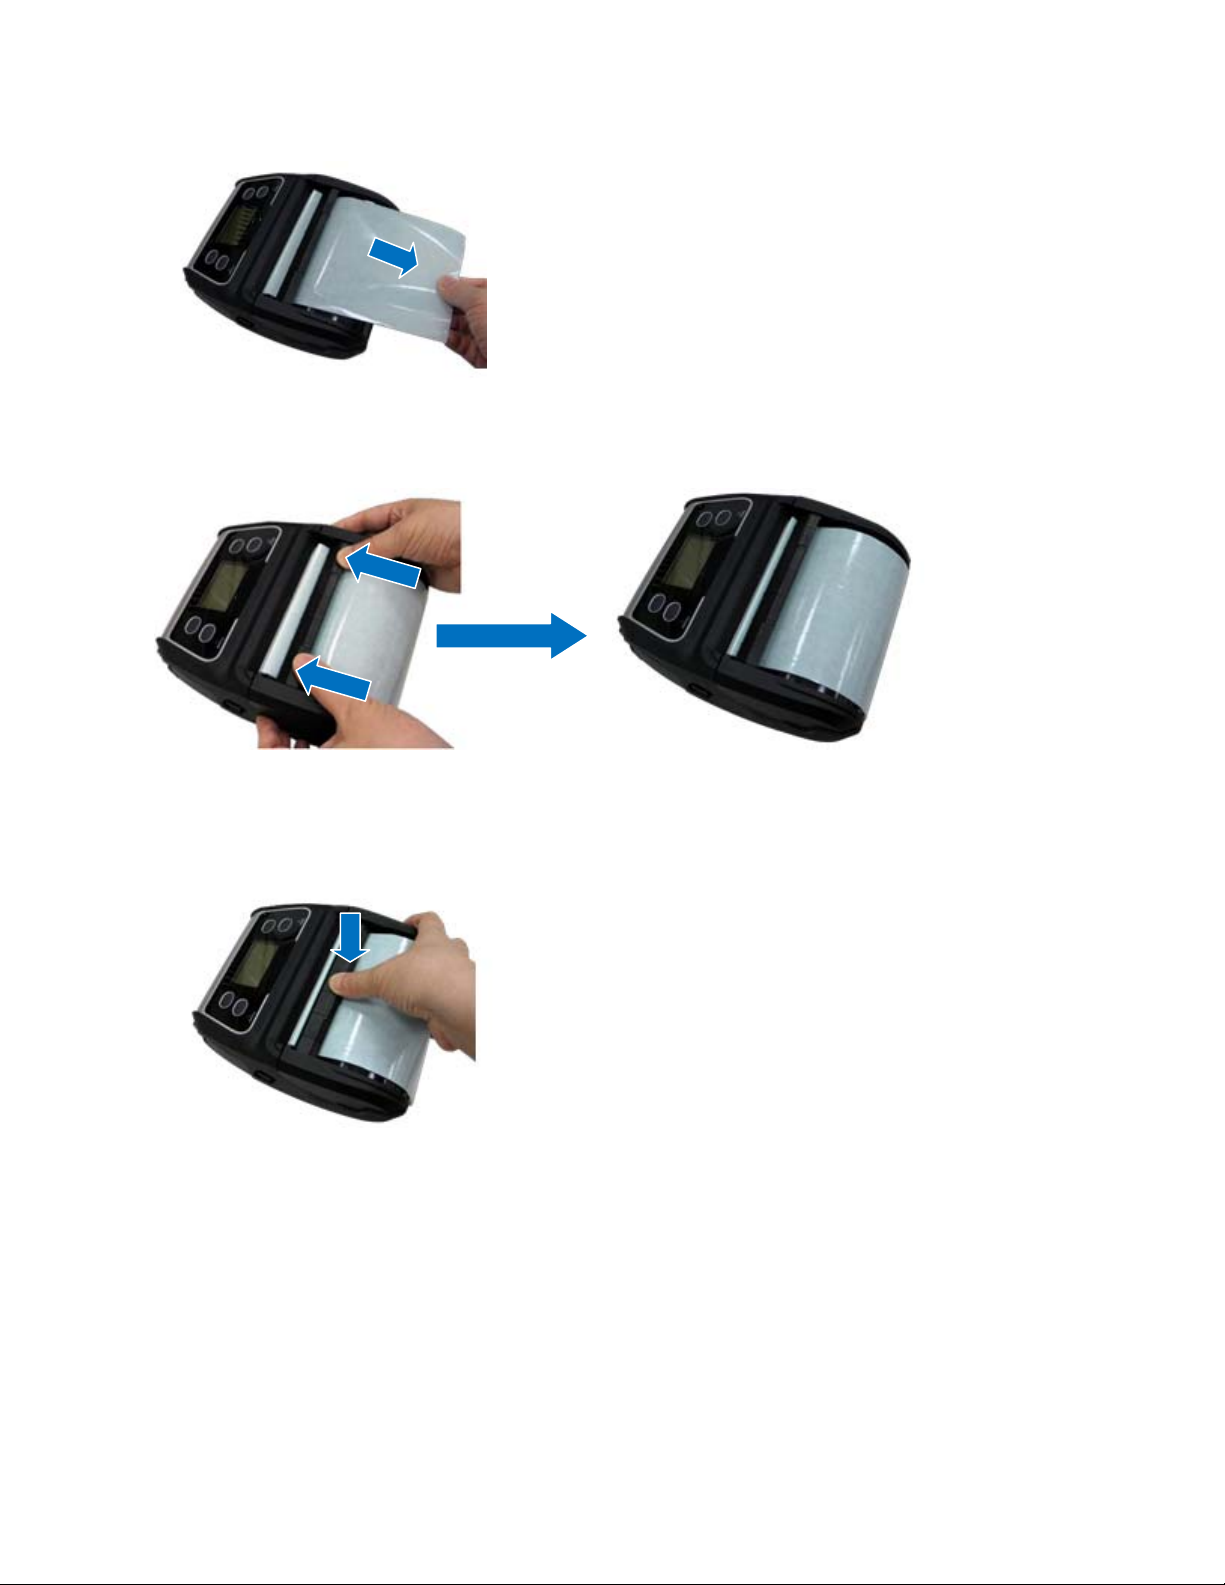
Pull the liner tightly
Push the label peel cover toward the front of the printer until it covers the plate roller
Press down on the label peel cover to lock it in place
Note: Calibrate the gap/black mark sensor when changing media using the Configuratio n Utility –
Printer Function – Calibrate Sensor
Page 19
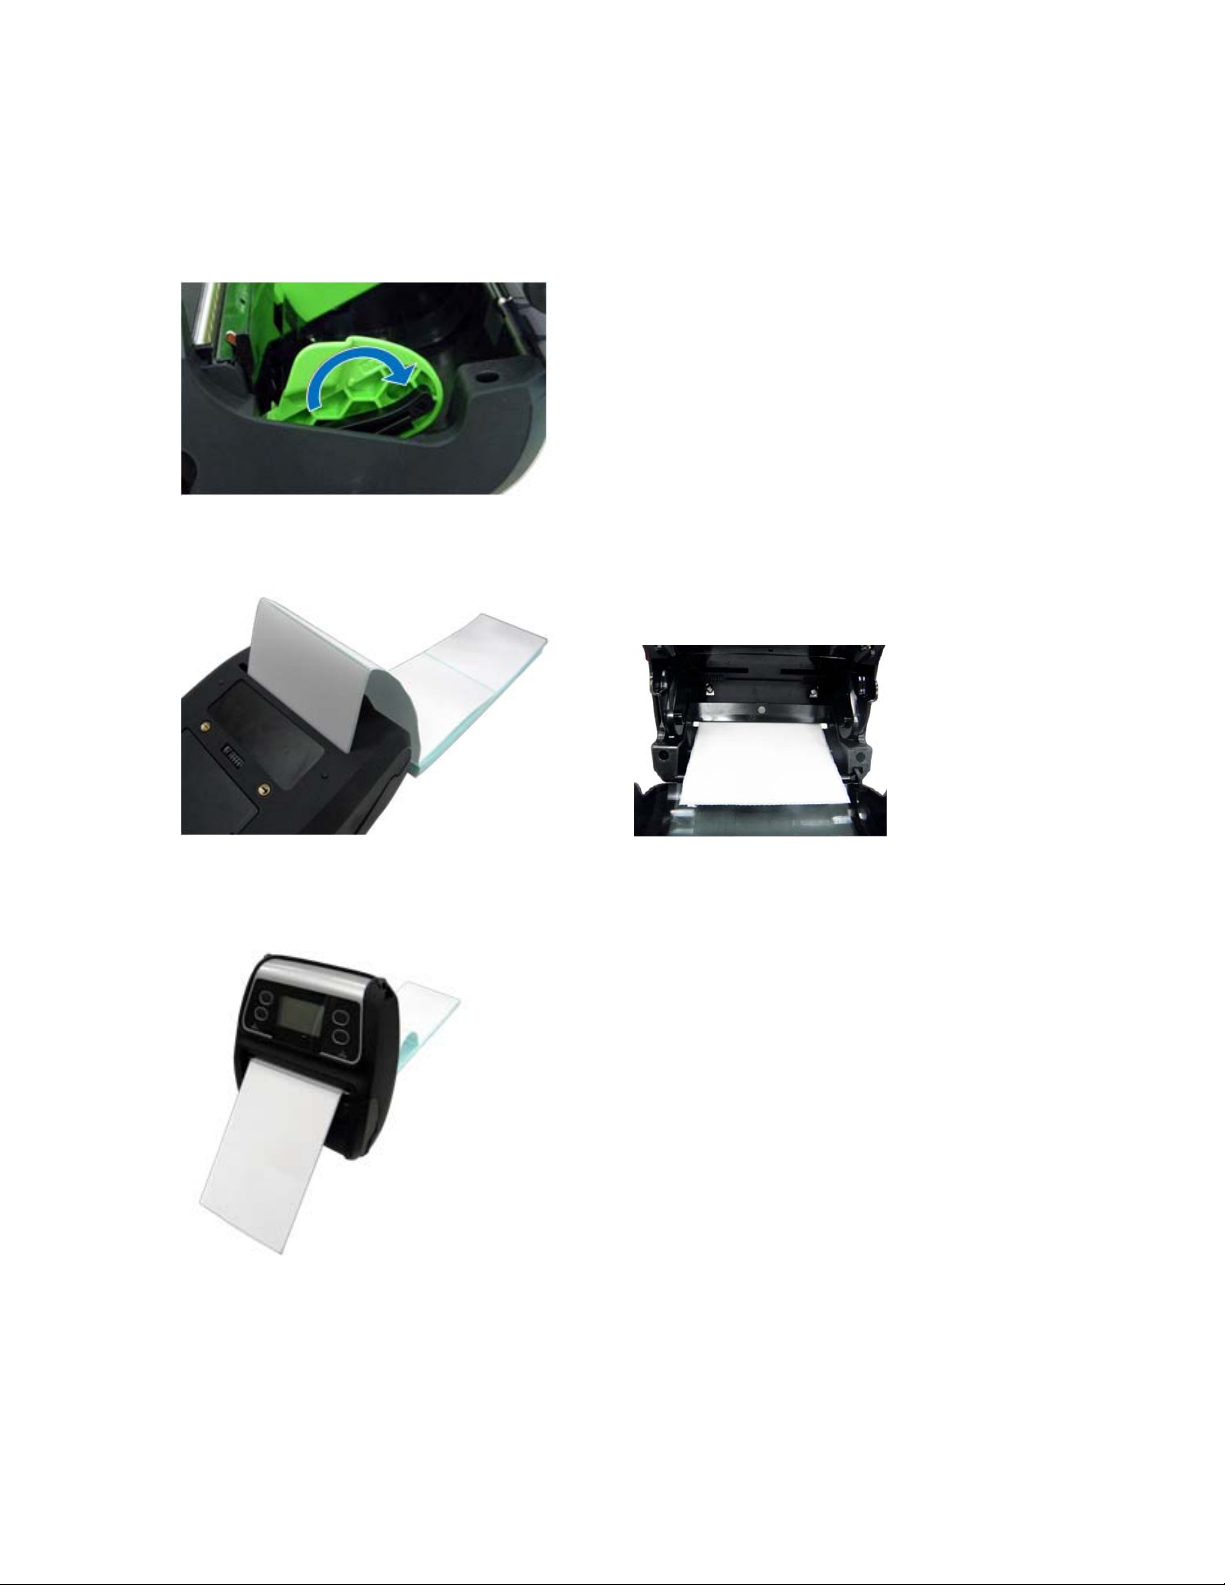
Loading Fan-fold/External Media
Open the printer media cover by pressing down on the media cover release latch.
Pull the media holders apart far enough to fit the width of the Fan-fold media you are installing
Push down each media holder lock lever to secure the media holders in place
Route the media, printing side out, through the bottom external label slot
Press down on both sides of the media cover to make sure it is closed correctly
Note: Calibrate the gap/black mark sensor when changing media using the Configuration Utility –
Printer Function – Calibrate Sensor
Page 20

Connecting the Printer
The printer must establish communication with a host terminal which sends the data to be printed.
There are three ways to connect the M4L series:
By an USB cable between the printer and its host terminal
By a Bluetooth short-range radio if Bluetooth is installed and enabled.
By a Wireless LAN per 802.1 b/g/n (Option)
Cable Communications
Open the interface cover and connect the printer to the computer/smart phone (host terminal) with
USB cable (USB to USB or USB to RS-232)
Wireless Communication with Bluetooth
Power on the printer
Open the Bluetooth device for host terminal to scan for printer’s Bluetooth device.
Connect the Bluetooth devices. The Bluetooth icon will display in the LCD panel if devices have
been paired.
Printer Bluetooth default
You can find this info from configuration (self-test) page,
Address
Name BT-SPP
PIN 0000
Note: Please refer to Setting Bluetooth by Configuration Utility in section 5 to change the
name and PIN by Configuration Utility or refer to Bluetooth in section 6 to change the name and
PIN directly
Please refer to Power On Utilities section for how to print the selftest.
Wireless Communication with WiFi
You should set the WLAN settings via the cable when first setting up the printer. Please refer to
Setting WiFi be Configuration Utility in section 5 to set up the WiFi module. Please refer to
Wireless LAN in section 6 to set up the WLAN settings
Page 21

4
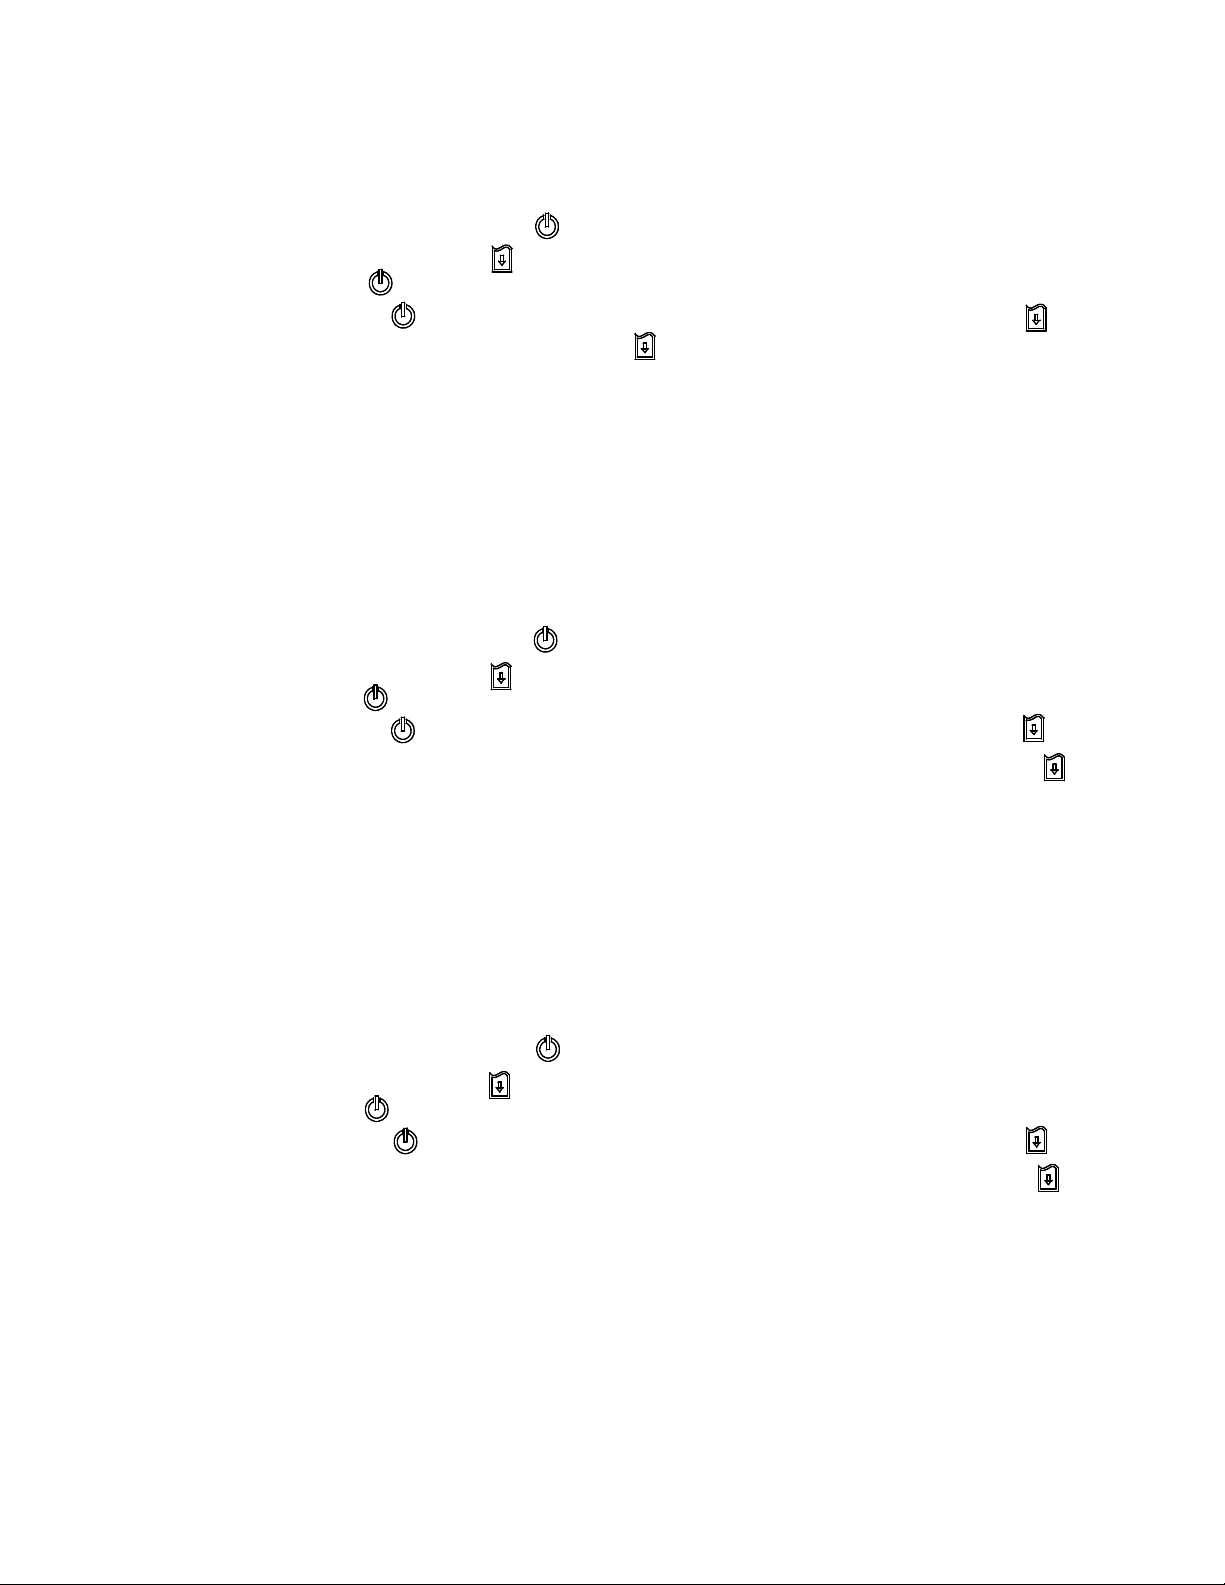
There are three power-on utilities to set up and test printer hardware.
These utilities are activated by pressing the FEED key then turning on the printer power key
simultaneously and releasing the FEED key when the desired utility function displays on the LCD
panel to initiate that utility.
Power-On Utilities
Power-On Utilities
Use the following steps to initiate different power-on utilities:
Turn off the printer power using the power key
Press and hold the FEED key then while still pressing the FEED key press and hold down the
power key
Release the power key when the “Error” LED turns red.
Note: At this time continue to press down on the FEED key
After the printer beeps twice, wait until the desired utility displays on the LCD and then release the
FEED key to initiate that utility. The order that the utilities appear on the LCD are described
below:
Power On Utilities The LCD will change as follows:
LCD
Release Feed key
for different functions
Calibrate.....
(5 dots) (5 dots) (5 dots)
Media sensor
calibration
SelfTest.....
Media sensor
calibration, self-test
and dump mode
Initialize.....
Printer initialization
Page 22
Media Sensor Calibration
Use the following steps to calibrate the media sensor:
Turn off the printer using the Power key
Press and hold down the Feed key then, while still holding down the Feed key, press and hold
down the Power key
Release the Power key when the Error LED turns red continuing to hold down the Feed key
When the printer beeps twice release the Feed key . The LCD will display “Calibrating…..”.
The printer will move media, calibrate the gap/black mark sensor sensitivity and then stop with
“Ready” displayed on the LCD.
Note: If the Feed key is held down after the printer beeps twice, with “Self Test” displayed, it will
perform a Calibrate followed by a Self Test where it prints a Configuration Page and then ends in
Dump mode.
Self Test and Dump Mode
Use the following steps to perform Self Test:
Turn off the printer using the Power key
Press and hold down the Feed key then, while still holding down the Feed key, press and hold
down the Power key
Release the Power key when the Error LED turns red continuing to hold down the Feed key
When the printer beeps twice wait until “Self Test” displays on the LCD then release the Feed key
The printer will calibrate the sensor, print a Configuration Page of its internal settings and then
enter Dump mode
Note: To exit Dump mode and return the printer back to normal print mode, turn off/on the printer
power or press the Feed key. The LCD will display “Ready”.
Printer Initialization
Printer initialization is used to clear DRAM and restore printer settings to defaults.
Use the following steps to perform printer initialization:
Turn off the printer using the Power key
Press and hold down the Feed key then, while still holding down the Feed key, press and hold
down the Power key
Release the Power key when the Error LED turns red continuing to hold down the Feed key
When the printer beeps twice wait until “Initialize” displays on the LCD then release the Feed key
The LCD will display “Initializing…..” followed by “Ready”.
The printer will restore printer settings to defaults (see Printer Defaults)
Page 23
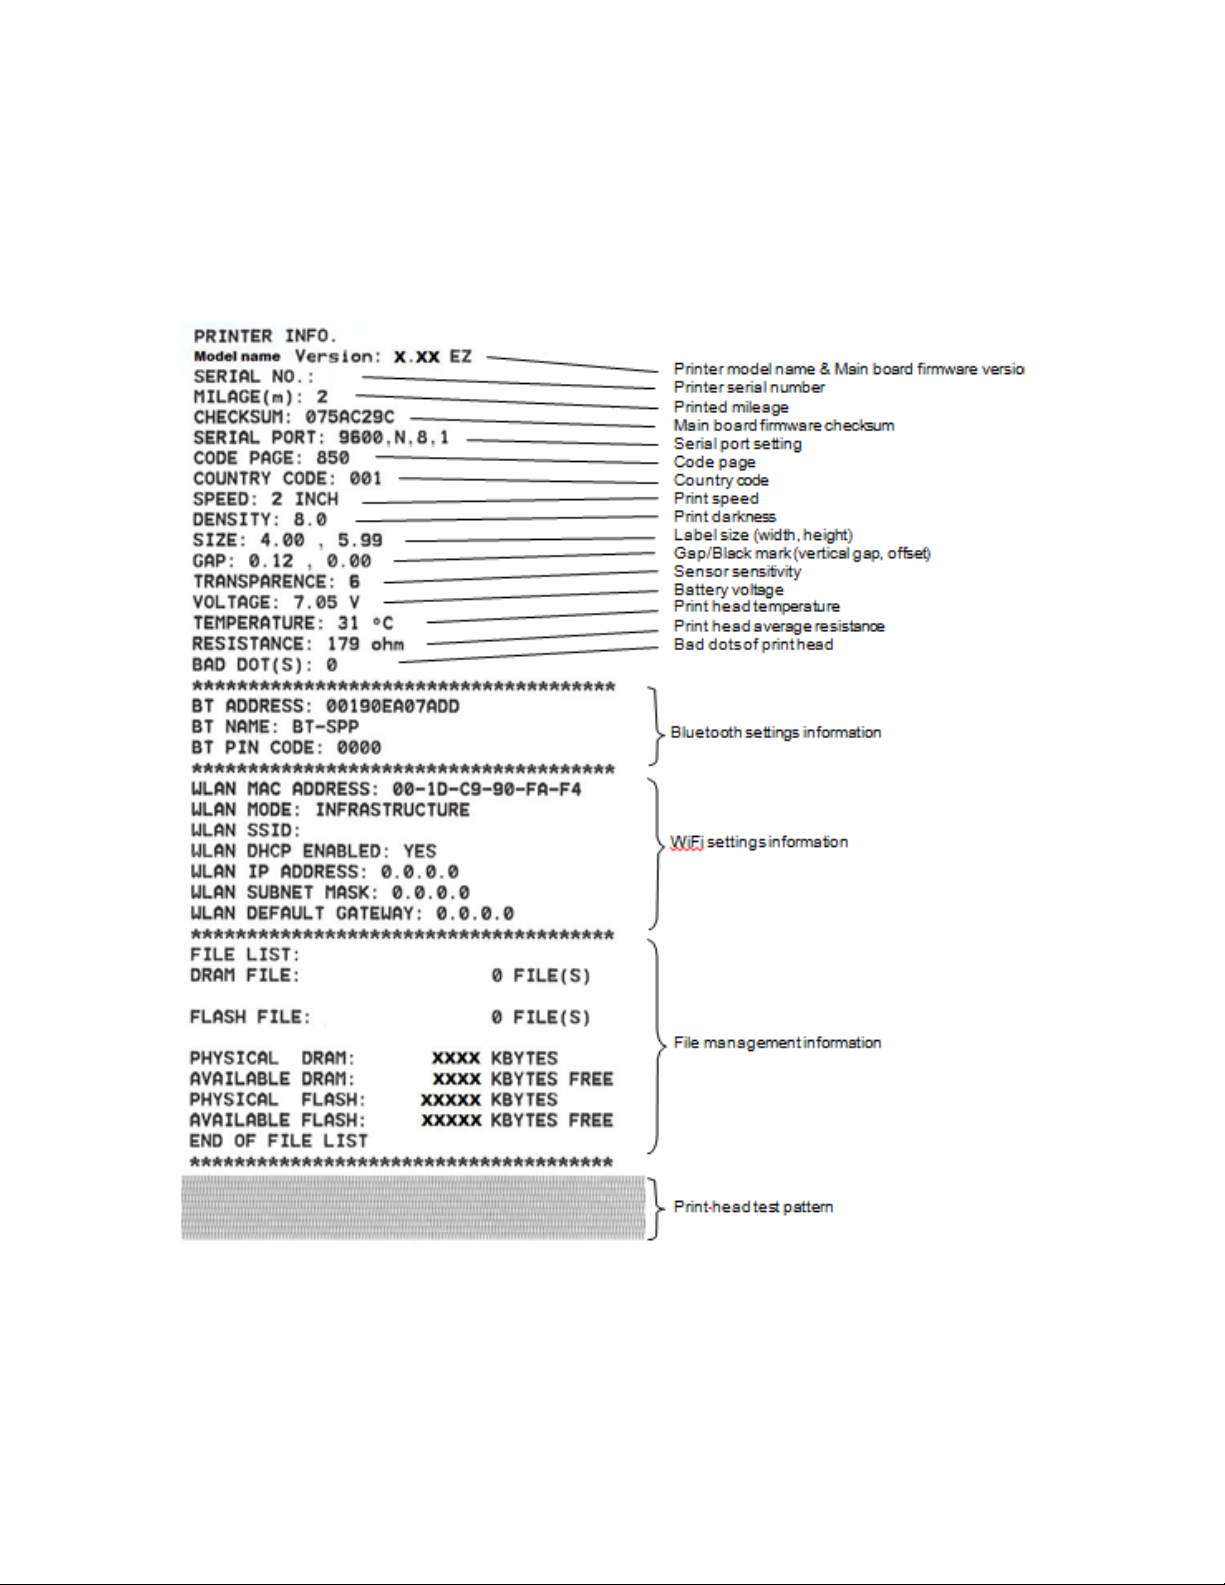
Self Test
Printer will print the Configuration Page after media sensor calibration. Self-test printout can be
used to verify printer configurations and available memory space. The printhead test pattern can
verify if any printhead heater elements (dots) are damaged.
Note: The Self-test printout requires 4” paper/label width.
Page 24

Dump Mode
Printer will enter dump mode after printing Configuration Page. In dump mode, all characters will
be printed in 2 columns as shown. The left side characters are received from your system and
right side data are the corresponding hexadecimal value of the characters. It allows users or
engineers to verify and debug the program.
ASCII Data
of ASCII data
Hex decimal data related to left column
Note:
Dump mode requires 4” paper/label width.
Exit Du m p m od e b y t urning of f / on the power or by pressin g the FEED key. The LCD will show
“Ready” for normal printing operation.
Printer Defaults
Printer configuration will be restored to defaults as below after initialization.
Parameter Default setting
Speed 50.8 mm/s ec (2 ips)
Density 8
Media Width 4” (101.5 mm)
Media Height 4” (101.5 mm)
Sensor Type Gap sensor
Print Direction 0
Reference Point 0,0 (upper left corner)
Gap Offset 0
Post-P rint Acti on Tear mode
Serial Port Settings 9600 bps, none parity, 8 data bits, 1 stop bit
Code Page 850
Country Code 001
Clear Flash Memory No
Note: When printer initialization is done, calibrate the gap or black mark sensor before printing or
attempting any Self tests.
Page 25

5
PRINTRONIX’s Configuration Utility is an integrated tool incorporating features that enable you to
explore a printer’s settings/status; change a printer’s settings; download graphics, fonts and
firmware; create a printer bitmap font; and send additional commands to a printer. With the aid of
this powerful tool, you can review printer status and setting in an instant, which makes it much
easier to troubleshoot problems and other issues.
Configuration Utility
Start the Configuration Utility
Double click on the Configuration Utility icon to start the software.
There are four features (Printer Configuration, File Manager, Bitmap Font Manager, Command
Tool) included in the Configuration Utility
FeaturesTab
Printer
Functions
PrinterStatus
Interface
PrinterSetup
Page 26
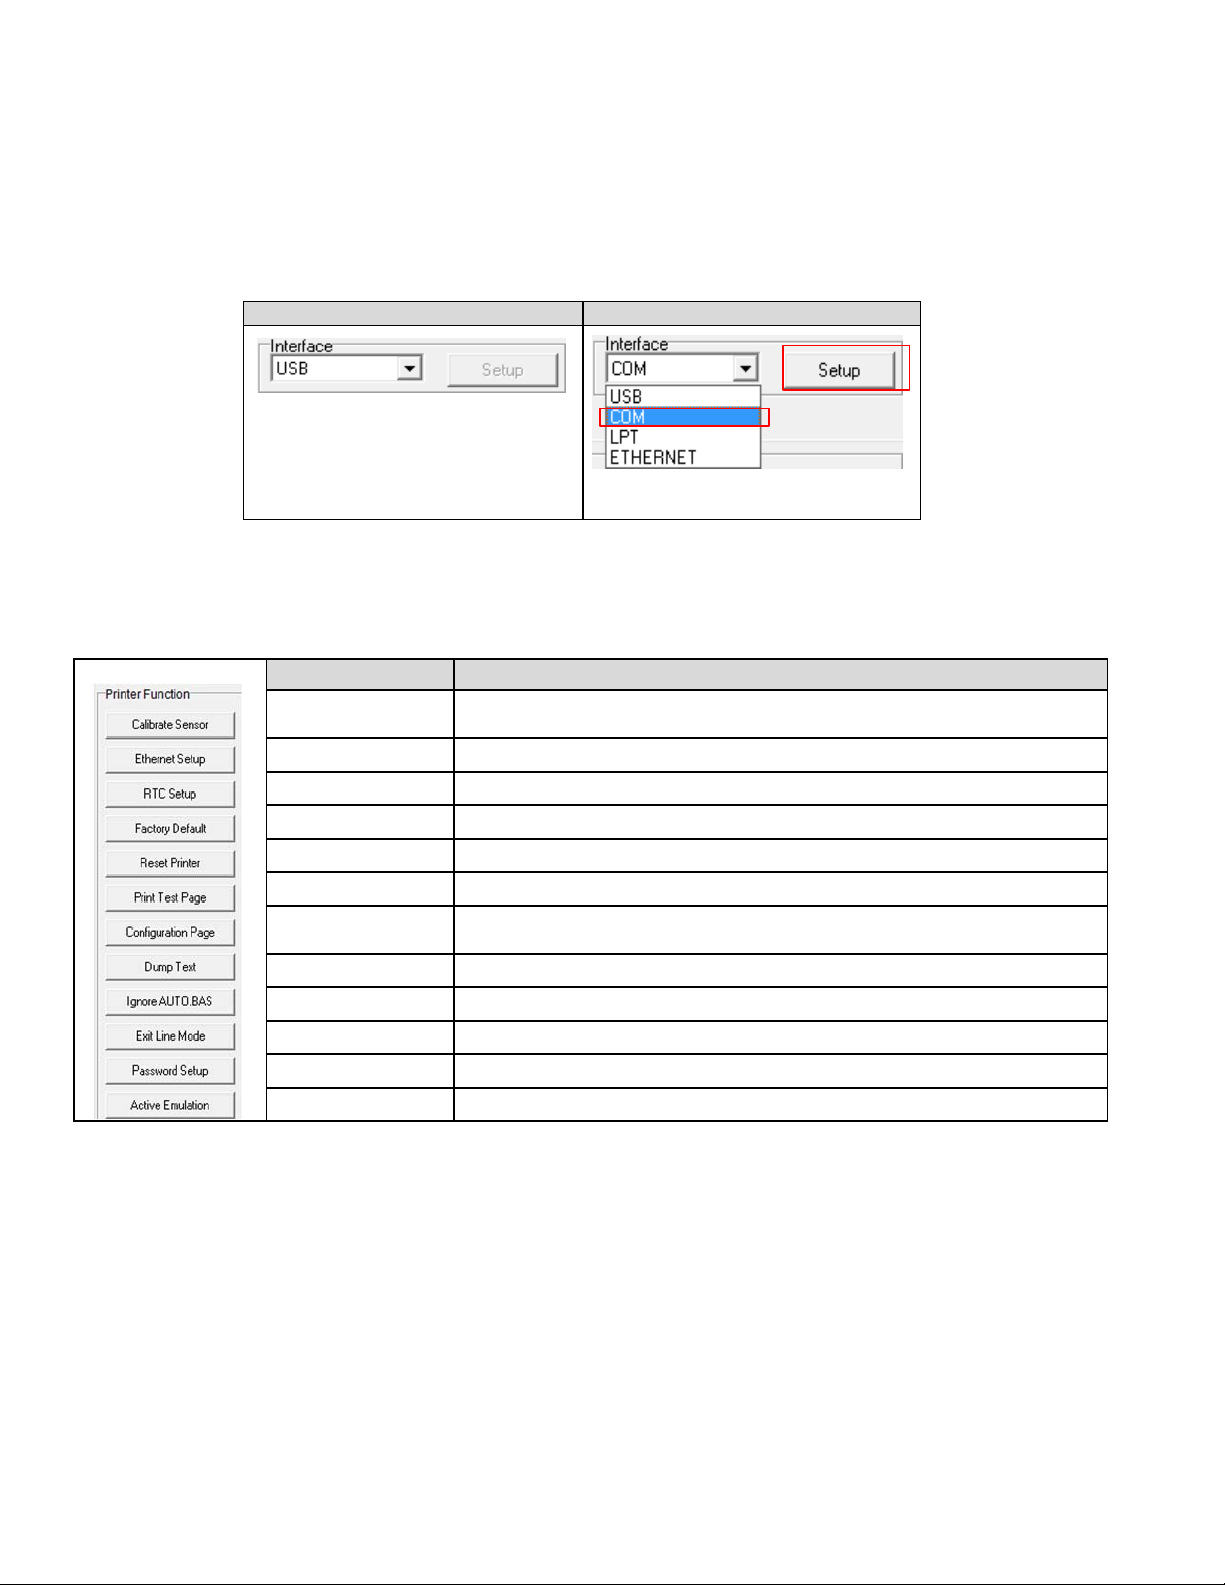
Connect the printer and computer with a USB cable.
Note: The printer connects with the computer via USB to USB cable or USB to RS-232 cable
(option).
Select the printer interface connected with bar code printer
USB to USB cable USBtoRS-232 cable
The default interface setting is USB
interface. If USB interface is
connected with printer, no other
settings need to be changed in the
interface field.
Click the “Printer Function” button to setup.
The detail functions in the Printer Function Group are listed as below.
Function Description
Calibrate Sensor
Ethernet Setup Setup the IP address, subnet mask, gateway for the on board Ethernet
RTC Setup Synchronize printer Real Time Clock with PC
Factory Default Initialize the printer and restore the settings to factory default.
Reset Printer Reboot printer
Print Test Page Print a test page
Configuration
Page
Dump Text To activate the printer dump mode.
Ignore AUTO.BAS Ignore the downloaded AUTO.BAS program
Exit Line Mode Exit line mode.
Password Setup Set the password to protect the settings
Active Emulation Select ZPL/EPL/TSPL or CPCL emulation
Calibrate the sensor specified in the Printer Setup group media sensor
field
Print printer configuration
Page 27
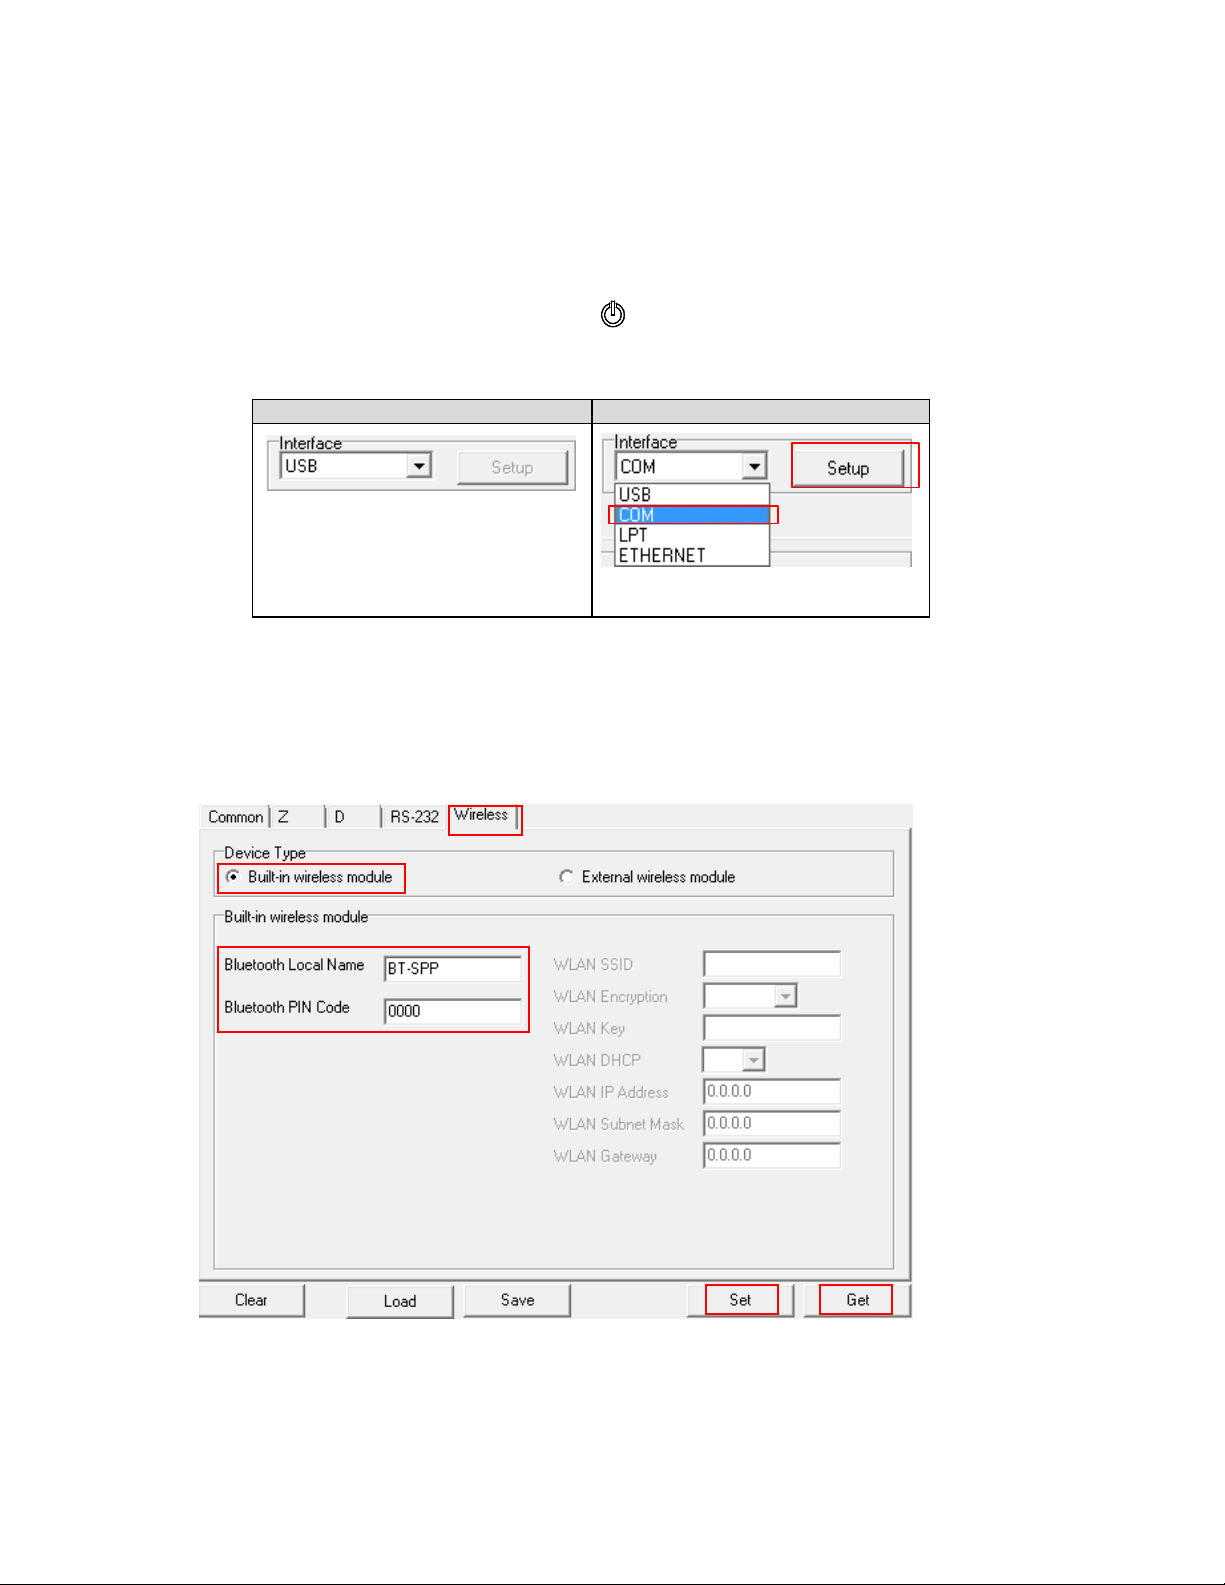
Setting Bluetooth by Configuration Utility
Connect the printer and computer with a USB cable.
Note: The printer connects with the computer via USB to USB cable or USB to RS-232 cable
(option).
Turn the printer power on using the Power key
Open Configuration Utility and set interface (default setting is USB)
USB to USB cable USBtoRS-232 cable
The default interface setting is USB
interface. If USB interface is
connected with printer, no other
settings need to be changed in the
interface field.
Select “Wireless” tab and click on “Built-in wireless module” item.
Enter the new BT Local Name or BT PIN Code in the editor.
Press “Set” button to set the new BT name or BT PIN code of the printer.
Press “Get” button to get back the settings. Make sure the Bluetooth module settings are set
properly
Page 28

Setting WiFi by Configuration Utility
Connect the printer and computer with a USB cable.
Note: The printer connects with the computer via USB to USB cable or USB to RS-232 cable
(option).
Turn the printer power on using the Power key
Open Configuration Utility and set interface (default setting is USB)
USB to USB cable USBtoRS-232 cable
The default interface setting is USB
interface. If USB interface is
connected with printer, no other
settings need to be changed in the
interface field.
Select “Wireless” tab and click on “Built-in wireless module” item.
Enter the new WLAN settings in the editor.
Press “Set” button to set the new settings to the printer.
The Wi-Fi icon will be shown in the LCD panel if the device has been connected.
Print out the self-test page to confirm if it’s connected with the correct settings.
Remove the cable to print data to test
Page 29
6
The M4L has an LCD panel to further enhance its capabilities to meet the demands of a wide
range of printing solutions. This includes an LCD control panel, 4 keys and 2 LED status
indicators.
LCD Menu Function
Using the LCD to Set the Printer
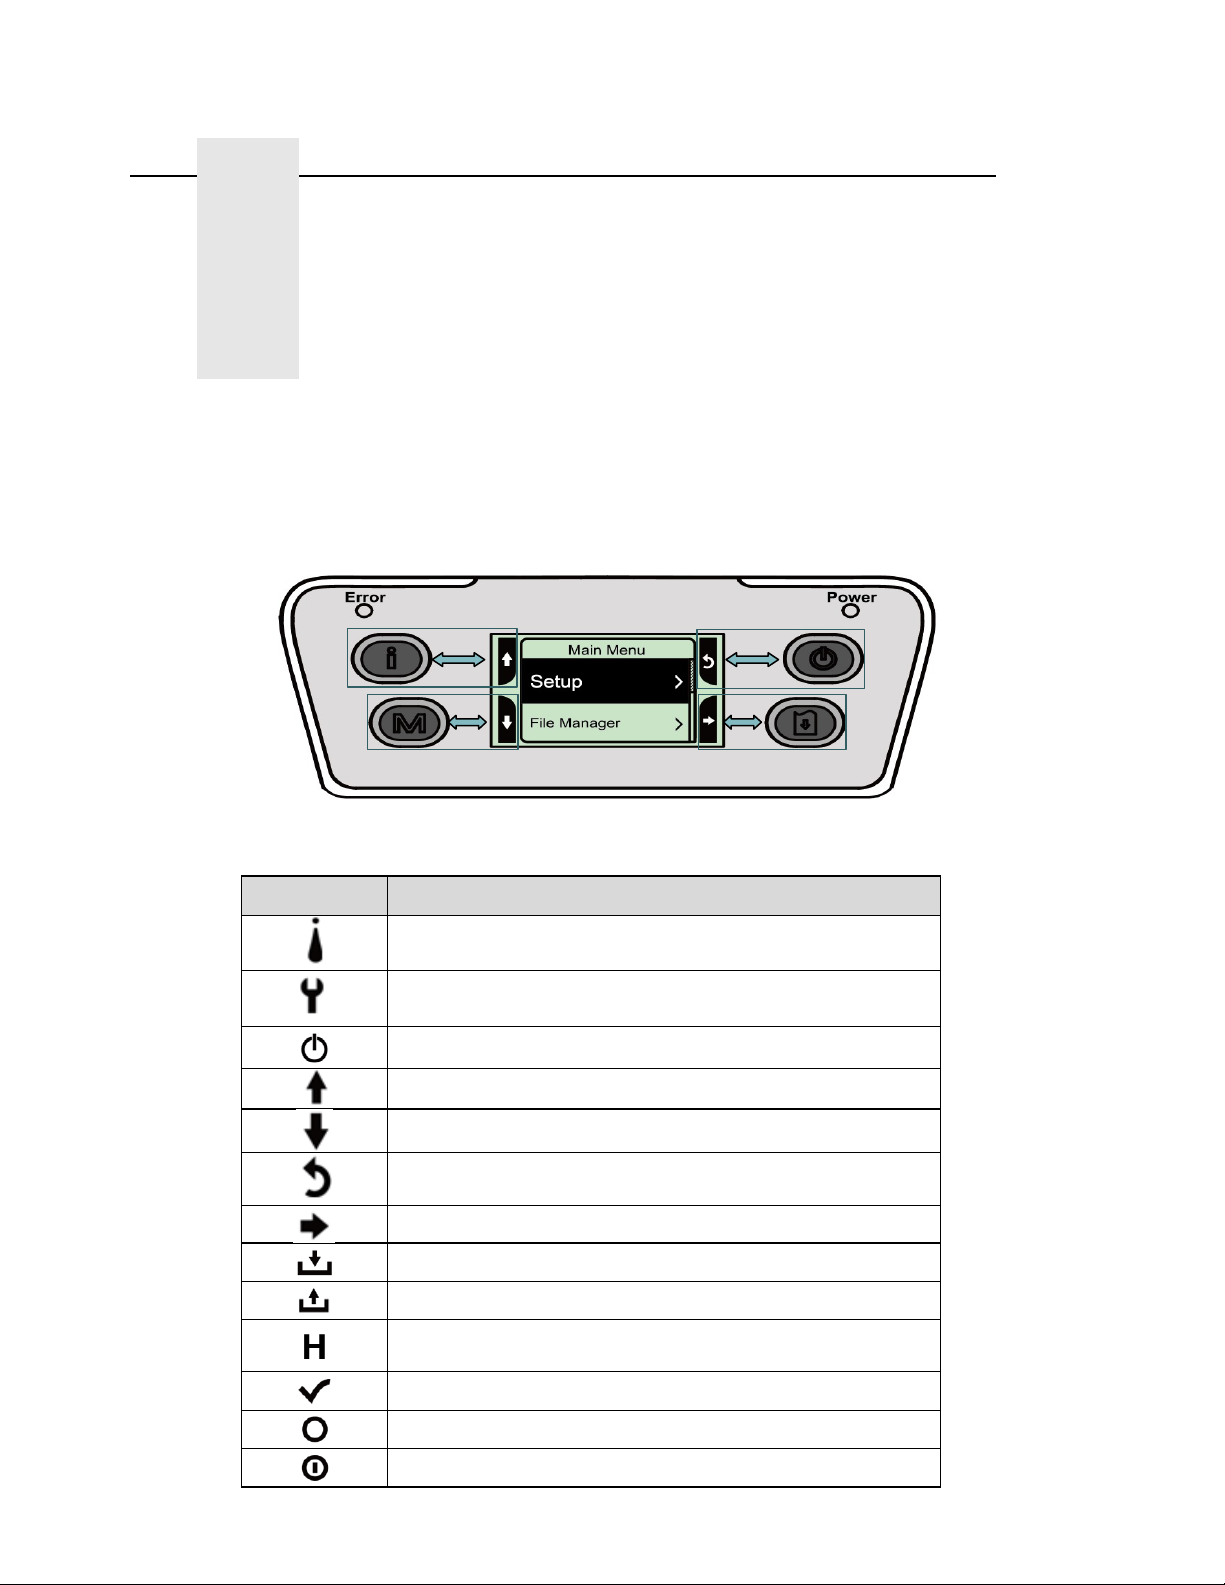
Press the “M” key to display the function menu screen as shown below
Use the 4 keys at the sides of the LCD to scroll, select, enter or return from the menu. The icon
functions are listed below.
Icon Function
Display printer information
Enter setting menu
Power switch
Scroll up
Scroll down
Return to previous menu
Enter to next menu
Enter setting mode
Exit setting mode
Save the selected settings and return to prev i ous
menu
Select
Alter to OFF
Alter to ON
Page 30
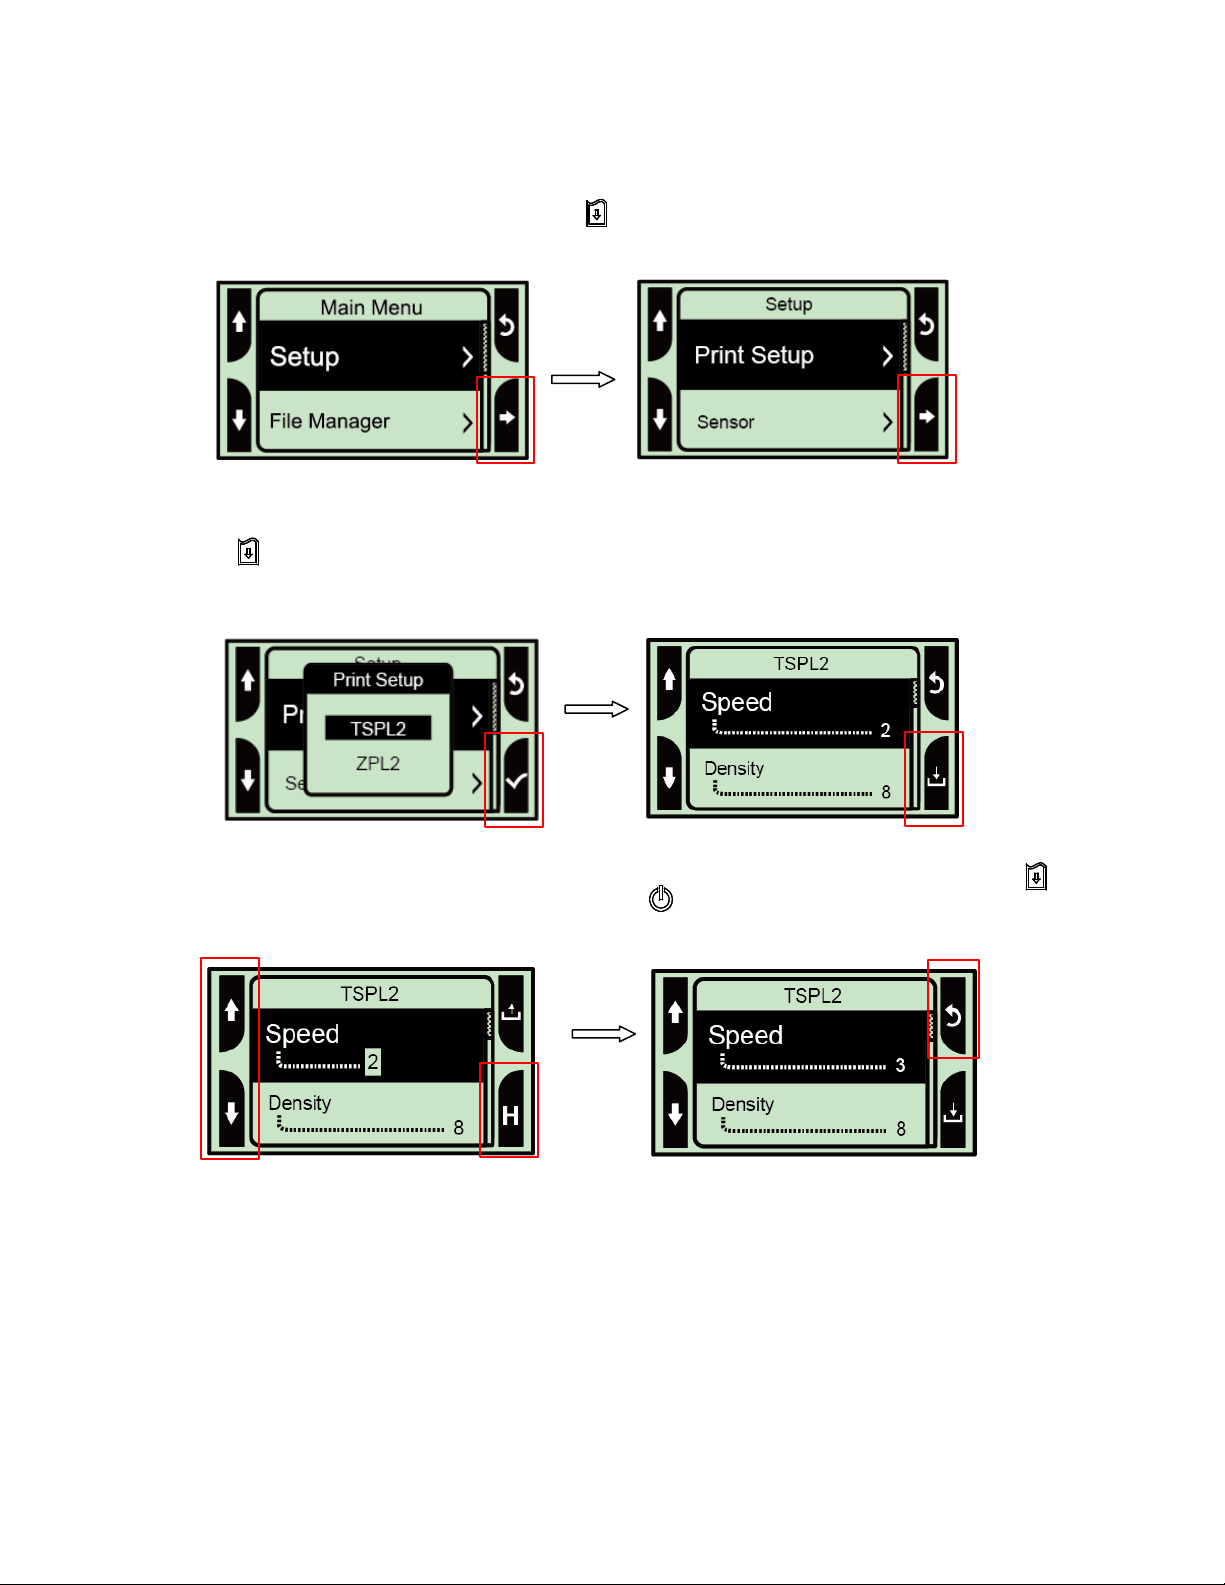
Example:
To change the Speed setting, follow the steps below:
Press “M” key to enter the Main menu. Press key to enter the “Setup” item.
Press button to enter the “Print Setup” item. Select the “TSPL2” item. Enter the “Speed” setting
mode.
At this status, you can scroll up or scroll down to select the value of print speed. Then press the
key to save the selected value into the printer. Press key to go back to “Ready mode”.
Page 31
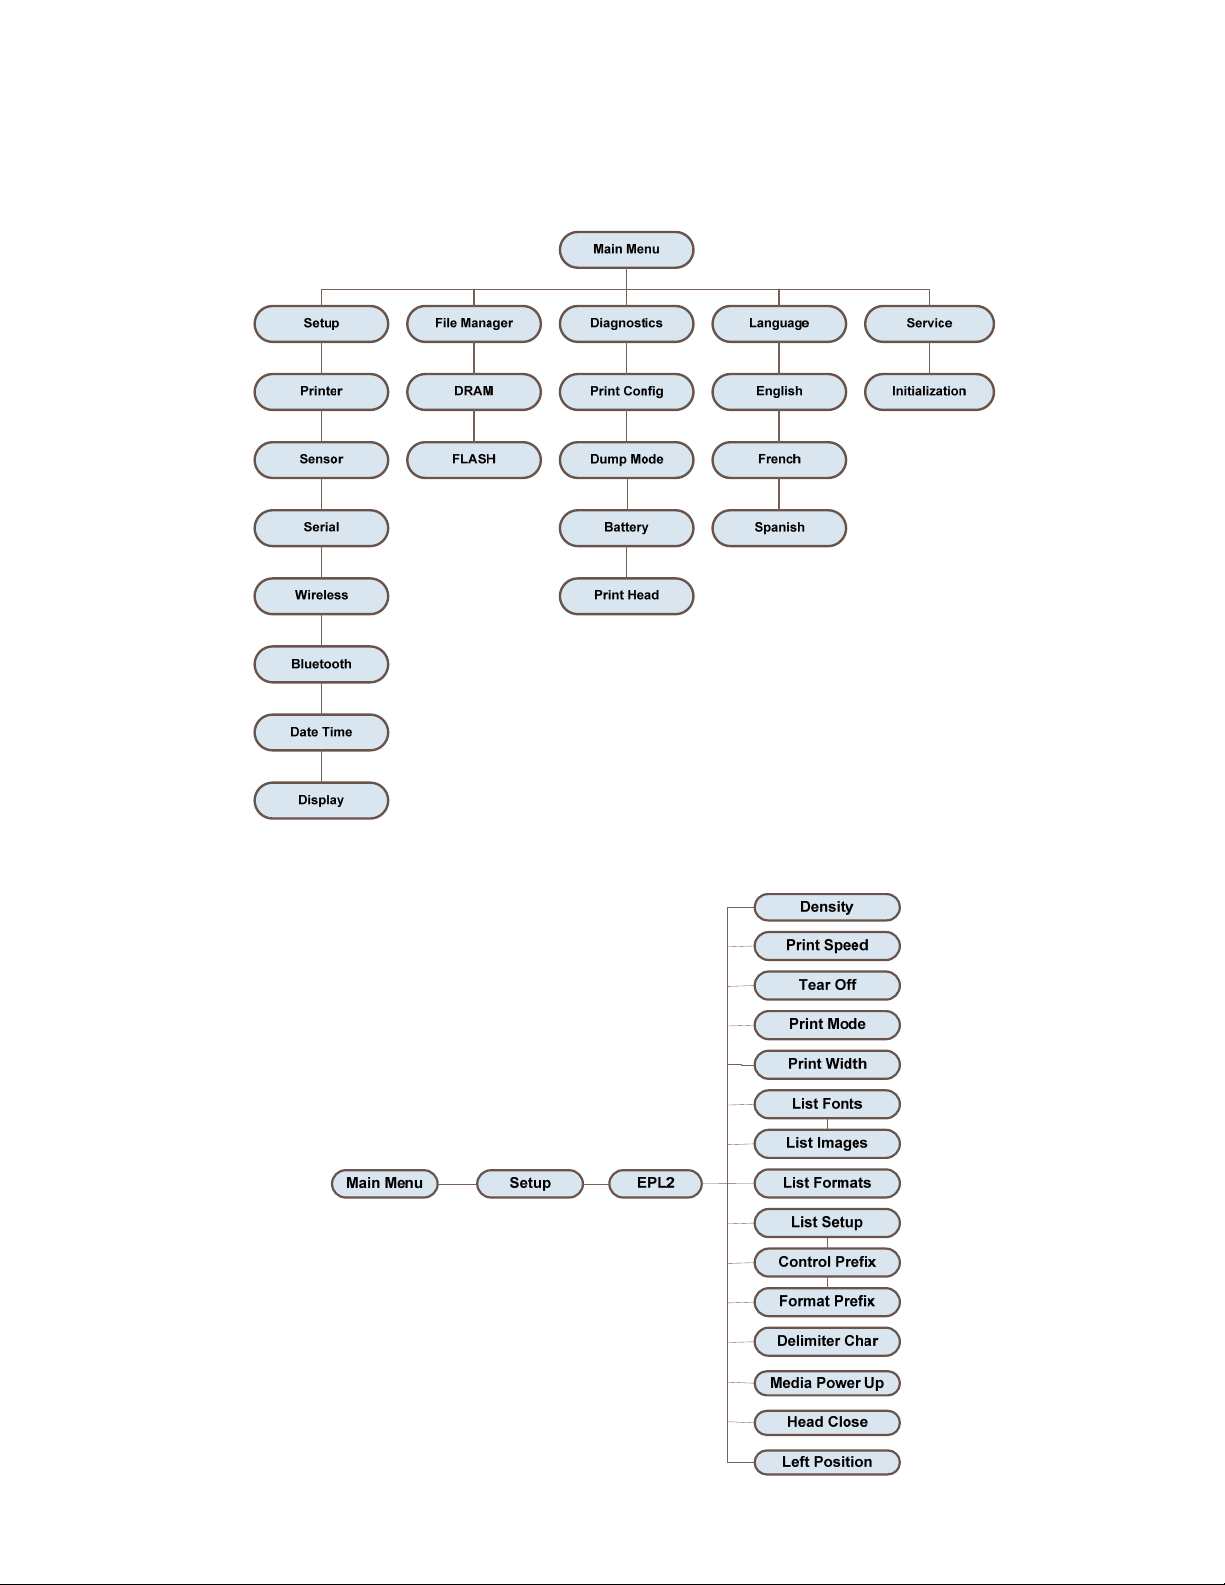
Using the LCD to Set the Printer
There are 5 categories for the main menu. You can easily set the settings of the printer without
connecting it to a computer. Please refer to the following sections for more details.
Printer Setup for EPL2
Page 32

Item Description Default
Density
Print Speed
Tear Off
Print mode
Print Width This item is used to s e t pr i nt wi d t h . Th e a v a il a b l e va lue is from “0” to “9 ”. 812
List Fonts
List Images
List Formats
List Setup This feature is used to print current printer configuration to the label. N/A
Control Prefix This feature is used to set control prefix character. N/A
Format Prefix This feature is used to set format prefix character. N/A
Delimiter Char This feature is used to set delimiter character. N/A
Use this item to setup printing darkness. The available setting is from 0 to 30, and
the step is 1. You may need to adjust your density base d on se lecte d media .
Use this item to setup print speed. The each increase or decrease is 1 ips. Available
This item is used to fine tune media stop location. Available setting value is from
This item is used to set the print mode. There are 2 modes as below,
Printer Mode Description
Tear Off Mode
Peeler Mode Enable the Label Peel Off mode
This feature is used to print current printer available fonts list to the label. The
fonts stored in the printer’s DRAM, Flash or optional memory card.
This feature is used to print current printer available images list to the label. The
images stored in the printer’s DRAM, Flash or optional memory card.
This feature is used to print current printer available formats list to the label. The
formats stored in the printer’s DRAM, Flash or optional memory card.
This option is used to set the action of the media when you turn on the printer.
setting is from 1 to 6.
“+” to “-” or “0” to “9”.
Next label top of form is aligned to the print head
burn line location
16
2
0
Tear Off
N/A
N/A
N/A
Selections Description
Media Power
Up
Head Close
Label Top
Left Position
This option is used to set the action of the media when you close the printhead
This option is used to adjust print position vertically on the label. The range is -
This option is used to adjust print position horizontally on the label. The range is -
Feed Printer will advance one label
Calibration
Length Printer will determine length and feed label
No Motion Printer will not move media
Selections Description
Feed Printer will advance one label
Calibration
Length Printer will determine length and feed label
No Motion Printer will not move media
Printer will calibrate the sensor levels, determine
length and feed label
Printer will calibrate the sensor levels, determine
length and feed label
120 to +120 dots.
9999 to +9999 dots.
No Motion
No Motion
0
0
Note: If printing from enclosed software/driver, the software/driver will send out the commands,
which will overwrite the settings set from the LCD panel
Page 33

Sensor
Item Description Default
This item is used to set the media sensor type and calibrate the
Auto Calibration
Manual Setup
Threshold This item is used to fix the calibrated sensor sensitivity. Auto
Maximum Length This item is used to set the max. Calibrate length. 152
Advanced
selected sensor. Printer will feed 2 to 3 gap labels to calibrate the
sensor sensitivity automatically.
In case “Auto Calibration” cannot apply to the media, please use
“Manual Setup” function to calibrate the sensor manually. Please
Note: You can open the media cover to move the paper but have to
close the media cover for each scan.
This item is used for pre-printed paper. If this advanced function is
turned “ON” then you can setup the min. paper and max. gap/black
mark size.
N/A
N/A
OFF
Page 34

Serial Comm.
Item Description Default
Baud Rate This item is used to set the RS-232 baud rate. 9600
Parity This item is used to set the RS-232 parity. None
Data Bits This item is used to set the RS-232 Data Bits. 8
Stop Bit(s) This item is used to set the RS-232 Stop Bits. 1
Page 35

Wireless LAN
Item Description Default
This item is used to set the operating mode of wireless local area networks
to connect devices to the networks.
Operating Mode
Scan AP This item is used to scan the access point devise N/A
DHCP
Bluetooth
Note: Infrastructure mode requires the use of an access point for this
communication to take place. Ad hoc mode involves connecting a computer
directly to another computer.
This item is used to ON or OFF the DHCP (Dynamic Host Configuration
Protocol) network protocol.
Infrastructure
ON
Item Description Default
Local Name This item is used to set the local na me for Bluetooth.
PIN Code This item is used to set the local PIN code for Bluetooth.
Date Time
Item Description Default
Date This item is used to set the date. (ex: 2013-05-30)
Time This item is used to set the time. (ex: 19:20:02)
BT-SPP
0
N/A
N/A
Page 36
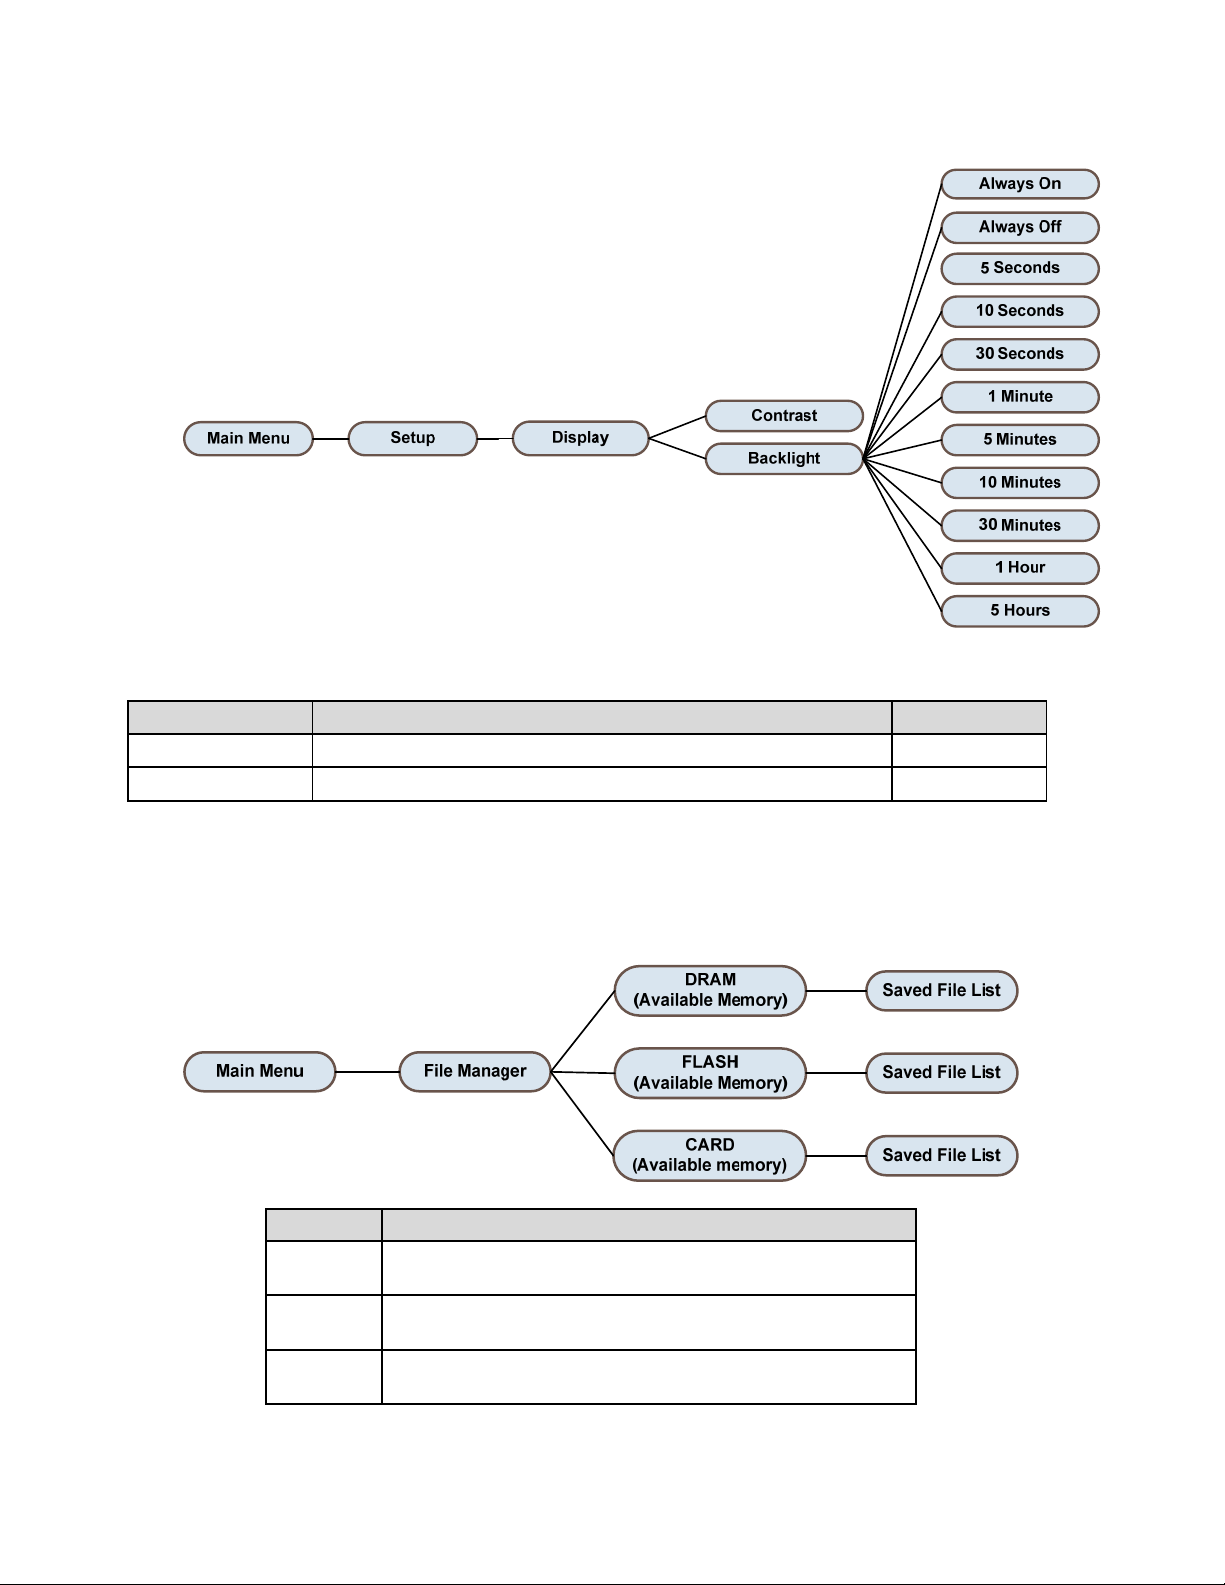
Display
Item Description Default
Contrast This item is used to set the contrast for the display. 50
Backlight T h i s i t e m is us e d to se t th e backlight time for the d i spl a y. 10 Seconds
File Manager
This feature is used to check the printer available memory and file list.
Item Description
DRAM
FLASH
CARD
Use this menu to show available memory space and run
(.BAS) the files saved in the printer DRAM memory.
Use this menu to show available memory space and run
(.BAS) the files saved in the printer Flash memory.
Use this menu to show available memory space and run
(.BAS) the files saved in the printer MicroSD card memory.
Page 37

Diagnostics
Print Config
This feature is used to print current printer configuration to the label. On the configuration printout,
there is a print head test pattern, which is useful for checking if there is any dot damage on the
printhead heater elements. Please refer to Self Test in Chapter 4 for more details.
Dump Mode
Captures the data from the communications port and prints out the data received by printer. In
Dump mode, all characters will be printed in 2 columns. (Please refer to Dump Mode in Chapter
4) The left side characters are received from your system and right side data are the
corresponding hexadecimal value of the characters. It allows users or engineers to verify and
debug the program.
Note: Dump mode requires 4” paper/label width.
Battery
This feature is used to check the printer battery voltage
Printhead
This feature is used to check the printer temperature, resistance and bad dots for the printhead.
Page 38

Display Languages
Is option is used to setup languages on LCD display
Service
This feature is used to restore printer settings to defaults. Please refer to Printer Defaults in
Chapter 4.
Note: When printer initialization is done, calibrate the gap or black mark sensor before printing or
attempting any Self Tests.
Page 39

7
The following guide lists the most common problems that may be encountered when operating this
bar code printer. If the printer still does not function after all suggested solutions have been
invoked, please contact the Printronix Customer Support Center for assistance.
Problem Possible Cause Recovery Procedure
Power indicator does not
illuminate
Not Printing
No print on the label
The printer status from the
Configuration Utility or LCD
shows “Head Open”.
The printer status from the
Configuration Utility or LCD
shows “Out of Paper”..
The printer status from the
Configuration Utility or LCD
shows “Paper Jam”.
The printer status from LCD
shows "Strong light. Press
FEED to print."
Trouble Shooting
* The battery is not properly installed. * Reinstall the battery correctly.
* The battery is out of power. * Power the printer on.
* The battery is dead. * Charge the battery.
* Check if interface cable is well connected
to the interface connector.
* Check if wireless or Bluetooth device
settings match between the host and
printer.
* The port specified in the Windows driver
is not correct.
* Labels are not loaded correctly.
* Media may be installed wrong side out.
* The wrong type paper/labels are
installed.
* The printer media cover is open or is not
closed properly.
* The printer has run out of media. * Install new media..
* The media is installed incorrectly.
* Media sensor is not calibrated.
* Media sensor is not set properly. * Calibrate the media sensor.
* Make sure media size is set properly. * Set media size correctly.
* A label may be stuck inside the printer
mechanism.
* The Peel-off sensor can’t work in strong
lighted areas.
* Replace with a new battery.
* Reset the wireless device settings.
* Select the correct printer port in the driver.
* Follow the instructions in loading the media.
* Use direct thermal type paper/labels.
* Close the media cover correctly.
* Follow the instructions for loading roll or
fanfold media.
* Calibrate the media sensor.
* Remove the stuck label from inside the
printer mechanism.
* Move the printer to a proper place to print in
peel-off mode.
Page 40

Problem Possible Cause Recovery Procedure
* Delete unused files in the memory.
* The max. number of DRAM is 256 files.
Can’t downloading the file
to memory (FLASH /
DRAM/CARD)
Poor Print Quality
Missing printing on the left
or right side of label
Gray line on the blank label
Irregular printing
* The max. user addressable memory space
* The selected memory space is full.
* Media is loaded incorrectly * Reload media correctly.
* Dust or adhesive accumulation on the
print-head.
* Print density (darkness) is not set
properly.
* Print speed is not set properly.
* Printhead element is damaged.
* Too small of label width size is setup. * Set the correct label width size.
* The print-head is dirty. * Clean the print-head.
* The platen roller is dirty.
* The printer is in Hex Dump mode. Dump
mode is displayed on the LCD panel.
of DRAM is 2048KB.
* The max. number of FLASH files is 256 files.
* The max. user addressable memory space
of FLASH is 14336KB.
* Clean the print-head.
* Clean the platen roller.
* Adjust the print density (darkness) and print
speed.
* Run the printer self-test and check the print-
head test pattern for dots missing in the
pattern.
* Change to a proper media roll.
* Clean the platen roller. Please refer to
Maintenance Chapter
* Turn the printer off and on to exit dump
mode.
Page 41

This section discusses how to maintain your printer.
Printer
PrintHead
8
1. Use one of following materials to clean the printer.
Cotton swab or authorized Printronix Thermal Printhead Cleaning Pen (203502-002)
Lint-free cloth
Vacuum / Blower brush
100% Ethanol or 99.7% Isopropyl Alcohol
2. The cleaning process is as follows:
Maintenance
Method Interval
1. Always turn off the printer before
cleaning the print head.
2. Allow the printhead to cool for a
minimum of one minute.
3. Use a cotton swab or thermal
printhead cleaning pen and 100% Ethanol
or 99.7% Isopropyl Alcohol to clean the
print head surface.
Clean the printhead prior to installing a new
label roll.
1. Turn the power off.
Platen Roller
Tear/Peel Bar
Sensor Use compressed air or vacuum Clean monthly
Exterior Wipe it with a damp cloth Clean as needed
Interior Brush or vacuum Clean as needed
2. Rotate the platen roller and wipe it
thoroughly with 100% ethanol alcohol or
99.7% isopropyl al a lint-free cloth.
Use a lint-free cloth with 100% ethanol
alcohol to wipe the Tear/Peel bar.
Clean the platen roller when changing a new
label roll
Clean as needed
Page 42

Page 43

Contact Information
A
Contact Information
Printronix Customer Support Center
IMPORTANT Please have the following information available prior to calling the Printronix
Customer Support Center:
Model number
Serial number (located on the back of the printer)
Installed options (i.e., interface and host type if applicable to the problem)
Configuration printout (Press CONFIG on the control panel, then press
ENTER)
Network test page if Ethernet is enabled.
Is the problem with a new install or an existing printer?
Description of the problem (be specific)
Good and bad samples that clearly show the problem (faxing or emailing of these samples
may be required)
Americas (714) 368-2686
Europe, Middle East and Africa (31) 24 6489 311
Asia Pacific (65) 6548 4114
China (86) 800-999-6836
Printronix Supplies Department
Contact the Printronix Supplies Department for genuine Printronix supplies.
http://www.printronix.com/support.aspx
Americas (800) 733-1900
Europe, Middle East and Africa (33) 1 46 25 19 07
Asia Pacific (65) 6548 4116
Or (65) 6548 4132
China (86) 400-886-5598
India (800) 102-7869
http://www.printronix.com/public/supplies/default.aspx
Page 44

Corporate Offices
Printronix, Inc.
15345 Barranca Parkway
Irvine, CA 92618
U.S.A.
Phone: (714) 368-2 300
Fax: (714) 368-2600
Printronix Inc.
c/o Printronix Nederland BV
Bijsterhuizen 11-38
6546 AS Nijmegen
The Netherlands
Phone: (31) 24 6489489
Fax: (31) 24 6489499
Printronix Schweiz GmbH
42 Changi South Street 1
Changi South Industrial Estate
Singapore 486763
Phone: (65) 6542 0110
Fax: (65) 6546 1588
Printronix Commercial (Shanghai) Co. Ltd
22F, Eton Building East
No.555, Pudong Av .
Shanghai City , 20 0120, P R China
Phone: (86) 400 886 5598
Fax: (86-21) 5138 0564
Visit the Printronix web site at www.printronix.com
Page 45

Page 46

B
This information was developed for prod ucts and services offered in th e U.S.A.
Printronix may not offer the products, services, or features discussed in this document in other
countries. Consult your Printronix representative for
currently available in your area. Any
not intended to state
used.
Any functionally equivalent product, program, or service that does not infringe any
Printronix intellectual property rights may be used instead. However, it is
responsibility to evaluate and verify the operation of any nonservice.
Printronix may have patents or pending patent applications cove ring subject
in this document. The furnishing of this document does not
patents. You can send license in quires, in
Printronix, Inc.
15345 Barranca Parkway
Irvine, CA 92618
The following paragraph does not apply to the United Kingdom or any other country
where such provisions are inconsistent with local law:
PRINTRONIX PROVIDES THIS PUBLICATION “AS IS” WITHOUT
KIND, EITHER EXPRESS OR IMPLIED, INCLUDING,
WARRANTIES OF NONPARTICULAR
PURPOSE. Some states do not allow disclaimer of express or implied
transactions, therefore, this statement may not apply to
This information could include technical inaccuracies or typographi cal errors. Changes are
periodically made to the information herein; these changes will
of the publication. Printronix may make
described in this publication
Any references in this information to non-Printronix Web sites are p rovided for
and do not in any manner serve as an endorsement of
Web sites are not part of the
at your own
Any performance data contained herein was determined in a controlled environment.
Therefore, the results obtained in other op erating environments
Some measurements may have been m ade on
guarantee that t hese
Furthermore,
results may vary. Users of this document should verify the applicable data for their specific
environment.
Information concerning non-Printronix products was ob tained from the
products, their published anno uncements or other pub licly
U.S.A.
risk.
some measurement may have been estimat ed through extrapolat ion. Actual
Notices
information on the produ cts and services
reference to an Printronix product, program, or service is
or imply that only that Printronix product, program, or service may be
the user’s
Printronix product, program, or
matter described
give you any license to these
writing, to:
WARRANTY OF ANY
BUT NOT LIMITED TO, THE IMPLIED
INFRINGEMENT, MERCHANTABILITY OR FITNESS FOR A
warranties in certain
you.
be incorporated in new editions
improvements and/or changes in the product(s)
at any time without notice.
convenience only
those Web sites. The materials a t those
materials for this Printronix product and use of those Web sites is
may vary significantly.
development-level sy stems and there is no
measurements will be the same on generally available systems.
suppliers of those
available sources. Printronix has
Page 47

not tested those products and cannot
any other claims related
Printronix
products should be addressed to the suppliers of those products.
to non-Printronix products. Questions on the capabilities of non-
confirm the accuracy of performance, compatibility or
Printronix encourages owners of information technology (IT) equipment to responsibly
recycle their equipment when it is no longe r needed. Printronix
and services to assist equipment owners in
product recycling offerings
can be found on Printronix’s Internet site at
recycling their IT products. Information on these
offers a variety of programs
http://www.printronix.com.
If you are viewing this information softcopy, the photographs and color
illustrations may not
appear.
For online versions of this book, we au thorize you to:
• Copy, modify, and print the documentation contained on the me dia, for
enterprise, provided you repro duce the copyright not ice,
other required statements on each copy or
partial copy.
all warning statements, and
• Transfer the original unalter ed copy of the documentation when you
Printronix product (which may be either machines you
program’s license terms permit a transfer). You
other copies of the docum entat ion.
own, or programs, if the
must, at the same time, destroy all
use within your
transfer the related
You are responsible for payment of a ny taxes, including personal pr operty taxes, resulting
from this authorization.
Your failure to comply with the terms above terminates this authorization. Upon
termination, you must destroy your machine readable documentation.
Page 48

Communication Statements
FEDERAL COMMUNICATIONS COMMISSION (FCC) STATEMENT
This equipment has been tested and found to comply with the limits for a Class B digital device,
pursuant to part 15 of the FCC Rules. These limits are designed to provide reasonable protection
against harmful interference in a residential installation. This equipment generates, uses and can
radiate radio frequency energy and, if not installed and used in accordance with the instructions, may
cause harmful interference to radio communications. However, there is no guarantee that
interference will not occur in a particular installation. If this equipment does cause harmful
interference to radio or television reception, which can be determined by turning the equipment off
and on, the user is encouraged to try to correct the interference by one or more of the following
measures:
Reorient or relocate the receiving antenna.
Increase the separation between the equipment and receiver.
Connect the equipment into an outlet on a circuit different from that to which the receiver is
connected.
Consult the dealer or an experienced radio/ TV technician for help.
CAUTION:
Any changes or modifications not expressly approved by the grantee of this device could void the user's
authority to operate the equipment.
This device complies with Part 15 of the FCC Rules. Operation is subject to the following two conditions:
This device may cause harmful interference, and
This device must accept any interference received, including interference that may cause undesired
operation.
RF exposure warning (WiFi)
This equipment must be installed and operated in accordance with provided instructions and must not be
co-located or operating in conjunction with any other antenna or transmitter. End-users and installers must
be providing with antenna installation instructions and transmitter operating conditions for satisfying RF
exposure compliance.
SAR Value: 0.663 W/kg
RF exposure warning (For Bluetooth)
The equipment complies with FCC RF exposure limits set forth for an uncontrolled environment. The
equipment must not be co-located or operating in conjunction with any other antenna or
transmitter.
Battery safety warning:
DO NOT throw the battery in fire.
DO NOT short circuit the contacts.
DO NOT disassemble the battery.
DO NOT throw the battery in municipal waste. Contact your loc al waste a gency fo r the c orrect di sposal
procedure
CAUTION: Danger of explosion if battery is incorrectly replaced. Replace only with the same or
equivalent type recommended by the manufacturer. Dispose of used batteries according to the
manufacturer’s instructions
The symbol of the crossed out wh eeled bin indic ates that the ba ttery shoul d not be placed in municipal waste .
Page 49

CE Notice (European Union)
Marking by the CE symbol indicates c omplia nce to th e EMC directive and Lo w Voltage Directiv e of the
European Union. Such markin g is indi cative that this s ystem me ets the following technica l standa rds:
EN 55022 “Limits and Methods of Measurement of Radio Interf erence Cha racteris tics of In formation
Technology Equipment.”
EN 55024 “Electromagnetic Immunity Requirements for Information Technology Equipment”
EN 60950 “Safety of Information Technology Equipment”
EN 300328, EN 301489 “Electromagnetic Compatibility and Radio spectrum Matters’
Konformitätserklärung:
FCC Klasse B entspricht EMVG Klasse B
Für alle in Deutschland vertriebenen EN 55022 Klasse B Geräte:
Zulassungsbescheinigung laut dem Deutschen Gesetz über die elektromagnetische Verträglichkeit
von Geräten (EMVG) vom 18. September 1998 (bzw. der EMC EG Richtlinie 89/336):
Dieses Gerät ist berechtigt in Übereinstimmung mit dem Deutschen EMVG das EG-
Konformitätszeichen - CE - zu führen. Verantwortlich für die Konformitätserklärung nach Paragraph 5
des EMVG ist die:
Printronix Deutschland GmbH
Goethering 56
D-63067 Offenbach
Deutschland
Informationen in Hinsicht EMVG Paragraph 4 Abs. (1) 4:
Das Gerät erfüllt die Schutzanforderungen nach EN 55024 u nd EN 55022 Klasse B.
EN 55022 Klasse B Geräte müssen mit folgendem Warnhinweis versehen werden: “Warnung: dies
ist eine Einrichtung der Klasse B. Diese Einrichtung kann im Wohnbereich Funkstörungen
verursachen. In diesem Fall kann vom Betreiber verlangt werden, angemessene Maßnahmen
durchzuführen und dafür aufzukommen.”
EN 55024 Hinweis:
Wird dieses Gerät in einer industriellen Umgebung betrieben (wie in EN 55024 festgelegt), dann kann
es dabei eventuell gestört werden. In solch einem Fall ist der Abstand bzw. die Abschirmung zu der
industriellen Störquelle zu vergrößern.
Anmerkung:
Um die Einhaltung des EMVG sicherzustellen sind die Geräte, wie in den Printronix Handbüchern
angegeben, zu installieren und zu betreiben.
Konformitätsklassen:
CE: EN 55022/24, IEC 61000-3-3, IEC 61000-3-2, EN 300328, EN 301489
EN 60950-1 durchgeführt von TÜV SÜD
Wichtige Sicherheits-Hinweise
1. Bitte lesen Sie die Hinweis sorgfältig durch.
2. Heben Sie diese Anleitung für den späteren Gebrauch auf.
3. Vor jedem Reinigen ist das Gerät vom Stromnetz zu trennen. Verwenden Sie keine Flüssig-ode r
Aerosolreiniger. Am besten eignet sich ein angefeuchtetes Tuch zur Reinigung.
4. Die Netzspannungs-Steckdose soll nahe dem Gerät angebracht und leicht zugängli ch sein.
5. Das Gerät ist vor Feuchtigkeit zu schützen.
6. Bei der Aufstellung des Gerätes ist auf sicheren Stand zu achten. Ein Kippen oder Fallen könnte
Beschädigungen hervorrufen.
7. Beachten Sie beim Anschluss ans Stromnetz die Anschlusswerte.
8. Dieses Gerät kann bis zu einer Außentemperatur von maximal 40¬Ԩ betrieben werden.
Page 50

Batterie-Sicherheitshinweis:
Batterie nicht in offenes Feuer werfen.
Batterie nicht kurzschließen.
Batterie nicht zerlegen.
Batterie nicht über den Hausmüll entsorgen.
Auf fachgerechte Entsorgung achten (Kennzeichnung durch durchgestrichene Mülltonne).
Achtung!
Explosionsgefahr bei unsachgemäßem Austausch der Batterie. Ersatz nur durch Original- oder
vom Hersteller empfohlenen Typ. Entsorgung gebrauchter Batterien nach Angaben des
Herstellers durchführen.
Page 51

Software License Agreement
Your printer contains, among other software, Printronix operating so ftware
including, but not limited to the Embedded Configura ble Operating System
(the “eCos Software”) as embedded software. The terms of this Agreement
apply only to the eCos Software, and all other embedded software supplied
with the printer. You accept the terms of this Agree men t by your initi al use of
your printer.
eCos License
This file is part of eCos, the Embedded Configurable Operating System.
Copyright (C) 1998, 1999, 2000, 2001, 2002 Red Hat, Inc.
eCos is free software; you can red istribut e it and/or modify it under the terms
of the GNU General Public License as pu blished by the Free Softwa re
Foundation; either version 2 or (a t your option) an y later ver sion.
You should have received a copy of the GNU General Public Licen se along
with eCos; if not, write to the Free Software Foundation, Inc., 59 Temple
Place, Suite 330, Boston, MA 02111-1307 USA.
eCos is distributed in the hope that it will be useful, but WITHOUT ANY
WARRANTY; without even the implied warranty of MERCHANTABILITY or
FITNESS FOR A PARTICULAR PURPOSE. See the GNU General Public
License for more details.
As a special exception, if other files instantiate templates or use macros or
inline functions from this file, or you compile this file and link it with other
works to produce a work base d on this file, this file d oes not by itself cau se
the resulting work to be covered by the GNU General Public Li cense.
However the source code for this file must still be made available in
accordance with section (3) of the GNU General P ublic License.
This exception does not invalidate any other reasons why a work based on
this file might be covered by the GNU General Public Li cense.
Alternative licenses for eCos may be arranged by contactin g Red Hat, Inc. at
http://sources.redhat.com/ecos/ecos-license/
Page 52

GNU GENERAL PUBLIC LICENSE
Version 2, June 1991
Copyright (C) 1989, 1991 Free Software Foundatio n, Inc., 51 Franklin Street,
Fifth Floor, Boston, MA 02110-1301 USA Everyone is permitted to copy and
distribute verbatim copies of this license document, but changing it is not
allowed.
Preamble
The licenses for most software are desig ned to take a way your freedom to
share and change it. By contrast, the GNU General Public License is intended
to guarantee your freedom to share and change free software--to make sure
the software is free for all its users. This General Public License applie s to
most of the Free Software Foundation 's software and t o any other program
whose authors commit to using i t. (Some other Free S oftware Fou ndation
software is covered by the GNU Lesser General Public License instead.) You
can apply it to your programs, too.
When we speak of free software, we are referring to freedom, not price. Our
General Public Licenses are designed to ma ke sure th at you have the
freedom to distribute copies of fre e software (and charge for thi s service if you
wish), that you receive source code or ca n get it if you want it, that you can
change the software or use pieces of it in new fre e prog rams; and th at you
know you can do these things.
To protect your rights, we need to make restrictions that forbid anyone to deny
you these rights or to ask you to surren der the rig hts. These restrict ions
translate to certain responsibilities for you if you distribute copies of the
software, or if you modify it.
For example, if you distribute copies of such a p rogram, whether grat is or for
a fee, you must give the recipients all th e rights that you have. You must make
sure that they, too, receive or can get the source co de. And you must show
them these terms so they know their rights.
We protect your rights with two steps: (1) copyright the software, and (2) offer
you this license which gives you legal permission to copy, distribute and/or
modify the software.
Also, for each author's protection and ours, we want to make certain that
everyone understands that there is no warranty for this free software. If the
software is modified by someone e lse and pas sed on, we want its recipients
to know that what they have is not the original, so that any probl ems
introduced by others will not reflect on the original authors' reputation.
Finally, any free program is threatened constantly by software patents. We
wish to avoid the danger that redistributors of a free program will individually
obtain patent licenses, in effect making the program proprietary. To prevent
this, we have made it clear that any patent must be licensed for everyone's
free use or not licensed at all.
Page 53

Page 54

The precise terms and conditions for copying, distribution, and modification
follow.
GNU GENERAL PUBLIC LICENSE
TERMS AND CONDITIONS FOR COPYING, DISTRIBUTION, AND
MODIFICATION
This License applies to any progr am or other wo rk which contain s a notice
placed by the copyright holder saying it may be distribu ted under the terms of
this General Public License. The "Program", below, refers to any such
program or work, and a "work based on the Program" mean s either the
Program or any derivative work under copyright law: that is to say, a work
containing the Program or a portion of it, either verbatim or with modifications
and/or translated into another language. (Hereinafter, translation is included
without limitation in the term "modification".) Each licen see is addressed as
"you".
Activities other than copying, distribution and m odification are not covered by
this License; they are outside its scope. The act o f running the Program is not
restricted, and the output fro m the Progra m is covere d only i f its content s
constitute a work based on the Program (independent of having bee n made
by running the Program). Whether th at is true depend s on what the Progra m
does.
1.
You may copy and distribute verbatim copies of the Program's sour ce
code as you receive it, in any medium, provided that you con spicuously
and appropriately publish on each copy an appropriate copyright notice
and disclaimer of warranty; keep intact all the notice s that refer t o this
License and to the absence of any warranty; and give any other recipients
of the Program a copy of this License along with the Program.
You may charge a fee for the physical a ct of transfer ring a copy, and you
may at your option offer warranty protection in exchange for a fee.
2.
You may modify your copy or copies of th e Program or any portion of it,
thus forming a work based on the Program, and copy and distrib ute such
modifications or work under the terms of Se ction 1 ab ove , provid ed that
you also meet all of these conditions:
a.
You must cause the modified files t o carry prominent notices
stating that you changed the files and the date of any change.
b.
You must cause any work that you distribute or publish, that in
whole or in part contains or is derived from the Program or any part
thereof, to be licensed as a whole at no charge to all th ird pa rties
under the terms of this License.
c.
If the modified program normally reads command s interactively
when run, you must cause it, when started running for such
interactive use in the most ordinary way, to print or display an
announcement including an appropriate copyrigh t notice and a notice
that there is no warranty (or else , saying that you provid e a warranty)
and that users may redistribute the prog ram under the se conditions,
and telling the user how to view a copy of this License. (Exception: if
the Program itself is interactive but does not normally print such an
announcement, your work based on the Program is not required to
print an announcement.)
Page 55

These requirements apply to the modified wor k as a whole. If identifiable
sections of that work are not deriv ed fro m the P rogra m, and can b e
reasonably considered independent and separate works in themselves,
then this License, and its terms, do not apply to those sections when you
distribute them as separate works. But when you distribute the same
sections as part of a whole which is a work base d on the Prog ram, the
distribution of the whole must be on the terms of this Licen se, whose
permissions for other licen sees extend t o the entire whole, an d thus to
each and every part regardless of who wrote it.
Thus, it is not the intent of this section to claim rights or contest your rights
to work written entirely by you; rather, the intent is t o exercis e the rig ht to
control the distribution of derivative or collective works based on the
Program.
In addition, mere aggregation of another work not based on the Prog ram
with the Program (or with a work based on the Program) on a volume of a
storage or distributi on medium doe s not bring the othe r work under th e
scope of this License.
3.
You may copy and distribute the Progra m (or a wor k based on it, under
Section 2) in object code or executable form under the terms of Sections
1 and 2 above provided that you also do one of the f ollowing:
a.
Accompany it with the complete corresponding machin e-readable
source code, which must be distributed under the terms of Sections 1
and 2 above on a medium customarily used for software inter change;
or,
b.
Accompany it with a written offer, valid for at least three years, to give
any third party, for a charge no more than your cost of physically
performing source di stributi on , a complete machine-readable co py of
the corresponding source code, to be distributed under the terms of
Sections 1 and 2 above on a medium customarily used for software
interchange; or,
c.
Accompany it with the informat ion you re ceived as to t he offer to
distribute corresponding sou rce code. (This alternative is allowed
only for noncommercial distribution and only if you received the
program in object code or executable form with such an offer, in
accord with Subsection b above.)
The source code for a work m eans the pre ferred form of the wo rk for
making modifications to it. For an executable work, complete source
code means all the source code for all modules it contai ns, plus any
associated interface definition files, plus the scripts used to co ntrol
compilation and installation of the executable. However, as a special
exception, the source code distri buted need not include anything that
is normally distributed (in either source or binary fo rm) with the major
components (compiler, kernel, and so on) of the operating system on
which the executable runs, unless that component itself accompanies
the executable.
Page 56

If distribution of executable or object code is made by offering access
to copy from a designated place, then offering eq uivalent acce ss to
copy the source code from the same place counts as distribution of
the source code, even though third parties are not compelled to copy
the source along with the object cod e.
4.
You may not copy, modify, sublicense, or distribut e the Program except
as expressly provided under this License. Any attempt otherwise to copy,
modify, sublicense or distribute the Program is void, and will automatically
terminate your rights under this Licen se. However, parties who hav e
received copies, or rights, from you under this License will not have their
licenses terminated so long as such parties remain in full compliance.
5.
You are not required to accept this License, since you have not signed it.
However, nothing else grants you permission to modify or distribute the
Program or its derivative works. These actions are prohibited by law if you
do not accept this License. Therefore, by modifying or distribut ing the
Program (or any work based on the Program), you indicate your
acceptance of this License to do so, and all its terms and conditions for
copying, distributing or modifying the Program or wor ks based on it.
6.
Each time you redistribute the Program (or any work based on the
Program), the recipient automatically receives a license from the original
licensor to copy, distribute or modify the Program subject to these terms
and conditions. You may not impose any further restrictions on the
recipients' exercise of the rights granted herein. You a re not responsib le
for enforcing compliance by third parties to this License.
7.
If, as a consequence of a court judgment or allegation of patent
infringement or for any other reason (not limited to patent issues),
conditions are imposed on you (whether by court orde r, agreement or
otherwise) that contradict the conditions of this License, they do not
excuse you from the conditions of this License. If you cannot distribute so
as to satisfy simultaneously your obligations under this License and any
other pertinent obligations, then as a consequ ence you may not distribute
the Program at all. For example, if a pate nt license would not perm it
royalty-free redistribution of the Program by all those who receive copies
directly or indirectly through you, then the only way you could sa tisfy both
it and this License would be to refrain entirely from distri bution o f the
Program.
If any portion of this section is held invalid o r unenforc eable under any
particular circumstance, the balance of the section is intended to apply
and the section as a whole is intended to apply in other circumstan ces.
It is not the purpose of this section to induce you to infringe any patents or
other property right claims or to contest validity of any such claims; this
section has the sole purpose of protecting the integrity of the fre e
software distribution system, which is implemented by public licen se
practices. Many people have made generous contribution s to the wide
range of software distributed throug h that system in reliance on consistent
application of that system; it is up to the author/donor to decide if h e or
she is willing to distribute software through any other system and a
licensee cannot impose that choice.
This section is intended to make thoroughly clear what is believed to be a
consequence of the rest of this License.
Page 57

8.
If the distribution and/or use of the Program is restrict ed in certain
countries either by patents or by copyrighted interfaces, the original
copyright holder who places the Program under this License may add an
explicit geographical distribution limitation excluding th ose countries, so
that distribution is permitted only in or among countries not thus excluded.
In such case, this License incorporates the limitation as if written in the
body of this License.
9.
The Free Software Foundation may publish revised a nd/or new ver sions
of the General Public License from time to time. Such new versions will
be similar in spirit to the present version, but may differ in detail to
address new problems or concerns.
Each version is given a distinguishing version number. If the Program
specifies a version number of this License which a pplies to it an d "any
later version", you have the option of following the te rms and con ditions
either of that version or of any l ater version publish ed by the Free
Software Foundation. If the Program does not specify a version number
of this License, you may choose any version ever publishe d by the Free
Software Foundation.
10.
If you wish to incorporate parts of the Program into other free p rograms
whose distribution conditions are different, write to the author to ask for
permission. For software which is copyrighted by the Free Softwa re
Foundation, write to the Free Software Foundation; we sometimes make
exceptions for this. Our decision will be guided by the two goals of
preserving the free status of all derivatives of our free software and of
promoting the sharing and reuse of software gen erally.
NO WARRANTY
11.
BECAUSE THE PROGRAM IS LICENSED FREE OF CHARGE, THERE
IS NO WARRANTY FOR THE PROGRAM, TO THE EXTENT
PERMITTED BY APPLICABLE LAW. EXCEPT WHEN OTHERWISE
STATED IN WRITING THE COPYRIGHT HOLDERS AND/OR OTHER
PARTIES PROVIDE THE PROGRAM "AS IS" WITHOUT WARRANTY
OF ANY KIND, EITHER EXPRESSED OR IMPLIED, INCLUDING, BUT
NOT LIMITED TO, THE IMPLIED WARRANTIES OF
MERCHANTABILITY AND FITNESS FOR A PARTICULAR PURPOSE.
THE ENTIRE RISK AS TO THE QUALITY AND PERFORMANCE OF
THE PROGRAM IS WITH YOU. SHOULD THE PROGRAM PROVE
DEFECTIVE, YOU ASSUME THE COST OF ALL NECESSARY
SERVICING,
Page 58

REPAIR OR CORRECTION
12.
IN NO EVENT UNLESS REQUIRED BY APPLICABLE LAW OR
AGREED TO IN WRITING WILL ANY COPYRIGHT HOLDER, OR ANY
OTHER PARTY WHO MAY MODIFY AND/OR REDISTRIBUTE THE
PROGRAM AS PERMITTED ABOVE, BE LIABLE TO YOU FOR
DAMAGES, INCLUDING ANY GENERAL, SPECIAL, INCIDENTAL OR
CONSEQUENTIAL DAMAGES ARISING OUT OF THE USE OR
INABILITY TO USE THE PROGRAM (INCLUDING BUT NOT LIMITED
TO LOSS OF DATA OR DATA BEING RENDERED INACCURATE OR
LOSSES SUSTAINED BY YOU OR THIRD PARTIES OR A FAILURE OF
THE PROGRAM TO OPERATE WITH ANY OTHER PROGRAMS),
EVEN IF SUCH HOLDER OR OTHER PARTY HAS BEEN ADVISED OF
THE POSSIBILITY OF SUCH DAMAGES.
END OF TERMS AND CONDITIONS
Artifex Portions Software Copyright Notices
Portions Copyright © 2001/2009 Artifex Software Inc.
This software is based in part on the work of the Independent JPEG Group.
Portions Copyright © 1998 Soft Horizons.
All Rights Reserved.
BSD License
Portions of this software may have been derived from OpenBSD, FreeBSD or
other sources, and are covered by the approp riate copyrigh t disclaimers
included herein.
Portions created by Red Hat are Cop yright (C) 2002 Red Hat, Inc. All Rights
Reserved.
Copyright (c) 1982, 1986, 1988, 1990, 1993, 1994, 1995
The Regents of the University of Californi a. All rights reserved.
Redistribution and use i n source and bina ry forms, with or without
modification, are permitted provided that the following conditions are met:
1.
Redistributions of source code m ust retain the above copyright no tice,
this list of conditions and the following disclaimer.
2.
Redistributions in binary form must repro duce the above copyright notice,
this list of conditions and the following disclaimer in the documentation
and/or other materials provided with the distribution.
3.
All advertising materials mentioning features or use of this software must
display the following acknowledgement: This product includes software
developed by the University of California, Berkeley and its contributors.
4.
Neither the name of the University nor the names of i ts contribu tors may
be used to endorse or promote products derive d from this software
without specific prior written permission.
Page 59

THIS SOFTWARE IS PROVIDED BY THE REGENTS AND
CONTRIBUTORS “AS IS'' AND ANY EXPRESS OR IMPLIED
WARRANTIES, INCLUDING, BUT NOT LIMITED TO, THE IMPLIED
WARRANTIES OF MERCHANTABILITY AND FITNESS FOR A
PARTICULAR PURPOSE ARE DISCLAIMED. IN NO EVENT SHALL THE
REGENTS OR CONTRIBUTORS BE LIABLE FOR ANY DIRECT,
INDIRECT, INCIDENTAL, SPECIAL, EXEMPLARY, OR CONSEQUENTIAL
DAMAGES (INCLUDING, BUT NOT LIMITED TO, PROCUREMENT OF
SUBSTITUTE GOODSOR SERVICES; LOSS OF USE, DATA, OR
PROFITS; OR BUSINESS INTERRUPTION) HOWEVER CAUSED AND ON
ANY THEORY OF LIABILITY, WHETHER IN CONTRACT, STRICT
LIABILITY, OR TORT (INCLUDING NEGLIGENCE OR OTHERWISE)
ARISING IN ANY WAY OUT OF THE USE OF THIS SOFTWARE, EVEN IF
ADVISED OF THE POSSIBILITY OF SUCH DAMAGE.
Page 60

I
Battery,35
Bluetooth,33
CableCommunications
ChargingtheBattery
ConnectingthePrinter
,13
,18
,18
Index
MediaSpecifications,9
B
P
C
Power‐OnUtilities
PrintConfig,35
PrintSpecifications
PrinterDefaults
PrinterInitialization
PrinterSetupforEPL2,29
Printhead,36
,19
,9
,22
,20
D
DateTime,33
Display,34
DisplayLanguages,36
DumpMode
,22,35
F
FileManager,34
InstallingtheBeltClipandBattery
LCDDisplay
LoadingFan‐fold/ExternalMedia
LoadingMediainPeel‐OffMode
LoadingtheMedia
,12
,14
M
MediaSensorCalibration
,20
I
L
,13
,17
,15
S
SelfTest
,21
SelfTestandDumpMode
Sensor,31
SerialComm.,32
Service,36
SettingBluetoothbyConfigurationUtility,25
SettingWiFibyConfigurationUtility,26
StandardFeatures,7
StarttheConfigurationUtility,23,24
,20
U
UsingtheLCDtoSetthePrinter,27,29
W
WirelessCommunicationwithBluetooth
WirelessCommunicationwithWiFi
WirelessLAN,33
,18
,18
Page 61

258192-001 rev 1
 Loading...