

Page 1
Compact 3D Printer
Accessory Checklist Specification
1
2
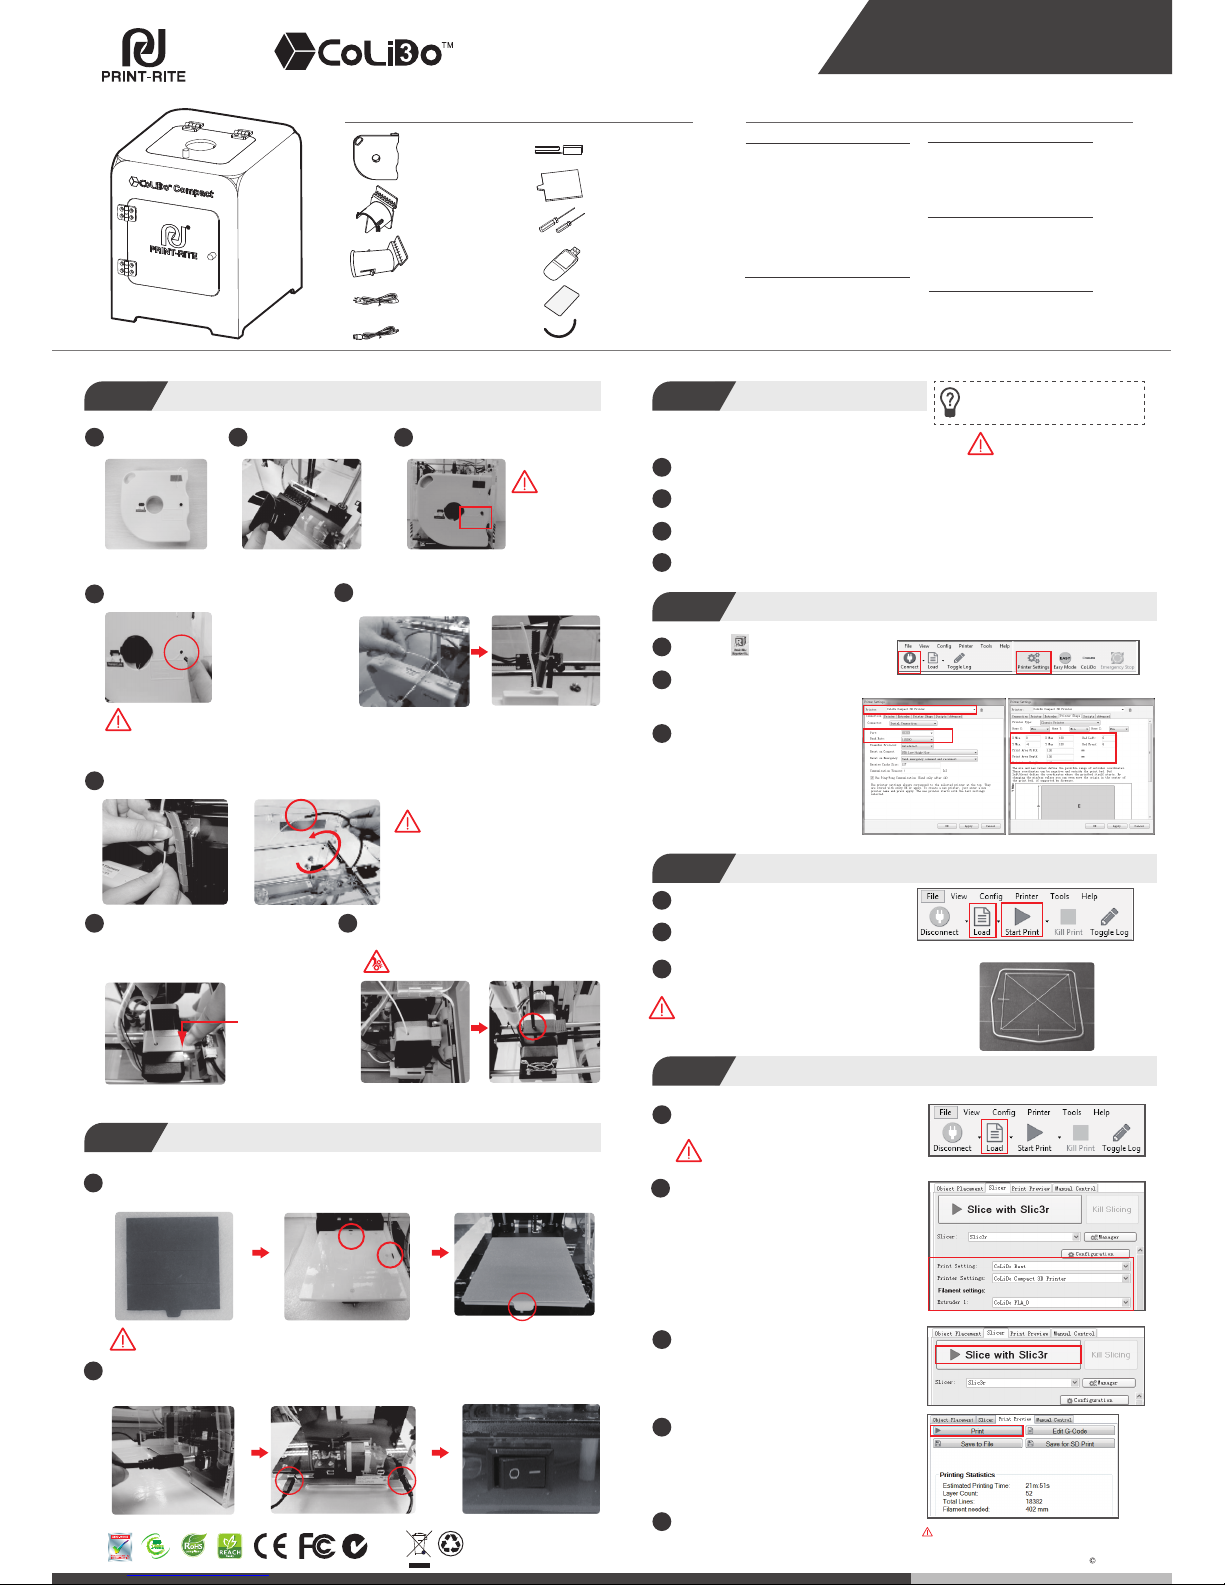
Find“setupCoLiDo-RepetierHost.exe”in the Flash Drive, double click to start inistallation.
4
NOTE: Make sure that the filament is inserted into
the tube properly to avoid the filament jam during
operation.
Do not push back excess filament into the cartridge.
5
6
Insert the filament into the tube until it comes out from the other end of the tube.
The tube witht he filament cross the hole of the printer top door.
7
8
Release the printer head arm.
Insert the end of the tube into the printer head hole.
Printer Head Arm
Step1
Install Filament Cartridge Install REPETIER-HOST
Step3
Setup REPETIER-HOSTStep4
Install Platform and Power on PrinterStep2
3
Click “Install Arduino driver”, “Install FTDI serial driver”, “launch Print-Rite Repetier-Host”
and then click“Finish”.
4
Click“Extract”to install the driver in the computer, click “Next”and“Finish”.
1
Double click to go into“Repetier-Host”.
REPETIER-HOST is a software which is used
to convert the 3D models (.GCO .STL file)
to the 3D printer command to print.
2
Click “Connect”, Click “Printer Settings”.
3
Select the “Printer:”to“CoLiDo Compact
3D printer”, check “Printer Shape”.
Then click “Apply”and “OK”.
NOTE:
Select “Port:”to the latest COMx,
(COM1 cannot be selected).
Baud Rate: 115200.
REPETIER-HOST Slice and Print
Step6
Click “Load”, select the .STL file to slice to .GCO file such
the 3D printer can recognize and print.
1
2
3
Click“Slice with Slic3r”to convert to G-code.
4
Click“Print”to start printing.
NOTE: If load the .GCO file which is sliced with CoLiDo
Compact 3D printer, click ”Print” to print directly.
5
Finish the printing.
Remove the platform and warp a little to remove the
printed object from the platform.
NOTE: The platform orientation: the paper surface of the platform is facing top, the silicon surface of the platform
is sticked to the bed. The platform holder must be facing front.
Printing TestStep5
1
Connect Flash Drive in the accessory to the computer.
2
Click“Load”,select the “Test.GCO”file saved in
the Flash Drive and open.
3
Click“Start Print”to print the test file.
The printed test file as shown in the right picture.
Select the settings base on the print effect you want and
the filament material you are using.
Print Settings:
CoLiDo Best→Print best model
CoLiDo draft→Print draft model
CoLiDo standard→Print standard model using PLA
CoLiDo standard ABS→Print standard model using ABS
CoLiDo support →Print model with support material
CoLiDo thin wall→Print the thinckness lower 2mm thin
wall model
Printer Settings:Select “CoLiDo Compact 3D Printer”
Filament Settings - Extruder 1:Select “CoLiDo PLA_0”
NOTE: Make sure that the printer is connected
with the computer.
1
2
User Manual
PLA Filament
Cartridge 1pc
Spool Holder 1pc
Power Cable 1pc
USB Cable 1pc
Power Supply 1pc
Platform 1pc
Allen Key 1set
Flash Drive 1pc
Test Sheet 1pc
Tube 1pc
Print Technology: Fused Deposition Modeling
Construction Dimension: 130*130*130mm
Layer Resolution Setting: 0.1~0.4mm
Positional Accuracy: XY: 0.011mm
Z: 0.0011mm
Filament: PLA
Filament Diameter: 1.75mm
Nozzle Diameter: 0.4mm
Printing
Frame: Acrylic
Platform: Engineering Plastic
XYZ Bearing: Steel
Stepper Motors: 1.8° step angle,
1/16 micro-stepping
Mechanical
Storage Temperature: 0 oC ~ 32 oC [32 oF~ 90 oF]
Operating Temperature:
15 oC ~ 32 oC [60 oF~ 90 oF]
Power: 60W
Rated Voltage: DC12V
Electrical
Printer Size: 276*318*343MM
Package Size: 395*365*485MM
Net Weight: 7KG
Gross Weight: 10KG
Software package: REPETIER-HOST
File Type: .STL,.GCO
Operating System: WINDOWS, MAC OS
Connection: USB
Software
Dimension
1
2
3
Take out filament cartridge.
Insert Spool Holder into the slot
located at the back of the printer.
Mount the filament cartridge on the spool
holder.
NOTE: The black thumb
pin and the printed“Note”
must be facing front.
Remove the black thumb pin to release filament.
NOTE: To avoid damage to the cartridge, do
NOT pull the filament until:
1. Black thumb pin is removed.
2. Cartridge is installed into the printer.
Pull the filament from the cartridge.
Cut the filament tip flat using scissor for easy installation.
Push down the printer head arm.
Insert the filament into the hole located on the top
of the printer head, push the filament until it reach
the end of the nozzle.
Get the platform from the package.
Put the platform on the bed, the two sides of the platform are fixed by the small location clip.
Press the platform for good sticking and leveling on the bed.
Connect the power supply to the printer, connect the power cable to the power supply and plug in.
Connect the printer to the computer using USB cable.
Power on the printer by switching to “I”position.
Computer Operation System:WINDOWS, MAC OS
NOTE: The Repetier-Host version
is depend on the shipped printer.
Start to install. (The computer will ask“Do you want to allow the following program to make
changes to this computer?”,please click“Yes”to go ahead installing.)
NOTE: When the printing is smooth and the filament sticking on
the platform is good, the printer test is ok.
If the filament cannot stick on the platform or the nozzle damage
the platform, please refer to FAQ in Flash Drive for troubleshoot,
or contact with us by email [email protected]
Long Spool
Holder 1pc
NOTE: The long spool holder is used to mount the filament with wider spool.
Suggest that the filament net weight do not excess 500g.
All rights reserved Print-rite
TM
 Loading...