

Page 1

Printrbot
Getting Started Guide
For models:
Simple
Software:
Mac - Repetier v 0.56
Windows - Repetier v 0.90C
Page 2

Contents
4 Chapter 1: Welcome
4 Overview
4 Support
5 Chapter 2: Your Printrbot has arrived... now what?
5 Printrbot Kits
5 Pre-Assembled Printrbots
6 Chapter 3: Building your Printrbot
6 Required and optional tools
6 Assembly instructions
6 Help during assembly
7 Chapter 4: Install Software
8 Chapter 5: Connect your Printrbot
9 Chapter 6: Congure Software
9 Congure Repetier printer settings
9 Connection
10 Behavior
10 Dimension
11 Congure Slic3r settings
11 Layers and perimeters
12 Inll
12 Skirt and brim
13 Filament
14 General
14 Extruder 1
15 Your saved selections
16 Chapter 7: Functional Pre-Print Test
16 Connect to the printer
16 Test the Z axis
16 Test the X axis
17 Test the Y axis
17 Test the extruder with initial burn-in temperature
18 Troubleshooting
2
Page 3

19 Chapter 8: Printing your First 3D Model
19 Download le
19 Add .STL le
19 Scale your 3D model
20 Slice
21 Connect
21 Set temperatures
21 Temperature curve
21 Run
21 After the print completes
21 Congratulations
22 Chapter 9: Advanced Printing
22 Technical Forums
22 Community
23 Chapter 10: Common Issues and Troubleshooting
23 Filament is not extruding
23 Print not sticking to bed
23 Head is dragging across the print
24 Print not correct size (G-Code)
24 Other problems
3
Page 4
Welcome
1
Read this guide to learn about your Printrbot, how to make your rst 3D print, and more.
Overview
The purpose of this guide is to get you printing your 3D models as soon as possible! Whether
you have a pre-assembled Printrbot or a build it yourself kit, this guide will walk you through
the necessary steps to a successful rst print. So let’s get going!
Support
If at any time you need help or get stuck, please check our FAQ page and then open a support
ticket if necessary. www.printrbot.com/support/
4
Page 5
Your Printrbot has Arrived...
now what?
2
The arrival of your bot can not only be exciting, but we realize it can be overwhelming at rst. If
you have received an assembled bot, your work is already nearly done. However, those with a
kit have a little bit more work to do. But fear not, our support team is here to help and we will
make sure you are printing in no time!
Printrbot Kits
If you have a Printrbot kit, proceed to Chapter 3: Building your Printrbot
Pre-Assembled Printrbots
If you have a pre-assembled Printrbot, please skip to Chapter 4: Install Software
5
Page 6
Building your Printrbot
3
Required and optional tools
Required Tools
Optional Tools
Phillips Screwdriver
8mm or 5/16 inch Wrench
1/2 inch Wrench
2.5mm Allen Wrench
1.5mm Allen Wrench
Hammer or Rubber Mallet
Wood or Super Glue
utility knife
at hand le
cordless drill
7/64" drill bit
9/64" drill bit
4" C Clamp
micro cutters
slim needle nose pliers
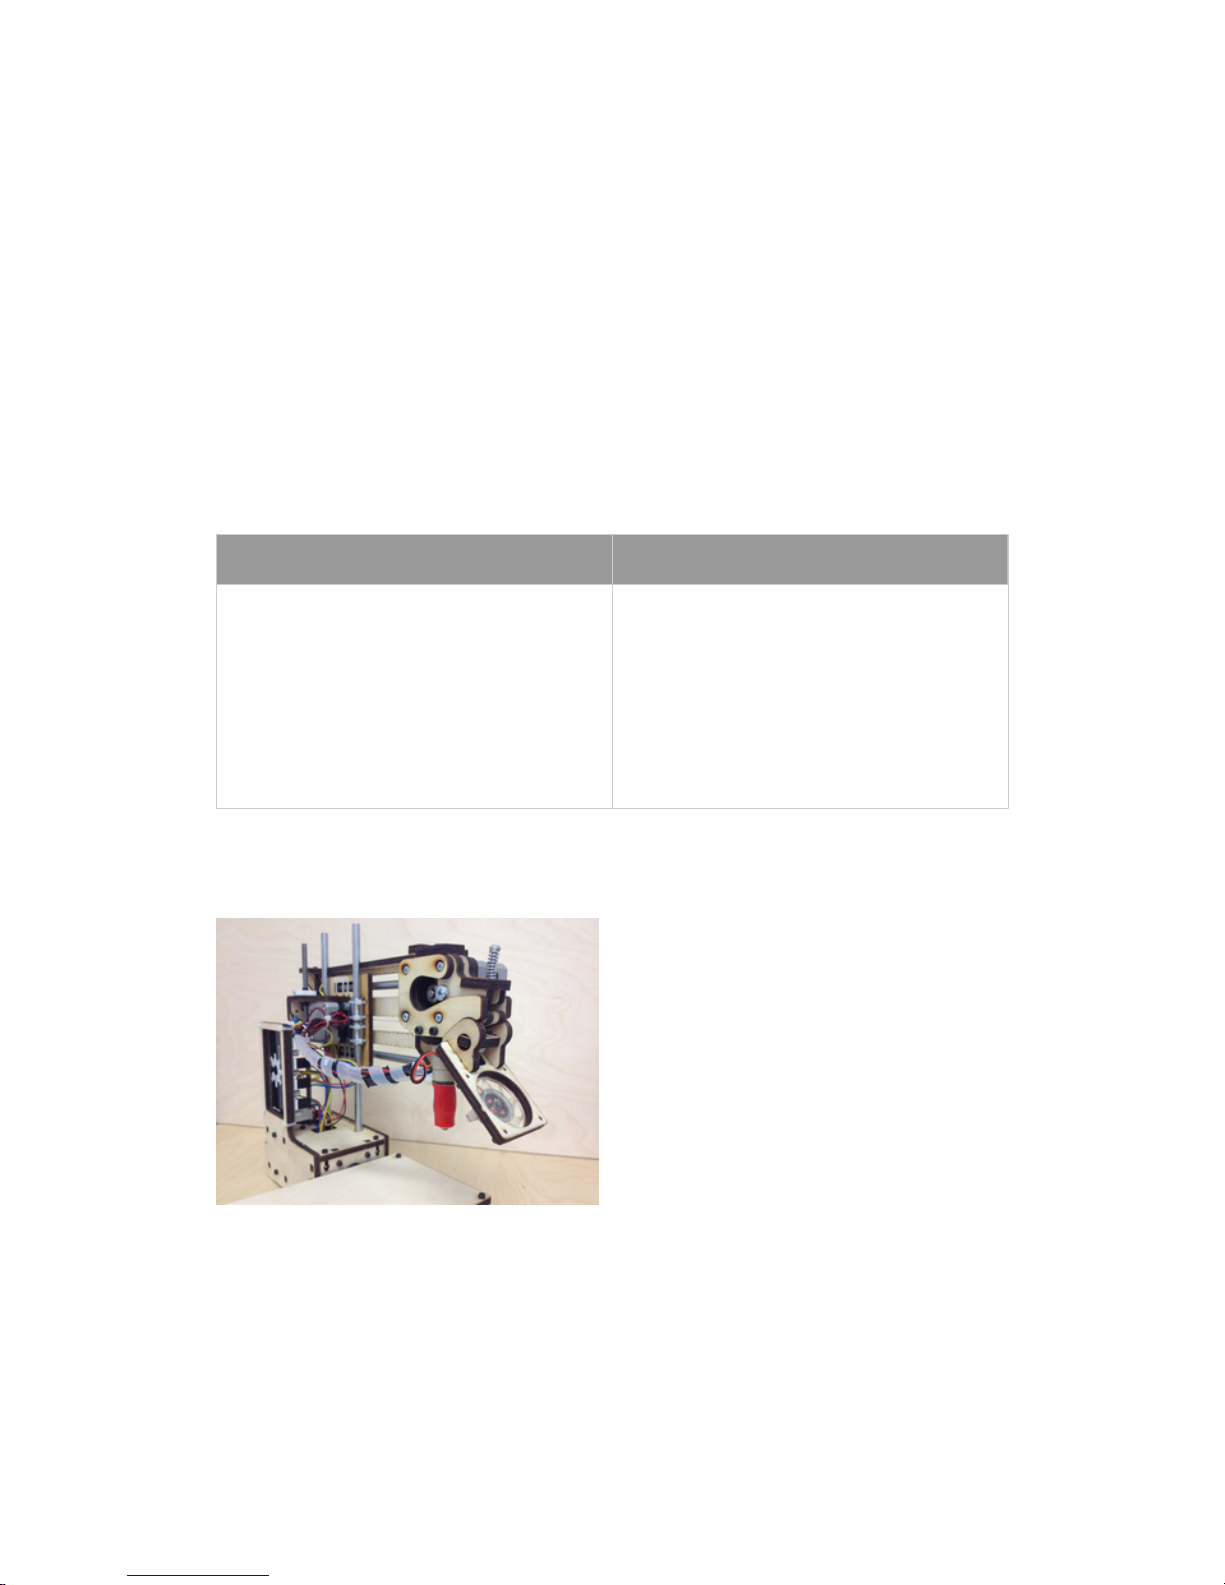
Before you begin to assemble your bot, please note that you are going to need several tools.
Below is a listing of the typical tools used for assembling a Printrbot Plus. This list should cover
you for both the LC and jr as well, however there may be a few other items you will need to
purchase depending on which version Printrbot you have.
Assembly Instructions
Download the appropriate instructions for
your model from www.printrbot.com/
support/. We recommend using a
combination of both the Step by Step
Installation Guides as well as the Build Videos.
Our designs have changed slightly since the
time these instructions were originally
created. However, using these in tandem will
help to clarify the process during assembly.
Help During Assembly
If you get stuck during assembly, we recommend browsing our technical forum at
www.printrbottalk.com as we have several power users and moderators that can give you quick
assistance and troubleshooting help. However, if you are unable to resolve your issues please
open a support ticket at www.printrbot.com/support/.
Note: During the build process, some sub
assemblies (such as the extruder) are detailed
in their own build instructions.
6
Page 7

Install Software
4
Now that your bot is fully assembled, the next step is to install the printing software on your
computer so that you can actually print a 3D model. While there are various free printing
software on the market, we currently use and recommend Repetier http://www.repetier.com/
when rst getting started. It’s easy to use and supports Windows, Mac, and Linux. Once
installed, the typical workow is as follows:
1. Create a 3d model and export it in STL format or get it from the internet.
2. Arrange one or more models on a virtual print plate.
3. Slice the the models into thin slices and compute a path for printer head. This is done
by a slicing software, which converts the model into g-code, the language your printer
speaks.
4. Check the created g-code for errors and printability.
5. Send the g-code to your printer or copy the code to a SD card, which you can insert
into your printer.
6. Monitor your printer.
Select your platform and download Repetier from www.repetier.com/download/ and install the
software using the default congurations.
Windows users only: Download the required USB driver from http://pjrc.com/teensy/
serial_install.exe, right click on it and "Run as Administrator" to install the INF file. It
should create a new COM port that you can then use in Repetier to connect to the
printer. For more information please see http://printrbot.com/wp-content/uploads/2012/04/
Printrbot-Getting-Started-Guide2.pdf
Windows 8 users: If you are having trouble installing the driver, please try the steps on http://
www.nextofwindows.com/how-to-install-an-un-signed-3rd-party-driver-in-windows-8/
7
Page 8

Connect your Printrbot
5
1. Find a secure table or at surface on which to print.
2. Place your printer close to your computer and plug in the power source for your bot.
3. Plug in the mini USB cable to the back of your Printrbot and connect the other end to a
USB port on your computer.
4. You should now have the Printrbot powered on and connected to your computer.
8
Page 9
Congure Software
6
The following settings are recommendations for your rst prints. Over time you can change
and modify them as you get more familiar with your printer as different 3D models often
require different settings for a more accurate and precise print. The reason for this is that your
3D printer is more like a tool than an appliance. Every 3D model is unique and often requires a
different “tool” to get the job done. So you will nd over time that certain settings work better
than others. It’s also worthy to note that the printers themselves often have their own
personalities and quirks as they have been assembled by hand. So expect to have small issues
here and there as time goes on. With that said, let’s get your software congured!
Note: The following screenshots are taken for both Mac and Windows. Be sure to complete all
of the settings elds to match exactly on your computer.
Congure Repetier Printer Settings
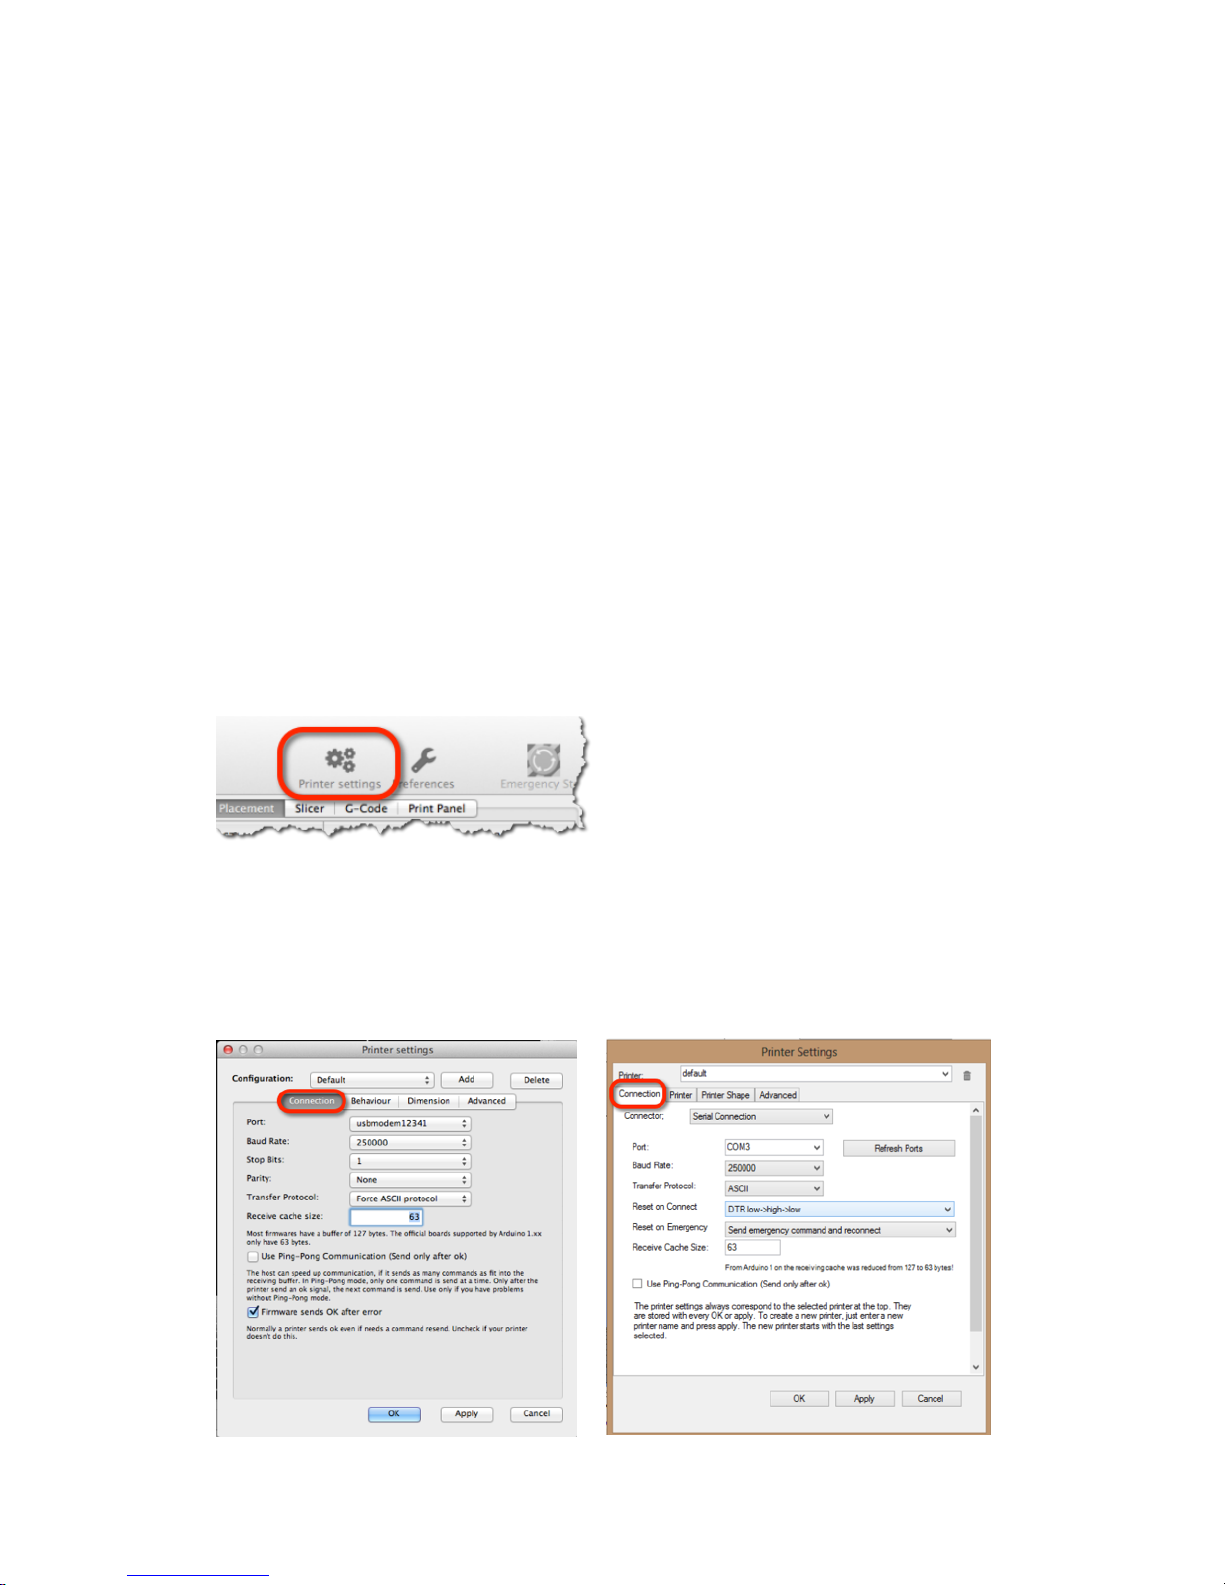
Open Repetier and click on Printer Settings at the top right for both Mac and Windows.
Connection
Select the port that matches your USB connection and set the Baud Rate to 250000. Click the
Add button and type “Simple” into the text eld that pops up. Change the cache size to 63 and
click Apply and then OK.
Mac Windows
9
Page 10
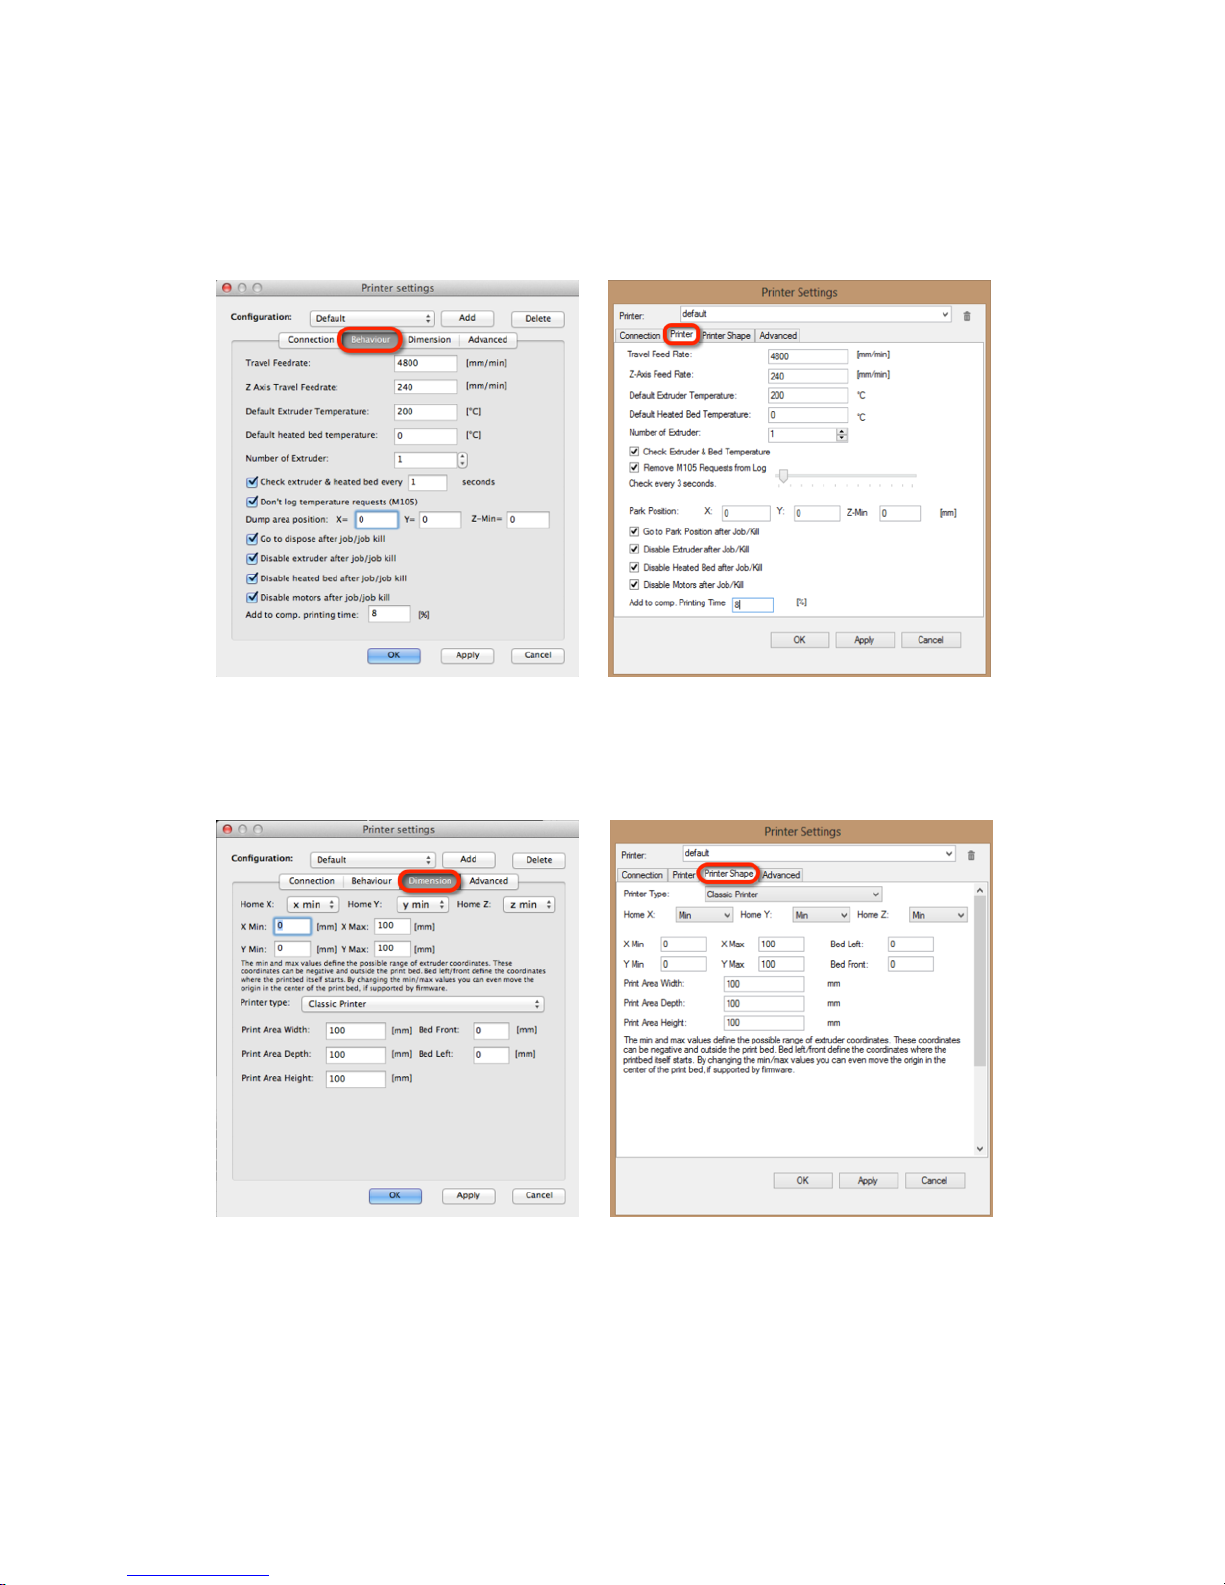
Behavior
Set the extruder temperature to 200 and the heated bed to 0 degrees. Travel Feedrate should
be 4800 and check the following boxes.
Mac Windows
Dimension
Set all print area settings to 100mm. Click Apply and then OK.
Mac Windows
10
Page 11
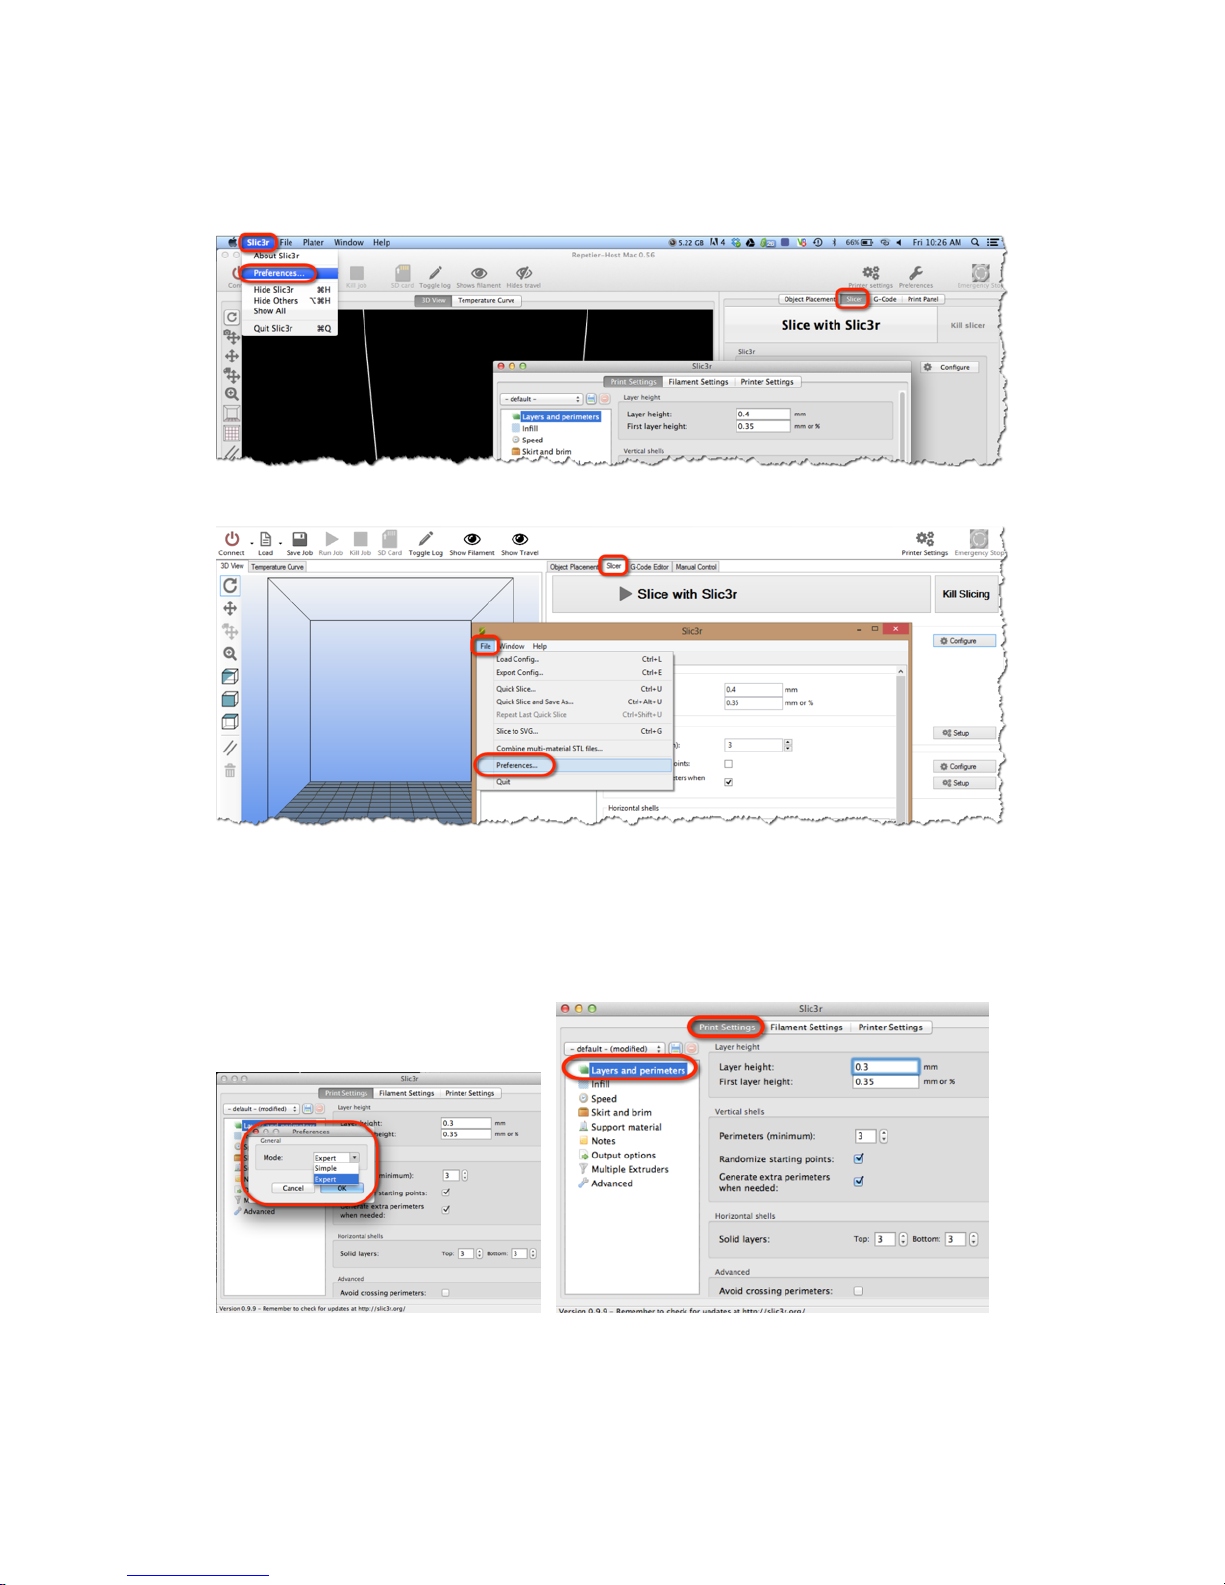
Congure Slic3r Settings
Select Slicer within Repetier and click on the Congure button
Mac
Windows
Layers and perimeters
0.3 mm is a good place to start for layer height
Mac
11
Page 12
Windows
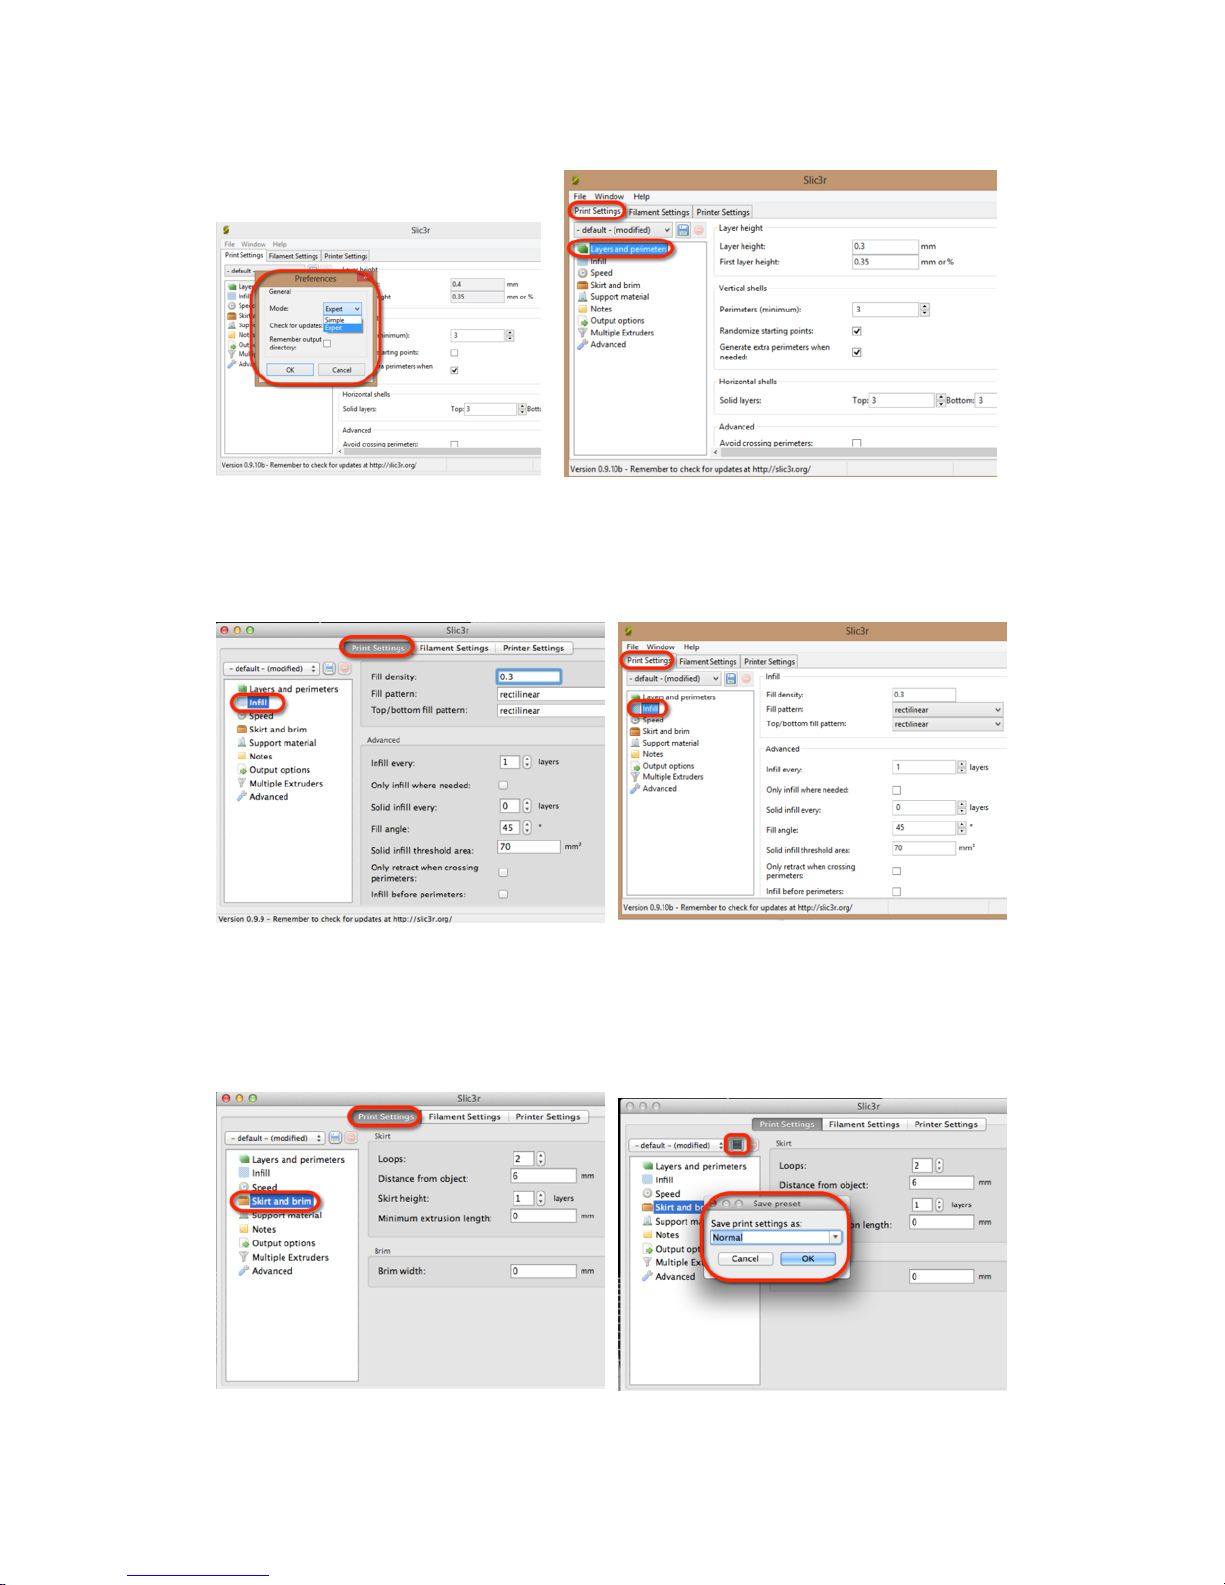
Inll
Rectilinear is a good place to start for ll patterns
Mac Windows
Skirt and brim
Set Loops to 2 and save settings.
Mac
12
Page 13
Windows
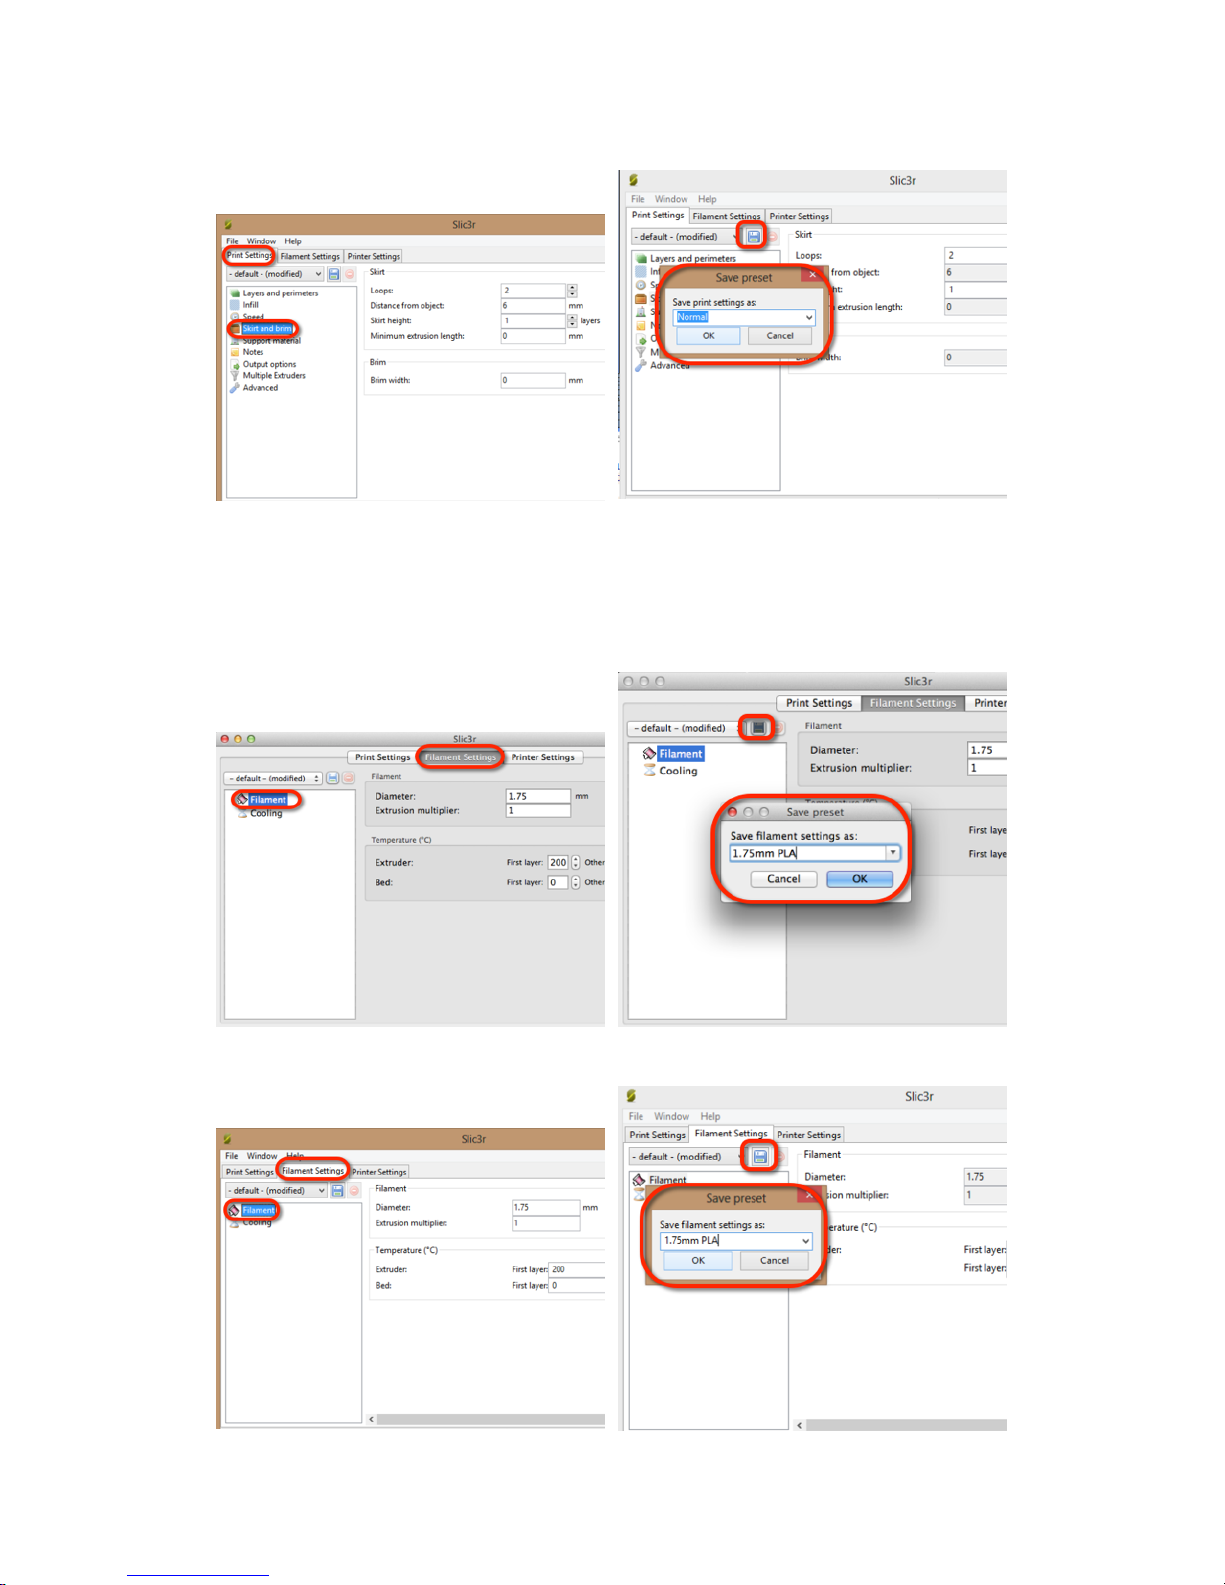
Filament
Set your lament to 1.75 and extruder temp to 200 for both rst and all other layers.
Mac
Windows
13
Page 14
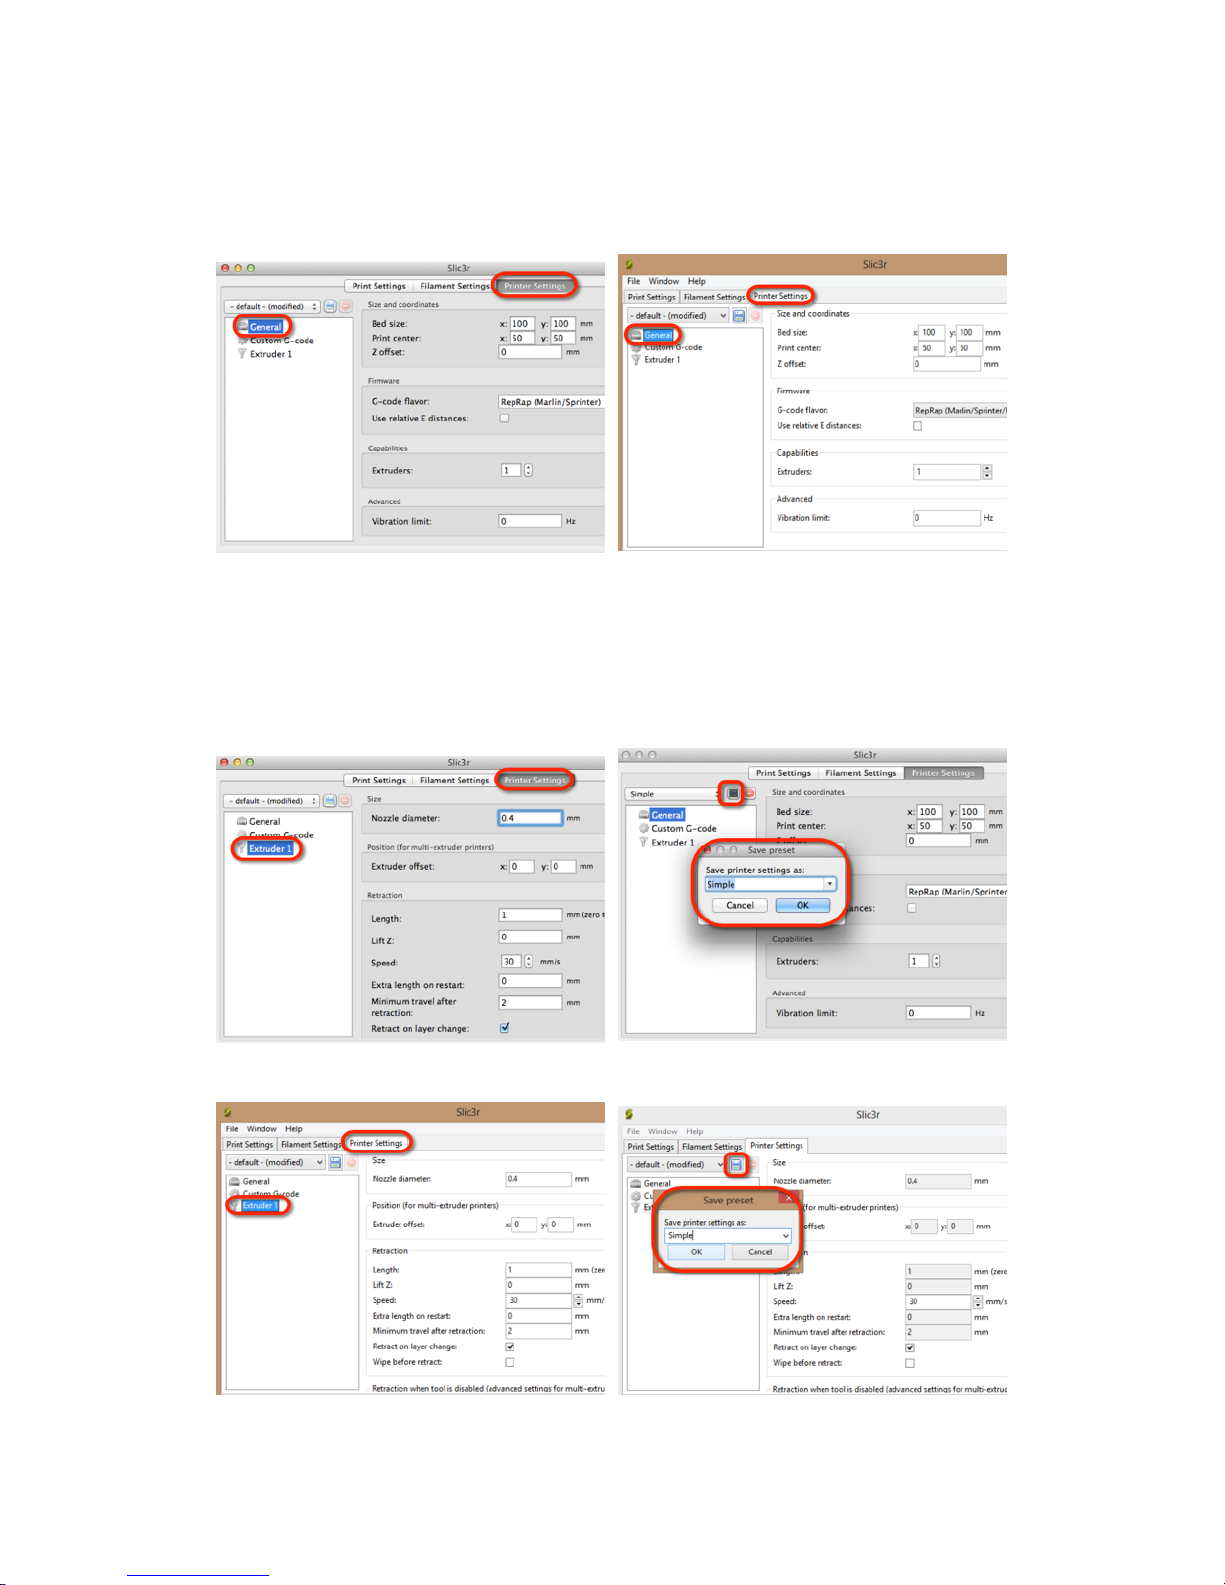
General
Make sure your bed size is set to 100mm and 50mm center points.
Mac Windows
Extruder 1
Standard tip size with all bots is currently 0.4 mm. Otherwise enter the appropriate diameter to
match the tip you are using. Save your settings.
Mac
Windows
14
Page 15
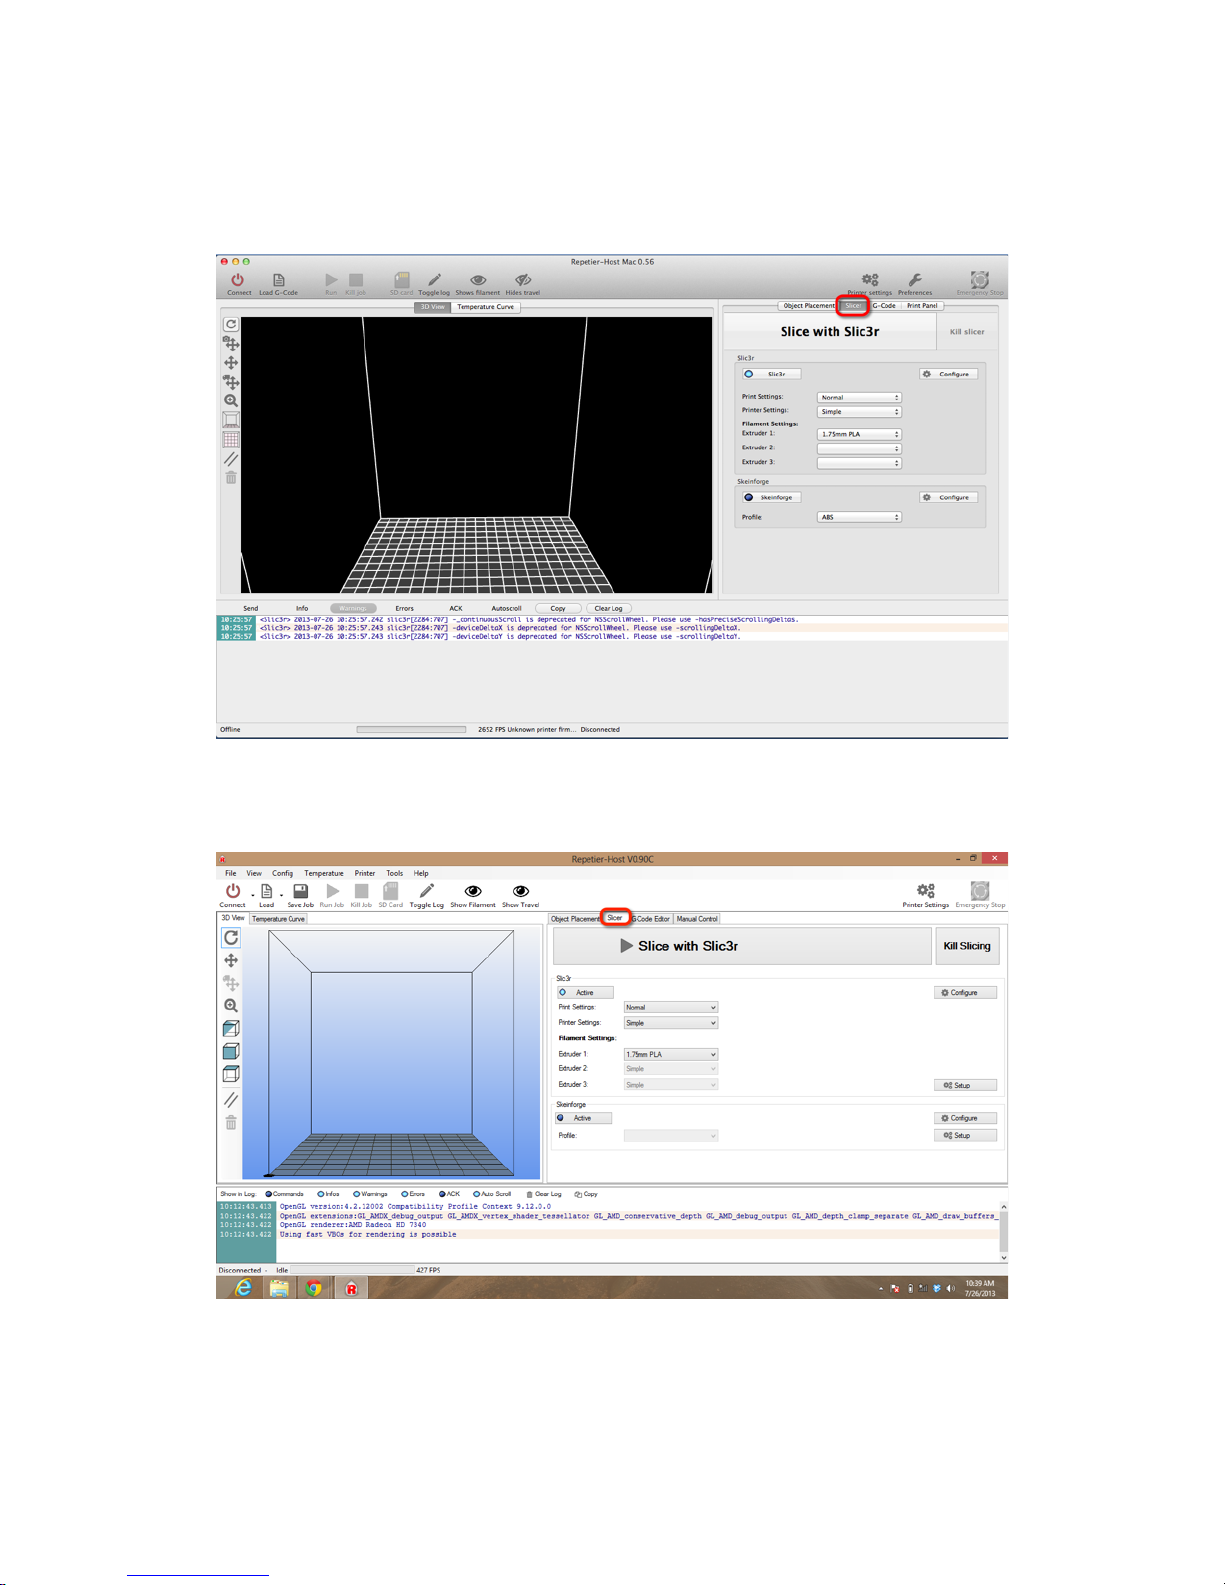
Your saved selections
Your settings should now look like this screen on the main Slicer settings screen.
Mac
Windows
15
Page 16
Functional Pre-Print Test
7
Before testing your rst print, you need to make sure all of your axis are working as expected on
your bot. Connect your printer to your computer and make sure both of them are powered on.
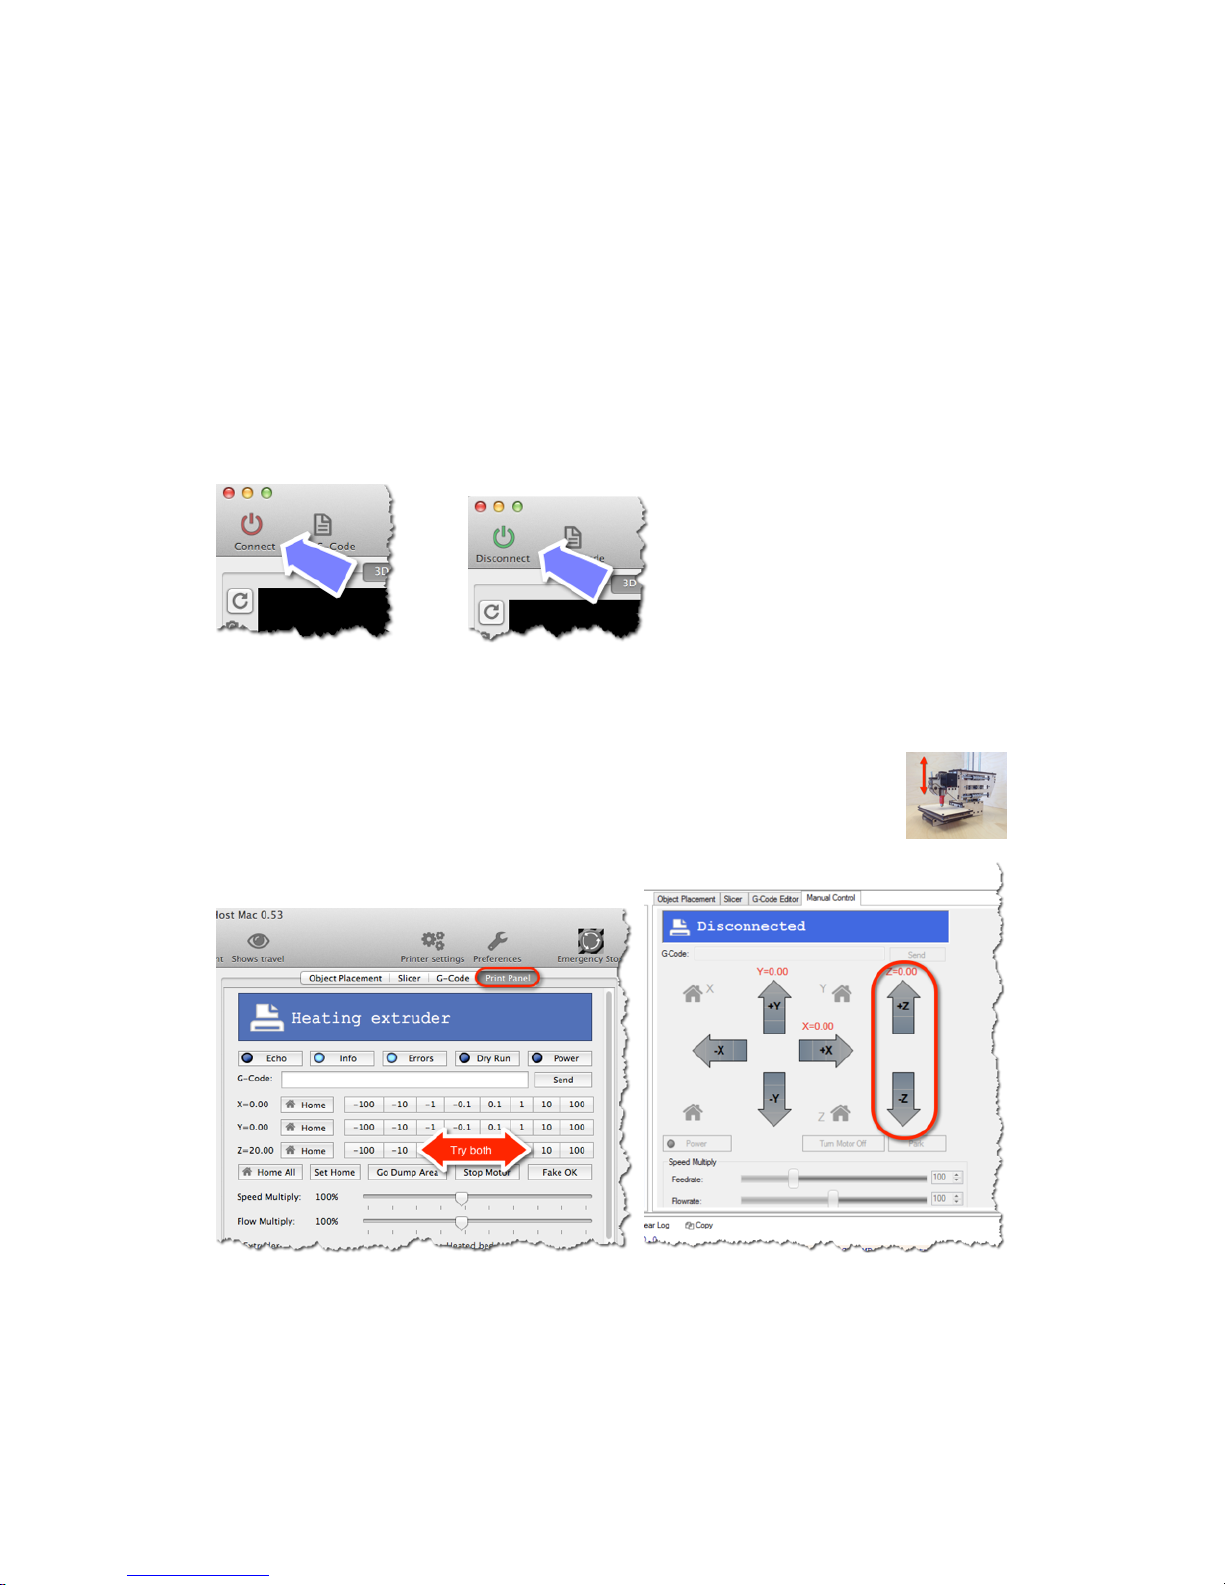
Connect to the printer
Click on the Connect button and it should turn green to indicate your are properly connected
Test the Z axis
Click on both the 10 and -10 buttons for the Z axis. Your extruder should be able
to move up and down freely.
Mac Windows
16
Page 17
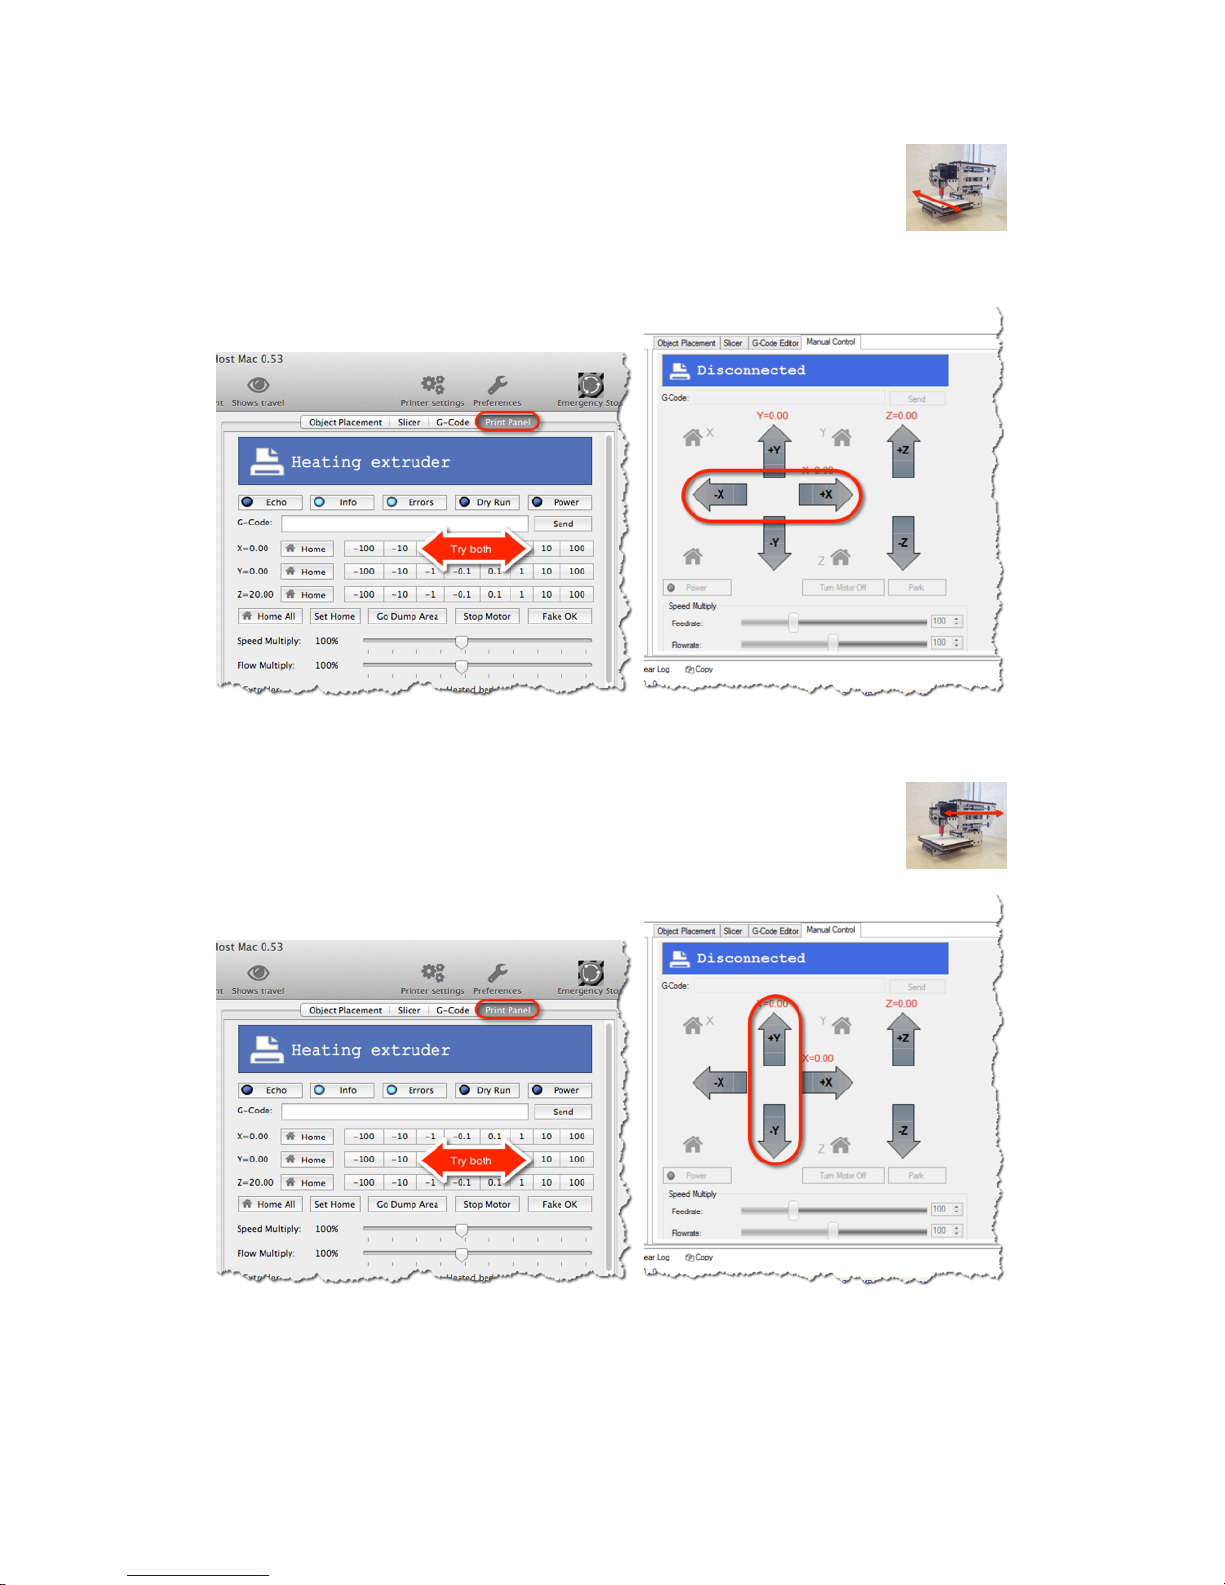
Test the X axis
Click on both the 10 and -10 buttons for the X axis. Your extruder should be
able to move left and right freely.
Mac Windows
Test the Y axis
Click on both the 10 and -10 buttons for the z axis. Your printer’s bed should be
able to move forwards and backwards freely.
Mac Windows
17
Page 18
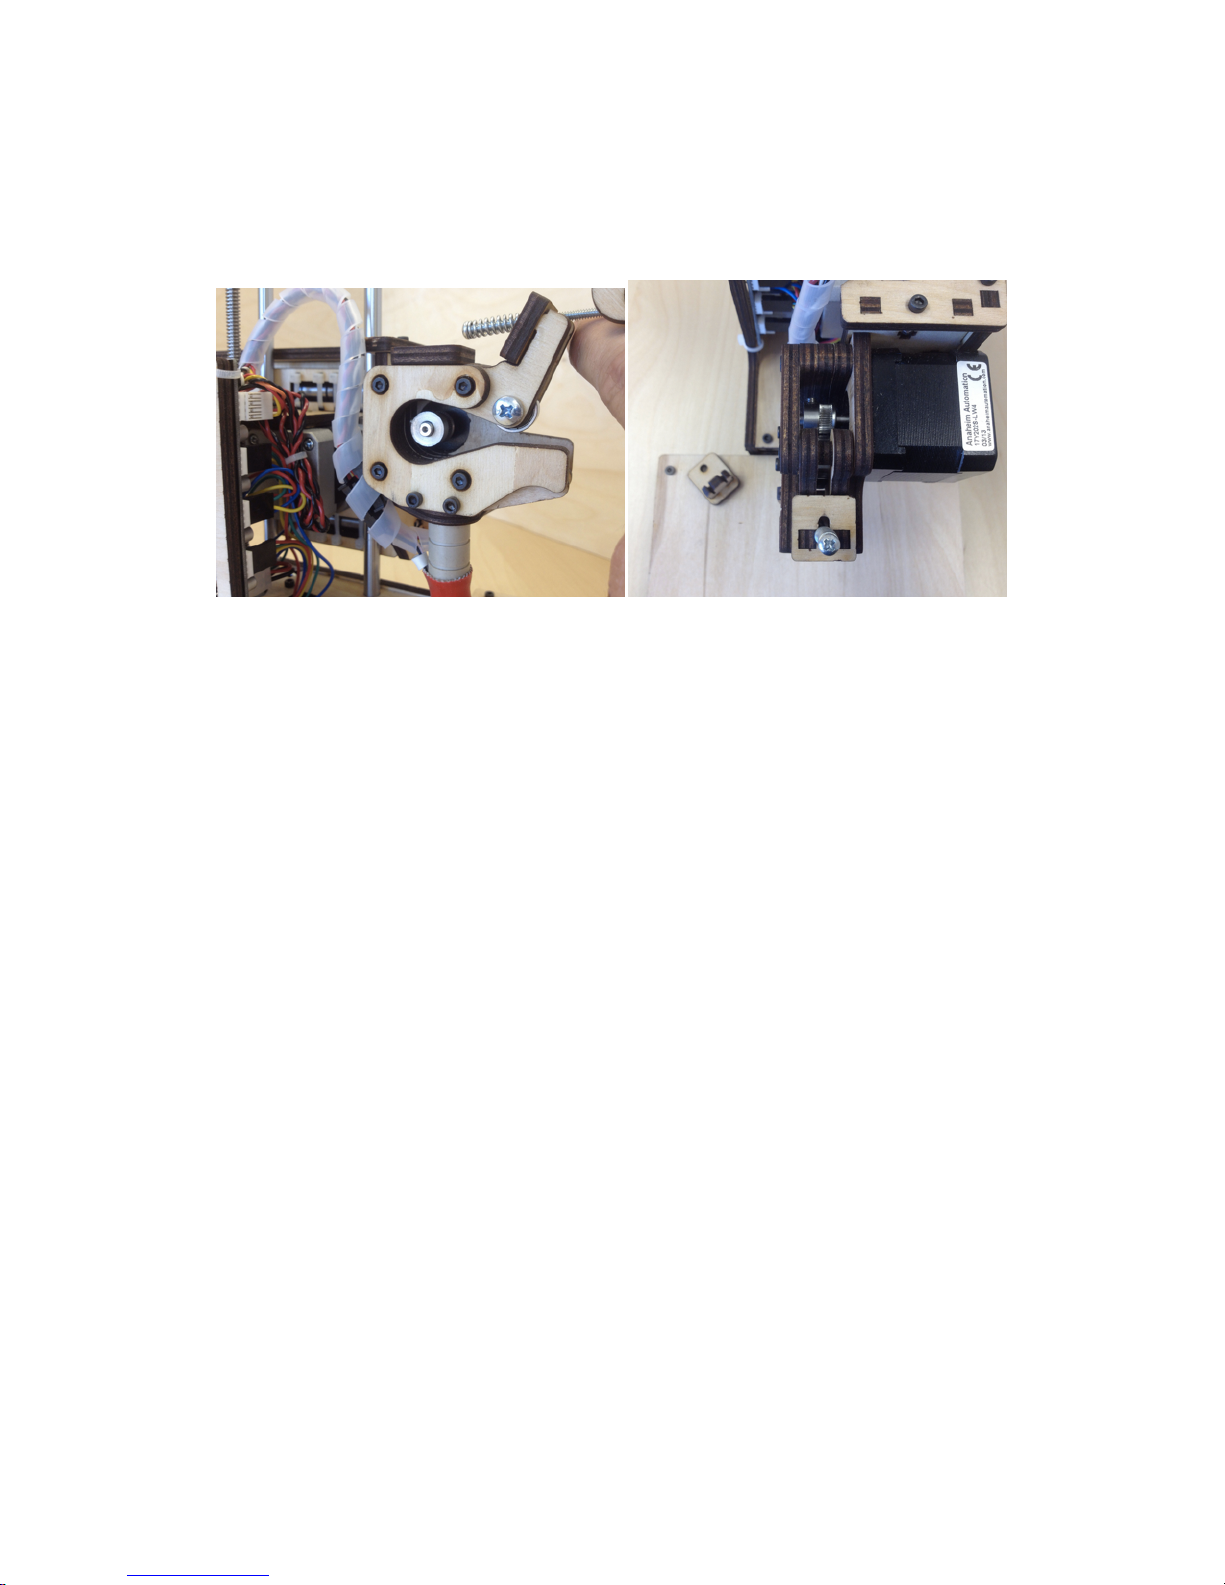
Test the extruder with initial burn-in temperature
Set your Extruder temperature to 200 and click Set. When the temp has reached 200, open the
extruder latch and feed the lament down into the hot end opening at the hobbed bolt area.
For easier access, we recommend trimming the lament at an angle.
Troubleshooting
If you encounter any movement issues with your axis or extruder, double check the assembly
instructions and check the technical forum at www.printrbottalk.com for possible quick x
solutions. If you are unable to resolve the problem quickly, please open a support ticket.
18
Page 19
Printing your First 3D Model
8
Now that your bot is assembled, connected to your computer, and the software installed - it’s
time to run your rst test print!
Download File
Go towww.thingiverse.comand nd something to print. For your rst print, we recommend
either the5mm Calibration CubeorMr. Jaws. Click on the big blue Download button and
select either an individual le or the entire zip le.
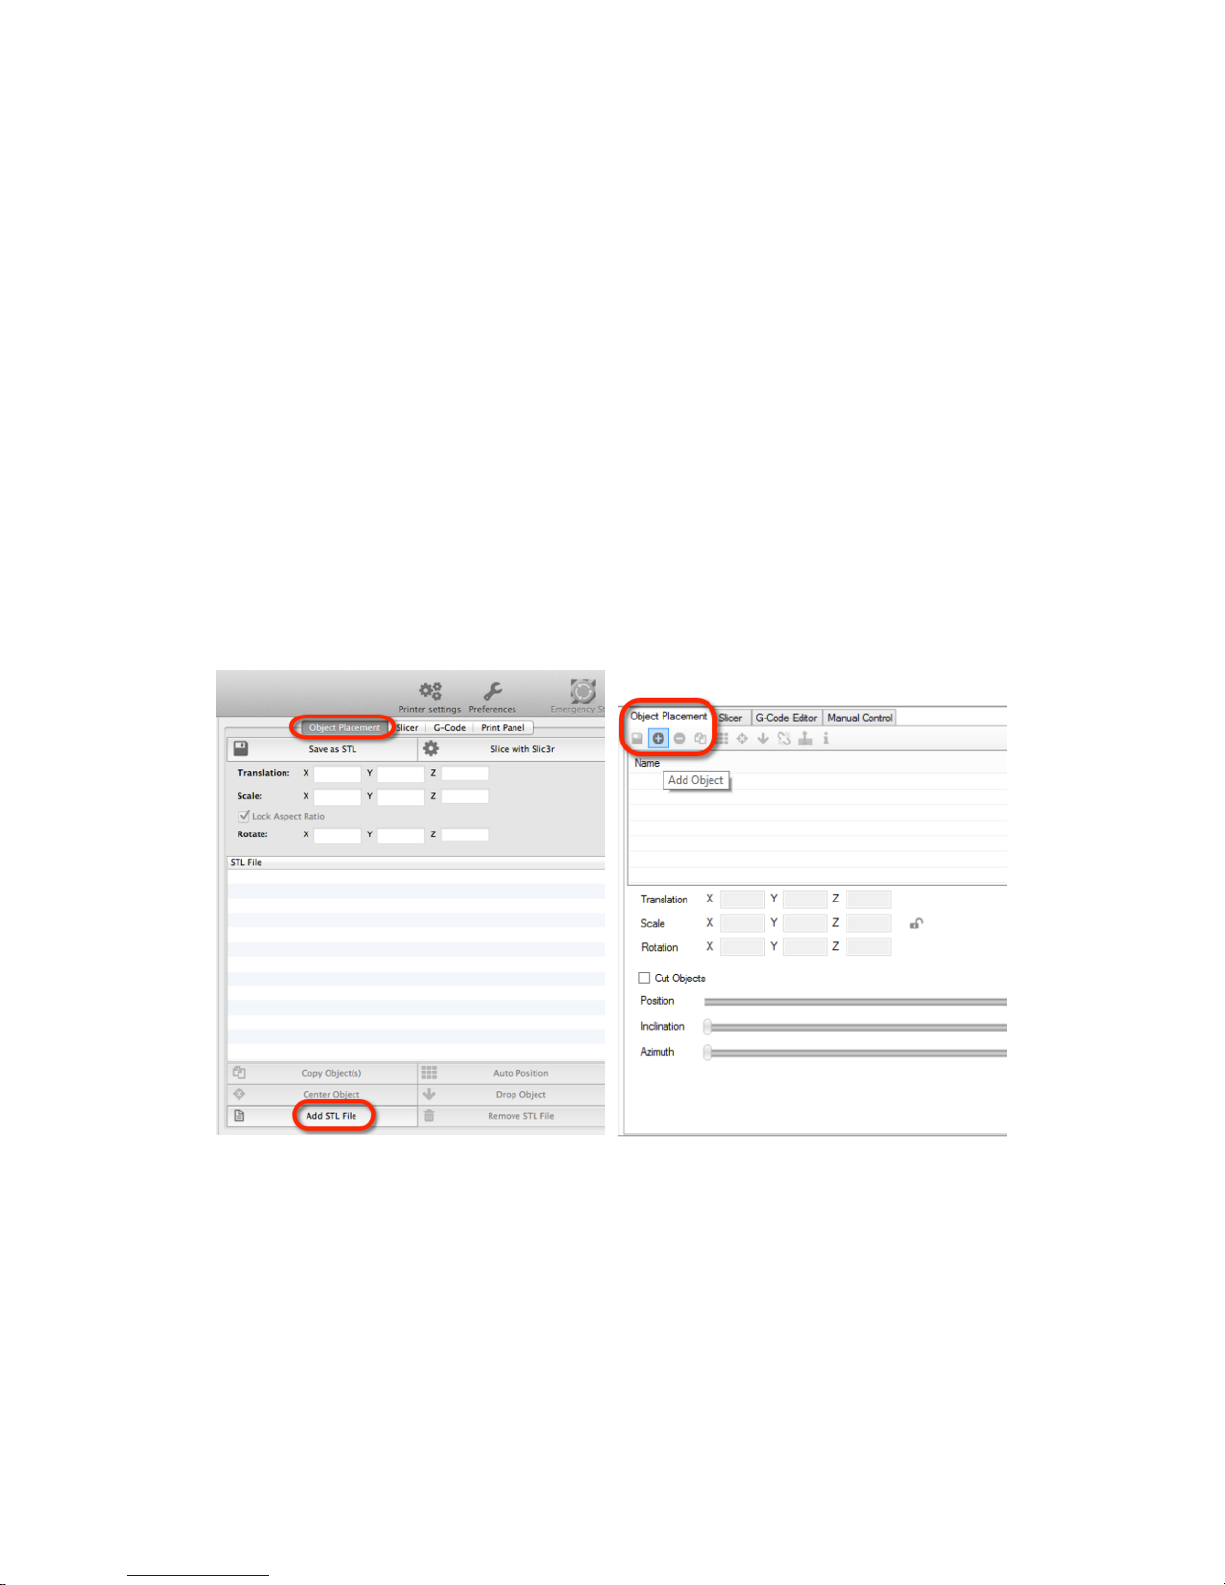
Add STL File
After you have downloaded a model, open Repetier and add the .STL le
Mac Windows
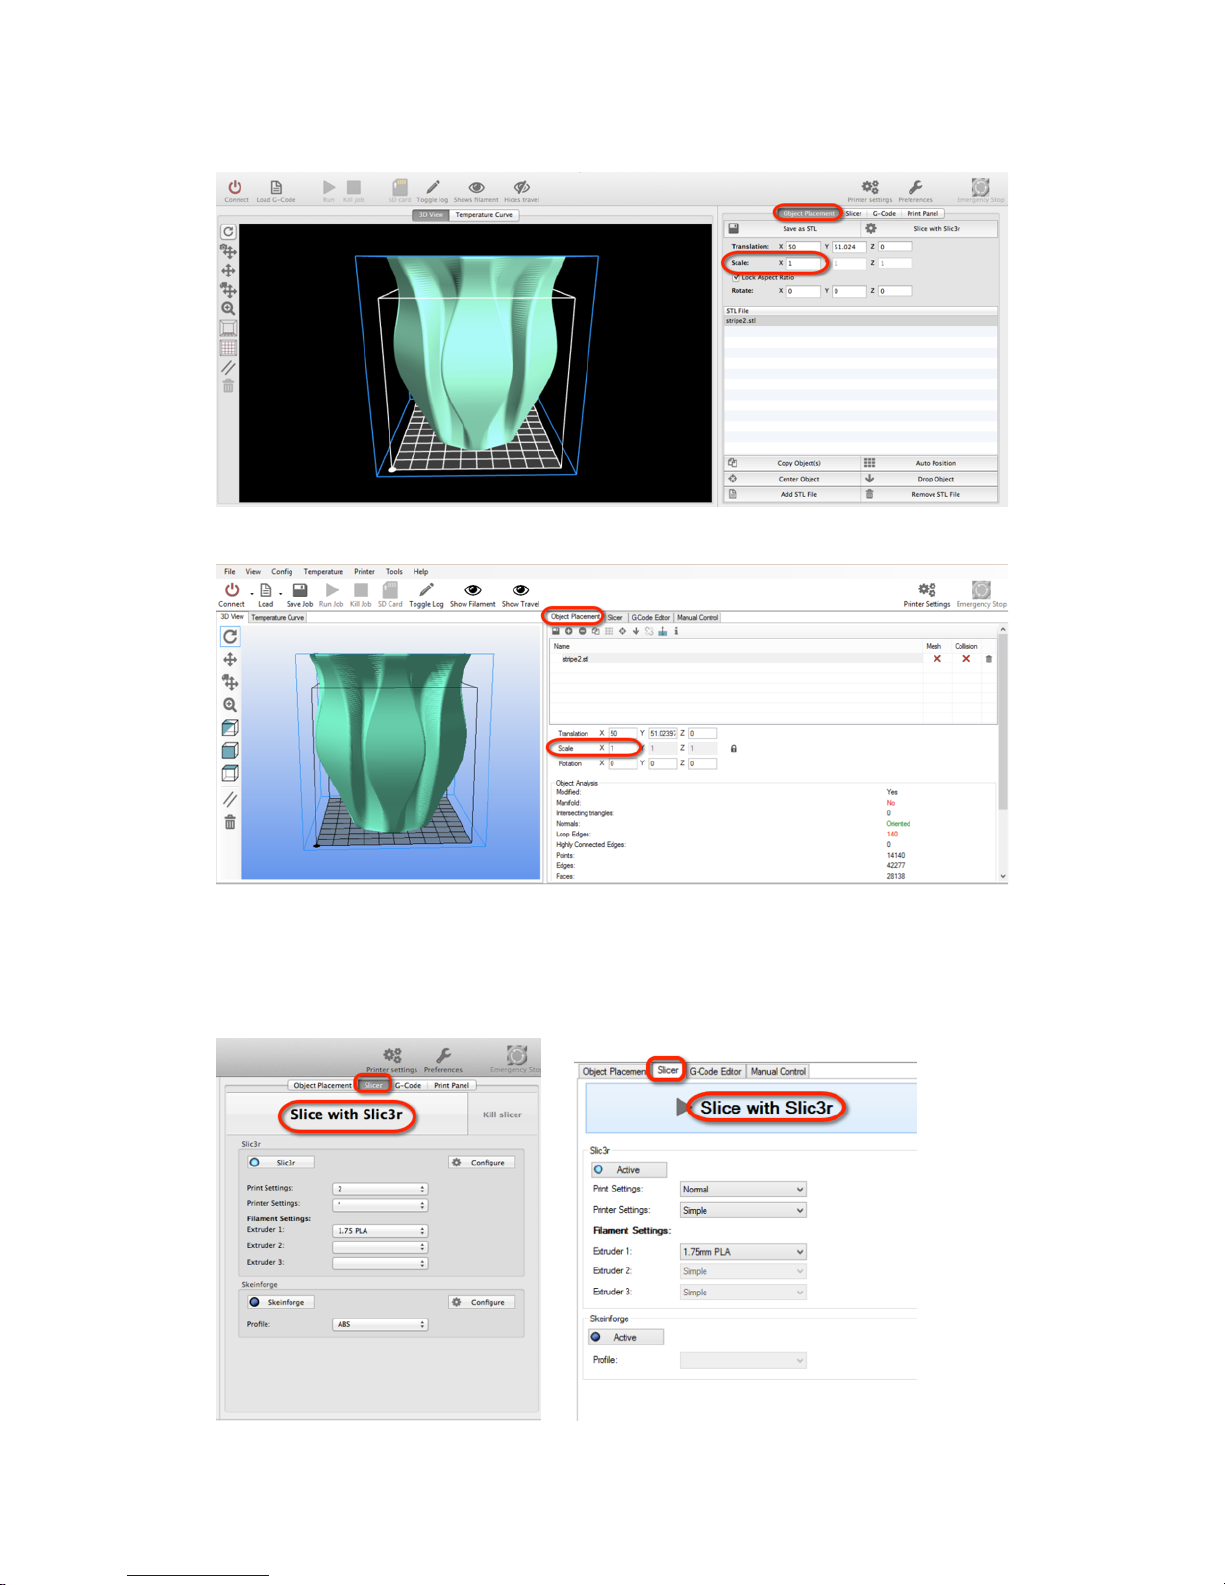
Scale Your 3D Model
Depending on the size of your 3D Model you may need to resize it. Look at the 3D image in the
Repetier window and how it relates to the box. If it is outside the boundaries of the box then
you will need to scale the model down. Go to Scale. The X value will automatically be set to 1
which means 100%. Change the X value and press enter (.5 = 50%, .35 = 35%).
19
Page 20
Mac
Windows
Slice
The le will drop into the print space, next click on Slice with Slic3r in the Slicer tab.
Mac Windows
20
Page 21
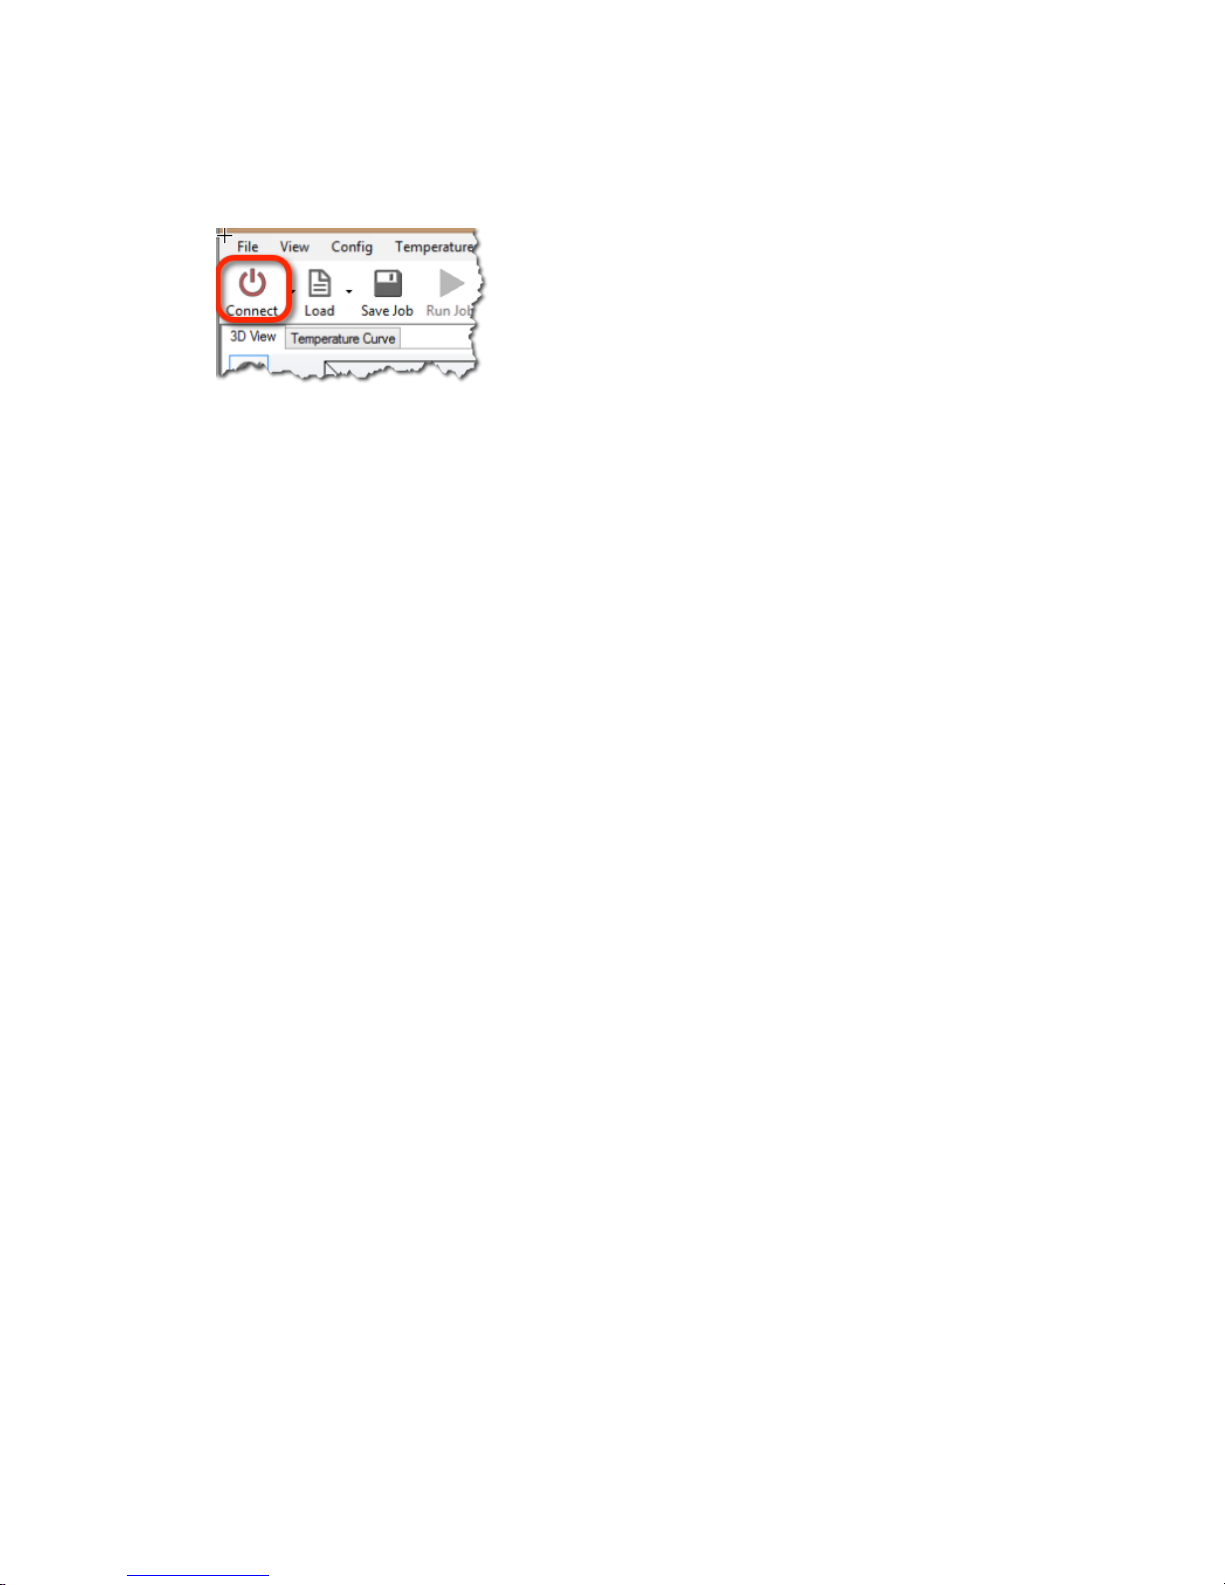
Connect
When the slice has completed, click on the Connect button.
Set Temperatures
Next up , you need to set the extruder temp. Click on the Print Panel and scroll down to set the
temperatures (Extruder 195 for PLA and Heated bed 0) be sure to click the Set buttons. Also,
please note that you should now have a green connect button to indicate that you are
connected to your computer.
Temperature Curve
Now click on the Temperature Curve and watch the graph as the extruder and heat bed rise in
temp. You need to make sure that both of them reach the purple lines before proceeding to
the next step.
Run
Once the proper temperatures have been reached, you can then click on Run to start the print.
Please note that it may take several seconds (or longer) before your print actually begins. Once
it does start, the printer will move to home position (if it's not there already) and then begin to
print. The rst thing it will do is lay down a perimeter line around the area of your model and
then it will start the nal print.
After the print completes
The extruder and heat bed will turn off automatically. Allow several minutes to cool before you
attempt to remove your print from the bed. Please note that the prints can often be rmly
attached to the bed. To remove them, you can slightly twist the print when pulling up as this
will help to break it free. You can also try to leverage a thin object underneath the print to pry it
upward when lifting, but we recommend caution with this approach as you don't want to cut
or damage the bed with a sharp object like an Exacto blade, etc.
Congratulations, you have completed your rst 3D print on the Simple!
21
Page 22

Advanced Printing
9
Now that you have done some basic prints, where do you go from here? Well, your journey has
just begun as there are lots of advanced techniques for printing highly precise and complex
prints; such as micro sized prints and complex objects.
Technical Forums
Please visit our technical forum at www.printrbottalk.com as we have several power users that
have pushed the limits on what is possible with a 3D printer. They will be able to give you
suggestions and advice on how to successfully print even the most complex objects.
Community
We also suggest checking out www.reprap.org and interacting with the rest of the 3D
community. Their community portal and New Development pages have more information on
how to get involved.
22
Page 23

Common Issues and
Troubleshooting
10
Filament is not extruding
The possible issue may be that either the hot end temp wasn't set to 15 for ABS or 195 for PLA
and/or the lament wasn't being pulled down into the extruder. If the lament is still in the hot
end, heat up the hot end to 15 for ABS or 195 for PLA degrees and then open the top latch on
the extruder and pull the lament out.
Check the small grooves in the hobbed bolt where the extruder goes into the hot end. The
grooves may be clogged with lament as this happens when the temp isn't hot enough and
then the lament just ends up grinding against that hobbled bolt. Use an Exacto knife to clean
out all of the grooves completely. Then snip off the end of the lament at an angle and push it
down into the hot end with medium pressure and you should see it extrude out the bottom.
Just make sure that your hot end temp has reached 215 for ABS or 195 for PLA before doing
this. You can click on the temp graph in Repetier to view the current temps.
If you see lament coming out the bottom when manually pushing, pull out the lament, retrim the tip, and then feed the lament between the two long bolts on the top latch down into
the extruder hole where the hobbled bolt is. Then close the top latch to lock it into place.
Make sure your computer is connected to the printer and that you are connected in Repetier.
Then click on the manual extrude button to make sure it comes out.
Print not sticking to bed
We recommend using common masking tape when printing PLA. Be sure that the tape is
covering your desired printing surface. If the print is still not sticking, try lightly sanding the
masking tape with a ne grit sand paper.
Head is dragging across the print
If the nozzle seems to drag through the plastic of the previous layer as it is printing then first
check to be sure that the thermal wrap on the print head is secure and is not hanging below
the level of the nozzle. If it is then slide it up slightly so that it is clear of the print surface. Be
careful, if your heater is turned on then it will be hot! Make sure there is no plastic debris on or
around the nozzle that may have been left over from a prior print -- even a small piece of plastic
stuck to the side of the nozzle can ruin a print.
23
Page 24
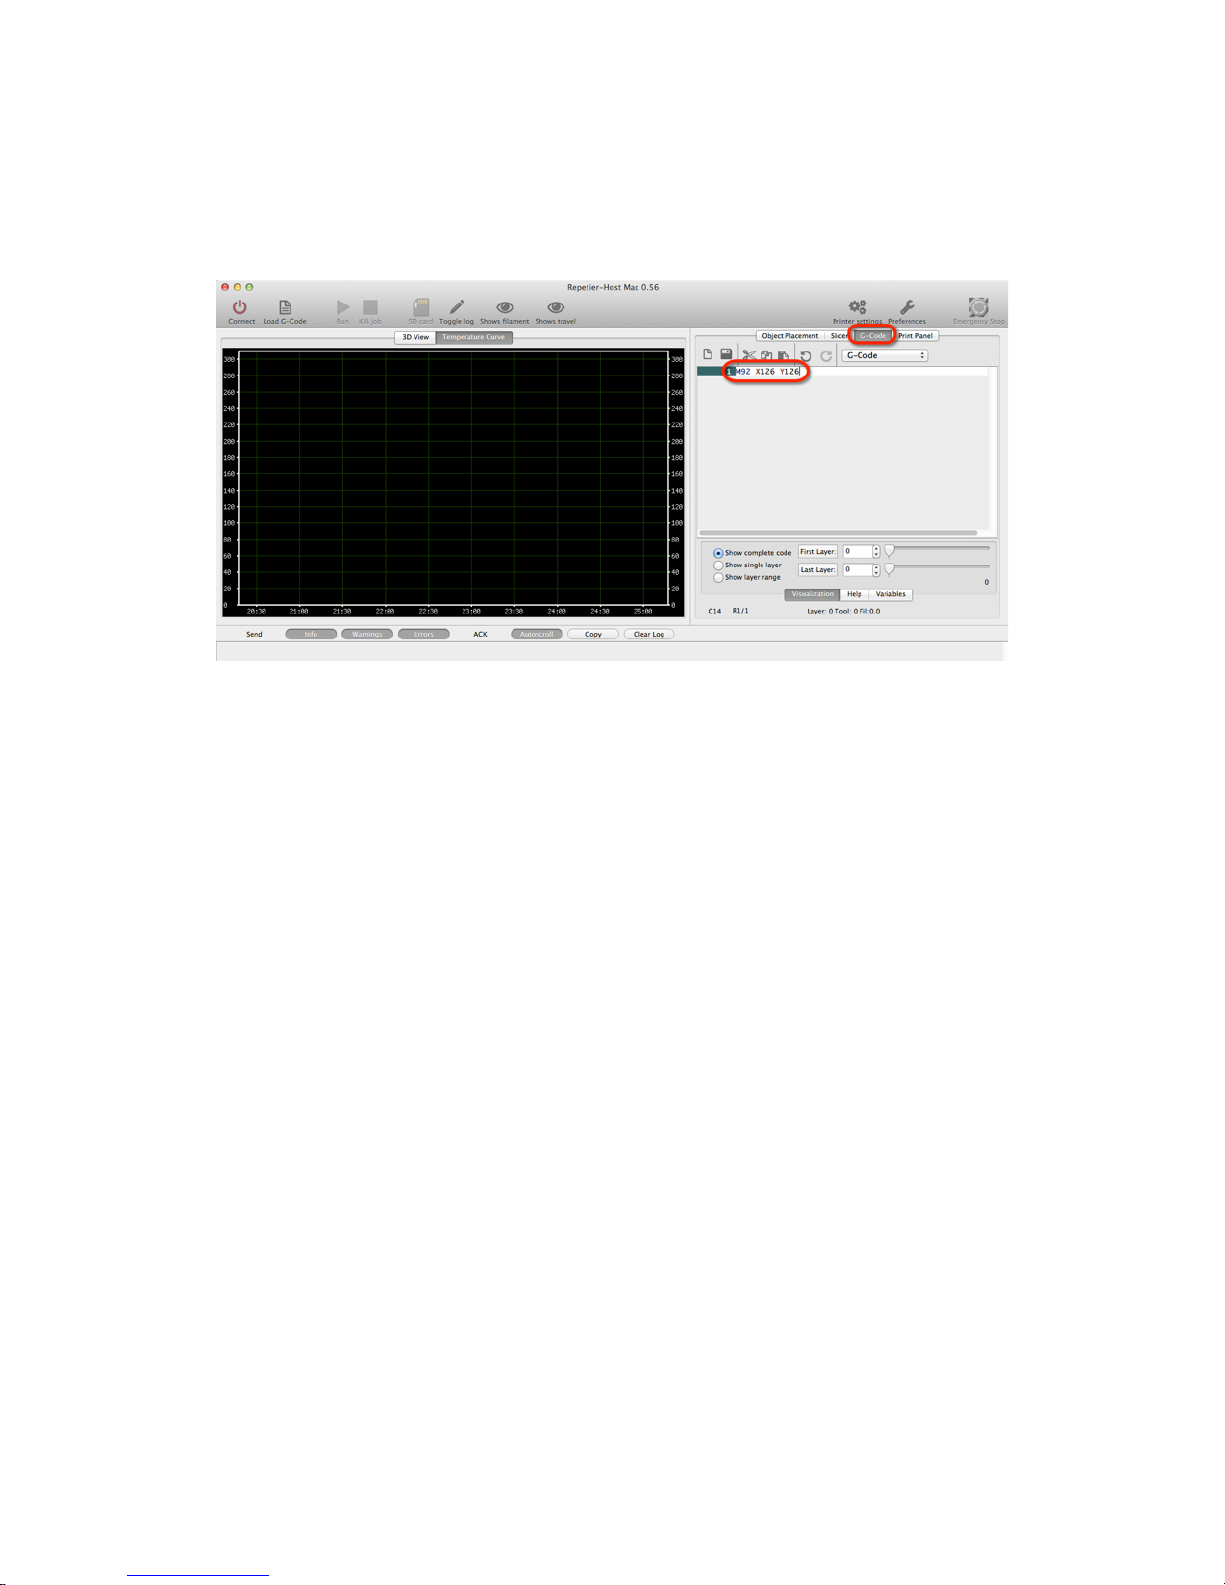
Print not correct size (G-Code)
Verify values for X,Y,Z by typing command M501. Values should be X119 Y119 Z2020 E100. If
for some reason values are not this, change with G-code command M92 X119. Save settings on
rmware with M500 command. Type M501 to verify change has been made.
Other Problems
For more in depth calibration troubleshooting, please review the Hardware Calibration and
other settings in our original Getting Started Guide - Version 1 http://bit.ly/YX8nct
For all other issues, please visit our technical forum at www.printrbottalk.com for further
assistance and troubleshooting. If needed, please open a support ticket for all broken and
faulty parts at www.printrbot.com/support/
24
 Loading...