

Page 1
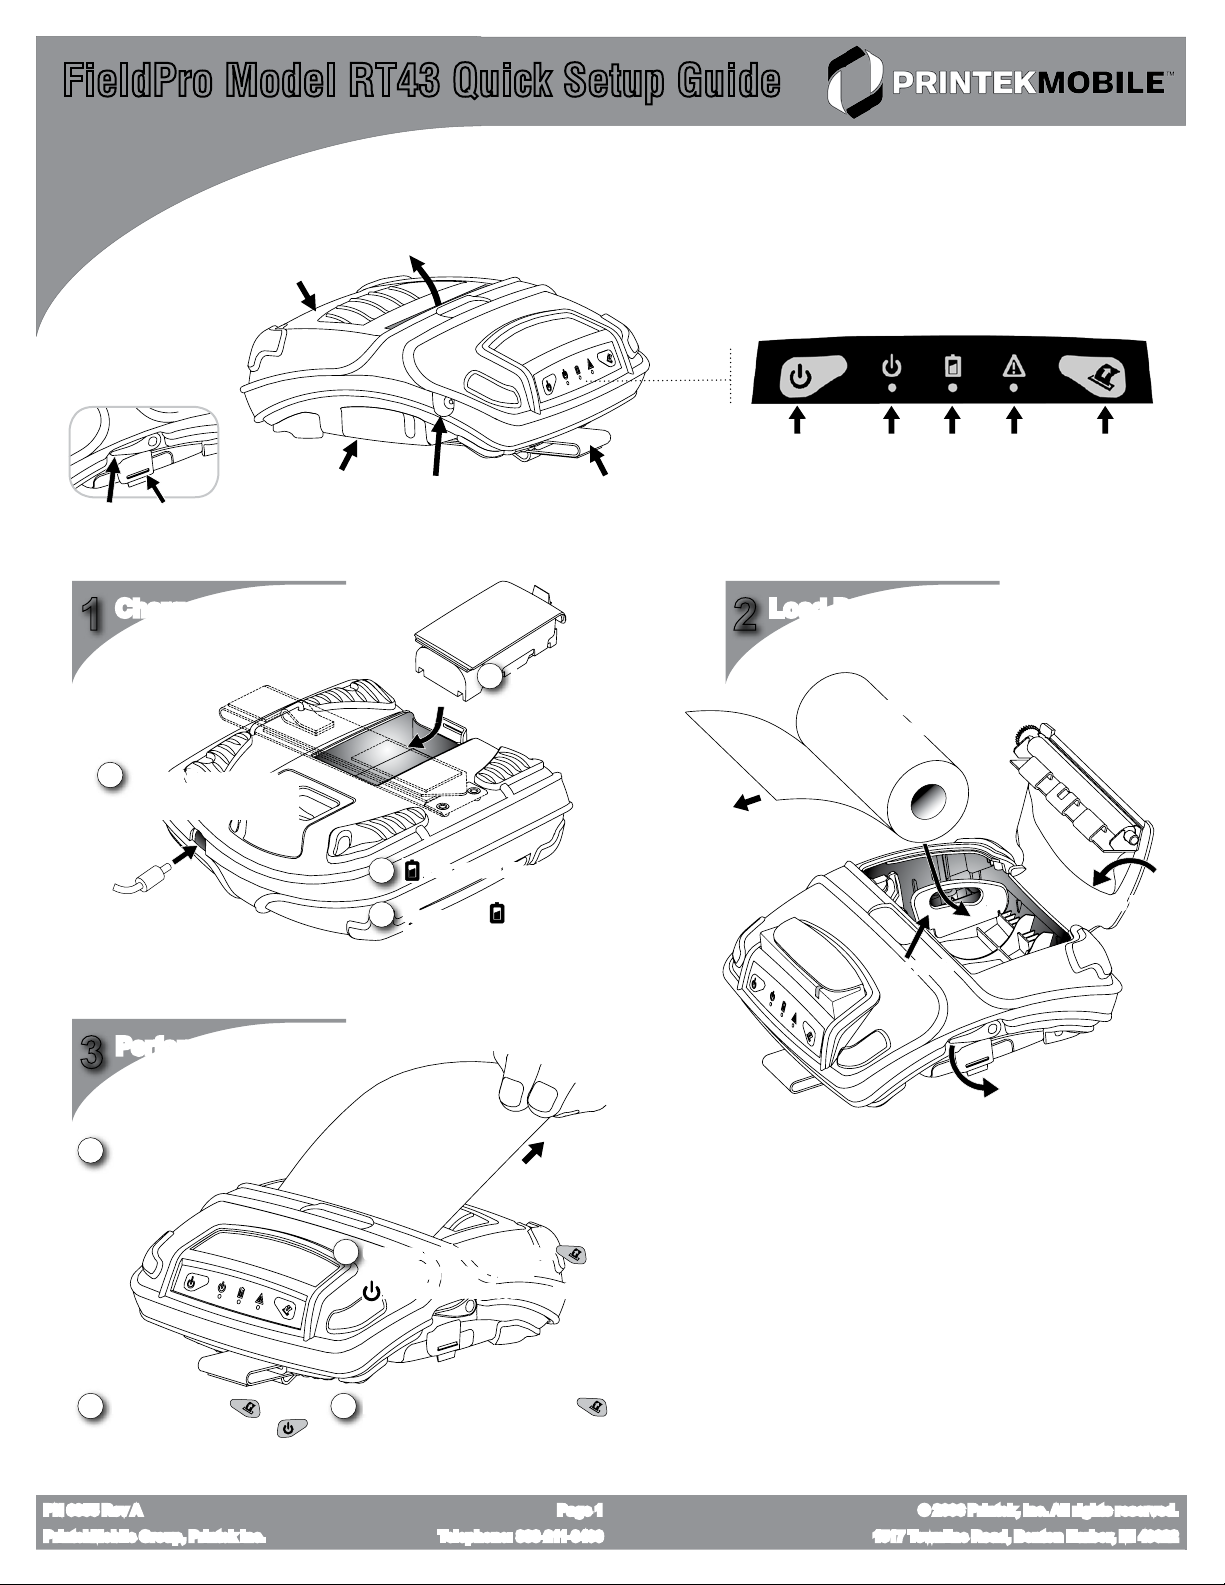
FieldPro Model RT43 Quick Setup Guide
Use this guide to configure your new FieldPro printer prior to use.
Printers may also be ordered from PrintekMobile pre-configured, if desired.
Rear
Detail Other Side
Paper Door
Release
1
2
Battery
Release
Charge the Battery
Connect Power Source
(PN 91373 AC Adapter, or
PN 91410 In-Vehicle Adapter)
Paper
Door
I/O Port
Cover
Paper
Exit
Power Input
Port
Top
Install Battery *
1
(Loosen Carrying
Strap if necessary)
Carrying
Strap
Front
Power
Button
Load Paper
2
Power
LED
Drop in
Paper ***
Battery
LED
Fault
LED
Feed
Button
LED Should Illuminate
3
Charge Until LED Goes Out **
4
(Approximately 2-3 hours)
Paper Guide
Perform Printer Test
3
Start with Power Off
1
Continue to Hold Feed Button
3
until Printer Beeps Twice.
LED will Flash, Test Page will Print
Hold Feed Button,
2
then Press Power Button
PN 6355 Rev A Page 1 © 2006 Printek, Inc. All rights reserved.
PrintekMobile Group, Printek Inc. Telephone: 888-211-3400 1517 Townline Road, Benton Harbor, MI 49022
Printer will Prompt You to Press
4
if You Want to Enter Setup Menu
(More on Setup Menu, See Reverse)
(Tear Direction)
*
FieldPro printers may be operated directly from an external power
source without a battery present. If no battery is to be used, battery
charging may be skipped. (A battery compartment cover is available
from PrintekMobile).
**
Maximum battery capacity is reached only after completing three
complete charge and discharge cycles. PrintekMobile recommends
completing three cycles before deploying your printer for best
results.
***
With media rolls of less than 4” width we recommend addition of a
second paper guide. See reverse for details.
More detailed instructions can be found in the Operator’s Manual, available at www.printekmobile.com
Depress Door
Release Lever
Close Door
Page 2
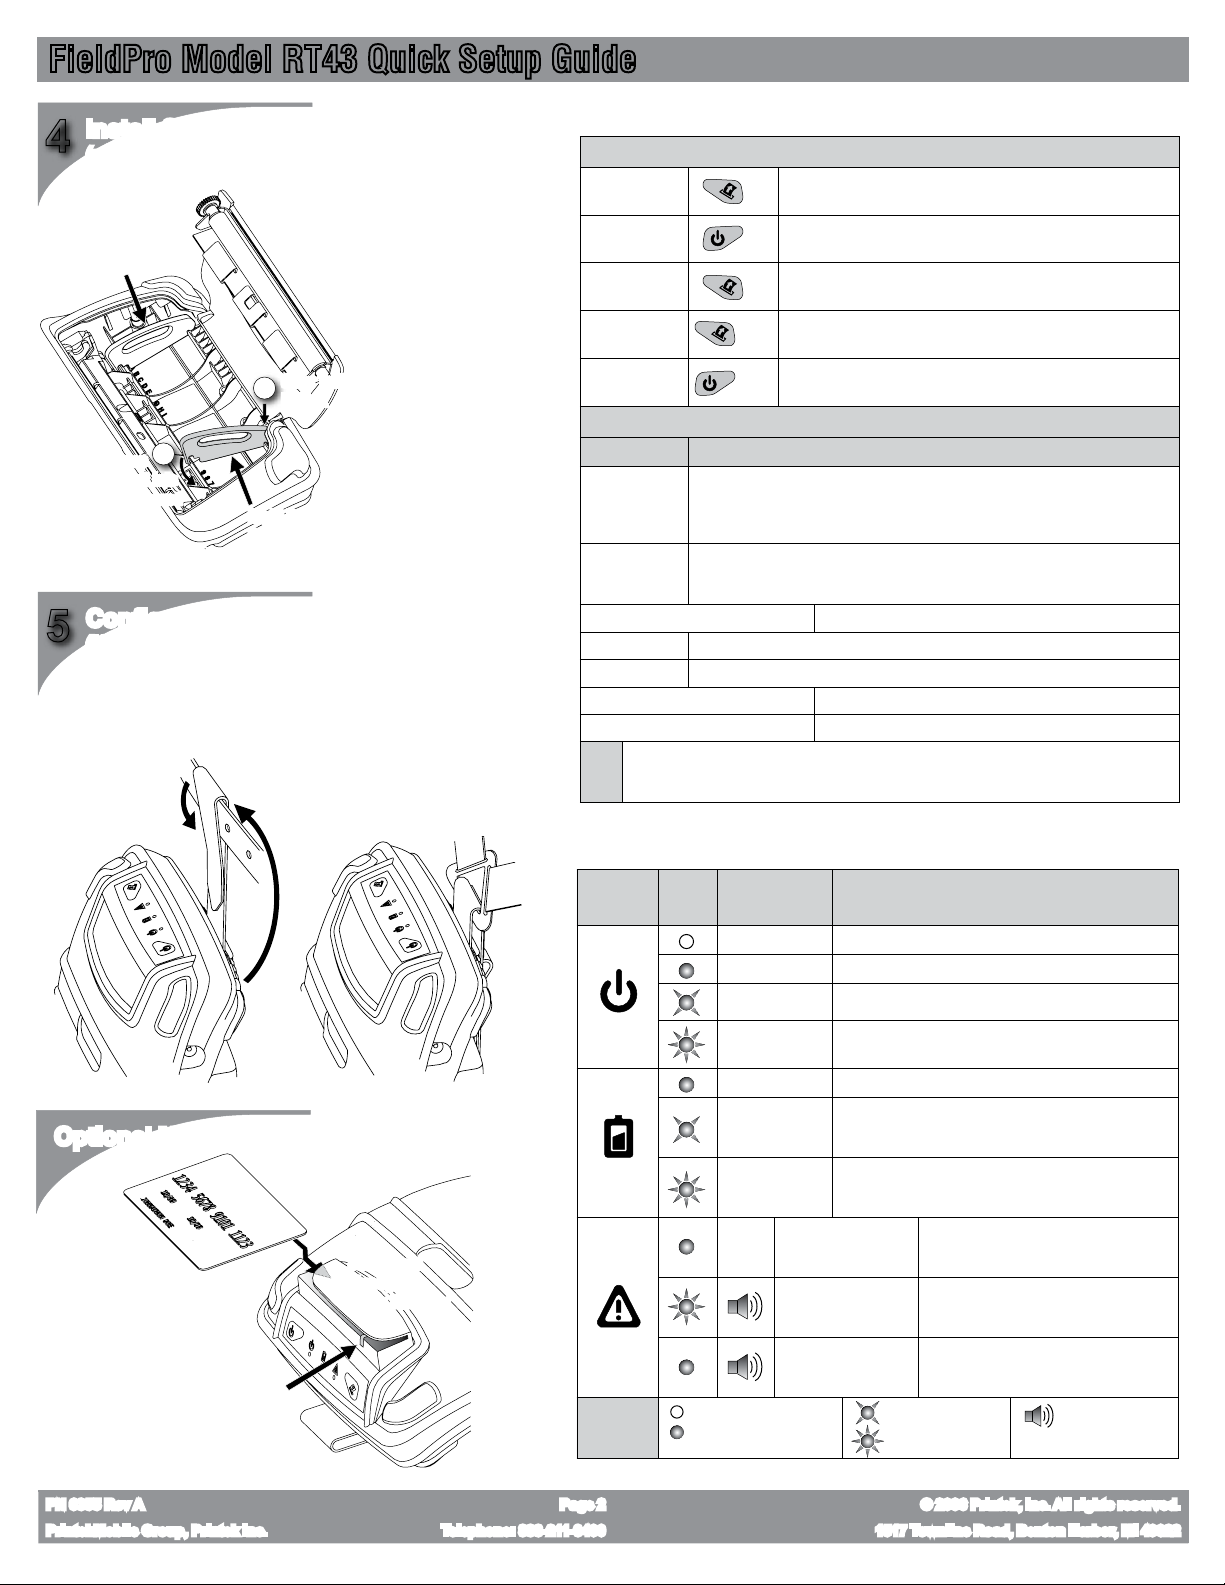
FieldPro Model RT43 Quick Setup Guide
Install Second Paper Guide
4
(not necessary for standard 4” roll)
Left Paper
Guide
Snap Tail
1
in First
2
Snap
Front into
Numbered
Slot
Configure Carrying Strap
5
(if necessary)
Belt Loop Conversion
Detach the carrying strap, thread behind
and over belt, and re-attach using the
two outside velcro pads provided.
Right Paper
Guide
The carrying strap may be converted to a
belt loop or connected to our Shoulder Strap
Accessory (PN 91868, sold separately)
Shoulder Strap Attachment
Detach the carrying strap, thread through
the opening on the triangular end of the
shoulder strap, and re-attach the inside
velcro pads.
To use the FieldPro for printing
on PrintekMobile standard 3”
paper (3.125” wide), insert the
second paper guide in slot 7.
This will left align the roll.
In Options menu, set the “Rt.
Paper Guide” setting to 7.
This will insure test pages print
and margins are measured
correctly.
For paper rolls less than 4”
wide that are not standard
PrintekMobile rolls, consult
operators manual for more
instructions on proper
installation and configuration.
FieldPro On-Board Menu
Menu Navigation
Enter Setup
Menu
Select/Change
Go To Next
Exit Menu
Power Off
(from setup menu)
Follow instructions for printing test page. The end of the test page
printout includes a prompt to press the feed button to enter setup.
Menu choices will print out. To select (enter) a menu or change the
most recently printed item, press the power button.
At any level in the menu structure, press the feed button to go to the
next item.
Shortcut - Exit from a menu and go to the next menu OR
Hold
Exit and Save Changes (if changes have been made).
1 sec
Shortcut - To turn the printer off in setup mode and discard any menu
Hold
changes, press and hold the power button for 2 seconds.
2 sec
Menu Structure
Menu List Menu Items
Interface Menu Emulation, Print Interface Settings
Format Menu
Print All Logos in Memory Select to print graphic files loaded in flash memory
Options Menu Left Paper Guide, Rt. Paper Guide, Auto Power Down, Print Promo, Print Header
Hardware Menu Enter HEX DUMP Mode, Reset to Factory Defaults
Exit Menu Discard Changes Select to exit the menu without saving
Exit Menu Save Changes Select to exit the menu while saving
Tips
The menus are cyclical and will return to the top of the list after the last item in each menu level.
The on-board menu is for convenience. Use the PrintekMobile Setup Utility when possible.
For more information on menus see the operator’s manual.
For Serial Interface:
For Bluetooth Interface:
For Wi-Fi Interface:
Font, Left Margin, Right Margin, Print Contrast, Max Paper Speed, FFeed Distance
When Using Mark Sensing:
Baud Rate, Parity, Data Bits, Stop Bits, RTS/CTS, XON/XOFF
Pairing Mode, Security, Role Policy, Discoverability
Wi-Fi Default Peer-to-Peer (for more info see operators manual)
Mark Sensitivity, Top Of Form Adj, Tearbar Adjust
Control Indicators
Optional MCR Module
Correct Card
Orientation
MCR Status Indicator LED
If Illuminated, Indicates
Ready for Swipe
NOTE: Application software must be
capable of capturing the magnetic
card data transferred from the printer.
See Programmer’s Manual for further
information.
Swipe Card
Through in
Either Direction
Symbol
LED State
Key:
LED
State
Indicates Cause
Power Off Printer turned off OR No power available
Power On Printer turned on, Normal operating state
Printer Standby Printer in standby mode (will wake with data)
Printer Busy Printer receiving data OR Printer is in setup mode
Charging Battery is receiving charge from external power
Battery Low Battery charge is low, printer is in standby mode
Battery Low
LED Off
LED On (Illuminated)
Battery charge is low, printer is in normal operating
state
Paper Door Open
Paper Out Fault
Communication
Fault
Paper door is open, preventing paper
feed
Paper roll empty or paper not fed
properly
Problem receiving data. Turn off
printer to reset
LED Slow Blink
LED Rapid Flash
Audible Tone
PN 6355 Rev A Page 2 © 2006 Printek, Inc. All rights reserved.
PrintekMobile Group, Printek Inc. Telephone: 888-211-3400 1517 Townline Road, Benton Harbor, MI 49022
 Loading...