

Page 1
SWITCH
MODULAR PERSONAL
LIGHTING SYSTEM
TM
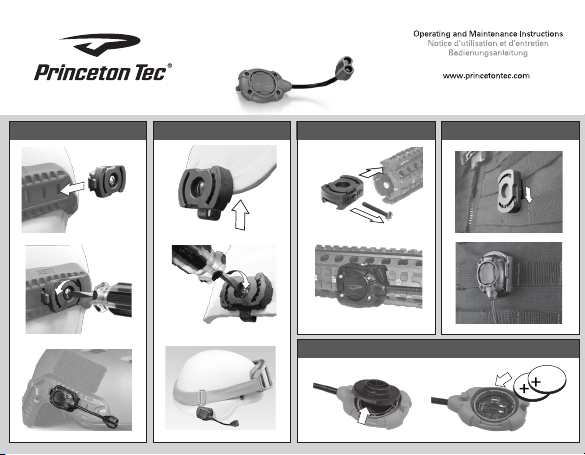
Helmet Rail Mount MOLLE Mount
Helmet Mount Picatinny Mount
Picatinny Mount
Battery Installation
Page 2

Battery Installation
See Battery Installation Diagram
White, Blue or Green LED
• (2) CR2016 Coin Cells - 6V
Infrared and Red LED
• (1) CR2032 Coin Cell - 3V
Princeton Tec cares about the environment and
recommends recycling batteries. For more
information about battery recycling, please go
to: www.batteryrecycling.com
To install the batteries, Rotate Light unit out of
Ratchet Base. Lift Tab of Battery Door on the
underside of light unit to expose Coin cell(s)
Install Coin cell(s) batteries with the + positive
side facing up. Improper installation of the
batteries will damage the light and void the
warranty.
Replace the battery door with the lift tab properly
aligned with lift tab slot of the housing. Press door
firmly in place making sure it is all the way seated
in place.
WARNING
Never mix fresh and used batteries.
Never mix different battery brands or chemistry
types.
Always remove drained batteries immediately.
Remove batteries during long periods of storage.
Switch Operation – See Operation diagram
A single press of the button turns on the primary
LED in low output mode.
A double press of the button turns on the
primary LED in high output mode.
Holding the button causes the secondary LED to
turn on. The secondary LED has one output level.
Continued holding switches back to the primary
LED.
Any button press after 2 seconds turns the
light off.
Troubleshooting
If the Switch MPLS fails to light:
• Check the batteries for proper installation.
• Replace batteries if proper installation is
confirmed.
• This light has been designed to be water
resistant. Check the light for water
contamination on the circuit board. The light
will resume normal operation once any water
is shaken or blown out and the light is left
open until completely dry. If the light has been
contaminated with salt water, flush the unit with
fresh water and dry as described above.
There are four different Base mounts your Switch
MPLS light will attach to. Helmet Mount, MOLLE
Vest mount, Picatinny and Reverse Picatinny mount.
1. Helmet mount – Back the screw out to the
end of screw is flush with metal U-clip. Slide
the exposed U-clip on the bottom edge of
your Helmet with the metal clip on the inside
and the plastic ratchet mount exposed on the
outside of your Helmet. Holding Mount firmly
upward, tighten center slotted screw until it
stops.
2. MOLLE Vest mount – Slide metal back clip
inside any MOLLE strap position, pinch Mollie
strap to hook the lower end of the metal clip
onto the strap.
3. Optional Reverse Picatinny mount – Will
work in ACH-ARC OPS-Core rails. Slide
Reverse Picatinny into ARC Dovetail rail to
desired position and secure in place with
center anti-slip lock screw. DO NOT
OVERTIGHTEN this screw.
4. Optional Picatinny mount – Remove the
center through bolt from the side of the
Picatinny base mount. Slide Picatinny to
desired position and insert side locking blot
aligning with any slot in Picatinny rail and
tighten to clamp in place. DO NOT
OVERTIGHTEN this screw.
USA – International 5-Year Warranty
Princeton Tec reserves the right to change product
specifications without notice.
Return Policy
If your light fails to operate, follow these simple
steps:
1) Check batteries. Replace if necessary.
2) Contact Princeton Tec customer service at
800-257-9080 to request an RMA number to
send your light in for repair or replacement. No
warranty repairs will be accepted without an
RMA number.
3) Return the light without batteries to:
Princeton Tec, 5198 Rt. 130, Bordentown, NJ
08505. Postage due and freight collect items
will not be accepted.
20 11
 Loading...