

Page 1

INTRODUCTION
This manual will familiarize you with the installation and use of your PRINCETON VL1919 LCD
Monitor, Please take the time to look through these instructions even if you are familiar with
monitors.
We have taken all possible care to ensure that this manual contains correct, accurate
information. However, the manufacturer cannot assume liability for any possible errors. In addition,
the manufacturer cannot guarantee that the hardware will meet the purpose you require.
All rights reserved. No part of this manual may be reproduced, processed or distributed in
any form (print, photocopy, microfilm or any other process) or processed by an electronic system
without prior written permission from the manufacturer.
We reserve the right to make changes according to technical progress. PRINCETON VL1919 is an
internationally registered trademark. Other brand names may be registered trademarks and must be
treated as such.
Important Safety Instructions
Do not place the monitor in very hot or cold, or damp or dusty surroundings. Do not put vases etc. on
the monitor (water may cause short circuits). Do not block or cover the ventilating openings. All
products that produce magnetic fields, i.e. laser printers, loud speakers, etc., must not be placed
close to the monitor. Do not install this monitor in areas where too much light or sunshine might
directly hit the screen, otherwise the brightness of the picture will be poor due to reflections.
Refer all servicing and maintenance to authorized service personnel only!
CAUTION
Do not remove the cover!
Serious electrical shock hazards exist inside this monitor.
NOTE
Removal of cover invalidates your warranty.
1
Page 2

TABLE OF CONTENTS
INTRODUCTION 1
TABLE OF CONTENTS 2
IMPORTANT INFORMATION 3
CARING FOR YOUR LCD MONITOR 4
WALL MOUNTING 4
UNPACKING 5
CONNECTING 5
STARTUP 6
BASIC SETUP 7
IMAGE SETTINGS USING THE OSD MENU 7
OSD MENU FUNCTIONS 8
TROUBLESHOOTING 14
TECHNICAL SPECIFICATIONS 15
CONFORMITY AND COMPLIANCE 16
2
Page 3

IMPORTANT INFORMATION
Note on monitor placement
The setup location must not be extremely hot, cold, humid or dusty. Heat and cold can impair
the functionality of the monitor. Humidity and dust can cause the monitor to fail.
Don’t place the monitor near heaters such as radiators or the like. Don’t expose the monitor to
mechanical vibration or jarring.
Position the monitor so that no direct light or sun strikes the screen, which could cause
reflections that reduce the quality of the image.
Notes on power connection
Only use the power cord designated for use in your country. The wall outlet should
be within easy reach. Pul lin g th e po we r pl u g is the onl y wa y t o disconnect
the monitor from the power source.
This monitor is ENERGY STAR®-compatible, and guarantees that this device
complies with the ENERGY STAR® guidelines for optimizing power consumption.
Safety instructions for operation
The power cord must not be damaged. Do not place any objects on the power cord
and make sure it does not have any knots. To unplug the cord, always pull on the plug
and not on the cable itself. Damage to the power cord may result in fire or cause electric
shocks.
Avoid covering the ventilation slots. Air circulation is necessary to prevent the
moni tor from overheating. If the air circulation is restricted it could cause fire or
damage the monitor.
Do not use any solvents to clean the monitor, as the housing could be damaged.
For more information about cleaning the monitor, please see “Caring for Your
LCD Monitor”.
Never open the monitor housing on you own. There is a danger of electric shock and
other hazards. The monitor may only be opened and serviced by qualified
professionals.
3
Page 4

Note on resolution
All resolutions provided by the graphics card that deviate form the physical resolution of the panel
are adjusted by interpolation. This can impair the image quality.
Notes on ergonomics
To protect your eyes, neck and shoulder muscles when working with a computer, we
recommend that you maintain a viewing distance of between 50 and 75 cm from the monitor.
Furthermore, you should regularly focus on an object around 6 m awa y f rom yo u t o help yo ur
eyes re la x. Ergonomica ll y, your posture is bes t when elbows, pelvis, knees and ankles are
all at right angles.
CARING FOR YOUR LCD MONITOR
First, unplug the power cord from the wall socket
If the LCD screen is extremely dirty, clean it with a moist cloth. Use only warm water and then
wipe the monitor dry. Solvents or harsh cleaners can damage the housing. Clean the display
surface only with a soft cloth, otherwise you may damage the display’s coating
If the monitor is only slightly dirty, clean it using a soft, dry and antistatic cloth.
The LCD monitor’s screen surface is very sensitive. Please avoid any contact with the
surface (finger, pencil, etc.) and be especially cautious during transportation since
jolts and shocks can cause the screen to become scratched (always use the original
packaging).
WALL MOUNTING
The PRINCETON monitor is shipped with the standard desktop configuration. However, you can optionally
mount the device on a wall or on a monitor swivel arm (optional accessory). Please follow the
corresponding instructions (4-hole assembly with a spacing of 4 × 4 inches (100 × 100 mm)according
to the international VESA FDMI standard).
4
Page 5

UNPACKING
Carefully lift the monitor out of the packaging and make sure that all components are included (see fig. 1).
Save the original box and packing material in case you have to ship or transport the monitor. To set up the
device, you must fit the monitor base together.
Figure 1.LCD Monitor
CONNECTING
➧ To connect the monitor to your PC
1. Make sure that the PC and the monitor is unplugged.
2. Connect the 15-pin signal cable to the monitor and The PC (see fig. 2)
3.
If you have a graphic card with a digital DVI-D connector(24-pin socket), then connect one end
of the DVI-D cable to the DVI-D connector of your monitor (see fi g. 2b), the other end to the
computer.
Figure 2.Connecting the monitor to the PC
Signal coble
5
Page 6
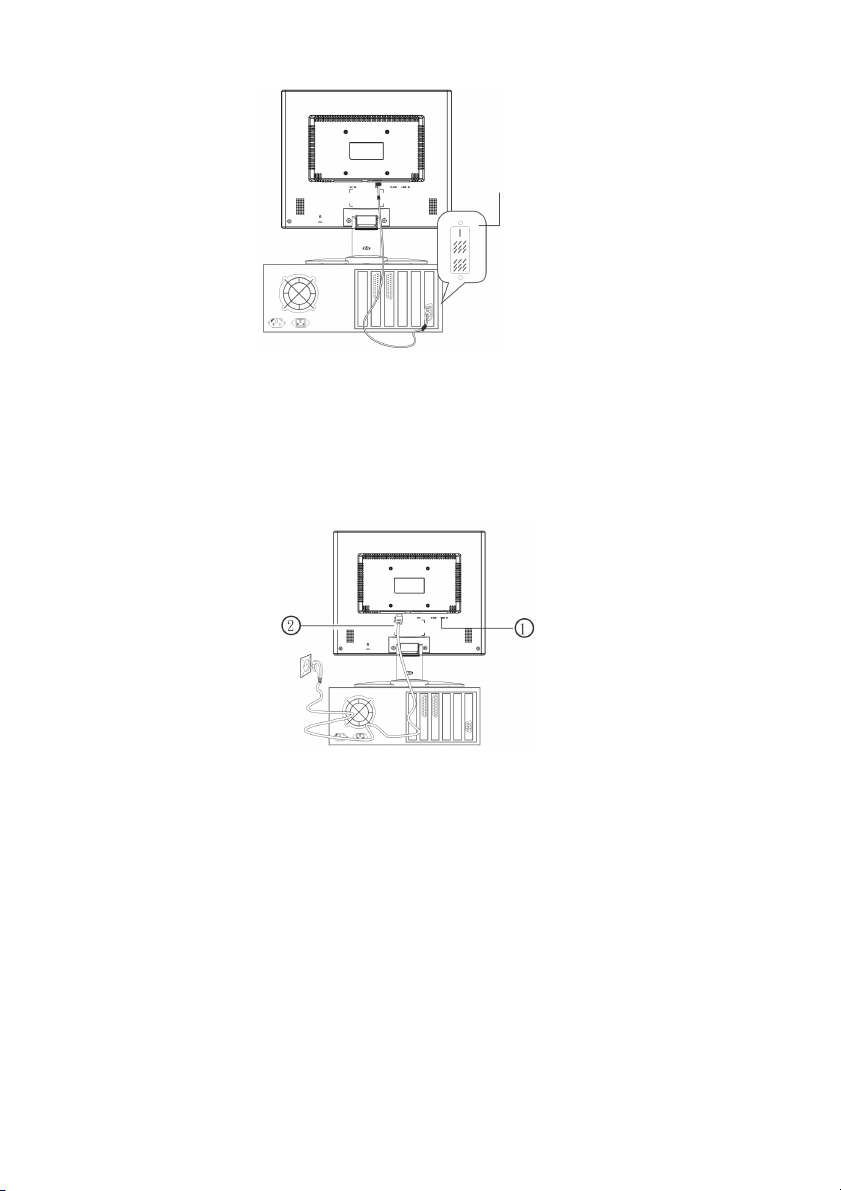
➧ Connecting the audio cable
If your computer is equipped with an audio output port, connect one end of the sound cable to the audio
Input connector of the monitor (① in fig. 3) and the other end to the Line-Out connector of the computer.
➧ To connect the monitor to the power source
Connect the separate power cable (②in fig. 3) to the Monitor and a grounded outlet.
Cable DVI-D
Figure 3.Connecting the monitor to the power source
STARTUP
1. First start your PC and then turn on your monitor using the power switch (④ in fig. 4). The status
indicator (④ in fig. 4) should light up green.
2. Adjust the image to meet your requirements (see the following sections “Basic Setup” and
“Image settings using the OSD menu”).
3. If there is no image displayed on the monitor, consult the section “Troubleshooting”.
6
Page 7

BASIC SETUP
➧ Automatic Image Adjustment
You can adjust the image settings (such as brightness, contrast, image position, phase, etc.)
manually or by using the LCD monitor’s automatic image adjustment feature. This will adjust
the image parameters to their optimal settings for the current graphics mode. Press
SELECT/AUTO (① in fig. 4) to launch the automatic adjustment. The process will take a short
while until completed.
➧ Setting the volume directly
You can adjust the speaker volume of the integrated audio system directly by pressing the ◄ or
► buttons (③and② in fig. 4) while the OSD menu is inactive. Next pre ss the ► button to increase
the volume or the ◄ button to decrease it.
➧ Shortcut for adjusting brightness and contrast
You can adjust brightness and contrast directly by pressing the ▲ or ▼ buttons (⑥and⑤ in fig. 4)
while the OSD menu is not displayed. Next, press the ▲ or ▼ buttons (⑥and⑤ in fig. 4) to adjust the
brightness or the ◄ or ► buttons (③and② in fig. 4) while the OSD contrast.
➧ Disabling the sound (MUTE)
You can mute sound playback by pressing the ◄ or ► buttons (③and② in fig. 4) while the OSD
menu is not displayed. Next, press the ▼ button to mute the sound or the ▲ button to reactivate it.
1. IMAGE SETTINGS USING THE OSD MENU
The OSD menu is a window on your screen that allows you to view and change display settings. To change
an OSD setting:
Figure 4.Monitor features
Press the MENU button (⑤ in fig. 4) to display the OSD menu on the screen.
1. There are a total of 5 OSD submenus divided by categories. Select the desired submenu by
pressing the OSD button < or > (① and ② in fig. 4; see section “OSD Menu Functions”).
2. Press the OSD button MENU (⑤ in fig. 4) to activate the selected function or associated submenu.
3. If you selected submenu, now select the sub-function you want using < or > (① and ② in fig. 4)
7
Page 8

4. Set the desired value using the OSD button < or > (① and ② in fig. 4)
5. The current settings are automatically saved when you return to the previous level or exit the OSD
menu. Repeat steps 2–5 to make further adjustments as needed.
6. The OSD menu aut omatica lly disappe ars if no changes are made for more than 45 seconds
(default setting). The current settings will be saved. You can close it manually by pressing the
button AUTO (⑥ in fig. 4).
2.OSD Structure
2.1 Menu Items
8
Page 9

2.2 Messages
Message
Audio Status
+- Audio Status: mute
+- Audio Status: normal
Auto Adjust
+- Auto processing
Input Status
+- Input: Analogue
+- Input: Digital
No Signal
+- No signal
Going to sleep
OSD locked
+- OSD locked
Power button locked
+- Power button locked
+- Power button unlocked
Out of Range
+- Frequency out of range: ## kHz / ## Hz
Please change the display mode to
1280 x 1024 with 60 Hz.
Resolution notice
+- For best picture quality, please
change resolution to 1280 x 1024.
SELECT: Disable EXIT: Clear
2.2.1 Message window style and size
Size 1: 290 x 94 pixels:
9
Page 10

-Input select message window to be defined-
Size 2: 360 x 140 pixels for Resolution notice and out of range message:
2.2.2 Message location
All messages are centered on the screen.
2.2.3 Message time-out
All messages are disappearing automatically after 3 seconds, except:
Resolution notice message keeps until end user either disables or exits message
Out of range message keeps until monitor enters to PS mode
3 Function description
3.1 Start up logo
When the monitor is switched on, the FSC logo is shown in center of screen with a black screen for about 2
seconds.
3.2 Key response
All changes of options with adjust bars will take place immediately. Also the color temperature menu shows
immediate response, when the selection cursor is moved. All other options are stored when EXIT is
pressed.
10
Page 11

3.3 Preview of next menu level
A
The OSD shows a preview to the options and settings of the next menu level if applicable.
The active menu level shows a bright background [4] and a colored cursor bar [3] (see color table). The
inactive menu level areas show the gray background [2].
3.4 Input detection for dual input monitors
If there is no signal on the actual input, the MCU should search also on the other input for a valid signal. If
the preferred input has no signal but the other, than the input status message is shown. If both inputs have
no signal the monitor shows the "No signal, going to sleep" message.
3.5 Auto level
Cursor moved to Auto level
SELECT is pressed 1st time
After selecting 2
This function should set the black level to the black level of the signal or to factory default black level and
signal input range to the actual signal white level.
This should work at least from 550 mV to 1000 mV.
nd
time, the auto level adjustment is performed and the menu returns back one level.
3.6 Audio
If mute is activated, the adjust bar of volume is not filled, but any change of volume switch audio status
back to normal.
confirmation dialog is shown
11
Page 12

3.7 Custom colour
After Custom colour is selected, the 3 adjust bars for red, green and blue are shown. SELECT button
navigate between red, green and blue, while ▼ and ▲ buttons change the highlighted colour value.
A hint is shown: SELECT: R > G > B
12
Page 13

3.8 Factory recall
When selected 1st time a confirmation dialog is shown:
SELECT: Start
EXIT: Back
After selected 2nd time, this function sets every option value to the factory-preset value.
After factory recall is finished, the OSD menu is closed and auto adjust is performed for the current mode,
excluding all 31 kHz modes.
3.9 Out of range message
This message starts to move slowly around the screen after 5 seconds. After 5 minutes the monitor
changes to power down mode.
3.10 Resolution notice
When enabled, this message appears when a resolution other than the panel resolution is selected with a
delay of 30 seconds to avoid the message appearing during boot sequence of operating system.
When pressed SELECT, this message is disabled and disappears from the screen. It also disappears after
EXIT is pressed.
3.11 OSD lock / unlock
When the MENU button is pressed during power on and held for 5 seconds, OSD menu is locked and the
message “OSD locked” appears. The message “OSD locked” pops up instead of the OSD menu, when the
MENU button is pressed in OSD lock condition.
To unlock OSD menu, repeat the same procedure as for lock. This opens the OSD menu.
3.12 Power button lock / unlock
To lock/unlock the power on/off button, press up and down button simultaneously (within 0.5 seconds).
The status message “Power button locked / unlocked” appears.
Every time, the power button is pressed in locked condition, the message “Power button locked” appears.
3.13 Service menu
The service menu includes the accumulated operating time (backlight on).
13
Page 14

TROUBLESHOOTING
Blank Screen
Power indicator is off
Make sure the power cable and the power adapter are connected properly (see section
“Connecting”).
Make sure that the monitor was turned on using the power switch (see section
“Start up ”).
Power indicator lights orange
A screen saver may have activated automatically after a certain period of inactivity.
Press any key on your keyboard or move the mouse.
“Check signal cable”message
Is the signal cable connected to the monitor and the PC’s graphics port (see section
“Connecting”)?
Is the PC turned on (see your PC’s documentation)?
Display Problems
Image is displaced to the left/right or to the top/bottom
If the image appears normal but off-center, you can adjust it using the OSD functions.
For further information, see chapter “Basic Setup”, section “Auto Image Adjustment”.
Image flickers or is shaky
Perhaps setup file chosen for the monitor is incorrect. For information on monitor setup
under Windows®9x/ME/2000/NT/XP consult the “Configuration” section.
Image is blurred
Check brightness and contrast settings (see chapter “OSD Menu Functions”, section
“Brightness/Contrast”).
Check the resolution setting (see “ Other” functions in the “ OSD Menu Functions ”
section).
Color problems
If the colors are off (e.g. white is not really displayed as white, etc.), you should adjust
the color temperature (see“Color” function in section “OSD Menu Functions”).
14
Page 15

TECHNICAL SPECIFICATIONS
LCD panel
Contrast ratio
Viewing angle
Response time
Brightness
Input signal
Display colors
Synchronization
Video band width
Ergo. resolution
Audio
Power connection
Power consumption
Dimensions
Weight
Environmental
19 inch diagonal size, low radiation according to TCO ‘99, certified
to ISO 13406-2
700:1 (typical)
horizontal 140°, vertical 130° (typical)
6 ms typical (Tr + Td)
300 cd/㎡ (typical)
Analog (D-SUB) & DVI-D (digital)
16.2 mill. Color (FRC)
31~ 81 kHz horizontal, 56 ~ 75 Hz vertical
135 MHz (pixel rate)
1280 × 1024 (60 Hz)
Amplifier: 1 Watt at 8 Ohms
Loudspeaker: 1 W continuous load, 1.5 W peak power
Input: 100-240 V+/-10%AC-CD, 50/60 Hz
ON status: max.37 W; color of the status LED: blue
SLEEP status: <1.5W; color of the status LED: amber
Power saving functions EPA certified
Width: 410 mm, height: 420 mm, depth: 178 mm
4.4 kg (net)
Operation:
5 - 35℃, humidity:20 - 90% (without condensation)
Storage:
-20- +60℃, humidity:5 – 90% (without condensation)
15
Page 16

CONFORMITY AND COMPLIANCE
FCC Compliance Statement
This equipment has been tested and found to comply with the limits for a Class B digital
device, pursuant to Part 15 of the FCC Rules. These limits are designed to provide
reasonable protection against harmful interference when the equipment is operated in a
residential installation. This device generates, uses, and can radiate radio frequency energy
and, if not installed and used in accordance with the instructions, may cause harmful
interference to radio communications. However, there is no guarantee that interference will
not occur in a particular installation. If this device does cause harmful interference to radio or
television reception (this can be determined by turning, the device off and on), you are
encouraged to try to correct the interference by one or more of the following measures:
Reorient or relocate the receiving antenna.
Increase the separation between the equipment and the receiver.
Connect the equipment into an outlet on a circuit different from that to which the
receiver is connected.
Consult the dealer or an experienced radio/TV technician for help.
Caution
To comply with the limits for an FCC Class B computing device, you should use the
shielded signal cord and shielded power cord supplied with this unit. The Federal
Communication Commission warns that changes or modifications of the unit not
expressly approved by the party responsible for compliance could void the user’s
authority to operate the equipment.
Radio Frequency Interference Statement
Warning
This is a Class B product. In a domestic environment this product may cause radio
interference in which case the user may be required to take adequate measures.
ENERGY STAR
This product meets the Energy Star guidelines for energy efficiency.
16
Page 17

PRINCETON DIGITAL (USA) CORP.
Your LCD monitor from Princeton Digital purchased in the United States and Canada is warranted to be
free from defect in materials or workmanship for
parts, labor and LCD panel and Backlight for the periods of time set forth in the chart below:
1 years Parts
1 year LCD Panel & Backlight
1 year Labor
All warranty periods begin from the date of the monitor’s original retail purchase, as brand new product. If
unit was purchased as a demonstration or
evaluation unit, warranty period begins from original reseller purchase date. If demonstration or evaluation
unit is resold at a later date, reseller is responsible
for declaring status to user and unit is sold “as is” condition and with the remaining warranty period from
original reseller purchase date. If the monitor fails to
conform to this warranty, we will replace it with a new or refurbished monitor or repair it using new or
refurbished parts. Refurbished units (meaning working
product with minor cosmetic damages) warranty period, if any, will be established at time of sale from
manufacturer.
To obtain warranty service in the United States, you must return the LCD monitor within the warranty
period together with the original or a machine
reproduction of a dated proof-of-purchase document describing it and a return merchandise authorization
to an authorized service center, transportation
charges prepaid. To obtain the name and address of the nearest authorized service center and a return
merchandise authorization,
call 1-800-747-6249. (English Only)
This warranty does not cover defects, malfunctions or failures resulting from shipping or transit accidents,
abuse, misuse, operation contrary to furnished
instructions, operation on incorrect power supplies, operation with faulty associated equipment,
modification, alteration, improper servicing, tampering or
normal wear and tear or LCD monitors on which the serial number has been removed or defaced. Interface
cards, cables or mishandling are not covered by
this warranty. LCD panel pixel defects within the panel manufacturer’s specifications or mishandling of the
LCD display by applying excessive pressure to the
panel are not covered under this warranty.
ANY IMPLIED WARRANTIES, INCLUDING ANY IMPLIED WARRANTY OF MERCHANTABILITY AND
FITNESS FOR A PARTICULAR PURPOSE SHALL
BE LIMITED IN DURATION TO THE PERIOD OF TIME SET FORTH ABOVE. OUR LIABILITY FOR ANY
AND ALL LOSSES AND DAMAGES RESULTING
FROM ANY CAUSE WHATSOEVER, INCLUDING OUR NEGLIGENCE, ALLEGED DAMAGE OR
DEFECTIVE GOODS, WHETHER SUCH DEFECTS ARE
DISCOVERABLE OR LATENT, SHALL IN NO EVENT EXCEED THE PURCHASE PRICE OF THE
MONITOR. WE SHALL NOT BE RESPONSIBLE FOR
LOSS OF USE, COMMERCIAL LOSS OR OTHER INCIDENTAL OR CONSEQUENTIAL DAMAGES.
SOME STATES DO NOT ALLOW LIMITATIONS ON
HOW LONG AN IMPLIED WARRANTY LASTS OR THE EXCLUSION OR LIMITATION OF INCIDENTAL
OR CONSEQUENTIAL DAMAGES, SO THE
ABOVE LIMITATIONS OR EXCLUSIONS MAY NOT APPLY TO YOU. This warranty gives you specific
legal rights, and you may also have other rights which
vary from state to state. This is the only warranty applicable; no one is authorized to extend or modify it or
to grant any other warranty.
. 2003-2005 Princeton Digital (USA) Corp. All rights reserved. Warranty Revision C 02/02/04
17
 Loading...