

Page 1

91
REFERENCE MANUAL
4
Page 2

Table of Contents
Tips and safety precautions................................................................................................................................. 2
Product description ............................................................................................................................................. 3
Height adjustment, angle adjustment.................................................................................................................. 4
Connecting the monitor and turning the monitor on and off.............................................................................. 5
Connecting the monitor to a computer........................................................................................................... 5
Connecting the monitor to a power ................................................................................................................ 6
Turning the power on ..................................................................................................................................... 6
Changing between input terminals................................................................................................................. 7
Turning the power off..................................................................................................................................... 7
Adjusting the screen display............................................................................................................................... 8
Adjusting the backlight................................................................................................................................... 8
Setting GAMMA ............................................................................................................................................ 9
Adjusting the screen display (When using an analog signal) ........................................................................... 10
Automatic screen adjustment ....................................................................................................................... 10
Manual screen adjustment ............................................................................................................................ 11
Adjusting the screen display (When using a digital signal)............................................................................. 14
Monitor care and repair .................................................................................................................................... 16
Monitor care ................................................................................................................................................. 16
Storage.......................................................................................................................................................... 16
Troubleshooting............................................................................................................................................ 16
Specifications.................................................................................................................................................... 17
Instructions for attaching a VESA compliant arm............................................................................................ 20
1
Page 3

Tips and safety precautions
- The TFT color LCD panel used in this monitor is
made with the application of high precision
technology. However, there may be minute
points on the screen where pixels never light or
are permanently lit. Also, if the screen is viewed
from an acute angle there may be uneven colors
or brightness. Please note that these are not
malfunctions but common phenomena of LCD's
and will not affect the performance of the
monitor.
- Do not leave the screen displaying idly for long
periods of time, as this could cause afterimage to
Remain.
- If the brightness is adjusted to the minimum
setting it may be difficult to see the screen.
- The quality of the computer signal may influence
the quality of the display. We recommend using a
computer able to emit high quality video signals.
- Never rub or tap the monitor with hard objects.
- This monitor and its accessories may be
upgraded without advance notice.
Location
- Do not use the monitor where ventilation is poor,
where there is a lot of dust, where humidity is
high, or where the monitor may come into
contact with oil or steam, as this could lead to
fire.
- Ensure that the monitor does not come into
contact with water or other fluids. Ensure that no
objects such as paper clips or pins enter the
monitor as this could lead to fire or electric
shock.
- Do not place the monitor on top of unstable
objects or in unsafe places. Do not allow the
monitor to come into contact with strong shocks
or vibrations. Causing the monitor to fall or
topple over may damage it.
- Do not use in places where the monitor will be
subject to direct sunlight, near heating equipment
or anywhere else where there is likelihood of
high temperature, as this may lead to generation
of excessive heat and outbreak of fire.
The Power Cord
- Do not damage the power cord nor place heavy
objects on it, stretch it or overly bend it. Also, do
not add extension cords. Damage to the cord may
result in fire or electric shock
- Use only the power cord supplied with the
monitor.
- Insert the power plug directly into the AC outlet.
Adding an extension cord may lead to fire as a
result of overheating.
Monitor and accessory checklist
- Please check that the following items are included
in the Package.
- LCD monitor (1)
- Digital DVI cable (1)
- Analog signal cable (1)
- Power cord (1)
- Operation manual (1)
Notes:
- Be sure to use cables that are less than 3 m in
length.
- You are advised to retain the carton in case the
monitor needs to be transported.
Manual Scope
- In the booklet, Microsoft Windows XP will be
referred to as "Windows XP", Microsoft Windows
Millennium as "Windows Me", Microsoft
Windows 2000 as "Windows 2000", Microsoft
Windows 98 as "Windows98", Microsoft
Windows 95 as "Windows 95”, and Microsoft
Windows Version 3.1 as "Windows 3.1". When
there is no need to distinguish between programs,
the term "Windows " will be used.
2
Page 4
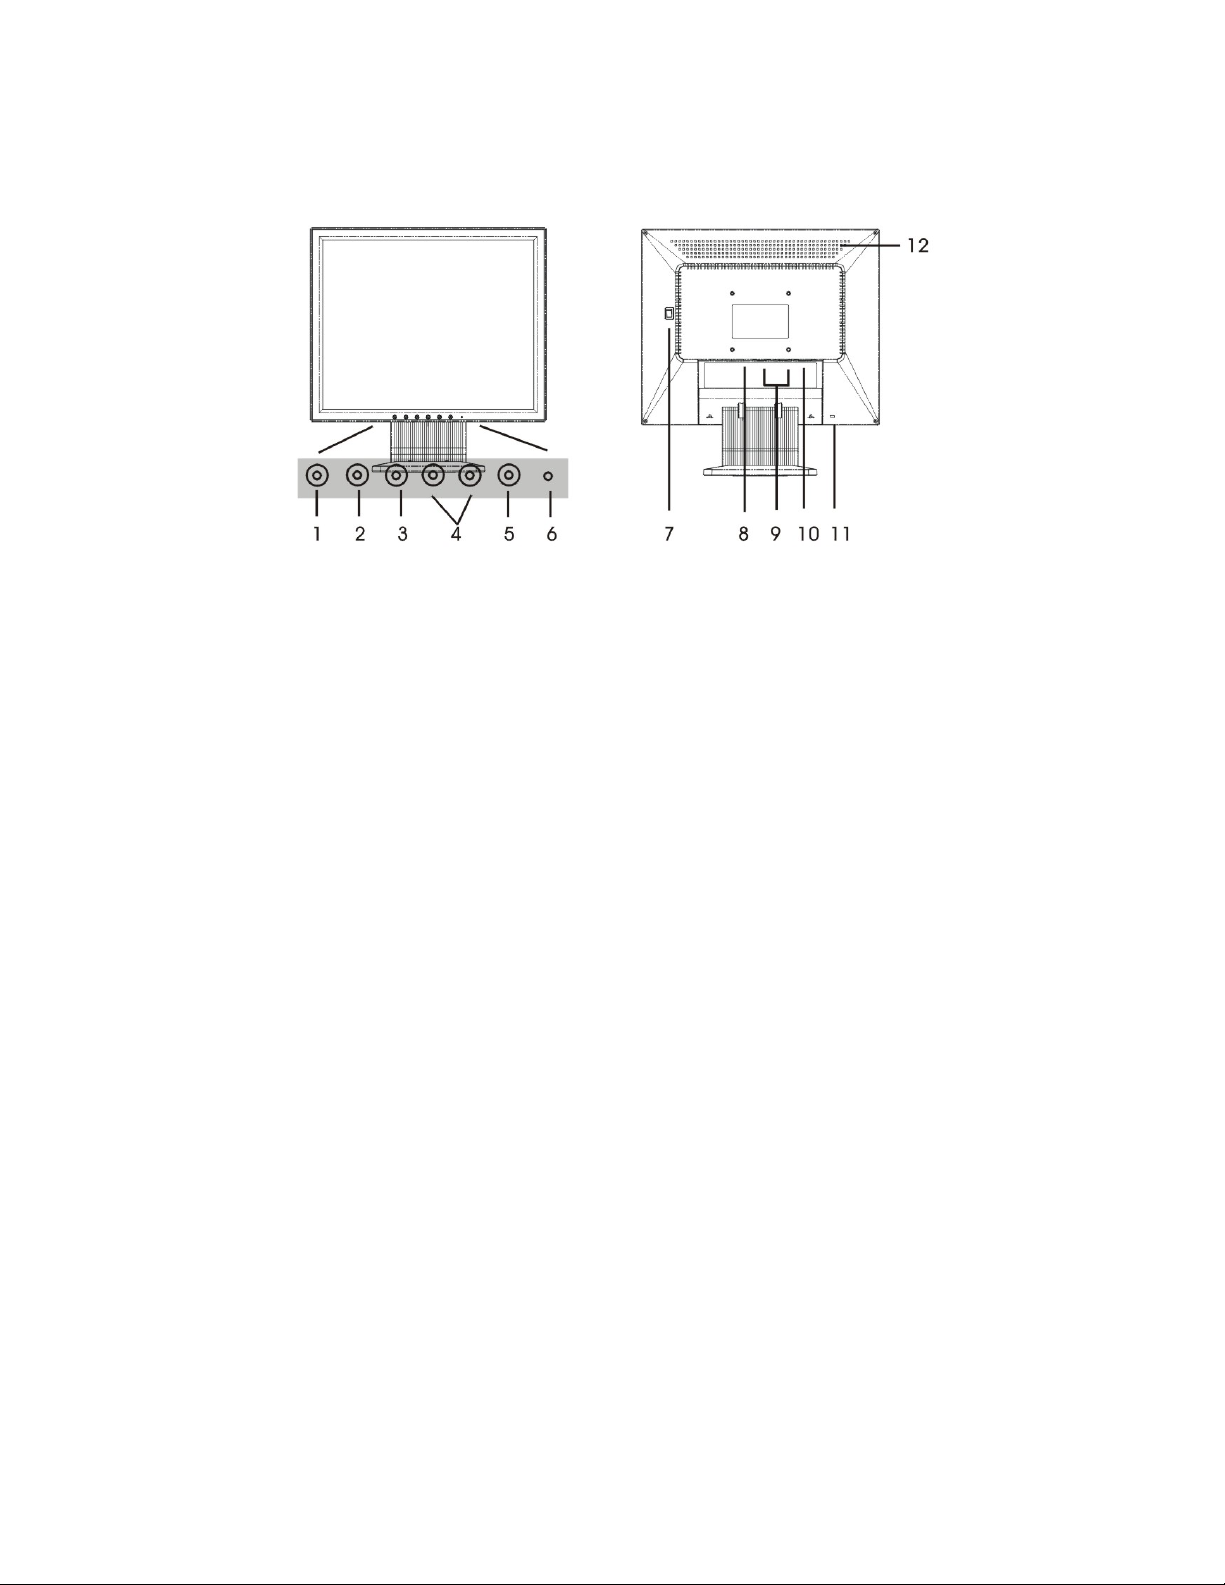
Product description
1. INPUT button---------------------------- To switch between the signal's input terminals.
2. MENU button--------------------------- This button is used to pop-up, select and close the OSD (On Screen
Display)
3. d/ MODE button----------------------- When the OSD Menu is displayed:
This button is used to select menu options.
When the OSD Menu is not displayed:
This button is used to set DISPLAY MODE.
4. ef buttons------------------------------ When the OSD Menu is displayed:
These buttons are used to select an option or adjust the value of
the selected option.
When the OSD Menu is not displayed:
These buttons are used to adjust backlight brightness.
5. Power button----------------------------- Pressing this button turns the power on.
Press the button again to turn the power off.
6. Power LED------------------------------- This LED is lit green when in use and orange when in power-saving
Mode.
7. Main power switch
8. Power terminal
9. Analog RGB input terminal 1 and 2-- The analog signal cable is connected here.
10.DVI-D input terminal------------------ The digital signal cable is connected here.
11. Security lock anchor------------------ By connecting a security lock (sold separately) to the security lock
anchor, the monitor is fixed so that it cannot be transported.
(The security slot works in conjunction with Kensington Micro
Saver Security Systems.)
12. Ventilation openings------------------- Note: Never block the ventilation openings as this may lead to
overheating inside the monitor and result in malfunction.
3
Page 5

Height adjustment, angle adjustment
CAUTION!
- Pressure from hands on the LCD panel could cause
damage.
- Do not attempt to move the monitor beyond its
movement range. Applying excessive force to move
the monitor may damage the product.
- Be careful not to allow your fingers to be pinched.
Height adjustment
- When positioning the display higher, hold the stand
tight so that it does not move together with the
display.
Angle adjustment
4
Page 6
Connecting the monitor and turning the monitor on and off
CAUTION!
- When connecting, ensure that both the monitor
and computer are switched off.
- Be careful not to overly bend the cable or add
extension cords as this could lead to a malfunction
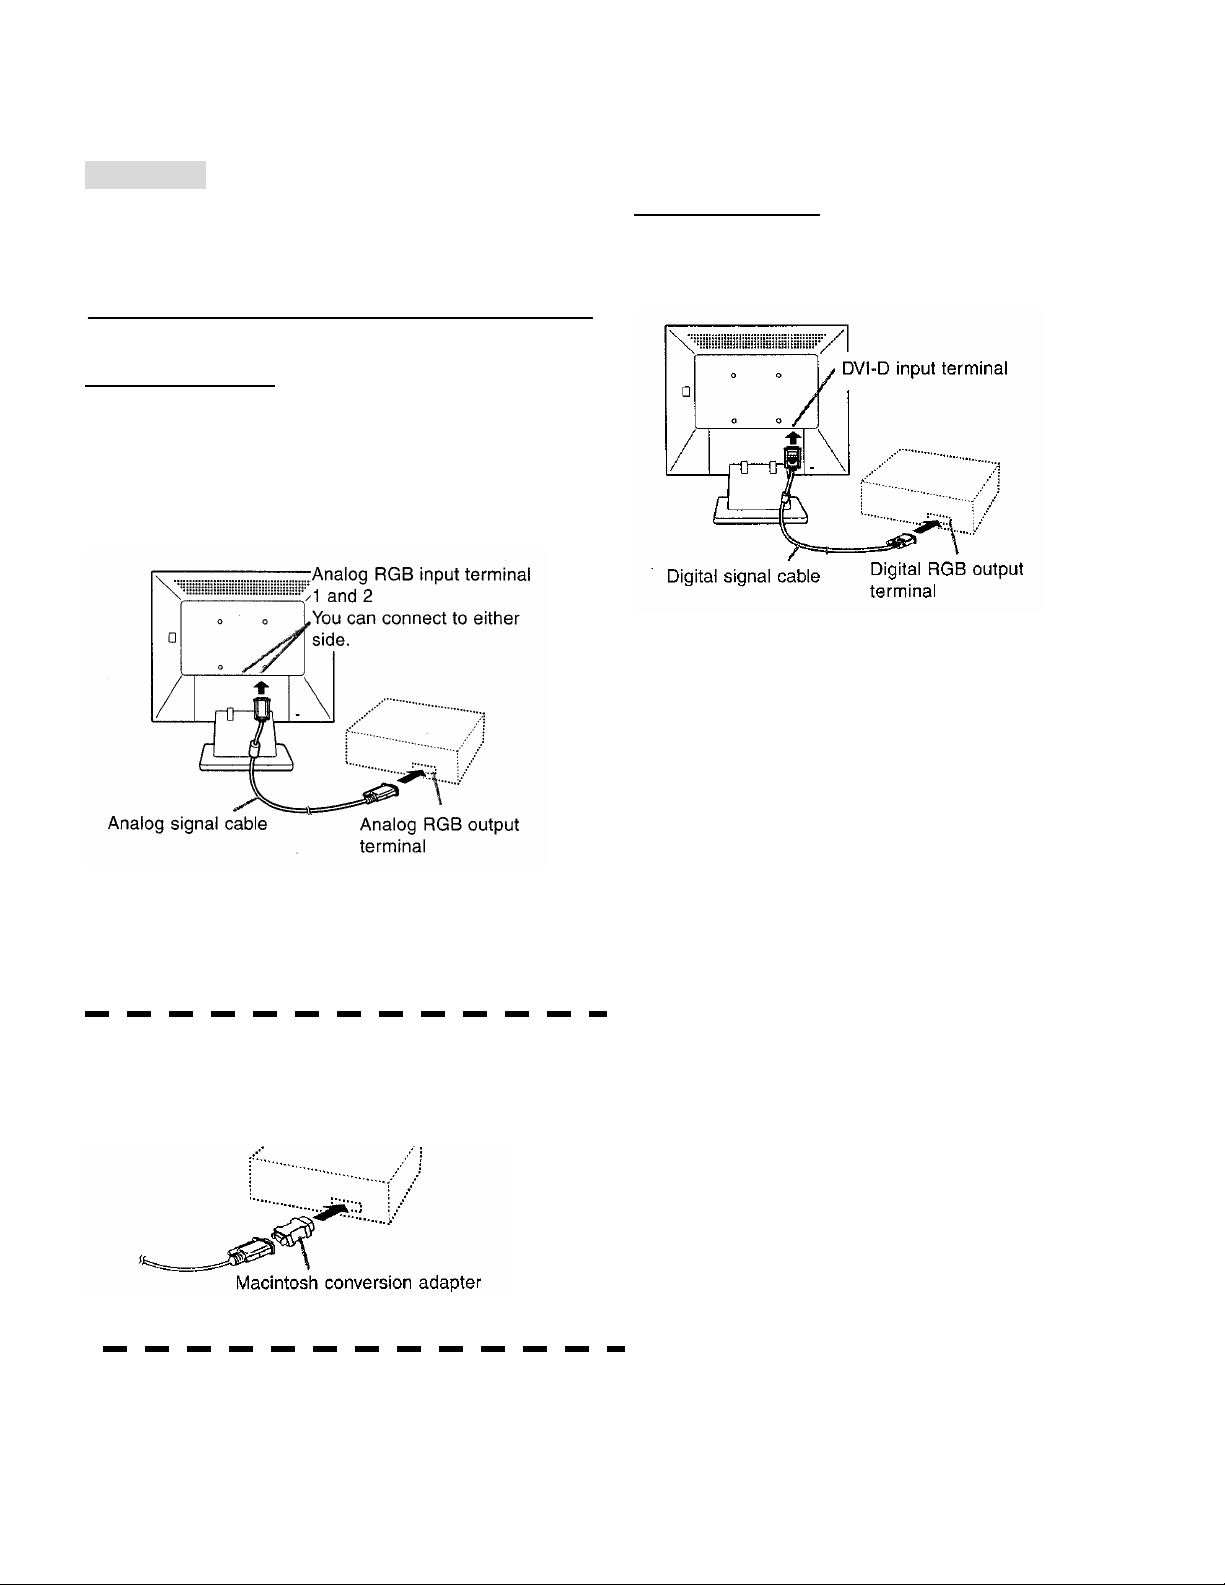
Connecting the monitor to a computer
Analog connection
Connect the analog signal cable to the analog RGB
output terminal of the computer.
- For analog connection, use the analog signal cable
accessory or a sold separately one (both ends
should be mini D-sub 15 pin).
- Paying attention to connector direction, firmly
insert the signal cable vertically into the connector,
and then tighten the screws at both sides.
If connecting to a D-sub 15 pin 2 rows Apple Power
Macintosh, attach a Macintosh conversion adapter
(sold separately) to the analog signal cable.
Note:
- If connecting to the Sun Ultra series, a conversion
adapter (sold separately) may be required.
Digital connection
Connect the digital signal cable to the digital RGB
output terminal of the computer.
- Paying attention to connector direction, firmly
insert the signal cable vertically into the connector,
and then tighten the screws at both sides
5
Page 7

Connecting the monitor and turning the monitor on and off
Connecting the monitor to a power source
Turning the power on
1. Turn on the main power of the monitor.
- When switching the main power switch on and
off, always wait for an interval of at least 5
seconds. Rapid switching may result in.
malfunction.
2. Press the monitor's POWER button.
The power LED will light up orange.
3. Turn on the computer.
When a signal is input from the computer, the
power LED lights up green, and the screen is
displayed. (After power is turned on, it may take a
little time until the screen is displayed.)
- If the input terminal to which the computer is
connected has not been selected, the screen will
not be displayed. If necessary, perform input
terminal switching. (P7.)
Notes:
- When using an analog signal, perform an automatic
screen adjustment under the following conditions
(P10.)
- Using the monitor for the first time.
- After having changed the system settings during
use.
6
Page 8

Connecting the monitor and turning the monitor on and off
Changing between input terminals
Use the INPUT button to switch between signal
input terminals
Analog RGB input terminal 1
Note:
- When there is no input signal, [NO SIGNAL]
Is displayed.
Turning the power off
1. Turn the computer off.
2. Press the monitor's POWER button.
The Power LED will disappear.
If the monitor will not be used for a long time,
turn off the main power switch of the monitor,
and remove the power plug from the outlet
7
Page 9

Adjusting the screen display
For analog signal
1. First perform an automatic adjustment. (P10)
2. Perform manual adjustment where necessary
(P11)
For digital signal
The monitor can generally be used without
adjustment. No manual adjustment should be
necessary.
Note:
- All adjustment will be saved even after turning the
power off
Resetting all adjustment values
All adjustment values can be returned to their
original ex-factory values in one command.
1. Turn off the monitor power.
2. Press the MENU button and the d/ MODE
button simultaneously, and while doing this press
the power button (i.e. turn the power on).
Continue to press the buttons until [ALL RESET]
appears on the screen. Reset is complete when
the displayed message disappears.
Note:
- While [ALL RESET] is displayed, the control
buttons are displayed.
- It is not possible to reset values when the
adjustment lock is in place. Remove the
adjustment lock before attempting to operate
control buttons.
SCREEN menu reset
Setting of items in the SCREEN Menu (CLOCK,
PHASE, H-POS, V-POS) can be returned to their
original ex-factory values.
1. Turn on the monitor power
2. Press the MENU button and the ebutton
simultaneously. When [RESET] appears on the
screen, the reset is complete.
Note:
- It is not possible to reset values when the
adjustment lock is in place. Remove the
adjustment lock before attempting to operate
control buttons.
Adjustment lock function
By disabling the control buttons (i.e. setting the lock)
any attempted changes to adjusted values will be
voided.
1. Turn off the monitor power.
2. While pressing the MENU button, press the
power button (i.e. turn power on).
Continue to press the buttons until
[ADJUSTMENT LOCKED] appears on the
screen.
The lock is set when the message is displayed.
Note:
- When the lock is in place, all buttons other than
the power button are disabled.
Adjustment lock release
1. Turn off the monitor power.
2. While pressing the MENU button, press the
power button (i.e. turn the power on).
Continue to press the buttons until
[ADJUSTMENT UNLOCKED] appears on the
screen.
The lock is released when the message is
displayed.
Adjusting the backlight
1. Without the OSD Menu being displayed, press
the eor the f button.
2. Adjust by pressing the ebutton (darker) or f
BACKLIGHT 31
button (lighter).
Note:
- On Screen display for adjustment disappears
several seconds after the last operation.
8
Page 10

Adjusting the screen display
Setting GAMMA
Color tone or brightness can be changed with one
Command.
GAMMA1
Displays image with the color tone results from
original scheme of liquid crystal panel.
GAMMA2
Display brightness is lowered. The brightness is
set to a level that is easier on the eyes than with
other modes and saves power.
GAMMA3
GAMMA3 is color conversion account of liquid
crystal's characteristics and represents color tone
close to its original image.
GAMMA4
Displays an image with dynamic and GAMMA4
primary colors.
How to set
Press the d/ Mode button when the OSD Menu is
not displayed.
Each time the button is pressed the next menu item
appears. (GAMMA1GAMMA2GAMMA3
GAMMA4GAMMA1)
On Screen display for adjustment for adjustment
disappears several seconds after the last operation.
9
Page 11

Adjusting the screen display (When using an analog signal)
Automatic screen adjustment
Options in the SCREEN Menu can be adjusted
automatically (CLOCK, PHASE, H-POS, V-POS).
Note:
- When setting up this monitor for the first time or
after having changed an aspect of the current system,
perform an automatic screen adjustment before use.
Adjusting the screen automatically
1. Press the MENU button.
The SCREEN Menu will be displayed.
2. Press the f button.
3. Press the MENU button 4 times to make the On
SCREEN
MANUAL AUTO
MANUAL
CLOCK 127
PHASE 16
H-POS 127
V-POS 32
INPUT-1 ANALOG
1280x1024 V:60Hz H:64.0kHz
The screen will become dark and [ADJUSTING]
will be displayed. After a few seconds the
SCREEN Menu will return. (The automatic
adjustment is now complete.)
Screen Display (OSD) Menu disappear.
Notes:
- In most cases automatic adjustment is sufficient.
- It may not be possible to achieve correct
adjustment with the first automatic adjustment. In
such a case, try repeating automatic adjustment 2
or 3 times.
- If necessary due to any of the following, manual
adjustments (P11) can be performed after the
automatic adjustment.
- When further fine adjustment is needed.
- When the computer's video input signals are
Composite Sync or Sync On Green. (Automatic
adjustments may not be possible.)
- When [OUT OF ADJUST] is displayed. (When
the screen displays an entirely dark image, the
automatic screen adjustment may be disabled.
When marking an automatic adjustment, be sure
to either use the Adjustment Pattern or try
displaying an image that makes the entire
screen very bright.)
- Automatic adjustment may not be achieved
correctly depending on what is displayed on the
screen – moving picture or the MS-DOS prompt
etc.
10
Page 12

Adjustment the screen display (When using an analog signal)
Manual screen adjustment
Adjustments can be made using On Screen Display
(OSD) Menu provided.
On Screen Display for adjustment
This chapter provides the procedure how to adjust
the screen by using operation Pattern.
How to adjust
- Press the MENU button.
The SCREEN Menu will be displayed.
SCREEN
Note:
- The OSD Menu automatically disappears
SCREEN Menu
MANUAL: Individual menu options are manually
Auto: Every menu option is automatically
Note:
MANUAL AUTO
MANUAL
CLOCK 127
PHASE 16
H-POS 127
V-POS 32
INPUT-1 ANALOG
1280x1024 V:60Hz H:64.0kHz
At this point relevant menu options can be adjusted.
Each time the MENU button is pressed the next
menu is selected. (SCREEN GAIN CONTROL
COLORMODE SELECT OSD Menu
disappears)
approximately 30 seconds after the last command.
SCREEN
MANUAL AUTO
MANUAL
CLOCK 127
PHASE 16
H-POS 127
V-POS 32
INPUT-1 ANALOG
1280x1024 V:60Hz H:64.0kHz
adjusted.
adjusted.
- Press the fbutton to select [AUTO].
- To choose a menu option:d / MODE button
- To go to the next menu: MENU button
CLOCK
This feature will increase or decrease vertical
picture alignments. Normally, Automatic Adjustment
should be used. Note: This is for advanced users.
(efbuttons)
PHASE
This feature will increase or decrease horizontal
picture alignments. Normally Automatic
Adjustment should be used. Note: This is for
advanced users.
(efbuttons)
NOTE:
- Adjustments to [PHASE] should be made only after
[CLOCK] has been correctly set.
H-POS (horizontal positioning) and V-POS
(vertical positioning)
To center the Adjustment Pattern within the
boundaries of the screen, adjust the left-right (H-POS)
values and the up-down (V-POS) values.
(efbuttons )
11
Page 13

Adjusting the screen display (When using an analog signal)
GAIN CONTROL Menu
MANUAL: Individual menu options are manually
AUTO: Every menu option is automatically
Notes:
- Press the fbutton to select [AUTO].
- To choose a menu option: d / MODE button
- To go to the next menu: MENU button
*Auto Gain Control function
- The Auto Gain Control adjusts contrast and
- If the signal coming from the computer is
- If [OUT OF ADJUST] is displayed, perform
- When using the Auto Gain Control function, set
BRIGHTNESS
This feature changes the brightness level.
(efbuttons )
CONTRAST
This feature changes the contrast level.
(efbuttons )
GAIN CONTROL
MANUAL AUTO
MANUAL
BRIGHTNESS 127
CONTRAST 16
INPUT-1 ANALOG
1280x1024 V:60Hz H:64.0kHz
adjusted.
adjusted using the Auto Gain Control*
function.
brightness based on the brightest and darkest colors
of the image displayed. If you are not using the
Adjustment Pattern it is necessary to have black
Area and white area of at least 5 mm × 5mm on
the screen. Adjustment may not be possible without
those areas.
composite sync or sync on green, automatic
adjustment cannot be performed. Please perform
manual adjustment instead.
manual adjustment.
[COLOR] to other than [USER]. If [USER] is set,
the Auto Gain Control function cannot be used.
COLOR Menu
COLOR
9300 6500 5000 USER
R-CONTRAST
G-CONTRAST
B-CONTRAST
INPUT-1 ANALOG
1280x1024 V:60Hz H:64.0kHz
6500
Notes:
- Use the efbuttons to select [9300], [6500], [5000]
or [USER].
- - Selecting [USER] will display the setting values
for [CONTRAST], in order to make fine
adjustments.
- Use the d / MODE button to select [CONTRAST]
- To go to the next menu: MENU button
9300……Color tone bluer than standard
6500……Color tone standard setting
5000……Color tone redder than standard
USER (Note: for advanced users)
R-CONTRAST..…e button for blue-green
f button for red
G-CONTRAST..…e button for purple
f button for green
B-CONTRAST..…e button for yellow
f button for blue
12
Page 14

Adjusting the screen display ( When using an analog signal )
MODE SELECT Menu
Notes:
- Depending on the resolution of the input signal,
even if menu options can be selected, the display
may not change.
- To choose a menu option: d / MODE button
- To complete adjustment: MENU button
OSD H-POSITION (OSD horizontal position)
The position of the OSD Menu can be moved to the
left and right. (efbuttons )
OSD H-POSITION (OSD vertical position)
The position of the OSD Menu can be moved up and
down. (efbuttons )
SCALING (Level of scaling)
The sharpness of the image can be adjusted.
Note: will only work with resolutions other than
1280 x 1024.
(efbuttons )
Note:
- When the display mode is set to less than 1280 ×
1024 pixels, the display is enlarged to cover the
whole screen (i.e. The side ratio of the display may
change).
LANGUAGE
You can choose the language used in OSD Menu.
1. Press the fbutton.
The Language Selection Menu will be displayed
on the screen
2. Use the d / MODE button to choose a language.
3. Press the MENU button.
Language Selection Menu will disappear.
MODE SELECT
OSD H-POSITION
OSD H-POSITION
OSD V-POSITION
SCALING 0
LANGUAGE
INPUT-1 ANALOG
1280x1024 V:60Hz H:64.0kHz
13
Page 15

Adjusting the screen display (When using a digital signal)
Adjustment can be made using On Screen Display
(OSD) Menu provided.
On Screen Display for adjustment
This chapter provides the procedure how to adjust
the screen by using operation Pattern.
How to adjust
1.Press the MENU button.
The COLOR Menu will be displayed.
Note:
- The OSD Menu automatically disappears
COLOR
9300 6500 5000 USER
R-CONTRAST
G-CONTRAST
B-CONTRAST
INPUT-1 ANALOG
1280x1024 V:60Hz H:64.0kHz
6500
At this point relevant menu options can be adjusted.
Each time MENU button is pressed the next menu
is selected. (COLOR MODE SELECT OSD
Menu disappears)
approximately 30 seconds after the last command.
COLOR Menu
COLOR
9300 6500 5000 USER
R-CONTRAST
G-CONTRAST
B-CONTRAST
INPUT-1 ANALOG
1280x1024 V:60Hz H:64.0kHz
6500
Notes:
- Use the efbuttons to select [9300], [6500], [5000]
or [USER].
- Selecting [USER] will display the setting values for
[CONTRAST], in order to make fine adjustments.
- Use the d / MODE button to select [CONTRAST]
- To go to the next menu: MENU button
9300……Color tone bluer than standard
6500……Color tone standard setting
5000……Color tone redder than standard
USER
R-CONTRAST..…e button for blue-green
f button for red
G-CONTRAST..…e button for purple
f button for green
B-CONTRAST..…e button for yellow
f button for blue
14
Page 16

Adjusting the screen display (When using a digital signal)
MODE SELECT Menu
MODE SELECT
Notes:
- To choose a menu option: d / MODE button
- To complete adjustment:MENU button
OSD H-POSITION (OSD horizontal position)
The position of the OSD Menu can be moved up and
down. (efbuttons )
SCALING (Level of scaling)
The sharpness of the image can be adjusted.
Note: will only work with resolutions other than
1280 x 1024.
(efbuttons )
Note:
- When the display mode is set to less than 1280 ×
1024 pixels, the display is enlarged to cover the
whole screen (i.e. The side ratio of the display may
change).
LANGUAGE
You can choose the language used in OSD Menu.
1. Press the fbutton.
2. Use the d / MODE button to choose a language.
3. Press the MENU button.
OSD H-POSITION
OSD V-POSITION
SCALING 0
LANGUAGE
INPUT-1 ANALOG
1280x1024 V:60Hz H:64.0kHz
The Language Selection Menu will be displayed
on the screen.
Language Selection Menu will disappear.
15
Page 17

Monitor care and repair
Monitor care
Always remove the plug from the AC outlet when
cleaning the monitor.
Cabinet and control panel section
Use a soft dry cloth to lightly wipe away any grime
from the cabinet and control panel.
If they are very dirty, apply neutral detergent to a
dampened soft cloth, wring it out well and wipe
away grime.
LCD panel section
Use a soft dry cloth to lightly wipe away dirt and
dust from the surface of the LCD panel. (A soft cloth
such as gauze or that used for lens cleaning is
suitable.)
CAUTION!
- Never use thinner, benzine, alcohol, glass cleaner,
etc, as this could lead to color change or change in
shape.
- Never scratch the monitor with anything hard or
apply strong pressure as this could leave marks or
result in malfunction
Storage
If the monitor will not be used for a long period of
time, be sure to remove the power plug from the AC
outlet.
CAUTION!
- Do not leave the monitor in contact with rubber or
plastic items for long periods of times as this could
lead to color change or change in shape.
Troubleshooting
If you think the monitor may be faulty, please check
the following points before taking it to be repaired.
If afterwards it still does not work, please contact the
shop where you purchased the monitor.
- In the initial period of use, due to the characteristics
of florescent tubes the screen may flicker. (This is
not a malfunction.) Should this happen, check by
first turning off the power, then turning it on again.
No image appears on the monitor (Power LED not
lit)
- Is the power cord connected properly? (P6)
No image appears on the monitor (Power LED is
lit)
- Is the computer connected properly? (P5)
- Is the computer turned on?
- Is the signal's input terminal switched to the correct
one? (P7)
- Does the computer's signal timing correspond to
monitor specifications? (P18)
- Is the computer in power-saving mode?
The image appears distorted
- Does the computer's signal timing correspond to
monitor specifications? (P18)
- If you are using the analog signal, perform
automatic screen adjustment. (P10)
- If you can change the refresh rate on the computer
you are using, change the value to a lower
frequency. (P18)
Control buttons do not work
- Is the adjustment lock on? (P8)
16
Page 18

Specifications
Product specifications
LCD display
48 cm measured diagonally TFT LCD module
Resolution (max.)
SXGA 1280 × 1024 pixels
Displayable colors (max.)
Approx. 16.77 million colors (8 bit)
Brightness (max.)
300 cd/m
Dot pitch
0.294 (H) × 0.294 (V) mm
Contrast ratio
700:1
Angle of visibility
Left-right 170° ; up-down 170°
(contrast ratio≧10)
Screen display size
Horizontal 376.3 mm × 301.1 mm
Video signal
Analog:Analog RGB (0.7 Vp-p) [75Ω]
Digital:DVI standard based on 1.0
Sync signal
Separate SYNC (TTL level:+/-), Sync on Green,
Composite Sync (TTL level:+/-)
Expansion compensation
Digital scaling (Enlarges VGA/SVGA/XGA etc.
to full screen size.)
Plug & Play
VESA DDC2B compatible
Power management
Energy Star Compliant
Input signal terminal
Analog:15pin mini D-sub ( 3 rows ) × 2
Digital:24 pin DVI-I × 1
Screen tilt
Upward approx. 0 - 20°;downward approx. 0 - 5°
Screen swivel
Approx. 90° from left through right (Turn table
type)
Power supply
AC100 – 240 V, 50/60 Hz
Temperature of operating environment
5 - 35°C
Power consumption
43 W maximum,
2.8 W when in power-saving mode
2
Dimensions
Approx. 423(W)×222(D)×392 – 439(H) mm
Weight
Approx. 6.9 kg (approx. 4.7 kg excluding stand)
(Excluding signal cable.)
Dimensions (Units: mm)
- Analog signal cable: approx. 1.8 m
- Digital signal cable, : approx. 2.0 m
17
Page 19

Specifications
Relevant signal timings
Display mode Hsync Vsync Dot
frequency
VESA
US text 720×400 31.5kHz 70Hz 28.3MHz
Power
Macintosh
series
Sun Ultra
series
- Recommended resolution is 1280×1024.
- All are compliant only with non-interlaced.
- Frequency for Power Macintosh and the Sun Ultra
series are reference values. To connect, another
adapter (sold separately) may be required.
- If the monitor is receiving timing signals that are
not compatible, [OUT OF TIMING] will appear.
Follow your computer's instruction manual to set
the timing so that it is compatible with the monitor.
- If the monitor is not receiving any signal (synch
640×480
800×600
1024×768
1152×864 67.5kHz 75Hz 108.0MHz
1280×960 60.0kHz 60Hz 108.0MHz
1280×1024
640×480 35.0kHz 66.7Hz 30.2MHz
832×624 49.7kHz 74.6Hz 57.3MHz
1024×768 60.2kHz 75Hz 80.0MHz
1152×870 68.7kHz 75Hz 100.0MHz
1280×1024
1024×768
1280×1024
31.5kHz 60Hz 25.175MHz
37.9kHz 72Hz 31.5MHz
37.5kHz 75Hz 31.5MHz
35.1kHz 56Hz 36.0MHz
37.9kHz 60Hz 40.0MHz
48.1kHz 72Hz 50.0MHz
46.9kHz 75Hz 49.5MHz
48.4kHz 60Hz 65.0MHz
56.5kHz 70Hz 75.0MHz
60.0kHz 75Hz 78.75MHz
64.0kHz 60Hz 108.0MHz
80.0kHz 75Hz 135.0MHz
64.0kHz 60Hz 108.0MHz
80.0kHz 75Hz 135.0MHz
48.3kHz 60Hz 64.13MHz
53.6kHz 66Hz 70.4MHz
56.6kHz 70Hz 74.25MHz
61.8kHz 66Hz 94.88MHz 1152×900
71.8kHz 76.2Hz 108.23MHz
71.7kHz 67.2Hz 117.01MHz
81.1kHz 76Hz 134.99MHz
signal), [NO SIGNAL] will appear.
Relevant signal timings (digital)
Display mode Hsync Vsync Dot
frequency
VESA
US text 720×400 31.5kHz 70Hz 28.3MHz
- Recommended resolution is 1280×1024.
- All are compliant only with non-interlaced.
- A computer with an output terminal conforming to
DVI and with SXGA output capability can be
connected here.
- If the monitor is receiving timing signal that are not
compatible, [OUT OF TIMING] will appear.
Follow your computer's instruction manual to set
the timing so that it is compatible with the monitor.
- If the monitor is not receiving any signal (synch
signal), [NO SIGNAL] will appear.
640×480
800×600
1024×768
1152×864 67.5kHz 75Hz 108.0MHz
1280×960 60.0kHz 60Hz 108.0MHz
1280×1024 64.0kHz 60Hz 108.0MHz
31.5kHz 60Hz 25.175MHz
37.9kHz 72Hz 31.5MHz
37.5kHz 75Hz 31.5MHz
37.9kHz 60Hz 40.0MHz
48.1kHz 72Hz 50.0MHz
46.9kHz 75Hz 49.5MHz
48.4kHz 60Hz 65.0MHz
56.5kHz 70Hz 75.0MHz
60.0kHz 75Hz 78.75MHz
18
Page 20

Specifications
The analog RGB input connector pin
(Mini D-sub connector with 15 pins)
No. Function
1 Red video signal input
2 Green video signal input
3 Blue video signal input
4 GND
5 GND
6 For red video signal GND
7 For green video signal GND
8 For blue video signal GND
9 +5V
10 GND
11 N.C.
12 DDC data
13 For Hsync signal input
14 For Vsync signal input
15 DDC clock
The DVI-D input connector pin
(DVI-D connector with 24 pins)
No. Function No. Function
1 TMDS data 2- 13 N.C.
2 TMDS data 2+ 14 +5V
3 TMDS data 2/4 shield 15 GND
4 N.C. 16 Hot plug detection
5 N.C. 17 TMDS data 06 DDC clock 18 TMDS data 0+
7 DDC data 19 TMDS data 0/5 shield
8 N.C. 20 N.C.
9 TMDS data 1- 21 N.C.
10 TMDS data 1+ 22 TMDS clock shield
11 TMDS data 1/3 shield 23 TMDS clock +
12 N.C. 24 TMDS clock -
Power management
Analog RGB
Modes Screen
ON Display on 43W Yes Yes
OFF Display off 2.8W No No
Digital DVI
Modes Screen
ON Display on 43W
OFF Display off 2.8W
DDC (Plug & Play)
This monitor supports the VESA DDC (Display Data
Channel) standard.
DDC is a signal standard for carrying out Plug &
Play function on the monitor or PC. It transfers
information such as degree of resolution between the
monitor and PC. You can use this function if your PC
is DDC compliant and if it is set so that it can detect
the Plug & Play monitor
There are many varieties of DDC due to the
difference between systems. This monitor works with
DDC2B.
Power
consumption
Power
consumption
H-sync V-sync
19
Page 21

Instructions for attaching a VESA compliant arm
An arm or stand based on the VESA standard (sold
separately) can be attached to the monitor.
Procurement of the arm or stand is at the customer's
discretion.
Arms or stands able to be used
Attachment must satisfy the following.
- Compatible with the VESA standard.
- Have a gap of 100 mm × 100 mm between the
screw holes on the section to be attached.
- Note be likely to fall off or break off after being
attached to the monitor.
How to attach the arm or stand
- Be careful not to overly bend the cable or add
extension cords as this could lead to malfunction.
- While following these instructions, please also refer
to the installation instructions in the operation
manual included with the arm or stand.
from the monitor.
Note:
- The stand is specially made for use with this
monitor. Once having removed the stand, never
attempt to another device.
- Once having removed the screws, store them
together with the stand and if the stand is ever
re-attached be sure to use the original screws.
Using different screws could lead to a malfunction.
6. Attach the arm to the monitor with the four screws.
CAUTION!
- Be careful not to get your fingers pinched between
the display and stand nor to let the stand drop.
These could lead to injury.
1. Remove the cables.
2. Spread out a soft cloth on a suitable horizontal
surface.
3. Being careful not to damage the monitor, gently
lay the monitor on it display-side down.
4. Remove the cover.
- While pressing the U areas on the sides, push
it up.
Note:
- The screws used to attach the arm should be M4
screws with a length of 6 mm ~ 8 mm protruding
from the surface to be attached. Using different
screws could cause the monitor to fall off or to be
internally damaged.
U
5. Remove the six screws and then remove the stand
20
Page 22

www.princetongraphics.com
Part No.: 14MP1905A00
Ref. No.: 00300000350
Revision A
© 2003 Princeton Digital (USA) Corp. All right reserved. This manual may not be copied in whole or in part without the written consent of Princeton Digital (USA) Corp.
Product Specifications are subject to change without notice. Princeton Digital (USA) Corp. is not responsible for printing or clerical errors. Windows® is a registered
trademark of Microsoft Corporation. Apple® and MacintoshTM are registered trademarks of Apple Computer, Inc. Energy Star® is a U.S. registered trademark. As an
Energy Star® Partner, Princeton Digital (USA) Corp. has determined that this product meets Energy Star® guidelines for energy efficiency .
 Loading...