


11/2002
625-242
OPERATOR’S
MANUAL
PRINCETON PIGGY BACK OPERATOR’S MANUAL
PIGGY BACK®PB50/PB65
You must read and understand this
manual before operating the forklift.
Keep this manual with the forklift.
NEED HELP
?
If you have a question on the operation of
this unit...
Or
If you have a problem on this or any other
Princeton product...
Contact your local dealer.
A comprehensive dealer listing is
available at www.piggy-back.com
Or call
Princeton Delivery Systems
1-800-331-5851
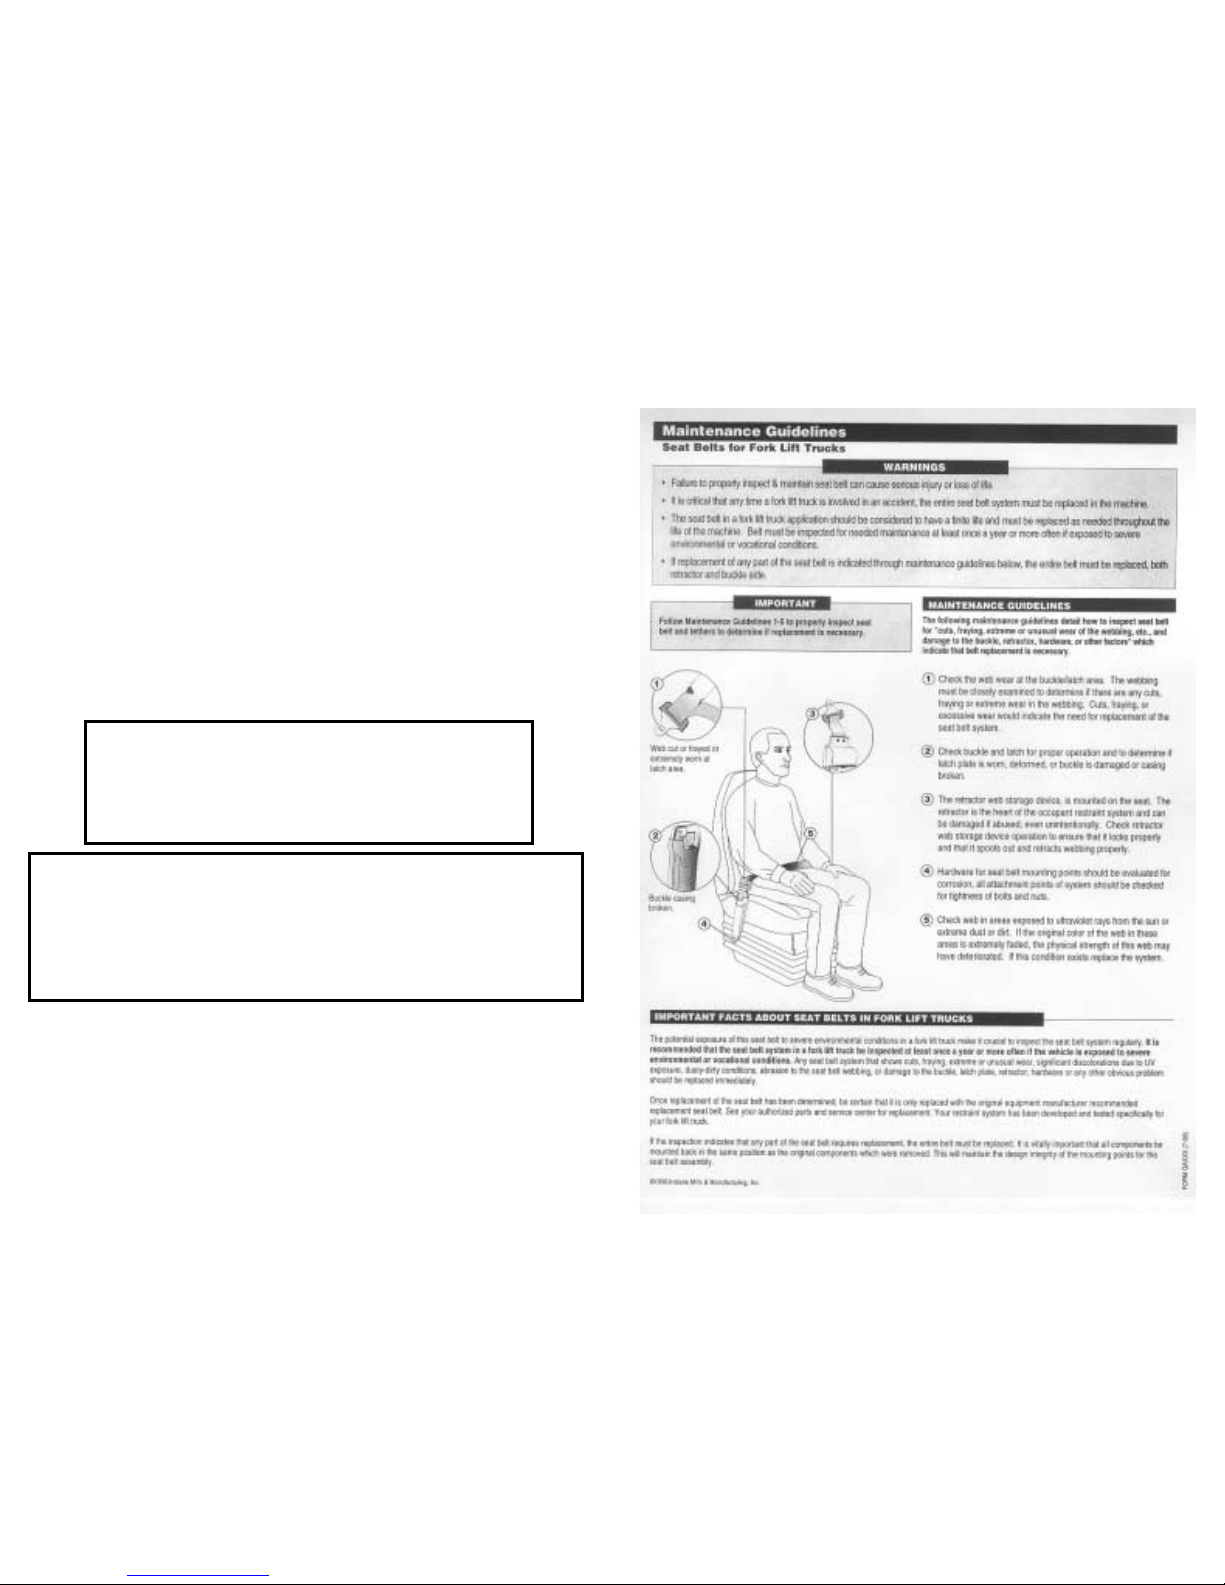
11 Seat Belt Safety Supplement
TRUCK DATA
Model No. _____________________________________
Serial No______________________________________
Weight (empty)_________________________________
Rated Capacity_________________________________
Gross Weight (loaded with Rated Load) _____________
Notice: The information in this manual was in effect at
the time of printing. Princeton Delivery Systems reserves
the right to make improvements and changes in specifications or designs without incurring obligation. Please
check with your Princeton dealer for possible updates or
revisions.
Copyright© 2002 Princeton Delivery Systems Inc. All rights reserved.
CALIFORNIA
PROPOSITION 65 WARNING
Diesel engine exhaust and some of its constituents
are known to the State of California to cause cancer,
birth defects, and other reproductive harm.
CALIFORNIA
PROPOSITION 65 WARNING
Battery posts, terminals and related accessories contain lead and
lead compounds, chemicals known to the State of California to
cause cancer, birth defects, and other reproductive harm.
Wash hands after handling.
54

10 Specifications
KUBOTAENGINE: (See Kubota engine manual)
CAUTION: Do not use ether or starting fluid. Severe non-warrantable
engine damage will occur.
FUEL: Diesel fuel must not be mixed with gasoline, kerosene, or alcohol.
*Above 32 Degrees. #2D should be used.
*Below 32 Degrees. either #1D or a mix of #1D and #2D
may be used.
ENGINE OIL: Use only CC/CD/CE rating API index oil in your diesel
engine.
*CF is the highest rating and is highly recommended.
*Change the engine oil type according to the ambient
temperature.
above 77 F. (25 C.) SAE30 or SAE10W30
SAE10W40
32 F. (0 C.) to 77 F. (25 C.) SAE20 or SAE10W30
SAE10W40
below 32 F. (0 C.) SAE10 or SAE10W30
SAE10W40
COLD WEATHER START: When the ambient temperature is below 50 F
(10 C), pre-heating is needed. The Kubota engine is equipped with quick
glow plugs. Automatic preheating is made for about 6 to 10 seconds
when starter switch key is turned to preheating position.
Start: Your unit is equipped with an (externally switched) Syncro-Start
Solenoid (Model 1753ES/1751ES).
Caution: Multiple start attempts and excessive engine cranking
could cause damage to the solenoid. Therefore, it is our
recommendation that engine cranking (pull-in coil energized) be
limited to three (3) 30 second attempts with a cool down period
120 seconds (two minutes) between each cranking attempt. After
three (3) cranking attempts, the solenoid must be allowed to cool
down to ambient temperatures before making further cranking
attempts.
53
Introduction
Your PIGGY BACK Delivery System was bought knowing it will give long
and useful service. To get the value built into it a small amount of time
and expense is needed to learn safe, productive operation, and to do
regular inspections and service.
This manual will tell you how to safely operate, inspect, and maintain
your PIGGY BACK forklift. Keep it with the forklift as a ready reference.
As with the use of all heavy machinery, failure to carefully follow these
instructions and use common sense may result in serious injury.
If you have questions about operating, maintaining, or obtaining parts for
your forklift; contact your Princeton dealer. They are always glad to help.
Table of Contents
Section
Page
Introduction 2
To Forklift Owners 3
To Forklift Operators 4
How To Use This Manual 5
Safety Signal Words 6
Service Position--Engine Off 7
Service Position--Engine Running 7
Jacking And Blocking 8
1 General Safety Practices 9
2 Operating Safety Rules And Practices 11
3 Forklift Description 13
4 Starting 16
5 Operation 18
6 Transport 34
7 Moving ADisabled Forklift 42
8 Inspection 43
9 Lubrication 46
10 Specifications 49
11 Seat Belt Safety Supplement 54

10 Specifications
ENGINE OIL: Lube oils are differentiated according to their effi-
ciency and quality grade. Commonly used are the API
Specifications.
Approved Oils:
Non-turbocharged Engines API-Specific
CC/SE CC/SF
CD/SE CD/SF
VISCOSITY: Because the viscosity of the lube oil is greatly influenced by the temperature, the choice of SAE-grade should be
governed by the ambient temperature at the engine site. Optimum
operating behavior will be attained if you use the chart below.
COLD WEATHER START: The Deutz engine is equipped with a
cold weather starting aid called “Glow Plugs”. When the temperature is below 40 F, you should use the pre-heat option. To pre-heat
the engine, turn the key to the “on” position until the pre-heat light
goes out. Then turn the key to the “start” position “the right”. If the
engine does not start, wait 1 minute before pre-heating the engine
again.
IMPORTANT: DO NOT OVERCRANK THE ENGINE
52
To Forklift Owners
ASME B56.1 and B56.6 are the standards for forklift operation,
rules and safety, maintenance, safe operation, training and supervision. You should read this manual and make it available to your
operators and their supervisors. You can get it from the American
Society of Mechanical Engineers, 345 East 47th Street, United
Engineering Center, New York, NY 10017.
ASME B56.1 and B56.6 are a key part of forklift safety. However,
making forklift operation safe involves other areas and responsibilities. The forklift owner is responsible to ensure their operators
have adequate training in operating the forklift. This training
includes, but should not be limited to, classroom and hands-on
training. Forklift safety involves the forklift itself, the environment it
works in, and the people who come in contact with it. Consider
your entire operation when addressing forklift safety.
The operator’s manual is not a training manual. It is a guide to
help trained and authorized operators safely operate their forklift
by showing the proper procedures. This manual combined with
adequate operator training will help reduce situations that may
cause an accident.
Operators must be trained and qualified to operate a forklift before
actually operating one.
Forklift training and operator awareness of the forklift work area
will help ensure a safe workplace for all your employees.
3

To Forklift Operators
Operators must become familiar with all forklift controls, procedures, and work areas. Understand what this forklift can do and its
limits. Understand and practice all safety rules.
Before driving a forklift, the user must inspect it completely to
insure safe operation. This is a requirement of OSHA, ANSI, and
ASME.
The operator is also responsible for understanding the environment the forklift is being operated in. Knowing how to operate the
forklift within their working environment is very important to overall
forklift safety.
Operate your forklift safely; careful driving is your responsibility.
Know your forklift’s capabilities and limits. Follow all instructions in
this manual.
4
10 Specifications
DEUTZ ENGINE: See Deutz engine manual)
CAUTION: Do not use ether or starting fluid. Severe non-warrantable engine damage will occur.
FUEL: Always use branded grades of diesel fuel having a sulfur
content of below 0.5%. In the case of higher sulfur content, the
periods between oil changes must be shortened.
The following fuel specifications are approved:
DIN 51 601
NATO Codes F54, F75 and F76
BS 2869: A1 and A2 (in case of A2, note sulfur content)
ASTM D 975-81 : 1-D and 2-D
VV-F-800a: DF-A, DF-1 and DF-2
WINTER-GRADE FUEL: At temperatures as low as -15 C (+5 F)
to -20 C (-4 F), kerosene should be mixed with the diesel fuel. The
necessary percentages for admixing are seen in the diagram
below.
51

10 Specifications
SPECIFICATIONS-FLUID CAPACITIES:
(All measurements listed below are completely empty/dry.)
HYDRAULIC OIL 17 US GALLONS
FUEL 8 US GALLONS
ENGINE OIL- DEUTZ 3FL1011 6.4 QUARTS
ENGINE OIL- DEUTZ 4FL1011 11.0 QUARTS
ENGINE OIL- KUBOTA 2003T 7.5 QUARTS
Fluids should be checked before starting, then run the
PIGGY BACK for 1 minute, shut engine off and re-check.
50
How To Use This Manual
The illustrations and explanations in this manual will help you
improve your skill and knowledge as a professional forklift operator
while taking full advantage of the capabilities and safety features
of your forklift.
The manual is designed to be easy to read and find information
in.The sections are numbered. The page numbers are on the bottom leading edge of each page. The Table of Contents lists the
sections and their beginning page number.
This manual is meant to be permanently attached to your
forklift as a reference. If the manual gets lost or damaged call
your Princeton dealer, they are waiting to help.
5

Safety Signal Words
Know these safety signal words and remember their meaning.
CAUTION
Is a reminder of safety practices, that if not followed, may lead to
personal injury.
WARNING
Is used when a hazard exists which can result in injury or death if
proper precautions are not taken.
DANGER
Is used when extreme hazard exists which will result in death
or serious injury if proper precautions are not taken.
6
10 Specifications
49
109” (PB50)
114“ (PB65)
9 Lubrication
LUBRICANT KEY
(1) Lithium base multipurpose grease
(2) Air filter P/N 505-141, 505-142
(3)Hydraulic Fluid, Texaco Rando
HD46 (or equal).
(4) See engine manual
(5) Hydraulic Filter P/N 207-104
(6) Engine Oil Filter-see engine parts
manual
(7)SAE 10W30
(8)Fuel Filter P/N 504-598
(9) Motor Oil 30W-40W or chain lube
RECOMMENDED LUBRICA
TION
(A) 8-10 hours or daily
(B) 25-50 hours or monthly
(C) 150 hours or every 6 months
48
Service Position--Engine Off
1. Park forklift on flat level surface.
2. Tilt mast to vertical position.
3. Lower forks to floor.
4. Shut engine off.
5. Chock drive wheels.
Service Position--Engine Running
1. Park forklift on flat level surface.
2. Tilt mast to vertical position.
3. Set parking brake.
4. Shut engine off.
5. Chock drive wheels.
6. Raise rear of vehicle and block -- see jacking and blocking
section.
7. Raise front of vehicle and block -- see jacking and blocking
section.
8. Connect hose to exhaust -- do not run engine in closed area
without venting.
9. Operator must remain in seat while engine is running.
7
IMPORTANT INFORMATION ON THE FILTRATION
OF YOUR PB SERIES
Your PB Series unit is equipped with a “suction boost” filter. This filter
provides superior protection to the drive circuit. It is equipped with a
dash mounted notification light that indicates if the filter needs changed.
This light is additional information for the operator and is not a
substitute for filter changes during PM’s.
This light will normally illuminate* under three circumstances.
1) During cold weather operation, the light may illuminate until
the hydraulic oil warms. This generally takes 1 to 3 minutes of
operation.
2) During high-speed multi-function operation, the light may
illuminate temporarily.
3) If the light remains on at any other time the filter should be
changed.
*An illuminated light does not mean the filter is by-passing but indicates
contaminates in the hydraulic system.
A “break-in” filter change is recommended in the first 5-10 hours of
operation.

Jacking and Blocking
WARNING
Avoid the risk of injury or death.
Use jack stands when working
on raised truck.
Front Jacking
With forklift in Service Position
Engine Off:
1.Use a hydraulic jack of 5 ton
capacity minimum.
2.Position front jacks under
stabilizer feet.
3.Position jack stands under
carriage.
4.Slowly lower forklift onto
stands.
Rear Jacking
With forklift in Service
Position Engine Off:
1.Use a hydraulic jack of 5 ton
capacity minimum.
2.Position jack under frame at
rear.
3.Position jack stand under
frame.
4.Slowly lower forklift onto
stands.
WARNING
Avoid hydraulic line damage.
Do not jack or block forklift
frame near hydraulic lines.
8
C
C
9 Lubrication
47
Grease Fitting, top of tilt
cylinder-1, B
Mast Chains-9, B
Grease Fitting, bottom of tilt
cylinder-1, B
Grease Fitting, Side Shift
Cylinder-1, B
Side Shift Blocks-1, B
Side Shift Blocks-1, B

1 General Safety Practices
DO
*Safeguard pedestrians at all times.
*Be sure everyone is clear of rear swing area.
*Use caution around pedestrian doorways, where they may step into
path of travel.
*Operate forklift safely.
DO NOT
*Start or operate unless you are in the driver position.
*Put any part of body into mast, or between mast and forklift.
*Put body within reach of mechanism or attachments.
*Drive forklift with anyone standing in front.
*Allow anyone to stand or walk under elevated part of forklift.
*Permit passengers.
*Hit overhead installations such as lights, wiring , pipes, sprinklers,
etc...
*Leave forklift unattended.
CHANGES TO THE FORKLIFT
*Affecting capacity or operation, must have manufacturer’s prior written
approval.
*Involving rebuild, replacement parts, and repair must meet the manufacturer’s set criteria and guidelines.
INSPECTION
*Daily or each shift.
STOPPING DISTANCE
*Operator must always have enough room to safely stop the forklift in
any given situation.
STABILITY changed by:
*Operator judgement.
*Improper operation.
*Faulty maintenance.
*Grade.
*Ground and floor conditions.
*Fast turns.
*Cutting corners.
9 Lubrication
Hyd. Return Filter-5, C (Left)
Fuel Filter-8, C (Right)
Tire Pressure-Check A
Chain Sheave-1, B
46
Air Cleaner-2, C
Hydraulic Oil- Check A
Diesel Fuel-Check A
Engine Oil-Check A
9

1 General Safety Rules
LOAD BACKREST
*If the load causes hazard, equip forklift with a vertical load backrest extension.
FUEL
*Fuel handling and storage must be done following ANSI/NFPA 505 and
ANSI/NFPA30.
HAZARDOUS CONDITIONS
*Operating in hazardous conditions is the responsibility of the user.
AISLES AND OBSTRUCTIONS
*Path of operation and ramps must be marked and clearly visible.
LIGHTS
*Where needed, forklift must have lights.
ENGINE EXHAUST
*Forklift must be used in a well ventilated area.
SOUND
*Consideration should be given to the sound exposure of personnel in the work
area.
DROP OFFS
*Keep safe distance from the edge of ramps and platforms.
TRAILER CREEP
*When driving on and off trucks or trailers apply trailer brakes and chock the
wheels.
*Do not mount or dismount the forklift from a semi-trailer which is not coupled to
a tractor.
*Forklifts mounted to uncoupled semi-trailers may need supports to prevent
upending.
LIFTING PEOPLE
*Do not use this forklift to lift people; it is not designed for it.
*Equipment specifically designed to raise people is available.
OPERATINGENVIRONMENT
*Avoid areas near excavations and embankments.
*Watch out for low electric lines, tree branches, and other obstacles.
SEATBELT
*Always wear the provided seat belt when operating the forklift.
10
8 Inspection
*Mast
Push lift control away from you, forks should move down. As the control is
pushed more, the forks should move faster. Report any sticking or jerking.
Pull lift control toward you, forks should move up. As the control is pulled more,
the forks should move faster. Report any sticking or jerking.
Push tilt control away from you, mast should tilt forward. As the control is
pushed more, the mast should tilt faster. Report any sticking or jerking.
Pull tilt control toward you, mast should tilt backward. As the control is pulled
more, the mast should tilt faster. Report any sticking or jerking.
Push carriage control away from you, mast should move forward. As the control
is pushed more, the mast should move faster. Report any sticking or jerking.
Pull carriage control toward you, mast should move backward. As the control is
pulled more, the mast should move faster. Report any sticking or jerking.
Push side shifter control away from you, mast should move left. As the control is
pushed more, the mast should move faster. Report any sticking or jerking.
Pull side shifter control toward you, mast should move right. As the control is
pulled more, the mast should move faster. Report any sticking or jerking.
Push stabilizer control away from you, stabilizer should move down. As the control is pushed more, the stabilizer should move faster. Report any sticking or
jerking.
Pull stabilizer control toward you, stabilizers should retract. As the control is
pulled more, the stabilizers should move faster. Report any sticking or jerking.
If forklift is unsafe or in need of repair, do not use it until it is returned to a safe
operating condition.
During use, if forklift becomes unsafe in any way, stop using. Do not use it until
is is returned to a safe operating condition.
Do not make repairs or adjustments, unless you are authorized to do so.
DOUBLE REACH (Optional)
1) Ensure the cylinder operates smoothly and that it slows at the end of
extension and retraction.
2) Inspect the cylinder and hoses for leaks and wear.
3) Inspect the bearings for breakage and that they turn freely.
45

2 Operators Safety Rules and Practices
OPERATORS RESPONSIBILITY
*Safe operation is the responsibility of the operator.
*Read and understand operator’s manual.
*Know all functions of controls and instruments.
*Be alert to other personnel and hazardous conditions.
*Be alert to unusual or special operating conditions and safety precautions.
*In hazardous areas, use only forklifts approved for those areas.
*Always where the provided seat belt when operating forklift.
OPERATORS MUST BE TRAINED AND UNDERSTAND
*Equipment operation.
*Control locations and functions, and what problems will occur when handled
improperly.
*Traveling.
*Loading.
*Mechanical limits.
*Center of gravity.
*Stability.
*Operating conditions.
*Nameplate information.
*Warning signs.
TRAVELING
*Obey all traffic rules and speed limits.
*Keep to the right.
*Always keep your forklift under control and stay a safe distance, based on
speed, from other vehicles.
*Operate at speed that allows stopping in a safe manner.
*Yield to pedestrians and emergency vehicles.
*Be alert to blind spots, and other locations where vision is not clear.
*Be sure you have a clear view of your path of travel.
*When load obstructs view of forward travel, travel backward.
*Cross railroad tracks at an angle, do not park closer than 6 ft.
*Go up and down grades slowly and carefully, tilt forks back.
*Avoid turning on grades, ramps or inclines.
*Stopping distances going down grades will be longer.
*Slow down and allow enough room at the bottom of grades to stop.
*Travel with forks raised, only far enough to clear road surface, and tilted back.
8 Inspection
*Fuel
Do not use open flame to check fuel level. When refueling, stop engine.
Replace fuel cap before starting engine. If spillage happens, be sure it has all
been absorbed or evaporated before starting engine.
*Engine oil
Check and fill, following manufacturers instruction.
*Hydraulic oil
Check and fill, if needed, with recommended hydraulic
oil.
*Lights
If forklift has lights, they must be in good condition and work.
*Mast chains
Check mast chains for damage or missing parts.
*Brakes
When the engine is off the brakes will engage.
DOUBLE REACH (Optional)
1) Ensure the scissor cylinder lock nut is tight. (FIG 1)
2) Ensure the stop bolts are properly contacting the ITA board. (FIG 2)
3) Inspect the scissor assembly for structural cracking.
INSPECTION WITH ENGINE RUNNING
Do this inspection in a large, open area (away from people, walls, ceil-
ings, and other equipment).
*Travel
Bring forklift to a complete stop before changing direction.
*Neutral position
When motion pedal is in neutral, drive wheels will not turn.
*Travel control
Push motion pedal away from you. The forklift should move forward.
As the pedal is pushed more, the the forklift should move faster.
Pull motion pedal toward you. The forklift should move backward. As the pedal
is pulled more, the the forklift should move faster.
44
11
Jam
Nut
FIG 1
Contact
FIG 2

2 Operators Safety Rules and Practices
TRAVELING (cont.)
*Starts, stops, turns and directional changes must be made smoothly to prevent
load shift and overturn.
*No horse play or stunt driving.
LOAD HANDLING
*Only handle loads that are stable, safely arranged, and within forklift capacity.
*Fork length must be within 2/3rds of load length.
*Tilt back only enough to stabilize load.
*Be careful when tilting stacked or high loads.
*Do not tilt forward when elevated except to deposit load.
BEFORE LEAVING OPERATOR’S POSITION
*Bring forklift to a complete stop.
*Do not block the way of fire equipment, fire aisles, or stairways.
*Be sure directional controls are in neutral.
*Full lower forks.
*Set parking brake.
*Turn ignition off and remove key.
ACCIDENTS
*Report all accidents , including personnel, equipment, or building structures.
SLOPES
*Use caution when driving on slopes. Avoid turning on slopes, if possible, and
use extreme caution on grades, ramps or inclines; normally travel straight up
and down.
*Elevation of load should also be avoided on sloped surfaces.
12
8 Inspection
INSPECTION WITH ENGINE OFF
Do this inspection with the forklift in a safe parked position.
*Warning and safety devices
Push horn button, horn must sound loud and clear. If forklift has other warning
devices (flashing lights, etc..), they must work.
*Frame
Look at the condition of the frame. Report cracked or broken frame members.
*Tires
Check tire pressure. Tires must be inflated to recommended pressure. Inspect
wheel fasteners. All fasteners must be in place and tight. Look at the condition
of the wheels and tires. Report worn, cracked or leaking tires.
*Lift control
Must work freely and return to neutral when released.
*Side shift control
Must work freely and return to neutral when released.
*Carriage control
Must work freely and return to neutral when released.
*Stabilizer control
Must work freely and return to neutral when released.
*Tilt control
Must work freely and return to neutral when released.
*Steering wheel
Must be in good condition and work freely.
*Forks
Must be in good condition and in good alignment. Report any cracks or breaks.
*Fuel system
Inspect fuel lines and fittings for leaks. Do not use open flame to inspect fuel
system.
43

7 Moving A Disabled Forklift
RELEASING BRAKE
THIS MACHINE HAS A BRAKE
IN THE FRONT MOTORS.
To release drive hub brake,
remove cap on the inside of the
hydraulic motor. Screw in a
12mm x 1.75mm x 35mm hex
head bolt with a washer larger
than the hole diameter. Tighten
the bolt to release the brake.
Reverse procedure to make
brakes work after towing and
repairs are completed.
Remove the bolt and install the
cap before operating the PIGGY
BACK. Drive hub will not operate
unless the bolt is removed.
TOWING FORKLIFT
Fasten a chain or cable to tow vehicle around fork bar of forklift. Cable
or chain must have capacity to pull 3 tons.
An operator must be seated on forklift.
42
3 Forklift Description
13
REAR DOLLY
HYDRAULIC FILTER
FUEL FILTER
ST ABILIZER PAD AND ARM
7-PIN WIRING CONNECTOR
MOTION PEDAL
TAIL LIGHTS
SEAT BELT
(With Integrated Brake Interlock)

3 Forklift Description
ACCELERATOR PEDAL BATTERY
DASH AND CONTROLS
MOUNTING HOOK
14
WHEEL MOTOR AND TIRE
MAST
6 Transport-EASY HITCH
Lower the PIGGY BACK
to the ground.
Tilt the top of the mast
forward to lower the rear
tire.
Drive the PIGGY BACK
straight back to pull the
forks from the fork supports.
41

6 Transport-EASY HITCH
Tilt the top of the mast
fully to the rear to raise
the rear tire of the PIGGY
BACK..
Raise the PIGGY BACK
until the hooks clear the
pins.
Extend the carriage 4-6
inches.
40
3 Forklift Description
15
WARNING
LIGHTS:
(left to right)
TOP:
Engine Temp.
Oil Pressure
Alternator
BOTTOM:
Blank
Blank
Filter Indicator
KEY SWITCH:
LEFT-OFF
RIGHT ONE POSITION-
ACCESSORY
RIGHT TWO POSITIONS-
PREHEAT
RIGHT THREE POSITIONS-
START
HORN
BUTTON
WORK
LIGHTS
3WDTRAC-LOC
SWITCH,
see pg. 19.
PARKING BRAKE:
UP-ON
DOWN-OFF
RE-SETABLE
CIRCUIT
BREAKERS
FUEL
GAUGE

4 Starting
BEFORE STARTING be sure
*Forward and reverse control (motion pedal) is in neutral.
*Seat belt is fastened.
*Operator Inspection is done.
COLD START (Deutz)
*Turn key to the right and hold on pre-heat for several seconds.
*Turn the key to the right and start engine.
*When the engine starts release ignition switch.
*If the engine fails to start, turn off ignition switch and repeat the
above.
COLD START (Kubota)
*Turn key to the right and hold on pre-heat for several seconds.
*Pre-heat engine several times in colder climates.
*Turn the key to the right and start engine.
*When the engine starts release ignition switch.
*If the engine fails to start, turn off ignition switch and repeat the
above.
WARM START
*Turn the key to the right and start engine.
*When the engine starts release ignition switch.
16
6 Transport-EASY HITCH
Dismounting the PIGGY
BACK from the transport vehicle.
Disconnect the safety
chains.
Disconnect the 7-pin electrical connector.
Remove the lynch pins
and pull out the hitch
pins.
Fasten your seat belt.
Start the PIGGY BACK.
39

4 Starting
JUMP START
WARNING
Failure to follow the these rules will cause serious injury or death.
BATTERIES PRODUCE EXPLOSIVE GASES.
*Keep sparks, flames, and cigarettes away from battery.
*Do not let tools or other metal touch positive (+) battery post.
*Remove all jewelry, rings, watches, etc.
CONNECT BOOSTER CABLES IN THE FOLLOWING ORDER
*Connect one Positive (+) red end of booster cable to Positive (+) post
on each battery.
*Connect second Negative (-) black end of booster cable to Negative (-)
post of starting battery and the other end to stalled vehicle engine block
or frame.
*Be sure everyone is away from both vehicles.
*Cables must be clear of all moving parts.
*Start engine of starting vehicle. Wait a few minutes.
*Start engine of stalled vehicle.
*If vehicle does not start after cranking for ten seconds, STOP PROCEDURE. More than ten seconds seldom starts the engine unless some
mechanical adjustments are made.
*After vehicle starts, remove Negative (-) black booster from engine or
frame ground. Then remove the other end from the starting battery.
*Remove Positive (+) black booster cable from stalled battery, then from
starting battery.
6 Transport-EASY HITCH
Install the hitch pins and
attach lynch pins.
Connect the safety chains.
Connect the 7-pin electrical
connector.
Before driving the transport vehicle
Check the function of the
tail, turn and stop lights.
Check the safety chains to
see if they are latched.
Check the hitch and lynch
pins on top of the hooks for
proper installation.
38
Note:
Your unit may be equipped with an automatic tilting device. It is
activated when the transporting vehicle’s lights are activated.
17

6 Transport-EASY HITCH
Retract the carriage to pull
the PIGGY BACK toward
the transport vehicle.
When the carriage is fully
retracted, lower the PIGGY
BACK until the hooks are
fully seated on the pins. Do
not power down.
Note
: If tires do not
contact tire pads
before hooks are
fully seated, tire
pads may be
incorrectly installed.
Shut off the PIGGY BACK.
Push the tilt lever forward
to “relax” the PIGGY BACK
tires onto the front tire
pads.
Note
: If unit does not
correctly contact the
two position tire
pads, then correctly
remount the tire
pads.
37
5 Operation
MOTION PEDAL
WARNING
UNEXPECTED FORKLIFT MOVEMENT
Avoid the risk of injury, follow this rule.
Do not casually rest foot on motion pedal.
Motion pedal controls speed and direction of travel.
IMPORTANT NOTE:
Your unit may be equipped with a seat belt/brake interlock. The seat belt
must be fastened to release parking brake. you must come to a complete stop before unlatching your seat belt to avoid a potential forward tip
or premature brake wear.
REMEMBER
Forklift will not respond to motion pedal until parking brake is released.
Forward
Push front of motion pedal
down and forklift will move forward. The more it is pushed
the faster the forklift will go.
Reverse
Push rear of motion pedal down
and forklift will move backward.
The more it is pushed the faster
the forklift will go.
Neutral Position
When the motion pedal is in
the center, the forklift will be in
the neutral position and should
not move.
18

6 Transport-EASY HITCH
Drive the PIGGY BACK
forward until the forks are
in the fork supports, tilting
the mast forward as you
drive to make sure the
forks are under the front
fork tube.
Tilt the top of the mast fully
to the rear to raise the rear
tire.
Raise the PIGGY BACK
until the hooks are above
the pins.
36
5 Operation
3WD AND TRAC-LOC SWITCH
Three Wheel Drive (3WD)
With the switch in the lower position, the
forklift will be in 3WD and power is
applied to all three wheels.
3WD IS THE NORMAL OPERATING
MODE.
Trac-Loc
Rock switch toward mast and the rear
wheel will be in locked in.
Use Trac-Loc in slippery conditions.
Continuous Trac-Loc usage adds
heat to hydraulic drive system and
inhibits vehicle turning. Use TracLoc only when necessary.
19
2 POSITION SWITCH
UP TRAC-LOC
DOWN 3WD
Important Note:
Disengage Trac-Loc before
starting the PIGGY BACK or
damage to the Hydraulic
System may occur.

5 Operation
STEERING WHEEL
20
Left
Turning steering wheel left when
you want to turn left. The forklift
responds quicker, the more the
more the wheel is turned.
Right
Turning steering wheel right when
you want to turn right. The forklift
responds quicker, the more the
more the wheel is turned.
6 Transport-EASY HITCH
Mounting the PIGGY BACK to the transport vehicle.
Fasten your seat belt.
Start the PIGGY BACK.
Raise the forks to the level
of the fork support tubes.
Extend the carriage 4-6
inches.
35

6 Transport-EASY HITCH
34
EASY HITCH MOUNTING SYSTEM
OPERATORS INSTRUCTIONS
The Easy Hitch mounting system for the Princeton PIGGY
BACK Material Handler consists of the following components:
Safety Chains
7-Pin Electrical Connector
Fork Support Tubes
Front Tire Pads
Hitch Pins with Lynch Pin Attached
Support Pins mounted to the Transport Vehicle
Hooks Mounted to the PIGGY BACK
5 Operation
LIFT CONTROL
21
Up
Push lift control away
from you, the forks will
move down. As the
control is pushed
more, the forks will
move down faster.
Neutral
When lift control is
in neutral, the forks
will not move.
Down
Pull lift control to you,
the forks will move up.
As the control is pulled
more, the forks will
move up faster.

5 Operation
TILT CONTROL
22
Down
Push tilt control away
from you, the forks
will tilt forward. As
the control is pushed
more, the mast will
tilt faster.
Neutral
When tilt control is
in neutral, the mast
will not move.
Up
Pull tilt control to you,
the mast will tilt backward. As the control is
pulled more, the mast
will tilt faster.
5 Operation
SAFETY SIGNS
33
Motion Pedal
NEVER put your body
between the horizontal
carriage and dash.
STAY away from pedestrians
at all times.
NEVER put your body between
the forklift and the mast.
DO NOT place foot under the
stabilizer pad .
KEEP YOUR HANDS AWAY
from chains at all times
PINCHPOINT-keep hands
and feet away at all times.
P.N. 604-218

5 Operation
SAFETY SIGNS
32
MAIN WARNING
DO NOT stand on or below
the forks.
NO RIDERS
STEERING CYLINDERkeep hands, arms and
body away from cylinder at all times
5 Operation
SIDE SHIFTER CONTROL (OPTIONAL)
Left
Push side shifter
control away from
you, the forks will
move left. As the
control is pushed
more, the forks will
move faster.
Right
Pull side shifter control to you, the forks
will move right. As the
control is pulled more,
the forks will move
faster.
23
Neutral
When control is in
neutral, the side
shifter will not
move.

5 Operation
SCISSOR CONTROL (OPTIONAL)
Out
Push scissor control away from you,
the forks will move
forward. As the control is pushed more,
the forks will move
faster.
Neutral
When scissor control is
in neutral, the forks will
not move.
Back
Pull scissor control to
you, the forks will move
backward. As the control is pulled more, the
forks will move faster.
24
5 Operation
Go up and down grades slowly and carefully. The mast must be extended and
as low as possible when climbing grades. Grades that are approaching the forklift’s capability limits should be climbed in reverse with the mast fully retracted.
Extreme care must be taken in these cases. Avoid turning on grades, ramps,
or inclines. Stopping distance going down grades will be longer. Slow down and
allow enough room at bottom of grades to stop.
Travel with forks raised only far enough to clear road surface and tilted back.
Starts, stops, turns, and directional changes must be made smoothly to prevent
overturn.
Operators must always be aware of any obstacles that may interfere with forklift
travel. These objects include: ground obstacles, ceilings, ceiling fixtures, and
objects interfering with the forklift travel path.
DEPOSITING LOAD-MAST RETRACTED
To deposit load after being moved into correct position, tilt mast forward to ver-
tical position and lower load.
Adjust fork height and tilt mast forward as needed for smooth fork removal from
load.
Carefully back away and clear forks from the load.
Raise forks for travel and tilt mast back.
DEPOSITING LOAD-MAST EXTENDED
To deposit load after being moved into correct position, tilt mast forward to vertical position and put stabilizers down. Extend mast and lower load.
Adjust fork height and tilt mast forward as needed for smooth fork removal from
load.
Carefully retract mast all the way from the load.
Raise stabilizers and back away from the load.
Raise forks for travel and tilt mast back.
31

5 Operation
Raise load to travelling height and tilt fully back. Never tilt mast forward past
horizontal when loaded.
PICKING UP LOAD-MAST EXTENDED
Forks must be spaced as far apart as the load being carried allows. Both forks
should be the same distance from the center of the mast. Be sure the fork lock
pin fits securely into a locking notch.
Handle only stable loads within the forklift’s rated capacity as shown on the
capacity sign. Always center load on forks.
Do not handle loads higher then the load backrest or its extension, unless load
is secured and will not fall backward.
Use lift and tilt controls, adjust the forks to correct height and angle for engaging
load.
Move forward until the forklift is almost touching load. Put stabilizers down.
Extend forks into load. Be sure forks do not extend beyond load, getting caught
on other loads or materials.
If forks are longer than load, move tips partially under load without extending
beyond the load. Raise load to clear floor. Back out, set the load down and position correctly on forks.
Raise load by tilting mast back just far enough to lift load from floor.
Raise load to travelling height and tilt fully back. Never tilt mast forward past
horizontal when loaded.
Retract mast and lift stabilizers.
TRAVELING LOADED
Keep load against the load backrest. Loads out on the fork ends make the forklift less stable and more likely to overturn.
Obey all traffic rules and speed limits. Always keep your forklift under control
and at a safe distance, based on speed, from other vehicles.
Be sure you have a clear view of your path of travel. Be alert to blind spots, and
other locations where vision is not clear. When load obstructs view, travel backwards.
30
5 Operation
CARRIAGE CONTROL
25
Out
Push carriage control away from you,
the mast will move
forward. As the control is pushed more,
the mast will move
faster.
Neutral
When control is in
neutral, the mast
will not move.
Back
Pull carriage control to
you, the mast will
move backward. As
the control is pulled
more, the forks will
move faster.

5 Operation
STABILIZER CONTROL
26
Down
Push stabilizer control
away from you, the
stabilizers will move
down. As the control is
pushed more, the stabilizers will move
faster.
Neutral
When stabilizer
control is in neutral,
the stabilizers will
not move.
Up
Pull stabilizer control
to you, the stabilizers
will retract. As the
control is pulled more,
the stabilizers will
retract faster.
5 Operation
TRAVELING EMPTY
Obey all traffic rules and speed limits. Always keep your forklift under control
and at a safe distance, based on speed, from other vehicles.
Be sure you have a clear view of your path of travel. Be alert to blind spots, and
other locations where vision is not clear.
Go up and down grades slowly and carefully. The mast must be extended and
as low as possible when climbing grades. Grades that are approaching the forklift’s capability limits should be climbed in reverse with the mast fully retracted.
Extreme care must be taken in these cases. Avoid turning on grades, ramps,
or inclines. Stopping distance going down grades will be longer. Slow down and
allow enough room at bottom of grades to stop.
Travel with forks raised only far enough to clear road surface and tilted back.
Starts, stops, turns, and directional changes must be made smoothly to prevent
overturn.
Operators must always be aware of any obstacles, trees, electrical wires, and
objects interfering with forklift travel path.
PICKING UP LOAD-MAST RETRACTED
Forks must be spaced as far apart as the load being carried allows. Both forks
should be the same distance from the center of the mast. Be sure the fork lock
pin fits securely into a locking notch.
Handle only stable loads within the forklift’s rated capacity as shown on the
capacity sign. Always center load on forks.
Do not handle loads higher then the load backrest or its extension, unless load
is secured and will not fall backward.
Use lift and tilt controls, adjust the forks to correct height and angle for engaging
load.
Move forward until the forks are squarely and completely under load. Be sure
forks do not extend beyond load, getting caught on other loads or materials. If
forks are longer than load, move tips partially under load without extending
beyond the load. Raise load to clear floor. Back out, set the load down and position correctly on forks.
Raise load by tilting mast back just far enough to lift load from floor.
29

5 Operation
DOUBLE REACH (Optional)
5 Operation
LOAD ARMS (Optional)
The Load Arm Option is used
when the forklift is carrying long
loads such as lumber, drywall,
and other building materials.
LOWERING ARMS
To lower the Load Arms into operating position, pull the spring pin
out of the hole on mounting hook
and lower the arm onto the front
support. Make sure pin end is
below the load surface or dimpling of load arm and load will
occur.
RAISING ARMS
To raise Load Arms, lift the arm
until spring pin snaps into detent
hole on mounting hook.
MOUNTING
Load Arms are to be in the raised
position when the forklift is
mounted on an EASY HITCH
Mounting. Safety chains will run
through the holes in the Load
Arms.
27 28
The first stage of reach is the standard moving mast and the second stage of
the reach is a scissor mechanism.
This option has been ordered by the owner of the PIGGY BACK Delivery
System for the following uses.
1) It allows a 4000 lb.* load on a truck or trailer to be unloaded from one side.
2) It allows a 2500 lb.* load to be placed in an area with low overhead clearance.
3) It allows a 2500 lb.* load to be placed across a small open area.
(See restrictions below)
GENERAL
It is recommended that the scissor is only operated as a second stage reach. This
means that it is the last reach extended and the first retracted when utilizing the double
reach feature. The unit has two extend levers the tall one operates the mast movement,
the short one operates the scissor (FIG 3). The utilization of the scissor reach for unloading may require a spotter to watch the other side of the truck or trailer for pedestrian or
vehicle traffic.
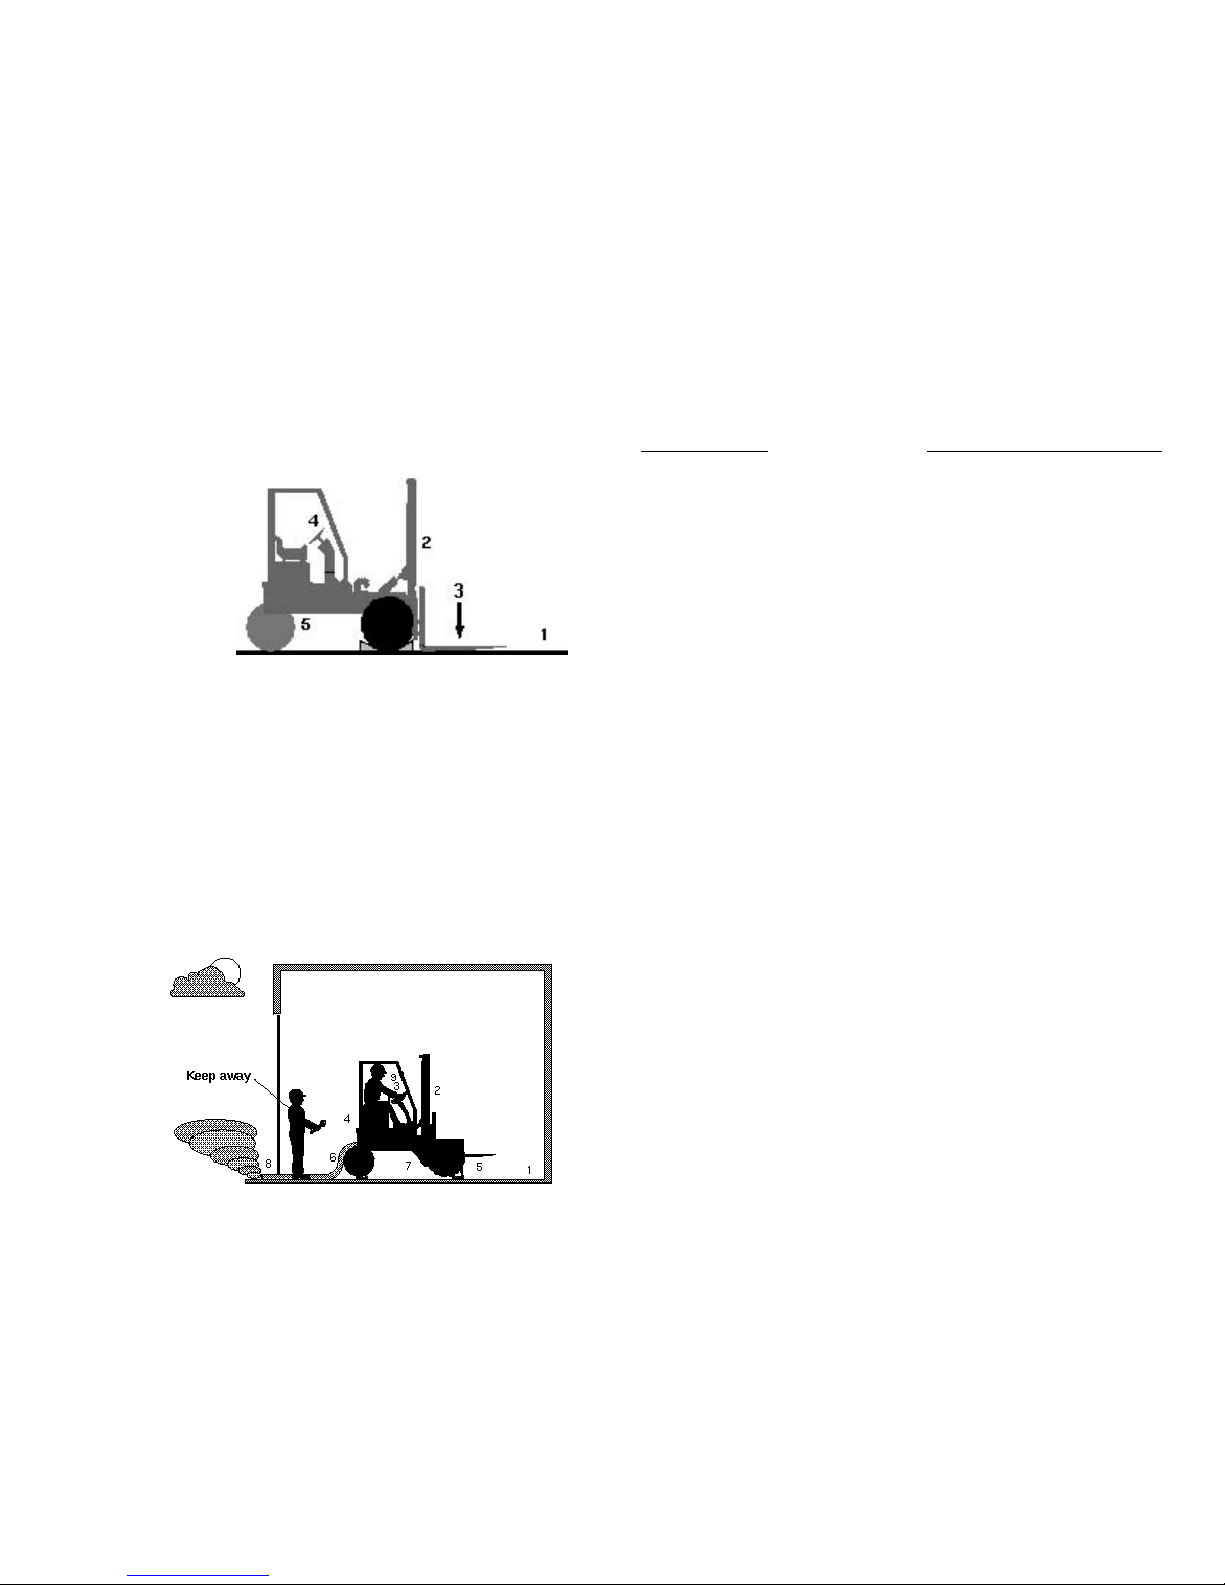
FREE LIFTING (LOAD FULLY EXTENDED)
The rated capacity for this option is 2500 lbs. when the unit is free standing, with stabilizers down, on reasonably firm terrain. This means that a 2500 lb. load that is 48” wide
can be fully extended out when the stabilizers are engaged. This would be a typical low
overhead clearance or an across open area drop.
WARNING: Exceeding this capaci-
ty will result in a forward tip.
ONE SIDE TRUCK UNLOADING
When unloading from one side of the truck you can get a lift capacity of up to 4000 lbs.
This is achieved by placing the mast of the unit up against the truck or trailer. There are
special bars welded to the mast (FIG 4) that allows free operation of the mast when the
unit is against the truck. To unload the truck or trailer, you will 1) drive up to it while raising your forks, 2) engage your stabilizers, 3) extend your mast until it contacts the truck
or trailer, 4) extended your scissor reach, 5) lift your load 1” to 2”(FIG 5), 6) fully retract
your scissor reach, 7) fully retract your mast, 8) raise your stabilizers, 9) back away from
the truck or trailer and lower your load to the carrying height.
Rub Bar
Contact
FIG 3
FIG 4
Scissor
Control
Mast
Control
FIG 5
1” to 2”
 Loading...