

Page 1
15 Discovery Way, Acton, MA 01720
Phone: (978)263-3584, Fax: (978)263-5086
Web Site:
www.piacton.com
Operating Instructions
Acton SP-750i
0.750 Meter Focal Length Triple Grating
Imaging Monochromator / Spectrograph
750i Manual V1098.1
Page 2

Acton SP-750i
Operating Instructions
CONTENTS: Page
I. Brief Introduction and SP-750i Description 2
II. Specifications 3
III. SP-750i Setup
A. Unpacking Note 4
B. Connecting the SP-750i to the Optional 749 4
Remote Scan Controller, or to a Computer
C. Cables and Connections for SP-750i 5
D. Mounting Accessories 6
E. Mounting Focal Plane Detectors 7
F. Slit Width Adjustment for 716 Bilateral Slits and 715 Fixed
Slit Assemblies 8 - 9
IV. SP-750i Operation
A. Initialization 10
B. Operating the SP-750i Using the Model 750-749
Remote Scan Controller 10 - 14
C. Operating the SP-750i Using a Computer 15 - 19
D. Focusing and Aligning CCD Array Detectors 19
E. Changing from Monochromator to Spectrograph Operation 20
V. Appendices and Schematic Drawings
A. Alternate Start-Up Parameters 21
B. Cable Connection Diagrams 22
C. Standard Slit Assembly Drawing 23
D. Accessories List and Ordering Information 24 - 29
E. Certification and Warranty Information 30
F. Drawing No. 8450-750-50, titled “SP-750i” 31
1
Page 3

I: Brief Introduction and SP-750i Description
Brief Introduction:
This instruction manual is intended to assist you in set-up and operation of your new SP-750i
monochromator/spectrograph. Even if you are an experienced user of spectroscopic equipment, we suggest
that you follow the manual (at least initially) to insure proper setup and operation. If you have any
questions about the information contained in this manual, please feel free to contact the Princeton
Instruments customer service department.
SP-750i Description:
The SP-750i is a 750mm focal length monochromator/spectrograph. It features an astigmatism-corrected
optical system, triple indexable gratings and triple grating turret. The SP-750i includes a direct digital
grating scan mechanism with full wavelength scanning capabilities, plus built-in RS232 and IEEE488
computer interfaces.
2
Page 4
II: SP-750i Specifications
NOTE: Each SP-750i is operated for at least 15 minutes prior to
calibration to insure optimum stability. End users should
follow this practice if their application calls for optimum
stability & reproducibility.
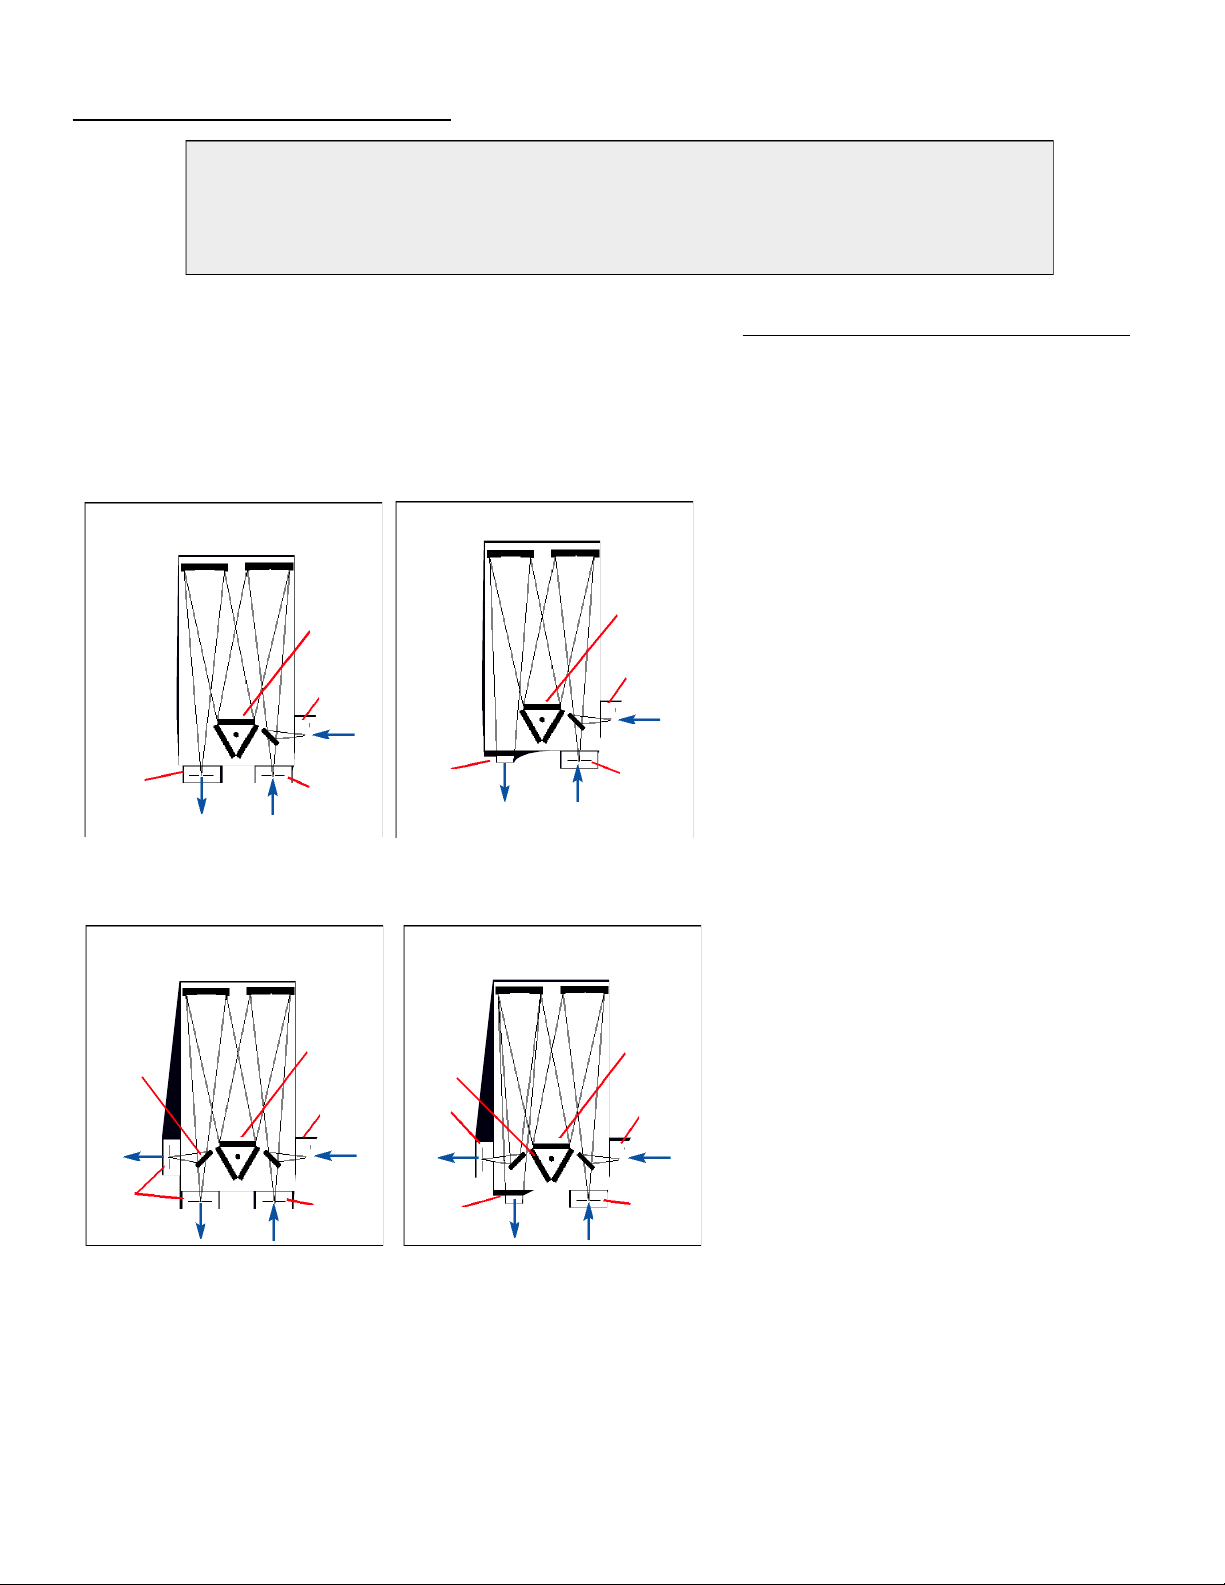
Every SP-750i monochromator or spectrograph
includes a triple grating turret for 1, 2, or 3 gratings,
an imaging optical system, 32-bit microprocessor
controlled scanning, built-in RS232 and IEEE488
interfaces, and micrometer controlled entrance slit
(optional second entrance slit available).
Model SP-555 Monochromator
Triple
Grating
Turret
Entrance
Slit
Exit
Slit
Includes 90° optical path, and micrometer
adjustable entrance and exit slits.
Optional
Entrance
Slit
Model SP-557
Dual Exit Port Monochromator
Motorized
Mirror
Two
Exit
Slits
Includes micrometer controlled dual exit
slits (90 & 180°), and motorized mirror for
rapid, computer controlled exit slit selection.
Triple
Grating
Turret
Entrance
Slit
Optional
Entrance
Slit
Model SP-556 Spectrograph
CCD
Port
Includes 90° optical path, large 14mm X
27mm focal plane, plus sliding tube CCD
adapter with focus-stop.
Model SP-558
Monochromator/Spectrograph
Motorized
Mirror
Exit
Slit
CCD
Port
Includes dual exit ports; one exit slit and
one sliding tube CCD adapter with motorized mirror for rapid, computer controlled
exit port selection.
Triple
Grating
Turret
Entrance
Slit
Optional
Entrance
Slit
Triple
Grating
Turret
Entrance
Slit
Optional
Entrance
Slit
Specifications (1200g/mm Grating)
Focal length: 750mm
Aperture Ratio: f/6.5 (68x68mm gratings)
Optical Design: Imaging Czerny-Turner with
original polished aspheric mirrors
Optical Paths: 90° standard, 180° and
multi-port optional
Scan Range: 0 to 1400nm mechanical
range
Operating Range: 185nm to the far infrared
with available gratings and accessories
Resolution: 0.05nm at 435.8nm
Dispersion: 1.7nm/mm (nominal)
Accuracy: ±0.2nm
Repeatability: ±0.05nm
Drive Step Size: 0.0025nm (nominal)
Focal Plane Size: 27mm wide x 14mm high
CCD Focus Arrangement: Exclusive o-ring
sealed sliding tube with unique 3-point focus
stop/fine focus adjustment mechanism.
Detector Coverage: ~42.5nm across a 1.0”
wide focal plane (~85nm: 600g/mm grating)
Standard Slits: Micrometer adjustable from
10µm to 3mm wide. Slit heights: 4 & 14mm
Grating Mount: Triple grating turret for 1, 2,
or 3 gratings.
Interchangeable Grating Turrets: Optional
Grating Change Time: Less than 20 seconds
Grating Drive System: 32-bit microprocessor
controlled direct digital scanning (DDS)
system.
Scan Linearity: The SP-750i scans
linear with respect to wavelength
Size: 21” long (534mm)
11” wide (280mm)
8” high (203mm)
4.875” (123.8mm) optical axis height
Weight: 40 lbs (18kg)
Tested and conforms to European CE
Standards
3
Page 5
III. SP-750i Setup
Section III-A: Unpacking and Inspection
Carefully unpack and examine the SP-750i and any accessories purchased.
Note: Report any damage immediately to the carrier and to
Princeton Instruments, and save all packing materials.
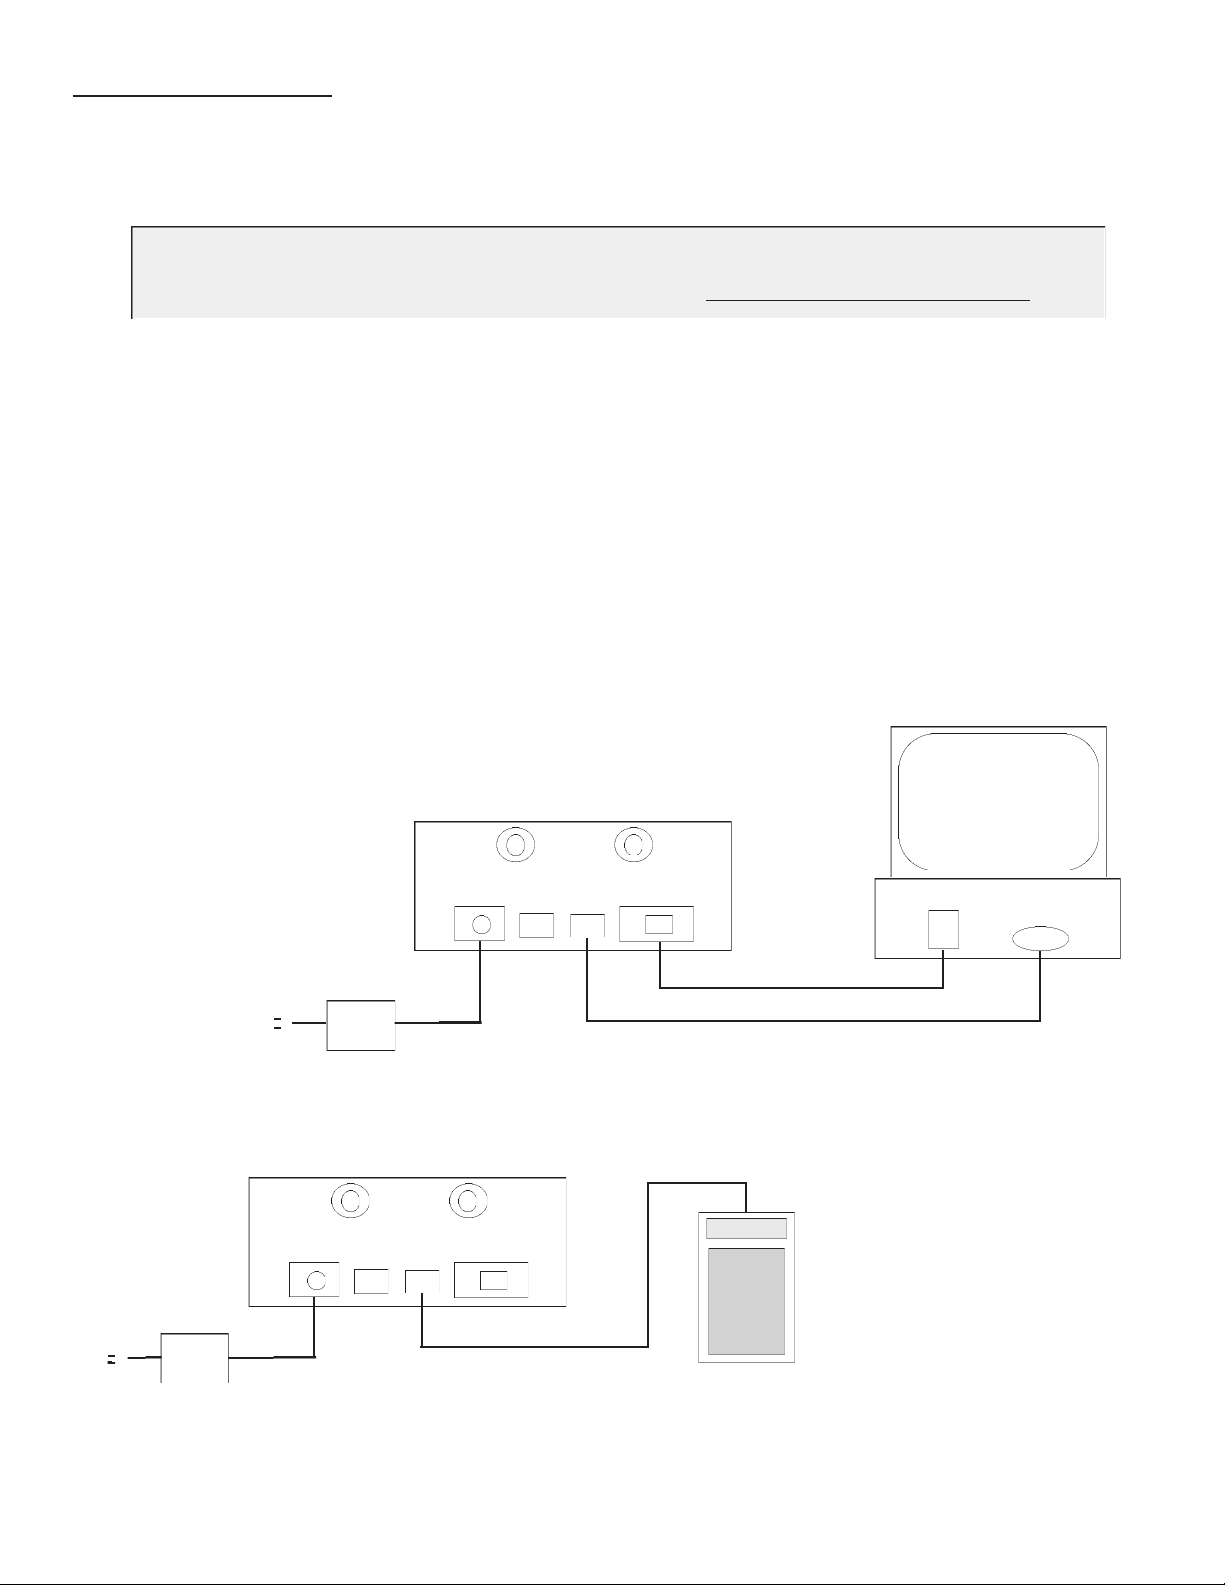
Section III-B: Connecting the SP-750i Monochromator/Spectrograph to the
Optional Model 750-749 Remote Scan Controller or Computer
The SP-750i is designed for operation by computer using RS232 or IEEE488, or by using the optional
Model 750-749 Remote Scan Controller. Either method of control enables wavelength scanning
at a pre-set linear scan rate, change of scanning speeds, grating selection, rapid GOTO wavelength
positioning, change of grating turrets if available, and “jog” wavelength positioning. Figure 1 below shows
the cable connections necessary for operation from a computer through the COM ports or with a GPIB
controller card. Figure 2 below shows the cable connections necessary for operation of the SP-750i
with the optional Model 750-749 remote scan controller. Refer to the Monochromator Control
Software for Windows for operation with a computer. Refer to Section IV-B for details on operation with the
Model 750-749 remote scan controller.
SP-750i Cable Connections:
Optional 750-749 Remote Scan Controller, RS232, or IEEE488
SP-750i Computer
FIGURE 1
Control from Computer
GPIB
power
POWER
SUPPLY
SP-750i
RS232
power
RS232
GPIB
GPIB Controller
COM Port*
FIGURE 2
Control from Optional
750-749 Remote Scan
Controller
*COM 1
or
COM 2
POWER
SUPPLY
750-749
4
Page 6
Section III-C: Cables and Connections for SP-750i
Princeton Instruments offers the following computer cables as options:
CC-499-1 IBM PC or XT compatible
25 pin female ( DB25S) connector to 9 pin male connector ( DB9P).
CC-499-2 IBM AT or compatible
9 pin female ( DB9S) connector to 9 pin male connector ( DB9P).
CC-499-3 Computer terminal type
25 pin male ( DB25S) connector to 9 pin male connector ( DB9P).
CC-499-4 9-pin cable for Macintosh computer
CC-499-5 IEEE488 cable, 4 meters long
The cable CC-499-2 is included with the SP-750i. The other cables are optional. If none of these
cables are compatible with your system, consult Princeton Instruments for a custom cable. If you have
facilities for constructing a custom cable, use the RS232 pin arrangement shown in Table 1, or the
IEEE-488 pin arrangement shown in Table 2. See also Appendix B.
Table 1: RS232 Computer Interface Pin Arrangement:
pin # description
1 open
2 RD data from SP-750i to computer
3 TD data from computer to SP-750i
4 open
5 ground
6 open
7 RTS connect these two pins together
8 CTS
9 Open
A terminal or RS232 computer port must be set up as follows: 9600 baud, 8 data bits, no parity, 1 start bit,
1 stop bit.
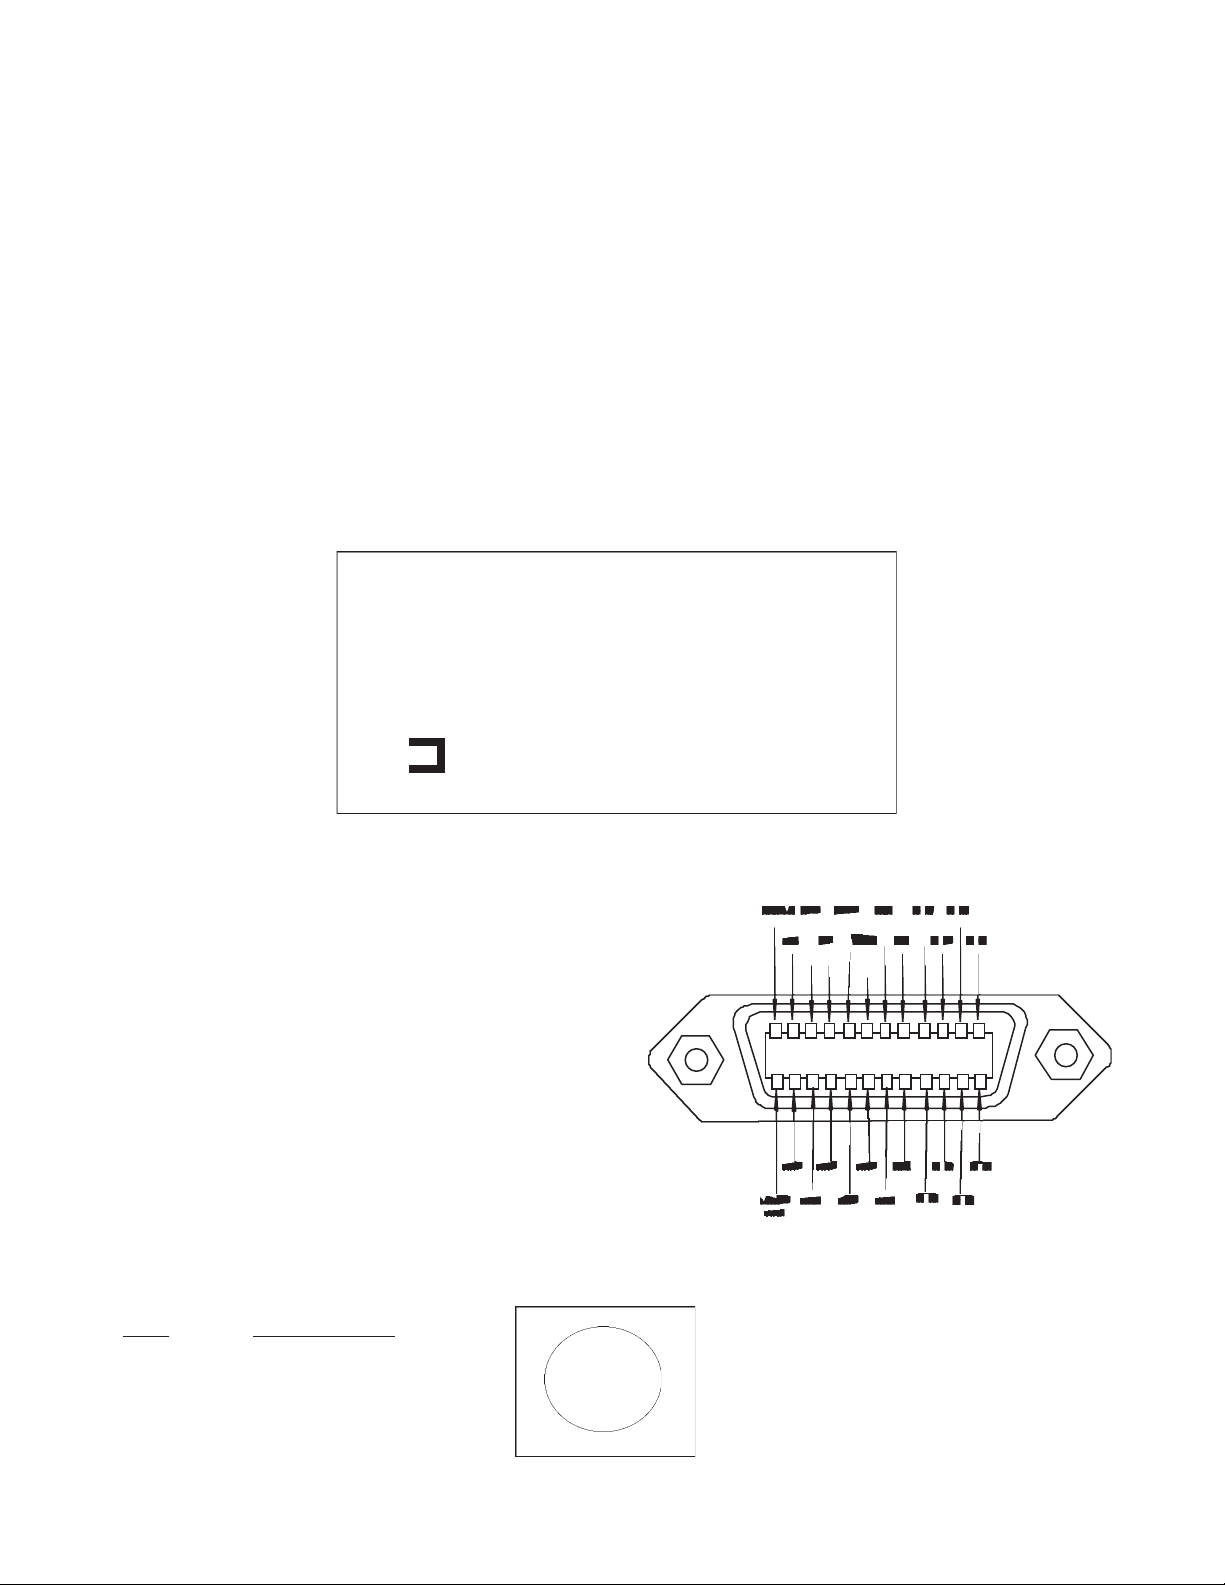
Table 2: IEEE488 Computer Interface
Pin Arrangement:
Table 3: Power Input Pin Arrangement:
PIN# DESCRIPTION
1 +5V
2 GND
3 GND
4 +24V
#2
#3
#1
#4
5
Page 7

Section III-D: Mounting Accessories to the SP-750i Slit Assemblies
All Acton accessories come with their own set of instructions for proper mounting and operation. The
instructions below are only general information. Please refer to the individual instructions for detailed
information.
Accessories: The full range of Acton SP accessories mount directly to the SP-750i slit assemblies.
A drawing of the standard slit assemblies can be found in the Appendices Section to assist you
in mounting accessories. To mount an accessory to the slit, the general procedure is as follows:
1. Place the accessory directly against the face of the slit body. Light sources normally mount
on the entrance slit, detectors on the exit slit. Other accessories such as fiber bundles
normally mount on the entrance slit, but are also compatible with the exit slit.
2. Using four (4) 8-32 screws normally provided with the accessory, secure the accessory to the
slit body.
Light sources fitted with light collection/focusing optics are normally factory aligned to the standard slit.
Note: In some instances with light sources, there is limited access to the
bottom two screw holes. In this case, Princeton Instruments provides
special slotted holes in the light source housing to facilitate mounting
of the source to the slit.
Section III-E: Detector Mounting Instructions: Mounting Focal Plane Detectors to
the SP-750i Spectrograph
The standard mounting flange for CCDs and diode arrays accommodates detectors with two different bolt
circles. There are three (3) equally spaced 10-32 tapped holes on a 3.60” bolt circle, and three (3) equally
spaced holes on a 3.88” bolt circle designed to accept 10-32 button head screws. A set of special
cross-shaped baffles are mounted in the array detector mounting flange to define the focal plane area and
reduce potential stray light. This unique baffle shape permits mounting of many different array detectors.
To mount an array detector to the SP-750i, use the following procedure:
1. The array detector mounting flange is attached to a sliding tube, which fits inside a unique
split camp arrangement.
2. Loosen the split clamp and gently slide the array detector mounting flange all the way out of
the SP-750i housing. Make sure that the sliding tube and o-ring are kept clean.
NOTE: At this point it is very important to check the focal plane distance
of the array detector. This is the distance from the front mounting
surface of the array detector to the actual CCD or diode array
element. Because array detector focal distances vary, the correct
distance is crucial in order to determine if a spacer is required for
proper focus. This spacer is provided with spectrographs. If the
detector focal plane distance falls between .67” and 1.00”, then no
spacer is required.
6
Page 8

3. Position the array detector mounting flange against the array detector, and match the hole
patterns. When correctly positioned, the baffles should be square to the array detector. If it
does not align properly, contact Princeton Instruments.
4. Fasten the array detector mounting flange to the detector, then carefully slide this assembly
back into the SP-750i housing.
5. Tighten the #10-32 set screw on the top of the front plate first, and then tighten the one on
the side.
Refer to Section IV-D for focusing reprocedures for array detectors.
7
Page 9
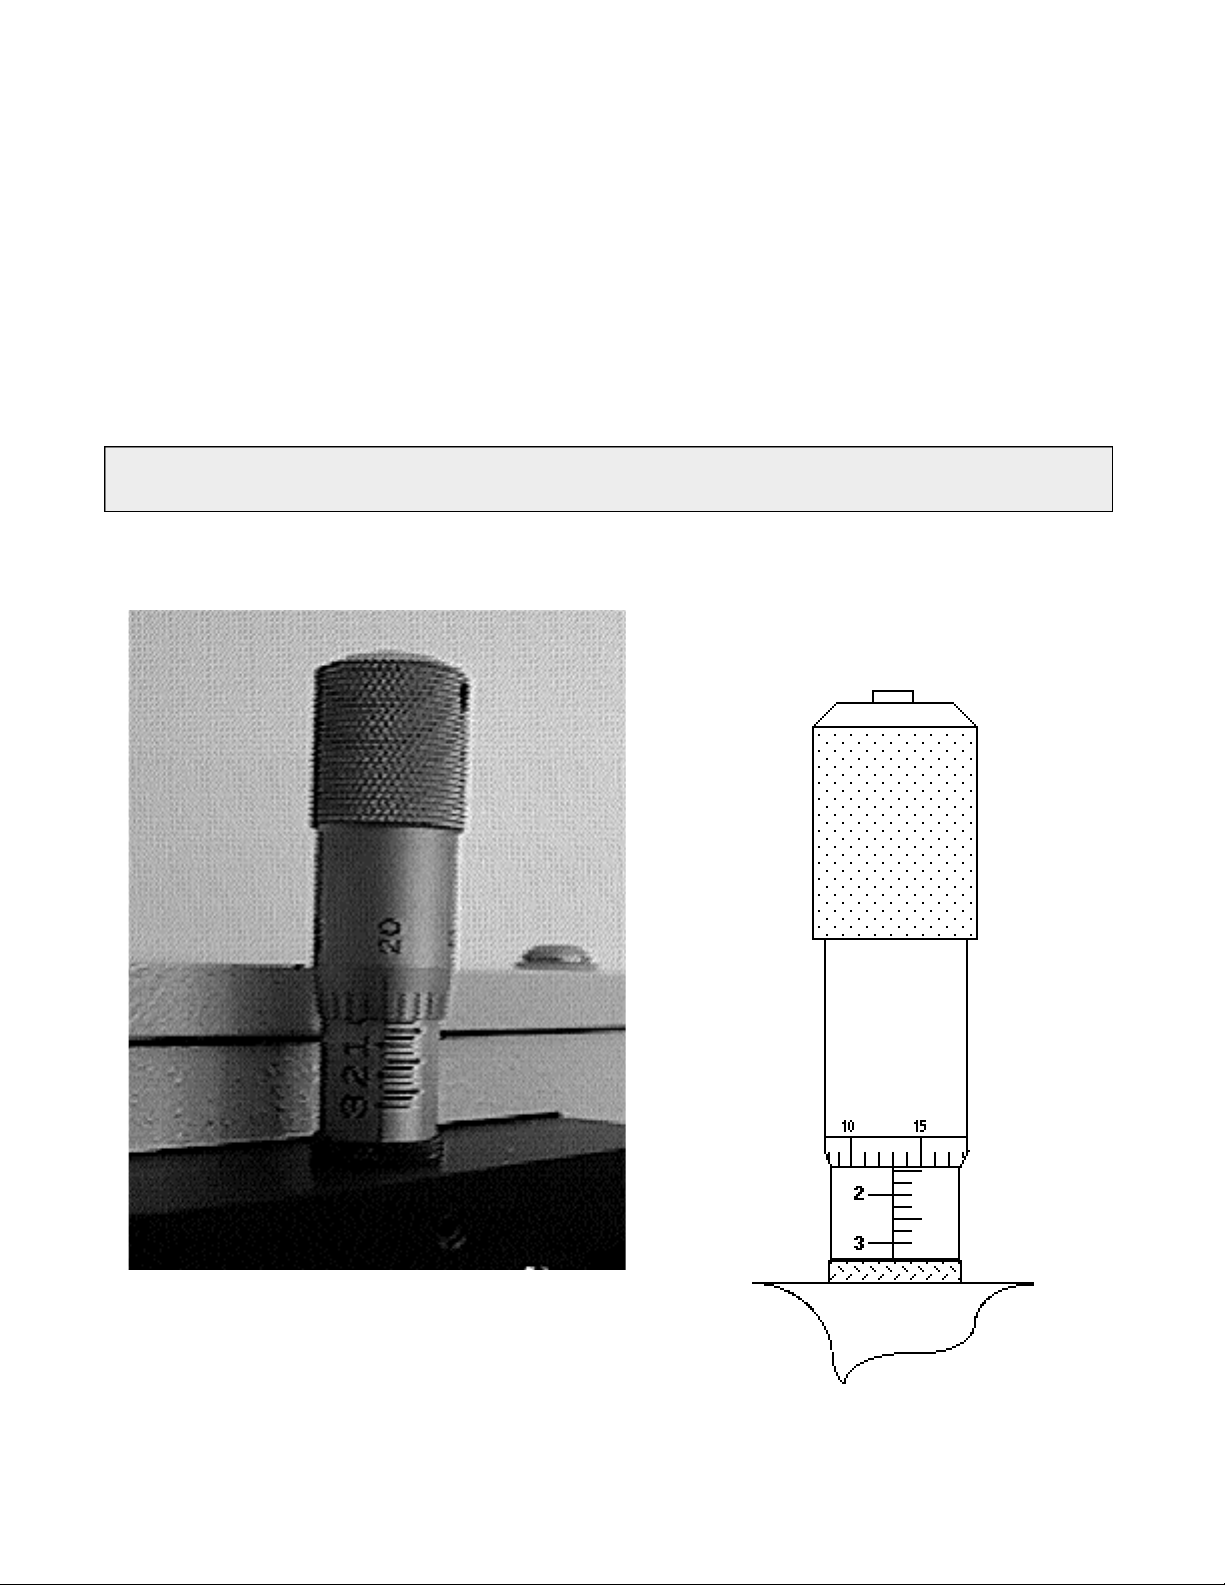
Section III-F: Slit Width Adjustments in the Model 716 Bilateral Slits
The slit width of each bilateral slit assembly (716 type) is adjustable from 0.010 millimeters to 3
millimeters (10 to 3,000 µm) by a micrometer located on the top of the slit housing. The micrometer
knob is graduated in 0.010 millimeter (10 µm) increments.
Each clockwise revolution of the micrometer knob increases the slit width 0.25 millimeters (250 µm). For
maximum reproducibility, the slit width should be set in a clockwise direction (increasing slit widths)
each time it is changed. Refer to the drawing below.
The micrometer knob should not be rotated below a reading of 0.00 or above 3.00. A micrometer setting
of less than 0.010 millimeters (10 µm) should not be used, because a stop is provided to prevent the slit
jaws from contacting each other.
Note: Damage May Be Done If Slit Jaws Are Opened Wider Than 3.0mm.
Slit Width Setting:
200 Micrometers (0.200mm)
Slit Width Setting:
1380 Micrometers (1.38mm)
8
Page 10
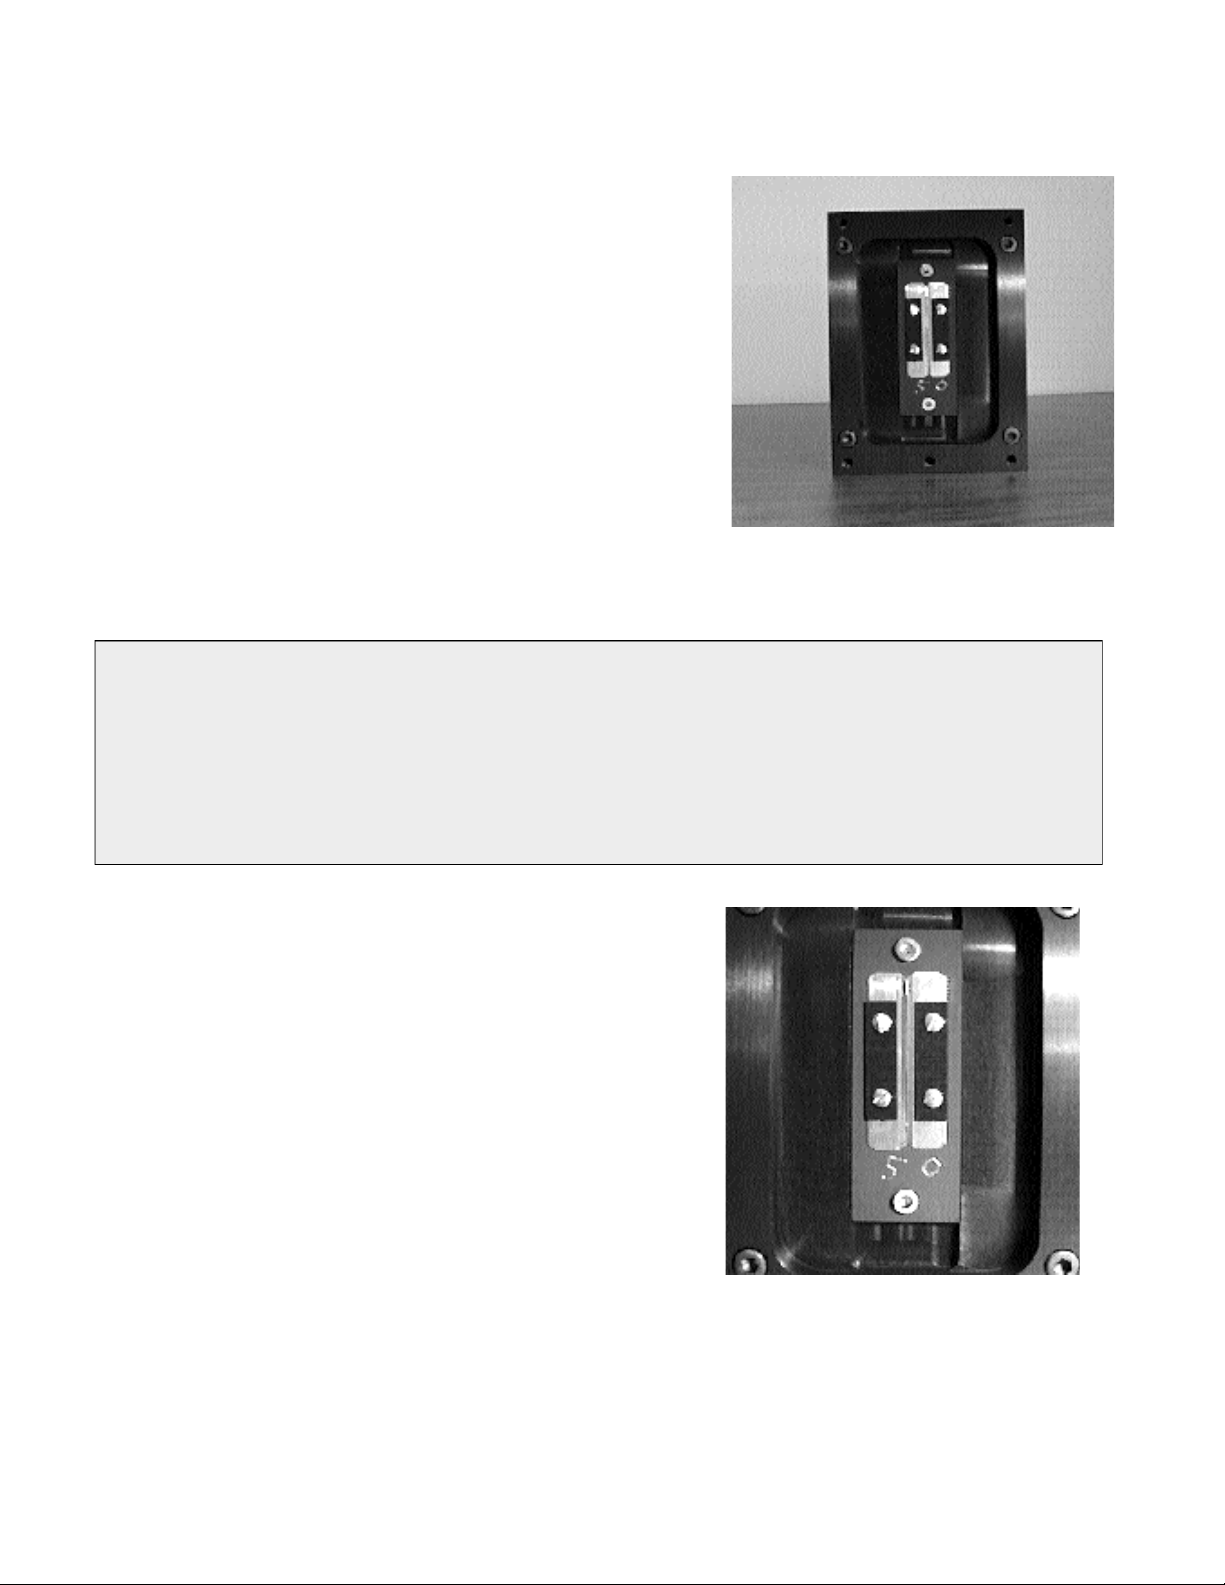
Section III-F Continued: Interchanging Fixed Width Slit Plates in the
Model 715 Fixed Slit Assemblies:
If your SP-750i was purchased with the Model 715 type
fixed slit assemblies, the following procedure should be
used in order to change slit widths. First, at least one
additional fixed slit plate, Model 715-4-XX or 715-14-XX,
must be available to permit changing widths in the 715 type
slit assemblies.
Changing Fixed Slit Plates in the 750-715-1
and 750-715-2 Assemblies:
1. Remove any accessories from the slit body.
2. Using an allen wrench, loosen the two slit plate screws
which hold the slit plate to the slit body. Remove the slit
plate without contacting the slit blades. Store the
removed slit plate in a clean, dry area.
Standard Model 715 Fixed Slit
Assembly
NOTE: Optical Axis Position
Note: Align the new slit plate to the SP-750i optical axis by
orienting it so that the slit width label is upright and readable.
When correctly mounted, the slits are off-centered height-wise,
slightly above the center of the slit body. See the slit assembly
drawing in the appendices section for details, or pictures on this
page for reference.
3. Place the new slit plate in the slit body and secure
it in position using the slit plate screws. The cone
shaped holes in the slit plate are designed to align
the slits to the optical system.
4. The slit width has now been changed.
Fixed Width Slit Plate
Note Orientation for Correct Installation
9
Page 11

IV: SP-750i Operation
Section IV-A: Initialization
When power is turned ON to the SP-750i, it initializes to a wavelength of 0.0nm for grating number 1.
If the power is switched OFF and then ON again to the SP-750i, it will re-initialize. Initialization gives
the system a reference, or starting position to keep track of wavelength position, grating location, and
other parameters. Alternative start-up parameters can be programmed if the factory defaults are not
suitable (See Appendix A).
Section IV-B: Using the Optional Model 750-749 Remote Scan Controller
The Model 750-749 is a Remote Scan Controller (referred to as “controller” for the remainder of this manual)
for the SP-750i Monochromator/Spectrographs. Functions include scanning of wavelengths, GOTO
for rapidly moving the monochromator to a specific center wavelength, grating selection, and interchanging
of grating turrets. It consists of an H-P Model HP 48G Graphics Calculator with RS232 interface, and
Acton-written scan control software. The controller is programmed with all the instrument scan functions
displayed as convenient menu items, with simple keystrokes enabling any of the scan
functions to be performed.
The controller is connected to the SP-750i through the standard RS232 port with the cable provided.
It is designed to send commands and receive information about the specific SP-750i it is attached to,
therefore a single controller can be used with many different instruments (one at a time, however).
When the power is switched OFF and then ON again to the SP-750i and the controller, the SP-750i
will re-initialize. If the controller power is switched OFF then ON again, and the SP-750i power is left
ON, then the controller will return to the last menu selected.
Battery Power Management Feature:
If the controller is not used for a few minutes, the LCD screen will turn off to save
battery power. If this happens, simply press the ON button to return to the menu you
were using.
Operation of the Controller with the SP-750i:
With the controller connected to the SP-750i, turn the power ON to both components. After the
SP-750i initializes, the following menu should be displayed:
{ HOME }
4:
3:
2:
1:
SP300
UTILIT
If the above menu does not appear (for example, if the controller was operated in the calculator mode),
press the RIGHT FUNCTION KEY (➦), followed by the LIBRARY key, then select SP300. When the above
menu is displayed, press the white key below the SP300 function to begin operation (see Appendices Section
for use of the "UTILIT” functions). The following menu will be shown:
10
Page 12

Acton
SP-300
Wavelength= 0.0nm
Scan to 0.0nm
Rate= 100.0 nm/min
Grating #1 1200 g/mm
Main Menu
Jog Incr 1.00nm
GOTO SCAN SPEED GRAT TURR QUIT
All functions of the SP-750i are accessed while the controller displays the Main Menu.
Note: When entering a number for GOTO, SCAN or SPEED, the controller
will accept an integer or a number to the nearest tenth of a
nanometer (nm). If you enter a number with hundredths or lower, it
rounds up to the nearest tenth nanometer.
GOTO Menu:
Press the white key below the GOTO command. The following menu will appear (with a flashing arrow next
to the Enter Wavelength line):
{ HOME } PRG
Go To:
Enter Wavelength
Key in the desired wavelength (in nm) and then push the <ENTER> key (ex: 500 <ENTER>). The
SP-750i will then race at the maximum motor speed to the selected wavelength and display this
interim menu.
Acton
SP-300
Wavelength= 234.5nm
Scan to 500.0nm
Rate= 100.0 nm/min
GOTO Interim Menu
11
Page 13

After the GOTO command is completed, the Main Menu will appear again showing the new center
wavelength (in a monochromator this is the wavelength at the exit slit, in a spectrograph it is the center of
the focal plane).
Acton
SP-300
Wavelength= 500.0nm
Scan to 500.0nm
Rate= 100.0 nm/min
Grating #1 1200g/mm
Main Menu
Jog Incr 1.00nm
GOTO SCAN SPEED GRAT TURR QUIT
SCAN Menu:
SCAN moves the SP-750i to a desired wavelength at a pre-set scanning rate in nanometers per minute.
To use the SCAN menu function, press the white key under the SCAN command while in the Main
Menu. The following menu will appear (with a flashing arrow after Enter wavelength):
{ HOME }
Scan to:
SCAN Menu
Enter Wavelength
As with GOTO, key in the desired wavelength (in nm) followed by <ENTER>. The SP-750i will scan
to the selected wavelength at the preset scanning rate. To change the scanning rate, see the SPEED
(Scanning Rate) instructions following this section. The controller will continue to update the wavelength
display as scanning takes place. When the scanning is complete, the controller returns to the Main Menu
with updated information:
Acton
SP-300
Wavelength= 100.0nm
Scan to 100.0nm
Rate= 100.0 nm/min
Grating #1 1200g/mm
Jog Incr 1.00nm
Main Menu
GOTO SCAN SPEED GRAT TURR QUIT
12
Page 14

SPEED (Scanning Rate) Menu:
To change the wavelength scanning speed of the SP-750i, press the white key below the SPEED
function in the Main Menu. The following menu will be displayed (with a flashing arrow after Enter speed):
{ HOME } PRG
SCAN Menu
Enter speed
Key in the desired scanning speed in nm/min then press <ENTER> (ex: 200.0 <ENTER>). If you enter a
wavelength above the maximum scanning speed for a specific grating, the SP-750i and controller will
default to the maximum scanning speed allowed for the specific grating. The controller will return to
the Main Menu with updated scan speed, as shown in the menu below:
Acton
SP-300
Wavelength= 100.0nm
Scan to 100.0nm
Rate= 200.0 nm/min
Main Menu
Grating #1 1200g/mm
Jog Incr 1.00nm
GOTO SCAN SPEED GRAT TURR QUIT
GRAT (Grating Change) Menu:
Use the GRAT menu to index a desired grating into the operating position (only if there is more than one
grating installed in your SP-750i). From the Main Menu, press the white key below the GRAT command.
This will display a menu that shows the available gratings for the turret currently installed, with
a dot (■) indicating the grating currently in operating position. For example:
Grating:
■
1 1200g/mm BLZ=500nm
GRAT Menu
2 300g/mm BLZ=500nm
3 150g/mm BLZ=500nm
QUIT321
This menu shows that Grating #1 (1200g/mm, blazed at 500nm) is in the operating position. To select
grating #2, press the white button under the number 2 on the display. During the 20 seconds required for
a grating change, the controller displays “Changing Grating”. When the change is complete, the dot (■)
appears next to the #2 grating. To return back to the Main Menu, press the white key below the QUIT
function. The Main Menu will now display the new grating.
13
Page 15

TURR (Turret Change) Menu:
The SP-750i comes with a triple grating turret which accepts 1, 2 or 3 gratings. If more than 3
gratings are required, optional interchangeable turrets are available. If your SP-750i has been
purchased with more than one turret (up to three turrets are possible for a total of nine gratings), you must
input the appropriate turret number using the TURR menu each time a turret is changed. For example, if
you switch from turret #1 to turret #2, use the TURR Menu to let the software know you made the change.
This enables the SP-750i and controller to scan correctly and provide correct wavelength display.
To select the Turret Change Menu from the Main Menu, press the white key below TURR on the controller
display. The TURR menu displays, with a dot (■), which grating turret is currently installed in the
SP-750i, along with available turrets. A display of “Not Inst” means that no gratings have been installed
in the specified turret position. For example, the following menu shows that turret #1 is installed with
Grating #1 (1200g/mm) and Grating #2 (300g/mm). It also shows that turret #2 is available, and that
#3 is not installed. To input the correct turret information, press the white key below the numbers 1, 2, or
3 (in this case, nothing will happen if you select turret 3).
Turret:
Grat #1 Grat #2 Grat #3
■ 1 1200g/mm 300g/mm 150g/mm
TURR Menu
2 600g/mm 150g/mm 75g/mm
3 Not Inst Not Inst Not Inst
1 2 3 QUIT
Press the key below the QUIT function to return to the Main Menu.
JOG Instructions:
The controller for the SP-750i allows the user to change wavelengths without accessing GOTO or
SCAN, and without keying in a destination wavelength. This function is useful for rapidly scanning from
one wavelength region to another, searching for the peak of a line, or accurately positioning a source image
on an array detector. This function is called JOG, and it can be accessed at any time that the other
functions (GOTO, SCAN, etc.) are not in operation. The controller has four direction keys marked with
arrow indicators (▲ ,▼, , and ). JOG operates by moving the SP-750i in wavelength increments
ranging from 0.1nm to 1000nm, and also in “single motor step” increments. Pressing the UP arrow ( )
increases the JOG increment a factor of 10 each time it is pressed, while the DOWN arrow ( ▼ ) decreases
the increment a factor of 10. To access the single motor step JOG, press the DOWN arrow ( ▼ ) until the
increment setting decreases below 0.1nm.
JOG direction is controlled by the arrow keys marked ( and ). To JOG to increasing wavelengths (by
the increment chosen), press the ( ) key. To JOG to decreasing wavelengths, press the ( ) key. If you
press either key more than once, the SP-750i will move the preset JOG increment multiplied by the
number of times the key is pressed. The maximum wavelength possible depends on the grating in the
operating position (1400nm maximum with a 1200g/mm grating, 2800nm maximum with a 600g/mm
grating, etc.). The minimum wavelength possible is -10nm for all gratings.
14
Page 16

Section IV-C: Operating the SP-750i Using a Computer
The Acton SP-750i Monochromator can be controlled from an RS232 terminal or computer using
RS232 or IEEE488. The same command set, listed below, is used for both RS232 and IEEE488.
Commands can be sent as single commands or grouped in strings of commands. All commands are single
words (contain no spaces) and all commands in a string are separated by at least one space. Parameters, if
needed, precede the command and are separated from the command by at least one space (e.g. 546.7
GOTO).
For RS232 operation, the port set-up is 9600 baud, 8 data bits, 1 stop bit and no parity. All commands or
strings of commands must be terminated with a carriage return (0D hex). The SP-750i responds to a
command when the command has been completed by returning the characters OK followed by carriage
return and line feed (hex ASCII sequence 20 6F 6B 0D 0A). The default condition is to echo each character
that is sent to the SP-750i.
When using the IEEE488 (or GPIB) interface, the default device address is 11. The device address can be
set to any value from 1 to 30 using the command SET-ID. The command ?ID is used to read back the IEEE
address. Each command or string of commands must be terminated with a carriage return (0D hex). When
sending a command or string of commands, it is important to wait for the monochromator to complete the
processing of that command string before sending another command. This is accomplished by checking the
status byte. The monochromator controls bits in the IEEE488 status byte which can be read from the
IEEE488 controller. The command for reading this status byte will be unique to your IEEE controller.
For example, with National Instrument controllers, the command is IBRSP. With CEC controllers, the
command is SPOLL.
IEEE488 Status Byte Bits:
Bit 0 0 = command is being processed
1 = SP-750i ready for another command
Bit 1 0 = no errors
1 = SP-750i detected an error in the command
Bit 7 0 = no response or response has been read
1 = SP-750i generated a response which is now ready to be sent
Note that with some fast computers, it is necessary to add a few milliseconds delay in your program after
sending a command and before checking the status byte to allow time for the status byte to be updated.
Monochromator Wavelength Movement Commands:
GOTO Goes to a destination wavelength at maximum motor speed. Accepts destination
wavelength in nm as a floating point number with up to 3 digits after the decimal
point or whole number wavelength with no decimal point.
<GOTO> Same as GOTO (For compatibility with software written for previous Acton SP
models.)
NM Goes to a destination wavelength at constant nm/min rate specified by last NM/MIN
command. Accepts destination wavelength in nm as a floating point number with up
to 3 digits after the decimal point or whole number wavelength with no decimal point.
<NM> Same as NM (For compatibility with software written for previous Acton SP models.)
15
Page 17

Monochromator Wavelength Movement Commands (cont.) :
>NM Similar to NM except it returns control to user immediately rather than waiting for
completion of monochromator wavelength move. Can be used with ?NM or
MONO-?DONE below. This command must be terminated with MONO-STOP listed
below. NOTE: Use the NM command when communication with the monochromator
during the scan is not required.
?NM Returns present wavelength in nm to 0.01nm resolution with units nm appended.
E.G. ?NM 300.00 nm
MONO-?DONE Used with >NM command to determine if monochromator has reached the destination.
Returns 0 if move is not complete, 1 if move is complete.
MONO-STOP Stops the monochromator wavelength move after use of the >NM command.
NM/MIN Returns present scan rate in nm/min to 0.01 nm/min resolution with units nm/min
appended.
E.G. ?NM/MIN 100.00 nm/min
Grating Control Commands:
GRATING Places specified grating in position to the wavelength of the wavelength on the present
grating. Up to nine (9) gratings are allowed on three (3) turrets. This command takes
a grating number from 1 - 9. IMPORTANT NOTE: This command assumes that the
correct turret is specified by the TURRET command. For example, using grating
numbers 1, 4 and 7 will place the first grating on the installed turret into that position
and call up the parameters for the grating number specified.
?GRATING Returns the number of gratings presently being used numbered 1 - 9.
?GRATINGS Returns the list of installed gratings with position groove density and blaze.
The present grating is specified with an arrow.
TURRET Specifies the presently installed turret or the turret to be installed.
E.G. If installing the second turret, issue the command 2 TURRET to insure using
the correct parameters.
?TURRET Returns the correctly installed turret numbered 1 - 3.
The following command is used for grating installation by Acton part#:
INSTALL Installs new grating parameters into the non-volatile memory of the Acton SP
monochromator. Uses the part # of the grating to specify the parameters.
E.G. 1-120-500 5 INSTALL places a 1200 g/mm grating blazed at 500nm into the
second grating position on turret #2.
16
Page 18

Grating Control Commands (cont.) :
The following commands are used for grating installation by grating parameters:
SELECT-GRATING Specifies the grating number to be installed 1 - 9.
G/MM Specifies groove density of grating to be installed in g/mm.
E.G. 1200 G/MM
BLAZE Specifies the blaze wavelength and units of the grating to be installed with 7
characters of the user’s choice. Unlike other commands, this command is issued
before the parameters. After the command is issued, the SP-750i responds with
“ “ . Seven characters are then entered (these may be numbers, letters,
spaces or special characters).
UNINSTALL Used to remove a grating and its parameters from the SP-750i non-volatile memory.
Diverter Control Commands:
EXIT-MIRROR Designates the exit diverter mirror to receive the diverter control commands. This
command is for Acton SP monochromators that can accept two diverter mirrors.
The SP-750i monochromators will accept this command but it is not required in these
monochromators.
ENT-MIRROR Designates the entrance diverter mirror to receive the diverter control commands.
This command is for Acton SP monochromators that can accept two diverter
mirrors. The SP-750i monochromators will not accept this command.
FRONT Moves the designated diverter mirror to position the beam to the front port position.
SIDE Moves the designated diverter mirror to position the beam to the side port position.
?MIRROR Returns the position of the designated diverter mirror with the responses “front” and
“side”.
?MIR Returns the position of the designated diverter mirror with the responses 0 for front
and 1 for side.
Slit Width Control Commands:
FRONT-EXIT-SLIT Designates front exit slit to receive slit control commands. NOTE: The designation
remains in effect until changed by another slit designator. This command does not
have to be repeated until the designated slit is changed.
SIDE-EXIT-SLIT Designates side exit slit to receive slit control commands.
FRONT-ENT-SLIT Designates front entrance slit to receive slit control commands.
SIDE-ENT-SLIT Designates side entrance slit to receive slit control commands.
MICRONS Sets the slit width for the designated slit in the range of 10 to 3000 microns to
1 micron resolution.
?MICRONS Returns the slit width setting in microns to the nearest 1 micron.
17
Page 19

GRATING CALIBRATION COMMANDS:
INIT-OFFSET Sets the offset value for the designated grating. Default values are 0 for gratings 1, 4
and 7; 1536000 for gratings 2, 5 and 8; and 3072000 for gratings 3, 6, and 9. The
limits on the settings are +/- 2500 for a 1200 g/mm grating. This corresponds to an
error of greater than +/- 5nm for a 1200 g/mm grating. The limits are adjusted for
grating groove density, e.g. error for a 600 g/mm grating is +/- 5000. The grating
density designator used with this command is grating# - 1.
E.G. 3072056. 8 INIT-OFFSET for setting offset on grating #9 - 3rd grating on
turret #3.
NOTE: This command requires a decimal point after the offset value.
INIT-SP750-OFFSET Same as INIT-OFFSET above except no decimal point is used after the offset value.
E.G. 3072056 8 INIT-SP750-OFFSET
INIT-GADJUST Sets grating adjustment value for the designated grating. Default values are 10000 for
all gratings. The limits on the parameter for this command are +/- 1000 for all
gratings. The grating designator used with this command is the grating # - 1.
E.G. 9993 1 INIT-GADJUST for setting gadjust on the second grating of turret #1.
NOTE: This command is to maintain compatibility with previous Acton SP
applications. For new applications, use the INIT-SP750-GADJUST command below.
INIT-SP750-GADJUSTSets grating adjustment value for the designated grating. Default values are 1000000
for all gratings. The limits on the parameter for this command are +/-100000 for all
gratings. The grating designator used with this command is the grating# - 1.
E.G. 999322 4 INIT-SP300-GADJUST for setting gadjust on the second grating of
turret #2.
MONO-EESTATUS Returns setup and grating calibration parameters for all gratings.
RESTORE FACTORY
SETTINGS Returns all parameters including grating calibration parameters to the original factory
calibrated settings. NOTE: This command will overwrite any calibration parameters
set by the user.
MONO-RESET Initializes monochromator. Necessary after using INIT-OFFSET,
INIT-GADJUST or INIT-SP750-GADJUST.
HELLO Same as MONO-RESET. Used to maintain compatibility with existing applications.
MODEL Returns model number of Acton SP monochromator.
E.G. MODEL SP-558
SERIAL Returns serial number of Acton SP monochromator. Format is 7 digits with the first
3 digits being the model #.
E.G. SERIAL 3060232
The following are the Start-Up parameters and their default values:
Default Values:
TURRET #1
GRATING #1
WAVELENGTH 0.0 nm
SCAN SPEED 100.0 nm/min
18
Page 20

INIT-GRATING Selects which of the three gratings on the installed turret the monochromator will go to
after finding 0.0 nm on the first grating of the installed turret.
E.G. 2 INIT-GRATING selects the second grating as the default. Accepts values 1 - 9.
INIT-WAVELENGTH Sets an initial wavelength for the monochromator after initialization.
E.G. 435.84 INIT-WAVELENGTH
INIT-SRATE Sets an initial scan rate for the monochromator.
E.G. 500.0 INIT-SRATE
Section IV-D: Focusing and Alignment of Array Detectors
With a CCD or diode array properly mounted to the SP-750i, use the following procedure to align and
focus the system.
1. Mount a light source such as a mercury pen-ray type to the entrance slit of the
SP-750i. Princeton Instruments offers a standard mercury lamp, Model MS-416, designed
for this purpose. Any light source with line output can be used. If there are no “line” sources
available, it is possible to use a broadband source such as a tungsten-halogen lamp for the
alignment. If this is the case, use only a wavelength setting of 0.0nm for alignment purposes.
2. Turn the power ON and move the spectrograph to a wavelength of 435.8nm if using a
mercury lamp, or 0.0nm for a broadband source, or another wavelength corresponding to a
spectrum produced by a different ”line” source.
3. With the array detector operating, check the image of the light source if running in an
imaging mode with a CCD. Otherwise check the line intensity and shape.
4. Loosen the split clamp and slowly move the array detector IN or OUT until the sharpest image
or best focus is achieved.
5. Move the focus-stop screw until it just makes contact with the array detector mounting
flange. This enables you to rotate the detector without changing the focus position.
6. Rotate the detector until the light source image is vertical on the CCD, or until the best focus
is achieved if a diode array is used. Tighten the split clamp to secure the detector.
7. The SP-750i is now ready for operation.
19
Page 21

V. Appendices and Schematic Drawings
Appendix V-A: Selecting Alternate Start-Up Parameters
The following are the Start-Up parameters and their default values:
GRATING #1
WAVELENGTH 0.0 nm
SCAN SPEED 100.0 nm/min
Each of the above may be changed through the RS232 port or IEEE488 port using the following
commands. These values are stored in non-volatile memory and will be in effect after the next power-up.
INIT-GRATING Selects which of the two gratings on the installed turret the SP-750i will go to
after finding 0.0 nm on the first grating.
E.G. 2 INIT-GRATING selects the second grating as the default
INIT-WAVELENGTH Sets an initial wavelength for the SP-750i after initialization.
E.G. 435.84 INIT-WAVELENGTH Notice that two digits after the decimal point are
required
INIT-SRATE Sets an initial scan rate for the SP-750i.
E.G. 500.00 INIT-SRATE Notice that two digits after the decimal point are required
The following command is used to return all grating parameters and start-up parameters to the original
factory settings.
Note that any gratings installed at a later date (after initially receiving the SP-750i) will be erased
from memory using this “restore command”.
RESTORE-FACTORY-SETTINGS Returns all parameters, including grating calibration parameters, to the
original factory calibrated settings. NOTE: This command will overwrite
any calibration parameters set by the user.
20
Page 22

DB9P
MALE
SP-750i to PC-XT
or Terminal
1
6
2
7
3
8
4
9
5
1
6
2
7
3
8
4
9
5
1
6
2
7
3
8
4
9
5
PC-AT or Compatible
SP-750i to
1
2
15
3
16
4
1
5
1
6
7
2
8
2
9
22
10
DB9P
MALE
11
24
DB9P
MALE
1
6
2
7
3
8
4
9
5
1
2
3
4
5
6
7
8
Macintosh Computer
(Modem or Printer Port)
12
2
13
SP-750i to
8 PIN
MALE
21
Page 23

Appendix V-C:
Standard Slit Assemblies
22
Page 24

Appendix V-D: Accessories Listing
SP-750i Monochromators & Spectrographs
SP-755 SP-750i, 750mm Monochromator: Base instrument with 90˚ optical path,
direct digital wavelength drive, Autotrack™ electronics, built-in RS232 and IEEE488
computer compatibility and triple indexable grating mount with one triple grating turret.
Requires grating(s), entrance slit, exit slit, and a #750-749 remote scan controller or computer
for operation. Includes PC-based software for control of SP-750i.
SP-756 SP-750i, 750mm Spectrograph: Same as above, with an array detector mounting
flange mounted on the exit port, compatible with standard Princeton Instruments, EG&G
PARC, or Photometrics (Spectra 9000 type) array detectors.
SP-757 SP-750i, 750mm Dual Exit Port Monochromator: Same as SP-755, with a
micrometer controlled entrance slit, two micrometer controlled exit slits and a motorized exit
slit selection mirror. Provides 90° and 180° optical paths.
SP-758 SP-750i, 750mm Monochromator/SpectroGraph: Same as SP-755, with
micrometer controlled entrance and exit slits 180° apart, motorized exit port selection mirror
and a multichannel detector adapter flange on end port.
Remote Scan Controller
750-749 Remote Scan Controller with Software: Functions include scanning, change of scan
speeds, wavelength readout in nanometers, GOTO, and grating selection. Includes controller
(H-P Graphics Calculator with RS232 output port), 5 foot long connecting cable and
dedicated scan control software.
Assemblies: Bilaterally Adjustable and Fixed Width
SP-716-1 Bilaterally adjustable ENTRANCE slit assembly for SP-750i monochromator or
spectrograph. Micrometer adjustable widths from 10µm to 3mm. Supplied with
interchangeable 4.0mm and 14.0mm high baffles.
SP-716-2 Bilaterally adjustable EXIT slit assembly with adapter for SP-750i monochromator.
Micrometer adjustable widths from 10µm to 3mm. Supplied with interchangeable 4.0mm
and 14.0mm high baffles.
Triple Grating Turret
GT-483 Optional interchangeable triple grating turret for the SP-750i. Must be specified at
time of SP-750i manufacture. Includes second turret, requires gratings.
23
Page 25

Other Acton SP Monochromators & Spectrographs
SP-150-M SP-150, 150mm Monochromator with internal image correction with original
polished aspheric optics, interchangeable dual grating turret, exclusive SpectraDrive™
stepping motor scanning system with 32-bit microprocessor control, Rs232 and IEEE488
computer interfaces, micrometer controlled entrance and exit slits, 90° optical path and scan
control software for Windows. Gratings are required for operation.
SP-150-S SP-150, 150mm Spectrograph: Same as above with a standard multichannel
detector adapter flange on exit port. Provides a 90° optical path.
SP-305 SP-300i, 300mm Monochromator with micrometer adjustable entrance/exit slits,
90° optical path, internal image correction with original polished aspheric optics, a triple
grating turret, exclusive SpectraDrive™ stepping motor scanning system with 32-bit
microprocessor control, RS232 and IEEE488 computer interfaces, plus scan control software
for Windows. Computer with RS232 or IEEE488 and gratings are required for operation.
SP-306 SP-300i, 300mm Spectrograph: Same as above Model SP-305, except with
micrometer controlled entrance slit, 14mm X 27mm focal plane, sliding tube CCD
adapter with exclusive focus stop and standard multichannel detector adapter flange.
Provides a 90° optical path.
SP-307 SP-300i, 300mm Dual Exit Port Monochromator: Same as SP-305, except with
micrometer controlled entrance slit, two micrometer controlled exit slits and a motorized exit
port selection mirror. Provides 90° and 180° optical paths.
SP-308 SP-300i, 300mm Monochromator/Spectrograph: Same as SP-305, except with
micrometer controlled entrance and exit slits 180° apart, motorized port selection mirror and
multichannel detector adapter on 90° port.
DM-481-N Motorized Diverter Mirror for entrance port selection.
SP-555 SP-500i, 500mm Monochromator with a triple indexable grating turret, micrometer
controlled entrance and exit slits 180° apart, exclusive SpectraDrive™ stepping motor
scanning system, remote scan controller with RS232 computer interface (IEEE488 optional),
plus scan control software for Windows. Gratings are required for operation.
SP-556 SP-500i, 500mm Spectrograph: Same as above, with micrometer controlled
entrance slit and standard multichannel detector adapter flange on exit port. Provides a 90°
optical path.
SP-557 SP-500i,500mm Dual Exit Port Monochromator: Same as SP-555, with
micrometer controlled entrance slit, two micrometer controlled exit slits and a motorized exit
slit selection mirror. Provides a 90° and 180° optical path.
SP-558 SP-500i, 500mm Monochromator/Spectrograph: Same as SP-555, with
micrometer controlled entrance and exit slits 180° apart, exit port selection mirror
and a multichannel detector adapter flange on end port.
Light Sources
MS-416 Low Pressure Mercury Light Source with power supply and mounting flange for Acton SP
monochromators and spectrographs. Provides output at typical mercury wavelengths (line
output).
DS-421 30 Watt Deuterium Light Source with housing, power supply, mounting flange, and light
collection mirror. Provides output from 190 to 350nm.
24
Page 26

Light Sources (cont.)
TS-425 30 Watt Tungsten-Halogen Light Source with housing, power supply, mounting flange, and
light collection mirror. Provides output from 350nm to >2.0µm
TS-428 250 Watt Tungsten-Halogen Light Source with housing, AC power supply, mounting flange,
variable brightness control and light collection mirror. Provides output from 350nm to
>2.0µm.
TS-428-DC Same as TS-428 with Regulated DC Power Supply .
TDS-429 Dual Light Source with 30 watt deuterium & 30 watt tungsten-halogen lamps. Includes
housing with light collection mirror, mounting flange, and power supply. Provides combined
output from 190 to >2.0µm.
XS-432 75 Watt Xenon Light Source includes power supply, housing, mounting flange and light
collection mirror. Provides continuous spectral output from 190nm to 750nm and declining
continuum out to 2.6µm.
IS-434 Infrared Source for wavelength region 2.6-16 microns includes silicon carbide resistor,
housing, mounting flange, light collection mirror and power supply.
Detectors and Accessories
PD-438 Universal Photomultiplier Tube Housing for standard 1 1/8" side window photomultiplier
tubes. Requires side window PMT, and photometer/power supply for operation. Accepts Acton
tubes P1, P2 or P3 below, or customer specified 1 1/8” side window PMTs.
PD-439 Same as PD-438 above, also includes integrated light tight shutter.
P1 IP28 side window photomultiplier tube (or equivalent) for wavelength region 185-650nm.
Fits PD-438 or PD-439 housing.
P2 R928 side window photomultiplier tube (or equivalent) for wavelength region from
185-900nm. Fits PD-438 or PD-439 housing.
P3 R5108 side window photomultiplier tube (or equivalent) for wavelength region from
300-1100nm. Fits PD-438 or PD-439 housing.
ID-441 InGaAs Detector, includes pre-amplifier, uncooled version.
ID-441-C InGaAs Detector, includes pre-amplifier, cooled version, requires either Model 442-1 or
442-1A thermoelectric cooling for operation.
ID-442 Infrared Detection Assembly (PbS) with housing, power supply, and mounting flange for
SP-750i, for wavelength region from 1.1 - 2.9 microns. (Requires 442-2 preamplifier
or customer supplied pre-amplifier for operation).
442-1 Thermoelectric cooling for ID-441 or ID-442 detectors; includes direct temperature readout.
442-1 A Thermoelectric cooling for ID-441 or ID-442 detectors.
442-2 Preamplifier for ID-442 detection assembly.
ID-443 IR Detection Assembly (InSb) for 1.5 to 5.0 microns. Includes detector housing,
pre-amplifier, and Dewar.
25
Page 27

ID-444 MCT IR Detector ( Mercury Cadmium Telluride). Covers 2 - 15 µm, includes power supply,
LN2 Dewar and pre-amplifier.
SC-1 SpectraCard data acquisition system, 16-bit PC expansion card with Windows data
acquisition software.
Filter Wheels and Order Sorting Filter Assemblies
FA-448 Six Position Filter Wheel Assembly. Manual sample indexing, holds up to six samples, each
1.0” diameter.
FA-448-1 Order Sorting Filter Assembly. Includes 320nm, 590nm, 665nm, and 715nm filters
mounted in FA-448 filter wheel. Manual indexing of filters for elimination of unwanted second
order radiation.
FA-448-2 Motorized Six Position Filter Wheel Assembly, with stepping motor and FA-448-4
controller. Enables indexing via thumb wheel control, or by computer with RS232. Requires
computer with RS232 for computerized operation.
FA-448-3 Motorized Order Sorting Filter Assembly. Includes 320nm, 590nm, 665nm,and 715nm
filters mounted in FA-448-2 filter wheel. Enables computer controlled indexing of order
sorting filters for elimination of unwanted second order radiation. Requires computer with
RS232 for operation.
FA-448-4 Controller Only for FA-448 or 448-1 filter wheel assemblies. Retrofit kit which enables
changing the FA-448 or 448-1 from manual to computer controlled indexing. Requires
FA-448 type filter wheel and computer with RS232 for operation.
488-03 IEEE488 Interface option for Models FA-448-2, FA-448-3 and FA-448-4.
Software
SW-417 Data Acquisition Software Package: Acton data acquisition and scan control software with
graphical user interface. Functions include spectral data acquisition, reflectance,
transmittance, plus storage and printing of acquired data. Data saved in ASCII format.
Requires Acton SP monochromator with SpectraDrive (SD-748) scan system. PS-445 detector
system, PMT detector and a 486 or higher PC-computer with Windows operating system for
operation. Pentium highly recommended for optimum performance.
26
Page 28

Fiber Optic Light Guides: All Fiber optic light guides contain 19 fibers, 200µm diameter, arranged in
a line pattern at the slit end, and round at the source end.
LG-455-020-1 UV-VIS Fiber Optic Bundle 1.0 meter long, for 190nm to 1100nm. Requires mount.
LG-455-020-3 UV-VIS Fiber Optic Bundle 3.0 meter long, for 190nm to 1100nm. Requires mount.
LG-456-020-1 VIS-NIR Fiber Optic Bundle 1.0 meter long, for 400nm to 2200nm. Requires mount.
LG-456-020-1 VIS-NIR Fiber Optic Bundle 3.0 meter long, for 400nm to 2200nm. Requires mount.
FC-446-020 Slit mount with horizontal translation capability for 10mm diameter fiber optic bundle.
Connecting Cables
CC-499-1 Cable for IBM-PC or XT compatible computer. 25 pin female connector to 9 pin male connector.
CC-499-2 Cable for IBM-PC AT or compatible computer. 9 pin female connector to 9 pin male connector.
CC-499-3 Computer terminal type connector. 25 pin male connector to 9 pin male connector.
CC-499-4 9-pin cable for Macintosh computer.
CC-499-5 IEEE488 cable, 4 meters long.
If the above cables are not compatible with your system,
contact Princeton Instruments for a custom cable.
27
Page 29

Gratings for SP-750i
Grooves/mm
20 45µm 1-002-45
75 8µm 1-075-8
50 12µm 1-050-12
150 500nm 1-015-500
150 4µm 1-015-4
300 300nm 1-030-300
300 500nm 1-030-500
300 2µm 1-030-2
600 300nm 1-060-300
600 1µm 1-060-1
600 1.6µm 1-060-1.6
1200 300nm 1-120-300
1200 500nm 1-120-500
1200 750nm 1-120-750
1200 holographic† 1-120-HUV
1200 holographic†† 1-120-HVIS
1800 250nm 1-180-250
1800 500nm 1-180-500
2400 240nm 1-240-240
2400 holographic††† 1-240-H
3600 240nm 1-360-240
Blaze Part
Wavelength Number
NOTES:
† Blazed Holographic, 190-400nm
optimum range
†† Blazed Holographic, 450-
1400nm optimum range
††† Blazed Holographic, 190-400nm
optimum range
Gold coated optics are
available on request.
_ _ _ _ _ _ _ _ _ _ _ _ _ _ _ _ _ _ _ _ _ _ _ _ _ _ _ _ _ _ _ _ _ _ _ _ _ _ _ _ _ _ _ _ _ _ _ _ _ _ _ _ _ _ _ _ _ _ _ _ _ _ _ _ _ _
Ordering Information
Telephone Orders MasterCard / VISA
Telephone orders may be placed between 7:30AM MasterCard & VISA accepted for purchases.
and 5:00PM EST. Written "Confirmations" are required
on all verbal orders. Written Orders
Telephone: (978) 263-3584 Submit all written orders to our mailing
address:
Fax Orders
Orders may be placed by fax with written confirmation. Princeton Instruments-Acton
Please include complete name and address with these orders 15 Discovery Way
FAX: (978) 263-5086 Acton, MA 01720
U.S.A.
Orders accepted subject to current pricing.
All orders FOB Princeton Instruments-Acton
or shipping charges & insurance added
separately.
• SpectraPro® is a registered trademark of Acton Research Corporation •
28
Page 30

Appendix V-E: Certification and Warranty
Certification
Princeton Instruments certifies that this instrument was thoroughly tested and
and found to meet the specifications furnished by Princeton Instruments when it
was shipped from the factory.
Warranty
Princeton Instruments instruments and accessories are warranted for a period of
one full year from date of delivery to be free from defects in material and to
conform to the specifications furnished by Princeton Instruments. The company's
obligation under this warranty is limited to servicing or adjusting an instrument
returned to the factory, prepaid, and to repairing or replacing at the factory any part
or parts thereof. All purchased items carry the original manufacturers warranty.
Princeton Instruments shall not be liable for consequential damages resulting
from accident, alteration, misuse, improper installation, operation on low or excessive
voltages or any use in violation of the operating instructions furnished by
Princeton Instruments.
If any defect appears within the warranty period, the purchaser shall promptly notify
Princeton Instruments. No material will be accepted for repair or replacement without
prior authorization from Princeton Instruments. Upon such authorization and in
accordance with instructions of Princeton Instruments, parts, materials or equipment
for which repair or replacement is requested shall be returned to Princeton Instruments
for examination, with shipping charges prepaid by the purchaser. Final determination
as to whether a product or part is actually defective rests with Princeton Instruments.
In such cases where necessary repairs are not covered by this warranty, an estimate
of repair charges will be submitted to the purchaser before servicing the equipment.
Princeton Instruments reserves the right to make changes or improvements
upon its products without imposing any obligations upon itself to install the same
upon its products previously manufactured.
This warranty is expressly in lieu of all other obligations or liabilities on the part of
Princeton Instruments, and Princeton Instruments neither assumes, nor authorizes
any other person to assume for them, other obligations or liability in connection with
the sale of equipment manufactured by Princeton Instruments
29
Page 31

Appendix V-F: Drawing No. 8450-750-50, titled “SP-750i”
1
Page 32

 Loading...