

Page 1
EN Instruction manual
NL Gebruiksaanwijzing
FR Mode d’emploi
DE Bedienungsanleitung
ES Manual de usuario
PT Manual de utilizador
IT Manuale utente
SV Bruksanvisning
CS Návod na použití
PL Instrukcja obsługi
SK Návod na použitie
Multi AeroCooker
01.182090.01.001
RU Руководство по эксплуатации
Page 2
PARTS DESCRIPTION / ONDERDELENBESCHRIJVING / DESCRIPTION DES PIÈCES
/ TEILEBESCHREIBUNG / DESCRIPCIÓN DE LAS PIEZAS / DESCRIÇÃO DOS
COMPONENTES / DESCRIZIONE DELLE PARTI / BESKRIVNING AV DELAR /
OPIS CZĘŚCI / POPIS SOUČÁSTÍ / POPIS SÚČASTÍ / ОПИСАНИЕ ЗАПЧАСТИ
2
4
10
3
8
1
695
7
Page 3

Instruction manual
SAFETY
• By ignoring the safety instructions the
manufacturer cannot be held responsible for
the damage.
• If the supply cord is damaged, it must be
replaced by the manufacturer, its service
agent or similarly qualified persons in order
to avoid a hazard.
• Never move the appliance by pulling the
cord and make sure the cord cannot
become entangled.
• The appliance must be placed on a stable,
level surface.
• The user must not leave the device
unattended while it is connected to the
supply.
• This appliance is not intended for use by
persons (including children) with reduced
physical, sensory or mental capabilities, or
lack of experience and knowledge, unless
they have been given supervision or
instruction concerning use of the appliance
by a person responsible for their safety.
• Close supervision is necessary when any
appliance is used by or near children.
• WARNING: Spilled food can cause serious
burns. Keep appliance and cord away from
children. Never drape cord over edge of
counter, never use outlet below counter, and
never use with an extension cord.
• The use of accessory attachments not
recommended by the appliance
manufacturer may cause injuries.
• Do not use outdoors.
• Do not place on or near a hot gas or electric
burner, or in a heated oven.
• Do not clean with metal scouring pads.
Pieces can break off the pad and touch
electrical parts, creating a risk of electric
shock.
• Use extreme caution when removing tray or
disposing of hot grease
• Extreme caution must be used when moving
an appliance containing hot oil or other hot
liquids.
• CAUTION: To protect against damage or
electric shock, do not cook in the base unit.
Cook only in the cooking pot provided.
• To disconnect, press the power button, then
remove plug from wall outlet.
• Do not use pressure plate, air fry grate, or
cooking pot if dented or worn.
EN
3
Page 4

Instruction manual
• WARNING: Never deep-fry or pressure-fry in
the Aerofryer, regardless of whether the lid is
on or off. THIS IS DANGEROUS, AND CAN
CAUSE A FIRE AND SERIOUS DAMAGE.
• ALWAYS use detachable handle to insert or
remove aerofryer grate or pressure plate
insert.
• Ensure filter and pressure release valve are
free of food residue or debris.
• Never fill the cooking pot over the max fill
line.
• Before placing cooking pot into the base,
ensure both pot and base are dry by wiping
with a soft cloth.
• Always ensure the appliance is properly
assembled before use.
• This appliance cooks under pressure.
Improper use may result in scalding injury.
Make certain unit is properly closed before
operating.
• When using the pressure plate, always
ensure pressure plate is installed and lid is
properly closed before operating.
• Do not cover the pressure release valve.
• Care should be taken when lifting the
cooking pot from the base.
• When removable cooking pot is empty do
not heat it for more than 10 minutes, this
may damage the cooking surface.
• When using the Stir fry function always leave
lid in the open position.
• To avoid possible damage from steam, place
the unit away from walls and cabinets during
use.
• Never lift the unit by the lid side tabs.
• Never touch exposed heating element.
• To protect yourself against an electric shock,
do not immerse the cord, plug or appliance
in the water or any other liquid.
• This appliance is intended to be used in
household and similar applications such as:
• Staff kitchen areas in shops, offices and
other working environments.
• By clients in hotels, motels and other
residential type environments.
• Bed and breakfast type environments.
• Farm houses.
• Children shall not play with the appliance.
• This appliance shall not be used by children.
Keep the appliance and its cord out of reach
of children.
4
Page 5

Instruction manual
• To protect yourself against an electric shock,
do not immerse the cord, plug or appliance
in the water or any other liquid.
• Do not heat the food for too long.
• The heating element surface is subject to
residual heat after use.
• The connector must be removed before the
appliance will be cleaned, please make sure
the inlet is completely dry before the unit will
be used again.
• The pressure container must not be opened
until the pressure has decreased sufficiently
and during use.
• Surface is liable to get hot during
use.
• WARNING: If the surface is cracked, switch
off the appliance to avoid the possibility of
an electric shock.
• The temperature of accessible surfaces may
be high when the appliance is operating.
• The appliance is not intended to be operated
by means of an external timer or a separate
remote-control system.
• The appliance is to be connected to a
socket-outlet having an earthed contact (for
class I appliances).
• In order to prevent disruptions of the airflow
do not put anything on top of the appliance
and make sure there is always 10
centimeter of free space around the
appliance.
• This appliance is only to be used for
household purposes and only for the
purpose it is made for. In worst case the
food can catch fire. (i.e. do not use more
than one tea spoon of oil, no meat that will
release to much grease or water intended
for boiling foods.
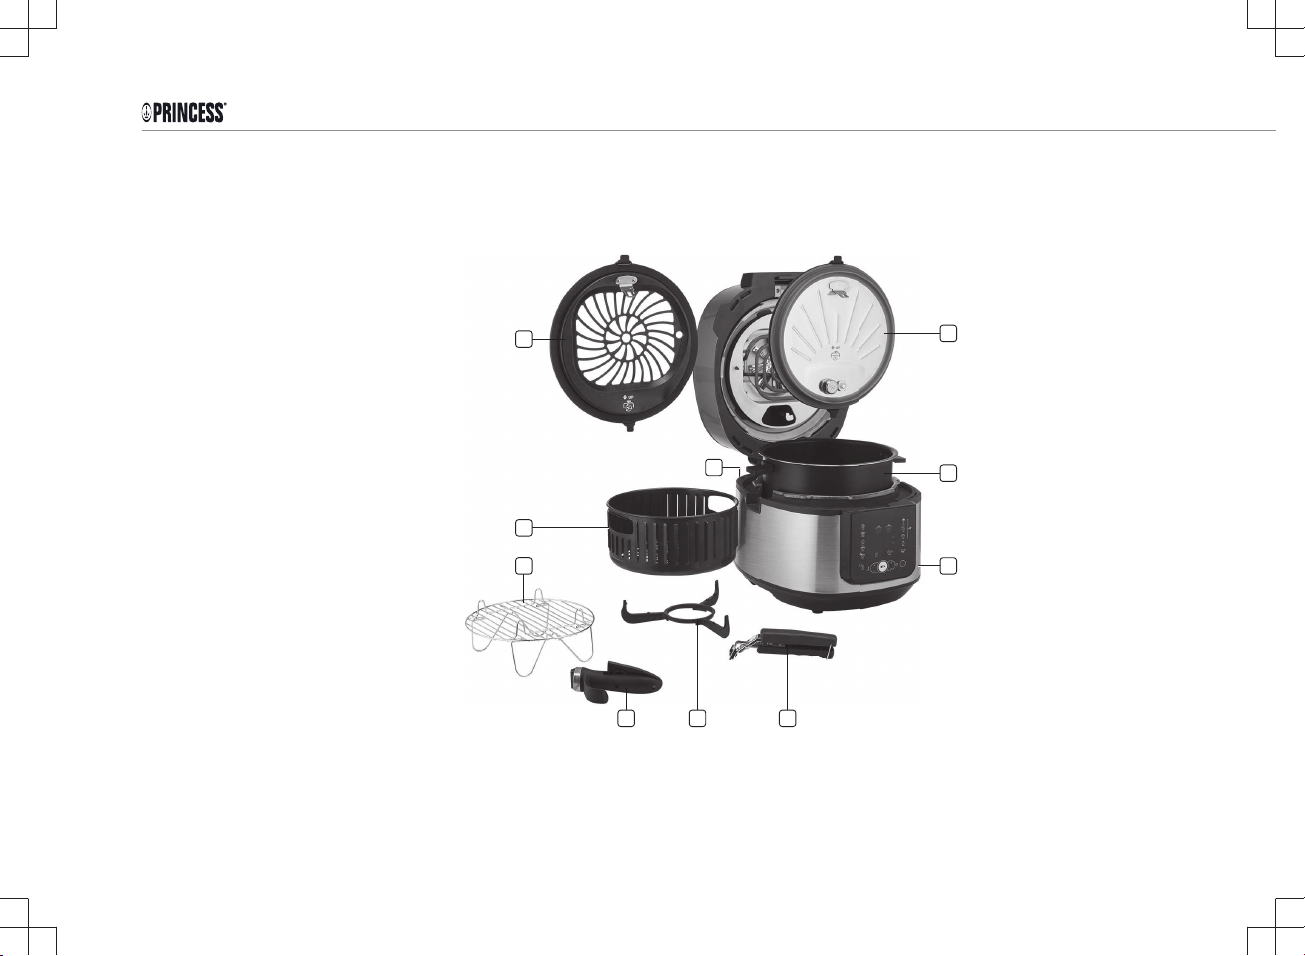
PARTS DESCRIPTION
1. Condensation tray
2. Unit
3. Aerofryer grate
4. Pressure plate
5. Plate handle for Pressure Plate and Aerofry grate
6. Handle for Aerofry basket
7. Steam rack
8. Aerofryer basket
9. Aeroflow stand
10. Non stick cooking pot
EN
5
Page 6
Instruction manual
1
716 1715 8
9
10
11
12
13
14
18 19 20
2
3
4
5
6
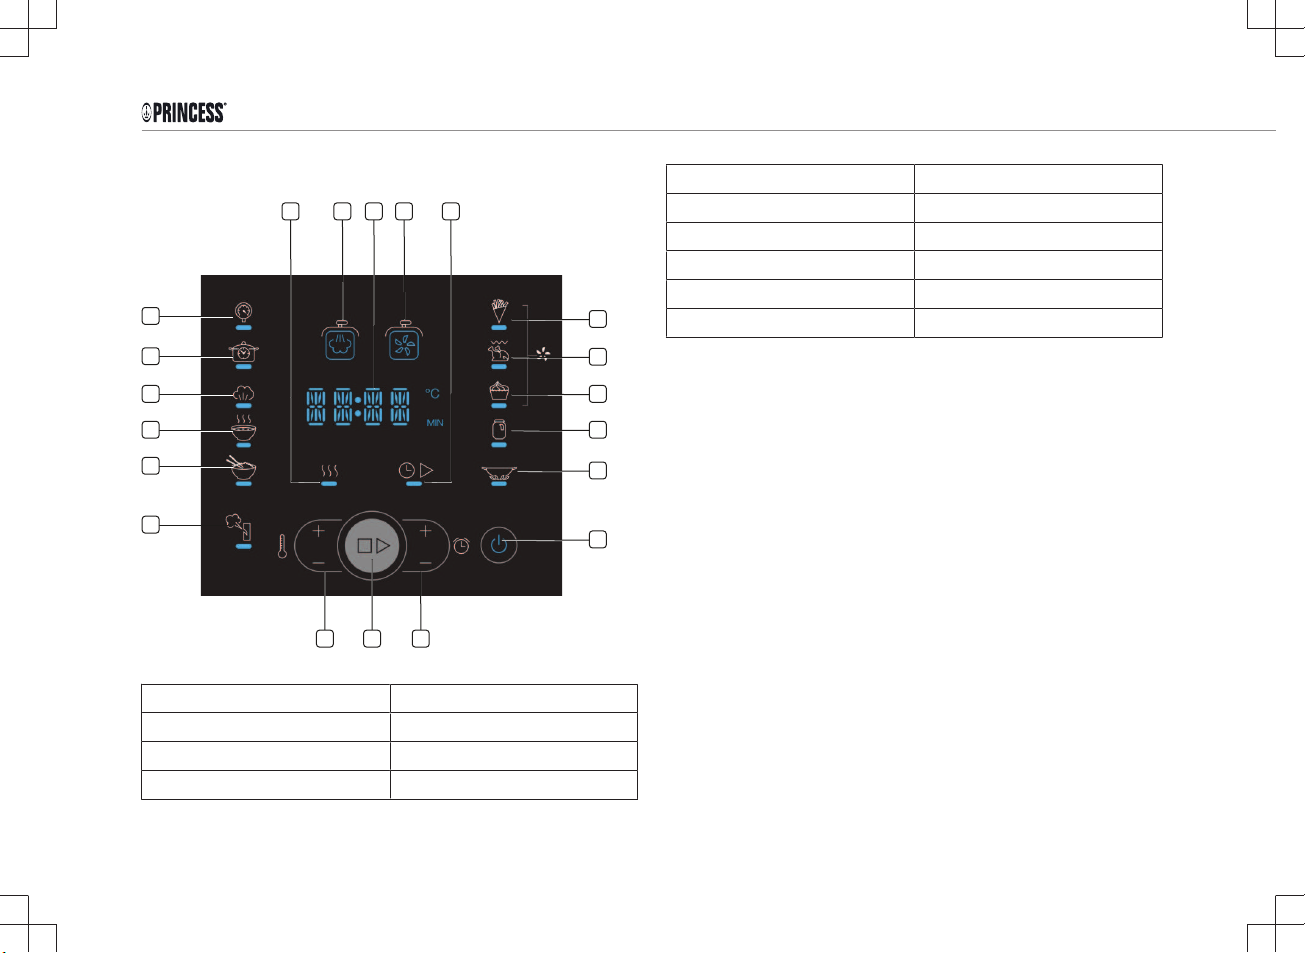
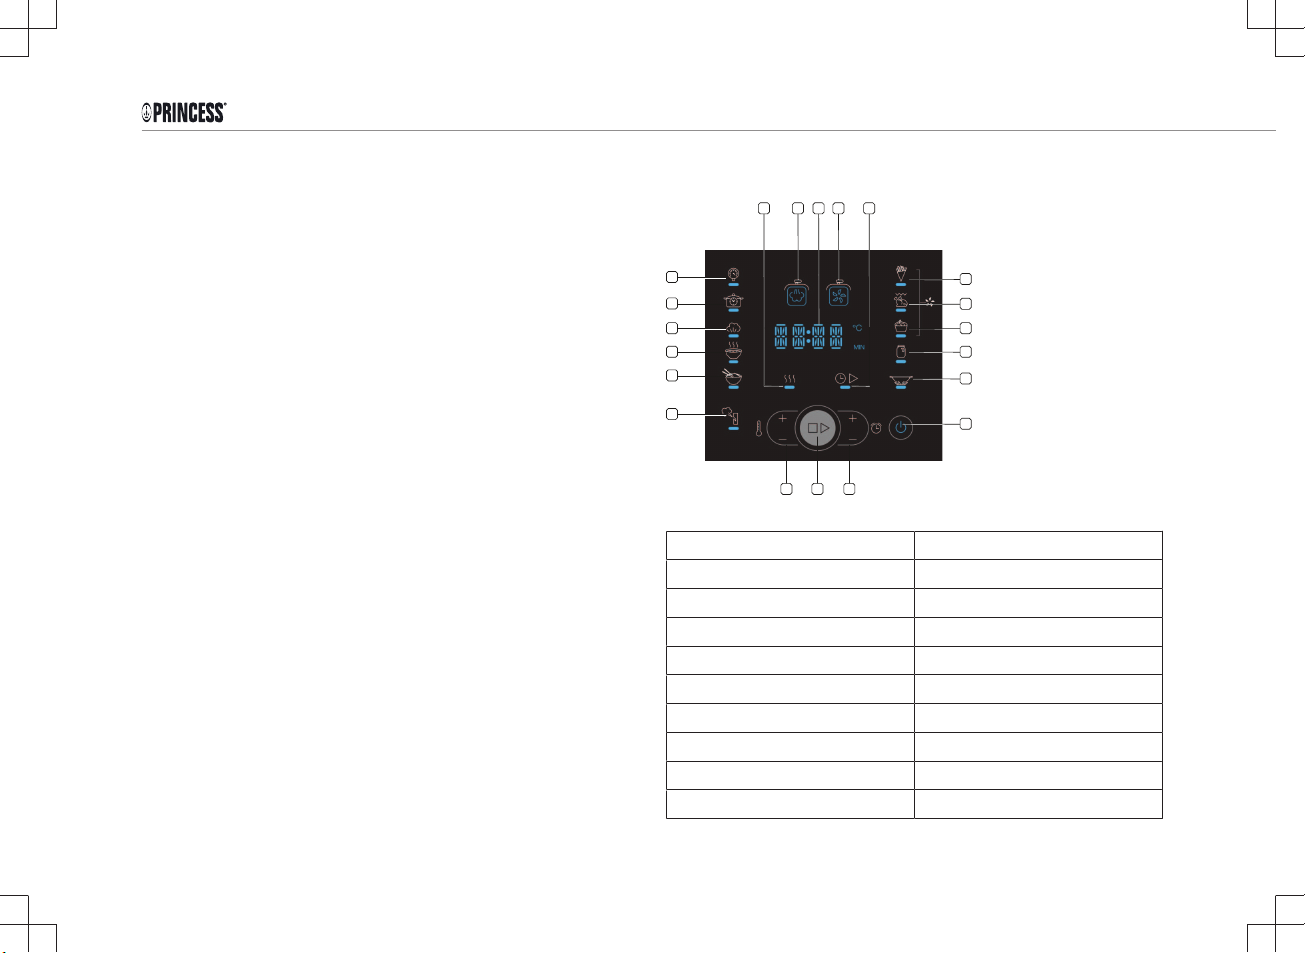
CONTROL PANEL
1 : Pressure cook 11 : Bake
2 : Slow cook 12 : Yoghurt
3 : Steam 13 : Stir fry
4 : Soup/Broth 14 : Power
5 : Rice/Grains 15 : Display
6 : Steam release 16 : Keep warm
7 : Pressure cooker icon 17 : Delay start
8 : Aerofryer icon 18 : Temp +/-
9 : Aerofry 19 : Start/Stop
10 : Grill/Roast 20 : Time +/-
Power On/Off Button
• Press this button to power the unit on and off. Once plugged in,
the power button will illuminate in red. Once the button is pressed,
the light will switch to white.
Aerofryer Icon
• This icon will illuminate automatically once the aerofryer grate is
securely inserted and the unit is ready for aero frying functions.
Note: The following functions are based on the aerofryer Grate: Aero
Fry, Grill/Roast and Bake. Only when the aerofryer grate is inserted
will these functions be illuminated and ready to select.
Pressure Cooker Icon
• This icon will illuminate automatically once the pressure plate is
securely inserted and the unit is ready for pressure cooking
functions.
Note: The following functions are based on the Pressure Plate
function: Pressure Cook, Slow Cook, Steam, Soup/Broth, Rice/
Grains, Yogurt & Stir fry. Only when the pressure plate is securely
inserted will these functions be illuminated and ready to select.
Note: The Stir fry function will still work when the lid is opened.
Display
6
Page 7
Instruction manual
• Displays temperature and time, the temperature and time icons
will alternatively light up.
Start/Stop Button
• Touch this once to start or stop the cooking process.
Plus Button
• Touch to increase the Temperature or Time.
Minus Button
• Touch to decrease the Temperature or Time.
Steam Release Button
• When pressure cooking is complete, press the Steam Release
button to release the pressure. The steam release cycle is 3
minutes long. Once all the steam is released, the lid can safely
be opened.
Note: In order to stop a cooking program before it has completed,
press the START/STOP button to end cooking, then press STEAM
RELEASE.
Keep Warm Function
• Once cooking is complete, the unit will automatically turn to Keep
Warm.
Delay Start Function
• Press this button to delay cooking until your desired start time
(range: 30mins – 24hrs). Press desired cook function first, then
press the delay timer button, the light will flicker, once this
happens adjust to the desired delayed cook and press START to
set. To cancel the delay timer setting, press the delay timer
button again (before pressing start).
• Remove any stickers or labels from the appliance.
• Thoroughly clean the parts with hot water, some washing-up
liquid and a non-abrasive sponge.
• Wipe the inside and outside of the appliance with a moist cloth.
• Place the appliance on a stable, horizontal and level surface, do
not place the appliance on non-heat-resistant surfaces.
• This is an air fryer that works on hot air. Do not fill the pan
with oil or frying fat.
• In order to prevent disruptions of the airflow do not put
anything on top of the appliance and make sure there is
always 10 centimeter of free space around the appliance.
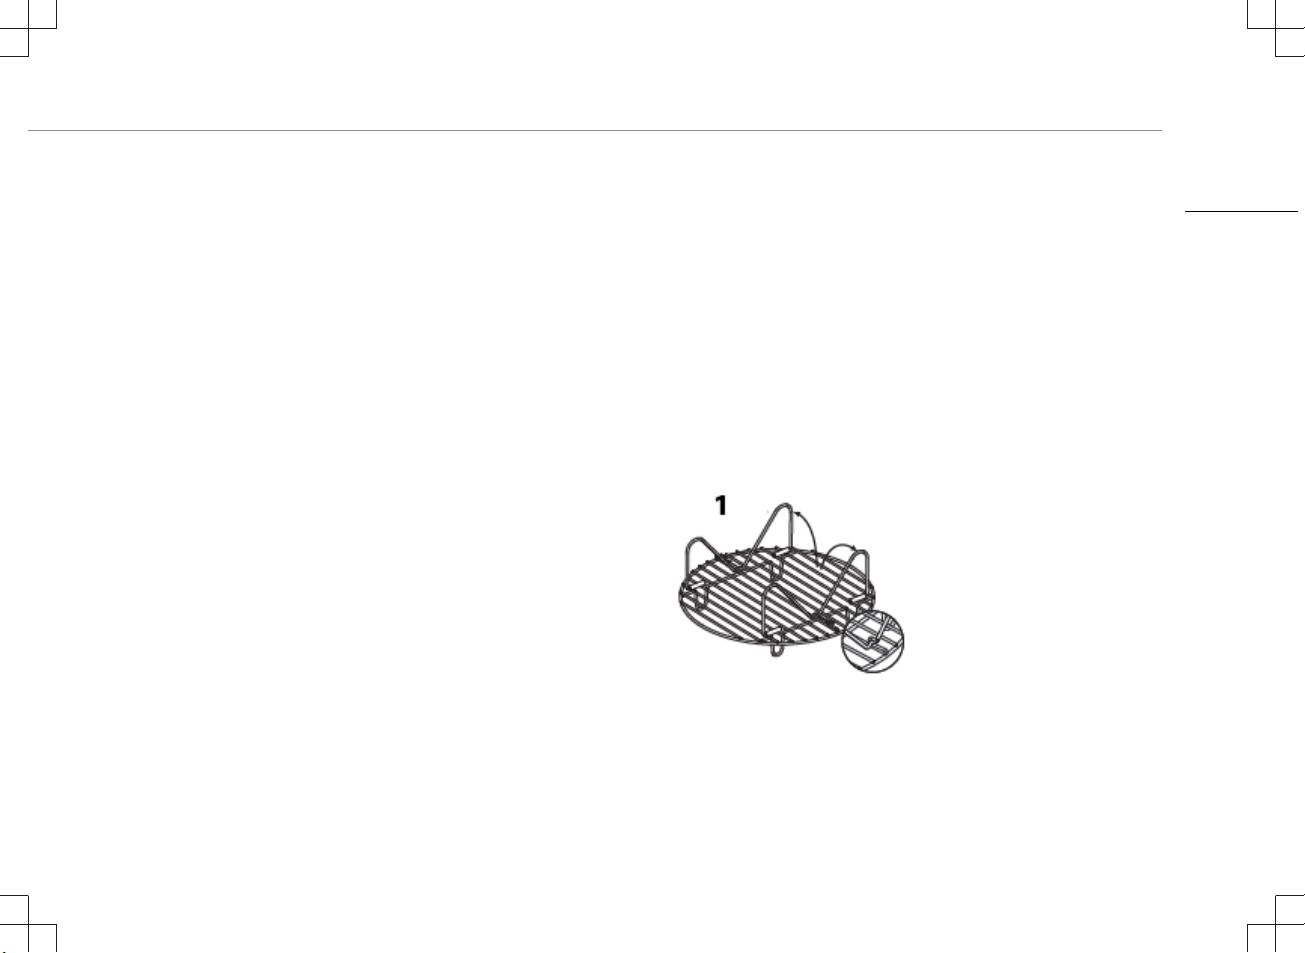
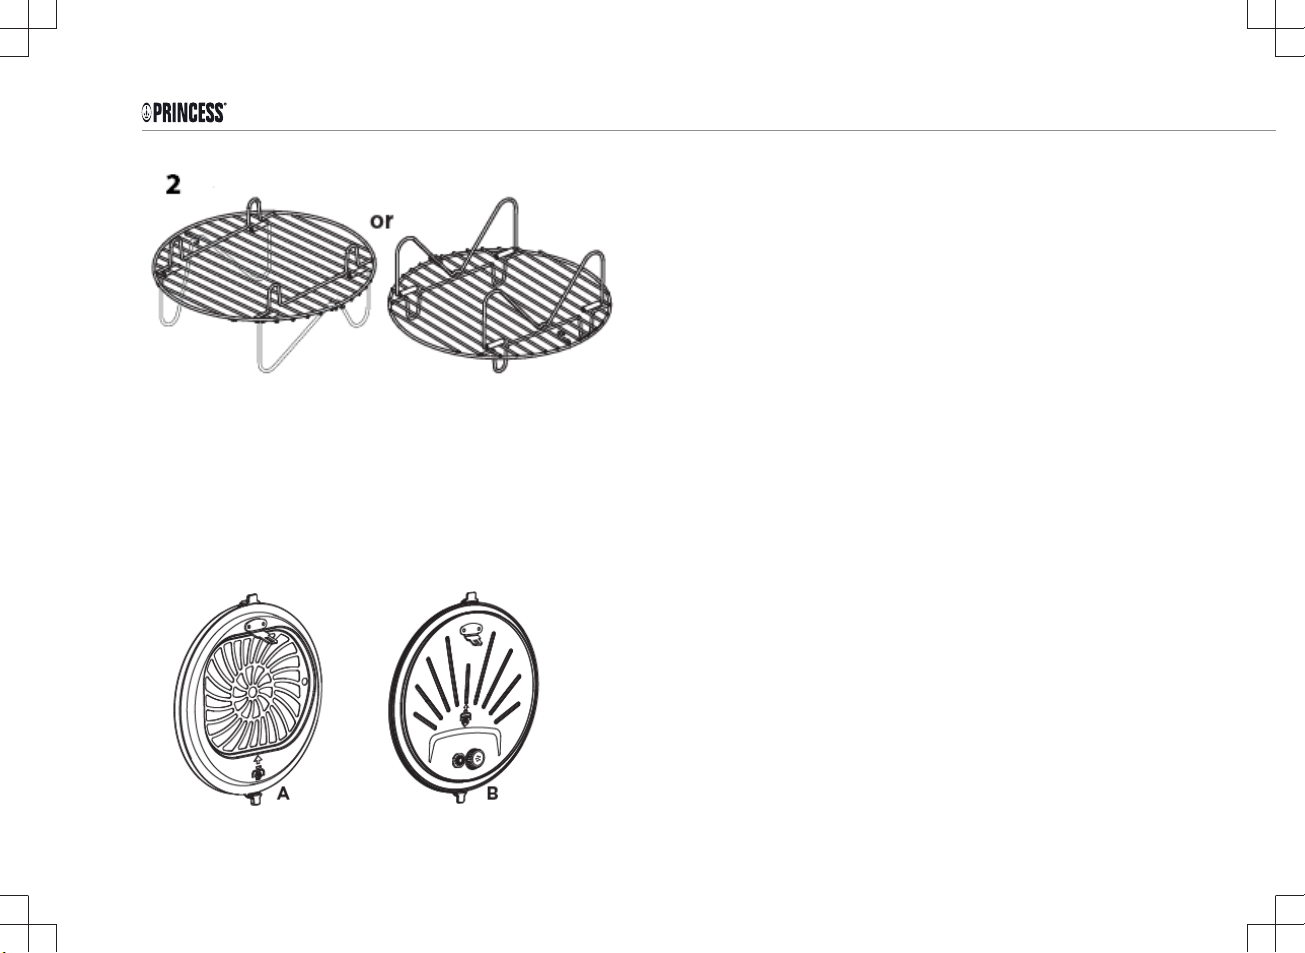
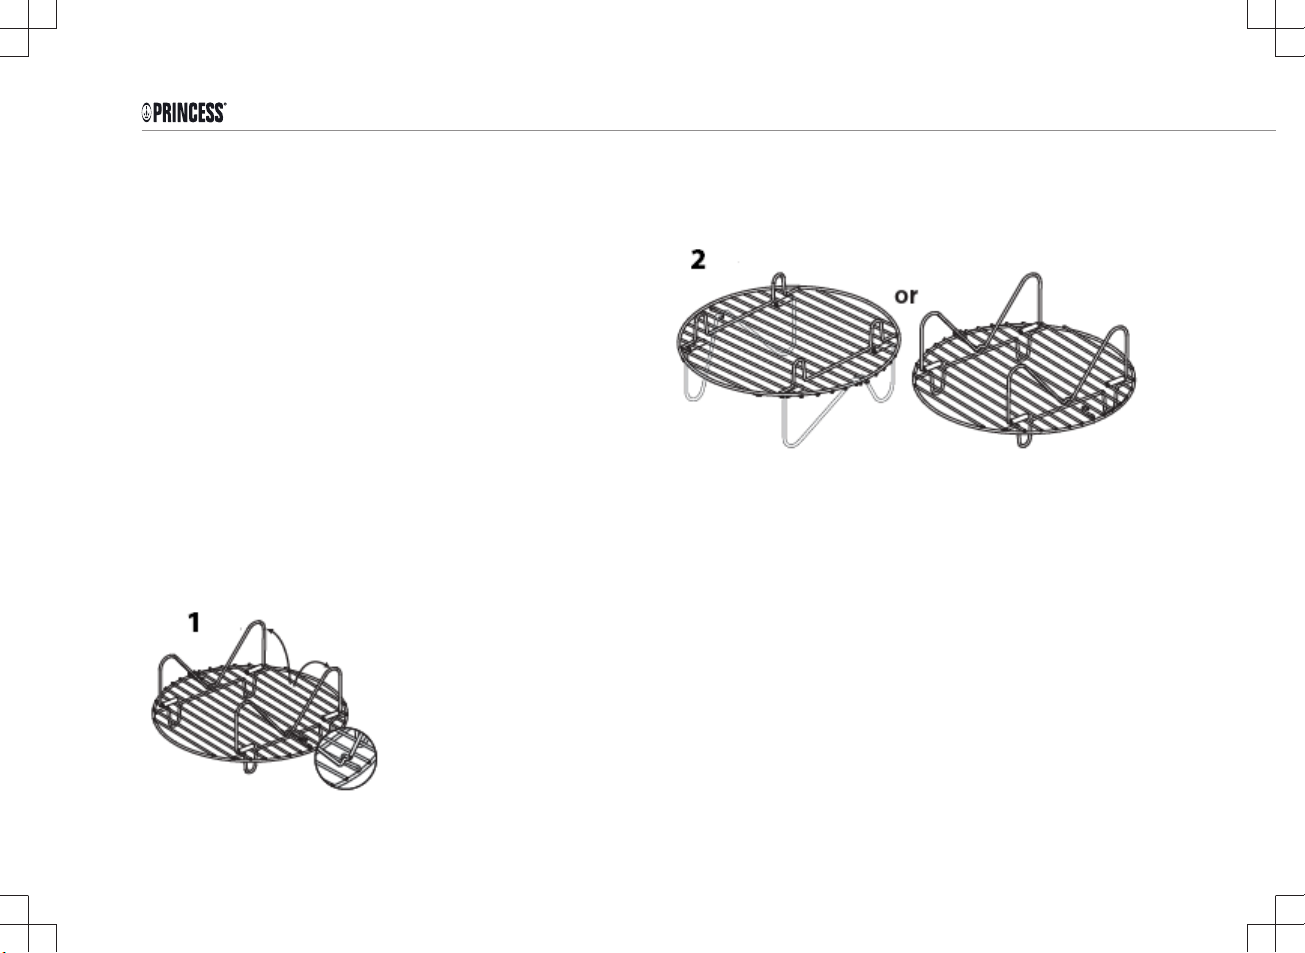
Setting up the Steam Rack
• To set up the steam rack, unfold the legs and carefully secure the
middle “V” part to hook located near the edge. (Figure 1)
• Based on recipe and cooking preference, food can be placed
either side of the reversible steam rack to achieve the desired
result. (Figure 2)
EN
BEFORE THE FIRST USE
• Remove all packaging material.
7
Page 8
Instruction manual
• The legs of the steam rack can be folded down for storage.
Carefully push the middle “V” part outward to unlock, then fold the
legs inwards.
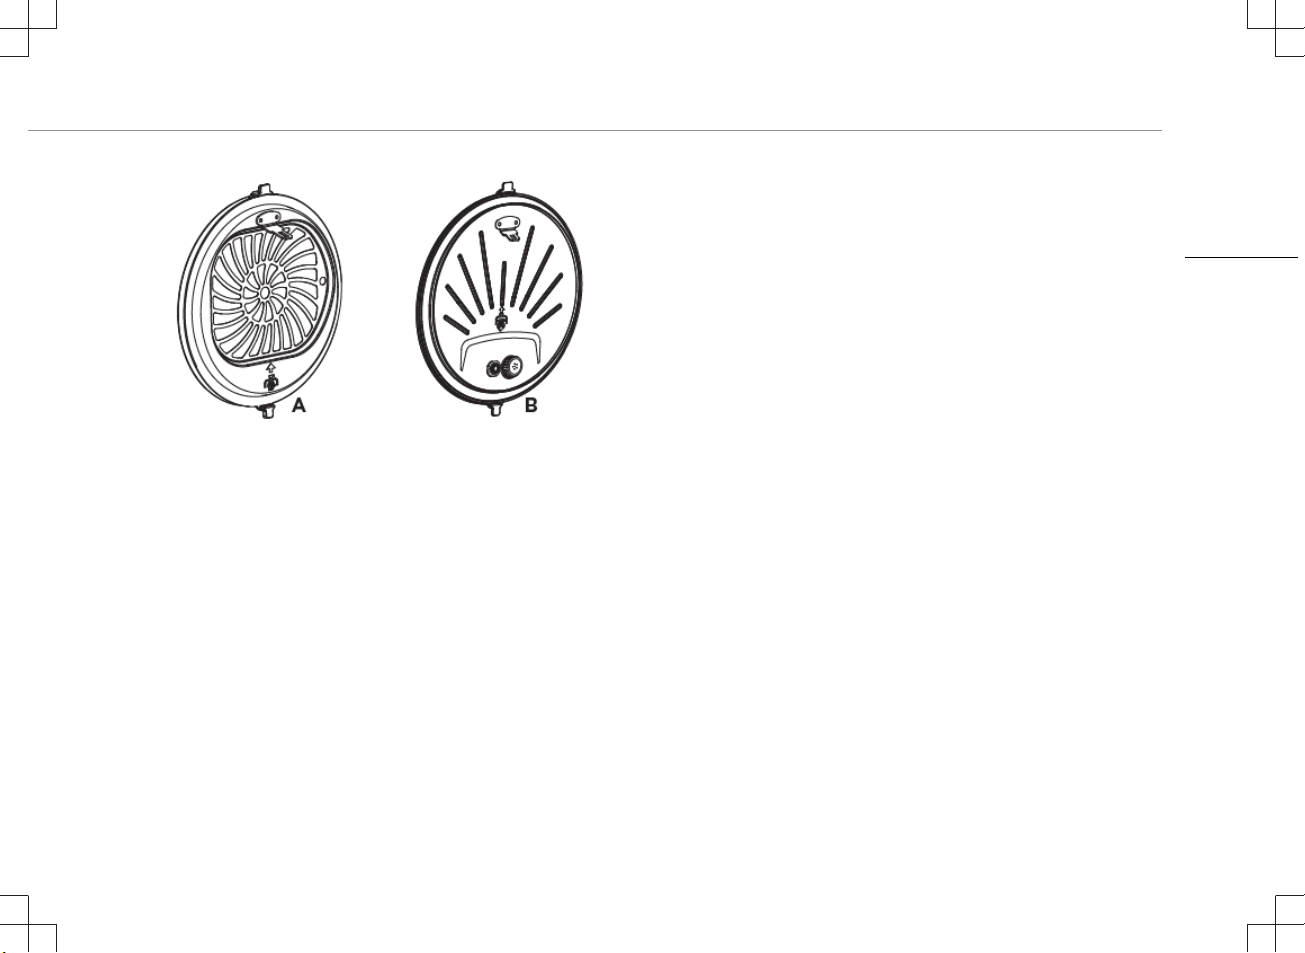
LID INSERTS
This unit comes with two different lid inserts, the Pressure Plate and
the Aerofryer Grate. The two inserts allow users to pressure cook,
aero fry, and more in the same unit by interchanging the plates.
Aerofryer Grate (A)
The Aerofryer Grate will need to be installed for access to these
cooking functions:
• Aero Fry
• Grill/Roast
• Bake
Pressure Plate (B)
The Pressure Plate will need to be installed for access to these
cooking functions:
• Pressure Cook
• Slow Cook
• Steam
• Soup/Broth
• Rice/Grains
• Yoghurt
• Stir Fry
NOTE: Cooking functions will be able to be selected, only once the
correct cooking insert has been installed.
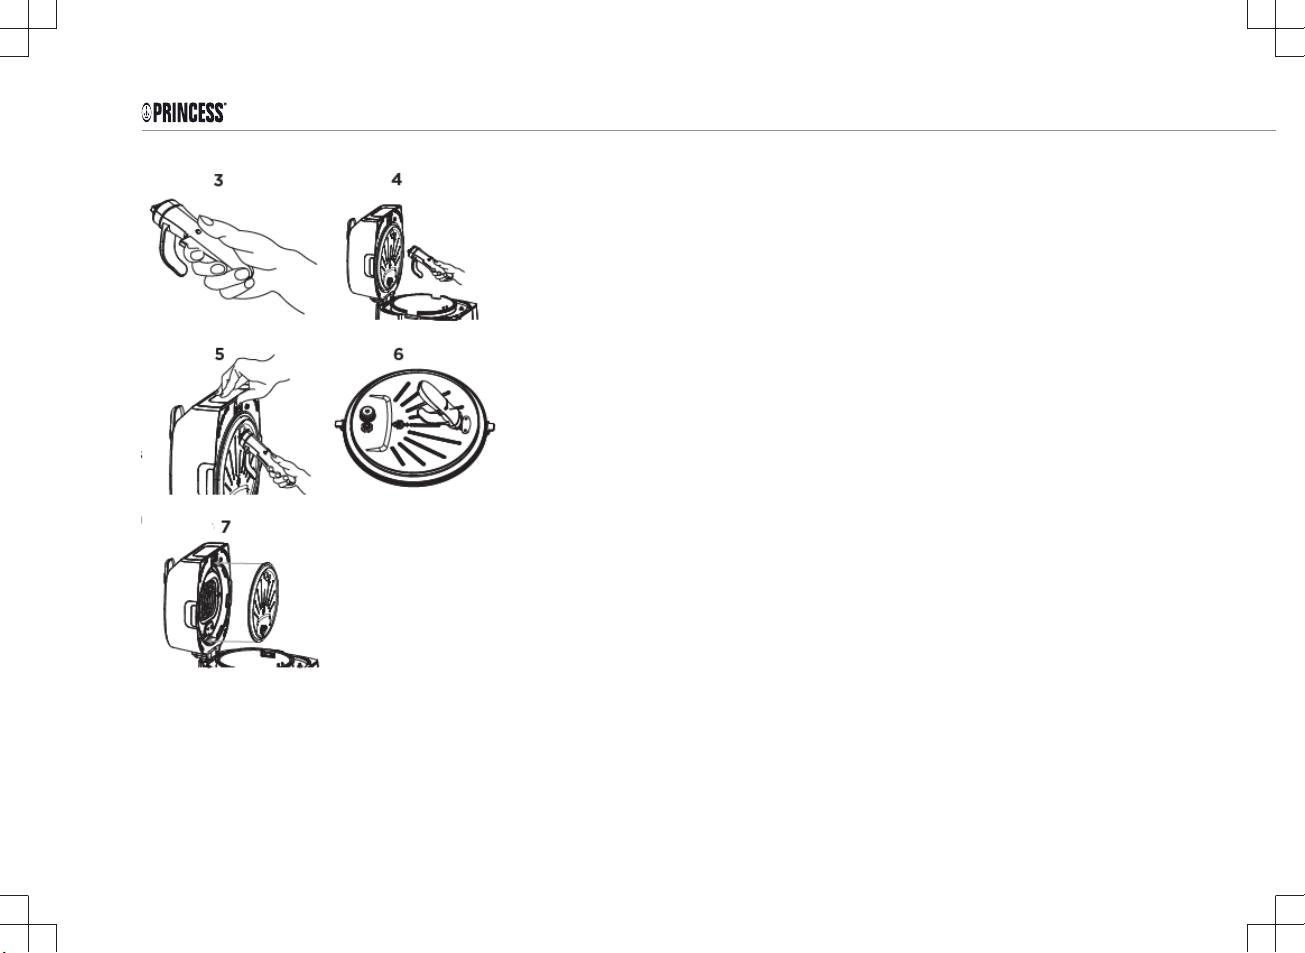
REMOVE/INSERT THE PRESSURE PLATE OR AEROFRYER GRATE
Where possible, leave the hot pressure plate insert or aerofryer grate
in place until the unit has completely cooled. For recipes where
switching the plate or insert is needed during the cooking process,
always use the included plate handle. This handle is designed to
conveniently allow you to insert and remove the plates even when
they are hot.
1. Firmly grasp the plate handle with the extended knuckle guard
facing down (3).
8
Page 9
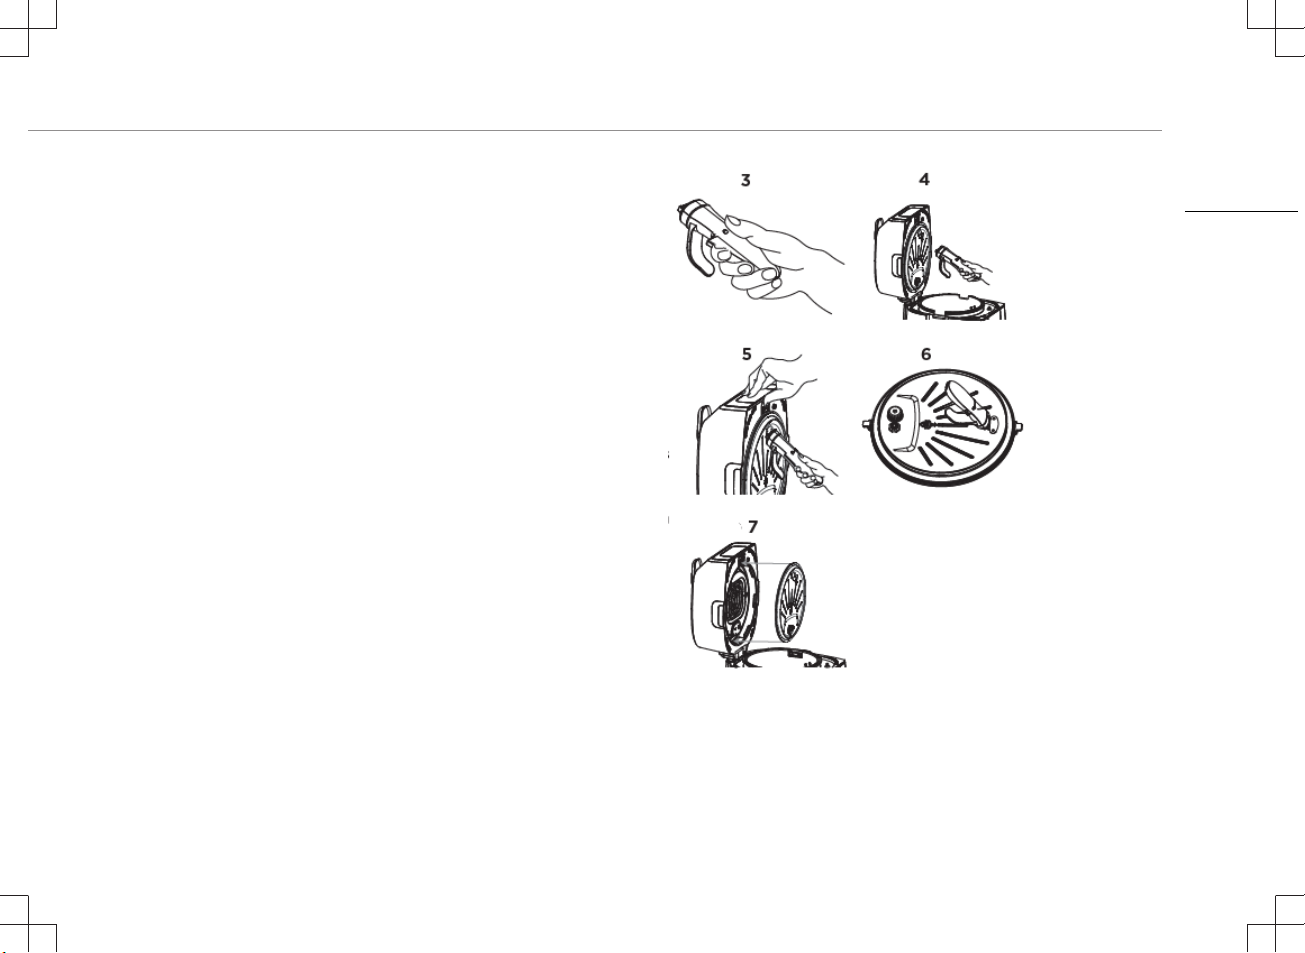
2. Connect the end of the handle to the protruding metal tab on the
plate. Once secure, press the button on the left to lock (4).
3. When the handle is securely locked to the plate, press the
release tab at the top of the plate (5).
4. With the handle, carefully lift the plate out of the unit and place on
a sturdy, flat, heat resistant surface.
5. To remove the handle from the plate, press the button on the
right side of the handle and pull the handle out (6).
6. Allow the plate to fully cool before moving or cleaning.
7. Picture 7 shows where to place the plate into the lid.
Instruction manual
EN
9
Page 10

Instruction manual
USE
Aerofryer Functions
How to use the Aerofry function
• Open the top lid by turning the lid knob counter clock wise.
• Ensure the pressure plate insert is removed. Always use the plate
handle if plates are hot.
• Insert the aerofryer grate.
• Place the non-stick cooking pot inside the unit. Place the air fry
basket inside the cooking pot. Place food inside the aero fry
basket.
• Close the lid and lock by turning clock wise
• Press the power button and then select AEROFRY. The aerofryer
icon will illuminate. Using the + and – buttons, adjust the
temperature and time to the desired cooking settings.
• Press the START/STOP button to begin cooking. The count down
timer and selected
• temperature will be displayed alternately on the screen.
• When cooking is complete audible tone will sound.
Note: The aerofry cycle can be ‘paused’ by either lifting the lid, or
pressing the START/STOP
button. Once the lid is closed, or the START/STOP button is pressed,
cooking will resume.
How to Grill / Roast
• Open the top lid by turning the lid knob counter clock wise.
• Ensure the pressure plate insert is removed. Always use the plate
handle if plates are hot. Insert the aerofryer grate.
• Place the non-stick cooking pot inside the unit. If needed, add the
steam rack inside the cooking pot, and arrange food on top of the
steam rack.
• Close the lid and lock by turning clock wise.
• Press the power button and then select GRILL/ROAST. The
aerofryer icon will illuminate. Using the + and – buttons, adjust the
temperature and time to the desired cooking settings. Press the
START/STOP button to begin cooking. The count down timer and
selected temperature will be displayed alternately on the screen.
• GRILL/ROAST cycle can be ‘paused’ by either lifting the lid, or
pressing the START/STOP button. Once the lid is closed, or the
START/STOP button is pressed, cooking will resume.
• When cooking is complete audible tone will sound and unit will go
to keep warm mode.
How to Bake
• Open the top lid by turning the lid knob counter clock wise.
• Ensure the pressure plate insert is removed. Always use the plate
handle if plates are hot. Insert the aerofryer grate.
• Place the non-stick cooking pot inside the unit. If needed, add the
steam rack inside the cooking pot, and arrange food on top of the
steam rack.
• Close the lid and lock by turning clock wise.
• Press the power button and then select BAKE. The aerofryer icon
will illuminate. Using the + and – buttons, adjust the temperature
and time to the desired cooking settings. Press the START/STOP
button to begin cooking. The count down timer and selected
temperature will be displayed alternately on the screen.
• Bake cycle can be ‘paused’ by either lifting the lid, or pressing the
START/STOP button. Once the lid is closed, or the START/STOP
button is pressed, cooking will resume.
• When cooking is complete audible tone will sound and unit will go
to keep warm mode.
10
Page 11

Instruction manual
With this function it is also possible to dehydrate fruit and/or
vegetables. See the aerofryer functions table for more information.
Pressure Cook Functions
Pressure Cook function
• Open the top lid by turning the knob counter clock wise.
• Ensure the aerofryer grate has been removed. Always use the
plate handle. Insert the pressure plate.
• Place the non-stick cooking pot inside the unit and place food
inside the cooking pot.
• Close the lid and lock by turning clock wise.
• Press the power button and then select PRESSURE COOK. The
pressure icon will illuminate. Using the + and – buttons, adjust to
the desired cook time.
• Once the correct pressure has been reached, the display will
switch from the cycling dashes to the timer count down.
• When cooking is complete an audible tone will sound. The unit
will automatically go to ‘keep warm’ mode once cooking is
complete.
• When pressure cooking is complete, press the STEAM
RELEASE button to release the pressure. The steam release
cycle is 3 minutes long. Once all the steam is released, the lid
can safely be opened.
• To Stop a cooking program before cooking has completed, press
the START/STOP button to end cooking, then press STEAM
RELEASE.
NEVER place your face or hands over the unit during steam release,
or when opening the lid. ALWAYS use pot holders during Steam
Release or when opening the lid. Note: press DELAY TIMER and
adjust time to set the delay start feature. If you would like cooking to
start immediately, press the START/STOP button to begin cooking.
Dash lines will cycle across the control panel to indicate the unit is
coming to pressure.
Slow Cook function
• Open the top lid by turning the knob counter clock wise.
• Ensure the aerofryer grate has been removed. Always use the
plate handle. Insert the pressure plate.
• Place the non-stick cooking pot inside the unit and place food
inside the cooking pot.
• Close the lid and lock by turning clock wise.
• Press the power button and then select SLOW COOK. The
pressure icon will illuminate. Using the + and – buttons, adjust the
timer to the desired cooking time.
• Once the correct temperature has been reached, the display will
switch from the cycling dashes to the timer count down.
• When cooking is complete an audible tone will sound. The unit
will automatically go to KEEP WARM mode once cooking is
complete.
• When pressure cooking is complete, press the STEAM
RELEASE button to release the pressure. The steam release
cycle is 3 minutes long. Once all the steam is released, the lid
can safely be opened.
• To Stop a cooking program before cooking has completed, press
the START/STOP button to end cooking, then press STEAM
RELEASE.
EN
11
Page 12

Instruction manual
Note: press DELAY TIMER and adjust time to set the delay start
feature. If you would like cooking to start immediately, press the
START/STOP button to begin cooking. Dash lines will cycle across
the control panel to indicate the unit is coming to temperature.
Steam function
• Open the top lid by turning the knob counter clock wise.
• Ensure the aerofryer grate has been removed. Always use the
plate handle. Insert the pressure plate.
• Place the non-stick cooking pot inside the unit. Arrange the food
on the steam rack provided. Never fill the cooking pot more than
2/3 full.
• Add 1.5 cups of water or steaming liquid into the cooking pot.
• Close the lid and lock by turning clock wise.
• Press the power button and then select STEAM. The pressure
icon will illuminate. Using the + and – buttons, adjust to the
desired cook time.
• Press the START/STOP button to begin cooking. Dash lines will
cycle across the control panel to indicate the unit is coming to
temperature.
• Once the correct pressure/temperature has been reached, the
display will switch from the cycling dashes to the timer count
down.
• When cooking is complete an audible tone will sound. Once
cooking is complete and you are ready to remove your food,
press the STEAM RELEASE button.
• When pressure cooking is complete, press the STEAM RELEASE
button to release the pressure. The steam release cycle is 3
minutes long. Once all the steam is released, the lid can safely be
opened.
• To Stop a cooking program before cooking has completed, press
the START/STOP button to end cooking, then press STEAM
RELEASE.
How to use the Soup / Broth function
• Open the top lid by turning the lid knob counter clock wise.
• Ensure the pressure plate insert is removed. Always use the plate
handle if plates are hot. Insert the aerofryer grate.
• Place the non-stick cooking pot inside the unit. Place the
aerofryer basket inside the cooking pot. Lay the ingredients inside
the basket.
• Close the lid and lock by turning clock wise.
• Press the power button and then select SOUP/BROTH function.
The aerofryer icon will illuminate. Using the + and – buttons,
adjust the temperature and time to the desired cooking settings.
• Press the START/STOP button to begin cooking. The count down
timer and selected temperature will be displayed alternately on
the screen.
• When cooking is complete audible tone will sound.
• When pressure cooking is complete, press the STEAM RELEASE
button to release the pressure. The steam release cycle is 3
minutes long. Once all the steam is released, the lid can safely be
opened.
• To Stop a cooking program before cooking has completed, press
the START/STOP button to end cooking, then press STEAM
RELEASE.
How to use the Rice / Grains function
• Open the top lid by turning the knob counter clock wise.
• Ensure the aerofryer grate has been removed. Always use the
plate handle. Insert the pressure plate.
12
Page 13

Instruction manual
• Place the non-stick cooking pot inside the unit. Place uncooked
rice and liquid inside the cooking pot.
• Close the lid and lock by turning clock wise.
• Press the power button and then select RICE/GRAINS. The
pressure icon will illuminate. Using the + and – buttons, adjust to
the desired cook time.
• Once pressure has been reached, the display will switch from the
cycling dashes to the timer count down.
• When cooking is complete an audible tone will sound. The unit
will automatically go to KEEP WARM mode once cooking is
complete.
• When pressure cooking is complete, press the STEAM
RELEASE button to release the pressure. The steam release
cycle is 3 minutes long. Once all the steam is released, the lid
can safely be opened.
• To Stop a cooking program before cooking has completed, press
the START/STOP button to end cooking, then press STEAM
RELEASE.
NEVER place your face or hands over the unit during steam release,
or when opening the lid. ALWAYS use pot holders during STEAM
RELEASE or when opening the lid.
Note: when cooking foods that expand, do not fill the cooking pot
more than half way.
Note: press DELAY TIMER and adjust time to set the delay start
feature.
• If you would like cooking to start immediately, press the START/
STOP button to begin cooking. Dash lines will cycle across the
control panel to indicate the unit is coming to pressure.
Yogurt Function
• Open the top lid by turning the knob counter clock wise.
• Ensure the aerofryer grate has been removed. Always use the
plate handle.
• Insert the pressure plate.
• Place the non-stick cooking pot inside the unit and place food
inside the cooking pot.
• Close the lid and lock by turning clock wise.
• Press the power button and then select YOGURT. The pressure
icon will illuminate. Using the + and – buttons, adjust to the
desired cook time.
• Once pressure has been reached, the display will switch from the
cycling dashes to the timer count down.
• When cooking is complete an audible tone will sound.
Note: press DELAY TIMER and adjust time to set the delay start
feature. If you would like cooking to start immediately, press the
START/STOP button to begin cooking. Dash lines will cycle across
the control panel to indicate the unit is coming to pressure.
How to Stir fry
• Open the top lid by turning the knob counter clock wise.
• Ensure the aerofryer grate has been removed. Always use the
plate handle if plates are hot.
• Insert the pressure plate.
• Place the non-stick cooking pot inside the unit.
• The lid can remain in the open position during when using the Stir
fry function
EN
13
Page 14
Instruction manual
• Press the power button and then select STIR FRY. The pressure
icon will illuminate. Using the + and – buttons, adjust the
temperature to the desired cooking temperature (High, Medium or
Low).
• Press the START/STOP button to begin cooking.
• When cooking is complete press the START/STOP button.
• When pressure cooking is complete, press the STEAM RELEASE
button to release the pressure. The steam release cycle is 3
minutes long. Once all the steam is released, the lid can safely be
opened.
• To Stop a cooking program before cooking has completed, press
the START/STOP button to end cooking, then press STEAM
RELEASE.
NOTE: NEVER use metal utensils with your Aerofryer as these may
scratch the non-stick
cooking pot or pressure grate.
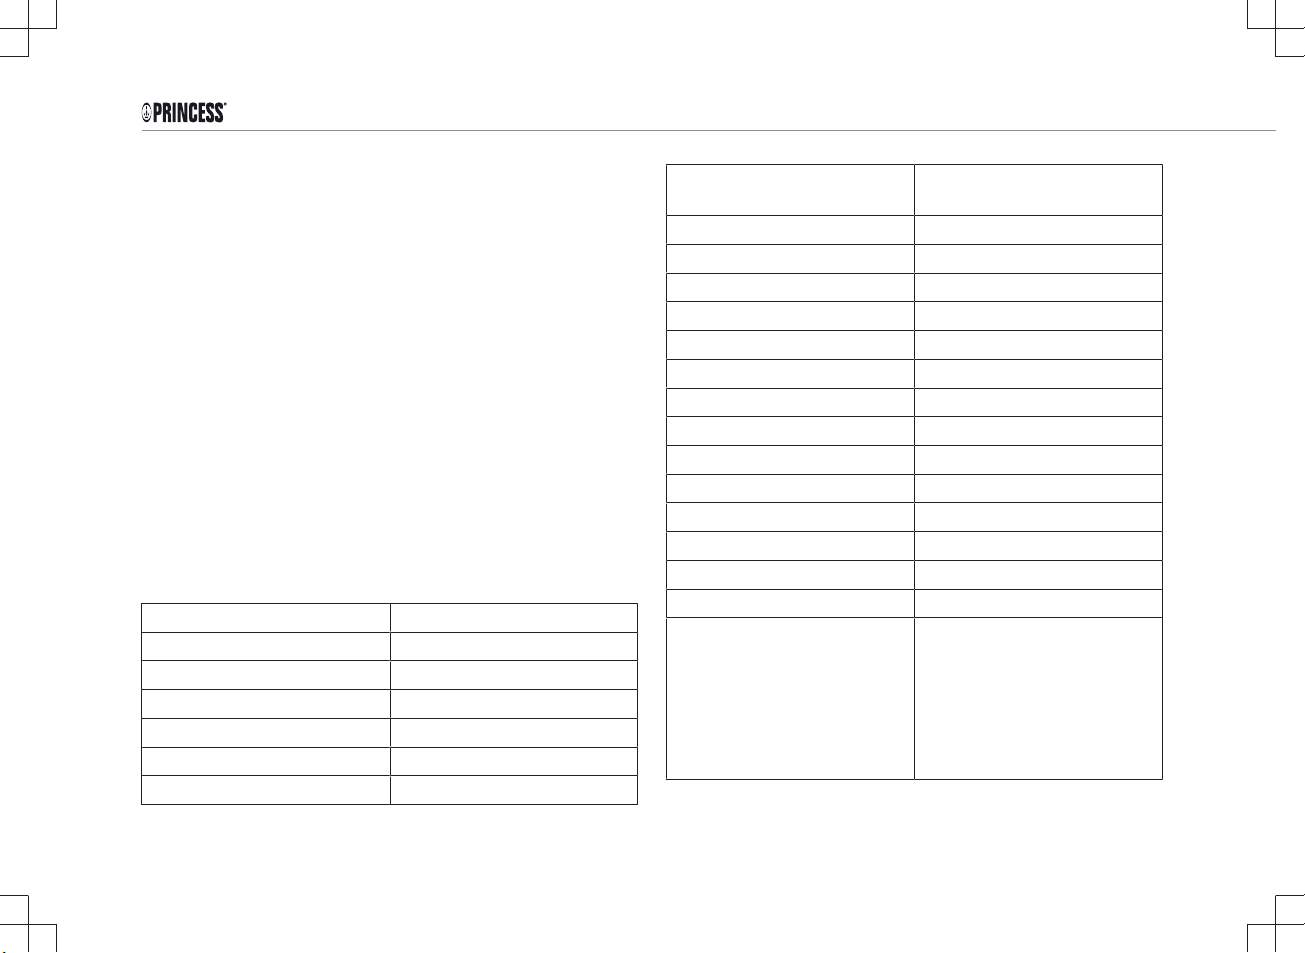
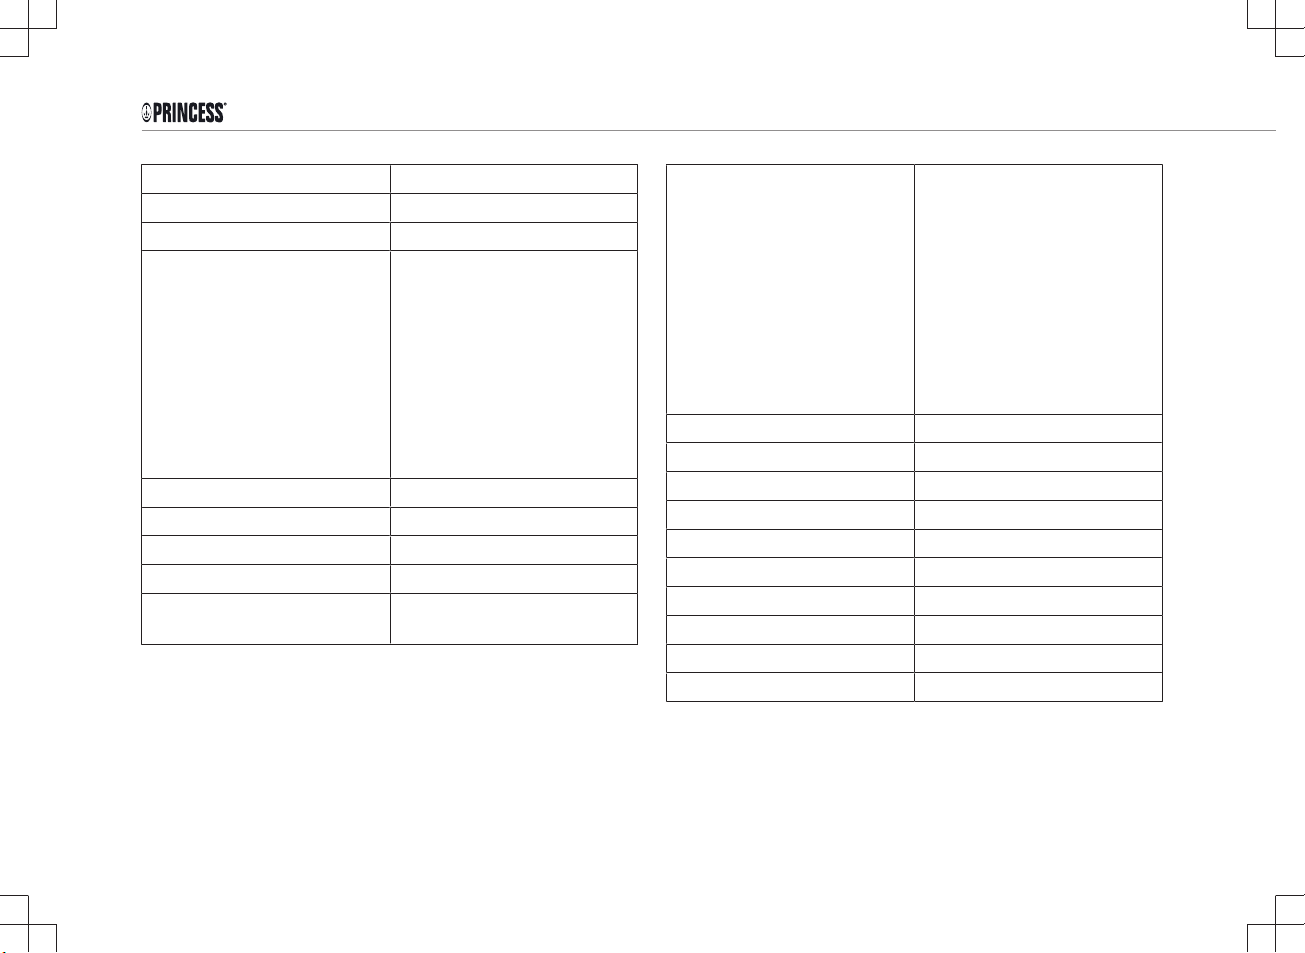
AEROFRYER FUNCTIONS
Program Aerofry
Logo
Default time (min) 20 min
Range (min) 1-60 min
Default temperature°C 200 °C
Range°C 80-200 °C
Quantity 500-750g
Extra information Shake every 5 minutes when
making fries
Program Grill/Roast
Logo
Default time (min) 10 min
Range (min) 1-60 min
Default temperature°C 220 °C
Range°C 80-220 °C
Quantity 250-500g
Program Bake/Dehydrate
Logo
Default time (min) 15 min
Range (min) 1 min-24 hours
Default temperature°C 200 °C
Range°C 30-200 °C
Quantity 250-500g
Extra information From 1-89 min step 1 minute, 90
min-24 hours step by 30 min.
With this function it is possible to
dehydrate fruit and/or vegetables.
Preferred settings: 30-70°C
degrees for 5-10 hours,
depending on type of food.
14
Page 15
Instruction manual
• Always make sure you have inserted the Aerofry grate when
using this functions.
• When cooking has finished the timer will go to “0” then will
automatically switch to Keep Warm function for 30mins at 80°C.
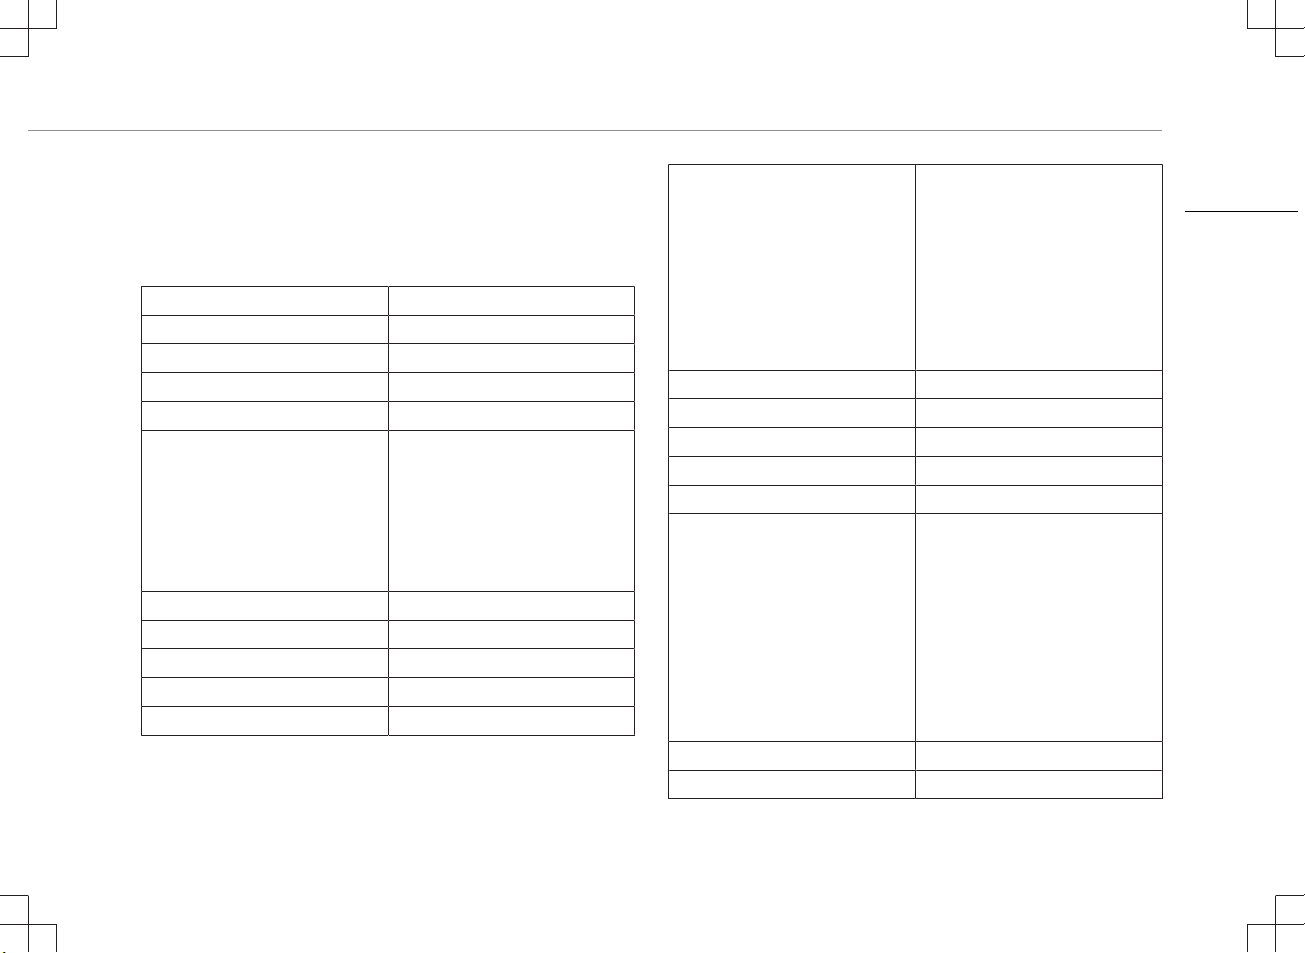
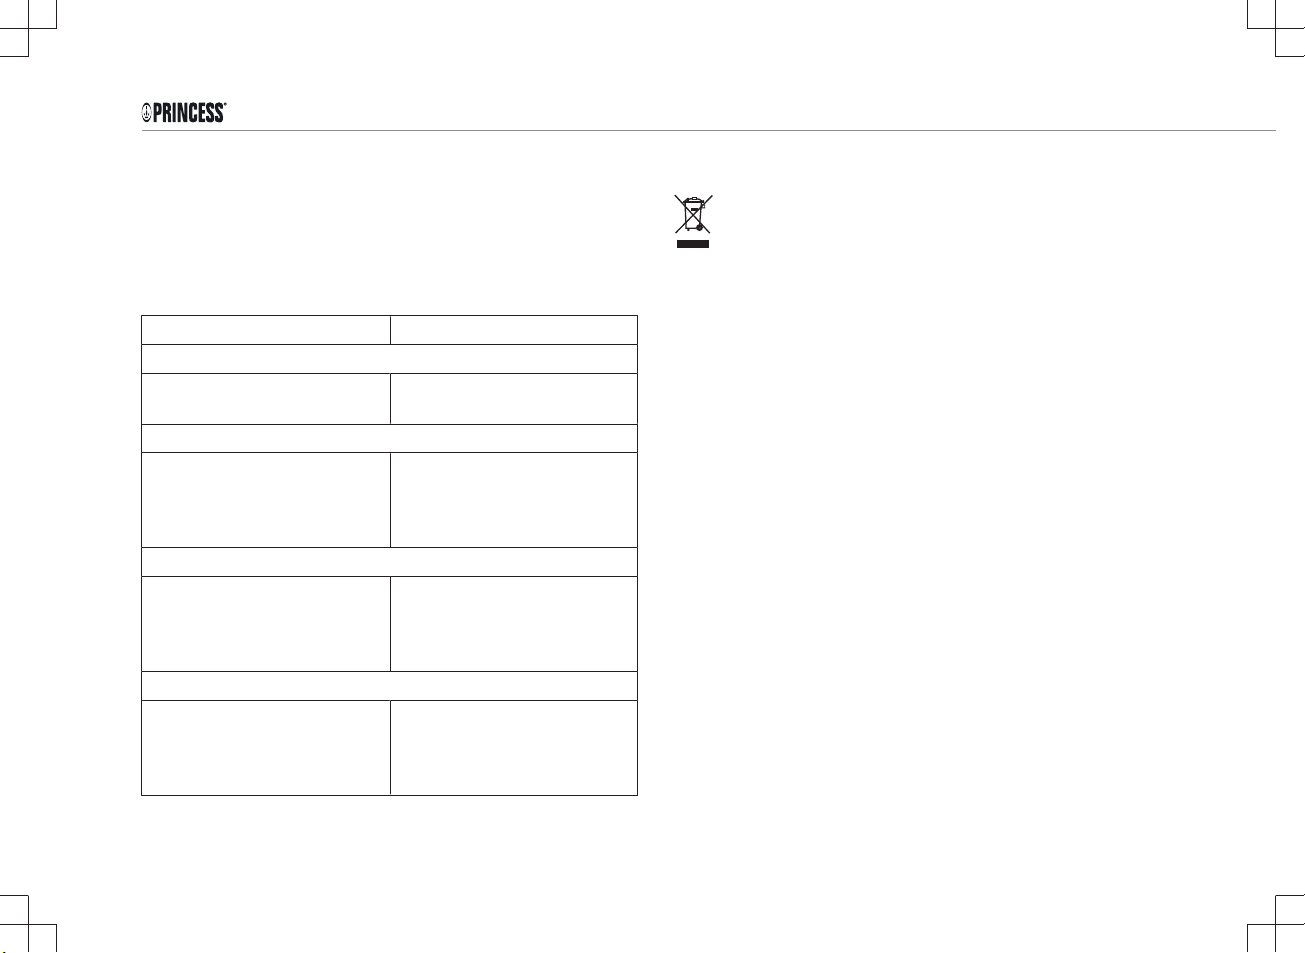
Aerofryer pressure functions
Program Pressure Cook
Logo
Default time (min) 30 min
Range (min) 0-4 Hrs
Quantity See max indicator innerpan
Extra information When pressure cooking is
complete, press the Steam
Release button to release the
pressure. The steam release
cycle is 3 minutes long. Once all
the steam is released, the lid can
safely be opened.
Program Slow Cook
Logo
Default time (min) 4 Hrs
Range (min) 4-12 Hrs
Quantity See max indicator innerpan
Extra information Default temperature is HI
(Settings:HI,LO).
When pressure cooking is
complete, press the Steam
Release button to release the
pressure. The steam release
cycle is 3 minutes long. Once all
the steam is released, the lid can
safely be opened.
Program Steam
Logo
Default time (min) 10 min
Range (min) 1-30 min
Quantity 500-750g
Extra information Add 1,5 cup of water into the
cooking pot, max volume of 2/3 of
the cooking pot.
When pressure cooking is
complete, press the Steam
Release button to release the
pressure. The steam release
cycle is 3 minutes long. Once all
the steam is released, the lid can
safely be opened.
Program Soup/Broth
Logo
EN
15
Page 16
Instruction manual
Default time (min) 1 Hr
Range (min) 0.5 - 4 Hrs
Quantity See max indicator innerpan
Extra information Use the stir fry function if you first
want to sear/saute your
vegetables.
When pressure cooking is
complete, press the Steam
Release button to release the
pressure. The steam release
cycle is 3 minutes long. Once all
the steam is released, the lid can
safely be opened.
Program Rice/Grains
Logo
Default time (min) 20 min
Range (min) 3-60 min
Quantity Using 4 cups of rice and 5 cups of
water
Extra information 100g uncooked rice becomes
250g cooked rice, different rice/
grains requires different ratio of
water.
When pressure cooking is
complete, press the Steam
Release button to release the
pressure. The steam release
cycle is 3 minutes long. Once all
the steam is released, the lid can
safely be opened.
Program Yoghurt
Logo
Default time (min) 6 Hrs
Range (min) 4-12 Hrs
Quantity 9 bottles of 120ml/bottle
Program Stir fry
Logo
Default time (min) 10 min
Range (min) 1-30 min
Quantity 500g
16
Page 17

Instruction manual
Extra information Default temperature is HI
(Settings: HI, MD, LO), when
using this function lid can be
opened.
When pressure cooking is
complete, press the Steam
Release button to release the
pressure. The steam release
cycle is 3 minutes long. Once all
the steam is released, the lid can
safely be opened.
• Always make sure you have inserted the Pressure plate when
using this functions.
• When cooking has finished the timer will go to "0" then will
automatically switch to keep warm function, default 4 Hrs.
CLEANING AND MAINTENANCE
• Before cleaning, unplug the appliance and wait for the appliance
to cool down.
• Use a soft damp cloth to wipe clean the base and lid of the unit
after every use.
• Use a small brush or cotton swab if necessary. Never pour any
liquid into the base of the unit.
• Wash the removable parts (cooking pot, basket, stand, steam
rack, pressure plate, aerofryer grate, plate handle, removal tool
and condensation tray) in warm soapy water with a soft cloth or
sponge.
• Before washing the lid inserts, please always follow the steps for
safe and proper plate removal.
• Dry each piece thoroughly.
• Note that the cooking pot, basket and steam rack are dishwasher
safe. However, we recommend to wash them by hand as this will
be beneficial for the lifetime of the product.
• When cleaning or cooking with the cooking pot or basket, never
use metal utensils or scouring pads in order to avoid damage to
the non-stick coating.
• Never use harsh chemical detergents, scouring pads or powders
on any of the parts or accessories.
Storing Instructions
• Unplug allow unit to cool completely.
• Store the cooking pot, and plate handle inside the unit.
• Store the unit in its original box or covered in a cool, dry place.
EN
17
Page 18
Instruction manual
TROUBLE SHOOTING
The unit is equipped with safety features that will shut the unit down if
an abnormal condition is encountered during cooking. An error signal
will be displayed on the control panel. Depending on the error, audible
beeping may be heard. Once the problem has been identified and
corrected, plug in the unit and resume pressure cooking.
Description Solution
ERROR: NOT-LOCK
Top lid is in the open position. Close the lid and turn the lid knob
clock-wise to securely close.
ERROR: Unit is not working under pressure cook mode
Pressure plate is not properly
inserted.
ERROR: Unit is not working under aerofryer mode
Aerofryer grate is not properly
inserted.
ERROR: NO-POT
Cooking pot not inserted
correctly.
Insert pressure plate as per
instructions.
Ensure air fry grate has been
removed.
Insert aerofryer grate as per
instructions.
Ensure pressure plate has been
removed.
Gently push the pressure pot
down into the unit until the pot
touches the heating plate on the
bottom of the unit.
ENVIRONMENT
This appliance should not be put into the domestic garbage at
the end of its durability, but must be offered at a central point for the
recycling of electric and electronic domestic appliances. This symbol
on the appliance, instruction manual and packaging puts your
attention to this important issue. The materials used in this appliance
can be recycled. By recycling of used domestic appliances you
contribute an important push to the protection of our environment. Ask
your local authorities for information regarding the point of
recollection.
Support
You can find all available information and spare parts at
www.princesshome.eu!
18
Page 19

Gebruiksaanwijzing
VEILIGHEID
• Als u de veiligheidsinstructies negeert, kan
de fabrikant niet verantwoordelijk worden
gehouden voor de mogelijke schade.
• Als het netsnoer beschadigd is, moet het
worden vervangen door de fabrikant, de
onderhoudsmonteur van de fabrikant of door
personen met een soortgelijke kwalificatie
om gevaar te voorkomen.
• Verplaats het apparaat nooit door aan het
snoer te trekken en zorg dat het snoer niet
in de war kan raken.
• Het apparaat moet op een stabiele, vlakke
ondergrond worden geplaatst.
• De gebruiker mag het apparaat niet
onbeheerd achterlaten wanneer de stekker
zich in het stopcontact bevindt.
• Dit apparaat is niet bedoeld voor gebruik
door personen (inclusief kinderen) met
verminderde lichamelijke, zintuiglijke of
verstandelijke vermogens of personen met
een gebruik aan ervaring en kennis, tenzij
iemand die verantwoordelijk is voor hun
veiligheid toezicht op hen houdt of hen heeft
uitgelegd hoe het apparaat dient te worden
gebruikt.
• Houd zorgvuldig toezicht wanneer
apparaten worden gebruikt door of in de
buurt van kinderen.
• WAARSCHUWING: Gemorst voedsel kan
ernstige brandwonden veroorzaken. Houd
het apparaat en snoer buiten bereik van
kinderen. Laat het snoer nooit over de rand
van een werkblad hangen, gebruik nooit een
stopcontact onder een werkblad en gebruik
het apparaat nooit in combinatie met een
verlengsnoer.
• Het gebruik van accessoires die niet worden
aanbevolen door de fabrikant van het
apparaat kan letsel veroorzaken.
• Gebruik het apparaat niet buitenshuis.
• Plaats het apparaat niet op of in de buurt
van een warm gasfornuis of elektrisch
fornuis, of in een verwarmde oven.
• Reinig het apparaat niet met een
metaalspons. Er kunnen stukjes afbreken
van de spons en in contact komen met
elektrische onderdelen, waardoor u risico
loopt op een elektrische schok.
• Ga uiterst voorzichtig te werk wanneer u de
bak verwijdert of verhit vet wegdoet.
NL
19
Page 20

Gebruiksaanwijzing
• Ga uiterst voorzichtig te werk wanneer u een
apparaat verplaatst dat hete olie of een
andere hete vloeistof bevat.
• LET OP: Bereid geen voedsel in de
buitenpan om schade of een elektrische
schok te voorkomen. Bereid alleen voedsel
in de meegeleverde binnenpan.
• Als u de stekker van het apparaat uit het
stopcontact wilt halen, drukt u eerst op de
aan/uit-knop.
• Gebruik de snelkookplaat, het Aerofryerrooster of de binnenpan niet als deze
onderdelen ingedeukt of versleten zijn.
• WAARSCHUWING: Gebruik de Aerofryer
nooit om voedsel gewoon of met de
snelkookfunctie te frituren, ongeacht of het
deksel is aangebracht. DIT IS GEVAARLIJK
EN KAN BRAND EN ERNSTIGE SCHADE
VEROORZAKEN.
• Gebruik ALTIJD de verwijderbare handgreep
om het Aerofryer-rooster of de snelkookplaat
te plaatsen of verwijderen.
• Zorg dat het filter en ontluchtingsventiel geen
voedselresten of vuil bevatten.
• Vul de binnenpan nooit verder dan de
maximale vullijn.
• Voordat u de binnenpan in de basis plaatst,
zorgt u dat zowel de binnen- als de
buitenpan droog zijn door ze af te vegen met
een zachte doek.
• Zorg altijd dat het apparaat vóór gebruik
correct in elkaar is gezet.
• Met dit apparaat bereidt u voedsel onder
druk. Foutief gebruik kan leiden tot
brandwonden. Controleer of het apparaat
correct is gesloten voordat u het bedient.
• Wanneer u de snelkookplaat gebruikt, zorgt
u altijd dat de plaat correct is geplaatst en
dat het deksel is gesloten voordat u het
apparaat bedient.
• Zorg dat het ontluchtingsventiel niet bedekt
is.
• Wees voorzichtig wanneer u de binnenpan
uit de buitenpan tilt.
• Wanneer de verwijderbare binnenpan leeg
is, mag u deze niet meer dan 10 minuten
verwarmen. Anders raakt het
bereidingsoppervlak mogelijk beschadigd.
• Laat het deksel altijd geopend wanneer u de
roerbakfunctie gebruikt.
• Plaats het apparaat niet te dicht bij muren en
kasten wanneer het in gebruik is. Zo
voorkomt u mogelijke schade door stoom.
20
Page 21
Gebruiksaanwijzing
• Til het apparaat nooit op aan de uitstekende
delen aan de zijkant van het deksel.
• Raak het blootliggende verwarmingselement
nooit aan.
• Dompel het snoer, de stekker of het
apparaat niet onder in water of andere
vloeistoffen om elektrische schokken te
voorkomen.
• Dit apparaat is bedoeld voor huishoudelijk
en soortgelijk gebruik, zoals:
• Personeelskeukens in winkels, kantoren en
andere werkomgevingen.
• Door gasten in hotels, motels en andere
residentiële omgevingen.
• Bed&Breakfast-type omgevingen.
• Boerderijen.
• Kinderen mogen niet met het apparaat
spelen.
• Dit apparaat mag niet worden gebruikt door
kinderen. Houd het apparaat en het
netsnoer buiten bereik van kinderen.
• Dompel het snoer, de stekker of het
apparaat niet onder in water of andere
vloeistoffen om elektrische schokken te
voorkomen.
• Verhit het voedsel niet te lang.
• Het oppervlak van het verwarmingselement
is na gebruik onderhevig aan restwarmte.
• De connector dient te worden verwijderd
alvorens het apparaat te reinigen. Wees er
zeker van dat de inlaat volledig droog is
alvorens het apparaat weer in gebruik te
nemen.
• De drukcontainer mag niet worden geopend
totdat de druk voldoende is afgenomen en
tijdens gebruik.
• Het oppervlak wordt heet tijdens
gebruik.
• WAARSCHUWING: Indien het oppervlak is
gebarsten, schakel dan het apparaat uit om
elektrische schokken te voorkomen.
• De temperatuur van de toegankelijke
oppervlakken kan hoog zijn wanneer het
apparaat in gebruik is.
• Het apparaat is niet bedoeld om bediend te
worden met behulp van een externe timer of
een afzonderlijk afstandbedieningssysteem.
NL
21
Page 22
Gebruiksaanwijzing
1
716 1715 8
9
10
11
12
13
14
18 19 20
2
3
4
5
6
• Het apparaat moet worden aangesloten op
BEDIENINGSPANEEL
een geaard stopcontact (voor klasse Iapparaten).
• Plaats niets boven op het apparaat en zorg
ervoor dat er altijd 10cm vrije ruimte rondom
het apparaat is om verstoring van de
luchtstroom te voorkomen.
• Dit apparaat is uitsluitend voor huishoudelijk
gebruik en voor het doel waar het voor
bestemd is. In het ergste geval kan het
voedsel vlam vatten. (Gebruik niet meer dan
één theelepel olie, geen vlees dat te veel vet
vrijgeeft of water dat bedoeld is om voedsel
te koken.)
BESCHRIJVING VAN ONDERDELEN
1. Condensbak
2. Apparaat
3. Aerofryer-rooster
4. Snelkookplaat
5. Handgreep voor snelkookplaat en Aerofryer-rooster
6. Handgreep voor Aerofryer-mandje
7. Stoomrek
8. Aerofryer-mandje
9. Aeroflow-standaard
10. Binnenpan met antiaanbaklaag
22
1: Snelkook 11: Gebak
2: Slowcook 12: Yoghurt
3: Stoom 13: Roerbak
4: Soep/bouillon 14: Aan/uit
5: Rijst/granen 15: Display
6: Ontluchting 16: Warmhoudfunctie
7: Snelkookpictogram 17: Startuitstel
8: Aerofryer-pictogram 18: Temp +/-
9: Aerofry 19: Start/stop
10: Grill/braad 20: Tijd +/-
Page 23

Aan/uit-knop
• Druk op deze knop om het apparaat in en uit te schakelen. Zodra
het apparaat is aangesloten op een stopcontact, gaat de aan/uitknop rood branden. Nadat u op deze knop hebt gedrukt, wordt
het lampje wit.
Aerofryer-pictogram
• Dit pictogram gaat automatisch branden zodra het Aerofryer-
rooster stevig is geplaatst en het apparaat gereed is voor gebruik
van de Aerofry-functies.
Opmerking: De volgende functies zijn afhankelijk van het Aerofryerrooster: Aerofry, Grill/braad en Gebak. Deze functies gaan alleen
branden en kunnen alleen worden geselecteerd als het Aerofryerrooster is geplaatst.
Snelkookpictogram
• Dit pictogram gaat automatisch branden zodra de snelkookplaat
stevig is geplaatst en het apparaat gereed is voor gebruik van de
snelkookfuncties.
Opmerking: De volgende functies zijn afhankelijk van de
snelkookplaat: Snelkook, Slowcook, Stoom, Soep/bouillon, Rijst/
granen, Yoghurt en Roerbak. Deze functies gaan alleen branden en
kunnen alleen worden geselecteerd als de snelkookplaat stevig is
geplaatst.
Opmerking: De roerbakfunctie werkt ook als het deksel geopend is.
Display
• Hier worden de temperatuur en tijd weergegeven. De
bijbehorende pictogrammen branden afwisselend.
Start/stop-knop
Gebruiksaanwijzing
• Raak deze knop één keer aan om het bereidingsproces te starten
of stoppen.
Plus-knop
• Raak deze knop aan om de temperatuur of tijd te verhogen.
Min-knop
• Raak deze knop aan om de temperatuur of tijd te verlagen.
Ontluchtingsknop
• Wanneer de snelkookbereiding is voltooid, drukt u op de
ontluchtingsknop om de druk vrij te geven. De ontluchtingscyclus
duurt 3 minuten. Nadat alle stoom is ontlucht, kunt u het deksel
veilig openen.
Opmerking: Als u een bereidingsprogramma wilt stoppen voordat het
is voltooid, drukt u op de START/STOP-knop om de bereiding te
beëindigen. Vervolgens drukt u op ontluchtingsknop.
Warmhoudfunctie
• Zodra de bereiding is voltooid, schakelt het apparaat automatisch
over naar de warmhoudfunctie.
Functie voor startuitstel
• Druk op deze knop om de bereiding uit te stellen tot de gewenste
begintijd (bereik: 30 min. - 24 uur). Druk eerst op de gewenste
bereidingsfunctie en daarna op de knop voor startuitstel. Zodra
het lampje begint te knipperen, stelt u de gewenste uitsteltijd in.
Druk op START om de tijd in te stellen. Als u de ingestelde
startuitstel wilt annuleren, drukt u nogmaals op deze knop
(voordat u op Start drukt).
NL
23
Page 24
Gebruiksaanwijzing
VOOR HET EERSTE GEBRUIK
• Verwijder alle verpakkingsmateriaal.
• Verwijder eventuele stickers of etiketten van het apparaat.
• Reinig de onderdelen grondig met heet water, een beetje
afwasmiddel en een niet-schurende spons.
• Reinig de binnenkant en de buitenkant van het apparaat met een
vochtige doek.
• Plaats het apparaat op een stabiele, horizontale en vlakke
ondergrond. Plaats het apparaat niet op een niet-hittebestendige
ondergrond.
• Dit is een heteluchtfriteuse die werkt op hete lucht. Vul de
pan niet met olie of frituurvet.
• Plaats niets boven op het apparaat en zorg ervoor dat er
altijd 10 centimeter vrije ruimte rondom het apparaat is om
verstoring van de luchtstroom te voorkomen.
Het stoomrek plaatsen
• Als u het stoomrek wilt plaatsen, vouwt u de pootjes uit en
bevestigt u het middelste V-deel voorzichtig aan het haakje vlak
bij de rand. (Figuur 1)
• Afhankelijk van het recept en uw voorkeur voor de bereiding, kunt
u voedsel aan beide kanten van het omkeerbare stoomrek
plaatsen om het gewenste resultaat te bereiken. (Figuur 2)
• Als u het stoomrek opbergt, kunt u de pootjes invouwen. Duw het
middelste V-deel voorzichtig naar buiten om het te ontgrendelen
en vouw vervolgens de pootjes naar binnen.
INZETSTUKKEN VOOR DEKSEL
Dit apparaat wordt geleverd met twee verschillende inzetstukken voor
het deksel: de snelkookplaat en het Aerofryer-rooster. Dankzij deze
twee inzetstukken kunnen gebruikers in hetzelfde apparaat de
snelkookfunctie, de Aerofry-functie en meer gebruiken door de platen
te verwisselen.
24
Page 25
Gebruiksaanwijzing
OPMERKING: U kunt pas bereidingsfuncties selecteren nadat u het
juiste inzetstuk hebt geplaatst.
Aerofryer-rooster (A)
Het Aerofryer-rooster moet zijn geplaatst om de volgende
bereidingsfuncties te kunnen gebruiken:
• Aerofry
• Grill/braad
• Gebak
Snelkookplaat (B)
De snelkookplaat moet zijn geplaatst om de volgende
bereidingsfuncties te kunnen gebruiken:
• Snelkook
• Slowcook
• Stoom
• Soep/bouillon
• Rijst/granen
• Yoghurt
• Roerbak
DE SNELKOOKPLAAT OF HET AEROFRYERROOSTER VERWIJDEREN/PLAATSEN
Laat de hete snelkookplaat of het Aerofryer-rooster indien mogelijk
zitten totdat het apparaat volledig is afgekoeld. Als het voor een
recept nodig is om de plaat of het inzetstuk tijdens het
bereidingsproces te verwisselen, gebruik dan altijd de meegeleverde
handgreep. Deze handgreep is zodanig ontworpen dat u de platen
makkelijk kunt plaatsen en verwijderen, zelfs wanneer ze heet zijn.
1. Houd de handgreep stevig vast met de uitstekende
vingerbescherming omlaag gericht (3).
2. Bevestig het uiteinde van de handgreep aan het uitstekende
metalen lipje op de plaat. Wanneer de greep vastzit, drukt u op
de knop aan de linkerkant om hem te vergrendelen (4).
3. Wanneer de handgreep stevig is vergrendeld aan de plaat, drukt
u op het vrijgavelipje bovenop de plaat (5).
4. Gebruik de handgreep om de plaat voorzichtig uit het apparaat te
tillen en op een stevig, vlak en hittebestendig oppervlak te
leggen.
5. Als u de handgreep wilt losmaken van de plaat, drukt u op de
knop aan de rechterkant van de greep en trekt u de greep naar
buiten (6).
6. Laat de plaat volledig afkoelen voordat u deze verplaatst of
reinigt.
7. In afbeelding 7 ziet u waar u de plaat in het deksel moet
plaatsen.
NL
25
Page 26
Gebruiksaanwijzing
GEBRUIK
Aerofry-functies
De Aerofry-functie gebruiken
• Open het bovenste deksel door de dekselknop linksom te
draaien.
• Zorg dat de snelkookplaat is verwijderd. Gebruik altijd de
handgreep als een plaat heet is.
• Plaats het Aerofryer-rooster.
• Plaats de binnenpan met antiaanbaklaag in het apparaat. Plaats
het Aerofry-mandje in de binnenpan. Plaats voedsel in het
Aerofry-mandje.
• Sluit en vergrendelen het deksel door de knop rechtsom te
draaien.
• Druk op de aan/uit-knop en selecteer vervolgens AEROFRY. Het
Aerofryer-pictogram gaat branden. Gebruik de knoppen + en –
om de gewenste temperatuur en tijd voor de bereiding in te
stellen.
• Druk op de START/STOP-knop om de bereiding te starten. De
aftellende timer en geselecteerde
• temperatuur worden afwisselend weergegeven op het scherm.
• Wanneer de bereiding is voltooid, klinkt er een geluidssignaal.
Opmerking: U kunt de AEROFRY-cyclus onderbreken door het deksel
omhoog te bewegen of op de START/STOP-knop
te drukken. Zodra u het deksel weer sluit of nogmaals op de START/
STOP-knop drukt, wordt de bereiding hervat.
De grill/rooster-functie gebruiken
• Open het bovenste deksel door de dekselknop linksom te
draaien.
26
Page 27

Gebruiksaanwijzing
• Zorg dat de snelkookplaat is verwijderd. Gebruik altijd de
handgreep als een plaat heet is. Plaats het Aerofryer-rooster.
• Plaats de binnenpan met antiaanbaklaag in het apparaat. Plaats
zo nodig ook het stoomrek in de binnenpan en verdeel het
voedsel over het stoomrek.
• Sluit en vergrendelen het deksel door de knop rechtsom te
draaien.
• Druk op de aan/uit-knop en selecteer vervolgens GRILL/BRAAD.
Het Aerofryer-pictogram gaat branden. Gebruik de knoppen + en
– om de gewenste temperatuur en tijd voor de bereiding in te
stellen. Druk op de START/STOP-knop om de bereiding te
starten. De aftellende timer en geselecteerde temperatuur
worden afwisselend weergegeven op het scherm.
• U kunt de GRILL/BRAAD-cyclus onderbreken door het deksel
omhoog te bewegen of op de START/STOP-knopte drukken.
Zodra u het deksel weer sluit of nogmaals op de START/STOPknop drukt, wordt de bereiding hervat.
• Wanneer de bereiding is voltooid, klinkt er een geluidssignaal en
schakelt het apparaat over op de warmhoudfunctie.
De gebakfunctie gebruiken
• Open het bovenste deksel door de dekselknop linksom te
draaien.
• Zorg dat de snelkookplaat is verwijderd. Gebruik altijd de
handgreep als een plaat heet is. Plaats het Aerofryer-rooster.
• Plaats de binnenpan met antiaanbaklaag in het apparaat. Plaats
zo nodig ook het stoomrek in de binnenpan en verdeel het
voedsel over het stoomrek.
• Sluit en vergrendelen het deksel door de knop rechtsom te
draaien.
• Druk op de aan/uit-knop en selecteer vervolgens GEBAK. Het
Aerofryer-pictogram gaat branden. Gebruik de knoppen + en –
om de gewenste temperatuur en tijd voor de bereiding in te
stellen. Druk op de START/STOP-knop om de bereiding te
starten. De aftellende timer en geselecteerde temperatuur
worden afwisselend weergegeven op het scherm.
• U kunt de GEBAK-cyclus onderbreken door het deksel omhoog
te bewegen of op de START/STOP-knopte drukken. Zodra u het
deksel weer sluit of nogmaals op de START/STOP-knop drukt,
wordt de bereiding hervat.
• Wanneer de bereiding is voltooid, klinkt er een geluidssignaal en
schakelt het apparaat over op de warmhoudfunctie.
Met deze functie is het ook mogelijk om fruit en/of groenten te
drogen. Raadpleeg de tabel met Aerofry-functies voor meer
informatie.
Snelkookfuncties
Snelkookfunctie
• Open het bovenste deksel door de knop linksom te draaien.
• Zorg dat het Aerofryer-rooster is verwijderd. Gebruik altijd de
handgreep. Plaats de snelkookplaat.
• Plaats de binnenpan met antiaanbaklaag in het apparaat en
plaats voedsel in de binnenpan.
• Sluit en vergrendelen het deksel door de knop rechtsom te
draaien.
• Druk op de aan/uit-knop en selecteer vervolgens SNELKOOK.
Het snelkookpictogram gaat branden. Gebruik de knoppen + en –
om de gewenste bereidingstijd in te stellen.
NL
27
Page 28

Gebruiksaanwijzing
• Zodra de juiste druk is bereikt, verandert het display van de
draaiende streepjes in een aftellende timer.
• Wanneer de bereiding is voltooid, klinkt er een geluidssignaal.
Het apparaat schakelt automatisch over naar de warmhoudfunctie
zodra de bereiding is voltooid.
• Wanneer de snelkookbereiding is voltooid, drukt u op de
ontluchtingsknop om de druk vrij te geven. De ontluchtingscyclus
duurt 3 minuten. Nadat alle stoom is ontlucht, kunt u het deksel
veilig openen.
• Als u een programma wilt stoppen voordat de bereiding is
voltooid, drukt u op de START/STOP-knop om de bereiding te
beëindigen. Vervolgens drukt u op ontluchtingsknop.
Houd NOOIT uw gezicht of handen op het apparaat wanneer u het
ontlucht of het deksel opent. Gebruik ALTIJD pannenlappen wanneer
u het apparaat ontlucht of het deksel opent. Opmerking: Als u de
functie voor startuitstel wilt gebruiken, drukt u op STARTUITSTEL en
stelt u de tijd in. Druk op de START/STOP-knop als u de bereiding
direct wilt starten. Op het bedieningspaneel verschijnen draaiende
streepjes om aan te geven dat er druk wordt opgebouwd in het
apparaat.
Slowcook-functie
• Open het bovenste deksel door de knop linksom te draaien.
• Zorg dat het Aerofryer-rooster is verwijderd. Gebruik altijd de
handgreep. Plaats de snelkookplaat.
• Plaats de binnenpan met antiaanbaklaag in het apparaat en
plaats voedsel in de binnenpan.
• Sluit en vergrendelen het deksel door de knop rechtsom te
draaien.
• Druk op de aan/uit-knop en selecteer vervolgens SLOWCOOK.
Het snelkookpictogram gaat branden. Gebruik de knoppen + en –
om de gewenste bereidingstijd in te stellen.
• Zodra de juiste temperatuur is bereikt, verandert het display van
de draaiende streepjes in een aftellende timer.
• Wanneer de bereiding is voltooid, klinkt er een geluidssignaal.
Het apparaat schakelt automatisch over naar de warmhoudfunctie
zodra de bereiding is voltooid.
• Wanneer de snelkookbereiding is voltooid, drukt u op de
ontluchtingsknop om de druk vrij te geven. De ontluchtingscyclus
duurt 3 minuten. Nadat alle stoom is ontlucht, kunt u het deksel
veilig openen.
• Als u een programma wilt stoppen voordat de bereiding is
voltooid, drukt u op de START/STOP-knop om de bereiding te
beëindigen. Vervolgens drukt u op ontluchtingsknop.
Opmerking: Als u de functie voor startuitstel wilt gebruiken, drukt u op
STARTUITSTEL en stelt u de tijd in. Druk op de START/STOP-knop
als u de bereiding direct wilt starten. Op het bedieningspaneel
verschijnen draaiende streepjes om aan te geven dat er temperatuur
wordt opgebouwd in het apparaat.
Stoomfunctie
• Open het bovenste deksel door de knop linksom te draaien.
• Zorg dat het Aerofryer-rooster is verwijderd. Gebruik altijd de
handgreep. Plaats de snelkookplaat.
• Plaats de binnenpan met antiaanbaklaag in het apparaat. Verdeel
het voedsel over het meegeleverde stoomrek. Vul de binnenpan
nooit verder dan 2/3.
• Voeg 1,5 kopje water of stoomvloeistof toe aan de binnenpan.
28
Page 29

Gebruiksaanwijzing
• Sluit en vergrendelen het deksel door de knop rechtsom te
draaien.
• Druk op de aan/uit-knop en selecteer vervolgens STOOM. Het
snelkookpictogram gaat branden. Gebruik de knoppen + en – om
de gewenste bereidingstijd in te stellen.
• Druk op de START/STOP-knop om de bereiding te starten. Op
het bedieningspaneel verschijnen draaiende streepjes om aan te
geven dat er temperatuur wordt opgebouwd in het apparaat.
• Zodra de juiste druk/temperatuur is bereikt, verandert het display
van de draaiende streepjes in een aftellende timer.
• Wanneer de bereiding is voltooid, klinkt er een geluidssignaal.
Zodra de bereiding is voltooid en u klaar bent om het voedsel te
verwijderen, drukt u op de ontluchtingsknop.
• Wanneer de snelkookbereiding is voltooid, drukt u op de
ontluchtingsknop om de druk vrij te geven. De ontluchtingscyclus
duurt 3 minuten. Nadat alle stoom is ontlucht, kunt u het deksel
veilig openen.
• Als u een programma wilt stoppen voordat de bereiding is
voltooid, drukt u op de START/STOP-knop om de bereiding te
beëindigen. Vervolgens drukt u op ontluchtingsknop.
De soep/bouillon-functie gebruiken
• Open het bovenste deksel door de dekselknop linksom te
draaien.
• Zorg dat de snelkookplaat is verwijderd. Gebruik altijd de
handgreep als een plaat heet is. Plaats het Aerofryer-rooster.
• Plaats de binnenpan met antiaanbaklaag in het apparaat. Plaats
het Aerofryer-mandje in de binnenpan. Leg de ingrediënten in het
mandje.
• Sluit en vergrendelen het deksel door de knop rechtsom te
draaien.
• Druk op de aan/uit-knop en selecteer vervolgens SOEP/
BOUILLON. Het Aerofryer-pictogram gaat branden. Gebruik de
knoppen + en – om de gewenste temperatuur en tijd voor de
bereiding in te stellen.
• Druk op de START/STOP-knop om de bereiding te starten. De
aftellende timer en geselecteerde temperatuur worden
afwisselend weergegeven op het scherm.
• Wanneer de bereiding is voltooid, klinkt er een geluidssignaal.
• Wanneer de snelkookbereiding is voltooid, drukt u op de
ontluchtingsknop om de druk vrij te geven. De ontluchtingscyclus
duurt 3 minuten. Nadat alle stoom is ontlucht, kunt u het deksel
veilig openen.
• Als u een programma wilt stoppen voordat de bereiding is
voltooid, drukt u op de START/STOP-knop om de bereiding te
beëindigen. Vervolgens drukt u op ontluchtingsknop.
De Rijst/granen-functie gebruiken
• Open het bovenste deksel door de knop linksom te draaien.
• Zorg dat het Aerofryer-rooster is verwijderd. Gebruik altijd de
handgreep. Plaats de snelkookplaat.
• Plaats de binnenpan met antiaanbaklaag in het apparaat. Doe
ongekookte rijst en vloeistof in de binnenpan.
• Sluit en vergrendelen het deksel door de knop rechtsom te
draaien.
• Druk op de aan/uit-knop en selecteer vervolgens RIJST/
GRANEN. Het snelkookpictogram gaat branden. Gebruik de
knoppen + en – om de gewenste bereidingstijd in te stellen.
NL
29
Page 30

Gebruiksaanwijzing
• Zodra de druk is bereikt, verandert het display van de draaiende
streepjes in een aftellende timer.
• Wanneer de bereiding is voltooid, klinkt er een geluidssignaal.
Het apparaat schakelt automatisch over naar de warmhoudfunctie
zodra de bereiding is voltooid.
• Wanneer de snelkookbereiding is voltooid, drukt u op de
ontluchtingsknop om de druk vrij te geven. De ontluchtingscyclus
duurt 3 minuten. Nadat alle stoom is ontlucht, kunt u het deksel
veilig openen.
• Als u een programma wilt stoppen voordat de bereiding is
voltooid, drukt u op de START/STOP-knop om de bereiding te
beëindigen. Vervolgens drukt u op ontluchtingsknop.
Houd NOOIT uw gezicht of handen op het apparaat wanneer u het
ontlucht of het deksel opent. Gebruik ALTIJD pannenlappen wanneer
u het apparaat ontlucht of het deksel opent.
Opmerking: Vul de binnenpan nooit verder dan de helft wanneer u
voedsel bereidt dat uitzet.
Opmerking: Als u de functie voor startuitstel wilt gebruiken, drukt u op
STARTUITSTEL en stelt u de tijd in.
• Druk op de START/STOP-knop als u de bereiding direct wilt
starten. Op het bedieningspaneel verschijnen draaiende streepjes
om aan te geven dat er druk wordt opgebouwd in het apparaat.
Yoghurt-functie
• Open het bovenste deksel door de knop linksom te draaien.
• Zorg dat het Aerofryer-rooster is verwijderd. Gebruik altijd de
handgreep.
• Plaats de snelkookplaat.
• Plaats de binnenpan met antiaanbaklaag in het apparaat en
plaats voedsel in de binnenpan.
• Sluit en vergrendelen het deksel door de knop rechtsom te
draaien.
• Druk op de aan/uit-knop en selecteer vervolgens YOGHURT. Het
snelkookpictogram gaat branden. Gebruik de knoppen + en – om
de gewenste bereidingstijd in te stellen.
• Zodra de druk is bereikt, verandert het display van de draaiende
streepjes in een aftellende timer.
• Wanneer de bereiding is voltooid, klinkt er een geluidssignaal.
Opmerking: Als u de functie voor startuitstel wilt gebruiken, drukt u op
STARTUITSTEL en stelt u de tijd in. Druk op de START/STOP-knop
als u de bereiding direct wilt starten. Op het bedieningspaneel
verschijnen draaiende streepjes om aan te geven dat er druk wordt
opgebouwd in het apparaat.
De roerbakfunctie gebruiken
• Open het bovenste deksel door de knop linksom te draaien.
• Zorg dat het Aerofryer-rooster is verwijderd. Gebruik altijd de
handgreep als een plaat heet is.
• Plaats de snelkookplaat.
• Plaats de binnenpan met antiaanbaklaag in het apparaat.
• Wanneer u de roerbakfunctie gebruikt, kunt u het deksel geopend
laten.
• Druk op de aan/uit-knop en selecteer vervolgens ROERBAK. Het
snelkookpictogram gaat branden. Gebruik de knoppen + en – om
de gewenste bereidingstemperatuur in te stellen (hoog, medium
of laag).
• Druk op de START/STOP-knop om de bereiding te starten.
• Wanneer de bereiding is voltooid, drukt u op de START/STOPknop.
30
Page 31

Gebruiksaanwijzing
• Wanneer de snelkookbereiding is voltooid, drukt u op de
ontluchtingsknop om de druk vrij te geven. De ontluchtingscyclus
duurt 3 minuten. Nadat alle stoom is ontlucht, kunt u het deksel
veilig openen.
• Als u een programma wilt stoppen voordat de bereiding is
voltooid, drukt u op de START/STOP-knop om de bereiding te
beëindigen. Vervolgens drukt u op ontluchtingsknop.
OPMERKING: Gebruik NOOIT metalen bestek in de Aerofryer,
omdat u hiermee mogelijk de antiaanbaklaag
of de snelkookplaat beschadigt.
AEROFRY-FUNCTIES
Programma Aerofry
Logo
Standaardtijd (min.) 20 min.
Bereik (min.) 1-60 min.
Standaardtemperatuur (°C) 200°C
Bereik (°C) 80-200°C
Hoeveelheid 500-750 g
Extra informatie Schud elke 5minuten wanneer u
friet bereidt.
Programma Grill/braad
Logo
Standaardtijd (min.) 10 min.
Bereik (min.) 1-60 min.
Standaardtemperatuur (°C) 220°C
Bereik (°C) 80-220°C
Hoeveelheid 250-500 g
Programma Gebak/drogen
Logo
Standaardtijd (min.) 15 min.
Bereik (min.) 1 min.-24 uur
Standaardtemperatuur (°C) 200°C
Bereik (°C) 30-200°C
Hoeveelheid 250-500 g
Extra informatie Van 1-89 minuten: stappen van 1
minuut. Van 90 min.-24 uur:
stappen van 30 min. Met deze
functie is het ook mogelijk om
fruit en/of groenten te drogen.
Voorkeursinstellingen: 30-70°C
gedurende 5-10 uur, afhankelijk
van het type voedsel.
• Zorg altijd dat het Aerofryer-rooster is geplaatst wanneer u deze
functies gebruikt.
• Wanneer de bereiding is voltooid, schakelt de timer naar de
stand '0' en wordt 30 min. lang automatisch de warmhoudfunctie
op 80°C geactiveerd.
NL
31
Page 32

Gebruiksaanwijzing
Aerofryer-snelkookfuncties
Programma Snelkook
Logo
Standaardtijd (min.) 30 min.
Bereik (min.) 0-4 uur
Hoeveelheid Zie de max.-aanduiding in de
pan
Extra informatie Wanneer de snelkookbereiding is
voltooid, drukt u op de
ontluchtingsknop om de druk vrij
te geven. De ontluchtingscyclus
duurt 3 minuten. Nadat alle stoom
is ontlucht, kunt u het deksel
veilig openen.
Programma Slowcook
Logo
Standaardtijd (min.) 4 uur
Bereik (min.) 4-12 uur
Hoeveelheid Zie de max.-aanduiding in de pan
Extra informatie Standaardtemperatuur is HI
(instellingen: HI, LO).
Wanneer de snelkookbereiding is
voltooid, drukt u op de
ontluchtingsknop om de druk vrij
te geven. De ontluchtingscyclus
duurt 3 minuten. Nadat alle stoom
is ontlucht, kunt u het deksel
veilig openen.
Programma Stoom
Logo
Standaardtijd (min.) 10 min.
Bereik (min.) 1-30 min.
Hoeveelheid 500-750 g
Extra informatie Voeg 1,5 kopje water toe aan de
binnenpan; het max. volume is
2/3 van de binnenpan.
Wanneer de snelkookbereiding is
voltooid, drukt u op de
ontluchtingsknop om de druk vrij
te geven. De ontluchtingscyclus
duurt 3 minuten. Nadat alle stoom
is ontlucht, kunt u het deksel
veilig openen.
Programma Soep/bouillon
Logo
32
Page 33

Gebruiksaanwijzing
Standaardtijd (min.) 1 uur
Bereik (min.) 0,5 - 4 uur
Hoeveelheid Zie de max.-aanduiding in de pan
Extra informatie Gebruik de roerbakfunctie als u
groenten eerst wilt aanbakken/
fruiten.
Wanneer de snelkookbereiding is
voltooid, drukt u op de
ontluchtingsknop om de druk vrij
te geven. De ontluchtingscyclus
duurt 3 minuten. Nadat alle
stoom is ontlucht, kunt u het
deksel veilig openen.
Programma Rijst/granen
Logo
Standaardtijd (min.) 20 min.
Bereik (min.) 3-60 min.
Hoeveelheid 4 kopjes rijst en 5 kopjes water
Extra informatie 100 g ongekookte rijst wordt 250
g gekookte rijst, voor andere
rijst-/graansoorten is een andere
waterverhouding vereist.
Wanneer de snelkookbereiding is
voltooid, drukt u op de
ontluchtingsknop om de druk vrij
te geven. De ontluchtingscyclus
duurt 3 minuten. Nadat alle
stoom is ontlucht, kunt u het
deksel veilig openen.
Programma Yoghurt
Logo
Standaardtijd (min.) 6 uur
Bereik (min.) 4-12 uur
Hoeveelheid 9 flessen à 120 ml/fles
Programma Roerbak
Logo
Standaardtijd (min.) 10 min.
Bereik (min.) 1-30 min.
Hoeveelheid 500 g
NL
33
Page 34

Gebruiksaanwijzing
Extra informatie Standaardtemperatuur is HI
(instellingen: HI, MD, LO); bij
gebruik van deze functie kan het
deksel geopend blijven.
Wanneer de snelkookbereiding is
voltooid, drukt u op de
ontluchtingsknop om de druk vrij
te geven. De ontluchtingscyclus
duurt 3 minuten. Nadat alle stoom
is ontlucht, kunt u het deksel
veilig openen.
• Zorg altijd dat het snelkookplaat is geplaatst wanneer u deze
functies gebruikt.
• Wanneer de bereiding is voltooid, schakelt de timer naar de stand
'0' en wordt 4 uur lang automatisch de warmhoudfunctie
geactiveerd.
REINIGING EN ONDERHOUD
• Verwijder voor reiniging de stekker uit het stopcontact en wacht
tot het apparaat is afgekoeld.
• Gebruik een zachte, vochtige doek om de buitenpan en het
deksel van het apparaat na elk gebruik schoon te vegen.
• Gebruik zo nodig een klein kwastje of wattenstaafje. Giet nooit
een vloeistof in de buitenpan.
• Was de verwijderbare onderdelen (binnenpan, mandje,
standaard, stoomrek, snelkookplaat, Aerofryer-rooster,
handgreep, verwijderinstrument en condensbak) in warm
zeepsop met een zachte doek of spons.
• Voordat u de inzetstukken van het deksel wast, moet u altijd de
stappen volgen om ze veilig en correct te verwijderen.
• Droog elk onderdeel zorgvuldig af.
• De binnenpan, het mandje en het stoomrek zijn
vaatwasserbestendig. Het wordt echter aanbevolen deze
onderdelen met de hand af te wassen om de levensduur van het
product te verlengen.
• Gebruik nooit metalen bestek of schuursponsjes wanneer u de
binnenpan of het mandje reinigt of gebruikt om voedsel te
bereiden. Zo voorkomt u dat u de antiaanbaklaag beschadigt.
• Gebruik nooit agressieve chemische schoonmaakmiddelen,
schuursponsjes of poeders voor de onderdelen of accessoires.
Opberginstructies
• Haal de stekker uit het stopcontact en laat het apparaat volledig
afkoelen.
• Bewaar de binnenpan en handgreep in het apparaat.
• Bewaar het apparaat in de originele verpakking of met een
andere afdekking op een koele, droge plaats.
PROBLEMEN OPLOSSEN
Het apparaat is voorzien van veiligheidsfuncties die zorgen dat het
wordt uitgeschakeld als er zich tijdens de bereiding iets
ongebruikelijks voordoet. Er verschijnt een foutmelding op het
bedieningspaneel. Afhankelijk van de fout klinkt er mogelijk ook een
geluidssignaal. Zodra het probleem is vastgesteld en verholpen, kunt
u het apparaat weer aansluiten en de bereiding hervatten.
Beschrijving Oplossing
FOUT: NOT-LOCK (niet vergrendeld)
34
Page 35

Gebruiksaanwijzing
Het bovenste deksel is geopend. Sluit het deksel en draai de
dekselknop rechtsom om het
deksel goed te sluiten.
FOUT: Het apparaat werkt niet in de snelkookmodus
De snelkookplaat is niet correct
geplaatst.
FOUT: Het apparaat werkt niet in de Aerofryer-modus
Het Aerofryer-rooster is niet
correct geplaatst.
FOUT: NO-POT
De binnenpan is niet correct
geplaatst.
Plaats de snelkookplaat volgens
de instructies.
Zorg dat het Aerofryer-rooster is
verwijderd.
Plaats het Aerofryer-rooster
volgens de instructies.
Zorg dat de snelkookplaat is
verwijderd.
Druk de snelkookpan voorzichtig
omlaag in het apparaat totdat de
pan de verwarmingsplaat onder
in het apparaat raakt.
MILIEU
Dit apparaat mag aan het einde van de levensduur niet bij het
normale huisafval worden gedeponeerd, maar moet bij een speciaal
inzamelpunt voor hergebruik van elektrische en elektronische
apparaten worden aangeboden. Het symbool op het apparaat, in de
gebruiksaanwijzing en op de verpakking attendeert u hierop. De in
het apparaat gebruikte materialen kunnen worden gerecycled. Met
het recyclen van gebruikte huishoudelijke apparaten levert u een
belangrijke bijdrage aan de bescherming van ons milieu. Informeer bij
uw lokale overheid naar het inzamelpunt.
NL
Support
U kunt alle beschikbare informatie en reserveonderdelen vinden op
www.princesshome.eu!
35
Page 36

Manuel d'instructions
SÉCURITÉ
• Si vous ignorez les consignes de sécurité, le
fabricant ne peut être tenu pour responsable
des dommages.
• Si le cordon d'alimentation est endommagé,
il doit être remplacé par le fabricant, son
réparateur ou des personnes qualifiées afin
d'éviter tout risque.
• Ne déplacez jamais l'appareil en tirant sur le
cordon et veillez à ce que celui-ci ne
s'enroule pas.
• L'appareil doit être posé sur une surface
stable et nivelée.
• Ne laissez jamais le dispositif sans
surveillance s'il est connecté à l'alimentation.
• Cet appareil n'est pas destiné à être utilisé
par des personnes (y compris des enfants)
ayant des capacités physiques, sensorielles
ou mentales réduites ou un manque
d'expérience et de connaissances, à moins
qu'elles ne bénéficient d'une supervision ou
d'instructions concernant l'utilisation de
l'appareil émanant d'une personne
responsable de leur sécurité.
• Une surveillance étroite est nécessaire
lorsqu'un appareil est utilisé par ou à
proximité des enfants.
• AVERTISSEMENT: Les aliments renversés
risquent de provoquer de graves brûlures.
Gardez l'appareil et le cordon d'alimentation
hors de portée des enfants. Ne faites jamais
passer le cordon par-dessus le bord du
comptoir, n'utilisez jamais la prise de courant
sous le comptoir et ne l'utilisez jamais avec
une rallonge.
• L'utilisation d'accessoires non recommandés
par le fabricant peut provoquer un accident.
• Ne l'utilisez pas à l'extérieur.
• Ne pas poser sur ou à proximité d'un brûleur
à gaz ou électrique chaud, ni dans un four
chauffé.
• N’utilisez pas de tampons à récurer
métalliques pour nettoyer. Des morceaux
peuvent se détacher du tampon et toucher
des parties électriques, créant un risque de
choc électrique.
• Faites preuve d'une extrême prudence
lorsque vous retirez le plateau ou que vous
jetez de la graisse chaude
• Il faut faire preuve d'une extrême prudence
lorsqu'on déplace un appareil contenant de
l'huile chaude ou d'autres liquides chauds.
36
Page 37

Manuel d'instructions
• ATTENTION: Pour vous protéger contre les
dommages ou les chocs électriques, ne
cuisinez pas dans l'unité de base. Ne
cuisinez que dans la casserole prévue à cet
effet.
• Pour vous déconnecter, appuyez sur le
bouton d'alimentation, puis retirez la fiche de
la prise murale.
• N'utilisez pas la plaque de pression, la grille
de la friteuse ou la casserole si elle est
bosselée ou usée.
• AVERTISSEMENT: Ne faites jamais de
friture dans l'huile ou de friture sous
pression dans l'Aerofryer, que le couvercle
soit ouvert ou fermé. CECI EST
DANGEREUX ET PEUT PROVOQUER UN
INCENDIE ET DES DÉGÂTS
IMPORTANTS.
• Utilisez TOUJOURS une poignée
détachable pour insérer ou retirer la grille de
la friteuse ou la plaque de pression.
• Assurez-vous que le filtre et la soupape de
décompression sont exempts de résidus ou
de débris alimentaires.
• Ne remplissez jamais la casserole au-delà
de la ligne de remplissage maximale.
• Avant de poser la casserole dans le fond,
assurez-vous que la casserole et le fond
sont secs en les essuyant avec un chiffon
doux.
• Assurez-vous toujours que l'appareil est
correctement assemblé avant de l'utiliser.
• L'appareil permet de cuire sous pression.
Une utilisation erronée peut entraîner des
brûlures. Assurez-vous que l'appareil est
correctement fermé avant de le mettre en
marche.
• Lorsque vous utilisez la plaque de pression,
assurez-vous toujours qu'elle est installée et
que le couvercle est correctement fermé
avant de l'utiliser.
• Ne couvrez pas la soupape de
décompression.
• Attention en soulevant la casserole du fond.
• Lorsque la casserole amovible est vide, ne
la faites pas chauffer pendant plus de 10
minutes, car cela pourrait endommager la
surface de cuisson.
• Lorsque vous utilisez la fonction Stir fry,
laissez toujours le couvercle en position
ouverte.
FR
37
Page 38

Manuel d'instructions
• Pour éviter tout dommage éventuel dû à la
vapeur, éloignez l'appareil des murs et des
armoires pendant l'utilisation.
• Ne soulevez jamais l'appareil par les
languettes latérales du couvercle.
• Ne jamais toucher l'élément chauffant
exposé.
• Afin de vous éviter un choc électrique,
n'immergez pas le cordon, la prise ou
l'appareil dans de l'eau ou autre liquide.
• Cet appareil est destiné à une utilisation
domestique et aux applications similaires,
notamment:
• Coin cuisine des commerces, bureaux et
autres environnements de travail.
• Hôtels, motels et autres environnements de
type résidentiel.
• Environnements de type chambre d’hôtes.
• Fermes.
• Les enfants ne doivent pas jouer avec
l'appareil.
• Cet appareil ne doit pas être utilisé par les
enfants. Maintenez l'appareil et son cordon
d'alimentation hors de portée des enfants.
• Afin de vous éviter un choc électrique,
n'immergez pas le cordon, la prise ou
l'appareil dans de l'eau ou autre liquide .
• Ne chauffez pas les aliments trop longtemps.
• La surface de l'élément chauffant est sujette
à une chaleur résiduelle après usage.
• L’adaptateur doit être retiré avant de
nettoyer l’appareil, veillez à ce que l'orifice
d'entrée soit totalement sec avant de
réutiliser l'appareil.
• Le conteneur sous pression ne doit pas être
ouvert durant l'utilisation et tant que la
pression n'a pas suffisamment diminué.
• La surface est susceptible de
devenir chaude pendant l'utilisation.
• AVERTISSEMENT: Si la surface est
fissurée, arrêtez l'appareil pour éviter tout
risque de choc électrique.
• La température des surfaces accessibles
peut devenir élevée quand l'appareil est en
fonction.
• L'appareil n'est pas destiné à fonctionner
avec un dispositif de programmation externe
ou un système de télécommande
indépendant.
38
Page 39

Manuel d'instructions
1
716 1715 8
9
10
11
12
13
14
18 19 20
2
3
4
5
6
• Branchez l'appareil sur une prise électrique
PANNEAU DE COMMANDE
munie d'une connexion à la terre (pour les
appareils de catégorie I).
• Pour éviter les perturbations du flux d'air, ne
placez rien sur l'appareil et assurez-vous de
préserver systématiquement un
dégagement de 10 cm autour de l'appareil.
FR
• Cet appareil est uniquement destiné à des
utilisations domestiques et seulement dans
le but pour lequel il est fabriqué. Dans le pire
des cas, les aliments peuvent prendre feu.
(N'utilisez pas plus d'une cuillère à café
d'huile, aucune viande pouvant diffuser trop
de graisse ou d'eau pour l'ébullition des
aliments.)
DESCRIPTION DES PIÈCES
1. Collecteur de condensation
2. Unité
3. Grille de la friteuse Aerofryer
4. Plaque de pression
5. Poignée pour plaque de pression et grille de la friteuse
6. Poignée pour le panier de friteuse
7. Grille vapeur
8. Panier de la friteuse Aerofryer
9. Support Aeroflow
10. Casserole antiadhésive
1: Cuisson sous pression 11: Cuisson
2: Cuisson lente 12: Yogourt
3: Vapeur 13: Sautés
4: Soupe/Bouillon 14: Alimentation
5: Riz/Céréales 15: Écran
6: Libération de vapeur 16: Maintien au chaud
7: Icône de cuisson sous
pression
8: Icône Aerofryer 18: Temp +/-
9: Friteuse à air chaud 19: Start/Stop
10: Grillade/Rôti 20: Heure +/-
17: Démarrage différé
39
Page 40

Manuel d'instructions
Bouton marche/arrêt de l'alimentation
• Appuyez sur ce bouton pour allumer et éteindre l'appareil. Une
fois branché, le bouton d'alimentation s'allume en rouge. Une fois
le bouton appuyé, la lumière passera au blanc.
Icône Aerofryer
• Cette icône s'allume automatiquement lorsque la grille de la
friteuse aerofryer est bien insérée et que l'appareil est prêt pour
les fonctions de friture.
Remarque: Les fonctions suivantes sont basées sur la grille de la
friteuse: Aero Fry (friture à air chaud), Grill/Roast (grillade/rôti) et
Bake (cuisson). Ce n'est que lorsque la grille de la friteuse est insérée
que ces fonctions s'allument et sont prêtes à être sélectionnées.
Icône de cuisson sous pression
• Cette icône s'allume automatiquement lorsque la plaque de
pression est bien insérée et que l'appareil est prêt pour les
fonctions de cuisson.
Remarque: Les fonctions suivantes sont basées sur la fonction de la
plaque de pression: Cuisson sous pression, cuisson lente, vapeur,
soupe / bouillon, riz / céréales, yaourt et sauté. Ce n'est que lorsque
la plaque de cuisson est fermement insérée que ces fonctions
s'allument et sont prêtes à être sélectionnées.
Remarque: La fonction Stir fry fonctionne toujours lorsque le
couvercle est ouvert.
Écran
• Affiche la température et l'heure, les icônes de température et
d'heure s'allument alternativement
Bouton Start/Stop (marche/arrêt)
• Touchez une fois pour démarrer ou arrêter le processus de
cuisson.
Bouton Plus
• Appuyez pour augmenter la température ou l'heure.
Bouton Moins
• Appuyez pour diminuer la température ou l'heure.
Bouton de libération de la vapeur
• Lorsque la cuisson sous pression est terminée, appuyez sur le
bouton «Steam Release» pour relâcher la pression. Le cycle de
libération de la vapeur dure 3 minutes. Une fois que toute la
vapeur est libérée, le couvercle peut être ouvert en toute sécurité.
Remarque: Pour arrêter un programme de cuisson avant qu'il ne soit
terminé, appuyez sur la touche START/STOP pour mettre fin à la
cuisson, puis appuyez sur STEAM RELEASE.
Fonction de maintien au chaud
• L'appareil passera automatiquement en mode Keep warm
(Garder au chaud) une fois la cuisson terminée.
Fonction de démarrage différé
• Appuyez sur ce bouton pour retarder la cuisson jusqu'à l'heure de
début souhaitée (plage: 30min - 24h). Appuyez d'abord sur la
fonction de cuisson souhaitée, puis sur la touche de
temporisation, la lumière clignotera. Réglez ensuite la fonction de
cuisson temporisée souhaitée et appuyez sur START pour la
régler. Pour annuler le réglage du différé, appuyez à nouveau sur
le bouton du temporisateur (avant d'appuyer sur le bouton de
démarrage).
40
Page 41

Manuel d'instructions
AVANT LA PREMIÈRE UTILISATION
• Retirez tout l'emballage.
• Retirez tout autocollant ou étiquette de l'appareil.
• Nettoyez soigneusement les pièces à l'eau chaude avec un peu
de liquide vaisselle et une éponge non abrasive.
• Nettoyez l'intérieur et l'extérieur de l'appareil avec un chiffon
humide.
• Placez l'appareil sur une surface stable, horizontale et de niveau
et évitez les surfaces non thermorésistantes.
• Cette friteuse à air chaud fonctionne à l'air chaud. Ne
remplissez pas la cuve avec de l'huile ou de la graisse de
friture.
• Pour éviter les perturbations du flux d'air, ne placez rien sur
l'appareil et assurez-vous de préserver systématiquement un
dégagement de 10 cm autour de l'appareil.
Mise en place de la grille à vapeur
• Pour installer le support à vapeur, dépliez les pieds et fixez
soigneusement la partie centrale en "V" au crochet situé près du
bord. (Figure 1)
• En fonction de la recette et des préférences de cuisson, les
aliments peuvent être disposés de part et d'autre de la grille à
vapeur réversible pour obtenir le résultat souhaité. (Figure 2)
FR
• Les pieds de la grille à vapeur peuvent être rabattus pour le
rangement. Poussez délicatement la partie centrale en "V" vers
l'extérieur pour la déverrouiller, puis repliez les pieds vers
l'intérieur.
INSERTS DU COUVERCLE
Cette unité est livrée avec deux couvercles différents, la plaque de
pression et la grille de friteuse. Les deux inserts permettent aux
utilisateurs d'opter pour une cuisson sous pression, des fritures à air,
etc. dans le même appareil en échangeant les plaques.
41
Page 42

Manuel d'instructions
Grille de la friteuse Aerofryer (A)
La grille de la friteuse devra être installée pour accéder à ces
fonctions de cuisson:
• Friteuse
• Grillade/Rôti
• Cuisson
Plaque de pression (B)
La plaque de pression devra être installée pour accéder à ces
fonctions de cuisson:
• Cuisson sous pression
• Cuisson lente
• Vapeur
• Soupe/Bouillon
• Riz/Céréales
• Yogourt
• Sautés
REMARQUE: Les fonctions de cuisson ne pourront être
sélectionnées qu'une fois que l'insert de cuisson adéquat aura été
installé.
ENLEVER/INSÉRER LA PLAQUE DE PRESSION OU LA GRILLE DE LA FRITEUSE AEROFRYER
Si possible, laissez l'insert de la plaque de pression ou la grille de la
friteuse chaude en place jusqu'à ce que l'appareil ait complètement
refroidi. Pour les recettes où il est nécessaire de changer la plaque ou
l'insert pendant la cuisson, utilisez toujours la poignée de plaque
fournie. Cette poignée est conçue pour vous permettre d'insérer et de
retirer facilement les plaques même lorsqu'elles sont chaudes.
1. Saisissez fermement la poignée de la plaque avec la protection
de l'articulation prolongée tournée vers le bas (3).
2. Reliez l'extrémité de la poignée à la languette métallique en saillie
sur la plaque. Une fois fixée, appuyez sur le bouton de gauche
pour verrouiller (4).
3. Lorsque la poignée est solidement verrouillée à la plaque,
appuyez sur la languette de dégagement située en haut de la
plaque (5).
4. Avec la poignée, soulevez délicatement la plaque de l'appareil et
placez-la sur une surface solide, plane et résistante à la chaleur.
5. Pour retirer la poignée de la plaque, appuyez sur le bouton situé
sur le côté droit de la poignée et tirez sur la poignée (6).
6. Laissez la plaque refroidir complètement avant de la déplacer ou
de la nettoyer.
7. La photo 7 montre où placer la plaque dans le couvercle.
42
Page 43

UTILISATION
Fonctions de l'Aerofryer
Comment utiliser la fonction Aerofry (friteuse à air)?
Manuel d'instructions
• Ouvrez le couvercle supérieur en tournant le bouton du couvercle
dans le sens contraire des aiguilles d'une montre.
• Assurez-vous que l'insert de la plaque de pression a été retiré.
Utilisez toujours la poignée de la plaque si les plaques sont
chaudes.
• Insérer la grille de la friteuse aerofryer.
• Placez la casserole antiadhésive à l'intérieur de l'appareil. Posez
le panier de la friteuse à l'intérieur de la casserole. Mettez les
aliments dans le panier à frites de l'aerofryer.
• Fermez le couvercle et verrouillez en tournant dans le sens des
aiguilles d'une montre
• Appuyez sur le bouton de mise en marche et sélectionnez
AEROFRY. L'icône de l'aerofryer s'allume. À l'aide des boutons +
et -, réglez la température et le temps de cuisson selon les
paramètres souhaités.
• Appuyez sur le bouton START/STOP (Marche/Arrêt) pour
démarrer. Le compte à rebours et [...] sélectionné
• la température sélectionnée s'affiche alternativement sur l'écran.
• Lorsque la cuisson est terminée, un signal sonore retentit.
Remarque: Le cycle de l'aerofryer peut être «mis en pause» en
soulevant le couvercle ou en appuyant sur la touche START/STOP
bouton. Une fois le couvercle fermé ou la touche START/STOP
enfoncée, la cuisson reprend.
Comment faire griller / rôtir?
• Ouvrez le couvercle supérieur en tournant le bouton du couvercle
dans le sens contraire des aiguilles d'une montre.
• Assurez-vous que l'insert de la plaque de pression a été retiré.
Utilisez toujours la poignée de la plaque si les plaques sont
chaudes. Insérer la grille de la friteuse aerofryer.
FR
43
Page 44

Manuel d'instructions
• Placez la casserole antiadhésive à l'intérieur de l'appareil. Si
nécessaire, ajoutez la grille à vapeur à l'intérieur de la casserole
et disposez les aliments dessus.
• Fermez le couvercle et verrouillez en tournant dans le sens des
aiguilles d'une montre.
• Appuyez sur le bouton de mise en marche et sélectionnez GRILL/
ROAST. L'icône de l'aerofryer s'allume. À l'aide des boutons + et
-, réglez la température et le temps de cuisson selon les
paramètres souhaités. Appuyez sur le bouton START/STOP
(Marche/Arrêt) pour démarrer. Le compte à rebours et la
température sélectionnée s'affichent alternativement sur l'écran.
• Le cycle GRILL/ROAST peut être «mis en pause» soit en
soulevant le couvercle, soit en appuyant sur le bouton START/
STOP. Une fois le couvercle fermé ou la touche START/STOP
enfoncée, la cuisson reprend.
• Lorsque la cuisson est terminée, un signal sonore retentit et
l'appareil passe en mode de maintien au chaud.
Conseils de cuisson
• Ouvrez le couvercle supérieur en tournant le bouton du couvercle
dans le sens contraire des aiguilles d'une montre.
• Assurez-vous que l'insert de la plaque de pression a été retiré.
Utilisez toujours la poignée de la plaque si les plaques sont
chaudes. Insérer la grille de la friteuse aerofryer.
• Placez la casserole antiadhésive à l'intérieur de l'appareil. Si
nécessaire, ajoutez la grille à vapeur à l'intérieur de la casserole
et disposez les aliments dessus.
• Fermez le couvercle et verrouillez en tournant dans le sens des
aiguilles d'une montre.
• Appuyez sur le bouton de mise en marche et sélectionnez BAKE.
L'icône de l'aerofryer s'allume. À l'aide des boutons + et -, réglez
la température et le temps de cuisson selon les paramètres
souhaités. Appuyez sur le bouton START/STOP (Marche/Arrêt)
pour démarrer. Le compte à rebours et la température
sélectionnée s'affichent alternativement sur l'écran.
• Le cycle de cuisson peut être «suspendu» en soulevant le
couvercle ou en appuyant sur le bouton START/STOP. Une fois
le couvercle fermé ou la touche START/STOP enfoncée, la
cuisson reprend.
• Lorsque la cuisson est terminée, un signal sonore retentit et
l'appareil passe en mode de maintien au chaud.
Grâce à cette fonction, il est également possible de déshydrater
fruits et/ou légumes. Voir les paramètres du tableau des fonctions
de la friteuse aerofryer pour plus d'informations.
Fonctions de Cuisson sous pression
Fonction de Cuisson sous pression
• Ouvrez le couvercle supérieur en tournant le bouton dans le sens
contraire des aiguilles d'une montre.
• Assurez-vous que la grille de la friteuse aerofryer a été enlevée.
Utilisez toujours la poignée de la plaque. Insérer la plaque de
pression.
• Placez le récipient de cuisson antiadhésif à l'intérieur de l'appareil
et déposez les aliments dans le récipient de cuisson.
• Fermez le couvercle et verrouillez en tournant dans le sens des
aiguilles d'une montre.
44
Page 45

Manuel d'instructions
• Appuyez sur le bouton de mise en marche et sélectionnez
PRESSURE COOK. L'icône de pression s'allume. À l'aide des
boutons + et -, réglez le temps de cuisson souhaité.
• Une fois la bonne pression atteinte, l'affichage passe des
pointillés en boucle au compte à rebours de la minuterie.
• Lorsque la cuisson est terminée, un signal sonore retentit.
L'appareil passera automatiquement en mode 'Keep
warm' (Garder au chaud) une fois la cuisson terminée.
• Lorsque la cuisson sous pression est terminée, appuyez sur le
bouton STEAM RELEASE pour relâcher la pression. Le cycle de
libération de la vapeur dure 3 minutes. Une fois que toute la
vapeur est libérée, le couvercle peut être ouvert en toute
sécurité.
• Pour arrêter un programme de cuisson avant que la cuisson ne
soit terminée, appuyez sur la touche START/STOP pour mettre
fin à la cuisson, puis appuyez sur STEAM RELEASE.
Ne placez JAMAIS votre visage ou vos mains sur l'appareil pendant
l'émission de vapeur ou l'ouverture du couvercle. Utilisez
TOUJOURS les supports de casseroles lors de la libération de la
vapeur ou de l'ouverture du couvercle. Note: appuyez sur DELAY
TIMER et ajustez le temps pour régler la fonction de démarrage
différé. Si vous souhaitez que la cuisson commence immédiatement,
appuyez sur le bouton START/STOP pour démarrer la cuisson. Des
lignes en pointillés traversent le panneau de commande pour
indiquer que l'appareil est en train d'atteindre la pression.
Fonction Cuisson lente
• Ouvrez le couvercle supérieur en tournant le bouton dans le sens
contraire des aiguilles d'une montre.
• Assurez-vous que la grille de la friteuse aerofryer a été enlevée.
Utilisez toujours la poignée de la plaque. Insérer la plaque de
pression.
• Placez le récipient de cuisson antiadhésif à l'intérieur de
l'appareil et déposez les aliments dans le récipient de cuisson.
• Fermez le couvercle et verrouillez en tournant dans le sens des
aiguilles d'une montre.
• Appuyez sur le bouton de mise en marche et sélectionnez SLOW
COOK. L'icône de pression s'allume. À l'aide des boutons + et -,
réglez le minuteur sur le temps de cuisson souhaité.
• Une fois la bonne température atteinte, l'affichage passe des
pointillés en boucle au compte à rebours de la minuterie.
• Lorsque la cuisson est terminée, un signal sonore retentit.
L'appareil passera automatiquement en mode KEEP WARM
(GARDER AU CHAUD) une fois la cuisson terminée.
• Lorsque la cuisson sous pression est terminée, appuyez sur le
bouton STEAM RELEASE pour relâcher la pression. Le cycle de
libération de la vapeur dure 3 minutes. Une fois que toute la
vapeur est libérée, le couvercle peut être ouvert en toute
sécurité.
• Pour arrêter un programme de cuisson avant que la cuisson ne
soit terminée, appuyez sur la touche START/STOP pour mettre
fin à la cuisson, puis appuyez sur STEAM RELEASE.
Note: appuyez sur DELAY TIMER et ajustez le temps pour régler la
fonction de démarrage différé. Si vous souhaitez que la cuisson
commence immédiatement, appuyez sur le bouton START/STOP
pour démarrer la cuisson. Des lignes en pointillés traversent le
panneau de commande pour indiquer que l'appareil est en train
d'atteindre la température.
FR
45
Page 46

Manuel d'instructions
Fonction vapeur
• Ouvrez le couvercle supérieur en tournant le bouton dans le sens
contraire des aiguilles d'une montre.
• Assurez-vous que la grille de la friteuse aerofryer a été enlevée.
Utilisez toujours la poignée de la plaque. Insérer la plaque de
pression.
• Placez la casserole antiadhésive à l'intérieur de l'appareil.
Disposez les aliments sur la grille à vapeur prévue à cet effet. Ne
remplissez jamais la casserole à plus de 2/3.
• Ajoutez 1,5 tasse d'eau ou de liquide de cuisson dans la
casserole.
• Fermez le couvercle et verrouillez en tournant dans le sens des
aiguilles d'une montre.
• Appuyez sur le bouton de mise en marche et sélectionnez
STEAM. L'icône de pression s'allume. À l'aide des boutons + et -,
réglez le temps de cuisson souhaité.
• Appuyez sur le bouton START/STOP (Marche/Arrêt) pour
démarrer. Des lignes en pointillés traversent le panneau de
commande pour indiquer que l'appareil est en train d'atteindre la
température.
• Une fois la bonne pression/température atteinte, l'affichage passe
des pointillés en boucle au compte à rebours de la minuterie.
• Lorsque la cuisson est terminée, un signal sonore retentit.
Lorsque la cuisson est terminée et que vous êtes prêt à retirer
vos aliments, appuyez sur le bouton STEAM RELEASE.
• Lorsque la cuisson sous pression est terminée, appuyez sur le
bouton STEAM RELEASE pour relâcher la pression. Le cycle de
libération de la vapeur dure 3 minutes. Une fois que toute la
vapeur est libérée, le couvercle peut être ouvert en toute sécurité.
• Pour arrêter un programme de cuisson avant que la cuisson ne
soit terminée, appuyez sur la touche START/STOP pour mettre
fin à la cuisson, puis appuyez sur STEAM RELEASE.
Comment utiliser la fonction Soup / Broth (soupe/bouillon)?
• Ouvrez le couvercle supérieur en tournant le bouton du couvercle
dans le sens contraire des aiguilles d'une montre.
• Assurez-vous que l'insert de la plaque de pression a été retiré.
Utilisez toujours la poignée de la plaque si les plaques sont
chaudes. Insérer la grille de la friteuse aerofryer.
• Placez la casserole antiadhésive à l'intérieur de l'appareil. Posez
le panier de la friteuse à l'intérieur de la casserole. Posez les
ingrédients dans le panier.
• Fermez le couvercle et verrouillez en tournant dans le sens des
aiguilles d'une montre.
• Appuyez sur le bouton de mise en marche et sélectionnez SOUP/
BROTH. L'icône de l'aerofryer s'allume. À l'aide des boutons + et
-, réglez la température et le temps de cuisson selon les
paramètres souhaités.
• Appuyez sur le bouton START/STOP (Marche/Arrêt) pour
démarrer. Le compte à rebours et la température sélectionnée
s'affichent alternativement sur l'écran.
• Lorsque la cuisson est terminée, un signal sonore retentit.
• Lorsque la cuisson sous pression est terminée, appuyez sur le
bouton STEAM RELEASE pour relâcher la pression. Le cycle de
libération de la vapeur dure 3 minutes. Une fois que toute la
vapeur est libérée, le couvercle peut être ouvert en toute sécurité.
• Pour arrêter un programme de cuisson avant que la cuisson ne
soit terminée, appuyez sur la touche START/STOP pour mettre
fin à la cuisson, puis appuyez sur STEAM RELEASE.
46
Page 47

Manuel d'instructions
Comment utiliser la fonction Rice / Grains (riz/céréales)?
• Ouvrez le couvercle supérieur en tournant le bouton dans le sens
contraire des aiguilles d'une montre.
• Assurez-vous que la grille de la friteuse aerofryer a été enlevée.
Utilisez toujours la poignée de la plaque. Insérer la plaque de
pression.
• Placez la casserole antiadhésive à l'intérieur de l'appareil. Versez
le riz non cuit et le liquide dans la casserole.
• Fermez le couvercle et verrouillez en tournant dans le sens des
aiguilles d'une montre.
• Appuyez sur le bouton de mise en marche et sélectionnez RICE/
GRAINS. L'icône de pression s'allume. À l'aide des boutons + et
-, réglez le temps de cuisson souhaité.
• Une fois la pression atteinte, l'affichage passe des pointillés en
boucle au compte à rebours de la minuterie.
• Lorsque la cuisson est terminée, un signal sonore retentit.
L'appareil passera automatiquement en mode KEEP WARM
(GARDER AU CHAUD) une fois la cuisson terminée.
• Lorsque la cuisson sous pression est terminée, appuyez sur le
bouton STEAM RELEASE pour relâcher la pression. Le cycle de
libération de la vapeur dure 3 minutes. Une fois que toute la
vapeur est libérée, le couvercle peut être ouvert en toute
sécurité.
• Pour arrêter un programme de cuisson avant que la cuisson ne
soit terminée, appuyez sur la touche START/STOP pour mettre
fin à la cuisson, puis appuyez sur STEAM RELEASE.
Ne placez JAMAIS votre visage ou vos mains sur l'appareil pendant
l'émission de vapeur ou l'ouverture du couvercle. Utilisez
TOUJOURS les supports de casseroles pendant la phase de
libération de la vapeur ou lors de l'ouverture du couvercle.
Remarque: lorsque vous cuisinez des aliments qui se dilatent, ne
remplissez pas la marmite à plus de la moitié.
Note: appuyez sur DELAY TIMER et ajustez le temps pour régler la
fonction de démarrage différé.
• Si vous souhaitez que la cuisson commence immédiatement,
appuyez sur le bouton START/STOP pour démarrer la cuisson.
Des lignes en pointillés traversent le panneau de commande
pour indiquer que l'appareil est en train d'atteindre la pression.
Fonction Yogourt
• Ouvrez le couvercle supérieur en tournant le bouton dans le sens
contraire des aiguilles d'une montre.
• Assurez-vous que la grille de la friteuse aerofryer a été enlevée.
Utilisez toujours la poignée de la plaque.
• Insérer la plaque de pression.
• Placez le récipient de cuisson antiadhésif à l'intérieur de
l'appareil et déposez les aliments dans le récipient de cuisson.
• Fermez le couvercle et verrouillez en tournant dans le sens des
aiguilles d'une montre.
• Appuyez sur le bouton de mise en marche et sélectionnez
YOGURT. L'icône de pression s'allume. À l'aide des boutons + et
-, réglez le temps de cuisson souhaité.
• Une fois la pression atteinte, l'affichage passe des pointillés en
boucle au compte à rebours de la minuterie.
• Lorsque la cuisson est terminée, un signal sonore retentit.
FR
47
Page 48

Manuel d'instructions
Note: appuyez sur DELAY TIMER et ajustez le temps pour régler la
fonction de démarrage différé. Si vous souhaitez que la cuisson
commence immédiatement, appuyez sur le bouton START/STOP
pour démarrer la cuisson. Des lignes en pointillés traversent le
panneau de commande pour indiquer que l'appareil est en train
d'atteindre la pression.
Comment faire sauter?
• Ouvrez le couvercle supérieur en tournant le bouton dans le sens
contraire des aiguilles d'une montre.
• Assurez-vous que la grille de la friteuse aerofryer a été enlevée.
Utilisez toujours la poignée de la plaque si les plaques sont
chaudes.
• Insérer la plaque de pression.
• Placez la casserole antiadhésive à l'intérieur de l'appareil.
• Le couvercle peut rester en position ouverte pendant l'utilisation
de la fonction Stir fry
• Appuyez sur le bouton de mise en marche et sélectionnez STIR
FRY. L'icône de pression s'allume. À l'aide des boutons + et -,
réglez la température à la température de cuisson souhaitée
(élevée, moyenne ou basse).
• Appuyez sur le bouton START/STOP (Marche/Arrêt) pour
démarrer.
• Lorsque la cuisson est terminée, appuyez sur la touche START/
STOP.
• Lorsque la cuisson sous pression est terminée, appuyez sur le
bouton STEAM RELEASE pour relâcher la pression. Le cycle de
libération de la vapeur dure 3 minutes. Une fois que toute la
vapeur est libérée, le couvercle peut être ouvert en toute sécurité.
• Pour arrêter un programme de cuisson avant que la cuisson ne
soit terminée, appuyez sur la touche START/STOP pour mettre
fin à la cuisson, puis appuyez sur STEAM RELEASE.
REMARQUE: N'utilisez JAMAIS d'ustensiles métalliques avec votre
Aerofryer, car ils pourraient rayer le revêtement antiadhésif.
Casserole ou grille à pression
FONCTIONS DE L'AEROFRYER
Programme Friteuse à air chaud
Logo
Heure par défaut (min) 20 min
Plage (min) 1-60min
Température par défaut °C 200°C
Plage °C 80-200°C
Quantité 500-750g
Informations supplémentaires Secouer toutes les 5 minutes
lorsque vous préparez des frites
Programme Grillade/Rôti
Logo
Heure par défaut (min) 10 min
Plage (min) 1-60min
Température par défaut °C 220°C
Plage °C 80-220°C
48
Page 49

Manuel d'instructions
Quantité 250-500g
Programme Cuire/Déshydrater
Logo
Heure par défaut (min) 15 min
Plage (min) 1 min-24 heures
Température par défaut °C 200°C
Plage °C 30-200°C
Quantité 250-500g
Informations supplémentaires De 1-89 min par étape de 1
minute, 90 min-24 heures par
étape de 30 min. Cette fonction
permet de déshydrater les fruits
et/ou les légumes. Paramètres
préférés: 30-70°C degrés
pendant 5-10 heures, selon le
type d'aliment.
• Assurez-vous toujours que vous avez inséré la grille de friteuse
lorsque vous utilisez cette fonction.
• Lorsque la cuisson est terminée, la minuterie passe à «0» puis
se met automatiquement en fonction de maintien au chaud,
durant 30 min à 80 °C.
Fonctions de pression de l'Aerofryer
Programme Cuisson sous pression
Logo
Heure par défaut (min) 30 min
Plage (min) 0-4 h
Quantité Voir max indicateur récipient
intérieur
Informations supplémentaires Lorsque la cuisson sous pression
est terminée, appuyez sur le
bouton «Steam Release» pour
relâcher la pression. Le cycle de
libération de la vapeur dure 3
minutes. Une fois que toute la
vapeur est libérée, le couvercle
peut être ouvert en toute sécurité.
Programme Cuisson lente
Logo
Heure par défaut (min) 4 h
Plage (min) 4-12 h
Quantité Voir l'indicateur max. récipient
intérieur
FR
49
Page 50

Manuel d'instructions
Informations supplémentaires Température par défaut: HI
(Paramètres: HI, LO).
Lorsque la cuisson sous pression
est terminée, appuyez sur le
bouton «Steam Release» pour
relâcher la pression. Le cycle de
libération de la vapeur dure 3
minutes. Une fois que toute la
vapeur est libérée, le couvercle
peut être ouvert en toute sécurité.
Programme Vapeur
Logo
Heure par défaut (min) 10 min
Plage (min) 1-30min
Quantité 500-750g
Informations supplémentaires Ajoutez 1,5 tasse d'eau dans la
casserole, volume maximum de
2/3 de la casserole.
Lorsque la cuisson sous pression
est terminée, appuyez sur le
bouton «Steam Release» pour
relâcher la pression. Le cycle de
libération de la vapeur dure 3
minutes. Une fois que toute la
vapeur est libérée, le couvercle
peut être ouvert en toute sécurité.
Programme Soupe/Bouillon
Logo
Heure par défaut (min) 1 h
Plage (min) 0,5 - 4h
Quantité Voir l'indicateur max. récipient
intérieur
Informations supplémentaires Utilisez la fonction stir fry (sauter)
si vous souhaitez d'abord saisir/
sauter vos légumes.
Lorsque la cuisson sous pression
est terminée, appuyez sur le
bouton «Steam Release» pour
relâcher la pression. Le cycle de
libération de la vapeur dure 3
minutes. Une fois que toute la
vapeur est libérée, le couvercle
peut être ouvert en toute sécurité.
Programme Riz/Céréales
Logo
Heure par défaut (min) 20 min
Plage (min) 3-60 min
Quantité En utilisant 4 tasses de riz et 5
tasses d'eau
50
Page 51

Manuel d'instructions
Informations supplémentaires 100 h de riz cru se transforme en
250g de riz cuit, différents riz/
grains nécessitent différentes
proportions d'eau
Lorsque la cuisson sous pression
est terminée, appuyez sur le
bouton «Steam Release» pour
relâcher la pression. Le cycle de
libération de la vapeur dure 3
minutes. Une fois que toute la
vapeur est libérée, le couvercle
peut être ouvert en toute sécurité.
Programme Yogourt
Logo
Heure par défaut (min) 6 h
Plage (min) 4-12 h
Quantité 9 bouteilles 120ml/bouteille
Programme Sautés
Logo
Heure par défaut (min) 10 min
Plage (min) 1-30min
Quantité 500W
Informations supplémentaires Température par défaut: HI
(Paramètres: HI, MD, LO), en
utilisant cette fonction, le
couvercle peut être ouvert.
Lorsque la cuisson sous pression
est terminée, appuyez sur le
bouton «Steam Release» pour
relâcher la pression. Le cycle de
libération de la vapeur dure 3
minutes. Une fois que toute la
vapeur est libérée, le couvercle
peut être ouvert en toute sécurité.
• Assurez-vous toujours que vous avez inséré la grille à pression
lorsque vous utilisez ces fonctions.
• Lorsque la cuisson est terminée, la minuterie passe à «0» puis
se met automatiquement en fonction de maintien au chaud, par
défaut 4 heures.
NETTOYAGE ET MAINTENANCE
• Avant le nettoyage, débranchez l'appareil et attendez qu'il
refroidisse.
• Utilisez un chiffon doux et humide pour nettoyer la base et le
couvercle de l'appareil après chaque utilisation.
• Utilisez une petite brosse ou un coton-tige si nécessaire. Ne
versez jamais de liquide dans la base de l'appareil.
• Lavez les parties amovibles (récipient de cuisson, panier,
support, grille à vapeur, plaque de pression, grille de la friteuse,
poignée de la plaque, outil de retrait et bac à condensation) à
l'eau chaude savonneuse avec un chiffon doux ou une éponge.
FR
51
Page 52

Manuel d'instructions
• Avant de laver les inserts du couvercle, veuillez toujours suivre
les étapes pour un retrait sûr et adéquat des plaques.
• Séchez bien chaque pièce.
• Notez que la casserole, le panier et la grille à vapeur passent au
lave-vaisselle. Cependant, nous recommandons de les laver à la
main car cela sera bénéfique pour la durée de vie du produit.
• Lorsque vous nettoyez ou cuisinez avec la casserole ou le panier,
n'utilisez jamais d'ustensiles ou de tampons à récurer en métal
afin d'éviter d'endommager le revêtement antiadhésif.
• N'utilisez jamais de détergents chimiques agressifs, de tampons à
récurer ou de poudres sur les pièces ou les accessoires.
Consignes de rangement
• Débranchez l'appareil pour le laisser refroidir complètement.
• Rangez la casserole et la poignée de la plaque à l'intérieur de
l'appareil.
• Conservez l'appareil dans sa boîte d'origine ou couvert dans un
endroit frais et sec.
RÉSOLUTION DES PANNES
L'appareil est équipé de dispositifs de sécurité qui l'arrêteront en cas
d'anomalie pendant la cuisson. Un signal d'erreur apparaîtra sur le
panneau de commande. En fonction de l'erreur, un bip sonore peut se
faire entendre. Une fois que le problème a été identifié et corrigé,
branchez l'appareil et reprenez la cuisson sous pression.
Description Solution
ERREUR: NOT-LOCK
Le couvercle supérieur est en
position ouverte.
ERREUR: L'unité ne fonctionne pas en mode de cuisson sous
pression
La plaque de pression n'est pas
bien insérée.
ERREUR: L'unité ne fonctionne pas en mode aerofryer
La grille de la friteuse aerofryer
n'est pas bien insérée.
ERREUR: NO-POT
La casserole n'est pas
correctement insérée.
Fermez le couvercle et tournez le
bouton du couvercle dans le sens
des aiguilles d'une montre pour
bien le fermer.
Insérer la plaque de pression
selon les instructions.
Assurez-vous que la grille de la
friteuse aerofryer a été enlevée.
Insérer la grille de la friteuse
aerofryer conformément aux
instructions.
Assurez-vous que la plaque de
cuisson a été enlevée.
Poussez doucement le récipient à
pression vers le bas dans
l'appareil jusqu'à ce qu'il touche
la plaque chauffante au fond de
l'appareil.
52
Page 53

ENVIRONNEMENT
Cet appareil ne doit pas être jeté avec les déchets ménagers
à la fin de sa durée de vie, il doit être remis à un centre de recyclage
pour les appareils électriques et électroniques. Ce symbole sur
l'appareil, le manuel d'utilisation et l'emballage attire votre attention
sur un point important. Les matériaux utilisés dans cet appareil sont
recyclables. En recyclant vos appareils, vous contribuez de manière
significative à la protection de notre environnement. Renseignezvous auprès des autorités locales pour connaître les centres de
collecte des déchets.
Support
Vous retrouvez toutes les informations et pièces de rechange sur
www.princesshome.eu!
Manuel d'instructions
FR
53
Page 54

Bedienungsanleitung
SICHERHEIT
• Beim Ignorieren der Sicherheitshinweise
kann der Hersteller nicht für Schäden haftbar
gemacht werden.
• Ist das Netzkabel beschädigt, muss es vom
Hersteller, dem Kundendienst oder ähnlich
qualifizierten Personen ersetzt werden, um
Gefahren zu vermeiden.
• Bewegen Sie das Gerät niemals durch
Ziehen am Kabel, und stellen Sie sicher,
dass sich das Kabel nicht verwickeln kann.
• Das Gerät muss auf einer ebenen, stabilen
Fläche platziert werden.
• Das Gerät darf nicht unbeaufsichtigt bleiben,
während es an einer Stromquelle
angeschlossen ist.
• Dieses Gerät ist nicht zur Benutzung durch
Personen (einschließlich Kindern) mit
eingeschränkten physischen, sensorischen
oder mentalen Fähigkeiten oder mit
mangelnden Erfahrungen oder Kenntnissen
geeignet, außer sie werden beaufsichtigt
oder durch eine für ihre Sicherheit
verantwortliche Person in die Benutzung des
Geräts eingewiesen.
• Wenn ein Gerät von Kindern oder in deren
Nähe verwendet wird, ist eine strenge
Aufsicht erforderlich.
• WARNUNG: Verschüttetes Gargut kann
ernsthafte Verbrennungen verursachen.
Halten Sie das Gerät und dessen
Stromkabel von Kindern fern. Führen Sie
das Kabel nie über die Kante der
Arbeitsplatte, benutzen Sie nie eine
Steckdose unter der Arbeitsplatte, und
benutzen Sie nie ein Verlängerungskabel.
• Die Verwendung nicht vom Gerätehersteller
empfohlener Zubehörteile kann zu
Verletzungen führen.
• Nicht im Freien benutzen.
• Nicht auf oder in die Nähe eines Gas- oder
Elektrobrenners oder in einen heißen Ofen
stellen.
• Nicht mit Metalltopfreinigern reinigen.
Abbrechende Stücke des Reinigers könnten
elektrische Teile berühren und zur Gefahr
eines Stromschlags führen.
• Besondere Vorsicht ist beim Entnehmen des
Kondensatbehälters oder Entsorgen von
heißem Fett geboten.
54
Page 55

Bedienungsanleitung
• Besondere Vorsicht ist zudem beim
Bewegen eines Geräts geboten, in dem sich
heißes Öl oder andere heiße Flüssigkeiten
befinden.
• VORSICHT: Zur Vermeidung eines
Schadens oder Stromschlags darf in der
Basiseinheit nicht gekocht werden. Bereiten
Sie Speisen ausschließlich im mitgelieferten
Gartopf zu.
• Um das Netzkabel abzutrennen, drücken
Sie die Ein/Aus-Taste und ziehen dann den
Stecker aus der Steckdose.
• Benutzen Sie die Druckplatte, das
Heißluftrost oder den Gartopf nicht, wenn
Dellen oder Abnutzungserscheinungen
vorhanden sind.
• WARNUNG: Benutzen Sie die
Heißluftfritteuse weder zum Frittieren noch
zum Druckbraten, ungeachtet dessen, ob
der Deckel angebracht ist oder nicht. DIES
IST GEFÄHRLICH UND KANN ZU EINEM
BRAND ODER ERSTHAFTEN SCHADEN
FÜHREN.
• Benutzen Sie IMMER den abnehmbaren
Griff, um das Heißluftrost oder die
Druckplatte einzusetzen oder
herauszunehmen.
• Achten Sie darauf, dass der Filter und das
Überdruckventil frei von Lebensmittelresten
oder Verunreinigungen ist.
• Befüllen Sie den Gartopf niemals über die
maximale Füllmengenkennzeichnung
hinaus.
• Bevor Sie den Gartopf in das Gerät
einsetzen, sind beide Komponenten mit
einem weichen Tuch trockenzureiben.
• Achten Sie stets darauf, das Gerät vor
Gebrauch korrekt zusammenzusetzen.
• Dieses Gerät gart unter
Druckbeaufschlagung. Bei unsachgemäßer
Benutzung besteht Verbrühungsgefahr.
Achten Sie vor der Benutzung darauf, dass
das Gerät ordnungsgemäß geschlossen ist.
• Bei Benutzung der Druckplatte ist vor dem
Betrieb stets sicherzustellen, dass diese
korrekt eingesetzt und der Deckel
ordnungsgemäß geschlossen ist.
• Das Überdruckventil darf keinesfalls
abgedeckt werden.
• Besondere Vorsicht ist geboten, wenn der
Gartopf aus dem Gerät genommen wird.
DE
55
Page 56

Bedienungsanleitung
• Wenn der entnehmbare Gartopf leer ist, darf
er nicht länger als 10Minuten erhitzt werden,
weil andernfalls die Oberfläche beschädigt
werden könnte.
• Lassen Sie den Deckel bei Verwendung der
Rührbratfunktion offen.
• Um mögliche Dampfschäden zu vermeiden,
sollte das Gerät während des Betriebs von
Wänden und Schränken abgerückt werden.
• Heben Sie das Gerät niemals an den
seitlichen Deckelgriffen an.
• Berühren Sie keinesfalls das freiliegende
Heizelement.
• Tauchen Sie zum Schutz vor einem
Stromschlag das Kabel, den Stecker oder
das Gerät niemals in Wasser oder sonstige
Flüssigkeiten.
• Dieses Gerät ist dazu bestimmt, im Haushalt
und ähnlichen Anwendungen verwendet zu
werden, wie beispielsweise:
• In Küchen für Mitarbeiter in Läden, Büros
und anderen gewerblichen Bereichen.
• Von Kunden in Hotels, Motels und anderen
Wohneinrichtungen.
• In Frühstückspensionen.
• In Gutshäusern.
• Kinder dürfen mit dem Gerät nicht spielen.
• Dieses Gerät darf nicht von Kindern
verwendet werden. Halten Sie das Gerät und
sein Anschlusskabel außerhalb der
Reichweite von Kindern.
• Tauchen Sie zum Schutz vor einem
Stromschlag das Kabel, den Stecker oder
das Gerät niemals in Wasser oder sonstige
Flüssigkeiten.
• Erwärmen Sie das Kochgut nicht zu lange.
• Die Oberfläche des Heizelementes weist
nach Gebrauch Restwärme auf.
• Vor der Reinigung des Geräts muss der
Netzstecker gezogen werden. Bitte stellen
Sie sicher, dass der Eingang vor der
Wiederverwendung komplett trocken ist.
• Der Druckbehälter darf nicht geöffnet
werden, wenn der Druck noch nicht
ausreichend abgenommen hat und nicht
beim Gebrauch.
• Die Oberfläche kann während des
Betriebs heiß werden.
56
Page 57

Bedienungsanleitung
1
716 1715 8
9
10
11
12
13
14
18 19 20
2
3
4
5
6
• ACHTUNG: Hat die Oberfläche einen Riss,
schalten Sie das Gerät aus, um die Gefahr
eines Stromschlags zu vermeiden.
• Die Temperatur der zugänglichen
Oberflächen kann hoch sein, wenn das
Gerät in Betrieb ist.
• Das Gerät darf nicht mit einem externen
Timer oder einem separaten
Fernbedienungssystem betrieben werden.
• Dieses Gerät darf nur mit einer geerdeten
Steckdose (für Klasse I Geräte) verbunden
werden.
• Legen Sie keine Gegenstände auf das Gerät
TEILEBESCHREIBUNG
1. Kondensatbehälter
2. Geräteeinheit
3. Heißluftrost
4. Druckplatte
5. Griff für Druckplatte und Heißluftrost
6. Griff für Frittierkorb
7. Dampfgestell
8. Frittierkorb
9. Heißluftgestell
10. Antihaft-Gartopf
BEDIENFELD
DE
und stellen Sie sicher, dass immer 10
Zentimeter Freiraum um das Gerät herum
sind, damit die Luft ungehindert zirkulieren
kann.
• Dieses Gerät darf nur für den
Haushaltsgebrauch und nur für den Zweck
benutzt werden, für den es hergestellt
wurde. Im schlimmsten Fall kann sich das
Essen entzünden. (Verwenden Sie nicht
mehr als einen Teelöffel Öl, verwenden Sie
kein Fleisch, das zu viel Fett auslässt oder
Wasser, das zum Kochen von Speisen
vorgesehen ist.)
57
Page 58

Bedienungsanleitung
1: Dampfgaren 11: Backen
2: Schongaren 12: Joghurt
3: Dampfgaren 13: Rührbraten
4: Suppe/Brühe 14: Ein/Aus
5: Reis/Getreide 15: Display
6: Dampf ablassen 16: Warm halten
7: Dampfgarsymbol 17: Startverzögerung
8: Heißluftsymbol 18: Temp. +/-
9: Heißluft 19: Start/Stopp
10: Grillen/Braten 20: Zeit +/-
Taste „Ein/Aus“
• Drücken Sie diese Taste, um das Gerät ein- und auszuschalten.
Nach dem Anschließen leuchtet die Ein/Aus-Taste rot auf. Sobald
die Taste betätigt wird, leuchtet sie weiß.
Heißluftsymbol
• Dieses Symbol leuchtet automatisch auf, sobald das Heißluftrost
korrekt eingesetzt und das Gerät für die Heißluft-Frittierfunktionen
bereit ist.
Hinweis: Folgende Funktionen beziehen sich auf das Heißluftrost:
Heißluftfrittieren, Grillen/Braten und Backen. Nur bei eingesetztem
Heißluftrost leuchten diese Funktionen auf und können gewählt
werden.
Dampfgarsymbol
• Dieses Symbol leuchtet automatisch auf, sobald die Druckplatte
korrekt eingesetzt und das Gerät für die Dampfgarfunktionen
bereit ist.
Hinweis: Folgende Funktionen beziehen sich auf die Druckplatte:
Dampfgaren, Schongaren, Dampf, Suppe/Brühe, Reis/Getreide,
Joghurt und Rührbraten. Nur bei korrekt eingesetzter Druckplatte
leuchten diese Funktionen auf und können gewählt werden.
Hinweis: Die Rührbratfunktion funktioniert auch bei geöffnetem
Deckel.
Display
• Zeigt Temperatur und Zeit an, wobei die jeweiligen Symbole
abwechselnd aufleuchten.
Taste „Start/Stopp“
• Drücken Sie diese Taste einmal, um den Garvorgang zu starten
oder zu stoppen.
Taste „Plus“
• Drücken, um die Temperatur oder die Zeit zu erhöhen.
Taste „Minus“
• Drücken, um die Temperatur oder die Zeit zu verringern.
Taste „Dampfauslass“
• Drücken Sie nach Abschluss des Garvorgangs die
Dampfablasstaste, um den Druck entweichen zu lassen. Der
Dampfablasszyklus dauert 3Minuten. Nachdem der gesamte
Dampf entwichen ist, lässt sich der Deckel sicher öffnen.
Hinweis: Um ein Garprogramm vorzeitig zu beenden, drücken Sie auf
START/STOPP und anschließend auf DAMPF ABLASSEN.
Warmhaltefunktion
• Nach Abschluss des Garvorgangs wechselt das Gerät
automatisch zur Warmhaltefunktion.
58
Page 59

Startverzögerungsfunktion
• Drücken Sie diese Taste, um eine bestimmte Startzeit für den
Garvorgang festzulegen (Intervall: 30Minuten – 24Stunden).
Drücken Sie zunächst die gewünschte Garfunktion und dann die
Verzögerungstaste. Daraufhin beginnt das Symbol zu blinken.
Wählen Sie nun die gewünschte Startverzögerung und
bestätigen Sie mit START. Um die Verzögerungseinstellung
wieder aufzuheben, drücken Sie die Startverzögerungstaste
erneut (bevor Sie auf „Start“ drücken).
VOR DER ERSTEN INBETRIEBNAHME
• Entfernen Sie das gesamte Verpackungsmaterial.
• Entfernen Sie die Aufkleber oder Schilder vom Gerät.
• Reinigen Sie die Teile gründlich mit heißem Wasser, etwas
Spülmittel und einem nicht scheuernden Schwamm.
• Wischen Sie das Innere und das Äußere des Geräts mit einem
feuchten Lappen.
• Stellen Sie das Gerät auf einer stabilen, waagerechten und
ebenen Fläche auf. Stellen Sie das Gerät nicht auf Oberflächen
auf, die nicht hitzebeständig sind.
• Diese Friteuse arbeitet mit Heißluft. Füllen Sie die Wanne
nicht mit Öl oder Frittierfett.
• Legen Sie keine Gegenstände auf das Gerät und stellen Sie
sicher, dass immer 10 Zentimeter Freiraum um das Gerät
herum sind, damit die Luft ungehindert zirkulieren kann.
Einsetzen des Dampfgestells
• Um das Dampfgestell einzusetzen, klappen Sie die Beine aus
und haken den mittleren „V“-Teil vorsichtig nahe am Rand ein.
(Abb. 1)
Bedienungsanleitung
• Je nach Rezept und Zubereitungspräferenz kann das Gargut auf
beiden Seiten des herausnehmbaren Dampfgestells platziert
werden, um das gewünschte Resultat zu erzielen. (Abb. 2)
• Die Beine des Dampfgestells lassen sich zur Lagerung
einklappen. Entriegeln Sie das mittlere „V“-Teil, indem Sie es
vorsichtig nach außen drücken, und klappen Sie die Beine dann
nach innen.
DE
59
Page 60

Bedienungsanleitung
DECKELEINSÄTZE
Dieses Gerät hat zwei verschiedene Deckeleinsätze: die Druckplatte
und das Heißluftrost. Mit den Deckeleinsätzen kann man im selben
Gerät Dampfgaren, Frittieren und mehr, indem man sie entsprechend
auswechselt.
Heißluftrost (A)
Das Heißluftrost muss eingesetzt werden, um folgende Garfunktionen
nutzen zu können:
• Heißluftfrittieren
• Grillen/Braten
• Backen
Druckplatte (B)
Die Druckplatte muss eingesetzt werden, um folgende Garfunktionen
nutzen zu können:
• Druckgaren
• Schongaren
• Dampfgaren
• Suppe/Brühe
• Reis/Getreide
• Joghurt
• Rührbraten
HINWEIS: Die Garfunktionen können nur gewählt werden, nachdem
zuvor der entsprechende Gareinsatz eingesetzt wurde.
DRUCKPLATTE ODER HEISSLUFTROST ENTFERNEN/EINSETZEN
Lassen Sie den heißen Druckplatten- oder Heißluftrosteinsatz im
Gerät, bis sich dieses vollständig abgekühlt hat. Falls Rezepte das
Wechseln der Einsätze während des Garvorgangs erfordern, sollten
Sie immer den mitgelieferten Griff benutzen. Mit diesem Griff lassen
sich die Einsätze bequem einsetzen und herausnehmen, auch wenn
sie heiß sind.
1. Nehmen Sie den Griff so in die Hand, dass der Knöchelschutz
nach unten weist (3).
2. Setzen Sie das Ende des Griffs in die hervorstehende
Metalllasche an der Platte ein. Um ihn zu fixieren, drücken Sie
den Knopf links (4).
3. Nachdem der Griff sicher am Einsatz angebracht ist, drücken Sie
auf die Lasche oben am Einsatz (5).
4. Entfernen Sie den Einsatz dann vorsichtig mit dem Griff vom
Gerät und legen Sie ihn auf einer stabilen, ebenen und
hitzebeständigen Fläche ab.
5. Um den Griff vom Einsatz zu entfernen, drücken Sie die Taste
rechts am Griff und ziehen ihn heraus (6).
60
Page 61

Bedienungsanleitung
6. Lassen Sie den Einsatz vollständig abkühlen, bevor Sie ihn
bewegen oder reinigen.
7. Abbildung 7 zeigt, wo der Einsatz in den Deckel eingesetzt wird.
BENUTZUNG
Heißluft-Frittierfunktionen
Benutzung der Heißluft-Frittierfunktion
• Öffnen Sie den Deckel, indem Sie den Knopf gegen den
Uhrzeigersinn drehen.
• Achten Sie darauf, dass der Druckplatteneinsatz entfernt ist.
Benutzen Sie immer den Griff, falls der Einsatz heiß ist.
• Setzen Sie das Heißluftrost ein.
• Setzen Sie den Antihaft-Gartopf in das Gerät ein. Setzen Sie den
Frittierkorb in den Gartopf ein. Geben Sie das Gargut in den
Frittierkorb.
• Schließen Sie den Deckel und verriegeln Sie ihn, indem Sie den
Knopf im Uhrzeigersinn drehen.
• Drücken Sie Starttaste und wählen Sie HEISSLUFT. Das
Heißluftsymbol leuchtet auf. Stellen Sie mit den Tasten „+“ und
„–“ die gewünschte Gartemperatur und -zeit ein.
• Drücken Sie die Start/Stopp-Taste, um den Garvorgang zu
starten. Der Countdown-Timer und die gewählte
• Temperatur werden abwechselnd auf dem Display angezeigt.
• Nach Abschluss des Garvorgangs ertönt ein akustisches Signal.
Hinweis: Um den Heißluftzyklus anzuhalten, öffnen Sie entweder den
Deckel oder drücken auf START/STOPP.
Der Garvorgang wird fortgesetzt, sobald der Deckel wieder
geschlossen ist oder die Taste START/STOPP gedrückt wird.
Grillen/Braten
• Öffnen Sie den Deckel, indem Sie den Knopf gegen den
Uhrzeigersinn drehen.
DE
61
Page 62

Bedienungsanleitung
• Achten Sie darauf, dass der Druckplatteneinsatz entfernt ist.
Benutzen Sie immer den Griff, falls der Einsatz heiß ist. Setzen
Sie das Heißluftrost ein.
• Setzen Sie den Antihaft-Gartopf in das Gerät ein. Setzen Sie ggf.
das Dampfgestell in den Gartopf und legen Sie das Gargut
darauf.
• Schließen Sie den Deckel und verriegeln Sie ihn, indem Sie den
Knopf im Uhrzeigersinn drehen.
• Drücken Sie Starttaste und wählen Sie GRILLEN/BRATEN. Das
Heißluftsymbol leuchtet auf. Stellen Sie mit den Tasten „+“ und
„–“ die gewünschte Gartemperatur und -zeit ein. Drücken Sie die
Start/Stopp-Taste, um den Garvorgang zu starten. Der
Countdown-Timer und die gewählte Temperatur werden
abwechselnd auf dem Display angezeigt.
• Um den Grill-/Bratvorgang anzuhalten, öffnen Sie entweder den
Deckel oder drücken auf START/STOPP. Der Garvorgang wird
fortgesetzt, sobald der Deckel wieder geschlossen ist oder die
Taste START/STOPP gedrückt wird.
• Nach Abschluss des Garvorgangs ertönt ein akustisches Signal
und das Gerät wechselt in den Warmhaltemodus.
Backen
• Öffnen Sie den Deckel, indem Sie den Knopf gegen den
Uhrzeigersinn drehen.
• Achten Sie darauf, dass der Druckplatteneinsatz entfernt ist.
Benutzen Sie immer den Griff, falls der Einsatz heiß ist. Setzen
Sie das Heißluftrost ein.
• Setzen Sie den Antihaft-Gartopf in das Gerät ein. Setzen Sie ggf.
das Dampfgestell in den Gartopf und legen Sie das Gargut
darauf.
• Schließen Sie den Deckel und verriegeln Sie ihn, indem Sie den
Knopf im Uhrzeigersinn drehen.
• Drücken Sie Starttaste und wählen Sie BACKEN. Das
Heißluftsymbol leuchtet auf. Stellen Sie mit den Tasten „+“ und
„–“ die gewünschte Gartemperatur und -zeit ein. Drücken Sie die
Start/Stopp-Taste, um den Garvorgang zu starten. Der
Countdown-Timer und die gewählte Temperatur werden
abwechselnd auf dem Display angezeigt.
• Um den Backvorgang anzuhalten, öffnen Sie entweder den
Deckel oder drücken auf START/STOPP. Der Garvorgang wird
fortgesetzt, sobald der Deckel wieder geschlossen ist oder die
Taste START/STOPP gedrückt wird.
• Nach Abschluss des Garvorgangs ertönt ein akustisches Signal
und das Gerät wechselt in den Warmhaltemodus.
Mit dieser Funktion können Sie auch Obst und/oder Gemüse dörren.
Zu weitergehenden Informationen siehe die
Heißluftfunktionsübersicht.
Dampfgaren
Dampfgarfunktionen
• Öffnen Sie den oberen Deckel, indem Sie den Knopf gegen den
Uhrzeigersinn drehen.
• Achten Sie darauf, dass das Heißluftrost entfernt ist. Benutzen
Sie dazu immer den Griff. Setzen Sie die Druckplatte ein.
• Setzen Sie den Antihaft-Gartopf in das Gerät ein und geben Sie
das Gargut hinein.
• Schließen Sie den Deckel und verriegeln Sie ihn, indem Sie den
Knopf im Uhrzeigersinn drehen.
62
Page 63

Bedienungsanleitung
• Drücken Sie Starttaste und wählen Sie DAMPFGAREN. Das
Dampfgarsymbol leuchtet auf. Stellen Sie mit den Tasten „+“ und
„–“ die gewünschte Garzeit ein.
• Sobald der korrekte Druck erreicht ist, wechselt das Display von
durchlaufenden Strichen zum Countdown-Timer.
• Nach Abschluss des Garvorgangs ertönt ein akustisches Signal.
Nach Abschluss des Garvorgangs wechselt das Gerät
automatisch zur Warmhaltefunktion.
• Drücken Sie nach Abschluss des Garvorgangs die
Dampfablasstaste, um den Druck entweichen zu lassen. Der
Dampfablasszyklus dauert 3Minuten. Nachdem der gesamte
Dampf entwichen ist, lässt sich der Deckel sicher öffnen.
• Um ein Garprogramm vorzeitig zu beenden, drücken Sie auf
START/STOPP und anschließend auf DAMPF ABLASSEN.
Halten Sie NIEMALS Gesicht oder Hände über das Gerät, wenn der
Dampf abgelassen oder der Deckel geöffnet wird. Benutzen Sie
IMMER Topflappen, wenn der Dampf abgelassen oder der Deckel
geöffnet wird. Hinweis: Drücken Sie auf STARTVERZÖGERUNG und
stellen Sie die gewünschte Startzeit ein. Um den Garvorgang sofort
zu starten, drücken Sie die Start/Stopp-Taste. Durchlaufende Striche
auf dem Display deuten darauf hin, dass das Gerät Druck aufbaut.
Schongaren
• Öffnen Sie den oberen Deckel, indem Sie den Knopf gegen den
Uhrzeigersinn drehen.
• Achten Sie darauf, dass das Heißluftrost entfernt ist. Benutzen
Sie dazu immer den Griff. Setzen Sie die Druckplatte ein.
• Setzen Sie den Antihaft-Gartopf in das Gerät ein und geben Sie
das Gargut hinein.
• Schließen Sie den Deckel und verriegeln Sie ihn, indem Sie den
Knopf im Uhrzeigersinn drehen.
• Drücken Sie Starttaste und wählen Sie SCHONGAREN. Das
Dampfgarsymbol leuchtet auf. Stellen Sie mit den Tasten „+“ und
„–“ die gewünschte Garzeit ein.
• Sobald die korrekte Temperatur erreicht ist, wechselt das Display
von durchlaufenden Strichen zum Countdown-Timer.
• Nach Abschluss des Garvorgangs ertönt ein akustisches Signal.
Nach Abschluss des Garvorgangs wechselt das Gerät
automatisch zur Warmhaltefunktion.
• Drücken Sie nach Abschluss des Garvorgangs die
Dampfablasstaste, um den Druck entweichen zu lassen. Der
Dampfablasszyklus dauert 3Minuten. Nachdem der gesamte
Dampf entwichen ist, lässt sich der Deckel sicher öffnen.
• Um ein Garprogramm vorzeitig zu beenden, drücken Sie auf
START/STOPP und anschließend auf DAMPF ABLASSEN.
Hinweis: Drücken Sie auf STARTVERZÖGERUNG und stellen Sie
die gewünschte Startzeit ein. Um den Garvorgang sofort zu starten,
drücken Sie die Start/Stopp-Taste. Durchlaufende Striche auf dem
Display deuten darauf hin, dass das Gerät auf die gewünschte
Temperatur aufgeheizt wird.
Dampfgaren
• Öffnen Sie den oberen Deckel, indem Sie den Knopf gegen den
Uhrzeigersinn drehen.
• Achten Sie darauf, dass das Heißluftrost entfernt ist. Benutzen
Sie dazu immer den Griff. Setzen Sie die Druckplatte ein.
• Setzen Sie den Antihaft-Gartopf in das Gerät ein. Legen Sie das
Gargut auf das Dampfgestell. Befüllen Sie den Gartopf maximal
bis zu 2/3.
DE
63
Page 64

Bedienungsanleitung
• Geben Sie 1,5Tassen Wasser oder Dämpfflüssigkeit in den
Gartopf.
• Schließen Sie den Deckel und verriegeln Sie ihn, indem Sie den
Knopf im Uhrzeigersinn drehen.
• Drücken Sie Starttaste und wählen Sie DAMPFGAREN. Das
Dampfgarsymbol leuchtet auf. Stellen Sie mit den Tasten „+“ und
„–“ die gewünschte Garzeit ein.
• Drücken Sie die Start/Stopp-Taste, um den Garvorgang zu
starten. Durchlaufende Striche auf dem Display deuten darauf
hin, dass das Gerät auf die gewünschte Temperatur aufgeheizt
wird.
• Sobald der korrekte Druck-/Temperaturwert erreicht ist, wechselt
das Display von durchlaufenden Strichen zum Countdown-Timer.
• Nach Abschluss des Garvorgangs ertönt ein akustisches Signal.
Nach Abschluss des Garvorgangs drücken Sie auf die
Dampfablasstaste,
• um den Druck entweichen zu lassen. Der Dampfablasszyklus
dauert 3Minuten. Nachdem der gesamte Dampf entwichen ist,
lässt sich der Deckel sicher öffnen.
• Um ein Garprogramm vorzeitig zu beenden, drücken Sie auf
START/STOPP und anschließend auf DAMPF ABLASSEN.
Benutzung der Suppe/Brühe-Funktion
• Öffnen Sie den Deckel, indem Sie den Knopf gegen den
Uhrzeigersinn drehen.
• Achten Sie darauf, dass der Druckplatteneinsatz entfernt ist.
Benutzen Sie immer den Griff, falls der Einsatz heiß ist. Setzen
Sie das Heißluftrost ein.
• Setzen Sie den Antihaft-Gartopf in das Gerät ein. Setzen Sie den
Frittierkorb in den Gartopf ein. Legen Sie das Gargut in den Korb.
• Schließen Sie den Deckel und verriegeln Sie ihn, indem Sie den
Knopf im Uhrzeigersinn drehen.
• Drücken Sie Starttaste und wählen Sie SUPPE/BRÜHE. Das
Heißluftsymbol leuchtet auf. Stellen Sie mit den Tasten „+“ und
„–“ die gewünschte Gartemperatur und -zeit ein.
• Drücken Sie die Start/Stopp-Taste, um den Garvorgang zu
starten. Der Countdown-Timer und die gewählte Temperatur
werden abwechselnd auf dem Display angezeigt.
• Nach Abschluss des Garvorgangs ertönt ein akustisches Signal.
• Drücken Sie nach Abschluss des Garvorgangs die
Dampfablasstaste, um den Druck entweichen zu lassen. Der
Dampfablasszyklus dauert 3Minuten. Nachdem der gesamte
Dampf entwichen ist, lässt sich der Deckel sicher öffnen.
• Um ein Garprogramm vorzeitig zu beenden, drücken Sie auf
START/STOPP und anschließend auf DAMPF ABLASSEN.
Benutzung der Reis/Getreide-Funktion
• Öffnen Sie den oberen Deckel, indem Sie den Knopf gegen den
Uhrzeigersinn drehen.
• Achten Sie darauf, dass das Heißluftrost entfernt ist. Benutzen
Sie dazu immer den Griff. Setzen Sie die Druckplatte ein.
• Setzen Sie den Antihaft-Gartopf in das Gerät ein. Geben Sie
ungekochten Reis und Flüssigkeit in den Gartopf.
• Schließen Sie den Deckel und verriegeln Sie ihn, indem Sie den
Knopf im Uhrzeigersinn drehen.
• Drücken Sie Starttaste und wählen Sie REIS/GETREIDE. Das
Dampfgarsymbol leuchtet auf. Stellen Sie mit den Tasten „+“ und
„–“ die gewünschte Garzeit ein.
• Sobald der korrekte Druck erreicht ist, wechselt das Display von
durchlaufenden Strichen zum Countdown-Timer.
64
Page 65

Bedienungsanleitung
• Nach Abschluss des Garvorgangs ertönt ein akustisches Signal.
Nach Abschluss des Garvorgangs wechselt das Gerät
automatisch zur Warmhaltefunktion.
• Drücken Sie nach Abschluss des Garvorgangs die
Dampfablasstaste, um den Druck entweichen zu lassen. Der
Dampfablasszyklus dauert 3Minuten. Nachdem der gesamte
Dampf entwichen ist, lässt sich der Deckel sicher öffnen.
• Um ein Garprogramm vorzeitig zu beenden, drücken Sie auf
START/STOPP und anschließend auf DAMPF ABLASSEN.
Halten Sie NIEMALS Gesicht oder Hände über das Gerät, wenn der
Dampf abgelassen oder der Deckel geöffnet wird. Benutzen Sie
IMMER Topflappen, wenn der Dampf abgelassen oder der Deckel
geöffnet wird.
Hinweis: Beim Zubereiten von Lebensmitteln, die sich ausdehnen,
darf der Gartopf maximal zur Hälfte befüllt werden.
Hinweis: Drücken Sie auf STARTVERZÖGERUNG und stellen Sie
die gewünschte Startzeit ein.
• Um den Garvorgang sofort zu starten, drücken Sie die Start/
Stopp-Taste. Durchlaufende Striche auf dem Display deuten
darauf hin, dass das Gerät Druck aufbaut.
Joghurt-Funktion
• Öffnen Sie den oberen Deckel, indem Sie den Knopf gegen den
Uhrzeigersinn drehen.
• Achten Sie darauf, dass das Heißluftrost entfernt ist. Benutzen
Sie dazu immer den Griff.
• Setzen Sie die Druckplatte ein.
• Setzen Sie den Antihaft-Gartopf in das Gerät ein und geben Sie
das Gargut hinein.
• Schließen Sie den Deckel und verriegeln Sie ihn, indem Sie den
Knopf im Uhrzeigersinn drehen.
• Drücken Sie Starttaste und wählen Sie JOGHURT. Das
Dampfgarsymbol leuchtet auf. Stellen Sie mit den Tasten „+“ und
„–“ die gewünschte Garzeit ein.
• Sobald der korrekte Druck erreicht ist, wechselt das Display von
durchlaufenden Strichen zum Countdown-Timer.
• Nach Abschluss des Garvorgangs ertönt ein akustisches Signal.
Hinweis: Drücken Sie auf STARTVERZÖGERUNG und stellen Sie
die gewünschte Startzeit ein. Um den Garvorgang sofort zu starten,
drücken Sie die Start/Stopp-Taste. Durchlaufende Striche auf dem
Display deuten darauf hin, dass das Gerät Druck aufbaut.
Rührbraten
• Öffnen Sie den oberen Deckel, indem Sie den Knopf gegen den
Uhrzeigersinn drehen.
• Achten Sie darauf, dass das Heißluftrost entfernt ist. Benutzen
Sie immer den Griff, falls der Einsatz heiß ist.
• Setzen Sie die Druckplatte ein.
• Setzen Sie den Antihaft-Gartopf in das Gerät ein.
• Bei Verwendung der Rührbratfunktion kann der Deckel
offenbleiben.
• Drücken Sie Starttaste und wählen Sie RÜHRBRATEN. Das
Dampfgarsymbol leuchtet auf. Stellen Sie mit den Tasten „+“ und
„–“ die gewünschte Gartemperatur ein (Hoch, Mittel oder
Niedrig).
• Drücken Sie die Start/Stopp-Taste, um den Garvorgang zu
starten.
• Drücken Sie nach Abschluss des Garvorgangs die Start-/StoppTaste.
DE
65
Page 66

Bedienungsanleitung
• Drücken Sie nach Abschluss des Garvorgangs die
Dampfablasstaste, um den Druck entweichen zu lassen. Der
Dampfablasszyklus dauert 3Minuten. Nachdem der gesamte
Dampf entwichen ist, lässt sich der Deckel sicher öffnen.
• Um ein Garprogramm vorzeitig zu beenden, drücken Sie auf
START/STOPP und anschließend auf DAMPF ABLASSEN.
HINWEIS: Verwenden Sie NIEMALS Metallgegenstände, da diese die
Antihaftbeschichtung
des Gartopfes oder der Druckplatte der zerkratzen könnten.
HEISSLUFT-FRITTIERFUNKTIONEN
Programm Heißluft
Symbol
Standarddauer (Min.) 20Min.
Einstellbereich (Min.) 1-60Min.
Standardtemperatur °C 200°C
Einstellbereich °C 80-200°C
Menge 500-750g
Zusatzinformation Bei Pommes Frites alle 5Minuten
rütteln.
Programm Grillen/Braten
Symbol
Standarddauer (Min.) 10Min.
Einstellbereich (Min.) 1-60Min.
Standardtemperatur °C 220°C
Einstellbereich °C 80-220°C
Menge 250-500g
Programm Backen/Dörren
Symbol
Standarddauer (Min.) 15Min.
Einstellbereich (Min.) 1Min. - 24Stunden
Standardtemperatur °C 200°C
Einstellbereich °C 30-200°C
Menge 250-500g
Zusatzinformation Von 1-89Min. in 1-Min.-Schritten,
von 90Min. bis 24Std. in 30Min.-Schritten. Außerdem können
Sie mit dieser Funktion auch Obst
und/oder Gemüse dörren
Bevorzugte Einstellungen:
30-70°C für 5-10Stunden, je
nach Art des Garguts.
• Achten Sie bei der Benutzung dieser Funktionen stets darauf,
dass das Heißluftrost eingesetzt ist.
• Nach Abschluss des Garvorgangs geht der Timer zurück auf „0“
und aktiviert automatisch die Warmhaltefunktion für 30Minuten
bei 80°C.
66
Page 67

Bedienungsanleitung
Heißluft-Druckgarfunktionen
Programm Dampfgaren
Symbol
Standarddauer (Min.) 30 Min.
Einstellbereich (Min.) 0-4Std.
Menge Siehe Maximalanzeige
Zusatzinformation Drücken Sie nach Abschluss des
Garvorgangs die
Dampfablasstaste, um den Druck
entweichen zu lassen. Der
Dampfablasszyklus dauert
3Minuten. Nachdem der
gesamte Dampf entwichen ist,
lässt sich der Deckel sicher
öffnen.
Programm Schongaren
Symbol
Standarddauer (Min.) 4Std.
Einstellbereich (Min.) 4-12Std.
Menge Siehe Maximalanzeige
Zusatzinformation Standardtemperatur ist HI
(Einstlg.: HI,LO).
Drücken Sie nach Abschluss des
Garvorgangs die
Dampfablasstaste, um den Druck
entweichen zu lassen. Der
Dampfablasszyklus dauert
3Minuten. Nachdem der
gesamte Dampf entwichen ist,
lässt sich der Deckel sicher
öffnen.
Programm Dampfgaren
Symbol
Standarddauer (Min.) 10Min.
Einstellbereich (Min.) 1-30Min.
Menge 500-750g
DE
67
Page 68

Bedienungsanleitung
Zusatzinformation Geben Sie eine 1,5 Tassen
Wasser in den Gartopf; max. 2/3
des Gartopfvolumens.
Drücken Sie nach Abschluss des
Garvorgangs die
Dampfablasstaste, um den Druck
entweichen zu lassen. Der
Dampfablasszyklus dauert
3Minuten. Nachdem der gesamte
Dampf entwichen ist, lässt sich
der Deckel sicher öffnen.
Programm Suppe/Brühe
Symbol
Standarddauer (Min.) 1Std.
Einstellbereich (Min.) 0,5-4Std.
Menge Siehe Maximalanzeige
Zusatzinformation Benutzen Sie die Rührfunktion,
wenn Sie Ihr Gemüse zunächst
anbraten wollen.
Drücken Sie nach Abschluss des
Garvorgangs die
Dampfablasstaste, um den Druck
entweichen zu lassen. Der
Dampfablasszyklus dauert
3Minuten. Nachdem der gesamte
Dampf entwichen ist, lässt sich
der Deckel sicher öffnen.
Programm Reis/Getreide
Symbol
Standarddauer (Min.) 20Min.
Einstellbereich (Min.) 3-60Min.
Menge Nehmen Sie 4Tassen Reis auf
5Tassen Wasser
Zusatzinformation 100g ungekochter Reis werden
zu 250g Kochreis;
unterschiedliche Reis-/
Getreidesorten benötigen
unterschiedliche Mengen an
Wasser.
Drücken Sie nach Abschluss des
Garvorgangs die
Dampfablasstaste, um den Druck
entweichen zu lassen. Der
Dampfablasszyklus dauert
3Minuten. Nachdem der gesamte
Dampf entwichen ist, lässt sich
der Deckel sicher öffnen.
Programm Joghurt
Symbol
Standarddauer (Min.) 6Std.
Einstellbereich (Min.) 4-12Std.
Menge 9Flaschen à 120ml
Programm Rührbraten
68
Page 69

Bedienungsanleitung
Symbol
Standarddauer (Min.) 10Min.
Einstellbereich (Min.) 1-30Min.
Menge 500g
Zusatzinformation Standardtemperatur ist HI
(Einstlg.: HI, MD, LO); bei
Benutzung dieser Funktion kann
der Deckel offenbleiben.
Drücken Sie nach Abschluss des
Garvorgangs die
Dampfablasstaste, um den Druck
entweichen zu lassen. Der
Dampfablasszyklus dauert
3Minuten. Nachdem der
gesamte Dampf entwichen ist,
lässt sich der Deckel sicher
öffnen.
• Achten Sie bei der Benutzung dieser Funktionen stets darauf,
dass die Druckplatte eingesetzt ist.
• Nach Abschluss des Garvorgangs geht der Timer zurück auf „0“
und aktiviert automatisch die Warmhaltefunktion (Standard:
4Std.).
REINIGUNG UND PFLEGE
• Ziehen Sie vor der Reinigung den Netzstecker und warten Sie,
bis das Gerät abgekühlt ist.
• Reinigen Sie nach jedem Gebrauch das Gerätegehäuse und den
Deckel mit einem weichen und feuchten Tuch.
• Nehmen Sie bei Bedarf einen kleinen Pinsel oder Wattestäbchen.
Gießen Sie nie Flüssigkeit in das Gerätegehäuse.
• Waschen Sie abnehmbare Teile (Gartopf, Korb, Ständer,
Dampfgestell, Druckplatte, Heißluftrost, Griff, Entnahmewerkzeug
und Kondensatbehälter) in warmem Seifenwasser mit einem
weichen Tuch oder Schwamm ab.
• Bevor Sie die Deckeleinsätze abwaschen, beachten Sie bitte die
folgenden Schritt für eine sichere und ordnungsgemäße
Demontage.
• Trocknen Sie jedes Teil sorgfältig ab.
• Beachten Sie, dass der Gartopf, der Korb und das Dampfgestell
spülmaschinenfest sind. Es wird jedoch empfohlen, diese Teile
per Hand abzuwaschen, weil dies der Nutzungsdauer des
Produkts zugutekommt.
• Verwenden Sie beim Reinigen oder Kochen mit dem Gartopf
oder dem Korb niemals Gegenstände aus Metall oder
Topfreiniger, um eine Beschädigung der Antihaftbeschichtung zu
vermeiden.
• Benutzen Sie für Gerätekomponenten oder Zubehörteile
keinesfalls aggressive chemische Reiniger, Scheuerschwämme
oder -pulver.
Lagerungshinweise
• Trennen Sie das Gerät von der Stromversorgung ab und lassen
Sie es vollständig abkühlen.
• Lassen Sie den Gartopf und den Griff im Gerät.
• Lagern Sie das Gerät in der Originalverpackung an einem
kühlen, trockenen Ort.
DE
69
Page 70

Bedienungsanleitung
FEHLERBEHEBUNG
Dieses Gerät verfügt über Sicherheitsfunktionen, die es abschalten,
sobald während der Benutzung eine unnormale Situation eintritt. Auf
dem Bedienfeld wird daraufhin eine Fehlermeldung angezeigt. Je
nach Fehler kann auch ein akustisches Signal zu hören sein. Sobald
das Problem erkannt und behoben ist, können Sie das Gerät wieder
anschließend und die Benutzung fortsetzen.
Beschreibung Lösung
FEHLER: NOT-LOCK
Der obere Deckel ist offen. Schließen Sie den Deckel und
drehen Sie den Knopf im
Uhrzeigersinn, um das Gerät
sicher zu verschließen.
FEHLER: Das Gerät funktioniert im Druckgarmodus nicht.
Druckplatte nicht korrekt
eingesetzt.
FEHLER: Das Gerät funktioniert im Heißluftmodus nicht.
Heißluftrost nicht korrekt
eingesetzt.
FEHLER: NO-POT
Setzen Sie die Druckplatte
anweisungsgemäß ein.
Achten Sie darauf, dass das
Heißluftrost entfernt ist.
Setzen Sie das Heißluftrost
anweisungsgemäß ein.
Achten Sie darauf, dass die
Druckplatte entfernt ist.
Gartopf nicht korrekt eingesetzt. Drücken Sie den Druckgartopf
vorsichtig in das Gerät, bis er die
Heizplatte unten im Gerät berührt.
UMWELT
Dieses Gerät darf am Ende seiner Lebenszeit nicht im
Hausmüll entsorgt werden, sondern muss an einer Sammelstelle für
das Recyceln von elektrischen und elektronischen Haushaltsgeräten
abgegeben werden. Das Symbol auf dem Gerät, in der
Bedienungsanleitung und auf der Verpackung macht Sie auf dieses
wichtige Thema aufmerksam. Die in diesem Gerät verwendeten
Materialien können recycelt werden. Durch das Recyceln gebrauchter
Haushaltsgeräte leisten Sie einen wichtigen Beitrag zum
Umweltschutz. Fragen Sie Ihre örtliche Behörde nach Informationen
über eine Sammelstelle.
Support
Sämtliche verfügbaren Informationen und Ersatzteile finden Sie unter
www.princesshome.eu!
70
Page 71

Manual de instrucciones
SEGURIDAD
• Si ignora las instrucciones de seguridad,
eximirá al fabricante de toda
responsabilidad por posibles daños.
• Si el cable de alimentación está dañado,
corresponde al fabricante, al representante
o a una persona de cualificación similar su
reemplazo para evitar peligros.
• Nunca mueva el aparato tirando del cable y
asegúrese de que no se pueda enredar con
el cable.
• El aparato debe colocarse sobre una
superficie estable y nivelada.
• El usuario no debe dejar el dispositivo sin
supervisión mientras esté conectado a la
alimentación.
• Este aparato no se ha diseñado para ser
utilizado por personas (incluidos niños) con
capacidades físicas, sensoriales o mentales
reducidas, ni por personas con falta de
experiencia y conocimientos, a no ser que
hayan recibido supervisión o instrucciones
respecto al uso del aparato por parte de una
persona responsable de su seguridad.
• Es necesario estar muy atento cuando se
utiliza el aparato cerca de niños.
• ADVERTENCIA: Los alimentos que se
vierten pueden provocar quemaduras
graves. Mantenga el aparato y el cable
alejados de los niños. En ningún caso
coloque el cable por encima del borde de la
encimera y no utilice una toma que esté
situada por debajo de la encimera ni un
cable alargador.
• El uso de accesorios no recomendados por
el fabricante del aparato puede provocar
lesiones.
• No utilice el aparato en el exterior.
• No coloque el aparato encima o cerca de un
quemador eléctrico o de gas caliente ni
dentro de un horno caliente.
• No limpie el aparato con estropajos
metálicos. Podrían desprenderse
fragmentos del estropajo y tocar las piezas
eléctricas, lo que supondría un riesgo de
descarga eléctrica.
• Tenga mucho cuidado al retirar la bandeja y
al desechar la grasa caliente.
• Se deben extremar las precauciones
cuando se mueve un aparato que contiene
aceite u otros líquidos calientes.
ES
71
Page 72

Manual de instrucciones
• PRECAUCIÓN: Para protegerse frente a los
daños y descargas eléctricas, no cocine en
la base. Cocine solo en el recipiente para
cocinar suministrado.
• Para desconectar el aparato, pulse el botón
de encendido y, a continuación, retire el
enchufe de la toma de pared.
• No utilice la placa de presión, la rejilla para
freír con aire ni el recipiente para cocinar si
están abollados o desgastados.
• ADVERTENCIA: Nunca fría con mucho
aceite ni con presión en la freidora Aerofryer,
independientemente de si la tapa está o no
colocada. ES PELIGROSO: PODRÍA
PRODUCIRSE UN INCENDIO Y DAÑOS
GRAVES.
• Utilice SIEMPRE el asa desmontable para
colocar o retirar la rejilla de la freidora
Aerofryer o la pieza de la placa de presión.
• Asegúrese de que el filtro y la válvula de
liberación de presión están libres de
desechos y restos de comida.
• No llene el recipiente para cocinar por
encima de la línea de llenado máximo.
• Antes de colocar el recipiente para cocinar
en la base, asegúrese de que tanto el
recipiente como la base están secos; para
ello, límpielos con un paño suave.
• Asegúrese siempre de que el aparato está
bien montado antes de su utilización.
• Este aparato cocina a presión. Un uso
inadecuado del mismo puede provocar
escaldaduras. Antes de utilizar la unidad,
asegúrese de que está bien cerrada.
• Cuando utilice la placa de presión,
asegúrese siempre de que esté bien
colocada y la tapa esté bien cerrada antes
de ponerla en funcionamiento.
• No cubra la válvula de liberación de la
presión.
• Lleve cuidado cuando levante el recipiente
para cocinar de la base.
• Si el recipiente para cocinar extraíble está
vacío, no lo caliente durante más de 10
minutos: la superficie para cocinar podría
sufrir daños.
• Cuando utilice la función de salteado, deje
siempre la tapa en la posición abierta.
72
Page 73

Manual de instrucciones
• Para evitar posibles daños producidos por el
vapor, coloque la unidad lejos de las
paredes y los armarios durante su
utilización.
• No levante la unidad por las pestañas
laterales de la tapa.
• No toque el elemento calentador expuesto.
• Para protegerse contra una descarga
eléctrica, no sumerja el cable, el enchufe ni
el aparato en el agua o cualquier otro
líquido.
• Este aparato se ha diseñado para el uso en
el hogar y en aplicaciones similares, tales
como:
• Zonas de cocina para el personal en
tiendas, oficinas y otros entornos de trabajo.
• Clientes en hoteles, moteles y otros
entornos de tipo residencial.
• Entornos de tipo casa de huéspedes.
• Granjas.
• Los niños no pueden jugar con el aparato.
• Este aparato no debe ser utilizado por
niños. Mantenga el aparato y el cable fuera
del alcance de los niños.
• Para protegerse contra una descarga
eléctrica, no sumerja el cable, el enchufe ni
el aparato en el agua o cualquier otro
líquido.
• No caliente los alimentos demasiado
tiempo.
• La superficie del elemento calefactor está
sujeta a calor residual tras el uso.
• El conector debe extraerse antes de limpiar
el aparato, asegúrese de que la toma esté
totalmente seca antes de volver a usar la
unidad.
• El recipiente a presión no debe abrirse
hasta que la presión haya disminuido lo
suficiente ni durante el uso.
• La superficie puede calentarse
durante el uso.
• ADVERTENCIA: Si la superficie está
agrietada, apague el aparato para evitar la
posibilidad de una descarga eléctrica.
• La temperatura de las superficies accesibles
puede ser elevada cuando funcione el
aparato.
ES
73
Page 74

Manual de instrucciones
1
716 1715 8
9
10
11
12
13
14
18 19 20
2
3
4
5
6
• El aparato no está diseñado para usarse
mediante un temporizador externo o un
sistema de control remoto independiente.
8. Cesta de la freidora Aerofryer
9. Soporte del flujo de aire
10. Recipiente para cocinar antiadherente
• Este aparato debe enchufarse a una toma
de pared conectada a tierra (para aparatos
PANEL DE CONTROL
de clase I).
• Para evitar obstrucciones en el flujo de aire,
no ponga nada encima del aparato y
asegúrese de que haya siempre 10cm de
espacio libre alrededor del aparato.
• Este aparato se debe utilizar únicamente
para el uso doméstico y sólo para las
funciones para las que se ha diseñado. En el
peor de los casos, los alimentos pueden
prenderse. (No utilice más de una
cucharadita de aceite, ninguna carne que
suelte demasiada grasa o agua para hervir
alimentos.)
DESCRIPCIÓN DE LAS PIEZAS
1. Bandeja de condensación
2. Unidad
3. Rejilla de la freidora Aerofryer
4. Placa de presión
5. Asa para la placa de presión y la rejilla de la freidora Aerofryer
6. Asa para la cesta para freír con aire
7. Rejilla para cocción al vapor
74
Page 75

Manual de instrucciones
1: Cocción a presión 11: Hornear
2: Cocción lenta 12: Yogur
3: Vapor 13: Saltear
4: Sopa/caldo 14: Encendido
5: Arroz/granos 15: Pantalla
6: Liberación de vapor 16: Mantenimiento del calor
7: Icono de olla a presión 17: Inicio retardado
8: Icono de la freidora Aerofryer 18: Subir/bajar temperatura
9: Freír con aire 19: Inicio/parada
10: Tostar/asar 20: Subir/bajar tiempo
Botón de encendido/apagado
• Pulse este botón para encender y apagar la unidad. Una vez
haya enchufado el aparato, el botón de encendido se iluminará
en color rojo. Cuando pulse el botón, la luz cambiará a blanco.
Icono de la freidora Aerofryer
• Este icono se iluminará automáticamente cuando la rejilla de la
freidora Aerofryer se haya colocado correctamente y la unidad
esté lista para utilizar las funciones de fritura con aire.
Nota: Las siguientes funciones se basan en la rejilla de la freidora
Aerofryer: freír con aire, tostar/asar y hornear. Estas funciones solo
se podrán seleccionar cuando se haya colocado la rejilla de la
freidora Aerofryer y se hayan iluminado.
Icono de olla a presión
• Este icono se iluminará automáticamente cuando la placa de
presión se haya colocado correctamente y la unidad esté lista
para utilizar las funciones para cocinar a presión.
Nota: Las siguientes funciones se basan en la función de la placa de
presión: cocción a presión, cocción lenta, vapor, sopa/caldo, arroz/
granos, yogur y saltear. Estas funciones solo se podrán seleccionar
cuando se haya colocado la placa de presión de manera correcta y
segura y se hayan iluminado.
Nota: La función de salteado se podrá utilizar incluso con la tapa
abierta.
Pantalla
• Muestra la temperatura y el tiempo; los iconos de temperatura y
tiempo se iluminarán de manera alternativa.
Botón de inicio/parada
• Tóquelo una vez para iniciar o detener el proceso de cocinado.
Botón +
• Tóquelo para aumentar la temperatura o el tiempo.
Botón -
• Tóquelo para disminuir la temperatura o el tiempo.
Botón de liberación de vapor
• Pulse el botón de liberación de vapor para liberar la presión
cuando la cocción a presión haya terminado. El ciclo de
liberación de vapor dura 3 minutos. Una vez se haya liberado
todo el vapor, la tapa se podrá abrir con seguridad.
Nota: Para detener un programa de cocinado antes de que haya
finalizado, pulse el botón de INICIO/PARADA para detener la cocción
y, a continuación, pulse el botón de LIBERACIÓN DE VAPOR.
Función de mantenimiento del calor
ES
75
Page 76

Manual de instrucciones
• Una vez haya terminado de cocinar, la unidad pasará
automáticamente a la función de mantenimiento del calor.
Función de inicio retardado
• Pulse este botón para retrasar la cocción hasta la hora de puesta
en marcha deseada (entre 30 minutos y 24 horas). En primer
lugar, pulse la función de cocinado que desee utilizar y, a
continuación, pulse el botón del programador de retardo. La luz
parpadeará. Establezca entonces la cocción retardada que desee
y pulse el botón de INICIO para fijarla. Para cancelar el ajuste del
programador de retardo, pulse de nuevo el botón del
programador de retardo (antes de pulsar el botón de inicio).
ANTES DEL PRIMER USO
• Retire todo el material de embalaje.
• Retire los adhesivos o etiquetas del aparato.
• Limpie bien las piezas con agua caliente, un poco de detergente
y una esponja no abrasiva.
• Limpie el interior y el exterior del aparato con un paño húmedo.
• Coloque el aparato sobre una superficie estable, horizontal y
nivelada; no coloque el aparato sobre superficies no resistentes
al calor.
• Esta es una freidora de aire que funciona con aire caliente.
No llene la cubeta con aceite o grasa para freír.
• Para evitar obstrucciones en el flujo de aire, no ponga nada
encima del aparato y asegúrese de que haya siempre 10
centímetros de espacio libre alrededor del aparato.
Ajuste de la rejilla para cocción al vapor
• Para ajustar la rejilla para cocción al vapor, despliegue las patas
y coloque con cuidado la parte en “V” central en el gancho
situado junto al borde. (Figura 1)
• Según la receta y las preferencias de cocción, es posible colocar
los alimentos en cualquiera de los lados de la rejilla para cocción
al vapor reversible, para conseguir así el resultado deseado.
(Figura 2)
76
Page 77

Manual de instrucciones
• Las patas de la rejilla para cocción al vapor pueden doblarse
para su almacenamiento. Empuje con cuidado la parte en “V”
central hacia fuera para desbloquearla y, a continuación, pliegue
las patas hacia dentro.
PIEZAS DE LA TAPA
Esta unidad se suministra con dos piezas distintas para la tapa: la
placa de presión y la rejilla de la freidora Aerofryer. Las dos piezas
permiten a los usuarios cocinar en la misma unidad a presión y freír
con aire, entre otras funciones, intercambiando las placas.
Rejilla de la freidora Aerofryer (A)
Es necesario colocar la rejilla de la freidora Aerofryer para acceder a
estas funciones de cocinado:
• Freír con aire
• Tostar/asar
• Hornear
Placa de presión (B)
Es necesario colocar la placa de presión para acceder a estas
funciones de cocinado:
• Cocción a presión
• Cocción lenta
• Vapor
• Sopa/caldo
• Arroz/granos
• Yogur
• Saltear
NOTA: Solo se podrán seleccionar las funciones de cocinado cuando
se haya colocado la pieza de cocción adecuada.
COLOCACIÓN/RETIRADA DE LA PLACA DE PRESIÓN O LA REJILLA DE LA FREIDORA AEROFRYER
Siempre que sea posible, deje la pieza de la placa de presión o la
rejilla de la freidora Aerofryer caliente colocada hasta que la unidad
se haya enfriado por completo. Utilice siempre el asa para la placa
incluida con aquellas recetas para las que sea necesario cambiar la
placa o la pieza durante el proceso de cocinado. El diseño de este
asa permite colocar y retirar cómodamente las placas incluso cuando
están calientes.
1. Sujete con firmeza el asa para la placa con el protector de
nudillos extendido orientado hacia abajo (3).
2. Una el extremo del asa con la pestaña metálica que sobresale de
la placa. Una vez fijada, pulse el botón de la izquierda para
bloquearla (4).
ES
77
Page 78

Manual de instrucciones
3. Cuando el asa esté bloqueada de forma segura en la placa, pulse
la pestaña de liberación situada en la parte superior de la placa
(5).
4. Con la ayuda del asa, levante con cuidado la placa para extraerla
de la unidad y colóquela sobre una superficie lisa, robusta y
resistente al calor.
5. Para retirar el asa de la placa, pulse el botón situado en el lado
derecho del asa y extráigala (6).
6. Antes de mover o limpiar la placa deje que se enfríe por
completo.
7. La imagen 7 muestra dónde se debe colocar la placa en la tapa.
78
Page 79

Manual de instrucciones
USO
Funciones de la freidora Aerofryer
Cómo utilizar la función de freír con aire
• Gire el mando de la tapa en el sentido contrario a las agujas el
reloj para abrir la tapa superior.
• Asegúrese de que la pieza de la placa de presión se ha retirado.
Utilice siempre el asa para la placa si las placas están calientes.
• Coloque la rejilla de la freidora Aerofryer.
• Coloque el recipiente para cocinar antiadherente dentro de la
unidad. Coloque la cesta para freír con aire dentro del recipiente
para cocinar. Introduzca los alimentos dentro de la cesta para
freír con aire.
• Cierre la tapa y bloquéela girándola en el sentido de las agujas
del reloj.
• Pulse el botón de encendido y, a continuación, seleccione FREÍR
CON AIRE. El icono de la freidora Aerofryer se iluminará. Ajuste
el tiempo y la temperatura de cocción deseados con los botones
+ y –.
• Pulse el botón de INICIO/PARADA para comenzar a cocinar. El
temporizador de cuenta atrás y la temperatura
• seleccionada se mostrarán alternativamente en la pantalla.
• Cuando la cocción haya terminado, se escuchará una señal
acústica.
Nota: El ciclo de fritura con aire se puede “pausar” levantando la tapa
o pulsando el botón de INICIO/PARADA
. Cuando se cierre la tapa o se pulse el botón de INICIO/PARADA, la
cocción se reanudará.
Cómo tostar/asar
• Gire el mando de la tapa en el sentido contrario a las agujas el
reloj para abrir la tapa superior.
• Asegúrese de que la pieza de la placa de presión se ha retirado.
Utilice siempre el asa para la placa si las placas están calientes.
Coloque la rejilla de la freidora Aerofryer.
• Coloque el recipiente para cocinar antiadherente dentro de la
unidad. Si es necesario, introduzca la rejilla para cocción al vapor
dentro del recipiente para cocinar y coloque alimentos encima.
• Cierre la tapa y bloquéela girándola en el sentido de las agujas
del reloj.
• Pulse el botón de encendido y, a continuación, seleccione
TOSTAR/ASAR. El icono de la freidora Aerofryer se iluminará.
Ajuste el tiempo y la temperatura de cocción deseados con los
botones + y –. Pulse el botón de INICIO/PARADA para comenzar
a cocinar. El temporizador de cuenta atrás y la temperatura
seleccionada se mostrarán alternativamente en la pantalla.
• El ciclo de TOSTAR/ASAR se puede “pausar” levantando la tapa
o pulsando el botón de INICIO/PARADA. Cuando se cierre la
tapa o se pulse el botón de INICIO/PARADA, la cocción se
reanudará.
• Cuando la cocción haya terminado, se escuchará una señal
acústica y la unidad pasará al modo de mantenimiento del calor.
Cómo hornear
• Gire el mando de la tapa en el sentido contrario a las agujas el
reloj para abrir la tapa superior.
• Asegúrese de que la pieza de la placa de presión se ha retirado.
Utilice siempre el asa para la placa si las placas están calientes.
Coloque la rejilla de la freidora Aerofryer.
ES
79
Page 80

Manual de instrucciones
• Coloque el recipiente para cocinar antiadherente dentro de la
unidad. Si es necesario, introduzca la rejilla para cocción al vapor
dentro del recipiente para cocinar y coloque alimentos encima.
• Cierre la tapa y bloquéela girándola en el sentido de las agujas
del reloj.
• Pulse el botón de encendido y, a continuación, seleccione
HORNEAR. El icono de la freidora Aerofryer se iluminará. Ajuste
el tiempo y la temperatura de cocción deseados con los botones
+ y –. Pulse el botón de INICIO/PARADA para comenzar a
cocinar. El temporizador de cuenta atrás y la temperatura
seleccionada se mostrarán alternativamente en la pantalla.
• El ciclo de horneado se puede “pausar” levantando la tapa o
pulsando el botón de INICIO/PARADA. Cuando se cierre la tapa
o se pulse el botón de INICIO/PARADA, la cocción se reanudará.
• Cuando la cocción haya terminado, se escuchará una señal
acústica y la unidad pasará al modo de mantenimiento del calor.
Con esta función también es posible deshidratar frutas o verduras.
Para obtener más información, consulte la tabla de funciones de la
freidora Aerofryer.
Funciones de la cocción a presión
Función de cocción a presión
• Gire el mando en el sentido contrario a las agujas el reloj para
abrir la tapa superior.
• Asegúrese de que la rejilla de la freidora Aerofryer se ha retirado.
Utilice siempre el asa para la placa. Coloque la placa de presión.
• Coloque el recipiente para cocinar antiadherente dentro de la
unidad y los alimentos dentro del recipiente.
• Cierre la tapa y bloquéela girándola en el sentido de las agujas
del reloj.
• Pulse el botón de encendido y, a continuación, seleccione
COCCIÓN A PRESIÓN. El icono de presión se iluminará. Ajuste
el tiempo de cocción deseado con los botones + y –.
• Cuando se alcance la presión adecuada, la pantalla dejará de
mostrar los guiones que dan vueltas y mostrará el temporizador
de cuenta atrás.
• Cuando la cocción haya terminado, se escuchará una señal
acústica. Una vez haya terminado de cocinar, la unidad pasará
automáticamente a la función de mantenimiento del calor.
• Pulse el botón de LIBERACIÓN DE VAPOR para liberar la
presión cuando la cocción a presión haya terminado. El ciclo de
liberación de vapor dura 3 minutos. Una vez se haya liberado
todo el vapor, la tapa se podrá abrir con seguridad.
• Para detener un programa de cocinado antes de que haya
finalizado, pulse el botón de INICIO/PARADA para detener la
cocción y, a continuación, pulse el botón de LIBERACIÓN DE
VAPOR.
NUNCA sitúe la cara o las manos sobre la unidad mientras esté
liberando vapor ni cuando abra la tapa. Utilice SIEMPRE agarradores
de cocina durante la liberación de vapor y cuando abra la tapa. Nota:
Pulse el PROGRAMADOR DE RETARDO y ajuste el tiempo para
definir la función de inicio retardado. Si desea que la cocción
comience de inmediato, pulse el botón de INICIO/PARADA para
comenzar a cocinar. Los guiones que dan vueltas por el panel de
control indican que la unidad está alcanzando la presión necesaria.
Función de cocción lenta
80
Page 81

Manual de instrucciones
• Gire el mando en el sentido contrario a las agujas el reloj para
abrir la tapa superior.
• Asegúrese de que la rejilla de la freidora Aerofryer se ha retirado.
Utilice siempre el asa para la placa. Coloque la placa de presión.
• Coloque el recipiente para cocinar antiadherente dentro de la
unidad y los alimentos dentro del recipiente.
• Cierre la tapa y bloquéela girándola en el sentido de las agujas
del reloj.
• Pulse el botón de encendido y, a continuación, seleccione
COCCIÓN LENTA. El icono de presión se iluminará. Ajuste el
temporizador en el tiempo deseado con los botones + y –.
• Cuando se alcance la temperatura adecuada, la pantalla dejará
de mostrar los guiones que dan vueltas y mostrará el
temporizador de cuenta atrás.
• Cuando la cocción haya terminado, se escuchará una señal
acústica. Una vez haya terminado de cocinar, la unidad pasará
automáticamente a la función de MANTENIMIENTO DEL
CALOR.
• Pulse el botón de LIBERACIÓN DE VAPOR para liberar la
presión cuando la cocción a presión haya terminado. El ciclo de
liberación de vapor dura 3 minutos. Una vez se haya liberado
todo el vapor, la tapa se podrá abrir con seguridad.
• Para detener un programa de cocinado antes de que haya
finalizado, pulse el botón de INICIO/PARADA para detener la
cocción y, a continuación, pulse el botón de LIBERACIÓN DE
VAPOR.
Nota: Pulse el PROGRAMADOR DE RETARDO y ajuste el tiempo
para definir la función de inicio retardado. Si desea que la cocción
comience de inmediato, pulse el botón de INICIO/PARADA para
comenzar a cocinar. Los guiones que dan vueltas por el panel de
control indican que la unidad está alcanzando la temperatura
necesaria.
Función de vapor
• Gire el mando en el sentido contrario a las agujas el reloj para
abrir la tapa superior.
• Asegúrese de que la rejilla de la freidora Aerofryer se ha retirado.
Utilice siempre el asa para la placa. Coloque la placa de presión.
• Coloque el recipiente para cocinar antiadherente dentro de la
unidad. Coloque los alimentos sobre la rejilla para cocción al
vapor suministrada. No llene el recipiente para cocinar más de
2/3 de su capacidad.
• Añada 1,5 tazas de agua o líquido que se vaporice en el
recipiente para cocinar.
• Cierre la tapa y bloquéela girándola en el sentido de las agujas
del reloj.
• Pulse el botón de encendido y, a continuación, seleccione
VAPOR. El icono de presión se iluminará. Ajuste el tiempo de
cocción deseado con los botones + y –.
• Pulse el botón de INICIO/PARADA para comenzar a cocinar. Los
guiones que dan vueltas por el panel de control indican que la
unidad está alcanzando la temperatura necesaria.
• Cuando se alcance la presión/temperatura adecuada, la pantalla
dejará de mostrar los guiones que dan vueltas y mostrará el
temporizador de cuenta atrás.
• Cuando la cocción haya terminado, se escuchará una señal
acústica. Cuando la cocción haya terminado y vaya a retirar los
alimentos, pulse el botón de LIBERACIÓN DE VAPOR.
ES
81
Page 82

Manual de instrucciones
• Pulse el botón de LIBERACIÓN DE VAPOR para liberar la
presión cuando la cocción a presión haya terminado. El ciclo de
liberación de vapor dura 3 minutos. Una vez se haya liberado
todo el vapor, la tapa se podrá abrir con seguridad.
• Para detener un programa de cocinado antes de que haya
finalizado, pulse el botón de INICIO/PARADA para detener la
cocción y, a continuación, pulse el botón de LIBERACIÓN DE
VAPOR.
Cómo utilizar la función de sopa/caldo
• Gire el mando de la tapa en el sentido contrario a las agujas el
reloj para abrir la tapa superior.
• Asegúrese de que la pieza de la placa de presión se ha retirado.
Utilice siempre el asa para la placa si las placas están calientes.
Coloque la rejilla de la freidora Aerofryer.
• Coloque el recipiente para cocinar antiadherente dentro de la
unidad. Coloque la cesta de la freidora Aerofryer dentro del
recipiente para cocinar. Introduzca los ingredientes dentro de la
cesta.
• Cierre la tapa y bloquéela girándola en el sentido de las agujas
del reloj.
• Pulse el botón de encendido y, a continuación, seleccione la
función de SOPA/CALDO. El icono de la freidora Aerofryer se
iluminará. Ajuste el tiempo y la temperatura de cocción deseados
con los botones + y –.
• Pulse el botón de INICIO/PARADA para comenzar a cocinar. El
temporizador de cuenta atrás y la temperatura seleccionada se
mostrarán alternativamente en la pantalla.
• Cuando la cocción haya terminado, se escuchará una señal
acústica.
• Pulse el botón de LIBERACIÓN DE VAPOR para liberar la
presión cuando la cocción a presión haya terminado. El ciclo de
liberación de vapor dura 3 minutos. Una vez se haya liberado
todo el vapor, la tapa se podrá abrir con seguridad.
• Para detener un programa de cocinado antes de que haya
finalizado, pulse el botón de INICIO/PARADA para detener la
cocción y, a continuación, pulse el botón de LIBERACIÓN DE
VAPOR.
Cómo utilizar la función de arroz/granos
• Gire el mando en el sentido contrario a las agujas el reloj para
abrir la tapa superior.
• Asegúrese de que la rejilla de la freidora Aerofryer se ha retirado.
Utilice siempre el asa para la placa. Coloque la placa de presión.
• Coloque el recipiente para cocinar antiadherente dentro de la
unidad. Coloque el arroz crudo y el líquido dentro del recipiente
para cocinar.
• Cierre la tapa y bloquéela girándola en el sentido de las agujas
del reloj.
• Pulse el botón de encendido y, a continuación, seleccione
ARROZ/GRANOS. El icono de presión se iluminará. Ajuste el
tiempo de cocción deseado con los botones + y –.
• Cuando se alcance la presión, la pantalla dejará de mostrar los
guiones que dan vueltas y mostrará el temporizador de cuenta
atrás.
• Cuando la cocción haya terminado, se escuchará una señal
acústica. Una vez haya terminado de cocinar, la unidad pasará
automáticamente a la función de MANTENIMIENTO DEL
CALOR.
82
Page 83

Manual de instrucciones
• Pulse el botón de LIBERACIÓN DE VAPOR para liberar la
presión cuando la cocción a presión haya terminado. El ciclo de
liberación de vapor dura 3 minutos. Una vez se haya liberado
todo el vapor, la tapa se podrá abrir con seguridad.
• Para detener un programa de cocinado antes de que haya
finalizado, pulse el botón de INICIO/PARADA para detener la
cocción y, a continuación, pulse el botón de LIBERACIÓN DE
VAPOR.
NUNCA sitúe la cara o las manos sobre la unidad mientras esté
liberando vapor ni cuando abra la tapa. Utilice SIEMPRE agarradores
de cocina durante la LIBERACIÓN DE VAPOR y cuando abra la
tapa.
Nota: No llene el recipiente para cocinar más de la mitad de su
capacidad cuando cocine alimentos que aumenten su volumen.
Nota: Pulse el PROGRAMADOR DE RETARDO y ajuste el tiempo
para definir la función de inicio retardado.
• Si desea que la cocción comience de inmediato, pulse el botón
de INICIO/PARADA para comenzar a cocinar. Los guiones que
dan vueltas por el panel de control indican que la unidad está
alcanzando la presión necesaria.
Función de yogur
• Gire el mando en el sentido contrario a las agujas el reloj para
abrir la tapa superior.
• Asegúrese de que la rejilla de la freidora Aerofryer se ha retirado.
Utilice siempre el asa para la placa.
• Coloque la placa de presión.
• Coloque el recipiente para cocinar antiadherente dentro de la
unidad y los alimentos dentro del recipiente.
• Cierre la tapa y bloquéela girándola en el sentido de las agujas
del reloj.
• Pulse el botón de encendido y, a continuación, seleccione
YOGUR. El icono de presión se iluminará. Ajuste el tiempo de
cocción deseado con los botones + y –.
• Cuando se alcance la presión, la pantalla dejará de mostrar los
guiones que dan vueltas y mostrará el temporizador de cuenta
atrás.
• Cuando la cocción haya terminado, se escuchará una señal
acústica.
Nota: Pulse el PROGRAMADOR DE RETARDO y ajuste el tiempo
para definir la función de inicio retardado. Si desea que la cocción
comience de inmediato, pulse el botón de INICIO/PARADA para
comenzar a cocinar. Los guiones que dan vueltas por el panel de
control indican que la unidad está alcanzando la presión necesaria.
Cómo saltear
• Gire el mando en el sentido contrario a las agujas el reloj para
abrir la tapa superior.
• Asegúrese de que la rejilla de la freidora Aerofryer se ha retirado.
Utilice siempre el asa para la placa si las placas están calientes.
• Coloque la placa de presión.
• Coloque el recipiente para cocinar antiadherente dentro de la
unidad.
• Cuando utilice la función de salteado, la tapa puede permanecer
abierta.
• Pulse el botón de encendido y, a continuación, seleccione
SALTEAR. El icono de presión se iluminará. Ajuste la
temperatura de cocción (alta, media o baja) deseada con los
botones + y –.
ES
83
Page 84

Manual de instrucciones
• Pulse el botón de INICIO/PARADA para comenzar a cocinar.
• Cuando la cocción haya terminado, pulse el botón de INICIO/
PARADA.
• Pulse el botón de LIBERACIÓN DE VAPOR para liberar la
presión cuando la cocción a presión haya terminado. El ciclo de
liberación de vapor dura 3 minutos. Una vez se haya liberado
todo el vapor, la tapa se podrá abrir con seguridad.
• Para detener un programa de cocinado antes de que haya
finalizado, pulse el botón de INICIO/PARADA para detener la
cocción y, a continuación, pulse el botón de LIBERACIÓN DE
VAPOR.
NOTA: NUNCA utilice utensilios metálicos con la freidora Aerofryer,
ya que podrían arañar el
recipiente para cocinar antiadherente o la rejilla de presión.
FUNCIONES DE LA FREIDORA AEROFRYER
Programa Freír con aire
Logotipo
Tiempo predeterminado (min) 20min
Intervalo (min) 1 a 60min
Temperatura predeterminada
(°C)
Intervalo (°C) 80 a 200°C
Cantidad 500 a 750g
200°C
Información adicional Cuando prepare patatas fritas,
agítelas cada 5 minutos
Programa Tostar/asar
Logotipo
Tiempo predeterminado (min) 10min
Intervalo (min) 1 a 60min
Temperatura predeterminada
(°C)
Intervalo (°C) 80 a 220°C
Cantidad 250 a 500g
Programa Hornear/deshidratar
Logotipo
Tiempo predeterminado (min) 15min
Intervalo (min) 1min a 24h
Temperatura predeterminada
(°C)
Intervalo (°C) 30 a 200°C
Cantidad 250 a 500g
220°C
200°C
84
Page 85

Manual de instrucciones
Información adicional Entre 1 y 89minutos se puede
avanzar de minuto a minuto, y
entre 90 minutos y 24 horas se
avanza cada 30 minutos. Con
esta función es posible
deshidratar frutas y verduras.
Configuración preferida: de 30 a
70°C durante 5 a 10 horas, en
función del tipo de alimento.
• Cuando utilice estas funciones, asegúrese siempre de que ha
introducido la rejilla de freír con aire.
• Cuando la cocción haya terminado, el temporizador pasará a “0”
y la unidad cambiará automáticamente a la función de
mantenimiento del calor durante 30minutos a 80°C.
Funciones de presión de la freidora Aerofryer
Programa Cocción a presión
Logotipo
Tiempo predeterminado (min) 30 min
Intervalo (min) 0 a 4h
Cantidad Observe el indicador máx del
interior de la olla
Información adicional Pulse el botón de liberación de
vapor para liberar la presión
cuando la cocción a presión haya
terminado. El ciclo de liberación
de vapor dura 3 minutos. Una
vez se haya liberado todo el
vapor, la tapa se podrá abrir con
seguridad.
Programa Cocción lenta
Logotipo
Tiempo predeterminado (min) 4h
Intervalo (min) 4 a 12h
Cantidad Observe el indicador máx del
interior de la olla
Información adicional La temperatura predeterminada
es HI (ajustes: HI, LO).
Pulse el botón de liberación de
vapor para liberar la presión
cuando la cocción a presión haya
terminado. El ciclo de liberación
de vapor dura 3 minutos. Una
vez se haya liberado todo el
vapor, la tapa se podrá abrir con
seguridad.
Programa Vapor
Logotipo
ES
85
Page 86

Manual de instrucciones
Tiempo predeterminado (min) 10min
Intervalo (min) 1 a 30min
Cantidad 500 a 750g
Información adicional Añada 1,5 tazas de agua en el
recipiente para cocinar. Puede
llenar el recipiente para cocinar
hasta 2/3 de su capacidad.
Pulse el botón de liberación de
vapor para liberar la presión
cuando la cocción a presión haya
terminado. El ciclo de liberación
de vapor dura 3 minutos. Una vez
se haya liberado todo el vapor, la
tapa se podrá abrir con
seguridad.
Programa Sopa/caldo
Logotipo
Tiempo predeterminado (min) 1h
Intervalo (min) 0,5 a 4h
Cantidad Observe el indicador máx del
interior de la olla
Información adicional Utilice la función de salteado para
dorar/sofreír verduras.
Pulse el botón de liberación de
vapor para liberar la presión
cuando la cocción a presión haya
terminado. El ciclo de liberación
de vapor dura 3 minutos. Una vez
se haya liberado todo el vapor, la
tapa se podrá abrir con
seguridad.
Programa Arroz/granos
Logotipo
Tiempo predeterminado (min) 20min
Intervalo (min) 3 a 60min
Cantidad Utilice 4 tazas de arroz y 5 tazas
de agua.
86
Page 87

Manual de instrucciones
Información adicional 100g de arroz crudo se
convierten en 250g de arroz
cocido. Los distintos tipos de
arroz/granos requieren
cantidades de agua diferentes.
Pulse el botón de liberación de
vapor para liberar la presión
cuando la cocción a presión haya
terminado. El ciclo de liberación
de vapor dura 3 minutos. Una
vez se haya liberado todo el
vapor, la tapa se podrá abrir con
seguridad.
Programa Yogur
Logotipo
Tiempo predeterminado (min) 6h
Intervalo (min) 4 a 12h
Cantidad 9frascos de 120ml cada uno
Programa Saltear
Logotipo
Tiempo predeterminado (min) 10min
Intervalo (min) 1 a 30min
Cantidad 500g
Información adicional La temperatura predeterminada
es HI (ajustes: HI, MD, LO).
Cuando utilice esta función,
podrá abrir la tapa.
Pulse el botón de liberación de
vapor para liberar la presión
cuando la cocción a presión haya
terminado. El ciclo de liberación
de vapor dura 3 minutos. Una
vez se haya liberado todo el
vapor, la tapa se podrá abrir con
seguridad.
• Cuando utilice estas funciones, asegúrese siempre de que ha
introducido la placa de presión.
• Cuando la cocción haya terminado, el temporizador pasará a “0”
y la unidad cambiará automáticamente a la función de
mantenimiento del calor. El tiempo predeterminado es de 4h.
LIMPIEZA Y MANTENIMIENTO
• Antes de limpiar, desenchufe el aparato y espere a que el
aparato se enfríe.
• Use un trapo suave humedecido para limpiar la base y la tapa de
la unidad tras su utilización.
• Si es necesario, utilice un cepillo pequeño o un bastoncillo de
algodón. No vierta líquido en la base de la unidad.
ES
87
Page 88

Manual de instrucciones
• Lave las piezas extraíbles (recipiente para cocinar, cesta,
soporte, rejilla para cocción al vapor, placa de presión, rejilla de
la freidora Aerofryer, asa para la placa, herramienta de extracción
y bandeja de condensación) con agua jabonosa templada y un
paño suave o esponja.
• Antes de lavar las piezas de la tapa, siga siempre los pasos para
retirar la placa de manera segura y adecuada.
• Seque bien todas las piezas.
• Tenga en cuenta que el recipiente para cocinar, la cesta y la
rejilla para cocción al vapor se pueden lavar en el lavavajillas. Sin
embargo, recomendamos lavarlas a mano, ya que de esta forma
se alargará la vida útil del producto.
• Cuando cocine con el recipiente para cocinar o con la cesta, y
cuando los limpie, no utilice utensilios ni estropajos metálicos
para evitar que el revestimiento antiadherente sufra daños.
• No utilice detergentes químicos agresivos, estropajos metálicos
ni detergentes en polvo en ninguna otra pieza o accesorio.
Instrucciones de almacenamiento
• Desenchufe la unidad y deje que se enfríe completamente.
• Almacene el recipiente para cocinar y el asa para la placa dentro
de la unidad.
• Almacene la unidad en su caja original o cubierta en un lugar
fresco y seco.
SOLUCIÓN DE FALLOS
Esta unidad dispone de funciones de seguridad que apagarán la
unidad si se detecta una condición anormal durante el cocinado. Se
mostrará una señal de error en el panel de control. En función del
error, es posible que se escuche un pitido. Cuando haya identificado
y solucionado el problema, enchufe la unidad y reanude la cocción a
presión.
Descripción Solución
ERROR: NOT-LOCK
La tapa superior está abierta. Cierre la tapa y gire el mando de
la tapa en el sentido de las
agujas el reloj para cerrarla de
manera segura.
ERROR: La unidad no funciona en el modo de cocción a presión
La placa de presión no está bien
colocada.
ERROR: La unidad no funciona en el modo de freidora Aerofryer
La rejilla de la freidora Aerofryer
no está bien colocada.
ERROR: NO-POT
El recipiente para cocinar no está
bien colocado.
Coloque la placa de presión de
acuerdo con las instrucciones.
Asegúrese de que la rejilla para
freír con aire se ha retirado.
Coloque la rejilla de la freidora
Aerofryer de acuerdo con las
instrucciones.
Asegúrese de que la placa de
presión se ha retirado.
Empuje con suavidad el
recipiente a presión en la unidad
hasta que toque la placa
calefactora de la parte inferior de
la unidad.
88
Page 89

MEDIO AMBIENTE
Este aparato no debe desecharse con la basura doméstica al
final de su vida útil, sino que se debe entregar en un punto de
recogida para el reciclaje de aparatos eléctricos y electrónicos. Este
símbolo en el aparato, manual de instrucciones y embalaje quiere
atraer su atención sobre esta importante cuestión. Los materiales
utilizados en este aparato se pueden reciclar. Mediante el reciclaje
de electrodomésticos, usted contribuye a fomentar la protección del
medioambiente. Solicite más información sobre los puntos de
recogida a las autoridades locales.
Soporte
Puede encontrar toda la información y recambios en
www.princesshome.eu!
Manual de instrucciones
ES
89
Page 90

Manual de Instruções
SEGURANÇA
• O fabricante não pode ser responsabilizado
por quaisquer danos se ignorar as
instruções de segurança.
• Se o cabo de alimentação estiver danificado,
deve ser substituído pelo fabricante, o seu
representante de assistência técnica ou
alguém com qualificações semelhantes para
evitar perigos.
• Nunca desloque o aparelho puxando pelo
cabo e certifique-se de que este nunca fica
preso.
• O aparelho deve ser colocado numa
superfície plana e estável.
• O utilizador não deve abandonar o aparelho
enquanto este estiver ligado à alimentação.
• Este aparelho não se destina a ser utilizado
por pessoas (incluindo crianças) com
capacidades físicas, sensoriais ou mentais
reduzidas ou com falta de experiência e
conhecimento, exceto se tiverem supervisão
ou instrução relativamente à utilização do
aparelho por uma pessoa responsável pela
sua segurança.
• É necessária supervisão sempre que
qualquer aparelho for utilizado por ou
próximo de crianças.
• AVISO: Os alimentos derramados podem
causar queimaduras graves. Mantenha o
aparelho e o cabo fora do alcance das
crianças. Nunca suspenda o cabo na
extremidade do balcão, nunca utilize uma
tomada abaixo do balcão e nunca utilize
com uma extensão.
• A utilização de acessórios não
recomendados pelo fabricante do aparelho
pode provocar lesões.
• Não utilize no exterior.
• Não coloque sobre, ou perto de, um
queimador a gás quente ou elétrico, nem
num forno aquecido.
• Não limpe com esfregões metálicos. Os
pedaços do esfregão podem partir e tocar
nos componentes elétricos, criando o risco
de choque elétrico.
• Tenha um cuidado extremo ao remover o
tabuleiro ou eliminar a gordura quente
• Proceda com cuidado extremo ao mover um
aparelho que contenha óleo quente ou
outros líquidos quentes.
• ATENÇÃO: Para proteger contra danos ou
choques elétricos, não cozinhe na unidade
base. Cozinhe apenas na panela fornecida.
90
Page 91

Manual de Instruções
• Para desligar, prima o botão de energia e
depois remova a tomada da parede.
• Não utilize a placa de pressão, a grelha da
fritadeira ou a panela se estiverem
amolgadas ou desgastadas.
• AVISO: Nunca frite por imersão em óleo ou
à pressão na Aerofryer, independentemente
de a tampa estar ligada ou desligada. ISTO
É PERIGOSO E PODE CAUSAR UM
INCÊNDIO E DANOS GRAVES.
• Utilize SEMPRE uma pega amovível para
inserir ou remover a grelha Aerofryer ou a
placa de pressão.
• Certifique-se de que o filtro e a válvula de
despressurização estão isentos de resíduos
alimentares ou detritos.
• Nunca encha a panela acima da linha de
enchimento máximo.
• Antes de colocar a panela na base,
certifique-se de que tanto a panela como a
base estão secas limpando-as com um
pano macio.
• Certifique-se sempre de que o aparelho é
devidamente montado antes de o utilizar.
• Este aparelho cozinha sob pressão. O uso
impróprio pode resultar em lesões por
escaldamento. Certifique-se de que a
unidade está devidamente fechada antes de
operar.
• Ao utilizar a placa de pressão, certifique-se
sempre de que a placa de pressão está
instalada e que a tampa está devidamente
fechada antes de operar.
• Não cubra a válvula de despressurização.
• Deve ter cuidado ao levantar a panela da
base.
• Quando a panela amovível estiver vazia,
não aqueça durante mais de 10 minutos,
pois pode danificar a superfície de
cozedura.
• Ao utilizar a função Saltear, deixe sempre a
tampa na posição aberta.
• Para evitar possíveis danos causados pelo
vapor, coloque a unidade longe das paredes
e armários durante a utilização.
• Nunca levante a unidade pelas abas laterais
da tampa.
• Nunca toque no elemento de aquecimento
exposto.
PT
91
Page 92

Manual de Instruções
• Para se proteger contra choques elétricos,
não mergulhe o cabo, a ficha nem o
aparelho em água ou qualquer outro líquido.
• Este aparelho destina-se a ser usado em
aplicações domésticas e semelhantes tais
como:
• Zonas de cozinha profissional em lojas,
escritórios e outros ambientes de trabalho.
• Por clientes de hotéis, motéis e outros
ambientes de tipo residencial.
• Ambientes de dormida e pequeno almoço.
• Quintas.
• As crianças não devem brincar com o
aparelho.
• Este aparelho não pode ser usado por
crianças. Mantenha o aparelho e respectivo
cabo fora do alcance de crianças.
• Para se proteger contra choques eléctricos,
não mergulhe o cabo, a ficha nem o
aparelho em água ou qualquer outro líquido.
• Não aqueça os alimentos durante
demasiado tempo.
• A superfície do elemento de aquecimento
está sujeita a calor residual após a
utilização.
• Deve retirar o cabo antes de limpar o
aparelho. Certifique-se de que a entrada
está completamente seca antes de utilizar
novamente a unidade.
• O reservatório sob pressão não deve ser
aberto até que a pressão tenha reduzido o
suficiente nem durante a utilização.
• A superfície pode aquecer durante
a utilização.
• AVISO: Se a superfície estiver rachada,
desligue o aparelho para evitar a
possibilidade de choque eléctrico.
• A temperatura das superfícies acessíveis
poderá ser elevada quando o aparelho está
em funcionamento.
• O aparelho não se destina a ser operado
através de um sistema de temporizador
externo ou de controlo remoto à parte.
• O aparelho deverá ser ligado a uma saída
de tomada com contacto de terra (para
aparelhos de classe I).
92
Page 93

Manual de Instruções
1
716 1715 8
9
10
11
12
13
14
18 19 20
2
3
4
5
6
• De modo a manter livre o fluxo de ar, não
PAINEL DE CONTROLO
coloque objetos em cima do aparelho e
certifique-se de que existe sempre 10 cm de
espaço à volta do mesmo.
• Este aparelho destina-se apenas a
utilização doméstica e para os fins para os
quais foi concebido. No pior dos casos, a
comida poderá incendiar-se. (Não utilize
mais do que uma colher de chá de óleo, não
cozinhe carne que liberte muita gordura
nem utilize água para cozinhar alimentos.)
DESCRIÇÃO DAS PEÇAS
1. Bandeja de condensação
2. Unidade
3. Grelha Aerofryer
4. Placa de pressão
5. Pega para placa de pressão e grelha Aerofryer
6. Pega para o cesto de fritar com ar
7. Grelha de vapor
8. Cesto da Aerofryer
9. Suporte Aeroflow
10. Panela antiaderente
1: Cozinhar à pressão 11: Cozer
2: Cozinhar lentamente 12: Iogurte
3: Cozinhar a vapor 13: Saltear
4: Sopa/Caldo 14: Alimentação
5: Arroz/Cereais 15: Visor
6: Libertação de vapor 16: Manter quente
7: Ícone da panela de pressão 17: Adiar início
8: Ícone da Aerofryer 18: Temperatura +/-
9: Fritar com ar 19: Iniciar/Parar
10: Grelhar/Assar 20: Tempo +/-
PT
93
Page 94

Manual de Instruções
Botão de ligar/desligar (on/off)
• Prima este botão para ligar e desligar a unidade. Uma vez
conectado, o botão de energia acenderá a luz vermelha. Assim
que premir o botão, a luz fica branca.
Ícone da Aerofryer
• Este ícone acende automaticamente assim que a grelha
Aerofryer estiver bem inserida e a unidade estiver pronta para as
funções de fritura com ar.
Nota: As seguintes funções baseiam-se na grelha Aerofryer: Fritar
com Ar, Grelhar/Assar e Cozer. Estas funções só se iluminam e ficam
prontas a serem selecionadas quando a grelha Aerofryer estiver
inserida.
Ícone da panela de pressão
• Este ícone acende automaticamente assim que a placa de
pressão estiver bem inserida e a unidade estiver pronta para as
funções de cozinhar à pressão.
Nota: As seguintes funções baseiam-se na função da placa de
pressão: Cozinhar à pressão, Cozinhar lentamente, Vapor, Sopa/
Caldo, Arroz/Cereais, Iogurte e Saltear. Estas funções só se
iluminam e ficam prontas a serem selecionadas quando a placa de
pressão estiver devidamente inserida.
Nota: A função Saltear continua ativa se abrir a tampa.
Visor
• Indica a temperatura e o tempo, os ícones de temperatura e
tempo acendem alternadamente.
Botão Iniciar/Parar
• Toque nele uma vez para iniciar ou parar o processo de
confeção.
Botão Mais
• Toque para aumentar a temperatura ou o tempo.
Botão Menos
• Toque para diminuir a temperatura ou o tempo.
Botão de libertação de vapor
• Quando o processo de preparação dos alimentos à pressão
estiver concluído, prima o botão de libertação de vapor para
despressurizar. O ciclo de libertação de vapor dura 3 minutos.
Assim que terminar de libertar o vapor, pode abrir a tampa com
segurança.
Nota: Para interromper um programa antes de o concluir, prima o
botão INICIAR/PARAR para terminar a confeção e, em seguida,
prima LIBERTAR VAPOR.
Função Manter quente
• Uma vez terminada a confeção, a unidade muda
automaticamente para o modo Manter Quente.
Função Adiar início
• Prima este botão para adiar a confeção até à hora de início
desejada (limites: 30 minutos - 24 horas). Primeiro, prima a
função de confeção desejada, depois prima o botão do
temporizador de atraso; a luz piscará, altura em que deve ajustar
o tempo de atraso desejado e premir INICIAR para programar.
Para cancelar a definição do temporizador, prima novamente o
botão do temporizador de atraso (antes de premir Iniciar).
ANTES DA PRIMEIRA UTILIZAÇÃO
• Retire todo o material de embalagem.
• Retire quaisquer autocolantes ou etiquetas do aparelho.
94
Page 95

• Limpe minuciosamente as peças com água quente, algum
detergente e uma esponja não abrasiva.
• Limpe o interior e o exterior do aparelho com um pano húmido.
• Coloque o aparelho sobre uma superfície estável, horizontal e
nivelada, não coloque o aparelho sobre superfícies não
resistentes ao calor.
• Esta é uma fritadeira sem óleo que funciona com ar quente.
Não encha a cuba com óleo ou gordura.
• De modo a manter livre o fluxo de ar, não coloque objetos
em cima do aparelho e certifique-se de que existe sempre 10
cm de espaço à volta do mesmo.
Montar a grelha de vapor
• Para montar a grelha de vapor, desdobre as pernas e prenda a
peça central em "V" cuidadosamente no gancho localizado perto
da extremidade. (Figura 1)
Manual de Instruções
• As pernas da grelha de vapor podem ser dobradas para
armazenamento. Empurre a peça central em “V”
cuidadosamente para fora, para a desbloquear, e depois dobre
as pernas para dentro.
PLACAS DA TAMPA
Esta unidade dispõe de duas placas para a tampa, a Placa de
Pressão e a Grelha Aerofryer. As duas placas permitem cozinhar à
pressão, fritar com ar, entre outros, na mesma unidade, trocando as
placas.
PT
• Dependendo da receita e do método de confeção preferido, os
alimentos podem ser colocados dos dois lados da grelha de
vapor reversível para alcançar o resultado desejado. (Figura 2)
95
Page 96

Manual de Instruções
Grelha Aerofryer (A)
A Grelha Aerofryer tem de ser instalada para acesso a estas funções
de confeção:
• Fritar com ar
• Grelhar/Assar
• Cozer
Placa de pressão (B)
A placa de pressão tem de ser instalada para acesso a estas funções
de confeção:
• Cozinhar à pressão
• Cozinhar lentamente
• Vapor
• Sopa/Caldo
• Arroz/Cereais
• Iogurte
• Refogar
NOTA: As funções de confeção dos alimentos só podem ser
selecionadas assim que a placa correta estiver instalada.
REMOVER/INSERIR A PLACA DE PRESSÃO OU A GRELHA AEROFRYER
Sempre que possível, deixe a placa de pressão quente ou a grelha
Aerofryer na unidade até que esta esfrie completamente. Para
receitas em que é necessário trocar de placa durante o processo de
confeção, utilize sempre a pega fornecida. Esta pega foi concebida
para que possa inserir e remover facilmente as placas, mesmo
quando estão quentes.
1. Agarre firmemente na pega com a proteção dos nós dos dedos
voltada para baixo (3).
2. Prenda a extremidade da pega à patilha metálica saliente na
placa. Uma vez presa, prima o botão da esquerda para bloquear
(4).
3. Quando a pega estiver bem fixa à placa, prima a patilha de
abertura na parte superior da placa (5).
4. Com a pega, levante cuidadosamente a placa para fora da
unidade e coloque-a sobre uma superfície robusta, plana e
resistente ao calor.
5. Para retirar a pega da placa, prima o botão do lado direito da
pega e puxe a pega para fora (6).
6. Deixe a placa arrefecer completamente antes de a mover ou
limpar.
7. A figura 7 mostra onde colocar a placa na tampa.
96
Page 97

UTILIZAÇÃO
Funções da Aerofryer
Como usar a função Fritar com ar
Manual de Instruções
• Abra a tampa superior rodando o botão da tampa no sentido antihorário.
• Certifique-se de que a placa de pressão foi removida. Utilize
sempre a pega da placa se esta estiver quente.
• Insira a grelha Aerofryer.
• Coloque a panela antiaderente dentro da unidade. Coloque o
cesto de fritura dentro da panela. Coloque os alimentos dentro
do cesto de fritura.
• Feche a tampa e bloqueie rodando no sentido horário.
• Prima o botão de ligar e depois selecione FRITAR COM AR. O
ícone da Aerofryer irá acender. Usando os botões + e -, ajuste a
temperatura e o tempo para os valores desejados.
• Prima o botão INICIAR/PARAR para começar a cozinhar. O
contador regressivo e a temperatura selecionada
• serão exibidos alternadamente no visor.
• Quando a preparação dos alimentos terminar, será emitido um
sinal acústico.
Nota: O ciclo de fritura com ar pode ser interrompido levantando a
tampa ou premindo o botão
INICIAR/PARAR. Uma vez fechada a tampa ou premido o botão
INICIAR/PARAR, a preparação é retomada.
Como Grelhar/Assar
• Abra a tampa superior rodando o botão da tampa no sentido antihorário.
• Certifique-se de que a placa de pressão foi removida. Utilize
sempre a pega da placa se esta estiver quente. Insira a grelha
Aerofryer.
PT
97
Page 98

Manual de Instruções
• Coloque a panela antiaderente dentro da unidade. Se necessário,
coloque a grelha de vapor dentro da panela e disponha os
alimentos sobre a grelha.
• Feche a tampa e bloqueie rodando no sentido horário.
• Prima o botão de ligar e depois selecione GRELHAR/ASSAR. O
ícone da Aerofryer irá acender. Usando os botões + e -, ajuste a
temperatura e o tempo para os valores desejados. Prima o botão
INICIAR/PARAR para começar a cozinhar. O contador regressivo
e a temperatura selecionada serão exibidos alternadamente no
visor.
• O ciclo GRELHAR/ASSAR pode ser interrompido levantando a
tampa ou premindo o botão INICIAR/PARAR. Uma vez fechada a
tampa ou premido o botão INICIAR/PARAR, a preparação é
retomada.
• Quando a preparação dos alimentos terminar, será emitido um
sinal acústico e a unidade passará para o modo Manter Quente.
Como Cozer
• Abra a tampa superior rodando o botão da tampa no sentido antihorário.
• Certifique-se de que a placa de pressão foi removida. Utilize
sempre a pega da placa se esta estiver quente. Insira a grelha
Aerofryer.
• Coloque a panela antiaderente dentro da unidade. Se necessário,
coloque a grelha de vapor dentro da panela e disponha os
alimentos sobre a grelha.
• Feche a tampa e bloqueie rodando no sentido horário.
• Prima o botão de ligar e depois selecione COZER. O ícone da
Aerofryer irá acender. Usando os botões + e -, ajuste a
temperatura e o tempo para os valores desejados. Prima o botão
INICIAR/PARAR para começar a cozinhar. O contador regressivo
e a temperatura selecionada serão exibidos alternadamente no
visor.
• O ciclo de cozedura pode ser interrompido levantando a tampa
ou premindo o botão INICIAR/PARAR. Uma vez fechada a tampa
ou premido o botão INICIAR/PARAR, a preparação é retomada.
• Quando a preparação dos alimentos terminar, será emitido um
sinal acústico e a unidade passará para o modo Manter Quente.
Esta função também permite desidratar frutas e/ou legumes.
Consulte a tabela de funções da Aerofryer para obter mais
informações.
Funções para Cozinhar à Pressão
Função Cozinhar à Pressão
• Abra a tampa superior rodando o botão no sentido anti-horário.
• Certifique-se de que a grelha da Aerofryer foi removida. Utilize
sempre a pega da placa. Insira a placa de pressão.
• Coloque a panela antiaderente dentro da unidade e coloque os
alimentos dentro da panela.
• Feche a tampa e bloqueie rodando no sentido horário.
• Prima o botão de ligar e depois selecione COZINHAR À
PRESSÃO. O ícone de pressão irá acender. Usando os botões +
e -, ajuste o tempo de confeção desejado.
• Uma vez atingida a pressão correta, o visor muda dos traços
circulantes para o contador regressivo.
• Quando a preparação dos alimentos terminar, será emitido um
sinal acústico. A unidade passa automaticamente para o modo
Manter Quente quando a preparação dos alimentos terminar.
98
Page 99

Manual de Instruções
• Quando a confeção à pressão terminar, prima o botão
LIBERTAR VAPOR para despressurizar. O ciclo de libertação de
vapor dura 3 minutos. Assim que terminar de libertar o vapor,
pode abrir a tampa com segurança.
• Para parar um programa antes de o concluir, prima o botão
INICIAR/PARAR para terminar a confeção e, em seguida, prima
LIBERTAR VAPOR.
NUNCA coloque o seu rosto ou mãos sobre a unidade durante a
libertação de vapor ou a abertura da tampa. Utilize SEMPRE pegas
de cozinha durante a Libertação de Vapor ou a abertura da tampa.
Nota: prima ADIAR TEMPORIZADOR e ajuste o tempo para
programar a função Atrasar Início. Se pretende começar a cozinhar
imediatamente, prima o botão INICIAR/PARAR para começar a
cozinhar. As linhas tracejadas começam a circular no painel de
controlo, indicando o aumento de pressão na unidade.
Função Cozinhar Lentamente
• Abra a tampa superior rodando o botão no sentido anti-horário.
• Certifique-se de que a grelha da Aerofryer foi removida. Utilize
sempre a pega da placa. Insira a placa de pressão.
• Coloque a panela antiaderente dentro da unidade e coloque os
alimentos dentro da panela.
• Feche a tampa e bloqueie rodando no sentido horário.
• Prima o botão de ligar e depois selecione COZINHAR
LENTAMENTE. O ícone de pressão irá acender. Usando os
botões + e -, ajuste o temporizador para o tempo desejado.
• Uma vez atingida a temperatura correta, o visor muda dos traços
circulantes para o contador regressivo.
• Quando a preparação dos alimentos terminar, será emitido um
sinal acústico. A unidade muda automaticamente para o modo
MANTER QUENTE quando terminar de preparar os alimentos.
• Quando a confeção à pressão terminar, prima o botão
LIBERTAR VAPOR para despressurizar. O ciclo de libertação de
vapor dura 3 minutos. Assim que terminar de libertar o vapor,
pode abrir a tampa com segurança.
• Para parar um programa antes de o concluir, prima o botão
INICIAR/PARAR para terminar a confeção e, em seguida, prima
LIBERTAR VAPOR.
Nota: prima ADIAR TEMPORIZADOR e ajuste o tempo para
programar a função Atrasar Início. Se pretende começar a cozinhar
imediatamente, prima o botão INICIAR/PARAR para começar a
cozinhar. As linhas tracejadas começam a circular no painel de
controlo, indicando o aumento de temperatura na unidade.
Função de Vapor
• Abra a tampa superior rodando o botão no sentido anti-horário.
• Certifique-se de que a grelha da Aerofryer foi removida. Utilize
sempre a pega da placa. Insira a placa de pressão.
• Coloque a panela antiaderente dentro da unidade. Disponha os
alimentos sobre a grelha de vapor fornecida. Nunca encha a
panela mais do que 2/3.
• Deite na panela 1,5 copo de água ou outro líquido para cozinhar
a vapor.
• Feche a tampa e bloqueie rodando no sentido horário.
• Prima o botão de ligar e depois selecione VAPOR. O ícone de
pressão irá acender. Usando os botões + e -, ajuste o tempo de
confeção desejado.
PT
99
Page 100

Manual de Instruções
• Prima o botão INICIAR/PARAR para começar a cozinhar. As
linhas tracejadas começam a circular no painel de controlo,
indicando o aumento de temperatura na unidade.
• Uma vez atingida a pressão/temperatura correta, o visor muda
dos traços circulantes para o contador regressivo.
• Quando a preparação dos alimentos terminar, será emitido um
sinal acústico. Quando terminar e estiver pronto para retirar os
alimentos, prima o botão LIBERTAR VAPOR.
• Quando a confeção à pressão terminar, prima o botão LIBERTAR
VAPOR para despressurizar. O ciclo de libertação de vapor dura
3 minutos. Assim que terminar de libertar o vapor, pode abrir a
tampa com segurança.
• Para parar um programa antes de o concluir, prima o botão
INICIAR/PARAR para terminar a confeção e, em seguida, prima
LIBERTAR VAPOR.
Como usar a função Sopa/Caldo
• Abra a tampa superior rodando o botão da tampa no sentido antihorário.
• Certifique-se de que a placa de pressão foi removida. Utilize
sempre a pega da placa se esta estiver quente. Insira a grelha
Aerofryer.
• Coloque a panela antiaderente dentro da unidade. Coloque o
cesto da Aerofryer dentro da panela. Coloque os ingredientes
dentro do cesto.
• Feche a tampa e bloqueie rodando no sentido horário.
• Prima o botão de ligar e depois selecione a função SOPA/
CALDO. O ícone da Aerofryer irá acender. Usando os botões + e
-, ajuste a temperatura e o tempo para os valores desejados.
• Prima o botão INICIAR/PARAR para começar a cozinhar. O
contador regressivo e a temperatura selecionada serão exibidos
alternadamente no visor.
• Quando a preparação dos alimentos terminar, será emitido um
sinal acústico.
• Quando a confeção à pressão terminar, prima o botão LIBERTAR
VAPOR para despressurizar. O ciclo de libertação de vapor dura
3 minutos. Assim que terminar de libertar o vapor, pode abrir a
tampa com segurança.
• Para parar um programa antes de o concluir, prima o botão
INICIAR/PARAR para terminar a confeção e, em seguida, prima
LIBERTAR VAPOR.
Como usar a função Arroz/Cereais
• Abra a tampa superior rodando o botão no sentido anti-horário.
• Certifique-se de que a grelha da Aerofryer foi removida. Utilize
sempre a pega da placa. Insira a placa de pressão.
• Coloque a panela antiaderente dentro da unidade. Coloque o
arroz cru e o líquido dentro da panela.
• Feche a tampa e bloqueie rodando no sentido horário.
• Prima o botão de ligar e depois selecione ARROZ/CEREAIS. O
ícone de pressão irá acender. Usando os botões + e -, ajuste o
tempo de confeção desejado.
• Uma vez atingida a pressão, o visor muda dos traços circulantes
para o contador regressivo.
• Quando a preparação dos alimentos terminar, será emitido um
sinal acústico. A unidade muda automaticamente para o modo
MANTER QUENTE quando terminar de preparar os alimentos.
100
 Loading...