

Page 1

TYPE 535576
WET AND DRY RECHARGEABLE HAIR CLIPPER
Gebruiksaanwijzing
Instructions for use
Mode d’emploi
Anleitung
Instrucciones de Uso
Istruzioni d’uso
Bruksanvisning
Brugsanvisning
Bruksanvisning
Käyttöohje
Instruções de utilização
Οδηγίες χρη΄σεως
Page 2

2
Page 3
Gebruiksaanwijzing . . . . . . . . . . . . . . . . . . . . . . . . . . . . . . . . . . 4
Instructions for use . . . . . . . . . . . . . . . . . . . . . . . . . . . . . . . . . . . 6
Mode d’emploi . . . . . . . . . . . . . . . . . . . . . . . . . . . . . . . . . . . . . . . 8
Anleitung . . . . . . . . . . . . . . . . . . . . . . . . . . . . . . . . . . . . . . . . . . . . 10
Instrucciones de Uso . . . . . . . . . . . . . . . . . . . . . . . . . . . . . . . . 12
Istruzioni d’uso . . . . . . . . . . . . . . . . . . . . . . . . . . . . . . . . . . . . . . 14
Bruksanvisning . . . . . . . . . . . . . . . . . . . . . . . . . . . . . . . . . . . . . . 16
Brugsanvisning . . . . . . . . . . . . . . . . . . . . . . . . . . . . . . . . . . . . . . 18
Bruksanvisning . . . . . . . . . . . . . . . . . . . . . . . . . . . . . . . . . . . . . . 20
Käyttöohje . . . . . . . . . . . . . . . . . . . . . . . . . . . . . . . . . . . . . . . . . . . 22
Instruções de utilização . . . . . . . . . . . . . . . . . . . . . . . . . . . . 24
Οδηγίες χρη΄σεως . . . . . . . . . . . . . . . . . . . . . . . . . . . . . . . 26
. . . . . . . . . . . . . . . . . . . . . . . . . . . . . . . . . . . . . . . . . . . . . . . . . . . . . . . 28
SEPT 2006
NL
UK
F
D
E
I
S
DK
N
SF
P
GR
ARAB
Page 4

4
PRINCESS WET AND DRY RECHARGEABLE HAIR CLIPPER ART. 535576
VOOR HET GEBRUIK
Lees voor het gebruik eerst deze gebruiksaanwijzing en bewaar hem om later nog eens te kunnen
raadplegen. Controleer of de netspanning in de woning overeenkomt met die van het apparaat. Plaats
de oplaadunit niet in de buurt van een met water gevulde wastafel, badkuip, douche e.d. Probeer een
oplaadunit die toch in het water gevallen is nooit vast te pakken, maar trek eerst de stekker uit het
stopcontact. Pak de oplaadunit alleen beet met droge handen.
BIJZONDERHEDEN
Praktische, oplaadbare (snoerloos) tondeuseset met laadindicatielampje en handige tafelvoet, die tevens
oplader is. De tondeuse is spatwaterdicht en kan onder de douche worden gebruikt, maar niet onder water.
Compleet met twee in zeven posities verstelbare opzetkammen (4 tot 20 mm) (24 tot 40 mm), kam, schaar,
laadadapter en reinigingsborsteltje. De opzetkam wordt gebruikt om verschillende kniplengtes in te stellen.
Hiermee is zelf knippen zo gemakkelijk, dat ook de thuiskapper professionele resultaten kan behalen.
GEBRUIKSAANWIJZING
U schakelt de tondeuse in door middel van de schuifschakelaar met twee standen.
Door de opzetkam te verschuiven kunt u de kniplengte wijzigen. Naar voren schuiven geeft een langere
lengte, naar achteren een kortere.
De opzetkam kunt u gewoon op de tondeuse schuiven. U neemt hem er weer af door de kam,
na ontgrendeling met het tuimelknopje, eraf te schuiven.
Door middel van het tuimelknopje aan de onderzijde
van het apparaat kunt u de lengte-instelling
van de opzetkam vergrendelen.
Als u een andere lengte wilt instellen, ontgrendelt u de opzetkam door middel van het tuimelknopje en
verschuift u de opzetkam. In het venstertje verschijnt de stand van de opzetkam.
Voordat u met knippen begint:
- Controleer de tondeuse. Zorg ervoor dat er geen haren of viezigheid op de tondeuse zitten.
Zet de tondeuse aan en controleer of deze probleemloos loopt.
- Leg een handdoek om de nek van degene die u gaat knippen.
- Zorg dat hij/zij zo zit dat zijn/haar hoofd zich voor u op ooghoogte bevindt. Daardoor hebt goed zicht
en kunt u beter werken. Maak indien nodig gebruik van een kussen o.i.d. om haar/hem hoger te laten
zitten.
- Kam eerst het haar, zodat het niet in de war zit. Houd de tondeuse vervolgens op een voor u prettige
manier vast.
- Ontspan u en werk nauwkeurig. Werk met korte banen. Maak niet meteen de zij- of achterkant af,
maar werk gelijkmatig over het hele hoofd.
- Het valt aan te bevelen om steeds kleine stukjes van het haar af te halen en niet in één keer heel veel.
U kunt er immers later altijd nog meer afhalen.
- Kam het haar terwijl u aan het werk bent geregeld terug in de stijl van het gewenste kapsel.
Beginnen met knippen
Knip de eerste keer dat u met de tondeuse werkt slechts een klein gedeelte van het haar. Op
die manier kunt u wennen aan de kniplengte van de opzetkam.
Kam het haar in de natuurlijke groeirichting en ga dan als volgt te werk om een vlot, taps
toelopend kapsel te krijgen:
Stap 1. De nekpartij
Gebruik opzetkam 1 of 2. Houd de tondeuse met de knipzijde naar boven en begin onderaan in de nek in het midden met knippen. Plaats de tondeuse licht tegen het hoofd, met de
Page 5

5
tanden van de opzetkam naar boven gericht. Beweeg de tondeuse geleidelijk naar boven en werk naar
boven en naar de buitenkant door het haar. Haal per keer slechts een klein gedeelte van het haar af.
Beweeg, terwijl u knipt, de kop van de tondeuse geleidelijk naar u toe. Knip vervolgens de achterpartij
vanuit het begin van de nek tot boven de oren.
Stap 2. Achterkant van het hoofd
Gebruik opzetkam 1 of 2 en knip de achterkant van het hoofd.
Stap 3. Zijkant van het hoofd
Gebruik de kortere lengtes van de opzetkam 1 voor het knippen van de bakkebaarden; dat wil zeggen,
het haar dat direct voor de oren zit. Stel vervolgens de grotere lengte van de opzetkam in en ga door met
knippen tot boven op het hoofd.
Stap 4. Bovenkant van het hoofd
Gebruik opzetkam 1 of 2 en knip de bovenkant van het hoofd van achteren naar voren tegen de groeirichting van het haar in. In sommige gevallen betekent dit dat u van voor naar achter moet werken.
Opzetkamlengte 1 gebruikt u voor het maken van stekeltjes. Indien u het haar boven op het hoofd langer
wilt houden, dient u een kam te gebruiken om het haar boven het hoofd te houden. Knip met de tondeuse
over de kam of houd het haar tussen de vingers en knip het op de gewenste lengte af. Werk altijd vanaf de
achterkant van het hoofd. Knip het haar geleidelijk korter door de afstand tussen het hoofd en de kam of
de vingers te verkleinen. Kam afgeknipt haar weg en controleerregelmatig met behulp van de kam of er
nog lokken te lang zijn.
Stap 5. De afwerking
Om een goede, nauwkeurig afgewerkte coupe te krijgen, haalt u ten slotte de opzetkam er weer af en
draait u de tondeuse om (met de onderkant naar boven). Nu kunt de onderkant van de nek, de zijkanten en
het gedeelte rond de oren bijwerken. Zet de verstelbare snijlengte op de kleinste stand. Plaats de tondeuse
in een rechte hoek langs het hoofd, terwijl de punten van het snijblad de huid licht raken, en werk naar
beneden. Op deze manier krijgt u een even glad resultaat als met een scheermesje.
Het knippen van langer haar
Indien het haar taps toe moet lopen, verdeelt en kamt u het haar zoals gebruikelijk. Verdeel vervolgens
het haar van achter op het hoofd in drie gelijke delen rondom het hoofd. Zet de twee bovenste lagen met
spelden vast, zodat ze niet in de weg zitten wanneer u de onderste laag knipt. Knip vervolgens met een
schaar of met de tondeuse in combinatie met een kapperskam.
SCHOONMAKEN EN ONDERHOUD
Verwijder na ieder gebruik de haarresten met het schoonmaakborsteltje.
U kunt de buitenzijde van de tondeuse schoonmaken met behulp van een zachte, vochtige doek.
TIPS
- Uit veiligheidsoverwegingen mag de oplaadunit niet binnen een afstand van één meter van de badkuip of
douche worden geplaatst en ook niet boven een met water gevulde wasbak. Nooit onder water houden!
- Bij kinderen of hulpbehoevenden het apparaat uitsluitend onder toezicht gebruiken.
- Ga voorzichtig met de snijbladen om. Stoot ze niet tegen harde voorwerpen en laat ze niet vallen.
Gebruik de tondeuse niet als de snijbladen beschadigd zijn!
- Reparatie en service dient u uit te laten voeren door onze servicedienst. Gebruik het
apparaat niet als het beschadigd is of als het snoer beschadigd is, maar stuur het dan
naar onze servicedienst.
BATTERIJEN
In dit apparaat zit een oplaadbare batterij. Deze kunt u verwijderen door de achterzijde
van de tondeuse te verwijderen, de batterij los te halen en hem eruit te halen.
Batterijen zijn chemisch afval; gooi ze dus niet zomaar weg. Stop de batterijen als ze leeg
zijn in de milieubox of lever ze apart in bij uw reinigingsdienst overeenkomstig de regelgeving in uw woonplaats.
Page 6
6
PRINCESS WET AND DRY RECHARGEABLE HAIR CLIPPER ART. 535576
BEFORE USING
Before use, first read these instructions carefully and retain for later reference. Check to ensure the
voltage in your home matches that of the appliance. Do not place the charger unit near a shower, washstand or bathtub, etc., filled with water. If the charger unit has fallen in the water, never try to remove it.
First pull the plug from the socket. Always use the charger unit with dry hands.
DETAILS
Practical rechargeable (cordless) clipper with a charge indicator light and handy table base, which also
serves as a charger. Splash-resistant - can be used in the shower, but not under water. Complete with
two adjustable comb attachments with 7 positions (4 to 20 mm) (24 to 40 mm), comb, scissors, charge
adapter, cleaning brush. The comb attachment is used to set different cutting lengths. This makes cutting
and trimming so easy that even as a home hairdresser, you can achieve professional results.
DIRECTIONS FOR USE
Switch on the clippers with the 2-setting slide switch.
Sliding the comb attachment will change the cutting length: sliding it forward will produce a longer
length, and backward will result in a shorter length.
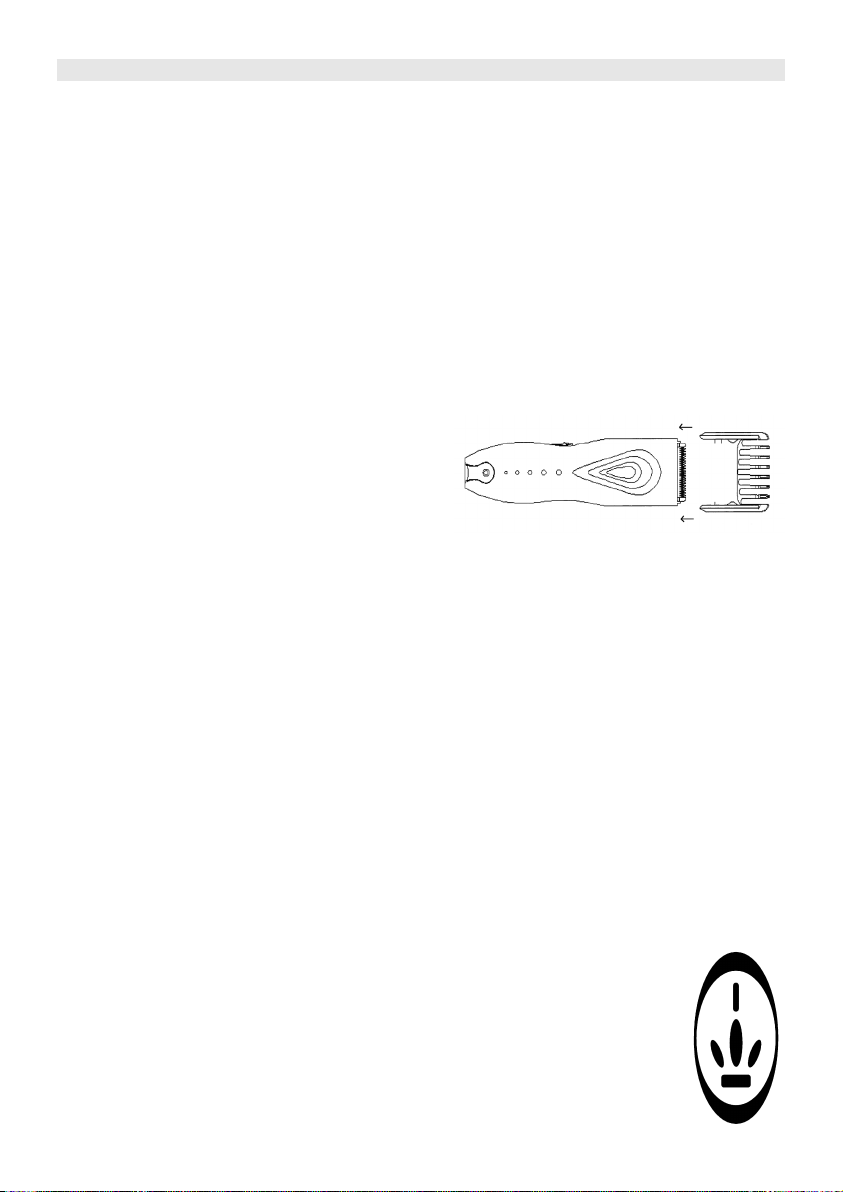
The comb attachment is simply clicked onto the clipper.
To remove the comb attachment after unlocking
the button, pull it up.
You can lock the length of the comb attachment on the bottom of the clippers by shifting the button.
When you want a different length, you can simply unlock the comb attachment by sliding the button and
the comb attachment. The window shows the setting of the comb attachment.
Before you start cutting:
- First check the clippers. Make sure there are no hairs or dirt on the clippers. Switch on the clippers and
check whether they are working properly.
- Drape a towel around the neck of the person whose hair you are about to cut.
- Seat the person is such a way that his/her head is at eye level for you, enabling you to see better and
work more comfortably. If necessary, use books or cushions to raise the person to eye level.
- First comb the hair, removing any knots or tangles. Now hold the clippers as comfortably as possible.
- Relax and work with precision, making short "runs". Do not shave off the side or back of the hair
straightaway; work gradually over the entire head.
- It is better to remove a small patch at a time. You can always remove more later.
- Before you start and while you are working, comb the hair regularly into the desired hairstyle.
To start cutting
When working with the clippers for the first time, cut only a small part of the hair until you become used
to the amount of hair that is cut off with a particular setting.
After the hair has been combed into the natural direction of growth, proceed as follows to achieve a
flowing, tapering hairstyle:
Step 1. The neck section.
Use comb attachment 1 or 2. Hold the clippers with the cutting side up and start cutting in
the middle, at the bottom of the neck. Hold the clippers lightly against the head with the
teeth of the comb attachment facing up. Gradually move the clippers upwards, work up
and to the outside through the hair, removing only a small part at a time. While cutting,
gradually move the head of the clippers towards you. Then cut the back section from the
beginning of the neck to above the ears.
Page 7

7
Step 2. Back of the head
Use comb attachment 1 or 2 to cut the back of the head.
Step 3. Side of the head.
Use the shorter settings of comb attachment 1 for cutting the sideboards - the hair directly in front of the
ears. After that, change the comb attachment to a longer length and continue cutting to the top of the head.
Step 4 Top of the head.
Use comb attachment 1 or 2 to cut the hair on the top of the head from back to front against the direction
of growth of the hair. In some cases you may have to work from front to back. The comb attachment 1 is
to make short, cropped hair. If you want to keep the hair on top of the head longer, you must use a comb
to keep the hair above the head. Cut with the clippers above the comb, or hold the hair between the fingers and cut it off at the desired length. Always work from the back of the head. Gradually cut the hair
shorter by reducing the distance between the comb, or the fingers, and the head. Use the comb regularly
to check whether there are any uneven locks and to comb out cut-off hair.
Step 5 The finishing touch.
Finally, for a good, accurately finished cut, remove the comb again and turn the clippers over (with the
bottom side up), so that you can touch up the bottom of the neck area, the sides and the area around the
ears. Put the adjustable cutting length button onto the lowest setting. Hold the clippers at a right angle to
the head, with the points of the cutting blade lightly touching the skin, and work in a downward direction.
This will produce just as smooth a result as if you had used a razor-blade.
Cutting longer hair.
If you want the hair tapered, then first part and comb the hair as usual. Now divide the hair on the head
from behind into three equal parts around the head. Fix the two upper layers with pins, so that they will
not be in the way when you cut the lowest layer. After that, proceed to cutting with a pair of scissors or
with the help of the clippers in combination with the styling comb.
CLEANING AND MAINTENANCE
After each use remove hair clippings with the cleaning brush.
You can clean the outside of the clippers with a soft, damp cloth.
TIPS
- For safety reasons, this appliance may not be used within one meter of a bathtub or shower, nor above
a washbasin filled with water. Never hold it under water!
- Only allow children or those with a disability to use the appliance if supervised.
- Handle the cutting blades carefully; do not drop them or bump them against hard objects. Do not use
the clipper if the cutting blades are damaged!
- If the appliance is defective, have it repaired or serviced by our service department. Do not use the
appliance if it is damaged or if the lead is damaged; send it to our service department.
BATTERIES
This appliance contains a rechargeable battery. It can be removed by loosening the screw on the back.
Now the battery can be cut loose and removed.
Batteries are chemical waste; do not simply throw them away. If the batteries are empty,
put them in the environmental box or bring them into your sanitation service and follow
further instructions from the municipality.
U.K. WIRING INSTRUCTIONS
The wires in the mains lead are coloured in accordance with the following code:
BLUE NEUTRAL
BROWN LIVE
Page 8
8
As the colours of the wire in the mains lead of this appliance may not correspond with the colour
markings identifying the terminals on your plug, proceed as follows:
The wire which is coloured BLUE must be connected to the terminal which is marked with the
letter N or coloured black.
The wire which is coloured BROWN must be connected to the terminal which is marked with the
letter L or coloured red.
WARNING: ON NO ACCOUNT SHOULD EITHER THE LIVE OR NEUTRAL WIRES BE
CONNECTED TO THE EARTH TERMINAL
PRINCESS WET AND DRY RECHARGEABLE HAIR CLIPPER ART. 535576
AVANT L'EMPLOI
Lisez attentivement ce mode d’emploi avant l’utilisation et conservez-le afin de pouvoir le consulter
ultérieurement. Assurez-vous que le voltage de votre logement correspond à celui indiqué sur l'appareil.
Ne posez pas le chargeur à proximité d’un lavabo, baignoire, douche etc. rempli d’eau. N’essayez jamais
de saisir à la main un chargeur qui est tombé dans l’eau sans avoir d’abord débranché la prise électrique.
Servez-vous du chargeur avec les mains sèches.
PARTICULARITÉS
Tondeuse rechargeable (sans fil) fournie avec un socle pratique qui sert également de chargeur avec
témoin de charge. Etanche aux éclaboussures ; peut être utilisé sous la douche mais pas sous l’eau. Livrée
complète avec 2 embouts réglables sur 7 positions de coupe (de 4 à 20 mm) (de 24 à 40 mm), peigne,
ciseaux, adaptateur de charge et petite brosse de nettoyage. Le peigne adaptable s’utilise pour régler des
longueurs de coupe différentes. Cela permet de se couper facilement les cheveux et d’obtenir à la maison
des résultats aussi professionnels que chez le coiffeur.
MODE D’EMPLOI
Allumez la tondeuse en poussant le commutateur à 2 positions.
Vous pouvez modifier la longueur de coupe en faisant coulisser le peigne. Pousser en avant pour couper
une plus grande longueur et en arrière pour une courte longueur de cheveux.
Le peigne adaptable s’enclique facilement sur
la tondeuse et s’enlève tout aussi facilement en
le débloquant à l’aide du petit bouton puis en
le faisant glisser de la tondeuse.
Pour bloquer le peigne à la longueur souhaitée, utiliser le petit bouton situé en bas de l’appareil.
Pour modifier la longueur de coupe, il suffit de débloquer le peigne à l’aide du petit bouton et de dégager
le peigne. La position du peigne adaptable apparaît dans la petite fenêtre.
Avant de commencer la coupe:
- Contrôler la tondeuse. Vérifier l’absence de poils ou de saletés. Allumer la tondeuse et vérifier qu’elle
fonctionne correctement.
- Mettre une serviette sur les épaules de la personne dont on veut couper les cheveux.
- Faire asseoir la personne de façon à ce que sa tête arrive à la hauteur de vos yeux.
Ainsi vous verrez bien ce que vous faites et pourrez mieux travailler. Si nécessaire, faire
asseoir la personne sur des coussins ou sur des livres.
- Peigner d’abord les cheveux pour bien les démêler. Tenir la tondeuse le plus confortablement possible.
- Travailler de façon détendue et avec précision. Ne couper que des petites longueurs à la
fois. Ne pas couper directement les côtés ou la nuque mais avancer progressivement sur
toute la tête.
- Il est préférable de couper une petite partie des cheveux à la fois. On peut toujours en
couper plus par la suite.
- Peigner les cheveux avant de commencer et les peigner régulièrement pendant la coupe
pour leur donner le modèle souhaité.
Page 9

9
Commencer la coupe proprement dite
Si c’est la première fois que vous utilisez la tondeuse, ne coupez qu’une petite partie des cheveux à la fois
jusqu’à ce que vous soyez habitué à la longueur de coupe qui correspond au peigne.
Après avoir peigné les cheveux dans le sens de la pousse naturelle, procédez comme suit pour obtenir une
coiffure moderne aux pointes effilées :
Etape 1. La nuque
Mettez le peigne adaptable 1 ou 2. Tenez la tondeuse avec le côté coupant vers le haut et commencez à
couper au milieu et au bas de la nuque. Appuyez la tondeuse légèrement contre la tête avec les dents du
peigne dirigées vers le haut. Déplacez la tondeuse progressivement vers le haut. Travaillez vers le haut et
vers l’extérieur en ne coupant qu’une petite partie des cheveux à la fois. Pendant que vous coupez,
ramenez progressivement la tête de la tondeuse vers vous. Coupez ensuite l’arrière en partant du début de
la nuque jusqu’au dessus des oreilles.
Etape 2. L’arrière de la tête.
Mettez le peigne adaptable 1 ou 2 pour couper l’arrière de la tête.
Etape 3. Les côtés de la tête.
Utilisez les réglages de longueur plus courts du peigne adaptable 1 pour couper les favoris, c’est à dire les
cheveux se trouvant juste devant les oreilles. Réglez ensuite le peigne sur une longueur plus grande et
continuez de couper jusqu’au sommet de la tête.
Etape 4. Le dessus de la tête.
Utilisez le peigne adaptable 1 ou 2 pour couper le dessus de la tête en allant d’arrière en avant dans le
sens contraire de la pousse des cheveux. Dans certains cas, vous devrez travailler d’avant en arrière.
Le peigne adaptable 1 est utilisé pour couper les cheveux en brosse. Si vous souhaitez garder les cheveux
plus longs sur le sommet de la tête, il faudra utiliser un peigne pour maintenir les cheveux droits sur le
haut de la tête. Passez la tondeuse par dessus le peigne ou tenez les cheveux entre les doigts et coupez-les
à la longueur souhaitée. Travaillez toujours en partant de l’arrière de la tête. Coupez les cheveux
progressivement en réduisant la distance entre le peigne, ou les doigts, et la tête. Peignez régulièrement
les cheveux pour vérifier qu’ils ont une longueur égale et pour éliminer les cheveux déjà coupés.
Etape 5. La touche finale
Pour obtenir une coupe parfaite, retirez le peigne adaptable et retournez la tondeuse (le dessous au dessus)
de façon à parfaire la coupe du bas de la nuque, des côtés et de la partie autour des oreilles. Réglez la
longueur de coupe sur la position courte. Tenez la tondeuse perpendiculairement à la tête, les pointes des
lames effleurant la peau et travaillez de haut en bas. Vous obtenez ainsi une peau aussi lisse que si vous
aviez utilisé un rasoir.
Pour couper les cheveux longs.
Si les cheveux doivent être coupés avec les pointes effilées, divisez les cheveux et peignez-les de la façon
habituelle. Divisez ensuite les cheveux en trois parties égales depuis l’arrière de la tête. Attachez les deux
couches supérieures avec des épingles à cheveux afin qu’elles ne gênent pas pour couper la couche du
dessous. Coupez ensuite avec des ciseaux ou avec la tondeuse en utilisant le peigne de coiffeur.
NETTOYAGE ET ENTRETIEN
Enlevez les cheveux restants à l’aide de la petite brosse après chaque utilisation.
Vous pouvez nettoyer l’extérieur de la tondeuse avec un chiffon doux et humide.
Conseils
- Pour des raisons de sécurité, l’élément de charge ne doit pas être utilisé à moins d’un
mètre de distance d’une baignoire ou d’une douche ni au-dessus d’un lavabo rempli
d’eau. Ne jamais le passer sous l’eau !
- Ne laissez jamais l’appareil utilisé sans surveillance par des enfants ou des personnes
dépendantes.
- Manipuler les lames avec précaution, ne pas les cogner contre des objets durs et ne pas
les faire tomber. Ne pas utiliser l’appareil si les lames sont endommagées !
Page 10
10
- Les réparations et l’entretien doivent être exécutés par notre service après-vente. Ne pas utiliser
l’appareil si celui-ci ou son cordon sont endommagés, mais l’expédier à notre service de réparation.
PILES
Cet appareil contient une pile rechargeable. Pour la retirer ouvrir le dos de l’appareil.
La pile peut alors être détachée et retirée.
Les piles sont des déchets chimiques et ne doivent donc pas être jetées avec les ordures ménagères.
Jetez les piles usées dans le conteneur spécial pour déchets chimiques ou remettez-les au service de la
voirie, et suivez les indications locales en vigueur.
PRINCESS WET AND DRY RECHARGEABLE HAIR CLIPPER ART. 535576
VOR DEM GEBRAUCH
Diese Gebrauchsanweisung vor dem Erstgebrauch sorgfältig durchlesen und für eventuelle spätere Fragen
aufheben. Überprüfen, ob die Netzspannung in der Wohnung der des Gerätes entspricht. Das Ladegerät
niemals in der Nähe eines mit Wasser gefüllten Waschbeckens, einer Badewanne oder Dusche benutzen.
Niemals versuchen, ein ins Wasser gefallenes Gerät zu berühren. Immer zuerst den Netzstecker ziehen.
Das Ladegerät nur mit trockenen Händen anfassen.
BESONDERHEITEN
Praktisches aufladbares Haarschneide-Set (ohne Kabel) mit Ladekontrolllämpchen und einem praktischen
Ständer, der gleichzeitig als Ladegerät dient. Spritzwasserbeständig, kann unter der Dusche benutzt werden, nicht unter Wasser. Komplett mit 2 in 7 Ständen einstellbaren Kammaufsätzen (4 bis 20 mm und 24
bis 40 mm), Frisierkamm, Schere, Ladegerät und Reinigungsbürste. Mit dem Kammaufsatz können verschiedene Schnittlängen eingestellt werden. Damit wird das Haareschneiden so einfach, dass auch der
Hausfriseur professionelle Ergebnisse erzielt.
GEBRAUCHSANWEISUNG
Die Haarschneidemaschine wird mit dem 2-Stände-Schiebeschalter eingeschaltet.
Durch das Verschieben des Kammaufsatzes kann die Schnittlänge verändert werden. Wird der
Kammaufsatz nach vorne geschoben, nimmt die Schnittlänge zu. Durch Verschieben des Kammaufsatzes
nach hinten wird die Schnittlänge kürzer.
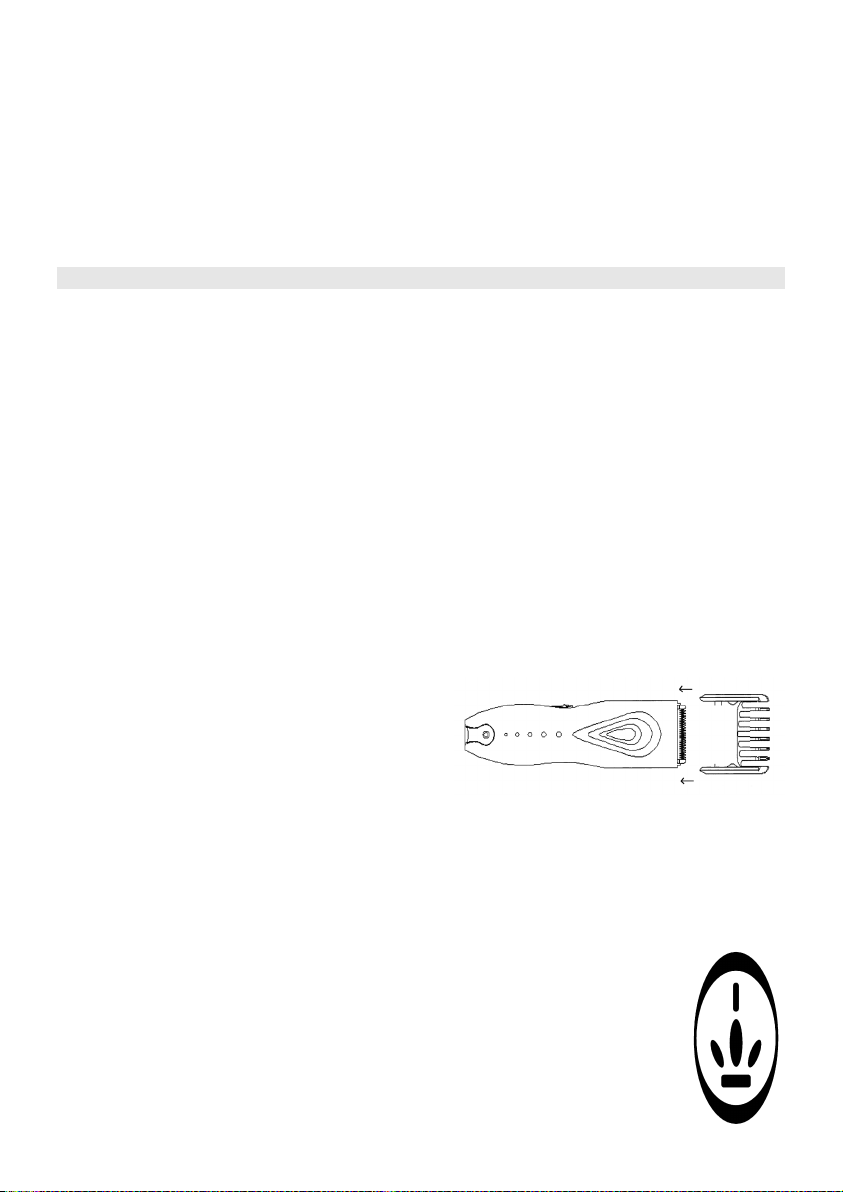
Der Kammaufsatz lässt sich einfach auf die Haarschneidemaschine schieben. Zum Abnehmen den
Kammaufsatz nach Entriegelung mit dem Knopf abziehen.
Die Kammaufsatzlänge kann mit Hilfe des Knopfes unten am Gerät verriegelt werden.
Ist eine andere Schnittlänge gewünscht, kann der Kammaufsatz mit diesem Knopf problemlos entriegelt
werden. Dann lässt er sich verschieben. Der Stand des Kammaufsatzes kann in dem kleinen Fenster
abgelesen werden.
Vor dem Haareschneiden:
- Die Haarschneidemaschine überprüfen. Darauf achten, dass sich keine Haare oder Schmutz an der
Haarschneidemaschine befinden. Die Haarschneidemaschine einschalten und überprüfen, ob sie
ordnungsgemäß funktioniert.
- Um den Nacken der Person, die sich die Haare schneiden lässt, ein Handtuch legen.
- Die Person sollte so sitzen, dass sich der Kopf in Augenhöhe des Friseurs befindet.
Nur so ist ein ausreichender Überblick und problemloses Arbeit garantiert. Nötigenfalls
können Bücher oder Kissen benutzt werden, um die Sitzhöhe der Person zu erhöhen.
- Zuerst das Haar kämmen, sodass es nicht verfitzt ist. Die Haarschneidemaschine sollte
beim Festhalten möglichst bequem in der Hand liegen.
- Entspannt und gewissenhaft vorgehen. Nur kurze Bahnen schneiden. Nicht sofort die
Seiten oder die Rückseite des Kopfes ganz fertig schneiden, sondern das Haar nach und
nach auf dem gesamten Kopf schneiden.
Page 11

11
- Es ist besser, je Schneidevorgang ein kleines Stück abzuschneiden. Später können die Haare immer
noch kürzer geschnitten werden.
- Vor dem und während des Schneidens das Haar regelmäßig in die gewünschte Frisur kämmen.
Beginn des Schneidens
Beim Erstgebrauch der Haarschneidemaschine nur ein kleines Stück des Haares abschneiden, bis man
sich an die Schnittlänge des jeweiligen Kammaufsatzes gewöhnt hat.
Nachdem das Haar in die natürliche Wuchsrichtung gekämmt wurde, folgendermaßen vorgehen, um eine
flotte, spitz zulaufende Frisur zu erhalten:
1. Schritt: Nackenpartie
Den Kammaufsatz in Stand 1 oder 2 benutzen. Die Haarschneidemaschine mit der Schnittseite nach oben
halten und unten am Nacken in der Mitte mit dem Schneiden beginnen. Die Haarschneidemaschine mit
den Zinken des Kammaufsatzes nach oben gerichtet leicht gegen den Kopf drücken. Dann langsam nach
oben bewegen; das Haar nach oben und zur Außenseite hin schneiden. Jeweils immer nur ein kurzes
Stück abschneiden. Während des Schneidens den Kopf der Maschine langsam in Richtung des Benutzers
bewegen. Anschließend den Hinterkopf vom Nackenansatz bis über die Ohren schneiden.
2. Schritt: Rückseite des Kopfes
Den Kammaufsatz in Stand 1 oder 2 stellen und die Rückseite des Kopfes schneiden.
3. Schritt: Kopfseiten
Zum Schneiden der Koteletten, also des Haares unmittelbar vor den Ohren, den Kammaufsatz 1 in den
kürzeren Schnittlängeneinstellungen verwenden. Den Kammaufsatz anschließend länger einstellen und
das Schneiden bis zur Oberseite des Kopfes fortsetzen.
4. Schritt: Oberseite des Kopfes
Kammaufsatz 1 oder 2 benutzen und die Oberseite des Kopfes von hinten nach vorne gegen die
Wuchsrichtung des Haares schneiden. In manchen Fällen heißt dies, dass man von vorn nach hinten
arbeiten muss. Für einen Igelschnitt den Kammaufsatz in Stand 1 verwenden. Wenn das Haar oben auf
dem Kopf etwas länger bleiben soll, muss das Haar mit einem Kamm oben hoch gehalten werden. Mit der
Haarschneidemaschine über den Kamm schneiden oder das Haar zwischen den Fingern halten und in der
gewünschten Länge abschneiden. Immer vom Hinterkopf aus arbeiten. Das Haar allmählich kürzer schneiden, indem der Abstand zwischen dem Kamm - oder den Fingern - und dem Kopf verringert wird. Den
Kamm regelmäßig benutzen, um zu prüfen, ob noch Haarzipfel herausschauen, und um abgeschnittenes
Haar herauszukämmen.
5. Schritt: letzter Schliff
Für eine gute, ordentliche Frisur zum Schluss den Kammaufsatz wieder abnehmen und die
Haarschneidemaschine umdrehen (mit der Unterseite nach oben), sodass der Nackenansatz, die Seiten
und die Partien um die Ohren nachgeschnitten werden können. Den Knopf für die verstellbare
Schnittlänge auf den kleinsten Stand einstellen. Die Haarschneidemaschine rechtwinklig am Kopf
ansetzen. Die Spitzen der Klingen sollten die Kopfhaut leicht berühren. Nun nach unten schneiden.
So erhält man ein ebenso glattes Ergebnis wie bei der Benutzung eines Rasiermessers.
Das Schneiden von langem Haar
Wenn das Haar spitz zulaufen soll, das Haar zunächst wie üblich verteilen und kämmen.
Anschließend das Haar in drei gleiche Teile aufteilen. Dabei an der Rückseite des Kopfes
beginnen. Die beiden oberen Lagen mit Haarklemmen befestigen, sodass sie beim
Schneiden der unteren Lage nicht stören. Danach mit einer Schere oder mit der
Haarschneidemaschine in Kombination mit dem Frisierkamm schneiden.
REINIGUNG UND WARTUNG
Nach jeder Benutzung die Haarreste mit Hilfe der Reinigungsbürste entfernen.
Die Außenseite der Haarschneidemaschine kann mit einem feuchten, weichen Tuch
gereinigt werden.
Page 12

12
TIPPS
- Das Ladegerät im Interesse der Sicherheit nicht in der Nähe (Mindestabstand 1 m) einer Badewanne
und Dusche oder über einem mit Wasser gefüllten Waschbecken benutzen. Nie unter Wasser halten!
- Kinder oder hilfsbedürftige Personen dürfen dieses Gerät nur unter Aufsicht verwenden.
- Die Klingen vorsichtig behandeln, nicht gegen harte Gegenstände stoßen und nicht fallen lassen. Das
Gerät nicht mehr benutzen, wenn die Klingen beschädigt sind!
- Reparatur und Wartung nur von unserem Kundendienst ausführen lassen. Das Gerät nicht mehr
benutzen, wenn es beschädigt ist oder ein Defekt am Kabel vorliegt. In diesem Fall das Gerät an
unseren Kundendienst schicken.
BATTERIEN
Das Gerät wird mit einer aufladbaren Batterie betrieben. Zum Entfernen der Batterie die Rückseite des
Gerätes öffnen.
Die Batterie kann nun gelöst und herausgenommen werden.
Batterien sind chemischer Abfall und gehören nicht in den Hausmüll. Die leeren Batterien in
entsprechende Batteriesammelbehälter werfen oder beim Reinigungsdienst abgeben. Dabei die jeweils
gültigen Vorschriften beachten.
PRINCESS WET AND DRY RECHARGEABLE HAIR CLIPPER ART. 535576
ANTES DEL USO
Antes del uso léanse detenidamente estas instrucciones de uso y consérvense para una posible consulta
posterior. Asegúrese de que la tensión de red de su vivienda coincide con la del aparato. No coloque el
cargador cerca de una ducha, lavabo, bañera, etc., con agua. Si se cae el cargador al agua no intente cogerlo
jamás. Antes desenchúfelo de la toma de corriente. Maneje el cargador siempre con las manos secas.
CARACTERÍSTICAS
Práctica maquinilla para cortar el pelo recargable (sin cable) con indicador luminoso de carga y práctico
pie de sobremesa que además es cargador. Resistente a salpicaduras, se puede usar en la ducha pero no
bajo el agua. Completa con dos peines de acoplamiento ajustables en 7 posiciones (de 4 a 20 mm)
(24 a 40 mm), peine, tijeras, adaptador de carga y escobilla de limpieza. El peine de acoplamiento se
utiliza para ajustar diferentes largos de corte. Hace el corte de pelo tan fácil que cualquiera puede obtener
resultados profesionales.
INSTRUCCIONES DE USO
Con el interruptor deslizante de 2 posiciones se puede activar la maquinilla.
Deslizando el peine de acoplamiento se ajusta el largo de corte: Deslizándolo hacia delante, se obtiene un
largo de corte más largo, para pelo más corto, hay que deslizarlo hacia atrás.
El peine de acoplamiento se encaja fácilmente en
la maquinilla. Para retirar el peine después de quitar
el tope sólo hay que tirar de él.
En la parte inferior de la maquinilla se puede bloquear el largo del peine de acoplamiento
deslizando el botón. Cuando se desea trabajar con otro largo, se puede desbloquear
sencillamente el peine de acoplamiento deslizando el botón y el peine. La ventana muestra
la posición del peine de acoplamiento.
Antes de proceder al corte:
- Compruebe la maquinilla para cortar el pelo. Asegúrese de que la misma esté libre de
pelos o suciedad. Ponga en funcionamiento la maquinilla para cortar el pelo y compruebe
que funcione sin problemas.
- Ponga una toalla alrededor del cuello de la persona cuyo pelo se va a cortar.
Page 13

13
- Coloque a esta persona de forma que su cabeza quede a la altura de los ojos de usted,
así usted tendrá una visión mejor y estará más cómodo. Si fuera preciso, utilice libros
apilados o cojines para subir la persona a la posición deseada.
- Primero péinele el cabello, para desenredarlo. Luego agarre la maquinilla para cortar el pelo de la forma
más cómoda posible.
- Relájese y trabaje con precisión. Trabaje con movimientos cortos. No corte totalmente la parte lateral o
posterior del cabello; vaya cortando gradualmente por toda la cabeza.
- Es preferible cortar una pequeña parte del pelo a la vez. Siempre podrá cortar más más adelante.
- Antes de empezar y sobre la marcha, vaya peinando el pelo una y otra vez según el corte final deseado.
Empezar el corte
Cuando estrena la maquinilla para cortar el pelo, corte solamente un poco el pelo, hasta que se familiarice
con el largo de corte correspondiente al peine de acoplamiento.
Después de peinar el pelo en el sentido de crecimiento natural, proceda como se explica a continuación
para obtener un peinado moderno de línea oblicua:
Paso 1. La zona del cuello.
Utilice el peine de acoplamiento 1 ó 2. Mantenga la maquinilla para cortar el pelo con el lado de corte
hacia arriba y empiece a cortar por el medio la zona inferior del cuello. Presione ligeramente la maquinilla
para cortar el pelo contra la cabeza con las púas del peine de acoplamiento mirando hacia arriba. Mueva
gradualmente la maquinilla para cortar el pelo hacia arriba, trabajando por el pelo hacia arriba y hacia los
lados, cortando sólo un poquito el pelo en cada pasada. Al cortar, mueva gradualmente hacia usted la
cabeza de la maquinilla para cortar el pelo. Seguidamente corte la parte posterior, partiendo desde el inicio
del cuello hasta por encima de las orejas.
Paso 2. La parte posterior de la cabeza.
Use el peine de acoplamiento 1 ó 2 para cortar la parte posterior de la cabeza.
Paso 3. La parte lateral de la cabeza.
Use el ajuste más corto del peine de acoplamiento 1 para cortar los lados - el pelo inmediatamente al lado de
las orejas. Luego, cambie el peine por otro más largo y continúe cortando hacia la parte superior de la cabeza.
Paso 4. La parte superior de la cabeza.
Use el peine de acoplamiento 1 ó 2 para cortar el pelo de la parte superior de la cabeza desde atrás hacia
delante contra la dirección de crecimiento del pelo. En algunos casos, esto último significa que tendrá que
trabajar desde delante hacia atrás. El peine de acoplamiento 1 se utiliza para pelo corto y recortar. Si desea
mantener más largo el cabello encima de la cabeza, ha de utilizar un peine para mantener el pelo encima de
la cabeza. Corte con la maquinilla para cortar el pelo por encima del peine, o tenga el pelo entre los dedos
y córtelo a la altura deseada. Trabaje siempre partiendo de la parte posterior de la cabeza. Vaya recortando
el cabello al reducir la distancia entre el peine - o bien los dedos - y la cabeza. Utilice con regularidad el
peine para controlar si quedan mechones de un largo irregular y para sacar los pelos ya cortados.
Paso 5. El toque final.
Finalmente, para obtener un peinado esmerado, saque nuevamente el peine y dé la vuelta a la maquinilla
(con la parte de abajo mirando hacia arriba), permitiéndole retocar la parte inferior del cuello, los laterales
y la parte alrededor de las orejas. Ponga en la posición inferior el botón para el largo de
corte ajustable. Ponga la maquinilla para cortar el pelo en ángulo recto con la cabeza, con
las puntas de las cuchillas
tocando ligeramente la piel, trabajando hacia abajo. De esta manera obtendrá un resultado
tan liso como si hubiera utilizado una hoja de afeitar.
Cómo cortar un cabello más largo.
Si se desea un corte en disminución, primero ha de distribuir y peinar el pelo como de
costumbre. Luego reparta el pelo en la parte posterior de la cabeza en tres partes iguales
alrededor de la cabeza. Fije las dos capas superiores con agujas, para que no le molesten al
cortar la capa inferior. Luego proceda al corte con unas tijeras o con ayuda de la maquinilla
para cortar el pelo en combinación con el peine de peluquero.
Page 14

14
LIMPIEZA Y MANTENIMIENTO
Límpiela con un cepillo pequeño después de cada uso. La parte exterior de la maquinilla para cortar el pelo
se puede limpiar con ayuda de un paño suave y húmedo.
CONSEJOS
- Por motivos de seguridad, no se puede utilizar este aparato a una distancia inferior de un metro de la
bañera o la ducha y tampoco encima de un lavabo con agua. ¡Nunca sumergirlo en agua!
- En niños o personas discapacitadas se debe utilizar este aparato únicamente bajo vigilancia.
- Manejar con cuidado las cuchillas, no chocar contra objetos duros ni dejarlas caer. ¡No utilizar si las
cuchillas están dañadas!
- Confiar reparaciones y revisiones a nuestro servicio técnico. No utilizar el aparato si está dañado el
mismo o el cable; envíelo a nuestro servicio técnico.
PILAS
Este aparato contiene una pila recargable. Se puede sacar destornillando el tornillo de la parte posterior.
Ahora se puede sacar la pila.
Las pilas son residuos químicos que no se pueden desechar normalmente. Deposite las pilas vacías en
un contenedor de recogida especial o entréguelas a su servicio de basura municipal, siguiendo las
instrucciones correspondientes.
PRINCESS WET AND DRY RECHARGEABLE HAIR CLIPPER ART. 535576
PRIMA DELL’USO
Leggete attentamente le istruzioni e conservatele per eventuali consultazioni successive. Verificate che la
tensione di alimentazione dell’apparecchio corrisponda a quella della vostra abitazione. Non posizionate
il caricabatterie in vicinanza della doccia o di un lavabo, vasca da bagno, o simili, contenenti acqua. Non
toccate mai un caricabatterie che sia accidentalmente caduto in acqua, ma togliete prima la spina dalla
presa di alimentazione. Maneggiate il caricabatterie esclusivamente con le mani asciutte.
CARATTERISTICHE PARTICOLARI
Comodo set tagliacapelli ricaricabile (senza filo), dotato di spia luminosa e comodo sostegno con funzione
di caricabatterie. Resistente agli spruzzi d’acqua, può essere utilizzato sotto la doccia, non sott’acqua.
Dotato di due pettini distanziatori, regolabili in 7 posizioni (da 4 a 20 mm) (da 24 a 40 mm), pettine,
forbici, adattatore caricabatterie e spazzolino per la pulizia. Il pettine distanziatore permette di regolare
la lunghezza di taglio dei capelli. Tagliare i capelli diventa così facile che anche il parrucchiere a casa può
ottenere risultati professionali
ISTRUZIONI PER L’USO
Il tagliacapelli si accende con l'apposito interruttore a 2 posizioni.
Facendo scorrere il pettine distanziatore sul supporto
potete regolare la lunghezza di taglio. Fate scorrere il
pettine distanziatore in avanti per ottenere una lunghezza
di taglio maggiore, indietro per tagliare i capelli più corti.
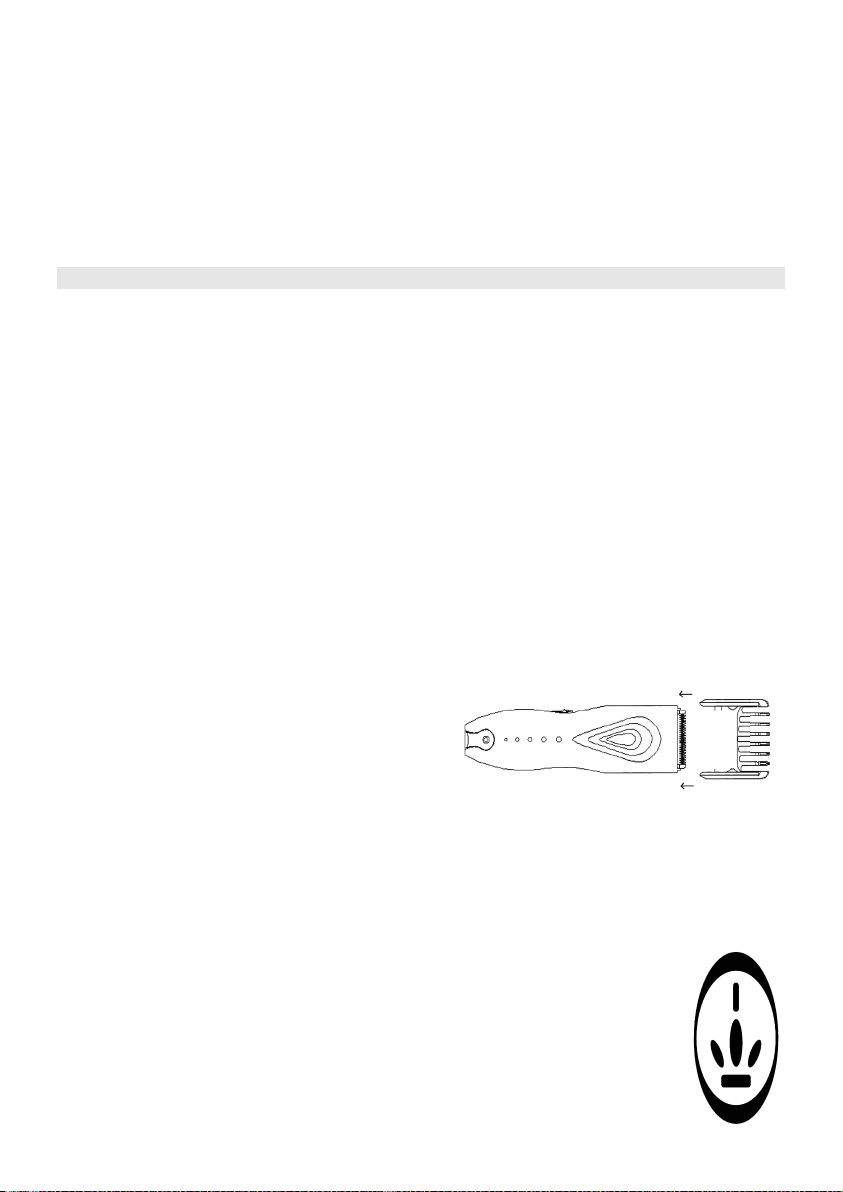
Il pettine distanziatore può essere facilmente inserito sul tagliacapelli ed essere nuovamente
sfilato dopo avere sbloccato il tasto di bloccaggio.
Il pettine distanziatore può essere bloccato nella posizione desiderata mediante il pulsante
situato sotto l'apparecchio.
Per passare ad un'altra lunghezza è sufficiente sbloccare il pettine distanziatore con il
pulsante e spostare il pettine stesso. La posizione del pettine appare nella finestrella.
Prima di iniziare a tagliare:
- Controllate il tagliacapelli. Assicuratevi che sia pulito, privo di capelli o sporcizia.
Azionate il tagliacapelli e controllate che funzioni regolarmente.
Page 15

15
- Mettete un asciugamano attorno al collo della persona a cui state per tagliare i capelli.
- Fate sedere la persona in modo che la sua testa sia all'altezza dei vostri occhi. Ciò vi permetterà di
avere una visuale sufficiente e di lavorare meglio. Se necessario, usate dei libri o cuscini per fare sedere
più in alto la persona.
- Pettinate bene i capelli, in modo da eliminare eventuali nodi. Prendete in mano il tagliacapelli, nel
modo più comodo.
- Rilassatevi e procedete con precisione. Procedete a piccoli tratti. Non rifinite immediatamente i lati ed
il collo, ma procedete gradualmente su tutta la testa.
- Si consiglia di tagliare i capelli poco per volta. Potete sempre accorciarli ulteriormente.
- Prima di iniziare e durante il taglio, pettinate regolarmente i capelli nel modello del taglio desiderato.
Iniziare a tagliare
La prima volta che usate il tagliacapelli, tagliate i capelli di poco, fino a quando non vi sarete abituati alle
diverse lunghezze di taglio impostabili.
Dopo avere pettinato i capelli secondo la naturale direzione di crescita, procedete come segue, per ottenere
un taglio moderno, scalato:
Passo 1. La parte posteriore.
Regolate il pettine distanziatore in posizione 1 o 2. Tenete il tagliacapelli con le lame verso l'alto, ed
iniziate a tagliare partendo dalla base del collo, al centro. Premete delicatamente il tagliacapelli contro il
cuoio capelluto, con i denti del pettine distanziatore rivolti verso l'alto. Muovete il tagliacapelli con
movimento continuo verso l'alto; passate attraverso i capelli spostandovi verso l'alto e verso l'esterno,
tagliandoli di poco per volta. Mentre tagliate, dirigete gradualmente la testa del tagliacapelli verso di voi.
Quindi tagliate i capelli nella parte posteriore della testa, partendo dal collo e procedendo fin sopra i capelli.
Passo 2. La parte posteriore.
Utilizzate il pettine distanziatore 1 o 2 per tagliare i capelli nella parte posteriore.
Passo 3. La parte laterale.
Per tagliare le basette, ossia i capelli che crescono davanti alle orecchie, regolate il pettine distanziatore
1 su una delle lunghezze più corte. Dopo avere tagliato le basette, regolate nuovamente il pettine
distanziatore ad una lunghezza maggiore e proseguite il taglio fin sopra la testa.
Passo 4. La parte superiore.
Regolate il pettine distanziatore in posizione 1 o 2 e tagliate la parte superiore procedendo da dietro in
avanti, in senso contrario alla crescita dei capelli. Ciò significa che, in alcuni casi, dovrete procedere in
senso opposto. L’altezza di taglio 1 viene usata per tagliare i capelli a spazzola. Se volete lasciare i capelli
più lunghi sopra, dovete usare il pettine a mano per trattenere i capelli. Passate, quindi, il tagliacapelli
sopra il pettine, oppure trattenete i capelli tra le dita e tagliateli alla lunghezza desiderata. Lavorate
sempre partendo dalla parte posteriore della testa. Tagliate i capelli via, via più corti, accorciando la
distanza tra il pettine, o le dita e la testa. Passate regolarmente il pettine a mano tra i capelli, per
controllare che non vi siano ciuffi di lunghezza diversa e per eliminare i capelli già tagliati.
Passo 5. Il tocco finale.
Infine, per un taglio accurato e ben rifinito, togliete il pettine distanziatore e girate il tagliacapelli (con la
parte inferiore rivolta verso l'alto), in modo da poter rifinire la base del collo, i lati e la
zona intorno alle orecchie. Mettete il pulsante per la regolazione dell'altezza di taglio nella
posizione più bassa. Tenete il tagliacapelli perpendicolare alla testa, in modo che la lama
tocchi leggermente il cuoio capelluto, e muovetevi verso il basso. In questo modo otterrete
lo stesso risultato liscio, che otterreste con un rasoio.
Taglio di capelli più lunghi.
Se i capelli devono risultare scalati, pettinate i capelli come di consueto, quindi, dividete
i capelli, intorno alla testa, in tre strati uguali, partendo da dietro. Fissate i due strati
superiori con dei fermagli, in modo che non vi diano fastidio mentre tagliate lo strato
inferiore. Procedete tagliando con le forbici, o con il tagliacapelli, aiutandovi con il pettine
a mano.
Page 16

16
PULIZIA E MANUTENZIONE
Dopo l’uso rimuovete i capelli superflui con l’ausilio dello spazzolino.
Potete pulire la superficie esterna del vostro tagliacapelli con un panno morbido inumidito con acqua.
SUGGERIMENTI
- Per motivi di sicurezza, il caricabatterie non deve essere usato entro la distanza di un metro dalla vasca
da bagno o dalla doccia, né sopra ad un lavabo riempito con acqua. Non immergete mai l’apparecchio
in acqua!
- Sorvegliate attentamente l'apparecchio in presenza di bambini o persone inabili.
- Maneggiate le lame con cura, non lasciatele cadere e non scontratele contro superfici dure. Non usate
l’apparecchio se le lame sono danneggiate!
- Fate effettuare eventuali riparazioni presso il nostro centro assistenza. Non usate l’apparecchio se è
difettoso o se il cavo di alimentazione è danneggiato, ma inviatelo al nostro centro di assistenza.
BATTERIE
L'apparecchio è dotato di una batteria ricaricabile, Per rimuovere la batteria è necessario aprire la parte
posteriore dell’apparecchio. Scollegate quindi la batteria e sostituitela.
Le batterie sono rifiuti chimici, non disperdetele nell'ambiente. ma gettatele negli appositi contenitori per
la raccolta o consegnatele all'ente preposto allo smaltimento dei rifiuti nella vostra zona, conformemente
alle disposizioni comunali in merito.
PRINCESS WET AND DRY RECHARGEABLE HAIR CLIPPER ART. 535576
INNAN DU BÖRJAR
Läs först igenom dessa instruktioner och spara dem för framtida bruk. Kontrollera att nätspänningen i ditt
hem motsvarar apparatens spänning. Placera aldrig laddaren i närheten av ett tvättställ eller badkar fyllt
med vatten eller i närheten av en dusch eller liknande. Om laddningsenheten ramlat ned i vatten ska du
inte försöka ta upp den. Tag först ut kontakten från uttaget. Använd alltid laddningsenheten med torra
händer.
EGENSKAPER
Praktisk uppladdningsbar (sladdlös) hårklippningsmaskin bestående av 8 delar med indikatorlampa för
laddning och praktisk bordsfot som laddare. Stänktålig – kan användas i duschen, men inte under vatten.
Komplett med två justerbara kamtillsatser med 7 lägen (4 till 20 mm) (24 till 40 mm), kam, sax,
laddningsadapter, rengöringsborste. Kamtillsatsen används till att ställa in olika klipplängder. Detta gör
hårklippning så enkelt att till och med hemfrisören kan uppnå professionella resultat.
BRUKSANVISNING
Starta hårklippningsmaskinen med 2-lägesknappen.
Klipplängden kan ändras genom att skjuta fast
kamtillsatsen. Om kammen skjuts fram ger detta en
längre längd, om den skjuts bak ger det en kortare längd.
Kamtillsatsen trycks enkelt fast på hårklippningsmaskinen.
Om du vill ta bort kamtillsatsen när du lossat knappen drar du den uppåt.
På apparatens undersida kan man låsa kamtillsatsens längd genom att flytta knappen.
Om man vill ha en annan längd kan man enkelt låsa upp kamtillsatsen genom att skjuta
knappen och kamtillsatsen. Fönstret visar kamtillsatsens inställning.
Innan du börjar klippa:
- Kontrollera först hårklippningsmaskinen. Se till att hårklippningsmaskinen inte är full
med hår eller annat smuts. Starta apparaten och kontrollera att den löper utan problem.
Page 17

17
- Häng en handduk runt halsen på personen som ska klippas.
- Låt personen sitta så att du har huvudet i ögonhöjd. Detta ger god sikt så att du kan arbeta noggrannare.
Använd eventuellt böcker eller kuddar så att personen sitter högre.
- Kamma först håret så att det inte är rufsigt. Håll sedan fast apparaten så bekvämt som möjligt.
- Arbeta avspänt och noggrant. Klipp endast med korta banor. Avsluta inte en sida eller nacken på en
gång, arbeta gradvis över hela huvudet.
- Det är bättre att avlägsna små mängder åt gången. Du kan alltid avlägsna mer senare.
- Kamma håret före och under arbetet regelbundet i stil med den önskade frisyren.
Påbörja klippningen
Första gången du använder hårklippningsmaskinen bör du endast klippa bort små mängder hår, tills du är
van vid klipplängden.
Kamma först håret i sin naturliga växtriktning och gör sedan så här för att få en snygg, jämnt uppklippt frisyr:
Steg 1. Nackpartiet.
Använd kamtillsats 1 eller 2. Håll apparaten med klippsidan uppåt och börja klippa nedtill i mitten av
nacken. Håll hårklippningsmaskinen lätt mot huvudet med kamtillsatsens tänder riktade uppåt. För
apparaten med en jämn rörelse uppåt, arbeta uppåt och utåt genom håret så att du endast avlägsnar en
liten mängd åt gången. För maskinens huvud långsamt mot dig under klippningen. Klipp sedan
bakhuvudet från början av nacken till ovanför öronen.
Steg 2. Baksidan av huvudet.
Använd kamtillsats 1 eller 2 när du klipper håret på huvudets baksida.
Steg 3. Sidan av huvudet.
Använd den kortare inställningen för kamtillsats 1 för klippning av polisongerna, det vill säga håret direkt
framför öronen. Därefter ändrar du kamtillsatsen till en längre längd och fortsätter klippa upp på huvudet.
Steg 4. Hjässan.
Använd kamtillsats 1 eller 2 när du klipper håret på huvudet bakifrån och framåt mot den riktning som
håret växer i. I vissa fall betyder detta att du måste arbeta från framsidan. Kamtillsats 1 används om du
vill ha kort, snaggat hår. Om du vill hålla håret längre på hjässan använder du en frisörkam till att hålla
håret ovanför huvudet. Klipp med maskinen över kammen, eller håll håret mellan fingrarna och klipp
det i önskad längd. Arbeta alltid från huvudets baksida. Klipp håret gradvis kortare genom att minska
avståndet mellan kammen, eller fingrarna, och huvudet. Använd regelbundet kammen för att kontrollera
om det sitter kvar ojämna lockar och till att avlägsna bortklippt hår.
Steg 5 Putsa frisyren.
Till sist tar du, för en snygg och välklippt frisyr, bort påsättningskammen och vänder på apparaten
(med undersidan uppåt), så att du kan ansa längst ned i nacken, längs sidorna och runt öronen. Ställ den
justerbara knappen för klipplängd på den lägsta inställningen. Ställ in knappen för inställbar klipplängd
i det kortaste läget. Sätt apparaten i rät vinkel mot huvudet, låt skärbladets spetsar lätt vidröra huden och
arbeta nedåt. På så sätt blir resultatet lika slätt som om du skulle ha använt en rakkniv.
Klippning av längre hår.
Om håret ska klippas upp fördelar och kammar du det först som vanligt. Sedan fördelar du
det från
baksidan i tre lika delar runt huvudet. Sätt fast de båda översta lagren med hårspännen så
att de inte sitter i vägen när du klipper det understa lagret. Klipp sedan med en sax eller
med hårklippningsmaskinen tillsammans med frisörsaxen.
RENGÖRING OCH UNDERHALL
Efter varje användningstillfälle ska ta bort hår med rengöringsborsten.
Apparatens utsida kan rengöras med en mjuk, fuktig trasa.
Page 18

18
TIPS
- Ur säkerhetssynpunkt får apparaten inte användas inom en radie av 1 meter från badkar eller dusch
och inte ovanför ett tvättställ fullt av vatten. Håll aldrig under vatten!
- Barn och handikappade får endast använda apparaten under tillsyn.
- Var försiktig med skärbladen, låt dem inte falla eller stöta mot hårda föremål. Använd inte apparaten
om bladen är skadade!
- Reparation och underhåll måste utföras av vår serviceavdelning. Använd aldrig apparaten om den är
skadad eller om sladden är trasig. Lämna in hos affären för reparation.
BATTERIER
I denna apparat sitter ett uppladdningsbart batteri. Detta kan man avlägsna genom att skruva bort skruven
som sitter på baksidan.
Nu kan batteriet tas bort och avlägsnas.
Batterier är kemiskt avfall; kasta dem inte hur som helst. När batterierna är slut skall de läggas i holken
eller lämnas separat till sophämtningen. Följ bestämmelserna inom din kommun.
PRINCESS WET AND DRY RECHARGEABLE HAIR CLIPPER ART. 535576
INDEN APPARATET TAGES I BRUG
Læs brugsanvisningen grundigt igennem og gem den, hvis du får brug for at slå noget op. Se efter, at
netspændingen i boligen svarer til apparatets. Anbring ikke opladeren i nærheden af en fyldt håndvask,
badekar, brusebad eller lignende. Rør aldrig ved en oplader, der ved et uheld er faldet i vandet, men tag
altid først stikket ud af stikkontakten. Sørg altid for at have tørre hænder, når du anvender opladeren.
BESKRIVELSE
Praktisk opladeligt (ledningsfrit) hårtrimmersæt med opladeindikator og praktisk fod, der samtidig
fungerer som oplader. Kan tåle stænk og kan anvendes under bruseren, men må ikke kommes ned i vand.
Leveres komplet med 2 indstillelige klippekamme, der kan indstilles i 7 klippelængder (4-20 mm og
24-40 mm), kam, saks, oplader og rensebørste. Klippekammene bruges til at indstille de forskellige
klippelængder med. Herved opnår du problemløst et professionelt klipperesultat hjemme i din egen stue.
BRUGSANVISNING
Hårtrimmeren tændes ved at indstille afbryderen på en af de to positioner.
Ved at skyde klippekammen frem eller tilbage, indstilles den ønskede klippelængde. Skydes kammen
fremad, bliver klippelængden længere; når den skydes tilbage, klippes håret kortere.
Klippekammen skydes på hårtrimmeren i en
håndevending og fjernes med samme glidende
bevægelse – efter at ’lock’-knappen er løsnet.
På apparatets underside kan man ’fastlåse’ kammens klippelængde ved hjælp af ’lock’-knappen. Ønsker
man at indstille andre klippelængder, løsnes klippekammen via ’lock’-knappen, hvorefter klippekammen
kan justeres. I den lille rude vises den indstillede position.
Inden klipningen påbegyndes:
- Kontroller hårtrimmeren. Sørg for, at der ikke sidder hår eller snavs på trimmeren. Tænd
hårtrimmeren og kontroller, at den fungerer, som den skal.
- Læg et håndklæde omkring nakken på den person, der skal klippes.
- Lad den pågældende person tage plads, så vedkommendes hoved befinder sig i øjenhøjde.
Herved kan du overskue situationen, så arbejdet bliver udført med omhu. Ifald det måtte
være nødvendigt, kan du lade vedkommende sidde på et par bøger eller puder.
- Red allerførst håret igennem, så det ikke er i uorden. Lad derefter hårtrimmeren hvile
roligt i hånden.
- Slap af og arbejd yderst omhyggeligt og klip kun i korte baner. Forsøg ikke at gøre
side-eller nakkepartier færdige på én gang, men arbejd jævnt hen over hele hovedet.
Page 19

19
- Det er bedst kun at klippe lidt af ad gangen. Du kan altid klippe mere af senere.
- Red af og til håret i den ønskede model, både inden og under klipningen.
Når du begynder at klippe
Klip kun lidt af håret den første gang, du bruger hårtrimmeren, indtil du ved hvilken klippekam, der giver
den ønskede klippelængde.
Følg - efter at håret er redt i dets naturlige vokseretning - nedenstående fremgangsmåde for at opnå en
naturligt afrundet model:
1. FASE. Nakken.
Brug klippekam 1 eller 2. Hold hårtrimmeren fast med klippeskæret opad og begynd at klippe den nederste del af nakken, midt for. Tryk hårtrimmeren let ind mod hovedet med klippekammens tænder i opadvendt position. Før roligt hårtrimmeren opad og bevæg den igennem håret i opadgående og udadgående
retning, således at der kun bliver taget lidt af ved hver bevægelse. Bevæg under klipningen hårtrimmerens
skær langsomt imod dig selv. Klip på denne måde bagpartiet fra nakken og frem til op over ørene.
2. FASE. Baghovedet.
Skift til klippekam 1 eller 2 og klip baghovedet.
3. FASE. Siderne.
Brug en af de kortere kamsindstillinger på klippekam 1 til at klippe bakkenbarterne med, det vil sige håret
lige foran ørerne. Indstil derefter klippekammen på en længere klippelængde og klip videre til op over issen.
4. FASE. Issen.
Brug klippekam 1 eller 2 og klip issen bagfra og fremover - imod hårets vokseretning. I visse tilfælde
betyder det, at du arbejder forfra og i bagud gående retning. Kam 1 anvendes til klipning af karsehår.
Hvis du foretrækker en model med længere hår på issen, løftes håret med en frisørkam. Lad hårtrimmeren
glide hen over kammen, eller hold håret mellem fingrene og klip det af i den ønskede længde. Arbejd
altid fra baghovedet og fremad. Klip håret et lille stykke kortere ved hver gang at formindske afstanden
mellem kam eller fingre og hoved. Brug hele tiden kammen for at kontrollere, om du har fået alle hårlokker med og for at rede det klippede hår til side.
5. FASE. The finishing touch.
Tag for at opnå et perfekt og professionelt slutresultat klippekammen af igen og vend til sidst hårtrimmeren
om (med undersiden opad) og trim det nederste af nakken, siderne og området omkring ørerne. Indstil
klippekammen i den korteste klippelængde. Hold hårtrimmeren vinkelret ind mod hovedet, så spidsen af
skærene berører huden ganske let, og arbejd nedad. På denne måde opnås et lige så glat resultat som med
et barberblad.
Klipning af langt hår.
Hvis håret skal klippes rundt i en bue, fordeles og redes håret som normalt. Fordel derefter håret på
baghovedet i tre dele omkring hovedet. Sæt de to øverste lag fast med hårklemmer, så de ikke er i vejen,
når du klipper det underste lag. Klip derefter håret med en saks eller brug hårtrimmeren og en frisørkam.
RENGØRING OG VEDLIGEHOLDELSE
Fjern - efter hver gang apparatet har været i brug - hårresterne med rensebørsten.
Hårtrimmerens yderside kan rengøres med en blød, fugtig klud.
TIPS
- Af sikkerhedshensyn må opladeren ikke anbringes inden for 1 meters afstand af et badekar
eller brusebad og heller ikke oven over en fyldt håndvask. Hold aldrig opladeren under
vand!
- Børn og mentalt handicappede må kun anvende apparatet under opsyn.
- Behandl skærene forsigtigt; stød dem ikke imod hårde genstande og tab ikke apparatet
på gulvet. Apparatet må ikke anvendes, hvis skærene er beskadiget!
- Send apparatet til reparation og vedligeholdelse hos vores serviceafdeling. Anvend aldrig
et beskadiget apparat eller ledning, men send det til reparation hos vores serviceafdeling.
Page 20

20
BATTERIER
Apparatet er udstyret med et opladeligt batteri. Batteriet kan tages ud ved at løsne apparatets bagside. Nu
kan batteriet klippes af og fjernes.
Batterier er kemisk affald; smid derfor ikke batterier direkte i skraldespanden. Aflever brugte batterier på
dertil egnede indsamlingssteder eller hos kommunens affaldsdepot; følg endvidere de kommunale forskrifter.
PRINCESS WET AND DRY RECHARGEABLE HAIR CLIPPER ART. 535576
FØR BRUK
Les gjennom hele bruksanvisningen før du begynner, og ta vare på den til senere bruk. Kontroller at
spenningen hjemme hos deg stemmer overens med spenningen på apparatet. Oppladningsenheten må ikke
brukes på badet eller i nærheten av en vaskeservant som er fylt med vann, badekar, dusj, osv. Forsøk aldri
å ta i en oppladningsenhet som har falt i vannet, men trekk støpselet ut av stikkontakten først.
Oppladningsenheten skal kun håndteres med tørre hender.
EGENSKAPER
Praktisk oppladbart hårklippersett (uten ledning) med oppladnings-kontrollys og en hendig bordfot, som
samtidig er opplader. Vanntett overfor vannsprut, kan brukes i dusj men ikke under vann. Komplett med
to 7-posisjons justerbare kammer (4-20 mm) (24-40 mm), kam, saks, ladeadaptor og rengjøringsbørste.
Kammen blir brukt når man skal stille inn forskjellige klippelengder. Dermed blir det så lett å klippe selv
at også hjemmefrisøren kan oppnå profesjonelle resultater.
BRUKSANVISNING
Slå på klippemaskinen med 2-posisjons skyvebryteren.
Du kan justere klippelengden ved å skyve den tilhørende
kammen fremover eller bakover. Skyv den fremover
for lengre hår og bakover for kortere hår.
Kammen skyves enkelt på klippemaskinen.
Ta av kammen ved å skyve den av etter at du har åpnet den med vippebryteren.
På apparatets underside kan du låse fast lengden på den tilhørende kammen ved hjelp av vippebryteren.
Hvis du vil ha en annen lengde, kan du frigjøre kammen med vippebryteren og flytte den. Kammens
posisjon vises i vinduet.
Før du begynner å klippe:
- Kontroller hårklippemaskinen. Sørg for at det ikke finnes hår eller smuss på hårklippemaskinen. Slå på
hårklippemaskinen og kontroller om den fungerer problemfritt.
- Heng et håndkle rundt nakken på personen som skal klippes.
- Sett personen slik at hodet er i øyenhøyde med ditt. Da har du god oversikt, og du kan arbeide bedre.
Bruk eventuelt bøker eller puter for å få personen til å sitte høyere.
- Gre håret slik at det ikke er flokete. Ta deretter hårklippemaskinen og hold den så komfortabelt som mulig.
- Slapp av og arbeid nøyaktig. Klipp kun korte baner. Klipp ikke hele siden eller baksiden på én gang,
men arbeid langsomt over hele hodet.
- Det er best å fjerne litt hår hver gang. Du kan alltid fjerne mer hår etterpå.
- Gre håret flere ganger i samme stil som frisyren du ønsker, både før du begynner og
mens du arbeider.
Når du begynner å klippe
Første gang du arbeider med hårklippemaskinen, bør du kun klippe en liten del av håret,
til du blir vant til klippelengden som hører til kammen.
Etter at du har gredd håret i i naturlig vekstretning, gjør du som følger for å få en sporty,
kjegleformet tilspisset frisyre:
Page 21

21
Fase 1. Nakkepartiet.
Bruk lengde nr. 1 eller 2. Hold hårklippemaskinen med klippesiden oppover og begynn med å klippe i
midten nederst i nakken. Trykk hårklippemaskinen lett mot hodet, med kammens tenner rettet oppover.
Beveg hårklippemaskinen langsomt oppover, arbeid oppover og mot utsiden av håret, og fjern kun litt hår
hver gang. Mens du klipper, bør du bevege hårklippemaskinens hode mot deg litt etter litt. Klipp deretter
bakpartiet fra begynnelsen av nakken til over ørene.
Fase 2. Baksiden av hodet.
Bruk kam nr. 1 eller 2 og klipp baksiden av hodet.
Fase 3. Siden av hodet
Bruk en av de kortere innstillingene på kam nr. 1 for å klippe kinnskjegg, det vil si håret som befinner seg
inntil ørene. Still deretter inn kammen på en større lengde og fortsett med klippingen til øverst på hodet.
Fase 4. Oversiden av hodet.
Bruk kam nr. 1 eller 2, og klipp oversiden av hodet bakfra og fremover, mot hårets vekstretning. I noen
tilfeller betyr dette at du må arbeide forfra og bakover. Hvis du vil ha snauklipt hår, bør du velge innstilling
nr. 1 til kammen. Hvis du vil at håret øverst på hodet skal være lengre, må du bruke en kam for å holde
håret over hodet. Klipp med hårklippemaskinen over kammen, eller hold håret mellom fingrene og klipp
det av ved ønsket lengde. Klipp alltid fra baksiden av hodet. Klipp håret gradvis kortere ved å minske
avstanden mellom kammen/fingrene og hodet. Bruk kammen regelmessig for å kontrollere at det ikke
finnes hårlokker med forskjellig lengde og for å gre bort avklippet hår.
Fase 5. Finpussing
Til slutt: For å få en god, nøyaktig ferdigklippet frisyre, må du ta av kammen og deretter snu hårklippemaskinen (d.v.s. med undersiden oppover), slik at du kan finpusse undersiden av nakken, sidene og
områdene rundt ørene. Sett knappen for justerbar skjærelengde på laveste posisjon. Sett hårklippemaskinen
i rett vinkel langs hodet, la spissene på skjærebladet berøre huden lett og klipp nedover. På den måten blir
resultatet like glatt som om du skulle ha brukt en barberkniv.
Å klippe langt hår.
Hvis det er meningen at håret skal være kjegleformet og spisst, bør du først fordele og gre håret som
vanlig. Deretter fordeles håret bak på hodet i tre like store deler rundt hodet. Fest de to øverste lagene
med hårklemmer, slik at de ikke er i veien når du klipper det underste laget. Klipp deretter med saks eller
bruk hårklippemaskinen i kombinasjon med frisørkammen.
RENGJØRING OG VEDLIKEHOLD
Fjern hårrester etter hver bruk ved hjelp av rengjøringsbørsten.
Hårklippemaskinens utside kan rengjøres ved hjelp av en myk, fuktig klut.
TIPS
- For sikkerhets skyld må apparatet kun brukes på mer enn 1 meters avstand fra badekar eller dusj.
Bruk det aldri over en håndvask som er fylt med vann og hold det aldri under vann!
- Hold godt tilsyn med apparatet når det er barn eller funksjonshemmede i nærheten.
- Håndter skjærebladene forsiktig, berør ikke harde gjenstander og slipp dem ikke i
gulvet. Bruk ikke apparatet når skjærebladene er skadet!
- Reparasjoner og service må utføres av vår serviceavdeling. Bruk ikke apparatet hvis
selve apparatet eller ledningen er skadet, men send det til vår serviceavdeling.
BATTERIER
Dette apparatet inneholder et oppladbart batteri. Du tar ut dette batteriet ved å skru løs
skruen på baksiden. Nå kan batteriet løsnes og tas ut.
Batterier er kjemisk avfall og bør ikke kastes bort uten videre. Legg tomme batterier i
miljøboks eller lever dem adskilt til din kommunale rengjøringsavdeling. Følg kommunens
forskrifter.
Page 22

22
PRINCESS WET AND DRY RECHARGEABLE HAIR CLIPPER ART. 535576
ENNEN KÄYTTÖÄ
Lue käyttöohje kokonaan läpi ennen laitteen käyttöönottoa ja säilytä se myöhempää tarvetta varten.
Tarkista, että käytettävissäsi oleva verkkojännite vastaa laitteeseen merkittyä jännitettä. Älä aseta
latauslaitetta lähelle kylpyammetta, suihkua tms. eikä myöskään vettä täynnä olevan pesualtaan lähelle.
Jos latauslaite on pudonnut veteen, älä koskaan yritä tarttua siihen, vaan irrota ensin pistotulppa
pistorasiasta. Käsittele latauslaitetta ainoastaan kuivin käsin.
ERIKOISOMINAISUUDET
Käytännöllinen, ladattava (johdoton) hiustenleikkuusetti, jossa on latauksen merkkivalo ja kätevä pöytäjalusta, joka toimii samalla laturina. Roiskevesitiivis, voidaan käyttää suihkussa, ei veden alla. Täydellinen
setti, johon kuuluu kaksi 7 asentoon säädettävää vaihtokampaa (4-20 mm) (24-40 mm), kampa, sakset,
latausadapteri ja puhdistusharja. Vaihtokampaa käytetään eri leikkauspituuksien säätöön. Hiusten leikkaaminen tällä laitteella on niin helppoa, että kotiparturikin saa syntymään ammattimaista jälkeä.
KÄYTTÖ
Hiustenleikkuukone käynnistetään 2-asentoisella likukytkimellä.
Leikkauspituutta voidaan muuttaa vaihtokamman asentoa siirtämällä. Kun sitä siirretään eteenpäin,
saadaan pitempi leikkauspituus ja taaksepäin siirtämällä lyhyt leikkauspituus.
Vaihtokampa asetetaan paikoilleen yksinkertaisesti
työntämällä se hiustenleikkuukoneeseen ja otetaan
pois työntämällä kampa irti sen jälkeen kun se on
vapautettu vipukytkimellä.
Vaihtokamman leikkauspituus voidaan lukita laitteen pohjassa olevalla vipukytkimellä. Jos halutaan
vaihtaa leikkauspituutta, vaihtokamman lukitus voidaan vapauttaa yksinkertaisesti vipukytkimellä ja
siirtämällä vaihtokampaa. Ruudussa näkyy vaihtokamman asento.
Ennen kuin alat leikata:
- Tarkasta hiustenleikkuukone. Tarkista, että siinä ei ole hiuksia tai likaa. Käynnistä laite ja tarkista, että
se toimii ilman vaikeuksia.
- Aseta käsipyyhe parturoitavan henkilön harteille.
- Parturoitavan henkilön täytyy istua siten, että hänen päänsä on silmiesi korkeudella. Tällöin näet
kohteesi paremmin ja sinun on helpompi työskennellä. Tarvittaessa käytä kirjoja tai tyynyä, että
istuinkorkeudesta tulee sopiva.
- Kampaa hiukset ensin sileäksi. Pidä hiustenleikkuukoneesta kiinni mahdollisimman luontevasti.
- Rentoudu ja työskentele huolellisesti. Leikkaa ainoastaan lyhyin vedoin. Älä viimeistele heti pään
sivu- tai niskaosaa, vaan leikkaa hiuksia vähitellen joka puolelta.
- On parempi leikata kerrallaan vain vähän hiuksia. Voit aina myöhemmin leikata enemmän.
- Kampaa hiukset säännöllisesti halutun kampauksen muotoon ennen parturointia sekä parturoinnin aikana.
Kun aloitat leikkaamisen:
Leikkaa ensimmäistä kertaa hiustenleikkuukonetta käyttäessäsi vain ihan vähän hiuksia, kunnes olet
tottunut vaihtokamman vaatimaan leikkauspituuteen.
Kampaa hiukset ensin luonnollisen kasvusuunnan mukaisesti ja toimi seuraavasti
saadaksesi syntymään tasaisesti viistonevan leikkausjäljen:
1. vaihe. Niskaosa
Käytä vaihtokampaa 1 tai 2. Pidä hiustenleikkuukonetta leikkuupää ylöspäin suunnattuna
ja ala leikata alhaalta keskeltä niskaa. Paina hiustenleikkuukonetta kevyesti päätä vasten
siten, että vaihtokamman piikit on suunnattu ylöspäin. Liikuta hiustenleikkuukonetta vähän
kerrallaan ylöspäin kohti latvoja ja leikkaa yhdellä kertaa vain vähän hiuksia. Leikatessasi
suuntaa hiustenleikkuukoneen pää vähän kerrallaan ulospäin. Parturoi siten koko niskaosa
niskan alarajasta korvien yläpuolelle.
Page 23

23
2. vaihe. Takaraivo
Käytä vaihtokampaa 1 tai 2, ja leikkaa takaraivon hiukset.
3. vaihe. Sivut
Käytä vaihtokamman 1 lyhyempää leikkauspituutta ”pulisonkien” leikkaamiseen, eli heti korvien
etupuolella olevan hiuskaistaleen parturointiin. Vaihda kamman leikkauspituus jälleen pitemmäksi ja jatka
leikkaamista päälaelle saakka.
4. vaihe. Päälaki
Käytä vaihtokampaa 1 tai 2 ja leikkaa hiukset päälaelta aloittamalla takaa ja siirtymällä eteenpäin hiusten
kasvusuuntaa vasten. Joissakin tapauksissa tämä tarkoittaa sitä, että on siirryttävä edestä taaksepäin.
Vaihtokampaa 1 käytetään pystytukan leikkaamiseen. Jos haluat tukan päälaelta pitemmäksi, on käytettävä kampaa pitämään hiuksia ylhäällä. Leikkaa hiukset hiustenleikkuukoneella kamman päältä, tai pidä
hiuksia sormiesi välissä ja leikkaa ne halutun pituisiksi. Aloita leikkaaminen aina takaraivolta. Leikkaa
hiukset vähän kerrallaan lyhyemmiksi pitämällä kampaa tai sormia lähempänä päätä. Kampaa tukkaa
säännöllisesti tarkistaaksesi, ettei väliin ole jäänyt epätasaisesti leikattuja hiustupsuja ja kammataksesi
pois leikatut hiukset.
5. vaihe. Viimeistely
Saadaksesi hyvän ja tarkoin viimeistellyn kampauksen poista lopuksi vaihtokampa ja pidä hiustenleikkuukonetta toisinpäin (takaosa ylöspäin), jolloin voit siistiä niskan sekä sivujen ja korvien ympäryksen
hiusrajan. Aseta leikkauspituuden säädin alimpaan asentoon ja aseta hiustenleikkuukone suorassa kulmassa päätä vasten siten, että leikkuuterän päät koskettavat ihoa kevyesti. Leikkaa ylhäältä alaspäin. Tällä
tavoin saat yhtä sileän tuloksen kuin partakoneen terää käytettäessä.
Pitkän tukan leikkaaminen
Jos hiukset halutaan leikata tasaiseti kerroksittain, kampaa hiukset ensin tavalliseen muotoonsa. Jaa
hiukset sen jälkeen takaraivolta lähtien kolmeen yhtä suureen osaan koko pään ympäri. Kiinnitä kaksi
ylintä kerrosta soljilla siten, että hiukset eivät ole tiellä kun leikkaat alinta kerrosta. Leikkaa hiukset sen
jälkeen joko saksilla tai hiustenleikkuukoneella ja parturinsaksilla.
PUHDISTUS JA HOITO
Poista jokaisen käyttökerran jälkeen laitteeseen jääneet hiukset puhdistusharjalla.
Hiustenleikkuukoneen ulkopinta voidaan puhdistaa pehmeällä, kostealla liinalla.
OHJEITA
- Turvallisuussyistä latauslaite on asetettava vähintään yhden metrin päähän kylpyammeesta tai suihkusta
eikä sitä saa myöskään asettaa vedellä täytetyn pesualtaan päälle. Sitä ei saa koskaan upottaa veteen!
- Lapset tai liikuntarajoitteiset eivät saa koskaan käyttää laitetta ilman valvontaa.
- Käsittele leikkuuteriä varovasti, älä kolhi niitä kovia esineitä vasten äläkä pudota niitä. Älä käytä
laitetta, jos leikkuuterät ovat vioittuneet!
- Laitteen korjaus ja huolto tulee antaa huoltopalvelumme tehtäväksi. Älä käytä laitetta, jos se tai sen
verkkojohto on vioittunut, vaan toimita se huoltopalveluumme.
PARISTOT
Tässä laitteessa on ladattava paristo. Se voidaan poistaa aukaisemalla laitteen pohja. Nyt paristo voidaan
leikata irti ja ottaa pois.
Paristot ovat kemiallista jätettä, joten niitä ei saa noin vain heittää pois. Vie tyhjät paristot
keräyspisteeseen tai toimita ne erikseen paikkakuntasi jätehuoltoon. Noudata asuinkuntasi
ohjeita.
Page 24

24
PRINCESS WET AND DRY RECHARGEABLE HAIR CLIPPER ART. 535576
ANTES DE UTILIZAR
Leia atentamente primeiro estas instruções, devendo conservá-las para as poder consultar mais tarde. Controlar
se a voltagem da corrente eléctrica da sua casa corresponde à do aparelho. Não deve utilizar uma tosquiadora
perto de um lavatório, banheira, duche, etc. com água. Nunca deve pegar num aparelho que tenha caído dentro
de água, devendo primeiro desligá-lo retirando a tomada da ficha. Deve utilizar a tosquiadora unicamente com
as mãos secas.
PARTICULARIDADES
Este conjunto de tosquiadora (sem fio) é prático e tem uma luz de controle de recarga e um suporte que pode
ser igualmente recargável. É impermeável e pode ser usado no duche, mas não o deve mergulhar em água. Vem
completado com 2 pentes ajustáveis em 7 posições (de 4 até 20 mm) (24 até 40 mm), pente, tesoura, adaptador
de recarga, e escovinha para limpar. O pente ajustável é utilizado para ajustar os diferentes comprimentos de
corte. Deste modo, torna-se fácil cortar em casa o cabelo, podendo você próprio obter o mesmo resultado de
um cabeleireiro profissional.
MODO DE UTILIZAÇÃO
Pode ligar a tosquiadora com o interruptor de ajuste de 2 posições.
Se deslizar o pente ajustável, pode mudar o comprimento do corte. Se deslizar para a frente o pente,
o comprimento do cabelo é mais longo, se o fizer para trás o cabelo é mais curto.
O pente ajustável pode ser facilmente enfiado na
tosquiadora, para o retirar , deve-o soltar, premindo
a tranca, puxando-oem seguida para fora.
Debaixo do aparelho pode trancar o comprimento de corte do pente que deseja , deslizando para tal o pequeno
botão até o pente ficar trancado. Assim que desejar cortar o cabelo com um comprimento diferente, pode
destrancar facilmente o pente, deslizando-o. No visor, surge a posição respectiva.
Antes de começar a tosquiar:
- Controlar a tosquiadora. Certifique-se que não existem cabelos ou sujidade no aparelho. Ligue a tosquiadora
e controle se funciona devidamente.
- Colocar uma toalha à volta do pescoço da pessoa a quem vai cortar o cabelo.
- A pessoa a quem corta o cabelo deve sentar-se com a cabeça situada à altura dos seus olhos. Isto permite-lhe
visualizar bem o seu trabalho, obtendo um melhor resultado. Caso seja necessário, utilize livros ou almofadas para que a pessoa se sente mais alto.
- Pentear primeiro o cabelo para poder cortar com mais facilidade. Em seguida, segurar na tosquiadora do
modo que achar mais confortável.
- Descontraia-se e corte com precisão, sem usar grandes superfícies. Não corte logo de imediato os lados ou a
parte de trás, mas tosquie gradualmente toda a cabeça.
- É preferível tosquiar por zonas. Se achar necessário, pode sempre tosquiar mais cabelo em seguida.
- Penteie com frequência o cabelo antes de começar e enquanto corta, de acordo com o penteado que deseja obter.
Começar a cortar
Na primeira vez que utilizar a tosquiadora, deve cortar apenas uma pequena zona do cabelo,
até que esteja habituado a um determinado comprimento de corte.
Depois de ter penteado o cabelo conforme a linha de crescimento natural do mesmo, deve
seguir as instruções mencionadas em baixo para obter um penteado moderno e jovial:
Fase 1. O Pescoço
Fixar o pente 1 ou 2. Segurar na tosquiadora com o lado de corte voltado para cima e começar
a cortar a partir do meio no lado abaixo do pescoço. Aplicar ligeiramente a tosquiadora sobre a
cabeça com os dentes do pente voltados para cima. Movimentar a tosquiadora gradualmente
Page 25

25
para cima e para os lados , enquanto tosquia de cada vez apenas um pequeno pedaço de cabelo. Enquanto
corta, deve voltar a cabeça da tosquiadora voltada para si. Em seguida corte a parte de trás, desde o início do
pescoço até por cima das orelhas.
Fase 2. A Parte de trás da Cabeça
Mude o pente, aplicando o pente 1 ou 2, e corte a parte de trás da cabeça.
Fase 3. Os lados da Cabeça
Use as superficies mais curtas do pente 1 para cortar as patilhas, isto é o cabelo que fica situado junto das orelhas. Mude em seguida o pente de novo para um mais longo, e continue a cortar até à parte superior da cabeça.
Fase 4. A parte Superior da Cabeça.
Use o pente 1 ou 2, e corte a parte superior da cabeça a partir de trás para a frente, no sentido contrário da
linha de crescimento do cabelo. Nalguns casos isto significa que deve trabalhar de frente para trás. O pente 1 é
utilizado para fazer “picos” (cabelo em pé). Se desejar que o cabelo em cima da cabeça fique mais longo, deve
usar um pente para manter o cabelo em pé, em cima da cabeça. Corte com a tosquiadora por cima do pente, ou
então segure o cabelo entre os dedos e corte até obter o comprimento desejado. Corte sempre a partir da parte
posterior da cabeça. Corte o cabelo gradualmente, diminuindo de cada vez a distância entre o pente, ou os
dedos, e a cabeça. Use com frequência o pente para controlar se existem madeixas desiguais, e para pentear o
cabelo já cortado.
Fase 5. O Toque Final.
Por fim, para obter um corte bonito e bem executado, retirar o pente e girar a tosquiadora (com a parte de baixo
voltada para cima), até que possa cortar a parte inferior do pescoço, os lados e o cabelo à volta das orelhas.
Colocar o botão para ajustar o comprimento na velocidade mais lenta. Colocar a tosquiadora em ângulo recto
ao longo da cabeça, enquanto as pontas da lâmina tocam ligeiramente a pele, e cortar a partir de cima para
baixo. Desta maneira, obtém um resultado idêntico ao de uma lâmina de barbear.
Cortar o cabelo Comprido
Se quiser cortar cabelo comprido, deve dividir e pentear o cabelo primeiro como está habituado. Em seguida,
divida o cabelo a partir da parte de trás da cabeça em três partes iguais, à volta da cabeça. Prender as duas
camadas superiores com ganchos, para que não caiam enquanto corta a camada inferior. Cortar depois com
uma tesoura ou com o tosquiador, juntamente com um pente de cabeleireiro.
LIMPEZA E MANUTENÇÃO
Depois de cada utilização, deve retirar os restos de cabelo com a escovinha.
Pode limpar o exterior da tosquiadora com um pano macio e húmido.
SUGESTÕES DA PRINCESS
- Por razões de segurança, não deve utilizar este aparelho a uma distância de um metro de uma banheira ou
douche, ou por cima de um lavatório com água. Nunca deve pôr o aparelho debaixo de água!
- Deve utilizar o aparelho unicamente sob vigilância, caso existem crianças ou indigentes por perto.
- Ter cuidado com as lâminas, não bater com as mesmas em objectos duros e não as deixar cair. Não deve
usar lâminas que estejam danificadas!
- Qualquer reparação ou serviço deverá ser efectuado pelos nossos serviços de assistência. Não utilizar o aparelho, se o mesmo ou o respectivo fio estiverem avariados ou danificados, devendo enviá-lo para os nossos
services de assistência.
PILHAS
Este aparelho tem uma pilha recargável. Pode retirá-la, desaparafusando o lado posterior. Em
seguida, pode soltar e retirar a pilha.
As pilhas constituem lixo químico; não deve por isso nunca as deitar fora. Quando estiverem
gastas, deve depositá-las no contentor do meio ambiente respective, ou entregá-las junto dos
serviços de limpeza do seu município, seguindo as instruções municipais. com ar quente ou
frio.
Page 26

26
FUNÇÃO FRIA
A função “cool” ou “ar frio” do secador é ideal para fazer penteados, crier volume e manter o penteado o
melhor possível. Utilizar a função “cool” depois de ter secado o cabelo. Graças a oar frio os poros voltam
a fechar-se de novo, fixando o penteado.
PRINCESS WET AND DRY RECHARGEABLE HAIR CLIPPER ART. 535576
Page 27

27
Page 28

28
PRINCESS WET AND DRY RECHARGEABLE HAIR CLIPPER ART. 535576
Page 29

29
Page 30

30
Page 31

Page 32

 Loading...