

Princess 352526 Instructions For Use Manual

TYPE 352526
FLOOR FAN 40 CM / 16 INCH
Gebruiksaanwijzing
Instructions for use
Mode d’emploi
Anleitung
Instrucciones de Uso
Istruzioni d’uso
Bruksanvisning
Brugsanvisning
Bruksanvisning
Käyttöohje
Instruções de utilização

2

Gebruiksaanwijzing . . . . . . . . . . . . . . . . . . . . . . . . . . . . . . . . . . 4
Instructions for use . . . . . . . . . . . . . . . . . . . . . . . . . . . . . . . . . . . 5
Mode d’emploi . . . . . . . . . . . . . . . . . . . . . . . . . . . . . . . . . . . . . . . 7
Anleitung . . . . . . . . . . . . . . . . . . . . . . . . . . . . . . . . . . . . . . . . . . . . . . 9
Instrucciones de Uso . . . . . . . . . . . . . . . . . . . . . . . . . . . . . . . . 11
Istruzioni d’uso . . . . . . . . . . . . . . . . . . . . . . . . . . . . . . . . . . . . . . 13
Bruksanvisning . . . . . . . . . . . . . . . . . . . . . . . . . . . . . . . . . . . . . . 15
Brugsanvisning . . . . . . . . . . . . . . . . . . . . . . . . . . . . . . . . . . . . . . 16
Bruksanvisning . . . . . . . . . . . . . . . . . . . . . . . . . . . . . . . . . . . . . . 18
Käyttöohje . . . . . . . . . . . . . . . . . . . . . . . . . . . . . . . . . . . . . . . . . . . 20
Instruções de utilização . . . . . . . . . . . . . . . . . . . . . . . . . . . . 21
. . . . . . . . . . . . . . . . . . . . . . . . . . . . . . . . . . . . . . . . . . . . . . . . . . . . . . . 23
18 . . . . . . . . . . . . . . . . . . . . . . . . . . . . . . . . . . . . . . . . . . . . . . . . . . . . 26
NOVEMBER 2006
NL
UK
F
D
E
I
S
DK
N
SF
P
GR
ARAB
4
PRINCESS FLOOR FAN 40 CM ART. 352526
Lees de instructies voor gebruik en bewaar ze zodat u ze later nog eens kunt raadplegen.
De PRINCESS FLOOR FAN is een fraai vormgegeven ventilator. Hij is voorzien van een ventilatorblad
van 40 cm, een vrij verstelbaar zwenkmechanisme en een kantelbare ventilator. De krachtige, geruisloze
motor heeft drie snelheden.
Pak de ventilator voorzichtig uit en plaats hem op een stevige ondergrond. Sluit het apparaat alleen aan op
een geaard stopcontact. Controleer de netspanning. Deze PRINCESS FLOOR FAN kan niet worden
gebruikt in vochtige ruimtes, zoals badkamers, en ook niet buitenshuis.
GEBRUIKSAANWIJZING
Bedieningspaneel met uitschakelaar en 3 snelheidsknoppen (10)
0 Hiermee schakelt u de motor uit
1, 2, 3 3 ventilatorsnelheden: 1 = laag; 2 = medium; 3 = hoog
Aan-/uitknop voor automatisch zwenken (7)
Omhoog: automatisch zwenken staat uit.
Omlaag: automatisch zwenken staat aan.
Vaste posities van de kantelhoek van de ventilator (9)
De ventilator kan met de hand omhoog of omlaag worden gekanteld in een bepaald aantal vaste posities.
Druk gewoon de ventilator omhoog of omlaag tot hij op een van de kantelpunten blijft staan.
Hoogte-instelling (13)
De hoogte kunt u verstellen door de knop aan de standaard los te draaien en de juiste hoogte in te stellen.
Zodra u dat hebt gedaan, draait u de knop weer vast.
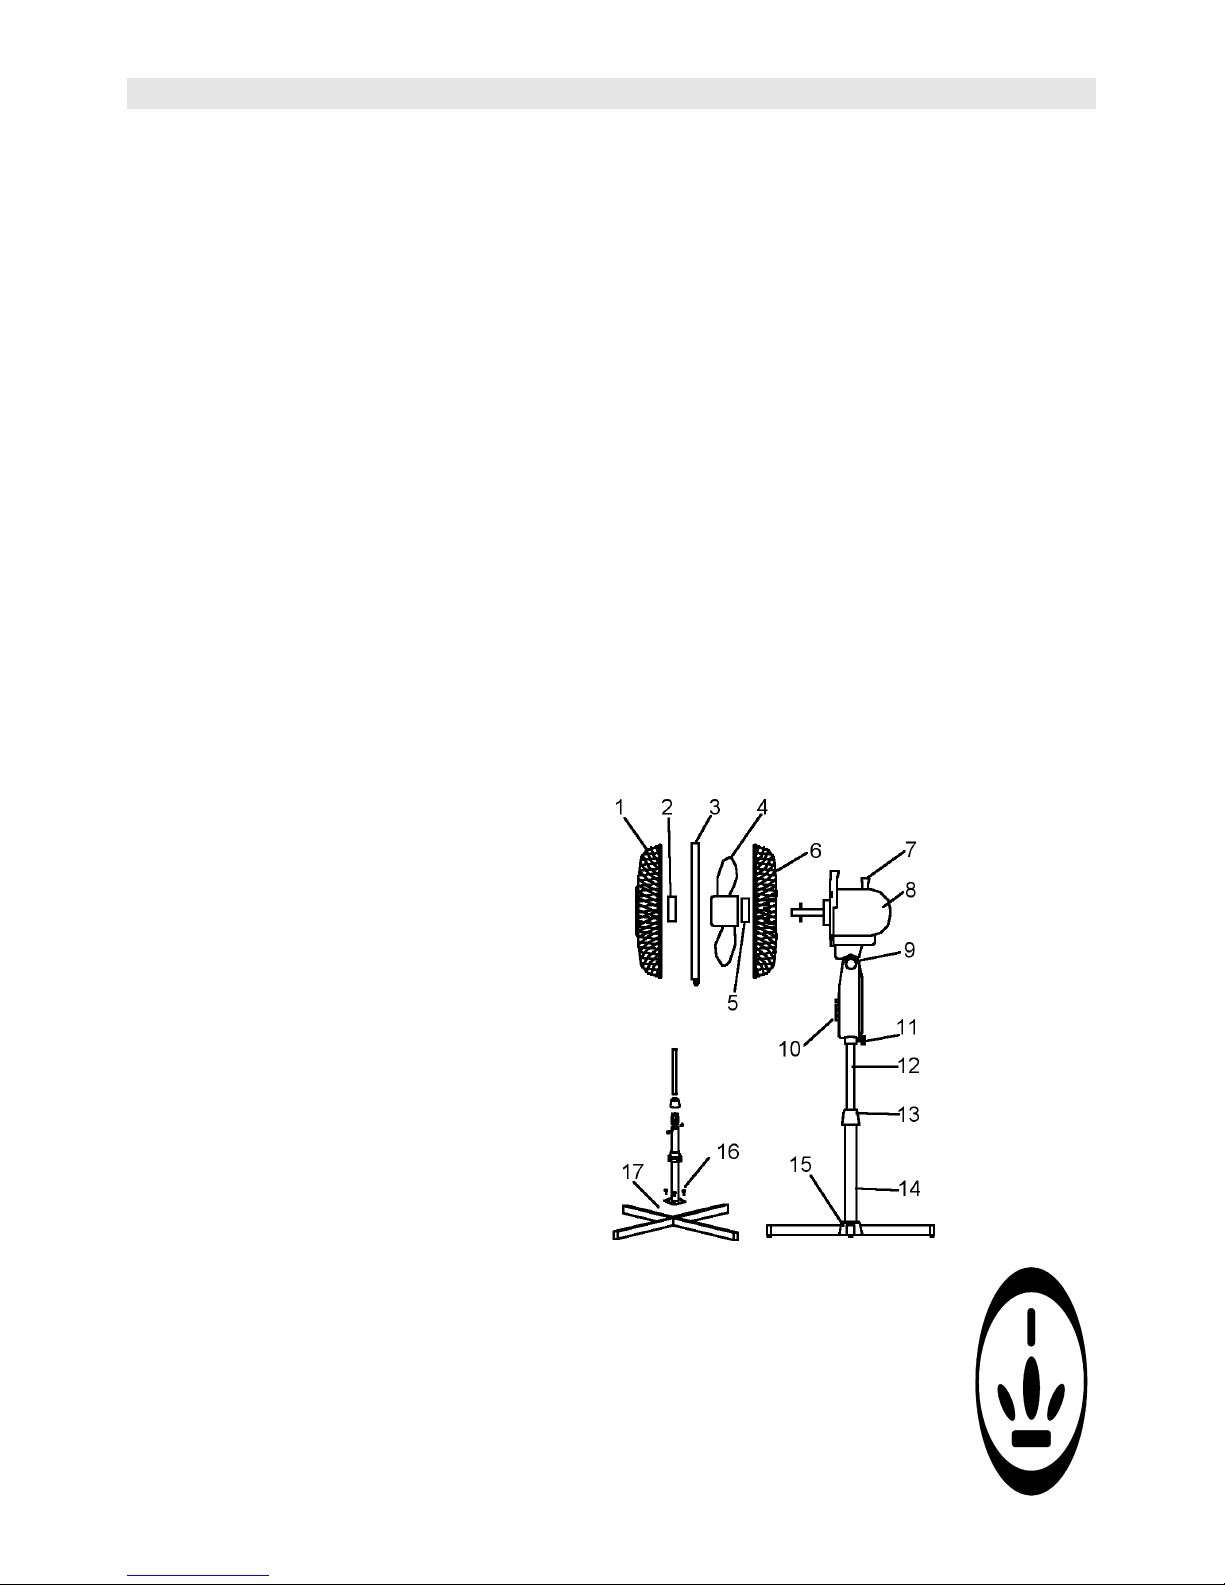
BESCHRIJVING VAN DE ONDERDELEN:
1. Beschermkap voor
2. Borgmoer ventilatorblad
3. Kunststof ring
4. Ventilatorblad
5. Borgmoer beschermkap
6. Beschermkap achter
7. Aan-/uitschakelaar zwenkmechanisme
8. Motor
9. Draaipunt voor kantelen
10. Centrale behuizing met bedieningspaneel
11. Bevestigingsschroef centrale behuizing
12. Binnenbuis
13. Schroef voor hoogte-instelling
14. Standaard
15. Voetkapje
16. Schroef
17. Voet
DE VENTILATOR OP DE CENTRALE BEHUIZING MONTEREN
1. Verwijder de ventilatorbladborgmoer van de motoras.
2. Verwijder de beschermkapborgmoer. Plaats de achterste beschermkap op de motor. Zorg
ervoor dat de pinnen op de motor precies in de gaten van de beschermkap vallen. Zet de
achterste beschermkap vast door de beschermkapborgmoer stevig vast te draaien.
3. Schuif het ventilatorblad op de motoras. Zorg dat de pin op de as in de uitsparing op het
ventilatorblad zit.
4. Schroef de ventilatorbladborgmoer op de motoras om het ventilatorblad goed vast te zetten.
5. Bevestig de voorste beschermkap samen met de kunststof ring op de achterste beschermkap.
6. Draai de schroef in de kunststof ring vast.

5
DE VOET EN DE STANDAARD IN ELKAAR ZETTEN
7. Verwijder de schroeven uit de centrale behuizing en monteer de standaard met deze schroeven op de
centrale behuizing. Verwijder de knop voor de hoogte-instelling, zodat u het voetkapje over de standaard
kunt schuiven totdat dit de schroeven bedekt. Zet de knop voor de hoogte-instelling weer terug.
8. Trek de binnenbuis omhoog tot de gewenste hoogte. Houd de buis goed vast terwijl u de knop voor de
hoogte-instelling goed vastdraait.
EINDMONTAGE
Monteer de ventilator met de centrale behuizing op de binnenbuis van de standaard. Houd de centrale
behuizing vast terwijl u de bevestigingsschroef van de centrale behuizing goed vastdraait.
SCHOONMAKEN
Voordat u met schoonmaken begint, moet u het apparaat uitschakelen en de stekker uit het stopcontact
trekken. Stof kunt u afnemen met een pluisvrije doek. U kunt dit ook doen met een stofzuiger. Als de
behuizing van de ventilator vies wordt, kunt u die schoonmaken met een warm – niet heet! – mild reinigingsmiddel. Droog het apparaat vervolgens af.
Dompel de ventilator niet in water of een andere vloeistof onder. Zorg dat er geen water of andere vloeistof in de ventilator of motor komt.
De motor van de ventilator is beveiligd tegen oververhitting en is blijvend gesmeerd. Smeren is dus niet
nodig.
DOMPEL DE VENTILATOR NOOIT ONDER IN WATER OF EEN ANDERE VLOEI¬STOF.
PRINCESS TIPS
- Deze ventilator is alleen voor huishoudelijk ge¬bruik.
- Zorg dat het snoer of een eventueel verlengsnoer zodanig weggelegd wordt dat niemand erover kan
struikelen.
- Bij beschadiging van de ventilator of het snoer raden wij u aan het apparaat niet meer te gebruiken.
Een beschadigd snoer kan alleen door onze servicedienst vervangen worden.
- Niet buitenshuis gebruiken.
- Buiten bereik van kinderen houden.
- Goed oppassen wanneer het apparaat wordt gebruikt in de nabijheid van kinderen, gehandicapten of
huisdieren.
- Plaats het apparaat op een stabiele ondergrond. Zet de ventilator niet in of vlakbij een open raam. Zorg
er geen voorwerpen in de omgeving van de ventilator staan als u het automatisch zwenken inschakelt.
Ze zouden kunnen omvallen of de ventilator kunnen blokkeren.
- Gebruik de ventilator niet in vochtige ruimtes, zoals badkamers en plaats deze ook niet dichtbij een
wastafel of andere bak met water.
- Zorg dat gordijnen en andere stoffen niet in de ventilator gezogen kunnen worden.
- Raak geen bewegende delen aan.
- Zorg dat er geen voorwerpen in het apparaat terechtkomen. Steek geen voorwerpen in de beschermkappen.
- Zorg dat de lucht ongehinderd kan circuleren.
- Gebruik de ventilator niet zonder de beschermkappen.
PRINCESS FLOOR FAN 16 INCH ART. 352526
Please read these instructions at your leisure and save them for future reference.
The PRINCESS FLOOR FAN is a fan with an attractive design. It is fitted with a 40 cm fan blade, an
independently adjustable swivelling mechanism and tilting fan. The powerful, silent motor
can be set to 3 different speeds.
Pick up the fan carefully and place it on a solid surface. Plug this appliance only into an
earthed outlet. Check the main voltage. The PRINCESS FLOOR FAN is not suitable for
use in damp rooms such as bathrooms and it is also not suitable for use outside.
6
HOW TO OPERATE :
Control panel with off button and 3 speed buttons (10)
0 Switches the motor off
1,2,3 3 different fan speeds; 1 = low, 2 = medium, 3 = high
Knob for automatic swivelling on/off (7)
Pull up: automatic swivelling is switched off.
Press down: switches swivelling on.
Pre-determined settings for fan tilting (9)
The fan can be tilted by hand up or down in a certain amount of pre-determined positions. Just push the
fan guard up or down and it will hinge around the Hinge point.
Height adjustment (13)
The height can be adjusted by loosening the knob on the stand. Once the correct height has been set
tighten the knob again.
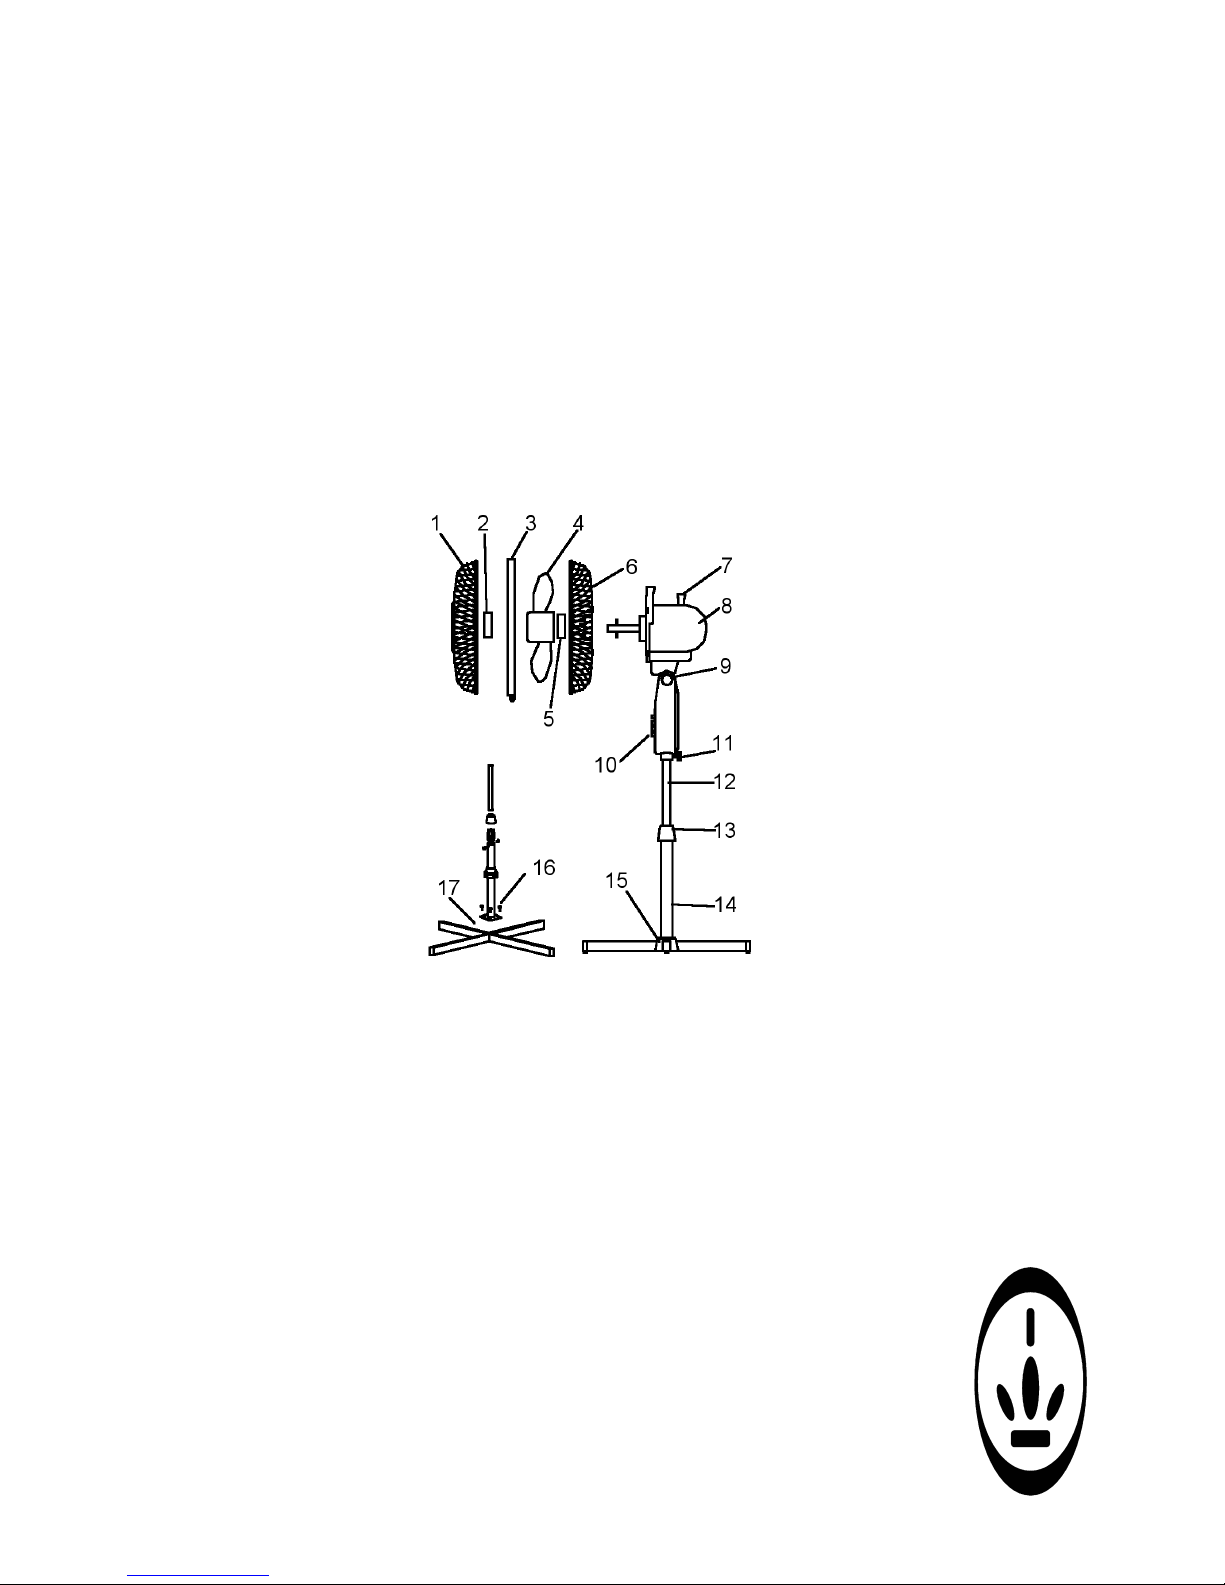
PART DESCRIPTION :
1. Front guard
2. Blade lock nut
3. Plastic ring
4. Fan blade
5. Guard lock nut
6. Rear guard
7. Swivel on/off knob
8. Motor
9. Tilt hinge point
10. Body with control panel
11. Body fixture screw
12. Inner tube
13. Height adjustment knob
14. Stand
15. Base cap
16. Screw
17. Base
ASSEMBLING THE FAN ONTO THE BODY
1. Remove the Blade lock nut from the shaft of the Motor.
2. Remove the Guard lock nut. Position the Rear guard onto the Motor making sure that the pins on the
Motor match with the holes on the Rear guard. Fix the Rear guard by screwing the Guard lock nut back
on tightly.
3. Insert the Fan Blade onto the shaft of the Motor. Be sure that the pin on the shaft is positioned inside
the slot on the Fan blade.
4. Screw the Blade lock nut onto the Motor shaft to make sure the Fan blade is tightly fixed.
5. Mount the Front guard to the Rear guard together with the Plastic ring.
6. Tighten the screw in the Plastic ring.
ASSEMBLING THE BASE AND STAND
7. Remove the screws from the Base and install the Stand onto the Base with these screws.
Remove the Height adjustment knob, so that the Base cap can slide over the Stand and
can cover the screws. Place the Height adjustment knob back again.
8. Pull up the Inner tube and hold the tube tight while you tighten firmly the Height adjustment knob.
FINAL ASSEMBLY
Mount the Fan with Body onto the Inner pipe of the Stand and hold the Body while you fix
firmly the Body fixture screw.

7
CLEANING
Before cleaning, turn fan off and unplug from electrical outlet. Wipe off excess dust with a lint free cloth.
A vacuum cleaner hose can be used to clean this area if desired. Should the fan housing become soiled, it
can be cleaned with warm (not hot) soapy, mild detergent solution. Then dry.
Do not submerse your fan in water or any other liquid. Do not allow any liquid to get into the fan or
motor.
Your fan is equipped with a thermally protected permanently lubricated motor. No oiling is necessary.
NEVER IMMERSE THE FAN IN WATER OR OTHER LIQUID.
PRINCESS TIPS
- This fan is intended for normal household use only.
- Make sure the cord or extension cord is carefully positioned to avoid people tripping over it.
- If the fan or cord is damaged, we advise you not to use the appliance. Damaged cords may only be
replaced by our service department.
- Not to be used outdoors.
- Make sure that the fan is out of the reach of children.
- Supervision is recommended when this appliance is used near children, invalids or pets.
- Place the fan on a stable surface. Do not place the fan in or nearby an open window. Make sure that
there are no objects near the fan which could be knocked over or be in the way when automatic
swivelling is switched on.
- Do not use the fan in damp rooms such as bathrooms and do not place it near a sink or other receptacle
full of water.
- Make sure that curtains and other fabrics cannot be sucked into the fan.
- Avoid contacting any moving parts.
- Never drop or insert any object into any opening. Do not insert any object into the area protected by the
wire guards.
- Do not obstruct the air flow.
- Do not operate the fan without the wire guard
U.K. WIRING INSTRUCTIONS
The wires in the mains lead are coloured in accordance with the following code:
BLUE NEUTRAL
BROWN LIVE
GREEN/YELLOW EARTH
As the colours of the wire in the mains lead of this appliance may not correspond with the colour
markings identifying the terminals on your plug, proceed as follows:
The wire which is coloured BLUE must be connected to the terminal which is marked with the
letter N or coloured black.
The wire which is coloured BROWN must be connected to the terminal which is marked with the
letter L or coloured red.
The wire which is coloured GREEN/YELLOW must be connected to the terminal which is marked with
the letter E or and is coloured GREEN or GREEN/YELLOW
WARNING: THIS APPLIANCE MUST BE EARTHED
PRINCESS FLOOR FAN 16 INCH ART. 352526
Lisez attentivement ces instructions et conservez-les pour pouvoir les consulter ultérieurement.
Le PRINCESS FLOOR FAN est un ventilateur de sol au design élégant. Il est équipé
d’une hélice de 40 cm de diamètre, d’un mécanisme d’oscillation réglable et d’un pied
pivotant. Le moteur puissant et silencieux peut être réglé sur 3 vitesses différentes.
Déballer le ventilateur avec précaution et le poser sur une surface solide et stable. Brancher
l'appareil uniquement sur une prise de terre. Vérifier la tension du secteur. Le PRINCESS
FLOOR FAN n’est pas prévu pour être utilisé dans des pièces humides telles que des salles
de bains et il ne doit pas être utilisé à l’extérieur.
8
MODE D'EMPLOI :
Panneau de commande avec interrupteur marche/arrêt et boutons de réglage à 3 vitesses (10)
0 Permet d’éteindre le moteur
1,2,3 3 vitesses de ventilateur différentes ; 1 = lente, 2 = moyenne, 3 = rapide
Interrupteur du mécanisme d’oscillation automatique (7)
En haut : le mécanisme d’oscillation automatique est éteint.
En bas : le mécanisme d’oscillation est activé :
Réglages prédéfinis pour l’orientation du pied (9)
Le ventilateur peut être orienté dans plusieurs positions prédéfinies en le basculant à la main vers le haut
ou vers le bas. Appuyer sur la grille de protection en haut ou en bas pour faire pivoter le ventilateur sur
son axe.
Réglage de la hauteur (13)
La hauteur peut être réglée en dévissant le bouton situé sur le pied. Une fois la hauteur réglée, revisser le
bouton.
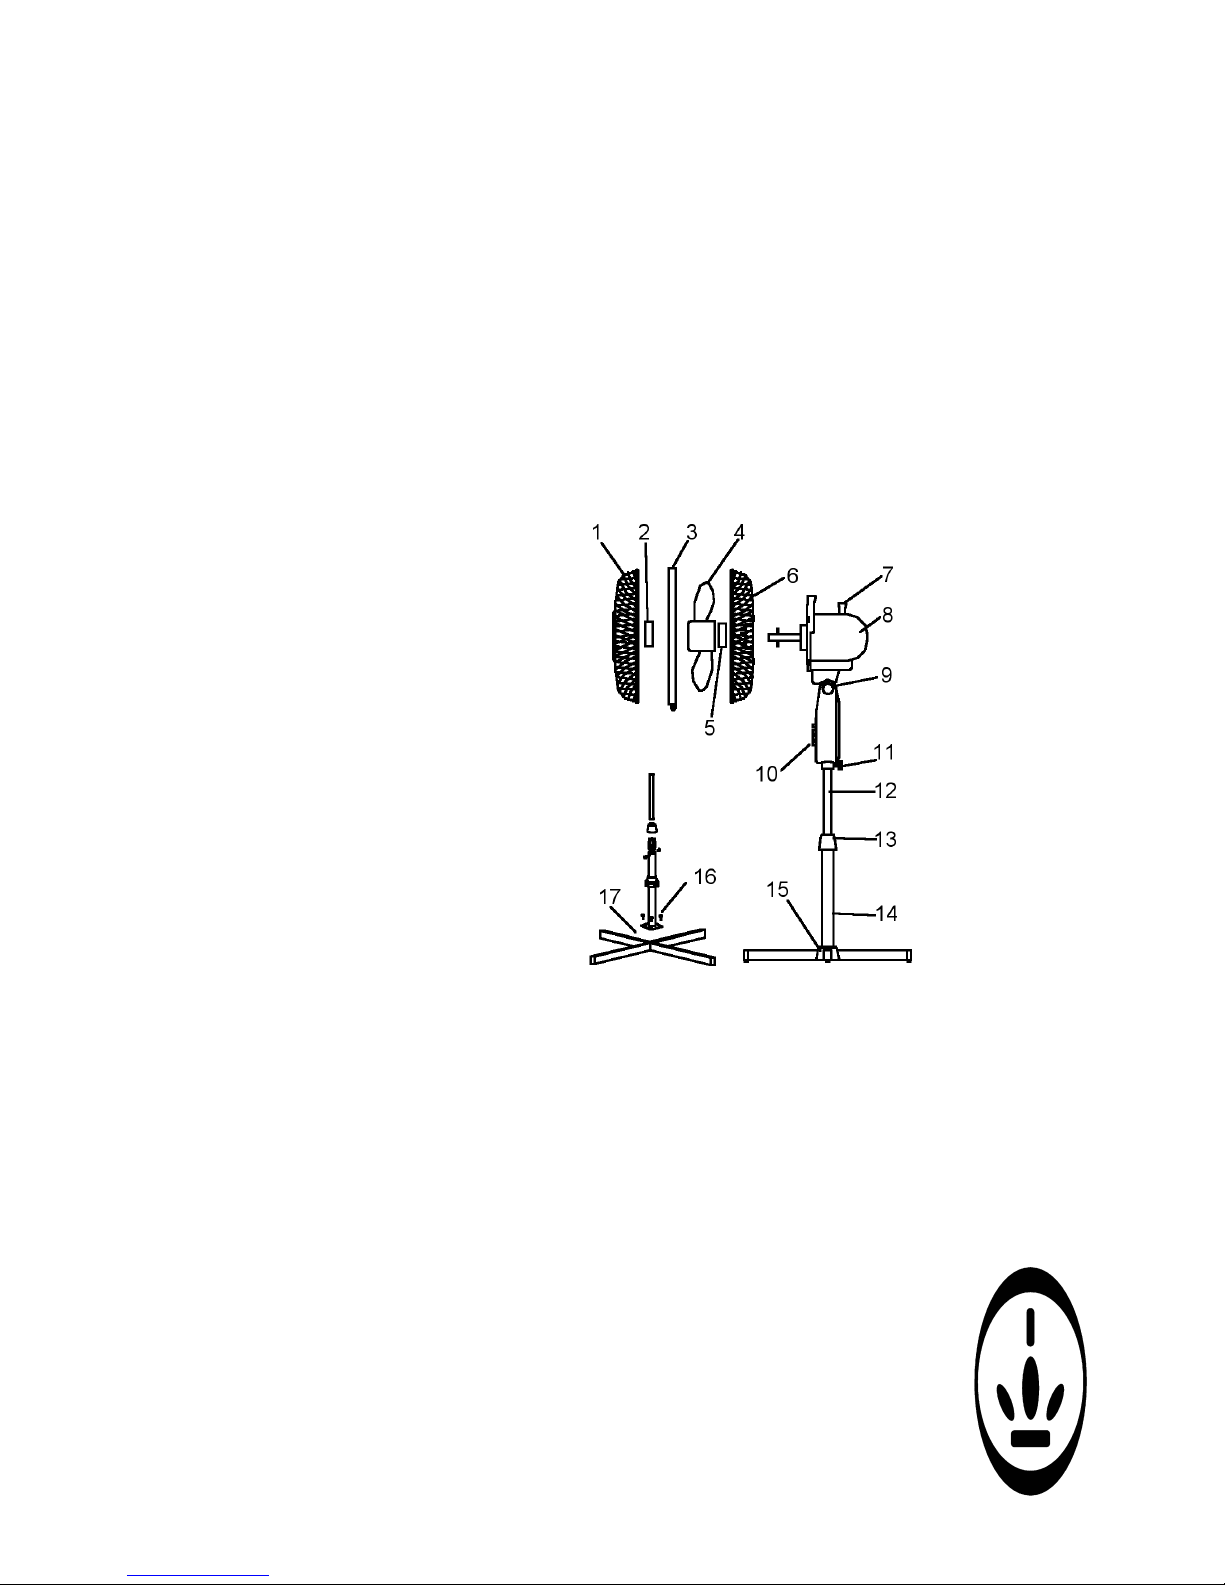
DESCRIPTIF :
1. Grille de protection avant
2. Ecrou de blocage de l’hélice
3. Bague en plastique
4. Hélice
5. Ecrou de blocage de la grille de protection
6. Grille de protection arrière
7. Interrupteur du mécanisme d’oscillation
8. Moteur
9. Axe de pivotement
10. Partie centrale avec panneau de commande
11. Vis de fixation de la partie centrale
12. Tube intérieur
13. Bouton de réglage de la hauteur
14. Pied
15. Chapeau
16. Vis
17. Base en croix
ASSEMBLAGE DU VENTILATEUR SUR LA PARTIE CENTRALE
1. Retirer l’écrou de blocage de l’hélice de l’axe du moteur.
2. Dévisser l’écrou de blocage de la grille de protection. Placer la grille de protection arrière sur le
moteur en veillant à ce que les ergots du moteur tombent bien dans les trous de la grille de protection
arrière. Fixer la grille de protection arrière en revissant à fond l’écrou de blocage.
3. Glisser l’hélice dans l’axe du moteur. Veillez à bien insérer l’ergot dans l’ouverture prévue sur l’hélice.
4. Visser l’écrou de blocage de l’hélice sur l’axe du moteur en veillant à ce que l’hélice soit fixée solidement.
5. Fixer la grille de protection avant sur la grille de protection arrière à l’aide de la bague en plastique.
6. Visser la bague en plastique.
ASSEMBLAGE DU SOCLE ET DU PIED
7. Retirer les vis du socle et fixer le pied sur le socle à l’aide de ces vis. Enlever le bouton
de réglage de la hauteur de façon à ce que le chapeau puisse glisser le long du pied et
recouvrir ainsi les vis. Remettre en place le bouton de réglage de la hauteur.
8. Tirer le tube intérieur et le tenir fermement pendant que vous serrez le bouton de réglage
de la hauteur.
ASSEMBLAGE FINAL
Monter le ventilateur avec la partie centrale sur le tube intérieur de la colonne et tenir la
partie centrale tout en serrant à fond la vis de fixation de la partie centrale.

9
ENTRETIEN
Eteindre et débrancher le ventilateur avant de procéder à son nettoyage. Essuyer la poussière à l’aide
d’un chiffon non pelucheux. On peut également utiliser un aspirateur pour cette opération. Si le boîtier du
ventilateur est encrassé, le nettoyer à l’eau tiède (pas trop chaude) additionnée d’un détergent doux. Bien
sécher.
Ne jamais immerger le ventilateur dans l’eau ou dans tout autre liquide. S’assurer qu’aucun liquide ne
pénètre à l’intérieur du ventilateur ou du moteur.
Votre ventilateur est équipé d’un moteur à protection thermique lubrifié en permanence. Il n’est donc
inutile de le graisser.
NE JAMAIS PLONGER LE VENTILATEUR DANS L’EAU NI DANS TOUT AUTRE LIQUIDE.
CONSEILS PRINCESS
- Ce ventilateur est uniquement destiné à un usage domestique normal.
- S’assurer que le cordon ou une rallonge éventuelle sont disposés de telle façon que personne ne puisse
trébucher dessus.
- Si le ventilateur ou le cordon sont endommagés, nous vous conseillons de ne plus utiliser l’appareil.
Le remplacement d’un cordon endommagé ne peut être effectué que par notre service après-vente.
- Ne pas utiliser cet appareil à l’extérieur.
- Ne pas laisser le ventilateur à la portée des enfants.
- Exercer une surveillance lorsque l'appareil est utilisé à proximité d’enfants, de personnes handicapées
ou d’animaux domestiques.
- Installer le ventilateur sur une surface solide et stable. Ne pas placer le ventilateur sur le rebord ou à
proximité d’une fenêtre ouverte. Eloigner tout objet de la proximité du ventilateur lorsque le mécanisme
oscillant est activé car il pourrait tomber ou se coincer dans l’appareil.
- Ne pas utiliser le ventilateur dans des pièces humides telles que salles de bains et ne pas le poser près
d’un évier, lavabo ou tout autre récipient rempli d’eau.
- S’assurer que des rideaux ou d’autres tissus ne peuvent pas être aspirés par le ventilateur.
- Eviter tout contact avec les parties mécaniques.
- Ne jamais faire tomber ou faire pénétrer d’objet par les orifices. Ne pas introduire d’objet dans la zone
protégée par les grilles de protection.
- Ne pas obstruer la circulation de l’air.
- Ne pas utiliser le ventilateur sans la grille de protection.
PRINCESS FLOOR FAN 40 CM ART. 352526
Diese Gebrauchsanweisung vor dem Erstgebrauch sorgfältig durchlesen und für eventuelle spätere Fragen
aufheben.
Der PRINCESS FLOOR FAN ist ein Ventilator in attraktivem Design. Er ist mit einem 40-cm-Propeller,
frei einstellbarem Schwenkmechanismus und Kippfunktion ausgestattet. Der leistungsstarke, geräuschlose
Motor verfügt über drei Geschwindigkeitsstufen.
Den Ventilator vorsichtig auspacken und auf eine stabile Unterlage stellen. Das Gerät nur an eine geerdete
Steckdose anschließen. Die Netzspannung überprüfen. Dieser PRINCESS FLOOR FAN darf nicht in
feuchten Räumen wie Badezimmern, und auch nicht im Freien benutzt werden.
GEBRAUCHSANWEISUNG
Bedienungspaneel mit Ausschalter und 3 Geschwindigkeitstasten (10)
0 Schaltet den Motor aus
1, 2, 3 3 Geschwindigkeitsstufen: 1 = niedrig, 2 = mittel, 3 = hoch
Ein-Aus-Schalter für den automatischen Schwenkmechanismus (7)
Nach oben: Schwenkmechanismus ausschalten
Nach unten: Schwenkmechanismus einschalten
Voreinstellung Kippwinkel des Ventilators (9)
Der Ventilator kann manuell in mehreren voreingestellten Positionen nach oben oder unten
gekippt werden. Einfach am Schutzkorb nach oben oder unten drücken, bis der Ventilator
in einer der Kipppositionen stehen bleibt.
 Loading...