

Princess 2954 New Classics User Manual [se]
New Classics Kitchen Scale
START/STOP
TIMER
RESET
START/STOP
TIMER
RESET
Article 2954
Nederlands 1
English 4
Français 7
Deutsch 10
Español 13
Italiano 17
Svenska 21
Dansk 24
Norsk 27
Suomi 30
START/STOP
RESET
TIMER
• Gebruiksaanwijzing • User's instructions • Mode d'emploi
• Bedienungsanleitung • Instrucciones de uso • Istruzioni per l'uso
• Bruksanvisning • Brugsanvisning • Bruksanvisning
• Käyttöohje • Instruções de uso •
ϡΪΨΘδϤϟ ϞϴϟΩ
Português 33
ΓΪΤΘϤϟ ΔϜϠϤϤϟ
36
START/STOP
TIMER
RESET
1
2
3
4
5
6
7
8
2
3
12
7
6
5
4
23
DC6V
1
9
RESET
START/STOP
TIMER

Voor het eerste gebruik
Zie figuur 3.
Algemeen
Deze fraaie Princess New Classics Kitchen
Scale is onderdeel van onze New Classicsproductlijn, die is uitgevoerd in robuust
verchroomd staal. Met de Kitchen Scale
kunt u producten wegen tot 5000 g/176 oz.
Ook is een handige timer ingebouwd, die u
als kookwekker kunt gebruiken.
Werking en bediening
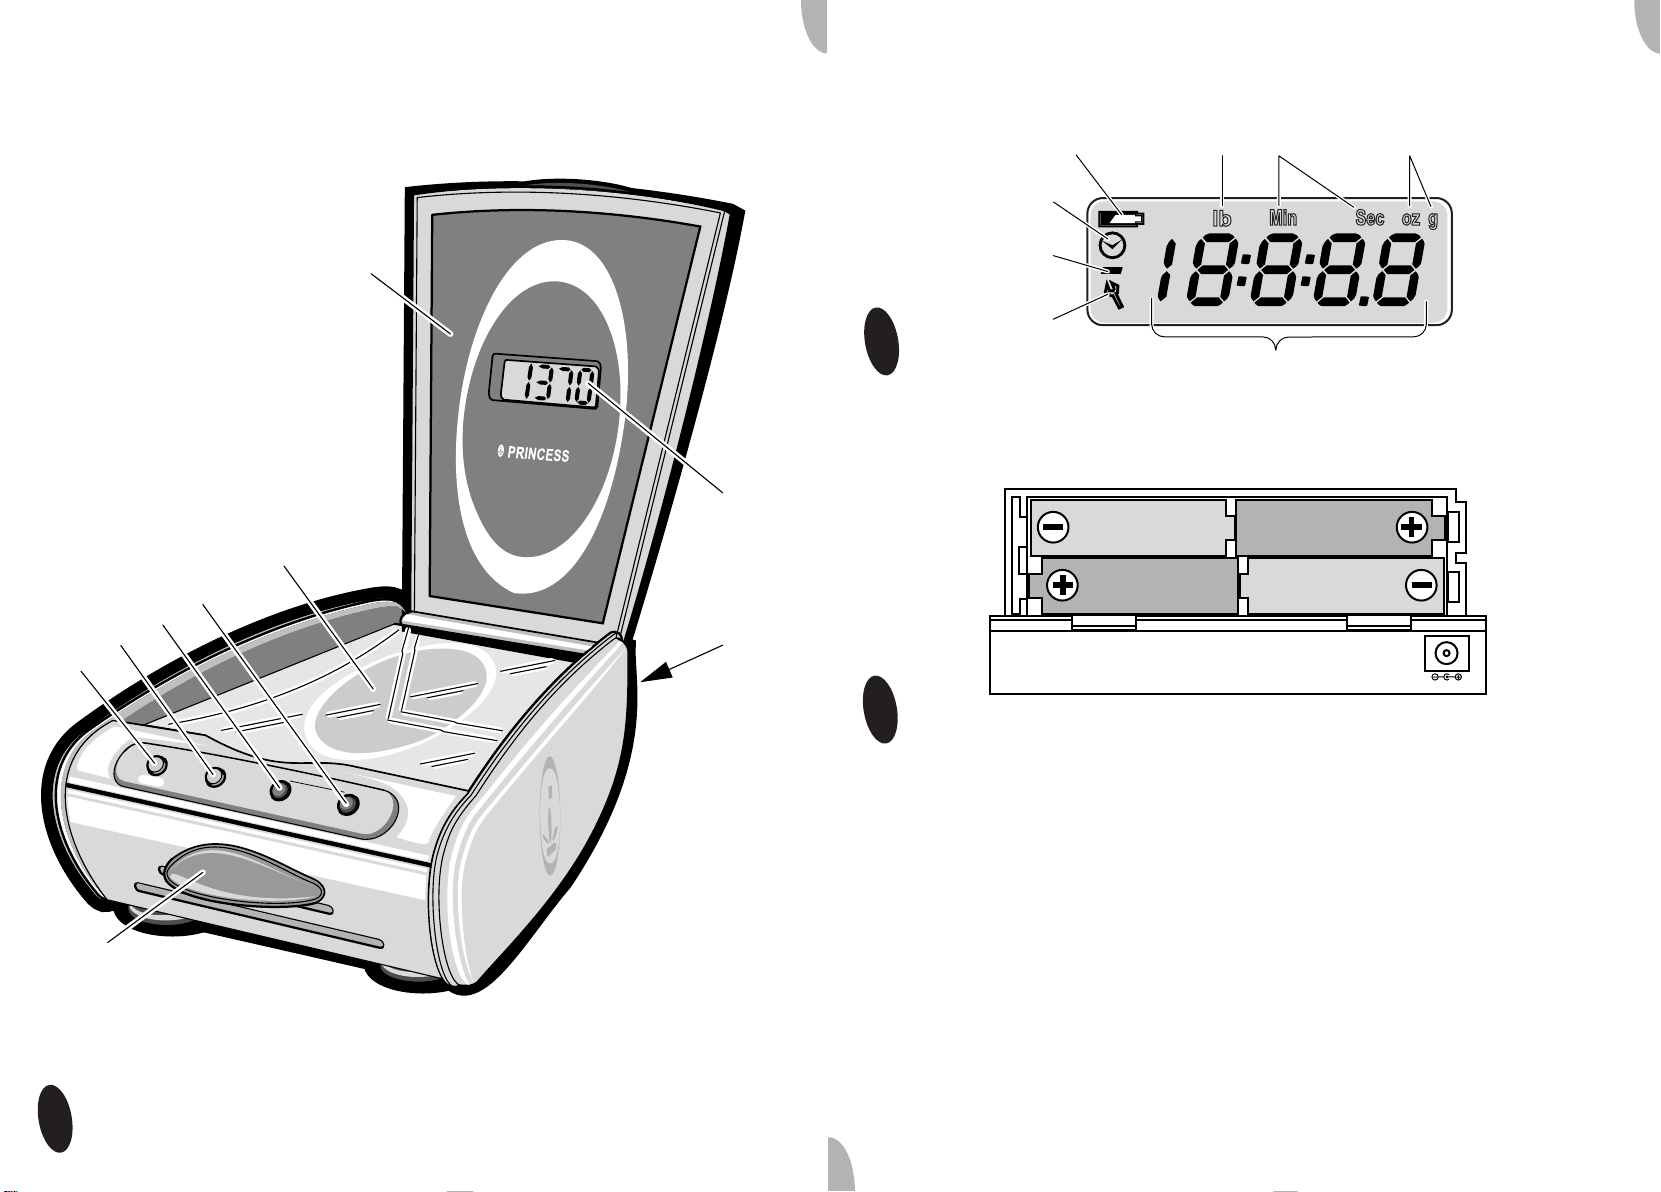
Zie figuur 1.
Het apparaat bevat de volgende
onderdelen:
1 Aan/uit- en reset-knop
2 g/oz- en start/stop-knop
3Timer 4Timer +
5 Weegplateau
6 Deksel
7 LCD-display
8 Afdekkap voor vier 1,5 V-batterijen
9 Opzetbak voor losse producten.
Zie figuur 2.
Het LCD-display bevat de volgende
functionaliteiten:
1 Batterij-indicator
2 Eenheid voor gewicht (g of oz)
3 Eenheid voor tijd (min en sec)
4 Gewicht- of tijdaanduiding
5 Tang (bij storingen)
6 Minteken (bij negatief gewicht)
7 Aanduiding voor timermodus.
1 Verwijder de verpakking.
2 Verwijder de afdekkap voor de
batterijen aan de achterkant van het
apparaat.
3 Plaats vier 1,5 V-batterijen, zoals op het
apparaat is aangegeven.
4 Plaats de afdekkap weer op het batterij-
vak.
Gebruik
• Plaats het apparaat op een harde en
vlakke ondergrond, waar zo min
mogelijk trillingen voorkomen.
• Plaats het apparaat zodanig dat het
niet kan vallen.
Producten wegen
1 Open het deksel.
2 Druk op de aan/uit- en reset-knop om
het apparaat aan te zetten. Op het
display verschijnt eerst ‘888’ en na
1 seconde ‘0g’ (default-scherm).
3 Druk op de g/oz- en start/stop-knop om
te schakelen tussen g en oz. Welke
eenheid u gebruikt, ziet u bovenin het
display. U kunt altijd van eenheid
wisselen.
4 Als u losse producten zoals rijst wilt
wegen, trekt u eerst de opzetbak uit de
voorkant van het apparaat en plaatst
hem op het weegplateau.
5 Druk kort op de aan/uit- en reset-knop
om te resetten. Hierdoor zet u het
gewicht op ‘0’. Deze knop kunt u altijd
gebruiken.
6 Plaats het product op het plateau of in
de opzetbak (als u deze gebruikt). Als u
hiermee de maximale capaciteit
overschrijdt (5000 g/176 oz) dan
verschijnt ‘EEEE’ in het display. Druk op
de aan/uit- en reset-knop om te
resetten. Het default-scherm verschijnt.
U kunt nu een nieuw product volgens
de aanwijzingen hierboven plaatsen.
7 Lees het gewicht af.
New Classics Kitchen Scale Article 2954
1

8 Pak het product (eventueel met de
opzetbak) van het apparaat af. Het
apparaat kan een negatief gewicht aangeven. Er verschijnt dan een ‘-’-teken
links in het display.
9 Druk gedurende 1 seconde de aan/uit-
en reset-knop in om het apparaat uit te
schakelen. Het apparaat schakelt ook
vanzelf uit als u het gedurende 1 minuut
niet gebruikt.
Timer instellen
U kunt altijd de timer inschakelen.
doen als de timer loopt, maar dan stopt
u de timer. U moet deze dan opnieuw
instellen.
9 Druk op de aan/uit- en reset-knop om
het apparaat uit te schakelen. Het
apparaat schakelt vanzelf uit als u het
gedurende 1 minuut niet gebruikt.
Onderhoud
1 Open het deksel.
2 Druk op de aan/uit- en reset-knop om
het apparaat aan te zetten. Op het
display verschijnt eerst ‘888’ en na
1 seconde ‘0g’ (default-scherm).
3 Druk op ‘timer -’ of ‘timer +’ om de timer
in te schakelen. Er verschijnt een klokje
) links in het display. Bovenin het
(
display verschijnt ‘min’ en ‘sec’. Midden
in het display staat ‘00:00’.
4 Druk op ‘timer +’ om de tijd met stappen
van 30 seconden te verhogen. De
maximale tijd is 90 minuten.
5 Druk op ‘timer -’ om de ingestelde tijd
met stappen van 30 seconden te
verlagen (u kunt geen negatieve tijd
instellen). Houd u ‘timer +’ of ‘timer -’
ingedrukt dan wordt de tijd sneller
verhoogd of verlaagd.
6 Druk op de g/oz- en start/stop-knop om
de timer te starten. U kunt de timer
onderbreken door op de g/oz- en start/
stop-knop te drukken. Drukt u nogmaals op deze knop dan loopt de timer
weer verder.
7 De timer telt af naar ‘0’. Als er nog
5 seconden op de timer staan, geeft de
timer elke 0,5 seconde een korte pieptoon. Als de timer op 0 springt, zal
‘00:00’ gedurende 10 seconden gaan
knipperen. Druk op een willekeurige
knop om de pieptoon te stoppen.
8 Druk op de aan/uit- en reset-knop om
terug te gaan naar het defaultscherm
van de weegmodus. Dit kunt u ook
en reinigen
Batterijen vervangen
Vervang de batterijen onmiddellijk als de
batterij-indicator links bovenin het display
knippert.
1 Schakel het apparaat uit.
2 Verwijder de afdekkap.
3 Vervang de batterijen.
4 Plaats de afdekkap weer op het batterij-
vak.
Kitchen Scale reinigen
• Dompel het apparaat nooit onder in
water of een andere vloeistof. Mocht
dit wel gebeuren, gebruik het apparaat
dan niet meer en gooi het weg.
• Gebruik geen schurende of
agressieve middelen.
1 Reinig het apparaat alleen met het spe-
ciaal daarvoor bijgeleverde microvezeldoekje. Gebruik dit doekje alleen droog.
Storingen oplossen
Er verschijnt een tangetje linksonder in het
display (fig. 2; 5), als er in het apparaat een
bepaalde storing optreedt. Los de storing
als volgt op:
1 Zet het apparaat uit door 1 s op de aan/
uit- en reset-knop te drukken.
2 Plaats de batterijen opnieuw goed in het
batterijvak (zie ‘Batterijen vervangen’).
3 Zet het apparaat weer aan.
2
New Classics Kitchen Scale Article 2954

Veiligheid
Algemeen
• Lees de gebruiksaanwijzing goed
door en bewaar deze zorgvuldig.
• Gebruik dit apparaat alleen zoals
beschreven in deze gebruiksaanwijzing.
• Gebruik dit apparaat alleen voor
huishoudelijke doeleinden.
• Houd het apparaat buiten het bereik
van kinderen of personen die er niet
goed mee om kunnen gaan.
• Laat reparaties uitvoeren door een
gekwalificeerde monteur. Probeer
nooit zelf het apparaat te repareren.
Warmte en elektriciteit
• Zorg ervoor dat het apparaat niet in
aanraking komt met hittebronnen,
zoals een hete kookplaat of open vuur.
• Zorg ervoor dat het apparaat niet in
aanraking komt met water.
apparaat gaat reinigen of klaar bent
met het gebruik.
• Verplaats het apparaat nooit als het is
ingeschakeld. Schakel het apparaat
eerst uit.
Milieu
Werp verpakkingsmateriaal zoals plastic
en dozen in de daarvoor bestemde
containers.
Aan het eind van de levensduur dient het
apparaat op een verantwoorde wijze
afgevoerd te worden. Neem hiervoor
contact op met uw gemeente of
afvalverwerkingsinstantie. U kunt het
apparaat ook inleveren bij de winkelier.
Tijdens gebruik
• Gebruik het apparaat nooit buiten.
• Plaats het apparaat op een harde en
vlakke ondergrond, waar zo min
mogelijk trillingen voorkomen.
• Plaats het apparaat zodanig dat het
niet kan vallen.
• Zorg ervoor dat uw handen droog zijn
als u het apparaat aanraakt.
• Gebruik het apparaat nooit in vochtige
ruimten.
• Schakel het apparaat uit als u tijdens
het gebruik storingen ondervindt, het
New Classics Kitchen Scale Article 2954
3

Before use for the first time
See Figure 3.
General
This attractive Princess New Classics
Kitchen Scale is one of the products in our
New Classics range, all of which are
finished in sturdy chrome-plated steel. You
can use your Kitchen Scale to weigh
products to 5000 g/176 oz. It also includes
a handy kitchen timer.
Operation and
controls
See Figure 1.
The appliance is equipped with the
following features:
1 On/off and reset button
2 g/oz and start/stop button
3Timer 4Timer +
5 Weighing platform
6 Cover
7 LCD display
8 Cover for four 1.5 V batteries
9 Container for loose products.
See Figure 2.
The LCD display has the following
functionalities:
1 Battery indicator
2 Units of weight (g or oz)
3 Units of time (min and sec)
4 Display of weight or time
5 Spanner (in the event of malfunction)
6 Minus sign (for negative weight)
7 Indicator for timer mode.
1 Remove the packaging.
2 Remove the battery cover at the rear of
the appliance.
3 Fit four 1.5 V batteries as indicated on
the appliance.
4 Fit the cover to the battery
compartment.
Use
• Place the appliance on a hard and
level surface, as free from vibration as
possible.
• Put the appliance in a place where it
cannot fall off the worktop.
Weighing products
1 Open the cover.
2 Press the on/off and reset button to
switch on the appliance. ‘888’ will be
shown on the display, and ‘0g’ will then
be shown after 1 second (default
display).
3 Press the g/oz and start/stop button to
switch between g and oz. The selected
unti is shown at the top of the display.
You can change units at any time you
wish.
4 To weigh loose products such as rice,
slide the container out of the front of the
appliance and put it on the weighing
platform.
5 Reset the appliance by briefly pressing
the on/off and reset button. This sets
the weight to ‘0’. You can use this
button at any time you wish.
6 Put the product on the weighing
platform or in the container (where
relevant). On weighing product with a
weight of more than (5000 g/176 oz)
‘EEEE’ will be shown in the display.
Reset the appliance by pressing the on/
off and reset button. The default display
will be shown. You can now weigh a
new product using the above
procedure.
4
New Classics Kitchen Scale Article 2954
7 Read the weight.
8 Remove the product (where relevant,
with the container) from the appliance.
The appliance may display a negative
weight. A ‘-’ sign will then be shown at
the left of the display.
9 Press the on/off and reset button for
1 second to switch off the appliance.
The appliance will also switch off
automatically when it is not used for
1 minute.
weighing mode. You can also do this
while the timer is running; however, this
will stop the timer. You will then need to
set the timer again.
9 Press the on/off and reset button to
switch off the appliance. The appliance
will also switch off automatically when it
is not used for 1 minute.
Setting the timer
You can set the timer whenever you wish.
1 Open the cover.
2 Press the on/off and reset button to
switch on the appliance. ‘888’ will be
shown on the display, and ‘0g’ will ten
be shown after 1 second (default
display).
3 Press either ‘timer -’ or ‘timer +’ to
switch on the timer. A clock (
shown at the left of the display. ‘min’
and ‘sec’ are shown at the top of the
display. ‘00:00’ is shown in the middle of
the display.
4 Press ‘timer +’ to increase the time in
intervals of 30 seconds. The maximum
time is 90 minutes.
5 Press ‘timer -’ to decrease the set time
in intervals of 30 seconds (you cannot
set a negative time). Keeping ‘timer +’
or ‘timer -’ pressed in will increase the
speed at which the time is increased or
decreased.
6 Press the g/oz and start/stop button to
switch on the timer. You can interrupt
the timer by pressing the g/oz and start/
stop button. Press the button again to
restart the timer.
7 The timer counts back to ‘0’. When
there are 5 seconds left the timer emits
a brief beep every 0.5 second. When
the timer reaches 0, then ‘00:00’ will
flash on the display for 10 seconds.
Press any button to stop the beep.
8 Press the on/off and reset button to
return to the default display of the
) will be
Maintenance
and cleaning
Replacing the batteries
Replace the batteries immediately if the
battery indicator at the top left of the
display begins to flash.
1 Switch off the appliance.
2 Remove the battery cover.
3 Replace the batteries.
4 Fit the cover to the battery
compartment.
Cleaning the Kitchen Scale
• Do not immerse the appliance in
water, or in other liquids. If this
happens do not use the appliance any
more; dispose of the appliance.
• Never use corrosive or scouring
cleaning agents.
1 Clean the control panel solely with the
special microfibre cloth supplied with
the appliance. Do not moisten the cloth.
Troubleshooting
A spanner is shown at the bottom left of
the display (Fig. 2; 5) in the event of a
specific malfunction. Rectify this
malfunction using the following procedure:
1 Switch off the appliance by pressing the
on/off and reset button for 1 s.
2 Remove the batteries, and then fit them
correctly in the battery compartment
(see ‘Replacing batteries’).
New Classics Kitchen Scale Article 2954
5
3 Switch the appliance on again.
Safety
General
• Please read these instructions
carefully and retain them for
reference.
• Use this appliance only in accordance
with the instructions.
• This appliance is intended solely for
domestic use.
• Keep the appliance out of the reach of
children, and of persons who may not
be able to operate it safely.
• Have the appliance repaired only by a
qualified electrician. Never try to
repair the appliance yourself.
Electricity and heat
• Make sure that the appliance does not
come in contact with sources of heat,
such as a hot hob or naked flame.
• Make sure that the appliance does not
come in contact with water.
• Switch off the appliance in the event
of a malfunction during use, and
before cleaning the appliance or
storing it after use.
• Never move the appliance whilst it is
switched on. Always switch off the
appliance first.
The Environment
Dispose of packaging material, such as
plastic and boxes, in the appropriate waste
containers.
When it reaches the end of its useful life
the appliance must be disposed of in a
responsible manner. Contact your
municipal council or refuse-disposal
agency for disposal instructions. You can
also hand in the appliance to the retailer.
During use
• Never use the appliance outdoors.
• Place the appliance on a hard and
level surface, as free from vibration as
possible.
• Put the appliance in a place where it
cannot fall off the worktop.
• Make sure that your hands are dry
before touching the appliance.
• Never use the appliance in a humid
room.
6
New Classics Kitchen Scale Article 2954

Avant la première utilisation
Voir la figure 3.
Généralités
Cette magnifique balance de cuisine
Princess New Classics Kitchen Scale fait
partie de notre ligne de produits New
Classics en robuste acier chromé. La
balance Kitchen Scale vous permet des
pesées allant jusqu'à 5000 g/176 oz. Elle
comporte également une minuterie
incorporée qui peut vous servir de
minuterie de cuisine.
Fonctionnement et
utilisation
Voir la figure 1.
Les composants de l'appareil sont :
1 Interrupteur principal 'reset' (mise sous
tension - réinitialisation)
2 'Start/stop' (g/oz et marche/arrêt)
3 Timer - (minuterie -)
4 Timer + (minuterie +)
5 Plateau de pesage
6 Couvercle
7 Écran LCD
8 Couvercle du compartiment des 4 piles
1,5 V
9 Récipient de pesage pour produits en
vrac.
Voir la figure 2.
Les fonctions de l'écran LCD sont :
1 Indication de charge de la pile
2 Unité de poids (g ou oz)
3 Unité de temps (min et sec)
4 Affichage du poids ou de l'heure
5 Pince (indicateur de problème)
6 Signe moins (pour un poids négatif)
7 Indication du mode de la minuterie.
1 Enlevez l'emballage.
2 Retirez le couvercle du compartiment
des piles, à l'arrière de l'appareil.
3 Placez quatre piles 1,5 V dans le
compartiment, comme indiqué sur
l'appareil.
4 Refermez le couvercle du
compartiment des piles.
Utilisation
• Installez l'appareil sur une surface
plane et stable, peu sensible aux
vibrations.
• Placez l'appareil de telle façon qu'il ne
risque pas de tomber.
Pesées
1 Ouvrez le couvercle.
2 Appuyez sur l'interrupteur principal
'reset' pour mettre l'appareil sous
tension. L'écran affiche d'abord '888',
puis, après 1 seconde, '0g' (écran par
défaut).
3 Appuyez sur le commutateur 'start/stop'
pour sélectionner g ou oz. L'unité en
usage est affichée en haut de l'écran.
Vous pouvez en changer à tout
moment.
4 Pour peser des produits en vrac,
comme par exemple du riz, vous sortez
d'abord le récipient de pesage de
l'avant de l'appareil, et vous le placez
sur le plateau.
5 Appuyez brièvement sur l'interrupteur
principal 'reset' pour initialiser l'appareil.
Vous mettez ainsi le poids à '0'. Vous
pouvez actionner cet interrupteur à tout
moment.
6 Mettez le produit à peser sur le plateau
ou, le cas échéant, dans le récipient. Si
le poids du produit dépasse le
maximum supporté (5000 g/176 oz),
l'écran affiche 'EEEE'. Appuyez sur
l'interrupteur principal 'reset' pour
réinitialiser l'appareil. L'écran par défaut
New Classics Kitchen Scale Article 2954
7

s'affiche. Vous pouvez maintenant
mettre en place un autre produit, selon
les indications ci-dessus.
7 Lisez le poids sur l'écran.
8 Retirez le produit de la balance (y
compris le récipient, si vous utilisez
celui-ci). Il est possible que la balance
affiche maintenant un poids négatif.
L'écran affiche alors un signe '-', à
gauche.
9 Appuyez sur l'interrupteur principal
'reset' pendant 1 seconde pour couper
l'alimentation de l'appareil. L'appareil se
met hors tension automatiquement s'il
reste inutilisé pendant 1 minute.
Réglage de la minuterie
Vous pouvez régler la minuterie à
n'importe quel moment.
1 Ouvrez le couvercle.
2 Appuyez sur l'interrupteur principal
'reset' pour mettre l'appareil sous
tension. L'écran affiche d'abord '888',
puis, après 1 seconde, '0g' (écran par
défaut).
3 Appuyez sur 'timer -' ou sur 'timer +'
pour enclencher la minuterie. Une
petite face d'horloge (
gauche de l'écran. En haut de l'écran
s'affichent 'min' et 'sec'. Au milieu de
l'écran s'affiche la durée '00:00'.
4 Appuyez sur 'timer +' pour augmenter la
durée affichée par incréments de
30 secondes. La durée maximale
possible est de 90 minutes.
5 Appuyez sur 'timer +' pour diminuer la
durée affichée par incréments de
30 secondes. Si vous enfoncez le
bouton 'timer +' ou 'timer -', et le
maintenez, la durée augmente ou
diminue plus rapidement.
6 Appuyez sur le commutateur 'start/stop'
pour que la minuterie commence à
compter. Appuyez de nouveau sur le
commutateur 'start/stop' pour
interrompre la minuterie. Appuyez
encore une fois sur le même
) s'affiche à
commutateur, et la minuterie se remet
en marche.
7 La minuterie compte à rebours jusqu'à
'0'. Quand il lui reste 5 secondes, la
minuterie donne un bref bip toutes les
0,5 secondes. Lorsque la minuterie
atteint 0, l'écran affiche '00:00' en
clignotant pendant 10 secondes.
Appuyez sur n'importe lequel des
boutons pour arrêter le signal sonore.
8 Appuyez sur l'interrupteur principal
'reset' pour revenir à l'écran par défaut
du mode de pesée. Ceci est également
possible pendant que la minuterie est
en train de compter, mais alors, la
minuterie s'arrête. Vous devez alors la
régler à nouveau.
9 Appuyez sur l'interrupteur principal
'reset' pour couper l'alimentation de
l'appareil. L'appareil se met hors
tension automatiquement s'il reste
inutilisé pendant 1 minute.
Entretien
et nettoyage
Remplacement des piles
Remplacez immédiatement les piles
lorsque l'indication de charge de la pile
clignote (en haut à gauche de l'écran).
1 Coupez l'alimentation de l'appareil.
2 Enlevez le couvercle.
3 Remplacez les piles.
4 Refermez le couvercle du
compartiment des piles.
Nettoyage de la balance Kitchen
Scale
• N'immergez jamais l'appareil dans
l'eau ou dans un autre liquide. Le cas
échéant, cessez d'utiliser l'appareil et
mettez-le au rebut.
• N'utilisez pas de détergents agressifs
ou décapants.
8
New Classics Kitchen Scale Article 2954
1 Nettoyez l'appareil uniquement avec le
chiffon microfibres spécial livré avec
l'appareil. Utilisez ce chiffon
uniquement à sec.
Problèmes et solutions
Une petite pince s'affiche en bas à gauche
de l'écran (fig. 2; 5) lorsque l'appareil a un
problème. Vous remédiez au problème
comme suit :
1 Coupez l'alimentation de l'appareil ;
pour cela, vous appuyez pendant 1 s
sur l'interrupteur principal 'reset'.
2 Sortez les piles de leur compartiment et
remettez-les en place comme il faut
(voir 'Remplacement des piles').
3 Remettez l'appareil sous tension.
Sécurité
Généralités
• Lisez soigneusement le mode
d'emploi et conservez-le
précieusement.
• Utilisez cet appareil uniquement
suivant les instructions décrites dans
le mode d'emploi.
• L'appareil est destiné uniquement à
l'utilisation domestique.
• Tenez l'appareil hors de la portée des
enfants ou des personnes incapables
de l'utiliser correctement.
• Faites effectuer les réparations par un
technicien qualifié. Ne tentez jamais
de réparer vous-même l'appareil.
• Assurez-vous que l'appareil n'entre
pas en contact avec de l'eau.
Pendant l'utilisation
• N´utilisez jamais l'appareil à
l'extérieur.
• Installez l'appareil sur une surface
plane et stable, peu sensible aux
vibrations.
• Placez l'appareil de telle façon qu'il ne
risque pas de tomber.
• Assurez-vous que vos mains sont
sèches avant de toucher l'appareil.
• N'utilisez jamais l'appareil dans une
pièce humide.
• Éteignez l'appareil en cas de problème
durant l'utilisation, pour le nettoyage,
et dès que vous avez fini de l'utiliser.
• Ne déplacez jamais l'appareil pendant
qu'il est en marche. Coupez au
préalable l'alimentation de l'appareil.
Environnement
Jetez le matériel d'emballage, tel que le
plastique et les boîtes, dans les
conteneurs prévus à cet effet.
Lorsque l'appareil est usé, il doit être mis
au rebut selon les règlements en vigueur.
Pour plus d'informations, contactez les
autorités communales ou l'autorité
responsable du retraitement des déchets.
Vous pouvez également rapporter
l'appareil au point de vente.
Électricité et chaleur
• Assurez-vous que l'appareil n'entre
pas en contact avec une source de
chaleur telle qu'une plaque électrique
chaude ou une flamme.
New Classics Kitchen Scale Article 2954
9
Vor der ersten Verwendung
Siehe Abbildung 3.
Allgemein
Diese geschmackvolle Princess New
Classics Küchenwaage ist Teil unserer
New Classics-Produktlinie, die aus
stabilem, verchromtem Stahl hergestellt
wird. Mit der Küchenwaage können Sie
Produkte bis 5000 g/175 oz wiegen. In der
Waage ist auch ein praktischer Timer
eingebaut, den Sie als Küchenwecker
verwenden können.
Arbeitsweise und
Bedienung
Siehe Abbildung 1.
Das Gerät besteht aus den folgenden
Teilen:
1 Ein/Aus- und Reset-Taste
2 g/oz- und Start/Stopp-Taste
3Timer 4Timer +
5 Wiegeplattform
6 Deckel
7 LCD-Display
8 Schutzhaube für vier 1,5 V-Batterien
9 Aufsatzbehälter für lose Produkte.
Siehe Abbildung 2.
Das LCD-Display verfügt über die
folgenden Funktionen:
1 Batterieanzeige
2 Einheit für Gewicht (g oder oz)
3 Einheit für Zeit (Min und Sek)
4 Gewichts- oder Zeitanzeige
5 Zange (bei Störungen)
6 Minuszeichen (bei negativem Gewicht)
7 Anzeige für Timermodus.
1 Entfernen Sie die Verpackung.
2 Nehmen Sie die an der Geräterückseite
befindliche Schutzhaube für die
Batterien ab.
3 Legen Sie wie auf dem Gerät
angegeben vier 1,5 V-Batterien ein.
4 Bringen Sie die Schutzhaube wieder
auf dem Batteriefach an.
Verwendung
• Stellen Sie das Gerät auf eine feste
und flache Oberfläche, die möglichst
keinen Erschütterungen ausgesetzt
ist.
• Stellen Sie das Gerät so auf, dass es
nicht herunterfallen kann.
Produkte wiegen
1 Öffnen Sie den Deckel.
2 Drücken Sie zum Einschalten des
Geräts auf die Ein/Aus- und ResetTaste. Auf dem Display erscheint zuerst
„888“ und nach 1 Sekunde "0g"
(Standardanzeige).
3 Drücken Sie auf die g/oz- und Start/
Stopp-Taste, um zwischen g und oz zu
wechseln. Welche Einheit Sie
verwenden, wird oben im Display
angezeigt. Sie können die Einheit
jederzeit wechseln.
4 Wenn Sie lose Produkte wie Reis
wiegen möchten, dann ziehen Sie
zuerst den Aufsatzbehälter aus der
Gerätevorderseite heraus und stellen
ihn auf die Wiegeplattform.
5 Drücken Sie kurz auf die Ein/Aus- und
Reset-Taste, um die Einstellung
zurückzusetzen. Hierdurch stellen Sie
das Gewicht auf „0“. Diese Taste
können Sie jederzeit verwenden.
6 Legen Sie das Produkt auf die Plattform
oder in den Aufsatzbehälter (wenn Sie
diesen verwenden). Wenn Sie damit die
Höchstmenge überschreiten (5000 g/
176 oz), erscheint im Display "EEEE".
10
New Classics Kitchen Scale Article 2954

Drücken Sie auf die Ein/Aus- und
Reset-Taste, um die Einstellung
zurückzusetzen. Es erscheint die
Standardanzeige. Jetzt können Sie ein
neues Produkt entsprechend den
Anweisungen dazugeben.
7 Lesen Sie das Gewicht ab.
8 Nehmen Sie das Produkt (eventuell mit
dem Aufsatzbehälter) vom Gerät
herunter. Die Waage kann ein
negatives Gewicht anzeigen. Im Display
erscheint dann links ein „-"-Zeichen.
9 Drücken Sie zum Ausschalten des
Geräts 1 Sekunde lang die Ein/Aus-
und Reset-Taste. Die Waage schaltet
sich auch von selbst aus, wenn sie
1 Minute lang nicht benutzt wurde.
Timer einstellen
Sie können den Timer jederzeit
einschalten.
1 Öffnen Sie den Deckel.
2 Drücken Sie zum Einschalten des
Geräts auf die Ein/Aus- und Reset-
Taste. Auf dem Display erscheint zuerst
„888“ und nach 1 Sekunde "0g"
(Standardanzeige).
3 Drücken Sie zum Einschalten des
Timers auf „Timer -„ oder „Timer +“. Im
Display erscheint links eine Uhr (
Oben im Display erscheint „min" und
"sec". In der Mitte des Displays steht
„00:00“.
4 Drücken Sie auf ‘Timer +’, um die Zeit
in Schritten von 30 Sekunden zu
erhöhen. Die einstellbare Höchstzeit
beträgt 90 Minuten.
5 Drücken Sie auf „Timer -, um die
eingestellte Zeit in Schritten von
30 Sekunden zurückzustellen (Sie
können keine negative Zeit einstellen).
Halten Sie die Taste „Timer +“ oder
„Timer “ gedrückt, wird die Zeit
schneller erhöht oder zurückgestellt.
6 Drücken Sie auf die g/oz- und Start/
Stopp-Taste, um den Timer zu starten.
Durch Drücken der g/oz- und Start/
Stopp-Taste können Sie den Timer
) .
unterbrechen. Wenn Sie die Taste
erneut drücken, läuft der Timer wieder
weiter.
7 Der Timer zählt auf „0“ zurück. Wenn
noch 5 Sekunden auf dem Timer
stehen, ertönt alle 0,5 Sekunden ein
kurzer Piepton. Wenn der Timer auf 0
springt, blinkt für 10 Sekunden die
Anzeige „00:00“. Drücken Sie auf eine
beliebige Taste, um den Piepton
auszustellen.
8 Drücken Sie auf die Ein/Aus- und
Reset-Taste, um zur Standardanzeige
des Wiegemodus zurückzukehren. Sie
können dies auch tun, wenn der Timer
läuft, allerdings stoppen Sie dann den
Timer. Diesen müssen Sie dann erneut
einstellen.
9 Drücken Sie zum Ausschalten des
Geräts auf die Ein/Aus- und ResetTaste. Die Waage schaltet sich auch
von selbst aus, wenn sie 1 Minute lang
nicht benutzt wurde.
Wartung
und Reinigung
Batterien ersetzen
Ersetzen Sie die Batterien sofort, wenn die
Batterieanzeige oben links im Display
blinkt.
1 Schalten Sie das Gerät aus.
2 Entfernen Sie die Schutzhaube.
3 Ersetzen Sie die Batterien.
4 Bringen Sie die Schutzhaube wieder
auf dem Batteriefach an.
Reinigung der Küchenwaage
• Tauchen Sie das Gerät nie ins Wasser
oder in eine andere Flüssigkeit. Sollte
dies trotzdem passieren, dann
benutzen Sie das Gerät nicht mehr
und entsorgen Sie es.
New Classics Kitchen Scale Article 2954
11
 Loading...