

Page 1
Beer Tap & Cooler
Article 282990
• Gebruiksaanwijzing • User's instructions • Mode d'emploi
• Bedienungsanleitung • Instrucciones de uso • Istruzioni per l'uso
• Bruksanvisning • Brugsanvisning • Bruksanvisning • Käyttöohje
• Instruções de uso • ȅįȘȖȓİȢ ȤȡȒıȘȢ •
© Princess 2008
Page 2
Nederlands 1
English 6
Français 11
Deutsch 16
Español 22
Italiano 27
Svenska 33
Dansk 38
Norsk 43
Suomi 48
Português 53
ǼȜȜȘȞȚțȐ
58
Page 3
A-1
Page 4
CLICK
90°
A-2
B-1
A-3
C-1
AC
OFF
DC
11 12 1310
Page 5

A-4
2
4
3
1
5
6
D-1
9
7
8
Page 6
Algemeen
Met deze fraaie Princess Beer Tap &
Cooler kunt u zelf het lekkerste biertje
tappen. Thuis, maar ook in de tuin tijdens
een barbecue of feest. De geïsoleerde
wanden van het apparaat zorgen er
namelijk voor dat het bier uren lang koel
blijft zonder stroom. De Princess Beer Tap
& Cooler is geschikt voor 5 liter tapvaten
zoals onder andere het Heineken tapvat.
Zie figuur C-1.
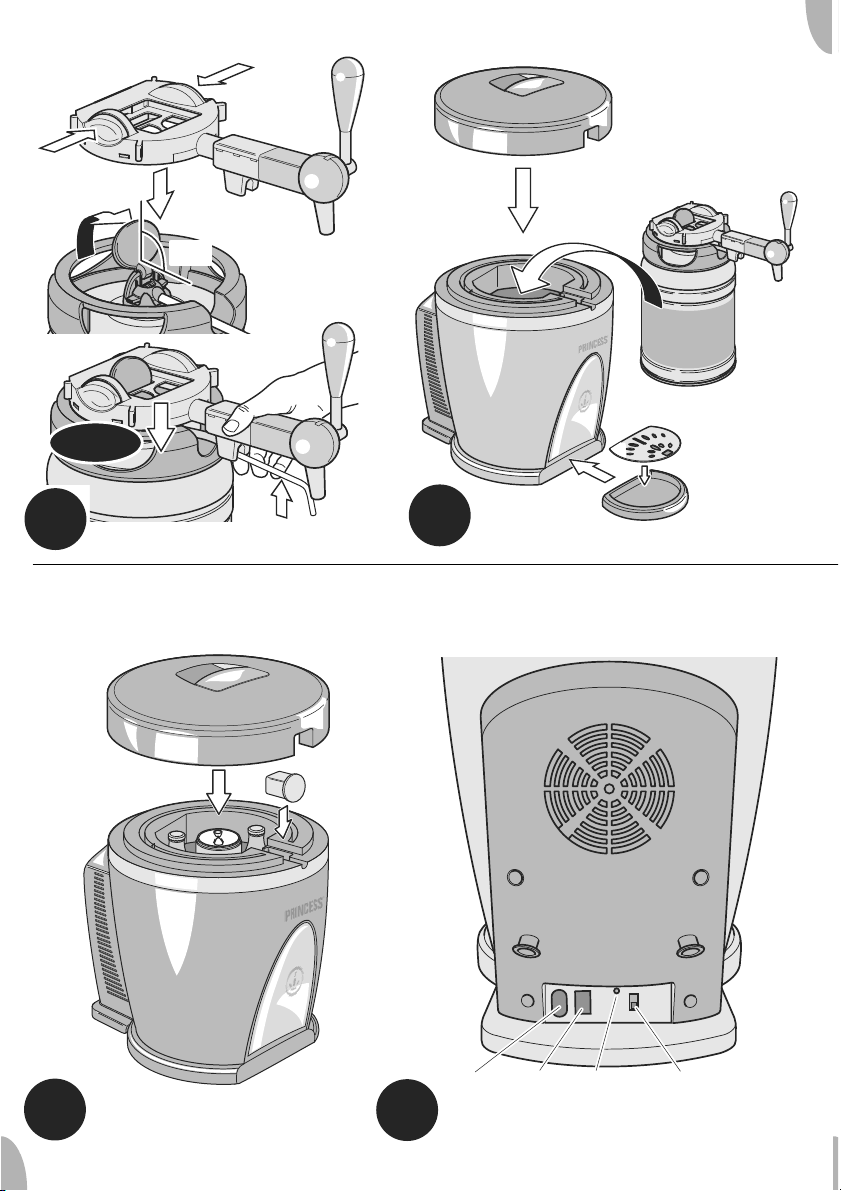
10 AC-aansluiting
11 12V DC-aansluiting
12 Indicatielampje aan/uit
13 Keuzeschakelaar voedingsspanning
Voor het eerste gebruik
1 Verwijder de gehele verpakking.
2 Reinig het apparaat en alle toebehoren
(zie ‘Onderhoud en reinigen’).
Bier tappen
Behalve voor het tappen van bier kunt u de
Princess Beer Tap & Cooler ook gebruiken
om bijvoorbeeld flessen wijn of blikjes bier
en frisdrank lang koel te houden. Handig
voor onderweg.
De kwaliteit en prestaties van deze Beer
Tap & Cooler in combinatie met het
Heineken 5L Tapvat vallen geheel onder
de verantwoordelijkheid van Princess. Er
berust hiervoor geen enkele
aansprakelijkheid bij de brouwer.
Werking en bediening
Zie figuur D-1.
Het apparaat bevat de volgende
onderdelen:
1 Behuizing
2 Deksel met handgreep
3 Afsluitblokje
4 Tapeenheid
5 Taphendel
6 Verlengbuisje (5x)
7 Lekbak met rooster
8 12V DC-snoer
9 AC-snoer met stekker
Tapvat plaatsen
Zie figuur A-1 t/m A-3 en figuur C-1.
• De tapfunctie van het apparaat is
alleen geschikt voor 5 liter tapvaten.
• Lees en volg altijd de instructies en
waarschuwingen op het tapvat
voordat u het tapvat in het apparaat
plaatst.
• Zorg dat het tapvat gekoeld is voordat
u het in het apparaat plaatst.
• Controleer altijd of de houdbaarheidsdatum van het tapvat nog niet
verstreken is bij aankoop en voordat u
het tapvat in het apparaat plaatst.
• Controleer voordat u het apparaat
gebruikt of de (net)spanning
overeenkomt met de aangegeven
(net)spanning op het typeplaatje van
het apparaat.
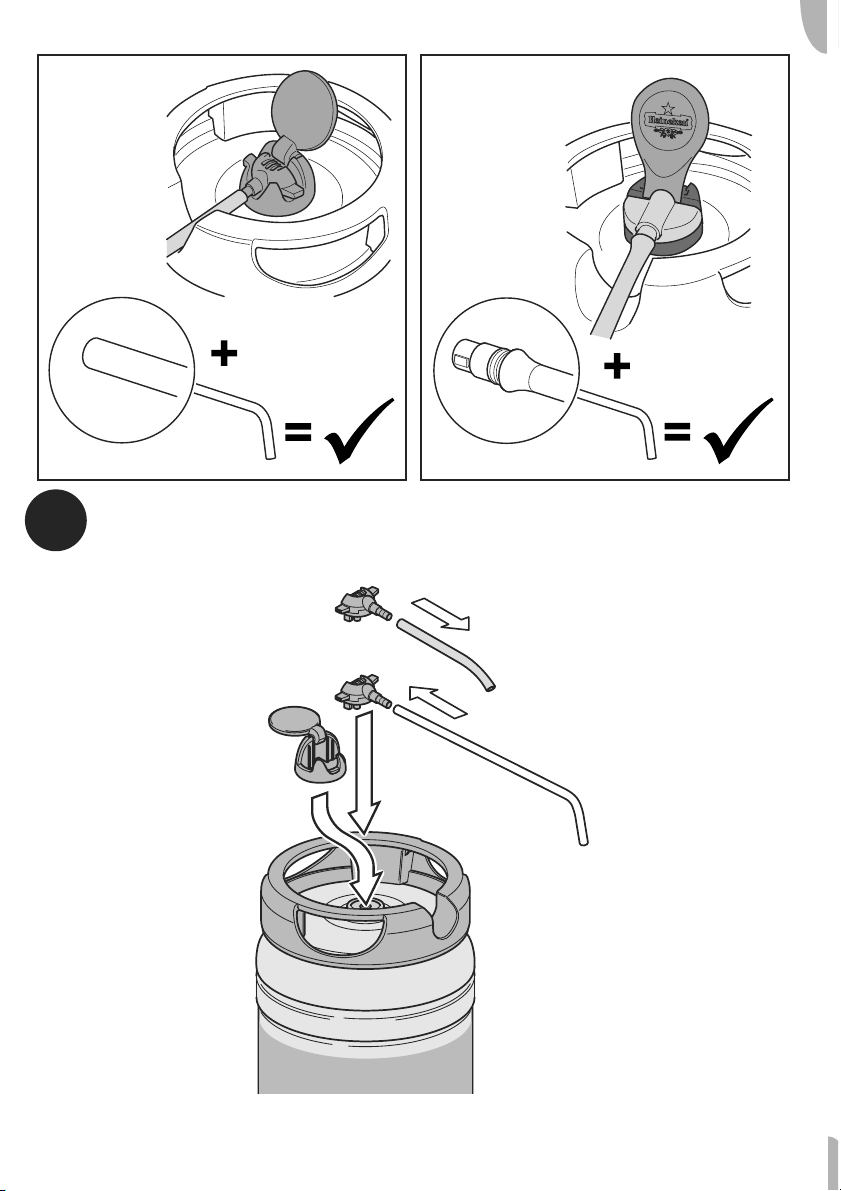
1 Plaats de groene taphendelhouder op
het tapvat.
2 Haal het grijze buisje van de groene
vataansluiting af en vervang dit buisje
door het verlengbuisje van de Beer Tap
& Cooler.
3 Plaats de vataansluiting (incl. verleng-
buisje) in de groene taphendelhouder.
Zorg er daarbij wel voor dat de groene
taphendel helemaal achterover geklapt
staat.
Beer Tap & Cooler Article 282990
1
Page 7

4 Plaats de tapeenheid op het tapvat.
Zorg er daarbij voor dat de groene
taphendel op het tapvat recht omhoog
staat en door de opening in de tapeenheid steekt. Druk de tapeenheid aan
totdat deze vastklikt op het tapvat.
5 Druk het verlengbuisje vast aan de
onderzijde van de tapeenheid.
6 Verwijder het deksel van het apparaat.
7 Plaats het tapvat met de tapeenheid in
het apparaat.
8 Plaats het deksel op het apparaat.
9 Plaats het rooster op de lekbak.
10 Plaats de lekbak tegen het apparaat.
De lekbak zit met twee magneten vast
aan het apparaat.
11 Schuif de keuzeschakelaar voor de
voedingsspanning naar de gewenste
positie: AC of 12V DC.
• Gebruik AC als u het apparaat aansluit
op de netspanning in huis.
• Gebruik 12V DC als u het apparaat
aansluit op het aanstekercontact in
bijvoorbeeld de auto of de caravan.
12 Sluit het AC-snoer of het 12V DC-
snoer aan op de daarvoor bestemde
aansluiting op het apparaat.
13 Steek de stekker van het AC-snoer in
het stopcontact of steek de aansluitplug
van het 12V DC-snoer in het aansteker-
contact.
Het indicatielampje gaat branden ten
teken dat het apparaat is ingeschakeld.
Tap pen
Zie figuur A-4.
1 Spoel een glas met schoon, koud water.
2 Houd het glas schuin, net onder het
uiteinde van de tapkraan.
3 Open de tapkraan door de taphendel op
de tapeenheid met een snelle beweging
naar u toe te kantelen.
4 Sluit de tapkraan door de taphendel op
de tapeenheid met een snelle beweging
van u af te kantelen als het bier de rand
van het schuingehouden glas bereikt.
5 Zet het glas op het rooster van de lek-
bak.
6 Schuim met een schuimspaan het bier
af zodat de bovenkant van de schuimkraag gelijk is aan de rand van het glas.
7 Laat het apparaat ingeschakeld staan
als u het tapvat gedurende langere tijd
koel wilt houden.
Koelen
Zie figuur B-1 en C-1.
Behalve voor het tappen van bier is de
Princess Beer Tap & Cooler bijzonder
geschikt voor het koel houden van
producten. De Princess Beer Tap & Cooler
heeft een capaciteit voor:
• maximaal 5 flessen met elk een inhoud
van 75 cl, of
• 17 blikjes met elk een inhoud van 33 cl,
of
• 12 flesjes met elk een inhoud van 33 cl
en een diameter van 50 mm.
• Zorg dat de producten gekoeld zijn
voordat u ze in het apparaat plaatst.
• Controleer voordat u het apparaat
gebruikt of de (net)spanning
overeenkomt met de aangegeven
(net)spanning op het typeplaatje van
het apparaat.
1 Verwijder het deksel van het apparaat.
2 Schuif het afsluitblokje in de opening in
het deksel.
3 Schuif de schakelaar voor de voedings-
spanning naar de gewenste positie: AC
of 12V DC.
• Gebruik AC als u het apparaat aansluit
op de netspanning in huis.
• Gebruik 12V DC als u het apparaat
aansluit op het aanstekercontact in
bijvoorbeeld de auto of de caravan.
4 Sluit het AC-snoer of het 12V DC-
snoer aan op de daarvoor bestemde
aansluiting op het apparaat.
5 Steek de stekker van het AC-snoer in
het stopcontact of steek de aansluitplug
van het 12V DC-snoer in het aanstekercontact.
2
Beer Tap & Cooler Article 282990
Page 8

Het indicatielampje gaat branden ten
teken dat het apparaat is ingeschakeld
6 Plaats de voorgekoelde producten in
het apparaat.
7 Plaats het deksel op het apparaat.
8 Laat het apparaat ingeschakeld staan
als u de producten gedurende langere
tijd koel wilt bewaren.
Onderhoud
en reinigen
• Gebruik geen agressieve of
schurende schoonmaakmiddelen of
scherpe voorwerpen (zoals messen of
harde borstels) bij het reinigen.
• Zorg dat het apparaat niet is
aangesloten op het stopcontact of het
aanstekercontact als u het gaat
schoonmaken.
• Dompel het apparaat nooit onder in
water.
• Zet het apparaat en de accessoires
nooit in een afwasmachine.
• Let op dat er geen vocht bij de
elektrische delen van het apparaat
komt.
1 Reinig de binnen- en buitenzijde van het
apparaat met een vochtige doek en een
mild reinigingsmiddel. Droog de binnen-
en buitenzijde vervolgens goed.
2 Reinig de lekbak en het rooster in een
warm sopje. Droog ze vervolgens goed.
3 Spoel na elk gebruik het tapbuisje op
het tapvat en het verlengbuisje door
met stromend water.
4 Plaats bij een nieuw tapvat een nieuwe
verlengbuisje of reinig het verlengbuisje
grondig in een warm sopje. Spoel het
verlengbuisje vervolgens door met
stromend water en laat het goed drogen.
Nieuwe verlengbuisjes kunt u
nabestelen via het serviceadres.
Veiligheid
Algemeen
• Lees en volg altijd de instructies en
waarschuwingen op het tapvat
voordat u het tapvat in het apparaat
plaatst.
• Lees deze gebruiksaanwijzing goed
door en bewaar deze zorgvuldig.
• Gebruik dit apparaat alleen zoals
beschreven in deze gebruiksaanwijzing.
• Gebruik dit apparaat alleen voor
huishoudelijke doeleinden.
• Het gebruik van dit apparaat door
kinderen of personen met een
lichamelijke, zintuiglijke, mentale of
motorische beperking, of gebrek aan
kennis en ervaring, kan tot gevaarlijke
situaties leiden. Personen die
verantwoordelijk zijn voor de
veiligheid van deze mensen moeten
duidelijke instructies geven of moeten
toezicht houden op het gebruik van
het apparaat.
• Houd het apparaat buiten het bereik
van kinderen of personen die er niet
goed mee om kunnen gaan.
• Laat reparaties uitvoeren door een
gekwalificeerde monteur. Probeer
nooit zelf het apparaat te repareren.
• Gebruik uitsluitend toebehoren welke
door de leverancier worden
aanbevolen. Door gebruik van andere
toebehoren kan schade optreden aan
het apparaat waardoor gevaar voor de
gebruiker kan ontstaan.
Beer Tap & Cooler Article 282990
3
Page 9

Warmte en elektriciteit
• Controleer voordat u het apparaat
gebruikt of de (net)spanning
overeenkomt met de aangegeven
(net)spanning op het typeplaatje van
het apparaat.
• Als u een verlengsnoer gebruikt,
gebruik dan alleen een geaard
verlengsnoer met geaarde stekkers in
een geaard stopcontact. Gebruik
alleen een verlengsnoer dat
voldoende dikte heeft voor de
maximale stroomsterkte (Ampère) en
het vermogen (Watt) van het apparaat.
• Rol het verlengsnoer altijd volledig af.
• Haal altijd de stekker uit het
stopcontact of de aansluitplug van het
12V DC-snoer uit het aanstekercontact
wanneer u het apparaat niet gebruikt.
• Als u de stekker uit het stopcontact
neemt of de aansluitplug van het 12V
DC-snoer uit het aanstekercontact
neemt, trek dan aan de stekker of de
aansluitplug, niet aan het snoer.
• Trek nooit aan het aansluitsnoer om
het apparaat te verschuiven.
• Controleer regelmatig of het snoer van
het apparaat nog intact is. Gebruik het
apparaat niet als een snoer
beschadigingen vertoont. Laat een
beschadigd snoer vervangen door een
gekwalificeerde monteur.
• Zorg ervoor dat het apparaat, het
snoer en de stekker/aansluitplug niet
in aanraking komen met hittebronnen,
zoals een hete kookplaat of open vuur.
• Zorg ervoor dat het apparaat, het
snoer en de stekker/aansluitplug niet
in aanraking komen met water.
• Het apparaat moet zijn warmte kwijt
kunnen om brandgevaar te voorkomen.
Zorg er dus voor dat het apparaat
voldoende vrij is en niet in contact kan
komen met brandbaar materiaal. Het
apparaat mag niet worden bedekt.
Tijdens gebruik
• Gebruik het apparaat alleen bij een
temperatuur tussen 10°C en 30°C.
• Stel het apparaat en het tapvat nooit
bloot aan direct zonlicht of aan
temperaturen boven 30°C.
• Plaats het apparaat op een stabiele en
vlakke ondergrond, op een plaats
waar het niet kan vallen.
• Laat het snoer niet over de rand van
een aanrecht, werkblad of tafel
hangen.
• Zorg ervoor dat het snoer volledig
uitgerold wordt.
• Zorg ervoor dat uw handen droog zijn
als u het apparaat, het snoer of de
stekker/aansluitplug aanraakt.
• Gebruik het apparaat nooit in vochtige
ruimten.
• Verwijder de stekker uit het stopcontact
of de aansluitplug van het 12V DCsnoer uit het aanstekercontact als u
tijdens het gebruik storingen
ondervindt, het apparaat gaat reinigen,
een accessoire aanbrengt of verwijdert,
of klaar bent met het gebruik.
• Dompel het apparaat, het snoer en de
stekker/aansluitplug nooit onder in
water of een andere vloeistof.
• Pak het apparaat niet op wanneer het
in het water is gevallen. Neem direct
de stekker uit het stopcontact of de
aansluitplug van het 12V DC-snoer uit
het aanstekercontact. Gebruik het
apparaat niet meer.
• Maak het apparaat na gebruik grondig
schoon (zie hoofdstuk ‘Onderhoud en
reinigen’).
• Bewaar een geopend tapvat op de
juiste temperatuur door het in het
apparaat te laten zitten. Zorg ervoor
dat het apparaat van stroom voorzien
wordt. Als u het apparaat langere tijd
niet gaat gebruiken, haal dan altijd het
geopende tapvat uit het apparaat en
4
Beer Tap & Cooler Article 282990
Page 10
plaats het in de koelkast. Na opening
van het tapvat blijft het bier 30 dagen
vers.
• Controleer altijd of de houdbaarheidsdatum van het tapvat nog niet
verstreken is bij aankoop en voordat u
het tapvat in het apparaat plaatst.
• Gebruik geen beschadigde tapvaten in
het apparaat, aangezien dit tot schade
aan het apparaat kan leiden. Breng
een beschadigd tapvat altijd terug
naar de winkel waar u het gekocht
heeft.
• Ongeopende tapvaten blijven het
langst goed wanneer ze bij een
constante temperatuur bewaard
worden. Hoe koeler u het tapvat
bewaart, hoe beter.
Milieu
Werp verpakkingsmateriaal zoals plastic
en dozen in de daarvoor bestemde
containers.
Wilt u het apparaat weg doen terwijl het
nog goed functioneert of eenvoudig
gerepareerd kan worden, zorg dan voor
hergebruik van het apparaat.
Aan het einde van de levensduur moet u
het apparaat op een verantwoorde wijze
laten verwerken, zodat het apparaat of
onderdelen daarvan kunnen worden
hergebruikt. Zet het apparaat niet bij het
ongesorteerde afval, maar lever het in bij
de winkelier of bij een erkend inzamelpunt.
Neem contact op met uw gemeente voor
informatie over de beschikbare inleveringsen inzamelsystemen.
Geldende Europese richtlijn:
• 2002/95/EC
• 2002/96/EC
Beer Tap & Cooler Article 282990
5
Page 11
General
With this attractive Princess Beer Tap &
Cooler you can tap the best tasting beer
yourself. At home, but also in the garden
for a barbecue or party. The cooler's
insulated wall ensure that the beer will stay
cold for hours, even without power. The
Princess Beer Tap & Cooler can dispense
Heineken 5 Litre Beer kegs or similar kegs
that utilises an internal carbonator that
releases carbon dioxide each time the tap
is opened. The princess Beer Tap & Cooler
is unfortunately not suitable for use with
gravity dispensed beer kegs.
As well as for tapping beer, you can also
use the Princess Beer Tap & Cooler for
keeping bottles of wine, and cans of beer
and soft drinks cool. Handy if you're on the
road.
The quality and performance of this Beer
Tap & Cooler in combination with the
Heineken 5 l keg is completely the
responsibility of Princess. The brewer is in
no way liable for this.
See Figure C-1.
10 AC connection
11 12 V DC connection
12 On/Off indicator light
13 Supply voltage selector switch
Before first use
1 Remove all the packaging.
2 Clean the appliance and all accessories
(see ‘Maintenance and cleaning’).
Tapping beer
Position the keg
See Figures A-1 to A-3 and Figure C-1.
• The appliance's tap function is only
suitable for 5 litre kegs.
• Read and follow the instructions and
warnings on the keg before you place
it in the appliance.
• Ensure that the keg has been cooled
before placing it in the appliance.
• Always check that the use-by date on
the keg has not expired before placing
the keg in the appliance.
• Before using the appliance, check
whether the mains supply voltage
matches the voltage indicated on the
type plate of the appliance.
Operation
See Figure D-1.
The equipment consists of the following
parts:
1 Housing
2 Cover with hand grip
3Seal
4 Tap unit
5 Tap handle
6 Extension pipe (5x)
7 Drip tray with grille
8 12 V DC cable
9 AC cable with plug
6
Beer Tap & Cooler Article 282990
1 Position the green tap handle holder on
the keg.
2 Remove the grey pipe from the green
keg connection and replace this pipe
with the extension pipe from the Beer
Tap & Cooler.
3 Position the keb conection (including
extension pipe) in the green tap handle
holder. Ensure that the green tap
handle is folded fully backwards.
4 Position the tap unit on the keg. Ensure
that the green tap handle on the keg is
vertical and protrudes through the
Page 12

opening in the tap unit. Press on the tap
unit until it clicks into place on the keg.
5 Push the extension pipe firmly onto the
underside of the tap unit.
6 Remove the cover from the appliance.
7 Position the keg with the tap unit in the
appliance.
8 Place the cover on the appliance.
9 Place the grille on the drip tray.
10 Position the drip tray against the
appliance. The drip tray is held in place
by two magnets.
11 Slide the supply voltage selector switch
to the required position: AC or 12 V DC.
• Use AC when you connect the appliance
to the mains supply at home.
• Use 12 V DC when you connect the
appliance to the cigarette lighter socket
in the car or caravan.
12 Connect the AC cable or the 12 V DC
cable to the associated connection on
the appliance.
13 Push the AC cable plug into the wall
socket, or plug the 12 V DC cable plug
into the cigarette lighter socket.
The indicator lamp will light to indicate
that the appliance is switched on.
Tapping
See Figure A-4.
1 Rinse a glass with clean, cold water.
2 Hold the glass at an angle just under
the tap outlet.
3 Open the tap by tilting the tap handle on
the tap unit quickly towards you.
4 Close the tap by pushing the tap on the
tap unit quickly away from you when the
beer reaches the lip of the tilted glass.
5 Place the glass on the drip tray grille.
6 Take the top of the foam off with a
spatula so that the foam head is level
with the top of the glass.
7 Leave the appliance switched on if you
want to keep the keg cooled for a longer
period.
Cooling
See Figure B-1 and C-1.
As well as tapping beer, the Princess Beer
Tap & Cooler is particularly suitable for
keeping products cold. The Princess Beer
Tap & Cooler has the capacity for:
• a maximum of 5 bottles, each with a
content of 75 cl, or
• 17 cans, each with a content of 33 cl, or
• 12 bottles, each with a content of 33 cl
and a diameter of 50 mm.
• Ensure that the products have been
cooled before you place them in the
appliance.
• Before using the appliance, check
whether the mains supply voltage
matches the voltage indicated on the
type plate of the appliance.
1 Remove the cover from the appliance.
2 Slide the sealing block into the opening
in the cover.
3 Slide the supply voltage selector switch
to the required position: AC or 12 V DC.
• Use AC when you connect the appliance
to the mains supply at home.
• Use 12 V DC when you connect the
appliance to the cigarette lighter socket
in the car or caravan.
4 Connect the AC cable or the 12 V DC
cable to the associated connection on
the appliance.
5 Push the AC cable plug into the wall
socket, or plug the 12 V DC cable plug
into the cigarette lighter socket.
The indicator lamp will light to indicate
that the appliance is switched on.
6 Place the pre-cooled products in the
appliance.
7 Place the cover on the appliance.
8 Leave the appliance switched on if you
want to keep the products cooled for a
longer period.
Beer Tap & Cooler Article 282990
7
Page 13

Maintenance
and cleaning
• Do not use any aggressive or abrasive
cleaning agents or sharp objects
(such as knives or hard brushes) for
cleaning.
• Ensure that the appliance is not
plugged into the wall socket or the
lighter socket when you are going to
clean it.
• Never immerse the appliance in water.
• Never put the appliance or the
accessories in a dish washing
machine.
• Ensure that no moisture gets into the
electrical parts of the appliance.
1 Clean the inside and outside of the
appliance with a damp cloth and a mild
cleaning agent. Then thoroughly dry the
inside and outside.
2 Clean the drip tray and grille in warm
soapy water. Then dry them thoroughly.
3 After each use, rinse the tap pipe on the
keg and the extension pipe with running
water.
4 When fitting a new keg, use a new
extension pipe or clean the extension
pipe thoroughly in warm soapy water.
Then rinse the extension pipe with
running water and let it dry completely.
You can order new extension pipes
through our service address.
Safety
General
• Read and follow the instructions and
warnings on the keg before you place
it in the appliance.
• Read these instructions carefully and
keep them in a safe place.
• Use this appliance only as described
in these instructions.
• Use this appliance only for domestic
purposes.
• The use of this appliance by children
or persons with a physical, sensory,
mental or motor limitation or persons
who lack the necessary knowledge
and experience may result in a
dangerous situation. Persons
responsible for the safety of these
people should give explicit
instructions or supervise the use of
the appliance.
• Keep the appliance out of the reach of
children and persons who are not able
to handle it properly.
• Have repairs carried out by a qualified
service technician. Never try to repair
the appliance yourself.
• Use only accessories that are
recommended by the supplier. The
use of any other accessories can
result in damage to the appliance and
create a hazard for the user.
8
Beer Tap & Cooler Article 282990
Heat and electricity
• Before using the appliance, check
whether the mains supply voltage
matches the voltage indicated on the
type plate of the appliance.
Page 14

• If you use an extension lead make
sure that it is earthed, has earthed
plugs, and is connected to an earthed
wall socket. Always use an extension
lead with a diameter suitable for the
appliance's maximum current
(Ampere) and power rating (Watt).
• Always unwind the extension lead
completely.
• Always remove the plug from the wall
socket or the 12 V DC plug from the
lighter socket when you are no longer
using the appliance.
• When you remove the plug from the
wall socket or the 12 V DC plug from
the lighter socket, pull on the plug and
not on the cable.
• Never pull the connecting cable to
move the appliance.
• Check regularly whether the appliance
cable is still intact. Do not use the
appliance if a cable shows signs of
damage. Have a damaged cable
replaced by a qualified service
technician.
• Ensure that the appliance, the cable
and the plug do not come into contact
with heat sources, such as a cooking
plate or an open fire.
• Ensure that the appliance, the cable
and the plug do not come into contact
with water.
• The appliance must be able to
dissipate its heat to avoid a risk of fire.
Therefore ensure that there is
sufficient clearance around the
appliance and that it cannot come into
contact with flammable materials. The
appliance may not be covered.
During use
• For optimum performance please use
the appliance at ambient temperatures
between 10°C and 30°C. When used in
higher ambient temperatures, the
internal cooling temperatures may
also rise. Keep the appliance in a cool
or shaded area.
• Place the appliance on a firm and level
surface, at a location where it cannot
fall.
• Do not allow the cable to hang over
the edge of a kitchen surface, a work
surface or a table.
• Ensure that the cable is fully
unwound.
• Ensure that your hands are dry before
you touch the appliance, the cable or
the plug.
• Never use the appliance in damp
areas.
• Remove the plug from the wall socket
or the 12 V DC plug from the lighter
socket if there is a malfunction during
use, if you are going to clean the
appliance, fit or remove an accessory,
or are finished using it.
• Never immerse the appliance, the
cable or the plug in water or any other
fluid.
• Do not touch the appliance if it has
fallen into water. Immediately remove
the plug from the wall socket or the
12 V DC plug from the lighter socket.
Do not use the appliance any more.
• Clean the appliance thoroughly after
use (see the section ‘Cleaning and
maintenance’).
• Store an opened keg at the right
temperature by leaving it in the
appliance. Ensure that the appliance
always has a power supply. If you are
not going to use the appliance for an
extended period of time, remove the
opened keg from the appliance and
place it in the refrigerator. After
opening, the keg stays fresh for 30
days.
• Always check that the use-by date on
the keg has not expired before placing
the keg in the appliance.
Beer Tap & Cooler Article 282990
9
Page 15
• Do not use damaged kegs in the
appliance as this can lead to damage
to the appliance. Always take a
damaged keg back to the shop where
you bought it.
• Unopened kegs stay good the longest
when they are kept at a constant
temperature. The cooler you keep the
keg, the better.
The Environment
Dispose of packaging materials such as
plastic and boxes in the appropriate
containers.
If you want to dispose of the appliance
while it still works properly or can be
repaired simply, ensure that the appliance
is recycled.
Safety
U.K. WIRING INSTRUCTIONS
The wires in the mains lead are
coloured in accordance with the
following code:
•BLUE NEUTRAL
•BROWN LIVE
As the colours of the wire in the mains
lead of this appliance may not
correspond with the colour markings
identifying the terminals on your plug,
proceed as follows:
• The wire which is coloured BLUE must
be connected to the terminal which is
marked with the letter N or coloured
black.
• The wire which is coloured BROWN
must be connected to the terminal
which is marked with the letter L or
coloured red.
WARNING: ON NO ACCOUNT SHOULD
EITHER THE LIVE OR NEUTRAL WIRES
BE CONNECTED TO THE EARTH
TERMINAL
An the end of its life you must have the
appliance processed in a responsible
manner so that the appliance or parts of it
can be reused. Do not dispose of the
appliance with unsorted refuse, but hand it
in at the retailer's or at a recognised
collection point. Contact your local
authority for information about available
disposal and collection systems.
Applicable European guideline:
• 2002/95/EC
• 2002/96/EC
10
Beer Tap & Cooler Article 282990
Page 16
Généralités
Votre Princess Beer Tap & Cooler vous
permettra de servir vous-même une
excellente bière pression. À la maison,
mais aussi au jardin, lors du barbecue, les
soirs de fête. Les parois isolées de
l'appareil maintiennent la bière au frais
pendant des heures, sans réfrigération
électrique. Le Princess Beer Tap & Cooler
peut être utilisé avec les fûts pression de
5 litres, comme par exemple les fûts
Heineken, etc.
Votre Princess Beer Tap & Cooler vous
servira non seulement pour la bière, mais
aussi pour garder au frais pendant
longtemps des bouteilles de vin ou des
canettes de bière ou autres boissons. C'est
un appareil nomade !
La qualité et les performances de ce Beer
Tap & Cooler associé au fût 5 litres
Heineken relèvent entièrement de
Princess. La responsabilité liée à
l'utilisation de ce fût n'incombe en aucune
manière au brasseur.
Fonctionnement et
utilisation
Voir la figure D-1.
Les composants de l'appareil sont :
1 Corps de l'appareil
2 Couvercle avec poignée
3 Bouchon pour le couvercle
4 Unité de tirage
5 Poignée de tirage
6 Rallonge (5x)
7 Collecteur de gouttes avec grille
8 Cordon 12V CC
9 Cordon CA avec fiche
Voir la figure C-1.
10 Branchement CA
11 Branchement 12V CC
12 Témoin lumineux marche/arrêt
13 Sélecteur de tension d'alimentation
Avant la première utilisation
1 Enlevez entièrement l'emballage.
2 Nettoyez l'appareil et tous les
accessoires (voir ‘Entretien et
nettoyage’).
Tirer la bière
Placement du fût pression
Voir les figures A-1 à A-3 et la figure C-1.
• L'appareil convient uniquement pour
tirer de la bière pression de fûts
pression de 5 litres.
• Lisez toujours bien les instructions et
avertissements sur le fût pression
avant de le placer dans l'appareil, et
respectez-les.
• Le fût pression doit être réfrigéré
avant que vous ne le placiez dans
l'appareil.
• Vérifiez toujours que la date limite de
consommation du fût pression n'est
pas passée, tant lors de l'achat que
lorsque vous le placez dans l'appareil.
• Avant d'utiliser l'appareil, vérifiez que
la tension d'alimentation du réseau
correspond à la tension indiquée sur
la plaquette de l'appareil.
1 Placez le support de poignée de tirage
vert sur le fût pression.
2 Retirez le tube gris du branchement de
fût vert et remplacez ce tube par le
tuyau de rallonge du Beer Tap & Cooler.
3 Placez le branchement de fût (ainsi que
le tuyau de rallonge) dans le support de
poignée de tirage vert. Veillez à ce que
Beer Tap & Cooler Article 282990
11
Page 17

le support de poignée de tirage vert soit
complètement replié vers l'arrière.
4 Posez l'unité de tirage sur le fût
pression. Veillez à ce que la poignée de
tirage verte soit positionnée à la
verticale sur le fût et qu'elle passe à
travers l'ouverture de l'unité de tirage.
Appuyez sur l'unité de tirage jusqu'à ce
que vous entendiez un déclic indiquant
qu'elle est correctement fixée au fût.
5 Enfoncez ensuite le tuyau de rallonge
pour le fixer au-dessous de l'unité de
tirage.
6 Enlevez le couvercle de l'appareil.
7 Placez le fût pression, avec l'unité de
tirage, à l'intérieur de l'appareil.
8 Placez le couvercle sur l'appareil.
9 Placez la grille sur le collecteur de
gouttes.
10 Placez le collecteur de gouttes contre
l'appareil. Le collecteur de gouttes se
colle contre l'appareil au moyen de
deux aimants.
11 Réglez le sélecteur de tension
d'alimentation sur la position désirée :
CA ou 12V CC.
• Si vous souhaitez brancher l'appareil
chez vous sur une prise de courant,
utilisez du CA.
• Si vous souhaitez brancher l'appareil sur
une prise d'allume-cigare (utilisation en
voiture, caravane, etc.), utilisez du
12V CC.
12 Branchez le cordon approprié, CA ou
12V CC, sur le branchement qui lui est
destiné sur l'appareil.
13 Branchez la fiche du cordon CA sur
une prise secteur ou branchez la fiche
du cordon 12V CC sur la prise allume-
cigare.
Le témoin lumineux s'allume, indiquant
que l'appareil est en marche.
Tirer la bière
Voir la figure A-4.
1 Rincez un verre à l'eau claire froide.
2 Tenez le verre légèrement incliné, sous
l'extrémité du robinet de tirage.
3 Ouvrez le robinet ; vous tirez à vous
d'un mouvement vif et franc la poignée
de tirage de l'unité.
4 Refermez le robinet ; vous repoussez à
la verticale la poignée de tirage sur
l'unité d'un mouvement vif, au moment
où la bière atteint le rebord du verre
toujours tenu incliné.
5 Posez le verre sur la grille du collecteur
de gouttes.
6 Passez la spatule pour égaliser le col
de mousse au niveau du bord du verre.
7 Laissez l'appareil en marche si vous
désirez garder le fût pression bien frais
pendant une durée prolongée.
Réfrigération
Voir les figures B-1 et C-1.
Le Princess Beer Tap & Cooler est utile
non seulement pour servir la bière à la
pression, mais aussi pour garder au frais
toutes sortes de produits. Capacité
maximale du Princess Beer Tap & Cooler :
• 5 bouteilles de 75 cl chacune, ou
• 17 cannettes de 33 cl chacune, ou
• 12 bouteilles de 33 cl chacune, diamètre
de 50 mm.
• Veillez à ce que les produits soient
déjà réfrigérés au moment où vous les
placez dans l'appareil.
• Avant d'utiliser l'appareil, vérifiez que
la tension d'alimentation du réseau
correspond à la tension indiquée sur
la plaquette de l'appareil.
1 Enlevez le couvercle de l'appareil.
2 Fixez le bouchon pour le couvercle
dans l'ouverture de celui-ci.
3 Réglez le sélecteur de tension
d'alimentation sur la position désirée :
CA ou 12V CC.
• Si vous souhaitez brancher l'appareil
chez vous sur une prise de courant,
utilisez du CA.
12
Beer Tap & Cooler Article 282990
Page 18
• Si vous souhaitez brancher l'appareil sur
une prise d'allume-cigare (utilisation en
voiture, caravane, etc.), utilisez du 12V
CC.
4 Branchez le cordon approprié, CA ou
12V CC, sur le branchement qui lui est
destiné sur l'appareil.
5 Branchez la fiche du cordon CA sur
une prise secteur ou branchez la fiche
du cordon 12V CC sur la prise allumecigare.
Le témoin lumineux s'allume, indiquant
que l'appareil est en marche.
6 Placez dans l'appareil les produits déjà
réfrigérés.
7 Placez le couvercle sur l'appareil.
8 Laissez l'appareil en marche si vous
désirez garder les produits bien frais
pendant une durée prolongée.
Entretien
et nettoyage
• N'utilisez pas de détergents agressifs
ou décapants ni d'objets tranchants
(tels que couteaux ou brosses dures)
pour le nettoyage.
• L'appareil ne doit pas être branché sur
l'alimentation électrique (réseau ou
batterie) pendant que vous le
nettoyez.
• N'immergez jamais l'appareil.
• Ne mettez jamais au lave-vaisselle ni
l'appareil ni les accessoires.
• Ne laissez pas d'humidité pénétrer à
l'intérieur de l'appareil jusqu'aux
composants électriques.
1 Nettoyez l'intérieur et l'extérieur de
l'appareil avec un chiffon humide et un
peu de détergent doux. Séchez bien à
l'intérieur et à l'extérieur.
2 Nettoyez le collecteur de gouttes et la
grille à l'eau chaude additionnée d'un
peu de détergent pour la vaisselle.
Séchez-les ensuite avec soin.
3 Après chaque utilisation, rincez le tube
verseur du fût pression et le tuyau de
rallonge à l'eau courante.
4 Lorsque vous placez un fût pression
neuf, prenez une rallonge propre ou
nettoyez la précédente avec soin, à
l'eau chaude additionnée d'un peu de
détergent pour la vaisselle. Rincez bien
le tuyau de rallonge et séchez comme il
faut.
Vous commandez des rallonges
supplémentaires auprès du service
après-vente.
Sécurité
Généralités
• Lisez toujours bien les instructions et
avertissements sur le fût pression
avant de le placer dans l'appareil, et
respectez-les.
• Lisez soigneusement le mode
d’emploi et conservez-le
précieusement.
• Utilisez cet appareil uniquement
suivant les instructions décrites dans
le mode d'emploi.
• L'appareil est destiné uniquement à
l'utilisation domestique.
• Si l'appareil est utilisé par des enfants,
ou par des personnes ayant un
handicap physique, sensoriel, mental
ou moteur, ou par des personnes
inexpérimentées, ceci peut entraîner
un danger. Les responsables de la
sécurité de telles personnes doivent
donner des instructions claires et
suffisantes et/ou surveiller l'utilisation
de l'appareil.
• Tenez l'appareil hors de la portée des
enfants ou des personnes incapables
de l'utiliser correctement.
Beer Tap & Cooler Article 282990
13
Page 19

• Faites effectuer les réparations par un
technicien qualifié. Ne tentez jamais
de réparer vous-même l'appareil.
• Utilisez uniquement des accessoires
que recommande le fabricant de
l'appareil. L'utilisation d'autres
accessoires peut endommager
l'appareil, ce qui peut entraîner un
danger pour l'utilisateur.
Électricité et chaleur
• Avant d'utiliser l'appareil, vérifiez que
la tension d'alimentation du réseau
correspond à la tension indiquée sur
la plaquette de l'appareil.
• Si vous utilisez une rallonge, vérifiez
qu'elle est mise à la terre, que ses
fiches sont également mises à la terre,
qu'elle est branchée sur une prise
réseau mise à la terre. Utilisez
toujours une rallonge dont diamètre
est suffisant pour le courant maximal
de l'appareil (en Ampères) et pour la
puissance de l'appareil (en Watt).
• Déroulez toujours entièrement la
rallonge.
• Débranchez toujours les fiches
lorsque vous n'utilisez pas l'appareil.
• Lorsque vous débranchez une fiche,
saisissez la fiche elle-même; ne tirez
pas sur le cordon.
• Ne tirez jamais sur le cordon
d'alimentation pour déplacer
l'appareil.
• Vérifiez régulièrement que le cordon
de l'appareil est intact. N'utilisez pas
l'appareil si vous constatez que le
cordon est endommagé. Faites
remplacer le cordon endommagé par
un technicien qualifié.
• Assurez-vous que ni l'appareil, ni le
cordon, ni la fiche n'entre en contact
avec une source de chaleur telle
qu'une plaque électrique chaude ou
une flamme.
• Assurez-vous que ni l'appareil, ni le
cordon, ni la fiche n'entre en contact
avec de l'eau.
• L'appareil doit pouvoir évacuer sa
chaleur, sinon il y risque d'incendie.
Laissez donc suffisamment d'espace
autour de l'appareil et évitez tout
contact avec des matériaux
inflammables. L'appareil ne doit
jamais être recouvert.
Pendant l'utilisation
• Utilisez cet appareil uniquement par
une température ambiante de 10°C à
30°C.
• N'exposez jamais l'appareil ni le fût
pression à la pleine lumière directe du
soleil, ni à des températures
supérieures à 30°C.
• Installez l'appareil sur une surface
plane et stable, à un endroit où il ne
risque pas de tomber.
• Ne laissez pas le cordon pendre pardessus le bord du plan de travail ou de
la table.
• Veillez à ce que le cordon soit
entièrement déroulé.
• Assurez-vous que vos mains sont
sèches avant de toucher l'appareil, le
cordon ou la fiche.
• N'utilisez jamais l'appareil dans une
pièce humide.
• Éteignez l'appareil et débranchez la
fiche en cas de problème durant
l'utilisation, pour le nettoyage, le
montage ou le démontage d'un
accessoire, et dès que vous avez fini
de l'utiliser.
• N'immergez jamais l'appareil, le
cordon ni la fiche dans l'eau ou tout
autre liquide.
• Si l'appareil est tombé à l'eau, ne le
rattrapez pas. Débranchez
immédiatement la fiche. Cessez
d'utiliser l'appareil.
14
Beer Tap & Cooler Article 282990
Page 20

• Nettoyez soigneusement l'appareil
après l'utilisation (voir ‘ Nettoyage et
entretien’).
• Vous conserverez un fût pression
entamé à la bonne température en le
laissant dans l'appareil. L'appareil doit
alors être alimenté en courant. Si vous
cessez d'utiliser l'appareil pour une
période prolongée, sortez toujours le
fût pression entamé et conservez-le
au réfrigérateur. Une fois le fût
pression ouvert, la bière reste
consommable pendant 30 jours.
• Vérifiez toujours que la date limite de
consommation du fût pression n'est
pas passée, tant lors de l'achat que
lorsque vous le placez dans l'appareil.
• N'utilisez jamais un fût pression
endommagé dans cet appareil : cela
causer des dommages au niveau de
l'appareil. Toujours rapporter un fût
pression endommagé au magasin où
vous l'avez acheté.
• Les fûts pression non ouverts se
conservent le mieux à une
température constante. Plus le fût
pression est au frais, meilleure sera la
conservation.
centre de collecte agréé. Pour plus
d'informations sur les possibilités de
retraitement, contactez les autorités
communales.
Directive européenne en vigueur :
• 2002/95/EC
• 2002/96/EC
Environnement
Jetez le matériel d'emballage, tel que le
plastique et les boîtes, dans les
conteneurs prévus à cet effet.
Si vous désirez vous débarrasser de
l'appareil alors qu'il fonctionne encore bien,
ou est facilement réparable, ne le mettez
pas au rebut mais recyclez-le.
Lorsque l'appareil ne peut plus servir, il
doit être retraité, de façon à pouvoir être
recyclé au moins partiellement. Ne le
mettez pas aux ordures ménagères, mais
portez-le chez le vendeur ou dans un
Beer Tap & Cooler Article 282990
15
Page 21
Allgemein
Mit diesem formschönen Princess Beer
Tap & Cooler können Sie selbst das
leckerste Bier zapfen. Zuhause, aber auch
im Garten beim Grillen oder bei einer
Feier. Die isolierten Wände des Geräts
sorgen nämlich dafür, dass das Bier
stundenlang kalt bleibt und zwar ohne
Strom. Der Princess Beer Tap & Cooler
eignet sich für 5 Liter-Zapffässer, unter
anderem auch für das Zapffass von
Heineken.
Außer zum Bierzapfen können Sie den
Princess Beer Tap & Cooler auch
beispielsweise zum Kühlen von
Weinflaschen oder Bierdosen verwenden
und um Erfrischungsgetränke lange kühl
zu halten. Praktisch für unterwegs.
Die Qualität und das Leistungsvermögen
dieses Beer Tap & Cooler in Kombination
mit dem 5 L-Zapffass von Heineken fallen
komplett unter die Verantwortung von
Princess. Es ergibt sich hierbei keinerlei
Haftung seitens der Brauerei.
Funktion und
Bedienung
Siehe Abbildung D-1.
Das Gerät besteht aus den folgenden
Teilen:
1 Gehäuse
2 Deckel mit Griff
3 Verschlussblock
4 Zapfeinheit
5 Zapfgriff
6 Verlängerungsschlauch (5 x)
7 Tropfbehälter mit Rost
8 12 V DC-Kabel
9 AC-Kabel mit Stecker
Siehe Abbildung C-1.
10 AC-Anschluss
11 12 V DC-Anschluss
12 Kontrolllampe ein/aus
13 Wahlschalter Stromspannung
Vor der ersten Verwendung
1 Entfernen Sie die gesamte Verpackung.
2 Reinigen Sie das Gerät und alle
Zubehörteile ‘Wartung und Reinigung’).
Bier zapfen
Zapffass aufstellen
Siehe Abbildung A-1 bis A-3 und
Abbildung C-1.
• Die Zapffunktion des Geräts eignet
sich nur für 5 Liter-Zapffässer.
• Lesen und befolgen Sie immer die
Anweisungen und Warnhinweise auf
dem Zapffass, bevor Sie das Fass in
das Gerät stellen.
• Sorgen Sie dafür, dass das Zapffass
gekühlt ist, bevor Sie es in das Gerät
stellen.
• Überprüfen Sie beim Kauf immer, ob
das Haltbarkeitsdatum des Zapffasses
noch nicht abgelaufen ist, bevor Sie
das Fass in das Gerät stellen.
• Bevor Sie das Gerät benutzen,
überprüfen Sie bitte, ob die
Netzspannung mit der auf dem
Typenschild des Geräts angegebenen
Spannung übereinstimmt.
1 Bringen Sie den grünen Zapfgriffhalter
auf dem Zapffass an.
2 Ziehen Sie den grauen Schlauch vom
grünen Fassanschluss ab und ersetzen
Sie diesen durch den Verlängerungsschlauch des Beer Tap & Coolers.
16
Beer Tap & Cooler Article 282990
Page 22

3 Bringen Sie den Fassanschluss
(einschl. Verlängerungsschlauch) im
grünen Zapfgriffhalter an. Sorgen Sie
dabei dafür, dass der grüne Zapfgriff
ganz nach hinten geklappt steht.
4 Bringen Sie die Zapfeinheit am Fass
an. Achten Sie darauf, dass sich der
grüne Zapfgriff am Fass in vertikaler
Position befindet und in der Öffnung der
Zapfeinheit steckt. Drücken Sie die
Zapfeinheit an, bis dieses einrastet.
5 Drücken Sie den Verlängerungs-
schlauch an der Unterseite der
Zapfeinheit an.
6 Nehmen Sie den Deckel vom Gerät
herunter.
7 Stellen Sie das Zapffass mit der
Zapfeinheit in das Gerät.
8 Legen Sie den Deckel auf das Gerät.
9 Legen Sie den Rost auf den
Tropfbehälter.
10 Stellen Sie den Tropfbehälter an das
Gerät. Der Tropfbehälter wird mit zwei
Magneten am Gerät festgehalten.
11 Schieben Sie den Wahlschalter für die
Stromspannung auf die gewünschte
Position: AC oder 12 V DC.
• Verwenden Sie Wechselstrom, wenn
Sie das Gerät an die Netzspannung im
Haus anschließen.
• Verwenden Sie 12 V Gleichstrom, wenn
Sie das Gerät zum Beispiel an den
Zigarettenanzünder im Auto oder
Wohnwagen anschließen.
12 Schließen Sie das AC-Kabel oder das
12 V DC-Kabel an dem dafür
vorgesehenen Anschluss am Gerät an.
13 Stecken Sie den Stecker des AC-
Kabels in die Steckdose oder stecken
Sie den Anschlussstecker des 12 V DC-
Kabels in die Zigaretten-
anzünderbuchse.
Die Kontrolllampe beginnt zu leuchten
und zeigt an, dass das Gerät einge-
schaltet ist.
Zapfen
Siehe Abbildung A-4.
1 Spülen Sie ein Glas mit sauberem,
kalten Wasser aus.
2 Halten Sie das Glas schräg unter das
Ende des Zapfhahns.
3 Öffnen Sie den Zapfhahn, indem Sie
den Zapfgriff an der Zapfeinheit mit
einer schnellen Bewegung in Ihre
Richtung ziehen.
4 Schließen Sie den Zapfhahn, indem Sie
den Zapfgriff an der Zapfeinheit mit
einer schnellen Bewegung von sich
weg drehen, sobald das Bier den Rand
des schräg gehaltenen Glases erreicht.
5 Stellen Sie das Glas auf den Rost des
Tropfbehälters.
6 Schäumen Sie mit einem Schaumlöffel
das Bier ab, sodass die Oberseite der
Schaumkrone mit dem Rand des
Glases übereinstimmt.
7 Lassen Sie das Gerät in
eingeschaltetem Zustand stehen, wenn
Sie das Zapffass längere Zeit kühl
halten wollen.
Kühlen
Siehe Abbildung B-1 und C-1.
Außer zum Bierzapfen ist der Princess
Beer Tap & Cooler auch besonders zum
Kühlhalten von Produkten geeignet. Der
Princess Beer Tap & Cooler hat ein
Fassungsvermögen für:
• maximal 5 Flaschen mit jeweils einem
Inhalt von 75 cl oder
• 17 Dosen mit jeweils einem Inhalt von
33 cl oder
• 12 Flaschen mit jeweils einem Inhalt von
33 cl und einem Durchmesser von
50 mm.
• Sorgen Sie dafür, dass die Produkte
gekühlt sind, bevor Sie sie in das
Gerät stellen.
• Bevor Sie das Gerät benutzen,
überprüfen Sie bitte, ob die
Netzspannung mit der auf dem
Typenschild des Geräts angegebenen
Spannung übereinstimmt.
Beer Tap & Cooler Article 282990
17
Page 23

1 Nehmen Sie den Deckel vom Gerät
herunter.
2 Schieben Sie den Verschlussblock in
die Öffnung des Deckels.
3 Schieben Sie den Schalter für die
Stromspannung auf die gewünschte
Position: AC oder 12 V DC.
• Verwenden Sie Wechselstrom, wenn
Sie das Gerät an die Netzspannung im
Haus anschließen.
• Verwenden Sie 12 V Gleichstrom, wenn
Sie das Gerät zum Beispiel an den
Zigarettenanzünder im Auto oder
Wohnwagen anschließen.
4 Schließen Sie das AC-Kabel oder das
12 V DC-Kabel an dem dafür
vorgesehenen Anschluss am Gerät an.
5 Stecken Sie den Stecker des AC-
Kabels in die Steckdose oder stecken
Sie den Anschlussstecker des 12 V DCKabels in die Zigarettenanzünderbuchse.
Die Kontrolllampe beginnt zu leuchten
und zeigt an, dass das Gerät eingeschaltet ist.
6 Stellen Sie die vorgekühlten Getränke
in das Gerät.
7 Legen Sie den Deckel auf das Gerät.
8 Lassen Sie das Gerät in
eingeschaltetem Zustand stehen, wenn
Sie die Getränke längere Zeit kühl
aufbewahren wollen.
• Tauchen Sie das Gerät nie unter
Wasser.
• Stellen Sie das Gerät und die
Zubehörteile keinesfalls in einen
Geschirrspüler.
• Achten Sie darauf, dass keine
Feuchtigkeit an die elektrischen Teile
des Geräts gelangt.
1 Reinigen Sie die Innen- und Außenseite
des Geräts mit einem feuchten Tuch
und einem milden Reinigungsmittel.
Trocknen Sie die Innen- und
Außenseite danach gut ab.
2 Reinigen Sie den Tropfbehälter und den
Rost in warmem Spülwasser. Trocknen
Sie sie anschließend gut ab.
3 Spülen Sie nach jeder Benutzung den
Zapfschlauch des Fasses und den
Verlängerungsschlauch mit fließendem
Wasser durch.
4 Bringen Sie bei einem neuen Zapffass
einen neuen Verlängerungsschlauch an
oder reinigen Sie diesen gründlich in
warmem Spülwasser. Spülen Sie den
Verlängerungsschlauch anschließend
mit fließendem Wasser durch und
lassen Sie ihn gut trocknen.
Neue Verlängerungsschläuche können
Sie über die Kundendienstadresse
nachbestellen.
Wartung
und Reinigung
• Verwenden Sie zur Reinigung keine
aggressiven Reinigungs- oder
Scheuermittel oder scharfen
Gegenstände (wie Messer oder harte
Bürsten).
• Sorgen Sie dafür, dass das Gerät bei
der Reinigung nicht an die Steckdose
oder den Zigarettenanzünder
angeschlossen ist.
18
Beer Tap & Cooler Article 282990
Sicherheit
Allgemein
• Lesen und befolgen Sie immer die
Anweisungen und Warnhinweise auf
dem Zapffass, bevor Sie das Fass in
das Gerät stellen.
• Lesen Sie diese Bedienungsanleitung
gut durch und bewahren Sie sie
sorgfältig auf.
Page 24

• Verwenden Sie dieses Gerät nur so
wie in dieser Bedienungsanleitung
beschrieben.
• Verwenden Sie dieses Gerät nur für
den Hausgebrauch.
• Die Verwendung dieses Geräts durch
Kinder oder Personen mit
körperlichen, geistigen oder
motorischen Einschränkungen, mit
Wahrnehmungseinschränkungen oder
mangelnder Kenntnis und Erfahrung
kann zu gefährlichen Situationen
führen. Für diesen Personenkreis
verantwortliche Personen müssen
deutliche Anweisungen erteilen oder
diesen bei der Verwendung des
Geräts beaufsichtigen.
• Halten Sie das Gerät außerhalb der
Reichweite von Kindern oder
Personen, die dieses nicht richtig
bedienen können.
• Lassen Sie Reparaturen von einem
qualifizierten Mechaniker ausführen.
Versuchen Sie nie, das Gerät selbst zu
reparieren.
• Verwenden Sie nur vom Lieferanten
empfohlene Zubehörteile. Bei
Verwendung anderer Zubehörteile
können am Gerät Schäden entstehen.
Dies kann zu einer Gefahr für den
Benutzer führen.
Wärme und Elektrizität
• Bevor Sie das Gerät benutzen,
überprüfen Sie bitte, ob die
Netzspannung mit der auf dem
Typenschild des Geräts angegebenen
Spannung übereinstimmt.
• Stellen Sie bei der Benutzung einer
Verlängerungsschnur sicher, dass
diese geerdet ist, einen geerdeten
Stecker hat und an eine geerdete
Wandsteckdose angeschlossen ist.
Verwenden Sie immer eine
Verlängerungsschnur, die für die
maximale Stromstärke (Ampere) und
die Leistung (Watt) des Geräts
geeignet ist.
• Wickeln Sie die Verlängerungsschnur
immer komplett ab.
• Ziehen Sie immer den Stecker aus der
Steckdose oder den Anschlussstecker
des 12 V DC-Kabels aus dem
Zigaretteanzünder, wenn Sie das
Gerät nicht benutzen.
• Ziehen Sie beim Entfernen des
Steckers aus der Steckdose oder des
Anschlusssteckers des 12 DC-Kabels
aus dem Zigarettenanzünder am
Stecker bzw. am Anschlussstecker
und nicht am Kabel.
• Ziehen Sie nie am Anschlusskabel, um
das Gerät zu verschieben.
• Überprüfen Sie regelmäßig, ob das
Gerätekabel noch intakt ist. Benutzen
Sie das Gerät nicht, wenn das Kabel
beschädigt ist. Lassen Sie ein
beschädigtes Kabel von einem
qualifizierten Wartungsdienst
ersetzen.
• Sorgen Sie dafür, dass das Gerät, das
Kabel und der Stecker/
Anschlussstecker nicht mit
Hitzequellen wie heißen Kochplatten
oder offenem Feuer in Berührung
kommen.
• Sorgen Sie dafür, dass das Gerät, das
Kabel und der Stecker/
Anschlussstecker nicht mit Wasser in
Berührung kommen.
• Um Brandgefahr zu verhindern, muss
das Gerät seine Wärme abgeben
können. Sorgen Sie also dafür, dass
das Gerät ausreichend frei steht und
nicht in Kontakt mit brennbarem
Material kommen kann. Das Gerät darf
nicht abgedeckt werden.
Beer Tap & Cooler Article 282990
19
Page 25

Bei der Benutzung
• Benutzen Sie das Gerät nur bei einer
Temperatur zwischen 10° C und 30° C.
• Setzen Sie das Gerät und das Zapffass
keinesfalls direktem Sonnenlicht oder
Temperaturen von über 30° C aus.
• Stellen Sie das Gerät auf einen
stabilen und ebenen Untergrund und
an eine Stelle, wo es nicht
herunterfallen kann.
• Lassen Sie das Kabel nicht über den
Rand einer Anrichte, Arbeitsplatte
oder eines Tisches hängen.
• Sorgen Sie dafür, dass das Kabel
komplett ausgerollt wird.
• Sorgen Sie dafür, dass Ihre Hände
trocken sind, wenn Sie das Gerät, das
Kabel oder den Stecker/
Anschlussstecker berühren.
• Benutzen Sie das Gerät nie in
feuchten Räumen.
• Ziehen Sie den Stecker aus der
Steckdose oder den Anschlussstecker
des 12 V DC-Kabels aus dem
Zigarettenanzünder, wenn beim
Gebrauch Störungen auftreten, Sie
das Gerät reinigen, Zubehör
anbringen oder entfernen oder das
Gerät nicht mehr benutzen.
• Tauchen Sie das Gerät, das Kabel und
den Stecker/Anschlussstecker nie in
Wasser oder andere Flüssigkeiten.
• Nehmen Sie das Gerät nicht auf, wenn
es ins Wasser gefallen ist. Ziehen Sie
sofort den Stecker aus der Steckdose
oder den Anschlussstecker des 12 V
DC-Kabels aus dem
Zigarettenanzünder. Benutzen Sie das
Gerät nicht mehr.
• Reinigen Sie das Gerät nach der
Benutzung gründlich (siehe Kapitel
‘Reinigung und Wartung’).
• Bewahren Sie ein geöffnetes Zapffass
bei der richtigen Temperatur auf,
indem Sie es im Gerät stehen lassen.
Sorgen Sie dafür, dass das Gerät mit
Strom versorgt wird. Wenn Sie das
Gerät längere Zeit nicht benutzen,
dann nehmen Sie immer erst das
geöffnete Zapffass aus dem Gerät
heraus und stellen Sie es in den
Kühlschrank. Nach dem Öffnen des
Zapffasses bleibt das Bier 30 Tage
frisch.
• Überprüfen Sie beim Kauf immer, ob
das Haltbarkeitsdatum des Zapffasses
noch nicht abgelaufen ist, bevor Sie
das Fass in das Gerät stellen.
• Verwenden Sie keine beschädigten
Zapffässer im Gerät, da dies zu
Schäden am Gerät führen kann.
Bringen Sie ein beschädigtes Zapffass
immer in das Geschäft zurück, in dem
Sie es gekauft haben.
• Ungeöffnete Zapffässer halten sich
am längsten, wenn sie bei
gleichbleibender Temperatur
aufbewahrt werden. Je kühler Sie das
Zapffass aufbewahren, desto besser.
Umwelt
Werfen Sie Verpackungsmaterial wie
Kunststoff und Kartons in die dafür
vorgesehenen Container.
Wollen Sie das Gerät entsorgen, obwohl
es noch richtig funktioniert und problemlos
repariert werden kann, dann sorgen Sie für
eine Wiederverwendung des Geräts.
Am Ende der Nutzungsdauer müssen Sie
das Gerät auf verantwortungsvolle Weise
aufbereiten lassen, sodass das Gerät und
dessen Teile wiederverwendet werden
können. Stellen Sie das Gerät nicht zum
unsortierten Abfall, sondern bringen Sie es
zum Händler oder zu einem anerkannten
Sammelpunkt. Setzen Sie sich mit Ihrer
Stadt in Verbindung, um Informationen
20
Beer Tap & Cooler Article 282990
Page 26

über die verfügbaren Abgabe- und
Sammelsysteme zu erhalten.
Geltende europäische Richtlinie:
• 2002/95/EC
• 2002/96/EC
Beer Tap & Cooler Article 282990
21
Page 27

7 Bandeja de goteo con rejilla
8 Cable de 12V CC
9 Cable de CA con enchufe
Generalidades
Con este hermoso dispensador y enfriador
de cerveza Beer Tap & Cooler de Princess
usted servirá la más deliciosa cerveza.
Ideal para tener en casa o en el jardín
mientras disfruta de una barbacoa o de
una fiesta. Las paredes aisladas del
aparato mantienen fría la cerveza durante
horas sin tener que recurrir a la
electricidad. El dispensador y enfriador
Beer Tap & Cooler de Princess es apto
para barriles de 5 litros, entre ellos el barril
de cerveza de Heineken.
Además de usar el dispensador y enfriador
Beer Tap & Cooler de Princes como
dispensador de cerveza, puede usarlo
también, por ejemplo, para enfriar botellas
de vino, latas de cerveza y refrescos. Es
muy útil también para llevar de paseo.
La calidad y las prestaciones del Beer Tap
& Cooler, en combinación con el barril de
cerveza Heineken de 5 litros, son
responsabilidad abstoluta de Princess. La
empresa cervecera no tiene ninguna
responsabilidad al respecto.
Funcionamiento y
manejo
Véase la figura D-1.
El aparato está compuesto por las
siguientes partes:
1Carcasa
2 Tapa con empuñadura
3 Cuña
4 Carcasa del aparato
5 Palanca del dispensador
6 Tubo de extensión (5 unid.)
Véase la figura C-1.
10 Conexión de CA
11 Conexión de 12V CC
12 Indicador luminoso de encendido/
apagado
13 Botón selector del voltaje de
alimentación
Antes del primer uso
1 Retire el aparato del embalaje.
2 Limpie el aparato y todos sus
accesorios (véase la sección
‘Mantenimiento y limpieza’).
Servir una cerveza
Colocación del barril
Véase las figuras A-1 hasta A-3 y la figura
C-1.
• La función de dispensador del aparato
es apta únicamente para barriles de
5 litros.
• Lea y siga siempre las instrucciones y
recomendaciones que vienen en el
barril antes de colocarlo en el aparato.
• Asegúrese de que el barril está frío
antes de colocarlo al aparato.
• Verifique siempre, al comprar el barril
o al colocarlo en el aparato, que la
fecha de vencimiento no haya
caducado.
• Antes de usar el aparato, verifique que
el voltaje de la red corresponda con el
voltaje indicado en la placa.
1 Coloque el soporte de la palanca del
dispensador, de color verde, en el
barril.
2 Retire el tubo gris de la conexión verde
del dispensador y sustitúyalo por el
22
Beer Tap & Cooler Article 282990
Page 28

tubo de extensión del dispensador y
enfriador de cerveza Beer Tap &
Cooler.
3 Coloque la conexión del barril (incluido
el tubo de extensión) en el soporte de
la palanca del dispensador, de color
verde. Al hacerlo, asegúrese de que la
palanca del dispensador, de color
verde, está levantada completamente
hacia atrás.
4 Acople la unidad dispensadora al barril.
Asegúrese de que la palanca
dispensadora de color verde se
encuentra en posición vertical en el
dispensador y que sobresale a través
del orificio de la unidad dispensadora.
Empuje la unidad dispensadora hasta
que quede fija en el barril.
5 Acople el tubo de extensión a la parte
inferior de la unidad dispensadora.
6 Retire la tapa del aparato.
7 Coloque el barril con la unidad
dispensadora en el aparato.
8 Coloque la tapa en el aparato.
9 Coloque la rejilla en la bandeja de
goteo.
10 Coloque la bandeja de goteo en el
aparato. La bandeja de goteo se fija al
aparato mediante dos imanes.
11 Coloque el selector de voltaje de
alimentación en la posición deseada:
CA o 12V CC.
• Use CA si conecta el aparato a la red
eléctrica en el hogar.
• Use 12V CC si conecta el aparato al
encendedor de cigarrillos del automóvil
o de la caravana.
12 Inserte el cable de CA o el cable de
12V CC en la conexión correspondiente
en el aparato.
13 Introduzca el enchufe del cable de CA
en la toma de alimentación o el
dispositivo de conexión del cable de
12V CC en el contacto del encendedor
del auto, por ejemplo.
El testigo indicador se enciende para
indicar que el aparato está encendido.
Servir una cerveza
Véase la figura A-4.
1 Enjuague un vaso con agua fría y
limpia.
2 Sostenga el vaso en posición inclinada
justo debajo del extremo del grifo
dispensador.
3 Abra el grifo tirando de la palanca de la
unidad dispensadora hacia usted con
un movimiento rápido.
4 Cierre el grifo tirando de la palanca de
la unidad dispensadora en dirección
contraria una vez la cerveza llegue al
borde del vaso que sostiene en
posición inclinada.
5 Coloque el vaso sobre la rejilla de la
bandeja de goteo.
6 Pase la paleta sobre el vaso de manera
que la parte superior de la corona de
espuma quede a ras del vaso.
7 Deje encendido el aparato si desea
mantener frío el barril por largo tiempo.
Enfriador
Véase las figuras B-1 y C-1.
Además de servir como dispensador de
cerveza, el enfriador Beer Tap & Cooler de
Princess es especialmente idóneo para
mantener frescos otros productos. El
enfriador Beer Tap & Cooler de Princess
tiene capacidad para:
• máximo 5 botellas de 75 cl cada una, o
• 17 latas de 33 cl cada una, o
• 12 botellas de 33 cl y un diámetro de
50 mm cada una.
• Asegúrese de que los productos están
fríos antes de meterlos en el aparato.
• Antes de usar el aparato, verifique que
el voltaje de la red corresponda con el
voltaje indicado en la placa.
1 Retire la tapa del aparato.
2 Coloque la cuña en la abertura de la
tapa.
Beer Tap & Cooler Article 282990
23
Page 29

3 Coloque el selector de voltaje de
alimentación en la posición deseada:
CA o 12V CC.
• Use CA si conecta el aparato a la red
eléctrica en el hogar.
• Use 12V CC si conecta el aparato al
encendedor de cigarrillos del automóvil
o de la caravana.
4 Inserte el cable de CA o el cable de
12V CC en la conexión correspondiente
en el aparato.
5 Introduzca el enchufe del cable de CA
en la toma de alimentación o el
dispositivo de conexión del cable de
12V CC en el contacto del encendedor
del auto, por ejemplo.
El testigo indicador se enciende para
indicar que el aparato está encendido.
6 Coloque los productos enfriados
previamente en el aparato.
7 Coloque la tapa en el aparato.
8 Deje encendido el aparato si desea
mantener fríos los productos por largo
tiempo.
Mantenimiento
y limpieza
• No use limpiadores abrasivos o
agresivos, ni objetos afilados (como
cuchillos o cepillos de cerda dura)
para limpiar el aparato.
• Asegúrese de que el aparato no está
conectado a la toma de alimentación
eléctrica o a la conexión del
encendedor cuando vaya a limpiarlo.
• No sumerja nunca el aparato en agua.
• Nunca debe colocar el aparato ni los
accesorios en el lavaplatos eléctrico.
• Evite que la humedad penetre a las
partes eléctricas del aparato.
1 Limpie el interior y el exterior del
aparato con un paño húmedo y un
detergente suave. Seque, a
continuación, muy bien el interior y el
exterior del aparato.
2 Lave la bandeja de goteo y la rejilla con
agua caliente y jabón. A continuación,
séquelos bien.
3 Después de cada uso, enjuague el tubo
dispensador y el tubo de extensión con
agua corriente del grifo.
4 Use para cada nuevo barril un nuevo
tubo de extensión o lávelo muy bien
con agua caliente y jabón. Enjuague el
tubo de extensión seguidamente con
agua corriente del grifo y déjelo secar
bien.
A través del departamento de servicio
puede usted ordenar nuevos tubos de
extensión.
Seguridad
Generalidades
• Lea y siga siempre las instrucciones y
recomendaciones que vienen en el
barril antes de colocarlo en el aparato.
• Lea las instrucciones de uso con
detenimiento y guárdelas
cuidadosamente.
• Utilice este aparato únicamente en la
forma que se describe en las
instrucciones.
• Use este aparato únicamente para
fines domésticos.
• El uso de este aparato por niños o
personas con impedimentos físicos,
sensoriales, mentales o motrices, así
como sin conocimientos y
experiencia, puede ocasionar
situaciones peligrosas. Aquellos
responsables de la seguridad de tales
personas deben impartir
instrucciones claras o vigilar el uso
del aparato.
24
Beer Tap & Cooler Article 282990
Page 30

• Manténgalo fuera del alcance de los
niños o de personas que no sepan
utilizarlo en la forma correcta.
• Haga reparar el aparato únicamente
por personal cualificado. No intente
nunca repararlo usted mismo.
• Utilice sólo los accesorios
recomendados por el proveedor El
uso de otros accesorios diferentes
puede ocasionar daños al aparato y
poner en peligro al usuario.
Electricidad y fuentes de calor
• Antes de usar el aparato, verifique que
el voltaje de la red corresponda con el
voltaje indicado en la placa.
• Si usa un cable de extensión,
asegúrese de que tanto el cable como
el enchufe y la toma de alimentación a
la que va a conectarse tienen polo a
tierra. Use siempre un cable de
extensión que tenga el diámetro
adecuado según la corriente máxima
(amperaje) y la potencia de salida
(vataje) del aparato.
• Desenrolle siempre en su totalidad el
cable de extensión.
• Retire siempre el enchufe de la toma
de alimentación eléctrica o el
dispositivo de conexión del cable de
12V CC del contacto del encendedor
cuando no vaya a usar el aparato.
• Cuando retire el enchufe de la toma de
alimentación eléctrica o el dispositivo
de conexión del cable de 12V CC del
contacto del encendedor asegúrese
de tirar del enchufe o del dispositivo
de conexión y no del cable.
• No tire nunca del cable de
alimentación para desplazar el
aparato.
• Verifique regularmente que el cable
del aparato esté en buenas
condiciones. No use el aparato si el
cable está averiado. Haga sustituir el
cable deteriorado por un técnico de
servicio cualificado.
• Asegúrese de que ni el aparato, ni el
cable, ni el enchufe/dispositivo de
conexión están en contacto con
fuentes de calor, por ejemplo, con una
placa caliente de la estufa o con fuego
abierto.
• Asegúrese de que ni el aparato, ni el
cable, ni el enchufe/dispositivo de
conexión están en contacto con el
agua.
• El aparato debe poder tener la
posibilidad de deshacerse del calor
para evitar peligro de incendio.
Asegúrese entonces de que esté lo
suficientemente libre y que no haga
contacto con materiales inflamables.
No se debe cubrir el aparato.
Durante el uso
• Use el aparato únicamente a una
temperatura entre 10°C y 30°C.
• No exponga el aparato ni el barril a la
luz directa del sol o a temperaturas
superiores a los 30°C.
• Coloque el aparato sobre una
superficie plana y estable, en un lugar
donde no pueda caerse.
• No deje que el cable quede colgando
por el borde del fregadero, la encimera
o la mesa.
• Asegúrese de desenrollar
completamente el cable.
• Asegúrese de tener las manos secas
cuando manipule el aparato, el cable o
el enchufe/dispositivo de conexión.
• No use el aparato en lugares
húmedos.
• Retire el enchufe de la toma de
alimentación o el dispositivo de
conexión del cable de 12V CC del
contacto del encendedor si se
presentan fallos durante el uso,
cuando quiera limpiar el aparato,
Beer Tap & Cooler Article 282990
25
Page 31

cuando vaya a colocar o a retirar un
accesorio o cuando haya terminado
de usarlo.
• No sumerja nunca el aparato, ni el
cable, ni el enchufe/dispositivo de
conexión en agua ni en ningún otro
líquido.
• No recoja el aparato cuando haya
caído en el agua. Retire
inmediatamente el enchufe de la toma
de alimentación o el dispositivo de
conexión del cable de 12V CC del
contacto del encendedor. No vuelva a
utilizar más el aparato.
• Limpie bien el aparato después de
usarlo (véase el apartado
‘Mantenimiento y limpieza’).
• Si desea conservar un barril abierto a
la temperatura adecuada déjelo entre
el aparato. Asegúrese de que el
aparato disponga de alimentación
eléctrica. Cuando no vaya a usar el
aparato por largo tiempo, retire
siempre el barril abierto y colóquelo
en el frigorífico. Después de abrir un
barril la cerveza se conserva durante
30 días en buen estado.
• Verifique siempre, al comprar el barril
o al colocarlo en el aparato, que la
fecha de vencimiento no haya
caducado.
• No use barriles averiados, esto puede
ocasionar daños al aparato. Devuelva
siempre los barriles averiados a la
tienda donde los adquirió.
• Los barriles que no han sido abiertos
se conservan por más tiempo si se
mantienen a una temperatura
constante. Mientras más frío conserve
el barril, mejor.
Medio ambiente
Tire el material de embalaje, como plástico
y cajas, en los contenedores destinados
para ello.
Si desea desprenderse del aparato
estando todavía en buen estado, o si
puede repararse fácilmente, por favor,
asegúrese de que pueda volver a
utilizarse.
Al final de la vida útil debe hacer procesar
el aparato de forma responsable de
manera que éste o sus partes puedan ser
reutilizadas. No tire el aparato junto con los
residuos domésticos no clasificados; en su
lugar llévelo a la tienda donde lo adquirió o
a un lugar de recolección autorizado.
Póngase en contacto con las autoridades
municipales para solicitar información
acerca de los lugares de recolección
autorizados.
Normativa europea vigente:
• 2002/95/EC
• 2002/96/EC
26
Beer Tap & Cooler Article 282990
Page 32

Introduzione
Con l'ausilio del prodotto Princess Beer
Tap & Cooler, dotato di un design moderno
e accattivante, sarà possibile spillare da
soli la propria birra, gustandone tutta la
sua freschezza: non solo tra le mura di
casa, ma anche in giardino oppure durante
un barbecue o una festa. Le pareti
termoisolanti dell'apparecchio assicurano
infatti il mantenimento della birra alla
giusta temperatura, anche in caso di
mancanza di corrente elettrica. Il sistema
Princess Beer Tap & Cooler è adatto
all’uso con gli appositi fusti di birra da
5 litri, come per es. i fusti Heineken.
Oltre che per la spillatura della birra, è
possibile utilizzare il prodotto Princess
Beer Tap & Cooler anche per mantenere
fresche a lungo per es. bottiglie di vino,
lattine di birra o di bibite, ecc.:
l'apparecchio si rivela quindi utilissimo
anche per i viaggi.
4 Blocco di spillatura
5 Dispositivo basculante di spillatura
6 Tubo di raccordo (5x)
7 Cassetto raccogligocce con griglia
8 Cavo 12 V CC
9 Cavo CA con spina
Vedere la figura C-1.
10 Presa CA
11 Presa 12 V CC
12 Spia luminosa di accensione/
spegnimento
13 Selettore tensione di alimentazione
Operazioni preliminari al primo
utilizzo
1 Rimuovere completamente
l'imballaggio.
2 Pulire l'apparecchio e tutti i suoi
componenti e accessori (vedere il
capitolo ‘Manutenzione e pulizia’).
Spillatura della birra
Inserimento del fusto di birra
Vedere le figure da A-1 a A-3 e la figura C-1.
Princess è responsabile per la qualità e
per le prestazioni fornite dal prodotto Beer
Tap & Cooler impiegato assieme ai fusti di
birra Heineken da 5 lt. Il produttore della
birra declina qualsiasi responsabilità per
l’utilizzo del prodotto.
Funzionamento e
utilizzo del prodotto
Vedere la figura D-1.
L’apparecchio è composto dai seguenti
elementi:
1 Corpo dell’apparecchio
2 Coperchio dotato di maniglia
3 Zoccoletto di riempimento
• Per la funzione di spillatura della birra
è necessario utilizzare unicamente gli
appositi fusti da 5 litri.
• Leggere e attenersi sempre
scrupolosamente alle istruzioni e alle
avvertenze riportate sul fusto prima di
inserire il fusto nell'apparecchio.
• Assicurarsi che il fusto sia stato
debitamente raffreddato prima di
collocarlo nell'apparecchio.
• Prima di acquistare e di inserire un
fusto nell'apparecchio, verificare
sempre che la data di scadenza del
prodotto non sia trascorsa.
• Prima di porre in uso l'apparecchio,
verificare che la tensione della rete
elettrica corrisponda a quella indicata
sulla targhetta identificativa
dell'apparecchio.
Beer Tap & Cooler Article 282990
27
Page 33

1 Montare sul fusto di birra l’apposito
supporto verde per la leva basculante di
spillatura.
2 Togliere il tubo grigio del raccordo verde
per il fusto e sostituire questo tubo con
il tubo di raccordo del prodotto Beer Tap
& Cooler.
3 Inserire il raccordo per il fusto (con il
tubo di raccordo) nel supporto verde
per la leva basculante di spillatura. Nel
compiere questa operazione
assicurarsi che il dispositivo basculante
di spillatura verde sia stato portato
completamente in posizione inversa.
4 Montare il blocco di spillatura sul fusto
di birra. Nel compiere questa
operazione assicurarsi che il dispositivo
basculante di spillatura verde da
applicare sul fusto si trovi in posizione
perfettamente verticale e che lo stesso
venga inserito nell'apposita apertura
presente sul blocco di spillatura.
Premere il blocco di spillatura sul fusto
di birra fino a quando esso non viene
bloccato in sede con uno scatto.
5 Inserire il tubo di raccordo e premerlo
nell'apposita sede presente sul lato
inferiore del blocco di spillatura.
6 Rimuovere il coperchio
dall’apparecchio.
7 Inserire nell'apparecchio il fusto di birra,
completo del blocco di spillatura.
8 Ricollocare il coperchio
sull'apparecchio.
9 Inserire la griglia sul cassetto
raccogligocce.
10 Applicare il cassetto raccogligocce
sull’apparecchio. Il cassetto
raccogligocce viene mantenuto in
posizione mediante 2 appositi magneti.
11 Porre il selettore della tensione di
alimentazione sulla posizione
desiderata: CA o 12 V CC.
• Utilizzare il voltaggio CA se si collega
l’apparecchio alla comune rete elettrica
di casa.
• Utilizzare il voltaggio 12 V CC se si collega l’apparecchio alla presa accendisigari dell’automobile o della roulotte.
12 Collegare il cavo CA o il cavo 12 V CC
all'apposita presa presente
sull'apparecchio.
13 Inserire la presa del cavo CA nella
presa di corrente o inserire lo spinotto
di collegamento del cavo 12 V CC nella
presa accendisigari.
La spia luminosa verrà attivata: ciò
indica che l'apparecchio è entrato in
funzione.
Spillatura della birra
Vedere la figura A-4.
1 Sciacquare un bicchiere in acqua
corrente fredda.
2 Mantenere inclinato il bicchiere, appena
al di sotto dell'beccuccio di erogazione
del rubinetto.
3 Aprire il rubinetto di erogazione tirando
verso di sé con un movimento veloce e
deciso l'apposita leva di erogazione
presente sul blocco di spillatura.
4 Quando la birra raggiunge il bordo del
bicchiere (mantenuto ancora in
posizione inclinata), richiudere il
rubinetto di erogazione riportando con
un movimento veloce e deciso
l'apposita leva di erogazione presente
sul blocco di spillatura nella posizione
iniziale.
5 Collocare il bicchiere sulla griglia del
cassetto raccogligocce.
6 Livellare la schiuma della birra con una
spatola in modo tale da pareggiare la
parte superiore della schiuma al bordo
del bicchiere.
7 Mantenere acceso l'apparecchio se si
desidera conservare il fusto di birra alla
giusta temperatura per un certo periodo
di tempo.
Raffreddamento delle bevande
Vedere le figure B-1 e C-1.
Oltre che per la spillatura della birra, il
prodotto Princess Beer Tap & Cooler si
confà particolarmente anche al
28
Beer Tap & Cooler Article 282990
Page 34

raffreddamento di bibite e prodotti. Il
prodotto Princess Beer Tap & Cooler può
contenere:
• max. 5 bottiglie da 75 cl, oppure
• 17 lattine da 33 cl, oppure
• 12 bottiglie da 33 cl e con un diametro di
50 mm.
• Assicurarsi che i prodotti siano stati
precedentemente refrigerati prima di
inserirli nell'apparecchio.
• Prima di porre in uso l'apparecchio,
verificare che la tensione della rete
elettrica corrisponda a quella indicata
sulla targhetta identificativa
dell'apparecchio.
1 Rimuovere il coperchio dall’apparecchio.
2 Inserire lo zoccoletto di riempimento
nell'apposito vano presente nel
coperchio.
3 Porre il selettore della tensione di
alimentazione sulla posizione
desiderata: CA o 12 V CC.
• Utilizzare il voltaggio CA se si collega
l’apparecchio alla comune rete elettrica
di casa.
• Utilizzare il voltaggio 12 V CC se si
collega l’apparecchio alla presa
accendisigari dell’automobile o della
roulotte.
4 Collegare il cavo CA o il cavo 12 V CC
all'apposita presa presente
sull'apparecchio.
5 Inserire la presa del cavo CA nella
presa di corrente o inserire lo spinotto
di collegamento del cavo 12 V CC nella
presa accendisigari.
La spia luminosa verrà attivata: ciò
indica che l'apparecchio è entrato in
funzione.
6 Collocare nell’apparecchio i prodotti
precedentemente refrigerati.
7 Ricollocare il coperchio
sull'apparecchio.
8 Mantenere acceso l'apparecchio se si
desidera conservare i prodotti alla
giusta temperatura per un certo periodo
di tempo.
Manutenzione
e pulizia
• Non utilizzare per la pulizia del
prodotto prodotti aggressivi o
abrasivi, né utensili taglienti (coltelli o
spazzole dure).
• Assicurarsi che l'apparecchio non sia
collegato all'alimentazione di rete o
alla presa accendisigari mentre lo si
pulisce.
• Non immergere mai l'apparecchio in
acqua.
• L’apparecchio e i suoi accessori non
sono adatti al lavaggio in
lavastoviglie.
• Assicurarsi che i componenti elettrici
non entrino in contatto con liquidi.
1 Pulire la parte interna ed esterna
dell’elettrodomestico utilizzando un
panno umido e un detergente neutro.
Asciugare quindi a fondo sia la parte
interna sia la parte esterna.
2 Lavare il cassetto raccogligocce e la
griglia con acqua calda e detergente.
Quindi asciugare a fondo gli elementi.
3 Dopo ogni utilizzo, sciacquare a fondo il
tubo di erogazione del fusto e il tubo di
raccordo in acqua corrente.
4 Quando si inserisce un nuovo fusto di
birra nell'apparecchio, utilizzare sempre
un nuovo tubo di raccordo o lavare a
fondo il tubo di raccordo in acqua calda
e detergente. Sciacquare quindi a
fondo il tubo di raccordo in acqua
corrente e lasciarlo asciugare
completamente.
È possibile ordinare nuovi tubi di
raccordo rivolgendosi al servizio di
assistenza.
Beer Tap & Cooler Article 282990
29
Page 35

Norme di sicurezza
Avvertenze generali
• Leggere e attenersi sempre
scrupolosamente alle istruzioni e alle
avvertenze riportate sul fusto prima di
inserire il fusto nell'apparecchio.
• Leggere attentamente le presenti
istruzioni per l'uso e conservarle con
cura.
• Utilizzare questo apparecchio
unicamente secondo le modalità
descritte nelle presenti istruzioni.
• Questo apparecchio è stato concepito
esclusivamente per l'impiego
domestico.
• L'utilizzo di questo elettrodomestico
da parte di bambini o di persone con
limitazioni fisiche, sensoriali,
cognitive o motorie oppure che non
dispongono di un adeguato livello di
conoscenza o di esperienza, potrebbe
causare l'insorgenza di situazioni di
pericolo. Le persone responsabili
della sicurezza di queste persone
devono impartire loro istruzioni chiare
e univoche in ogni circostanza o
mantenere sempre la sorveglianza
sull'impiego dell'apparecchio.
• Tenere l’apparecchio fuori della
portata dei bambini o di persone che
non sono in grado di maneggiarlo in
modo corretto.
• Fare eseguire le riparazioni da
personale qualificato. Non cercare mai
di riparare da soli l’apparecchio.
• Usare esclusivamente accessori
raccomandati dal fornitore. L’uso di
accessori diversi può causare danni
all’apparecchio, dai quali possono
derivare pericoli per l’utente.
Elettricità e calore
• Prima di porre in uso l'apparecchio,
verificare che la tensione della rete
elettrica corrisponda a quella indicata
sulla targhetta identificativa
dell'apparecchio.
• Se si usa una prolunga, assicurarsi
che sia con messa a terra, abbia spine
con messa a terra e sia collegata ad
una presa a muro con messa a terra.
Usare sempre una prolunga con
diametro adatto alla corrente massima
dell'apparecchio (Ampere) e alla
potenza (Watt).
• Svolgere sempre completamente la
prolunga.
• Estrarre sempre la spina dalla presa
elettrica o lo spinotto di collegamento
del cavo a 12 V CC dalla presa
accendisigari quando l’apparecchio
non è in uso.
• Quando si disinserisce la spina dalla
presa elettrica o lo spinotto di
collegamento del cavo a 12 V CC dalla
presa accendisigari, esercitare la
trazione sempre sulla spina stessa e
non sul cavo.
• Evitare di spostare l’apparecchio
tirandolo per il cavo di alimentazione.
• Verificare regolarmente l'integrità del
cavo dell'apparecchio. Non utilizzare
l'apparecchio qualora uno dei cavi
risultasse danneggiato. Fare sostituire
il cavo danneggiato da un tecnico
qualificato.
• Assicurarsi che l'apparecchio, il cavo,
la spina e/o lo spinotto di
collegamento non entrino mai a
contatto con fonti di calore quali per
es. piani di cottura caldi o fiamme
libere.
• Assicurarsi che l’apparecchio, il cavo
e la spina e/o lo spinotto di
collegamento non entrino mai in
contatto con l’acqua.
30
Beer Tap & Cooler Article 282990
Page 36

• L’apparecchio deve essere in grado di
dissipare il proprio calore onde evitare
eventuali rischi di incendio.
Assicurarsi pertanto che
l’apparecchio sia sufficientemente
libero da ostacoli e non possa venire
in contatto con materiali incendiabili.
L’apparecchio non deve essere mai
coperto.
Precauzioni da osservare
durante l’utilizzo
• Utilizzare l'apparecchio unicamente a
una temperatura ambiente compresa
tra 10 °C e 30 °C.
• Non esporre mai l'apparecchio e il
fusto di birra alla luce diretta del sole
o a temperature al di sopra dei 30 °C.
• Posizionare l'apparecchio su di una
superficie piana e stabile, in un punto
in cui esso non possa cadere o
ribaltarsi.
• Assicurarsi che il cavo elettrico non
penda dal bordo del piano di lavoro, di
mensole o di tavoli.
• Accertarsi che il cavo sia sempre
completamente srotolato.
• Assicurarsi di avere le mani asciutte
prima di toccare l'apparecchio, il cavo,
la spina e/o lo spinotto di
collegamento.
• Non utilizzare l’apparecchio in
ambienti umidi.
• Disinserire la spina dalla presa
elettrica o lo spinotto di collegamento
del cavo da 12 V CC dalla presa
accendisigari se durante l’uso si
verificano malfunzionamenti e quando
si pulisce l’apparecchio, si applica o si
toglie un accessorio o si è terminato
di utilizzare l’apparecchio.
• Non immergere mai l'apparecchio, il
cavo, la spina e/o lo spinotto di
collegamento in acqua o in altri
liquidi.
• Non tentare di recuperare
l’apparecchio qualora esso sia caduto
in acqua. In tal caso, disinserire la
spina dalla presa elettrica o lo
spinotto di collegamento del cavo da
12 V CC dalla presa accendisigari e
non utilizzare più l'apparecchio.
• Dopo l’uso, pulire sempre a fondo
l’apparecchio (vedere la sezione
‘‘Manutenzione e pulizia’’).
• Conservare i fusti di birra aperti
all'interno dell'apparecchio per
mantenerli sempre alla giusta
temperatura. Assicurarsi a tale scopo
che l'apparecchio sia costantemente
alimentato. Qualora si intenda non
utilizzare l'apparecchio per un periodo
prolungato, estrarre il fusto di birra
dall'apparecchio e conservare il fusto
in frigorifero. I fusti di birra possono
essere conservati in frigorifero per un
periodo di 30 giorni dalla loro
apertura.
• Prima di acquistare e di inserire un
fusto nell'apparecchio, verificare
sempre che la data di scadenza del
prodotto non sia trascorsa.
• Assicurarsi di non inserire
nell'apparecchio fusti di birra
danneggiati, poiché ciò potrebbe
causare danni o malfunzionamenti al
sistema di spillatura. Restituire i fusti
danneggiati al negozio presso il quale
sono stati acquistati.
• Per mantenere al meglio la qualità dei
fusti di birra non aperti, si consiglia di
conservarli in ambienti a temperatura
costante. La qualità del prodotto verrà
mantenuta maggiormente qualora il
luogo di conservazione risulti tanto
più fresco.
Beer Tap & Cooler Article 282990
31
Page 37

Tutela dell'ambiente
Gettare il materiale di imballaggio, come
plastica e cartone, negli appositi
contenitori.
Se si desidera smaltire l'apparecchio,
anche se funziona ancora correttamente o
può essere riparato facilmente, assicurarsi
che venga riutilizzato.
Al termine del ciclo della sua vita
economica, l'apparecchio deve essere
smaltito in modo ecologicamente corretto,
in maniera tale che l'apparecchio stesso o i
suoi componenti possano essere
riutilizzati. Non smaltire l'apparecchiatura
deponendola assieme ai rifiuti comuni e
non differenziati: consegnarla invece al
negoziante o presso un punto di raccolta
autorizzato. Contattare la propria
amministrazione comunale per ulteriori
informazioni sulle modalità disponibili di
consegna e di raccolta.
Direttiva europea vigente:
• 2002/95/CE
• 2002/96/CE
32
Beer Tap & Cooler Article 282990
Page 38

Allmänt
Med denna snygga Princess Beer Tap &
Cooler kan du själv tappa den godaste
ölen. Hemma, men även i trädgården när
du grillar eller har fest. Apparatens
isolerade väggar ser nämligen till att ölen
håller sig kall i flera timmar utan ström.
Princess Beer Cooler passar för 5 liters fat
som bl.a. ett Heineken-fat.
Förutom att tappa öl kan du även använda
Princess Beer Tap & Cooler för att kyla till
exempel vinflaskor eller ölburkar och läsk
under en längre tid. Praktiskt om man är på
resande fot.
Kvaliteten och prestationerna av denna
Beer Tap & Cooler tillsammans med ett
Heineken 5L fat faller under Princess
ansvar. Öltillverkaren har inget som helst
ansvar för detta.
Innan användning
1 Avlägsna hela förpackningen.
2 Rengör apparaten och alla tillbehör (se
‘‘Underhåll och rengöring’’).
Tappa öl
Fatmontering
Se figur A-1 t.o.m. A-3 och figur C-1.
• Apparatens utskänkningsfunktion
passar endast 5 liters fat.
• Läs och följ alltid instruktionerna och
varningarna på fatet innan du
monterar det i apparaten.
• Kontrollera att fatet är kylt innan du
monterar det i apparaten.
• Kontrollera alltid att fatets bäst föredatum inte gått ut vid inköp och innan
du monterar det i apparaten.
• Prima di porre in uso l'apparecchio,
verificare che la tensione della rete
elettrica corrisponda a quella indicata
sulla targhetta identificativa
dell'apparecchio.
Drift och användning
Se figur D-1.
Apparaten innehåller följande delar:
1Hölje
2 Lock med handtag
3 Avstängningsblock
4 Fatenhet
5 Fathandtag
6 Förlängningsrör (5x)
7 Droppbricka med galler
8 12 V DC-sladd
9 AC-sladd med kontakt
Se figur C-1.
10 AC-anslutning
11 12 V DC-anslutning
12 Indikatorlampa på/av
13 Funktionsbrytare matarspänning
1 Placera den gröna fathandtagshållaren
på fatet.
2 Avlägsna det grå röret från den gröna
fatanslutningen och byt röret mot
förlängningsröret på Beer Tap & Cooler.
3 Placera fatanslutningen (inkl.
förlängningsröret) i den gröna
fathandtagshållaren. Kontrollera att det
gröna fathandtaget är helt tillbaka.
4 Placera tappenheten på fatet.
Kontrollera att gröna tapphandtaget på
fatet är i vertikalt läge och går in i
tappenhetens öppning. Tryck på
tappenheten tills den klickar fast på
fatet.
5 Tryck fast förlängningsröret på
tappenhetens undersida.
6 Avlägsna locket från apparaten.
7 Placera fatet med tappenheten i
apparaten.
Beer Tap & Cooler Article 282990
33
Page 39

8 Sätt tillbaka locket på apparaten.
9 Placera gallret på droppbrickan.
10 Placera droppbrickan mot apparaten.
Droppbrickan fästs på apparaten med
två magneter.
11 Vrid matarspänningens
funktionsbrytare till önskat läge: AC
eller 12 V DC.
• Använd AC om du ansluter apparten till
elnätet i huset.
• Använd 12 V DC om du ansluter
apparaten till adapterkontakten i t.ex.
bilen eller husvagnen.
12 Anslut AC-sladden eller 12 V DC-
sladden i därför avsett uttag på
apparaten.
13 Sätt AC-sladdens kontakt i vägguttaget
eller 12 V DC-sladdens
anslutningskontakt i till exempel bilens
adapterkontakt.
Indikatorlampan tänds, vilket visar att
apparaten är inkopplad.
Tap pa
Se figur A-4.
1 Spola ett glas med rent, kallt vatten.
2 Håll glaset i vinkel, precis under
tappkranen.
3 Öppna tappkranen genom att föra
tapphandtaget på tappenheten snabbt
mot dig.
4 Stäng tappkranen genom att föra
tapphandtaget på tappenheten snabbt
från dig när ölen når det rena glasets
kant.
5 Ställ glaset på droppskålens galler.
6 Skumma av ölen med en hålslev så att
skummets ovankant överensstämmer
med glaskanten.
7 Låt apparaten vara igång om du vill
hålla fatet kallt under en längre tid.
Kyla
Se figur B-1 och C-1.
Förutom öltappning är Princess Beer Tap &
Cooler mycket lämpad för att hålla
produkter kylda. Princess Beer Tap &
Cooler har kapacitet för:
• max. 5 flaskor à 75 cl, eller
• 17 burkar à 33 cl, eller
• 12 flaskor à 33 cl och en diameter på
50 mm.
• Se till att produkterna är kylda innan
du sätter dem i apparaten.
• Prima di porre in uso l'apparecchio,
verificare che la tensione della rete
elettrica corrisponda a quella indicata
sulla targhetta identificativa
dell'apparecchio.
1 Avlägsna locket från apparaten.
2 Skjut in avstängningsblocket i lockets
öppning.
3 Vrid matarspänningens
funktionsbrytare till önskat läge: AC
eller 12 V DC.
• Använd AC om du ansluter apparten till
elnätet i huset.
• Använd 12 V DC om du ansluter
apparaten till adapterkontakten i t.ex.
bilen eller husvagnen.
4 Anslut AC-sladden eller 12 V DC-
sladden i därför avsett uttag på
apparaten.
5 Sätt AC-sladdens kontakt i vägguttaget
eller 12 V DC-sladdens
anslutningskontakt i till exempel bilens
adapterkontakt.
Indikatorlampan tänds, vilket visar att
apparaten är inkopplad.
6 Sätt de förkylda produkterna i
apparaten.
7 Sätt tillbaka locket på apparaten.
8 Låt apparaten vara igång om du vill
hålla produkterna kylda under en längre
tid.
34
Beer Tap & Cooler Article 282990
Page 40

Underhåll
och rengöring
• Använd inga aggressiva eller slipande
rengöringsmedel eller vassa föremål
(t.ex. knivar eller hårda borstar) vid
rengöring.
• Kontrollera att apparaten inte är
ansluten till vägguttaget eller
adapterkontakten när du rengör den.
• Sänk aldrig ned apparaten i vatten.
• Diska aldrig apparaten och dess
tillbehör i diskmaskinen.
• Kontrollera att fukt inte tränger in vid
apparatens elektriska delar.
1 Rengör apparatens in- och utsida med
en fuktig trasa och ett milt
rengöringsmedel. Torka därefter in- och
utsidan ordentligt.
2 Rengör droppbrickan och gallret i varmt
såpvatten. Torka därefter av dem
ordentligt.
3 Genomspola tappröret på fatet samt
förlängningsröret med rinnande vatten
efter varje användning.
4 Sätt ett nytt förlängningsrör på ett nytt
fat eller rengör förlängningsröret
ordentligt i varmt såpvatten.
Genomspola förlängningsröret därefter
med rinnande vatten och låt det torka
ordentligt.
Nya förlängningsrör kan du
efterbeställa via serviceadressen.
Säkerhet
Allmänt
• Läs och följ alltid instruktionerna och
varningarna på fatet innan du
monterar det i apparaten.
• Läs igenom bruksanvisningen
ordentligt och förvara den på en säker
plats.
• Använd endast denna apparat så som
beskrivs i denna bruksanvisning.
• Apparaten är endast avsedd för
hushållsbruk.
• Användning av denna apparat av barn
eller personer med en fysisk,
sensorisk, mental eller motorisk
begränsning, eller som saknar
kunskap och erfarenhet kan leda till
farliga situationer.Personer som
ansvarar för säkerheten för dessa
personer måste ge tydliga
instruktioner eller övervaka
apparatens användning.
• Håll apparaten utom räckhåll för barn
och personer som inte klarar av den.
• Reparationer ska utföras av en
kvalificerad reparatör. Reparera aldrig
apparaten själv!
• Använd endast de tillbehör som
rekommenderas av tillverkaren. Om
andra tillbehör används kan apparaten
skadas och fara kan uppstå för
användaren.
Värme och elektricitet
• Prima di porre in uso l'apparecchio,
verificare che la tensione della rete
elettrica corrisponda a quella indicata
sulla targhetta identificativa
dell'apparecchio.
• Om en förlängningssladd används, se
till att den är jordad, har jordade
Beer Tap & Cooler Article 282990
35
Page 41

kontakter och ansluts till ett jordat
vägguttag. Använd alltid en
förlängningssladd med en diameter
som är lämplig för apparatens
maximala ström (Ampere) och
märkeffekt (Watt).
• Avlinda alltid förlängningssladden
helt.
• Drag alltid ur kontakten ur vägguttaget
eller 12 V DC-sladdens adapterkontakt
när apparaten inte används.
• Drag alltid i kontakten och inte i själva
sladden när du drar ur kontakten ur
vägguttaget eller 12 V DC-sladdens
adapterkontakt.
• Drag aldrig i sladden för att flytta
apparaten.
• Kontrollera regelbundet att
apparatens sladd är intakt. Använd
inte apparaten om sladden är skadad.
Låt en kvalificerad reparatör byta en
skadad sladd.
• Kontrollera att apparaten, sladden och
kontakten inte kommer i kontakt med
värmekällor, t.ex. en varm kokplatta
eller öppen eld.
• Kontrollera att apparaten, sladden och
kontakten inte kommer i kontakt med
vatten.
• Apparaten måste kunna bli av med
värmen för att förhindra brandfara. Se
därför till att apparaten står fritt och
inte kan komma i kontakt med
brännbara material. Apparaten får inte
täckas över.
Vid användning
• Använd endast apparaten i
temperaturer mellan 10°C och 30°C.
• Ställ aldrig apparaten och fatet i direkt
solljus eller temperaturer som
överstiger 30°C.
• Placera apparaten på ett stadigt och
plant underlag, på en plats där den
inte kan ramla ner.
• Sladden får inte hänga över
diskbänkens, arbetsytans eller
bordets kant.
• Kontrollera att sladden rullats ut helt.
• Kontrollera att dina händer är torra när
du tar i apparaten, sladden eller
kontakten.
• Använd aldrig apparaten i fuktiga
utrymmen.
• Avlägsna kontakten från vägguttaget
eller 12 V DC-sladden från
adapterkontakten om fel uppstår
under användning, om apparaten ska
rengöras, om ett tillbehör ska sättas
på eller avlägsnas eller när du är klar
med den.
• Sänk aldrig apparaten, sladden och
kontakten i vatten eller annan vätska.
• Tag inte upp apparaten om den ramlat
ned i vatten. Drag direkt ur kontakten
ur vägguttaget eller 12 V DC-sladdens
adapterkontakt. Använd aldrig
apparaten mer.
• Rengör apparaten ordentligt efter
användning (se avsnittet ‘Underhåll
och rengöring’).
• Förvara ett öppnat fat i rätt temperatur
genom att låta det sitta kvar i fatet.
Kontrollera att apparaten är påslagen.
Om apparaten inte ska användas
under en längre tid ska öppnade fat
avlägsnas från apparaten och förvaras
i kylskåpet. Ett öppnat fat håller i 30
dagar.
• Kontrollera alltid att fatets bäst föredatum inte gått ut vid inköp och innan
du monterar det i apparaten.
• Använd inga skadade fat i apparaten,
då detta kan leda till skador på
apparaten. Returnera alltid skadade
fat till butiken där det köptes.
• Oöppnade fat håller sig bäst om de
förvaras i en konstant temperatur. Ju
kallare fatet förvaras, desto bättre.
36
Beer Tap & Cooler Article 282990
Page 42

Miljö
Kasta förpackningsmaterial som plast och
kartong i containrar avsedda för detta.
Om apparaten kasseras när den ännu är
funktionsduglig skall den återvinnas.
Apparaten ska kasseras på ett ansvarsfullt
sätt, så att apparaten eller delarna kan
återanvändas. Apparaten får inte kasseras
som osorterat avfall. Lämna in den hos
återförsäljaren eller på en miljöstation. Tag
kontakt med kommunen för information om
tillgängliga inlämnings- och
återvinningssystem.
Gällande EU-direktiv:
• 2002/95/EC
• 2002/96/EC
Beer Tap & Cooler Article 282990
37
Page 43

Generelt
Med denne lækre Princess Beer Tap &
Cooler kan De selv på kort tid tappe den
bedste øl.. Hjemme, men også i haven til
en grill-fest eller fest. De isolerede sider på
apparatet sørger nemlig for, at øllet
forbliver køligt længe, uden brug af strøm.
Princess Beer Tap & Cooler er egnet til
5 liter fade, som bl.a. Heineken fustage.
Udover til tapning af øl, kan De også bruge
Princess Beer Tap & Cooler til f.eks. at
afkøle vinflasker eller øldåser og sodavand
i lang tid. Praktisk på tur.
Kvaliteten og ydelsen af denne Beer Tap &
Cooler i kombination med Heineken 5L
fustage er helt Princess’ ansvar. Bryggeriet
bærer intet ansvar for dette apparat.
Funktion og betjening
Se Figur D-1.
Apparatet er forsynet med følgende:
1 Huset
2 Låg med håndtag
3 Lukkeblok
4 Tappeenhed
5 Tappehåndtag
6 Forlængerstykke (5x)
7 Drypbakke med rist
8 12V jævnstrømsledning
9 vekselstrømsleding med stik
Se Figur C-1.
10 vekselstrømstilslutning
11 12V jævnstrømstilslutning
12 Kontrollampe tænd/sluk
13 Strømstyrkevælger
Før apparatet tages i brug
1 Fjern hele indpakningen.
2 Rengør apparatet og alt tilbehøret (se
‘‘Vedligeholdelse og rengøring’’).
Tappe øl
Sætte fustagen i apparatet
Se Figur A-1 til og med A-3 og Figur C-1.
• Apparatets tappefunktion er kun
beregnet til 5 liters fustager.
• Læs og følg altid instruktionerne og
advarslerne til fustagen, før De sætter
fustagen i apparatet.
• Sørg for at fustagen er kølet ned, før
De sætter den i apparatet.
• Kontroller altid at fustagens
holdbarhedsdato ikke er overskredet
ved købet og før De sætter den i
apparatet.
• Før De tager apparatet I brug, skal De
tjekke om strømstyrken i elnettet
stemmer overens med det, som er
angivet på apparatets typeskilt.
1 Anbring den grønne
tappehåndtagsholderen på fustagen.
2 Tag det grå rør af den grønne
fadtilslutning og udskift det med
forlængerrøret på Beer Tap & Cooler.
3 Anbring fadtilslutningen (inkl.
forlængerrøret) i den grønne
tappehåndtagsholder. Sørg for, at det
grønne tappehåndtag står klappet helt
bagover.
4 Sæt tappeenheden på fustagen. Sørg
for, at det grønne tappehåndtag på
fustagen står ret op og stikker op
igennem åbningen i tappeenhed. Tyk
tappeenheden ind til den klikker fast på
fustagen.
5 Trykforlængerrøret fast på undersiden
af tappeenheden.
6 Tag låget af apparatet.
38
Beer Tap & Cooler Article 282990
Page 44

7 Sæt fustagen med tappeenheden i
apparatet.
8 Sæt låget på apparatet.
9 Sæt risten på drypbakken.
10 Sæt drypbakken ind mod apparatet.
Drypbakken sidder fast på apparatet
med to magneter.
11 Sæt strømstyrkevælgeren i den
ønskede position: vekselstrøm eller
12V jævnstrøm.
• Brug vekselstrømstilslutning, hvis De
tilslutter apparatet til husets lysnet.
• Brug 12V jævnstrømstilslutning, hvis De
tilslutter apparatet til cigarettænderen i
f.eks. bilen eller campingvognen.
12 Sæt -ledningen eller 12V-ledningen i
det dertil bestemte stik på apparatet.
13 Sæt vekselstrømsledningens stik i
stikkontakten eller sæt stikket på 12V-
jævnstrømsledningen i
cigarettænderen.
Indikatorlampen tændes, som et tegn
på at apparatet er tændt.
Tapning
Se Figur. A -4.
1 Skyl et glas med rent, koldt vand.
2 Hold glasset skråt, lige under enden på
tappen.
3 Åbn tappen ved med en hurtig
bevægelse at vippe håndtaget på
tappen hen mod Dem selv.
4 Luk tappen igen med en hurtig
bevægelse ved at vippe håndtaget væk
fra Dem selv, når øllet har nået kanten
på glasset som er holdt skråt under
tappen.
5 Stil glasset på drypbakkens rist.
6 Stryg skummet af øllet med
skumspatelen således at overkanten af
skumlaget er på højde med glassets
rand.
7 Lad apparatet stå tændt hvis De vil
holde fustagen kold i længere tid.
Køle
Se Figur B-1 og C-1.
Ud over tapning af øl er Princess Beer Tap
& Cooler også særdeles velegnet til at
holde andre produkter kølige. Princess
Beer Tap & Cooler har kapacitet til:
• maksimum 5 flasker med et indhold på
75 cl, eller
• 17 dåser med et indhold på 33 cl, eller
• 12 flasker på hver 33 cl og med en
diameter på 50 mm.
• Sørg for at produkterne er kølige, før
De lægger dem i apparatet.
• Før De tager apparatet I brug, skal De
tjekke om strømstyrken i elnettet
stemmer overens med det, som er
angivet på apparatets typeskilt.
1 Tag låget af apparatet.
2 Sæt isolationsblokken i åbningen i
låget.
3 Sæt strømstyrkevælgeren i den
ønskede position: vekselstrøm eller
12V jævnstrøm.
• Brug vakselstrøm, hvis De tilslutter
apparatet til husets lysnet.
• Brug 12V jævnstrømstilslutning, hvis De
tilslutter apparatet til cigarettænderen i
f.eks. bilen eller campingvognen.
4 Sæt -ledningen eller 12V-ledningen i
det dertil bestemte stik på apparatet.
5 Sæt vekselstrømsledningens stik i
stikkontakten eller sæt stikket på 12Vjævnstrømsledningen i
cigarettænderen.
Indikatorlampen tændes, som et tegn
på at apparatet er tændt.
6 Læg de afkølede produkter i apparatet.
7 Sæt låget på apparatet.
8 Lad apparatet stå tændt hvis De vil
opbevare varerne kolde i længere tid.
Beer Tap & Cooler Article 282990
39
Page 45

Vedligeholdelse
og rengøring
• Brug ingen aggressive eller skurende
rengøringsmidler eller skarpe
genstande (som fx knive og hårde
børster) ved rengøringen.
• Sørg for at apparatet ikke er sat til i en
stikkontakt eller cigarettænder, når De
gør det rent.
• Sænk aldrig apparatet ned i vand.
• Læg aldrig apparatet eller tilbehøret i
en opvaskemaskine.
• Pas på at der ikke kommer nogen fugt
ind omkring apparatets elektriske dele.
1 Rengør indersiden og ydersiden af
apparatet med en fugtig klud og et mildt
rengøringsmiddel. Tør derefter
indersiden og ydersiden godt af.
2 Rengør drypbakken og risten i varmt
sæbevand. Tør dem derefter godt af.
3 Skyl tappen og forlængerstykket på
fustagen af i rindende vand efter hver
gang det har været i brug.
4 Sæt et nyt forlængerstykke på en ny
fustage, eller rengør forlængerstykket
grundigt med varmt sæbevand. Skyl
derefter forlængerstykket af med
rindende vand og lad det tørre helt.
De kan bestille et nyt forlængerstykke
på serviceadressen.
Sikkerhed
Generelt
• Læs og følg altid instruktionerne og
advarslerne til fustagen, før De sætter
fustagen i apparatet.
• Læs denne brugsanvisningen
grundigt igennem og opbevar den
omhyggeligt.
• Brug maskinen kun således, som det
er beskrevet i brugsanvisningen.
• Brug kun maskinen til
husholdningsmæssige formål.
• Det kan medføre farlige situationer,
hvis børn eller mennesker med
fysiske, sanselige, mentale eller
motoriske handikap eller med for lidt
kendskab bruger dette apparat.
Personer, som er ansvarlige for disse
personers sikkerhed, skal give
tydelige instruktioner eller føre tilsyn
med brugen af apparatet.
• Hold apparatet udenfor rækkevidde af
børn og andre personer, der ikke kan
omgås det på en god måde.
• Lad reparationer udføre af en
kvalificeret montør. Prøv aldrig selv at
reparere maskinen.
• Brug kun tilbehør, der bliver anbefalet
af leverandøren. Ved brug af andet
tilbehør kan der opstå skader på
maskinen, hvorved der kan opstå fare
for brugeren.
Varme og elektricitet
• Før De tager apparatet I brug, skal De
tjekke om strømstyrken i elnettet
stemmer overens med det, som er
angivet på apparatets typeskilt.
• Hvis du bruger en forlængerledning,
skal den være jordet, dvs. at den både
skal have stik med jordforbindelse og
sættes i en stikkontakt med
jordforbindelse. Brug altid en
forlængerledning med en diameter,
der passer til den maksimale
elektriske strøm (Ampere) og effekt
(Watt), der er angivet for apparatet.
• Fold altid ledningen helt ud.
• Træk altid stikket ud af stikkontakten
eller 12V-ledningen ud af
40
Beer Tap & Cooler Article 282990
Page 46

cigarettænderen når De ikke bruger
apparatet.
• Når De trækker stikket ud af
stikkontakten eller 12V-ledningen ud
af cigarettænderen, skal De altid
trække i stikket og ikke i ledningen.
• Flyt aldrig apparatet ved at trække i
ledningen.
• Kontroller regelmæssigt om
apparatets ledning stadig er intakt.
Brug ikke apparatet hvis ledningen
viser tegn på beskadigelse. Lad en
beskadiget ledning udskifte af en
kvalificeret montør.
• Sørg for at apparatet, ledningen og
stikket ikke kommer i kontakt med
varmekilder, som fx en varm
kogeplade eller åben ild.
• Sørg for at apparatet, ledningen og
stikket ikke kommer i berøring med
vand.
• For at undgå brandfare skal maskinen
kunne komme til at afgive sin varme.
Sørg derfor for at apparatet står
tilstrækkeligt frit, og ikke kan komme i
kontakt med brændbart materiale.
Maskinen må ikke dækkes til.
Under brugen
• Brug kun apparatet ved en temperatur
på mellem 10°C og 30°C.
• Udsæt aldrig apparatet eller fustagen
for direkte sollys eller temperaturer
over 30°C.
• Stil apparatet på en stabil og flad
undergrund på et sted hvor det ikke
kan falde ned.
• Lad ikke ledningen hænge ud over
kanten på bordet.
• Sørg for at ledningen bliver ruller helt
ud.
• Sørg for at Deres hænder er tørre, når
De rører ved apparatet, ledningen eller
stikket.
• Brug aldrig apparatet i fugtige rum.
• Træk stikket ud af stikkontakten eller
12V-ledningen ud af cigarettænderen
hvis De under brugen opdager
funktionsforstyrrelser, og når De
rengør apparatet, placerer eller fjerner
tilbehør eller er færdig med at bruge
apparatet.
• Sænk aldrig apparatet, ledningen og
stikket ned i vand eller nogen anden
væske.
• Saml ikke apparatet op hvis det er
faldet i vand. Træk omgående stikket
ud af stikkontakten eller 12Vledningen ud af cigarettænderen.
Brug aldrig apparatet mere.
• Rengør apparatet grundigt efter
brugen (se kapitlet ‘Vedligeholdelse
og rengøring’)
• Opbevar en åbnet fustage ved den
rette temperatur ved at lade det sidde i
apparatet. Sørg for at strømmen er sat
til på apparatet. Tag altid den åbnede
fustage ud af apparatet og sæt den i
køleskabet, hvis De ikke bruger
apparatet i længere tid. Efter åbning af
fustagen holder øllet sig friskt i 30
dage.
• Kontroller altid at fustagens
holdbarhedsdato ikke er overskredet
ved købet og før De sætter den i
apparatet.
• Brug ingen beskadigede fustager i
apparatet da det kan medføre skadet
på apparatet. Bring altid en
beskadiget fustage tilbage til den
butik, hvor De har købt den.
• Uåbnede fustager holder sig længst,
når de bliver opbevaret ved en
konstant temperatur. Jo køligere De
opbevarer fustagen desto bedre.
Beer Tap & Cooler Article 282990
41
Page 47

Miljø
Smid indpakningsmaterialet som fx plastik
og æsker væk i de dertil bestemte
containere.
Vil De kassere apparatet mens det stadig
fungerer godt eller let kan repareres, sørg
da for at apparatet bliver genbrugt.
Ved afslutningen af apparatets levetid skal
De sørge for, at apparatet bliver behandlet
på forsvarlig måde, således at dele af
apparatet kan genbruges. Sæt aldrig
apparatet ned sammen med restaffald,
men indlever det hos forhandleren eller til
et godkendt indsamlingssted. Tag kontakt
med Deres kommune og få informationer
om de indleverings- indsamlingssteder, der
er til rådighed.
Gældende europæisk retningslinje:
• 2002/95/EØF
• 2002/96/EØF
42
Beer Tap & Cooler Article 282990
Page 48

Generelt
Med denne attraktive Princess Beer Tap &
Cooler kan du tappe det mest
velsmakende ølet selv. Hjemme, eller i
hagen ved en grillfest. Den isolerte veggen
i kjøleren sørger for at ølet holder seg kaldt
i timevis, også uten strøm. Princess Beer
Tap & Cooler er velegnet for 5 liters fat,
som for eksempel Heineken-fatet.
I tillegg til å tappe øl, kan du også bruke
Princess Beer Tap & Cooler for å holde
vinflasker og bokser med øl og
mineralvann kjølig. Praktisk hvis du er på
veien.
Kvalitet og ytelse for denne Beer Tap &
Cooler kombinert med Heinekens 5 l fat er
utelukkende Princess’ ansvar. Bryggeriet
har ikke noe ansvar for dette.
Før første gangs bruk
1 Fjern all forpakning.
2 Rengjør apparatet og alt tilbehøret (se
‘Vedlikehold og rengjøring’).
Tappe øl
Plassér fatet
Se figurine A-1 til A-3 og figure C-1.
• Apparatets tappefunksjon er bare
egnet for 5- litersfat.
• Les og følg instruksjonen og
advarslene på fatet før du plasserer
det i apparatet.
• Sørg for at fatet er kaldt før du
plasserer det i apparatet.
• Kontroller alltid at fatet ikke har gått ut
på dato før du plasserer det i
apparatet.
• Før apparatet tas i bruk må du sjekke
om nettspenningen stemmer overens
med den spenningen som er angitt på
apparatets typeskilt.
Bruk
Se figur D-1.
Utstyret består av følgende deler:
1 Apparatet
2 Lokk med håndtak
3Segl
4 Tappe-enhet
5 Tappekran
6 Forlengelsesrør (5x)
7 Dryppebrett med grill
8 12 V likestrømsledning
9 vekselstrømsledning med støpsel
Se figur C-1.
10 vekselstrømkobling
11 12 V likestrømkobling
12 På/av indikatorlys
13 Spenningsvelger
1 Plasser den grønne tappekranholderen
på fatet.
2 Ta av det grå røret fra den grønne
fattilkoblingen og erstatt dette røret med
utvidelsesrøret fra Beer Tap & Cooler.
3 Plasser fat-forbindelsen (inkludert
forlengelsesrøret) i den grønne
tappekranholderen. Sørg for at den
grønne tappekranen er bøyd helt
bakover.
4 Plassér tappeenheten på fatet. Sørg for
at det grønne tappehåndtaket på fatet
står vertikalt og stikker ut gjennom
åpningen i tappeenheten. Trykk på
tappeenheten til den klikker på plass i
fatet.
5 Skyv deretter forlengelsesrøret fast inn
på undersiden av tappeenheten.
6 Ta av lokket på apparatet.
7 Plassér fatet med tappeenheten i
apparatet.
Beer Tap & Cooler Article 282990
43
Page 49

8 Sett lokket på apparatet.
9 Plasser grillen på dryppebrettet.
10 Plassér dryppebrettet mot apparatet.
Dryppebrettet holdes på plass av to
magneter.
11 Sett spenningsvelgeren i ønsket
posisjon. vekselstrøm eller 12 V
likevstrøm.
• Bruk V vekselstrøm når du kobler
apparatet til strømtilførselen hjemme.
• Bruk 12 V likestrøm når du kobler
apparatet til sigarettenneren i bilen eller
campingvognen.
12 Koble vekselstrømledningen eler 12 V
likestrømsledningen til den tilordnede
tilkoblingen på apparatet.
13 Sett vekselstrømledningen inn i
stikkontakten i veggen, eller sett 12 V
likestrømsledningen inn i
sigarettenneren på bilen.
Indikatorlampen lyser for å indikere at
apparatet er slått på.
Tap ping
Se figur A-4.
1 Skyll et glass i rent, kaldt vann.
2 Hold glasset litt skrått under
tappeutgangen.
3 Åpne kranen ved å vippe
tappehåndtaket raskt mot deg.
4 Steng kranen ved å skyve kranen på
tappeenheten raskt bort fra deg når ølet
når opp til kanten av glasset.
5 Plasser glasset på dryppebrett-grillen..
6 Ta toppen skummet av med en spatel,
slik at skumtoppen er på høyde med
kanten på glasset.
7 La apparatet være slått på dersom du
vil holde fatet kaldt i en lengre periode.
Kjøling
Se figur B-1 og C-1.
I tillegg til å tappe øl, er Princess Beer Tap
& Cooler spesielt egnet til å holde drikke
kaldt. Princess Beer Tap & Cooler har
kapasitet for:
• maksimalt 5 flasker med et innhold på
75 cl hver, eller
• 17 bokser med et innhold på 33 cl hver,
eller
• 12 flasker med et innhold på 33 cl hver
og en diameter på 50 mm.
• Sørg for at produktene er kalde før du
plasserer dem i apparatet.
1 Ta av lokket på apparatet.
2 Skyv forseglingsblokken inn i åpningen
på dekselet.
3 Sett spenningsvelgeren i ønsket
posisjon: vekselstrøm eller 12 V
likestrøm.
• Bruk vekselstrøm når du kobler
apparatet til strømtilførselen hjemme.
• Bruk 12 V likestrøm når du kobler
apparatet til sigarettenneren i bilen eller
campingvognen.
4 Koble vekselstrømledningen eler 12 V
likestrømsledningen til den tilordnede
tilkoblingen på apparatet.
5 Sett vekselstrømledningen inn i
stikkontakten i veggen, eller sett 12 V
likestrømsledningen inn i
sigarettenneren på bilen.
Indikatorlampen lyser for å indikere at
apparatet er slått på.
6 Plasser de kalde produktene i
apparatet.
7 Sett lokket på apparatet.
8 La apparatet være slått på dersom du
vil holde produktene kalde i en lengre
periode.
Vedlikehold
og rengjøring
• Ikke bruk aggressive eller skrurende
rengjøringsmidler eller skarpe
gjenstander (som kniver eller harde
børster) til rengjøringen.
44
Beer Tap & Cooler Article 282990
Page 50

• Sørg for at apparatet ikke er koblet til
strømuttaket eller sigarettenneren når
du rengjør det.
• Apparatet må ikke nedsenkes i vann.
• Sett aldri apparatet eller tilbehøret inn
i en oppvaskmaskin.
• Sørg for at det ikke kommer fuktighet
inn i de elektriske delene på apparatet.
1 Rengjør apparatet innvendig og
utvendig med en fuktig klut og et mildt
vaskemiddel. Tørk deretter apparatet
grundig innvendig og utvendig.
2 Rengjør dryppebrett-grillen i varmt
såpevann. Tørk det deretter grundig.
3 Hver gang apparatet har vært i bruk,
skal tapperøret på fatet samt
forlengelsesrøret skylles under
rennende vann.
4 Bruk et nytt forlengelsesrør når du
bruker et nytt fat, eller rengjør
forlengelsesrøret grundig i varmt
såpevann. Skyll deretter
forlengelsesrøret under rennende vann
og la det tørke fullstendig.
Du kan bestille nye forlengelsesrør
gjennom vår serviceadresse.
Sikkerhet
Generelt
• Les og følg instruksjonen og
advarslene på fatet før du plasserer
det i apparatet.
• Les denne instruksjonen grundig og
oppbevar den på et trygt sted.
• Apparatet må bare brukes slik det er
beskrevet i disse instruksjonene.
• Apparatet må ikke brukes
kommersielt.
• Hvis dette apparatet brukes av barn
eller personer med fysiske, sanselige,
mentale eller motoriske
funksjonshemninger, eller personer
uten kunnskap og erfaring, kan det
føre til farlige situasjoner. De som har
ansvaret for sikkerheten til slike
personer, må gi tydelige instruksjoner
eller holde øye med bruken av
apparatet.
• Hold apparatet unna barn og personer
som ikke er i stand til å håndtere det
ordentlig.
• Reparasjoner må utføres av kvalifisert
servicetekniker. Prøv aldri å reparere
apparatet selv.
• Bruk bare tilbehør som er anbefalt av
leverandøren. Bruk av annet tilbehør
kan føre til skade på apparatet og fare
for brukeren.
Varme og elektrisitet.
• Før apparatet tas i bruk må du sjekke
om nettspenningen stemmer overens
med den spenningen som er angitt på
apparatets typeskilt.
• Hvis du bruker skjøteledning, må du
forsikre deg om at den er jordet, har
jordet støpsel og er koplet til en jordet
stikkontakt. Bruk alltid skjøteledning
med et tverrsnitt som passer til
utstyrets maksimale, elektriske strøm
(ampere) og effekt (watt).
• Rull alltid ut hele skjøteledningen.
• Apparatet skal alltid kobles fra
strømtilførselen når det ikke er i bruk.
• Når du kobler støpselet fra
strømuttaket i veggen eller 12 V
likestrømspluggen fra
lighterutgangen, skal du trekke i
pluggen, og ikke i ledningen.
• Trekk aldri i ledningen for å flytte
apparatet.
• Kontroller jevnlig at apparatledningen
er intakt. Apparatet må ikke brukes
dersom en ledning viser tegn på
skade. En skadet ledning må
Beer Tap & Cooler Article 282990
45
Page 51

repareres av en kvalifisert
servicetekniker.
• Sørg for at apparatet, ledningen og
pluggen ikke kommer i kontakt med
varmekilder som en kokeplate eller
åpen ild.
• Sørg for at apparatet, ledningen og
pluggen ikke kommer i kontakt med
vann.
• Apparatet må være i stand til å spre
sin egen varme for å unngå brannfare.
Sørg derfor for at det er tilstrekkelig
klaring rundt apparatet, og at det ikke
kan komme i kontakt med brennbare
materialer. Apparatet må ikke dekkes
til.
Under bruk
• Apparatet må bare brukes ved en
temperatur mellom 10 °C og 30 °C.
• Apparatet må ikke utsettes for direkte
sollys eller en temperatur som
overstiger 30 °C.
• Plasser apparatet på et jevnt og stødig
underlag, på et sted der det ikke kan
velte.
• La ikke ledningen henge over kanten
av en kjøkkenbenk eller et bord.
• Sørg for at ledningen er rullet helt ut.
• Sørg for at du har tørre hender før du
berører apparatet, ledningen eller
pluggen.
• Bruk ikke apparatet i fuktige
omgivelser.
• Trekk støpselet ut av stikkontakten
eller 12 V likestrømspluggen ut av
lighterutgangen dersom det oppstår
en feilfunksjon under bruk, hvis du
skal rengjøre apparatet, montere eller
avmontere tilbehør eller du er ferdig
med å bruke det.
• Legg aldri apparatet, ledningen eller
stikkontakten i vann eller annen
væske.
• Ta ikke på apparatet dersom det har
falt ned i vann. Trekk støpselet ut av
stikkontakten i veggen eller 12 V
likestrømspluggen ut av
lighterutgangen umiddelbart.
Apparatet må ikke brukes mer.
• Rengjør apparatet nøye etter bruk (se
avsnittet ‘Rengjøring og vedlikehold’).
• Et fat som er åpnet oppbevares ved
korrekt temperatur ved å være koblet
til apparatet. Sørg for at apparatet
alltid har strøm. Dersom du ikke skal
bruke apparatet på lengre tid, må fatet
frakobles fra apparatet og oppbevares
i kjøleskap. Fatet holder seg ferskt i 30
dager etter at det er åpnet.
• Kontroller alltid at fatet ikke har gått ut
på dato før du plasserer det i
apparatet.
• Ikke plasser et ødelagt fat i apparatet,
det kan føre til at apparatet skades.
Bring det ødelagte fatet tilbake til
butikken der du kjøpte det.
• Uåpnede fat holder seg lengst dersom
de oppbevares ved jevn og konstant
temperatur. Jo kjøligere du
oppbevarer fatet, dess bedre er det.
Miljøet
Forpakningsmateriell som plast og esker
må kildesorteres.
Dersom du vil kvitte deg med apparatet
mens det fortsatt fungerer som det skal
eller kan repareres enkelt, må du sørge for
at apparatet blit resyklert.
Når apparatets levetid er over, må det
avfallsbehandles på en ansvarlige åte, slik
at apparatet eller delre av det kan brukes
om igjen. Ikke kvitt deg med apparatet
sammen med restavfallet, men lever det til
en forhandler eller ved et autorisert
46
Beer Tap & Cooler Article 282990
Page 52

avfallshåndteringssted. Kontakt de lokale
myndighetene for informasjon om
tilgjengelige avfallshåndteringssteder.
Gjeldene europeisk retningslinje:
• 2002/95/EF
• 2002/96/EF
Beer Tap & Cooler Article 282990
47
Page 53

12 Virtamerkkivalo
13 Käyttöjännitteen valintakytkin
Yleistä
Tämän tyylikkään Princess Beer Tap &
Coolerin avulla voit laskea itse hanasta
maistuvaa olutta. Voit käyttää sitä kotona,
grillatessa tai juhlissa. Laitteen eristetyt
seinämät varmistavat, että olut pysyy pitkään
kylmänä ilman sähköä. Princess Beer Tap &
Cooler sopii 5 litran oluttynnyreille,
esimerkiksi Heinekenin tynnyreille.
Oluen laskemisen lisäksi Princess Beer
Tap & Coolerilla voi pitää pitkään viileänä
esimerkiksi viinipulloja tai olut- ja
virvoitusjuomatölkkejä. Se sopii mainiosti
matkakäyttöön.
Kun tätä Beer Tap & Cooleria käytetään
Heinekenin 5 litran tynnyrin kanssa,
Princess vastaa täysin yhdistelmän
laadusta ja toimintakyvystä.
Oluenvalmistaja ei ole vastuussa
järjestelmän toiminnasta.
Toiminta ja käyttö
Katso kuva D-1.
Laitteessa on seuraavat osat:
1 Kotelo
2 Kahvallinen kansi
3 Sulkuosa
4 Käyttöyksikkö
5 Käyttökahva
6 Pidennysputki (5x)
7 Ritilällinen valutusalusta
8 12 V DC -johto
9 AC -johto ja pistotulppa
Katso kuva C-1.
10 :n vaihtovirtaliitäntä
11 12 V:n tasavirtaliitäntä
Ennen käyttöä
1 Poista kaikki pakkausmateriaalit.
2 Puhdista laite ja kaikki tarvikkeet (Katso
‘Hoito ja puhdistaminen’).
Oluen laskeminen
Oluttynnyrin sijoittaminen
Katso kuva A-1 – A-3 ja kuva C-1.
• Laitteen oluenlaskutoiminto sopii vain
5 litran tynnyreille.
• Lue tynnyrin ohjeet ja varoitukset aina
ennen tynnyrin sijoittamista
laitteeseen ja noudata niitä.
• Varmista, että tynnyri on jäähdytetty
ennen sen sijoittamista laitteeseen.
• Tarkista aina ostohetkellä ja ennen
tynnyrin laitteeseen sijoittamista, ettei
tynnyrin viimeinen käyttöpäivä ole
mennyt.
• Tarkista ennen laitteen käyttöä, että
syöttövirran jännite vastaa laitteen
tyyppikilvessä ilmoitettua
jännitearvoa.
1 Laita tynnyriin vihreä käyttökahvan
pidike.
2 TIrrota harmaa putki vihreästä
tynnyrikappaleesta ja vaihda putken
tilalle Beer Tap & Coolerin
pidennysputki.
3 Laita tynnyrikappale (pidennysputken
kanssa) vihreään käyttökahvan
pidikkeeseen. Varmista, että vihreä
käyttökahva on käännettynä täysin
taakse.
4 Laita käyttöyksikkö oluttynnyrin päälle.
Varmista, että vihreä käyttökahva on
pystyssä tynnyrin päällä ja että se on
käyttöyksikön aukossa. Työnnä
täyttöyksikköä, kunnes se napsahtaa
kiinni tynnyriin.
48
Beer Tap & Cooler Article 282990
Page 54

5 Paina pidennysputki kiinni
käyttöyksikön alareunaan.
6 Irrota laitteen kansi.
7 Aseta oluttynnyri ja käyttöyksikkö
laitteeseen.
8 Laita laitteen kansi paikalleen.
9 Laita ritilä valutusastiaan.
10 Laita valutusastia laitetta vasten. Se
kiinnittyy laitteeseen kahdella
magneetilla.
11 Työnnä käyttöjännitteen valintakytkin
haluamaasi asentoon: AC tai 12 V DC.
• Käytä AC -liitäntää, jos kkytket laitteen
talon verkkovirtaan.
• Käytä 12V DC -liitäntää, jos liität laitteen
esimerkiksi auton tai asuntovaunun
pistokkeeseen.
12 Liitä :n vaihtovirtajohto tai 12 V:n
tasavirtajohto laitteen pistokkeeseen.
13 Työnnä :n vaihtovirtajohdon pistotulppa
pistorasiaan tai 12 V:n tasavirtajohdon
pistotulppa pistokkeeseen.
Merkkivalon syttyminen ilmaisee, että
laite on päällä.
Oluen laskeminen
Katso kuva A-4.
1 Huuhtele lasi puhtaalla, kylmällä
vedellä.
2 Pidä lasia vinossa hieman oluthanan
alapuolella
3 Avaa oluthana kääntämällä
käyttöyksikön käyttökahva nopeasti
itseesi päin.
4 Sulje oluthana kääntämällä
käyttöyksikön käyttökahva nopeasti
itsestäsi poispäin, kun olutta on vinon
lasin reunaan saakka.
5 Laita lasi valutusastian ritilälle.
6 Pyyhi vaahto vaahtolastalla siten, että
vaahdon yläreuna on täsmälleen lasin
reunan tasalla.
7 Jätä laite päälle, jos haluat pitää
oluttynnyrin pitkään viileänä.
Jäähdyttäminen
Katso kuvat B-1 ja C-1.
Princess Beer Tap & Cooler sopii oluen
laskemisen lisäksi erittäin hyvin tuotteiden
säilyttämiseen viileinä. Princess Beer Tap
& Cooleriin mahtuu:
• enintään 5 pulloa, joiden tilavuus on
75 cl
• 17 pulloa, joiden tilavuus on 33 cl tai
• 12 pulloa, joiden tilavuus on 33 cl ja
halkaisija 50 mm.
• Varmista, että tuotteet on jäähdytetty
ennen niiden laittamista laitteeseen.
• Tarkista ennen laitteen käyttöä, että
syöttövirran jännite vastaa laitteen
tyyppikilvessä ilmoitettua
jännitearvoa.
1 Irrota laitteen kansi.
2 Työnnä peitinosa kannen aukkoon.
3 Työnnä käyttöjännitteen valintakytkin
haluamaasi asentoon: AC tai 12 V DC.
• Käytä AC -liitäntää, jos kytket laitteen
talon verkkovirtaan.
• Käytä 12V DC -liitäntää, jos liität laitteen
esimerkiksi auton tai asuntovaunun
pistokkeeseen.
4 Liitä :n vaihtovirtajohto tai 12 V:n
tasavirtajohto laitteen pistokkeeseen.
5 Työnnä :n vaihtovirtajohdon pistotulppa
pistorasiaan tai 12 V:n tasavirtajohdon
pistotulppa pistokkeeseen.
Merkkivalon syttyminen ilmaisee, että
laite on päällä.
6 Laita valmiiksi jäähdytetyt tuotteet
laitteeseen.
7 Laita laitteen kansi paikalleen.
8 Jätä laite päälle, jos haluat pitää
tuotteet pitkään viileänä.
Hoito
ja puhdistaminen
• Älä käytä puhdistukseen hankaavia tai
voimakkaita puhdistusaineita tai teräviä
esineitä (kuten veitsiä tai kovia harjoja).
Beer Tap & Cooler Article 282990
49
Page 55

• Kun puhdistat laitetta, varmista, että
laite on irrotettu verkkovirrasta tai
tupakansytyttimestä.
• Älä koskaan upota laitetta veteen.
• Älä pese laitetta ja sen tarvikkeita
astianpesukoneessa.
• Varmista, ettei laitteen sähköosiin
pääse kosteutta.
1 Puhdista laitteen sisä- ja ulkopinta
kostealla liinalla ja miedolla
puhdistusaineella ja kuivaa ne hyvin.
Kuivaa sisä- ja ulkopinnat huolellisesti.
2 Puhdista valutusastia ja ritilä
lämpimässä pesuvedessä. Kuivaa ne
sen jälkeen hyvin.
3 Huuhtele oluttynnyrin olutputki ja
pidennysputki aina käytön jälkeen
juoksevassa vedessä.
4 Kun otat käyttöön uuden oluttynnyrin,
käytä uutta pidennysputkea tai pese
pidennysputki huolellisesti lämpimässä
pesuvedessä. Huuhtele pidennysputki
juoksevassa vedessä ja anna sen
kuivua kunnolla.
Voit tilata uusia pidennysputkia huoltoosoitteesta.
Turvallisuus
Yleistä
• Lue tynnyrin ohjeet ja varoitukset aina
ennen tynnyrin sijoittamista
laitteeseen ja noudata niitä.
• Lue käyttöohje huolellisesti ja säilytä
se.
• Käytä tätä laitetta ainoastaan
käyttöohjeessa kuvatulla tavalla.
• Laite on tarkoitettu vain kotikäyttöön.
• Jos laitetta käyttävät lapset tai
henkilöt, joilla on fyysisiä tai motorisia
rajoituksia tai aisti- tai kehitysvamma
tai joilla ei ole riittävästi tietoa ja
kokemusta, seurauksena voi olla
vaaratilanne. Tällaisten henkilöiden
turvallisuudesta vastaavien ihmisten
on annettava käyttäjille selkeät ohjeet
tai valvottava laitteen käyttöä.
• Pidä laite poissa lasten ja sellaisten
henkilöiden ulottuvilta, jotka eivät
kykene käyttämään sitä oikein.
• Teetä korjaukset hyväksytyllä
asentajalla. Älä koskaan korjaa laitetta
itse.
• Käytä vain valmistajan suosittelemia
lisävarusteita. Muiden varusteiden
käyttäminen voi vaurioittaa laitetta ja
aiheuttaa käyttäjälle vaaran.
Lämpö ja sähkö
• Tarkista ennen laitteen käyttöä, että
syöttövirran jännite vastaa laitteen
tyyppikilvessä ilmoitettua
jännitearvoa.
• Jos käytät jatkojohtoa, varmista, että
se on maadoitettu, että siinä on
maadoitetut pistotulpat ja että se on
kytketty maadoitettuun pistorasiaan.
Käytä aina jatkojohtoa, jonka
halkaisija sopii laitteen
enimmäisvirtaan (A) ja tehoon (W).
• Avaa jatkojohto aina kokonaan.
• Irrota pistotulppa pistorasiasta tai
liitintulppa 12 V:n virtalähteestä aina,
kun laitetta ei käytetä.
• Kun irrotat pistotulpan pistorasiasta
tai liitintulpan 12 V:n virtalähteestä,
vedä pistotulpasta tai liitintulpasta, älä
koskaan liitosjohdosta.
• Älä koskaan siirrä laitetta
liitosjohdosta vetämällä.
• Tarkasta säännöllisesti, ettei laitteen
virtajohdossa ole vaurioita. Älä käytä
laitetta, jos johdossa on vaurioita.
Vaihdata vahingoittunut johto
hyväksytyllä asentajalla.
50
Beer Tap & Cooler Article 282990
Page 56

• Varmista, etteivät laite, virtajohto tai
pistotulppa/liitintulppa joudu
kosketuksiin lämmönlähteen, kuten
kuuman keittolevyn tai avotulen
kanssa.
• Varmista, etteivät laite, johto tai
pistotulppa/liitintulppa joudu
kosketuksiin veden kanssa.
• Tulipalon vaaran vuoksi laitteen on
annettava jäähtyä kunnolla. Varmista
siis, että laitteen ympärillä on
riittävästi tilaa ja ettei se pääse
kosketuksiin palavan materiaalin
kanssa. Laitetta ei saa käyttää
peitettynä.
Käytön aikana
• Käytä laitetta vain 10–30 °C
lämpötilassa.
• Älä koskaan altista laitetta ja
oluttynnyriä suoralle auringonvalolle
tai yli 30 °C lämpötilalle.
• Sijoita laite vakaalle ja tasaiselle
alustalle paikkaan, josta se ei pääse
putoamaan.
• Älä jätä johtoa roikkumaan työtason
tai pöydän laidalta.
• Varmista, että johto on avattu
kokonaan.
• Ennen kuin kosketat laitetta, johtoa tai
pistotulppaa/liitintulppaa, varmista,
että kätesi ovat kuivat.
• Älä koskaan käytä laitetta kosteissa
tiloissa.
• Jos havaitset laitteessa
toimintahäiriön, haluat puhdistaa
laitteen, kiinnittää tai poistaa
lisävarusteen tai lopettaa käytön,
sammuta laite ja irrota pistotulppa
pistorasiasta tai liitintulppa 12 V:n
virtalähteestä.
• Älä koskaan upota laitetta, johtoa tai
pistotulppaa/liitintulppaa veteen tai
muuhun nesteeseen.
• Älä tartu veteen pudonneeseen
laitteeseen. Irrota välittömästi
pistotulppa pistorasiasta tai
liitintulppa 12 V:n virtalähteestä. Älä
enää käytä laitetta.
• Puhdista laite huolellisesti aina käytön
jälkeen (katso kohta ‘Hoito ja
puhdistaminen’).
• Säilytä avattu oluttynnyri oikeassa
lämpötilassa jättämällä se laitteeseen.
Varmista, että laite saa virtaa. Jos et
aio käyttää laitetta pitkään aikaan, ota
avattu oluttynnyri pois laitteesta ja
laita tynnyri jääkaappiin. Oluttynnyri
säilyy hyvänä 30 päivää avaamisen
jälkeen.
• Tarkista aina ostohetkellä ja ennen
tynnyrin laitteeseen sijoittamista, ettei
tynnyrin viimeinen käyttöpäivä ole
mennyt.
• Älä käytä laitteessa vaurioituneita
oluttynnyreitä, sillä ne voivat
vaurioittaa laitetta. Palauta
vaurioitunut oluttynnyri myymälään,
josta ostit sen.
• Avaamattomat oluttynnyrit säilyvät
parhaiten tasaisena pysyvässä
lämpötilassa. Ne on parasta säilyttää
viileässä.
Ympäristö
Toimita pakkausmateriaalit, kuten muovi ja
pahvilaatikot, niitä varten tarkoitettuihin
säiliöihin.
Jos et enää halua käyttää laitetta, vaikka
se toimii hyvin tai sen voi korjata helposti,
huolehdi laitteen kierrätyksestä.
Laite on käyttöiän päätyttyä hävitettävä
asianmukaisesti, jotta laite tai sen osat
voidaan käyttää uudelleen. Älä hävitä
laitetta lajittelemattoman jätteen mukana,
Beer Tap & Cooler Article 282990
51
Page 57

vaan toimita se myyjälle tai
keräyspisteeseen. Lisätietoja
keräysjärjestelmästä saa kunnan
jäteviranomaisilta.
Sovellettava EU-direktiivi:
• 2002/95/EY
• 2002/96/EY
52
Beer Tap & Cooler Article 282990
Page 58

Geral
Esta Princess Beer Tap & Cooler graciosa
permite-lhe tirar a cerveja mais saborosa.
Em casa, mas também no quintal durante
um churrasco ou festa. As paredes
isoladas do aparelho fazem com que a
cerveja fique horas fresca, sem que haja
corrente eléctrica. A Princess Beer Tap &
Cooler é apropriada para pequenos barris
de 5 litros como, por exemplo, o barril da
Heineken.
Veja a figura C-1.
10 Ligação de 230 Vca
11 Ligação de 12 Vcc
12 Luz indicadora de ligar/desligar
13 Interruptor selector da voltagem da
rede
Antes da primeira utilização
1 Retire toda a embalagem.
2 Limpe o aparelho e todos os acessórios
(Veja ‘Manutenção e limpeza’).
Tirar cerveja
Além de ser utilizado para tirar cerveja
também pode utilizar a Princess Beer Tap
& Cooler para manter fresco, por exemplo,
uma garrafa de vinho, latas de cerveja ou
refrigerante. Prático para utilizar em
viagem.
A qualidade e prestação desta Beer Tap &
Cooler em combinação com o barril
Heineken 5L são da total responsabilidade
da Princess. Não cabe nenhuma
responsabilidade ao produtor de cerveja.
Funcionamento e
manuseamento
Veja a figura D-1.
O aparelho contém os seguintes
componentes:
1 Corpo do aparelho
2 Tampa com pega
3 Bloco de fecho
4 Corpo do aparelho
5 Manípulo de tirar cerveja
6 Tubo de prolongamento (5x)
7 Colector com grelha
8 Cabo de 12 Vcc
9 Cabo com ficha de 230 Vca
Colocar barril
Veja as figuras A-1 até A-3 e a figura C-1.
• A função de tirar cerveja do aparelho
apenas é apropriada para barris de
5 litros.
• Leia e siga sempre as instruções e os
avisos no barril antes de colocar o
barril no aparelho.
• Tenha o cuidado de ter o barril fresco
antes de o colocar no aparelho.
• Na compra controle sempre se a data
de validade no barril não expirou e
controle também antes de colocar o
barril no aparelho.
• Antes de utilizar o aparelho, verifique
se a voltagem da rede eléctrica
corresponde à voltagem indicada na
chapa de tipo do aparelho.
1 Coloque o suporte do manípulo verde
de tirar cerveja no barril.
2 Tire o tubo cinzento da ligação do barril
verde e substitua este tubo pelo tubo
de prolongamento da Beer Tap &
Cooler.
3 Coloque a ligação do barril (incl. o tubo
de prolongamento) no suporte do
manípulo verde de tirar cerveja.
Quando fizer isto tenha cuidado para
Beer Tap & Cooler Article 282990
53
Page 59

que o manípulo verde de tirar cerveja
esteja completamente virado para trás.
4 Coloque a unidade de tirar cerveja no
barril. Mantenha sempre o manípulo
verde no barril na posição vertical e a
passar pela abertura da unidade de
tirar cerveja. Carregue a unidade de
tirar cerveja até esta fazer clique e ficar
presa no barril.
5 A seguir, para fixar carregue o tubo de
prolongamento no lado inferior da
unidade de tirar cerveja.
6 Remova a tampa do aparelho.
7 Coloque o barril com a unidade de tirar
cerveja no aparelho.
8 Coloque a tampa no aparelho.
9 Coloque a grelha no colector.
10 Coloque o colector contra o aparelho. O
colector fica preso ao aparelho com
dois imãs.
11 Deslize o interruptor selector da
voltagem da rede para a posição
correcta. 230 Vca ou 12 Vcc.
• Use a opção de 230 Vca se o aparelho
ficar ligado à rede eléctrica em casa.
• Use a opção 12 Vcc se ligar o aparelho
à tomada do isqueiro, por exemplo, no
automóvel ou na caravana.
12 Ligue o cabo de ca ou de 12Vcc à
ligação adequada do aparelho.
13 Introduza a ficha do cabo de 230 Vca
na tomada ou introduza a ficha de
ligação do cabo de 12 Vcc na tomada
do isqueiro.
A luz indicadora acende para sinalizar
que o aparelho está activado.
Tirar cerveja
Veja a figura A-4.
1 Enxagúe um copo com água fria e
limpa.
2 Mantenha o copo inclinado por baixo
da saída torneira.
3 Abra a torneira movendo o manípulo da
unidade de tirar cerveja com um
movimento rápido inclinando-o para si.
4 Feche a torneira movendo o manípulo
da unidade de tirar cerveja com um
movimento rápido afastando-o de si
quando a cerveja se aproxima da borda
do copo inclinado.
5 Coloque o copo na grelha do colector.
6 Tire a espuma com a espátula da
espuma de modo que no topo do copo
fique uma gola de espuma nivelada
pela borda do copo.
7 Deixe o aparelho ficar ligado se
pretender manter a cerveja no barril
fresca durante um período mais longo.
Arrefecer
Veja a figura B-1 e C-1.
Além de tirar cerveja, a Princess Beer Tap
& Cooler é especialmente apropriada para
manter os produtos frescos. A Princess
Beer Tap & Cooler tem uma capacidade
para:
• Máximo de 5 garrafas de 75 cl, ou
• 17 latas de 33 cl, ou
• 12 latas de 33 cl e um diâmetro de
50 mm.
• Faça com que os produtos estejam
bem frescos quando os colocar no
aparelho.
• Antes de utilizar o aparelho, verifique
se a voltagem da rede eléctrica
corresponde à voltagem indicada na
chapa de tipo do aparelho.
1 Remova a tampa do aparelho.
2 Deslize o bloco de fecho na abertura da
tampa.
3 Deslize o interruptor da voltagem de
rede para a posição correcta: 230 Vca
ou 12 Vcc.
• Use a opção de 230 Vca se o aparelho
ficar ligado à rede eléctrica em casa.
• Use a opção 12 Vcc se ligar o aparelho
à tomada do isqueiro, por exemplo, no
automóvel ou na caravana.
4 Ligue o cabo de ca ou de 12Vcc à
ligação adequada do aparelho.
5 Introduza a ficha do cabo de 230 Vca
na tomada ou introduza a ficha de
54
Beer Tap & Cooler Article 282990
Page 60

ligação do cabo de 12 Vcc na tomada
do isqueiro.
A luz indicadora acende para sinalizar
que o aparelho está activado.
6 Coloque os produtos previamente
refrescados no aparelho.
7 Coloque a tampa no aparelho.
8 Deixe o aparelho ficar ligado se
pretender manter os produtos frescos
durante um período mais longo.
Manutenção
e limpeza
• Na limpeza não utilize produtos de
limpeza agressivos ou ásperos ou
objectos afiados (como facas ou
escovas duras).
• Quando estivar para efectuar a
limpeza retire a ficha da tomada da
rede eléctrica ou do isqueiro.
• Nunca mergulhe o aparelho em água.
• Nunca coloque o aparelho ou os
acessórios numa máquina de lavar
loiça.
• Tenha atenção para que não entre
humidade para os componentes
eléctricos no interior do aparelho.
1 Limpe o interior e exterior do aparelho
com um pano húmido e um produto de
limpeza suave. A seguir seque bem o
exterior e o interior.
2 Limpe o colector e a grelha com água
quente com detergente. Depois seque-
os bem.
3 Depois de utilizar enxagúe o tubo do
barril no barril e o tubo de
prolongamento com água a correr.
4 Num barril novo coloque um tubo de
prolongamento novo ou limpe o tubo de
prolongamento a fundo com água
quente e detergente. A seguir passe o
tubo de prolongamento por água
corrente e depois seque-o
completamente.
Os tubos de prolongamento novos
podem ser encomendados no local de
assistência.
Segurança
Geral
• Leia e siga sempre as instruções e os
avisos no barril antes de colocar o
barril no aparelho.
• Leia bem estas instruções de uso e
guarde-as cuidadosamente.
• Utilize este aparelho apenas como
descrito nestas instruções de uso.
• Apenas utilize este aparelho para fins
domésticos.
• O uso deste aparelho por crianças ou
pessoas com uma deficiência física,
sensorial, mental ou motriz, ou com
falta de conhecimento e experiência
pode levar a situações perigosas. As
pessoas responsáveis pela segurança
de tais pessoas têm que dar
instruções claras ou supervisionar o
uso do aparelho.
• Mantenha o aparelho fora do alcance
de crianças ou de pessoas que não
sabem lidar bem com o aparelho.
• No caso de reparações, mande
efectuar as reparações a um técnico
qualificado. Nunca tente você próprio
reparar o aparelho.
• Apenas use acessórios aconselhados
pelo fornecedor. A utilização de
outros acessórios pode provocar
danos no aparelho pelo que pode
surgir perigo para o utilizador.
Beer Tap & Cooler Article 282990
55
Page 61

Calor e electricidade
• Antes de utilizar o aparelho, verifique
se a voltagem da rede eléctrica
corresponde à voltagem indicada na
chapa de tipo do aparelho.
• Se utilizar um cabo de prolongamento
certifique-se de que tem ficha com
ligação à terra, e de que é ligado a
uma tomada ligada à terra. Utilize
sempre um cabo de prolongamento
com o diâmetro adequado para a
corrente máxima do aparelho
(Amperes) e para o valor de potência
(Watts).
• Desenrole sempre o cabo de
prolongamento completamente.
• Retire sempre a ficha da tomada da
rede eléctrica ou da tomada de 12 Vcc
quando não utilizar o aparelho.
• Quando tirar a ficha da tomada da
rede eléctrica ou da tomada de 12 Vcc,
puxe pela ficha, não puxe pelo cabo.
• Nunca puxe pelo cabo eléctrico para
deslocar o aparelho.
• Verifique com regularidade se o cabo
do aparelho ainda está intacto. Não
utilize o aparelho se o cabo mostrar
estar danificado. Se o cabo se
danificar mande efectuar a reparação
a um técnico qualificado.
• Tenha atenção para que o aparelho, o
cabo e a ficha da rede/do isqueiro não
toquem em fontes de calor como, por
exemplo, o elemento dum forno
eléctrico ou chamas.
• Tenha cuidado para que o aparelho, o
cabo e a ficha da rede/do isqueiro não
entrem em contacto com água.
• O aparelho tem que conseguir perder
o calor para evitar o perigo de fogo.
Por isso, mantenha o aparelho
suficientemente livre e não o deixe
entrar em contacto com material
inflamável. O aparelho não pode ser
coberto.
Durante a utilização
• Use o aparelho apenas a uma
temperatura entre 10°C e 30°C.
• Não exponha o aparelho e o barril à
luz directa do sol ou a temperaturas
acima dos 30°C.
• Coloque o aparelho numa superfície
plana e estável num local de onde não
possa cair.
• Não deixe o cabo ficar suspenso num
forno, numa bancada ou numa mesa.
• Faça com que o cabo seja
completamente desenrolado.
• Tenha as mãos secas quando tocar no
aparelho, no cabo ou na ficha da rede/
do isqueiro.
• Nunca use o aparelho em áreas
húmidas.
• Retire a ficha da tomada da rede/do
isqueiro de 12V cc, se detectar alguma
anomalia durante a utilização, quando
estiver para iniciar a limpeza do
aparelho, quando aplicar ou tirar um
acessório, ou quando terminar a
utilização.
• Nunca mergulhe o aparelho, o cabo e
a ficha da rede/do isqueiro em água
ou noutro líquido.
• Não pegue no aparelho se este caiu na
água. Tire a ficha da tomada da rede
eléctrica ou da tomada de 12 Vcc
quando não utilizar o aparelho. Não
utilize mais o aparelho.
• Depois da utilização limpe
completamente o aparelho (veja o
capítulo ‘Manutenção e limpeza’).
• Guarde um barril aberto à temperatura
certa mantendo-o no aparelho.
Mantenha o aparelho fornecido de
corrente eléctrica. Se não utilizar o
aparelho durante um período longo,
tire sempre o barril aberto do aparelho
e coloque-o num frigorífico. Depois de
abrir um barril, a cerveja mantém-se
fresca durante 30 dias.
56
Beer Tap & Cooler Article 282990
Page 62

• Na compra controle sempre se a data
de validade no barril não expirou e
controle também antes de colocar o
barril no aparelho.
• Não use barris danificados no
aparelho, porque isto pode provocar
danos no aparelho. Leve sempre um
barril danificado de volta para a loja
onde o comprou.
• Os barris não abertos ficam mais
tempo bons se forem guardados a
uma temperatura constante. Quanto
mais frio guardar o barril, melhor.
Ambiente
Coloque o material de embalagem, como
plástico e caixas, no contentor de lixo
apropriado.
Se pretender desfazer-se do aparelho,
mesmo que este funcione bem ou possa
ser facilmente reparado, então arranje
maneira de este ser reutilizado.
No fim de vida do aparelho desfaça-se do
aparelho de modo responsável, para que
os componentes possam ser reutilizados.
Não coloque o aparelho no lixo doméstico
mas entregue-o na loja ou num ponto de
recolha apropriado. Entre em contacto
com a sua câmara para obter informação
acerca dos sistemas de recolha e de
recepção de lixo.
Directiva Europeia em vigor:
• 2002/95/CE
• 2002/96/CE
Beer Tap & Cooler Article 282990
57
Page 63

īİȞȚțȐ
Ȃİ IJȠ țȠµȥȩ Princess Beer Tap & Cooler
µʌȠȡİȓIJİ Ȟ' ĮʌȠȜĮµȕȐȞİIJİ ʌȐȞIJĮ IJȘȞ
µʌȓȡĮ ıĮȢ ıIJȘȞ ıȦıIJȒ șİȡµȠțȡĮıȓĮ. ǵȤȚ
µȩȞȠ ıIJȠ ıʌȓIJȚ, ĮȜȜȐ țĮȚ ıIJȠȞ țȒʌȠ, ȖȚĮ
ȑȞĮ µʌȐȡµʌİțȚȠȣ Ȓ ʌȐȡIJȚ. ȉȠ µȠȞȦµȑȞȠ
IJȠȓȤȦµĮ IJȠȣ ȥȪțIJȘ įȚĮıijĮȜȓȗİȚ ȩIJȚ Ș µʌȓȡĮ
șĮ ʌĮȡĮµȑȞİȚ țȡȪĮ ȖȚĮ ȫȡİȢ, ĮțȩµȘ
IJȠȞ ĮʌȠıȣȞįȑıİIJİ Įʌȩ IJȠ ȡİȪµĮ. ȉȠ
Princess Beer Tap & Cooler İȓȞĮȚ
țĮIJȐȜȜȘȜȠ ȖȚĮ ȕĮȡİȜȐțȚĮ 5 ȜȓIJȡȦȞ, ȩʌȦȢ
ĮȣIJȐ IJȘȢ µʌȓȡĮȢ Heineken.
ǼțIJȩȢ Įʌȩ IJȘȞ µʌȓȡĮ, µʌȠȡİȓIJİ İʌȓıȘȢ ȞĮ
ȤȡȘıȚµȠʌȠȚİȓIJİ IJȠ Princess Beer Tap &
Cooler ȖȚĮ ȞĮ įȚĮIJȘȡİȓIJİ įȡȠıİȡȑȢ ijȚȐȜİȢ
țȡĮıȚȠȪ țĮȚ țȠȣIJȐțȚĮ µʌȓȡĮȢ/ĮȞĮȥȣțIJȚțȫȞ.
ǹȣIJȩ İȓȞĮȚ ȚįȚĮȓIJİȡĮ ȕȠȜȚțȩ țĮIJȐ IJȚȢ
µİIJĮțȚȞȒıİȚȢ ıĮȢ.
țȚ ĮȞ
8 ȀĮȜȫįȚȠ IJȡȠijȠįȠıȓĮȢ ıȣȞİȤȠȪȢ
ȡİȪµĮIJȠȢ (DC) 12 V
9 ȀĮȜȫįȚȠ IJȡȠijȠįȠıȓĮȢ
İȞĮȜȜĮııȩµİȞȠȣ ȡİȪµĮIJȠȢ (AC) 230 V
ǹȞĮIJȡȑȟIJİ ıIJȘȞ ǼȚțȩȞĮ C-1.
10 ȈȪȞįİıȘ ıİ İȞĮȜȜĮııȩµ
ȡİȪµĮIJȐıȘȢ 230 V
11 ȈȪȞįİıȘ ıİ ıȣȞİȤȑȢ (DC) ȡİȪµĮIJȐıȘȢ
12 V
12 DzȞįİȚȟȘ On/Off (ȜİȚIJȠȣȡȖȓĮȢ)
13 ǻȚĮțȩʌIJȘȢ İʌȚȜȠȖȒȢ IJȐıȘȢ
İȞȠ (AC)
ȆȡȚȞ Įʌȩ IJȘȞ ʌȡȫIJȘ ȤȡȒıȘ
1 ǹijĮȚȡȑıIJİ ȩȜĮ IJĮ ȣȜȚțȐ ıȣıțİȣĮıȓĮȢ
2 ȀĮșĮȡȓıIJİ IJȘȞ ıȣıțİȣȒ țĮȚ ȩȜĮ IJĮ
ĮȟİıȠȣȐȡ IJȘȢ (įİȓIJİ ‘ȈȣȞIJȒȡȘıȘ țĮȚ
țĮșĮȡȚıµȩȢ’).
ȆĮȡȠȤȒ µʌȓȡĮȢ
Ǿ ʌȠȚȩIJȘIJĮ țĮȚ
Tap & Cooler ıİ ıȣȞįȣĮıµȩ µİIJȠ
ȕĮȡİȜȐțȚ Keineken 5 l ĮʌȠIJİȜİȓ İȣșȪȞȘ
ĮʌȠțȜİȚıIJȚțȐ IJȘȢ Princess. Ǿ ȗȣșȠʌȠȚȓĮ
įİȞ ijȑȡİȚ țĮµȓĮ ĮʌȠȜȪIJȦȢ İȣșȪȞȘ ȖȚ
IJȠ șȑµĮ.
Ș ĮʌȩįȠıȘ ĮȣIJȠȪ IJȠȣ Beer
' ĮȣIJȩ
ȁİȚIJȠȣȡȖȓĮ
ǹȞĮIJȡȑȟIJİ ıIJȘȞ ǼȚțȩȞĮ D-1.
Ǿ ıȣıțİȣȒ ĮʌȠIJİȜİȓIJĮȚ Įʌȩ IJĮ ĮțȩȜȠȣșĮ
µȑȡȘ:
1 ȆİȡȓȕȜȘµĮ
2 ȀĮʌȐțȚ µİȜĮȕȒ
3 ǹıijȐȜİȚĮ
4 ȈȪıIJȘµĮʌĮȡȠȤȒȢ
5 ȁĮȕȒ ĮȞȠȓȖµĮIJȠȢ
6 ȈȦȜȒȞĮȢ İʌȑțIJĮıȘȢ (5x)
7 ǻȓıțȠȢ µİ ıȤȐȡĮ ȖȚĮ IJȘȞ ıȣȜȜȠȖȒ
ıIJĮȖȩȞȦȞ
58
Beer Tap & Cooler Article 282990
ȉȠʌȠșİIJȒıIJİ IJȠ ȕĮȡİȜȐțȚ.
ǹȞĮIJȡȑȟIJİ ıIJȚȢ ǼȚțȩȞİȢ A-1 ȑȦȢ A-3 țĮȚ
ıIJȘȞ ǼȚțȩȞĮ C-1.
• ȉȠ ıȪıIJȘµĮ ʌĮȡȠȤȒȢ ĮȣIJȒȢ IJȘȢ
ıȣıțİȣȒȢ İȓȞĮȚ țĮIJȐȜȜȘȜȠ µȩȞȠ ȖȚĮ
ȕĮȡİȜȐțȚĮ 5 ȜȓIJȡȦȞ.
• ǻȚĮȕȐıIJİ țĮȚ ĮțȠȜȠȣșȒıIJİ IJȚȢ ȠįȘȖȓİȢ
țĮȚ ʌȡȠİȚįȠʌȠȚȒıİȚȢ ʌȠȣ
ĮȞĮȖȡȐijȠȞIJĮȚ ıIJȠ ȕĮȡİȜȐțȚ, ʌȡȚȞ IJȠ
IJȠʌȠșİIJȒıİIJİ ıIJȘȞ ıȣıțİȣȒ.
• ǺİȕĮȚȦșİȓIJİ ȩIJȚ IJȠ ȕĮȡİȜȐțȚ ȑȤİȚ
ȥȣȤșİȓ İʌĮȡțȫȢ ʌȡȚȞ IJȠ
IJȠʌȠșİIJȒıİIJİ
• ȃĮ İȜȑȖȤİIJİ ʌȐȞIJĮ IJȘȞ ȘµİȡȠµȘȞȓĮ
ȜȒȟȘȢ, ʌȡȚȞ IJȠʌȠșİIJȒıİIJİ IJȠ ȕĮȡİȜȐțȚ
ıIJȘȞ ıȣıțİȣȒ.
• ȆȡȚȞ ȤȡȘıȚµȠʌȠȚȒıİIJİ IJȘ ıȣıțİȣȒ,
İȜȑȖȟIJİ İȐȞ Ș IJȐıȘ IJȠȣ įȚțIJȪȠȣ
ʌĮȡȠȤȒȢ ȡİȪµĮIJȠȢ IJĮȚȡȚȐȗİȚ µİIJȘȞ
IJȐıȘ ʌȠȣ ĮȞĮijȑȡİIJĮȚ ıIJȘȞ İIJȚțȑIJĮ
IJȪʌȠȣ IJȘȢ ıȣıțİȣȒȢ.
ıIJȘȞ ıȣıțİȣȒ.
Page 64

1 ȉȠʌȠșİIJȒıIJİ IJȠȞ ijȠȡȑĮ IJȘȢ ʌȡȐıȚȞȘȢ
ȜĮȕȒȢ ĮȞȠȓȖµĮIJȠȢ ıIJȠ ȕĮȡİȜȐțȚ.
2 ȅȜȚıșȒıIJİ IJȠȞ ıȦȜȒȞĮ İʌȑțIJĮıȘȢ IJȠȣ
Beer Tap & Cooler ʌȐȞȦ ıIJȠȞ ĮȖȦȖȩ
ʌĮȡȠȤȒȢ ıIJȠ ȕĮȡİȜȐțȚ.
3 ȉȠʌȠșİIJȒıIJİ IJȠ ıȪıIJȘµĮ ıȪȞįİıȘȢ µİ
IJȠ ȕĮȡİȜȐțȚ (ıȣµʌİȡȚȜĮµȕĮȞȠµȑȞȠȣ
IJȠȣ ıȦȜȒȞĮ İʌȑțIJĮıȘȢ) ıIJȠȞ ijȠȡȑĮ
IJȘȢ ʌȡȐıȚȞȘȢ ȜĮȕȒȢ ĮȞȠȓȖµĮIJȠȢ.
ǺİȕĮȚȦșİȓIJİ ȩIJȚ Ș ʌȡȐıȚȞȘ ȜĮȕȒ
ĮȞȠȓȖµĮIJȠȢ İȓȞĮȚ įȚʌȜȦµȑȞȘ ʌȡȠȢ IJĮ
ʌȓıȦ µȑȤȡȚ IJȠ IJȑȜȠȢ IJȘȢ įȚĮįȡȠµȒȢ IJȘȢ.
4 ȉȠʌȠșİIJȒıIJİ IJȠ ıȪıIJȘµĮʌĮȡȠȤȒȢ
ʌȐȞȦ ıIJȠ ȕĮȡİȜȐțȚ. ǺİȕĮȚȦșİȓIJİ ȩIJȚ Ș
ʌȡȐıȚȞȘ ȜĮȕȒ ĮȞȠȓȖµĮIJȠȢ ıIJȠ ȕĮȡİȜȐțȚ
İȓȞĮȚ ıİ țĮIJĮțȩȡȣijȘ șȑıȘ țĮȚ ȩIJȚ
ʌȡȠİȟȑȤİȚ µȑıĮ Įʌȩ IJȠ ȐȞȠȚȖµĮIJȠȣ
ıȣıIJȒµĮIJȠȢ ʌĮȡȠȤȒȢ. ȆȚȑıIJİ IJȠ
ıȪıIJȘµĮʌĮȡȠȤȒȢ µȑȤȡȚ Ȟ' ĮıijĮȜȓıİȚ
ıIJȘ șȑıȘ IJȠȣ ʌȐȞȦ ıIJȠ ȕĮȡİȜȐțȚ µ' ȑȞĮ
țȜȚț.
5 ȆȚȑıIJİ ıIJĮșİȡȐ IJȠȞ ıȦȜȒȞĮ İʌȑțIJĮıȘȢ
ıIJȘȞ țȐIJȦ ʌȜİȣȡȐ IJȠȣ ıȣıIJȒµĮIJȠȢ
ʌĮȡȠȤȒȢ.
6 ǹijĮȚȡȑıIJİ IJȠ țĮʌȐțȚ Įʌȩ IJȘȞ ıȣıțİȣȒ.
7 ȉȠʌȠșİIJȒıIJİ IJȠ ȕĮȡİȜȐțȚ µİIJȠ
ıȪıIJȘµĮʌĮȡȠȤȒȢ µȑıĮ ıIJȘȞ ıȣıțİȣȒ.
8 ȉȠʌȠșİIJȒıIJİ IJȠ țĮʌȐțȚ ıIJȘȞ ıȣıțİȣȒ
9
ȉȠʌȠșİIJȒıIJİ IJȘȞ ıȤȐȡĮ ıIJȠȞ įȓıțȠ
ıȣȜȜȠȖȒȢ ıIJĮȖȩȞȦȞ.
10 ȉȠʌȠșİIJȒıIJİ IJȠȞ įȓıțȠ ıȣȜȜȠȖȒȢ
ıIJĮȖȩȞȦȞ ıIJȘȞ ıȣıțİȣȒ. ȅįȓıțȠȢ
ıȣȜȜȠȖȒȢ ıIJĮȖȩȞȦȞ ıIJȘȡȓȗİIJĮȚ ıIJȘȞ
șȑıȘ IJȠȣ µİįȪȠ µĮȖȞȒIJİȢ.
11 ȉȠʌȠșİIJȒıIJİ IJȠȞ İʌȚȜȠȖȑĮ IJȐıȘȢ ıIJȘȞ
țĮIJȐȜȜȘȜȘ șȑıȘ. 230 V AC
(İȞĮȜȜĮııȩµİȞȠ) Ȓ 12 V DC (ıȣȞİȤȑȢ).
• ǼʌȚȜȑȟIJİ IJȘȞ șȑıȘ ȖȚĮ İȞĮȜȜĮııȩµİȞȠ
ȡİȪµĮ 230 V (AC) ȩIJĮȞ ıȣȞįȑİIJİ IJȘȞ
ıȣıțİȣȒ ıIJȠ
• ǼʌȚȜȑȟIJİ IJȘȞ șȑıȘ ȖȚĮ ıȣȞİȤȑȢ ȡİȪµĮ 12
V (DC) ȩIJĮȞ ıȣȞįȑİIJİ IJȘȞ ıȣıțİȣȒ ıIJȘȞ
ȣʌȠįȠȤȒ ĮȞĮʌIJȒȡĮ İȞȩȢ ĮȣIJȠțȚȞȒIJȠȣ Ȓ
IJȡȠȤȩıʌȚIJȠȣ.
12 ȈȣȞįȑıIJİ IJȠ țĮȜȫįȚȠ ȡİȪµĮIJȠȢ 230 V
AC, ȒIJȠțĮȜȫįȚȠȡİȪµĮIJȠȢ 12 V DC
ıIJȘȞ ĮȞIJȓıIJȠȚȤȘ ȣʌȠįȠȤȒ IJȘȢ
ıȣıțİȣȒȢ.
įȓțIJȣȠ ȡİȪµĮIJȠȢ ıIJȠ ıʌȓIJȚ.
13 ǼȚıȐȖİIJİ IJȠ ijȚȢ IJȠȣ țĮȜȦįȓȠȣ ȡİȪµĮIJȠȢ
230 V AC (İȞĮȜȜĮııȩµİȞȠ)
ʌȡȓȗĮ, Ȓ ıȣȞįȑıIJİ IJȠ țĮȜȫįȚȠ ȡİȪµĮIJȠȢ
12 V DC (ıȣȞİȤȑȢ) ıIJȘȞ ȣʌȠįȠȤȒ
ĮȞĮʌIJȒȡĮ.
Ǿ ȑȞįİȚȟȘ ȜİȚIJȠȣȡȖȓĮȢ ș' ĮȞȐȥİȚ,
ȣʌȠįİȚțȞȪȠȞIJĮȢ ȩIJȚ Ș ıȣıțİȣȒ
ȕȡȓıțİIJĮȚ ıİ ȜİȚIJȠȣȡȖȓĮ.
ȈİȡȕȓȡȚıµĮ
ǹȞĮIJȡȑȟIJİ ıIJȘȞ ǼȚțȩȞĮ A-4.
1 ȄİʌȜȪȞİIJİ ȑȞĮ ʌȠIJȒȡȚ µİ țĮșĮȡȩ, țȡȪȠ
Ȟİȡȩ.
2 ȀȡĮIJȒıIJİ IJȠ ʌȠIJȒȡȚ ȣʌȩ ȖȦȞȓĮ țȐIJȦ
Įʌȩ IJȘȞ țȐȞȠȣȜĮ IJȠȣ ıȣıIJȒµĮIJȠȢ
ʌĮȡȠȤȒȢ
3 ǹȞȠȓȟIJİ IJȘȞ ʌĮȡȠȤȒ ʌȚȑȗȠȞIJĮȢ IJȘȞ ȜĮȕȒ
IJȠȣ ıȣıIJȒµĮIJȠȢ ʌĮȡȠȤȒȢ ʌȡȠȢ IJĮ İıȐȢ
µİ µȓĮ ȖȡȒȖȠȡȘ țȓȞȘıȘ.
4 ȀȜİȓıIJİ IJȘȞ ʌĮȡȠȤȒ ʌȚȑȗȠȞIJĮȢ IJȘȞ ȜĮȕȒ
IJȠȣ ıȣıIJȒµĮIJȠȢ ʌĮȡȠȤȒȢ ʌȡȠȢ IJȘȞ
ĮȞIJȓșİIJȘ țĮIJİȪșȣȞıȘ (µĮțȡȚȐ Įʌȩ İıȐȢ)
µİ µȓĮ ȖȡȒȖȠȡȘ țȓȞȘıȘ, ȩIJĮȞ Ș µʌȓȡĮ
ijIJȐıİȚ ıIJȠ ȤİȓȜȠȢ IJȠȣ țİțȜȚµȑȞȠȣ
ʌȠIJȘȡȚȠȪ.
5 ȉȠʌȠșİIJȒıIJİ IJȠ ʌȠIJȒȡȚ ıIJȘȞ ıȤȐȡĮ IJȠȣ
.
įȓıțȠȣ ıȣȜȜȠȖȒȢ ıIJĮȖȩȞȦȞ.
6 ǹijĮȚȡȑıIJİ IJȠ İʌȐȞȦ µȑȡȠȢ IJȠȣ ĮijȡȠȪ
µİ µȓĮ ıʌȐIJȠȣȜĮ, ȑIJıȚ ȫıIJİ Ș țȠȡȣijȒ
IJȠȣ ĮijȡȠȪ ȞĮ ijIJȐȞİȚ ȑȦȢ IJȠ İʌȐȞȦ
ȐțȡȠ IJȠȣ ʌȠIJȘȡȚȠȪ.
7 ǹijȒıIJİ IJȘȞ ıȣıțİȣȒ ĮȞĮµµȑȞȘ İȐȞ
șȑȜİIJİ ȞĮ įȚĮIJȘȡȒıİIJİ IJȠ ȣʌȩȜȠȚʌȠ
ʌİȡȚİȤȩµİȞȠ țȡȪȠ ȖȚĮ µİȖĮȜȪIJİȡȠ
ȤȡȠȞȚțȩ
.
įȚȐıIJȘµĮ.
ıİ µȓĮ
ȌȪȟȘ
ǹȞĮIJȡȑȟIJİ ıIJȚȢ ǼȚțȩȞİȢ B-1 țĮȚ C-1.
ǼțIJȩȢ Įʌȩ IJȘȞ µʌȓȡĮ, IJȠ Princess Beer
Tap & Cooler µʌȠȡİȓ ȞĮ ȤȡȘıȚµȠʌȠȚİȓIJĮȚ
ȖȚĮ ȞĮ įȚĮIJȘȡİȓ țȡȪĮ țĮȚ ȐȜȜĮ ʌȡȠȧȩȞIJĮ. ȉȠ
Princess Beer Tap & Cooler ȑȤİȚ İʌĮȡțȒ
ȤȦȡȘIJȚțȩIJȘIJĮ ȖȚĮ:
• ȑȦȢ 5 ijȚȐȜİȢ µİʌİȡȚİȤȩµİȞȠ 75 cl
ȑțĮıIJȘ, Ȓ
Beer Tap & Cooler Article 282990
59
Page 65

• 17 țȠȣIJȐțȚĮ µİ ʌİȡȚİȤȩµİȞȠ 33 cl
ȑțĮıIJȠ, Ȓ
• 12 ijȚȐȜİȢ µİ ʌİȡȚİȤȩµİȞȠ 33 cl ȑțĮıIJȘ
țĮȚ įȚȐµİIJȡȠ 50 ȤȚȜ.
• ǺİȕĮȚȦșİȓIJİ ȩIJȚ IJĮ ʌȡȠȧȩȞIJĮ ȑȤȠȣȞ
ȥȣȤșİȓ İʌĮȡțȫȢ ʌȡȚȞ IJĮ
IJȠʌȠșİIJȒıİIJİ ıIJȘȞ ıȣıțİȣȒ.
• ȆȡȚȞ ȤȡȘıȚµȠʌȠȚȒıİIJİ IJȘ ıȣıțİȣȒ,
İȜȑȖȟIJİ İȐȞ Ș IJȐıȘ IJȠȣ įȚțIJȪȠȣ
ʌĮȡȠȤȒȢ ȡİȪµĮIJȠȢ IJĮȚȡȚȐȗİȚ µİIJȘȞ
IJȐıȘ ʌȠȣ ĮȞĮijȑȡİIJĮȚ ıIJȘȞ İIJȚțȑIJĮ
IJȪʌȠȣ IJȘȢ ıȣıțİȣȒȢ.
1 ǹijĮȚȡȑıIJİ IJȠ țĮʌȐțȚ Įʌȩ IJȘȞ ıȣıțİȣȒ.
2 ȅȜȚıșȒıIJİ IJȠ ʌȫµĮ ĮıijȐȜİȚĮȢ ıIJȠ
ȐȞȠȚȖµĮIJȠȣțĮʌĮțȚȠȪ.
3 ȉȠʌȠșİIJȒıIJİ IJȠȞ İʌȚȜȠȖȑĮ IJȐıȘȢ ıIJȘȞ
țĮIJȐȜȜȘȜȘ șȑıȘ: 230 V AC
(İȞĮȜȜĮııȩµİȞȠ) Ȓ 12 V DC (ıȣȞİȤȑȢ).
• ǼʌȚȜȑȟIJİ IJȘȞ șȑıȘ ȖȚĮ İȞĮȜȜĮııȩµİȞȠ
ȡİȪµĮ 230 V (AC) ȩIJĮȞ ıȣȞįȑİIJİ IJȘȞ
ıȣıțİȣȒ ıIJȠ įȓțIJȣȠ ȡİȪµĮIJȠȢ ıIJȠ ıʌȓIJȚ.
• ǼʌȚȜȑȟIJİ IJȘȞ șȑıȘ ȖȚĮ ıȣȞİȤȑȢ ȡİȪµĮ 12
V (DC) ȩIJĮȞ ıȣȞįȑİIJİ IJȘȞ ıȣıțİȣȒ ıIJȘȞ
ȣʌȠįȠȤȒ ĮȞĮʌIJȒȡĮ İȞȩȢ ĮȣIJȠțȚȞȒIJȠȣ Ȓ
IJȡȠȤȩıʌȚIJȠȣ.
4 ȈȣȞįȑıIJİ IJȠ țĮȜȫįȚȠ ȡİȪµĮIJȠȢ 230 V
AC, ȒIJȠțĮȜȫįȚȠȡİȪµĮIJȠȢ 12 V DC
ıIJȘȞ ĮȞIJȓıIJȠȚȤȘ ȣʌȠįȠȤȒ IJȘȢ
ıȣıțİȣȒȢ
5 ǼȚıȐȖİIJİ IJȠ ijȚȢ IJȠȣ țĮȜȦįȓȠȣ ȡİȪµĮIJȠȢ
230 V AC (İȞĮȜȜĮııȩµİȞȠ) ıİ µȓĮ
ʌȡȓȗĮ, Ȓ ıȣȞįȑıIJİ IJȠ
12 V DC (ıȣȞİȤȑȢ) ıIJȘȞ ȣʌȠįȠȤȒ
ĮȞĮʌIJȒȡĮ.
Ǿ ȑȞįİȚȟȘ ȜİȚIJȠȣȡȖȓĮȢ ș' ĮȞȐȥİȚ,
ȣʌȠįİȚțȞȪȠȞIJĮȢ ȩIJȚ Ș ıȣıțİȣȒ
ȕȡȓıțİIJĮȚ ıİ ȜİȚIJȠȣȡȖȓĮ.
6 ȉȠʌȠșİIJȒıIJİ µȑıĮ ıIJȘȞ ıȣıțİȣȒ IJĮ
ʌȡȠȧȩȞIJĮ, IJĮ ȠʌȠȓĮ ʌȡȑʌİȚ ȞĮ İȓȞĮȚ ȒįȘ
țȡȪĮ.
7 ȉȠʌȠșİIJȒıIJİ IJȠ țĮʌȐțȚ ıIJȘȞ ıȣıțİȣȒ.
8 ǹijȒıIJİ IJȘȞ ıȣıțİȣȒ ĮȞĮµµȑȞȘ İȐȞ
șȑȜİIJİ ȞĮ įȚĮIJȘȡȒıİIJİ IJĮ ʌȡȠȧȩȞIJĮ
țȡȪĮ ȖȚĮ µİȖĮȜȪIJİȡȠ ȤȡȠȞȚțȩ įȚȐıIJȘµĮ.
.
țĮȜȫįȚȠ ȡİȪµĮIJȠȢ
ȈȣȞIJȒȡȘıȘ
țĮȚ țĮșĮȡȚıµȩȢ
• ȂȘȞ ȤȡȘıȚµȠʌȠȚİȓIJİ ʌȠIJȑ įȚĮȕȡȦIJȚțȐ
Ȓ “ıțȜȘȡȐ” țĮșĮȡȚıIJȚțȐ, Ȓ ĮȚȤµȘȡȐ
ĮȞIJȚțİȓµİȞĮ (ȩʌȦȢ ʌ.Ȥ. µĮȤĮȓȡȚĮ Ȓ
ıțȜȘȡȑȢ ȕȠȪȡIJıİȢ) ȖȚĮ IJȠȞ țĮșĮȡȚıµȩ.
• ȆȡȚȞ țĮșĮȡȓıİIJİ IJȘȞ ıȣıțİȣȒ,
ȕİȕĮȚȦșİȓIJİ ȩIJȚ įİȞ İȓȞĮȚ ıȣȞįİįݵȑȞȘ
ıİ µȓĮ ʌȡȓȗĮ ȡİȪµĮIJȠȢ Ȓ ıIJȘȞ
ȣʌȠįȠȤȒ ĮȞĮʌIJȒȡĮ IJȠȣ ĮȣIJȠțȚȞȒIJȠȣ.
• ȂȘȞ ȕȣșȓȗİIJİ ʌȠIJȑ IJȘȞ
Ȟİȡȩ.
• ȂȘȞ IJȠʌȠșİIJİȓIJİ ʌȠIJȑ IJȘȞ ıȣıțİȣȒ Ȓ
IJĮ İȟĮȡIJȒµĮIJĮ/ĮȟİıȠȣȐȡ IJȘȢ ıİ
ʌȜȣȞIJȒȡȚȠ ʌȚȐIJȦȞ.
• ǺİȕĮȚȦșİȓIJİ ȩIJȚ įİȞ İȚıȑȡȤİIJĮȚ
ȣȖȡĮıȓĮ ıIJĮ ȘȜİțIJȡȚțȐ µȑȡȘ/
İȟĮȡIJȒµĮIJĮ IJȘȢ ıȣıțİȣȒȢ.
1 ȀĮșĮȡȓıIJİ IJȠ İıȦIJİȡȚțȩ țĮȚ IJȠ
İȟȦIJİȡȚțȩ IJȘȢ ıȣıțİȣȒȢ
ȤȡȘıȚµȠʌȠȚȫȞIJĮȢ ȑȞĮ ȣȖȡȩ ʌĮȞȓ țĮȚ ȑȞĮ
“ȒʌȚȠ” ĮʌȠȡȡȣʌĮȞIJȚțȩ. ȀĮIJȩʌȚȞ
ıțȠȣʌȓıIJİ ıȤȠȜĮıIJȚțȐ
IJȠ İȟȦIJİȡȚțȩ IJȘȢ ıȣıțİȣȒȢ µȑȤȡȚ ȞĮ
ıIJİȖȞȫıİȚ.
2 ȀĮșĮȡȓıIJİ IJȠȞ įȓıțȠ ıȣȜȜȠȖȒȢ
ıIJĮȖȩȞȦȞ țĮȚ IJȘȞ ıȤȐȡĮ
ȤȡȘıȚµȠʌȠȚȫȞIJĮȢ ȤȜȚĮȡȩ Ȟİȡȩ țĮȚ
ıĮʌȠȪȞȚ. ȀĮIJȩʌȚȞ ıIJİȖȞȫıIJİ IJĮ
ıȤȠȜĮıIJȚțȐ.
3 ȂİIJȐ Įʌȩ țȐșİ ȤȡȒıȘ, ȟİʌȜȪȞİIJİ IJȠȞ
ıȦȜȒȞĮ ʌĮȡȠȤȒȢ Įʌȩ IJȠ ȕĮȡİȜȐțȚ țĮȚ
IJȠȞ ıȦȜȒȞĮ İʌȑțIJĮıȘȢ µ
Ȟİȡȩ.
4 ǵIJĮȞ IJȠʌȠșİIJİȓIJİ
ȤȡȘıȚµȠʌȠȚȒıIJİ ȑȞĮ ȞȑȠ ıȦȜȒȞĮ
İʌȑțIJĮıȘȢ Ȓ țĮșĮȡȓıIJİ ıȤȠȜĮıIJȚțȐ IJȠȞ
ȣʌȐȡȤȠȞIJĮ ıȦȜȒȞĮ İʌȑțIJĮıȘȢ µİ
ȤȜȚĮȡȩ Ȟİȡȩ țĮȚ ıĮʌȠȪȞȚ. ȀĮIJȩʌȚȞ
ȟİʌȜȪȞİIJİ IJȠȞ ıȦȜȒȞĮ İʌȑțIJĮıȘȢ µİ
IJȡİȤȠȪµİȞȠ Ȟİȡȩ țĮȚ ĮijȒıIJİ IJȠȞ ȞĮ
ıȣıțİȣȒ ıİ
IJȠ İıȦIJİȡȚțȩ țĮȚ
İIJȡİȤȠȪµİȞȠ
ȑȞĮ ȞȑȠ ȕĮȡİȜȐțȚ,
60
Beer Tap & Cooler Article 282990
Page 66

ıIJİȖȞȫıİȚ ʌȜȒȡȦȢ.
ȂʌȠȡİȓIJİ ȞĮ ʌĮȡĮȖȖİȓȜİIJİ ȞȑȠȣȢ
ıȦȜȒȞİȢ İʌȑțIJĮıȘȢ µȑıȦ IJȘȢ IJİȤȞȚțȒȢ
ȣʌȘȡİıȓĮȢ IJȘȢ İIJĮȚȡİȓĮȢ µĮȢ.
ǹıijȐȜİȚĮ
īİȞȚțȐ
• ǻȚĮȕȐıIJİ țĮȚ ĮțȠȜȠȣșȒıIJİ IJȚȢ ȠįȘȖȓİȢ
țĮȚ ʌȡȠİȚįȠʌȠȚȒıİȚȢ ʌȠȣ
ĮȞĮȖȡȐijȠȞIJĮȚ ıIJȠ ȕĮȡİȜȐțȚ, ʌȡȚȞ IJȠ
IJȠʌȠșİIJȒıİIJİ ıIJȘȞ ıȣıțİȣȒ.
• ǻȚĮȕȐıIJİ ʌȡȠıİțIJȚțȐ ĮȣIJȑȢ IJȚȢ
ȠįȘȖȓİȢ țĮȚ ijȣȜȐȟIJİ IJİȢ ȖȚĮ
µİȜȜȠȞIJȚțȒ ĮȞĮijȠȡȐ.
• Ǿ ȤȡȒıȘ ĮȣIJȒȢ IJȘȢ ıȣıțİȣȒȢ ʌȡȑʌİȚ
ȞĮ ȖȓȞİIJĮȚ µȩȞȠ ıȪµijȦȞĮ µİIJȚȢ
ȠįȘȖȓİȢ ʌȠȣ ĮȞĮijȑȡȠȞIJĮȚ İįȫ.
• ǹȣIJȒ Ș ıȣıțİȣȒ ʌȡȠȠȡȓȗİIJĮȚ
ĮʌȠțȜİȚıIJȚțȐ ȖȚĮ ȠȚțȚĮțȒ ȤȡȒıȘ.
• Ǿ ȤȡȒıȘ ĮȣIJȒȢ IJȘȢ ıȣıțİȣȒȢ Įʌȩ
ʌĮȚįȚȐ Ȓ ȐIJȠµĮ µİijȣıȚțȑȢ,
ĮȚıșȘIJȒȡȚİȢ, ʌȞİȣµĮIJȚțȑȢ, Ȓ țȚȞȘIJȚțȑȢ
ĮȞĮʌȘȡȓİȢ, Ȓ ȤȦȡȓȢ IJȘȞ ĮʌĮȡĮȓIJȘIJȘ
ȖȞȫıȘ țĮȚ ݵʌİȚȡȓĮ, µʌȠȡİȓ Ȟ'
ĮʌȠIJİȜȑıİȚ ʌȘȖȒ țȚȞįȪȞȦȞ. ȉĮ Ȑ IJȠµĮ
ʌȠȣ İȓȞĮȚ ȣʌİȪșȣȞĮ ȖȚĮ IJȘȞ ĮıijȐȜİȚĮ
ĮȣIJȫȞ ĮȞșȡȫʌȦȞ șĮ ʌȡȑʌİȚ ȞĮ IJȠȣȢ
ʌĮȡȑȤȠȣȞ ȡȘIJȑȢ ȠįȘȖȓİȢ Ȓ ȞĮ
İʌȚȕȜȑʌȠȣȞ IJȘȞ ȤȡȒıȘ IJȘȢ ıȣıțİȣȒȢ.
• ĭȣȜȐȟIJİ IJȘȞ ıȣıțİȣȒ µĮțȡȚȐ Įʌȩ
µȑȡȘ ıIJĮ ȠʌȠȓĮ µʌȠȡȠȪȞ ȞĮ ijIJȐıȠȣȞ
ʌĮȚįȚȐ Ȓ ȐȞșȡȦʌȠȚ ʌȠȣ įİȞ µʌȠȡȠȪȞ
ȞĮ IJȘȞ ȤİȚȡȚıIJȠȪȞ µİ ĮıijȐȜİȚĮ.
• Ǿ İʌȚıțİȣȒ IJȘȢ ıȣıțİȣȒȢ ʌȡȑʌİȚ ȞĮ
ȖȓȞİIJĮȚ µȩȞȠ Įʌȩ İȚįȚțİȣµȑȞȠȣȢ
IJİȤȞȚțȠȪȢ. ȂȘȞ ʌȡȠıʌĮșȒıİIJİ ʌȠIJȑ
ȞĮ İʌȚıțİȣȐıİIJİ µ
ıȣıțİȣȒ.
• ĬĮ ʌȡȑʌİȚ ȞĮ ȤȡȘıȚµȠʌȠȚİȓIJİ µȩȞȠ
ĮȟİıȠȣȐȡ ıȣȞȚıIJȫµİȞĮ Įʌȩ IJȠȞ
ʌȡȠµȘșİȣIJȒ. ǾȤȡȒıȘȐȜȜȦȞ
ĮȟİıȠȣȐȡ µʌȠȡİȓ ȞĮ ʌȡȠțĮȜȑıİȚ
ȩȞȠȚ ıĮȢ IJȘȞ
ȕȜȐȕİȢ Ȓ ijșȠȡȑȢ ıIJȘȞ ıȣıțİȣȒ, ȠȚ
ȠʌȠȓİȢ µʌȠȡİȓ ȞĮ İȞȑȤȠȣȞ țȓȞįȣȞȠ ȖȚĮ
IJȠȞ ȤȡȒıIJȘ.
ǾȜİțIJȡȚıµȩȢ țĮȚ șİȡµȩIJȘIJĮ
• ȆȡȚȞ ȤȡȘıȚµȠʌȠȚȒıİIJİ IJȘ ıȣıțİȣȒ,
İȜȑȖȟIJİ İȐȞ Ș IJȐıȘ IJȠȣ įȚțIJȪȠȣ
ʌĮȡȠȤȒȢ ȡİȪµĮIJȠȢ IJĮȚȡȚȐȗİȚ µİIJȘȞ
IJȐıȘ ʌȠȣ ĮȞĮijȑȡİIJĮȚ ıIJȘȞ İIJȚțȑIJĮ
IJȪʌȠȣ IJȘȢ ıȣıțİȣȒȢ.
• ǼȐȞ ȤȡȘıȚµȠʌȠȚȒıİIJİ µȓĮ ʌȡȠȑțIJĮıȘ
(Ȓ µʌĮȜĮȞIJȑȗĮ), ȕİȕĮȚȦșİȓIJİ ȩIJȚ İȓȞĮȚ
ȖİȚȦµȑȞȘ țĮȚ ȩIJȚ įȚĮșȑIJİȚ ijȚȢ µİ
ȖİȓȦıȘ, țĮȚ ıȣȞįȑıIJİ IJȘȞ ıİ µȓĮ ʌȡȓȗĮ
ȡİȪµĮIJȠȢ µİ ȖİȓȦıȘ. ȃĮ
ȤȡȘıȚµȠʌȠȚİȓIJİ ʌȐȞIJĮ ʌȡȠİțIJȐıİȚȢ µİ
įȚȐµİIJȡȠ țĮIJȐȜȜȘȜȘ ȖȚĮ IJȠ µȑȖȚıIJȠ
ȡİȪµĮ (ǹµʌȑȡ) țĮȚ IJȘ µȑȖȚıIJȘ
ȠȞȠµĮıIJȚțȒ ȚıȤȪ ((Watt) IJȘȢ
ıȣıțİȣȒȢ.
• ȃĮ ȟİIJȣȜȓȖİIJİ ʌȐȞIJȠIJİ ʌȜȒȡȦȢ IJȠ
țĮȜȫįȚȠ IJȘȢ ʌȡȠȑțIJĮıȘȢ.
• ȃĮ ĮʌȠıȣȞįȑİIJİ ʌȐȞIJĮ IJȠ țĮȜȫįȚȠ
ȡİȪµĮIJȠȢ Įʌȩ IJȘȞ ʌȡȓȗĮ, ȒIJȠijȚȢIJȠȣ
țĮȜȦįȓȠȣ ȡİȪµĮIJȠȢ 12 V DC Įʌȩ IJȘȞ
ȣʌȠįȠȤȒ ĮȞĮʌIJȒȡĮ IJȠȣ ĮȣIJȠțȚȞȒIJȠȣ,
ȩIJĮȞ įİȞ ȤȡȘıȚµȠʌȠȚİȓIJİ IJȘȞ ıȣıțİȣȒ.
• īȚĮ ȞĮ ĮʌȠıȣȞįȑıİIJİ IJȠ țĮȜȫįȚȠ
ȡİȪµĮIJȠȢ Įʌȩ IJȘȞ ʌȡȓȗĮ Ȓ IJȘȞ
ȣʌȠįȠȤȒ ĮȞĮʌIJȒȡĮ IJȠȣ ĮȣIJȠțȚȞȒIJȠȣ,
șĮ ʌȡȑʌİȚ ȞĮ IJȠ ʌȚȐȞİIJİ Įʌȩ IJȠ ijȚȢ
– µȘȞ IJȡĮȕȐIJİ IJȠ ȓįȚȠ IJȠ țĮȜȫįȚȠ.
IJȠȣ
• ǻİȞ șĮ ʌȡȑʌİȚ
ıȣıțİȣȒ IJȡĮȕȫȞIJĮȢ IJȘȞ Įʌȩ IJȠ
țĮȜȫįȚȠ.
• ȃĮ İȜȑȖȤİIJİ IJĮțIJȚțȐ ȩIJȚ IJȠ țĮȜȫįȚȠ IJȘȢ
ıȣıțİȣȒȢ İȓȞĮȚ ıİ țĮȜȒ țĮIJȐıIJĮıȘ țĮȚ
įİȞ ȑȤİȚ ȕȜȐȕİȢ Ȓ ijșȠȡȑȢ. ȂȘȞ
ȤȡȘıȚµȠʌȠȚİȓIJİ IJȘȞ ıȣıțİȣȒ İȐȞ IJȠ
țĮȜȫįȚȠ įİȓȤȞİȚ ıȘµȐįȚĮ ȕȜȐȕȘȢ Ȓ
ijșȠȡȐȢ. ǼȐȞ IJȠ țĮȜȫįȚȠ ȑȤİȚ ȕȜȐȕİȢ Ȓ
ijșȠȡȑȢ, ĮʌİȣșȣȞșİȓIJİ
İȚįȚțİȣµȑȞȠ IJİȤȞȚțȩ ȖȚĮ IJȘȞ
ĮȞIJȚțĮIJȐıIJĮıȒ IJȠȣ.
ʌȠIJȑ ȞĮ µİIJĮțȚȞİȓIJİ IJȘȞ
ı' ȑȞĮȞ
Beer Tap & Cooler Article 282990
61
Page 67

• ȆȡȠıȑȟIJİ ȞĮ µȘȞ ȑȡșİȚ Ș ıȣıțİȣȒ, IJȠ
țĮȜȫįȚȠ ȡİȪµĮIJȠȢ țĮȚ IJȠ ijȚȢ ıİ İʌĮijȒ
µİ ʌȘȖȑȢ șİȡµȩIJȘIJĮȢ, ȩʌȦȢ ʌ.Ȥ. µȓĮ
İıIJȓĮ µĮȖİȚȡȑµĮIJȠȢ Ȓ ijȜȩȖĮ.
• ǻȚĮıijĮȜȓıIJİ ȩIJȚ Ș ıȣıțİȣȒ, IJȠ
țĮȜȫįȚȠ ȡİȪµĮIJȠȢ țĮȚ IJȠ ijȚȢ įİȞ
ȑȡȤȠȞIJĮȚ ıİ İʌĮijȒ µİ Ȟİȡȩ.
• Ǿ ıȣıțİȣȒ șĮ ʌȡȑʌİȚ
įȣȞĮIJȩIJȘIJĮ ĮʌĮȖȦȖȒȢ IJȘȢ
șİȡµȩIJȘIJĮȢ ʌȠȣ ʌĮȡȐȖİȚ, ȖȚĮ IJȘȞ
ĮʌȠijȣȖȒ țȚȞįȪȞȦȞ ʌȣȡțĮȖȚȐȢ. īȚĮ
IJȠȞ ȜȩȖȠ ĮȣIJȩ, șĮ ʌȡȑʌİȚ ȞĮ
įȚĮıijĮȜȓıİIJİ ȩIJȚ ȣʌȐȡȤİȚ ĮȡțİIJȩȢ
İȜİȪșİȡȠȢ ȤȫȡȠȢ ȖȪȡȦ Įʌȩ IJȘȞ
ıȣıțİȣȒ, țĮșȫȢ țĮȚ ȩIJȚ Ș ıȣıțİȣȒ įİȞ
ȑȡȤİIJĮȚ ıİ İʌĮijȒ µİ İȪijȜİțIJĮ ȣȜȚțȐ.
Ǿ ıȣıțİȣȒ įİȞ ʌȡȑʌİȚ ȞĮ țĮȜȪʌIJİIJĮȚ
Įʌ'
ȠʌȠȚĮįȒʌȠIJİ ĮȞIJȚțİȓµİȞĮ.
ȞĮ ȑȤİȚ
ȀĮIJȐ IJȘȞ ȤȡȒıȘ
• Ǿ ıȣıțİȣȒ șĮ ʌȡȑʌİȚ ȞĮ
ȤȡȘıȚµȠʌȠȚİȓIJĮȚ µȩȞȠ ıİ
ʌİȡȚȕȐȜȜȠȞIJĮ µİ șİȡµȠțȡĮıȓĮ Įʌȩ
10°C ȑȦȢ 30°C.
• ȂȘȞ İțșȑIJİIJİ ʌȠIJȑ IJȘȞ ıȣıțİȣȒ ıIJȠ
ȐµİıȠ ȘȜȚĮțȩ ijȦȢ Ȓ ıİ șİȡµȠțȡĮıȓĮ
µİȖĮȜȪIJİȡȘ Įʌȩ 30°C.
• ȉȠʌȠșİIJȒıIJİ IJȘȞ ıȣıțİȣȒ ıİ µȓĮ
İʌȓʌİįȘ țĮȚ ıIJĮșİȡȒ İʌȚijȐȞİȚĮ, ȑIJıȚ
ȫıIJİ ȞĮ µȘȞ țȚȞįȣȞİȪİȚ ȞĮ ʌȑıİȚ.
• ȂȘȞ
ĮijȒȞİIJİ ʌȠIJȑ IJȠ țĮȜȫįȚȠ
ȡİȪµĮIJȠȢ ȞĮ țȡȑµİIJĮȚ Įʌȩ IJȠ ȐțȡȠ
µȚĮȢ İʌȚijȐȞİȚĮȢ IJȘȢ țȠȣȗȓȞĮȢ, İȞȩȢ
ʌȐȖțȠȣ İȡȖĮıȓĮȢ Ȓ İȞȩȢ IJȡĮʌİȗȚȠȪ.
• ǺİȕĮȚȦșİȓIJİ ȩIJȚ ȑȤİIJİ ȟİIJȣȜȓȟİȚ
ʌȜȒȡȦȢ IJȠ țĮȜȫį ȚȠ.
• ȆȡȚȞ ĮȖȖȓȟİIJİ IJȘȞ ıȣıțİȣȒ, IJȠ
țĮȜȫįȚȠ ȡİȪµĮIJȠȢ, ȒIJȠijȚȢ,
ȕİȕĮȚȦșİȓIJİ ȩIJȚ IJĮ ȤȑȡȚĮ ıĮȢ İȓȞĮȚ
ıIJİȖȞȐ.
• ȂȘȞ
ȤȡȘıȚµȠʌȠȚİȓIJİ ʌȠIJȑ IJȘȞ
ıȣıțİȣȒ ıİ ȤȫȡȠȣȢ µİȣȥȘȜȒ
ȣȖȡĮıȓĮ.
• ǹʌȠıȣȞįȑıIJİ IJȠ țĮȜȫįȚȠ ȡİȪµĮIJȠȢ
Įʌȩ IJȘȞ ʌȡȓȗĮ Ȓ IJȘȞ ȣʌȠįȠȤȒ
ĮȞĮʌIJȒȡĮ IJȠȣ ĮȣIJȠțȚȞȒIJȠȣ İȐȞ
ʌĮȡȠȣıȚĮıIJİȓ ȠʌȠȚȠįȒʌȠIJİ
ʌȡȩȕȜȘµĮ țĮIJȐ IJȘȞ ȤȡȒıȘ IJȘȢ
ıȣıțİȣȒȢ, ȩIJĮȞ șȑȜİIJİ ȞĮ țĮșĮȡȓıİIJİ
IJȘȞ ıȣıțİȣȒ Ȓ ȞĮ IJȠʌȠșİIJȒıİIJİ
țȐʌȠȚȠ İȟȐȡIJȘµĮ/ĮȟİıȠȣȐȡ, ȒȩIJĮȞ
IJİȜİȚȫıİIJİ
• ȂȘȞ ȕȣșȓȗİIJİ ʌȠIJȑ IJȘȞ ıȣıțİȣȒ, IJȠ
țĮȜȫįȚȠ ȡİȪµĮIJȠȢ, Ȓ IJȠ ijȚȢ ıİ Ȟİȡȩ Ȓ
ȐȜȜĮ ȣȖȡȐ.
• ǼȐȞ Ș ıȣıțİȣȒ ʌȑıİȚ µȑıĮ ıİ Ȟİȡȩ,
µȘȞ IJȘȞ ĮȖȖȓȗİIJİ. ǹʌȠıȣȞįȑıIJİ
ĮµȑıȦȢ IJȠ țĮȜȫįȚȠ ȡİȪµĮIJȠȢ Įʌȩ IJȘȞ
ʌȡȓȗĮ Ȓ IJȘȞ ȣʌȠįȠȤȒ ĮȞĮʌIJȒȡĮ IJȠȣ
ĮȣIJȠțȚȞȒIJȠȣ. ȂȘȞ ȤȡȘıȚµȠʌȠȚİȓIJİ
ʌȜȑȠȞ IJȘȞ ıȣıțİȣȒ.
• ȀĮșĮȡȓıIJİ ʌȡȠıİțIJȚțȐ IJȘȞ ıȣıțİȣȒ
µİIJȐ Įʌȩ IJȘȞ ȤȡȒıȘ (ĮȞĮIJȡȑȟIJİ ıIJȘȞ
İȞȩIJȘIJĮ ‘ȀĮșĮȡȚıµȩȢ țĮȚ ıȣȞIJȒȡȘıȘ’).
• īȚĮ ȞĮ įȚĮIJȘȡȒıİIJİ ȑȞĮ ĮȞȠȚȤIJȩ
ȕĮȡİȜȐțȚ ıIJȘȞ ıȦıIJȒ șİȡµȠțȡĮıȓĮ,
ĮijȒıIJİ IJȠ µȑıĮ ıIJȘȞ ıȣıțİȣȒ.
ǺİȕĮȚȦșİȓIJİ ȩIJȚ Ș ıȣıțİȣȒ İȓȞĮȚ
ıȣȞįİįݵȑȞȘ ıIJȠ ȡİȪµĮ. ǼȐȞ įİȞ
ıțȠʌİȪİIJİ ȞĮ ȤȡȘıȚµȠʌȠȚȒıİIJİ
ıȣıțİȣȒ ȖȚĮ µİȖȐȜȠ ȤȡȠȞȚțȩ
įȚȐıIJȘµĮ, ȕȖȐȜIJİ Įʌȩ IJȘȞ ıȣıțİȣȒ IJȠ
ȕĮȡİȜȐțȚ ʌȠȣ ȑȤİIJİ ĮȞȠȓȟİȚ țĮȚ
ijȣȜȐȟIJİ IJȠ ıIJȠ ȥȣȖİȓȠ. ǹijȠȪ ĮȞȠȓȟİIJİ
ȑȞĮ ȕĮȡİȜȐțȚ, IJȠ ʌİȡȚİȤȩµİȞȩ IJȠȣ
įȚĮIJȘȡİȓIJĮȚ ijȡȑıțȠ ȖȚĮ 30 ȘµȑȡİȢ.
• ȃĮ İȜȑȖȤİIJİ ʌȐȞIJĮ IJȘȞ ȘµİȡȠµȘȞȓĮ
ȜȒȟȘȢ, ʌȡȚȞ IJȠʌȠșİIJȒıİIJİ IJȠ ȕĮȡİȜȐțȚ
ıIJȘȞ ıȣıțİȣȒ.
• ȂȘȞ IJȠʌȠșİIJİȓIJİ
ȕĮȡİȜȐțȚĮ µİijșȠȡȑȢ/ȕȜȐȕİȢ, İʌİȚįȒ
ĮȣIJȩ µʌȠȡİȓ ȞĮ ȠįȘȖȒıİȚ ıİ ȕȜȐȕȘ
IJȘȢ ıȣıțİȣȒȢ. ȃĮ İʌȚıIJȡȑijİIJİ ʌȐȞIJĮ
IJĮ ȕĮȡİȜȐțȚĮ µİijșȠȡȑȢ/ȕȜȐȕİȢ ıIJȠ
țĮIJȐıIJȘµĮ Įʌȩ IJȠ ȠʌȠȓȠ IJĮ
ĮȖȠȡȐıĮIJİ.
• ȉĮ ıijȡĮȖȚıµȑȞĮ ȕĮȡİȜȐțȚĮ įȚĮIJȘȡȠȪȞ
IJȠ ʌİȡȚİȤȩµİȞȩ IJȠȣȢ ıİ țĮȜȒ
țĮIJȐıIJĮıȘ ȖȚĮ µİȖĮȜȪIJİȡȠ ȤȡȠȞȚțȩ
įȚȐıIJȘµĮ ȩIJĮȞ ijȣȜȐııȠȞIJĮȚ
ıIJĮșİȡȒ șİȡµȠțȡĮıȓĮ. ǵıȠ µȚțȡȩIJİȡȘ
İȓȞĮȚ Ș șİȡµȠțȡĮıȓĮ IJȠȣ ȤȫȡȠȣ ıIJȠȞ
IJȘȞ ȤȡȒıȘ IJȘȢ.
IJȘȞ
ıIJȘȞ ıȣıțİȣȒ
ıİ
62
Beer Tap & Cooler Article 282990
Page 68

ȠʌȠȓȠ įȚĮIJȘȡİȓIJİ IJĮ ȕĮȡİȜȐțȚĮ, IJȩıȠ
IJȠ țĮȜȪIJİȡȠ.
ȆİȡȚȕȐȜȜȠȞ
ȆİIJȐȟIJİ IJĮ ȣȜȚțȐ ıȣıțİȣĮıȓĮȢ, ȩʌȦȢ ʌ.Ȥ.
IJĮ ʌȜĮıIJȚțȐ țĮȚ IJĮ țȚȕȫIJȚĮ, ıIJĮ țĮIJȐȜȜȘȜĮ
ıȘµİȓĮ ıȣȜȜȠȖȒȢ ĮʌȠȡȡȚµµȐIJȦȞ.
ǼȐȞ įİȞ ȤȡİȚȐȗİıIJİ ʌȜȑȠȞ IJȘȞ ıȣıțİȣȒ
ĮȜȜȐ ĮȣIJȒ ȜİȚIJȠȣȡȖİȓ țĮȞȠȞȚțȐ, Ȓ
ȤȡİȚȐȗİIJĮȚ µȩȞȠ µȓĮ ĮʌȜȒ İʌȚıțİȣȒ, ıĮȢ
ıȣȞȚıIJȠȪµİ ȞĮ ijȡȠȞIJȓıİIJİ ȖȚĮ IJȘȞ
ĮȞĮțȪțȜȦıȒ IJȘȢ.
ǵIJĮȞ Ș ıȣıțİȣȒ ijIJȐıİȚ ıIJȠ IJȑȜȠȢ IJȘȢ
ȦijȑȜȚµȘȢ ȗȦȒȢ IJȘȢ, Ș ĮʌȩȡȡȚȥȒ IJȘȢ
ʌȡȑʌİȚ ȞĮ ȖȓȞİȚ µİ ȣʌİȪșȣȞȠ IJȡȩʌȠ, ȑIJıȚ
ȫıIJİ ȞĮ µʌȠȡȠȪȞ ȞĮ
İʌĮȞĮȤȡȘıȚµȠʌȠȚȘșȠȪȞ IJĮ İȟĮȡIJȒµĮIJȐ IJȘȢ
(Ȓ ȠȜȩțȜȘȡȘ Ș ıȣıțİȣȒ). ȂȘȞ ʌİIJȐȟİIJİ IJȘȞ
ıȣıțİȣȒ µĮȗȓ µİ IJĮ ıȣȞȘșȚıµȑȞĮ ȠȚțȚĮțȐ
ĮʌȠȡȡȓµµĮIJĮ IJĮ ȠʌȠȓĮ įİȞ ȣʌȩțİȚȞIJĮȚ ıİ
įȚĮȜȠȖȒ. ǼʌȚıIJȡȑȥIJİ IJȘȞ ıIJȠ ıȘ
ĮȖȠȡȐȢ, Ȓ ʌĮȡĮįȫıIJİ IJȘȞ ı' ȑȞĮ
İȟȠȣıȚȠįȠIJȘµȑȞȠ ıȘµİȓȠ ıȣȜȜȠȖȒȢ. īȚĮ
ʌȜȘȡȠijȠȡȓİȢ ıȤİIJȚțȐ µİ IJĮ ıȣıIJȒµĮIJĮ
ȣʌȠįȠȤȒȢ țĮȚ ıȣȖțȑȞIJȡȦıȘȢ IJȑIJȠȚȦȞ
ĮʌȠȡȡȚµµȐIJȦȞ ıIJȘȞ ʌİȡȚȠȤȒ ıĮȢ,
İʌȚțȠȚȞȦȞȒıIJİ µİ IJȚȢ IJȠʌȚțȑȢ ĮȡȤȑȢ.
µİȓȠ
ȈȤİIJȚțȒ ǼȣȡȦʌĮȧțȒ ȅįȘȖȓĮ:
• 2002/95/EC
• 2002/96/EC
Beer Tap & Cooler Article 282990
63
Page 69

64
Beer Tap & Cooler Article 282990
 Loading...