

Page 1

Gebruiksaanwijzing
Instructions for use
Mode d’emploi
Anleitung
Instrucciones de Uso
Istruzioni d’uso
Bruksanvisning
Brugsanvisning
Bruksanvisning
Käyttöohje
Instruções de utilização
TYPE 282969
SILVER ICE CUBE MAKER
Page 2

2
Page 3
NL
Gebruiksaanwijzing . . . . . . . . . . . . . . . . . . . . . . . . . . . . . . . . . . 4
UK
F
D
E
I
S
DK
N
SF
Instructions for use . . . . . . . . . . . . . . . . . . . . . . . . . . . . . . . . . . . 6
Mode d’emploi . . . . . . . . . . . . . . . . . . . . . . . . . . . . . . . . . . . . . . . 9
Anleitung . . . . . . . . . . . . . . . . . . . . . . . . . . . . . . . . . . . . . . . . . . . . 11
Instrucciones de Uso . . . . . . . . . . . . . . . . . . . . . . . . . . . . . . . . 13
Istruzioni d’uso . . . . . . . . . . . . . . . . . . . . . . . . . . . . . . . . . . . . . . 15
Bruksanvisning . . . . . . . . . . . . . . . . . . . . . . . . . . . . . . . . . . . . . . 18
Brugsanvisning . . . . . . . . . . . . . . . . . . . . . . . . . . . . . . . . . . . . . . 20
Bruksanvisning . . . . . . . . . . . . . . . . . . . . . . . . . . . . . . . . . . . . . . 22
Käyttöohje . . . . . . . . . . . . . . . . . . . . . . . . . . . . . . . . . . . . . . . . . . . 24
P
GR
ARAB
Instruções de utilização . . . . . . . . . . . . . . . . . . . . . . . . . . . . 26
. . . . . . . . . . . . . . . . . . . . . . . . . . . . . . . . . . . . . . . . . . . . . . . . . . . . . . . 28
18 . . . . . . . . . . . . . . . . . . . . . . . . . . . . . . . . . . . . . . . . . . . . . . . . . . . . 31
JAN 09 V0
Page 4

PRINCESS SILVER ICE CUBE MAKER ART. 282969
VOOR GEBRUIK
Lees deze instructies zorgvuldig voordat u dit apparaat gaat gebruiken. Bewaar ze om ze later nog eens te
kunnen raadplegen. Controleer of de netspanning in uw woning overeenkomt met die van het apparaat.
Gebruik voor het aansluiten van het apparaat uitsluitend een geaard stopcontact.
De PRINCESS SILVER ICE CUBE MAKER is een semiprofessionele ijsblokjesmachine. Met dit apparaat
kunt u snel en makkelijk ijsblokjes maken. Binnen 15 minuten is het apparaat op temperatuur en zijn de
eerste ijsblokjes klaar. Zolang de machine aan blijft staan, blijft hij 12 ijsblokjes per 9 tot 13 minuten
maken (al naar gelang de omvang).
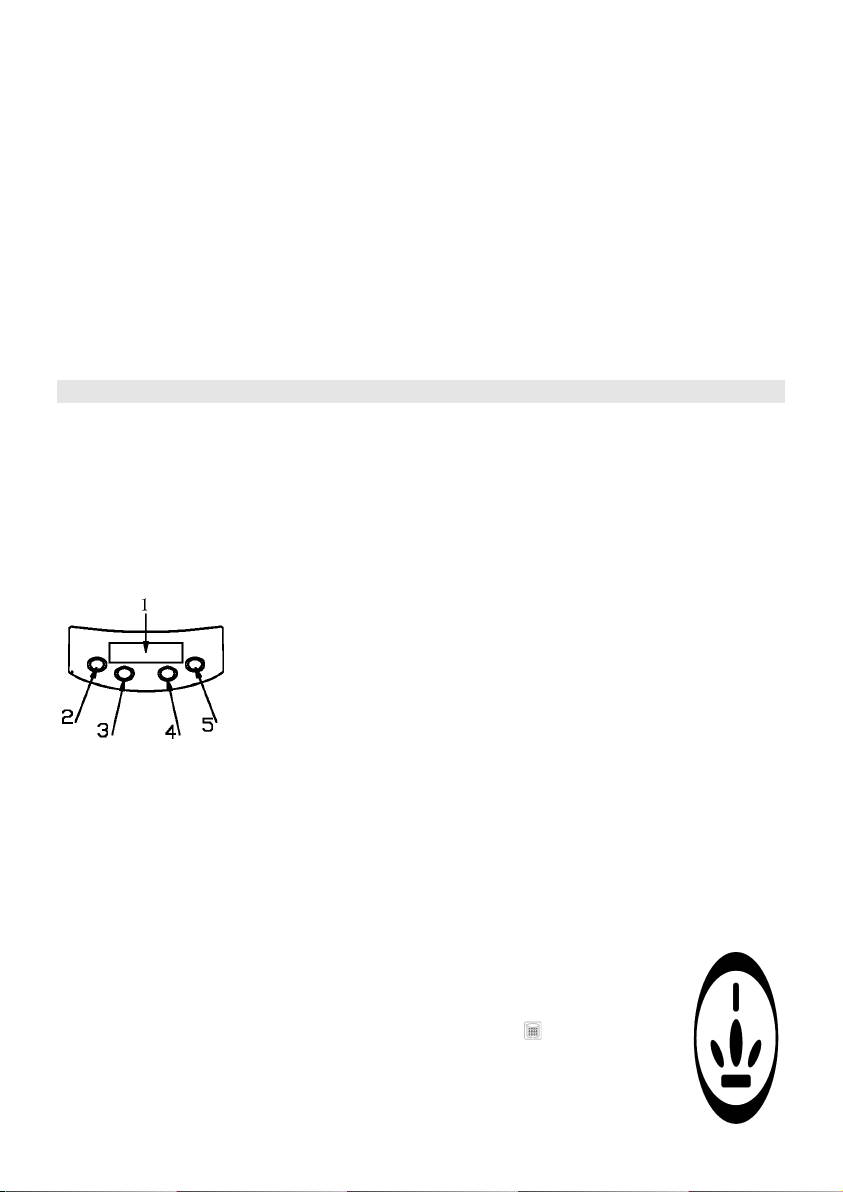
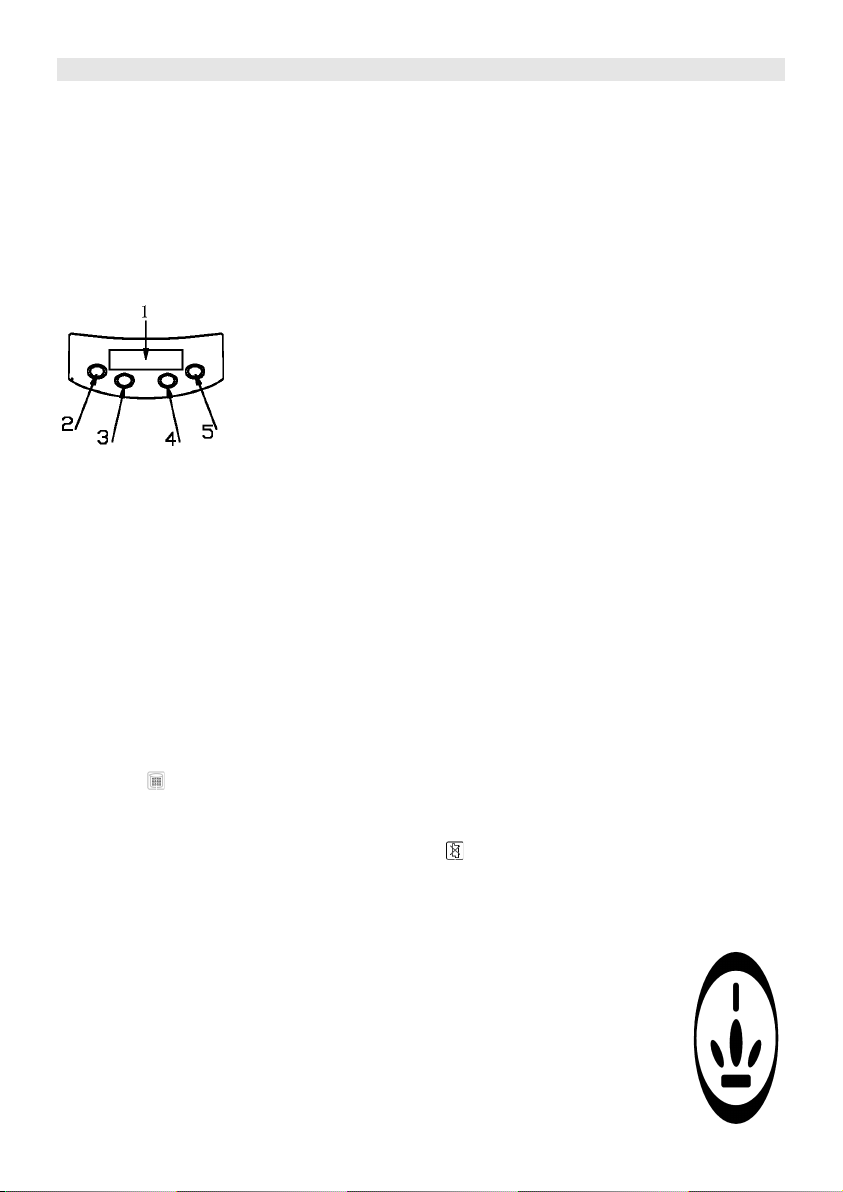
Uitgerust met een helder display (1), ON/OFF-knop (2), SET-knop (3), aanpasknop ▲(4) en SELECTknop (5). Zie fig.
GEBRUIK
Plaats de Ice Cube Maker op een stevige, stabiele ondergrond. Zorg dat de ventilatieopeningen niet
geblokkeerd zijn. De afstand tot andere apparaten of muren moet ten minste 20 cm bedragen. Voordat u
het apparaat voor de eerste keer gebruikt, moet het ten minste 3 uur rustig gestaan hebben. Dat is omdat
de koelvloeistof in het koelelement eerst tot rust moet komen. Open het deksel en vul het reservoir met
water. De maximuminhoud is ongeveer 3 liter. Plaats nu de ijsblokjesemmer terug in het apparaat en sluit
het deksel. Steek de stekker in het stopcontact. In de lcd verschijnt het 'sneeuwicoontje'
nu klaar voor gebruik.
Kies met de SELECT-knop het formaat van het ijsblokje. U kunt uit drie formaten kiezen.
S = klein (klaar in ongeveer 9 minuten)
M = medium (klaar in ongeveer 11 minuten)
L = groot (klaar in ongeveer 13 minuten)
. Het apparaat is
❆
Nadat u op de ON/OFF-knop hebt gedrukt, blijft het sneeuwicoontje
bezig is de ijsblokjes van het gewenste formaat te maken. Als de ijsemmer helemaal vol is, knippert in de
lcd het icoontje ‘IJsemmer vol’ . Haal de emmer uit het apparaat, bewaar de ijsblokjes op een koele
plaats en plaats de emmer terug in het apparaat.
U kunt de Ice Cube Maker meteen weer inschakelen om nog een serie ijsblokjes te maken. Als het water
op is, knippert in de lcd het icoontje ‘Water bijvullen’ .Ook klinken er korte piepjes. Vul het reservoir
en druk op de ON/OFF-knop om het proces te vervolgen.
Als u de ijsblokjes in het apparaat laat zitten, zullen ze langzaam smelten. Het gesmolten water wordt
opgevangen in het waterreservoir, waarna het apparaat een nieuwe reeks ijsblokjes gaat maken.
Door op de ON/OFF-knop te drukken, kunt u het apparaat te allen tijde stopzetten. Als u de Ice Cube
Maker lange tijd niet gaat gebruiken, giet dan het waterreservoir leeg en trek de stekker uit
het stopcontact.
knipperen ten teken dat de machine
❆
GEBRUIK TIMER
Met de timer kunt u opgeven wanneer het apparaat in- of uitgeschakeld wordt.
Het is bijvoorbeeld 16.30 uur. U wilt het apparaat aanzetten om 17.30 uur en weer uitzetten
om 19.30 uur.
4
Page 5

Tijd instellen
Steek de stekker in het stopcontact. 12:00 staat op de display (de standaardtijd is 12.00 uur). Druk
één keer op de SET-knop. '12' knippert gedurende 5 seconden. In die 5 seconden drukt u telkens weer op
de aanpasknop ▲ om de tijd bij te stellen van '12' naar '16'. Deze tijd knippert eveneens 5 seconden lang.
Gedurende deze 5 seconden drukt u opnieuw op de SET-knop. '00' begint te knipperen. Druk telkens op
de aanpasknop ▲ om de minuten van '00' naar '30' bij te stellen. Na 5 seconden zonder knipperen van een
icoontje op de display is de tijd ingesteld.
Druk 3 keer op de SET-knop wanneer u ‘00:00’ op de display ziet. Volg de hierboven beschreven
procedure voor het instellen van de kloktijd om met de SET-knop en de aanpasknop de gewenste inschakeltijd op 17.30 uur in te stellen.
Druk 5 keer op de SET-knop wanneer u ‘00:00’ op de display ziet. Volg de hierboven beschreven
procedure voor het instellen van de kloktijd om met de SET-knop en de aanpasknop de gewenste uitschakeltijd op 19.30 uur in te stellen.
Apparaat met timer aan- of uitzetten
Wanneer de in- en uitschakeltijd eenmaal ingesteld zijn, kunt u met de aanpasknop ▲ de door u gewenste
instellingen kiezen (auto-inschakelen, auto-uitschakelen, auto-in- en -uitschakelen).
Instelling auto-inschakelen: druk een keer op de aanpasknop ▲; u ziet op de display. Het programma is nu ingesteld. Het apparaat schakelt nu automatisch om 17.30 uur in.
Instelling auto-uitschakelen: druk twee keer op de aanpasknop ▲; u ziet op de display. Druk op de
ON/OFF-knop om het apparaat in te schakelen. Het apparaat schakelt nu automatisch om 19.30 uur uit.
Instelling auto-in- en -uitschakelen: druk drie keer op de aanpasknop ▲; u ziet op de display. U
hoeft niet op de ON/OFF-knop te drukken om het apparaat in te schakelen. Overeenkomstig het programma
dat u hebt ingesteld, schakelt het apparaat om 17.30 uur automatisch in en om 19.30 uur automatisch uit.
NB: Als u geen gebruik wilt maken van de timerfunctie drukt u verschillende malen op de aanpasknop ▲
totdat in de lcd het icoontje en de huidige tijd wordt weergegeven. Druk dan op de ON/OFF-knop
om het apparaat doorlopend te gebruiken.
SCHOONMAKEN
Voordat u met schoonmaken begint, moet u de stekker uit het stopcontact trekken. Reinig de binnenkant
en de buitenkant met een vochtige doek. Gebruik geen schurende schoonmaak- of oplosmiddelen om het
apparaat schoon te maken.
Maak het apparaat ook niet met een wasmiddel schoon.
Laat geen water gedurende een lange periode in het apparaat zitten. Het water kan verontreinigd raken.
Laat het water weglopen met behulp van het klepje aan de achterkant van het apparaat. We adviseren u
om het apparaat regelmatig te reinigen met een antialgen- en een antibacterieel middel. Volg de instructies
op de verpakking op.
We adviseren u om elke keer als u de ijsblokjesmaker vult, een eetlepel citroensap aan het water toe te
voegen. Dankzij het citroensap dat door het koelsysteem van uw ijsblokjesmaker loopt, gaat uw huis lekker
ruiken naar verse citroen. De zuren in het sap gaan bovendien de groei van bacteriën, schimmel en allergenen in de lucht tegen. Bovendien helpt het citroensap om het waterdoorvoersysteem verser te houden
tussen twee reinigingsbeurten in.
Aan de achterkant van de ijsblokjesmaker zit een aftapkraantje met een klepdopje waarmee u het apparaat
leeg kunt maken. Schroef de klep open en laat het reservoir leeglopen (gebruik zo nodig een geschikte
slang). Als het reservoir leeg is, sluit u het klepje door middel van het dopje.
PRINCESS-TIPS
- Plaats de Ice Cube Maker niet op zijn kant of ondersteboven. Let hier met name op
wanneer u het apparaat verplaatst.
- Plaats de machine niet tegen een muur of een ander apparaat. De ventilatieopeningen
moeten altijd open zijn.
- Gebruik de Ice Cube Maker niet buitenshuis.
- Dompel het apparaat nooit onder in water of een andere vloeistof. Hierdoor kunt u een
elektrische schok krijgen.
5
Page 6
- Houdt goed toezicht op de Ice Cube Maker wanneer kinderen erbij kunnen. Wees zelf natuurlijk ook
voorzichtig.
- Haal de stekker uit het stopcontact als u het apparaat gedurende lange tijd niet gaat gebruiken.
- Plaats de machine niet vlak bij een hittebron.
- Bij beschadiging van het apparaat of het snoer dient u het apparaat niet meer te gebruiken maar naar
de winkel terug te brengen voor reparatie. Een beschadigd snoer kan alleen door onze servicedienst
vervangen worden.
- Gebruik van onderdelen die niet door de fabrikant worden aangeraden, kan gevaarlijk zijn.
- Gebruik dit apparaat alleen voor de bedoelde toepassing.
- De koelvloeistof in de Ice Cube Maker is chemisch afval. Daarom dient het apparaat uiteindelijk op
de juiste, milieuvriendelijke manier te worden weggegooid. Informeer naar de juiste methode bij uw
plaatselijk afvalscheidingsstation.
- Zorg ervoor dat kinderen niet met dit apparaat spelen.
- Het is niet zonder gevaar om dit apparaat te laten gebruiken door kinderen of personen met een
geestelijke of lichamelijke handicap, of met te weinig ervaring of deskundigheid. De voor de veiligheid
van deze gebruikers verantwoordelijke persoon dient ze duidelijke instructies te geven voor of ze te
begeleiden bij het gebruik van dit apparaat.
PRINCESS SILVER ICE CUBE MAKER ART. 282969
BEFORE USING
Read these instructions thoroughly first and keep them for future reference. Check that your domestic
electricity supply matches that of the appliance. Only connect the appliance to an earthed electrical outlet.
The PRINCESS SILVER ICE CUBE MAKER is a semi-professional ice cube machine. With this
appliance, ice cubes can be made quickly and easily. Within 15 minutes, the appliance is at the proper
temperature and the first ice cubes are ready. As long as the machine stays on, it will continue to produce
12 ice cubes every 9-13 minutes (depending on the size).
Equipped with a clear display (1), ON/OFF button (2), SET button (3), adjust button ▲ (4) and SELECT
button (5). See fig.
USE
Place the Ice Cube Maker securely onto a sturdy and even surface. Make sure that the ventilation openings
are not obstructed. The distance to other appliances or walls must be at least 20 cm. The appliance must
be allowed to sit for at least three hours before being used for the first time. This is because the coolant
first has to settle in the cooling element. Open the lid and fill the water reservoir with water. The maximum
is approx. 3 litres. Now place the ice cube basket back inside the appliance and close the lid. Put the plug
into the wall socket. The ‘Snow Pattern’
Use the SELECT button to set the ice cube format. There are three different formats to choose from.
S = small (ready in approximately 9 minutes)
M = medium (ready in approximately 11 minutes)
L = large (ready in approximately 13 minutes)
After the ON/OFF button has been pushed, the ‘Snow Pattern’
that the machine has begun the preparation of the ice cubes in the selected size. If the
container is completely full of ice cubes the LCD flashes ‘Ice Full’ . Take the container
out of the appliance, store the ice cubes in a cool place and put the container back into the
appliance.
shows on the LCD. Now the appliance is ready to start.
❆
keeps flashing to indicate
❆
6
Page 7

The Ice Cube Maker can be switched on again straight away to prepare a new batch of ice cubes. If there
is no more water, the LCD flashes‘ Water Low’ and emits short beep sounds. Fill the water reservoir
with water and then press the ON/OFF button to continue the process.
If the ice cubes are left in the appliance they will gradually melt. The melt water will collect in the water
reservoir and then the ice cube maker will start to produce a new batch of ice cubes.
The machine can be stopped at any time by pushing the ON/OFF button. When the Ice Cube Maker is not
being used for an extended period, empty the water out of the reservoir and unplug the appliance.
USE TIMER
The inner timer enables you to specify when the appliance is turned on or off.
For example, the current time is 16:30. You want to turn on the appliance at 17:30 and turn off the
appliance at 19:30.
Setting time
Put the plug into wall socket, 12:00 is on the display (the default time is 12:00). Push SET button
once, ‘12’ flashes for 5 seconds. During this time you can continuously push the adjust button ▲ to adjust
the hour from ‘12’ to ‘16’which also flashes for 5 seconds. In these 5 seconds push the SET button again
and then ‘00’ flashes. Use the adjust button ▲ to adjust the time in minutes ‘00’ to ‘30’. After 5 seconds
without any symbol flashing on the display the current time has been set.
Push the SET button 3 times when you see ‘00:00’ is on the display. Follow the above procedures for
setting the clock time and you can use the SET button and adjust button to set your desired turn-on time
to 17:30.
Push the SET button 5 times when you see ’00:00’ is on the display, Follow the above procedures for
setting the clock clock time, and you can use SET button and adjust button ▲ to set your desired turn-off
time to 19:30.
Use timer to turn on/off
Once the turn-on and turn-off time have been set, use the adjust button▲ to adjust to your desired settings
(auto turn on, auto turn off, auto-turn on and off).
Auto turn on setting: push the adjust button ▲ once, you can see on the display. Now the program is
set. The appliance will turn on automatically at 17:30.
Auto turn off setting: push the adjust button ▲ twice, you can see on the display. Push the ON/OFF
button to turn on the appliance. The appliance will turn off automatically at 19:30.
Auto turn on and off setting: push the adjust button ▲ 3 times, you can see on the display. Don’t
need to push ON/OFF button to turn on the appliance. According to the program you set the appliance
will turn on at 17:30 and turn off at 19:30 automatically.
Note: if you do not need the timer function, push the adjust button ▲ several times until only the symbol
and the current time are displayed on the LCD. Then use the ON/OFF button to operate the
appliance continuously.
CLEANING
Before cleaning, unplug the appliance from the electrical outlet. You should use a damp cloth to clean
both the interior and exterior of the appliance. Do not use any abrasives or solvents to clean the appliance.
Do not clean the appliance with detergent, either.
Do not leave water in the machine for an extended period. The water may become contaminated.
Use the valve on the back of the appliance to remove any excess water. It is advisable to
clean the machine regularly with an anti-algae and anti-bacterial agent. Follow the instructions
on the packaging.
It is advised to pour 1 tablespoon of lemon juice into the water reservoir each time you fill
the ice cube maker. The lemon juice running through the cooling system of ice cube maker
releases a fresh citrus smell throughout your home. The acid in the lemon juice will
combat the growth of bacteria, mould and airborne allergens. In addition, the lemon juice
aids in keeping the water flowing system much fresher in between cleanings.
7
Page 8

On the rear of the ice-cube maker you will find a drainage outlet with valve cap that can be used to empty
the appliance. Unscrew the valve cap and drain the reservoir (if necessary, use a suitable hose). Once it
has emptied close the valve by replacing the cap.
PRINCESS TIPS
- Do not place the Ice Cube Maker on its side or upside down. Especially watch out for this when
moving the appliance.
- Do not position the machine up against other appliances or a wall. The ventilation holes should never
be covered.
- Do not use the Ice Cube Maker outdoors.
- Never submerge the appliance in water or any other liquid, as this can cause electric shock.
- Keep an eye on the Ice Cube Maker when within the reach of children. Of course be careful yourself,
as well.
- Unplug the appliance if you will not be using it for an extended period.
- Do not put the machine near heat sources.
- In case of damage to the appliance or its cord, we advise you to not use the device, but to return it to
the store for repair. Damaged cords must be replaced by our service department.
- Keep in mind that using parts which are not recommended by the manufacturer can be dangerous.
- Only use this appliance for its intended purpose.
- The coolant in the Ice Cube Maker is chemical waste, therefore the machine must be disposed of
properly, in an environmentally friendly way. Inquire about proper disposal with your municipal refuse
department.
- Children should be supervised to ensure that they do not play with the appliance.
- This appliance is not intended for use by persons (including children) with reduced physical, sensory
or mental capabilities, or lack of experience and knowledge, unless they have been given supervision
or instruction concerning use of the appliance by a person responsible for their safety.
U.K. WIRING INSTRUCTIONS
The wires in the mains lead are coloured in accordance with the following code:
BLUE NEUTRAL
BROWN LIVE
GREEN/YELLOW EARTH
As the colours of the wire in the mains lead of this appliance may not correspond with the colour markings identifying the terminals on your plug, proceed as follows:
The wire which is coloured BLUE must be connected to the terminal which is marked with the letter N or
coloured black.
The wire which is coloured BROWN must be connected to the terminal which is marked with the letter L
or coloured red.
The wire which is coloured GREEN/YELLOW must be connected to the terminal which is marked with
the letter E or and is coloured GREEN or GREEN/YELLOW
If a 13Amp (BS1363) plug is used, a 13Amp (BS1362) fuse must be fitted, or if any other type of plug is
used, a 13Amp fuse must be fitted, either in the plug or adaptor, or on the Distribution Board.
WARNING: THIS APPLIANCE MUST BE EARTHED
8
Page 9
PRINCESS SILVER ICE CUBE MAKER ART. 282969
AVANT L'EMPLOI
Lisez attentivement ce mode d’emploi avant d’utiliser l’appareil. Conservez-le afin de pouvoir le consulter
ultérieurement si nécessaire. Assurez-vous que le voltage de votre domicile correspond à celui de l’appareil.
Toujours raccorder l’appareil à une prise de terre.
Le PRINCESS SILVER ICE CUBE MAKER est une machine à glaçons semi-professionnelle. Elle vous
permet d'obtenir des glaçons facilement et rapidement. En un quart d’heure, l'appareil arrive à température et les premiers glaçons sont prêts. Tant que la machine reste allumée, elle produit 12 glaçons en 9 - 13
minutes (selon leur taille).
Equipée d’un écran bien lisible (1), interrupteur Marche/Arrêt (2), touche de réglage SET (3), touche d’ajustement ▲ (4) et touche de sélection SELECT (5). Voir la fig.
UTILISATION
Installez le Ice Cube Maker sur une surface plane et solide. Contrôlez que les orifices de ventilation ne
sont pas bouchés. Laissez un espace d'au moins 20 cm entre l'appareil et le mur ou d'autres appareils.
Laissez l’appareil au mois 3 heures au repos, avant de l’utiliser pour la première fois. Ceci afin que le
liquide réfrigérant retombe dans l’élément frigorifique. Ouvrez le couvercle et remplissez le réservoir d'eau.
La contenance maximum est d’environ 3 litres. Replacez à présent le panier à glaçons dans l’appareil et
refermez le couvercle. Branchez la fiche dans la prise de courant. Le symbole
L’appareil est alors prêt à l’emploi.
Sélectionnez la taille des glaçons à l’aide de la touche SELECT. Vous avez le choix entre trois tailles de
glaçons.
S = petit (prêt en 9 minutes environ)
M = moyen (prêt en 11 minutes environ)
L = gros (prêt en 13 minutes environ)
apparaît sur l’écran.
❆
Une fois le bouton Marche/Arrêt enfoncé, le symbole de neige
train de fabriquer les glaçons de la taille désirée. Lorsque le panier à glaçons est plein, le symbole de
panier plein clignote sur l’écran. Sortez alors le panier de l'appareil, conservez les glaçons au frais et
remettez le panier en place dans l’appareil.
Vous pouvez rallumer aussitôt votre Ice Cube Maker pour préparer de nouveau une série de glaçons.
Lorsqu’il n’y a plus d’eau, le symbole Niveau d’eau bas clignote sur l’écran et l’appareil émet des bips
sonores. Remplissez le réservoir et appuyez sur la touche Marche/Arrêt pour poursuivre le fonctionnement.
Si vous laissez les glaçons dans l’appareil, ils fonderont lentement. L’eau des glaçons fondus sera recueillie
dans le réservoir d’eau et la machine recommencera à fabriquer une série de glaçons.
La machine peut être arrêtée à tout moment en appuyant sur la touche Marche/Arrêt. Si
vous n’utilisez pas votre Ice Cube Maker pendant une période prolongée, videz l’eau du
réservoir et débranchez la prise de courant.
clignote indiquant que la machine est en
❆
UTILISATION DU MINUTEUR
Le minuteur permet de programmer l’heure à laquelle la machine à glaçons s’allume et
s’éteint.
Par exemple, il est 16h30. Vous voulez que l’appareil démarre à 17h30 puis qu’il s’éteigne
à 19h30.
9
Page 10
Réglage de l’horloge
Branchez la fiche dans la prise de courant. 12:00 est indiqué sur l’écran (l’horloge interne indique
par défaut 12h00). Appuyez une fois sur la touche SET. '12' clignote pendant 5 secondes. Durant ces 5
secondes, continuez d’appuyer sur la touche d’ajustement ▲ pour passer de '12' à '16' heures. L’écran
clignote encore pendant 5 secondes. Pendant ces 5 secondes, appuyez de nouveau sur la touche SET. '00'
clignote. Appuyez plusieurs fois sur la touche d’ajustement ▲ pour changer les minutes de '00' à '30'.
Lorsque plus rien ne clignote sur l’écran pendant 5 secondes, l’horloge est réglée.
Appuyez 3 fois sur la touche SET lorsque ‘00:00’ est affiché sur l’écran. Suivez ensuite la procédure
décrite ci-dessus pour régler l’horloge et réglez à présent l’heure de mise en marche désirée à 17h30 à
l’aide de la touche SET et de la touche d’ajustement ▲.
Appuyez 5 fois sur la touche SET lorsque ‘00:00’ est affiché sur l’écran. Suivez ensuite la procédure
décrite ci-dessus pour régler l’horloge et réglez à présent l’heure de l’arrêt désirée à 19h30 à l’aide de la
touche SET et de la touche d’ajustement ▲.
Mise en marche et arrêt de l’appareil avec le minuteur
Une fois réglées l’heure de mise en marche et l’heure d’arrêt, vous pouvez sélectionner la fonction
désirée (mise en marche automatique, arrêt automatique, mise en marche et arrêt automatiques) à l’aide
de la touche d’ajustement ▲.
Mise en marche automatique : appuyez une fois sur la touche d’ajustement ▲: est affiché sur l’écran. Le programme est à présent réglé. L’appareil se mettra automatiquement en marche à 17h30.
Arrêt automatique : appuyez deux fois sur la touche d’ajustement ▲: est affiché sur l’écran.
Appuyez sur la touche Marche/Arrêt pour allumer l’appareil. L’appareil s’éteindra automatiquement à
19h30.
Mise en marche et Arrêt automatiques : appuyez trois fois sur la touche d’ajustement ▲: est affiché
sur l’écran. Il est inutile d’appuyer sur la touche Marche/Arrêt pour allumer l’appareil. Conformément au
programme réglé, l’appareil se mettra automatiquement en marche à 17h30 et s’éteindra automatiquement
à 19h30.
NB : Si vous ne souhaitez pas utiliser la fonction de minuteur, appuyez à plusieurs reprises sur la touche
d’ajustement ▲ jusqu’à ce que le symbole et l’heure actuelle soient indiqués sur l’écran. Appuyez
ensuite sur la touche Marche/Arrêt pour utiliser l’appareil en continu.
ENTRETIEN
Toujours débrancher l’appareil de la prise de courant avant de procéder à son nettoyage. Nettoyer l’extérieur
et l’intérieur de l'appareil avec un chiffon humide. Ne pas utiliser de solvant ou de produit nettoyant abrasif
pour nettoyer l’appareil.
Ne pas non plus le laver avec du produit vaisselle.
Ne pas laisser d’eau dans l’appareil pendant une période prolongée. Car l’eau serait souillée. Vider l’eau à
l’aide du petit clapet situé à l’arrière de l’appareil. Il est conseillé de nettoyer régulièrement l'appareil
avec un produit bactéricide et destructeur d'algues. Suivre les instructions figurant sur l’emballage.
Nous conseillons d’ajouter une cuillère à soupe de jus de citron dans l’eau du réservoir à chaque remplissage
de la machine à glaçons. Le jus de citron qui circule dans le système réfrigérant de la machine répandra
une agréable odeur de citron dans la maison. En outre, l’acide du citron combat la propagation des bactéries,
moisissures et allergènes présents dans l’air. Le jus de citron contribue également à préserver la fraîcheur
du système de circulation d’eau de la machine entre deux nettoyages.
A l’arrière de la machine à glaçons se trouve un robinet de vidange avec un petit clapet permettant de
vider l’appareil. Ouvrir le clapet en le dévissant et laisser l’eau s’écouler du réservoir (utiliser si nécessaire un tuyau souple adapté). Lorsque le réservoir est vide, refermer le clapet
avec le bouchon.
CONSEILS PRINCESS
- Ne pas basculer la machine à glaçons sur le côté ni la renverser. Faire particulièrement
attention à cela lorsque la machine est déplacée.
- Ne pas installer la machine à glaçons contre un mur ou contre un autre appareil. Les
aérations doivent toujours rester ouvertes.
- Ne pas utiliser la machine à glaçons à l'extérieur.
10
Page 11

- Ne jamais plonger l’appareil dans l’eau ni dans tout autre liquide. Vous pourriez ressentir une décharge
électrique.
- Surveiller la machine à glaçons si des enfants sont à proximité. Soyez bien sûr vous-même très prudent.
- Débrancher la prise de courant si l'appareil n'est pas utilisé pendant une période prolongée.
- Ne pas installer la machine à glaçons à proximité d’une source de chaleur.
- Si l'appareil ou le cordon est endommagé, ne plus utiliser l'appareil et le rapporter au magasin pour le
faire réparer. Le remplacement du cordon ne peut être effectué que par notre service après-vente.
- L’utilisation d’accessoires non recommandés par le fabricant peut être dangereuse.
- Utiliser cet appareil uniquement pour l’usage auquel il est destiné.
- Le liquide réfrigérant contenu dans la machine à glaçons fait partie des déchets chimiques. Il convient
donc de se débarrasser de la machine en respectant les normes écologiques en vigueur. Renseignezvous auprès de la déchetterie de votre commune.
- Veiller à ce que les enfants ne jouent pas avec l’appareil.
- L’utilisation de cet appareil par des enfants ou des handicapés physiques, sensoriels, mentaux ou
moteurs, ou dénués d’expérience et de connaissance peut être dangereuse. Les personnes responsables
de leur sécurité devront fournir des instructions explicites ou surveiller l’utilisation de l’appareil.
PRINCESS SILVER ICE CUBE MAKER ART. 282969
VOR DEM GEBRAUCH
Diese Gebrauchsanweisung vor dem Erstgebrauch sorgfältig durchlesen und für eventuelle spätere Fragen
aufheben. Überprüfen, ob die Netzspannung im Haus der des Gerätes entspricht. Das Gerät nur an einer
geerdeten Steckdose anschließen.
Der PRINCESS SILVER ICE CUBE MAKER ist eine semiprofessionelle Eiswürfelmaschine. Dieses
Gerät kann schnell und problemlos Eiswürfel herstellen. Innerhalb von 15 Minuten ist das Gerät die
benötigte Temperatur erreicht und sind die ersten Eiswürfel fertig. Solange das Gerät eingeschaltet ist,
produziert es aller 9-13 Minuten jeweils 12 Eiswürfel (abhängig von der Größe).
Ausgestattet mit einer deutlichen Anzeige (1), ON/OFF-Knopf (2), SET-Knopf (3), Korrekturknopf ▲(4)
und SELECT-Knopf (5). Siehe Abb.
GEBRAUCH
Den Ice Cube Maker auf eine sichere und stabile Unterlage stellen. Darauf achten, dass die Belüftungsöffnungen nicht blockiert sind. Der Abstand zu anderen Geräten oder Wänden muss mindestens 20 cm
betragen. Vor dem Erstgebrauch des Gerätes muss das Gerät mindestens 3 Stunden ruhig an einer Stelle
gestanden haben. Die Kühlflüssigkeit muss nämlich erst einmal im Kühlelement zur Ruhe kommen. Den
Deckel öffnen und den Wasserbehälter mit Wasser füllen. Der maximale Inhalt beträgt ungefähr 3 Liter.
Danach den Eiswürfeleimer in das Gerät stellen und den Deckel schließen. Den Stecker an eine Steckdose
anschließen. Ein „Schneeflocken-Symbol“
Wählen Sie mit dem SELECT-Knopf die Größe der Eiswürfel aus. Drei verschiedene Größen stehen zur
Auswahl.
S = klein (fertig in ungefähr 9 Minuten)
M = mittel (fertig in ungefähr 11 Minuten)
L = groß (fertig in ungefähr 13 Minuten)
Nachdem der ON/OFF-Knopf gedrückt wurde, bleibt das „Schneeflocken-Symbol“
blinken. Das bedeutet, dass das Gerät die Eiswürfel in der gewünschten Größe herstellt.
Wenn der Eiswürfeleimer voll ist, blinkt in der Anzeige „Eiseimer voll“ . Den Eimer
aus dem Gerät nehmen, die Eiswürfel an einem kalten Ort aufbewahren und den Eimer
anschließend wieder in das Gerät stellen.
erscheint in der Anzeige. Das Gerät ist einsatzbereit.
❆
❆
11
Page 12

Der Ice Cube Maker kann sofort wieder eingeschaltet werden, um weitere Eiswürfel herzustellen. Wenn
das Wasser alle ist, blint in der Anzeige „Wasser nachfüllen“ und es ertönt ein kurzer Signalton. Den
Behälter mit Wasser füllen und den ON/OFF-Knopf drücken, um den Vorgang fortzusetzen.
Wenn die Eiswürfel im Gerät liegen bleiben, werde sie langsam schmelzen. Das geschmolzene Wasser
wird im Wasserbehälter aufgefangen, danach produziert das Gerät neue Eiswürfel.
Das Gerät kann jederzeit ausgeschaltet werden, indem der ON/OFF-Knopf gedrückt wird. Wenn der Ice
Cube Maker längere Zeit nicht benutzt wird, sollte der Wasserbehälter entleert und der Stecker aus der
Steckdose gezogen werden.
GEBRAUCH TIMER
Mit dem Timer kann eingestellt werden, wann sich das Gerät ein- oder ausschalten soll.
Es ist beispielsweise 16:30 Uhr. Sie wollen das Gerät um 17:30 Uhr einschalten und um 19:30 Uhr
wieder ausschalten.
Uhrzeit einstellen
Den Stecker an eine Steckdose anschließen, auf der Anzeige steht 12:00 (die Standardzeit auf der
Anzeige ist immer 12:00 Uhr). Den SET-Knopf 1 Mal drücken, „12“ blinkt 5 Sekunden lang. In diesen 5
Sekunden drückt man so lange auf den Korrekturknopf ▲, bis die Zeit von „12“ auf „16“ eingestellt ist.
Diese Zeit blinkt ebenfalls 5 Sekunden lang. In diesen 5 Sekunden muss erneut der SET-Knopf gedrückt
werden. „00“ beginnt zu blinken. Den Korrekturknopf ▲ drücken, um die Zeit von „00“ auf „30“ einzustellen. Nach 5 Sekunden ohne blinkendes Symbol auf der Anzeige ist die Zeit eingestellt.
3 Mal auf den SET-Knopf drücken, wenn „00:00“ auf der Anzeige zu sehen ist. Das oben beschriebene Verfahren befolgen, um mit dem SET-Knopf und dem Korrekturknopf die gewünschte Einschaltzeit
auf 17:30 Uhr einzustellen.
5 Mal auf den SET-Knopf drücken, wenn „00:00“ auf der Anzeige zu sehen ist. Das oben beschriebene Verfahren befolgen, um mit dem SET-Knopf und dem Korrekturknopf ▲die gewünschte
Ausschaltzeit auf 19:30 Uhr einzustellen.
Gerät mit Timer ein- und ausschalten
Wenn die Ein-/Ausschaltzeit einmal eingestellt ist, können mit dem Korrekturknopf ▲ die gewünschten
Einstellungen (Auto-Einschalten, Auto-Ausschalten, Auto-Ein- und Ausschalten) eingestellt werden.
Einstellung Auto-Einschalten: Den Korrekturknopf ▲ 1 Mal drücken, auf der Anzeige erscheint .
Das Programm ist jetzt eingestellt. Das Gerät schaltet sich automatisch um 17:30 Uhr ein.
Einstellung Auto-Ausschalten: Den Korrekturknopf ▲ 2 Mal drücken, auf der Anzeige erscheint .
Den ON/OFF-Knopf drücken, um das Gerät einzuschalten. Das Gerät schaltet sich automatisch um 19:30
Uhr aus.
Einstellung Auto-Ein- und Ausschalten: Den Korrekturknopf ▲ 3 Mal drücken, auf der Anzeige erscheint
Der ON/OFF-Knopf braucht nicht eingedrückt zu werden, um das Gerät einzuschalten. Gemäß dem
eingestellten Programm schaltet sich das Gerät um 17:30 Uhr automatisch ein und um 19:30 Uhr
automatisch aus.
Hinweis: Wenn die Timerfunktion nicht genutzt werden soll, muss der Korrekturknopf ▲ verschiedene
Male gedrückt werden bis das Symbol und die aktuelle Uhrzeit in der Anzeige erscheint. In dem
Fall den ON/OFF-Knopf drücken, um das Gerät durchgehend zu gebrauchen.
REINIGUNG
Vor der Reinigung immer den Stecker aus der Steckdose ziehen. Die Innen- und
Außenseite des Geräts mit einem feuchten Tuch reinigen. Keine scheuernden Reinigungsoder Lösungsmittel benutzen.
Das Gerät auch nicht mit einem Waschmittel reinigen.
Wasser nie längere Zeit im Gerät belassen, es kann verunreinigen. Das Wasser über den
Klappverschluss an der Rückseite des Geräts herauslaufen lassen. Es empfiehlt sich, das
Gerät regelmäßig mit einem antialgen- und antibakteriellen Mittel zu reinigen. Befolgen
Sie die Hinweise auf der Verpackung.
12
Page 13

Es empfiehlt sich, dem Wasser bei jeder Füllung des Ice Cube Maker 1 Esslöffel Zitronensaft beizufügen.
Durch den durch das Kühlsystem des Ice Cube Maker laufenden Zitronensaft verbreitet sich im Haus ein
frischer Zitronenduft. Die Säuren im Saft bekämpfen außerdem das Bakterien-, Schimmel- und Allergenwachstum in der Luft. Darüber hinaus hält der Zitronensaft das Wasserdurchführsystem zwischen den
Reinigungen sauberer.
An der Rückseite des Geräts befindet sich ein Abzapfhahn mit einem Klappverschluss, mit dem das Gerät
entleert werden kann. Die Klappe aufschrauben und den Wasserbehälter leer laufen lassen (falls nötig
einen geeigneten Schlauch benutzen). Wenn der Wasserbehälter leer ist, die Klappe mit dem Verschluss
schließen.
PRINCESS-TIPPS
- Den Ice Cube Maker nicht auf die Seite oder auf den Kopf stellen. Besonders beim Umstellen des
Geräts darauf achten.
- Das Gerät nicht gegen eine Wand oder ein anderes Gerät stellen. Die Belüftungsöffnungen müssen
immer offen sein.
- Den Ice Cube Maker nicht im Freien benutzen.
- Das Gerät nie in Wasser oder andere Flüssigkeiten tauchen, es besteht die Gefahr eines elektrischen
Schlags.
- Den Ice Cube Maker im Beisein von Kindern gut im Auge behalten. Selbst natürlich auch vorsichtig sein.
- Wenn das Gerät über längere Zeit nicht benutzt wird, den Stecker aus der Steckdose ziehen.
- Das Gerät nicht in die Nähe von Wärmequellen stellen.
- Bei einer Beschädigung von Gerät oder Kabel das Gerät nicht mehr benutzen, sondern zur Reparatur
zurück ins Geschäft bringen. Ein beschädigtes Kabel kann nur vom Kundendienst ausgetauscht werden.
- Der Gebrauch von Zubehörteilen, die nicht vom Hersteller empfohlen werden, kann gefährlich sein.
- Das Gerät ist ausschließlich für den dafür vorgesehenen Gebrauch bestimmt.
- Die Kühlflüssigkeit des Ice Cube Maker ist chemischer Abfall. Das Gerät muss deshalb umweltfreundlich entsorgt werden. Informieren Sie sich bei der örtlichen Abfallbehörde über die ordnungsgemäße
Entsorgung.
- Darauf achten, dass Kinder nicht mit dem Gerät spielen.
- Die Benutzung dieses Gerätes durch Kinder oder Personen mit eingeschränkten körperlichen, sensorischen
oder geistigen Fähigkeiten oder fehlender Erfahrung und Kenntnis kann Gefahren mit sich bringen.
Diese Benutzer sind daher von den für ihre Sicherheit verantwortlichen Personen in den Gebrauch
einzuweisen oder dürfen dieses Gerät nur unter Aufsicht benutzen.
PRINCESS SILVER ICE CUBE MAKER ART. 282969
ANTES DEL USO
Léanse primero en su totalidad estas instrucciones de uso y consérvense para una posible consulta posterior.
Compruebe que el tipo de suministro eléctrico de su domicilio coincida con el de este equipo. Conecte el
aparato únicamente a un enchufe con toma de tierra.
La PRINCESS SILVER ICE CUBE MAKER es una máquina para cubitos de hielo semiprofesional. Con
este aparato se pueden hacer rápida y fácilmente cubitos de hielo. Al cabo de 15 minutos la máquina
alcanzará la temperatura adecuada para hacer los primeros cubitos de hielo. Mientras la máquina permanezca
encendida hará 12 cubitos de hielo cada 9-13 minutos (dependiendo del tamaño).
Tiene una amplia pantalla (1), botón de encendido/apagado (ON/OFF) (2), botón Establecer (SET) (3),
botón Ajustar ▲(4) y botón Seleccionar (SELECT) (5). Vea la figura.
USO
Coloque la máquina para cubitos de hielo en una superficie sólida y plana, y estabilice el
aparato. Asegúrese de que las aperturas de ventilación del aparato queden libres. La distancia
a otros aparatos o paredes debe ser como mínimo de 20 cm. El aparato debe dejarse reposar
13
Page 14

un mínimo de tres horas antes de usarlo por primera vez. Ello es necesario para que el refrigerante se
asiente en el elemento de refrigeración. Abra la tapa del aparato y rellene el depósito de agua con agua. El
máximo son aproximadamente 3 litros. Ponga la canastilla para cubitos de hielo en el aparato y cierre la
tapa. Conecte el enchufe a la toma de corriente. En la pantalla se mostrará el ‘símbolo de nieve’
el aparato está listo para funcionar.
Con el botón ‘Select’ se puede ajustar el tamaño deseado de cubitos de hielo. Se pueden escoger los siguientes
tres tamaños:
S = pequeño (cubitos de hielo pequeños, listos al cabo de 9 minutos).
M = medio (listos en aproximadamente 11 minutos).
L = grande (listos al cabo de 13 minutos).
. Ahora
❆
Después de pulsar el botón de encendido/apagado (ON/OFF), el ‘símbolo de nieve’
indicar que el aparato ha empezado la preparación de cubitos de hielo del tamaño seleccionado. Cuando
el depósito esté completamente lleno de cubitos, en la pantalla parpadeará ‘Ice Full’ (lleno) . Entonces
se ha de sacar el depósito del aparato, guardar los cubitos de hielo en un lugar fresco y volver a colocar el
depósito.
La máquina de hielo se puede volver a poner en funcionamiento inmediatamente para preparar más cubitos de hielo. Cuando no haya agua, en la pantalla parpadeará ‘ Water Low’ (falta agua) y se oirá un
pitido corto. Rellene el depósito de agua y pulse el botón de encendido/apagado (ON/OFF) para continuar
el proceso.
Si se dejan en el aparato los cubitos de hielo se irán fundiendo. El agua fundida se recogerá en el depósito
de agua y la máquina empezará a fabricar una nueva ronda de cubitos.
Se puede parar la máquina en cualquier momento pulsando botón de encendido/apagado (ON/OFF).
Cuando no vaya a usar el aparato durante una temporada, saque el agua del depósito y desenchúfelo de la
toma de corriente.
parpadeará para
❆
USO DEL TEMPORIZADOR
El temporizador permite indicar cuándo se encenderá y apagará el aparato.
Por ejemplo, son las 16:30 y usted desea que el aparato se conecte a las 17:30 y se apague a las 19:30.
Establecer la hora
Enchúfelo a la toma de corriente y aparecerá 12:00 en la pantalla (la hora predeterminada son las
12:00). Pulse el botón Establecer "SET" una vez; ‘12’ parpadeará durante 5 segundos. Durante este tiempo puede mantener pulsado el botón ▲ para ajustar la hora de ‘12’ a ‘16’, que también parpadeará durante 5 segundos. En estos 5 segundos, pulse de nuevo el botón Establecer "SET", y parpadeará ‘00’. Use
el botón ▲ para ajustar los minutos de ‘00’ a ‘30’. Tras 5 segundos sin que parpadee ningún símbolo en
la pantalla, la hora quedará ajustada.
Pulse el botón Establecer "SET" 3 veces cuando vea ‘00:00’ en la pantalla. Siga el proceso anterior
para establecer la hora del reloj y los botones Establecer "SET" y Ajustar para activar la hora de encendido
deseada a las 17:30.
Pulse el botón Establecer "SET" 5 veces cuando vea ’00:00’ en la pantalla; siga los pasos anteriores
para establecer la hora del reloj; puede usar el botón Establecer "SET" y el botón ▲ para activar la hora
deseada de apagado a las 19:30.
Uso del temporizador para encender/apagar
Una vez establecidas las horas de encendido y apagado, use el botón Ajustar ▲ para los
ajustes deseados (autoencendido, autoapagado, autoencendido y autoapagado).
Ajuste de autoencendido: pulse el botón Ajustar ▲ una vez; verá en la pantalla. El
programa está activado. El aparato se encenderá automáticamente a las 17:30.
Ajuste de autoapagado: pulse el botón Ajustar ▲ dos veces; verá en la pantalla.
Pulse el botón ON/OFF (encendido/apagado) para encender el aparato. El aparato se apagará automáticamente a las 19:30.
14
Page 15

Ajuste de autoencendido y autoapagado: pulse el botón Ajustar ▲ 3 veces; verá en la pantalla. No
necesitará pulsar el botón ON/OFF (encendido/apagado) para encender el aparato. Según la programación
deseada, el aparato se encenderá a las 17:30 y se apagará automáticamente a las 19:30.
Nota: cuando no necesite la función de temporizador, pulse el botón Ajustar ▲ varias veces hasta que en
la pantalla sólo se muestren el símbolo y la hora actual. Luego, use el botón ON/OFF para accionar
el aparato en modo manual.
LIMPIEZA
Antes de la limpieza desenchufe la clavija de la toma de corriente. Tanto la parte interior como la exterior
del aparato se pueden limpiar con un trapo húmedo. No utilice productos abrasivos o disolventes para la
limpieza.
Tampoco limpie el aparato con un detergente líquido.
No deje agua durante un período prolongado dentro de la máquina. El agua puede ensuciarse. Para ello,
use la válvula de la parte posterior del aparato para eliminar el agua restante. Se recomienda limpiar con
regularidad la máquina con un producto antialgas y antibacteriano. Consulte las instrucciones suministradas.
Se recomienda poner 1 cucharada de zumo de limón en el depósito del agua cada vez que llene la máquina
de hacer cubitos. El zumo de limón en el sistema de refrigeración de la máquina de hacer cubitos dará un
fresco aroma a cítrico por la casa. El ácido del zumo de limón combate el crecimiento de bacterias, moho
y alérgenos en el aire. Además, el zumo de limón ayuda a mantener el sistema de flujo de agua más fresco
entre limpiezas.
En la parte posterior de la máquina de hacer cubitos hay un tubo de desagüe con tapón válvula que permite
vaciarla. Desatornille el tapón válvula y vacíe el depósito (en caso necesario puede usar un tubo flexible).
Una vez vaciado, cierre la válvula volviendo a colocar el tapón.
CONSEJOS PRINCESS
- No coloque la máquina de hacer cubitos de lado ni tampoco boca abajo. Preste atención a la posición
correcta especialmente durante traslados del aparato.
- No sitúe la máquina cerca de otros aparatos o cerca de una pared. Los orificios de ventilación han de
permanecer abiertos en todo momento.
- No use la máquina de hacer cubitos en el exterior.
- No sumerja nunca el aparato en agua ni en otro líquido para evitar descargas eléctricas.
- Vigile bien la máquina de hacer cubitos cuando está al alcance de los niños. Naturalmente, tenga cuidado también usted.
- Desenchúfelo cuando no vaya a usar el aparato durante un tiempo prolongado.
- No sitúe la máquina cerca de fuentes de calor.
- En caso de avería de la máquina o del cable, le aconsejamos que deje de usar el aparato y lo devuelva a
la tienda para su reparación. Un cable defectuoso solo puede ser reemplazado por nuestro servicio de
reparaciones.
- Tenga en cuenta que el uso de piezas no recomendadas por el fabricante pueden ser un peligro.
- Use este aparato únicamente para los fines indicados.
- El líquido refrigerante de la máquina de hacer cubitos es un residuo químico y, por ello, en caso de
desechar la máquina, debe hacerlo según las indicaciones medioambientales. Los organismos municipales podrán informarle sobre los procedimientos de desecho.
- Los niños deberán estar vigilados para evitar que no jueguen con el aparato.
- El uso de este aparato por niños o personas con alguna discapacidad física, sensorial, mental o motora,
o con falta de experiencia o conocimientos puede implicar riesgos. Las personas responsables de su
seguridad deberán proporcionar instrucciones explícitas o supervisar el uso del aparato.
PRINCESS SILVER ICE CUBE MAKER ART. 282969
PRIMA DELL'USO
Leggete attentamente queste istruzioni d’uso e conservatele per eventuali consultazioni
future. Verificate che la rete di alimentazione della vostra abitazione corrisponda alle
caratteristiche elettriche dell’apparecchio. Collegate l’apparecchio esclusivamente ad una
presa di alimentazione con messa a terra.
La PRINCESS SILVER ICE CUBE MAKER è una macchina per il ghiaccio semiprofessionale.
La macchina permette di preparare cubetti di ghiaccio in maniera facile e veloce. Entro 15
minuti, la macchina ha raggiunto la temperatura giusta ed i primi cubetti di ghiaccio sono
pronti. Fintanto che è accesa, la macchina produce 12 cubetti di ghiaccio ogni 9-13
minuti (a seconda della dimensione).
15
Page 16

Dotata di un chiaro display (1), pulsante ON/OFF (2), pulsante SET (3), pulsante di regolazione▲(4) e
pulsante di selezione SELECT (5). Vedi fig.
USO
Posizionate l’Ice Cube Maker su una superficie solida e piana. Fate attenzione che le aperture di ventilazione non vengano ostruite. La macchina deve distare almeno 20 cm da altre apparecchiature o dal muro.
Dopo il posizionamento lasciate riposare la macchina per almeno tre ore prima di metterla in uso. Ciò
per permettere al liquido refrigerante di depositarsi correttamente negli elementi refrigeranti. Aprite il
coperchio e riempite il serbatoio con acqua. La capienza massima è pari a 3 litri. Quindi inserite il cestello nella macchina e chiudete il coperchio. Inserite la spina nella presa di alimentazione. Il display LCD
mostra l’icona con il “Fiocco di neve”
Usate il pulsante di selezione SELECT per impostare il formato dei cubetti di ghiaccio. Potete scegliere
tra tre diversi formati.
S = small (pronti in circa 9 minuti)
M = medium (pronti in circa 11 minuti)
L = large (pronti in circa 13 minuti)
. La macchina è ora pronta per essere accesa.
❆
Una volta premuto il pulsante ON/OFF, l’icona con il “Fiocco di neve”
indicare che la macchina ha iniziato a preparare i cubetti del formato selezionato. Quando il serbatoio è
completamente pieno di cubetti di ghiaccio sul display LCD lampeggia l’icona “Pieno di ghiaccio” .
Estraete il recipiente dalla macchina, conservate i cubetti di ghiaccio in un luogo freddo e rimettete il
serbatoio nella macchina.
L’Ice Cube Maker può essere riacceso immediatamente per preparare una nuova serie di cubetti di ghiaccio.
Se non vi è più acqua nel serbatoio, sul display LCD lampeggia l’icona “Livello acqua basso” e la
macchina emette un segnale acustico. Riempite il serbatoio d’acqua e premete il pulsante ON/OFF per
riprendere il processo.
I cubetti di ghiaccio lasciati dentro la macchina si sciolgono gradualmente. L’acqua di scioglimento viene
convogliata nel serbatoio, dopodichè l’Ice Cube Maker ricomincia a produrre una nuova serie di cubetti.
La macchina può essere fermata in qualunque momento premendo il pulsante ON/OFF. Quando l’Ice
Cube Maker non viene usato per un periodo prolungato, svuotate il serbatoio dell’acqua e togliete la spina
dalla presa di alimentazione.
comincerà a lampeggiare per
❆
USO DEL TIMER
Il timer interno vi permette di impostare l’ora in cui la macchina deve accendersi e quando deve spegnersi.
Per esempio, sono le ore 16:30 e volete che la macchina si accenda alle ore 17:30 e si spenga alle ore 19:30.
Impostazione dell’ora
Inserite la spina nella presa di alimentazione, il display visualizza le ore 12:00
(questa è l’ora impostata di serie). Premete una volta il pulsante SET, il “12” lampeggia
per 5 secondi. Durante questo periodo premete il pulsante di regolazione ▲ per portare
l’ora da “12” a “16”; anche il “16” lampeggerà per 5 secondi. In questi 5 secondi premete
nuovamente il pulsante SET e lo “00” comincerà a lampeggiare. Usate il pulsante ▲ per
regolare i minuti da “00” a “30”. Dopo 5 secondi senza che lampeggi alcuna icona sul
display l’ora sarà impostata.
Premete 3 volte il pulsante SET quando “00:00” appare sul display. Seguite la
procedura precedentemente descritta per la regolazione dell’ora per impostare l’ora di
accensione sulle ore 17:30 mediante il pulsante SET ed il pulsante di regolazione.
16
Page 17

Premete il pulsante SET per 5 volte quando appare “00:00” sul display. Seguite la procedura precedentemente descritta per la regolazione dell’ora per impostare l’ora di spegnimento sulle ore 19:30 mediante il pulsante SET ed il pulsante di regolazione▲.
Uso del timer per accendere/spegnere la macchina
Una volta impostati gli orari di accensione e spegnimento, usate il pulsante di regolazione ▲ per le
impostazioni desiderate (accensione automatica, spegnimento automatico, accensione e spegnimento
automatici).
Impostazione dell’accensione automatica: premete una volta il pulsante di regolazione ▲, l’icona
apparirà sul display. Il programma è impostato. La macchina si accenderà automaticamente alle ore 17:30.
Impostazione dello spegnimento automatico: premete due volte il pulsante di regolazione ▲, l’icona
apparirà sul display. Premete il pulsante ON/OFF per accendere la macchina. La macchina si spegnerà
automaticamente alle ore 19:30.
Impostazione dell’accensione e dello spegnimento automatici: premete tre volte il pulsante di regolazione ▲,
l’icona apparirà sul display. Non avete bisogno di premere il pulsante ON/OFF per accendere la
macchina. La macchina si accenderà automaticamente alle ore 17:30 e si spegnerà automaticamente alle
ore 19:30.
Nota: se non usufruite della funzione timer, premete ripetutamente il pulsante di regolazione▲ fino a
quando il display visualizzerà solo l’icona e l’ora attuale. Premete il pulsante ON/OFF per accendere la macchina in modalità continua.
PULIZIA
Togliete la spina dalla presa di alimentazione prima di pulire la macchina. Usate un panno umido per
pulire sia l’interno, sia l’esterno della macchina. Non usate sostanze abrasive o solventi per pulire la
macchina.
Non usate nemmeno sostanze detergenti per pulire la macchina.
Non lasciate acqua nella macchina per periodi prolungati. L’acqua potrebbe contaminarsi. Usate la
valvola sul retro della macchina per rimuovere l’eccesso d’acqua. Si consiglia di pulire regolarmente
l’apparecchio con un prodotto contro la formazione di alghe e batteri. Seguite le istruzioni sulla confezione.
Si consiglia di versare un cucchiaino di succo di limone al serbatoio dell’acqua ogni volta che riempite la
macchina per il ghiaccio. Passando attraverso il sistema di raffreddamento della macchina per il ghiaccio,
il succo di limone rilascia un gradevole profumo di fresco. Inoltre, l’acidità del succo di limone contrasta
lo sviluppo dei batteri, muffe ed allergeni volatili. Infine, il succo di limone aiuta a mantenere più fresca
l’acqua nel sistema di circolazione, tra una pulizia e l’altra.
Sul retro della macchina per il ghiaccio si trova il tappo della valvola per svuotare la machina. Svitate il
tappo della valvola e versate l’acqua in un recipiente di raccolta (se necessario, usate un tubo di gomma di
dimensione adeguata). Una volta svuotata la macchina chiudete la valvola con il tappo.
SUGGERIMENTI PRINCESS
- Non mettete mail l’Ice Cube Maker su un fianco o a testa in giù. Fate attenzione soprattutto quando
spostate la macchina.
- Non mettete la macchina a contatto con altre apparecchiature o contro una parete. Le aperture di
ventilazione non dovrebbero mai essere ostruite.
- Non usate l’Ice Cube Maker in ambiente esterno.
- Non immergete mai la macchina in acqua o in altri liquidi, onde evitare il rischio di scosse elettriche.
- Sorvegliate l’Ice Cube Maker quando si trova alla portata dei bambini.
- Staccate la spina dalla presa di alimentazione se non usate la macchina per un periodo
prolungato.
- Non posizionate la macchina in prossimità di fonti di calore.
- In caso di danneggiamento dell’apparecchio o del cavo di alimentazione, non usate più
l’apparecchio, ma riportatelo al negozio per la riparazione. Un cavo di alimentazione
danneggiato deve essere sostituito esclusivamente presso il nostro centro di assistenza.
- L’uso di ricambi non consigliati dal fabbricante può essere pericoloso.
- Usate l’apparecchio esclusivamente per lo scopo previsto.
17
Page 18

- Il liquido refrigerante contenuto nell’Ice Cube Maker è un rifiuto chimico, per questo la macchina deve
essere dismessa conformemente alle disposizioni locali. Consultate le disposizioni del comune in cui
risiedete per smaltire correttamente la macchina.
- Controllare i bambini affinché non giochino con l’apparecchio.
- L’uso di questo apparecchio da parte di bambini o persone con problemi fisici, sensoriali, mentali o
motori, o con scarsa esperienza o conoscenza, può causare gravi pericoli. Le persone responsabili per la
loro sicurezza devono dare loro istruzioni chiare o supervisionare l’uso dell’apparecchio.
PRINCESS SILVER ICE CUBE MAKER ART. 282969
INNAN DU BÖRJAR
Läs först instruktionerna noggrant och behåll dem för framtida referens. Kontrollera att hushållets
elförsörjning motsvarar apparatens. Apparaten får endast kopplas till ett jordat vägguttag.
PRINCESS SILVER ICE CUBE MAKER är en semi-professionell ismaskin. Den används till att snabbt
och enkelt frysa isbitar. Inom 15 minuter har apparaten uppnått rätt temperatur och de första isbitarna är
färdiga. Så länge maskinen är igång producerar den 12 isbitar per 9-13 minuter (beroende på formatet).
Apparaten är utrustad med en tydlig display (1), ON/OFF-knapp (2), SET-knapp (3), justeringsknapp▲(4)
och SELECT-knapp (5). Se fig.
ANVÄNDNING
Placera ismaskinen ordentligt på en stabil och jämn yta. Se till att apparatens ventilationsöppningar hålls
fria. Avståndet till andra apparater eller väggar ska vara minst 20 cm. Apparaten måste stå stilla i minst tre
timmar innan den startas första gången. Då har kylvätskan tid att sjunka i kylelementet. Öppna locket och
fyll vattenbehållaren med vatten. Den maximala volymen är ca 3 liter. Placera isbitskorgen i apparaten
och stäng locket. Sätt i kontakten i uttaget. ”Snösymbolen”
redo att startas.
visas på LCD-skärmen. Apparaten är nu
❆
Använd knappen ”SELECT” för att ställa in isbitsform. Det finns tre olika former att välja bland.
S = small (klara på ungefär 9 minuter)
M = medium (klara på ungefär 11 minuter)
L = large (klara på ungefär 13 minuter)
När ON/OFF-knappen har tryckts ned fortsätter ”snösymbolen”
påbörjat frysningen av isbitar i den valda storleken. Om behållaren är helt full av isbitar blinkar symbolen
för ”fullt med is” på LCD-skärmen. Ta ur behållaren ur apparaten, lägg isbitarna på en sval plats och
sätt tillbaka behållaren i apparaten.
Ismaskinen kan slås på igen på en gång för att frysa en ny sats isbitar. Om vattnet är slut blinkar symbolen
för ”låg vattennivå” och korta pipljud hörs. Fyll på vattenbehållaren med vatten och tryck sedan på
ON/OFF-knappen för att fortsätta.
Om isbitar lämnas kvar i maskinen smälter de gradvis. När det smälta vattnet samlas i
vattenbehållaren börjar ismaskinen frysa en ny sats med isbitar.
Det går att när som helst stoppa maskinen genom att trycka på ON/OFF-knappen.
Avlägsna allt vatten ur behållaren och drag ut kontakten ur vägguttaget om maskinen inte
kommer att användas under en längre tid.
att blinka för att visa att maskinen har
❆
ANVÄNDNING AV TIMER
Med hjälp av den inre timern kan du ange när maskinen ska slås på och stängas av.
Anta t.ex. att den aktuella tiden är 16:30. Du vill starta maskinen kl. 17:30 och stänga av
den kl. 19:30.
18
Page 19

Inställning av tiden
Sätt i kontakten i uttaget. 12:00 visas på displayen (standardtiden är 12:00). Tryck på SET-knappen
en gång, så blinkar ”12” i 5 sekunder. Under den tiden kan du upprepade gånger trycka på justeringsknappen▲
för att ändra timvärdet från ”12” till ”16”, som också blinkar i 5 sekunder. Under dessa 5 sekunder trycker
du på SET-knappen igen och sedan blinkar "00". Använd justeringsknappen▲ för att ändra minutvärdet
från ”00” till ”30”. När 5 sekunder har gått utan att någon symbol blinkar på displayen har den aktuella
tiden ställts in.
Tryck på SET-knappen 3 gånger när ”00:00” visas på displayen. Följ ovanstående steg för att ställa
in klockans tid och använd SET-knappen och justeringsknappen för att ställa in önskad påslagningstid till
17:30.
Tryck på SET-knappen 5 gånger när ”00:00” visas på displayen. Följ stegen ovan för att ställa in
klockans tid och använd SET-knappen och justeringsknappen▲ för att ställa in önskad avstängningstid till
19:30.
Använd timer för att slå på/stänga av
När påslagningstiden och avstängningstiden har ställts in använder du justeringsknappen▲ för att ange de
önskade inställningarna (automatisk påslagning, automatisk avstängning, automatisk påslagning och
avstängning).
Inställningen för automatisk påslagning: tryck på justeringsknappen▲ en gång så visas på displayen.
Nu är inställningen klar. Apparaten kommer att slås på automatiskt kl. 17:30.
Inställningen för automatisk avstängning: tryck på justeringsknappen▲ två gånger så visas på displayen. Tryck på ON/OFF-knappen för att slå på apparaten. Apparaten kommer att stängas av automatiskt
kl. 19:30.
Inställningen för automatisk påslagning och avstängning: tryck på justeringsknappen▲ 3 gånger så visas
på displayen. Du behöver inte trycka på ON/OFF-knappen för att slå på apparaten. Enligt inställningarna
du har gjort slås apparaten automatiskt på kl. 17:30 och stängs av kl. 19:30.
Obs! om du inte behöver timerfunktionen trycker du på justeringsknappen ▲ flera gånger tills bara symbolen och den aktuella tiden visas på LCD-skärmen. Du använder sedan ON/OFF-knappen när du
använder apparaten.
RENGÖRING
Drag före rengöring först ut kontakten ur vägguttaget. Använd en fuktig trasa för att göra rent på insidan
och utsidan av apparaten. Använd inga skur- eller lösningsmedel för rengöring.
Apparaten får inte heller rengöras med diskmedel.
Lämna inget vatten under en längre tid i maskinen. Vattnet kan kontamineras. Använd ventilen på baksidan
av apparaten för att ta bort överflödigt vatten. Vi rekommenderar att du regelbundet rengör maskinen med
ett medel mot alger och bakterier. Följ instruktionerna på förpackningen.
Vi rekommenderar att du häller 1 matsked citronsaft i vattenbehållaren varje gång du fyller ismaskinen.
Citronsaft som rinner genom kylsystemet i ismaskinen ger en fräsch citrondoft i ditt hem. Syran i citronsaften motverkar att bakterier, mögel och luftburna allergener bildas. Dessutom gör citronsaften att vattensystemet blir fräschare mellan rengöringarna.
På baksidan av ismaskinen finns en avtappningsöppning med en ventilkåpa som kan användas för att
tömma apparaten. Skruva bort ventilkåpan och töm behållaren (om nödvändigt, använd en lämplig slang)
När du har tömt behållaren stänger du ventilen genom att sätta tillbaka kåpan.
PRINCESS-TIPS
- Placera inte ismaskinen på sidan eller uppochnervänd. Var särskilt noga med detta när
apparaten förflyttas.
- Sätt inte maskinen för nära en vägg eller andra apparater. Ventilationshålen får aldrig
täckas över.
- Använd inte ismaskinen utomhus.
- Sänk inte ner apparaten i vatten eller i annan vätska, eftersom detta kan orsaka elektriska
stötar.
- Håll ett öga på ismaskinen när barn vistas i närheten av den. Var givetvis även själv försiktig.
- Ta ut kontakten om du inte ska använda apparaten under en längre tid.
- Ställ inte maskinen i närheten av värmekällor.
19
Page 20

- Om apparaten eller sladden är skadad bör den inte längre användas, lämna in den hos affären för
reparation. Skadade sladdar får endast bytas ut av vår servicetjänst.
- Observera att det kan vara farligt att använda delar som inte rekommenderats av tillverkaren.
- Apparaten får endast användas för sitt avsedda ändamål.
- Kylvätskan i ismaskinen är kemiskt avfall, se alltså till att den kastas på ett miljövänligt sätt. Kontakta
den lokala renhållningstjänsten för information.
- Barn ska hållas under uppsikt så att de inte leker med apparaten.
- Om apparaten används av personer med ett fysiskt, mentalt eller motoriskt funktionshinder eller nedsatt
sinnesförmåga, eller brist på erfarenhet och kunskap, kan fara uppstå. Personer som är ansvariga för
deras säkerhet ska ge uttryckliga instruktioner eller hålla dem under uppsikt när de använder apparaten.
PRINCESS SILVER ICE CUBE MAKER ART. 282969
INDEN APPARATET TAGES I BRUG
Læs først brugsanvisningen grundigt igennem og gem den, så du også ved en senere lejlighed kan kigge i
den. Kontrollér at den lokale netspænding svarer til apparatets. Tilslut kun apparatet til en stikkontakt med
jordforbindelse.
PRINCESS SILVER ICE CUBE MAKER er en halvprofessionel isterning-maskine. Med dette apparat
laver du nemt og hurtigt isterninger. På mindre end 15 minutter har maskinen opnået den rette temperatur
og er de første isterninger færdige. Så længe der er tændt for maskinen, producerer den 12 isterninger
hvert 9. –13. minut (alt efter isterningernes størrelse).
Apparatet er forsynet med et tydeligt display (1), TÆND/SLUK-knap (2), kontrolknap (3), indstillingsknap ▲(4) og SELECT-knap (5). Jævnfør ill.
SÅDAN ANVENDES APPARATET
Stil din Silver Ice Cube Maker på et fast og stabilt sted. Sørg for at ventilationsåbningerne på apparatet er
åbne. Afstanden mellem apparatet og andre apparater eller vægge skal være mindst 20 cm. Apparatet skal
have stået stille i mindst tre timer, inden det tages i brug for første gang. Dette er nødvendigt, fordi
kølevæsken i køleelementet skal have tid til at synke. Luk låget op på apparatet og fyld vandreservoiret
med vand, maksimalt ca. 3 liter. Anbring nu opsamlingsbakken til isterninger i apparatet og luk låget. Sæt
stikket i stikkontakten. ’Snefnug’-symbolet
gå i gang. Med ´SELECT´-knappen kan du indstille den ønskede isterninge-størrelse. Du kan vælge imellem
3 størrelser:
S = small (klar efter ca. 9 minutter)
M =medium (klar efter ca. 11 minutter)
L = large (klar efter ca. 13 minutter)
Efter at du har trykket på TÆND/SLUK-knappen, blinker ’snefnug’-symbolet
maskinen er begyndt at lave isterninger af den valgte størrelse. Er beholderen helt fyldt op med isterninger, begynder ’Ice Full’-lampen at blinke. Tag da beholderen ud af apparatet, opbevar
isterningerne på et køligt sted og sæt beholderen på plads i apparatet igen.
Du kan tænde for Silver Ice Cube Makeren med det samme igen og fortsætte med at lave
isterninger. Hvis der ikke er mere vand i apparatet, lyser ’Water Low’-kontrollampen
og der lyder et kort lydsignal. Fyld vandreservoiret med vand og tryk derefter på
TÆND/SLUK-knappen for at aktivere apparatet igen.
Hvis man ikke tager isterningerne ud af apparatet, vil de begynde at smelte. Smeltevandet vil
blive opsamlet i vandreservoiret, hvorefter apparatet begynder at lave et nyt hold isterninger.
kommer nu til syne på displayet, og apparatet er parat til at
❆
fortsat for at angive, at
❆
20
Page 21

Maskinen kan til enhver tid stoppes ved at trykke på TÆND/SLUK-knappen. Hvis apparatet ikke bruges
igennem længere tid, fjerner man vandet fra reservoiret og tages stikket ud af stikkontakten.
BRUG AF TIMER
Ved hjælp af timeren kan du selv bestemme, om apparatet skal være tændt eller slukket.
Et eksempel: Klokken er nu 16:30. Du ønsker at tænde for apparatet kl. 17:30 og slukke for det igen kl.
19:30.
Tidsindstilling
Stik stikket i kontakten, 12:00 står der på displayet (normal udgangsposition). Tryk én gang på
kontrolknappen, og ’12-tallet’ blinker i 5 sekunder. I løbet af dette tidsrum kan du trykke på indstillingsknappen▲ for at indstille timetallet fra ‘12’ til ‘16’, der også blinker i 5 sekunder. I løbet af disse 5
sekunder trykker du endnu en gang på kontrolknappen, hvorefter ‘00’ begynder at blinke. Brug indstillingsknappen ▲ til indstilling af minuttallet fra ‘00’ til ‘30’. Efter 5 sekunder hvor der ikke er andre blinkende
symboler på displayet er det pågældende tidspunkt indstillet.
Tryk 3 gange på kontrolknappen, indtil du ser ‘00:00’ på displayet. Gentag ovennævnte fremgangsmåde til indstilling af tidspunkt og du kan nu også bruge kontrol- og indstillingsknapperne til indstilling af den ønskede tændetid 17:30.
Tryk 5 gange på kontrolknappen, indtil du ser ‘00:00’ på displayet. Gentag ovennævnte fremgangsmåde til indstilling af tidspunkt og du kan nu også bruge kontrol- og indstillingsknapperne til indstilling af den ønskede slukketid 19:30.
Brug af timeren til at tænde/slukke for apparatet
Når tænde/slukke-tidspunktet er blevet indstillet, anvendes indstillingsknappen ▲ til indstilling af den
ønskede funktion (auto tænd, auto sluk, auto-tænd/sluk).
Auto tænd-funktion: tryk én gang på indstillingsknappen▲ , og du ser på displayet. Nu er indstillingen aktiveret, og apparatet vil blive tændt automatisk kl. 17:30.
Auto sluk-funktion: tryk 2 gange på indstillingsknappen▲ , og du ser på displayet. Tryk på
TÆND/SLUK-knappen for at tænde for apparatet. Apparatet vil automatisk blive slukket kl. 19:30.
Auto tænd/sluk-funktion: tryk 3 gange på indstillingsknappen▲, og du ser på displayet. Det er ikke
nødvendigt at trykke på TÆND/SLUK-knappen for at tænde for apparatet. Alt efter det indstillede program vil apparatet automatisk blive tændt kl. 17:30 og slukket kl. 19:30.
Bemærk: hvis du ikke ønsker at anvende timerfunktionen, bliver du ved med at trykke på indstillingsknappen ▲ til kun symbolet og det pågældende tidspunkt kan aflæses på displayet. Brug derefter
TÆND/SLUK-knappen til manuel betjening af apparatet.
RENGØRING
Tag stikket ud af stikkontakten inden rengøringen. Både yder- og indersiden af apparatet kan rengøres
med en fugtig klud. Anvend ikke skure- eller opløsningsmidler til rengøringen. Anvend heller ikke
opvaskemiddel til rengøring af apparatet.
Sørg for, at (smelte-)vandet ikke forbliver i maskinen i for lang tid. Dette kan resultere i forurenet vand.
Det resterende (smelte-)vand kan lukkes ud ved hjælp af ventilen, der er anbragt på apparatets bagside.
Det anbefales at rengøre maskinen jævnligt med et alge- og bakteriedræbende middel.
Jævnfør instrukserne på rengøringsmidlets emballage.
Det anbefales at hælde 1 spiseskefuld citronsaft i vandreservoiret, hver gang du fylder din
Silver Ice Cube Maker. Citronsaften, der løber igennem apparatets kølesystem, vil sørge
for en frisk citrusduft i din bolig, og syren i citronsaften vil dæmme op for bakterievækst,
mug og allergener i luften. Endvidere hjælper citronsaften også med til at holde cirkulationssystemet frisk mellem rengøringerne.
I bunden af din Silver Ice Cube Maker er der anbragt en afløbsåbning med ventilhætte, der
kan bruges til tømning af apparatet. Løsn ventilhætten og tøm reservoiret (brug evt. en
slange om nødvendigt). Når reservoiret er tømt, lukkes ventilen ved at sætte ventilhætten
på igen.
21
Page 22

PRINCESS TIPS
- Sæt ikke Silver Ice Cube Makeren på kanten eller på hovedet. Vær især opmærksom, når apparatet
sættes et andet sted.
- Stil maskinen ikke for tæt på andre maskiner eller op ad en væg. Ventilationsåbningerne skal til enhver
tid være åbne.
- Anvend aldrig Silver Ice Cube Makeren udendørs.
- Dyp aldrig apparatet i vand eller andre væsker – for at undgå elektriske stød.
- Vær yderst forsigtig, når der er børn i nærheden. Selvfølgelig bør du også altid selv være forsigtig.
- Tag stikket ud af stikkontakten, når apparatet ikke er i brug igennem længere tid.
- Stil aldrig maskinen i nærheden af andre varmekilder.
- Ved beskadigelse af apparatet eller netledningen bør apparatet ikke længere bruges. Bring apparatet
tilbage til butikken til reparation. En beskadiget netledning kan udelukkende udskiftes af vores serviceafdeling.
- Vær opmærksom på, at det kan være farligt at anvende tilbehør, der ikke er anbefalet af leverandøren.
- Apparatet må udelukkende anvendes som foreskrevet i brugsanvisningen.
- Kølevæsken i Silver Ice Cube Makeren er kemisk affald. Sørg derfor for, at maskinen kasseres på en
miljøvenlig måde. Følg de kommunale henvisninger.
- Hold opsyn med børn, så man er sikker på, at de ikke bruger apparatet som legetøj.
- Det kan være farligt at lade børn eller personer med et mentalt eller fysisk handicap eller uden den
nødvendige erfaring eller viden anvende apparatet. Den, der har ansvaret for deres sikkerhed, bør først
instruere dem i brugen heraf eller altid selv holde tilsyn, når apparatet er i brug.
PRINCESS SILVER ICE CUBE MAKER ART. 282969
FØR BRUK
Les gjennom bruksanvisningen før du begynner å bruke apparatet og ta vare på den til senere bruk.
Kontroller at nettspenningen hjemme hos deg stemmer overens med nettspenningen på apparatet. Koble
dette apparatet kun til en jordet stikkontakt.
PRINCESS SILVER ICE CUBE MAKER er en halvprofesjonell maskin til å lage isbiter. Nå kan du raskt
og lett tilberede isbiter. Innen 15 minutter når maskinen den riktige temperaturen, og de første isbitene
blir ferdige. Så lenge maskinen er på, vil den produsere 12 isbiter hvert 9.-13. minutt (avhengig av størrelsen).
Maskinen har et tydelig display (1) med AV/PÅ-knapp (2), INNSTILLINGS-knapp (3), justeringsknapp ▲ (4)
og VELGER-knapp (5). Se tegningen.
BRUK
Sett isbitmaskinen på et stødig og jevnt underlag. Sørg for at apparatets ventilasjonsåpninger ikke er blokkert.
Avstanden til andre apparater eller til vegger bør være minst 20 cm. Isbitmaskinen må ha stått stille i
minst 3 timer før den brukes for første gang, fordi kjølevæsken må kunne synke ned i kjøleelementet.
Åpne apparatets lokk og fyll vannbeholderen med vann. Maksimum er ca. 3 liter. Sett deretter beholderen
for isbiter inn i apparatet og lukk lokket. Sett støpselet i stikkontakten. ‘Snømønsteret’
Nå er apparatet ferdig til å starte.
Ved å trykke inn ’Select’-tasten kan du stille inn isbitenes størrelse. Du kan velge blant
følgende tre formater:
S = small (små isbiter, som er ferdige etter ca. 9 minutter)
M = medium (middels store isbiter, som er ferdige etter ca. 11 minutter)
L = large (store isbiter, som er ferdige etter ca. 13 minutter)
Etter at du har trykket på PÅ/AV-knappen, vil ‘Snømønsteret’
har begynt med tilberedelsen av de innstilte isbitene. Når beholderen er helt fylt med
isbiter, vil ICE FULL-lyset begynne å blinke. Ta beholderen ut av apparatet, oppbevar
isbitene et kjølig sted og sett beholderen i apparatet igjen.
blinke for å angi at maskinen
❆
vises på skjermen.
❆
22
Page 23

Isbitmaskinen kan slås på igjen med en gang for å lage flere isbiter. Hvis det er slutt på vannet, vil ”Water
Low” lyset blinke og avgi pipelyder. Fyll vannbeholderen med vann og trykk deretter på PÅ/AV-tasten
for å fortsette tilberedningen.
Hvis isbitene blir liggende i apparatet, vil de begynne å smelte. Smeltevannet kommer sammen i
vannbeholderen, og deretter begynner isbitmaskinen å lage en ny porsjon med isbiter.
Maskinen kan stanses når som helst ved å trykke på PÅ/AV-tasten. Hvis apparatet ikke skal brukes over
lengre tid, anbefaler vi å helle vannet ut av beholderen og trekke støpselet ut av stikkontakten.
BRUKE KLOKKEN
Med den innvendige klokken kan du angi når apparatet skal slås av eller på.
For eksempel: nåværende tid er 16:30. Du vil slå på apparatet kl. 17:30 og slå det av kl. 19:30.
Stille inn tid
Sett støpselet i stikkontakten 12:00 vises på displayet (standardtiden er 12:00). Trykk én gang på
SET-knappen – ’12’ blinker i 5 sekunder. I løpet av denne tiden kan du hele tiden trykke på justeringsknappen▲ for å justere tiden fra ‘12’ til ‘16’, som også vil blinke i 5 sekunder. Trykk i disse 5 sekundene
på SET-knappen igjen, og ’00’ vil blinke. Bruk justeringsknappen▲ for å justere tiden i minutter fra ‘00’
til ‘30’. Etter at et symbol har blinket uavbrutt på displayet i 5 sekunder er nåværende tid innstilt.
Trykk 3 ganger på SET-knappen når du ser ‘00:00’ på displayet. Følg ovennevnte fremgangsmåte
for å stille inn klokketiden. Du kan bruke SET-knappen og justeringsknappen for å stille inn ønsket
aktiveringstid på 17:30.
Trykk 5 ganger på SET-knappen når du ser ’00:00’ på displayet. Følg ovennevnte fremgangsmåte
for å stille inn klokkeslettet, og du kan bruke SET-knappen og justeringsknappen▲ for å stille inn ønsket
deaktiveringstid på 19:30.
Bruke klokken for å slå på/av
Etter at du har innstilt aktiverings- og deaktiveringstiden, kan du bruke justeringsknappen▲ for å justere
dine foretrukne innstilliger (automatisk aktivering, automatisk deaktivering, automatisk på og av).
Automatisk aktivering: trykk én gang på justeringsknappen▲, du vil se på displayet. Nå er programmet innstilt. Apparatet blir slått på automatisk kl. 17:30.
Automatisk deaktivering: trykk to ganger på justeringsknappen▲, du vil se på displayet. Trykk på
PÅ/AV-knappen for å slå på apparatet. Apparatet blir slått av automatisk kl. 19:30.
Automatisk aktivering og deaktivering: trykk 3 ganger på justeringsknappen▲, du vil se på displayet.
Du behøver ikke trykke på PÅ/AV-knappen for å slå på apparatet. Avhengig av programmet du velger vil
apparatet starte kl. 17:30 og bli avslått automatisk kl. 19:30.
Merk: hvis du ikke trenger klokkefunksjonen, kan du trykke flere ganger på justeringsknappen▲ til bare
symbolet og nåværende klokkeslett blir vist på skjermen. Deretter kan du bruke PÅ/AV-knappen
for å styre apparatet kontinuerlig.
RENGJØRING
Trekk støpselet ut av stikkontakten før rengjøring. Både inn- og utsiden på apparatet kan rengjøres
med en fuktig klut. Bruk aldri sterke skure- eller oppløsningsmidler til rengjøringen.
Apparatet bør ikke heller rengjøres med oppvaskmidler.
Ikke la (smelte)vann stå lengre tid i maskinen, da vannet kan bli forurenset. Med ventilen
på apparatets bakside kan du fjerne resterende (smelte)vann. Vi anbefaler å rengjøre maskinen
regelmessig med et middel mot alger og bakterier. Følg instruksjonene på pakken.
Vi anbefaler å helle 1 spiseskje sitronsaft i vannbeholderen hver gang du fyller isbitmaskinen.
Sitronsaften som går gjennom isbitmaskinens kjølesystem avgir en frisk sitronduft i huset
ditt. Syren i sitronsaften vil hindre vekst av bakterier, mugg og allergener i luften.
Dessuten hjelper sitronsaften med å holde vannsystemet mye renere mellom rengjøringene.
På baksiden av isbitmaskinen finnes en dreneringsutgang med ventilhette, som kan brukes
til å tømme apparatet. Skru løs ventilhetten og tøm beholderen (om nødvendig kan du
bruke en slange til det). Lukk deretter ventilen ved å sette hetten tilbake.
23
Page 24

TIPS FRA PRINCESS:
- Isbitmaskinen bør ikke settes på siden eller opp ned. Vær særlig varsom ved transport av apparatet.
- Maskinen må ikke plasseres i nærheten av andre apparater eller mot en vegg. Ventilasjonsåpningene må
aldri blokkeres.
- Isbitmaskinen bør ikke brukes utendørs.
- For å unngå elektrisk sjokk, dypp aldri apparatet i vann eller annen væske.
- Hold godt tilsyn med isbitmaskinen når det er barn i nærheten. Vær også forsiktig selv.
- Ta alltid støpselet ut av stikkontakten når du ikke skal bruke apparatet in lengre tid.
- Ikke plasser apparatet nær en varmekilde.
- Ved skade på apparatet eller ledningen, anbefaler vi at du ikke bruker apparatet, men tar det med
tilbake til butikken for reparasjon. En skadet ledning kan kun skiftes ut av servicetjenesten.
- Bruk av tilbehør som ikke er anbefalt av produsenten kan medføre risiko.
- Bruk ikke apparatet til annet enn det er beregnet for.
- Kjølevæsken i isbitmaskinen er kjemisk avfall. Ved kassering må apparatet avhendes på en miljøvennlig
måte. Følg instruksene fra ditt kommunale renholdsverk.
- Barn bør overvåkes for å sikre at de ikke leker med apparatet.
- Bruk av dette apparatet av barn eller personer med et fysisk, sensorisk, mentalt eller motorisk handikapp,
eller med manglende erfaring og kunnskap, kan medføre fare. Personer som er ansvarlig for deres
sikkerhet bør gi spesifikke instrukser eller overvåke bruken av apparatet.
PRINCESS SILVER ICE CUBE MAKER ART. 282969
ENNEN KÄYTTÖÄ
Lue tämä käyttöohje ensin kokonaan läpi ja säilytä se myöhempää käyttöä varten. Tarkista, että käytettävissäsi
oleva verkkojännite vastaa laitteeseen merkittyä jännitettä. Kytke laite ainoastaan maadoitettuun pistorasiaan.
PRINCESS SILVER ICE CUBE MAKER on puoliammattimainen jääpalakone. Jääpalojen valmistaminen
tällä laitteella on nopeaa ja yksinkertaista. Laitteen lämpeneminen oikeaan lämpötilaan kestää 15 minuuttia,
jolloin ensimmäiset jääpalat ovat valmiit. Sen jälkeen kone valmistaa käynnistettynä ollessaan jokaisen
9-13 minuutin kuluessa 12 jääpalasta (koosta riippuen).
Laitteessa on selkeä näyttöruutu (1), virtapainike ON/OFF (2), asetuspainike SET (3), säätöpainike▲(4)
ja valintapainike SELECT (5). Kts kuva.
KÄYTTÖ
Aseta Ice Cube Maker tukevalle ja tasaiselle pinnalle. Varmista, että ilmanvaihtoaukkojen ympärillä ei
ole esteitä. Etäisyyden muihin laitteisiin tai seiniin tulee olla vähintään 20 cm. Laitteen täytyy antaa olla
paikallaan vähintään 3 tuntia ennen ensimmäistä käyttöä. Tämä on tarpeen siksi, että jäähdytysnesteen
täytyy ensin asettua jäähdytyselementtiin. Avaa kansi ja täytä vesisäiliö vedellä. Enimmäismäärä on n. 3
litraa. Aseta jääpalakori takaisin laitteeseen ja sulje kansi. Liitä pistotulppa pistorasiaan.
Näyttöruutuun ilmestyy ’Lumi’-symboli
SELECT-valintapainikkeella voit valita jääpalojen koon. Valittavana on 3 eri kokoa:
S = pieni (valmistusaika n. 9 minuuttia)
M = keskikokoinen (valmistusaika n. 11 minuuttia)
L = iso (valmistusaika n. 13 minuuttia)
Painettuasi virtapainiketta symboli
valmistamaan halutun kokoisia jääpaloja. Jos jääpalasäiliö on täynnä, näytössä vilkkuu ’
Ice Full’-symboli . Ota jääpalasäiliö pois laitteesta, säilytä jääpalat viileässä paikassa ja
aseta jääpalasäiliö takaisin laitteeseen.
. Laite on nyt käyttövalmis.
❆
alkaa vilkkua merkkinä siitä, että laite käynnistyy
❆
24
Page 25

Ice Cube Maker voidaan käynnistää heti uudelleen uuden jääpalaerän valmistamiseksi. Jos vesi on loppunut,
näytössä vilkkuu ’Water Low’-symboli ja kuuluu lyhyt merkkiääni. Täytä vesisäiliö vedellä ja paina
virtapainiketta jatkaaksesi jääpalojen valmistusta.
Jos jääpalat jätetään laitteeseen, ne alkavat vähitellen sulaa. Sulanut vesi valuu vesisäiliöön ja jääpalakone
alkaa valmistaa uutta jääpalaerää.
Voit pysäyttää laitteen milloin tahansa painamalla virtapainiketta. Jos et käytä Ice Cube Makeria pitkään
aikaan, tyhjennä vesisäiliö ja ota pistotulppa pois pistorasiasta.
AJASTIMEN KÄYTTÖ
Sisäisen ajastimen avulla voit määrätä, milloin laite kytkeytyy toimintaan tai pois toiminnasta.
Esimerkki: kello on tällä hetkellä 16:30. Haluat kytkeä laitteen toimintaan 17:30 ja pois toiminnasta 19:30.
Ajan asetus
Liitä pistotulppa pistorasiaan. Näyttöön ilmestyy 12:00 (oletettu aika on 12:00). Paina kerran
asetuspainiketta SET, jolloin näytössä vilkkuu ’12’ viiden sekunnin ajan. Tänä aikana voit painaa jatkuvasti
säätöpainiketta ▲ asettaaksesi tunnin aikavälillä ’12’-’16’, joka myös vilkkuu viiden sekunnin ajan. Tänä
aikana paina jälleen asetuspainiketta SET, jolloin näytössä vilkkuu ’00’. Aseta säätöpainikkeella ▲
minuutit aikavälillä ’00 ’- ’30’. Jos viiden sekunnin kuluttua näytössä ei vilku yhtään symbolia, tämänhetkinen
aika on asetettu.
Paina asetuspainiketta SET 3 kertaa, kunnes näyttöön ilmestyy ‘00:00’. Noudata yllä olevaa
kellonajan asetusmenettelyä ja käytä asetuspainiketta SET ja säätöpainiketta ▲ asettaaksesi haluamasi
käynnistysajan 17:30.
Paina asetuspainiketta SET 5 kertaa, kunnes näyttöön ilmestyy ’00:00’. Noudata yllä olevaa
kellonajan asetusmenettelyä ja käytä asetuspainiketta SET ja säätöpainiketta ▲ asettaaksesi haluamasi
lopetusajan 19:30.
Ajastimen kytkeminen toimintaan ja pois toiminnasta
Kun käynnistys- ja lopetusaika on asetettu, voit säätää säätöpainikkeella ▲ haluamasi asetukset (automaattinen käynnistysaika, automaattinen lopetusaika, automaattinen käynnistys- ja lopetusaika).
Automaattisen käynnistysajan asetus: paina säätöpainiketta ▲ kerran, jolloin näyttöön ilmestyy .
Ohjelma on nyt asetettu. Laite kytkeytyy toimintaan automaattisesti 17:30.
Automaattisen lopetusajan asetus: paina säätöpainiketta ▲ 2 kertaa, jolloin näyttöön ilmestyy .
Paina virtapainiketta ON/OFF laitteen kytkemiseksi toimintaan. Laite kytkeytyy automaattisesti pois
toiminnasta 19:30.
Automaattisen käynnistys- ja lopetusajan asetus: paina säätöpainiketta ▲ 3 kertaa, jolloin näyttöön ilmestyy .
Virtapainiketta ON/OFF ei tarvitse painaa laitteen kytkemiseksi toimintaan. Asettamasi ohjelman mukaisesti
laite kytkeytyy toimintaan automaattisesti 17:30 ja pois toiminnasta 19:30.
Huom.: jos et tarvitse ajastintoimintoa, paina säätöpainiketta ▲ useita kertoja, kunnes vain symboli
ja tämänhetkinen aika näkyvät näytössä. Sen jälkeen paina ON/OFF-virtapainiketta laitteen käyttämiseksi
edelleen.
PUHDISTUS
Ota pistotulppa pois pistorasiasta ennen puhdistusta. Laitteen sekä sisä- että ulkopinta voidaan puhdistaa
kostealla liinalla. Älä käytä puhdistukseen hankausaineita tai liuotteita. Älä puhdista laitetta
myöskään astianpesuaineella.
Älä anna veden seista laitteessa kauan aikaa, koska vesi saattaa pilaantua. Poista liika vesi
laitteesta sen taakse sijoitetun venttiilin avulla. On suositeltavaa puhdistaa kone säännöllisesti
leviä ja bakteereita tuhoavalla aineella. Noudata tällöin aineen pakkauksessa olevia ohjeita.
On suositeltavaa kaataa 1 ruokalusikallinen sitruunamehua vesisäiliöön joka kerta jääpalakonetta
täytettäessä. Jääpalakoneen jäähdytysjärjestelmän läpi virtaava sitrunamehu levittää raikasta
sitruunan tuoksua joka puolelle kotiasi. Sitruunamehussa oleva happo ehkäisee bakteerien,
homeen ja ilmassa liikkuvien allergeenien syntymistä. Lisäksi sitruunamehu auttaa pitämään
vedenkiertojärjestelmän raikkaampana puhdistuskertojen välillä.
25
Page 26

Jääpalakoneen takana on vedenpoistoaukko, jossa on tulpallinen venttiili ja jota voidaan käyttää laitteen
tyhjentämiseen. Kierrä venttiilin tulppa irti ja tyhjennä säiliö (käytä tarvittaessa sopivaa letkua). Kun
säiliö on tyhjä, sulje venttiili laittamalla tulppa paikoilleen.
PRINCESS-OHJEITA
- Älä aseta Ice Cube Makeria kyljelleen eikä myöskään ylösalaisin. Kiinnitä tähän erityistä huomiota
varsinkin laitetta siirrettäessä.
- Älä aseta laitetta liian lähelle muita laitteita tai seinää vasten. Ilmanvaihtoaukkoja ei saa peittää.
- Älä käytä Ice Cube Makeria ulkona.
- Älä upota laitetta koskaan veteen tai muuhun nesteeseen, koska siitä voi olla seurauksena sähköisku.
- Pidä Ice Cube Makeria silmällä, jos se on lasten ulottuvilla. Luonnollisesti sinun itsesikin tulee olla
varovainen.
- Ota pistotulppa pois pistorasiasta, jos et käytä laitetta pitkään aikaan.
- Älä aseta laitetta lämmönlähteiden lähelle.
- Laitteen tai virtajohdon vioittuessa laitetta ei saa käyttää, vaan se on vietävä takaisin myyntiliikkeeseen
korjattavaksi. Ainoastaan huoltopalvelumme voi vaihtaa vioittuneen virtajohdon uuteen.
- Ota huomioon, että muiden kuin valmistajan suosittamien osien käyttö voi aiheuttaa vaaratilanteen.
- Käytä tätä laitetta ainoastaan sille kuuluvaan tarkoitukseen.
- Ice Cube Makerin sisältämä jäähdytysneste on kemiallista jätettä, joten huolehdi siitä, että laitteen
hävittäminen tapahtuu ympäristöystävällisesti. Ota tällöin yhteyttä kuntasi jätehuoltoon.
- Lapsia on valvottava tarkoin, että he eivät leiki laitteella.
- Jos lapset tai fyysisesti vammaiset, aisti-, kehitys- tai liikuntavammaiset tai henkilöt, joilla ei ole
tarvittavaa kokemusta tai taitoa, käyttävät tätä laitetta, siitä voi olla seurauksena vaaratilanne. Heidän
turvallisuudestaan vastuussa olevien henkilöiden on annettava selvät ohjeet tai heidän on valvottava
laitteen käyttöä.
PRINCESS SILVER ICE CUBE MAKER ART. 282969
ANTES DE UTILIZAR
Leia primeiro atentamente estas instruções e guarde-as para mais tarde as voltar a consultar. Controlar se
a voltagem da corrente eléctrica corresponde à do aparelho. Ligue unicamente o aparelho a uma tomada
de corrente residual.
A PRINCESS SILVER ICE CUBE MAKER é uma máquina de cubos de gelo semi-professional. Com
este aparelho, pode fazer rapida e facilmente cubos de gelo. A máquina atinge dentro do prazo de 15
minutos a temperatura certa e os primeiros cubos de gelo estão prontos. Enquanto a máquina estiver a
funcionar, continuará a produzir 12 cubos de gelo de cada 9 a 13 minutos (dependendo do tamanho).
Vem equipada com um mostruário nítido (1), botão ON/OFF (2), botão SET (3), botão de ajuste ▲(4) e
botão SELECT (5). Ver fig.
EMPREGO
Colocar a Ice Cube Maker num lugar seguro sobre uma superfície sólida e estável.
Certifique-se que os orifícios de ventilação não se encontram obstruídos. Deve estar afastada
de outros aparelhos ou das paredes a uma distância de pelo menos 20 cm. Deve deixar o
aparelho esperar durante pelo menos três horas antes de o utilizar pela primeira vez, porque
o líquido refrigerante tem primeiro de se estabilizar no elemento de arrefecimento. Abrir a
tampa e encher o reservatório com água com uma quantidade maxima de aproximadamente
3 litros. Colocar em seguida de novo o cesto para os cubos de gelo dentro do aparelho e
fechar a tampa. Ligar a ficha à tomada. O ‘Snow Pattern’
mostruário LCD. O aparelho está pronto a ser utilizado.
(símbolo neve) aparece no
❆
26
Page 27

Usar o botão SELECT para seleccionar o formato do cubo de gelo. Pode escolher entre três formatos
diferentes .
S = pequeno (fica pronto em aproximadamente 9 minutos)
M = médio (fica pronto em aproximadamente 11 minutos)
L = grande (fica pronto em aproximadamente 13 minutos)
Depois de premir o botão ON/OFF, o‘Snow Pattern’
início à preparação dos cubos de gelo no tamanho seleccionado. Se o contentor estiver completamente
cheio de cubos de gelo, o mostruário indica‘Ice Full’ . Retire o contentor do aparelho, guarde os cubos
de gelo num lugar fresco e coloque de novo o contentor dentro da máquina.
Pode ligar de novo a Ice Cube Maker para preparar masis cubos de gelo. Se já não houver água, o mostruário indica an be ‘ Water Low’ e emite sons intermitentes curtos. Encha o reservatório com água e
prima em seguida o botão ON/OFF para continuar o processo.
Se deixar os cubos de gelo dentro do aparelho, acabam por derreter gradualmente. A água derretida cai
para dentro do reservatório e a máquina de fazer cubos de gelo começa a fazer outros cubos de gelo.
Pode parar a máquina sempre que queira, premindo o botão ON/OFF. Quando não usar a Ice Cube Maker
durante bastante tempo, deve esvaziar o reservatório de água e desligar o aparelho.
continua a piscar para indicar que a máquina deu
❆
EMPREGO DO CRONÓMETRO
O cronómetro interno permite-lhe especificar as horas, esteja o aparelho ligado ou desligado.
Por exemplo, a hora actual é 16.30. Deseja ligar o aparelho às 17.30 e depois desligá-lo às 19.30.
Programar as horas
Ligue a ficha à tomada, o de 12:00 surge no mostruário (o tempo predefinido é de 12:00). Prima
uma vez o botão SET, este pisca ‘12’ vezes durante 5 segundos. Durante este período, pode premir sem
soltar o botão de ajuste▲ para ajustar a hora de ‘12’ para ‘16’ , o qual piscará igualmente durante 5
segundos. Durante este tempo, prima de novo o botão SET, piscando ‘00’ em seguida. Use o botão de
ajuste ▲ para ajustar os minutos de ‘00’ para ‘30’. Depois de terem decorrido 5 segundos sem que tenha
piscado qualquer símbolo no mostruário, a hora actual ficou programada.
Prima o botão SET 3 vezes quando vir ‘00:00’ no mostruário. Siga as instruções acimas mencionadas
para programar o relógio, podendo usar o botão SET e o botão de ajuste para programar as horas que
deseja para ligar o aparelho às 17.30.
Prima o botão SET 5 vezes quando vir ’00:00’ no mostruário. Siga as instruções acima mencionadas
para programar o relógio, podendo usar o botão SET e o botão de ajuste ▲ para programar as horas que
deseja para desligar o aparelho às 19.30.
Como usar o cronómetro para ligar/desligar
Quando tiver programado as horas para ligar/desligar, use o botão de ajuste▲ para ajustar as programações que deseja (ligar automático, desligar automático, ligar e desligar automático).
Programação de ligar automático: prima o botão de ajuste ▲ uma vez, pode ver no mostruário.
O programa está agora programado. O aparelho liga-se automaticamente às 17.30.
Programação de desligar automático: prima o botão de ajuste▲ duas vezes, pode ver no mostruário.
Prima o botão ON/OFF para ligar o aparelho. Este desliga-se automaticamente às 19.30.
Programação de ligar e desligar automático: prima o botão de ajuste ▲ 3 vezes, pode ver
no mostruário. Não precisa do botão ON/OFF para ligar o aparelho. Dependendo do
programa que seleccionar, o aparelho liga-se às 17.30 e desliga-se às 19.30 automaticamente.
Aviso: se não necessitar da função do cronómetro, prima o botão de ajuste ▲ várias vezes
até que apenas o símbolo e a hora local surjam no LCD. Prima em seguida o botão
ON/OFF para que o aparelho possa funcionar continuamente.
27
Page 28

LIMPEZA
Antes de limpar, desligue o aparelho da tomada eléctrica. Deve usar um pano humedecido para limpar
tanto o interior como o exterior do aparelho. Não deve usar abrasivos ou dissolventes para limpar o aparelho.
Também não deve limpar o aparelho com detergente.
Não deve deixar água dentro da máquina durante muito tempo porque a água pode ficar contaminada. Use
a válvula situada na parte traseira do aparelho para retirar a água em excesso. Aconselhamos-lhe a limpar
a máquina com frequência com um agente anti-algas e anti-bactérias. Siga as instruções da embalagem.
É aconselhável deitar uma colher de sopa de sumo de limão para dentro do reservatório da água, de cada
vez que encher a máquina dos cubos de gelo. Quando o sumo de limão passa através do sistema de
arrefecimento do aparelho, liberta um aroma fresco de citrinos por toda a casa. O ácido do sumo de
limão combate o aparecimento de bactérias, fungos e a condensação de alergénios. Para além disso, o
sumo de limão ajuda a manter mais fresco o sistema do fluxo da água entre os períodos de limpeza.
Na parte traseira do aparelho, existe uma saída de drenagem com uma válvula com tampa que pode ser
utilizada para esvaziar a máquina. Desaparafuse a tampa da válvula e poderá drenar o reservatório (se for
necessário, use um tubo pequeno que seja adequado). Depois de ter esvaziado o aparelho, feche a válvula
e coloque novamente a tampa.
SUGESTÕES DA PRINCESS
- Não colocar a Ice Cube Maker de lado ou voltada ao contrário. Tenha especialmente cuidado quando
deslocar o aparelho.
- Não colocar a máquina encostada a outros aparelhos ou à parede. Nunca se devem cobrir os orifícios
de ventilação.
- Não deve usar a Ice Cube Maker no exterior.
- Nunca deve mergulhar o aparelho em água ou em qualquer outro líquido porque pode provocar um
choque eléctrico.
- Mantenha a Ice Cube Maker sob vigilância quando existirem crianças por perto. Tenha igualmente
você mesmo cuidado.
- Desligue o aparelho se não o usar durante bastante tempo.
- Não coloque a máquina perto de fontes de calor.
- Se o aparelho se avariar ou o cabo de alimentação estiver danificado, aconselhamos-lhe a deixar de
utilizar o aparelho e a devolvê-lo à loja para ser reparado. Os cabos de alimentação devem ser
substituídos pelos nossos serviços de assistência.
- Lembre-se que pode ser perigoso usar peças que não sejam recomendadas pelo fabricante.
- Deve usar unicamente este aparelho para a finalidade com que foi concebido.
- O líquido refrigerante na Ice Cube Maker é considerado lixo químico, por isso deve deitar fora a
máquina de forma adequada, de maneira a respeitar o meio ambiente. Deve informar-se sobre as
directivas relativas ao lixo químico no seu município.
- Deve vigiar as crianças para se assegurar que não brincam com o aparelho.
- O uso deste aparelho por crianças ou pessoas com deficiências físicas, sensoriais, mentais ou motoras,
ou com falta de experiência ou conhecimentos pode provocar a ocorrência de riscos. As pessoas
responsáveis pela sua segurança deverão receber instruções explícitas, ou então manter a vigilância
enquanto o aparelho for utilizado.
PRINCESS SILVER ICE CUBE MAKER ART. 282969
28
Page 29

293031
Page 30

Page 31

PRINCESS SILVER ICE CUBE MAKER ART. 282969
Page 32

32
Page 33

333435
Page 34

Page 35

Page 36

© PRINCESS 2009
 Loading...