

Page 1

TYPE 1919
Gebruiksaanwijzing
Instructions for use
Mode d’emploi
Anleitung
Instrucciones de Uso
Istruzioni d’uso
Bruksanvisning
Brugsanvisning
Bruksanvisning
Käyttöohje
Instruções de utilização
RICE COOKER
Page 2

Page 3

Gebruiksaanwijzing . . . . . . . . . . . . . . . . . . . . . . . . . . . . . . . . . 4
Instructions for use . . . . . . . . . . . . . . . . . . . . . . . . . . . . . . . . . 6
Mode d’emploi . . . . . . . . . . . . . . . . . . . . . . . . . . . . . . . . . . . . . . 9
Anleitung . . . . . . . . . . . . . . . . . . . . . . . . . . . . . . . . . . . . . . . . . . . 11
Instrucciones de Uso . . . . . . . . . . . . . . . . . . . . . . . . . . . . . . 14
Istruzioni d’uso . . . . . . . . . . . . . . . . . . . . . . . . . . . . . . . . . . . . 16
Bruksanvisning . . . . . . . . . . . . . . . . . . . . . . . . . . . . . . . . . . . . 19
Brugsanvisning . . . . . . . . . . . . . . . . . . . . . . . . . . . . . . . . . . . . 21
Bruksanvisning . . . . . . . . . . . . . . . . . . . . . . . . . . . . . . . . . . . . 24
Käyttöohje . . . . . . . . . . . . . . . . . . . . . . . . . . . . . . . . . . . . . . . . . 26
Instruções de utilização . . . . . . . . . . . . . . . . . . . . . . . . . . .29
GARANTIEKAART/GUARANTEE CARD/CARTE DE GARANTIE/ GARANTIEKARTE
CERTIFICADO DI GARANTÍA/CARTOLINA DI GARANZIA/GARANTIKORT/
G
ARANTIBEVIS/GARANTIKORT/TAKUUTODISTUS . . . . . . . . . . . . . . . . . . . . . 33-34
JANUARI 2004
NL
UK
F
D
E
I
S
DK
N
SF
P
Page 4

4
PRINCESS RICE COOKER ART. 1919
VOOR HET GEBRUIK
Deze gebruiksaanwijzing eerst geheel doorlezen en bewaren om later nog eens te kunnen raadplegen.
Controleer of de netspanning in de woning overeenkomt met die van het apparaat. Sluit dit toestel alleen
op een geaard stopcontact aan.
Reinig vóór gebruik alle onderdelen (behalve de buitenpan en het snoer) in een sopje en spoel ze goed na.
BESCHRIJVING VAN DE PRINCESS RICE COOKER
Dit Princess keukenwonder is zeer geschikt om binnen korte tijd rijst te bereiden. Naast het bereiden van
rijst is het apparaat ook geschikt om het voedsel warm te houden door de geïntegreerde warmhoudfunctie.
De Princess Rice Cooker bestaat uit een buitenpan met daarin alle techniek (verwarmingselement,
temperatuursensor) en een binnenpan. De werking is als volgt:
- Steek eerst het snoer in de pan en daarna pas de stekker in het stopcontact..
- De pan schakelt in op de warmhoudfunctie zodra de stekker in het stopcontact gestoken wordt.
- Door de schakelaar aan de voorzijde naar beneden te drukken schakelt de pan over op koken/stomen.
- Zodra de kooktemperatuur bereikt is, schakelt de temperatuursensor de pan automatisch terug naar de
warmhoudfunctie.
Omdat de warmhoudfunctie direct inschakelt zodra de stekker in het stopcontact gestoken wordt, dient u
altijd de stekker uit het stopcontact te halen als de pan niet in gebruik is.
Bijgeleverd worden de volgende onderdelen:
• Buitenpan;
• Binnenpan;
• Doorzichtige deksel;
• Stekker;
• Maatbeker;
• Rijstlepel.
GEBRUIKSTIPS VOOR DE PRINCESS RICE COOKER
Rijst koken
Voor rijst koken gebruikt u de buitenpan met daarin geplaatst de binnenpan; sluit de pan tijdens het koken
af met het doorzichtige deksel.
Voordat u begint is het belangrijk te weten wat voor soort rijst u gaat koken. Rijst is grofweg onder te
verdelen in 2 soorten, nl.
- Witte rijst;
- Bruine rijst (zilvervliesrijst).
Van beide soorten komen verschillende variëteiten voor, zoals langgraanrijst, ronde korrel, gebroken rijst,
Surinaamse rijst, wilde rijst, basmatirijst, pandanrijst. Dit is voor de bereidingswijze verder niet van
belang.
Wel belangrijk is dat rijst te koop is als:
1. Gewone rijst; dit is onbewerkte rijst;
2. Voorgekookte of voorgestoomde rijst.
De laatste soort, de voorgekookte of voorgestoomde rijst, wordt vaak aangeboden als
'snelkookrijst', 'snelrijst', 'toverrijst' of 'kort kokende rijst'.
Om een goede kwaliteit rijst te verkrijgen is de verhouding tussen de hoeveelheid rijst en
water belangrijk.
Page 5
5
1. Bereiding van gewone rijst (zilvervliesrijst en witte rijst, niet voorgekookt)
- Afmeten rijst:
Gebruik voor het afmeten van de rijst de bijgeleverde maatbeker. Een volle maatbeker is 100 gram
rijst. Dit is een gemiddelde portie voor één persoon. Doe de gewenste hoeveelheid rijst in de
binnenpan.
- Afmeten water:
Doe vervolgens water in de binnenpan. Gebruik ook hiervoor de bijgeleverde maatbeker. Een volle
maatbeker staat voor 175 ml water.
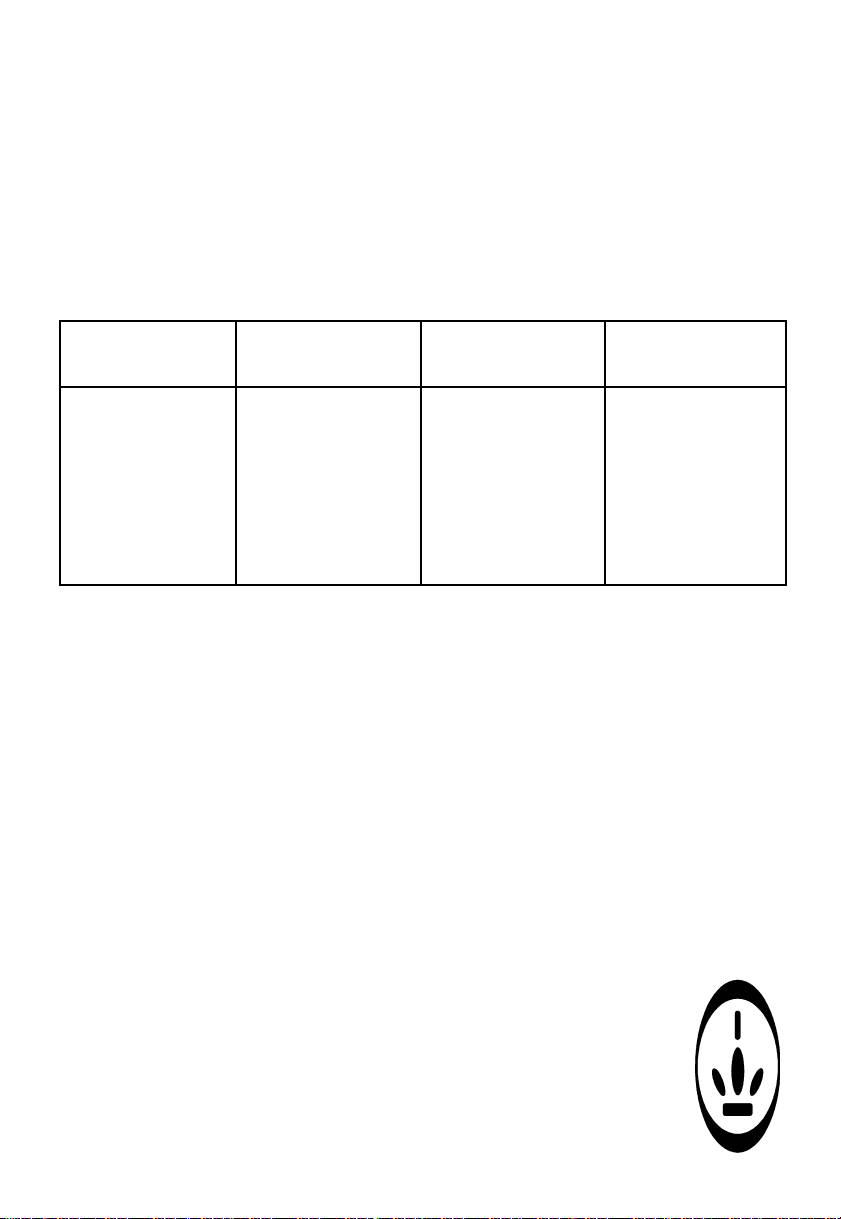
Onderstaande tabel geeft een overzicht van de correcte verhoudingen en het daarmee te behalen volume
van gekookte rijst.
WATER / RIJST-VERHOUDINGSTABEL
1 kop komt overeen met 175 ml water of 100 gram ongekookte rijst
- Steek vervolgens de stekker in het stopcontact en schakel de rijstkoker op de stand 'cook' door de
schakelaar in te drukken.
- Na enige tijd zal de rijstkoker automatisch overschakelen naar de stand 'warm'. Laat de rijst in deze
stand nog 5-10 minuten staan met gesloten deksel om goed door te garen.
Enige 'rijsttips':
- U kunt de rijst eventueel eerst wassen. Gewassen rijst kleeft minder aan de pan, maar er gaat wel
iets van de voedingswaarde verloren.
- Indien de rijst aan de pan kleeft (dit is bij sommige soorten rijst bijna niet te voorkomen), kunt u de
binnenpan lichtjes oliën met bijv. slaolie, olijfolie of andere plantaardige olie.
- Om een zachtere rijst te verkrijgen kan de ongekookte rijst 5-10 minuten voorgeweekt worden in het
water in de binnenpan, voordat de rijstkoker ingeschakeld wordt.
2. Bereidingswijze voorgekookte rijst (snelkookrijst).
De bereidingswijze is hetzelfde als bij gewone rijst, maar de verhouding tussen hoeveelheid water en
rijst is anders. Hiervoor is geen vuistregel te geven omdat iedere rijstproducent een andere
voorkooktijd en methode gebruikt. Voor de hoeveelheid water en rijst dient u daarom de aanwijzingen
op de verpakking van de rijst te volgen. Handel verder als volgt:
- Doe de aangegeven hoeveelheid water in de pan en schakel de pan in op de stand
'cook'. Zodra het water kookt wordt de rijst toegevoegd.
- Laat de rijst koken gedurende de op de verpakking aangegeven tijd. Schakel hierna de
rijstkoker uit door de stekker uit het stopcontact te trekken.
- Handel verder zoals op de verpakking aangegeven is. Meestal moet men de rijst nog
ca. 15 minuten laten staan, soms met gesloten deksel, waarna de rijst afgegoten wordt.
Ongekookte rijst
1 kop
2 koppen
3 koppen
4 koppen
5 koppen
6 koppen
7 koppen
8 koppen
9 koppen
10 koppen
Water
(gemeten met bijgeleverde maatbeker)
1
1/2
kop
2
1/2
kop
3
1/2
kop
4
1/2
kop
5
1/2
kop
6
1/2
kop
7
1/2
kop
8
1/2
kop
9
1/2
kop
10
1/2
kop
Waterniveau binnenpan
Lijn 1
Lijn 2
Lijn 3
Lijn 4
Lijn 5
Lijn 6
Lijn 7
Lijn 8
Lijn 9
Lijn 10
Uiteindelijk volume
gekookte rijst
2 koppen
4 koppen
6 koppen
8 koppen
10 koppen
12 koppen
14 koppen
16 koppen
18 koppen
20 koppen
Page 6

6
SCHOONMAKEN
HAAL EERST DE STEKKER UIT HET STOPCONTACT.
De buitenpan kan met een vochtige doek schoongemaakt worden. Let erop dat de pan goed droog is
voordat deze weer op het stopcontact aangesloten wordt. Droog indien nodig de elektrische aansluiting
aan de zijkant even na met bijvoorbeeld keukenpapier.
De overige onderdelen kunnen in een warm sopje gereinigd worden. Gebruik hierbij geen schurende
middelen of een schuursponsje.
Schoonmaaktip: doe een kopje water en een klein scheutje afwasmiddel in de binnenpan. Schakel de pan
in op de stand 'cook' en laat de pan een minuutje of 10 aanstaan. Daarna uitschakelen en goed uitspoelen.
PRINCESS-TIPS
- Doe nooit water in de buitenpan.
- Zorg dat de binnenpan niet overkookt want dan loopt er water in de buitenpan. Indien dit toch mocht
gebeuren, haal dan eerst de stekker uit het stopcontact, neem de binnenpan met pannenlappen uit de
buitenpan, giet het water uit de buitenpan en laat deze afkoelen.
- Dompel de buitenpan en het snoer nooit in water of andere vloeistof onder.
- Trek altijd de stekker uit het stopcontact vóór het schoonmaken en bij storingen. Haal de stekker ook
uit het stopcontact als de pan niet in gebruik is.
- De pan en de diverse onderdelen worden erg heet; zorg dat kinderen er niet bij kunnen en wees er
zelf ook voorzichtig mee. Pak de pan alleen beet aan de handgrepen.
- Zorg dat het apparaat niet zo dicht bij de rand van tafel, werkblad e.d. staat dat iemand het eraf zou
kunnen stoten; zorg ook dat het snoer niet zodanig hangt dat men erover zou kunnen struikelen of
erachter blijven haken.
- Gebruik het apparaat niet als het beschadigd is of als het snoer beschadigd is, maar stuur het dan
naar onze servicedienst.
- Plaats het apparaat niet op of in de directe nabijheid van een hete kookplaat e.d.
- Sluit de pan uitsluitend op een geaard stopcontact aan.
- Deze pan is alleen bedoeld voor huishoudelijk gebruik.
- Gebruik in de binnenpan geen azijn of overmatig zout want dit tast de coating aan.
PRINCESS RICE COOKER ART. 1919
BEFORE USING
Read these instructions thoroughly first and keep them for future reference. Check that your domestic
electricity supply matches that of the appliance. Plug this appliance only into an earthed outlet.
Wash all parts before use (except the outer pan and the cord) in warm soapy water and rinse well.
DESCRIPTION OF THE PRINCESS RICE COOKER
This kitchen miracle from Princess is highly suitable for preparing rice in a short time. As well as
preparing rice, the appliance is also suitable for keeping food warm due to its integrated heat retention
function.
The Princess Rice Cooker consists of an outer pan containing the heating element and temperature sensor,
and an inner pan. It works as follows:
- First put the cord in the pan and then insert the plug into the socket.
- The heat retention function of the pan will start as soon as the plug has been inserted into the socket.
- When the switch on the front is pressed downwards, the pan changes to boil/steam
mode.
- As soon as boiling temperature has been reached, the temperature sensor will
automatically change the pan back to the heat retention function.
Because the heat retention function is activated as soon as the plug is inserted into the
socket, the plug should always be removed from the socket whenever the pan is not in
use.
Page 7

7
The following accessories are also included:
• Outer pan
• Inner pan
• Transparent lid
• Plug
• Measuring cup
• Rice spoon.
USER TIPS FOR THE PRINCESS RICE COOKER
Boiling rice
To boil rice place the inner pan inside the outer pan; cover the pan with the transparent lid while cooking.
Before you begin it is important to be aware of what sort of rice you will be cooking. Generally speaking,
there are 2 sorts of rice, i.e.
- White rice;
- Brown rice (unpolished rice).
There are different varieties of both sorts of rice, such as long grain rice, round grain rice, broken rice,
Surinamese rice, wild rice, Basmati rice, Pandan rice. For the purposes of preparing the rice, though, this
is not important.
What is important, is that rice is available as:
1. Normal rice; i.e. untreated rice
2. Precooked or preboiled rice.
The latter sort, the precooked or preboiled rice, is often sold as 'quick boiling rice', 'magic rice', etc.
To get good quality rice, the ratio of rice to water is important.
1. Preparing normal rice (unpolished rice and white rice, not precooked)
- Measuring the rice
Use the measuring cup provided to determine how much rice to use. The measuring cup contains 100
grammes of rice when full. This is an average portion per person. Put the desired quantity of rice into
the inner pan.
- Measuring the water:
Then put the water into the inner pan. Again, use the measuring cup provided. The measuring cup
contains 175 ml water when full.
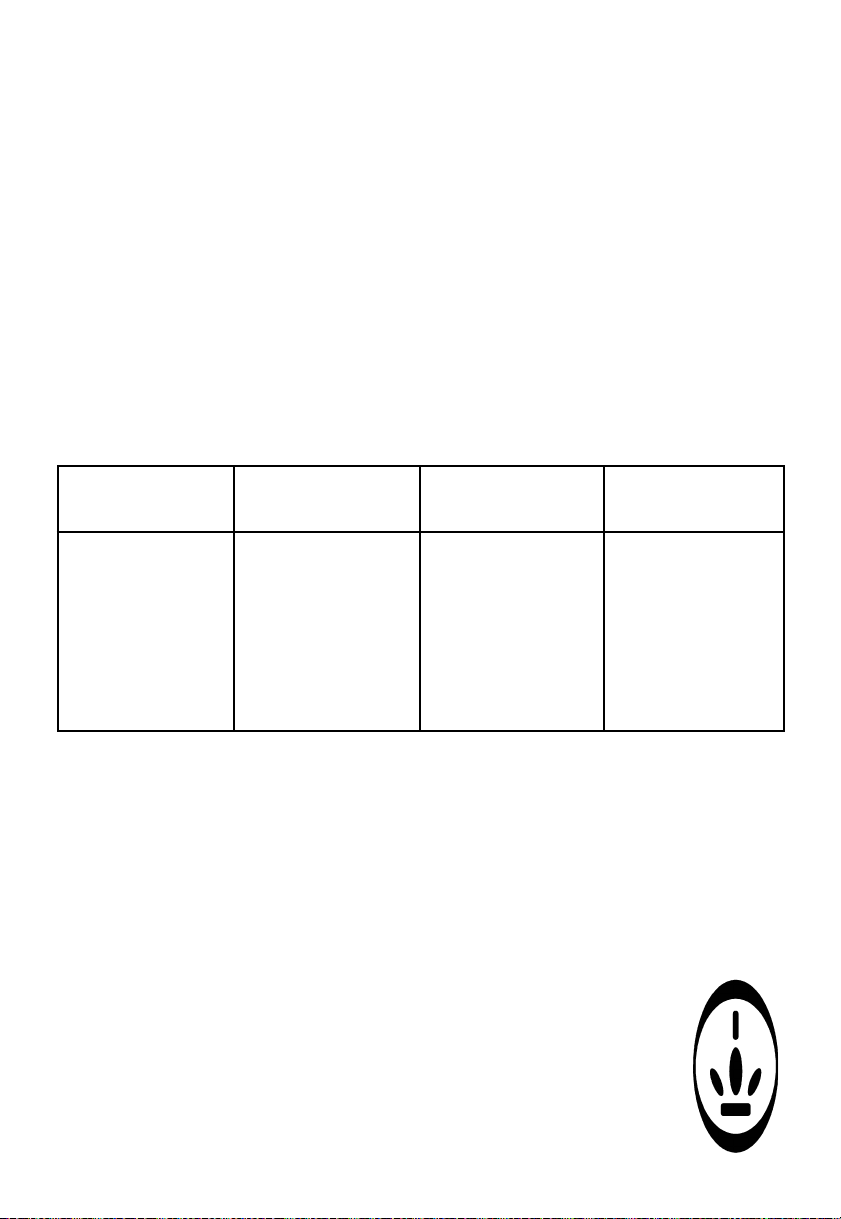
The table below shows the correct ratios and the resulting volume of boiled rice.
WATER / RICE RATIO TABLE
1 cup is equivalent to 175 ml water or 100 grammes of uncooked rice
Uncooked rice
1 cup
2 cups
3 cups
4 cups
5 cups
6 cups
7 cups
8 cups
9 cups
10 cups
Water (measured with
the measuring cup provided)
1
1/2
cup
2
1/2
kop
3
1/2
kop
4
1/2
kop
5
1/2
kop
6
1/2
kop
7
1/2
kop
8
1/2
kop
9
1/2
kop
10
1/2
kop
Water level in the
inner pan
Line 1
Line 2
Line 3
Line 4
Line 5
Line 6
Line 7
Line 8
Line 9
Line 10
Eventual volume of
rice when boiled
2 cups
4 cups
6 cups
8 cups
10 cups
12 cups
14 cups
16 cups
18 cups
20 cups
Page 8

8
- Next, insert the plug into the socket and switch the appliance to the 'cook' position by pressing the
switch.
- After a while the rice boiler will automatically switch over to the 'warm' position. Leave the rice for
another 5-10 minutes with the lid closed, to allow it to cook properly.
Some 'rice tips':
- If desired, the rice may be washed beforehand. Rice that has been washed will stick less to the pan,
but it loses some of its nutritional value.
- If the rice sticks to the pan (with certain types of rice this is almost inevitable), you can lightly oil
the inner pan with salad oil, olive oil, or any other kind of vegetable oil.
- For a softer end result, soak the uncooked rice for 5-10 minutes in the water in the inner pan, before
switching on the rice cooker.
2. Preparation of precooked rice (quick boiling rice).
The method of preparation is the same as for normal rice, but the ratio between the amount of water
and rice is different. There is no hard and fast rule for this as every rice producer uses a different
precooking time and method. The quantities of water and rice used should therefore be as instructed
on the packaging of the rice. Proceed then as follows:
- Put the amount of water indicated into the pan and switch the pan on to the 'cook' position. The rice
should be added as soon as the water is boiling.
- Boil the rice for the time indicated on the packaging. Then, switch off the rice cooker by removing
the plug from the socket.
- Follow the instructions on the packaging. Usually the rice should be left to stand for about 15
minutes, sometimes with the lid closed, after which the water should be drained.
CLEANING
ALWAYS UNPLUG THE APPLIANCE BEFORE CLEANING.
Use a damp cloth to wipe off the outer pan. Make sure the pan is completely dry before reconnecting it to
the socket. If necessary dry the electric connection on the side with a piece of kitchen roll, for example.
The other parts can be cleaned in warm soapy water. Do not use any abrasive cleaning products or scourers.
Cleaning tip: pour a cup of water and a drop of dish washing liquid in the inner pan. Switch the pan onto
the 'cook' position and leave it for about 10 minutes. Then switch it off and rinse thoroughly.
PRINCESS TIPS
- Never put water into the outer pan.
- Make sure that the inner pan does not boil over as this will allow water into the outer pan. If this
does happen, first remove the plug from the socket, then use oven gloves to take the inner pan out of
the outer pan, pour the water out of the outer pan and allow it to cool down.
- Never immerse the outer pan or cord in water or any other liquid.
- Always remove the plug from the socket before cleaning or if any fault develops.
The pan should also be unplugged when not in use.
- The pan and the various parts get very hot; make sure that children do not come near it, and be
careful yourself as well. Only pick up the pan using the handle.
- Ensure that the appliance is not so close to the edge of a table, counter top, etc., that someone could
knock it over. Do not allow the cord to hang over the edge or on the floor, as someone may become
entangled or trip over it.
- Do not use the appliance if it is damaged or if the cable is damaged. Instead, send it to
our service department .
- Do not place the appliance on or directly adjacent to a warm hotplate or other source
of heat.
- Plug the pan only into an earthed socket.
- This pan is intended for normal household use only.
- Do not use any vinegar or excessive amounts of salt in the inner pan as this will
affect the coating.
Page 9

9
U.K. WIRING INSTRUCTIONS
The wires in the mains lead are coloured in accordance with the following code:
BLUE = neutral, BROWN = LIVE, GREEN-YELLOW = EARTH
As the colours of the wire in the mains lead of this appliance may not correspond with the colour
markings identifying the terminals on your plug, proceed as follows:
The wire which is coloured BLUE must be connected to the terminal which is marked with the
letter N or coloured black.
The wire which is coloured BROWN must be connected to the terminal which is marked with the
letter L or coloured red.
The wire which is coloured GREEN-YELLOW must be connected to the earth terminal which is marked
with the letter E or or coloured green and yellow.
With this appliance, if a 13 amp plug is used a 13 amp fuse should be fitted. If any other type of plug is
used a 15 amp fuse must be fitted either in the plug or at the distribution board.
PRINCESS RICE COOKER ART. 1919
AVANT L'EMPLOI
Lisez attentivement ce mode d'emploi et conservez-le afin de pouvoir le consulter ultérieurement si
nécessaire. Assurez-vous que le voltage de votre logement correspond à celui indiqué sur l'appareil.
Brancher cet appareil uniquement sur une prise de terre.
Lavez avant de les utiliser toutes les pièces (sauf la cuve extérieure et le cordon électrique) dans de l’eau
additionnée de produit vaisselle et rincez-les soigneusement.
DESCRIPTION DU PRINCESS RICE COOKER
Cette petite merveille de Princess est idéale pour préparer du riz en un rien de temps. En plus de cuire le
riz, cet autocuiseur possède également une fonction intégrée pour conserver au chaud.
Le cuiseur de riz de Princess se compose d'une cuve extérieure comportant la partie technique (éléments à
chauffer, détecteur de température) et d'une cuve de cuisson intérieure. Fonctionnement :
- Raccordez d’abord le cordon dans l’appareil avant de brancher la fiche dans la prise.
- La fonction de maintien au chaud est activée dès que l'on branche la fiche dans la prise de courant.
- Abaisser l’interrupteur situé en façade pour passer en mode Cuisson/Vapeur.
- Dès que la température de cuisson est atteinte, l’autocuiseur se met automatiquement en mode de
maintien au chaud.
Débrancher toujours la fiche de la prise lorsque le cuiseur de riz n’est pas utilisé car la fonction de
maintien au chaud est activée automatiquement dès que la fiche est branchée dans la prise.
L’appareil est constitué des éléments suivants :
• Cuve extérieure ;
• Cuve intérieure ;
• Couvercle transparent ;
• Fiche ;
• Godet doseur ;
• Cuillère à riz.
CONSEILS D’UTILISATION DU PRINCESS RICE COOKER
Cuisson du riz
Pour cuire du riz, utilisez la cuve intérieure que vous placerez dans la cuve extérieure ;
pendant la cuisson fermez le cuiseur avec le couvercle transparent.
Avant de commencer, il faut savoir quel type de riz vous voulez cuire. En gros, on
distingue deux sortes de riz:
- Le riz blanc
- Le riz complet (riz brun)
Dans les deux sortes on trouve différentes variétés telles que le riz long, le riz rond, le
riz brisé, le riz du Suriname, le riz sauvage, le riz Basmati, le riz Pandan. Cela n’a pas
d’importance pour la préparation.
Page 10
10
Par contre il est important de savoir que le riz peut s’acheter sous diverses formes :
1. Du riz cru, non traité.
2. Du riz précuit.
Ce dernier, le riz précuit, est aussi appelé « riz à cuisson rapide » ou « riz minute ».
Pour obtenir du riz de bonne qualité, la proportion de riz et d’eau est essentielle.
1. Préparation du riz ordinaire (c.a.d. du riz blanc ou du riz complet, mais pas précuit)
- Quantité de riz
Pour mesurer la quantité de riz exacte, utilisez le godet doseur fourni. Un doseur plein correspond à
100 grammes de riz. C’est la dose moyenne pour une personne. Versez la quantité de riz désirée dans
la cuve.
- Quantité d’eau
Versez ensuite l’eau dans la cuve. Pour mesurer la quantité d’eau, utilisez le godet doseur fourni. Un
doseur plein correspond à 175 ml d’eau.
Le tableau ci-dessous vous indique les proportions exactes ainsi que le volume obtenu de riz cuit
correspondant.
TABLEAU DES QUANTITÉS EAU/RIZ
1 tasse correspond à 175 ml d’eau ou à 100 grammes de riz cru
- Brancher ensuite la fiche dans la prise et régler le commutateur sur la fonction « cuisson ».
- Au bout d’un certain temps le cuiseur se mettra automatiquement en mode « chaud ». Laisser le
cuiseur dans cette position pendant encore 5 à 10 minutes avec le couvercle fermé pour parfaire la
cuisson.
Conseils pour la cuisson du riz :
- Vous pouvez éventuellement laver le riz avant de le cuire. Du riz lavé colle moins à la casserole mais
il perd aussi un peu de sa valeur nutritionnelle.
- Si le riz colle à la casserole (c’est inévitable avec certaines variétés de riz), graissez légèrement la
cuve avec par exemple de l’huile pour salade, de l’huile d’olive ou une autre huile
végétale.
- Pour obtenir un riz plus mou, laissez le riz cru tremper 5 à 10 minutes dans l’eau dans
la cuve de cuisson avant d’allumer le cuiseur.
2. Mode de cuisson du riz précuit (riz à cuisson rapide).
Le procédé est identique au riz ordinaire sauf que les proportions d’eau et de riz
diffèrent. Il n’existe pas de règle absolue en la matière car chaque fabricant prescrit un
temps de cuisson et un procédé différents. Il faudra donc respecter les quantités d’eau
et de riz indiquées sur le paquet. Pour le reste, procédez comme suit :
Riz cru
1 tasse
2 tasses
3 tasses
4 tasses
5 tasses
6 tasses
7 tasses
8 tasses
9 tasses
10 tasses
Quantité d’eau
(mesurée avec le
doseur fourni)
1
1/2
tasses
2
1/2
tasses
3
1/2
tasses
4
1/2
tasses
5
1/2
tasses
6
1/2
tasses
7
1/2
tasses
8
1/2
tasses
9
1/2
tasses
10
1/2
tasses
Niveau d’eau dans la
cuve
Ligne 1
Ligne 2
Ligne 3
Ligne 4
Ligne 5
Ligne 6
Ligne 7
Ligne 8
Ligne 9
Ligne 10
Volume de riz cuit
obtenu
2 tasses
4 tasses
6 tasses
8 tasses
10 tasses
12 tasses
14 tasses
16 tasses
18 tasses
20 tasses
Page 11

11
- Mettez la quantité d’eau indiquée dans la cuve et réglez le sélecteur sur la position « cuisson ».
Ajoutez le riz dès que l’eau bout.
- Faire cuire le riz le temps indiqué sur le paquet. Eteindre ensuite le cuiseur en retirant la fiche de la
prise.
- Suivre ensuite les instructions figurant sur le paquet. En principe, il faudra laisser le riz encore un
quart d’heure dans le cuiseur, parfois avec le couvercle fermé, avant de l’égoutter.
ENTRETIEN
DEBRANCHER D'ABORD L'APPAREIL DE LA PRISE DE COURANT.
L’extérieur du cuiseur peut être nettoyé avec un chiffon humide. Veiller à bien essuyer le cuiseur avant de
brancher la prise électrique. Si besoin est, essuyer également avec du papier essuie-tout la connexion
électrique située sur le côté de l’appareil.
Nettoyer les autres pièces dans de l’eau chaude additionnée de liquide vaisselle. Ne pas utiliser de
nettoyant abrasif ni de tampon à récurer.
Conseil de nettoyage : verser une tasse d'eau et un peu de liquide vaisselle dans la cuve intérieure. Régler
le cuiseur sur la position « cuisson » et laisser allumé une dizaine de minutes. Eteindre ensuite l’appareil
et bien rincer.
CONSEILS DE PRINCESS
- Ne mettez jamais d'eau dans la cuve extérieure.
- Veillez à ce que la cuve intérieure ne déborde pas car l’eau passerait alors dans la cuve extérieure. Si
néanmoins cela se produisait, retirer d’abord la fiche de la prise, sortir la cuve intérieure de la cuve
extérieure, vider l’eau de la cuve extérieure et laisser refroidir.
- Ne plonger jamais la cuve extérieure ou le cordon dans l’eau ni dans tout autre liquide.
- Retirer toujours la fiche de la prise avant de nettoyer l’appareil ou s’il est défectueux. Enlevez aussi
la fiche de la prise si vous n'utilisez pas l'appareil.
- Le cuiseur et les accessoires deviennent très chauds, les tenir donc hors de portée des enfants et les
manipuler avec prudence. Saisissez toujours le cuiseur par la poignée.
- Ne placez pas l’appareil près du bord d’une table, d’un plan de travail, etc. pour ne pas risquer de le
heurter ; veillez également à ce que personne ne puisse trébucher sur le cordon ou y rester accroché.
- Ne pas utiliser l’appareil si celui-ci ou son cordon sont endommagés, mais l’expédier à notre service
de réparation.
- Ne pas placer l’appareil sur ou à proximité d’une plaque de cuisson chaude, etc.
- Raccorder cet appareil uniquement à une prise à la terre.
- Cet appareil est uniquement destiné à un usage domestique.
- Ne pas mettre de vinaigre ou de sel en abondance dans la cuve intérieure car cela attaque le revêtement.
PRINCESS RICE COOKER ART. 1919
VOR DEM GEBRAUCH
Diese Gebrauchsanweisung zuerst gründlich durchlesen und für eventuelle spätere Fragen aufheben.
Überprüfen, ob die Netzspannung Ihrer Wohnung der des Geräts entspricht. Das Gerät nur an eine
geerdete Steckdose anschließen.
Vor dem Erstgebrauch alle Teile (mit Ausnahme des Außentopfs und des Kabels) mit Seifenwasser
reinigen und danach gründlich abspülen.
BESCHREIBUNG DES PRINCESS RICE COOKER
Dieses Küchenwunder von Princess kann innerhalb kürzester Zeit Reis zubereiten. Außer
der Zubereitung von Reis eignet sich das Gerät aufgrund seiner integrierten
Warmhaltefunktion außerdem zum Warmhalten von Nahrungsmitteln.
Der Princess Rice Cooker besteht aus einem Außentopf mit integrierter Technik
(Heizelement, Temperatursensor) und einem Innentopf. Wie folgt vorgehen:
- Zuerst das Kabel am Topf anschließen und erst danach in die Steckdose stecken.
- Sobald der Stecker in die Steckdose gesteckt wird, schaltet sich die Warmhaltefunktion
ein.
Page 12

12
- Wenn der Schalter auf der Vorderseite nach unten gedrückt wird, schaltet der Topf auf die
Kochen/Dämpfen-Funktion um.
- Bei Erreichen der Kochtemperatur schaltet der Temperatursensor des Topfes automatisch wieder
auf die Warmhaltefunktion um.
Da die Warmhaltefunktion sofort aktiviert wird, wenn sich der Stecker in der Steckdose befindet, muss
der Stecker bei Nichtgebrauch des Topfes immer aus der Steckdose gezogen werden.
Folgende Zubehörteile werden mitgeliefert:
• Außentopf
• Innentopf
• Durchsichtiger Deckel
• Stecker
• Messbecher
• Reislöffel
BENUTZERTIPPS FÜR DEN PRINCESS RICE COOKER
Reis kochen
Zum Kochen von Reis den Außentopf mit dem darin befindlichen Innentopf benutzen. Den Topf während
des Kochen mit dem durchsichtigen Deckel verschließen.
Vor Beginn ist es wichtig zu wissen, welche Sorte Reis gekocht wird. Reis lässt sich in 2 Arten einteilen,
und zwar:
- Weißer Reis
- Brauner Reis (ungeschälter Reis)
Bei beiden Arten gibt es verschiedene Sorten, wie z.B. Langkornreis, Rundkornreis, gebrochener Reis,
Surinamreis, Wildreis, Basmatireis, Pandanreis. Für alle Sorten gilt die gleiche Zubereitung.
Wichtig aber ist, dass der Reis gekauft werden kann als:
1. normaler Reis, d.h. unbehandelter Reis
2. vorgekochter oder vorgedämpfter Reis
Der vorgekochte oder vorgedämpfte Reis wird im Handel häufig als „Schnellkochreis“, „Schnellreis“,
„Zauberreis“ oder „Kurz kochender Reis“ angeboten.
Das Wasser-Reis-Verhältnis ist für eine gute Reisqualität sehr wichtig.
1. Zubereitung von normalem Reis (ungeschälter Reis und weißer Reis, nicht vorgekocht)
- Reis abmessen:
Für das Abmessen des Reises den mitgelieferten Messbecher benutzen. Ein voller Messbecher
entspricht 100 Gramm Reis. Das ist die durchschnittliche Portion für eine Person. Die gewünschte
Reismenge in den Innentopf geben.
- Wasser abmessen:
Das Wasser in den Innentopf geben. Dazu ebenfalls den mitgelieferten Messbecher benutzen.
Ein voller Messbecher entspricht 175 ml Wasser.
Nachfolgende Tabelle zeigt eine Übersicht über das richtige Verhältnis und die dabei entstehende Menge
gekochter Reis.
Page 13

13
WASSER-REIS-VERHÄLTNISTABELLE
1 Tasse entspricht 175 ml Wasser oder 100 Gramm ungekochtem Reis.
- Anschließend den Stecker in die Steckdose stecken und durch Drücken des Schalters den Stand
„cook“ einschalten.
- Nach einiger Zeit schaltet der Reiskocher automatisch in den Stand „warm“ um. Den Reis in diesem
Stand noch 5-10 Minuten mit geschlossenem Deckel stehen lassen.
EINIGE REIS-TIPPS:
- Der Reis kann eventuell vor dem Kochen gewaschen werden. Gewaschener Reis klebt nicht so sehr
am Topf, verliert dadurch allerdings an Nährwert.
- Wenn der Reis am Topf klebt (bei einigen Reissorten lässt sich das beinahe nicht vermeiden), kann
der Innentopf mit beispielsweise Salatöl, Olivenöl oder einem anderen Pflanzenöl leicht eingeölt
werden.
- Für einen weicheren Reis den ungekochten Reis vor dem Einschalten des Reiskochers 5-10 Minuten
im mit Wasser gefüllten Innentopf weichen lassen.
2. Zubereitung vorgekochter Reis (Schnellkochreis):
Die Zubereitung entspricht der von normalem Reis, nur das Wasser-Reis-Verhältnis ändert sich. Es
gibt keine Faustregel, da jeder Reisproduzent eine andere Vorkochzeit und -methode gebraucht. Für
das Wasser-Reis-Verhältnis deshalb immer die Angaben auf der Reisverpackung beachten. Wie folgt
vorgehen:
- Die angegebene Wassermenge in den Topf geben und den Stand „cook“ einschalten. Sobald das
Wasser kocht, den Reis hinzufügen.
- Den Reis gemäß der auf der Verpackung angegebenen Kochzeit kochen lassen. Danach den
Reiskocher ausschalten.
- Dazu den Stecker aus der Steckdose ziehen. Im Weiteren die Angaben auf der Verpackung befolgen.
Meistens muss der Reis noch ca. 15 Minuten stehen gelassen werden. Manchmal mit geschlossenem
Deckel. Danach das Wasser abgießen.
REINIGUNG
ZUERST DEN STECKER AUS DER STECKDOSE ZIEHEN.
Der Außentopf kann mit einem feuchten Tuch gereinigt werden. Darauf achten, dass der Topf vollkommen
trocken ist, bevor er wieder an die Steckdose angeschlossen wird. Gegebenenfalls den
elektrischen Anschluss an der Seite kurz nachtrocknen (z.B. mit Küchenkrepp).
Die übrigen Elemente können in warmem Seifenwasser gereinigt werden. Keine
scheuernden Reinigungsmittel oder Topfkratzer verwenden.
Reinigungstipp: Eine Tasse Wasser und etwas Geschirrspülmittel in den Innentopf geben.
Den Reiskocher im Stand „cook“ einschalten und etwa 10 Minuten eingeschaltet lassen.
Anschließend ausschalten und gut ausspülen.
Ungekochter Reis
1 Tasse
2 Tassen
3 Tassen
4 Tassen
5 Tassen
6 Tassen
7 Tassen
8 Tassen
9 Tassen
10 Tassen
Wasser (mit mitgeliefertem Messbecher
gemessen )
1
1/2
Tassen
2
1/2
Tassen
3
1/2
Tassen
4
1/2
Tassen
5
1/2
Tassen
6
1/2
Tassen
7
1/2
Tassen
8
1/2
Tassen
9
1/2
Tassen
10
1/2
Tassen
Wasserstand Innentopf
Strich 1
Strich 2
Strich 3
Strich 4
Strich 5
Strich 6
Strich 7
Strich 8
Strich 9
Strich 10
Gekochte Reismenge
2 Tassen
4 Tassen
6 Tassen
8 Tassen
10 Tassen
12 Tassen
14 Tassen
16 Tassen
18 Tassen
20 Tassen
Page 14

14
PRINCESS-TIPPS
- Niemals Wasser in den Außentopf füllen.
- Darauf achten, dass der Innentopf nicht überkocht, da dann Wasser in den Außentopf gelangt. Sollte
das doch einmal passieren, zuerst den Stecker aus der Steckdose ziehen, den Innentopf mit
Topflappen aus dem Außentopf herausheben, das Wasser aus dem Außentopf abgießen und diesen
abkühlen lassen.
- Den Außentopf und das Kabel nie in Wasser oder andere Flüssigkeiten tauchen.
- Vor dem Reinigen oder bei Störungen immer den Stecker aus der Steckdose ziehen. Den Stecker
auch aus der Steckdose ziehen, wenn der Reiskocher nicht in Betrieb ist.
- Das Heizelement und andere Teile werden sehr heiß. Außerhalb der Reichweite von Kindern halten
und selbst auch immer vorsichtig sein. Den Topf nur an den Griffen anfassen.
- Das Gerät nicht so nahe am Tischrand oder am Rand einer Arbeitsfläche o. Ä. aufstellen, dass es
heruntergestoßen werden kann. Außerdem dafür sorgen, dass das Kabel nicht so liegt, dass man
darüber stolpern oder darin hängen bleiben kann.
- Ein beschädigtes Gerät oder ein defektes Kabel nicht benutzen, sondern an unseren Kundendienst
schicken.
- Das Gerät niemals auf oder in unmittelbare Nähe einer heißen Kochplatte o. Ä. stellen.
- Den Topf nur an eine geerdete Steckdose anschließen.
- Dieser Reiskocher ist nur für den Haushaltsgebrauch bestimmt.
- Im Innentopf keinen Essig und kein Salz verwenden, da sonst die Beschichtung angegriffen wird.
OLLA ARROCERA PRINCESS ART. 1919
ANTES DEL USO
Léanse detenidamente todas estas instrucciones de uso y guárdense para una eventual consulta posterior.
Controle si la tensión de la red en la vivienda coincide con la del aparato. Conecte este aparato
únicamente a un enchufe con toma de tierra.
Antes de usar el aparato, limpie todos sus componentes (salvo la olla exterior y el cable) en agua
jabonosa y enjuáguelos bien.
DESCRIPCIÓN DE LA OLLA ARROCERA PRINCESS
Esta maravilla de la cocina de Princess es apta para preparar arroz en corto tiempo. También es muy útil
para mantener caliente los alimentos.
La olla arrocera de Princess se compone de una olla exterior que incorpora todos los elementos técnicos
(resistencia, sensor de temperatura) y una olla interior. Su operación es como sigue:
- Enchufe primero el cable en la olla, sólo después enchufe la clavija en la toma de corriente.
- La olla se activa en la función de mantenimiento en caliente en el momento de enchufar la clavija en
la toma de corriente.
- Al pulsar el interruptor en la parte frontal, la olla pasa a la función de hervir / cocer al vapor.
- En cuanto se haya alcanzado la temperatura de hervir, el sensor de temperatura conmuta
automáticamente a mantenimiento en caliente y la olla vuelve a dicha función.
Puesto que la función de mantenimiento en caliente se activa directamente cuando se introduce la clavija
en la toma de corriente, es preciso desenchufar siempre la clavija de la toma de corriente cuando no se
utiliza la olla.
Componentes incluidos:
• Olla exterior;
• Olla interior;
• Tapa transparente;
• Clavija;
• Taza medidora;
• Cuchara arrocera.
CONSEJOS PARA EL USO DE LA OLLA ARROCERA PRINCESS
Cocer arroz
Para cocer arroz utilice la olla interior que viene dentro de la olla exterior; tape la olla con
la tapa transparente cuando está hirviendo.
Page 15

15
Antes de empezar es importante saber qué tipo de arroz va a cocer. El arroz se puede clasificar más o
menos en 2 tipos, a saber:
- Arroz blanco;
- Arroz moreno (integral).
Ambos tipos tienen diferentes variedades, como arroz de grano largo, de grano redondo, arroz partido,
arroz de Surinam, arroz silvestre, arroz Basmati, arroz Pandan. No obstante, estas diferencias no tienen
importancia para la preparación.
En lo que sí hay que fijarse es si el arroz se vende como:
1. Arroz común; es arroz sin tratar.
2. Arroz precocido o prevaporizado.
Este último tipo, el arroz precocido o prevaporizado, a menudo se comercializa como ‘arroz de cocción
rápida’, ‘arroz rápido’, ‘arroz mágico’ o ‘arroz de cocción corta’.
Para obtener un arroz de buena calidad, es importante fijarse en la proporción de arroz y agua.
1. Preparar arroz común (arroz integral y arroz blanco, no precocido):
- Medir el arroz:
Para medir el arroz utilice la taza medidora. Una medida llena contiene 100 gramos de arroz, igual a
una porción media para una persona. Ponga la cantidad deseada de arroz en la olla interior.
- Medir el agua:
Seguidamente ponga agua en la olla interior, utilice también aquí la taza medidora. Una medida llena
contiene 175 ml de agua.
La tabla de abajo presenta las proporciones correctas y el volumen de arroz hervido que se obtendrá.
TABLA DE PROPORCIONES DE AGUA / ARROZ
1 taza equivale a 175 ml de agua o 100 gramos de arroz sin cocer.
- Seguidamente enchufe la clavija en la toma de corriente y active la olla arrocera en la posición de
cocer ‘cook’ al pulsar el interruptor.
- Al cabo de cierto tiempo la olla cambiará automáticamente a la posición de caliente
‘warm’. Deje reposar el arroz en esta posición unos 5 -10 minutos más con la tapa
puesta para que el arroz quede bien hecho.
Algunos 'consejos arroceros’:
- Eventualmente puede lavar previamente el arroz. El arroz lavado se pegará menos en
la olla, por otra parte, perderá algo de su valor nutritivo.
- Si el arroz se pega en la olla (prácticamente inevitable con algunos tipos de arroz),
vierta en la olla un poco de aceite para ensalada, aceite de oliva u otro aceite vegetal.
- Para obtener un arroz más blando, se puede dejar remojando previamente el arroz en
agua durante 5 -10 minutos en la olla interior, antes de activar la olla arrocera.
Arroz no cocido
1 taza
2 tazas
3 tazas
4 tazas
5 tazas
6 tazas
7 tazas
8 tazas
9 tazas
10 tazas
Agua
(medida con la taza
medidora)
1
1/2
tazas
2
1/2
tazas
3
1/2
tazas
4
1/2
tazas
5
1/2
tazas
6
1/2
tazas
7
1/2
tazas
8
1/2
tazas
9
1/2
tazas
10
1/2
tazas
Nivel de agua en olla
interior
Línea 1
Línea 2
Línea 3
Línea 4
Línea 5
Línea 6
Línea 7
Línea 8
Línea 9
Línea 10
Volumen de arroz
cocido
2 tazas
4 tazas
6 tazas
8 tazas
10 tazas
12 tazas
14 tazas
16 tazas
18 tazas
20 tazas
Page 16

16
2. Preparación de arroz precocido (arroz rápido).
La preparación es la misma que la del arroz normal, sólo que la proporción de agua y arroz es
distinta. No hay regla general porque cada productor de arroz utiliza otro tiempo de precocción y
otro método. Por eso referimos a las indicaciones en el envase del arroz para saber la cantidad de
agua y arroz. Luego proceda como sigue:
- Ponga la cantidad de agua indicada en la olla y actívela en la posición ‘cook’. En cuanto llegue el
agua a ebullición, se añade el arroz.
- Deje hervir el arroz durante el tiempo indicado en el envase. Después desactive la olla arrocera
desenchufando la clavija de la toma de corriente.
- Continúe con el procedimiento indicado en el envase. Normalmente le indicarán que deje reposar el
arroz unos 15 minutos más, a veces tapado, para después escurrir el arroz.
LIMPIEZA
PRIMERO DESENCHUFE LA CLAVIJA DE LA TOMA DE CORRIENTE.
La olla exterior se puede limpiar con un paño húmedo. Preste atención a que el aparato esté totalmente
seco antes de enchufarlo otra vez. Si es necesario, seque la conexión eléctrica en el lateral por ejemplo,
con papel de cocina.
Los demás componentes se pueden limpiar en agua jabonosa caliente. No utilice nunca productos de
limpieza abrasivos ni estropajos.
Consejo de limpieza: ponga una tacita de agua y un chorrito de detergente en la olla interior. Active el
aparato en la posición ‘cook’ y déjelo encendido unos 10 minutos. Luego desactivar y enjuagar bien.
CONSEJOS PRINCESS
- No ponga nunca agua en la olla exterior.
- Asegure que no rebose agua hirviendo de la olla interior porque el agua pasará a la olla exterior.
Si esto ocurriese, primero desenchufe la clavija de la toma de corriente, saque la olla interior de la
olla exterior por medio de manoplas, vierta el agua de la olla exterior y déjela enfriar.
- No sumerja nunca la olla arrocera ni el cable en agua u otro líquido.
- Siempre desenchufe la clavija de la toma de corriente antes de la limpieza y en caso de fallas.
También desenchufe la olla cuando no esté en uso.
- La olla y los diversos componentes se calientan mucho; asegure que quedarán fuera del alcance de
los niños y naturalmente tenga cuidado también usted. Agarre la olla sólo por las asas.
- Asegure de no situar el aparato tan cerca del borde de la mesa, encimera, etc. de manera que alguien
pudiera tumbarlo; asegure también que el cable no cuelgue de manera que alguien pudiera tropezar
con él o quedarse enganchado en él.
- No utilice el aparato cuando está averiado o con el cable defectuoso, sino envíelo a nuestro servicio
técnico.
- No coloque el aparato encima o muy cerca de una placa de cocción caliente, o similar.
- Conecte este aparato únicamente a un enchufe con toma de tierra.
- Este aparato es apropiado únicamente para uso doméstico.
- No ponga en la olla interior vinagre ni sal porque dañarían el revestimiento.
PRINCESS RICE COOKER ART. 1919
PRIMA DELL’USO
Leggete attentamente queste istruzioni d’uso e conservatele per eventuali consultazioni future. Verificate
che la tensione di alimentazione dell’apparecchio corrisponda a quella della vostra abitazione. Collegate
l’apparecchio unicamente ad una presa di alimentazione con messa e terra.
Prima dell’uso lavate tutte le parti (eccetto la pentola esterna ed il cavo di alimentazione)
con detersivo e sciacquatele bene.
DESCRIZIONE DEL PRINCESS RICE COOKER
Questo miracoloso elettrodomestico Princess è particolarmente indicato per preparare il
riso in breve tempo. Oltre che per la cottura del riso, l'apparecchio è indicato anche per
mantenere in caldo i cibi, grazie ad una funzione riscaldante integrata.
Il Princess Rice Cooker è costituito da una pentola esterna, contenente tutti i componenti
tecnici (elemento riscaldante, sensore della temperatura), ed una pentola interna.
L’apparecchio funziona come segue:
Page 17

17
- Collegare prima il cavo di alimentazione alla pentola e poi inserire la spina nella presa di
alimentazione.
- Non appena la spina viene inserita nella presa di alimentazione, la pentola si accende in funzione
riscaldante.
- Premendo verso il basso l'interruttore posto sulla parte anteriore, viene attivata la funzione di
bollitura/cottura a vapore.
- Non appena è stata raggiunta la temperatura di cottura, il sensore del termostato provoca l’attivazione
automatica della funzione di scaldavivande.
Dato che la funzione di scaldavivande si attiva non appena la spina viene inserita nella presa di
alimentazione, è necessario togliere sempre la spina dalla presa di alimentazione quando la pentola non
viene usata.
L’apparecchio viene fornito completo dei seguenti componenti:
• Pentola esterna
• Pentola interna
• Coperchio trasparente
• Spina
• Misurino
• Cucchiaio da riso.
SUGGERIMENTI PER L’USO DEL PRINCESS RICE COOKER
Cottura del riso
Per la cottura del riso dovete usare la pentola interna, inserita in quella esterna; durante la cottura, coprite
la pentola con il coperchio trasparente.
Prima di cominciare è importante sapere che tipo di riso state per cuocere. A grandi linee, il riso può
essere diviso in due tipi, ossia:
- Riso bianco;
- Riso integrale.
Entrambi i tipi presentano diverse varietà, quali il riso a chicchi lunghi, a chicchi rotondi , il riso spezzato,
il riso del Suriname, il riso selvatico, il riso Basmati, il riso Pandan. La varietà non influisce sul metodo
di cottura.
Influisce invece la forma in cui il riso viene commercializzato, ovvero:
1. Riso normale, ossia non lavorato;
2. Riso perboilled o precotto al vapore.
Quest’ultimo tipo, il riso perboilled o precotto al vapore, viene spesso definito ‘riso a cottura rapida’,
‘riso veloce’ o ‘riso a cottura breve’.
Il rapporto tra la quantità di acqua e di riso è importante per ottenere un riso di buona qualità.
1. Cottura del riso normale (riso integrale e riso bianco, non precotti)
- Dosaggio del riso:
Usate il bicchiere in dotazione per dosare il riso. Un bicchiere colmo equivale a 100 grammi di riso.
Questa è la porzione media per una persona. Versare la quantità desiderata di riso nella pentola interna.
- Dosaggio dell’acqua:
Quindi versate l’acqua nella pentola interna. Potete usare il bicchiere anche per il
dosaggio dell’acqua. Un bicchiere colmo equivale a 175 ml d’acqua.
Nella seguente tabella sono indicati i rapporti corretti ed il relativo volume di riso cotto.
Page 18

18
TABELLA DEI RAPPORTI ACQUA/RISO
1 bicchiere equivale a 175 ml d’acqua o 100 grammi di riso non cotto
- Inserite, quindi, la spina nella presa di alimentazione ed attivate la funzione di ‘cottura’, premendo
l’interruttore.
- Dopo un certo periodo di tempo, l’interruttore tornerà automaticamente in posizione ‘caldo’.
Lasciate che il riso continui a cuocere in questa posizione, a coperchio chiuso, per altro 5-10 minuti.
Alcuni suggerimenti:
- Potete eventualmente lavare il riso prima di cuocerlo. Il riso lavato si attacca meno facilmente alla
pentola, ma perde parte del suo valore nutritivo.
- Se il riso si attacca alla pentola (cosa pressoché inevitabile con alcuni tipi di riso), potete ungere
leggermente la pentola interna con olio di semi, olio d’oliva o un altro tipo di olio vegetale.
- Per ottenere un riso più morbido, il riso non precotto può essere lasciato a bagno nell’acqua, nella
pentola interna, per 5-10 minuti prima di accendere l’apparecchio.
2. Cottura del riso precotto (riso a cottura rapida).
Il metodo di cottura è lo stesso del riso normale, ma varia il rapporto tra la quantità d’acqua e di riso.
Non è possibile dare una regola generale, dato che ciascun produttore adotta un proprio tempo e
metodo di precottura. Pertanto, dovete seguire le indicazioni riportate sulla confezione per le giuste
dosi d’acqua e di riso. Poi procedete come segue:
- Versate la quantità d’acqua indicata nella pentola e mettete l’interruttore in posizione ‘cottura’.
Non appena l’acqua bolle, unite il riso.
- Lasciate bollire il riso per il periodo di tempo indicato sulla confezione. Quindi, spegnete
l’apparecchio togliendo la spina dalla presa di alimentazione.
- Dopo la cottura, procedete secondo le indicazioni riportate sulla confezione. In genere, il riso va
lasciato nella pentola, per altri 15 minuti ca., a volte con il coperchio chiuso, prima di essere scolato.
PULIZIA
TOGLIETE PRIMA LA SPINA DALLA PRESA DI ALIMENTAZIONE.
Pulite la pentola esterna con un panno umido. Assicuratevi che la pentola sia ben asciutta prima di
ricollegarla alla presa di alimentazione. Se necessario, asciugate la presa elettrica, situata a lato
dell’apparecchio, con carta da cucina.
Le altre parti possono essere lavate con acqua calda e detersivo. Non usate mai sostanze o
spugnette abrasive.
Suggerimento per la pulizia: versate un bicchiere d’acqua ed una goccia di detersivo nella
pentola interna. Accendete l’apparecchio in posizione ‘cottura’e lasciatelo in funzione per
una decina di minuti. Quindi, spegnete l’apparecchio e sciacquatelo bene.
Riso non precotto
1 bicchiere
2 bicchieri
3 bicchieri
4 bicchieri
5 bicchieri
6 bicchieri
7 bicchieri
8 bicchieri
9 bicchieri
10 bicchieri
Acqua
(dosata con il bicchiere
in dotazione)
1 bicchiere e
1/2
2 bicchieri e
1/2
3 bicchieri e
1/2
4 bicchieri e
1/2
5 bicchieri e
1/2
6 bicchieri e
1/2
7 bicchieri e
1/2
8 bicchieri e
1/2
9 bicchieri e
1/2
10 bicchieri e
1/2
Livello dell’acqua
nella pentola interna
Linea di livello 1
Linea di livello 2
Linea di livello 3
Linea di livello 4
Linea di livello 5
Linea di livello 6
Linea di livello 7
Linea di livello 8
Linea di livello 9
Linea di livello 10
Volume finale del riso
cotto
2 bicchieri
4 bicchieri
6 bicchieri
8 bicchieri
10 bicchieri
12 bicchieri
14 bicchieri
16 bicchieri
18 bicchieri
20 bicchieri
Page 19

19
SUGGERIMENTI PRINCESS
- Non versate mai acqua nella pentola esterna.
- Assicuratevi che l’acqua non possa fuoriuscire dalla pentola interna durante la cottura, altrimenti
rischia di entrare nella pentola esterna. Se questo dovesse succedere, togliete la spina dalla presa di
alimentazione, estraete la pentola interna da quella esterna con l’aiuto di due presine, eliminate
l’acqua dalla pentola esterna e lasciatela raffreddare.
- Non immergete mai la pentola esterna in acqua, o in altri liquidi.
- Togliete sempre la spina dalla presa di alimentazione prima di pulire l’apparecchio o in caso di
funzionamento difettoso. Togliete la spina dalla presa di alimentazione quando non usate
l’apparecchio.
- La pentola ed i vari componenti diventano molto caldi, assicuratevi che i bambini non possano
toccarli e maneggiateli con cura. Prendete la pentola esclusivamente per i manici.
- Assicuratevi che l’apparecchio non si trovi mai tanto vicino al bordo del tavolo o del ripiano, da poter
essere accidentalmente scontrato; assicuratevi anche che nessuno possa inciampare o rimanere
impigliato nel cavo di alimentazione.
- Non usate l’apparecchio se è difettoso o se il cavo di alimentazione è danneggiato, ma inviatelo al
nostro centro di assistenza.
- Non posizionate l’apparecchio su, o in prossimità di, piastre di cottura o altre fonti di calore.
- Collegate l’apparecchio unicamente ad una presa di alimentazione con messa e terra.
- Questo apparecchio è destinato al solo uso domestico.
- Non mettete aceto o una quantità eccessiva di sale nella pentola interna, per evitare di danneggiarne
il rivestimento interno.
PRINCESS RICE COOKER ART. 1919
INNAN DU BÖRJAR
Läs först instruktionerna noggrant och behåll dem för framtida referens. Kontrollera att elförsörjningen i
ditt hushåll motsvarar apparatens. Anslut apparaten endast till jordade uttag.
Rengör alla delar före bruk (utom ytterpannan och sladden) i diskvatten och skölj dem noggrant.
BESKRIVNING AV PRINCESS RICE COOKER
Detta Princess-köksunder är mycket väl lämpat för att tillaga ris på en mycket kort tid. Utöver att tillaga
ris är apparaten lämplig för att hålla mat varm tack vare den integrerade värmebevarande funktionen.
Din Princess Rice Cooker består av en ytterpanna som innehåller värmeelementet och temperatursensorn
och en innerpanna. Den fungerar så här:
- Sätt först sladden i pannan och sedan kontakten i vägguttaget.
- Pannans värmefunktion startas så snart kontakten sitter i vägguttaget.
- Genom att trycka på strömbrytaren på framsidan kopplas pannan om till kokning/ångkokning.
- Så snart koktemperaturen har uppnåtts, kopplar temperatursensorn automatiskt tillbaka pannan till
värmefunktionen.
Eftersom värmefunktionen startar direkt så snart kontakten sitter i vägguttaget, måste du alltid dra ut
kontakten när pannan inte är i bruk.
Följande tillbehör medföljer:
• Ytterpanna
• Inre panna
• Genomskinligt lock
• Kontakt
• Mätbägare
• Rissked
ANVÄNDARTIPS FÖR PRINCESS RICE COOKER
Koka ris
För att koka ris använder du ytterpannan med innerpannan placerad inuti; stäng pannan
med det genomskinliga locket under kokningen.
Page 20

20
Innan du börjar är det viktigt att veta vilken sorts ris du ska koka. Ris kan generellt indelas i två sorter,
nämligen:
- Vitt ris;
- Brunt ris (opolerat ris).
Inom båda sorterna förekommer diverse varianter, t.ex. långkornsris, rundkornsris, krossat ris, Surinamris,
vilt ris, Basmatiris och Pandanris. För beredningen har detta inget inflytande.
Däremot är det viktigt att ris kan köpas som:
1. Vanligt ris, dvs. obehandlat ris
2. Förkokat eller –ångat ris.
Den senare varianten, det förbehandlade riset, säljs ofta som 'snabbkokris', 'snabbris', 'parboiled' eller
'kortkokande ris'.
För att erhålla en god kvalitet är förhållandet mellan mängden ris och vatten viktigt.
1. Beredning av vanligt ris (opolerat och vitt ris, ej förbehandlat)
- Mätning av riset
Använd den medföljande måttbägaren för att mäta upp riset. En full måttbägare innehåller 100 gram
ris. Detta är en medelstor portion för en person. Lägg önskad mängd ris i innerpannan.
- Mätning av vatten:
Fyll sedan vatten i innerpannan. Använd även nu den bifogade måttbägaren. En full måttbägare
innehåller 175 ml vatten.
Nedanstående tabell ger en översikt över rätt förhållande och vilken volym kokat ris detta ger.
TABELL MED FÖRHÅLLANDET MELLAN VATTEN OCH RIS
1 kopp motsvarar 175 ml. vatten eller 100 gram okokat ris
- Nu sätter du i kontakten i vägguttaget och ställer apparaten på "kokning" genom att trycka på knappen.
- Efter ett tag slår riskokaren automatiskt om till värmeläget. Lämna riset i ytterligare 5-10 minuter
med locket stängt för att låta det tillagas ordentligt.
Några ristips:
- Om så önskas kan riset tvättas innan tillagning. Ris som tvättats fastnar inte lika lätt i
pannan, men förlorar ett visst näringsvärde.
- Om riset fastnar i pannan (med vissa ristyper är detta nästan oundvikligt) kan du olja
den inre pannan något med salladsolja, olivolja eller någon annan typ av vegetabilisk
olja.
- För ett mjukare slutresultat kan det okokade riset blötas i 5-10 minuter i vatten i den
inre pannan innan riskokaren slås på.
Okokat ris
1 kopp
2 koppar
3 koppar
4 koppar
5 koppar
6 koppar
7 koppar
8 koppar
9 koppar
10 koppar
Vatten
(mätt med den medföljande mätbägaren)
1
1/2
koppar
2
1/2
koppar
3
1/2
koppar
4
1/2
koppar
5
1/2
koppar
6
1/2
koppar
7
1/2
koppar
8
1/2
koppar
9
1/2
koppar
10
1/2
koppar
Vattennivå innerpanna
Streck 1
Streck 2
Streck 3
Streck 4
Streck 5
Streck 6
Streck 7
Streck 8
Streck 9
Streck 10
Slutgiltig volym kokat
ris
2 koppar
4 koppar
6 koppar
8 koppar
10 koppar
12 koppar
14 koppar
16 koppar
18 koppar
20 koppar
Page 21

21
2. Förberedning av förkokat ris (snabbkokande ris).
Föreberedningsmetoden är densamma som för vanligt ris, men förhållande mellan vatten och ris är
ett annat. Det finns ingen säker och enkel regel eftersom alla risproducenter använder olika tider och
metoder för förkokningen. Vatten- och rismängden ska därför motsvara instruktionerna på
risförpackningen. Gör sedan så här:
- Häll angiven mängd vatten i pannan och ställ pannan på “kokning”. Riset tillsätts så snart vattnet kokar.
- Koka riset den tid som anges på förpackningen. Slå sedan av riskokaren genom att ta ut kontakten
från uttaget.
- Följ instruktionerna på förpackningen. Vanligtvis ska riset lämnas i ungefär 15 minuter, ibland med
locket stängt, efter detta ska vattnet hällas ut.
RENGÖRING
KOPPLA ALLTID UR MASKINEN INNAN RENGÖRING.
Använd en fuktig trasa för att torka av ytterpannan. Se till att pannan är helt torr innan du sätter i den i
vägguttaget. Om nödvändigt kan du torka av den elektriska anslutningen på sidan med till exempel
kökspapper.
De andra delarna kan rengöras med vatten och tvål. Använd inget slipande eller nötande rengöringsmaterial.
Rengöringstips: Häll en kopp vatten med en droppe diskmedel i den inre pannan. Ställ pannan på
"kokning" och låt den stå i ungefär 10 minuter. Stäng sedan av den och skölj ordentligt.
PRINCESS-TIPS
- Häll aldrig vatten i ytterpannan.
- Se till att vattnet i den inre pannan inte kokar över eftersom vatten då kommer in i den yttre pannan.
Om detta händer ska kontakten först dras ut från vägguttaget. Använd sedan grytvantar för att ta ut
den inre pannan ur ytterpannan, häll ut vattnet från ytterpannan och låt den kylas ned.
- Sänk aldrig ytterpannan eller sladden i vatten eller någon annan vätska.
- Drag alltid ut kontakten ur vägguttaget före rengöring och vid störningar. Drag även ut kontakten
om pannan inte är i bruk.
- Pannan och de olika delarna blir mycket heta: se till att barn inte kommer åt dem och var även själv
försiktig. Använd endast handtagen för att lyfta den.
- Se till att apparaten inte står för nära bordets eller arbetsbänkens kant så att den kan stötas ned. Se
även till att sladden inte hänger där någon kan snubbla över den eller fastna i den.
- Använd inte apparaten om den är skadad eller om kabeln är skadad. Skicka den istället till vår
serviceavdelning.
- Placera inte apparaten på eller direkt bredvid en varm platta eller någon annan värmekälla.
- Anslut apparaten endast till jordade uttag.
- Denna panna är endast avsedd för hushållsbruk.
- Använd inte ättika eller stora mängder salt i innerpannan, då detta skadar täcklagret.
PRINCESS RICE COOKER ART. 1919
INDEN IBRUGTAGNING
Læs denne brugsanvisning grundigt igennem og gem den, så du også ved en senere lejlighed kan kigge i
den, hvis du får brug for at slå noget op. Kontrollér, om husets vekselspænding svarer til apparatets.
Tilslut dette apparat udelukkende til en stikkontakt med jordforbindelse.
Rengør alle dele (med undtagelse af den ydre gryde og ledningen) inden ibrugtagning i lidt sæbevand og
skyl dem godt af.
BESKRIVELSE AF PRINCESS RICE COOKER
Med dette Princess køkkenvidunder kan du koge ris på ganske kort tid. Derudover er
apparatet også egnet til at holde maden varm på ved hjælp af den integrerede
varmholdningsfunktion.
Page 22

22
Princess Rice Cooker består af en ydre gryde med deri alle tekniske dele
(opvarmnings-element, temperatursensor) og en indre gryde. Den virker som beskrevet i nedenstående:
- Stik først ledningen i gryden og først derefter stikket i stikkontakten.
- Gryden tænder for varmholdningsfunktionen, så snart stikket er sat i stikkontakten.
- Ved at tænde for kontakten foran på gryden, starter gryden med at koge/dampe.
- Så snart kogetemperaturen er nået, sørger tempera-tursensoren for, at gryden automatisk skifter
tilbage til varmholdningsfunktionen.
Efter som der øjeblikkeligt tændes for varmholdningsfunktionen, når stikket sættes i stikkontakten, bør
stikket altid tages ud af stikkontakten, når gryden ikke er i brug.
Gryden leveres med følgende tilbehørsdele:
• Ydre gryde;
• Indre gryde;
• Gennemsigtigt låg;
• Stik;
• Målebæger;
• Risske
TIPS VED BRUG AF PRINCESS RICE COOKER
Kogning af ris
Til kogning af ris anvendes den ydre gryde med deri den indre gryde. Læg det gennemsigtige låg på
gryden, mens der koges.
Inden du starter, er det vigtigt at vide, hvilken slags ris, der skal koges. Ris kan i grove træk deles op i 2
sorter, nemlig:
- Hvid ris.
- Brun ris (ikke-afskallet ris).
Inden for begge sorter findes der forskellige varianter, såsom langkornede ris, runde riskorn, knækkede
ris, Suriname ris, vild ris, Basmati ris og Pandan ris. Rissorten har ingen indflydelse på tilberedningen.
Det er derimod vigtigt at vide, at man kan købe:
1. almindelig ris; dette er ubehandlet ris.
2. forbehandlet (forkogt eller dampbehandlet) ris.
Den sidste slags (forbehandlet ris) tilbydes tit som 'hurtigkog-ris', 'hurtig-ris' eller 'minut-ris'.
For at opnå en god riskvalitet spiller forholdet mellem mængden af ris og vandmængden en vigtig rolle.
1. Tilberedning af almindelig ris (ikke-afskallet og hvid ris, ikke forkogt)
- Afmåling af ris:
Brug det medleverede målebæger til afmåling af ris. Et fyldt målebæger er lig med 100 gram ris. Dette
er, hvad der gennemsnitligt beregnes til én person. Hæld den ønskede mængde ris i den indre gryde.
- Afmåling af vand:
Kom herefter vand i den indre gryde. Hertil kan du ligeledes bruge det medleverede målebæger.
Et fyldt målebæger er lig med 175 ml. vand.
Nedenfor stående tabel er en oversigt over de korrekte mængder (i forhold til hinanden), der skal
anvendes og over den efter kogning opnåede volumen af ris.
Page 23

23
VAND/RIS FORHOLDSTABEL
1 kop svarer til 175 ml. vand eller 100 gram ukogt ris
- Stik derefter stikket i stikkontakten og indstil riskogeren på funktionen 'cook' ved at trykke på kontakten.
- Efter nogen tid vil riskogeren automatisk skifte til funktionen 'varm'. Lad risen blive stående i denne
funktion i 5-10 minutter med låg på, så risen bliver kogt godt igennem.
Nogle få 'ris - tips':
- Du kan eventuelt først skylle risen. Skyllet ris klistrer mindre fast til gryden. Dog vil en del af
næringsværdien gå tabt.
- Klistrer risen fast til gryden (dette kan næsten ikke undgås ved nogle sorter ris), kan du smøre den
indre gryde med lidt olie, såsom f.eks. salatolie, olivenolie eller andre vegetabilske olier.
- For at opnå en blødere ris, kan den ukogte ris lægges i blød i 5-10 minutter i vandet i den indre gryde,
inden der tændes for riskogeren.
2. Tilberedning af forkogt ris (minut-ris).
Tilberedningsmåden er den samme som ved almindelig ris, men forholdet mellem mængde vand og
ris er anderledes. Der kan ikke gives nogen tommelfingerregel herfor, eftersom hver risproducent
håndterer en anden forkogningstid og metode. Med hensyn til mængde vand og ris bør du derfor
følge anvisningerne på emballagen. Fortsæt derefter som følger:
- Hæld den angivne mængde vand i gryden og indstil gryden på funktionen 'cook'. Så snart vandet
koger, tilføjes risen.
- Lad risen koge i den på emballagen angivne tid. Sluk herefter for riskogeren ved at trække stikket ud
af stikkontakten.
- Fortsæt derefter som angivet på emballagen. For det meste skal man lade risen blive stående i
yderligere ca. 15 minutter – i nogle tilfælde med låg på - hvorefter vandet hældes fra risen.
RENGØRING
TAG FØRST STIKKET UD AF STIKKONTAKTEN
Den ydre gryde kan rengøres med en fugtig klud. Vær opmærksom på, at gryden er helt tør, inden denne
atter tilsluttes stikkontakten. Tør om nødvendigt den elektriske tilslutning på siden af gryden af med f.
eks. køkkenrulle.
De øvrige dele kan rengøres i varmt sæbevand. Anvend ingen skuremidler eller skuresvamp.
Rengøringstips: hæld en lille kop vand og en lille smule opvaskemiddel i den indre gryde.
Tænd for gryden på funktion 'cook' og lad den forblive tændt i ca. 10 minutter. Sluk
derefter for denne og skyl den grundigt.
Ukogt ris
1 kop
2 kopper
3 kopper
4 kopper
5 kopper
6 kopper
7 kopper
8 kopper
9 kopper
10 kopper
Vand
(afmålt med
medleveret målebæger)
1
1/2
kopper
2
1/2
kopper
3
1/2
kopper
4
1/2
kopper
5
1/2
kopper
6
1/2
kopper
7
1/2
kopper
8
1/2
kopper
9
1/2
kopper
10
1/2
kopper
Vandniveau indre
gryde
Streg 1
Streg 2
Streg 3
Streg 4
Streg 5
Streg 6
Streg 7
Streg 8
Streg 9
Streg 10
Endelig volumen kogt
ris
2 kopper
4 kopper
6 kopper
8 kopper
10 kopper
12 kopper
14 kopper
16 kopper
18 kopper
20 kopper
Page 24

24
PRINCESS TIPS
- Kom aldrig vand i den ydre gryde.
- Sørg for, at den indre gryde ikke koger over, for da vil der komme vand i den ydre gryde. Skulle
dette alligevel ske, træk da først stikket ud af stikkontakten. Tag derefter den indre gryde med
grydelapper ud af den ydre gryde, hæld vandet ud af den ydre gryde og lad denne køle af.
- Kom aldrig den ydre gryde og ledningen i vand eller andre væsker.
- Tag altid stikket ud af stikkontakten inden rengøring, og når gryden ikke virker. Tag ligeledes stikket
ud af stikkontakten, når gryden ikke er i brug.
- Gryden og de forskellige dele bliver meget varme: sørg for, at børn ikke kan komme til gryden og
vær også selv forsigtig. Tag udelukkende fat i gryden ved håndtagene.
- Sørg for, at apparatet ikke står for tæt ved kanten af bordet, køkkenbordet eller lignende, så ingen
kan komme til at skubbe det ud over kanten. Sørg ligeledes for, at man ikke kan falde over ledningen
eller blive hængende i den.
- Hvis apparatet eller ledningen er beskadiget, må apparatet ikke bruges men bør da sendes til
reparation hos vores tekniske afdeling.
- Stil aldrig apparatet på eller i nærheden af en varm kogeplade eller lignende.
- Tilslut gryden udelukkende til stikkontakt med jordforbindelse.
- Denne gryde må udelukkende bruges i husholdningen.
- Anvend aldrig eddike eller salt i den indre gryde, da grydens belægning ellers vil blive ødelagt.
PRINCESS RICE COOKER ART. 1919
FØR BRUK
Les gjennom hele bruksanvisningen før du begynner og ta vare på den til senere bruk. Kontroller at
spenningen hjemme hos deg stemmer overens med spenningen på apparatet. Koble apparatet kun til en
jordet stikkontakt.
Vask alle delene (unntatt ytterpannen og ledningen) i varmt oppvaskvann og skyll dem grundig før du
bruker maskinen for første gang.
BESKRIVELSE AV PRINCESS RICE COOKER
Dette kjøkkenvidunderet fra Princess egner seg ikke bare til å koke ris i. Foruten tilberedning av ris er
apparatet også utmerket til å holde maten varm med, takket være den innebygde varmeholdefunksjonen.
Princess Rice Cooker består av en ytterpanne med alle tekniske muligheter (varmeelement, temperatursensor) og en innerpanne. Apparatet virker på følgende måte:
- Koble først ledningen til pannen, og sett deretter støpselet i stikkontakten.
- Pannen settes på varmholdefunksjonen så snart støpselet blir satt i stikkontakten.
- Når du trykker ned bryteren på forsiden, går pannen over til koking/dampkoking.
- Når koketemperaturen er nådd, setter temperatursensoren pannen automatisk tilbake til
varmholdefunksjonen.
Siden varmholdefunksjonen blir slått på så snart støpselet blir satt i stikkontakten, bør man alltid trekke
støpselet ut av stikkontakten når pannen ikke er i bruk.
Følgende deler følger med:
• Ytterpanne;
• Innerpanne;
• Gjennomsiktig lokk;
• Støpsel;
• Målebeger;
• Risskje.
BRUKSTIPS FOR PRINCESS RICE COOKER
Koke ris
Når du skal koke ris, bruker du ytterpannen med innerpannen plassert i den. Lukk pannen
med det gjennomsiktige lokket mens kokingen pågår.
Page 25

25
Før du begynner, er det viktig å vite hva slags ris du skal koke. Ris kan stort sett deles opp i 2 typer, det
vil si:
- Hvit ris.
- Brun ris (ubehandlet ris).
Begge sorter inneholder flere varianter , som langkornet ris, rundkornet ris, brukket ris, surinamsk ris,
villris, Basmatiris, Pandanris. Dette spiller ingen rolle for tilberedningen.
Det som er viktig, er at ris selges som:
1. Vanlig ris, det vil si ubehandlet ris.
2. Forhåndskokt ris eller ris som er dampkokt på forhånd.
Den siste versjonen, forhåndskokt ris eller ris som er dampkokt på forhånd, tilbys ofte som ‘minuttris’
eller hurtigris.
Hvis du vil ha ris av god kvalitet, er det viktig at du har rett forhold mellom ris og vann.
1. Tilberedning av vanlig ris (brun ris og hvit ris, ikke forhåndskokt)
- Måle risen:
Bruk det tilhørende målebegeret for å måle rismengden. Et fullt målebeger er 100 gram ris. Dette er
en gjennomsnittlig porsjon til én person. Hell ønsket rismengde i innerpannen.
- Måle vann:
Hell deretter vann i innerpannen. Bruk også det tilhørende målebegeret til det. Et fullt målebeger
tilsvarer 175 ml. vann.
Nedenstående tabell gir en oversikt over de rette forholdene og mengden kokt ris du får med dem.
TABELL OVER VANN/RIS-FORHOLD
1 kopp tilsvarer 175 ml. vann eller 100 gram ukokt ris
- Sett deretter støpselet i stikkontakten og sett riskokeren i 'cook'-stillingen ved å trykke inn bryteren.
- Etter en stund vil riskokeren automatisk gå over til 'varm'-stillingen. La risen stå i den stillingen enda
5-10 minutter med lokket på, slik at risen kan bli gjennomkokt.
Et par 'ristips':
- Eventuelt kan du vaske risen først. Vasket ris kleber mindre på pannen, men mister
også litt av næringsverdien.
- Hvis risen kleber på pannen (noe som nesten ikke kan utelukkes ved visse ristyper),
kan du olje innerpannen litt med f.eks. salatolje, olivenolje eller annen vegetabilsk olje.
- Hvis du vil ha mykere ris, kan du bløte den ukokte risen i vann i innerpannen i 5-10
minutter før du slår på riskokeren.
Ukokt ris
1 kopp
2 kopper
3 kopper
4 kopper
5 kopper
6 kopper
7 kopper
8 kopper
9 kopper
10 kopper
Vann (målt med
det tilhørende
målebegeret)
1
1/2
kopper
2
1/2
kopper
3
1/2
kopper
4
1/2
kopper
5
1/2
kopper
6
1/2
kopper
7
1/2
kopper
8
1/2
kopper
9
1/2
kopper
10
1/2
kopper
Vannivået i
innerpannen
Strek 1
Strek 2
Strek 3
Strek 4
Strek 5
Strek 6
Strek 7
Strek 8
Strek 9
Strek 10
Endelig mengde kokt
ris
2 kopper
4 kopper
6 kopper
8 kopper
10 kopper
12 kopper
14 kopper
16 kopper
18 kopper
20 kopper
Page 26

26
2. Tilberedning av forhåndskokt ris (hurtigris).
Tilberedningen er den samme som for vanlig ris, men forholdene mellom vannet og risen er
annerledes. Det er ikke mulig å gi en god regel for dette, siden risprodusentene bruker forskjellige
forhåndskoketider og metoder. For å vite hvilke mengder vann og ris du skal bruke, bør du derfor
følge bruksanvisningen på rispakken. Deretter gjør du som følgende:
- Hell den angitte vannmengden i pannen og sett pannen i 'cook'-stilling. Tilsett risen så snart vannet koker.
- La risen koke slik det er angitt på pakken. Slå deretter av riskokeren ved å trekke støpselet ut av
stikkontakten.
- Fortsett deretter som angitt på pakken. Som oftest skal risen stå i ca. 15 minutter til, noen ganger
med lokket på. Hell deretter ut risvannet.
RENGJØRING
TREKK STØPSELET UT AV STIKKONTAKTEN FØRST
Ytterpannen kan rengjøres med en fuktig klut. Sørg for at pannen er helt tørr før du kobler den til stikkontakten
igjen. Om nødvendig kan du ettertørke den elektriske tilkoblingen på siden, f.eks. med kjøkkenpapir.
De øvrige løse delene kan rengjøres i varmt oppvaskvann. Bruk aldri skuremidler eller skuresvamp.
Rengjøringstips: hell en kopp vann og litt oppvaskmiddel i innerpannen. Sett pannen i 'cook'-stilling og la
pannen stå på i ca. 10 minutter. Slå deretter av pannen og skyll grundig.
TIPS FRA PRINCESS
- Hell aldri vann i ytterpannen.
- Sørg for at innerpannen ikke koker over, for da vil det renne vann i ytterpannen. Hvis dette hender
likevel, trekk da først støpselet ut av stikkontakten, ta innerpannen ut av ytterpannen med
stekehansker, hell vannet ut av ytterpannen og la den avkjøles.
- Dypp aldri ytterpannen og ledningen i vann eller annen væske.
- Trekk alltid støpselet ut av stikkontakten før rengjøring og ved defekter. Trekk også støpselet ut av
stikkontakten når pannen ikke er i bruk.
- Pannen og de løse delene kan bli svært varme: hold dem utilgjengelig for barn og vær også forsiktig
selv. Ta pannen kun i håndtakene.
- Sørg for at apparatet ikke står så nært kanten av et bord, en kjøkkenbenk eller lignende, at det kan
falle av. Sørg også for at ledningen ikke henger slik at noen kan snuble i den eller vikle seg inn i den.
- Bruk ikke apparatet hvis selve apparatet eller ledningen er skadet, men send det til vår serviceavdeling.
- Plasser ikke apparatet på eller i nærheten av en varm kokeplate eller lignende.
- Pannen må kun kobles til en jordet stikkontakt.
- Denne pannen er kun beregnet på hjemmebruk.
- Bruk aldri eddik eller salt i innerpannen, da dette kan skade dekkelaget.
PRINCESS RICE COOKER ART. 1919
ENNEN KÄYTTÖÄ
Lue tämä käyttöohje ensin kokonaan läpi ja säilytä se myöhempää tarvetta varten. Tarkista, että
käytettävissäsi oleva verkkojännite on sama kuin laitteeseen merkitty jännite. Kytke laite ainoastaan
maadoitettuun pistorasiaan.
Puhdista ennen käyttöä kaikki osat (paitsi kattilaosa ja verkkojohto) astianpesuainevedellä ja huuhtele hyvin.
PRINCESS RICE COOKER –LAITTEEN KUVAUS
Tämä Princess-keittiöihme sopii erittäin hyvin riisin nopeaan valmistukseen. Sen lisäksi se
sopii myös ruoan lämpimänäpitoon laitteeseen integroidun lämpimänäpitotoiminnon ansiosta.
Princess Rice Cooker –laitteeseen kuuluu kattilaosa, jossa on kaikki tekniset osat
(lämmityselementti, lämpötila-anturi) sekä sisäkulho. Keitin toimii seuraavasti:
- Kytke verkkojohto ensin keittimeen ja vasta sitten pistorasiaan.
- Keitin kytkeytyy lämpimänäpitotoiminnolle heti kun pistotulppa liitetään pistorasiaan.
- Painettaessa etupuolella olevaa käyttökytkintä alas keitin kytkeytyy keitto/höyrytystoiminnolle.
- Heti kun kiehumispiste on saavutettu, lämpötila-anturi kytkee keittimen automaattisesti
takaisin lämpimänäpitotoiminnolle.
Page 27

27
Koska lämpimänäpitotoiminto käynnistyy heti kun pistotulppa liitetään pistorasiaan, pistotulppa on aina
irrotettava pistorasiasta, kun keitintä ei käytetä.
Varusteisiin kuuluvat seuraavat osat:
• Kattilaosa;
• Sisäkulho;
• Läpinäkyvä kansi;
• Pistotulppa;
• Mitta-astia;
• Riisilusikka.
PRINCESS RICE COOKER –LAITTEEN KÄYTTÖVINKKEJÄ
Riisin keittäminen
Riisin keittämiseen käytetään kattilaosaa ja sen sisällä olevaa kulhoa. Sulje kattilaosa läpinäkyvällä
kannella keittämisen ajaksi.
Tätä ennen on kuitenkin tärkeä tietää, millaista riisiä aiot käyttää. Riisilajit voidaan jakaa suurin piirtein
kahteen ryhmään:
- Valkoriisi;
- Ruskea riisi (täysjyväriisi).
Molempiin ryhmiin kuuluu eri lajeja kuten pitkäjyväinen ja pyöreäjyväinen riisi, rikottu riisi, surinamilainen
riisi, villiriisi, basmatiriisi ja Pandan-riisi. Tällä ei ole kuitenkaan mitään merkitystä riisin valmistustapaan.
On kuitenkin tärkeä tietää, että saatavilla on eri tavoin käsiteltyjä riisejä kuten:
1. Tavallinen riisi; ei esikäsitelty;
2. Esikeitetty tai esihöyrytetty riisi.
Viimeksi mainittua lajia, esikeitettyä tai –höyrytettyä riisiä, myydään usein nimellä ‘pikariisi’, tai
pakkauksessa on maininta ‘lyhyt keittoaika’.
Keitetyn riisin laatuun vaikuttaa olennaisesti riisin ja vesimäärän oikea suhde.
1. Tavallisen riisin valmistaminen (ei-esikypsennetty täysjyvä- ja valkoriisi).
- Riisin mittaaminen:
Käytä riisin mittaamiseen varusteisiin kuuluvaa mitta-astiaa. Täysi mitta-astia vastaa 100 grammaa
riisiä. Tämä on yhden hengen keskimääräinen annos. Laita haluamasi määrä riisiä sisäkulhoon.
- Veden mittaaminen:
Kaada seuraavaksi vesi sisäkulhoon. Käytä myös tähän tarkoitukseen varusteisiin kuuluvaa
mitta-astiaa. Täysi mitta-astia vastaa 175 ml vettä.
Alla olevasta taulukosta käyvät ilmi oikeat mittasuhteet sekä näin saadun keitetyn riisin määrä.
VEDEN/RIISIN MITTASUHDETAULUKKO
1 mitallinen vastaa 175 ml vettä tai 100 g keittämätöntä riisiä
Keittämätöntä riisiä
1 mitallinen
2 mitallista
3 mitallista
4 mitallista
5 mitallista
6 mitallista
7 mitallista
8 mitallista
9 mitallista
10 mitallista
Vettä (mitattu
varusteisiin kuuluvalla
mitta-astialla)
1
1/2
mitallista
2
1/2
mitallista
3
1/2
mitallista
4
1/2
mitallista
5
1/2
mitallista
6
1/2
mitallista
7
1/2
mitallista
8
1/2
mitallista
9
1/2
mitallista
10
1/2
mitallista
Sisäkulhon vesiraja
Täyttöraja 1
Täyttöraja 2
Täyttöraja 3
Täyttöraja 4
Täyttöraja 5
Täyttöraja 6
Täyttöraja 7
Täyttöraja 8
Täyttöraja 9
Täyttöraja 10
Lopullinen valmiin
riisin määrä
2 mitallista
4 mitallista
6 mitallista
8 mitallista
10 mitallista
12 mitallista
14 mitallista
16 mitallista
18 mitallista
20 mitallista
Page 28

28
- Liitä pistotulppa pistorasiaan ja kytke riisinkeitin toimintaan painamalla käyttökytkin asentoon ‘cook’.
- Jonkin ajan kuluttua riisinkeitin kytkeytyy automaattisesti ‘lämpimänäpito’-toiminnolle. Anna riisin
olla tällä toiminnolla vielä 5-10 minuuttia kansi kiinni, jotta riisi kypsyy lopullisesti.
Muutamia ‘riisivinkkejä’:
- Voit halutessasi huuhdella riisin vedellä ennen valmistusta. Huuhdeltu riisi tarttuu kulhoon
vähemmän, mutta menettää samalla jonkin verran ravintoarvostaan.
- Jos riisi tarttuu kulhon pintaan (joillakin riisilajeilla tätä on lähes mahdoton estää), voit öljytä
sisäkulhon kevyesti esim. salaatinkastikeöljyllä, oliiviöljyllä tai muulla kasvisöljyllä.
- Saat riisistä pehmeämpää liottamalla keittämätöntä riisiä vedessä sisäkulhossa 5-10 minuuttia ennen
kuin kytket riisinkeittimen toimintaan.
2. Esikypsennetyn riisin (pikariisin) valmistus.
Valmistustapa on sama kuin tavallisella riisillä, mutta veden ja riisin mittasuhde on erilainen. Tähän
ei ole olemassa nyrkkisääntöä, koska eri valmistajat käyttävät eri esikypsennysaikoja ja –tapoja. Sen
vuoksi on parasta noudattaa riisipakkauksen ohjeita veden ja riisin määrästä. Toimi tämän jälkeen
seuraavasti:
- Kaada sisäkulhoon tarvittava määrä vettä ja kytke keitin 'cook'-toiminnolle. Lisää riisi heti kun vesi
alkaa kiehua.
- Anna riisin kiehua pakkauksessa mainitun ajan. Katkaise sen jälkeen riisinkeittimen virta irrottamalla
pistotulppa pistorasiasta.
- Toimi sen jälkeen pakkauksen ohjeiden mukaisesti. Useimmiten riisin on vielä annettava hautua noin
15 minuuttia, joskus kansi kiinni, minkä jälkeen liika vesi kaadetaan pois.
PUHDISTUS
IRROTA ENSIN PISTOTULPPA PISTORASIASTA
Kattilaosa voidaan puhdistaa kostealla liinalla. Pidä huoli siitä, että kattilaosa on täysin kuiva ennen
kuin kytket laitteen jälleen pistorasiaan. Kuivaa vielä tarvittaessa laitteen sivussa oleva sähköliitäntä
esimerkiksi talouspaperilla.
Muut osat voidaan puhdistaa lämpimällä astianpesuainevedellä. Älä käytä puhdistukseen hankausaineita
tai hankaavaa pesusientä.
Puhdistusvinkki: kaada sisäkulhoon kupillinen vettä ja hieman astianpesuainetta. Kytke laite ‘cook’-toiminnolle ja anna aineen vaikuttaa noin 10 minuuttia. Katkaise laitteen virta ja huuhtele kulho hyvin.
PRINCESS-OHJEITA
- Älä kaada koskaan vettä kattilaosaan.
- Pidä huoli siitä, että sisäkulho ei koskaan kiehu yli, koska silloin kattilaosaan pääsee vettä. Jos näin
kuitenkin käy, irrota ensin pistotulppa pistorasiasta, nosta sisäkulho patalappuja käyttäen kattilaosasta,
kaada vesi kattilaosasta ja anna sen jäähtyä.
- Älä koskaan upota kattilaosaa ja verkkojohtoa veteen tai muuhun nesteeseen.
- Irrota pistotulppa pistorasiasta aina ennen puhdistusta tai häiriöiden sattuessa. Irrota pistotulppa
pistorasiasta myös kun laitetta ei käytetä.
- Keitin ja sen osat kuumenevat: pidä siis huoli siitä, että lapset eivät pääse sen lähelle ja ole itsekin
varovainen. Tartu keittimeen ainoastaan kädensijoista.
- Pidä huoli siitä, että laite ei ole sijoitettu niin lähelle pöydän, työtason tms. reunaa, että sen voi
tönäistä kumoon; pidä huoli myös siitä, että verkkojohto ei roiku niin että siihen voi kompastua tai
takertua.
- Älä käytä laitetta, jos se tai sen verkkojohto on vioittunut, vaan toimita se
huoltopalveluumme.
- Älä aseta laitetta kuumalle keittolevylle tms. tai sen lähelle.
- Kytke laite ainoastaan maadoitettuun pistorasiaan.
- Tämä keitin on tarkoitettu ainoastaan kotitalouskäyttöön.
- Älä laita sisäkulhoon etikkaa tai liian paljon suolaa, koska se vioittaa pinnoitetta.
Page 29

29
PRINCESS RICE COOKER ART. 1919
ANTES DE UTILIZAR
Deve ler primeiro este manual de instruções e conservá-lo para o poder eventualmente mais tarde voltar a
consultar. Controlar se a corrente eléctrica da sua casa corresponde à do aparelho. Deve ligar unicamente
este aparelho a uma tomada de corrente residual.
Lave antes de utilizar o aparelho todas as peças (com excepção da panela exterior e do cabo de
alimentação) em água tépida , lavando-as bem em seguida à torneira.
DESCRIÇÃO DA PRINCESS RICE COOKER
Esta panela mágica para cozinhar da Princess é ideal para fazer arroz em pouco tempo. Para além de
arroz, pode ser usada para conservar os alimentos quentes graças ao mecanismo de aquecimento integrado.
A Princess Rice Cooker consiste numa panela exterior que inclui todos os componentes técnicos
necessários (um elemento de aquecimento, um sensor de temperatura) e numa panela interior. A panela
funciona do seguinte modo:
- Ligue primeiro o cabo de alimentação à panela, e ligue em seguida a ficha à tomada eléctrica.
- O mecanismo de aquecimento da panela fica ligado logo que se ligar a ficha à corrente eléctrica.
- Se carregar para baixo no interruptor situado no lado exterior, a panela passa à função de
cozinhar/cozinhar a vapor.
- Logo que se atingiu a temperatura apropriada para cozinhar, o sensor da temperatura volta
automaticamente para o mecanismo de aquecimento.
Uma vez que o mecanismo de aquecimento se acende logo que a ficha estiver ligada à corrente, deve
retirar sempre a ficha da tomada quando não utilizar a panela.
São fornecidas as seguintes peças:
• Panela exterior;
• Panela interior;
• Tampa transparente;
• Interruptor;
• Copo de medição;
• Colher de arroz;
SUGESTÕES DE COMO DEVE UTILIZAR A PRINCESS RICE COOKER
Preparar arroz
Para preparar ar arroz, deve usar a panela exterior juntamente com a panela interior; tapando a panela
com a tampa transparente enquanto o arroz coze.
Antes de começar, é importante saber qual o tipo de arroz que pretende utilizar. Geralmente pode dividir
o arroz em duas categorias, nomeadamente:
- arroz branco
- arroz integral
Estes dois tipos de arroz incluem muitas variedades, tal como arroz de grão comprido, grão redondo, grão
miúdo, arroz do Suriname, arroz silvestre, aaroz Basmati, arroz Pandan. Isto não é importante para o
modo de preparação do arroz.
O que é importante é que pode comprar o arroz como:
1. Arroz normal: isto é arroz sem qualquer tipo de preparação especial anterior.
2. Arroz pré-cozinhado ou pré-cozinhado a vapor.
A última versão, o arroz pré-cozinhado ou pré-cozinhado a vapor, pode ser geralmente
comprado na forma de “arroz de tempo de cozedura rápida”, “arroz rápido”, “arroz
mágico” ou “arroz que coze rapidamente”.
Page 30

30
Para obter uma boa qualidade de arroz, a proporção entre a quantidade de arroz e a quantidade de água é
importante.
1. Preparar arroz normal (integral ou branco, não pré-cozinhado)
- Medir o arroz:
Utilize o copo de medição que vem incluído com o aparelho para medir o arroz. Um copo cheio
corresponde a 100 gramas de arroz. Esta constitui a quantidade média por pessoa. Deite a quantidade
desejada de arroz para dentro da panela.
- Medir a água:
Em seguida, deite a água para dentro da panela. Para tal deve usar o copo de medição que vem
incluído com o aparelho. Um copo cheio corresponde a 175 ml de água.
A tabela seguinte mostra a proporção correcta entre o arroz e a água e o volume de arroz que obtém
depois de cozinhado.
TABELA DE PROPORÇÃO ENTRE A QUANTIDADE DE ARROZ E ÁGUA
1 chávena corresponde a 175 ml de água ou 100 gramas de arroz cru.
- Ligue em seguida a ficha à corrente e ligue a panela de cozer o arroz para a função “cook”
(cozinhar), carregando no interruptor da panela.
- Ao fim de alguns minutos, a panela de cozer o arroz muda automaticamente para a função “warm”
(quente). Deixe cozer bem o arroz nesta função durante 5-10 minutos com tampa.
Algumas sugestões do “arroz”:
- Pode eventualmente lavar o arroz primeiro. O arroz que foi primeiro lavado pega menos à panela,
mas perde igualmente alguns valores nutritivos.
- Se o arroz pegar à panela (para alguns tipos de arroz é quase impossível evitar que isso aconteça),
pode untar ligeiramente a panela interior com óleo ou azeite ou outro tipo de óleo vegetal.
- Para obter um arroz mais macio, pode pôr o arroz de molho em água durante 5 a 10 minutos dentro
da panela interior, antes de ligar a ficha à corrente.
2. Como preparar o arroz pré-cozinhado (de cozedura rápida).
O modo de preparação é o mesmo que para o arroz normal, mas a proporção entre a quantidade de
água e de arroz é diferente. Para isso, não existe qualquer regra visto que cada
produtor de arroz utiliza um outro tempo de cozedura ou método diferente. Para saber
qual a quantidade de água e de arroz que deve utilizar, deve seguir por isso as
instruções que vêm na embalagem do arroz em questão. Deve fazer o seguinte:
- Deite para dentro da panela a quantidade de água indicada e ligue a panela para a
função de “cook”. Logo que a água ferva, acrescente o arroz.
- Deixe cozer o arroz durante o tempo indicado na embalagem. Em seguida desligue a
panela do arroz, retirando a ficha da tomada.
- Em seguida, deve seguir as instruções indicadas na embalagem. Geralmente deve
deixar secar o arroz durante ainda cerca de 15 minutos, por vezes com tampa,
escorrendo-o em seguida.
Arroz cru
1 chávena
2 chávenas
3 chávenas
4 chávenas
5 chávenas
6 chávenas
7 chávenas
8 chávenas
9 chávenas
10 chávenas
Água
(medida com copo de
medição incluído)
1
1/2
chávenas
2
1/2
chávenas
3
1/2
chávenas
4
1/2
chávenas
5
1/2
chávenas
6
1/2
chávenas
7
1/2
chávenas
8
1/2
chávenas
9
1/2
chávenas
10
1/2
chávenas
Nível de água da
panela interior
Risca 1
Risca 2
Risca 3
Risca 4
Risca 5
Risca 6
Risca 7
Risca 8
Risca 9
Risca 10
Quantidade do arroz
cozinhado
2 chávenas
4 chávenas
6 chávenas
8 chávenas
10 chávenas
12 chávenas
14 chávenas
16 chávenas
18 chávenas
20 chávenas
Page 31

31
LIMPEZA
RETIRAR PRIMEIRO A FICHA DA CORRENTE.
A panela exterior pode ser limpa com um pano húmido. Deve certificar-se de que a mesma está seca antes
de a voltar a ligar à electricidade. Se for necessário, deve secar a ligação eléctrica situada num dos lados,
por exemplo com papel absorvente de cozinha.
As outras peças podem ser lavadas em água tépida. Para tal não deve usar detergentes ou esponjas que risquem.
Sugestão de limpeza: Deite uma chávena de água e um pouco de detergente para dentro da panela.
Ligue a panela para a função “cook” e deixe ficar a actuar durante uns 10 minutos. Desligue em seguida
a panela e lave muito bem.
SUGESTÕES DA PRINCESS
- Nunca deve deitar água para dentro da panela exterior.
- Não deve deixar que a panela interior transborde água a ferver para a panela exterior. Caso isso
aconteça, desligue primeiro a panela, puxando a ficha da corrente, esvazie a água da panela exterior
e deixe arrefecer.
- Nunca deve mergulhar a panela exterior e o cabo de alimentação em água ou em qualquer outro
líquido.
- Puxe sempre a ficha da corrente antes de limpar a panela ou em caso de avaria. Também deve puxar
a ficha da corrente quando não utilizar a panela.
- A panela e as peças respectivas podem aquecer muito: assegure-se que as crianças não se encontram
perto e tenha você mesmo cuidado ao manejar a panela. Deve apenas pegar na panela pela asa.
- Certifique-se que o aparelho não se encontra colocado à beira da mesa, da bancada, etc, de modo a
que alguém o possa derrubar; certifique-se igualmente de que o cabo de alimentação não se encontra
pendurado de forma a que alguém possa eventualmente tropeçar nele ou ficar com o salto preso no
mesmo.
- Não use o aparelho quando estiver avariado ou quando o cabo de alimentação estiver danificado,
devendo enviá-lo nesse caso para os nossos serviços de assistência.
- Não deve colocar o aparelho perto de fontes de calor tais como uma chapa de fogão quente, etc.
- Deve unicamente ligar a panela a uma corrente residual.
- Esta panela destina-se unicamente ao uso doméstico.
- Não deve deitar vinagre ou sal para dentro da panela interior porque estas substâncias podem afectar
o seu revestimento.
Page 32

32
Page 33

GARANTIEKAART
GUARANTEE CARD
CARTE DE GARANTIE
GARANTIEKARTE
GARANTIE
CERTIFICADO DE GARANTÍA
TARJA DE GARANTIA
CARTOLINA DI GARANZIA
GARANTIKORT
GARANTIBEVIS
GARANTIKORT
TAKUUTODISTUS
GARANCIJSKI LIST
ÁBYGADARSKÍRTEINI
ZÁRU/NÍ LIST
Κα τα εγγυησης
Datum van aankoop
Date of Purchase
Date d’achat
Kaufdatum
Fecha de compra
Data de compra
Data di acquisto
Inköpsdatum
Købs-dato
Innkjøpsdato
Ostopäivä
Datum nakupa
Hvenær keypt
Datum nákupu
Ηµε οµηυια αγο ας
TYPE
Dealer
Revendeur
Händler
Haendler/commercant
Vendedor
Comprador
Rivenditore
Återförsäljare
Forhandler
Jälleenmyyjä
Zastopnik
Söluadili
Π οµηθευτης
Koper
Buyer
Acheteur
Käufer
Kaeufer
Comprador
Comerç
Acquirente
Köpare
Køber
Kjøper
Ostaja
Kupec
Kaupandi
Kupujci
Αγο αστης
➙
➙
∂
´
´
∂
´
´
∂
∂
´
^
∂
´
➙
➙
Page 34

NEDERLANDS: GARANTIEVOORWAARDEN
1 jaar op fabrikage- en materiaalfouten. De garantie geldt
alleen met volledig ingevuld garantiebewijs. Geen garantie op
defekten t.g.v. verkeerd gebruik, onbevoegde demontage en
vallen. De garantie is niet geldig voor gevolgschade.
ENGLISH: GUARANTEE
For 1 year in respect of defects found to be due to faulty
workmanship or material. The guarantee is only valid with a
complete filled in guarantee card. There is no guarantee on
appliances found to be defective due to wrongful use,
disassembling or accidental breakage.
FRANÇAIS: CONDITIONS DE LA GARANTIE
1 an de défaut de fabrication ou vice de matière. Pour
bénéficier de la garantie le présent bon doit porter la date
d’achat et le cachet du vendeur. La garantie ne couvre pas les
dégâts résultant d’une mauvaise utilisation, d’un démontage
ou réparation ou échange standard par des personnes non
autorisées.
DEUTSCH: GARANTIE
1 Jahr hinsichtlich Material- oder Produktionsfehler.
Garantieansprüche können nur mit vollständig ausgefüllter
Garantiekarte bzw. dem Kaufbeleg geltend gemacht werden.
Die Garantie erlischt durch unsachgemässen Gebrauch,
Bruch, unauthorisierten Eingriff sowie mutwillige
Zerstörung.
ESPAÑOL: GARANTÍA
PRINCESS garantiza sus productos por el período de 1 año,
a contar desde la fecha de la primera compra, contra
cualquier defecto de fabricación. La garantía sólo tendrá
validez si está completamente rellenada y sellada por el
establecimiento vendedor. No quedan cubiertos por la
presente garantía los desperfectos producidos por un mal uso
del producto, por haber sido manipulado por un servicio no
autorizado, por caída, etc.
CATALÀ: GARANTIA
Per un any contra defectes de fabricació. La garantia només
es vàlida una vegada la tarja de garantia ha estat correctament
plena. La garantia no serà vàlida contra un ús no autoritzat, si
l’aparell ha estat desmontat o si presenta cops o
maltractaments.
ITALIA: GARANZIA
L’apparecchio è garantito per un periodo di un anno dalla
data di acquisto che viene comprovata dallo scontrino. Per
garanzia si intende la sostituzione o riparazione gratuita delle
parti componenti l’apparecchio che risultano difettose
all’origine per vizi di fabbricazione. Non sono coperte de
garanzia tutte le parti che dovessero risultare difettose a causa
di negligenza o trascuratezza nell’uso, di danno da trasporto
ed in ogni caso di circostanze checomunque non è possibile
far risalire a difetti di fabbricazione. La garanzia è inoltre
esclusa in tutti i casi di uso improprio dell’apparecchio ed in
particolare in caso di uso non domestico.
SVENSKA: GARANTI
1 års garanti. Konsumentköplagens regler gäller vid eventuell
reklamation. Garantin omfattar fabrikations- och/eller
materialfel. Om apparaten används felaktigt eller för icke
avsett ändamål, tas inget ansvar för eventuella skador. Kom
ihåg att du måste kunna styrka inköpsdatum. Spar kvitto och
köpbevis/garantikort.
DANSK: GARANTI
Garantien gœlder 1 år fra købsdato, denne udfyldes af
forhandleren.Garantien gœlder ikke såfremt produktet œndres
eller repareres af andre end den af leverandøren anviste
service adresse. Endvidere bortfalder garantien, hvis
produktet benyttes til andre formål end den foreskrevne
anvendelse i brugsanvisningen.
NORSK: GARANTI
1 års garanti. Garantien gjelder fabrikasjons feil og-eller
material feil. Hvis apparatet brukes feilaktig, eller utenom
angitt bruksområde, er garantien ikke gyldig ved eventuelle
skader. Garantien er kun gyldig sammen med et korrekt utfylt
garanti kort med kjøpedato samt kvittering.
SUOMI: TAKUU
Takuuaika 1 vuosi. Takuu kattaa valmistus-ja/tai
raakaainevirheet. Takuu ei vastaa vahingoista, jotka johtuvat
laitteen virheellisestä käytöstä. Viallisen tuotteen mukaan on
liitettävä ostokuitti / takuutodistus, josta selviää ostopaikka
ja-aika.
SLOVENIA: GARANCIJA
Za kvaliteto in izdelavo dajemo garancijsko dobo 1 leta.
V/asu garancije bo nasa servisna sluzba brezpla/no opravila
vse pomanjkljivosti, ki bi nastale zaradi napak pri izdelavi ali
materialu. Okvare zaradi uporabe ali mehanske poskodbe so
iz garancije izuzete. Garancija izuzete. Garancija preneha, /e
so v izdelek posegale osebe, kijjih proivalalec ni pooblastil
ali ce pri popraavilu niso bili uporabljeni originalni nadomestni deli.
CESKY: PODMINKY ZARUKY
Záruka 1 rok na chyby vztahující se na materiál a montáz.
Záruka platí jen na kompletnc vyplneny zárucní list. Záruka se
nevztahuje na poruchy zpusobené nesprávnym pouzíváním
nebo neautorizovanou demontází. Záruka se nevztahuje na
úmyslné poskození.
ICELANDIC: ÁBYRGDARSKÍRTEINI
Ábyrgd bessi gildir í eitt ár frá kaupdegi og tekur til galla sem
rekja má til mistaka í framleidsu eda galla í hráefni. Ábyrgin
er hád pví ad framvísad sé útfylltu ábyrgdarskírteini. Hún nær
ekki yfir skemmdir sem rekja má til rangrar notkunar eda
höggs. Ábyrgdin nær eingöngu til bess hlutar sem tilgreindur
er á skírteininu.
ΕΕΛΛΛΛΗΗΝΝΙΙΚΚΑΑ:: ΟΟΡΡΟΟΙΙ ΕΕΓΓΓΓΥΥΗΗΣΣΗΗΣΣ
1χρóνο εγγυησησ για λιθη κατασκευησ και υλικου.
Η εγγυηση ισχυει µóνο óταν εχει συµπληρωθει πληρωσ
η απóδειξη εγγαησησ ∆εν εγγυωνται βλαβεσ που
οϕειλονται σε εσφαλµενη χρηση, αποσυναρµολóγηση
απó αναρµóδια ατοµα η πτωση.
Η εγγυηση δεν ισχυει για επακóλουθεσ βλαβεσ.
^
^
^
^
^
°
^
^
´
´
´
´
´´
´
´
´
´
´
´
´
´
´
´
´
´
´
´
Page 35

Page 36

PRINCESS HOUSEHOLD APPLIANCES BV
Baronielaan 1, 4818 PA Breda. P.O. Box 4722, 4803 ES Breda, The Netherlands.
Tel. +31 (0)76 - 521 77 16, Fax +31 (0)76 - 521 71 16
Internet http://www.princess.nl, E-mail: info@princess.nl
 Loading...