

Princess 152000 User Manual

Breadmaker DeLuxe
Article 152000
• Gebruiksaanwijzing • User's instructions • Mode d'emploi
• Bedienungsanleitung • Instrucciones de uso • Istruzioni per l'uso
• Bruksanvisning • Brugsanvisning • Bruksanvisning • Käyttöohje
• Instruções de uso • ȅįȘȖȓİȢ ȤȡȒıȘȢ •
© Princess 2008

Nederlands 1
English 13
Français 25
Deutsch 38
Español 51
Italiano 64
Svenska 77
Dansk 89
Norsk 101
© Princess 2008
Suomi 113
Português 124
ǼȜȜȘȞȚțȐ
136
1
2
15
3
4
5
6
7
14
8
16
9
10
12
1
13
11

Algemene informatie
Dit volautomatische apparaat mengt en
kneedt het deeg en bakt vervolgens het
brood. Het apparaat wordt geleverd met
een maatbeker, maatschepje en twee
bakblikken met anti-aanbaklaag: een enkel
blik voor grotere broden en een dubbel blik
voor twee kleinere of verschillende broden.
De broodbakmachine is voorzien van
11 programma's die u voor verschillende
soorten brood, cake en jam kunt
gebruiken. Eén programma kan op uw
persoonlijke recept worden ingesteld.
Het apparaat heeft een timer die u kunt
instellen op de tijd waarop u wilt dat het
brood klaar is - zo kunt u er bijvoorbeeld
voor zorgen dat u heerlijk brood hebt voor
het ontbijt!
Bediening en
onderdelen
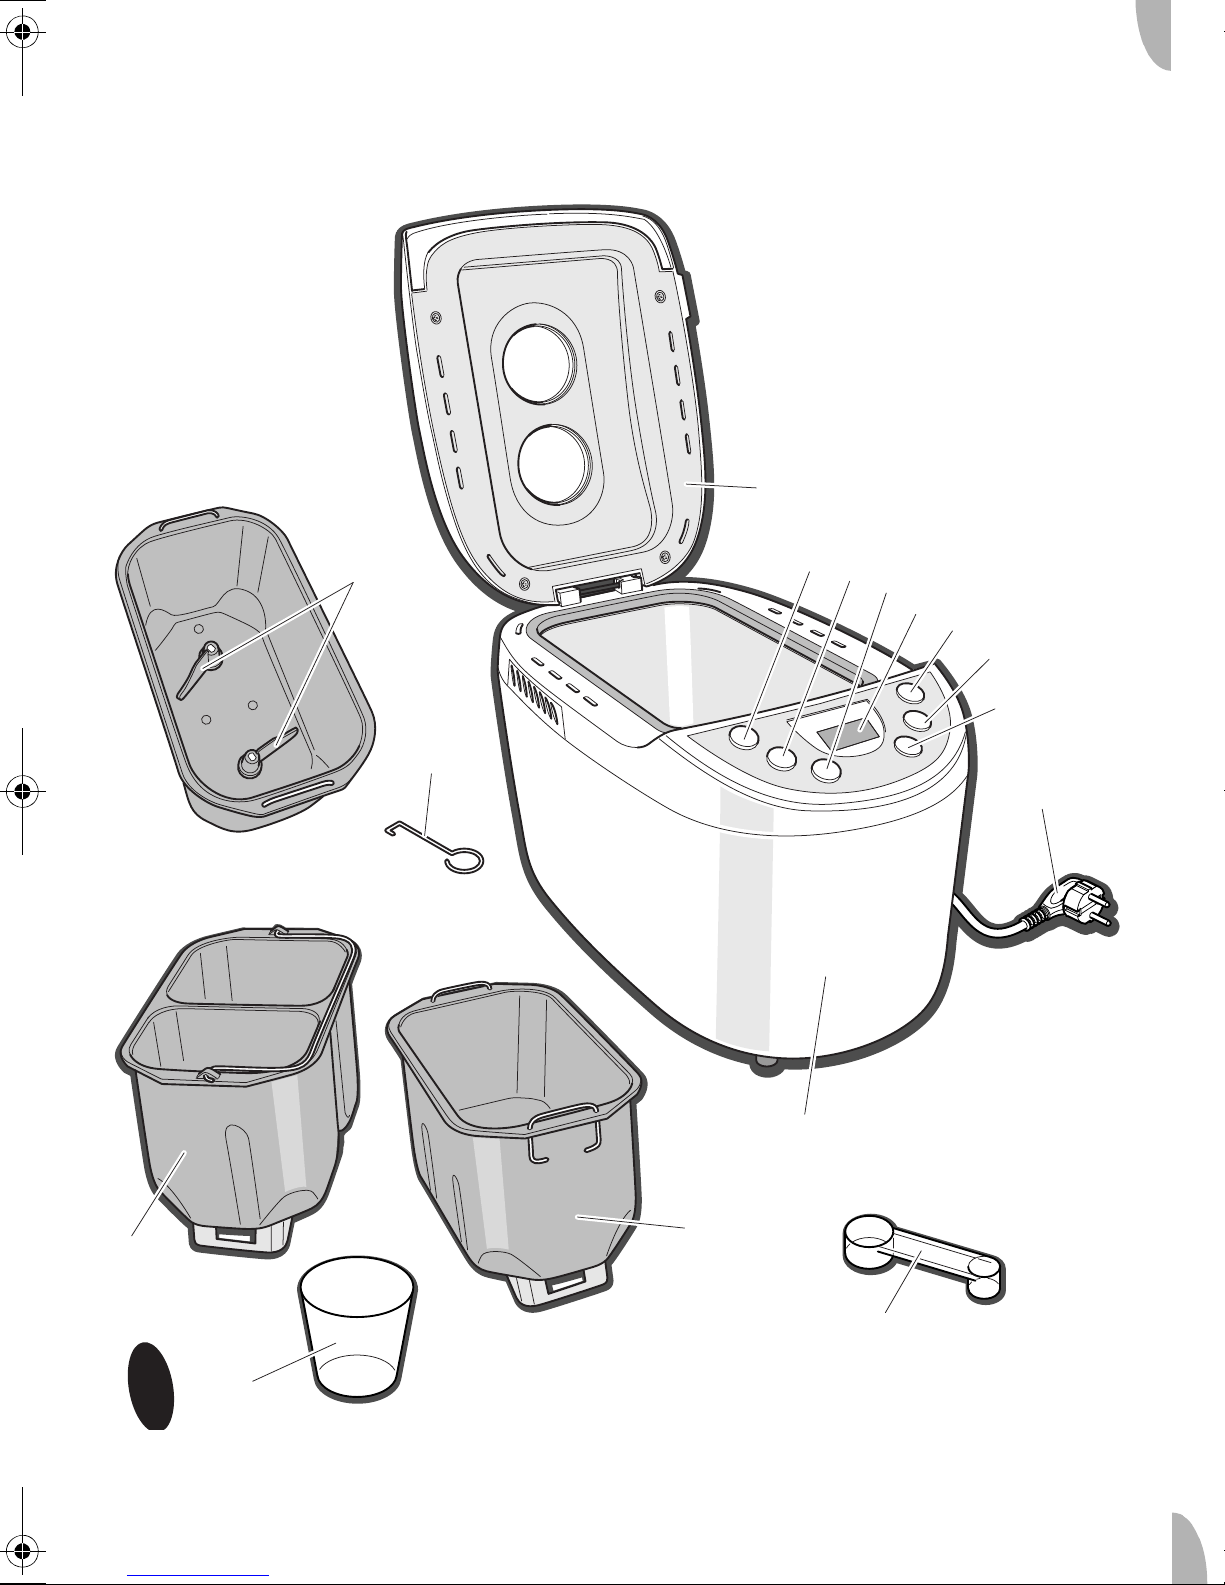
Zie figuur 1.
Het apparaat heeft de volgende
onderdelen:
1 Deksel met kijkvenster
2 Een knop MENU
3 Een knop TEMP
4 Een knop LOAF
5 Display
6 Een knop START/STOP
7 Een knop PROCESS
8 Een knop TIME
9 Stroomsnoer en stekker
10 Behuizing
11 Maatschepje
12 Enkel bakblik
13 Maatbeker
14 Dubbel bakblik
15 Kneedarmen
16 Stalen haakje
Voor het eerste gebruik
• Lees deze instructies aandachtig en
volg ze nauwkeurig op. Bewaar deze
handleiding voor toekomstig gebruik.
• Controleer of de netspanning
overeenkomt met de aangegeven
netspanning op het typeplaatje van
het apparaat.
• Voor dit apparaat hebt u een geaard
stopcontact nodig.
1 Verwijder al het verpakkingsmateriaal
en de stickers van het apparaat.
2 Reinig het apparaat en alle accessoires
(zie 'Onderhoud en reiniging').
3 Plaats het apparaat op een vlak, stabiel
oppervlak zodat het niet kan vallen.
4 Plaats het bakblik in de machine en
druk het omlaag tot het vastklikt.
5 Plaats de twee kneedarmen op de
assen onderin het bakblik. Draai de
kneedarmen totdat u voelt dat ze
vastzitten op de assen.
6 Sluit de deksel.
7 Steek de stekker in het stopcontact.
U hoort een korte pieptoon en de
displayverlichting gaat ongeveer 30
seconden aan.
De display toont Programma 1, de tijd
3:20 en een temperatuur van 180°C.
De streepjes in de tijddisplay knipperen
niet om aan te geven dat de klok niet
loopt.
8 Druk herhaaldelijk op de knop MENU
tot de display programma 8 aangeeft
(BAKE stand).
9 Druk op de knop START/STOP en laat
het apparaat ongeveer 10 minuten
bakken.
De streepjes in de tijddisplay knipperen
om aan te geven dat de klok loopt. De
tijddisplay begint af te tellen.
10 Na ongeveer 10 minuten houdt u de
knop START/STOP meer dan twee
seconden ingedrukt om het programma
te stoppen. U hoort een pieptoon als
teken dat het programma is beëindigd.
Laat het apparaat afkoelen.
11 Haal het bakblik uit het apparaat.
Breadmaker DeLuxe Article 152000
1

12 Reinig het bakblik en de kneedarmen
en droog ze grondig af.
Zie 'Onderhoud en reiniging'.
13 Herhaal deze procedure met het
tweede bakblik.
Gebruik
Ingrediënten toevoegen
1 Weeg de benodigde ingrediënten voor
het recept af.
• Bij het eerste gebruik van het apparaat
kan er lichte rookontwikkeling en een
specifieke geur ontstaan. Dit is
normaal en zal snel stoppen. Zorg dat
er voldoende ventilatie voor het
apparaat is.
• De bakblikken die bij het apparaat zijn
geleverd, zijn voorzien van een antiaanbaklaag op basis van PTFE. Bij
verwarming hiervan kunnen kleine
hoeveelheden gassen afgegeven
worden, die voor de mens volkomen
onschadelijk zijn. Gebleken is echter
dat het zenuwstelsel van vogels
hiervoor extreem gevoelig is. Gebruik
het apparaat daarom niet in de buurt
van vogels (denk aan siervogels zoals
papegaaien).
Het apparaat voorbereiden op
gebruik
1 Plaats het apparaat op een vlak, stabiel
oppervlak zodat het niet kan vallen.
2 Kies het bakblik dat u wilt gebruiken:
het enkele of dubbele bakblik.
3 Plaats de twee kneedarmen op de
assen onderin het gewenste bakblik.
Draai de kneedarmen totdat u voelt dat
ze vastzitten op de assen.
Voordat u gaat bakken, raden we u aan
de gaten rondom de assen van de
kneedarmen in het bakblik met boter te
vullen voordat u de kneedarmen plaatst.
Hierdoor voorkomt u dat het deeg op
deze plekken blijft vastplakken en zijn
de kneedarmen gemakkelijker uit het
brood te verwijderen wanneer dat klaar
is.
Doe nooit meer dan de aangegeven
hoeveelheid in de machine (totaal max.
1150 g (2,5 lb.) voor het enkele bakblik
of 450 g (1 lb.) voor elke helft van het
dubbele bakblik); anders zal het deeg
over het bakblik lopen.
2 Doe de ingrediënten stuk voor stuk in
het bakblik. Giet nu eerst water of een
andere vloeistof in het bakblik. Voeg
vervolgens het meel en - afhankelijk
van het recept - suiker, zout, boter en
gist of bakpoeder toe.
Plaats de gist of het bakpoeder in een
kuiltje in het meel en alle andere
ingrediënten gescheiden van elkaar in
een hoekje van het bakblik (dit is
speciaal van belang wanneer u de timer
gebruikt)
3 Plaats het bakblik in de machine en
druk het stevig omlaag tot het vastklikt.
4 Sluit de deksel.
• Zorg voor voldoende vrije ruimte
rondom het apparaat. Zo krijgt u een
goede verspreiding van de nevel en
worden voorwerpen in de omgeving
niet vochtig.
• Gebruik geen scherpe voorwerpen in
de bakblikken, zoals metalen spatels,
messen en vorken. Dit kan de
antiaanbaklaag beschadigen.
Programma instellen
5 Steek de stekker in het stopcontact.
U hoort een korte pieptoon en de
displayverlichting gaat ongeveer 30
seconden aan..
De display toont Programma 1, de tijd
3:20 en een temperatuur van 180°C.
De streepjes in de tijddisplay knipperen
2
Breadmaker DeLuxe Article 152000

niet om aan te geven dat het
programma niet loopt.
6 Selecteer het gewenste programma
door herhaaldelijk op de knop MENU te
drukken totdat het gewenste
programmanummer wordt
weergegeven.
Zie 'MENU-selectie'.
7 Selecteer de gewenste baktemperatuur
door herhaaldelijk op de knop TEMP te
drukken totdat de gewenste
temperatuur wordt weergegeven.
Zie 'Temperatuurselectie'.
8 Geef het volume van het brood aan
door herhaaldelijk op de knop LOAF te
drukken tot de display de pijl onder het
gewenste volume aangeeft (2.5LB,
2.0LB of DOUBLE).
Zie 'Selectie volume brood'.
9 Met behulp van de knop TIME kunt u de
tijd waarop het brood klaar moet zijn,
uitstellen tot het gewenste tijdstip.
Zie 'TIME'.
Bakken
10 Druk op de knop START/STOP. U hoort
een korte pieptoon en de streepjes in
de tijddisplay knipperen om aan te
geven dat het geselecteerde
programma loopt.
• Afgezien van de knop START/STOP
zijn alle andere knoppen vanaf dit
moment inactief om te voorkomen dat
u per ongeluk op een knop drukt en zo
de programma's ongewenst
verandert.
• U kunt het programma stoppen door
meer dan twee seconden op de knop
START/STOP te drukken. U hoort een
korte pieptoon en de streepjes in de
tijdsaanduiding stoppen met
knipperen om aan te geven dat het
programma is beëindigd.
• Gebruik het apparaat altijd met
gesloten deksel.
• Als de netspanning mocht wegvallen
tijdens het gebruik, dan schakelt het
apparaat automatisch uit. Als de
netspanning tussen 5 en 15 minuten
wordt hersteld, schakelt het apparaat
weer automatisch in. Het programma
wordt dan afgemaakt.
Als de netspanning meer dan
15 minuten wegvalt, kan het
programma niet worden afgemaakt
Als het deeg zich nog niet in de
rijsfase bevindt, kunt u in dat geval op
de knop START/STOP drukken om het
programma opnieuw van voor af aan
te beginnen. Anders gooit u de
ingrediënten weg en begint u
opnieuw.
• Gebruik ovenwanten als u het
apparaat tijdens of na gebruik
aanraakt. Het apparaat en het bakblik
worden heet.
• Het apparaat functioneert prima onder
uiteenlopende temperaturen, maar het
volume van brood dat in een zeer
warme of koude kamer wordt
gebakken, kan verschillen. We raden u
aan het apparaat bij een temperatuur
tussen 15 en 35 °C te gebruiken.
Door de kijkvensters in de deksel kunt u
het bakproces volgen.
Voor de programma's BASIC, QUICK,
FRENCH, SUPER RAPID, WHOLE
WHEAT, SWEET, en SANDWICH:
11 Gedurende het bakproces krijgt u
pieptonen te horen. Deze pieptonen
herinneren u eraan extra ingrediënten
toe te voegen voor extra smaak (indien
gewenst):
Open de deksel, voeg de benodigde
ingrediënten toe en sluit de deksel
weer.
Einde
12 Wanneer het programma is afgelopen
krijgt u enkele pieptonen te horen.
Nadat het brood is gebakken, houdt het
apparaat het nog een uur warm. Dit
voorkomt condensvorming in de korst
van het brood. Als u dit
Breadmaker DeLuxe Article 152000
3

warmhoudproces wilt stopzetten, drukt
u meer dan 2 seconden op de knop
START/STOP. Bij einde programma
klinkt opnieuw een pieptoon.
Het apparaat en het bakblik worden erg
heet. Gebruik ovenwanten om de deksel
te openen en het bakblik uit het
apparaat te nemen.
13 Verwijder het brood uit het bakblik door
het om te draaien en voorzichtig los te
kloppen. Gebruik eventueel een houten
of plastic spatel, maar zorg ervoor dat u
de anti-aanbaklaag niet beschadigt.
De kneedarmen kunnen nog in het
brood vastzitten. Gebruik het stalen
haakje om deze uit het brood te
verwijderen. Verwijder deze voorzichtig,
ze zijn heet.
Laat het brood op een rekje afkoelen
voordat u het aansnijdt. (Tip: het
gemakkelijkst snijdt u vers brood met
het Princess elektrische mes
(artikelnummer 492952).
14 Laat het apparaat voldoende afkoelen
voordat u het opnieuw gebruikt.
15 Wanneer u klaar bent met het apparaat
trekt u de stekker uit het stopcontact en
laat u het apparaat voldoende afkoelen
voordat u het schoonmaakt en opbergt.
Zie 'Onderhoud en reiniging'.
MENU-selectie
1 Druk op de knop MENU om tussen de
verschillende programma's te
schakelen.
gebakken is doorgaans kleiner en
compacter.
3. FRENCH
Een programma dat kneedt, doet rijzen en
bakt, en gebruikmaakt van een langere
rijstijd. Hierdoor krijgt het brood een
krokante korst en lichte structuur.
4. SUPER RAPID
Een heel kort programma om het brood te
kneden, doen rijzen en bakken. Hiermee
krijgt u een grof brood.
5. WHOLE WHEAT
Dit programma wordt gebruikt voor het
kneden, doen rijzen en bakken van
volkorenbrood. We raden u aan niet de
vertragingsfunctie (timer) te gebruiken in
combinatie met dit programma omdat dit
tot minder goede resultaten zal leiden.
6. SWEET
Een programma om zoet brood te kneden.
7. DOUGH
Met dit programma kunt u deeg kneden en
doen rijzen, zonder het te bakken. Het
deeg kunt u gebruiken om broodjes,
pizza's, gestoomd brood, enz. te maken.
8. BAKE
Met dit programma kunt u een brood
bakken zonder deeg te kneden en doen
rijzen.
U kunt het ook gebruiken om de baktijd te
verlengen met gewenste instellingen,
direct nadat u een ander standaard
bakprogramma hebt gebruikt.
1. BASIC
Dit is het meest gebruikte programma voor
het kneden, doen rijzen en bakken van
gewoon brood.
2. QUICK
Dit programma kunt u gebruiken om
broden te kneden, doen rijzen en bakken
in minder tijd dan het BASIC programma.
Brood dat met dit programma wordt
4
Breadmaker DeLuxe Article 152000
9. JAM
Gebruik dit programma om jam en
marmelades te koken. Hak het fruit en/of
de groenten fijn voordat u ze in het bakblik
plaatst.
10. SANDWICH
Met dit programma kunt u casinobrood
kneden, doen rijzen en bakken. Dit brood

heeft een lichte structuur en een dunnere
korst.
11. HOME MADE
Dit programma kan door de gebruiker
worden ingesteld. U kunt de
tijdsinstellingen voor kneden, rijzen,
bakken en warmhouden aan uw eigen
persoonlijke bakstijl aanpassen.
Zie 'HOME MADE-programma'.
HOME MADE-programma
In het programma HOME MADE kunt u de
timing van de verschillende
programmaonderdelen naar eigen wens
instellen.
De tijdsintervallen zijn als volgt:
Programmaonderdeel Tijd
KNEAD1 3 - 14 min
RISE1 20 - 60 min
KNEAD2 8 - 24 min
RISE2 1 - 60 min
RISE3 20 - 120 min
BAKE 0 - 80 min
WARM 0 - 120 min
1 Steek de stekker in het stopcontact.
U hoort een korte pieptoon en de
displayverlichting gaat ongeveer 30
seconden aan.
De display toont Programma 1, de tijd
3:20 en een temperatuur van 180°C De
streepjes in de tijddisplay knipperen
niet om aan te geven dat het
programma niet loopt.
2 Druk herhaaldelijk op de knop MENU
tot programma nummer 11 (HOME
MADE) wordt weergegeven.
3 Druk op de knop PROCESS.
U ziet dat KNEAD1 op de display begint
te knipperen en dat de tijdsinstelling
voor dit programmaonderdeel KNEAD1
op de display wordt weergegeven.
Verander de instelling door
herhaaldelijk op de knop TIME te
drukken. Elke keer dat u op de knop
TIME drukt, gaat de tijdsinstelling met
een minuut omhoog.
Als u de knop TIME ingedrukt houdt,
gaat de tijdsinstelling sneller omhoog.
Zodra de tijdsinstelling het maximum
heeft bereikt, drukt u nogmaals op de
knop TIME om weer naar de
minimuminstelling te gaan.
Pas de tijdsinstelling naar wens aan.
4 Druk op de knop PROCESS om naar
de instelling van het volgende
programmaonderdeel (RISE1) te gaan.
Wijzig de tijdsinstelling op dezelfde
manier als hierboven beschreven.
5 Druk elke keer op de knop PROCESS
om de tijdsinstellingen voor de
resterende programmaonderdelen
(KNEAD2, RISE2, RISE3, BAKE en
WARM) aan te passen.
6 Wanneer u de programma-instellingen
naar wens hebt aangepast, drukt u op
de knop START/STOP om het
programma op te slaan.
7 Selecteer de gewenste baktemperatuur
door herhaaldelijk op de knop TEMP te
drukken totdat de gewenste
temperatuur wordt weergegeven. Zie
'Temperatuurselectie'.
8 Met behulp van de knop TIME kunt u de
tijd waarop het brood klaar moet zijn,
uitstellen tot het gewenste tijdstip. Zie
'Timer'.
9 Druk nogmaals op de knop START/
STOP om het programma te starten.
10 Voor nadere instructies met betrekking
tot het bakken en beëindigen van het
programma, gaat u naar ' Bakken' en '
Einde' .
Breadmaker DeLuxe Article 152000
5

Temperatuurselectie
De baktemperatuur wordt op de display
weergegeven in °C, evenals met een pijl
die LOWER, MEDIUM of HIGH aangeeft.
Nr. PROGR. LOWER MEDIUM HIGH
1. BASIC 160°C 180°C 200°C
2. QUICK 165°C 175°C 185°C
3. FRENCH 160°C 180°C 200°C
4. SUPER
RAPID
5. WHOLE
WHEAT
6. SWEET 160°C 180°C 200°C
7. DOUGH n.v.t. n.v.t. n.v.t.
8. BAKE 160°C 180°C 200°C
9. JAM n.v.t. n.v.t. n.v.t.
10. SANDWICH 160°C 180°C 200°C
180°C 190°C 200°C
160°C 180°C 200°C
Selectie volume brood
Uitsluitend voor de programma's
BASIC,FRENCH, SUPER RAPID,
WHOLE WHEAT, SWEET, en
SANDWICH:
1 Druk op de knop LOAF om tussen de
hoeveelheidsinstellingen te schakelen
zoals hieronder weergegeven:
De instellingen 2.5 LB en 2 LB worden
normaal gesproken voor het enkele
bakblik gebruikt, terwijl de instelling
DOUBLE doorgaans wordt gebruikt
voor het dubbele bakblik
Instelling Hoeveelhe
id
2.5 lb. 1.150 g.
2 lb. 900 g.
DOUBLE 2 x 450 g.
.
11. HOME
MADE
1 Druk op de knop TEMP om te
schakelen tussen de
temperatuurinstellingen LOWER,
MEDIUM en HIGH.
Progr. Progr. Progr.
Timer
Met de timer kunt u aangeven wanneer u
wilt dat het apparaat het gekozen
programma afrondt (uitsluitend voor de
programma's BASIC, FRENCH, WHOLE
WHEAT, SWEET , BAKE, SANDWICH en
HOME MADE).
Voorbeeld:
1 Doe de ingrediënten stuk voor stuk in
het bakblik. Giet nu eerst water of een
andere vloeistof in het bakblik. Voeg
vervolgens het meel en - afhankelijk
van het recept - suiker, zout, boter en
gist of bakpoeder toe.
Plaats de gist of het bakpoeder in een
kuiltje in het meel en alle andere
ingrediënten gescheiden van elkaar in
een hoekje van het bakblik. De gist mag
niet in aanraking komen met vloeistof,
zout of boter, om het gistingsproces niet
gelijk in gang te zetten.
2 Selecteer de gewenste programma-,
temperatuur- en
hoeveelheidsinstellingen.
3 Stel dat het 22.00 uur is en u om 7.30
uur versgebakken brood wilt. In dit
6
Breadmaker DeLuxe Article 152000

geval zit hier 9 uur en 30 minuten
tussen.
Gebruik de knop TIME om de start met
ongeveer 9:30 uit te stellen.
Elke keer dat u op de knop TIME drukt,
neemt de 'gereed' tijd met 10 minuten
toe.
Als u de knop TIME ingedrukt houdt, zal
de tijdsaanduiding na korte tijd met
stappen van 10 minuten toenemen.
4 Druk op de knop START/STOP om de
timer te starten. De streepjes in de
tijddisplay knipperen om aan te geven
dat de klok loopt. De timer start het
programma en zorgt ervoor dat uw
brood op de ingestelde tijd klaar is.
Het apparaat uitschakelen en
opbergen
1 Trek de stekker uit het stopcontact.
2 Laat het apparaat goed afkoelen.
3 Reinig het apparaat en alle accessoires
(zie 'Onderhoud en reiniging').
4 Bewaar het apparaat op een droge,
vorstvrije plek.
• Gebruik om het apparaat te reinigen
nooit harde, bijtende of schurende
schoonmaakproducten of scherpe
voorwerpen (zoals messen of harde
borstels).
• Alleen de losse onderdelen en
accessoires (bakblikken, kneedarmen,
meetschepje en -beker en het stalen
haakje) kunnen in de vaatwasser
worden gereinigd. Het apparaat zelf
mag niet in de vaatwasser worden
gereinigd.
1 Neem de stekker uit het stopcontact en
laat het apparaat geheel afkoelen.
2 Reinig de behuizing van het apparaat
met een zachte, vochtige doek. Gebruik
warm water en een beetje afwasmiddel
om de doek vochtig te maken.
3 Reinig de losse onderdelen
(bakblikken, kneedarmen, maatlepel en
-beker en stalen haakje) in water met
zeep of in de vaatwasser.
4 Droog het apparaat en de accessoires
grondig voordat u ze opbergt.
Onderhoud
en reiniging
• Maak het apparaat na gebruik grondig
schoon.
• Zorg dat het apparaat niet is
aangesloten op het stopcontact
wanneer u het gaat schoonmaken.
• Reinig het apparaat nooit wanneer het
nog heet is.
• Let op dat er geen vocht in contact
komt met de elektrische onderdelen
van het apparaat.
• Dompel het apparaat, het snoer of de
stekker nooit onder in water of een
andere vloeistof.
Veiligheid
Algemene informatie
• Lees deze instructies aandachtig en
volg ze nauwkeurig op. Bewaar deze
handleiding voor toekomstig gebruik.
• Gebruik dit apparaat alleen
overeenkomstig de instructies.
• Dit apparaat is uitsluitend bestemd
voor huishoudelijk gebruik.
• Het gebruik van dit apparaat door
kinderen of personen met een fysieke,
zintuiglijke, verstandelijke of
motorische handicap, of met gebrek
aan de nodige ervaring en kennis, kan
gevaarlijke situaties opleveren.
Personen die verantwoordelijk zijn
voor de veiligheid van dergelijke
personen moeten duidelijke
Breadmaker DeLuxe Article 152000
7

instructies geven of toezien op het
gebruik van het apparaat.
• Houd het apparaat buiten het bereik
van kinderen en van personen die het
apparaat misschien niet veilig kunnen
bedienen.
• Haal altijd de stekker uit het
stopcontact wanneer u het apparaat
langere tijd niet gebruikt.
• Als u de stekker uit het stopcontact
neemt, trek dan aan de stekker, niet
aan het snoer.
• Laat het apparaat alleen repareren
door een bevoegde elektromonteur.
Probeer het apparaat nooit zelf te
repareren.
• Gebruik uitsluitend accessoires die
worden aanbevolen door de
leverancier. Het gebruik van andere
accessoires kan schade aan het
apparaat tot gevolg hebben, wat
gevaarlijk kan zijn voor de gebruiker.
• Het apparaat mag niet worden
gebruikt met behulp van een externe
timer of een apart
afstandsbedieningsysteem.
Elektriciteit en warmte
• Controleer voordat u het apparaat
gebruikt of de netspanning
overeenkomt met de aangegeven
netspanning op het typeplaatje van
het apparaat.
• Gebruik een geaard stopcontactdat is
aangesloten op een zekeringgroep
van minimaal 10 A en waarop geen
andere zware belastingen zijn
aangesloten.
• Als u een verlengsnoer gebruikt,
gebruik dan een verlengsnoer met
randaarding dat geschikt is voor het
vermogen van het apparaat. Rol het
verlengsnoer volledig uit en leg het zo
neer dat niemand er over kan
struikelen.
• De elektriciteit moet worden
aangevoerd via een
reststroomapparaat met een nominale
actieve reststroom van niet meer dan
30 mA.
• Trek nooit aan het snoer om het
apparaat te verplaatsen.
• Verplaats het apparaat niet als het in
bedrijf is.
• Gebruik het apparaat niet als het
apparaat of het snoer beschadigd is.
Laat een beschadigd snoer vervangen
door een bevoegde elektromonteur.
• Zorg ervoor dat het apparaat, het
snoer en de stekker niet in aanraking
komen met hittebronnen, zoals een
hete kookplaat of open vuur.
• Zorg ervoor dat het apparaat, het
snoer en de stekker niet in aanraking
komen met water of chemicaliën.
• Pak het apparaat niet op als het in het
water is gevallen. Neem in dat geval
onmiddellijk de stekker uit het
stopcontact. Gebruik het apparaat
hierna niet meer.
• Het apparaat en de onderdelen
kunnen tijdens het gebruik heet
worden. Voorkom brandwonden en let
op bij het aanraken van het apparaat
en de onderdelen.
• Het apparaat moet de hitte kwijt
kunnen om brandgevaar te
voorkomen. Zorg ervoor dat er
voldoende ruimte vrij is rondom het
apparaat en dat het niet in contact
komt met brandbare materialen. Het
apparaat mag niet worden afgedekt.
• Laat het apparaat volledig afkoelen
voordat u het opruimt, onderhoudt of
reinigt.
• Gebruik het apparaat niet in de buurt
van een andere warmtebron.
8
Breadmaker DeLuxe Article 152000

Tijdens gebruik
• Gebruik het apparaat nooit
buitenshuis.
• Gebruik het apparaat nooit in een
vochtige ruimte.
vogels (denk aan siervogels zoals
papegaaien).
• Gebruik het apparaat uitsluitend bij
een temperatuur tussen 15 °C en
35 °C.
• Plaats het apparaat op een vlak,
stabiel oppervlak zodat het niet kan
vallen.
• Laat het stroomsnoer nooit over de
rand van het aanrecht, het werkblad of
de tafel hangen.
• Zorg er altijd voor dat het snoer
volledig afgewikkeld is.
• Zorg ervoor dat uw handen droog zijn
als u het apparaat, het snoer of de
stekker aanraakt.
• Schakel het apparaat uit en/of
verwijder de stekker uit het
stopcontact als u tijdens het gebruik
storingen ondervindt, het apparaat
gaat reinigen, een accessoire
aanbrengt of verwijdert, of klaar bent
met het gebruik en het apparaat wilt
opbergen.
• Laat het apparaat nooit onbeheerd
achter als het in gebruik is.
Het milieu
U dient het verpakkingsmateriaal, zoals
plastic en dozen, in de hiervoor
aangewezen afvalbakken weg te gooien.
Indien u het apparaat wilt wegdoen terwijl
het nog steeds goed werkt of eenvoudig
gerepareerd kan worden, zorg dan dat het
apparaat hergebruikt wordt.
Wanneer het einde van de gebruiksduur
van het apparaat wordt bereikt, moet u zich
hier op verantwoorde wijze van ontdoen,
zodat hergebruik van (delen van) het
apparaat kan worden gewaarborgd. Doe
het apparaat niet bij uw ongescheiden
afval; lever het in bij de winkel of breng het
naar een erkend inzamelpunt. Neem
contact op met uw gemeente voor
informatie over de inname- en
inzamelingssystemen bij u in de buurt.
Toepasselijke Europese richtlijnen:
2002/95/EC
2002/96/EC
• Verplaats het apparaat nooit als het is
ingeschakeld of nog warm is. Voordat
u het apparaat verplaatst, moet u het
uitschakelen en wachten tot het is
afgekoeld.
• De bakplaat van dit apparaat is
voorzien van een antiaanbaklaag op
PTFE-basis. Bij verwarming hiervan
kunnen uiterst kleine hoeveelheden
gassen afgegeven worden, die voor de
mens volkomen onschadelijk zijn.
Gebleken is echter dat het
zenuwstelsel van vogels hiervoor
extreem gevoelig is. Gebruik het
apparaat daarom niet in de buurt van
Enkele broodrecepten
Voor de hoeveelheden is uitgegaan van de
bijgeleverde maatbeker en het
maatschepje (met de maat voor een theeof eetlepel aan de uiteinden).
Witbrood:
Tarwebloem of -meel 450 g
Gist (droge) 1½ theelepel
Olie 3 eetlepels
Melk 2 à 3 eetlepels
Zout 1½ theelepel
Breadmaker DeLuxe Article 152000
9

Suiker 1½ eetlepel
Water 250 ml
Volkorenbrood:
Vokorenmeel 450 g
Gist (droge) 1½ theelepel
Olie 3 eetlepels
Melk 2 eetlepels
Zout 1½ theelepel
Suiker 1½ eetlepel
Water 260 ml
Gemengd brood:
Tarwemeel 400 g
Waldkornmeel
(of andere meelsoort) 50 g
Gist (droge) 1½ theelepel
Olie 3 eetlepels
Melk 2 eetlepels
Yoghurt 1 eetlepel
Zout 1½ theelepel
Suiker 1½ eetlepel
Water 250 ml
Ingrediënten
Natuurlijk kunt u meteen een broodje
bakken met één van de recepten. Maar als
u de smaak te pakken krijgt, is het leuk om
wat met de verschillende ingrediënten te
experimenteren. Om dat te doen is het
handig iets meer van de verschillende
broodbak-ingrediënten af te weten.
Hieronder vindt u informatie die u bij het
bakken van pas kan komen.
Meel
Hoofdbestanddeel van brood is meel. Er
bestaan veel verschillende soorten meel
en meelmixen. Het maakt veel uit welke
graansoort u voor uw brood gebruikt.
Tarwebloem bevat bijvoorbeeld zo veel
gluten dat het beter rijst dan ‘zwaarder’
meel, en dus minder gist nodig heeft.
Gluten zijn eiwitcomplexen in graansoorten
als tarwe, haver, rogge en gerst. Deze
gluten vormen bij het rijzen van brood een
netwerk dat de koolzuurgasbelletjes
tegenhoudt. Hierdoor zal het brood rijzen.
Patent- of huishoudbloem
De meest blanke bloem heet patentbloem
of huishoudbloem. Ze bevat vrijwel geen
zemelen of kiemdeeltjes, wel veel gluten.
Dit meel wordt meestal gebruikt om
soepen en sauzen te binden, maar er valt
best (wit)brood mee te bakken.
Tarwebloem en -meel
Tarwebloem is wit tarwemeel. Tarwemeel
is wat grauwer van kleur en bevat een
kleine hoeveelheid zemelen en
kiemdeeltjes. Tarwebloem en -meel
bevatten ook veel gluten.
Volkoren (tarwe-)meel
Volkorenmeel wordt gemalen van de volle,
onbewerkte tarwekorrel. Alle zemelen en
kiemdelen van de tarwe zitten er nog in.
Volkorenmeel is net als tarwebloem
glutenrijk, maar ‘zwaarder’ vanwege de
zemelen en kiemdeeltjes. Daardoor zal het
brood compacter worden als het van alleen
maar volkorenmeel gebakken wordt.
Daarom voegen de meeste thuisbakkers
wat tarwebloem toe.
Naast deze soorten bestaan er nog tal van
andere meelsoorten waarmee u naar
hartelust kunt experimenteren, zoals:
haver-, gerste-, boekweit-, spelt-, mais- en
roggemeel.
Meelsoorten mengen
De meeste meelsoorten lenen zich goed
voor onderlinge vermenging. De
combinatie boekweit-/havermeel/
tarwebloem bijvoorbeeld. Of gerstemeel/
tarwebloem. Ook zijn er diverse meelmixen
in de handel, zoals bijvoorbeeld waldkorn-,
zes-, negen- of tiengranenmeel. Deze
mixen bevatten soms al bloem en/of
broodverbeteraar.
All-in-mixen
Er zijn ook meelmixen in de handel
waaraan alle andere ingrediënten, behalve
water, al zijn toegevoegd. Deze
zogenaamde all-in-mixen zijn gemakkelijk
en snel in gebruik, maar ook duurder.
10
Breadmaker DeLuxe Article 152000

Gist
Om brood te laten rijzen is gist nodig. Gist
is er in verse vorm (‘blokjes’), maar ook
gedroogd (korreltjes). De smaak van verse
gist is iets uitgesprokener dan die van
droge gist. Er zijn verschillende merken
droge gist, die in hun werking enigszins
kunnen verschillen. Welke gist het beste
bevalt, is een kwestie van persoonlijke
voorkeur. Grofweg kun je stellen dat je van
droge gist (ook wel instantgist genoemd) in
gewicht maar half zo veel nodig hebt als
van verse. De werking van gist kan
verstoord worden als de gist in contact
komt met zout of vetstoffen. Zout ‘doodt’ de
gist, vet ‘sluit de gistcellen op’ waardoor
het deeg niet meer kan rijzen. Daarom is
het belangrijk ervoor te zorgen dat gist,
zout en boter in de broodbakmachine niet
te dicht bij elkaar liggen.
Zout
Zout zorgt natuurlijk voor de smaak van
brood, maar is ook belangrijk voor een
krokante korst en voor het rijzen (terwijl
zout het rijzen ook teniet kan doen als het
in direct contact met de gist komt). Zout
verstevigt de glutenconstructie die het
brood vorm geeft. Tevens zorgt zout ervoor
dat het brood niet de pan uit rijst en inzakt
voor het goed en wel gebakken is.
Het is goed mogelijk een zoutarm of zelfs
zoutloos brood te bakken, maar het is dan
wel even variëren met de ingrediënten.
Vloeistoffen
De meest gangbare vloeistof om brood
mee te bakken is water, maar u kunt het
ook eens met (karne-)melk proberen. Dat
beïnvloedt zowel de smaak als het rijzen
en de broodstructuur.
Volle melk heeft door de vetten in de melk
een positieve invloed op de versheid en de
in melk aanwezige melksuiker (lactose)
bevordert de rijskracht. Karnemelk geeft
een lichter brood dat langer vers blijft.
Suiker
Suiker is maar ten dele belangrijk voor het
rijsproces; meer nog bepaalt het de smaak
van het brood. In plaats van suiker kan ook
honing, stroop of siroop worden gebruikt.
Gebruik in de broodmachine geen grove
greinsuiker (dit zijn harde suikerparels) of
kandij. Dit kan de antiaanbaklaag
beschadigen. Gebruik bij het bakken geen
kunstmatige zoetstoffen. Deze zijn over het
algemeen niet goed bestand tegen
verhitting.
Vetten
Vet is eigenlijk een broodverbeteraar; je
hebt het niet per se nodig, maar het brood
wordt er beter van als je het wel gebruikt.
Vet maakt het deeg soepeler en zorgt
ervoor dat het gemakkelijker kan rijzen. Vet
sluit tevens het glutennetwerk af zodat het
gevormde koolzuurgas wordt
‘vastgehouden’. Hierdoor wordt het brood
malser en blijft het langer vers.
Diverse soorten vet zijn geschikt. Olie
(zonnebloem- of olijf-), (room-)boter en
margarine geven een prima resultaat. Van
olie wordt de korst iets zachter. Margarine
geeft een krokantere korst en komt tevens
het rijsproces ten goede. Bij het bakken
van een kruidenbrood kan het lekker zijn
olie met een smaakje te gebruiken, zoals
bijvoorbeeld walnoten-, knoflook- of
basilicumolie.
Temperatuur
Het is het beste als de ingrediënten op
kamertemperatuur zijn als ze in de
bakvorm worden gedaan. Gebruik nooit te
warme vloeistof. Dit kan de werking van de
gist teniet doen.
Hulpmiddelen en tips
Afkoelen op rooster
Laat het brood na het bakken afkoelen op
een rooster. Zo kan de warmte aan alle
kanten ontsnappen.
Breadmaker DeLuxe Article 152000
11

Snijden na afkoeling
Zelfgebakken brood laat zich pas na
afkoeling goed snijden. Is het brood nog
warm, dan lukt snijden alleen goed met
een elektrisch mes, bijvoorbeeld de
Princess 2952 Silver Electric Knife.
Brood bewaren
Zelfgebakken brood kan het beste - na
volledige afkoeling - in een theedoek
worden gewikkeld. Zo blijft de korst
knapperig. Speciale papieren broodzakken
zijn ook geschikt. In plastic zakken wordt
de broodkorst zacht, evenals in de
koelkast.
Brood invriezen
Zelfgebakken brood kan goed worden
ingevroren, vanzelfsprekend na volledige
afkoeling. Het is handig om dit in
dagelijkse porties te doen.
Ontdooien op kamertemperatuur is het
beste, want in de magnetron droogt brood
snel uit.
Hoewel invriezen dus mogelijk is, gaat het
brood altijd in kwaliteit achteruit.
Donkerder brood
Om een brood donkerder te kleuren, kan
1 eetlepel cacaopoeder aan het meel
worden toegevoegd. Dit is nauwelijks van
invloed op de smaak.
Krokantere korst
Om een krokantere korst te krijgen, kunt u
het brood na het bakken nog tien of vijftien
minuten tijdens de warmhoudfase in de
machine laten zitten.
Als het brood de pan uit rijst
Het rijsproces kunt u volgen door het
kijkvenstertje. Normaalgesproken is het af
te raden het deksel tijdens het rijzen te
openen, want dan kan het brood inzakken.
Maar mocht het deeg de pan uit rijzen en
tegen het kijkvenster aanplakken (dit kan
ook nog tijdens het bakken gebeuren), licht
dan even het deksel op. Het deeg zal dan
iets inzakken.
Een compact, klein brood
Te veel vloeistof geeft een klein, plat
brood. Het deeg kan dan niet goed rijzen
omdat het te nat is. Ook kan de gist te oud
zijn geweest.
Te droog brood
Te weinig vloeistof geeft een te droog
brood. Probeer het met (iets) meer water of
melk. Is het brood na het bakken wel goed,
maar droogt het daarna snel uit, voeg dan
wat meer olie of boter toe.
Inzakkend brood
Rijst uw brood goed, maar zakt het tijdens
het bakken in, bak dan eens met het
kortste programma (Basic). In het
algemeen kun je stellen dat bij de langere
programma’s de kans groter is dat broden
tijdens het bakken inzakken.
Tot slot
Na al deze informatie heeft u in theorie
alles in handen om uw eigen
lievelingsrecept te ontwikkelen. Nu nog de
praktijk. En dat kan best een beetje
tegenvallen, want broodbakken is en blijft
een ambacht dat u niet zo maar van de
ene dag op de ander in de vingers zult
hebben. De zoektocht naar het ‘perfecte’
brood, gaat vaak met vallen en opstaan
gepaard. Wees niet teleurgesteld als het
niet meteen lukt. Vraag andere
thuisbakkers naar hun ervaringen. Verdiep
u in de materie, lees erover, kijk eens op
internet. En ga vooral door met
experimenteren, want de mogelijkheden
zijn eindeloos. En zelfgebakken brood is
toch het lekkerst.
12
Breadmaker DeLuxe Article 152000

General information
This fully automatic breadmaker mixes and
kneads the dough, and then bakes the
bread. The appliance is supplied complete
with a measuring cup and measuring
spoon and two baking tins with non-stick
coating: one single for larger breads and
one double for two smaller or different
breads.
The Breadmaker is equipped with
11 programs that you can use for various
types of bread, cake and jam. One
program can be adjusted to suit your
personal recipe.
The appliance has a timer that you can use
to set the time at which you wish the bread
to be ready – for example, delicious bread
when you sit down to breakfast!
Operation and
controls
See figure 1.
The appliance includes the following
components:
1 Lid with windows
2 MENU button
3 TEMP button
4 LOAF button
5 Display
6 START/STOP button
7 PROCESS button
8 TIME button
9 Power cord and plug
10 Housing
11 Measuring spoon
12 Baking tin single
13 Measuring cup
14 Baking tin double
15 Kneaders
16 Steel hook
Before first use
• Read and follow these instructions
carefully. Keep this manual for future
reference.
• Make sure that the mains voltage is
the same as that indicated on the type
plate on the appliance.
• This appliance requires an earthed
wall socket.
1 Remove all packaging materials and
stickers from the appliance.
2 Clean the appliance and all the
accessories (see ‘Maintenance and
cleaning’).
3 Put the appliance on a flat, stable
surface where it cannot fall.
4 Place a baking tin in the appliance and
press it down till the tin clicks into
position.
5 Place the two kneaders on the shafts
on the bottom of the tin. Turn the
kneaders till you feel that they are fixed
on the shafts.
6 Close the lid.
7 Put the plug into the wall socket.
A short beep will be heard and the
backlight of the display will switch on for
about 30 seconds.
The display will show Program 1, time
3:20 and temperature 180°C. The
dashes in the time indication do not
blink to show that the clock is standing
still.
8 Press the MENU button repeatedly till
the display shows program 8 (BAKE
mode).
9 Press the START/STOP button and let
the appliance bake for about 10
minutes.
The dashes in the time display will blink
to show that the clock is running. The
time display will count down.
10 After about 10 minutes, press the
START/STOP button for more than two
seconds to stop the program. A beep
will be heard as a sign that the program
is stopped. Let the appliance cool
down.
Breadmaker DeLuxe Article 152000
13

11 Pull the baking tin out of the appliance.
12 Clean the baking tin and the kneaders
and dry them thoroughly.
See ‘Maintenance and cleaning’.
13 Repeat this procedure with the second
baking tin.
• The appliance may emit a little smoke
and a characteristic smell when you
turn it on for the first time. This is
normal and will soon stop. Make sure
the appliance has sufficient
ventilation.
• The baking tins supplied with this
appliance are finished with a non-stick
PTFE coating. when heated this
coating may release small amounts of
gases which are totally harmless to
humans. However, the nervous
system of birds has been found to be
extremely sensitive to these gases.
Therefore, this appliance should not
be used near cage birds (for example,
tropical birds such as parrots).
Preparing the appliance for use
1 Put the appliance on a flat, stable
surface where it cannot fall.
2 Choose the baking tin that you want to
use: the single or the double tin.
3 Place the two kneaders on the shafts
on the bottom of the tin of your choice.
Turn the kneaders till you feel that they
are fixed on the shafts.
Never fill the appliance with more than
the maximum quantity (a total of a
maximum of 1150 g (2.5 lb.) for the
single baking tin or 450 g (1 lb.) for each
half of the double baking tin); otherwise
the dough will spill over the baking tin.
2 Add the ingredients one by one to the
baking tin. Begin by pouring water or
liquid into the baking tin. Then add the
flour and - depending on the recipe add sugar, salt, butter and yeast or
baking powder.
Put the yeast or baking powder in a
hollow in the flour and each of the other
ingredients in one corner of the baking
tin (this is particularly important when
using the timer).
3 Place the baking tin in the appliance
and press it firmly down till it clicks in
position.
4 Close the lid.
• Make sure there is sufficient free
space around the appliance. This will
ensure that the vapour is distributed
well and items close to the appliance
will not become damp.
• Do not use sharp implements with the
tins, such as metal spatulas, knives
and forks. This may damage the nonstick coating.
Before baking, it is recommendable to
fill the holes around the shafts of the
kneaders in the baking tin with butter
prior to placing the kneaders. This
prevents the dough sticking in these
places and facilitates the removal of the
kneaders from the bread when it is
ready.
Use
Adding ingredients
1 Weigh the required ingredients for the
recipe.
14
Breadmaker DeLuxe Article 152000
Setting the program
5 Put the plug into the wall socket.
A short beep will be heard and the
backlight of the display will switch on for
about 30 seconds.
The display will show Program 1, time
3:20 and temperature 180°C. The
dashes in the time indication do not
blink to show that the program is not
running.
6 Select the required program by
pressing the MENU button repeatedly
till the required program number is
displayed.
See ‘MENU selection’.

7 Select the required baking temperature
by pressing the TEMP button
repeatedly till the required temperature
is displayed.
See ‘Temperature selection’.
8 Specify the size of the loaf by pressing
the LOAF button repeatedly till the
display places the arrow below the
required loaf size (2.5LB, 2.0LB or
DOUBLE).
See “Loaf size selection’.
9 You can delay the time at which you
wish to have the loaf ready by using the
TIME button.
See ‘TIME’.
Baking
10 Press the START/STOP button. A short
beep will be heard and the dashes in
the time display will start blinking to
show that the selected program is
running.
• Apart from the START/STOP button,
all other buttons are inactive from now
on to avoid unwanted program
changes by accidentally pressing a
button.
• The program can be stopped by
pressing the START/STOP button for
more than two seconds. A short beep
will be heard and the dashes in the
time display will stop blinking to show
that the program has stopped.
• Always use the appliance with the lid
closed.
• The appliance will automatically
switch off in the event of a power
failure whilst it is in use. The
appliance will automatically switch on
again if the power is restored within 5
to 15 minutes. The appliance will then
complete the program.
If the power interruption exceeds
15 minutes, the program can not be
kept. If, in this case, the dough has not
yet entered the rising phase, you can
press the START/STOP button to
restart the program from the
beginning. Otherwise, discard the
ingredients and start over again.
• Use oven gloves if you need to touch
the appliance during or after use. The
appliance and the baking tin will
become hot.
• The appliance will work fine in a wide
temperature range, but there may be a
difference in loaf size baking in a very
warm room or in a very cold room. We
suggest that the appliance is used at
temperatures between 15 and 35°C.
You can keep track of the baking process
by looking through the windows in the lid.
For the programs BASIC, QUICK,
FRENCH, SUPER RAPID, WHOLE
WHEAT, SWEET, and SANDWICH:
11 During the baking process beeps will
be heard. These beeps alert you to add
extra ingredients to improve the flavour
(if required):
Open the lid and add the required
ingredients and close the lid again.
End
12 When the program is finished, beeps
will be heard to alert you to the program
end.
The appliance will keep the bread warm
for one hour once it is baked. This
prevents condensation on the crust. If
you want to stop this warming process,
press the START/STOP button for more
than 2 seconds. You will hear a beep to
indicate the end of the program.
The appliance and the baking tin are
very hot. Use oven gloves to open the
lid and to remove the baking tin out of
the appliance.
13 Remove the loaf from the baking tin by
turning the tin upside down and tapping
it gently. If so required, you can use a
wooden or plastic spatula to remove the
Breadmaker DeLuxe Article 152000
15

loaf; take care however not to damage
the non-stick coating.
The kneaders may remain in the loaf.
Use the steel hook to remove them
from the bread. Take care when
removing them; they are hot.
Allow the bread to cool on a rack before
cutting it. (Tip: you can cut fresh bread
very easily with the Princess electrical
knife (Article no. 492952).
14 Allow the appliance to cool down
sufficiently before using it again.
15 When you have finished using the
appliance remove the plug from the wall
socket, and allow the appliance to cool
down sufficiently before you clean and
store it.
See ‘Maintenance and cleaning’.
MENU selection
1 Press the MENU button to toggle
through the different programs.
1. BASIC
This is the most used program for
kneading, rise and baking normal bread.
2. QUICK
This program can be used for the
kneading, rising and baking of loaves in
less time than the BASIC program. Bread
baked with this program is usually smaller
with a dense texture.
3. FRENCH
Program that kneads, rises and bakes
using a longer rise time.This results in
bread with a crispy crust and a light
texture.
4. SUPER RAPID
This is a very short program to knead, rise
and bake the loaf. The result will be a
rough bread.
5. WHOLE WHEAT
Use this program to knead, rise and bake a
whole wheat bread. The use of the delay
function (timer) in combination with this
program is not advised because this will
give poor results.
6. SWEET
Program to knead, rise and bake sweet
bread.
7. DOUGH
With this program you can knead and rise
dough without baking it. The dough can be
used for making bread rolls, pizza,
steamed bread, etc.
8. BAKE
This program only bakes a loaf without
kneading and rising.
This program can also be used to increase
the baking time with preferred settings
directly after using another standard bake
program.
9. JAM
Use this program to boil jam and
marmalades. Chop the fruits and/or
vegetables before putting them in the
baking tin.
10. SANDWICH
This program kneads, rises and bakes
sandwich bread. This is a light texture
bread with a thinner crust.
11. HOME MADE
This program can be adapted by the user.
You can adapt the time settings of
kneading, rise and baking and keeping
warm to make a personalized style of
bread.
See ‘HOME MADE program’.
HOME MADE program
In the HOME MADE program you have the
possibility to adjust the timing of the
16
Breadmaker DeLuxe Article 152000

different program elements to your
particular wishes.
The time ranges are as follows:
Program element Time
KNEAD1 3 - 14 min
RISE1 20 - 60 min
KNEAD2 8 - 24 min
RISE2 1 - 60 min
RISE3 20 - 120 min
BAKE 0 - 80 min
WARM 0 - 120 min
1 Put the plug into the wall socket.
A short beep will be heard and the
backlight of the display will switch on for
about 30 seconds.
The display will show Program 1, time
3:20 and temperature 180°C. The
dashes in the time indication do not
blink to show that the program is not
running.
2 Press the MENU button repeatedly till
program number 11 (HOME MADE) is
displayed.
3 Press the PROCESS button.
On the display you can see that
KNEAD1 starts blinking and the display
shows the time setting for this KNEAD1
element of the program.
Change the setting by pressing the
TIME button repeatedly. Each time you
press the TIME button, the time setting
will increase by one minute.
If you keep the TIME button pressed,
the time setting will increase faster.
When the time setting has reached the
maximum setting, press the TIME
button again to go to the minimum time
setting again.
Adjust the time setting to the required
setting.
4 Press the PROCESS button to go to the
setting of the next program element
(RISE1).
Change the time setting in the same
way as described above.
5 Press the PROCESS button each time
to adjust time settings for the remaining
program elements (KNEAD2, RISE2,
RISE3, BAKE and WARM).
6 When you have finished adapting the
program settings, press the START/
STOP button to store the program.
7 Select the required baking temperature
by pressing the TEMP button
repeatedly till the required temperature
is displayed. See ‘Temperature
selection’.
8 You can delay the time at which you
wish to have the loaf ready by using the
TIME button. See ‘Timer’.
9 Press the START/STOP button again to
start the program.
10 For further baking and the ending
sequence, see ‘Baking’ and ‘End’.
Temperature selection
The baking temperature is indicated on the
display in °C and also with an arrow
indicating LOWER, MEDIUM or HIGH.
No PROGR. LOWER MEDIUM HIGH
1. BASIC 160°C 180°C 200°C
2. QUICK 165°C 175°C 185°C
3. FRENCH 160°C 180°C 200°C
4. SUPER
RAPID
5. WHOLE
WHEAT
6. SWEET 160°C 180°C 200°C
7. DOUGH n.a. n.a. n.a.
8. BAKE 160°C 180°C 200°C
9. JAM n.a. n.a. n.a.
10. SANDWICH
11. HOME
MADE
1 Press the TEMP button to toggle
through the LOWER, MEDIUM and
HIGH temperature settings.
180°C 190°C 200°C
160°C 180°C 200°C
160°C 180°C 200°C
Progr. Progr. Progr.
Breadmaker DeLuxe Article 152000
17

Loaf size selection
Solely for the programs BASIC,
FRENCH, SUPER RAPID, WHOLE
WHEAT, SWEET, and SANDWICH:
1 Press the LOAF button to toggle
through the quantity settings as
indicated below.
The setting 2.5 LB and 2 LB are
normally used for the single baking tin
while the DOUBLE setting is normally
used for the double baking tin
Setting Quantity
2.5 lb. 1150 g.
2 lb. 900 g.
DOUBLE 2 x 450 g.
.
Timer
The timer enables you to specify when the
appliance must complete the selected
program (solely for programs BASIC,
FRENCH, WHOLE WHEAT, SWEET,
BAKE, SANDWICH and HOME MADE).
Example:
1 Add the ingredients one by one to the
baking tin. Begin by pouring water or
liquid into the baking tin. Then add the
flour and - depending on the recipe add sugar, salt, butter and yeast or
baking powder.
Put the yeast or baking powder in a
hollow in the flour and each of the other
ingredients in a corner of the baking tin.
The yeast may not come into contact
with liquids, salt or butter, since this
would immediately start the
fermentation process.
2 Select the required program,
temperature and quantity settings.
3 It is, for example, 10 PM and you wish
the freshly-baked bread to be ready at
7:30 AM. In this case, the time
difference is 9 hours and 30 minutes.
Use the TIME button to set the delay to
approx. 9:30.
Each time you press the TIME button,
the ‘ready’ time will increase by 10
minutes.
If you hold the TIME button depressed
then, after a short time, the time
indication will start increasing in steps
of 10 minutes.
4 Press the START/STOP button to start
the timer. The dashes in the time
display will start blinking to show that
the clock is running. The timer will start
the program and makes sure that your
bread will be ready at the adjusted time.
Turning off and storing the
appliance
1 Remove the plug from the plug socket.
2 Allow the appliance to cool down.
3 Clean the appliance and all accessories
(see ‘Maintenance and cleaning’).
4 Store the appliance in a dry, frost-free
location.
Maintenance
and cleaning
• Clean the appliance thoroughly after
use.
• Make sure the appliance is not
plugged into the plug socket when
you are going to clean it.
• Never clean the appliance when it is
still hot.
• Make sure no moisture comes into
contact with the appliance’s electrical
parts.
• Never immerse the appliance, the
power cord or the plug in water or
other liquids.
• Never use aggressive or scouring
cleaning products or sharp objects
(such as a knife or a hard brush) to
clean the appliance.
18
Breadmaker DeLuxe Article 152000

• Only the loose parts and accessories
(baking tins, kneaders, measuring
spoon and cup, and the steel hook)
may be cleaned in a dishwasher. The
appliance itself may not be cleaned in
the dishwasher.
1 Remove the plug from the wall socket
and let the appliance cool down
completely.
2 Clean the appliance’s housing with a
soft, damp cloth. Use warm water and
some washing-up liquid to moisten the
cloth.
3 Clean the loose parts (baking tins,
kneaders, measuring spoon and cup,
and the steel hook) in soapy water or in
a dishwasher.
4 Dry the appliance and accessories
thoroughly before storing them.
• Have the appliance repaired only by a
qualified electrician. Never try to
repair the appliance yourself.
• Only use accessories recommended
by the supplier. The use of other
accessories may result in damage to
the appliance, thereby creating
hazards for the user.
• The appliance is not intended to be
operated by means of an external
timer or separate remote control
system.
Electricity and heat
• Verify that the mains voltage is the
same as that indicated on the
appliance’s type plate before use.
• Use an earthed plug socket that is
connected to a fused circuit of at least
10 A and to which no other heavy
loads are connected.
Safety
General information
• Read and follow these instructions
carefully. Keep this manual for future
reference.
• Use this appliance only in accordance
with these instructions.
• This appliance is intended solely for
domestic use.
• The use of this appliance by children
or persons with a physical, sensory,
mental or motor disability or with a
lack of the necessary knowledge and
experience may cause a hazard.
Persons responsible for the safety of
such people must give explicit
instructions or supervise the use of
the appliance.
• Keep the appliance out of the reach of
children, and of persons who may not
be able to operate it safely.
• If you use an extension lead, use an
earthed extension lead that is suitable
for the appliance’s power rating.
Unwind the extension lead fully and
position it so that nobody can trip
over it.
• The appliance should be supplied
through a residual current device
(RCD) having a rated residual
operating current not exceeding
30 mA.
• Always remove the plug from the wall
socket when the appliance is not
going to be used for a longer period of
time.
• When you remove the plug from the
plug socket, pull the plug and not the
power cord.
• Never pull the power cord to move the
appliance.
• Never move the appliance while it is in
use.
• Do not use the appliance if the
appliance or the power cord is
Breadmaker DeLuxe Article 152000
19

damaged. Have a damaged power
cord replaced by a qualified
electrician.
• Make sure your hands are dry when
you touch the appliance, the power
cord or the plug.
• Make sure the appliance, the power
cord and the plug do not come into
contact with heat sources, such as a
hot hob or a naked flame.
• Make sure the appliance, the power
cord do not come into contact with
water, other fluids or chemicals.
• Do not pick up the appliance if it falls
into water. Immediately remove the
plug from the wall socket. Do not use
the appliance anymore.
• The appliance and its parts can
become hot while the appliance is in
use. To avoid being burnt, take care
when touching the appliance and its
parts.
• The appliance must be able to
dissipate its heat to avoid a risk of fire.
Make sure that the appliance has
sufficient space around it, and does
not come in contact with inflammable
material. The appliance must not be
covered.
• Allow the appliance to cool down
before you store it, clean it or carry
out maintenance work.
• Turn off the appliance and/or remove
the plug from the plug socket in the
event of a malfunction during use,
before cleaning the appliance, before
fitting or removing an accessory and
before storing the appliance after use.
• Never leave the appliance unattended
when in use.
• Never move the appliance when it is
switched on or is still hot. Before you
move the appliance, switch it off and
wait till it has cooled.
• This appliance’s tins have a non-stick
PTFE coating. On heating this coating,
it may release small amounts of gases
which are totally harmless to humans.
However, the nervous system of birds
has been found to be extremely
sensitive to these gases. Therefore,
this appliance should not be used
near cage birds (for example, tropical
birds such as parrots).
U.K. WIRING INSTRUCTIONS
The wires in the mains lead are
coloured in accordance with the
following code:
• Do not use the appliance near another
heat source.
During use
• Never use the appliance outdoors.
• Never use the appliance in a humid
room.
• Use the appliance only at a
temperature between 15 °C and 35 °C.
• Place the appliance on a flat, stable
surface where it cannot fall.
• Never allow the power cord to hang
over the edge of the draining board,
worktop or table.
• Always make sure the power cord has
been fully unwound.
20
Breadmaker DeLuxe Article 152000
•BLUE NEUTRAL
• BROWN LIVE
• GREEN/YELLOW EARTH
As the colours of the wire in the mains
lead of this appliance may not
correspond with the colour markings
identifying the terminals on your plug,
proceed as follows:
• The wire which is coloured BLUE
must be connected to the terminal
which is marked with the letter N or
coloured black.
• The wire which is coloured BROWN
must be connected to the terminal

which is marked with the letter L or
coloured red.
• The wire which is coloured GREEN/
YELLOW must be connected to the
terminal which is marked with the
letter E or (earth symbol) and is
coloured GREEN or GREEN/YELLOW
WARNING: THIS APPLIANCE MUST BE
EARTHED
Some bread recipes
The measuring jug and the measuring
spoon (with the teaspoon and tablespoon
measures on the ends), that come with the
breadmaker, have been used for the
quantities.
With this appliance, if a 13A plug is
used a 13A fuse should be fitted. If any
other type of plug is used, a 15A fuse
must be fitted either in the plug or at the
distribution board.
The Environment
Dispose of packaging material, such as
plastic and boxes, in the appropriate waste
containers.
If you wish to dispose of the appliance
whilst it still works properly or can be easily
repaired, then ensure that the appliance is
recycled.
When the appliance reaches the end of its
useful life, it should be disposed of in a
responsible manner, thereby ensuring the
reuse of the appliance or its parts. Do not
dispose of the appliance with unsorted
refuse; hand it in at the store, or take it to a
recognized collection point. Contact your
municipality for information about the
reception and collection systems in your
area.
Applicable European guideline:
2002/95/EC
2002/96/EC
White bread
Wheat flour or wheatmeal 450 g
Yeast (dry) 1½ teaspoons
Oil 3 tablespoons
Milk 2 to 3 tablespoons
Salt 1½ teaspoons
Sugar 1½ tablespoons
Water 250 ml
Wholemeal bread
Wholemeal flour 450 g
Yeast (dry) 1½ teaspoon
Oil 3 tablespoons
Milk 2 tablespoons
Salt 1½ teaspoons
Sugar 1½ tablespoons
Water 260 ml
Mixed bread
Wheatmeal 400 g
Cornmeal
(or another type of flour) 50 g
Yeast (dry) 1½ teaspoons
Oil 3 tablespoons
Milk 2 tablespoons
Yoghurt 1 tablespoon
Salt 1½ teaspoons
Sugar 1½ tablespoons
Water 250 ml
Ingredients
You can, of course, bake bread using one
of the recipes given above, but once you
get into it, it is fun to experiment using
different ingredients. To do so, it is useful
to know more about the various breadbaking ingredients. Some useful
Breadmaker DeLuxe Article 152000
21

information you will need when baking
bread is given below.
Flour
The main ingredient of bread is flour. There
are many different kinds of flour and mixes
of flour. The type of grain you use makes a
big difference to the bread. For example,
wheat flower contains so much gluten that
it rises better than heavier flour and you,
therefore, need less yeast. Gluten is a
protein compound which is found in grain,
such as wheat, oats, rye and barley. As the
bread rises, gluten forms a network that
keeps in the carbon dioxide bubbles and
this causes the bread to rise.
Meal mixes
Most types of meal can be mixed together.
The combination of buckwheat flour/
oatmeal/wheat flour is a good example.
You could also try barley meal/wheat flour.
Various mixes can also be bought in
shops, such as cornmeal, six-grain meal,
nine-grain meal or ten-grain meal. These
mixes sometimes contain flour and/or a
bread improver.
All-in-one mixes
You can also buy mixes which contain all
the ingredients, except water. These all-inone mixes are easy and quick to use, but
are also more expensive.
Patent flour or household flour
Most white flour is called patent flour or
household flour. It contains almost no bran
or seeds, but does contain a lot of gluten.
This flour is usually used to bind soups and
sauces, but is also good for baking (white)
bread.
Wheat flour and wheatmeal
Wheat flour is white wheatmeal.
Wheatmeal is somewhat greyer in colour
and contains a small amount of bran and
seeds. Wheat flour and wheatmeal also
contain a lot of gluten.
Wholewheat flour and wholewheat meal
Wholewheat flour is ground from whole,
untreated grains of wheat. It contains all
the bran and seeds from the wheat.
Wholewheat flour has, just like wheat flour,
a lot of gluten, but is heavier because of
the bran and seeds. As a result, the bread
will be more compact if it is made only
using wholewheat meal. Therefore, most
home bakers add some wheat flour.
Besides these types of flour and meal,
there are also many other types to keep
you busy to your heart’s content, such as:
oatmeal, barley meal, buckwheat flour,
maize meal and rye flour.
Yeast
Yeast is required in order for the bread to
rise. You can buy fresh yeast (blocks) or
dried yeast (granules). The taste of fresh
yeast is slightly more pronounced than that
of dry yeast. There are various brands of
dry yeast and the effect they have varies
somewhat. The yeast that suits you the
best is a question of personal preference.
As a rule of thumb, you can say that you
need about half the weight of dry yeast
(also called instant yeast) compared to
fresh yeast. The effect of the yeast can be
affected if the yeast comes into contact
with salt or fat. Salt dries out the yeast and
fat encloses the yeast cells, so that the
dough can no longer rise. It is, therefore,
important to ensure that the yeast, salt and
butter are not placed too close to each
other in the breadmaker.
Salt
Salt adds to the taste of the bread, but is
also important for the crust and for the
bread rising (although salt can also stop
the bread from rising if it comes into direct
contact with the yeast). Salt strengthens
the gluten construction which gives the
bread shape. Salt also ensures that the
bread does not rise out of the baking tin
and then sinks before it is well baked.
22
Breadmaker DeLuxe Article 152000

It is possible to bake low-sodium or saltfree bread, but it will require varying the
ingredients.
baking tin. Never use liquid that is too
warm, because this can have a negative
effect on the yeast.
Liquids
The most common liquid used to bake
bread is water, but you can also try using
milk or buttermilk. This influences the
taste, the rising and the bread structure.
The fats in full-fat milk have a positive
influence on the freshness and the lactose
in the milk stimulates the fermentative
power. Buttermilk produces a lighter bread
that remains fresh for longer.
Sugar
Sugar only makes a small contribution to
the rising process, but it determines the
taste of the bread. Instead of sugar, you
can also use honey, treacle or syrup. Do
not use any large granular sugar (hard
sugar) or sugar candy in the breadmaker.
This may damage the non-stick coating.
Do not use any artificial sweeteners,
because they are generally not good at
withstanding heat.
Aids and tips
Cool the bread on a grille
After baking, leave the bread to cool down
on a grille. The heat can then escape from
all sides.
Cutting the bread after it has cooled
down
Home-made bread is best cut after it has
cooled down. If the bread is still warm, then
it is best to cut it using an electric knife,
such as the Princess 2952 Silver Electric
Knife.
Storing bread
After cooling, it is best to wrap home-made
bread in a tea towel. This will keep the
crust nice and crisp. Special paper bread
bags are also suitable. The bread will
become soft if it is kept in a plastic bag or
in the refrigerator.
Fats
Fat is, in fact, a bread improver. You do not
necessarily need it, but the bread is much
better if you do use it. Fat makes the
dough more pliable and ensures that it can
rise more easily. Fat also encloses the
gluten network, so that the carbon dioxide
is kept in. This makes the bread airier and
it remains fresh for longer.
Various types of fat are suitable. Oil
(sunflower oil or olive oil), butter and
margarine give an excellent result. Oil
makes the crust softer. Margarine
produces a crispier crust and also
improves the rising process. When baking
herb bread, it may be tasty to use a
seasoned oil, such as walnut oil, garlic oil
or basil oil.
Temperature
It is best if the ingredients are at room
temperature when they are placed in the
Freezing bread
Home-made bread can be frozen after it
has cooled down. It is useful to freeze it in
daily portions.
It is best to defrost the bread at room
temperature, because a microwave dries
the bread out too quickly.
Although the bread can be frozen, it
always has a negative effect on the quality.
Darker bread
One tablespoon of cacao powder can be
added to the flour to give bread a darker
colour. This has almost no influence on the
flavour.
Crispier crust
To achieve a crispier crust, you can leave
the bread in the machine for ten to fifteen
minutes during the keep-warm phase.
Breadmaker DeLuxe Article 152000
23

If the bread rises out of the baking tin
You can watch the rising process through
the viewing window. Normally, it is not a
good idea to open the lid during the rising
process, because this can cause the bread
to sink, but if the dough rises out of the
baking tin and sticks against the viewing
window (this can also happen during
baking), then open the lid briefly. The
dough will then sink slightly.
Small, compact bread
Too much liquid produces a small, flat
bread. The dough is not able to rise
properly, because it is too wet. The yeast
may also have been too old.
Dry bread
Too little liquid produces bread which is too
dry. Try using (slightly) more water or milk.
If the bread is good after baking, but then
dries out quickly, add more oil or butter.
Sunken bread
If your bread rises fine, but sinks during
baking, try baking it using the shortest
program (Basic). In general, longer
programs increase the chance of the bread
sinking during baking.
Finally
After reading all of this information, you
should, in theory, be able to come up with
your own favourite recipes. All that is left is
the practice. It may not be so easy, though,
because baking bread is a skill that you
cannot learn in just one day. The search for
the perfect bread can have a lot of
setbacks. Do not be disappointed if you
have trouble at first. Ask other home
bakers about their experiences, take time
to read about the subject, look things up on
the Internet and, most importantly, keep
experimenting, because the possibilities
are endless. After all, home-made bread is
the tastiest.
24
Breadmaker DeLuxe Article 152000

14 Moule de cuisson double
15 Pales de pétrissage
16 Crochet en acier
Information générale
Cette machine à pain complètement
automatique mélange et pétrit la pâte, puis
fait cuire le pain. Cet appareil est fourni
avec une tasse à mesurer, une cuillère à
mesurer, ainsi que deux moules de
cuisson avec revêtement antiadhésif. Un
moule unique pour les plus gros pains et
un moule double pour deux pains plus
petits ou différents.
La machine à pain possède
11 programmes qui vous permettent de
réaliser différents types de pain, gâteaux
ou confiture. Un des programmes peut être
adapté pour correspondre à votre recette
personnelle.
L’appareil est équipé d’un minuteur qui
permet de régler l’heure à laquelle vous
souhaitez que le pain soit prêt – par
exemple au moment du petit déjeuner afin
de disposer d'un délicieux pain frais!
Fonctionnement et
utilisation
Voir la figure 1.
L’appareil comprend les composants
suivants :
1 Couvercle avec hublots
2 Bouton MENU
3 Bouton TEMP
4 Bouton LOAF (miche de pain)
5 Affichage
6 Bouton START/STOP (marche/arrêt)
7 Bouton PROCESS (processus)
8 Bouton TIME (durée)
9 Cordon et fiche
10 Boîtier
11 Cuillère à mesurer
12 Moule de cuisson simple
13 Tasse à mesurer
Avant la première utilisation
• Lisez et suivez soigneusement ces
instructions. Conservez le manuel afin
de pouvoir vous y référer à l’avenir.
• Vérifiez que la tension d'alimentation
du réseau est identique à la tension
indiquée sur la plaquette type de
l'appareil.
• Cet appareil nécessite une prise
murale équipée de la terre.
1 Retirez tous les matériaux d’emballage
et toutes les étiquettes de l’appareil.
2 Nettoyez l’appareil et tous les
accessoires (voir « Entretien et
nettoyage »).
3 Installez l'appareil sur une surface
plane et stable, où il ne risque pas de
tomber.
4 Placez un moule de cuisson dans
l'appareil et enfoncez-le jusqu’à ce
qu'un « clic » se fasse entendre.
5 Placez les deux pales sur les tiges au
fond du moule de cuisson. Tournez les
pales jusqu’à ce que vous sentiez
qu’elles sont bien enfoncées sur les
tiges.
6 Fermez le couvercle.
7 Branchez la fiche dans la prise murale
Un « bip » court se fait entendre et le
rétro éclairage de l’affichage se met en
route peur environ 30 secondes.
L’affichage indiquera Program 1, time
(durée) 3:20 et température 180°C. Le
double point dans l’indication horaire ne
clignote pas afin d’indiquer que
l’horloge de minuterie n’est pas active.
8 Appuyez répétitivement sur le bouton
MENU jusqu’à ce que l’affichage
indique 8 (BAKE mode).
9 Appuyez sur le bouton START/STOP et
laissez l’appareil cuire pendant environ
10minutes.
Le double point dans l’affichage de
l’heure clignotera pour indiquer que
Breadmaker DeLuxe Article 152000
25

l’horloge de la minuterie est en marche.
L’affichage de l’heure commence son
décompte.
10 Après environ 10 minutes, appuyez sur
le bouton START/STOP pendant plus
de deux secondes, pour arrêter le
programme. Vous entendrez un « bip »
indiquant que le programme est arrêté.
Laissez l’appareil refroidir.
11 Retirez le moule de cuisson de
l’appareil.
12 Nettoyez le moule de cuisson et les
pales puis séchez –les soigneusement.
Voyez “Entretien et nettoyage”.
13 Répétez cette procédure avec le
deuxième moule de cuisson.
jusqu’à ce que vous sentiez qu’elles
sont bien enfoncées sur les tiges.
Avant la cuisson, il est recommandé,
avant de placer les pales, de remplir de
beurre les trous autour des tiges de
pales dans le moule de cuisson Ceci
évitera que la pâte n’adhère au moule à
ces endroits précis, et facilitera le
dégagement du pain cuit hors du
moule.
Utilisation
Ajouter les ingrédients
1 Pesez les ingrédients nécessaires à la
recette.
• Il est possible que l’appareil émette un
peu de fumée et une odeur
caractéristique quand vous l'allumez
pour la première fois. C’est normal et
s'arrêtera bientôt. Assurez-vous que
l’appareil est suffisamment aéré.
• Les moules de cuisson fournis avec
cet appareil sont enduits d’en
revêtement antiadhésif PTFE qui,
lorsqu’il est chauffé, peut dégager de
petites quantités de gaz
complètement inoffensif pour les
humains. Cependant, le système
nerveux des oiseaux est extrêmement
sensible à ces gaz. C’est pourquoi cet
appareil ne devrait pas être utilisé
près d’une cage à oiseaux (comme par
exemple des oiseaux tropicaux,
perroquets ou autres).
Préparez l’appareil pour
l’utilisation
1 Installez l'appareil sur une surface
plane et stable, où il ne risque pas de
tomber.
2 Choisissez le moule de cuisson que
vous souhaitez utiliser : Le simple ou le
double.
3 Placez les deux pales de pétrissage sur
les tiges au fond du moule de cuisson
de votre choix. Tournez les pales
Ne remplissez jamais l’appareil avec
plus de la quantité maximum (au
maximum 1150 g (2.5 lb.) pour le moule
de cuisson simple et 450 g (1 lb.) pour
chaque moitié du moule de cuisson
double); sinon la pâte débordera du
moule de cuisson.
2 Ajoutez les ingrédients un par un dans
le moule de cuisson. Commencez par
verser l’eau ou le liquide dans le moule
de cuisson. Ajoutez ensuite la farine
puis- selon la recette – ajoutez du
sucre, du sel, du beurre, et de la levure
de boulanger ou chimique.
Placez la levure de boulanger ou
chimique dans un puits que vous aurez
creusé dans la farine, et chacun des
ingrédients suivants dans un des coins
du moule de cuisson (il est
particulièrement important de respecter
cette méthode lorsque vous utilisez le
minuteur).
3 Placez le moule de cuisson dans
l'appareil et enfoncez-le fermement
jusqu'à ce que vous entendiez un
"clic".
4 Fermez le couvercle.
• Assurez-vous qu’il y a suffisamment
d'espace libre autour de l'appareil.
26
Breadmaker DeLuxe Article 152000

Ceci permettra que la vapeur qui
s'échappe de l'appareil soit bien
évacuée et que les objets proches de
la machine ne deviennent pas
humides.
• N’utilisez pas d’instruments aiguisés
dans le moule, comme des spatules
en métal, des couteaux ou des
fourchettes. Ils pourraient
endommager le revêtement
antiadhésif.
Sélection du programme
5 Branchez la fiche dans la prise murale
Un “bip” court se fait entendre et le rétro
éclairage de l’affichage se met en route
peur environ 30 secondes.
L’affichage indiquera Program 1, time
(durée) 3:20 et température 180°C. Le
double point dans l’indication horaire ne
clignote pas afin d’indiquer que
l’horloge de minuterie n’est pas active.
6 Sélectionnez le programme désiré en
appuyant sur le bouton MENU
répétitivement jusqu’à ce que le bon
numéro de programme soit affiché.
Voir « sélection MENU ».
7 Sélectionnez la température de cuisson
désirée en appuyant sur le bouton
TEMP répétitivement jusqu’à ce que la
bonne température soit affichée.
Voir « sélection Température ».
8 Spécifiez la taille du pain en appuyant
sur le bouton LOAF répétitivement
jusqu’à ce que l’affichage place la
flèche devant la taille de pain désirée
(2.5LB, 2.0LB ou DOUBLE).
Voir “Sélection de la taille de pain”.
9 Vous pouvez retarder l’heure à laquelle
vous souhaitez avoir votre pain prêt, en
utilisant le bouton TIME.
Voir ‘TIME’.
Cuisson
10 Appuyez sur le bouton START/STOP.
Un court « bip » se fera entendre et les
pointillés dans l’affichage de l'heure
commenceront à clignoter pour montrer
que le programme sélectionné est en
cours.
• A l’exception du bouton START/STOP,
tous les autres boutons deviennent
maintenant inactifs, pour éviter un
changement de programme inopiné
au cas où une touche serait enfoncée
par erreur.
• Le programme peut être arrêté en
appuyant sur le bouton START/STOP
pendant plus de 2 secondes. Un court
« bip » se fera entendre et les
pointillés dans l’affichage de l'heure
s’arrêteront de clignoter pour montrer
que le programme s’est arrêté.
• Utilisez toujours l’appareil avec le
couvercle fermé.
• L’appareil s’éteindra automatiquement
dans le cas d’une panne de courant
pendant l’utilisation. L’appareil se
rallumera automatiquement si le
courant est rétabli dans les 5 à 15
minutes. L’appareil finira alors le
programme.
Si la panne de courant excède les
15 minutes, le programme ne sera pas
conservé. Si, dans ce cas, la pâte n'est
pas encore entrée dans la phase de
levage, vous pouvez appuyer sur le
bouton START/STOP pour reprendre
le programme depuis le début. Sinon,
jetez les ingrédients et recommencez
la préparation depuis le début.
• Utilisez des gants de protection contre
la chaleur si vous touchez l’appareil
pendant ou après l’utilisation.
L’appareil et le moule de cuisson
deviennent chauds.
• L’appareil fonctionnera sans problème
dans une large plage de température
ambiante, mais il pourra y avoir une
différence de taille entre le pain qui
aura cuit dans une pièce très chaude
et dans une pièce très froide. Nous
vous suggérons d’utiliser l’appareil à
Breadmaker DeLuxe Article 152000
27
 Loading...