

Page 1
Operation
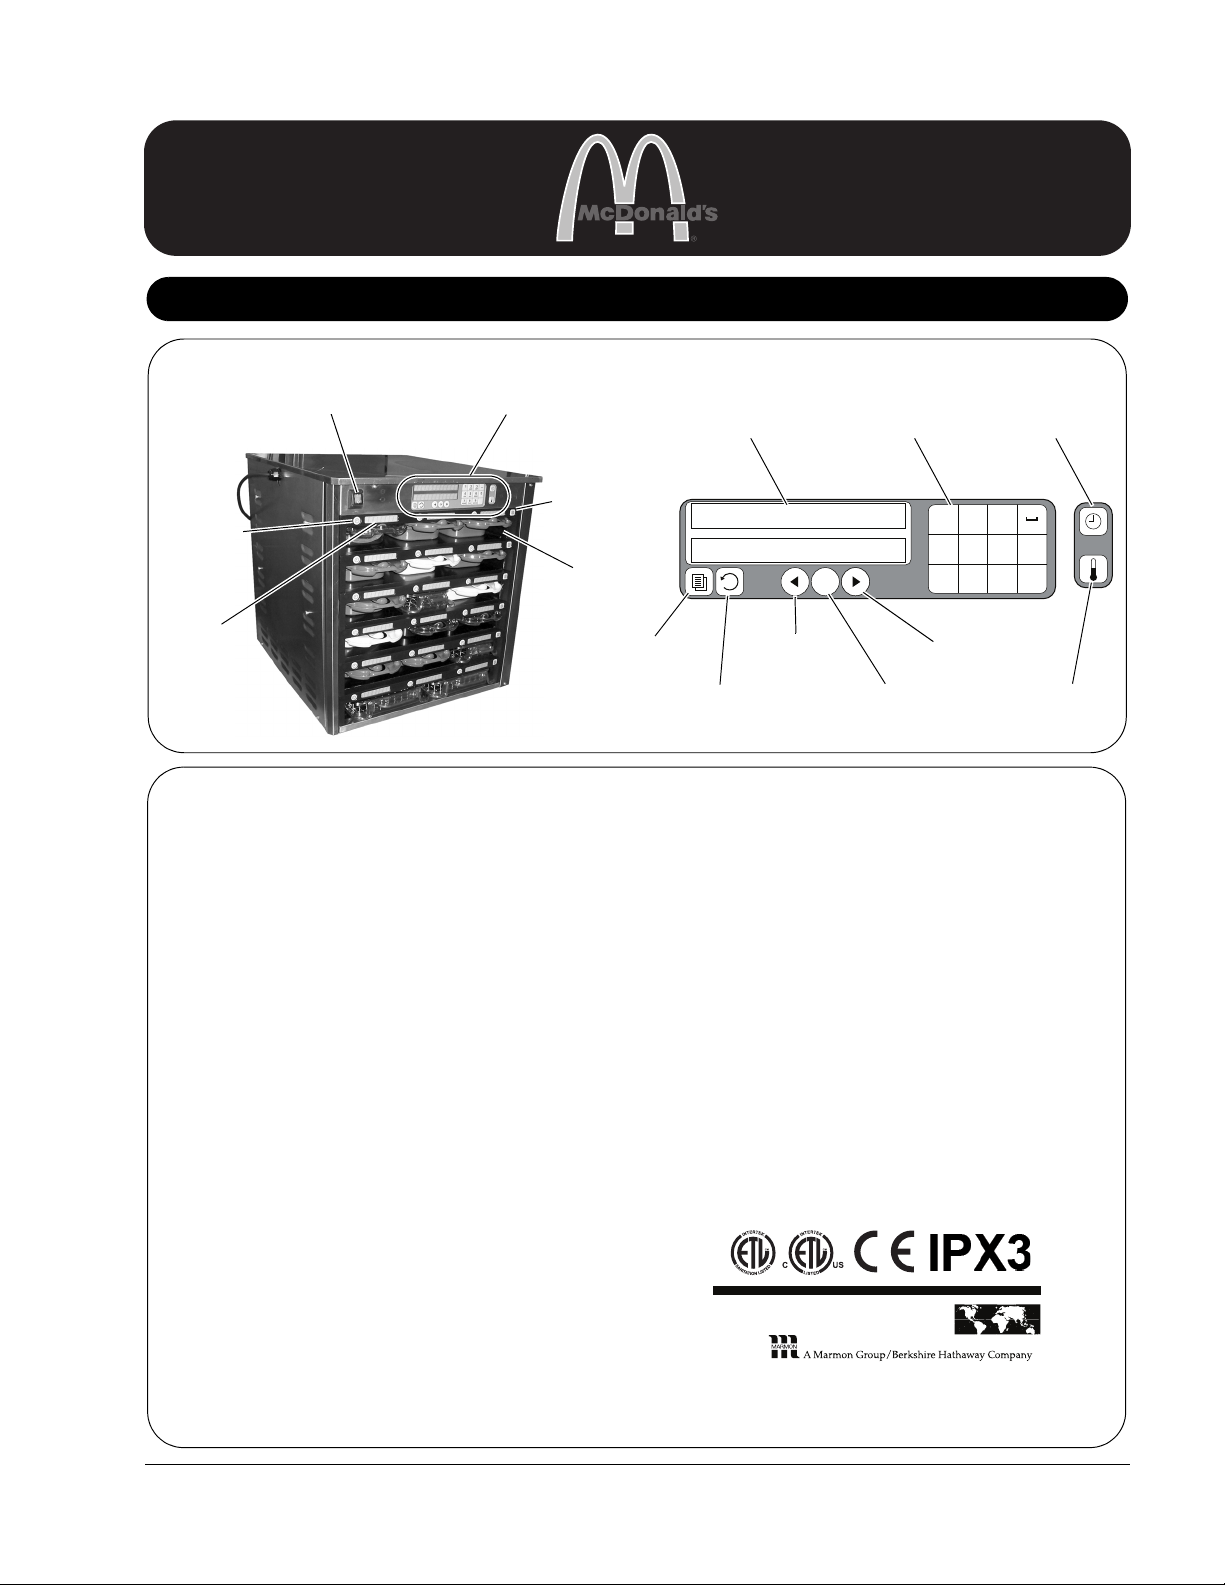
Product Identification
ON/OFF
Switch
Item Timer
Button
Item
Display
Slot
Row Mode
Button
Master
Control
Left
Button
Master
Display
Master
Keypad
Master
Timer
Button
Master
Temperature
Button
Right
Button
OK Select
Button
Back
Button
Program
Button
LIMITED WARRANTY
This product is warranted to be free from defects in material and/
or workmanship for a period of three (3) years from date of
original installation, not to exceed 42 months from date of
shipment from our factory. Any part or component which proves
to be faulty in material and/or workmanship within the warranty
period will be replaced or repaired (at the option of Prince
Castle) without cost to the customer for parts or labor, except as
provided below:
• Use of any non-genuine Prince Castle parts voids this
warranty. All work must be performed by an authorized Prince
Castle Service Agent, except as provided herein.
• All labor shall be performed during regular work hours.
Overtime premium will not be covered.
• Travel charges are limited to 100 miles (200 kilometers) round
trip, 2 hours travel time, one trip per repair.
• Damage caused by carelessness, neglect, and/or abuse (e.g.,
using wrong current, dropping, tampering with or altering
electrical components, or improper cleaning) is not covered.
• Equipment damaged in shipment, by fire, flood or an act of
God is not covered.
• Damage to coated surfaces is not covered by this limited
warranty.
• Labor for repair or replacement of the following parts is not
covered by this Limited Warranty: Display Bar (IUC) part
number 547-058S, Heater Board part number 547-221S.
Prince Castle will provide replacement parts to customer so
customer can replace parts if they are defective. Replacement
instructions are set out in the product’s Operations Manual.
PRINCE CASTLE SHALL NOT BE LIABLE FOR INCIDENTAL OR
CONSEQUENTIAL DAMAGES, LOSSES, OR EXPENSES. THIS IS
PRINCE CASTLE’S ONLY WARRANTY. PRINCE CASTLE MAKES NO
OTHER WARRANTY, EXPRESS OR IMPLIED. ALL IMPLIED
WARRANTIES OF MERCHANTABILITY AND/OR FITNESS FOR ANY
PARTICULAR PURPOSE ARE HEREBY DISCLAIMED AND
EXCLUDED
TABLE OF CONTENTS
Product Identification . . . . . . . . . . . . . . . . . . . . . . . . . . . . . . . 1
Safety Information . . . . . . . . . . . . . . . . . . . . . . . . . . . . . . . . . 2
Important . . . . . . . . . . . . . . . . . . . . . . . . . . . . . . . . . . . . . . . . 2
Electrical Specifications . . . . . . . . . . . . . . . . . . . . . . . . . . . . . 2
Installation . . . . . . . . . . . . . . . . . . . . . . . . . . . . . . . . . . . . . . . 2
Operation – Item Timers . . . . . . . . . . . . . . . . . . . . . . . . . . . . 3
Operation – Mode Select . . . . . . . . . . . . . . . . . . . . . . . . . . . . 5
Management Programming . . . . . . . . . . . . . . . . . . . . . . . . . . 6
Factory Presets . . . . . . . . . . . . . . . . . . . . . . . . . . . . . . . . . . . 8
Daily Planned Maintenance . . . . . . . . . . . . . . . . . . . . . . . . . . 9
Weekly Heater Check . . . . . . . . . . . . . . . . . . . . . . . . . . . . . . 10
Troubleshooting . . . . . . . . . . . . . . . . . . . . . . . . . . . . . . . . . . 11
Wiring Diagram . . . . . . . . . . . . . . . . . . . . . . . . . . . . . . . . . . . 12
P
RINC
E
C
A
STL
E
LLC
WORLDWIDE
355 East Kehoe Blvd. • Carol Stream, IL 60188 USA
Telephone: 630-462-8800 • Toll Free: 1-800-PCASTLE
Fax: 630-462-1460 • www.princecastle.com
Universal Holding Cabinet
Manual
UHC6PT-22MCD
213
ABC DEF
2430
JKLGHI MNO
OK
879
TUVPQRS WXYZ
547-500revB_EN Printed in USA 1/11 © 2011
Page 2
Universal Holding Cabinet
P
RINC
E
C
A
STL
E
LLC
WORLDWIDE
Safety Information
Indicates information important to the proper operation of
the unit. Failure to observe may result in damage to the
equipment and/or severe bodily injury or death.
Indicates information important to the operation of the unit.
Failure to observe may result in damage to the equipment.
WARNING
CAUTION
Important
Prince Castle reserves the right to change specifications
and product design without notice. Such revisions do not
entitle the buyer to corresponding changes, improvements,
additions or replacements for previously purchased
equipment.
Electrical Specifications
208-240V 50/60 Hz 2250-3450W
Installation
Unpack and inspect. Remove the unit from the
carton and inspect for signs of damage. If there is
damage to the unit:
• Notify the carrier within 24 hours of delivery.
• Save carton and packaging materials for inspection
purposes.
• Contact your local dealer, or if purchased directly,
the Prince Castle Sales Department at
1-800-722-7853 or 630-462-8800 to arrange for a
replacement unit.
Note: If UHC is not place on High Density Brackets,
the hole pattern below is required to secure the UHC
to the mounting surface.
1
Place Universal Holding Cabinet (UHC) on flat
surface. Remove blue and/or white protective
covering.
NOTE: When installing this unit, the ambient
temperature at the mounting site should not exceed
100°F (38°C).
2
Plug unit in. Plug
unit into a grounded
receptacle with a
matching plug
configuration.
All electrical connections must be in accordance
with local electrical codes and any other
applicable codes.
If the supply cord is damaged, it must be replaced
by the manufacturer, its service agent, or similarly
qualified persons in order to avoid a hazard.
To prevent an electric shock hazard this device
must be bonded to equipment in close proximity
with an equipotential bonding conductor. This
device is equipped with a grounding lug for this
purpose and is marked with the following symbol.
WARNING
3
UHC6PT-22MCD
Printed in USA 1/11 © 2011 2 547-500revB_EN
Page 3
P
RINC
E
C
A
STL
E
LLC
WORLDWIDE
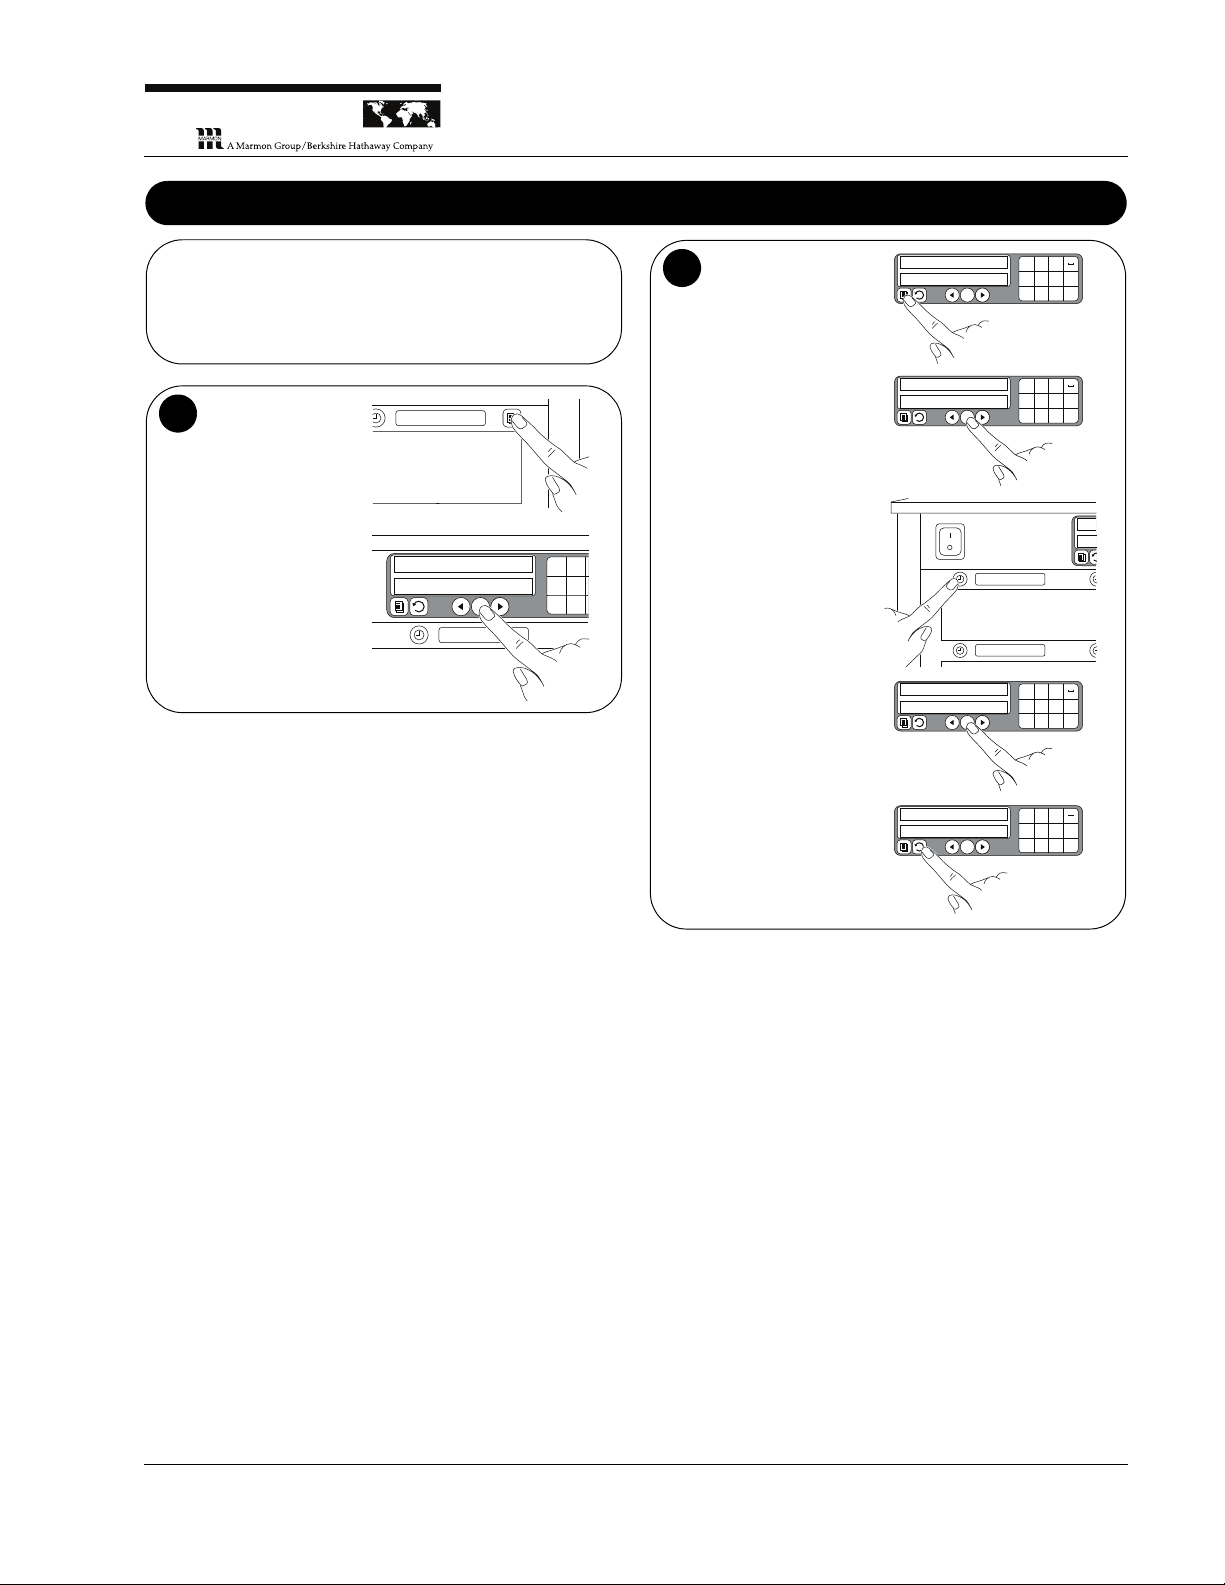
Operation – Item Timers
This appliance is not intended for use by persons
(including children) with reduced physical, sensory, or
mental capabilities, or lack of experience and knowledge
unless they have been given supervision or instruction
concerning use of the appliance by a person responsible
for their safety.
WARNING
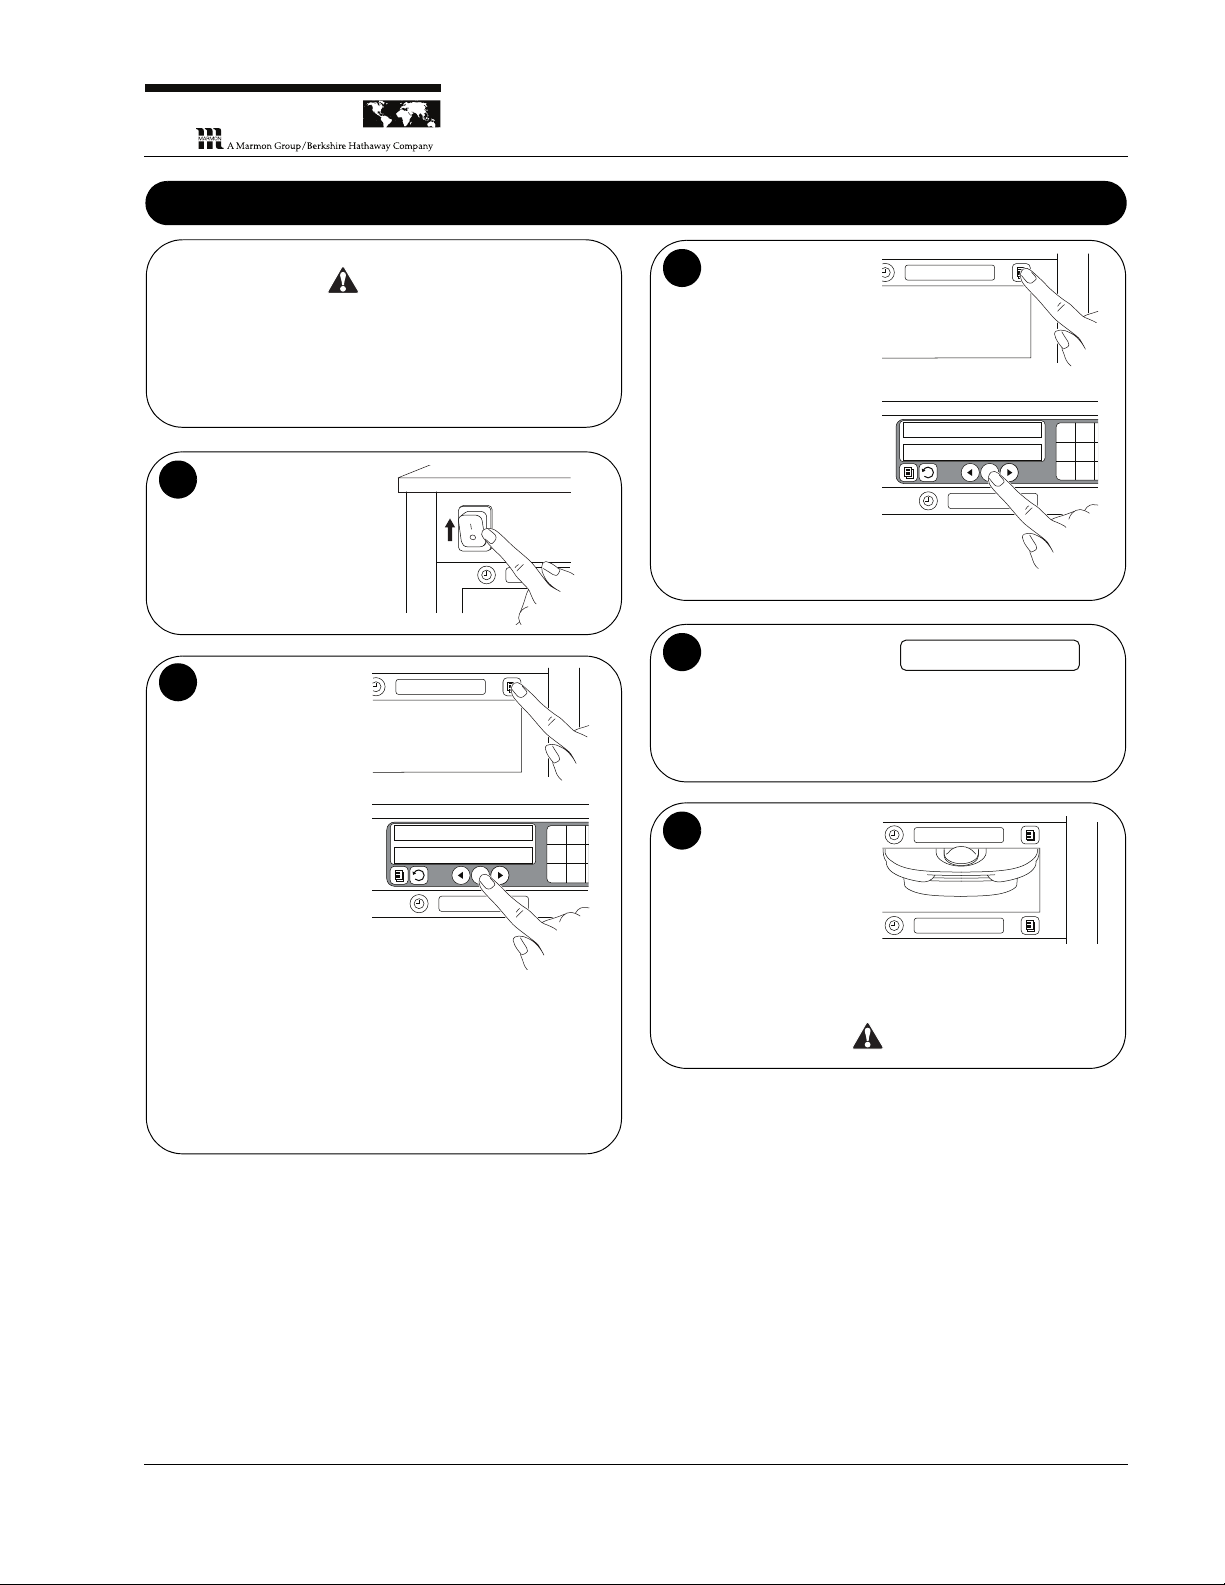
Turn unit ON. Turn
the ON/OFF switch
located on the upper
left of the UHC to the
ON position.
1
Set each active
row to the correct
mode. For each row
of slots that will be
used, press its Row
Mode button until
the correct mode
appears in that
row’s Item Displays
(for example,
BRKFST). Then
press the OK Select
button.
NOTE: If the entire
UHC will be used in
one mode and you
have a password,
you may set the
entire UHC at once.
Press the Master Program button, enter your
password and press the OK Select button. Then press
the button to the left of the word “MODES”, then the lit
Item Timer to the left of the desired mode, and then
the OK Select button. CHG COMPLETE will appear in
the Master Display. Press the Back button three times
to return to normal operation. See “Changing Between
Menu Modes”.
brkfst
OK
21
ABC
24
JKLGHI
87
TUVPQRS
brkfst
2
Set each inactive
row to OFF. For each
row of slots that will
not be used, press its
Row Mode button
until OFF appears in
that row’s Item
Displays. Then press
the OK Select button.
This will keep unused
rows of slots from
heating up and save
energy.
off
OK
21
ABC
24
JKLGHI
87
TUVPQRS
brkfst
3
Allow the rows to
heat up. Each row’s
Item Displays will
read LOW TEMP until
that row is ready for
use. Depending on
settings, warm-up can
take up to 35 minutes.
4
Load a UHC slot
with prepared food.
Place a tray of
cooked product into a
slot with that food’s
name in its Item
Display. Make sure
the slot line on the
tray handle lines up
with the edge of the
slot.
Discard cracked or damaged trays.
can bacn
CAUTION
5
Universal Holding Cabinet
UHC6PT-22MCD
low temp
547-500revB_EN 3 Printed in USA 1/11 © 2011
Page 4
Universal Holding Cabinet
P
RINC
E
C
A
STL
E
LLC
WORLDWIDE
Operation – Item Timers (continued)
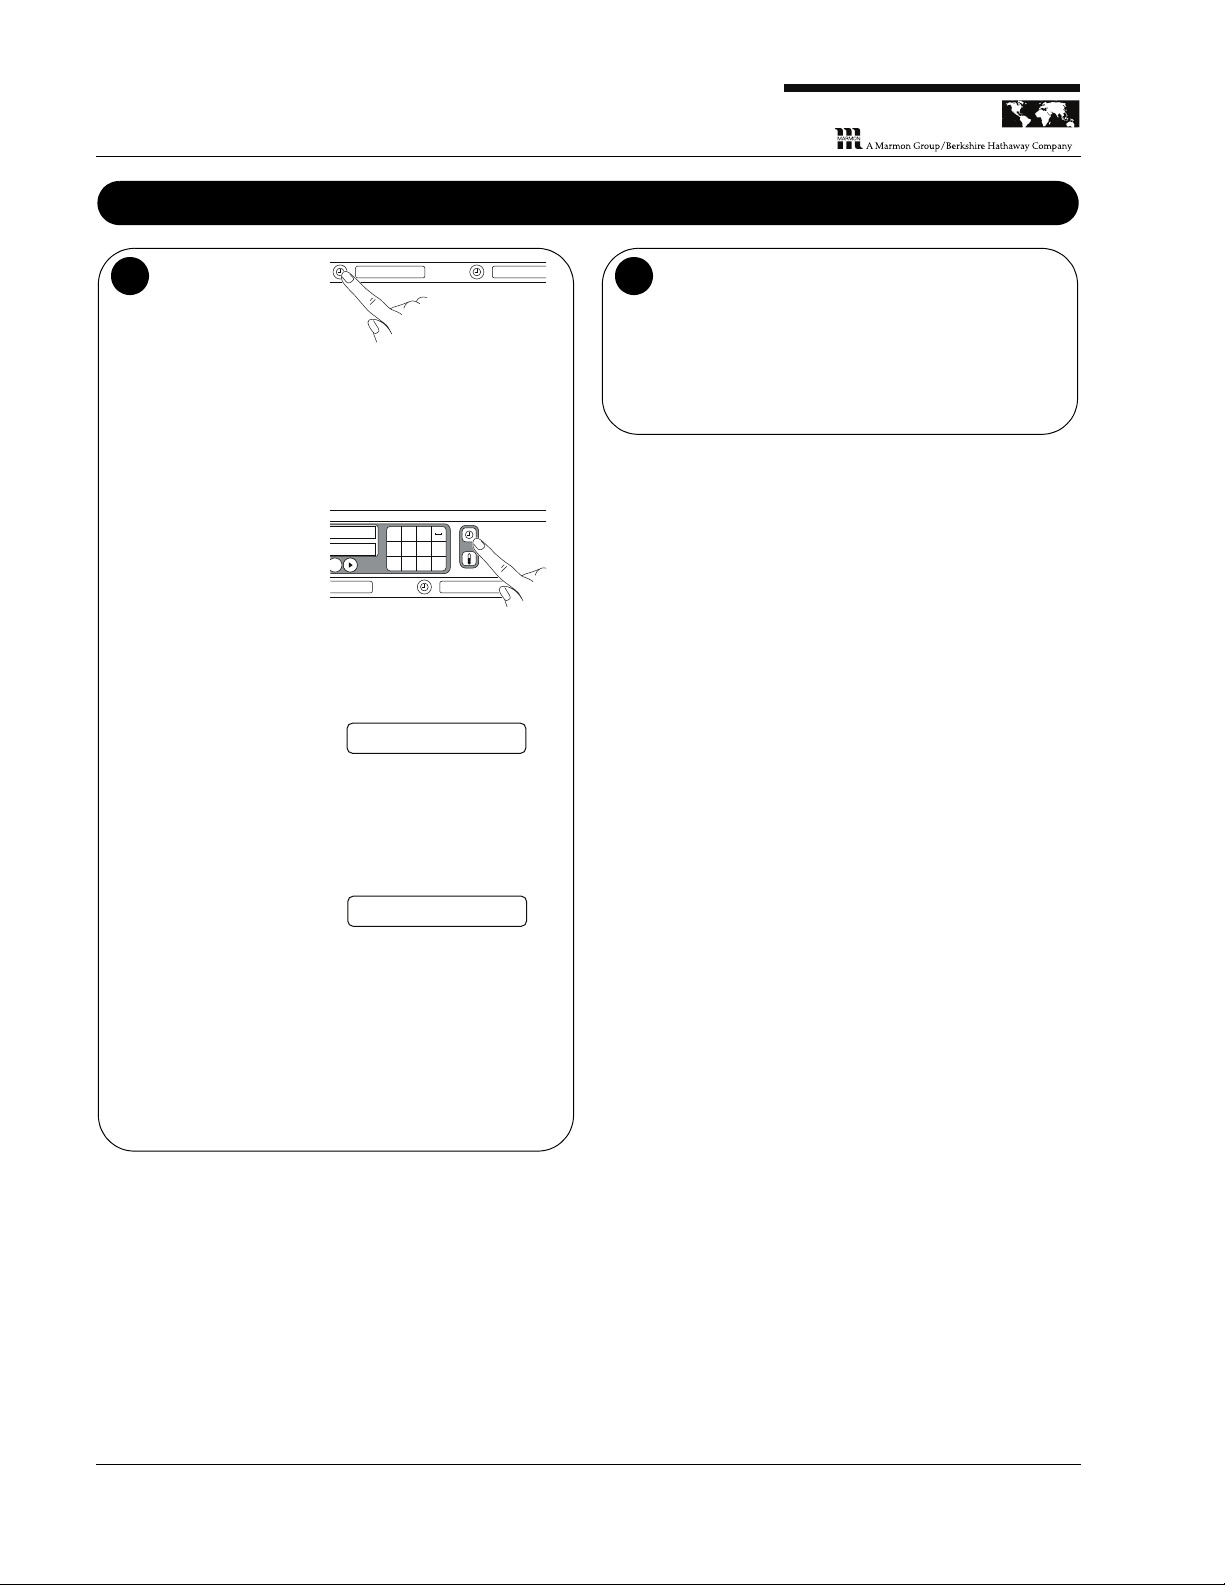
Press the slot’s Item
Timer button.
Pressing the slot’s
Item Timer button
once will illuminate
the pressed button
and start the product’s holding timer. The associated
display will also get brighter. After a short delay the
hold time will disappear and the timer will begin to
count down. If the button is pressed again while the
time is still displayed the hold time is reduced in 5
minute increments for every button press.
NOTE: Pressing the slot’s Item Timer button again
after pausing will cancel timing.
A. To view the time
left for a tray,
press the Master
Timer button.
B. To remove
portions from the
tray, slide the tray
only as far as
needed, then
quickly return the
tray to the slot
line.
C. When the
brightness of the
button illumination,
Item Timer button
begins to pulse and
the Item Display
flashes COOK
NOW, indicating it
is time to cook
more food.
D. When the final
alarm sounds and
the Item Display
flashes
XXXXXXXX, the
hold time has
expired and the
remaining product
should be
discarded. Press
the Item Timer
button to turn off
the alarm.
1 15
OK
213
ABC DEF
2430
JKLGHI MNO
879
TUVPQRS WXYZ
15 15
xxxxxxxx
6
Load and time all of the active slots. Continue
loading and timing the requested product (see steps 5
and 6).
NOTE: When more than one slot holds trays of the
same item, the Item Timer button for each of these
pans will be illuminated and the display associated
with the pan that contains the product that should be
used first will be bright. The displays for the other pans
with this same product will be dim.
7
UHC6PT-22MCD
Printed in USA 1/11 © 2011 4 547-500revB_EN
cook now
Page 5
Universal Holding Cabinet
P
RINC
E
C
A
STL
E
LLC
WORLDWIDE
Operation – Mode Select
CHANGING BETWEEN MENU MODES
You can choose between the following modes: Breakfast,
Change Over, Regular Menu, Custom 1, Custom 2, Clean and
OFF. The operating mode can be changed two different ways,
on a row-by-row basis or all rows at one time.
One row at a time:
For each row of
slots that will be
changed, press its
Row Mode button
until the correct
mode appears in
that row’s Item
Displays (for
example, BRKFST).
Then press the OK
Select button on the
Master Control
Panel.
OK
21
ABC
24
JKLGHI
87
TUVPQRS
brkfst
1
Entire UHC at
once (requires
password): Change
the entire unit by
pressing the Master
Program button,
entering your
password and
pressing the OK
Select button.
Then press the lit
Item Timer to the left
of “MODES”, then the
lit Item Timer to the
left of the desired
mode, and then the
OK Select button.
CHG COMPLETE
will appear in the
Master Display.
Press the Back
button three times to
return to normal
operation.
modes
menus
pr
OK
213
ABC DEF
2430
JKLGHI MNO
879
TUVPQRS WXYZ
CHG COMPLETE
2
UHC6PT-22MCD
brkfst
program
program
program
213
ABC DEF
2430
JKLGHI MNO
OK
OK
OK
879
TUVPQRS WXYZ
213
ABC DEF
2430
JKLGHI MNO
879
TUVPQRS WXYZ
213
ABC DEF
2430
JKLGHI MNO
879
TUVPQRS WXYZ
547-500revB_EN 5 Printed in USA 1/11 © 2011
Page 6

Universal Holding Cabinet
P
RINC
E
C
A
STL
E
LLC
WORLDWIDE
Management Programming
Press the Master Program button. The Master
Display will request your password.
1
Enter your password. Type your password in on the
keypad and press the OK Select button.
Programmable categories will appear in the rows of
Item Displays, reading from the left.
2
Choose a
programmable
category. Press the
lit Item Timer button
to the left of the
category you wish to
program. Follow the
instructions on the
Master Display to
navigate and
program the UHC.
Confirm selections by
pressing the OK
Select button.
Press the Back
button to retreat one
level of programming
(press several times
to exit programming).
OK
213
ABC DEF
2430
JKLGHI MNO
879
TUVPQRS WXYZ
program
OK
213
ABC DEF
2430
JKLGHI MNO
879
TUVPQRS WXYZ
CHG COMPLETE
3
The first
programmable
category is MODES.
Sets the entire UHC
to one of the different
daypart modes,
Breakfast, Change
Over, Regular,
Custom 1, Custom 2,
or Cleaning. Each of
the dayparts modes is
displayed. Press the
button next to the
desired daypart mode
and then press the
OK Select button on
the Master Control
Panel. Press the Back
button on the Master
Control Panel twice to
exit programming.
4
The second
programmable
category is MENUS.
Sets which food
product is assigned to
each tray in each of
the daypart modes.
Press the button next
to the daypart mode
whose menu is to
change. The name of
the food product
currently assigned to
each tray position is
displayed. Pressing
the button next to the
desired tray position
cycles through the
available food
products that can be
assigned to the tray
position. When the
desired food product
is displayed, press
the OK Select button
on the Master Control
Panel. You can
change more than
one item before
confirming by
pressing OK Select.
NOTE: Be sure to
start with the left-most
Item Display in each
row, because
changing an item may
also make changes to
items to the right in
that row due to
temperature
restrictions.
brkfst
CHG OVER
REG MENU
CUSTOM 1
CUSTOM 2
Me
SE
bagel
fold egg
griddles
griddles
rnd egg
BR
SA
5
UHC6PT-22MCD
pr
modes
menus
Mo
SE
brkfst
CHG OVER
REG MENU
Printed in USA 1/11 © 2011 6 547-500revB_EN
CUSTOM 1
CUSTOM 2
Page 7

Universal Holding Cabinet
P
RINC
E
C
A
STL
E
LLC
WORLDWIDE
Management Programming (continued)
The third
programmable
category is ITEMS.
Press the button next
to the task to be
performed, add a food
product, change a
product’s parameters,
or delete a food
product from the UHC’s
product library. You can
set the item’s Name,
Top Temperature,
Bottom Temperature,
Hold Time and CookNow Time.
add item
CHG item
del item
it
SE
6
The fourth programmable category is LOCALE.
Choose the language for the displays and whether
temperatures are reported in Fahrenheit or Celcius.
Press the button next to LANGUAGE and a list of
available languages appears. Press the button next to
the desired language and then the OK Select button.
Press the Back button twice to exit language selection
or additional times to exit programming.
Press the button next to DEGREES to select between
Celcius and Fahrenheit. Press the button next to the
desired temperature units and then the OK Select
button. Press the Back button twice to exit language
selection or additional times to exit programming.
OK
213
ABC DEF
2430
JKLGHI MNO
879
TUVPQRS WXYZ
englishlanguage
fahrenhtdegrees
locale
g
7
The last
programmable
category is SOUND.
Choose how loud the
alarms are. There are
four sound levels plus
silent. Press the
button next to the
desired sound level
and the OK Select
button. Press the
Back button three
times to exit
programming.
curre
level 1
level 2
level 3
level 4
silent
so
SE
8
UHC6PT-22MCD
547-500revB_EN 7 Printed in USA 1/11 © 2011
Page 8

Universal Holding Cabinet
P
RINC
E
C
A
STL
E
LLC
WORLDWIDE
Factory Presets
Item Display Temperature
Setpoint
(Top/Bottom)
Hold
Time
(Min.)
Cook
More
Time
(Min.)
Bagels BAGELS
Breakfast
Chicken
BFST CKN
Biscuits BISCUITS 175°F (79°C)/
175°F (79°C)
30
Burritos BURRITO 175°F (79°C)/
175°F (79°C)
20
Canadian
Bacon
CAN BACN 175°F (79°C)/
175°F (79°C)
30
Crispy
Chicken
CRISPY
Filet-O-Fish FILET 200°F (93°C)/
200°F (93°C)
30
Folded Eggs FOLD EGG 175°F (79°C)/
175°F (79°C)
20
Griddles GRIDDLES
Grilled
Chicken
GRIL CKN 185°F (85°C)/
185°F (85°C)
60
Ham HAM
Hotcakes HOTCAKES
McChicken
Patties
MCCHIKEN 200°F (93°C)/
200°F (93°C)
30
McRib MCRIB
English
Muffins
MUFFINS 175°F (79°C)/
175°F (79°C)
20
None NONE — — —
McNuggets NUGGETS
Round Egg RND EGG 175°F (79°C)/
175°F (79°C)
20
Sausage SAUSAGE 175°F (79°C)/
175°F (79°C)
60
Scrambled
Eggs
SCRAMBLE 175°F (79°C)/
175°F (79°C)
20
Selects SELECTS
Skillet
Burger
SKLT BUR
Spicy
Chicken
SPCY CKN
Breakfast
Steak
STEAK
Regular
Patties
10-1 185°F (85°C)/
185°F (85°C)
15
Third
Pounder
3-1 185°F (85°C)/
185°F (85°C)
15
Quarter
Pounder
4-1 185°F (85°C)/
185°F (85°C)
15
SETTING THE UHC TO
FACTORY DEFAULT SETTINGS
If necessary, the UHC can be set to its original factory settings.
Press the Master
Program button and
enter 3550 on the
Keypad. The
maintenance menu
will appear and the
Master Display will
read TEST MODE.
OK
213
ABC DEF
2430
JKLGHI MNO
879
TUVPQRS WXYZ
test mode
press
1
Press the Right
button repeatedly.
Press the Right
button on the Master
Display until CHG
SETTINGS appears
on the Master
Display.
OK
213
ABC DEF
2430
JKLGHI MNO
879
TUVPQRS WXYZ
chg settings
press
2
Press the OK Select
button.
OK
213
ABC DEF
2430
JKLGHI MNO
879
TUVPQRS WXYZ
chg settings
press
3
Press the Left
button repeatedly.
Press the Left button
on the Master Display
until USE SYS DEFS
appears on the
Master Display.
OK
213
ABC DEF
2430
JKLGHI MNO
879
TUVPQRS WXYZ
use sys defs
press
4
Press the OK Select
button. SAVING
DONE will appear in
the Master Display.
OK
213
ABC DEF
2430
JKLGHI MNO
879
TUVPQRS WXYZ
saving done
5
UHC6PT-22MCD
Printed in USA 1/11 © 2011 8 547-500revB_EN
Page 9

Universal Holding Cabinet
P
RINC
E
C
A
STL
E
LLC
WORLDWIDE
Factory Presets (continued)
Turn the UHC OFF.
Using the ON/OFF
switch, turn the
UHC OFF and wait
10 seconds.
6
Turn the UHC ON.
Using the ON/OFF
switch, turn the UHC
ON. The UHC will
now be set to factory
default settings.
7
Daily Planned Maintenance
Place the unit in the
Cleaning mode. For
each row of slots,
press its Row Mode
button until CLEAN
appears in that row’s
Item Displays. Then
press the OK Select
button.
NOTE: The row
cannot be switched to
clean mode if any of
the timers in that row
are active.
Do not use McD Sink Sanitizer (HCS) to clean the
exterior of the UHC.
OK
21
ABC
24
JKLGHI
87
TUVPQRS
brkfst
clean
CAUTION
1
Let the unit cool.
2
Use a cabinet brush to clean the slot surface.
Remove any remaining buildup on the surface.
DO NOT use any tool other than the cabinet cleaning
brush to clean the cabinet slots. Wire brushes,
abrasive pads, or metal scrapers will permanently
damage the surface of the cabinet slot.
DO NOT use any other cleaner than McD APC (All
Purpose Concentrate) (HCS). Using other compounds
may result in damage to control components.
Do not hose down or use a water jet on the unit. Keep
the unit away from running water.
CAUTION
CAUTION
CAUTION
3
Remove all loose particles. Push the debris out the
opposite end of the cabinet with the cabinet brush.
4
Clean each slot.
Use a damp, clean/
sanitized towel and
the cleaning brush.
OK
213
ABC DEF
2430
JKLGHI MNO
879
TUVPQRS WXYZ
5
Wipe the exterior.
Clean all exterior
surfaces with a
clean, sanitized
towel that has been
dampened with McD
APC (HCS).
6
Turn the unit OFF.
7
UHC6PT-22MCD
547-500revB_EN 9 Printed in USA 1/11 © 2011
213
ABC DEF
2430
JKLGHI MNO
879
OK
TUVPQRS WXYZ
Page 10

Universal Holding Cabinet
P
RINC
E
C
A
STL
E
LLC
WORLDWIDE
Weekly Heater Check
Ensure the slots are clean. Remove all signs of
cooking oil and food particles.
1
Select low temperature for one slot. Choose a
mode in which the item in that slot has a temperature
setpoint of 175°F (79°C). Or program an item to
achieve a temperature setpoint of 175°F (79°C) (see
Management Programming). Wait until the Item
Display no longer reads LOW TEMP.
filetfiletfilet
2
Take a top heater
temperature
reading. Using a
stand-alone
temperature meter
(not supplied), take a
temperature reading
within 1 inch
(2.54 cm) of the
center of the top
heater plate for the
slot. Temperature
should be within 5°F
(3°C) of 175°F (79°C).
Hot surfaces. Use caution when taking temperature
readings within the shelf.
OK
213
ABC DEF
2430
JKLGHI MNO
879
TUVPQRS WXYZ
WARNING
3
Take a bottom
heater temperature
reading. Using the
stand-alone
temperature meter,
take a temperature
reading within 1 inch
(2.54 cm) of the
center of the bottom
heater plate for the
slot. Temperature
should be within 5°F
(3°C) of 175°F
(79°C).
OK
213
ABC DEF
2430
JKLGHI MNO
879
TUVPQRS WXYZ
4
Repeat test for each slot.
5
Select high temperature for one slot. Choose a
mode in which the item in that slot has a temperature
setpoint of 200°F (93°C). Or program an item to
achieve a temperature setpoint of 200°F (93°C) (see
Management Programming). Wait until the Item
Display no longer reads LOW TEMP.
fold eggfold eggfold egg
6
Take a top heater
temperature reading.
Using the stand-alone
temperature meter,
take a temperature
reading within 1 inch
(2.54 cm) of the
center of the top
heater plate for the
slot. Temperature
should be within 5°F
(3°C) of 200°F
(93°C).
OK
213
ABC DEF
2430
JKLGHI MNO
879
TUVPQRS WXYZ
7
Take a bottom
heater temperature
reading. Using the
stand-alone
temperature meter,
take a temperature
reading within 1 inch
(2.54 cm) of the
center of the bottom
heater plate for the
slot. Temperature
should be within 5°F
(3°C) of 200°F
(93°C).
OK
213
ABC DEF
2430
JKLGHI MNO
879
TUVPQRS WXYZ
8
Turn the unit OFF.
9
UHC6PT-22MCD
Printed in USA 1/11 © 2011 10 547-500revB_EN
Page 11

Universal Holding Cabinet
P
RINC
E
C
A
STL
E
LLC
WORLDWIDE
Troubleshooting
UHC6PT-22MCD
547-500revB_EN 11 Printed in USA 1/11 © 2011
Page 12

Universal Holding Cabinet
P
RINC
E
C
A
STL
E
LLC
WORLDWIDE
Troubleshooting
UHC6PT-22MCD
Printed in USA 1/11 © 2011 12 547-500revB_EN
Page 13

P
RINC
E
C
A
STL
E
LLC
WORLDWIDE
Troubleshooting
Universal Holding Cabinet
UHC6PT-22MCD
547-500revB_EN 13 Printed in USA 1/11 © 2011
Page 14

Universal Holding Cabinet
P
RINC
E
C
A
STL
E
LLC
WORLDWIDE
UHC6PT-22MCD
Wiring Diagram
Printed in USA 1/11 © 2011 14 547-500revB_EN
 Loading...