

Page 1
R
980-500revA-EN
Printed in USA 04/17 © 2017
Operating
Instructions
Universal Slicer
Saber King™
TM
355 East Kehoe Blvd. • Carol Stream, IL 60188 USA
Telephone: 630-462-8800 • Toll Free: 1-800-PCASTLE
Fax: 630-462-1460 • www.princecastle.com
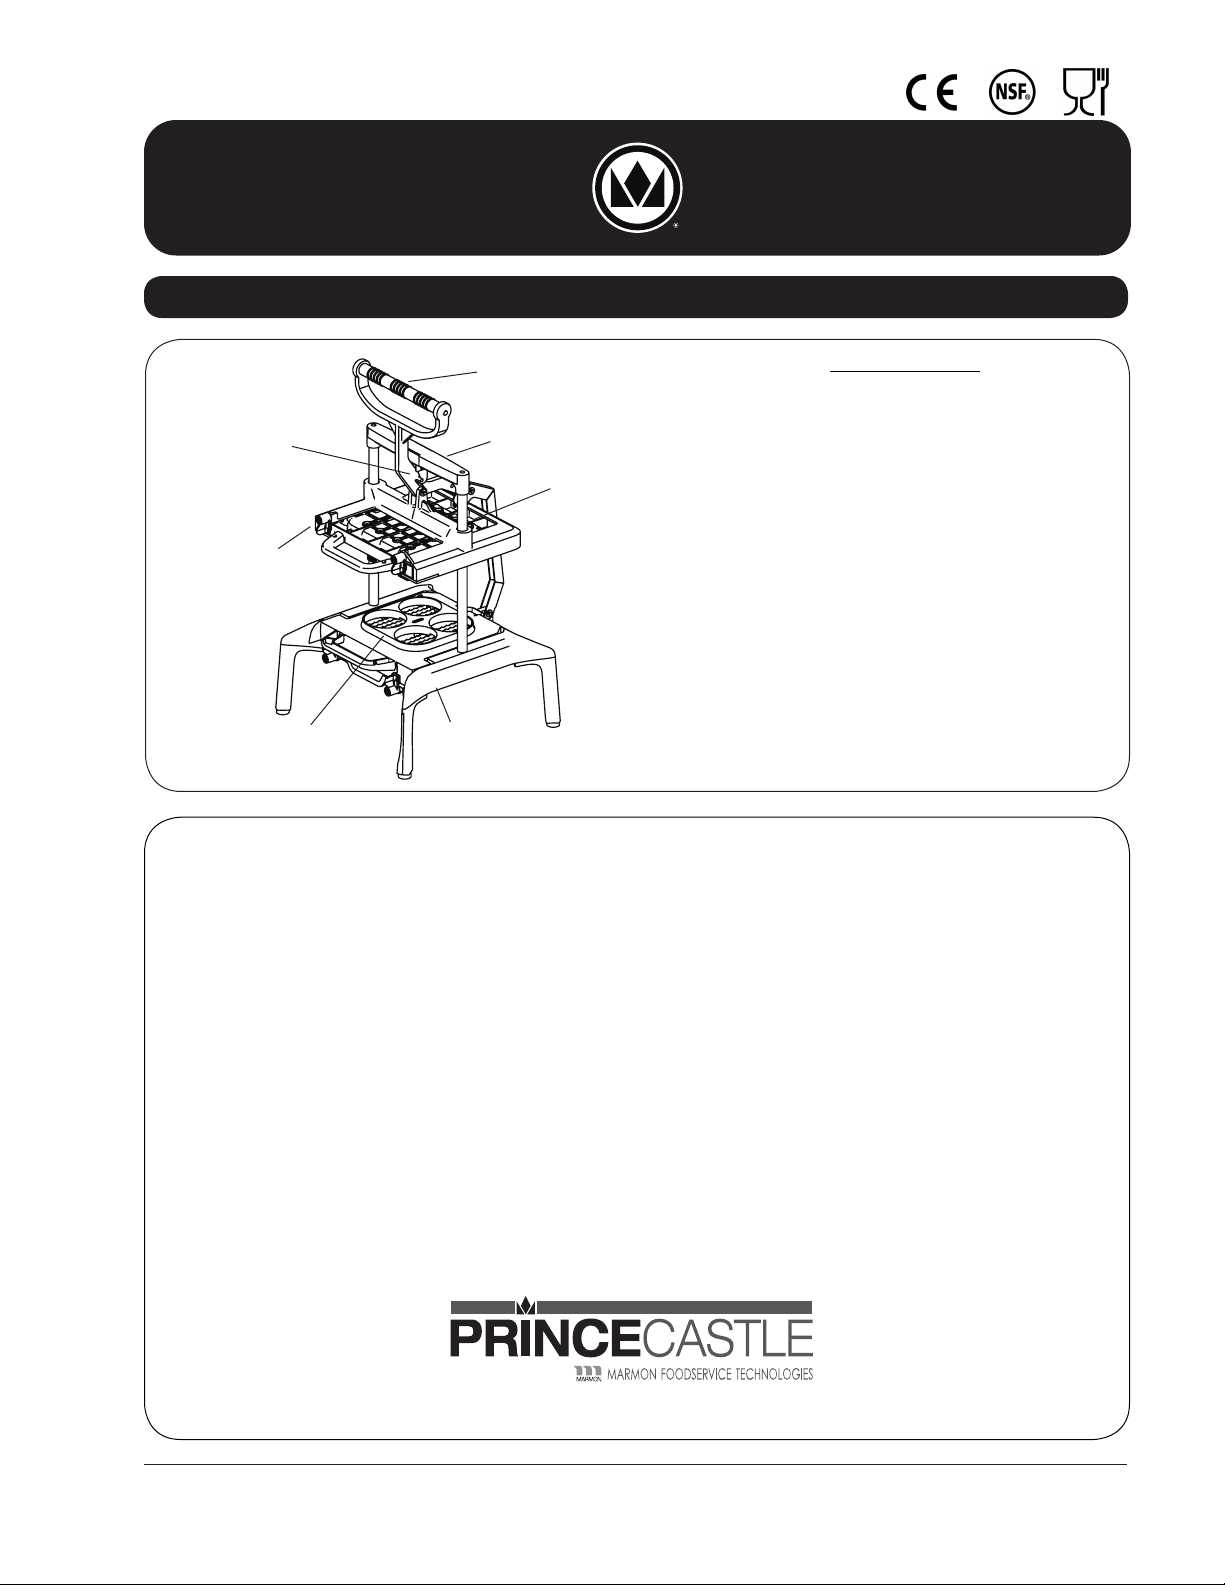
Product Identication
Handle
Handle Latch
Cartridge
Locking Pin
Blade
Component
Crossbar
Pusher Component
of Blade/Pusher
Cartridge
Chassis
LIMITED WARRANTY
This product is warranted to be free from defects in material
and/or workmanship for a period of one (1) year from date
of original installation, not to exceed 18 months from date of
shipment from our factory with the exception of the blade/
pusher cartridge. Blade/pusher cartridge is warranted to be free
from defects at time of delivery only.
Any component which proves to be faulty in material and/or
workmanship will be replaced or repaired (at the option of Prince
Castle LLC) without cost (including freight and duty) to the
customer for parts or labor.
This warranty is subject to the following exceptions/conditions:
• Use of food products other than those specied will void this
warranty.
• This equipment is portable; charges for on-location service
(e.g., trip charges, mileage) are not included in the provisions
of this warranty.
• Damage caused by carelessness, neglect, and/or abuse (e.g.,
dropping, tampering or altering parts), equipment damaged in
shipment, by re, ood or an act of nature is not covered under
this warranty.
Chassis & Blade Sets
980-000-00 Chassis
980-000-10A 3/16" Tomato Slicer
980-000-12A 1/4" Tomato Slicer
980-000-20A 3/16" Onion
980-000-22A 1/4" Onion
980-000-32A 1x1 Chop
980-000-33A 1x2 Chop
980-000-34A 1x7 Chop
980-000-43A 5/16" Shredder
980-000-50A 1/4" Dicer
980-000-51A 3/8" Dicer
980-000-52A 1/2" Dicer
980-000-60A 4 Sections Wedger
980-000-61A 6 Sections Wedger
980-000-62A 8 Sections Wedger
980-000-65A Citrus Halfer
TABLE OF CONTENTS
Product Identication ............................................................... 1
Safety Information ................................................................... 2
Important ................................................................................. 2
Description............................................................................... 2
Specications .......................................................................... 2
Installation ............................................................................... 2
Choosing and Inserting a Cartridge......................................... 3
Operation ................................................................................. 4
Removing a Cartridge .............................................................. 5
Cleaning .................................................................................. 5
Exploded View and Parts List .................................................. 7
Prince Castle ©
Page 2
TM
Universal Slicer
Saber King™
Safety Information
WARNING
Indicates information important to the proper operation
of the unit. Failure to observe may result in damage to the
equipment and/or severe bodily injury or death.
CAUTION
Indicates information important to the operation of the unit.
Failure to observe may result in damage to the equipment.
Description
Prince Castle’s Saber King™ is a universal food prep system
designed with a multi-purpose chassis and interchangeable
blade/pusher cartridges to accommodate slicing a variety of
foods all on one slicer. This space-saving slicer has patented
blade covers and requires both hands to operate, making it safe
and easy to use and clean.
The cartridges are designed to cut specific types of food:
See Blade set list Page 1
Important
Prince Castle reserves the right to change specifications
and product design without notice. Such revisions do not
entitle the buyer to corresponding changes, improvements,
additions or replacements for previously purchased
equipment.
CAUTION
Please inspect the blades before and after every use.
Immediately stop using and replace the blade cartridge if the
blade shows signs of damage.
Specications
Approximate Dimensions and Weight
Height 23.0" (58.4 cm)
Width 16.4" (41.7 cm)
Depth 16.2" (41.1 cm)
Shipping Weight 30.0 lbs (13.6 kg)
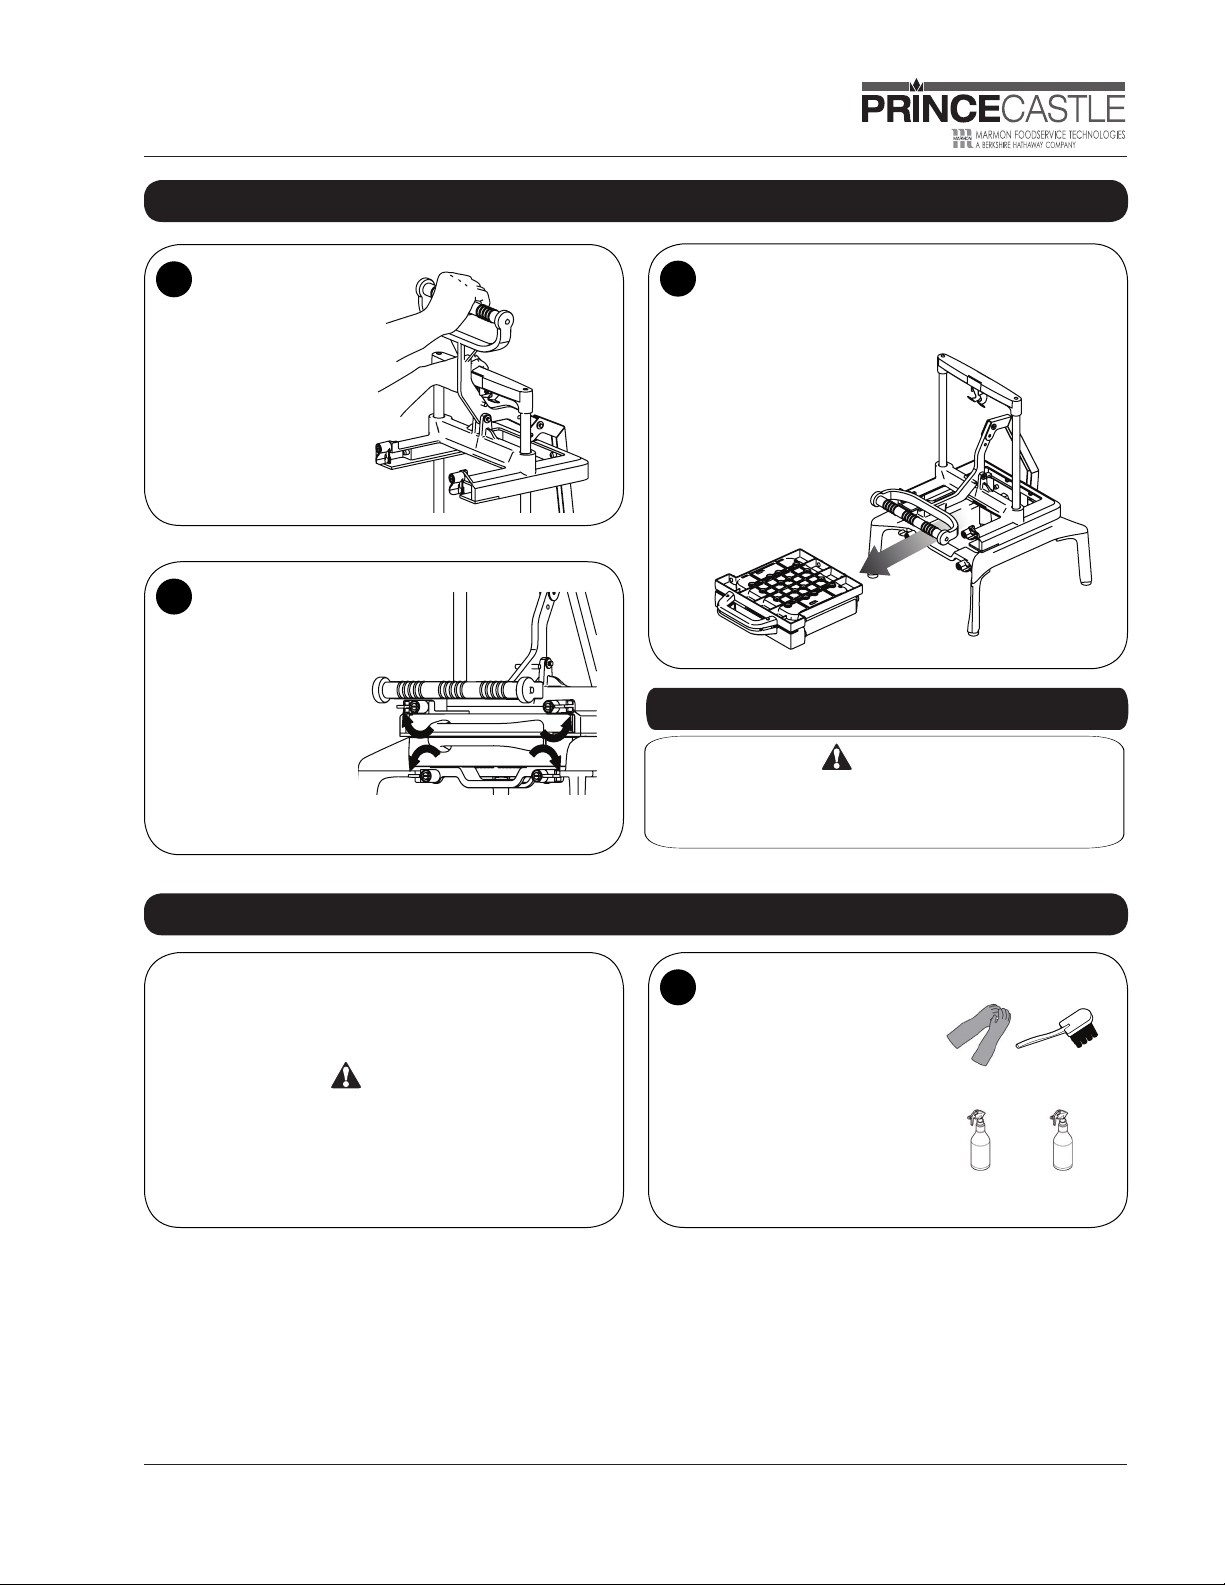
Remove the unit from the carton and inspect for
1
signs of damage. If there is damage to the unit:
• Notify carrier within 24 hours after delivery.
• Save carton and packing materials for inspection
purposes.
• Contact the Prince Castle Customer Sales Department
at 1-800-722-7853 to arrange for a replacement to be
sent.
Verify that all parts have been received.
2
• Chassis
• Cleaning Brush, P/N 980-043
• Blade sets as ordered
Printed in USA 04/17 © 2017
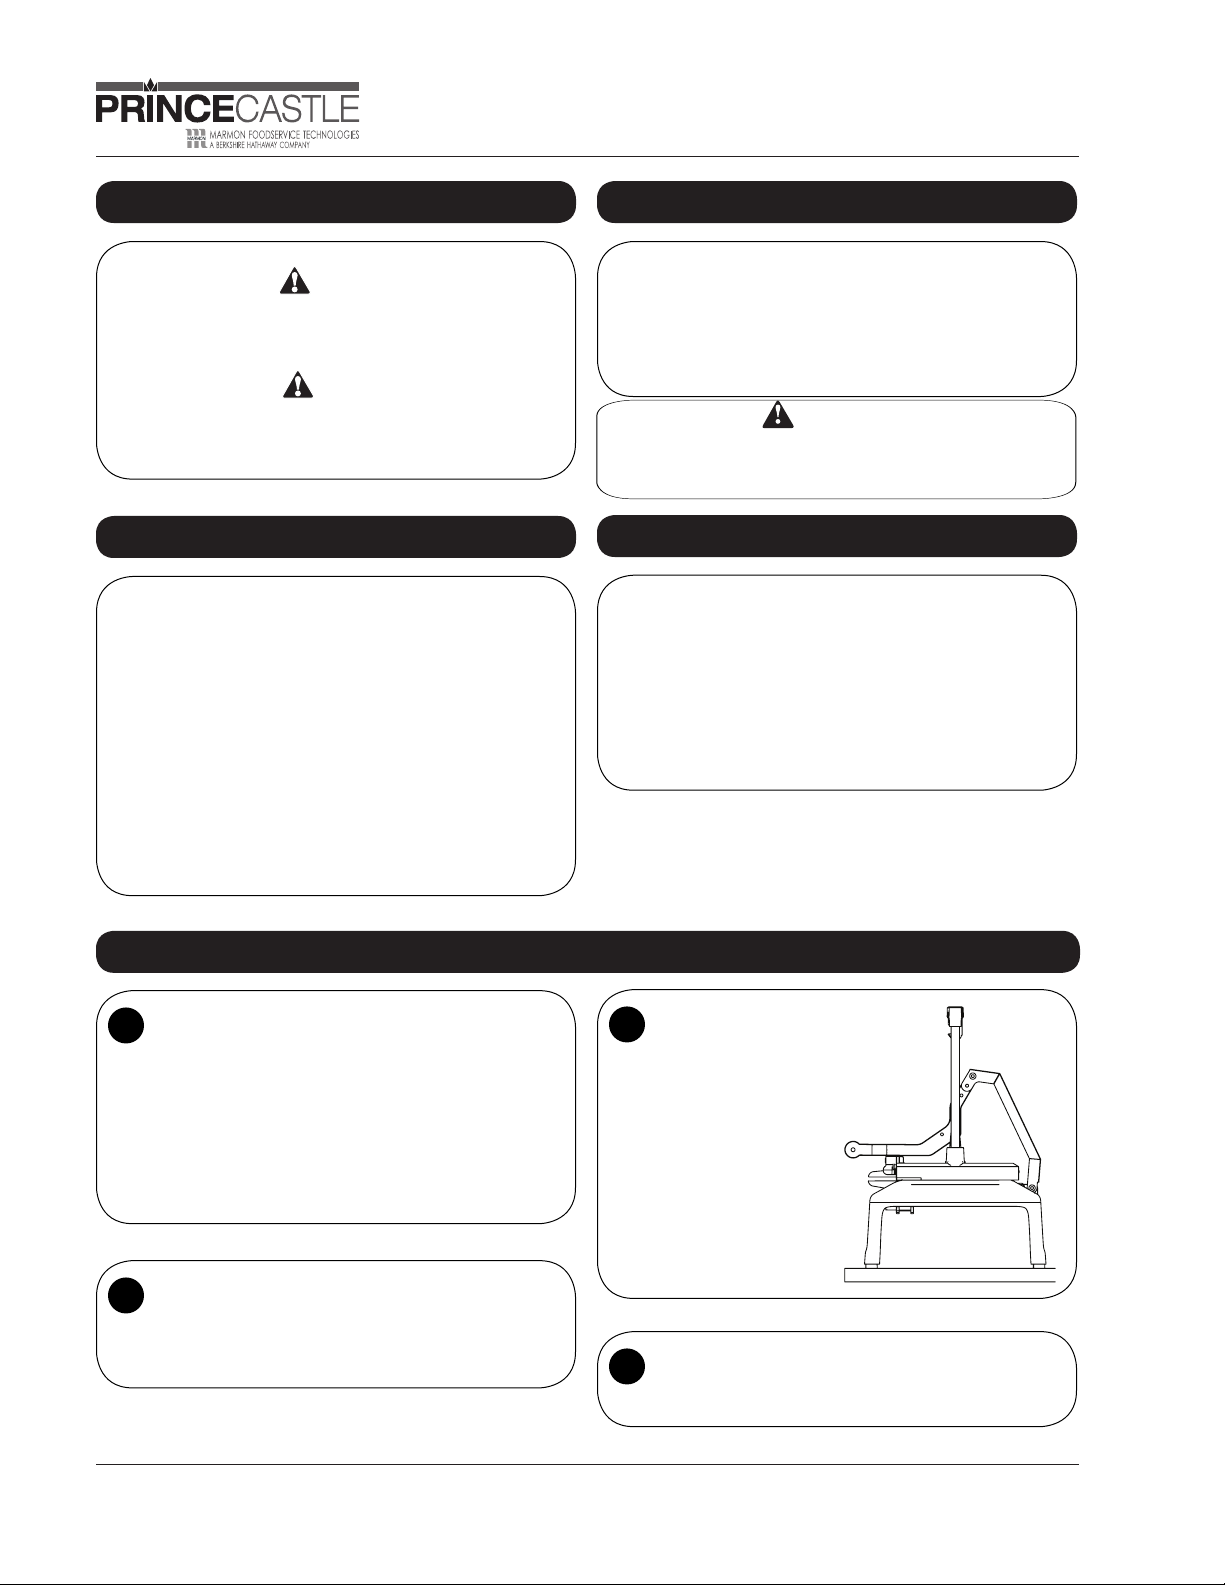
Installation
3
4
2
Place chassis on a
prep table or other at
surface.
Perform initial cleaning. Refer to the instructions under
Cleaning in this manual.
980-500 RevA-EN
Page 3
TM
Universal Slicer
Saber King™
Choosing and Inserting a Cartridge
CAUTION
Choose the red cartridge for tomatoes only and choose
the green cartridge for lettuce only. Use of the red or green
cartridges for other foods may damage the blades.
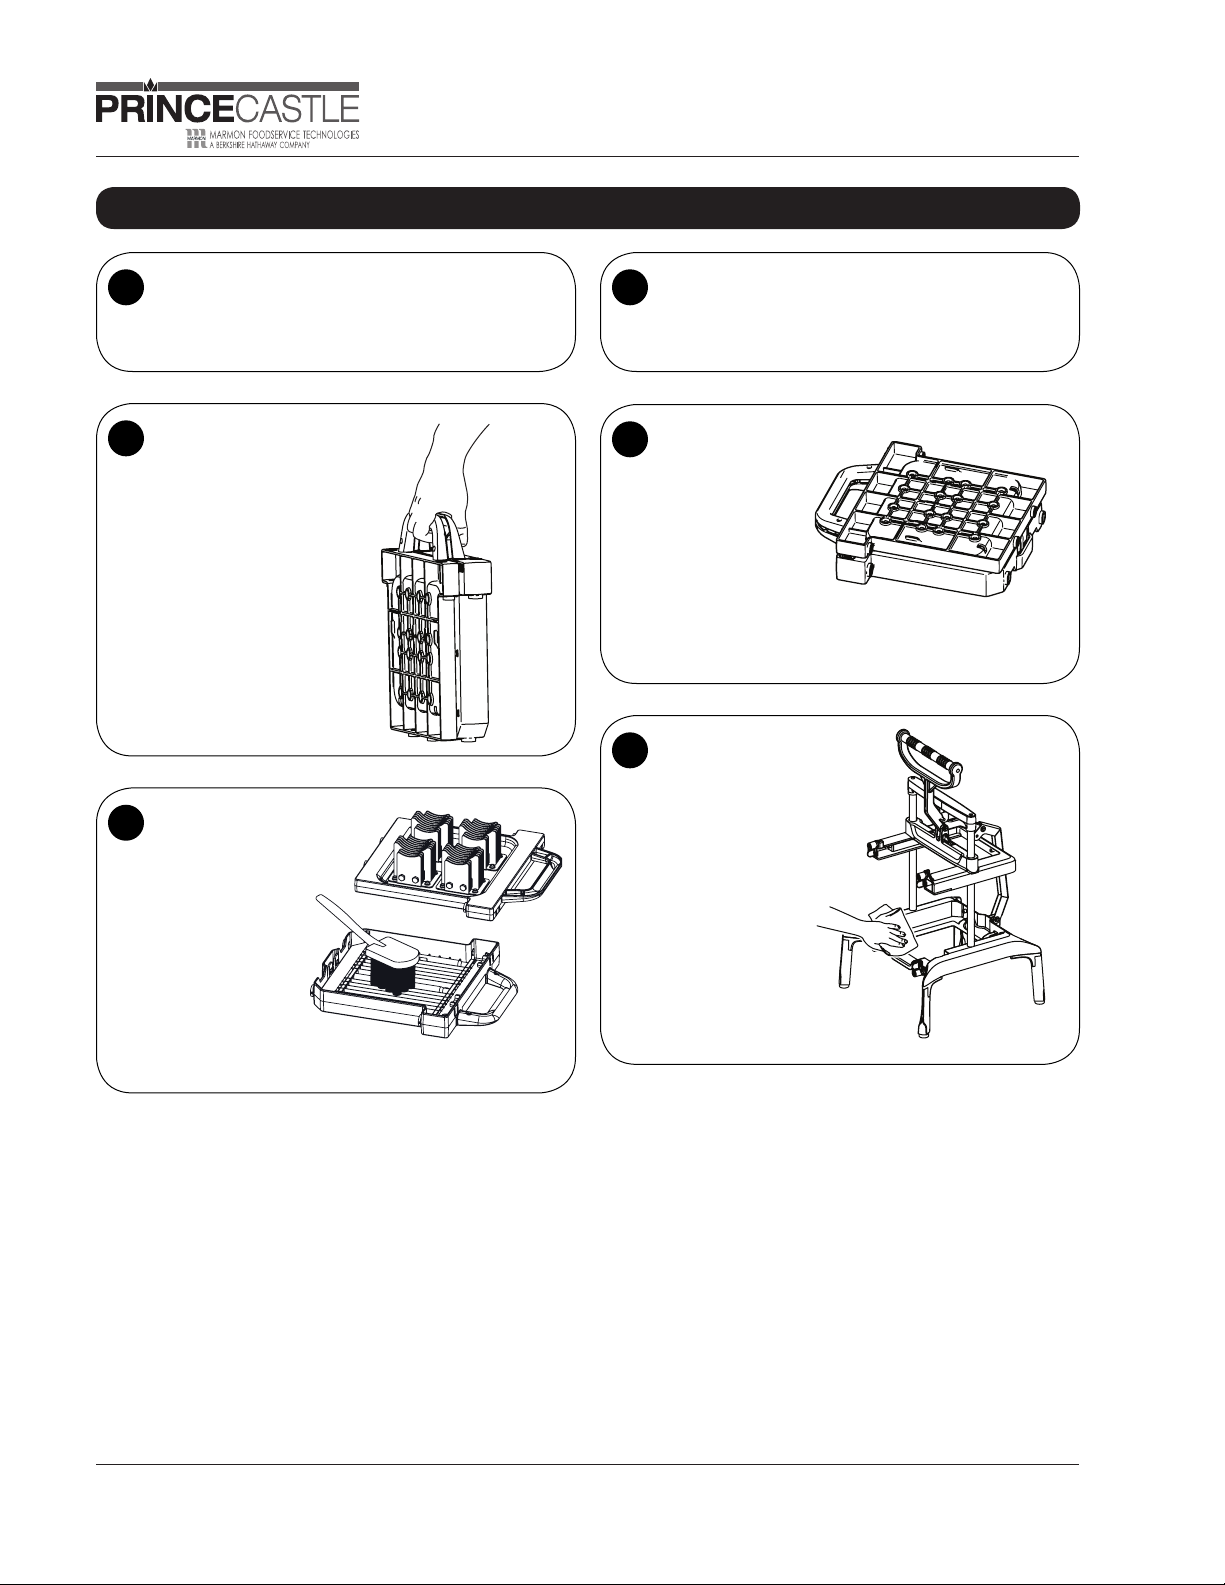
Choose the blade/pusher cartridge for the food
1
product you want to prepare. (see examples below)
980-000-12A – For slicing tomatoes.
980-000-33A – For cubing lettuce.
980-000-20A – For slicing onions and
980-000-43A – For shredding lettuce
NOTE: Cut lettuce head into quarters
Remove core.
other similarly textured foods.
before shredding.
Remove core.
Move the cartridge
3
locking pins to the
unlocked position.
Move the two upper
cartridge locking
pins and the two
lower cartridge
locking pins to their
horizontal positions
so the cartridge can
be inserted.
Holding the
4
pusher and blade
components
together as one
cartridge, insert
into the chassis.
With the pusher
component facing
up (solid face),
guide the sides
of the pusher
component into the
C-shaped channel
in the chassis. The
blade component
will automatically
be correctly
inserted.
Ensure the handle
2
on the chassis is
down. If necessary,
place one hand on
the handle and the
other hand on the
crossbar. Use your
thumb to open the
handle latch and
then pull the handle
down.
980-500 RevA-EN
Move the cartridge
5
locking pins to the
locked position.
Move the two upper
cartridge locking
pins and the two
lower cartridge
locking pins to their
vertical positions so
the components will
stay aligned in the
chassis.
CAUTION
The four locking pins must be in the locked position during
operation to prevent damage to the blades.
3
Printed in USA 04/17 © 2017
Page 4
TM
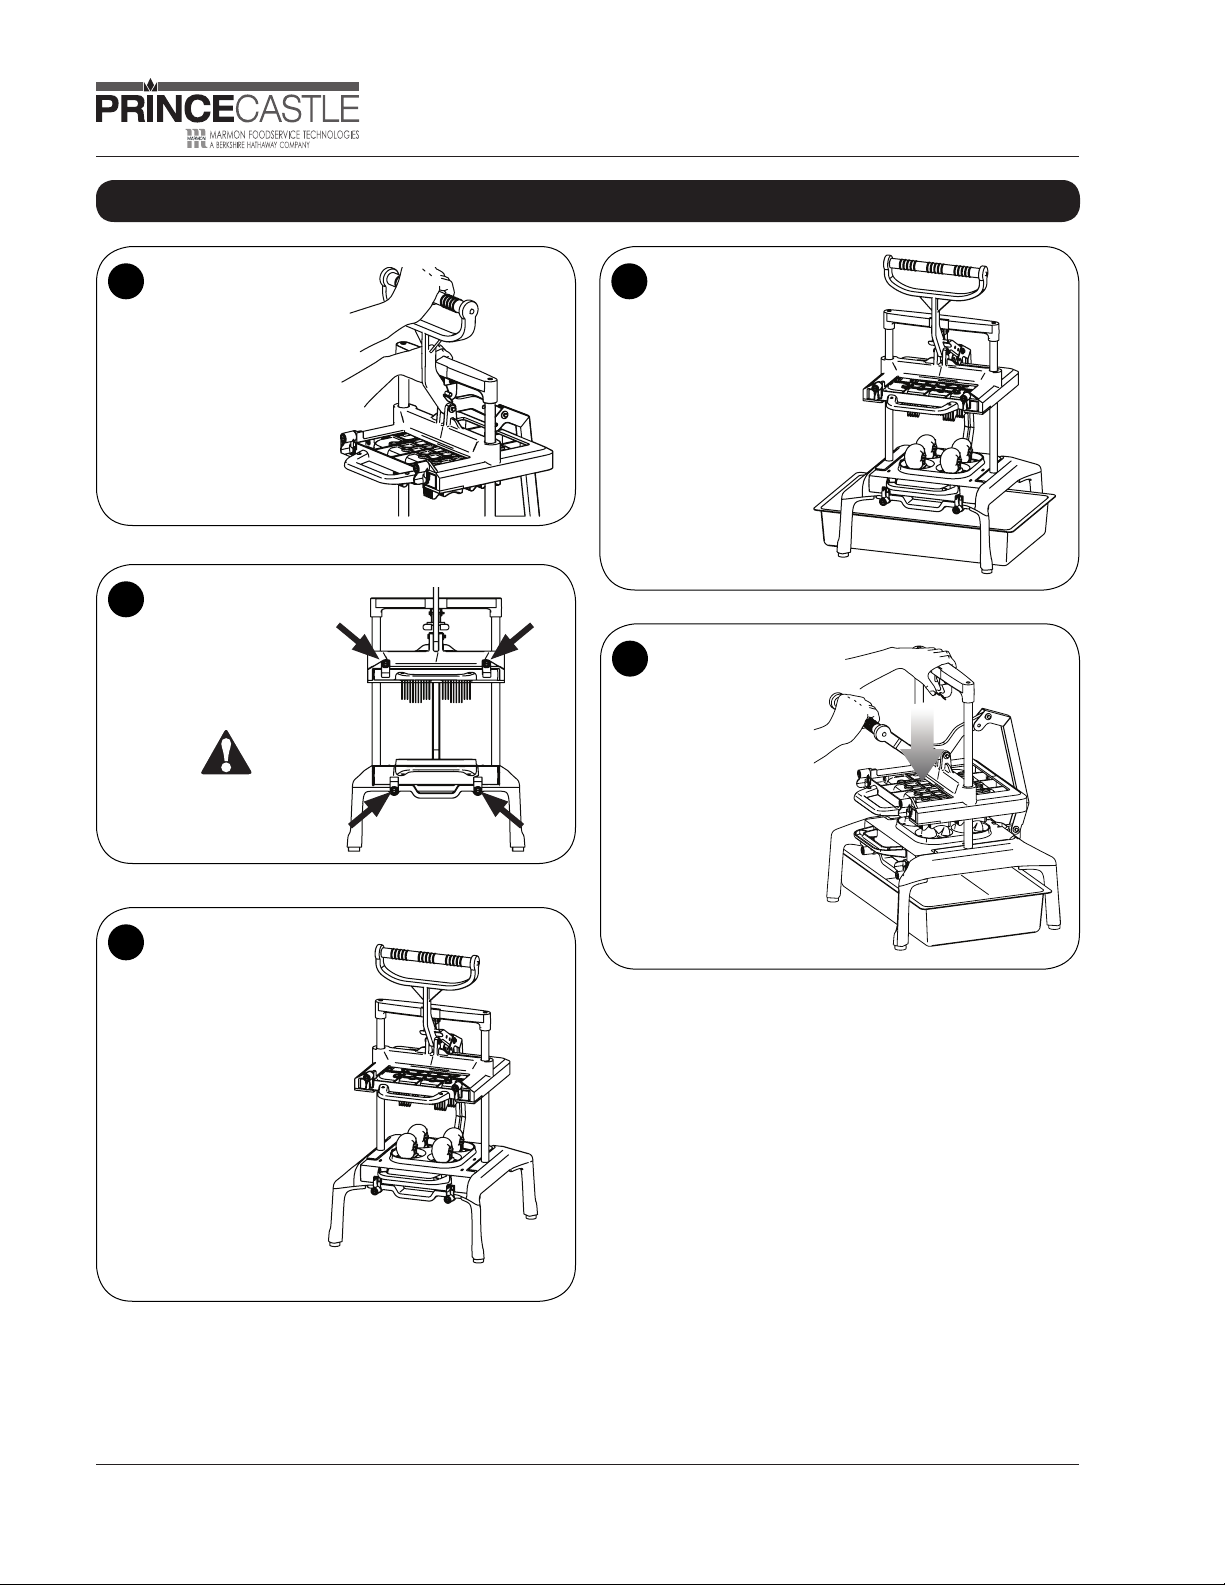
Operation
Universal Slicer
Saber King™
Ensure the handle
1
on the chassis is
up. If necessary,
place one hand on
the handle and the
other hand on the
crossbar. Pull the
handle up, and the
handle latch will hold
the handle in the “up”
position.
Ensure the
2
cartridge locking
pins are in the
locked (vertical)
position.
IMPORTANT
Put a pan or bowl
4
under the slicer to
catch the food as it
is cut.
Pull the handle on
5
the chassis down.
Place one hand on
the handle and the
other hand on the
crossbar. Use your
thumb to open the
handle latch and
then pull the handle
swiftly down.
Place the food
3
product onto the
blade component.
Shaped guides on
the red and white
cartridges indicate
how the food should
be positioned. For
tomatoes, make sure
to point their
stemmed ends
toward the right or
left to slice across
them correctly. The
white cartridge has
flat sides on the
shaped guide for
stemmed ends of
onions and other
similar foods.
Printed in USA 04/17 © 2017
4
980-500 RevA-EN
Page 5
TM
Universal Slicer
Saber King™
Removing a Cartridge
Ensure the handle
1
on the chassis is
down. If necessary,
place one hand on
the handle and the
other hand on the
crossbar. Use your
thumb to open the
handle latch and
then pull the handle
down.
Move the cartridge
2
locking pins to the
unlocked position.
Move the two upper
cartridge locking
pins and the two
lower cartridge
locking pins to their
horizontal positions
so the cartridge can
be removed.
Holding the pusher and blade components together
3
as one cartridge, remove from the chassis. Guide
the sides of the pusher component out of the C-shaped
channel in the chassis.
Inspect Blades and Pushers
CAUTION
Please inspect the blades before and after every use.
Immediately stop using and replace the blade cartridge if the
blades show sign of damage.
Daily cleaning will keep this universal slicer clean and free
from buildup.
CAUTION
Do not allow residual food juices to remain on the blade
component for long periods. A hard deposit may form on the
blades which is difficult to remove and will dull the blades.
980-500 RevA-EN
Cleaning
1
5
Gather tools and supplies you will need for cleaning.
• Cut-resistant gloves
• Three compartment sink
• Cleaning brush, P/N
980-021 Red/Green
• Cleaning brush, P/N
980-043 White/White
• Sanitizing solution
• Cleaning solution
Printed in USA 04/17 © 2017
Page 6
TM
Cleaning (continued)
Universal Slicer
Saber King™
Remove the blade/pusher cartridge from the
2
chassis. Refer to the instructions under Removing a
Cartridge in this manual.
Carry the blade/pusher
3
cartridge to the threecompartment sink.
Put on the cut-resistant
gloves. Separate the
blade and pusher
components.
Clean the blade
4
and pusher
components in
the sink. Using
the cleaning brush,
scrub off any
residue.
Rinse and sanitize the blade and pusher
5
components.
Assemble the
6
sanitized blade
and pusher
components. Let
the assembled
cartridge air dry.
Clean, rinse
7
and sanitize the
exterior surfaces
of the chassis.
Wipe the chassis
rst with a cleaning
solution, then with
clear water and
nally with sanitizing
solution. Let the
surfaces air dry.
NOTE: Blades
should only be
disassembled by
AUTHORIZED
FACTORY
personnel.
Printed in USA 04/17 © 2017
6
980-500 RevA-EN
Page 7
TM
Universal Slicer
Saber King™
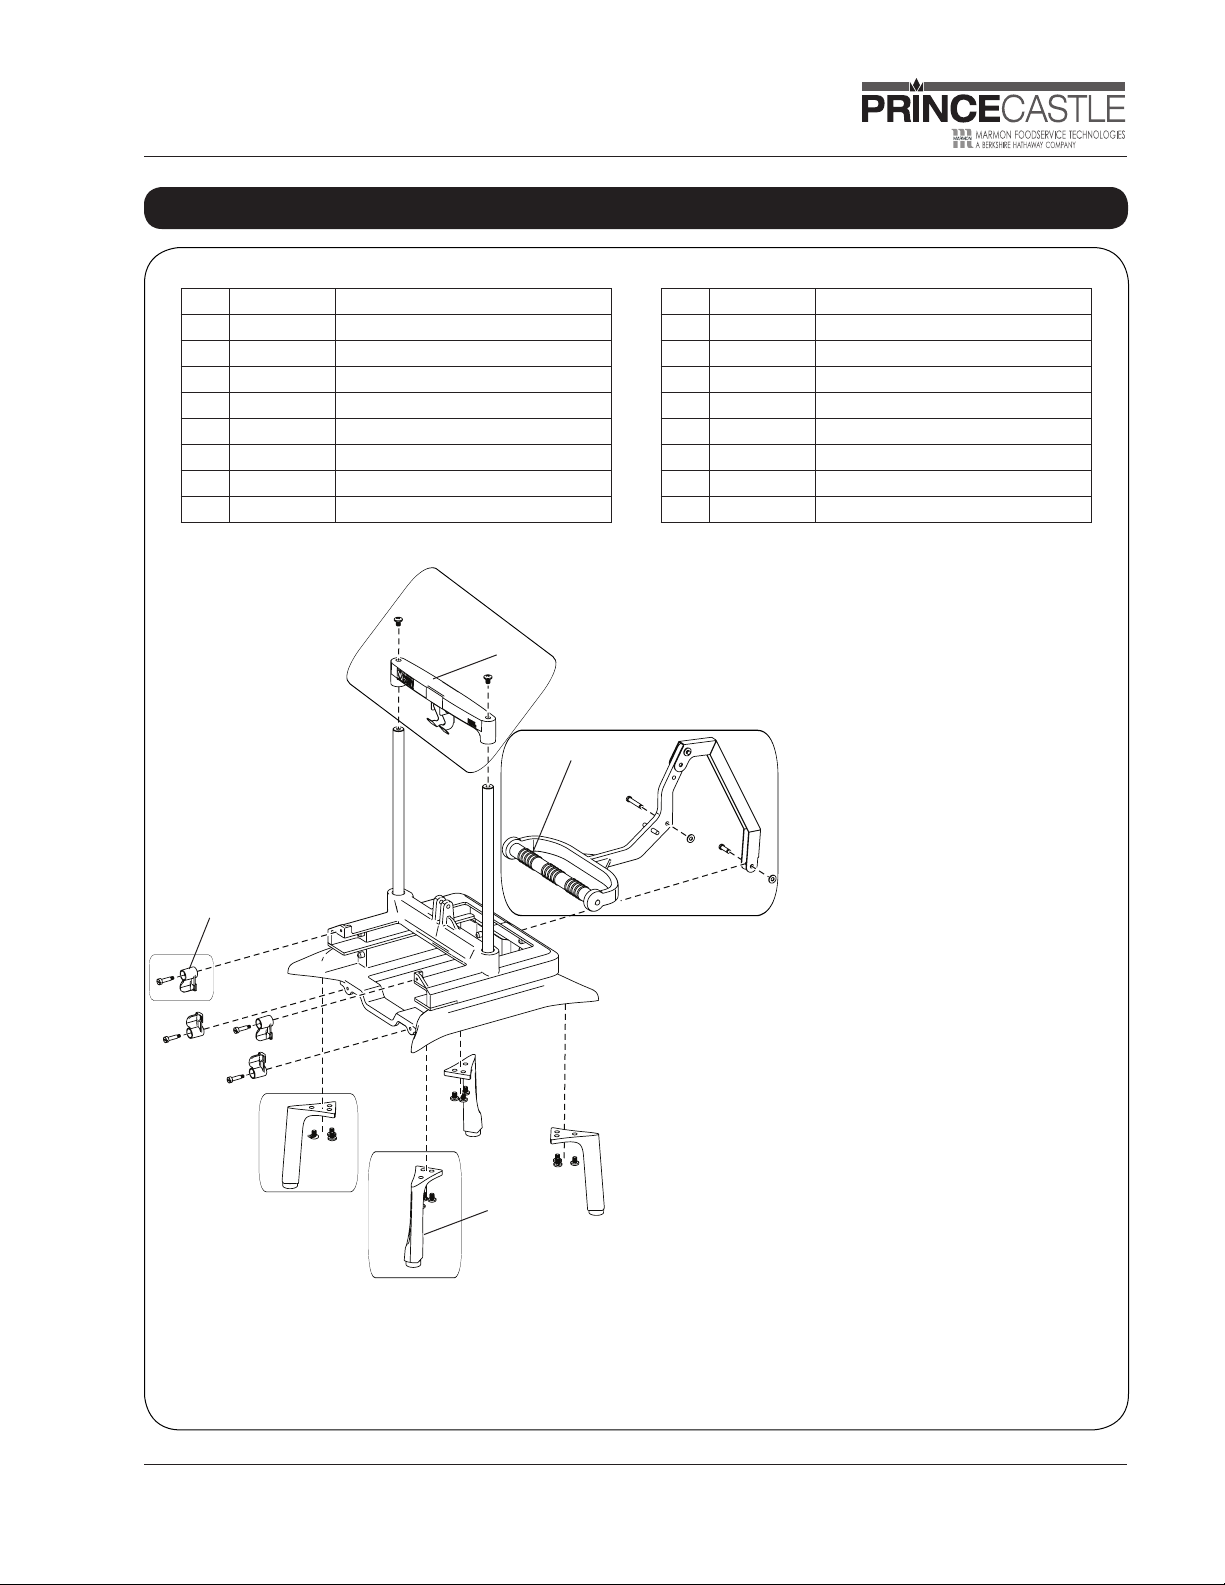
No. Part No. Description
1
980-REPL-001
2
980-REPL-002
3
980-REPL-003
980-REPL-005
4
980-REPL-006
5
6
980-REPL-007*
980-REPL-008*
7*
980-REPL-009*
8*
Exploded View and Parts List
Cross Bar / Latch Kit Leg Kit
Leg Kit
Thumb Latch Kit
Handle Linkage Assy Kit
Rubber Feet Kit
Linkage Pin Kit-Hardware
Suction Cup Kit-Feet
1/4" Tomato Blade Cover
1
SERVICE KITS
* Not Shown
No. Part No. Description
9*
980-REPL-010*
10*
980-REPL-011*
11*
980-REPL-012*
12*
980-REPL-013*
13*
980-REPL-014*
14*
980-REPL-015*
3/16" Tomato Blade Cover
Onion Blade Cover
Shredder /1x1 Blade
Dicer Blade Cover
1x2 Blade Cover
REPLACEMENT KIT - SPRING PINS
4
14
3
2
5
980-500 RevA-EN
7
Printed in USA 04/17 © 2017
 Loading...