

Page 1

Solid State Digital Energy Saving Toaster
Prince Castle Model No. 411-SDFM85CE and 411-SDFM11CE Series
This equipment chapter is to be placed in the toasters
section of your
TOLL FREE NUMBER: 1-800-323-2930
Warranty . . . . . . . . . . . . . . . . . . . . . . . . . . . . . . . . . . . . . . . . . . . . . . . . . . . . . . . . . . . . . . . . . . . . . . . . . . . . . Page 1
Specifications . . . . . . . . . . . . . . . . . . . . . . . . . . . . . . . . . . . . . . . . . . . . . . . . . . . . . . . . . . . . . . . . . . . . . . . . . Page 2
Toaster Conversion . . . . . . . . . . . . . . . . . . . . . . . . . . . . . . . . . . . . . . . . . . . . . . . . . . . . . . . . . . . . . . . . . . . . Page 2
Front and Side Views . . . . . . . . . . . . . . . . . . . . . . . . . . . . . . . . . . . . . . . . . . . . . . . . . . . . . . . . . . . . . . . . . . . Page 3 – 4
Internal Views . . . . . . . . . . . . . . . . . . . . . . . . . . . . . . . . . . . . . . . . . . . . . . . . . . . . . . . . . . . . . . . . . . . . . . . . . Page 5
Equipment Set-Up . . . . . . . . . . . . . . . . . . . . . . . . . . . . . . . . . . . . . . . . . . . . . . . . . . . . . . . . . . . . . . . . . . . . . Page 6
Programming . . . . . . . . . . . . . . . . . . . . . . . . . . . . . . . . . . . . . . . . . . . . . . . . . . . . . . . . . . . . . . . . . . . . . . . . . Page 8
Cleaning . . . . . . . . . . . . . . . . . . . . . . . . . . . . . . . . . . . . . . . . . . . . . . . . . . . . . . . . . . . . . . . . . . . . . . . . . . . . . Page 9
Troubleshooting . . . . . . . . . . . . . . . . . . . . . . . . . . . . . . . . . . . . . . . . . . . . . . . . . . . . . . . . . . . . . . . . . . . . . . . Page 10
Wiring Diagram . . . . . . . . . . . . . . . . . . . . . . . . . . . . . . . . . . . . . . . . . . . . . . . . . . . . . . . . . . . . . . . . . . . . . . . . Page 10
Rice Burger Grill Cleaning Procedure . . . . . . . . . . . . . . . . . . . . . . . . . . . . . . . . . . . . . . . . . . . . . . . . . . . . . Page 11 – 12
Equipment Manual
.
MANUFACTURED FOR
McDONALD’S
®
BY PRINCE CASTLE INC.
355 KEHOE BLVD.
CAROL STREAM, IL 60188 USA
PHONE: 1-630-462-8800
FAX:1-630-462-1460
TABLE OF CONTENTS
LIMITED WARRANTY
This product is warranted to be free from defects in material and/or workmanship for a period of (2) years from date of
original installa tion not t o exceed 30 months from date of shi pm ent fr om o ur fac to r y. Pri nted ci rcu it bo ards and platen are
warranted for a period of (3) years from date of original installation not to exceed 42 months from date of shipment from
our factory for parts and labor only. Any part or component which proves to be faulty in material and/or workmanship
within the warranty period will be replaced or repaired without cost to the customer for parts or labor (at the option of
Prince Castle, Inc.).
This warranty is subject to the following exceptions/conditions:
• Any use of Non-genuine Prince Castle spare parts voids this warranty, and all work must be performed by an
authorized Prince Castle Serv ice Agent.
• All labor should be performed during regular working hours. Overtime premium will not be covered.
• Travel charges are limited to 100 miles (200 km) round trip, 2 hours travel time, one trip per repair.
• Damage caused by carelessness, neglect, and/or abuse (e.g., using wrong current, dropping, tampering with or
altering electrical components, or improper cleaning) is not covered.
• Equipment damaged in shipment, by fire, flood or an act of God.
This manual is for the exclusive use of licensees and employees of McDonald’s Systems, Inc.
411-561revB Printed in USA 4/06 © 2006
Page 2

Specifications
411-SDFM85CE 230VAC 3990W 50 HZ
411-SDFM11CE 230VAC 3990W 50 HZ
Toasters 411-SDFM11CE (11 mm spacer pins for rice
cakes) and 411-SD FM 85 CE ( 8 .5 mm spa cer p ins fo r
pitas) are designed to heat and toast thin product in the
center section between the upper an d lo w er pl a t en s.
The 411-SDFM85CE will provide an 8.5 mm center
gap at the -R/Q, R/Q, and +R/Q stop block window
setting while maintaining the standard gap between
base and lower platen at these three settings. This
allows both pitas (in the center section) and chicken
sandwich buns (in the lower section) to use the sa me
stop block setting. The 411-SDFM11CE will provide an
11 mm gap at all except the _RIB, RIB, and +RIB
settings, but the gap bet ween the base and the lower
platen will not be the same as a standard
411-SDFMCE. Making the conversion in these
instructions will give both toaste rs the same ce nter and
bottoms gaps as a standard 411-SDFMCE.
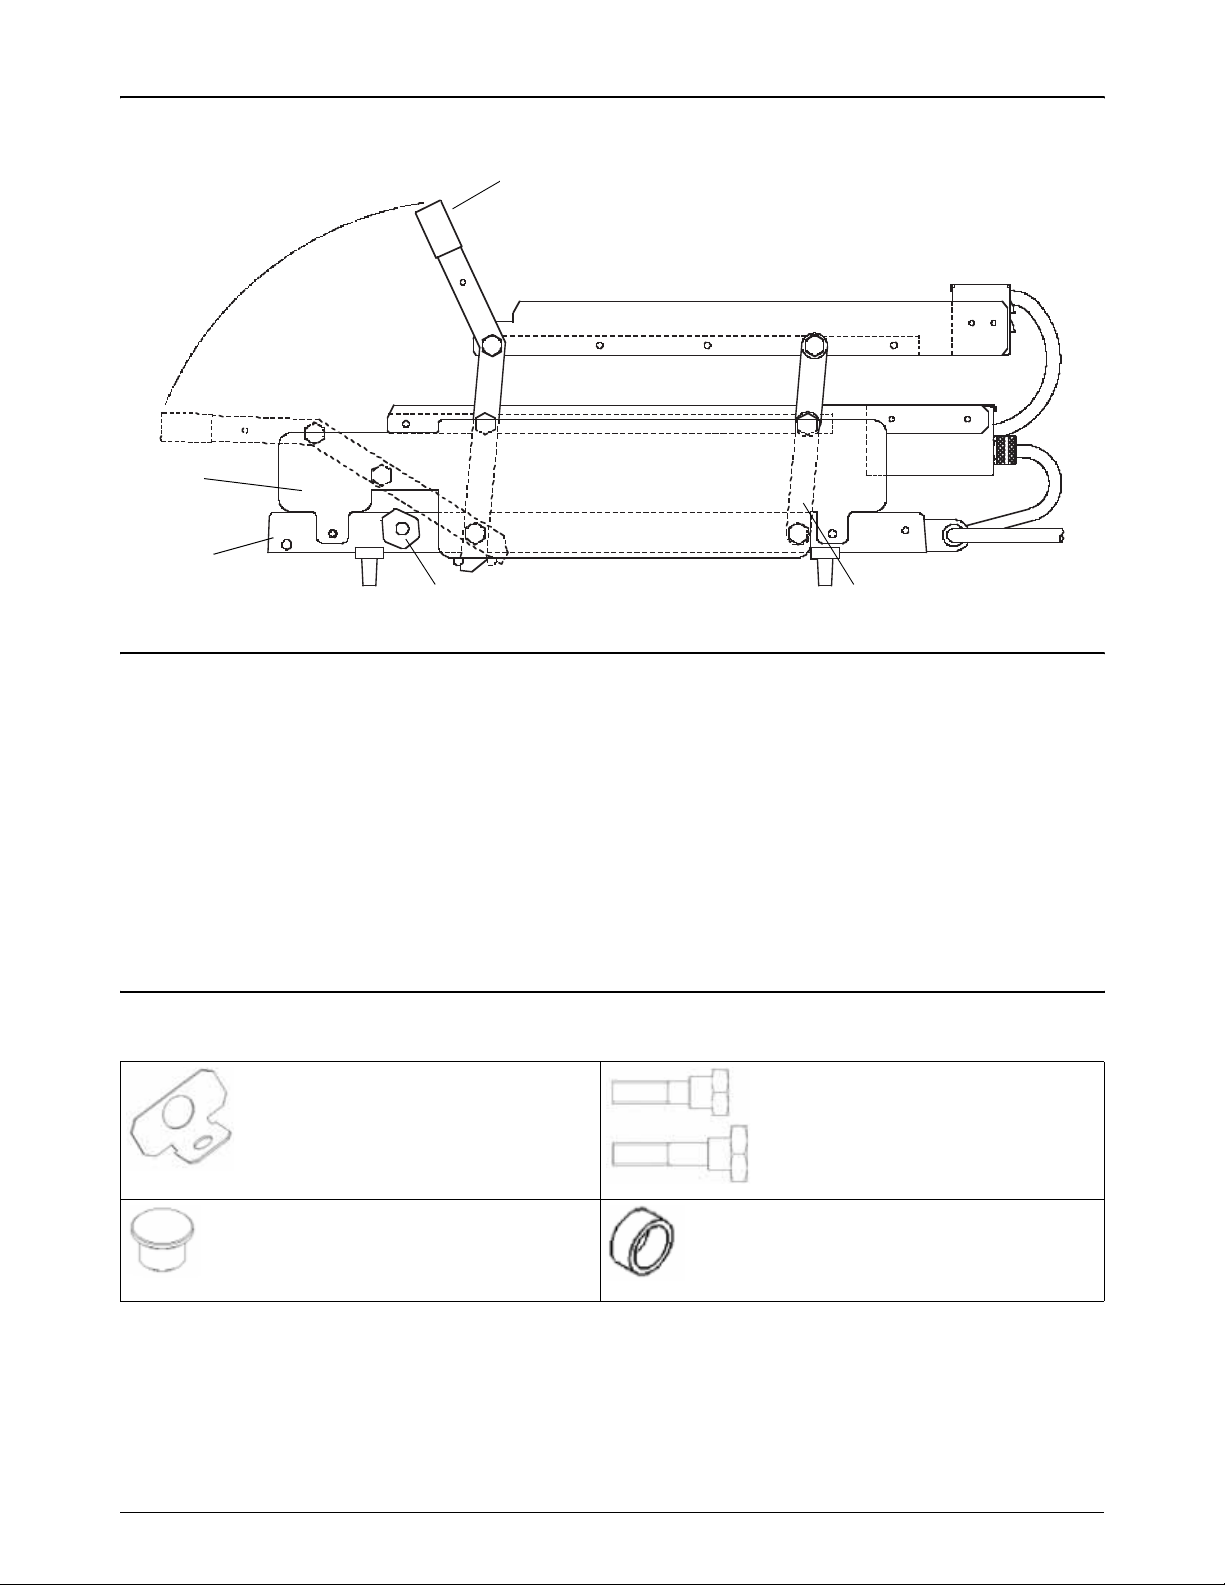
Conversion Instructions for
411-SDFM11CE and 411-SDFM85CE
Toasters
If desired, these toasters may be converted to a typical
Big Mac toaster 411-SDFMCE. After conversion the
center gap will vary from 11 to 23 mm depending on
the stop block set ting just as it does with older 411
series Big Mac toasters .
To convert to Big Mac toasting, only the upper platen
needs to be moved. Pl atens must be cool before
converting. It is best to change the two rear studs first.
Then change the two front studs.
Rear studs:
• Raise the front handle to the upper position and latch
the red strap to its mating pin o n the handle.
• Support the upper platen at the back so it does not
fall.
• Remove the two upper rear studs.
• Keep and store the two spacer pins in case you wish
to convert back to the 8.5 or 11 mm ga ps in the
future.
• Move the rear studs to the upper holes in the rear
link.
• Mount the rear hexagonal spacers onto the studs.
• Mount the spacer pin mounting br ackets ont o th e
spacers. These brackets are needed to cover the
vacant holes exposed when the stud is moved.
• Screw the studs into the forward holes at the rear of
the upper platen. Tighten studs.
Front studs:
• Raise the pl atens to their upper positions and latch
the red strap to its mating pin on the handle.
• Support the upper platen at th e front so it does not
fall.
• Remove the two upper front studs.
• Keep and store the two spacer pins and stud
bearings in case you wish to convert back to the 8.5
or 11 mm gaps in the future.
• Move the front studs to the upper holes in the front
handle assembly.
• Mount the front hexagonal spacers onto the studs.
• Mount the spacer pin mounting br ackets ont o th e
spacers. These brackets are needed to cover the
vacant holes exposed when the stud is moved.
• Screw the studs in to the f o rwa rd holes at the f ront of
the upper platen. Tighten studs.
The light sensor that begins the timing period has been
adjusted at the factory to work properly at both pla ten
positions. If, for some reason, it does not work properly
a service agent should adjust it. This adjustment needs
to be done when the toaster is operating and hot. Only
a service agent should do this.
Printed in USA 4/06 © 2006 2 411-561revB
Page 3
Side View
5
4
1
3
Parts List
Item Part Number Description
1 411-829S Handle and Lever Assy.
2 411-459S Lower Rear Lever Assy.
3 411-137 Right Hand Stop Block
411-138 Left Hand Stop Block
4 411-2S Base
5 411-256 Side Panel, Right Hand
411-257 Side Panel, Left Hand
Not Shown 411-114S Safety Latch
Not Shown 411-744 Bun Board
Not Shown 411-833S Upper Rear Lever Assy.
Conversion Parts
411-812
Spacer Pin Bracket
2
411-147S
Upper Platen Rear Stud
411-838S
Upper Platen Front Stud
411-813
8.5 mm Spacer Pin (pita)
411-771
11 mm Spacer Pin (rice cake)
411-561revB 3 Printed in USA 4/06 © 2006
62-033S
Bearing
Page 4
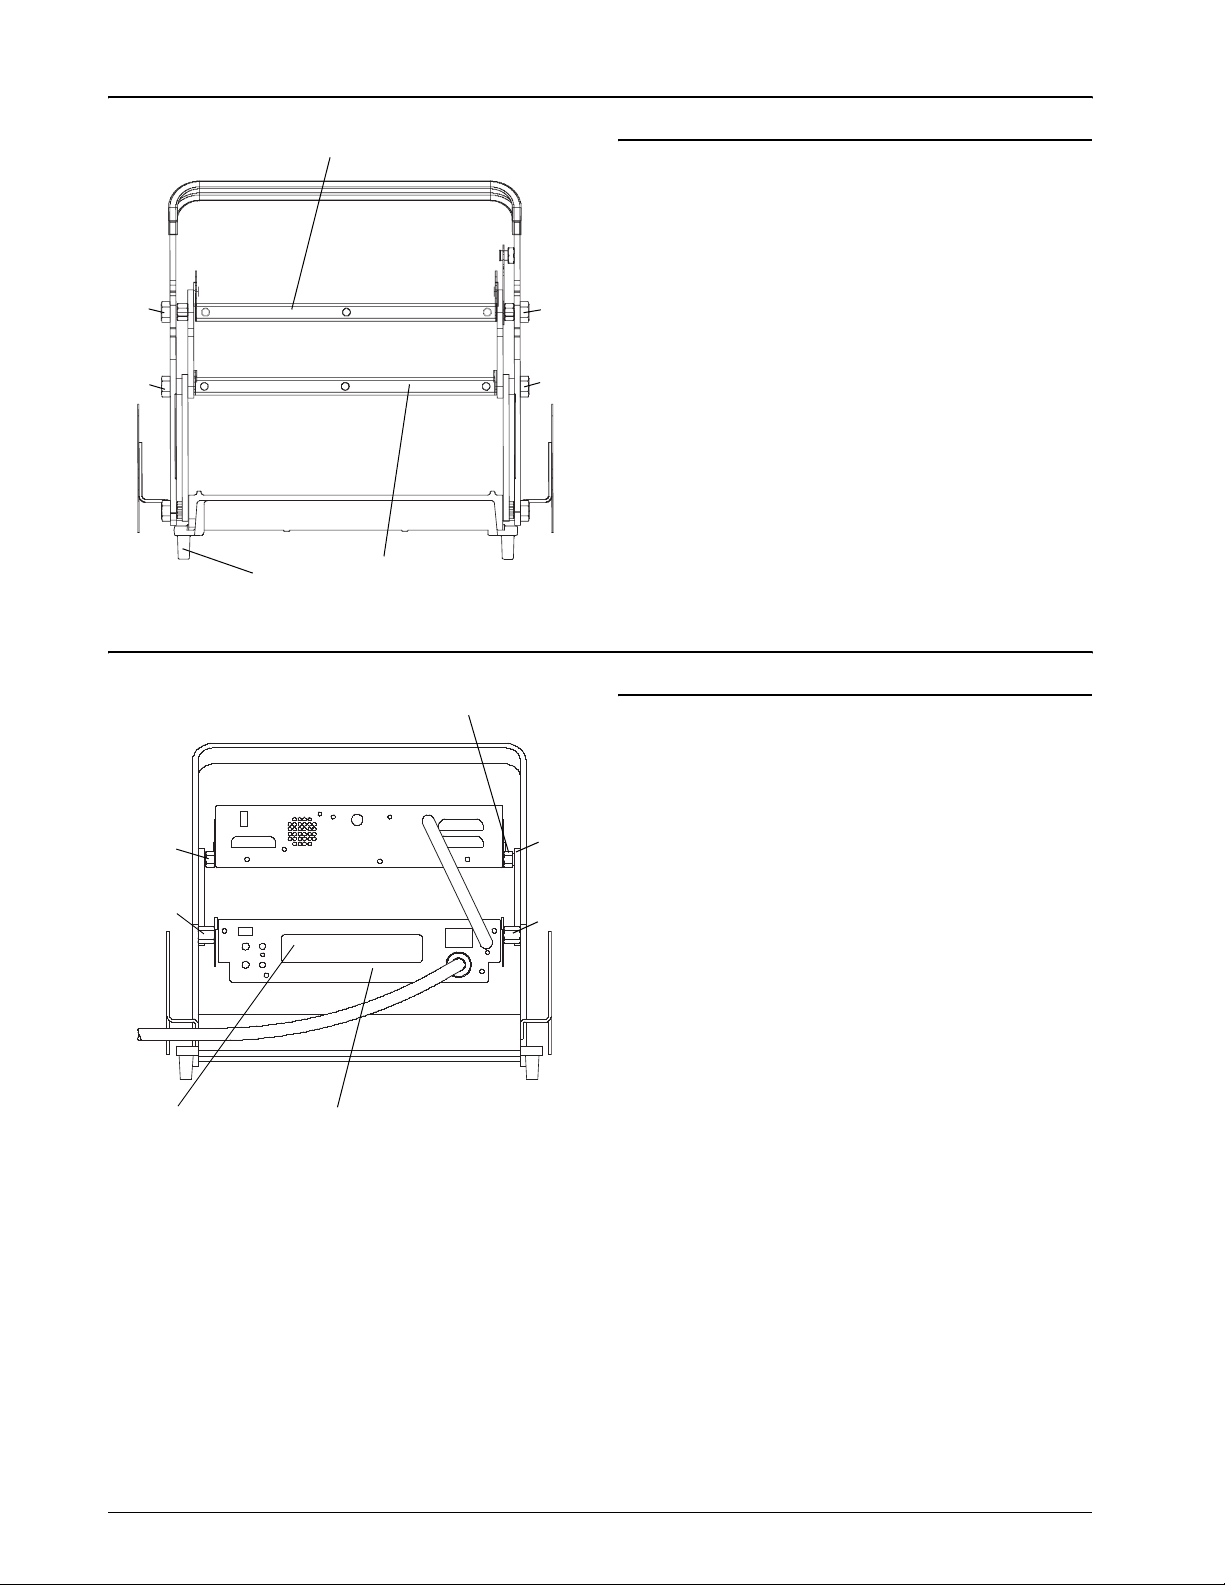
Front View
1
1
O
2
Parts List
Item Part Number Description
1 411-416 S Upper Platen 230V
2 411-838S Front Upper Platen Stud
3 411-60S Front Lower Platen Stud
2
4 411-486 S Lower Platen 230V
5 89-959S Foot (Pkg. of 4)
3
Rear View
2
3
3
5
4
Parts List
Item Part Number Description
1 411-770S Front Upper Platen
Spacers
2
3
2 411-147S Rear Upper Platen Studs
411-775S Rear Upper PLaten
Spacers
3 411-61S Rear Lower Platen Studs
411-113S Front Lower and Base
Platen Spacer Kit
411-57S Rear Lower Spacers
Not Shown 411-347S Base Studs
verlay (see Control Board, Page 5)
Printed in USA 4/06 © 2006 4 411-561revB
Page 5
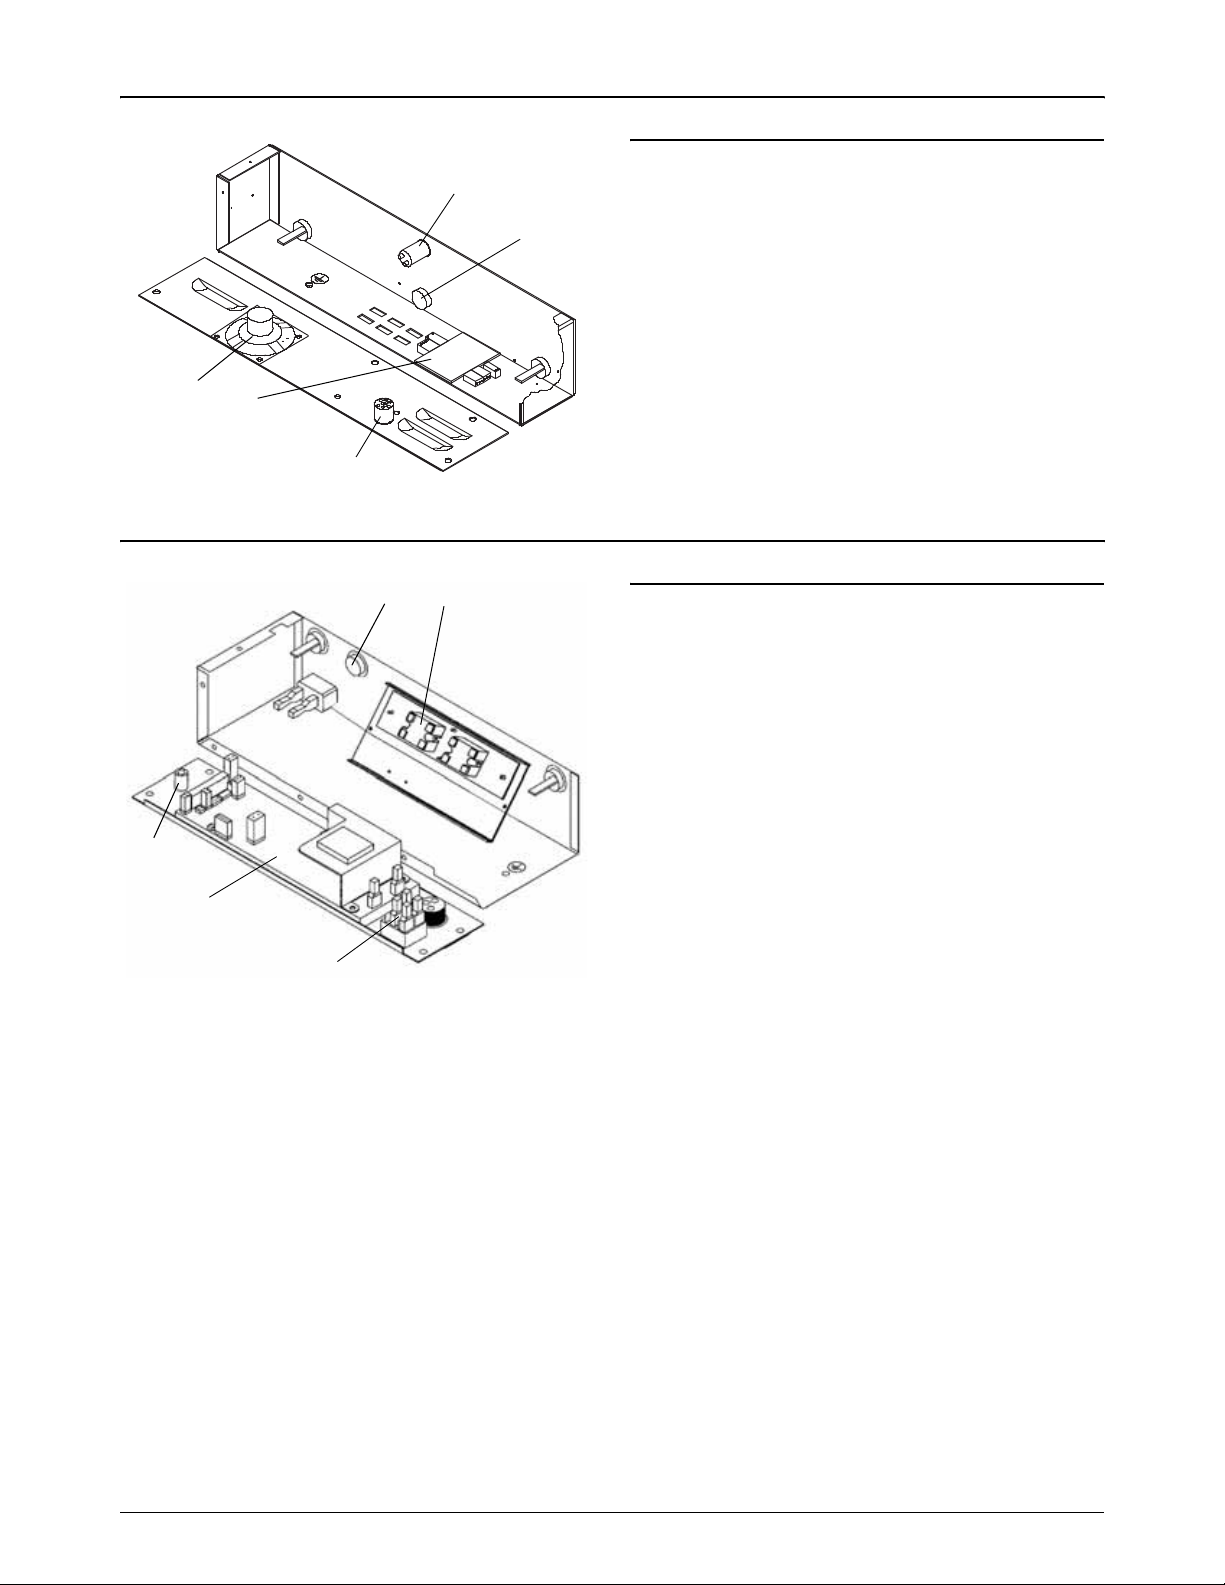
Internal View Upper Control Box
2
1
1
5
4
3
Internal View Lower Control Box
Parts List
Item Part Number Description
2
1 213-257S Bun Done Light
2 411-698S Upper Probe
3 411-682S Interconnect Cable
4 411-839S Interconnect Board
5 213-229S Speaker
Parts List
Item Part Number Description
1 65-058S Relay, Lower and Upper
2 411-698S Probe
3 72-301S Power Cord 220 – 230V
4 78-166S Rocker Switch
5 411-427-09S Control PCB 220 – 230V
3
5
4
411-561revB 5 Printed in USA 4/06 © 2006
Page 6

Symbols and Terms
Equipment Set-Up
C - - A
F - - A
A L -
Toaster is set on Celsius.
Toaster is set on Fahrenheit.
Alarm Level setting 1 – 4.
Sound Button: Used with timer button and
temperature button to set alarm level.
Timer Button: Used to view time in run mo de.
Used to set time in program mode.
Temperature Bu tt on : U se d to view se t po in t
temperature in run mode, and used to set the
set point temperature in program mode.
Up Arrow: Used to set time, sound and
temperature in program mode.
Down Arrow: Used to set time, sound an d
temperature in program mode.
Energy Saving Mode
To conserve energy during non-toasting periods, pull
the toaster handle down, so that the timing cycle
activates. When the audio alarm goes off, indicating
that the toasting time is complete,
handle up. Allow the audio al arm to sound until the
alarm shuts off, the display will alternately flash
“Stand”
energy saving mode. The toaster platens will continue
to maintain the programmed operating temperature.
Raising the toaster handle will put the toaster back into
the operation mode.
and
“By”
, indicating the toaster is in the
DO NOT
pull the
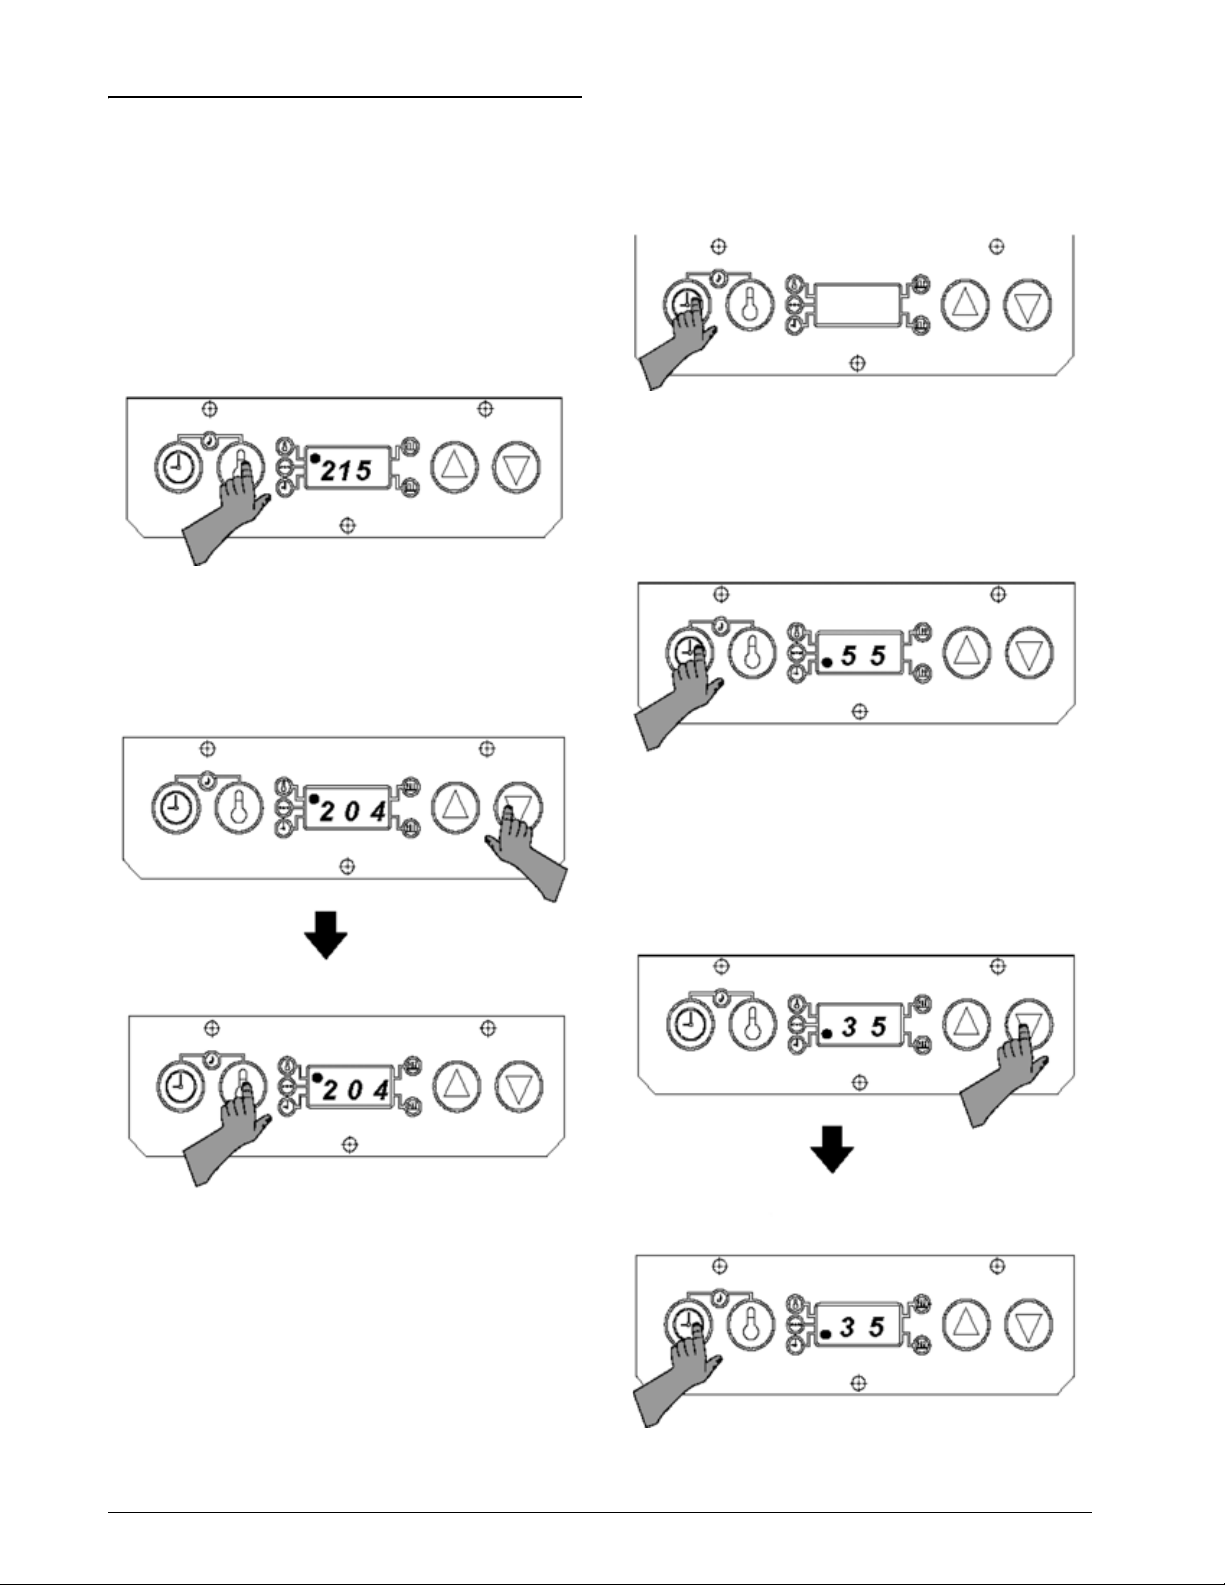
1. Refer to the nameplate on the control box for the
proper operating voltage. Connect the toaster to a
grounded receptacle that matches the nameplate
voltage information. Press the power switch to the
on position, allow the unit 30 minutes to reach
operating temperature.
2. The toaster is factory-set to display temperature
readings in Celsius. When the toaster is turned
on, the digital display on the control box will read
C - - A
for Celsius, and the “A” will begin to count
down 9 seconds. During this countdown, you can
change the temperature display from Celsius to
Fahrenheit
display, press and hold the temperature button for
six seconds. See figure 1.
figure 1
3. During the pre-heat cycle, the display will read
LO-
149°C (300°F), the display will begin to show the
actual platen temperature throughout the toasting
cycles. See figure 2.
figure 2
readings. To change the temperature
. When the platen temperature reaches
Factory Pre-Set
Prince Castle’s Solid State Digital Display toasters are
pre-set at the fac tory.
Model 411-SDFM85CE is set for a 35 second toast
time and the temperature is pre-set and calibrated to
215°C.
Model 411-SDFM11CE is set for a 100 second toast
time and the temperature is pre-set and calibrated to
249°C.
Printed in USA 4/06 © 2006 6 411-561revB
Page 7
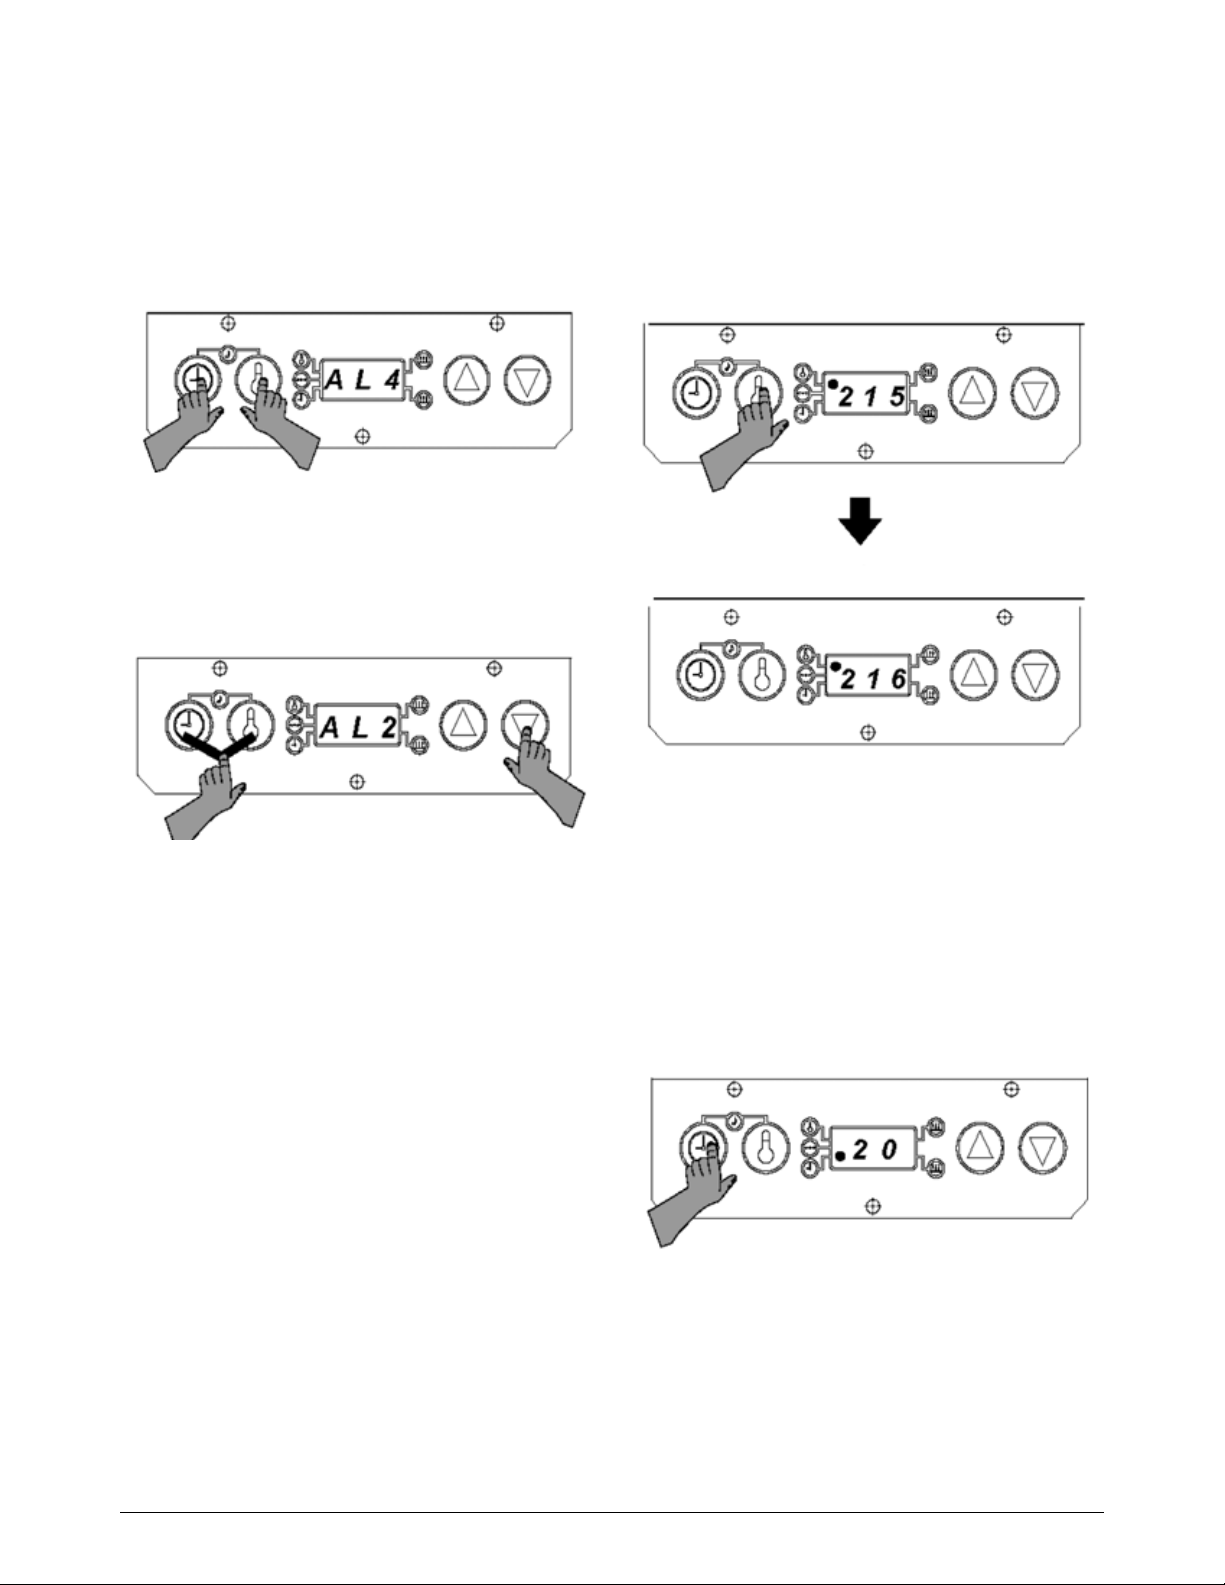
Sound Level Adjustment
Set Point Tempera ture
The audio alarm has four sound levels.
1. Press and hold the time and temperature buttons
simultaneously. The display will show the current
sound level. The toasters are factory set at level 4,
and the display will read,
See
figure 3
.
figure 3
2. While holding the time and temperature buttons,
press the up or down arrow button to adjust the
sound level. A continuous tone will sound.
Release all buttons when the desired sound level
is reached. The display will show the current
sound level. See figure 4.
figure 4
A L 4
for Alarm Level 4.
View Set Point Temperature
Press and release the temperature button. (Do not hold
for more than 6 seconds.) A beep will sound, the
temperature indicator will turn on, and the display will
show the set point temperature for three seconds. The
display will then change to show the actual
temperatu re. See
figure 5
figure 5
Actual Temperature
.
View Timer Setting
Press and release the time button. (Do not press the
time button for more than 6 seconds.) The set time
will be displayed for three seconds. If the timer is
activated and is in a count-down sequence, the time
remaining will be displayed, and will continue to count
down to zero. After three seconds, the display will
change to show actual platen temperature. See
figure 6.
figure 6
Set Time
411-561revB 7 Printed in USA 4/06 © 2006
Page 8
Programming
The programming modes are used for setting
individual set point temperature, and setting toast
times.
Programming the Set P oint Temper ature
1. Press and hold the temperature button for six
seconds. A beep will sound, the temperature
indicator light will blink, and the display will show
the current set point temperature. See figure 7.
figure 7
2. To change the set point temperature, use the up
or down arrow. Once the desired temperature is
displayed, press the temperature button to store
the new setting. See figure 8.
figure 8
Adjust Set Point Temperature
3. To cancel the set point programming mode at any
time, press and release the time button. The
display will change to show the actual platen
temperature. See figure 9.
figure 9
Programming Toast Times
1. Press and hold the time button for 6 seconds. A
beep will sound, and the time indicator light will
blink. Release the time button to show the current
toast time. See figure 10.
figure 10
Store Set Point Temperature
2. Use the up and down arrow buttons to set your
desired toast time. The range is from 20 seconds
to 1 minute, 30 seconds. When the desired time is
reached, press and release the time button to
store the new time. See figure 11.
figure 11
Setting the New Time
Storing the New Time
Printed in USA 4/06 © 2006 8 411-561revB
Page 9
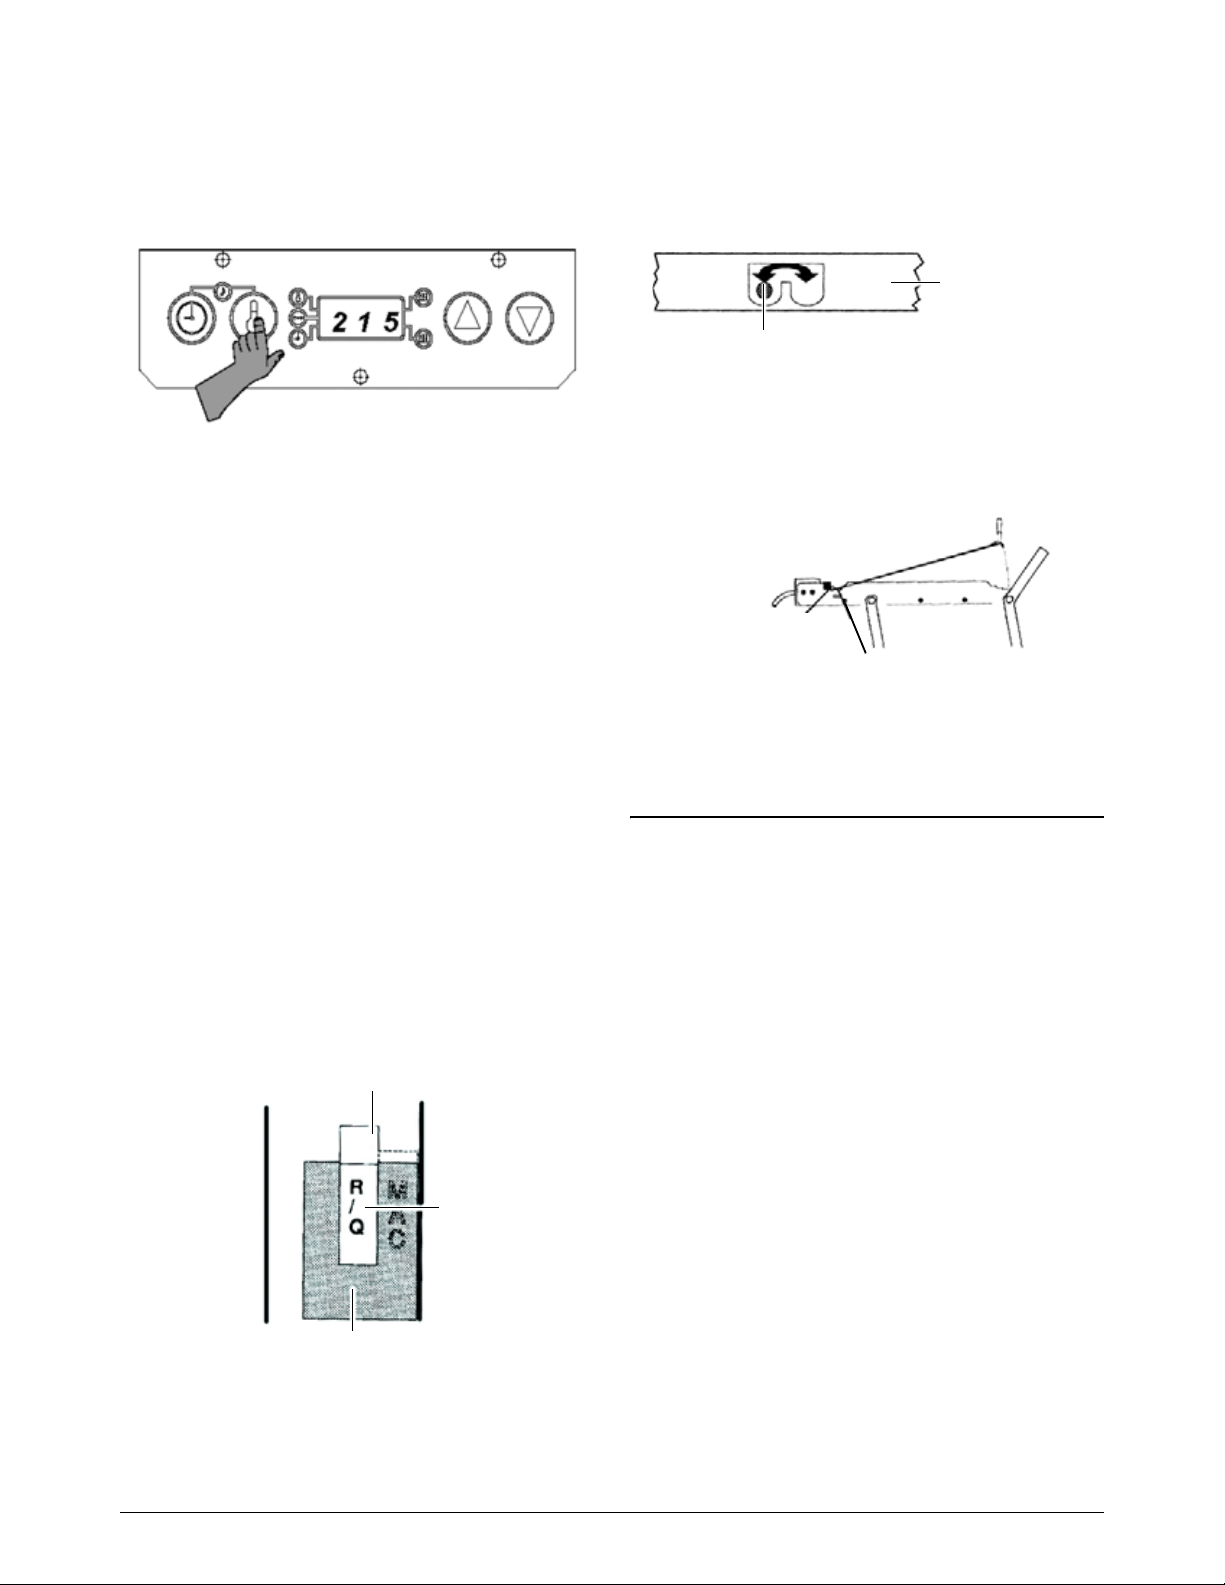
3. To cancel the time set function at any time, press
Stop Block
and release the temperature button. The time
indicator light will turn off, and the display will
change to show the actual platen temperature.
See figure 12.
figure 12
Setting Stop Blocks
Stop blocks allow for prope r crush when t oasting bu ns.
The toaster leaves the factory with the stop blocks set
on R/Q.
Dual stop blocks allow you to swi tch back an d fo rth
from Reg/Qtr bu n an d Bi g M ac Bu n toa sting, or Rib
bun or Rye bun toasting.
1. Ensure the stop blocks are on the correct setting.
There are (6) combination Stop Block Settings:
1. R/Q / MAC 4. RIB / RYE
2. R/Q+ / MAC + 5. RIB+ / RYE +
3. R/Q- / MAC - 6. RIB- / RYE -
THE (+) SETTING IS FOR BUNS THAT ARE
CUT TOO THICK. THE (-) SETTING IS FOR
BUNS CUT TOO THIN. FOR NORMAL SIZE
BUNS, DO NOT USE (+) or (-) SETTINGS.
[R/Q = REG/QTR]
2. Rotate stop blocks by hand to the desired
combinati on bun setting listed above.
3. View the stop block setting selected through the
index window bracket, which is located over the
left stop block. See figure 13.
figure 13
4. To switch between the two types of buns per your
stop block setting, locate the selector lever on the
front of the toaster frame. Move the lever left or
right to switch back and forth between the
combination setting. See figure 14.
figure 14
Front of Frame
Selector Lever
Bun Board Adjustments
1. Push or pull the bun board handle to desired
notched setting as indicated by graphics stamped
on top of bun board. See figure 15.
figure 15
Mac Crowns and
Rib Heels
Reg. Rye/Qtr. Heels
2. Bun board graphics are:
FRONT = REG, RYE, QTR HEELS
REAR = BIG MAC, (CROWNS) AND RIB HEELS
Cleaning
1. Press the power switch to the off position.
2. Unplug toaster.
3. Allow toaster and platens to cool down.
4. Wipe entire platen with clean, damp grill cloth.
Full toaster cleaning must be done in the morning
when toaster is cold. See your Planned
Maintenance Card for proper cleaning
procedures.
IMPORTANT:
board or platen. This will cause cord to burn.
Do not drape cord over hot to aster bun
Bun Setting
Side Panel
Index Window Bracket
411-561revB 9 Printed in USA 4/06 © 2006
(Regular Buns)
Page 10

Troubleshooting Guide
Problem Cause Solution
Platen loose. Platen bolts loose. Tighten platen bolts.
Buns being crushed. Stop blocks not adjust ed properly.
Warped bun trays.
No display. Fuse defective. Check fuse with ohmmeter, reading should be
Adjust stop blocks.
Straighten or replace bun trays.
Contact Bakery.
1 – 2 ohms.
Wiring Diagram
Printed in USA 4/06 © 2006 10 411-561revB
Page 11

Rice Burger Grill Cleaning Procedure
This procedure covers the recommended daily
cleaning of the Prince Castle 411 Rice Burger Grill.
Procedure Frequency
Daily, possibly less frequently depending upon the soil
load.
Supplies
•McD® Hi-Temp Grill Cleaner
•McD
•McD
•McD
• Metal Container Plate
• Prince Castle No. 257 Cleaning Tool Set
• Heat Resistant Gloves
• Meshed Grill Cloths (6 – 8)
• Bucket or ot he r re se rv oi r fi l l ed wi th lu kewarm water
Procedure
1. Remove left over rice burgers, bun tray, and
NOTE:
2. Clean the grill in a well-ventilated area.
3. Start the exhaust fan above the Clamshell Grill.
4. Heat the grill to the cleaning temperature
NOTE:
operating temperature.
5. Turn the Rice Burger Grill power switch to the
WARNING: There is the possibility of electric
shock if cleaning is done without disconnecting
the power plug.
6. Put on the heat resistant gloves.
7. Open the grill and mount the red latch to its
8. Wipe top of the upper platen with a sanitized
9. Apply the McD
®
All Purpose Super Concentrate
®
Sanitizer
®
NO-SCRATCH™ Pads
Teflon sheet. Remove any other components
remaining on the placing table.
Follow standard food carryover procedures.
(480°F/163°C).
The Rice Burger Grill must be cleaned at
OFF position and disconnect the power plug.
mating stud on the handle.
towel.
®
NO-SCRATCH™ Pad to the
holder located within the Prince Castle No. 257
Cleaning Tool Kit.
NOTE:
Use only the McD® NO-SCRATCH™ Pad. Do
not use the green abrasive cleaning pad. Do not
scrape or otherw is e scra tch the heating platen s. The
use of metal scrapers, abrasive pads, or wire brushes
will permanently damage the surface of the heating
platens.
10. Pour the entire packet of McD® Hi-Temp Grill
Cleaner into the metal container plate.
11. Use the McD
®
McD
Hi-Temp Grill Cleaner onto the surface of
®
NO-SCRATCH™ Pad to apply
the heating platens and along the edges. Dip the
flat edge of the McD
®
NO-SCRATCH™ Pad into
the metal container plate and saturate with McD
Hi-Temp Grill Cleaner. Allow the excess to drain
into the metal container plate. Do not scrub
while applying the McD
®
Hi-Temp Grill
Cleaner. If the surface of the upper heating platen
is clean, no cleaning will be necessary. Allow at
least a three minute contact time between the
®
McD
Hi-Temp Grill Cleaner and the surfaces.
NOTE:
applied by the McD
apply the McD
Ensure the McD® Hi-Temp Grill Cleaner is
®
NO-SCRATCH™ Pad. Do not
®
Hi-Temp Grill Cleaner directly onto the
surface of the heating platens. Do not brush or wash
the platens before the McD
®
Hi-Temp Grill Cleaner is
applied.
12. Lightly scrub surfaces using the McD®
NO-SCRATCH™ Pad until clean. Apply more
®
McD
Hi-Temp Grill Cleaner as needed.
13. Apply the McD
®
Hi-Temp Grill Cleaner onto the
bun fence on both sides of the heating platen.
Make sure to apply to the blocks at the four top
corners of the upper heating platen. Dip the flat
edge of the McD
®
NO-SCRATCH™ Pad into the
metal container plate and saturate with the McD
Hi-Temp Grill Cleaner. Allow the excess to drain
into the metal container plate. Do not scrub
while applying the McD
®
Hi-Temp Grill
Cleaner. Allow at least a three minute contact
time between the McD
®
Hi-Temp Grill Cleaner
and the surfaces.
®
14. Lightly scrub all surfaces using the McD
NO-SCRATCH™ Pad until all carbon deposits
have been removed. Apply additional McD
®
Hi-Temp Grill Cleaner as needed.
®
®
411-561revB 11 Printed in USA 4/06 © 2006
Page 12

15. Remo v e the McD® NO-SCRATCH™ Pad from the
tool handle and replace it with a clean meshed
grill cloth. The meshed grill cloth should be folded
into a rectangle shape slightly larger than the end
of the tool. Use this to wipe the upper and lower
platen, side bun plates, and clearance blocks
clean. Areas that are difficult to reach can be
wiped with the meshed grill cloth by hand. The
wiping should be continued until all parts are
wiped clean.
TIP:
While wiping with the meshed grill cloth, the cloth
must either be frequently replaced or washed and dried.
This will prevent soils from accumulating on the cloth.
16. Use a dry meshed grill cloth to wipe any residual
soil from platens, side bun fence, link and
clearance blocks, and other parts where McD®
Hi-Temp Grill Cleaner was previously applied.
CAUTION:
Do not pour water directly onto the heating
platen or use a dripping wet towel. This may cause
water intrusi o n into the upper and low er he a ting
platens and could short circuit the grill. This step must
be strictly followed.
17. Wipe platens, side bun fence, and link and
clearance blocks, with a damp (not wet) meshed
grill cloth. After several wipes, the meshed grill
cloth must be cleaned and twisted dry.
18. To clean the electrical boxes, spray McD
®
All
Purpose Super Concentrate onto a dry cloth and
use it to wipe the electrical boxes. DO NOT wipe
the upper and lower electrical boxes with a damp
cloth.
19. Wipe all parts of the machine with a clean
meshed grill cloth and remove any residual debris
from the upper and lower heating platen.
20. Following the completion of the cleaning
procedures discussed above, it is necessary to
dry the grill. Operate the toaster for 30 – 60
minutes in the energy saving position (platens
down).
21. Wipe down surfaces where soils have dripped
during the drying cycle before the grill is used
again.
NOTE:
Burger Grills. Reverse the McD
Repeat this procedure to clean additional Rice
®
NO-SCRATCH™ Pad
and use the clean side.
NOTE:
Before using the grill the next morning, inspect
the heating platens to make sure that they have been
thoroughly cleaned and that all grommets and gaskets
on the platen are in good condition to help prevent
grease build-up and migrati on. Correct any
discrepancy and then install the release sheets.
Printed in USA 4/06 © 2006 12 411-561revB
Page 13

Planned Maintenance
System: Maintenance
Requirement Card (MRC)
TS 016-1
Toasters
Prince Castle: Bun Toasters
Pictures and additional information:
Corresponding Chapter of Equipment
Manual
When
Weekly
Tools
®
Bun Toaster Release
McD
Agent (HCS)
Customer paper napkins or
paper towels
Protective Gloves
257 Cleaning Tool
Precaution
During some checks, live electrical circuits will be exposed, and hot
toasting surfaces will be uncovered.
Hazard Communication Standard (HCS) — The procedures on this card
include the use of chemical products. These chemical products will be
highlighted with bold face letters followed by the abbreviation (HCS) in the
tools portion of the procedure. See the Hazard Communication Standard
(HCS) Manual for the appropriate Material Safety Data Sheet(s) (MSDS ) .
Applying Bun Toaster Release Agent
IMPORTANT: Use only McD Toaster Release Agent on bun toasters.
Other products ma y dam age bun toasters.
1. Dust all loose crumbs from toaster surfaces.
2. Toaster platens must be well rinsed and dry. McD Bun Toaster Release
Agent may be applied to hot toaster platens. Before applying to hot platens,
put on protective gloves.
3. To coat top platen surface, thoroughly wet a clean, folded customer napkin
or paper towel with Release Agent.
4. Rub a generous amount of Release Agent over entire surface of a platen until
well coated. Use protective gloves and No. 257 cleaning tool.
5. Repeat steps 2 and 3 for other platens, including undersides.
IMPORTANT: Platen undersides and difficult to reach areas can be
coated by placing a folded customer napkin or paper towel with Release
Agent on No. 257 cleaning tool to apply Release Agent to platen surface.
Toasters
IMPORTANT: Do not wipe toaster with a damp cloth after Release
Agent is applied. This removes Release Agent and causes sticking.
6. If sticking occurs between weekly applications, reapply Release Agent using
steps 1 – 4.
IMPORTANT: Toaster does not need to be recleaned or cooled down
before applying Release Agent.
IMPORTANT: Reapply Release Agent weekly, while toaster is cold
between monthly cleaning, to all platen surfaces.
©2006 McDonald’s Corporation
Printed in SEP 2000
Revised in APRIL 2006
Page 1 of 6
Page 14

When
Monthly
Tools
Digital Thermometer with
Surface Probe
Check Calibration of Temperature
IMPORTANT: Do not perform this procedure until the toa ster has been
on for at least 45 minutes and temp erature has s tabilized. Do not use the
toaster during this 45 minute period.
1. Place the rear of the bun board on top of the control bo x and place the res t of
the bun board on top of the platen.
NOTE: On dual platen toasters (411 & 416), the bun board is only
required for use on the top platen.
2. On dual platen toasters, use to select the platen to be calibrated.
3. Center the digital thermometer on the front edge of the platen. When the
corresponding LED on the control panel turns on, immediately record the
digital thermometer temperature reading.
NOTE: On dual platen toasters (411 & 416), perform step 2 on the lower
platen first, then the upper platen.
IMPORTANT: If the temperature read ing on the platen is greater than
±3°C (±5°F) compared to the toaster temperature display, proceed with
step 3 to perform calibration. If temperature reading is within range,
toaster is functioning properly and does not require calibration.
4. Enter the calibration mode by pr essing and hol ding for 6 seconds.
A beep will sound and the LED next to the calibration symbol will turn on.
Release all buttons.
5. Press and release to select upper platen for calibration or to select
lower platen. Allow 10 seconds for the display to stabilize. The display will
show the measured platen temperature value with no offset.
NOTE: On dual platen toasters (411 & 416), calibrate each platen
separately.
TS 016-1
Toasters
6. When the corresponding platen LED turns on, use to adjust the
display temperature to match the reading recorded in step 3.
NOTE: Temperature can only be adjusted ±5°C (±9°F).
7. Press to store the new calibrated temperature and to exit calibration
mode.
IMPORTANT: After calibration is complete, allow one full heater on/off
cycle to allow the new calibrated temperature to stabilize.
©2006 McDonald’s Corporation
Printed in SEP 2000
Revised in APRIL 2006
Page 2 of 6
Page 15

When
Daily, possibly less frequently
depending upon the soil load
Tools
®
McD
Hi-Temp Grill Cleaner
®
McD
All Purpose Super
Concentrate
®
McD
Sanitizer
®
McD
NO-SCRATCH™ Pads
Metal Container Plate
Rice Burger Grill Cleaning Procedure
This procedure covers the recommended daily cleaning of the Prince
Castle 411 Rice Burger Grill.
1. Remove left over rice bu rgers, bun tray, and Teflon sheet. R emov e an y other
components remaining on the placing table.
NOTE: Follow standard food carryover procedures.
2. Clean the grill in a well-ventilated area.
3. Start the exhaust fan above the Clamshell Grill.
4. Heat the grill to the cleaning temperature (480°F/163°C).
NOTE: The Rice Burger Grill must be cleaned at operating
temperature.
TS 016-1
Toasters
Prince Castle No. 257 Cleaning
Tool Set
Heat Resistant Gloves
Meshed Grill Cloths (6 – 8)
Buck et or other reservoir filled
with lukewarm water
5. Turn the Rice Burger Grill power switch to the OFF position and disconnect
the power plug.
WARNING: There is the possibility of electric shock if cleaning is do ne
without disconnecting the power plug.
6. Put on the heat resistant gloves.
7. Open the grill and mount the red latch to its mating stud on the handle.
8. Wipe top of the upper platen with a sanitized towel.
9. Apply the McD
®
NO-SCRATCH™ Pad to the holder located within the
Prince Castle No. 257 Cleaning Tool Kit.
NOTE: Use only the McD
®
NO-SCRA TCH™ Pad. Do not use the gr een
abrasive cleaning pad. Do not scrape or otherwise scratch the heating
platens. The use of metal scrapers, abrasive pads, or wire brushes will
permanently damage the surface of the heating platens.
10. Pour the entire packet of McD
®
Hi-Temp Grill Cleaner into the metal
container plate.
11. Use the McD
®
NO-SCRATCH™ Pad to apply McD® Hi-Temp Grill Cleaner
onto the surface of the heating platens and alon g the edg es. Dip the flat edg e
of the McD
saturate with McD
the metal container plate. Do not scrub while applying t he McD
®
NO-SCRATCH™ Pad into the metal container plate and
®
Hi-Temp Grill Cleaner. Allow the excess to drain into
®
Hi-T em p
Grill Cleaner. If the surface of the upper heating platen is clean, no cleaning
will be necessary. Allow at least a three minute contact time between the
®
McD
Hi-Temp Grill Cleaner and the surfaces.
NOTE: Ensure the McD
®
NO-SCRATCH™ Pad. Do not apply the McD® Hi-Temp Grill
McD
®
Hi-Temp Gri ll Cleaner is applied by the
Cleaner directly onto the surface of the heating platens. Do not brush or
wash the platens before the McD
12. Lightly scrub surfaces using the McD
Apply more McD
®
Hi-Temp Grill Cleaner as needed.
®
Hi-Temp Gri ll Cleaner is applied.
®
NO-SCRATCH™ Pad until clean.
©2006 McDonald’s Corporation
Printed in SEP 2000
Revised in APRIL 2006
Page 3 of 6
Page 16

13. Apply the McD® Hi-Temp Grill Cleaner onto the bun fence on both sides of
the heating platen. Make sure to apply to the blocks at the four top co rners of
the upper heating platen. Dip the flat edge of the McD
Pad into the metal container plate and saturate with the McD
®
NO-SCRATCH™
®
Hi-T emp Grill
Cleaner. Allow the excess to drain into the metal container plate. Do not
scrub while applying the McD
three minute contact time between the McD
®
Hi-Temp Grill Cleaner. Allow at least a
®
Hi-T emp Grill Cleaner and the
surfaces.
14. Lightly scrub all surfaces using the McD
carbon deposits have been removed. Apply additional McD
®
NO-SCRATCH™ Pad until all
®
Hi-Temp Grill
Cleaner as needed.
15. Remove the McD
®
NO-SCRA TCH™ Pad from the tool handle and replace it
with a clean meshed grill cloth. The meshed grill cloth s hou ld b e fo lded in to
a rectangle shape slightly larg er than the end of the tool. Use this to wipe the
upper and lower platen, side bun plates, and clearance blocks clean. Areas
that are difficult to reach can be wiped with the meshed grill cloth by hand.
The wiping should be continued until all parts are wiped clean.
TIP: While wiping with the meshed grill cloth, the cloth must either be
frequently replaced or washed and dried. This will prevent soils from
accumulating on the cloth.
TS 016-1
Toasters
16. Use a dry meshed grill cloth to wi pe any resi d ual soil fro m pl atens , si de bun
fence, link and clearance blocks, and other parts where McD
®
Hi-T emp Grill
Cleaner was previously applied.
CAUTION: Do not pour water directly onto the heating platen or use a
dripping wet towel. This may cause water intrusion into the upper and
lower heating platens and could short circuit the grill. This step must be
strictly followed.
17. Wipe platens, side bun fence, and link and clearance blocks, with a damp
(not wet) meshed grill cloth. After several wipes, the meshed grill cloth must
be cleaned and twisted dry.
18. To clean the electrical boxes, spray McD
®
All Purpose Super Concentrate
onto a dry cloth and use it to wipe the electrical boxes. DO NOT wipe the
upper and lower electrical boxes with a damp cloth.
19. Wipe all parts of the machine with a clean meshed grill cloth and remove any
residual debris from the upper and lower heating platen.
20. Following the completion of the cleaning procedures discussed above, it is
necessary to dry the grill. Operate the toaster for 30 – 60 minutes in the
energy saving position (platens down).
21. Wipe down surfaces where soils have drip ped during the drying cycle before
the grill is used again.
NOTE: Repeat this procedure to clean additional Rice Burger Grills.
Reverse the McD
®
NO-SCRATCH™ Pad and use the clean side.
NOTE: Before using the grill the next morning, inspect the heating
platens to make sur e that they have been thorou ghly cleaned and that all
grommets and gaskets on the platen are in good condition to help
prevent grease build-up and migration. Correct any discrepancy and
then install the release sheets.
©2006 McDonald’s Corporation
Printed in SEP 2000
Revised in APRIL 2006
Page 4 of 6
Page 17

When
Monthly
Tools
Adjustable Wrench
Flatblade Screwdriver
Tighten Platen and Leg Bolts
TIGHTEN PLATEN BOLTS
1. Turn the power switch to the OFF Position.
2. Unplug the power cord.
3. Allow toaster to cool before proceeding.
4. Using an adjustable wrench, tighten the platen bolts which hold handle in
upright position.
TIGHTEN LEG BOLTS
1. Carefully turn the toaster upside down for access to legs.
2. Adjust and tighten leg bolts to obtain a level setting for toasting.
3. Set toaster right side up and check for level setting.
4. Adjust leg bolts as necessary until toaster sits level.
5. Plug the power cord into the appropriate electrical receptacle.
6. If the toaster is about to be used, turn the power switch to ON position.
TS 016-1
Toasters
When
Monthly
Tools
Pliers
Hammer
File
Check Bun Tray Platforms, Bun Board, Bun Trays and
Spatulas
IMPORTANT: This check procedure should be conducted while the
platforms, trays and s patulas are col d. It should b e done for all spatulas ,
trays and platforms.
BUN SPATULA
1. Lay the spatula on a flat work table top.
2. Make sure the entire surface is flat, including the fr ont edge. The front end of
bun spatula must be free from necks and burrs.
3. Sharpen front edge of spatula so all nicks and burrs are removed.
IMPORTANT: St raightening curled corners with pliers and hammer
middle part of the tray flat.
BUN TRAY
1. Lay the track on a flat work tabletop and inspect for flatness.
2. Inspect the try for uniform height.
3. Straightened curled corners with pliers and hammer middle part of the tray
flat.
©2006 McDonald’s Corporation
Printed in SEP 2000
Revised in APRIL 2006
Page 5 of 6
Page 18

BUN TRAY PLATFORM
1. Remove the platform from the lower part of the toaster.
2. Lay the platform on a flat work tabletop and inspect the entire surface to
make sure it is flat.
3. Using pliers or a hammer, straighten as needed.
4. Reinstall the platform into toaster.
BUN BOARD
1. Remove the bun board f rom toaster.
2. Lay the bun board on a flat work tabletop and inspect for flatness.
3. Measure the distance between the tabletop and the bottom side of the bun
board in the front, center, and rear . It sh ou ld be approximately 1/2" (13 mm)
for all toasters except Big Mac 412 and 416 series, and approximately 3/4"
(19 mm) for Big Mac Toasters.
4. Bend as needed to maintain flatness.
TS 016-1
Toasters
©2006 McDonald’s Corporation
Printed in SEP 2000
Revised in APRIL 2006
Page 6 of 6
Page 19

Système d’entretien
planifié : Carte d’entretien
(MRC)
TS 016-1
Grille-pain
Prince Castle : Grille-pain
Illustrations et renseignements
supplémentaires : Chapitre
correspondant du mode d’emploi
Quand
Chaque semaine
Matériel
®
Bun Toaster Release
McD
Agent (HCS)
Serviettes en papier du
restaurant ou essuie-tout
Gants protecteurs
Outil de nettoyage 257
Précautions
Lors de certains contrôles, des circuits électriques sous tension et des
surfaces de cuisson chaudes sont exposés.
Norme sur la communication des dangers HCS (Hazard Communication
Standard) — Les procédures décrites dans ce document peuvent inclure
l’emploi de produits chimiques. Ces produits chimiques sont imprimés en
caractères gras et suivis de l’abréviation (HCS) dans la partie Matériel
des instructions. Voir les fiches signalétiques/fiches de données de
sécurité (MSDS) correspondantes dans le manuel HCS.
Application du produit antiadhérent
IMPORTANT : Utiliser exclusivement le produit antiadhérent McD
Toaster Release Agent sur les grille-pain. Tout autre produit peut
endommager le grille-pain.
1. Balayer les miettes des surfaces du grille-pain.
2. Les plaques chauffantes du grille-pain doivent être bien rincées et sèches. Le
McD Bun Toaster Release Agent peut être appliqués sur des plaques
chaudes. Veiller à porter des gants protecteurs pour l’appliquer sur des
plaques chaudes.
3. Pour enduire la plaque supérieure, bien imbiber une serviette en papier ou un
essuie-tout de produit antiadhérent McD.
4. Frotter une quantité généreuse de produit anti adhér ent pour bien endui r e
toute la surface du plateau. Porter des gants protecteurs et utiliser l’outil de
nettoyage n°257.
5. Répéter les étapes 2 et 3 pour les autres plaques, y compris les dessous de
plaque.
Grille-pain
IMPORTANT : Pour traiter les dessous de plaque et autres surfaces
difficiles d’accès, il est possible de placer une serviette en papier ou un
essuie-tout plié imbibé de produit adhérent sur l’outil de nettoyage
n°257.
IMPORTANT : Ne pas essu yer le grille-pain avec un chiffon humide
après avoir appliqué le produit antiadhérent. Ceci élimine le produit et
entraîne des problème d’adhérence.
6. En cas de problème d’adhérence entre les applications hebdomadaires,
réappliquer le produit antiadhérent en suivant les étapes 1 à 4.
IMPORTANT : Il n’est pas nécessaire de renettoyer ni de laisser
refroidir le grille-pain avant d’appliquer le produit antiadhérent.
IMPORTANT : Réappliquer le produit antiadhérent chaque semaine,
lorsque le grille-pain est froid entre les nettoyages mensuels, sur toutes
les surfaces de plaques chauffantes.
©2006 McDonald’s Corporation
Imprimé en SEP 2000
Révisé en AVRIL 2006
Page 1 / 6
Page 20

Quand
Chaque mois
Matériel
Thermomètre numérique avec
sonde de surface
Contrôle de l’étalonnage de température
IMPORTANT : Avant d’effectuer cette procédure, laisser le grille-pain
allumé pendant au moins 45 minutes jusqu’à ce que sa température soit
stabilisée. Ne pas utiliser le grille-pain durant cette période de 45
minutes.
1. Placer l’arrière du plat à petits pains sur le dessus du boîtier de commande et
le reste du plat sur le dessus de la plaque chauffante.
REMARQUE : Avec les grille-pain à deux plaques chauffantes (411 et
416), le plat à petits pains n’est requis que sur la plaque supérieure.
2. A vec les g rille-pain à deux plaqu es, appuyer sur pour sélectionner la
plaque à étalonner.
3. Centrer le thermomètre numérique s ur le bord avant de la plaque ch auf fante.
Lorsque le voyant correspondant du panneau de commande s’allume, noter
immédiatement la valeur de température affichée par le thermomètre
numérique.
REMARQUE : Avec les grille-pain à deux plaques (411 et 416), effectuer
l’étape 2 sur la plaque inférieure d’abord, puis sur la plaque supérieure.
IMPORTANT : Si la température mesurée sur la plaque diffère de plus
de ±3°C (±5°F) de la valeur affichée par le grille-pain, passer à l’étape 3
pour effectuer l’étalonnage. Si la température mesurée est dans cette
plage, le grille-pain fonctionne correctement et ne doit pas être étalonné.
4. Tenir la touche enfoncée pendant 6 secondes pour passer en
mode d’étalonnage. Un bip sonore est audible et le voyant à côté du symbole
d’étalonnage s’allume. Relâcher tous les boutons.
5. Appuyer sur pour sélectionner la plaque supérieure ou sur pour la
plaque inférieure. Attendre 10 secondes que l’affichage soit stabilisé.
L’écran affiche la température de plaque mesurée sans correction.
REMARQUE : Avec les grille-pains à deux plaques (411 et 416),
étalonner chaque plaque séparément.
TS 016-1
Grille-pain
6. Lorsque le voyant de la plaque s’allume, ajuster la température affichée en
appuyant sur pour la faire correspondre à la valeur mesurée à l’étape 3.
REMARQUE : La température peut être ajustée de ±5°C (±9°F)
seulement.
7. Appuyer sur pour valider la nouvelle température étalon et quitter le
mode d’étalonnage.
IMPORTANT : Une fois l’étalonnage termin é, lais ser le grille-pain
effectuer un cycle de chauffage complet pour permettre la stabilisation
de la nouvelle température étalon.
©2006 McDonald’s Corporation
Imprimé en SEP 2000
Révisé en AVRIL 2006
Page 2 / 6
Page 21

Quand
Chaque jour, moins souvent en
fonction de la salissure
Matériel
®
McD
Hi-Temp Grill Cleaner
®
McD
All Purpose Super
Concentrate
®
McD
Sanitizer
Tampons McD
®
NO-
SCRATCH™
Bac métallique
Trousse d’outils de nettoyage
Prince Castle n°257
Gants résistant à la chaleur
Chiffons en toile maillée (6 à 8)
Seau ou autre récipient rempli
d’eau tiède
Nettoyage du gril à galettes de riz
Cette procédure couvre le nettoyage quotidien du gril à galettes de riz
Prince Castle 411.
1. Enlever les galettes restantes, le plateau à petits pains et la feuille en Téflon.
Enlever tout autre élément restant sur la table de placement.
REMARQUE : Suivre les procédures standard de transfert d’aliments.
2. Nettoyer le gril dans un endroit bien ventilé.
3. Démarrer la hotte aspirante au-dessus du gril double-face.
4. Régler le gril sur la température de nettoyage (480°F/163°C).
REMARQUE : Le gril à galettes de riz doit être nettoyé à sa
température d'utilisation.
5. Placer l’interrupteur d’alimentation du gril sur ARRÊT et débrancher le
cordon d’alimentation.
AVERTISSEMENT : Le nettoyage de l’appareil sans débancher le
cordon d’alimentation présente un risque de décharge électrique.
6. Enfiler les gants résistant à la chaleur.
7. Ouvrir le gril et poser le loquet rouge sur la tige correspondante sur la
poignée.
8. Essuyer le dessus de la plaque supérieure avec un chiffon stérile.
9. Poser le tampon McD
trousse d’outils de nettoyage Prince Castle n°257.
REMARQUE : Utiliser exclusivement un tampon McD
SCRATCH™. Ne pas utiliser de tampon à récurer abrasif vert. Ne pas
érafler ni rayer les plaques chauffantes. L’emploi de racloirs
métalliques, tampons abrasifs ou brosses métalliques endommagerait de
façon permanente la surface des plaques.
10. Verser le paquet entier de McD
métallique.
11. Utiliser le tampon McD
Temp Grill Cleaner sur la surface des plaques chauffantes et le long des
bords. Tremp er le bo rd plat du ta mpo n McD
métallique et l'imbiber jusqu’à saturation de McD
Laisser l’excès de produit s’égoutter dans le bac métallique. Ne pas frotter
durant l’application du McD
plaque chauffante supérieure est propre, aucun nettoyage n’est nécessaire.
Laisser le McD
moins trois minutes.
REMARQUE : Veiller à bien appliquer le McD
avec le tampon McD
Te mp G r ill Cleaner directement sur la surface des plaques chauffantes.
Ne pas brosser ni laver les plaques avant d’appliquer le McD
Grill Cleaner.
12. Frotter légèrement les surfaces avec le tampon McD
Appliquer plus de McD
®
NO-SCRATCH™ s ur le support compris dans la
®
NO-
®
Hi-Temp Grill Cleaner dans le bac
®
NO-SCRATCH™ pour appliquer le McD® Hi-
®
NO-SCRATCH™ dans le bac
®
Hi-Temp Grill Cleaner.
®
Hi-Temp Grill Cleaner. Si la surface de la
®
Hi-Temp Grill Cleaner agir sur les surfaces pendant au
®
®
NO-SCRATCH™. Ne pas appliquer le McD® Hi-
®
Hi-Temp Grill Cleaner si nécessaire.
Hi-Temp Grill Cleaner
®
Hi-Temp
®
NO-SCRATCH™.
TS 016-1
Grille-pain
©2006 McDonald’s Corporation
Imprimé en SEP 2000
Révisé en AVRIL 2006
Page 3 / 6
Page 22

13. Appliquer le McD® Hi-Temp Grill Cleaner sur la butée à petit pain de
chaque côté de la plaque chauffante. Veiller à en appliquer sur les cales aux
quatre coins supérieurs de la plaq ue du h aut. T remper le b ord plat d u tam pon
®
McD
NO-SCRATCH™ dans le bac métallique et l'imbiber jusqu’à
saturation de McD
®
Hi-Temp Grill Cleaner. Laisser l’excès de produit
s’égoutter dans le bac métallique. Ne pas frotter durant l’application du
®
McD
Hi-T emp Grill Cleaner. Laisser le McD® Hi-T emp Grill Cleaner agir
sur les surfaces pendant au moins trois minutes.
14. Frotter légèrement toutes les surfaces avec le tampon McD
®
NOSCRATCH™ ju squ’à élimination de tous les dépôts de carbone. Appliquer
plus de McD
15. Détacher le tampon McD
®
Hi-Temp Grill Cleaner si nécessaire.
®
NO-SCRATCH™ de la poignée et le remplacer
par un chiffon en toile maillée propre. Ce chiffon doit être plié en forme de
rectangle légèrement plus grand que l’extrémité de l’outil. S’en servir pour
essuyer les plaques chauffantes supérieure et inférieure, les plaques à petits
pains latérales et les cales d’espacement. Les surfaces difficiles d’accès
peuvent être essuyées en tenant le chiffon à la main. Essuyer jusqu’à ce que
toutes les pièces soient propres.
CONSEIL : Pour éviter l’accumulation de saleté sur le chiffon en toile
maillée, veiller à le changer ou à le laver et le sécher fréquemment.
16. Utiliser un chiffon en toile maillée pour essuyer toute saleté résiduelle des
plaques, de la butée à petits pains latérale, des cales de tringle et
d’espacement et de toute autre surface sur laquelle le McD
®
Hi-Temp Grill
Cleaner a été appliqué.
ATTENTION : Ne pas verser d’eau directement sur la plaque
chauffante ni utiliser une serviette trempée d’eau. Ceci causerait une
pénétration d’eau dans les plaques chauffantes supérieure et inférieure
et pourrait provoquer un court-circuit. Il est absolument impératif de
respecter cette instruction.
TS 016-1
Grille-pain
17. Essuyer les plaques, la butée à petits pains latérale et les cales de tringle et
d’espacement avec un chiffon maillé humide (pas mouillé). Après quelques
passages, le chiffon doit être nettoyé et essoré.
18. Pour nettoyer les boîtiers él ect riques , vap oris e r du McD
®
All Purpose Super
Concentrate sur un chiffon sec et essuyer les boîtiers. NE PAS essuyer les
boîtiers électriques supérieur et inférieur avec un chiffon humide.
19. Essuyer toutes les pièces de l'appareil avec un chiffon en toile maillée propre
et éliminer tout résidu des plaques chauffantes supérieure et inférieure.
20. À l’issue des procédures de nettoyage décrites ci-dessus, il est nécessaire de
faire sécher le gril. Faire fonctionner le grille-pain pendant 30 à 60 minutes
en position d’économie d’énergie (plaques abaissées).
21. Essuyer les surfaces salies par des égouttements durant le cycle de séchage
avant de réutiliser le gril.
REMARQUE : Répéter cette procédure pour nettoyer les autres grils à
galettes de riz. Retourner le tampon McD
®
NO-SCRATCH™ et utiliser
le côté propre.
REMARQUE : Avant d’utiliser le gril le lendemain, contrôler les
plaques chauffantes po ur s’a ss u r er qu'elles ont été soigneusement
nettoyées et que tous les œillets et joints de la plaque sont en bon état
afin d’empêcher les accumulations et transferts de graisse. Rectifier tout
problème et poser les feuilles antiadhérentes.
©2006 McDonald’s Corporation
Imprimé en SEP 2000
Révisé en AVRIL 2006
Page 4 / 6
Page 23

Quand
Chaque mois
Matériel
Clé à molette
Tournevis plat
Serrage des vis de plaques chauffantes et de pieds
SERRAGE DES VIS DE PLAQUE CHAUFFANTE
1. Placer l’interrupteur d’alimentation sur ARRÊT.
2. Débrancher le cordon d’alimentation.
3. Laisser le grille-pain refroidir avant de poursuivre.
4. À l’aide de la clé à molette, serrer les vis de plaque qui maintiennent la
poignée en position verticale.
SERRAGE DES VIS DE PIEDS
1. Avec précaution, poser le grille-pain à l’envers pour accéder aux pieds.
2. Régler et serrer les vis des pieds de manière à mettre l’appareil de niveau.
3. Remettre le grille-pain à l’endroit et vérifier qu’il est horizontal.
4. Réajuster les pieds au besoin jusqu’à ce que le grille-pain soit horizontal.
5. Brancher le cordon d’alimentation sur une prise électrique adaptée.
6. Si le grille-pain est sur le point d’être utilisé, mettre l’interrupteur
d’alimentation sur MARCHE.
TS 016-1
Grille-pain
Quand
Chaque mois
Matériel
Pince
Marteau
Lime
Contrôle des plateformes à plateau, du plat à petit pains, des
plateaux à petits pains et des spatules
IMPORTANT : Cette procédure de contrôle doit s'effectuer alors que
les plateformes, plateaux et spatules sont froids. Elle concerne tous les
plateaux, plateformes et spatules.
SPATULE À PETIT PAIN
1. Poser la spatule sur un plan de travail.
2. S’assurer que la surface est entièrement plate, y compris le bord avant. Le
bord avant de la spatule ne doit comporter aucune entaille ni ébarbure.
3. Affûter le bord avant de la spatule pour éliminer toute entaille ou ébarbure
éventuelle.
IMPORTANT : Redresser les coins à la pince et aplatir le milieu de la
spatule au marteau.
PLATEAU À PETITS PAINS
1. Poser le plateau sur un plan de travail et vérifier qu’il est bien plat.
2. S’assurer que la hauteur du plateau est uniforme.
3. Redresser les coins à la pince et aplatir le milieu du plateau au marteau.
©2006 McDonald’s Corporation
Imprimé en SEP 2000
Révisé en AVRIL 2006
Page 5 / 6
Page 24

PLATEFORME À PLATEAU
1. Sortir la plateforme de la partie inférieure du grille-pain.
2. Poser la plateforme sur un plan de travail et vérifier l’ensemble de la surface
pour s’assurer qu'elle est plate.
3. Le cas échéant, redresser à la pince ou au marteau.
4. Remettre la plateforme en place dans le grille-pain.
PLAT À PETITS PAINS
1. Sortir le plat à petits pains du grille-pain.
2. Poser le plat sur un plan de travail et vérifier qu’il est bien plat.
3. Mesurer la distance entre le plan de travail et la face inférieure du plat à
petits pains à l’avant, au centre et à l’arrière. Cette distance doit être
d’environ 13 mm pour tous les grille-pain à l’exception des séries Big Mac
412 et 416 et d’environ 19 mm pour les grille-pain Big Mac.
4. Redresser le cas échéant.
TS 016-1
Grille-pain
©2006 McDonald’s Corporation
Imprimé en SEP 2000
Révisé en AVRIL 2006
Page 6 / 6
Page 25

Planmäßiges
Wartungssystem:
Wartungsanforderungskarte
(MRC)
Abbildungen und zusätzliche
Informationen: Zugehöriges Kapitel des
Gerätehandbuchs
Toaster
Prince Castle: Brötchentoaster
Vorsichtsmaßnahmen
Bei diesen Prüfungen liegen stromführende Teile und heiße
Toasterflächen frei.
Gefahrenangabestandard (HCS) – Die Verf ahren auf dieser Karte können
den Einsatz von Chemikalien umfassen. Diese Chemikalien sind in
fettgedruckten Buchstaben, gefolgt vom Akronym für den
Gefahrenangabestandard (HCS) in Werkzeugabschnitt des Verfahrens
angeführt. Die entsprechenden Materialsicherheit-Datenblätter (MSDS)
sind dem Handbuch „Hazard Communication Standard“
(Gefahrenangabestandard HCS) zu entnehmen.
TS 016-1
Toaster
Wann
Wöchentlich
Werkzeuge
®
McD
Brötchentoaster-
Trennmittel (HCS)
Papierservietten oder
Papiertücher (vom Kunden)
Schutzhandschuhe
257 Reinigungswerkzeug
Anwendung des Brötchentoaster-Trennmittels
WICHTIG: An Brötchentoastern nur McD BrötchentoasterT rennmittel verwenden. Andere Produkte können den Brötchentoaster
beschädigen.
1. Alle losen Krümel von den Flächen des Toasters abwischen.
2. Heizplatten des Toasters müssen gut gespült und trocken sein. McD
Brötchentoaster-T rennmittel kann auf heiße Toaster-Heizplatten aufgetragen
werden. Vor Auftragung auf heiße Heizplatten Schutzhandschuhe anziehen!
3. Zum Beschichten der Heizplatte eine gefaltete Serviette oder ein Papiertuch
gründlich mit Trennmittel benetzen.
4. Eine großzügige Menge Trennmittel auf der gesamten Oberfläche der
Heizplatte einreiben, bis diese gut beschichtet ist. Schutzhandschuhe und das
Reinigungswerkzeug Nr. 257 verwenden.
5. Schritte 2 und 3 für andere Heizplatten, einschließlich Unterseiten
wiederholen.
WICHTIG: Plattenunterseite n und schwierig erreichbare Bereiche
können mit Trennmittel beschichtet werden, indem ein e gründlich mit
Trennmittel benetzte gefaltete Serviette oder ein Papiertuch am
Reinigungswerkzeug angebracht wird.
WICHTIG: Den To aster nach dem Auftragen von Tr ennmittel nicht mit
einem feuchten T uch abwischen. Dadurch wird das T rennmittel entfernt
und die Brötchen kleben an.
6. Falls Brötchen bei wöchentlicher Auftragung trotzdem ankleben, das
Trennmittel wie in Schritten 1– 4 beschrieben erneut aufgetragen.
WICHTIG: Der Toaster muss nicht neu gereinigt werden oder
abkühlen, bevor Trennmittel aufgetragen wird.
WICHTIG: Das Trennmittel wöchentlich auf alle Heizplattenflächen
auftragen, solange der Toaster kalt ist (zwischen den monatlichen
Reinigungen).
©2006 McDonald’s Corporation
Gedruckt: SEPTEMBER 2000
Revidiert: APRIL 2006
Seite 1 von 6
Page 26

Wann
Monatlich
Werkzeuge
Digitalthermometer mit
Oberflächensonde
Prüfen der Kalibriertemperatur
WICHTIG: Dieses V er fahr en erst dann durchführen, wenn der Toast er
mindestens 45 Minuten lang ausgeschaltet ist und sich die Temperatur
stabilisiert hat. Den Toaster während der ersten 45 Minuten nicht
verwenden.
1. Die Rückseite der Brötchenplatte auf den Steuerkasten setzen und den Rest
der Brötchenplatte auf der Heizplatte ablegen.
ANMERKUNG: Bei Toastern mit zwei Heizplatten (411 und 416) wird
die Brötchenplatte nur für die obere Heizplatte benötigt.
2. Bei Toastern mit zwei Heizplatten die Heizplatte, die kalibriert werden soll,
mit auswählen.
3. Das Digitalthermometer an der Vorderkante der Heizplatte zentrieren. Wenn
sich die zugehörige LED auf d em Bedienf eld einschaltet, die T emperatu r am
Digitalthermometer sofort notieren.
ANMERKUNG: Bei Toastern mit zwei Heizplatten (411 und 416) muss
Schritt 2 erst an der unteren und dann an der oberen Heizplatte
durchgeführt werden.
WICHTIG: Falls der Temperatur-Ablesewert der Heizplatte im
Vergleich zu r Toaster-Temperatur auf der Anzeige um mehr als ±3° C
(±5° F) höher ist, mit Schritt 3 fortfahren, um die Kalibrierung
durchzuführen. Falls der Temperatur-Messwert innerhalb des
zulässigen Bereichs liegt, funktioniert der Toaster korrekt und muss
nicht kalibriert werden.
4. Den Kalibriermodus aufrufen, indem 6 Sekunden lang gedrückt
gehalten wird. Ein Signal ertönt und die LED neben dem Kalibriersymbol
schaltet sich ein. Alle Tasten loslassen.
5. Kurz die Taste drücken, um die obere Heizplatte zur Kalibrierung
auszuwähle n, bzw. drücken, um die untere a uszuwählen. 10 Sekunden
warten, bis sich die Anzeige stabilisiert hat. Die Anzeige zeigt nun die
gemessene Heizplattentemperatur ohne Versatz.
ANMERKUNG: Bei Toastern mit zwei Heizplatten (411 und 416)
müssen die beiden Heizplatten separat kalibriert werden.
TS 016-1
Toaster
6. Wenn sich die zugehörige Heizplatten-LED einschaltet, muss die
Anzeigetemperatur mit der Taste so eingestellt werden, dass sie
dem in Schritt 3 notierten Messwert entspricht.
ANMERKUNG: Die Temperatur kann nur um ±5° C (±9° F) korrigiert
werden.
7. Die Taste drücken, um den neu kalibrierten Temperaturwert zu
speichern und den Kalibriermodus zu verlassen.
WICHTIG: Nach Abschluss der Kalibrierung muss ein kompletter
Ein-/Ausschaltzyklus des To asters abgewartet werden, damit sich die
neu kalibrierte Temperatur stabilisieren kann.
©2006 McDonald’s Corporation
Gedruckt: SEPTEMBER 2000
Revidiert: APRIL 2006
Seite 2 von 6
Page 27

Wann
Täglich, bei geringer
Verschmutzung möglicherweise
auch weniger häufig
Reinigungsverfahren für Rice Burger Grill
Diese Anleitung beschreibt die empfohlene tägliche Reinigung des Prince
Castle 411 Rice Burger Grill.
TS 016-1
Werkzeuge
®
McD
Hochtemperatur-
Grillreiniger
®
McD
Allzweck-Superkonzentrat
®
McD
Hygienelösung
®
NO-SCRATCH™-
McD
Schwämme
Metallener flacher
Auffangbehälter
Prince Castle Nr. 257
Reinigungswerkzeugsatz
Hitzeschutz-Handschuhe
Grillgittertücher (6 – 8)
Eimer oder anderer Behälter, mit
lauwarmem Wasser gefüllt
1. Zurückgebliebene Rice Burger, Brötchenblech und Teflon-Blech entfernen.
Alle anderen Teile entfernen, die sich noch auf dem Vorbereitungstisch
befinden könnten.
ANMERKUNG: Übliche Verfahren zur Umplatzierung von
Nahrungsmitteln befolgen.
2. Den Grill an einem gut entlüfteten Ort reinigen.
3. Den Dunstabzug über dem Clamshell-Grill einschalten.
4. Den Grill auf die Reinigungstemperatur 163°C (480°F) erwärmen.
ANMERKUNG: Der Rice Burger Grill muss bei Betriebstemperatur
gereinigt werden.
5. Den Netzschalter des Rice Burger Grill ausschalten und das Netzkabel abziehen.
ACHTUNG: Wenn die Reinigung bei angeschlossenem Netzkabel
durchgeführt wird, besteht Stromschlaggefahr.
6. Die Schutzhandschuhe anziehen.
7. Den Grill öffnen und das rote Schloss am zugehörigen Zapfen am Griff
anbringen.
8. Die Oberfläche der oberen Heizplatte mit einem in Hygienelösung
angefeuchteten Tuch sauber wischen.
9. Den McD
®
NO-SCRATCH™-Schwamm auf den Halter des Prin ce Castle
Nr. 257 Reinigungswerkzeugsatzes auftragen.
ANMERKUNG: Es darf nur der McD
®
NO-SCRATCH™-Schwamm
verwendet werden. Nicht den grünen Reibschwamm verwenden! Die
Heizplatten dürfen nicht abgekratzt bzw. zerkratzt werden. Metallene
Kratzer, Reibschwämme oder Drahtbürsten bes c hädigen die
Oberfläche der Heizplatten permanent.
10. Den gesamten Inhalt einer Packung McD
®
Hochtemperatur-Grillreiniger in
den flachen metallenen Auffangbehälter leeren.
11. Mit dem McD
®
NO-SCRATCH™-Schwamm Mc D® HochtemperaturGrillreiniger auf die Oberfläche der Heizplatten und entlang der Kanten
auftragen. Die flache Kante des McD
metallenen Auffangbehälter eintauchen und mit McD
®
NO-SCRATCH™-Schwamms in den
®
Hochtemperatur-
Grillreiniger sättigen. Den Schwamm in den metallenen Auffangbehälter
abtropfen lassen. Beim Auftragen des McD
®
Hochtemperatur-
Grillreinigers nicht reiben. Falls die Oberfläche der oberen Heizplatte sauber
ist, muss diese nicht gereinigt werden. Mindestens drei Minuten Einwirkzeit
für McD
ANMERKUNG: Sicherstellen, dass der McD
Grillreiniger mit dem McD
wird. McD
®
Hochtemperatur-Grillreiniger und den Oberflächen lassen.
®
®
®
Hochtemperatur-Grillreiniger nicht direkt auf die
NO-SCRATCH™-Schwamm aufgetragen
Hochtemperatur-
Oberfläche der Heizplatten auftragen. Die Heizplatten vor dem
Auftragen von McD
®
Hochtemperatur-Grillreiniger nicht abbürsten
oder waschen.
12. Die Oberfläche mit dem McD
Andruck bürsten, bis diese sauber sind. Bei Bedarf mehr McD
®
NO-SCRATCH™-Schwamm unter leichtem
®
Hochtemperatur-Grillreiniger auftragen.
Toaster
©2006 McDonald’s Corporation
Gedruckt: SEPTEMBER 2000
Revidiert: APRIL 2006
Seite 3 von 6
Page 28

13. McD® Hochtemperatur-Grillreiniger auf beiden Seiten der Heizplatte auf die
Brötchenwand auftragen. Sicherstellen, dass der Reiniger auch auf die
Blöcke an den vier oberen Ecken der oberen Heizplatte aufgetragen wird.
Die flache Kante des McD
metallenen Auffangbehälter eintauchen und mit McD
®
NO-SCRATCH™-Schwamms in den
®
Hochtemperatur-
Grillreiniger sättigen. Den Schwamm in den metallenen Auffangbehälter
abtropfen lassen. Beim Auftragen des McD
®
Hochtemperatur-
Grillreinigers nicht reiben. Mindestens drei Minuten Einwirkzeit für
®
McD
Hochtemperatur-Grillreiniger auf den Oberflächen lassen.
14. Alle Oberflächen mit dem McD
®
NO-SCRATCH™-Schwamm unter
leichtem Andruck bürsten, bis alle Verkohlungen entfernt wurden. Bei
Bedarf mehr McD
15. Den McD
®
®
Hochtemperatur-Grillreiniger auftragen.
NO-SCRATCH™-Schwamm vom Werkzeuggriff entfernen und
durch ein sauberes Grillgittertuch ersetzen. Das Grillgittertuch muss
rechteckig gefaltet werden, und zwar so, dass es etwas größer als das
Werkzeugende ist. Damit nun die obere und untere Heizplatte, die
Brötchenwände und die Distanzblöcke sauber wischen. Schwer erreichbare
Stellen können mit dem Grillgittertuch von Hand abgewischt werden.
Solange sauber wischen, bis alle Teile sauber sind.
TIPP: Beim Wischen mit dem Grillgittertuch muss das Tuch entweder
häufig ersetzt oder gewaschen und getrocknet werden. Das verhindert,
dass sich Verunreinigungen im Tuch ansammeln.
16. Mit einem trockenen Grillgittertuch etwaige Restverschmutzungen von
Heizplatten, Brötchenwänden, Verbindungs- und Distanzblöcken und
anderen Teilen, an denen McD
®
Hochtemperatur-Grillreiniger aufgetragen
wurde, abwischen.
TS 016-1
Toaster
VORSICHT: Kein Wasser direkt auf die Heizplatte schütten oder ein
triefend nasses Handtuch verwenden. Dadurch kann Wasser in die
obere und untere Heizplatte eindringen und einen Kurzschluss im Grill
verursachen. Diese Anweisung muss streng befolgt werden.
17. Heizplatten, Brötchenwände und Verbindungs- und Distan zblöcke mit einem
feuchten (nicht nassen) Grillgittertuch abwischen. Nach mehrmaligem
Wischen muss das Grillgittertuch gereinigt und ausgewrungen werden.
18. Zum Reinigen der Ele ktrokästen M cD
®
Allzweck-Superkonzentrat auf ein
trockenes Tuch sprühen und mit diesem die Elektrokästen abwischen. Der
obere und untere Elektrokasten darf NICHT mit einem feuchten Tuch
abgewischt werden.
19. Alle Teile der Maschine mit einem sauberen Grillgittertuch abwischen und
Restverschmutzungen von der oberen und unteren Heizplatte entfernen.
20. Nach Abschluss der oben angeführten Reinigungsverfahren muss der Grill
getrocknet werden. Den Toaster 30 – 60 Minuten lang im Energies parmodu s
betreiben (Heiplatten nach unten).
21. Flächen, auf die während des Trocknens Verunreinigungen getropft sind,
abwischen, bevor der Grill wieder verwendet wird.
ANMERKUNG: Dieses V erfahr en wiederholen, um weitere Rice Burger
Grills zu reinigen. Den McD
®
NO-SCRATCH™-Schwamm umdrehen
und die saubere Seite verwenden.
ANMERKUNG: Bevor der Grill am nächsten Morgen verwendet wird,
müssen die Heizplatten überprüft werden; sie müssen gründlich
gereinigt worden sein und alle Tüllen und Dichtungen müssen in gutem
Zustand sein, damit sich kein Fett ansammeln und verbreiten kann.
Etwaige Mängel beheben und anschließe nd die Trennbögen installieren.
©2006 McDonald’s Corporation
Gedruckt: SEPTEMBER 2000
Revidiert: APRIL 2006
Seite 4 von 6
Page 29

Wann
Monatlich
Werkzeuge
Verstellbarer
Schraubenschlüssel
Flachklingenschraubendreher
Heizplatten- und Standbeinschrauben festziehen.
HEIZPLATTENSCHRAUBEN FESTZIEHEN
1. Den Netzschalter ausschalten.
2. Das Netzkabel abziehen.
3. Den Toaster vor den nächsten Schritten abkühlen lassen.
4. Mit dem verstellbaren Schraubenschlüssel die Heizplattenschrauben
festziehen, die den Griff senkrecht halten.
STANDBEINSCHRAUBEN FESTZIEHEN
1. Den Toaster vorsichtig umdrehen, damit die Standbeine zugänglich sind.
2. Die Standbeinschrauben einstellen und festziehen, damit der Toaster
waagrecht ist.
3. Den Toaster wieder aufrecht abstellen und prüfen, ob er waagrecht ist.
4. Die Standbeinschrauben nach Bedarf einstellen, bis der Toaster waagrecht ist.
5. Das Netzkabel an eine geeignete Steckdose anschließen.
6. Wenn der Toaster wieder verwendet werden soll, den Netzschalter
einschalten.
TS 016-1
Toaster
Wann
Monatlich
Werkzeuge
Zange
Hammer
Feile
Brötchenblech-Pl attformen, Brötchenplatten, Brötchenbleche
und Spachteln überprüfen
WICHTIG: Diese Prüfung muss durchgefü hrt w erden, während die
Plattformen, Bleche und Spachteln kalt sind. Sie muss für alle
Spachteln, Bleche und Plattformen durchgeführt werden.
BRÖTCHENSPACHTEL
1. Die Spachtel auf einen flachen Arbeitstisch legen.
2. Sicherstellen, ob die Oberfläche flach ist, einschließlich der Vorderkante.
Die Vorderkante der Brötchenspachtel darf keine Kerben oder Grate
aufweisen.
3. Die Spachtel vord erka nte absc hle ife n, bis all e K erbe n und Grat e entf er nt sin d.
WICHTIG: Aufgebogene Ecken mit einer Zange gerade biegen und
gewellte Stellen in der Mitte mit einem Hammer flachklopfen.
BRÖTCHENBLECH
1. Das Blech auf einen flachen Arbeitstisch legen und auf Ebenheit prüfen.
2. Prüfen, ob das Blech gleichmäßig hoch ist.
3. Aufgebogene Ecken mit einer Zange gerade biegen und gewellte Stellen in
der Mitte mit einem Hammer flachklopfen.
©2006 McDonald’s Corporation
Gedruckt: SEPTEMBER 2000
Revidiert: APRIL 2006
Seite 5 von 6
Page 30

BRÖTCHENBLECH-PLATTFORM
1. Die Plattform aus dem unteren Teil des Toasters nehmen.
2. Die Plattform auf einen flachen Arbeitstisch legen und prüfen, ob die
gesamte Oberfläche flach ist.
3. Nach Bedarf mit einer Zange oder einem Hammer gerade richten.
4. Die Plattform wieder im Toaster einbauen.
BRÖTCHENPLATTE
1. Die Brötchenplatte aus dem Toaster ziehen.
2. Die Brötchenplatte auf einen flachen Arbeitstisch legen und auf Ebenheit
prüfen.
3. Den Abstand zwischen der Tischoberfläche und der Unterseite der
Brötchenplatte an der Vorderseite, in der Mitte und an der Rückseite messen.
Er muss bei allen Toaster-Modellen, außer Big Mac 412 und 416 Serie etwa
13 mm (1/2 Zoll) betragen; bei Big Mac Toastern muss er etwa 19 mm
(3/4 Zoll) betragen.
4. Nach Bedarf zurecht biegen, bis die Platte flach ist.
TS 016-1
Toaster
©2006 McDonald’s Corporation
Gedruckt: SEPTEMBER 2000
Revidiert: APRIL 2006
Seite 6 von 6
Page 31

Sistema di manutenzione
pianificata: Scheda dei
requisiti di manutenzione
(MRC)
Immagini ed informazioni aggiuntive:
Capitolo corrispondente del manuale
delle apparecchiature
Tostapane
Prince Castle: Tostapane
Precauzione
Durante alcuni controlli, i circuiti elettrici e le superfici di tostature molto
calde restano scoperti.
Standard sulle comunicazioni pericolose (HCS) - Le procedure riportate
su questa scheda includono l’uso di prodotti chimici. T ali prodotti verranno
evidenziati a caratteri in grassetto, seguiti dall’abbreviazione (HCS) nella
sezione degli attrezzi della procedura. Consultare il manuale degli
standard sulle comunicazioni pericolose (HCS) per la scheda dati sulla
sicurezza dei materiali (MSDS).
TS 016-1
Tostapane
Quando
Settimanalmente
Attrezzi
®
Bun Toaster Release
McD
Agent (HCS)
Tovagliolo di carta del cliente o
scottex
Guanti protettivi
Attrezzo di pulitura n. 257
Applicazione dell’agente speciale Bun Toaster Release Agent
IMPORTANTE: usare sui tostapane solo McD Toaster Release Agent.
Altri prodott i potrebbero danneggiare i tostapane.
1. Eliminare tutte le briciole dalle superfici del tostapane.
2. Le piastre del tostapane vanno sciacquate ed asciugate. È possibile applicare
l’agente McD Bun Toaster Release Agent alle superfici molto calde del
tostapane. Prima di applicarlo alle piastre molto calde, indossare guanti
protettivi.
3. Per rivestire la superficie della piastra superiore, inzuppare di agente un
tovagliolo del cliente piegato o uno scottex.
4. Applicare una quantità generosa di agente sull’intera superficie di una
piastra fino a rivestirla completamente. Usare guanti protettivi ed un attrezzo
di pulitura n. 257.
5. Ripetere le fasi 2 e 3 per le altre piastre, inclusi i lati inferiori.
IMPORTANTE: i lati inferiori della piastra ed i punti difficili da
raggiungere possono essere rivestiti infilando un tovagliolo ripiegato o
uno scottex inbevuto di agente sull’attrezzo di pulitura n. 257 per
applicare agente sulla superficie della piastra.
IMPORTANTE: non pulire il tostapane a griglia con un pa nno umido
dopo aver applicato il Release Agent. Così facendo si rimuove l’agente e
la superficie potrebbe far attaccare il pane.
6. Qualora questo dovesse succedere tra due applicazioni settimanali,
riapplicare il Release Agent seguendo le fasi 1 - 4.
IMPORTANTE: prima di applicare il Release Agent non occorre
ripulire o raffreddare il tostapane.
IMPORTANTE: riapplicare il Release Agent con frequenza
settimanale, quando il tostapane è freddo o tra una pulitura mensile e
l’altra, su tutte le superfici della piastra.
© 2006 McDon ald’s Corporation
Stampato nel mese di SET 2000
Rivisto nel mese di APRILE 2006
Pagina 1 di 6
Page 32

Quando
Mensilmente
Attrezzi
Ter mom etr o dig ita le co n sond a
in superficie
Controllo della calibraz ione del la temperatura
IMPORTANT E: eseguire questa procedura solo dopo che il tostapane è
rimasto acceso per almeno 45 minuti e la temperatura non si è
stabilizzata. Non usare il tostapane durante questo periodo di 45 minuti.
1. Poggiare la parte posteriore della piastra dei panini sulla scatola di controllo
ed il resto della piastra sulla piastra del tostapane.
NOTA: sui tostapane con due piastre (411 e 416), occorre montare la
piastra dei panini solo sulla piastra superiore.
2. Sui tostapane a due piastre, usare per selezionare la piastra da
calibrare.
3. Centrare il termometro digitale sul bordo anteriore della piastra. Quando la
spia LED corrispondente sul pannello di controllo si accende, registrare
subito la lettura della temperatura del termometro digitale.
NOTA: sui tostapane a due piastre (411 e 416), eseguire la fase 2 prima
sulla piastra inferiore e quindi su quella superiore.
IMPORT ANTE: se la lettura della temperatura sulla piastra è superiore
a ±3 °C (±5 °F) rispetto al display della temperatura del tostapane,
passare alla fase 3 per eseguire la calibrazione. Se la lettura della
temperatura rientra nella gamma, il tostapane funziona correttamente e
non richiede calibrazione.
4. Passare alla modalità di calibrazione premendo e tenendo
premuto per 6 secondi. Viene emess o un segnale acustico e la spia
LED accanto al simbolo della calibrazione si accende. Rilasciare tutti i
pulsanti.
5. Premere e rilasciare per selezionare la piastra superiore per la
calibrazione o per selezionare la piastra inferiore. Attendere 10 secondi
fin quando il display non si stab ilizza. Il display most ra quindi il valore della
temperatura della piastra misurata, senza sfalsamento.
TS 016-1
Tostapane
NOTA: sui tostapane a due piastre (411 e 416), calibrare le piastre
separatamente.
6. Quando la spia LED della piastra corrispondente si accende,
usare per regolare la temperatura del display e farla corrispondere
alla lettura registrata alla fase 3.
NOTA: la temperatura può essere regolata solo di ±5°C (±9°F).
7. Premere per memorizzare la nuova temperatura calibrata e per uscire
dalla modalità di calibrazione.
IMPORTANTE: al completamento della calibrazione attendere un ciclo
completo di accensione/spegnimento del riscaldatore per consentire alla
nuova temperatura calibrata di stabilizzarsi.
© 2006 McDon ald’s Corporation
Stampato nel mese di SET 2000
Rivisto nel mese di APRILE 2006
Pagina 2 di 6
Page 33

Quando
Quotidianamente, possibilmente
con meno frequenza secondo il
carico del terreno
Procedura per pulire la griglia per panini di riso
Questa procedura tratta la pulitura quotidiana consigliata per la griglia per
panini di riso Prince Castle 411.
TS 016-1
Attrezzi
®
McD
Hi-Temp Grill Cleaner
®
All Purpose Super
McD
Concentrate
®
McD
Sanitizer
®
NO-SCRATCH™ Pad
McD
Piastra per contenitore in
metallo
Set di attrezzi di pulitura n. 257
Prince Castle
Guanti resistenti al calore
Panni metallici per griglia (6 - 8)
Secchio o altro contenitore
pieno di acqua tiepida
1. Eliminare i residui, il vassoio dei panini ed il foglio in Teflon. Togliere tutti
gli altri componenti ancora presenti sulla tavola di posizionamento.
NOTA: attenersi alle procedure standard per il trasporto di alimenti.
2. Pulire la griglia in un'area ben ventilata.
3. Avviare la ventola di scarico sopra la griglia a conchiglia.
4. Riscaldare la griglia fino a raggiungere la temperatura di pulitura (163 °C/
480 °F).
NOTA: la griglia per panini di riso va pulita alla temperatura di
esercizio.
5. Portare l’interruttore di accensione della griglia per panini di riso sulla
posizione di spegnimento (OFF) e scollegare la presa di corrente.
AVVERTENZA: se la pu li tu ra vi en e ef fettu at a s e nz a s col le ga re la presa
di corrente, esiste il pericolo di folgorazione.
6. Indossare i guanti resistenti al calore.
7. Aprire la griglia e montare il gancio rosso sul perno corrispondente
sull’impugnatura.
8. Pulire la sommità della piastra superiore con un panno sterilizzato.
9. Applicare il McD
®
NO-SCRATCH ™ Pad sul contenitore situato all’interno
del kit di attrezzi di pulitura Prince Castle n. 257.
NOT A: usar e solo McD
®
NO-SCRATCH™ Pad. Non usar e la s pug net ta
di pulitura abrasiva verde. Non gra ffiare le piastre di riscaldamento.
L’uso di raschietti metallici, spugnette abrasive o spazzole metalliche
danneggia in modo permanente la superficie delle piastre di
riscaldamento.
10. Versare l’intero contenuto del McD
®
Hi-T emp Grill Cleaner nella piastra del
contenitore metallico.
11. Usare McD
®
NO-SCRATCH™ Pad per applicare McD® Hi-Temp Grill
Cleaner sulla superficie delle piastre di riscaldamento e lungo i bordi.
Infilare il bordo piatto del McD
contenitore metallico e saturare con McD
®
NO-SCRATCH™ Pad nella piastra del
®
Hi-Tem p Grill Cleaner . Attendere
che la quantità in eccesso cada nella piastra del contenitore metallico. Non
strofinare applicando McD
®
Hi-T emp Grill Cleaner . Se la superficie della
piastra di riscaldamento superiore è pulita, non occorre pulire. Attendere
almeno tre minuti per il contatto tra McD
®
Hi-Temp Grill Cleaner e le
superfici.
NOTA: accertarsi che al McD
®
McD
Hi-Temp Grill Cleaner. Non applicare McD® Hi-Temp Grill
®
NO-SCRATCH™ Pad venga applicato
direttamente sulla superficie delle piastre di riscaldamento. Non
spazzolare o lavare le piastre prima di applicare McD
®
Hi-Temp Grill
Cleaner.
12. Strofinare leggermente le su perf ic i usando McD
quando non risultano pulite. Applicare altro McD
®
NO-SCRATCH™ Pad fin
®
Hi-Temp Grill Cleaner
secondo necessità.
Tostapane
© 2006 McDon ald’s Corporation
Stampato nel mese di SET 2000
Rivisto nel mese di APRILE 2006
Pagina 3 di 6
Page 34

13. Applicare McD® Hi-T emp Grill Cleaner sulla fessura dei panini su entrambi
i lati della piastra di riscaldamento. Accertarsi di applicare l’agente ai
blocchi sui quattro angoli superiori della piastra di riscaldamento superiore.
Infilare il bordo piatto del McD
contenitore metallico e saturare con McD
®
NO-SCRATCH™ Pad nella piastra del
®
Hi-Tem p Grill Cleaner . Attendere
che la quantità in eccesso cada nella piastra del contenitore metallico. Non
strofinare applicando McD
tre minuti per il contatto tra McD
14. Strofinare leggermente tutte le superfici usando McD
Pad fino ad aver rimosso tutti i depositi di carbonio. Applicare altro McD
®
Hi-Tem p G r ill Cleaner. Attendere almeno
®
Hi-Temp Grill Cleaner e le superfici.
®
NO-SCRATCH™
®
Hi-Temp Grill Cleaner secondo necessità.
15. Rimuovere il McD
®
NO-SCRATCH™ dall’impugnatura dell’attrezzo e
sostituirlo con un panno metallico per griglia pulito. Questo panno va
piegato in una forma rettangolare leggermente più brande dell’estremità
dell’attrezzo; farne uso per pulire la piastra superiore ed inferiore, le piastre
per panini laterali ed i blocchi distanziali. I punti difficili da raggiungere
possono essere puliti a mano con questo panno metallico. Continuare fino ad
aver pulito tutte le parti.
SUGGERIMENTO: durante la pulitura con il panno metallico, questo
va sostituito con regolare frequenza o lavato ed asciugato, al fine di
impedire l’accumulo di sporco.
16. Usare un panno metallico pulito per eliminare eventuali residui di sporco
dalle pias t re, dalla fe ssura dei panini, dai blocchi di collegamento e
distanziali e da altre parti su cui in precedenza era stato applicato McD
®
Hi-Temp Grill Cleaner.
TS 016-1
Tostapane
ATTENZIONE: non versare acqua direttamente sulla piastra di
riscaldamento e non usare un panno troppo ba gnato. Questo potrebbe
causare l’infiltrazione di acqua nelle piastre di riscaldamento inferiore e
superiore, con conseguente pericolo di cortocircuito alla griglia.
Attenersi strettamente a questa precauzione.
17. Pulire le piastre, la fessura dei panini laterale ed i blocchi di collegamento e
distanziali con un panno met al lico um ido (non bagnato). Dopo divers i us i , il
panno metallico va pulito e strizzato bene.
18. Per pulire le scatole elettriche, spruzzare McD
®
All Purpose Super
Concentrate su un panno pulito ed usarlo per pulire le scatole in questione
NON pulire le scatole elettriche superiore ed inferiore con un panno umido.
19. Pulire tutte le parti della macchina con un panno metallico pulito ed
eliminare eventuali residui dalle piastre di riscaldamento superiore ed
inferiore.
20. Attenendosi al completamento delle procedure di pulitura discusse in
precedenza, asciugare la griglia. Azionare il tostapane per 30 - 60 minuti
nella posizione di risparmio energetico (piastre in giù).
21. Prima di usare nuovamente la griglia, pulire le superfici su sui si sono
accumulati depositi di sporco durante il ciclo di asciugatura.
NOT A: ripetere questa procedura per pulire le altr e griglie per panini di
riso. Invertire il McD
®
NO-SCRATCH™ Pad ed usare il lato pulito.
NOTA: prima di usare la griglia il mattino successivo, ispezionare le
piastre di riscaldamento per accertarsi che siano state pulite con cura e
che tutti i gommini e le guarnizioni sulle piastre siano in buone
condizioni per impedire l’accumulo e l’infiltrazione di grasso.
Correggere eventuali discrepanze ed installare quindi le lastre di
rilascio.
© 2006 McDon ald’s Corporation
Stampato nel mese di SET 2000
Rivisto nel mese di APRILE 2006
Pagina 4 di 6
Page 35

Quando
Mensilmente
Attrezzi
Chiave regolabile
Cacciavite a lama piatta
Serrare le piastre ed i bulloni dei sostegni
SERRARE I BULLONI DELLE PIASTRE
1. Portare l’interruttore di accensione sulla posizione di spento (OFF).
2. Staccare il cavo di alimentazione.
3. Prima di procedere, attendere che il tostapane si raffreddi.
4. Con una chiave regolabile, serrare i bulloni delle piastre che tengono
l’impugnatura in posizione verticale.
SERRARE I BULLONI DEI SOSTEGNI
1. Ribaltare con attenzione il tostapane per poter accedere ai sostegni.
2. Regolare e serrare i bulloni per garantire una tostatura a livello.
3. Portare il tostapane nella posizione giusta e controllare che sia a livello.
4. Regolare i bulloni dei sostegni secondo necessità, fino a portare il tostapane
a livello.
5. Infilare il cavo di alimentazione nella presa elettrica giusta.
6. Se si è pronti ad usare il tostapane, portare l’interruttore di accensione sulla
posizione di acceso (ON).
TS 016-1
Tostapane
Quando
Mensilmente
Attrezzi
Pinze
Martello
Lima
Controllare le piatt afor me del v assoio dei panini, dell a piastra ,
dei vassoi e delle spatole
IMPORTANTE: questa procedura di controllo va effettuata con
piattaforme, vassoi e spatole freddi. Controllare tutte le spatole, i vassoi
e le piattaforme.
SPATOLA PER PANINI
1. Poggiare la spatola su una superficie di lavoro piatta.
2. Accertarsi che l’intera superficie sia piatta, incluso il bordo anteriore. La
parte anteriore della spatola per panini non d eve riportare tacche e sbavature.
3. Affilare la parte anteriore della spatola al f ine di eliminare ev entuali tacche e
sbavature.
IMPORTANTE: raddrizzare i bordi curvi con pinze e martellare la
parte centrale del vassoio per appiattirla.
VASSOIO PER PANINI
1. Poggiare il vassoio su una superficie di lavoro piatta ed accertarsi che sia
piatto.
2. Ispezionare il vassoio per accertarsi che sia di altezza uniforme.
3. Raddrizzare i bordi curvi con pinze e martellare la parte centrale del vass oio
per appiattirla.
© 2006 McDon ald’s Corporation
Stampato nel mese di SET 2000
Rivisto nel mese di APRILE 2006
Pagina 5 di 6
Page 36

PIATTAFORMA DEL VASSOIO PER PANINI
1. Togliere la piattaforma dalla parte anteriore del tostapane.
2. Poggiare la piattaforma su una superficie di lavoro piatta ed ispezionare
l’intera superficie per accertarsi che sia piatta.
3. Con pinze o un martello, raddrizzare secondo necessità.
4. Rimontare la piattaforma nel tostapane.
PIASTRA PER PANINI
1. Rimuovere dal tostapane la piastra per panini.
2. Poggiare la scheda su una superficie di lavoro piatta ed accertarsi che sia
piatta.
3. Misurare la distanza tra la superficie di lavoro ed il lato inferiore della
piastra per panini nella parte anteriore, centrale e posteriore. Questa
dovrebbe corrispondere a circa 0,5 pollici (13 mm) per tutti i tostapane, ad
eccezione della serie Big Mac 412 e 416, ed a circa 0,75 pollici (19 mm) per
i tostapane Big Mac.
4. Piegare secondo necessità per garantire che sia piatta.
TS 016-1
Tostapane
© 2006 McDon ald’s Corporation
Stampato nel mese di SET 2000
Rivisto nel mese di APRILE 2006
Pagina 6 di 6
Page 37

Sistema de mantenimiento
programado: Tarjeta de
requisito de mantenimiento
(MRC, por sus siglas en
inglés)
Imágenes e información adicional:
Capítulo respectivo del manual del
equipo
Tostadoras
Prince Castle: Tostadoras de pan
Precaución
Durante algunas revisiones, se expondrán circuitos eléctricos activos y
estarán descubiertas superficies de tostado calientes.
Norma de comunicación de riesgos (HCS, por sus siglas en inglés): Los
procedimientos que se indican en esta tarjeta incluyen el uso de
productos químicos. Estos productos se resaltarán en negrita seguidos
de la abreviatura (HCS) en la parte de herramientas del procedimiento.
Consulte el manual de la Norma de comunicación de riesgos (HCS) para
obtener las hojas de datos de seguridad de materiales correspondientes
(MSDS, por sus siglas en inglés).
TS 016-1
Tostadoras
Cuándo
Semanalmente
Herramientas
Agente de desmoldeado para
tostadoras de pan McD
®
(HCS)
Servilletas o toallas de papel
para los clientes
Guantes protectores
Herramienta de limpieza Nº 257
Aplicación del agente de desmoldeado para tostadoras
de pan
IMPORTANTE: Use sólo el agente de desmoldeado para tostadoras
McD en las tostadoras de pan. Es posible que otros productos dañen las
tostadoras de pan.
1. Quite todas las migas sueltas de las superficies de la tostadora.
2. Las platinas de la tostadora se deben enjuagar y secar bien. El agente de
desmoldeado se puede aplicar a platinas del tostador que estén calientes.
Antes de aplicarlo a platinas calientes, póngase guantes protectores.
3. Para recubrir la superficie de la platina superior, humedezca completamente
una servilleta o toalla de papel para clientes limpia y doblada con el agente
de desmoldeado.
4. Frote una cantidad generosa de agente de desmoldeado sobre toda la
superficie de una platina hasta que quede bien recubierta. Use guantes
protectores y la herramienta de limpieza Nº 257.
5. Repita los pasos 2 y 3 para otras platinas, incluyendo las caras inferiores.
IMPORTANTE: Las caras inferiores de las platinas y los lugares que
son difíciles de alcanzar se pueden recubrir colocando una servilleta o
toalla de papel doblada con el agente de desmoldeado en la herramienta
Nº 257, para aplicar el agente de desmoldeado a la superficie de la
platina.
IMPORTANTE: No le pase un paño húmedo a la tostador a después de
aplicar el agente de desmoldead o. Esto quita el agente de desmolde ado y
produce que el pan se pegue.
6. Si el pan se pega entre aplicaciones semanales, vuelva a aplicar el agente de
desmoldeado siguiendo los pasos 1 al 4.
IMPORTANTE: No es necesario volver a limpiar o enfriar la tostadora
antes de aplicar el agente de desm oldeado.
IMPORTANTE: Entre las limpiezas mensuales, vuelva a aplicar el
agente de desmoldeado semanalment e a tod as las superf icies de las
platinas, mientras la tostadora esté fría.
© 2006 McDon ald’s Corporation
Impreso en SEPTIEMBRE de 2000
Modificado en ABRIL de 2006
Página 1 de 6
Page 38

Cuándo
Mensualmente
Herramientas
Termómetro digital con sonda
de superficie.
Revisar calibración de la temperatura
IMPORTANTE: No realice este procedimiento hasta que la tostadora
haya estado encendida durante por lo menos 45 minutos y se haya
estabilizado la temperatura. No use la tostadora durante este período.
1. Coloque la parte posterior del bandejón de pan sobre la parte superior de la
caja de control y coloque el resto del band ejón de pan sobre la par te supe rior
de la platina.
NOTA: En tostadoras de dos platinas (411 y 416), el bandejón de pan
sólo se debe usar en la platina superior.
2. En tostadoras de dos platinas, use para seleccionar la platina que va
a calibrar.
3. Centre el termómetro digital en el borde delantero de la platina. Cuando se
encienda el LED respectivo del panel de control, registre inmediatamente la
lectura de temperatura del termómetro digital.
NOTA: En tostadoras de dos platinas (411 y 416), realice el paso 2 en la
platina inferior primero y luego en la platina superior.
IMPORTANTE: Si la lectura de temperatura de la platina es mayor que
±3° C (±5° F) en comparación con la pantalla de temperatura de la
tostadora, siga con el paso 3 para r ealizar l a calibraci ón. Si l a lectura de
temperatura se encuentra dentro del rango, la tostadora funciona
correctamente y no requiere calibración.
4. Ingrese al modo de calibración presionando y manteniendo
presionado durante 6 segundos. Se escuchará un sonido y se
encenderá el LED que se encuentra junto al símbolo de calibración. Suelte
todos los botones.
5. Presione y suelte para seleccionar la platina superior para realizar la
calibración, o para seleccionar la platina inferior. Espere 10 segundos
para que se estabilice la pantalla. La pantalla mostrará el valor de
temperatura que se midió de la platina sin margen.
TS 016-1
Tostadoras
NOTA: En tostadoras de dos platinas (411 y 416), calibre cada platina
por separado.
6. Cuando se encienda el LED de la platina respectiva, use para ajustar
la temperatura de la pantalla para que coincida con la lectura que se registró
en el paso 3.
NOTA: La temperatura sólo se puede ajustar ±5° C (±9° F).
7. Presione para almacenar la nueva temperatura que se calibró y salir del
modo de calibración.
IMPORTANTE: Después de terminar la calibración, espere un ciclo
completo de encendido/apagado del calentador para permitir que se
estabilice la nueva temperatura que se calibró.
© 2006 McDon ald’s Corporation
Impreso en SEPTIEMBRE de 2000
Modificado en ABRIL de 2006
Página 2 de 6
Page 39

Cuándo
Diariamente, con una frecuencia
menor, posiblemente,
dependiendo de la carga de
suciedad
Procedimiento de limpieza de la parrilla para hamburguesas
de arroz
Este procedimiento aborda la limpieza diaria recomendada de la parrilla
para hamburguesas de arroz 411 de Prince Castle.
TS 016-1
Herramientas
Limpiador de parrillas de alta
temperatura McD
Superconcentrado multiuso de
®
McD
Desinfectante McD
Almohadillas NO-SCRATCH™
de McD
®
®
®
Placa del recipiente de metal
Juego de herramienta de
limpieza Nº 257 Prince Castle
Guantes resistentes al calor
Paños de malla para limpiar
parrillas (6 a 8)
Balde u otro recipiente lleno con
agua tibia
1. Retire la s hamburguesa s de arroz sobrantes, la bandeja de pan y la hoja de
teflón. Retire cualquier otro componente restante de la mesa de colocación.
NOTA: Siga los procedimientos estándar de traslado de alimentos .
2. Limpie la parrilla en un área bien ventilada.
3. Arranque el ventilador eductor sobre la parrilla con tapa.
4. Caliente la parrilla hasta alcanzar la temper atura de limpieza ( 163º C/480º F) .
NOTA: La parrilla para hamburguesas de arroz se debe limpiar a
temperatura de funcionamiento.
5. Gire el interruptor de encendido de la parrilla para hamburguesas de arroz a
la posición OFF (apagado) y desconecte el enchufe.
ADVERTENCIA: Existe la posibilidad de descarga eléctrica si la
limpieza se realiza sin desconectar el enchufe.
6. Colóquese los guantes resistentes al calor.
7. Abra la parrilla y monte el pestillo rojo en su montante coincidente en el asa.
8. Limpie l a parte de arriba de la platina superior con una toalla desinfectada.
9. Aplique la almohadilla NO-SCRATC H™ de McD
®
en el soporte que se
encuentra al interior de la herramienta de limpieza Nº 257 de Prince Castle.
NOTA: Use solamente la almohadilla NO-SCRATCH™ de McD
®
. No
use la almohadilla abrasiva verde de limpieza. No raspe ni raye las
platinas de calentamie nt o. El uso de ra sp ad ores metálicos, almohad il la s
abrasivas o cepillos de alambre dañará permanentemente la superficie
de las platinas de calentamiento.
Tostadoras
10. Vierta el paquete completo de limpiador de parrillas de alta temperatura
®
McD
en la placa del recipiente de metal.
11. Use la almohadilla NO-SCRATCH™ de McD
®
parrillas de alta temperatura McD
en la superficie de las platinas de
®
para aplicar el limpiador de
calentamiento y en los bordes. Meta el borde plano de la almohadilla NOSCRATCH™ de McD
limpiador de parrillas de alta temperatura McD
®
en la placa del recipiente de metal y empape con
®
. Deje que el exceso se drene
hacia la placa del recipiente de metal. No friegue mien tras aplica e l
limpiador de parillas de alta temperatura McD
®
. Si la superficie de la
platina de calentamiento superior está limpia, no es necesaria su limpieza.
Deje un tiempo de contacto de por lo menos tres minutos entre el limpiador
de parrillas de alta temperatura McD
®
y las superfi cies.
NOTA: Asegúrese de que el limpiador de parrillas de alta temperatura
®
McD
se aplique con la almohadilla NO-SCRATCH™ de McD®. No
aplique el limpiador de parrillas de alta temperatura McD
®
en forma
directa sobre la superficie de las platinas de calentamiento. No cepille ni
lave las platinas antes de que se aplique el limpiador de parrillas de alta
temperatura McD
®
.
12. Friegue suavemente las superficies con la almohadilla NO-SCRATCH™ de
®
McD
hasta que estén limpias. Aplique más limpiador de parrillas de alta
temperatura McD
®
según sea necesario.
© 2006 McDon ald’s Corporation
Impreso en SEPTIEMBRE de 2000
Modificado en ABRIL de 2006
Página 3 de 6
Page 40

13. Aplique el limpiador de parrillas de alta temperatura McD® sobre el protector
para pan a ambos lados de la platina de calentamiento. Asegúrese de aplicarlo
en los bloques de las cuatro esquinas superiores de la platina de calentamiento
superior. Meta el borde plano de la almohadilla NO-SCRATCH™ de McD
®
en
la placa del recipiente de metal y empape con limpiador de parrillas de alta
temperatura McD
®
. Deje que el exceso se drene hacia la placa del recipiente de
metal. No friegue mientras aplica el limpiador de parillas de alta
temperatura McD
entre el limpiador de parrillas de alta temperatura McD
®
. Deje un tiempo de contacto de por lo menos tres minutos
®
y las superficies.
14. Friegue suavemente todas las superficies con la almohadilla NO-SCRA TCH™
de McD
más limpiador de parrillas de alta temperatura McD
15. Retire la almohadilla NO-SCRA TCH™ de McD
®
hasta que se hayan eliminado todos los depósitos de carbón. A plique
®
según sea necesario.
®
del asa de la herramienta y
cámbiela por un paño de malla limpio para limpiar parrillas. El paño de
malla para limpiar parrillas se debe doblar en forma rectangular, levemente
mayor que el extremo de la herramienta. Úselo para limpiar la platina
superior e inferior, las placas de pan laterales y los bloques de separación.
Las áreas que sean difíciles de alcanzar se pueden limpiar manualmente con
el paño de malla para limpiar parrillas. La limpieza debe continuar hasta que
se hayan limpiado todas las piezas.
CONSEJO: Mientras limpia con el paño de malla para limpiar
parrillas, el paño se debe cambiar o lavar y secar con frecuencia. Ello
evitará que la suciedad se acumule en el paño.
16. Use un paño de malla seco pa ra limpiar parr illas y elimin ar cualquier resi duo
de suciedad de las platinas, el protector para pan lateral, bloques de unión y
separación, y otras piezas en que se aplicó previamente el limpiador de
parrillas de alta temperatura McD
®
.
PRECAUCIÓN: No vierta agua directamente sobre la platina de
calentamiento ni use una toalla de papel que gotee. Esto puede hacer
que ingrese agua a las platinas de calentamiento superior e inferior y
provocar un cortocircuito en la parrilla. Este paso debe respetarse
estrictamente.
17. Limpie las platinas, protectores para pan laterales y bloques de unión y
separación con un paño de malla para limpiar parrillas húmedo (no mojado).
Después de limpiar v arias veces, el pañ o se de be limpiar y seca r estr ujánd olo.
18. Para limpiar las cajas eléctricas, rocíe superconcentrado multiuso de McD
®
en un paño seco y úselo para limpiar las cajas eléctricas. NO limpie las cajas
eléctricas superior e inferior con un paño húmedo.
19. Limpie todas las piezas de la máquina con un paño de malla para limpiar
parrillas limpio y elimine todos los desechos residuales de las platinas de
calentamiento superior e inferior.
20. A continuación del término de los procedimientos de limpieza que se
explicaron con anterioridad, debe secar la parrilla. Haga funcionar la
tostadora durante 30 a 60 minutos en la posición de ahorro de energía (con
las platinas hacia abajo).
21. Limpie las superficies en que la suciedad escurrió durante el ciclo de secado
antes de volver a usar la parrilla.
NOTA: Repita este procedimiento para limpiar las otras parrillas para
hamburguesas de arroz. Dé vuelta la almohadilla NO-SCRATCH™ de
®
McD
y use el lado limpio.
NOTA: Antes de usar la parrilla a la mañana siguiente, inspeccione las
platinas de calentamiento para comprobar que se hayan limpiado por
completo y que todas las arandelas aislantes y empaquetaduras de la
platina estén en buen estado, a fin de evitar la acumulación de grasa y la
migración. Corrija cualquier discrepancia e instale las hojas de
liberación.
TS 016-1
Tostadoras
© 2006 McDon ald’s Corporation
Impreso en SEPTIEMBRE de 2000
Modificado en ABRIL de 2006
Página 4 de 6
Page 41

Cuándo
Mensualmente
Herramientas
Llave ajustable
Destornillador de punta plana
Apretar los pernos de la platina y de las patas
APRETAR LOS PERNOS DE LA PLATINA
1. Gire el interruptor de encendido hasta la posición OFF.
2. Desenchufe el cable de alimentación.
3. Permita que la tostadora se enfríe antes de continuar.
4. Use una llave ajustable para apretar los pernos de la platina que sostienen la
manilla en posición vertical.
APRETAR LOS PERNOS DE LAS PATAS
1. Dé vuelta cuidadosamente la tostadora para tener acceso a las patas.
2. Ajuste y apriete los pern os de las patas para obtener el asen tamiento de nivel
para tostar.
3. Coloque la tostadora en posición normal y revise el asentamiento de nivel.
4. Ajuste los pernos de las patas según sea necesario hasta que la tostadora se
encuentre nivelada.
5. Enchufe el cable de alimentación en el tomacorriente adecuado.
6. Si va a usar la tostadora pronto, gire el interruptor de encendido hasta la
posición ON (encendido).
TS 016-1
Tostadoras
Cuándo
Mensualmente
Herramientas
Alicate
Martillo
Lima
Revise las plataformas de la bandeja de pan, el bandejón de
pan, las bandejas de pan y las espátulas
IMPORTANTE: Este procedimiento de revisión se debe realizar
mientras las plataformas, bandejas y espátulas estén frías. Se debe
realizar en todas las espátulas, bandejas y plataformas.
ESPÁTULA PARA PAN
1. Deje la espátula sobre la superficie de una mesa de trabajo plana.
2. Asegúrese de que toda la superficie esté plana, incluyendo el borde
delantero. El extrem o delantero de la espátula para pan debe estar libre de
muescas y rebabas.
3. Afile el borde delantero de la espátula para que desaparezcan todas las
muescas y rebabas.
IMPORTANTE: Enderece esquinas rizadas con un alicate y martillee el
centro de la bandeja hasta que quede plana.
BANDEJA DE PAN
1. Coloque la banda de rodamiento sobre la superficie de una mesa de trabajo
plana y verifique que esté plana.
2. Verifique que la bandeja tenga una altura un iforme.
3. Enderece las esquinas rizadas con un alicate y martillee el centro de la
bandeja hasta que quede plana.
© 2006 McDon ald’s Corporation
Impreso en SEPTIEMBRE de 2000
Modificado en ABRIL de 2006
Página 5 de 6
Page 42

PLATAFORMA DE LA BANDEJA DE PAN
1. Retire la plataforma de la parte inferior de la tostadora.
2. Coloque la plataforma sobre la superficie de una mesa de trabajo plana e
inspeccione toda la superficie para asegurarse de que esté plana.
3. Use el alicate o el martillo para enderezarla según sea necesario.
4. Vuelva a instalar la plataforma en la tostadora.
BANDEJÓN DE PAN
1. Retire el bandejón de pan de la tostadora.
2. Coloque el bandejón de pan sobre la superficie de una mesa de trabajo plana
y verifique que esté plano.
3. Mida la distancia entre la superficie de la mesa y la parte inferior del
bandejón de pan en la parte delantera, central y posterior. Debe ser
aproximadamente de 13 mm (1/2") para todas las tostadoras, excepto las de
las series Big Mac 412 y 416, y aproximadamente de 19 mm (3/4") para las
tostadoras Big Mac.
4. Dóblelo según sea necesario para que se mantenga plano.
TS 016-1
Tostadoras
© 2006 McDon ald’s Corporation
Impreso en SEPTIEMBRE de 2000
Modificado en ABRIL de 2006
Página 6 de 6
 Loading...