

Prince Castle 411-CFMCE Parts List
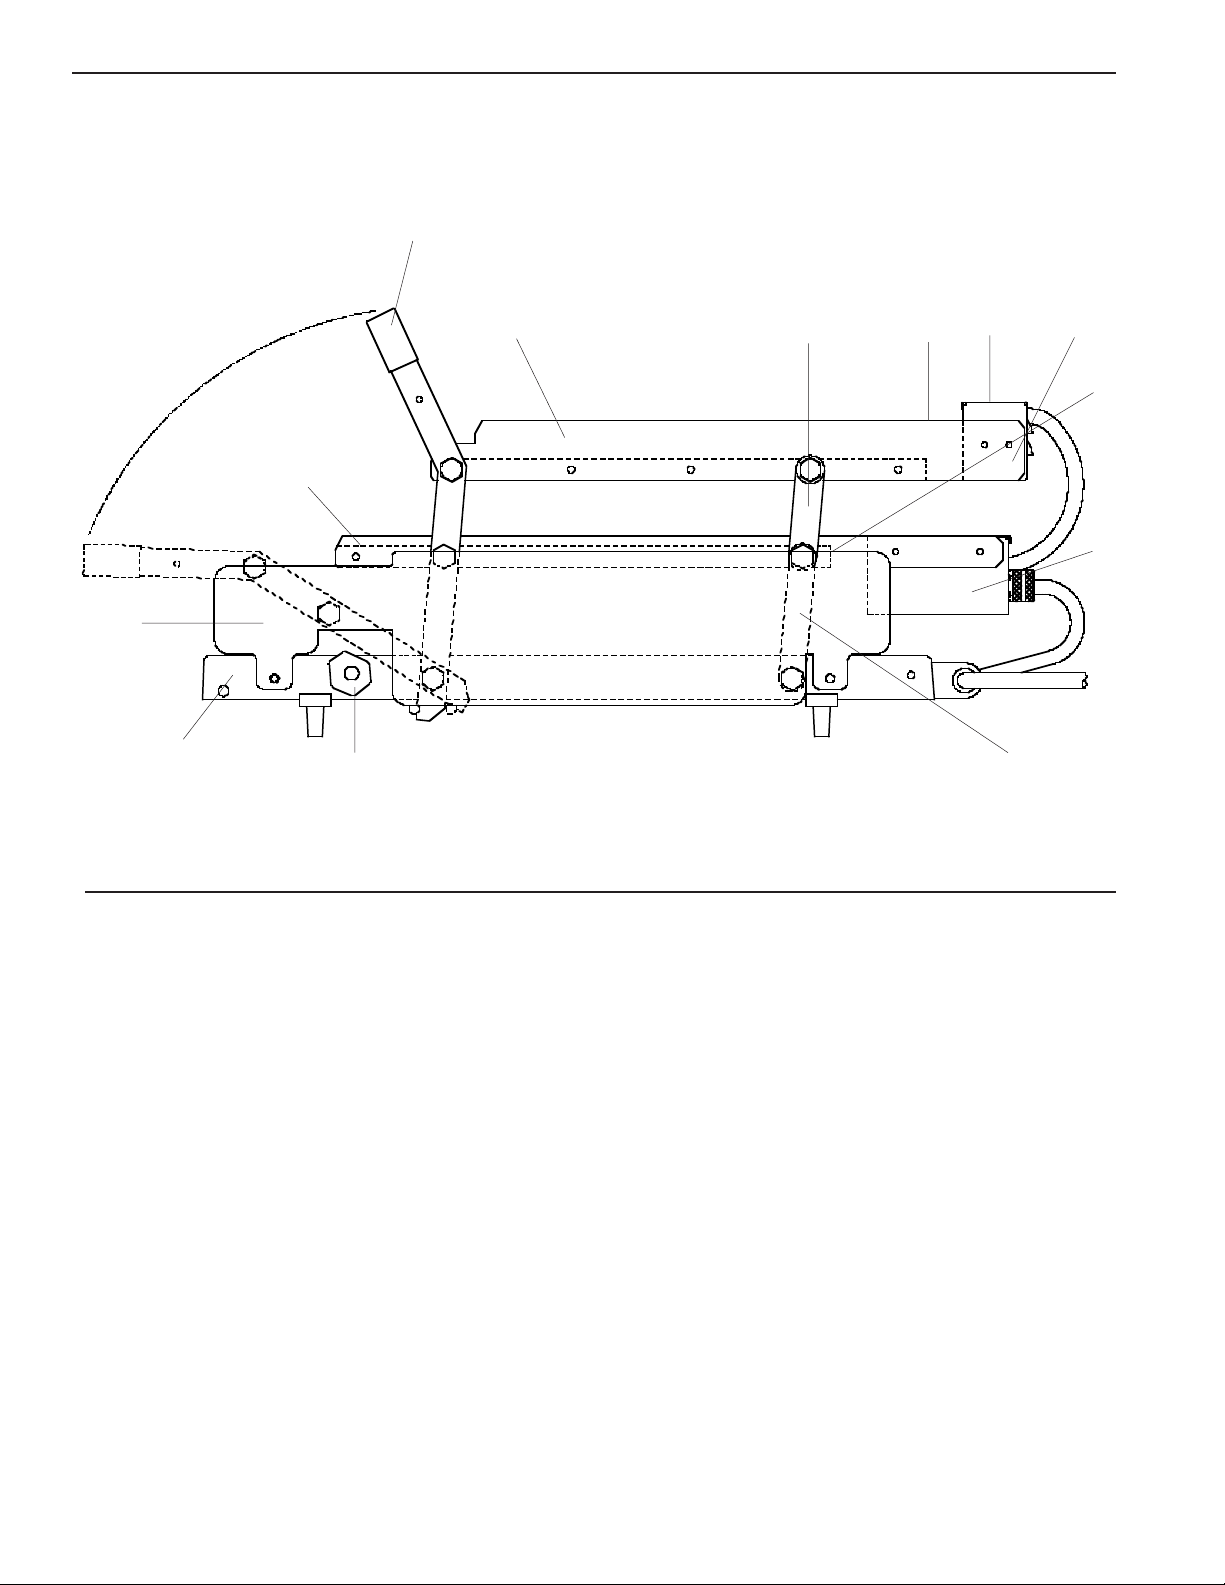
SIDE VIEW
1
12
11
13
10
2
3456
7
8
9
PARTS LIST
ITEM PART NUMBER DESCRIPTION
1 411-149S Handle and Lever Assy.
2 411-441 Right Hand Upper Bun Fence
411-440 Left Hand Upper Bun Fence
3 411-161S Upper Rear Lever Assy.
4 411-378 Upper Rear Bun Fence
5 411-31 Upper Cover
6 411-283 Upper Chassis
7 411-381 Lower Rear Bun Fence
8 411-741 Lower Chassis
9 411-459S Lower Rear Lever Assy.
10 411-137 Right Hand Stop Block
411-138 Left Hand Stop Block
11 411-2S Base
12 411-444 Side Panel, Right Hand
411-445 Side Panel, Left Hand
13 411-379 Right Hand Lower Bun Fence
411-380 Left Hand Lower Bun Fence
Not Shown 411-114 Safety Latch
Not Shown 411-131 Bun Board
2

FRONT VIEW
1
PARTS LIST
2
3
5
REAR VIEW
2
3
4
1
2
ITEM PART NUMBER DESCRIPTION
1 411-483S Upper Platen 230V
2 411-60 Front Upper
Platen Stud
3 411-60 Front Lower
Platen Stud
4 411-486S Lower Platen 230V
5 89-959S Foot (Pkg. of 4)
2
PARTS LIST
3
3
4
4
6
5
ITEM PART NUMBER DESCRIPTION
1 411-712 Upper Faceplate
2 411-57 Platen Spacer
3 411-147 Rear Upper
Platen Stud
4 411-61 Rear Lower
Platen Stud
5 411-705 Lower Faceplate
6 411-707 Overlay
3
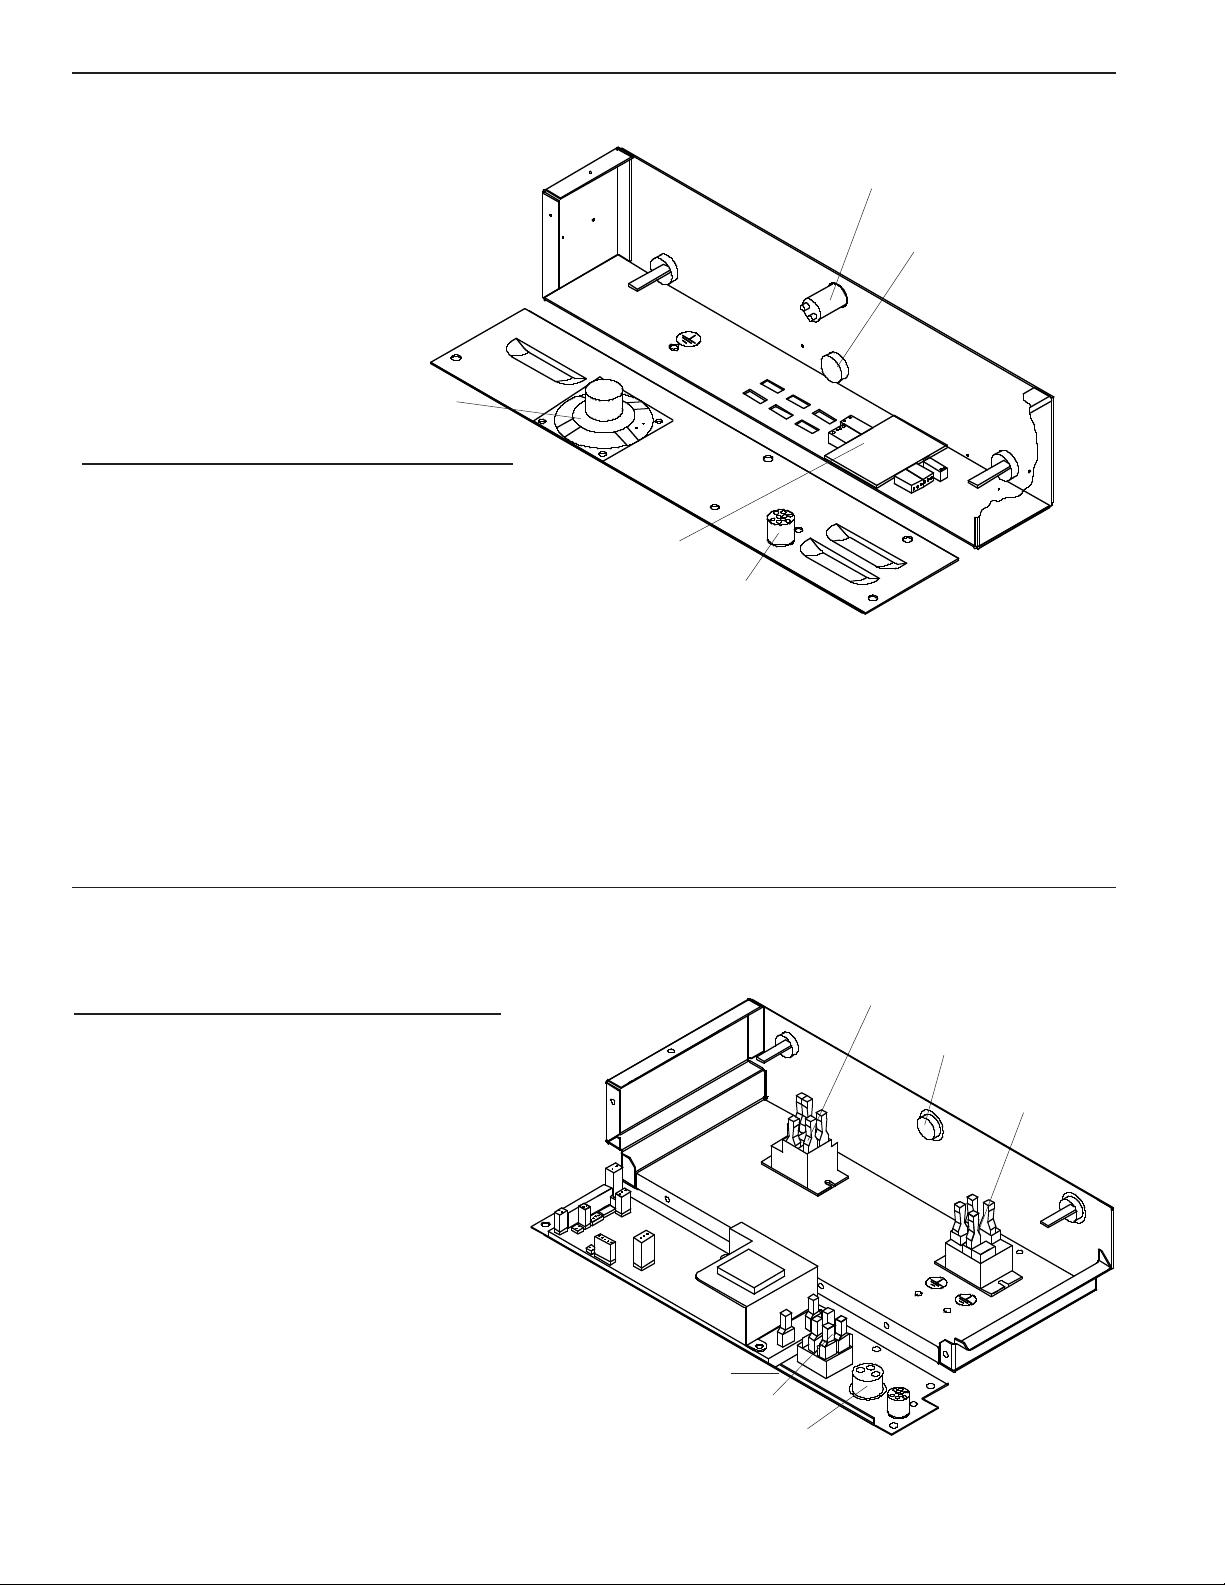
INTERNAL VIEW UPPER CONTROL BOX
5
PARTS LIST
1
2
ITEM PART NUMBER DESCRIPTION
1 213-257S Bun Done Light
2 411-700S Upper Probe
3 411-740 Interconnect Cable
4 411-14S Interconnect Board
5 213-229S Speaker
INTERNAL VIEW LOWER CONTROL BOX
PARTS LIST
ITEM PART NUMBER DESCRIPTION
4
3
1
2
3
1 65-053-04S Relay
2 411-700S Probe
4 72-301S Power Cord
5 78-166S Rocker Switch
6 411-427-02S Control Display
P.C. Board, 200-230V
6
5
4
4
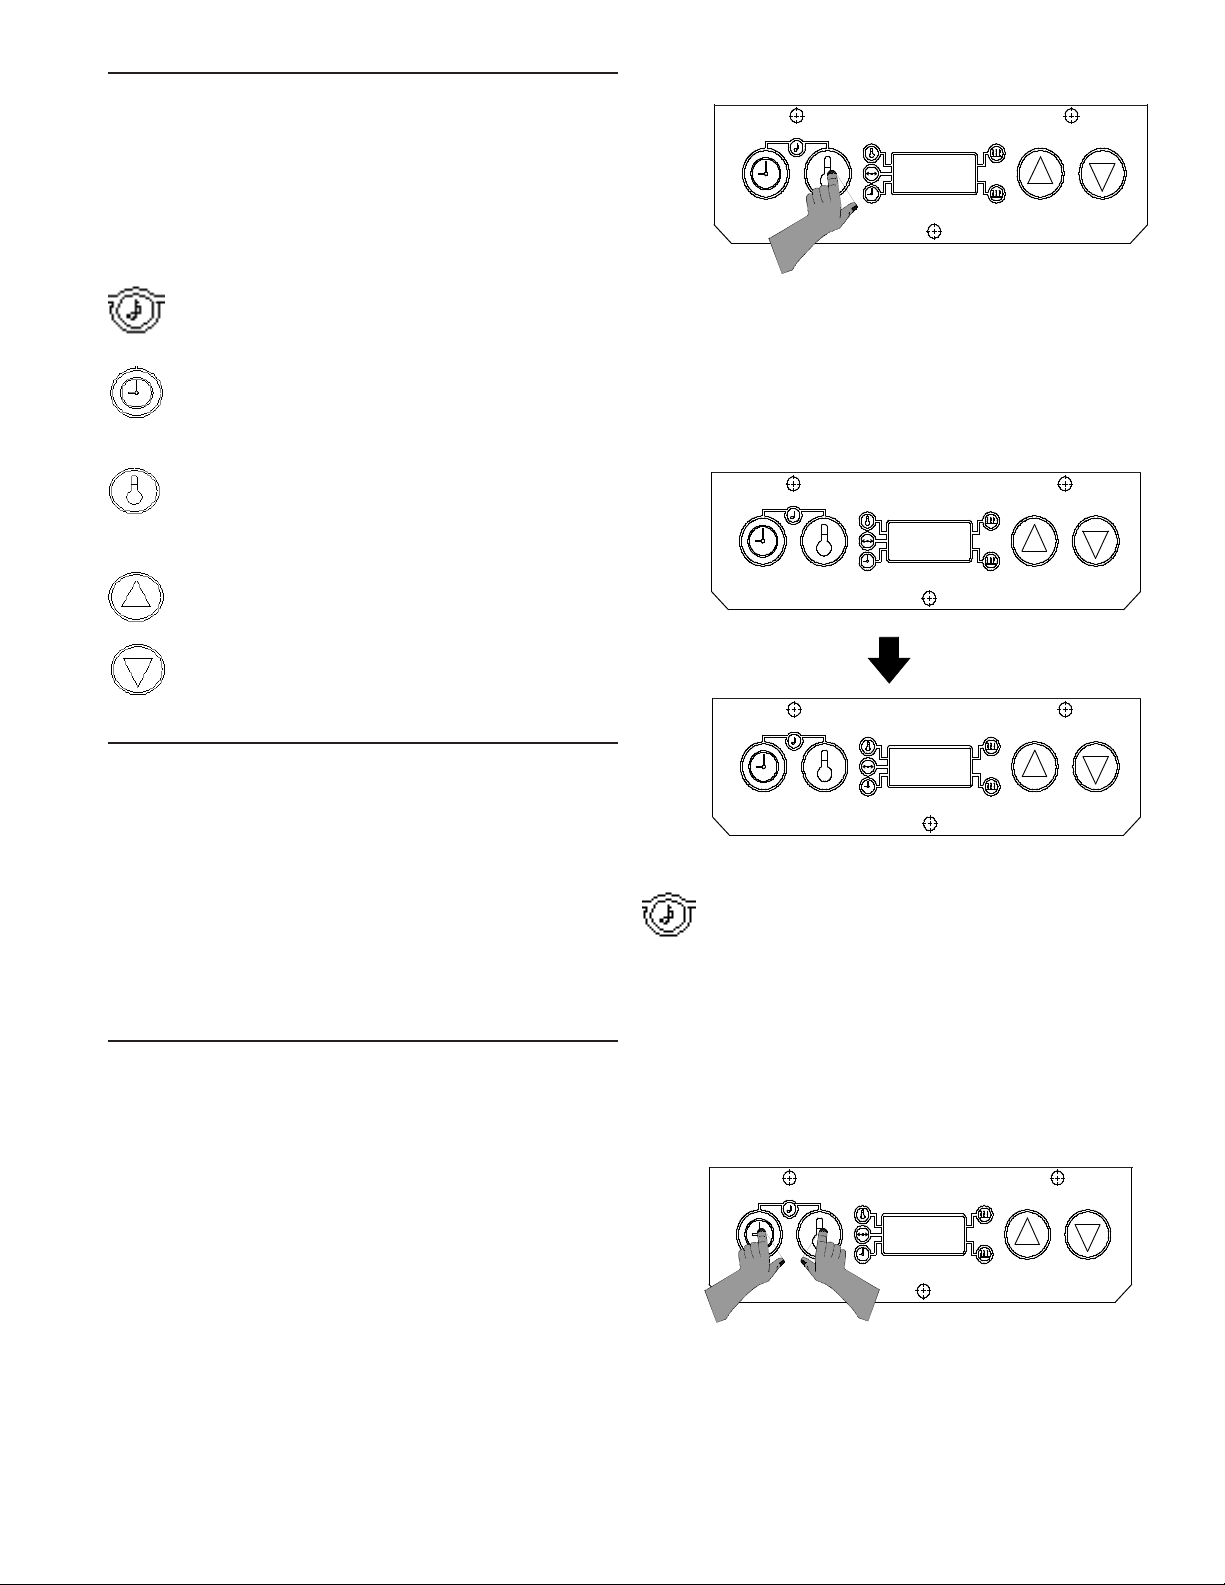
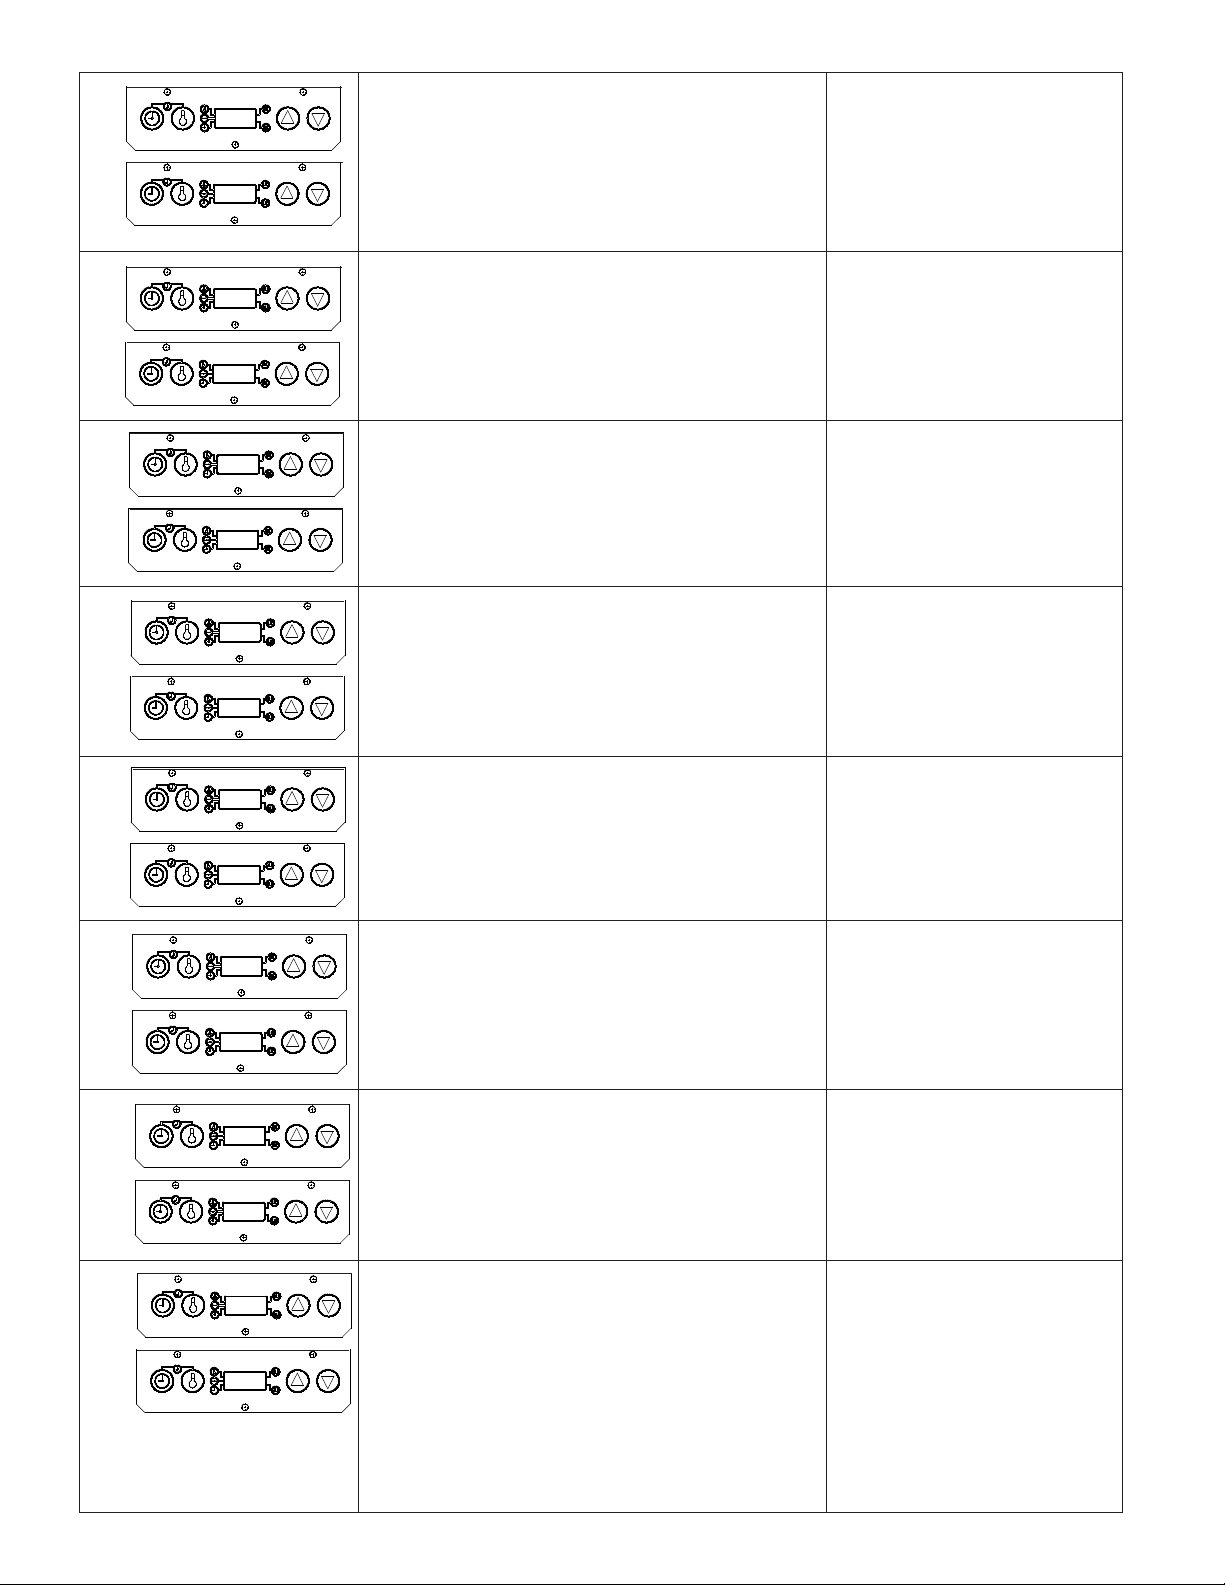
SYMBOLS & TERMS
C - - A Toaster is set on Celsius.
F - - A Toaster is set on Fahrenheit.
A L - Alarm Level setting 1-4.
figure 1
F - -
Sound Button: Used with timer button
and temperature button to set alarm level.
Timer Button: Used to view time in run
mode. Used to set time in program
mode.
Temperature Button: Used to view set
point temperature in run mode, and used
to set the set point temperature in program mode.
Up Arrow: Used to set time, sound and
temperature in program mode.
Down Arrow: Used to set time, sound,
and temperature in program mode.
FACTORY PRE-SET
Prince Castle’s Solid State Digital Display toasters are
pre-set at the factory.
If your toaster model is set for a 35 second toast time,
then the temperature is pre-set and calibrated to 215°C.
If your toaster model is set for a 55 second toast time,
then the temperature is pre-set and calibrated to 204°C.
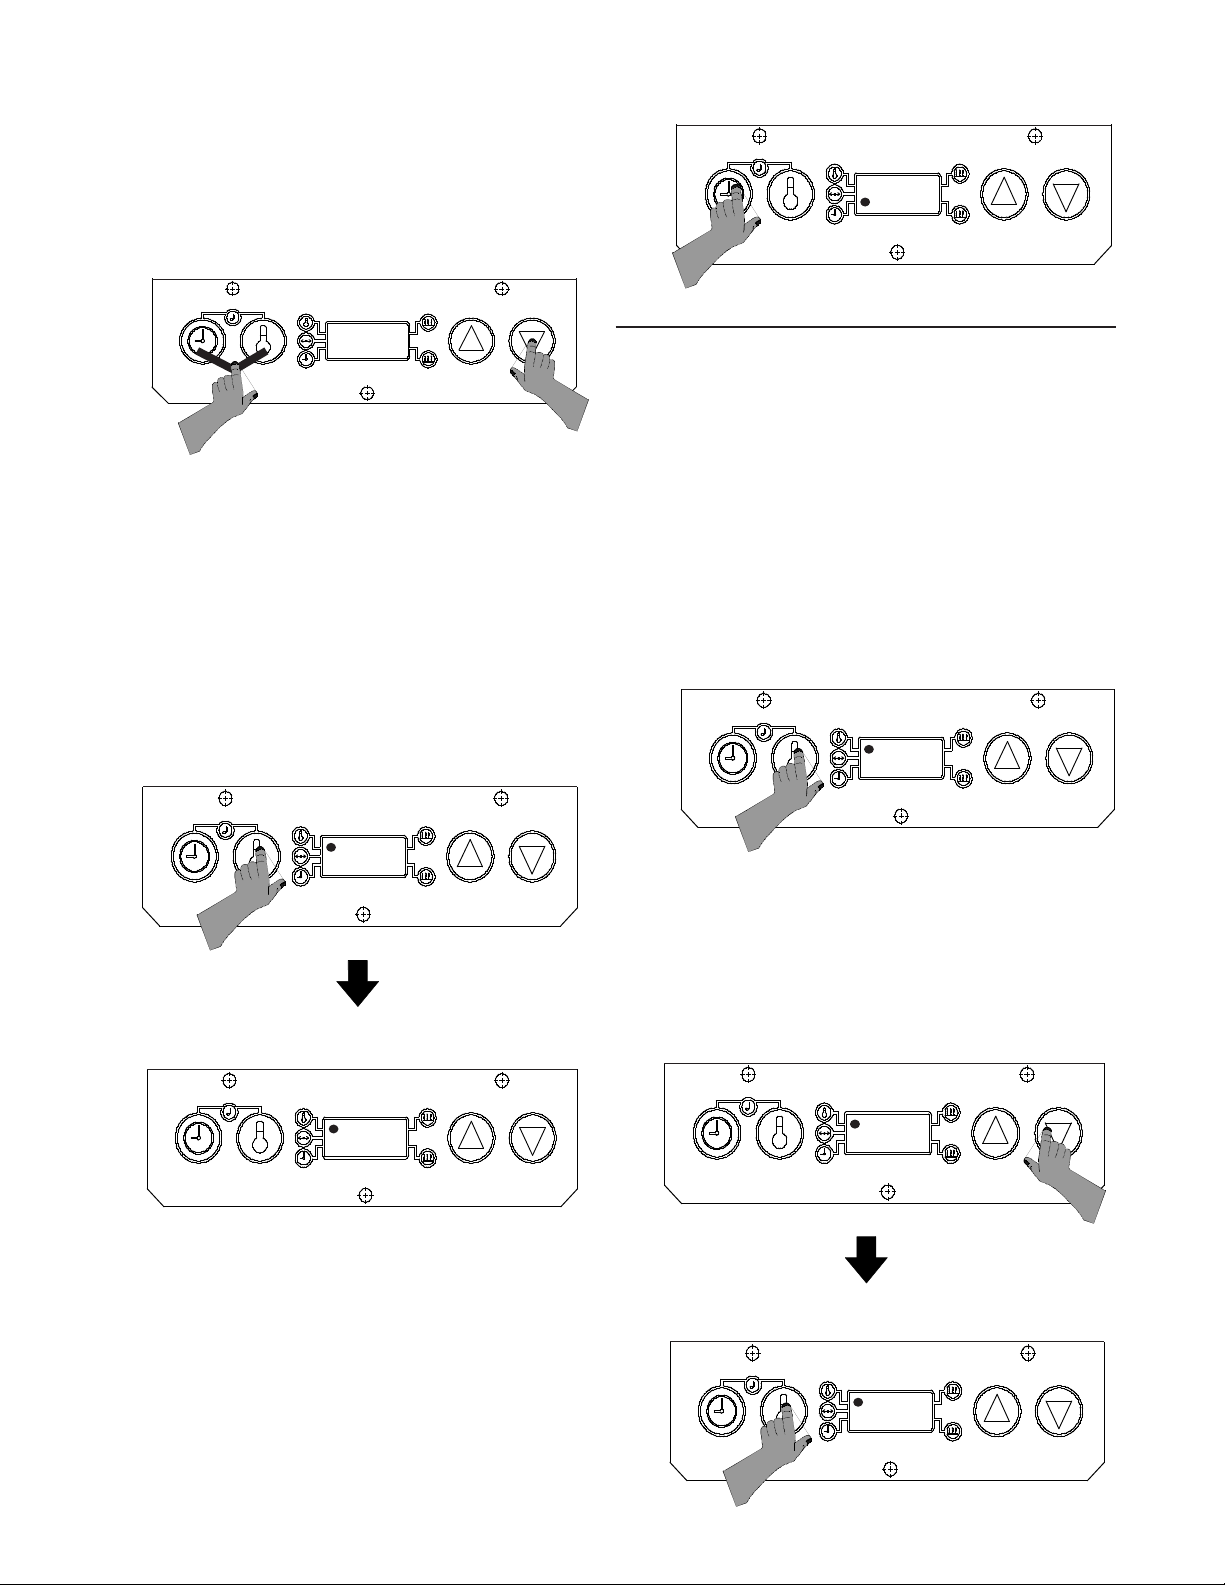
SET-UP
3. During the pre-heat cycle, the display will read L O -. When the platen temperature reaches
149° C (300° F), the display will begin to show
the actual platen temperatures throughout the
toasting cycles. See figure 2.
figure 2
- L O -
1 4 9
Sound Level Adjustment
The audio alarm has four sound levels.
1. Press and hold the time button and temperature
buttons simultaneously. The display will show the
current sound level. The toasters are factory set
at level 4, and the display will read, A L 4 for
Alarm Level 4. See figure 3.
1. Refer to the nameplate on the control box for the
proper operating voltage. Connect the toaster to a
grounded receptacle that matches the nameplate
voltage information. Press the power switch to the
on position, allow the unit 30 minutes to reach
operating temperature.
2. The toaster is factory-set to display temperatures
reading in Celsius. When the toaster is turned on,
the digital display on the controll box will read C--A
for Celsius, and the “A” will begin to count down 9
seconds. During this countdown, you can change
the temperature display from Celsius to Farenheit
readings. To change temperature display, press
and hold the temperature button for six seconds.
See figure 1.
figure 3
A L 4
5
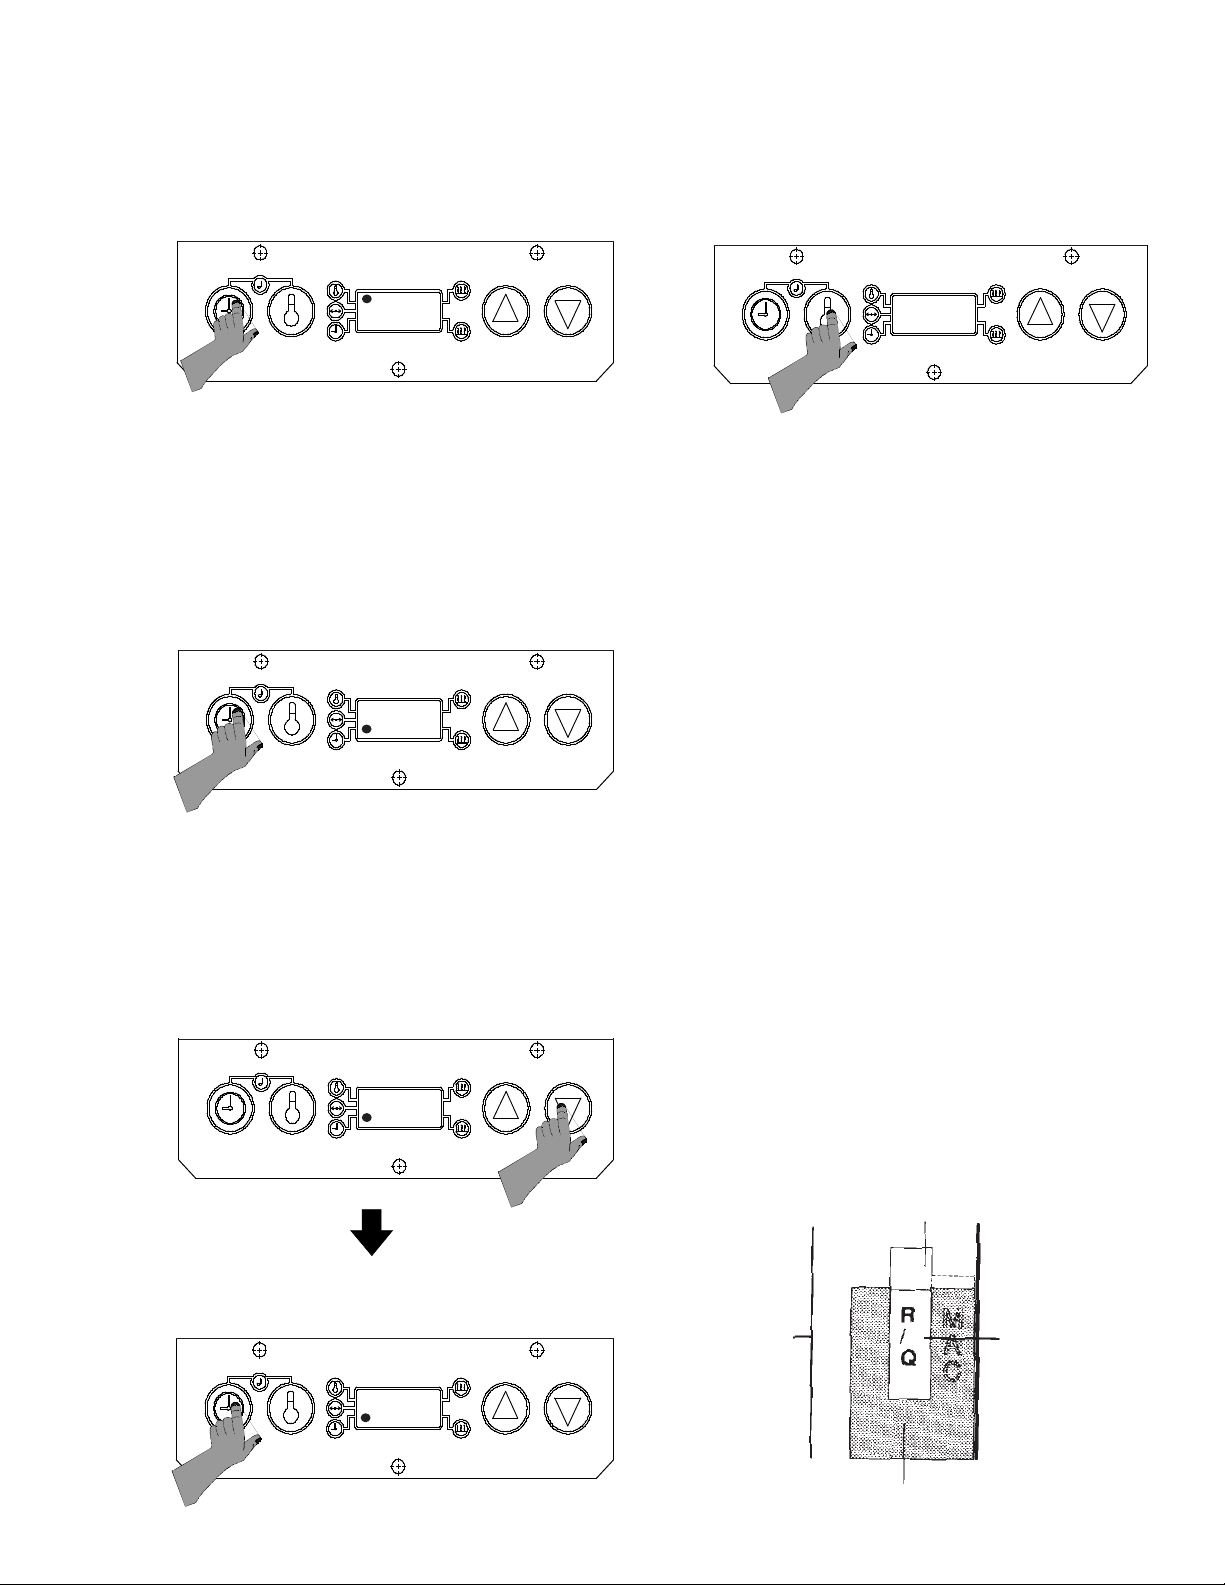
2. While holding the time and temperature buttons,
press the up or down arrow buttons to adjust the
sound level. A continuous tone will sound.
Release all buttons when the desired sound level
is reached. The display will show the current
sound level. See figure 4.
figure 4
figure 6
SET TIME
2 0
A L 2
VIEW SET POINT TEMPERATURE
1. Press and release the temperature button. (Do not
hold for more than 6 seconds.) A beep will sound,
the temperature indicator will turn on, and the
display will show the set point temperature for three
seconds. The display will then change to show the
actual temperature. See figure 5.
figure 5
SET POINT TEMPERATURE
2 1 5
ACTUAL TEMPERATURE
PROGRAMMING
The programming modes are used for setting individual
set point temperature, and setting toast times.
Programming the Set Point Temperature
1. Press and hold the temperature button for six
seconds. A beep will sound, the temperature
indicator light will blink, and the display will show
the current set point temperature. See figure 7.
figure 7
215
2. To change the set point temperature, use the up
or down arrow. Once the desired temperature is
displayed, press the temperature button to store
the new setting. See figure 8.
figure 8
ADJUST SET POINT TEMPERATURE
2 1 6
VIEW TIMER SETTING
1. Press and release the time button. (Do not
press the time button for more than 6 seconds.)
The set time will be displayed for three seconds.
If the timer is activated and is in a countdown
sequence, the time remaining will be displayed,
and will continue to countdown to zero. After
three seconds, the display will change to show
actual platen temperature. See figure 6.
2 0 4
STORE SET POINT TEMPERATURE
2 0 4
6
3. To cancel the set point programming mode at any
time, press and release the time button. The
display will change to show the actual platen
temperature. See figure 9.
3. To cancel the time set function at any time, press and
release the temperature button. The time indicator
light will turn off, and the display will change to show
the actual platen temperature. See figure 12.
figure 9
2 1 5
Programming Toast Times
1. Press and hold the time button for 6 seconds. A
beep will sound, and the time indicator light will
blink. Release the time button to show the
current toast time. See figure 10.
figure 10
5 5
figure 12
2 1 5
SETTING STOP BLOCKS
Stop blocks allow for proper crush when toasting
buns. The toaster leaves the factory with the stop
blocks set on R/Q.
Dual stop blocks allow you to switch back and forth
from Reg/Qtr. bun and Big Mac Bun toasting, or Rib
bun or Rye bun toasting.
1. Ensure the stop blocks are on the correct setting.
There are (6) combination Stop Block Settings:
1. R/Q / MAC 4. RIB / RYE
2. R/Q+ / MAC + 5. RIB+ / RYE +
3. R/Q- / MAC - 6. RIB- / RYE -
2. Use the up and down arrow buttons to set your
desired toast time. The range is from 20 seconds
to 1 minute, 30 seconds. When desired time is
reached, press and release the time button to
store the new time. See figure 11.
figure 11
SETTING THE NEW TIME
3 5
STORING THE NEW TIME
3 5
THE (+) SETTING IS FOR BUNS THAT ARE CUT
TOO THICK. THE (-) SETTING IS FOR BUNS CUT
TOO THIN. FOR NORMAL SIZE BUNS DO NOT USE
(+) or (-) SETTINGS.
[R/Q = REG/QTR]
2. Rotate stop blocks by hand to the desired
combination bun setting listed above.
3. View the stop block setting selected through the
index window bracket, which is located over the
left stop block. See figure 13.
figure 13
SIDE PANEL
STOP BLOCK
BUN SETTING
(REGULAR BUNS)
7
INDEX WINDOW BRACKET
4. To switch between the two types of buns per
your stop block setting, locate the selector lever
on the front of the toaster frame. Move the lever
left or right to switch back and forth between the
combination setting. See figure 14.
figure 14
figure 15
FRONT OF
FRAME
CLEANING
1. Press the power switch to the off position.
SELECTOR
LEVER
2. Unplug toaster.
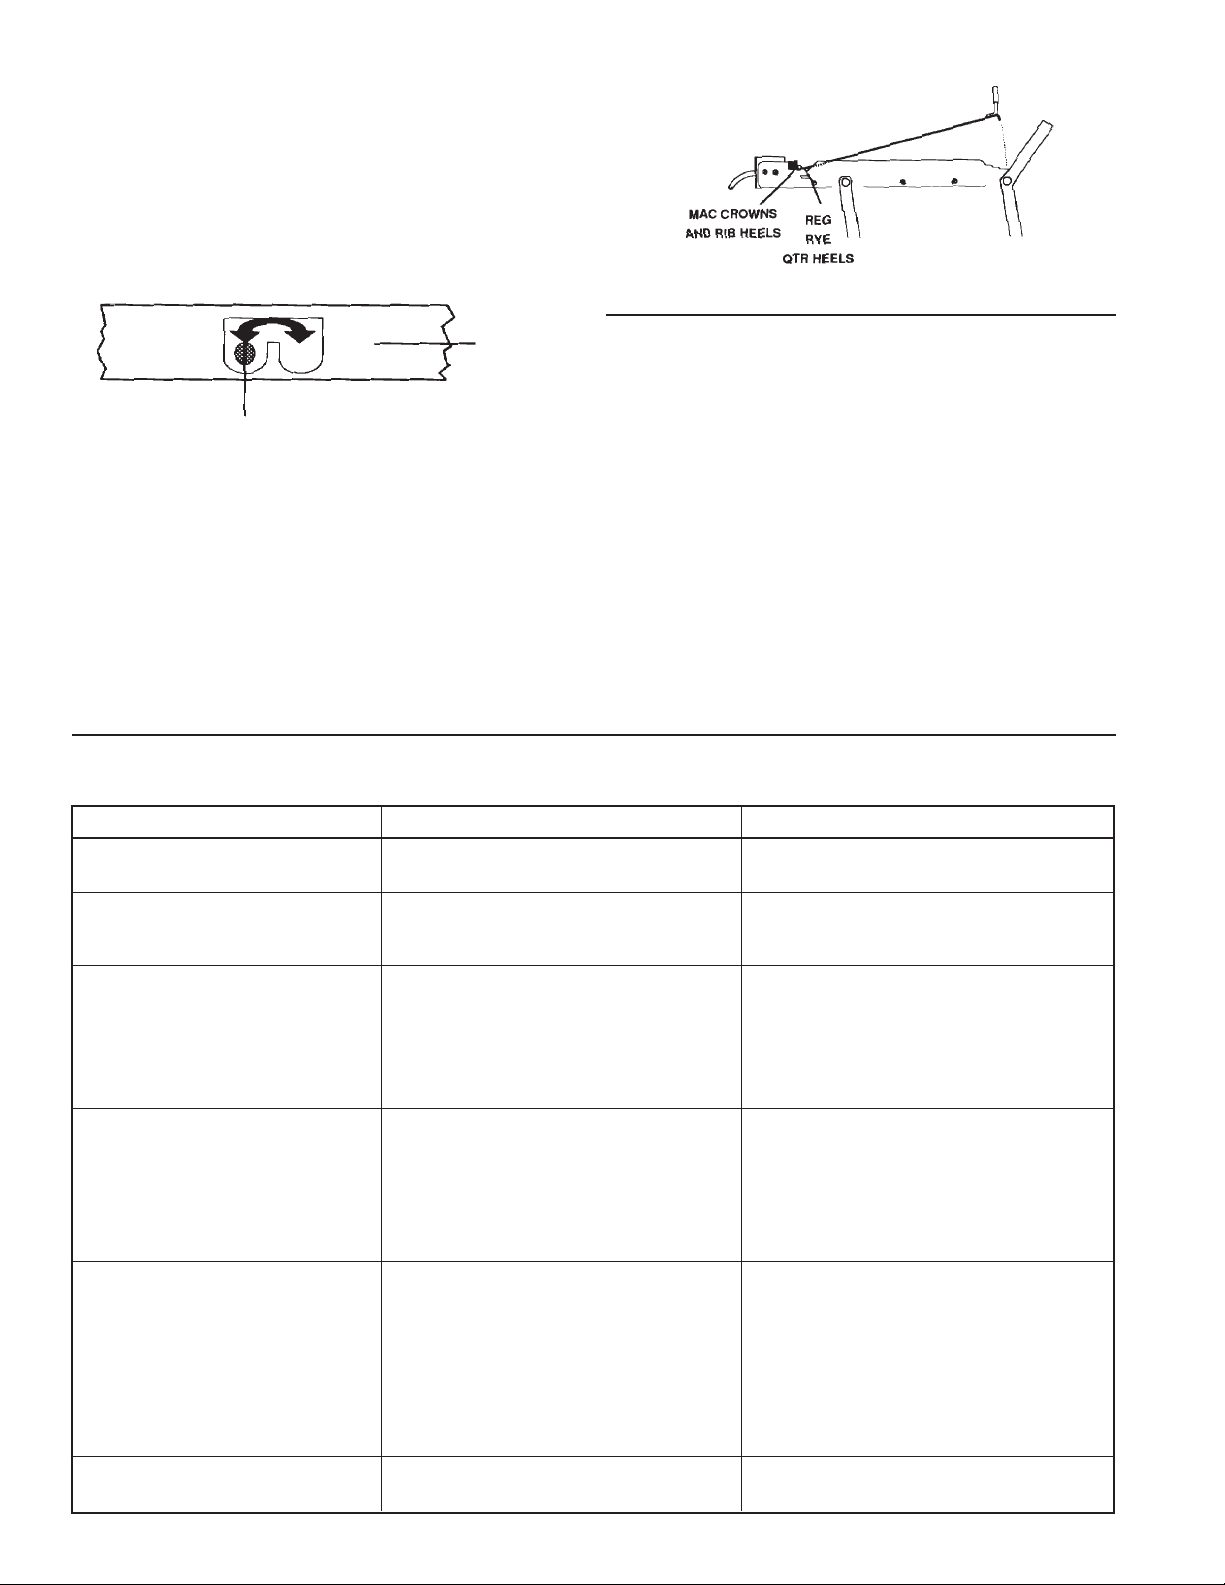
BUN BOARD ADJUSTMENTS
3. Allow toaster and platens to cool down.
1. Push or pull the bun board handle to desired
notched setting as indicated by graphics
stamped on top of bun board. See figure 15.
4. Wipe entire platen with clean, damp grill cloth.
Full toaster cleaning must be done in the morning when toaster is cold. See your Planned
2. Bun board graphics are:
Maintenance Card for proper cleaning procedures.
FRONT = REG, RYE, QTR HEELS
REAR = BIG MAC, (CROWNS) AND RIB HEELS
IMPORTANT: Do not drape cord over hot toaster bun
board or platen. This will cause cord to burn.
TROUBLESHOOTING GUIDE
PROBLEM CAUSE SOLUTION
Platen loose. Platen bolts loose. Tighten platen bolts.
Speaker sounds, but no Done light burned out. Replace done light.
bun done light comes on.
No audio alarm or Interconnect cable connection Check connections at Opto-Sensor
amber colored bun loose. board and main board.
“done” light. Keyhole slot filled with debris. Clean keyhole slot.
Speaker defective Replace speaker.
Opto-Sensor board defective Replace Opto-Sensor board.
Buns being crushed. Stop blocks not adjusted Adjust stop blocks.
properly.
Warped bun trays. Straighten or replace bun
trays.
Buns cut improperly. Contact bakery.
Platen does not heat. No power. Check power source.
Power switch defective. Replace power switch.
Shorted power board. Replace power board.
Platen burned out or shorted. Check platen with ohmmeter
for 11 ohms, if reading is less
than 7 ohms or more than 14
ohms, replace platen.
No Display. Fuse Defective. Check fuse with ohmmeter,
reading should be 1-2 ohms.
8
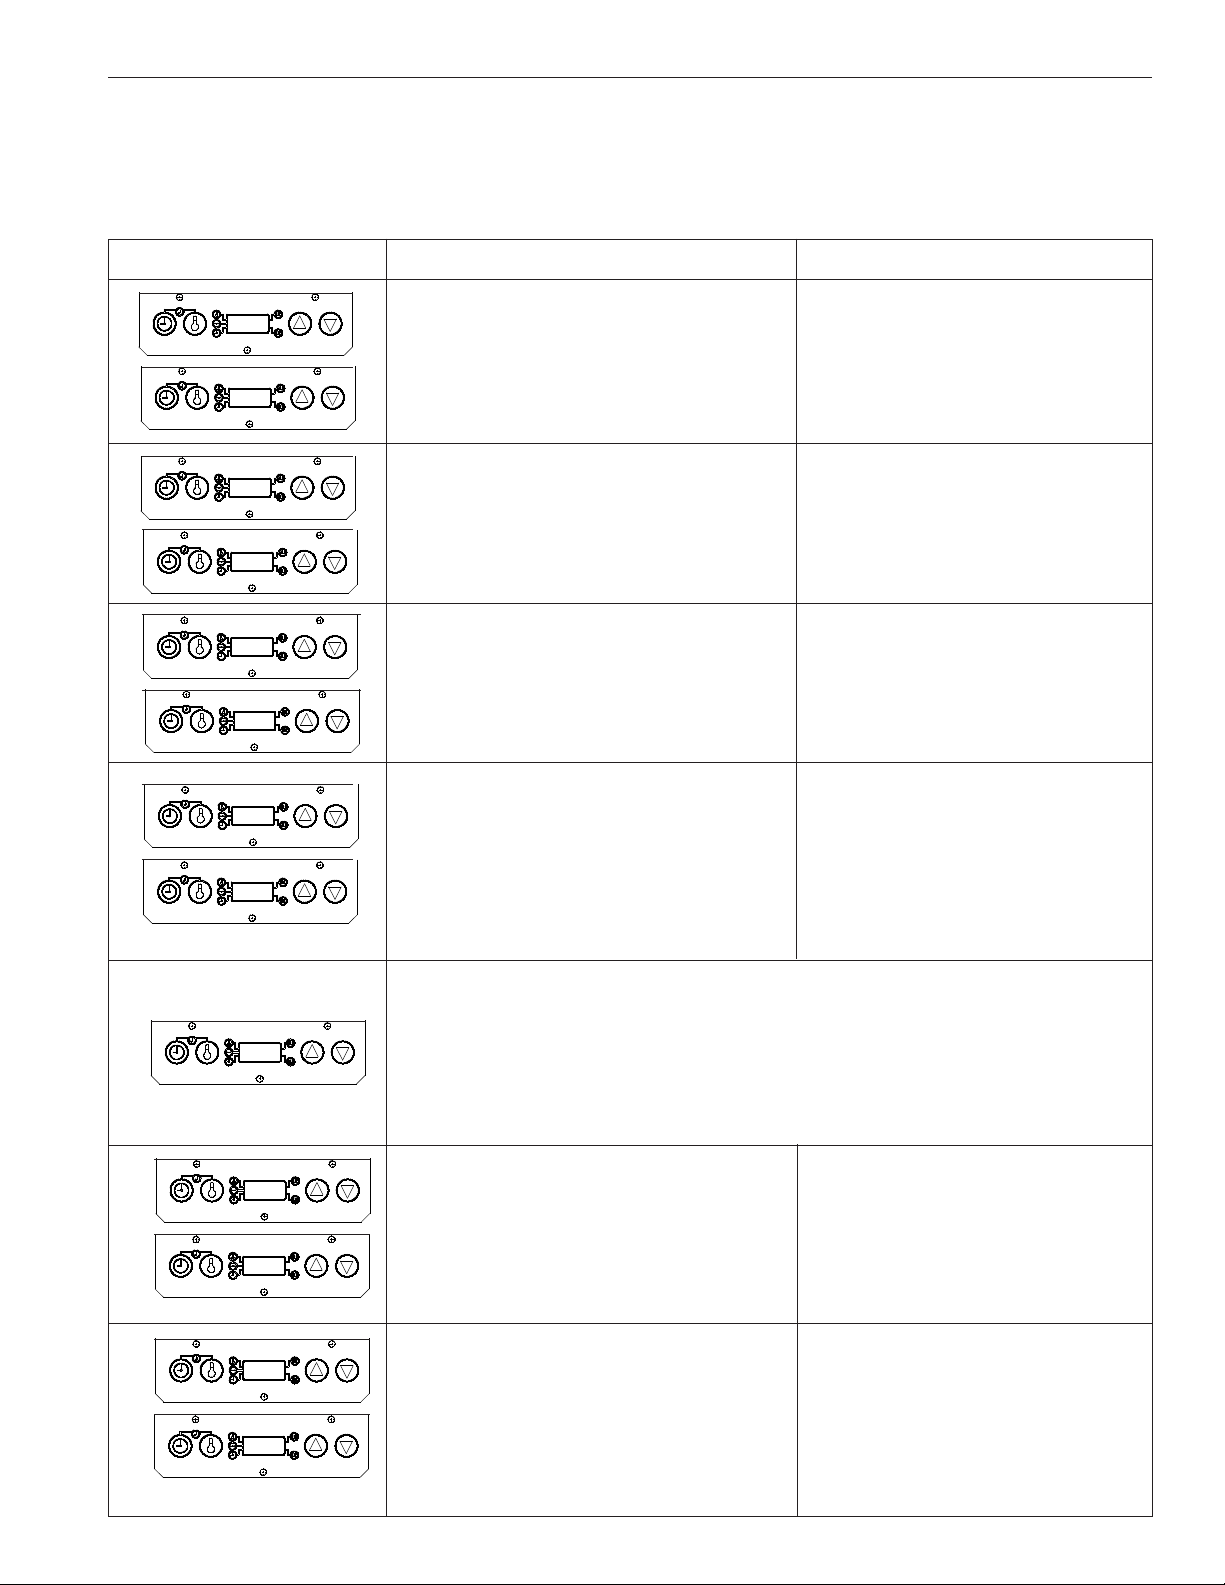
DIAGNOSTIC TROUBLESHOOTING
If the toaster malfunctions, the display will flash an error code E and a number between 1-9, or a letter between AE. Below are different error codes and their solutions. For Example If error code is EO1, a failure related to the
lower platen controls has occurred. If error code is E1O a failure related to the upper platen controls has occurred.
Diagnostics Problem Solution
EO1
E1O
EO2
E2O
EO3
E3O
EO4
E4O
1. Lower Relay Contacts Shorted. Replace Lower Relay.
Lower Platen Overheating. Replace P. C. Board.
1. Upper Relay Contacts Shorted. Replace Upper Relay.
Upper Platen Overheating. Replace P. C. Board.
2. Lower Probe Open. Replace Lower Probe.
2. Upper Probe Open Replace Upper Probe.
3. Lower Failures 1 And 2 Combined
3. Upper Failures 1 And 2 Combined
4. Lower Platen Underheating. Replace Lower Relay.
Check Lower Platen Resistance.
Replace P. C. Board.
4. Upper Platen Underheating. Replace Upper Relay
Check Upper Platen Resistance.
Replace P. C. Board.
E44
EO5
E5O
EO6
E6O
Both Platens Underheating. 1.Check For Cool Air Blowing On
Toaster.
2. A maximum of 900 sets of buns can be toasted in 1 hour, anything over
that and the toaster can go into an E44 failure. If this happens discontinue
using the toaster for 3 minutes and the failure will clear. You can then resume
using the toaster again. If None of the above occurs, replace the P. C. Board.
5. Lower Failures 1 And 4 Combined.
5. Upper Failures 1 And 4 Combined.
6. Lower Failures 2 And 4 Combined.
6. Upper Failures 2 And 4 Combined.
9
EO7
7. Lower Failures 1, 2 And 4 Combined.
E7O
EO8
E8O
EO9
E9O
EOA
EAO
7. Upper Failures 1, 2 And 4 Combined.
8. Lower Probe Circuit Failure. Replace P. C. Board.
8. Upper Probe Circuit Failure. Replace P. C. Board.
9. Lower Failures 1 And 8 Combined.
9. Upper Failures 1 And 8 Combined.
10.Lower Failures 2 And 8 Combined.
10.Upper Failures 2 And 8 Combined.
EOB
EBO
EOC
ECO
EOd
EdO
EOE
EEO
11.Lower Failures 1, 2 And 8 Combined.
11.Upper Failures 1, 2 And 8 Combined.
12.Lower Failures 4 And 8 Combined.
12.Upper Failures 4 And 8 Combined.
13.Lower Failures 1, 4 And 8 Combined.
13.Upper Failures 1, 4 And 8 Combined.
14.Lower Failures 2, 4 And 8 Combined.
14.Upper Failures 2, 4 And 8 Combined.
10
 Loading...