

Page 1
Dispenser 409-50
1revA Printed in USA1102 © 2002
Dispenser
Dispenser
409
409
Operation
Operation
Manual
Manual
355 East Kehoe Blvd. • Carol Stream, IL 60188
Phone: 630-462-8800 • Toll Free: 1-800-PCASTLE
Fax: 630-462-1460 • www.princecastle.com
LIMITED WARRANTY
This product is warranted to be free from defects in material and/or workmanship for a period of one (1) year from the date of original installation.
Any component which proves to be faulty during the warranty period will be
replaced without cost to the customer.
TABLE OF CONTENTS
Product Identification . . . . . . . . . . . . . . . . . . . . . . . . . . .1
Safety Information . . . . . . . . . . . . . . . . . . . . . . . . . . . . .2
Unpacking . . . . . . . . . . . . . . . . . . . . . . . . . . . . . . . . . . .2
Important . . . . . . . . . . . . . . . . . . . . . . . . . . . . . . . . . . . .2
Ordering/Service Information . . . . . . . . . . . . . . . . . . . . .2
General . . . . . . . . . . . . . . . . . . . . . . . . . . . . . . . . . . . . .2
Initial Setup . . . . . . . . . . . . . . . . . . . . . . . . . . . . . . . . . .2
Operation . . . . . . . . . . . . . . . . . . . . . . . . . . . . . . . . . . . .3
Calibration . . . . . . . . . . . . . . . . . . . . . . . . . . . . . . . . . . .3
End of Day Cleaning . . . . . . . . . . . . . . . . . . . . . . . . . . .4
Troubleshooting . . . . . . . . . . . . . . . . . . . . . . . . . . . . . . .6
Replacement Parts . . . . . . . . . . . . . . . . . . . . . . . . . . . . .6
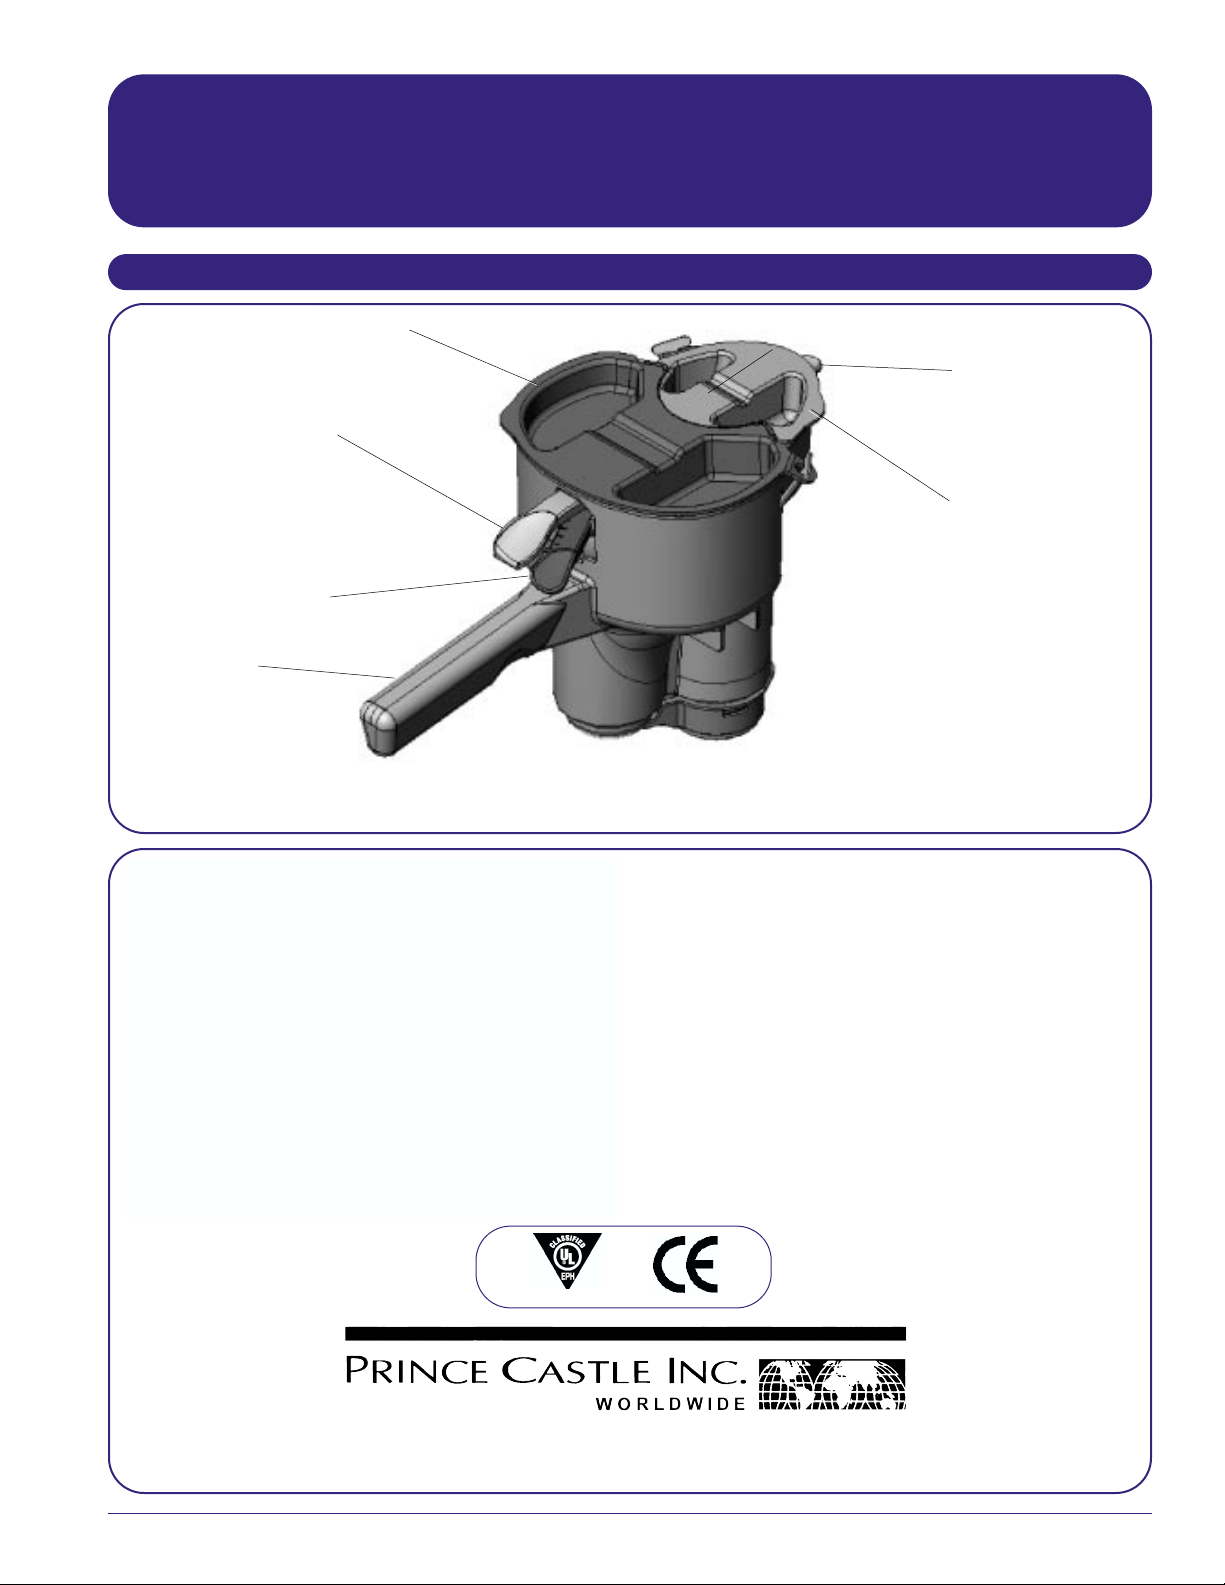
Product Identification
ANSI / C2
Dispenser Handle
Ketchup Lever – dispenses
ketchup only
Combination Lever – dispenses both
mustard and ketchup together
Mustard Lever
dispenses mustard only
Ketchup Lid
Mustard Lid
NOTE: Pressing ketchup or combination lever straight down dispenses a small portion of condiment.
Pressing ketchup or combination lever down to the left dispenses a large portion of condiment.
Page 2
Dispenser 409-501revA
Printed in USA1102 © 2002
2
Dispenser
409
Unpacking
General
Safety Information
Remove the unit from the carton and inspect for signs of
damage. If there is damage to the unit:
• notify the carrier within 24 hours of delivery
• save carton and packaging materials for inspection
purposes
• contact your local dealer, or if purchased directly, the
Prince Castle Sales Department at 800-722-7853
or 1-630-462-8800 to arrange for a replacement unit.
Prince Castle reserves the right to change specifications
and product design without notice. Such revisions do
not entitle the buyer to corresponding changes,
improvements, additions or replacements for previously
purchased equipment.
The Prince Castle 409 Dual Condiment Dispenser reduces
sandwich prep time, allowing operators to dispense both
ketchup and mustard simultaneously.
The 409 Dual Condiment Dispenser has flexible dispensing
options, which allows the operator to dispense mustard or
ketchup only, in either regular or quarter portions.
Ordering/Service Information
To order replacement parts, look on the back of your
Prince Castle Price List for the name and phone number
of your local Prince Castle Service Center. You may also
call Prince Castle at 1-800-323-2930 for the name of your
local service center
Hazard Communication Standard (HCS) Procedures
in this equipment manual include the use of chemical products. These chemical products will be highlighted with bold face letters followed by the abbreviation (HCS) in the text of the manual.
See the Hazard Communication Standard (HCS)
Manual for the appropriate Material Safety Data
Sheet(s) (MSDS).
Important
Initial Setup
A. If using dispenser for the first time, disassemble the dis-
penser and wash all parts.
NOTE: Refer to END OF DAY CLEANING, page 4, for all
disassembly/assembly procedures.
B. Thoroughly dry all parts. Assembly ketchup and mustard
spring and rod assemblies, then insert them into dispenser.
IMPORTANT: Ketchup and mustard must be at room
temperature. Shake ketchup and mustard containers
vigorously before filling dispenser. Make sure lids on
containers are tightly sealed before shaking.
C. Remove the mustard lid and fill the dispenser to the fill
line with mustard. Re-install the mustard lid.
D. Remove the ketchup lid and fill the dispenser to the fill
line with ketchup. Re-install the ketchup lid.
E. Proceed to Step 3 under Operation (next page) for
instructions on priming before initial use.
Ketchup Refill Line
Mustard Refill Line
Step D
Add ketchup to fill line
S
tep C
Add mustard
to fill line
Page 3

Dispenser 409-501
revA Printed in USA1102 © 20023
Dispenser
409
Operation
1
Remove the mustard lid and fill the dispenser to the
fill line with mustard. Re-install the mustard lid.
2
Remove the ketchup lid and fill the dispenser to the
fill line with ketchup. Re-install the ketchup lid.
3
4
Each chamber must be primed before initial use.
1. Press straight down on the combination lever
approximately 30 times to completely prime.
2. Wipe the bottom of the dispenser with a clean,
moist hand towel after priming.
3. Pressing either lever (separately or together)
straight down will deliver the proper volume for
10:1 portions.
4. Pressing either lever (separately or together)
down and to the left will deliver the proper volume
for 4:1 portions.
IMPORTANT: If air remains trapped in the piston/spring
chamber area, the dispenser will not dispense the correct
amount and condiments will drip after each shot.
To release trapped air from the mustard or ketchup chamber,
remove the lever and cap. Gently pull out the rod assemblies.
Re-install rod assemblies and repeat step 3.
If necessary, empty some of the mustard and ketchup before
reassembling.
NOTE: Refer to END OF DAY CLEANING, page 4, for all
disassembly/assembly procedures.
Mustard Lid
Ketchup Lid
Mustard Fill Line
Ketchup Fill Line
Combination Lever
(dispenses both mustard
and ketchup)
Dispense Adjustment
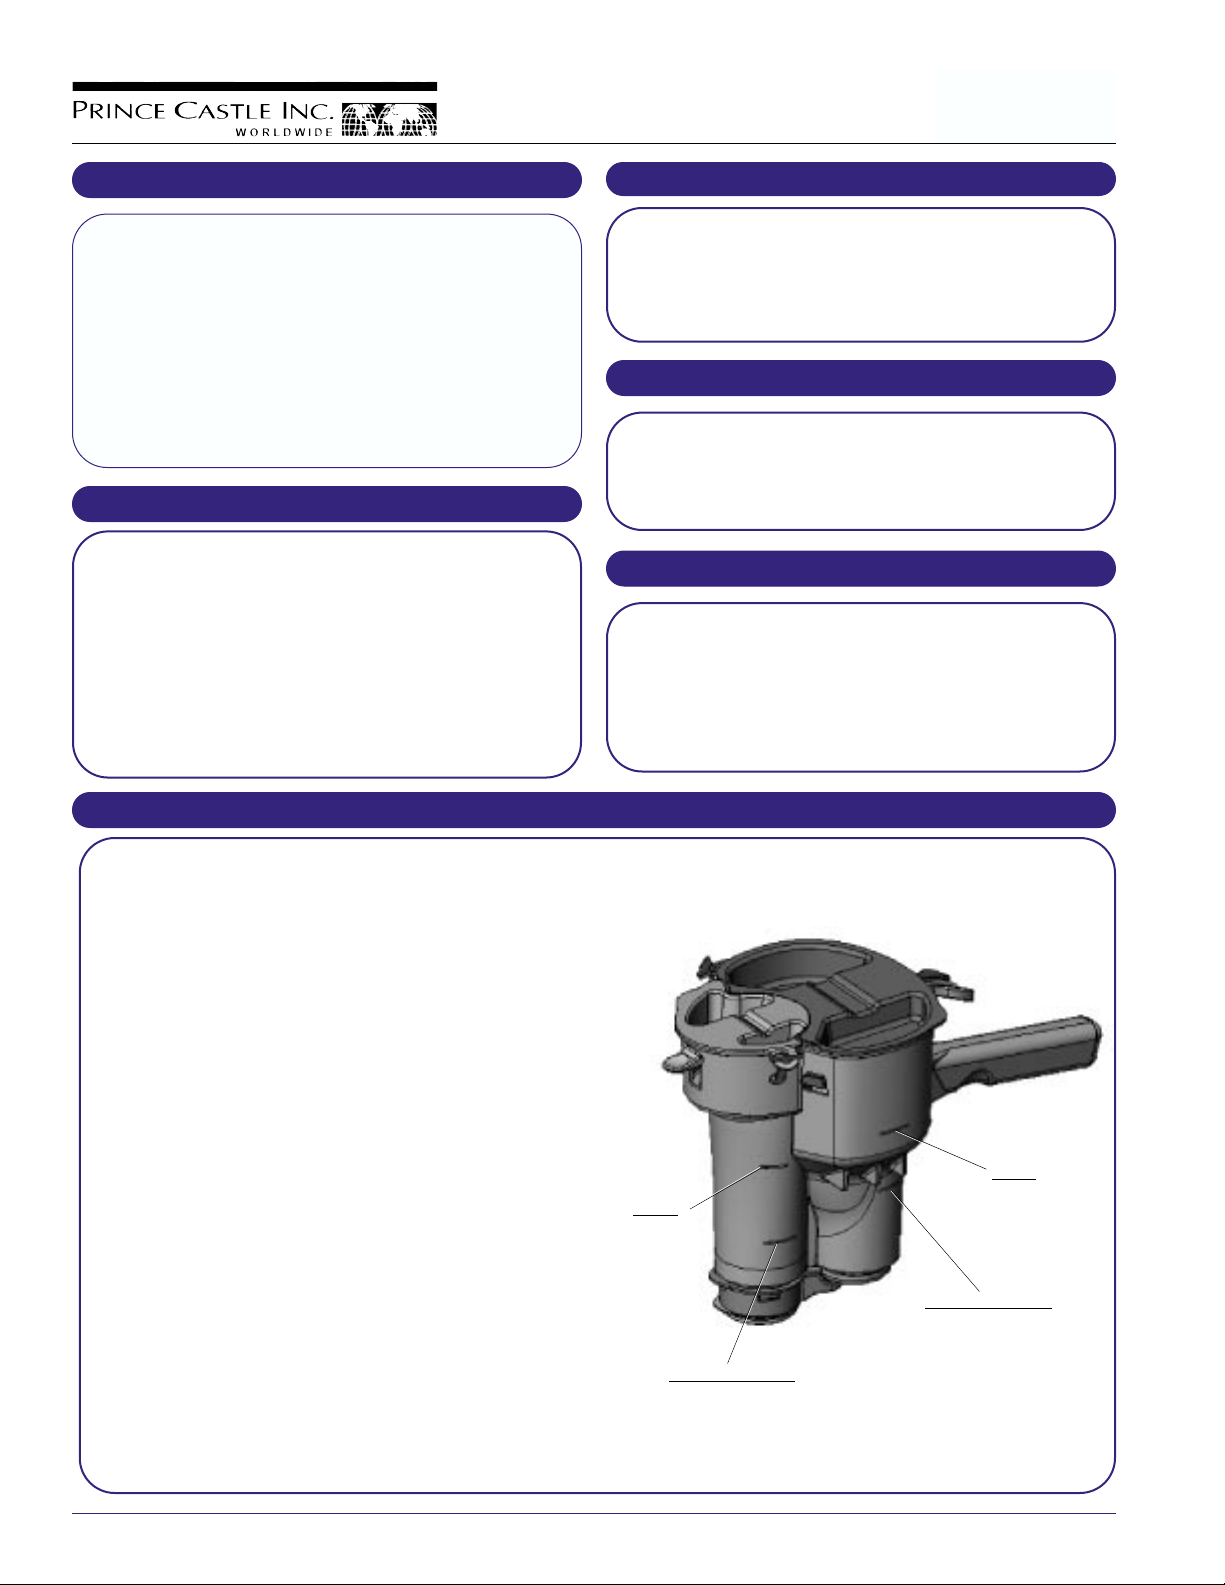
A.Set a cup under dispenser and dispense 47 shots of mustard into
cup. Allow the lever to return fully after each shot.
47 shots should dispense 1 fl.oz. of mustard into a cup.
B.If the amount dispensed is above or below 1 fl.oz., move the adjusting
cam until the dispensed amount is to equal 1 fl.oz.
C.Moving the cam to a lower number increases the amount dispensed.
Moving the cam to a higher number decreases the amount dispensed.
D.Repeat all steps for ketchup dispenser (cam adjustments are opposite for ketchup).
Mustard
Adjusting
Cam
Ketchup Adjusting Cam
Page 4

Dispenser 409-501revA
Printed in USA1102 © 2002
4
Dispenser
409
End of Day Cleaning
1
A.Empty all mustard and ketchup from the
dispenser.
B.Fill dispenser with warm water.
C.Repeatedly press both mustard and ketchup levers to
pump water and flush dispenser.
A.Remove lids.
B.Reach into the dispenser and hold the ketchup plunger
assembly down away from the ketchup lever..
C.Push end of ketchup lever down in the slot and remove
lever by sliding out of the dispenser.
D.Remove the ketchup plunger assembly from the
dispenser.
2
A.Reach into the dispenser and hold the mustard plunger
assembly (with adjustment cam) down away from the
mustard lever.
B.Rotate mustard lever in the slot and remove lever by
sliding out of the dispenser.
D.Remove the mustard plunger assembly from the
dispenser.
3
A.Disassemble each plunger assembly by pulling apart
the individual pieces. Parts are a “snap” fit.
4
Pump the Combination
Lever to empty dispenser
Push plunger assy. down
away from lever.
Push plunger assy. down
away from lever.
Slide lever out of dispenser
Rotate lever and slide
out of dispenser
Mustard plunger assembly Ketchup plunger assembly
Page 5

Dispenser 409-501revA
Printed in USA1102 © 20025
Dispenser
409
A.Wash the dispenser and all parts in a solution of warm water and mild detergent.
B.Rinse all loose parts and the container with running cold water.
C.Sanitize the dispenser.
D.Let air dry.
IMPORTANT: Do not reassemble until ready to use the next day.
5
A.Reassemble plunger assemblies as shown in step 4.
B.Place each plunger assembly into the proper dispenser cavity.
C.Slide ketchup lever into dispenser and engage the plunger assembly into the center hole on the lever.
D.Insert ketchup lever all the way through dispenser until tip of lever is properly engaged in the mounting hole.
6
A.Press and hold down ketchup lever. Rotate mustard lever and insert it all the way through dispenser mounting
holes until tip of lever is positioned into the far mounting hole, then rotate mustard lever to properly engage it into
the mounting hole. Release the ketchup lever so pin on top registers in the slot on the bottom of the mustard
lever..
B.Place adjustment cam on top of the mustard plunger assembly. Push down on plunger assembly to seat the
mustard lever on top of the plunger and adjustment cam.
NOTE: See Dispense Adjustment, page 3, for positioning the adjustment cam.
7
Slot on underside of mustard plunger
assembly engages pin on top of ketchup
plunger assembly
Place adjustment cam on mustard lever, then
push down plunger assembly to engage
plunger/cam into hole on mustard lever
Page 6

Problem Cause Solution
Will not dispense.
Troubleshooting
Plastic parts broken.
Dispenser
409
Replace broken parts.
Does not dispense full portion.
Pattern irregular.
Does not dispense correct amount
and drips from dispenser after
each use.
Mustard/ketchup collects on bottom of dispenser.
18
16
13
11
5
310
4
6
Not assembled properly.
Not primed.
Parts missing.
Out of calibration.
Diffuser holes plugged in bottom of
container.
Air pocket in piston spring and cylinder area.
Bottom of dispenser has made
contact with bun.
Ref. Kit No. Description
2 J Manifold
3 A Cylinder
4 A Check Valve
5 B Spring, Piston Return, Mustard
17
12
14
15
9
7
8
20
6
6 A Spring, Conical, Check Valve
7 D Piston
8 D Slide, Piston
9 F,H Rod, Ketchup
10 D Spring, Conical, Ketchup
11 A,G Rod, Mustard
12 G Lever, Mustard
13 G Adjustment Cam, Mustard
14 H Lever, Ketchup
15 H Adjustment Cam, Ketchup
16 F,I Lid, Mustard
17 F,I Lid, Ketchup
18 E,I Tether
Assemble properly.
See setup procedure.
Check for proper assembly.
Re-calibrate (see Calibration.
Disassemble and clean diffuser holes by
flushing water through holes.
Remove lever and cam, gently pull piston push
rod and assemble parts from mustard to release
trapped air. Reassemble.
Wipe off bottom of dispenser with damp cloth.
Kit No. Part No. Description
A 409-005S Piston, Valve & Spring Assy.
B 398-20S Piston Return Spring
C 404-7S Check Valve Spring Kit
D 404-15 Piston, Valve & Spring Kit
E 404-13S Tether (Pkg of 6)
F 409-008S Piston, Valve & Spring Assy.
2
G 409-006S Mustard Rod Lever Kit
H 409-009S Lever Adjustment Parts Kit
I 409-011S Mustard/Ketchup Lid Tether Kit
J 409-17S Manifold & Lid Kit
 Loading...