

Prince Castle 340-URT Installation Manual
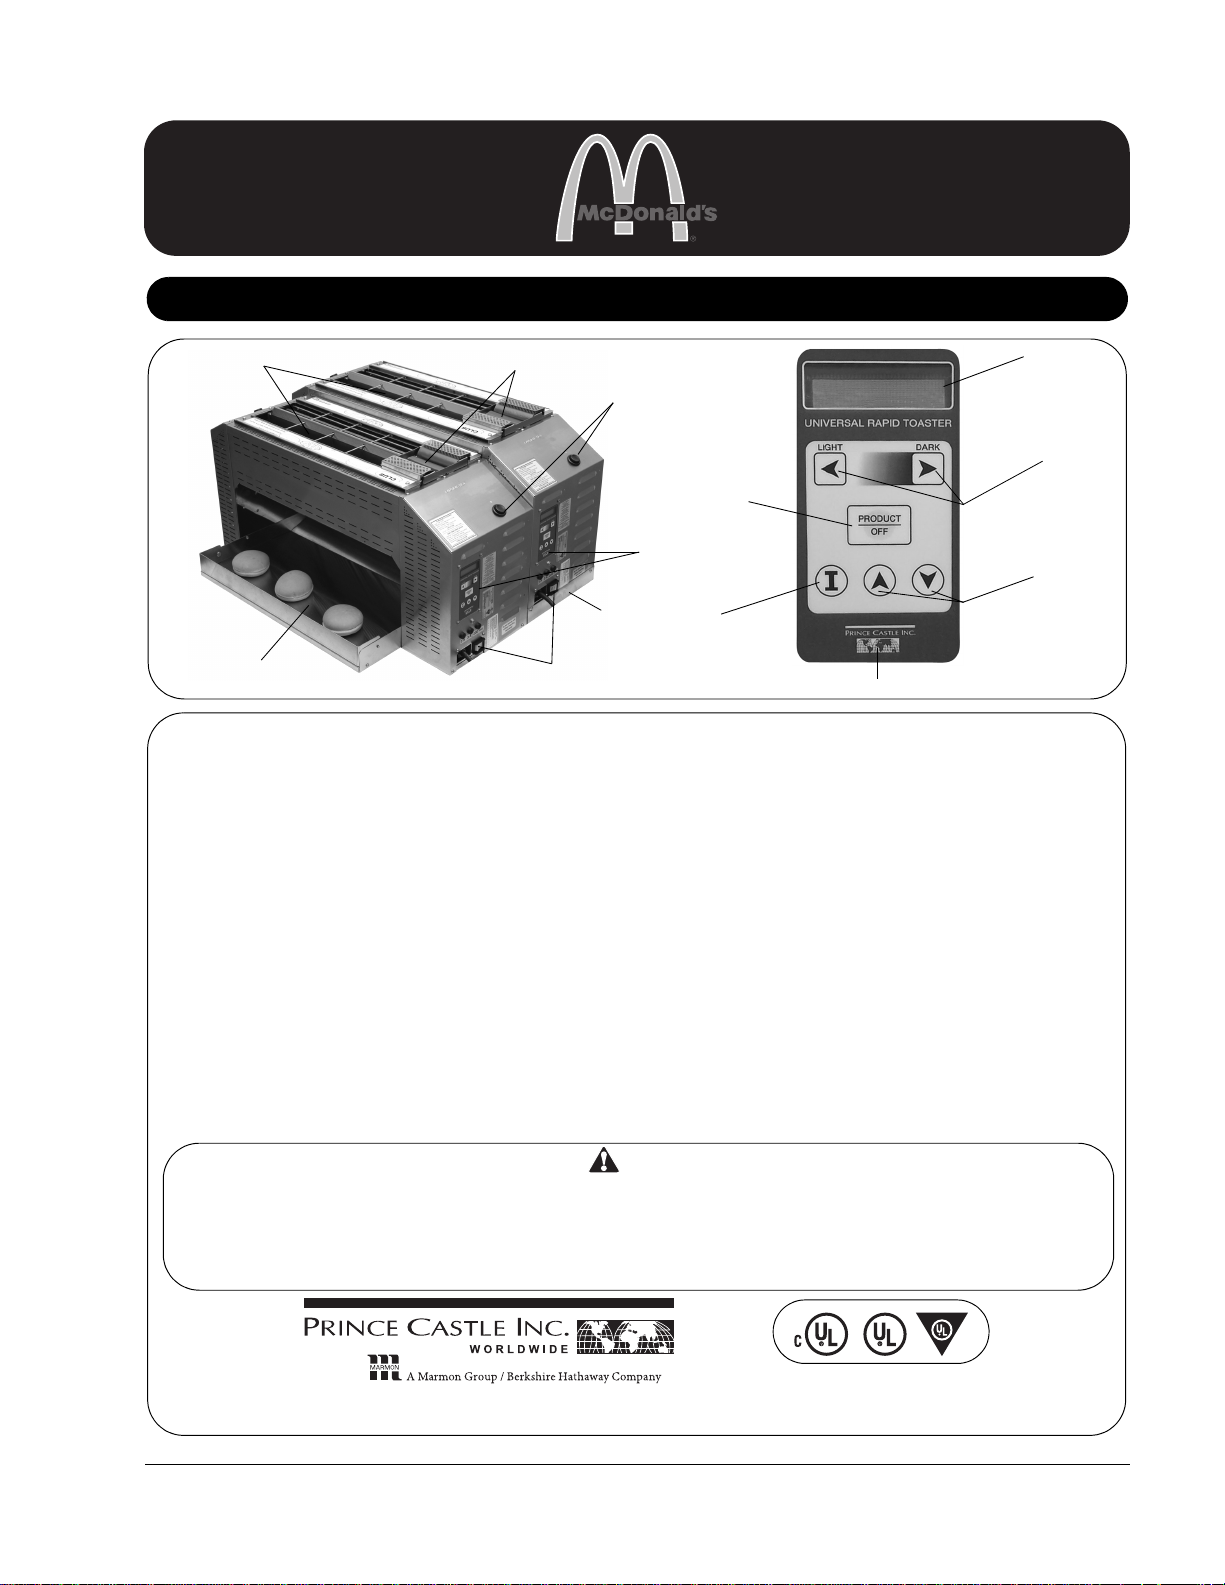
Operation
Product Identification
Club Section
Main Product Section
Start Button
Control Panel
On/Off Switch
Buffered Bun Landing Zone
(BBLZ)
LED Display
PRODUCT
Button
INFORMATION
Button
Left and Right
LIGHT/DARK Buttons
UP and DOWN
Scroll Buttons
Rear
Riser
PRINCE CASTLE Logo Button
LIMITED WARRANTY
This product is warranted to be free from defects in material and/
or workmanship for a period of two (2) years from date of original
installation, not to exceed 30 months from date of shipment from
our factory or 240,000 cycles. Any part or component which
proves to be faulty in material and/or workmanship within the
warranty period will be replaced or repaired (at the option of Prince
Castle, Inc.) without cost to the customer for parts or labor.
This warranty is subject to the following exceptions/conditions:
• Use of any non-genuine Prince Castle parts voids this
warranty and all work must be performed by an authorized
Prince Castle Service Agent.
• All labor shall be performed during regular work hours.
Overtime premium will not be covered.
• Travel charges are limited to 100 miles (200 kilometers) round
trip, 2 hours travel time, one trip per repair.
• Damage caused by carelessness, neglect, and/or abuse (e.g.,
using wrong current, dropping, tampering with or altering
electrical components, or improper cleaning) is not covered.
• Equipment damaged in shipment, by fire, flood or an act of
God is not covered.
• Damage to non-stick coated surfaces is not covered by this
warranty.
TABLE OF CONTENTS
Product Identification . . . . . . . . . . . . . . . . . . . . . . . . . . . . . . . 1
Safety Information . . . . . . . . . . . . . . . . . . . . . . . . . . . . . . . . . 2
Important . . . . . . . . . . . . . . . . . . . . . . . . . . . . . . . . . . . . . . . . 2
Installation . . . . . . . . . . . . . . . . . . . . . . . . . . . . . . . . . . . . . . . 2
Installing New Riser and Rear Chute . . . . . . . . . . . . . . . . . . . 5
Operation . . . . . . . . . . . . . . . . . . . . . . . . . . . . . . . . . . . . . . . 6
Loading Diagram . . . . . . . . . . . . . . . . . . . . . . . . . . . . . . . . . . 8
Operation Tips . . . . . . . . . . . . . . . . . . . . . . . . . . . . . . . . . . . . 9
Adjustments/Settings . . . . . . . . . . . . . . . . . . . . . . . . . . . . . . 10
Management Programming . . . . . . . . . . . . . . . . . . . . . . . . . . 11
Troubleshooting . . . . . . . . . . . . . . . . . . . . . . . . . . . . . . . . . . 12
Exploded Views and Parts Lists . . . . . . . . . . . . . . . . . . . . . . 17
Wiring Diagram . . . . . . . . . . . . . . . . . . . . . . . . . . . . . . . . . . . 21
Printed Circuit Board . . . . . . . . . . . . . . . . . . . . . . . . . . . . . . . 23
Planned Maintenance . . . . . . . . . . . . . . . . . . . . . . . . . . . . . . 24
Only use URT Cleaning Tool with a sanitized towel or blue non-scratch pad wrapped around the head of the cleaning
tool to clean the platens. Do NOT use anything abrasive because it will scratch the platens, which could cause bun
sticking. Do not use abrasive materials such as scrapers, steel wool, etc. to clean the Buffered Bun Landing Zone or
exterior of the unit, as damage to the surface could occur. Failure to follow the correct cleaning procedure or damage
to the platen due to scratches are not covered under the provisions of the warranty.
Do NOT use any unapproved agents or cleaning solutions inside or on the surfaces of the toaster unit.
CAUTION
C
L
A
S
S
I
F
I
E
D
EPH
355 East Kehoe Blvd. • Carol Stream, IL 60188 USA
Telephone: 630-462-8800 • Toll Free: 1-800-PCASTLE
Fax: 630-462-1460 • www.princecastle.com
Universal Rapid Toaster
Manual
340-URT
340-500revH-EN Printed in USA 06/09 © 2009
Universal Rapid Toaster
Safety Information
Indicates information important to the proper operation of
the unit. Failure to observe may result in damage to the
equipment and/or severe bodily injury or death.
Indicates information important to the operation of the unit.
Failure to observe may result in damage to the equipment.
WARNING
CAUTION
Important
Prince Castle reserves the right to change specifications
and product design without notice. Such revisions do not
entitle the buyer to corresponding changes, improvements,
additions or replacements for previously purchased
equipment. This unit requires (2) 30 amp single phase
outlets.
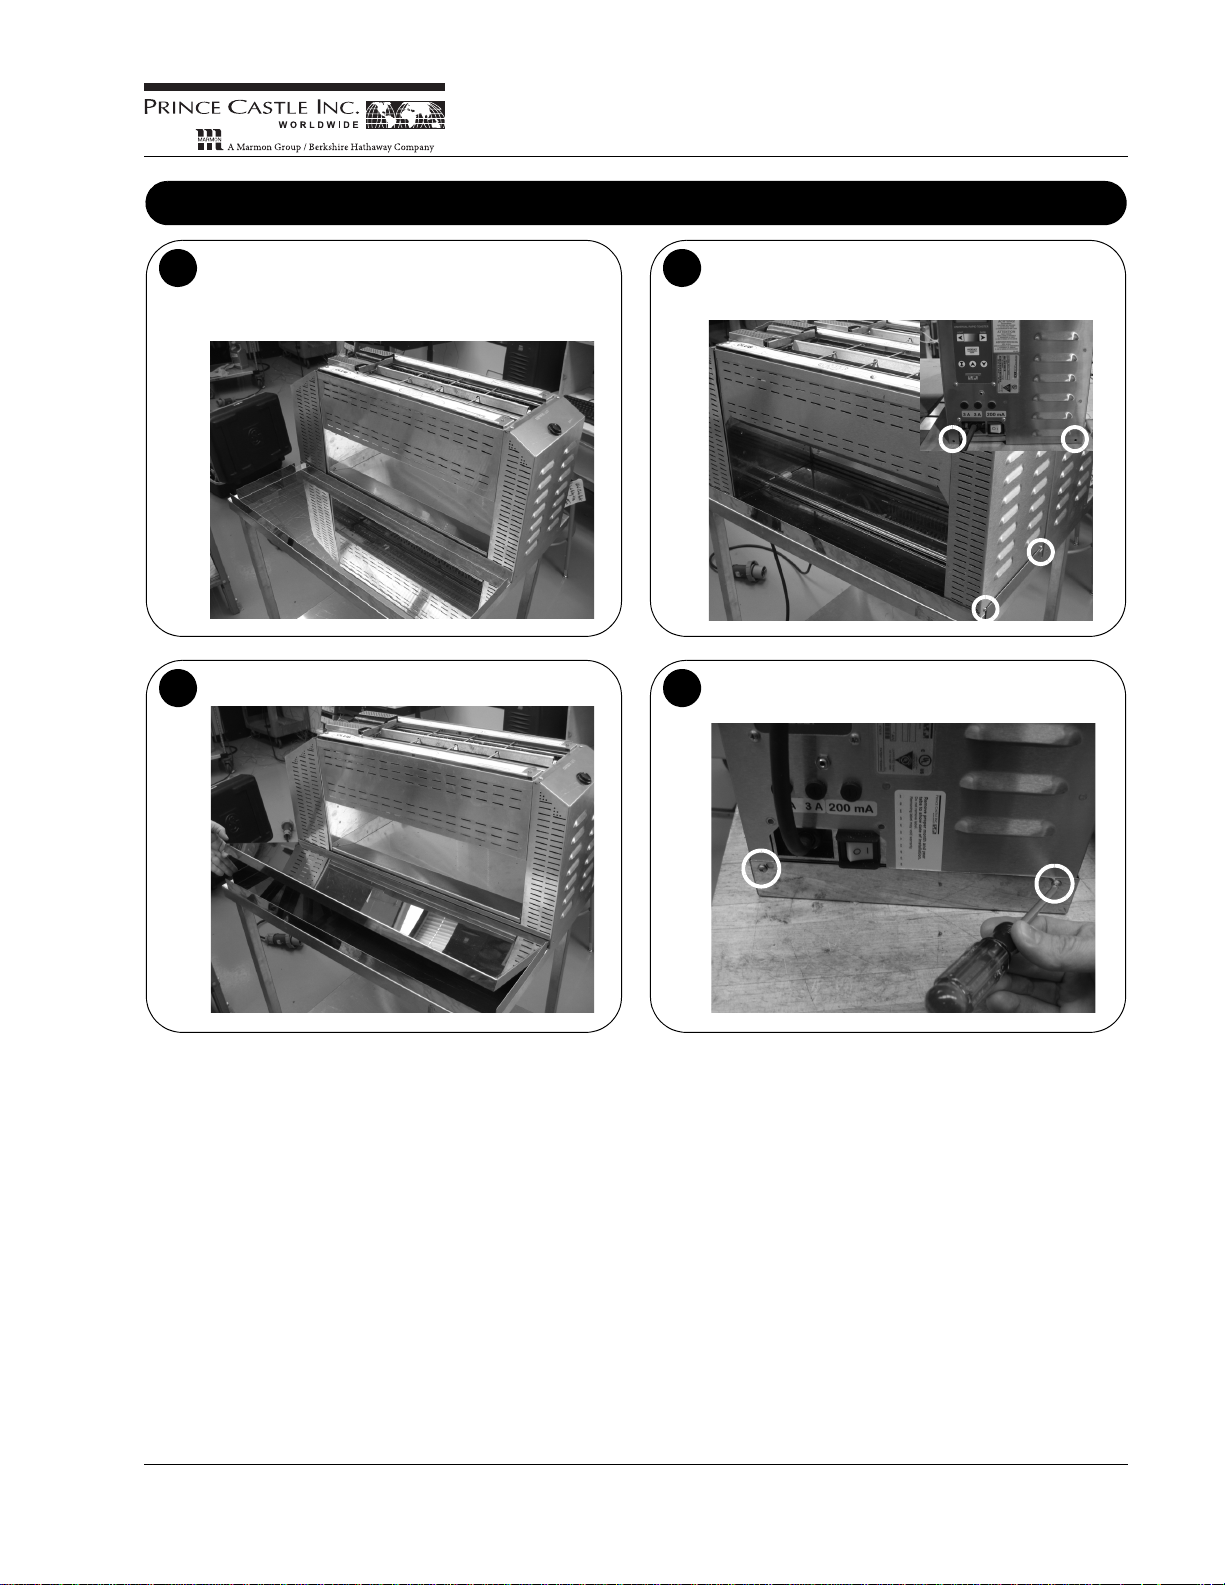
Installation
Remove the unit from the carton and inspect for signs
of damage. If there is damage to the unit:
• Notify the carrier within 24 hours of delivery,
• Save carton and packaging materials for inspection
purposes,
• Contact your local dealer, or if purchased directly, the
Prince Castle Sales Department at 1-800-722-7853
or 630-462-8800 to arrange for a replacement unit.
1
NOTE: When installing this unit, the ambient
temperature at the mounting site should not exceed
37.8°C (100°F).
Your toaster consists of two units positioned together
to perform as an assembly. Two-unit assemblies must
be equipped with a BBLZ and a bun chute that carries
the product from the rear unit to the BBLZ.
2
A. To install the 340-URT, designate one unit to be the
“FRONT” chamber. The design is flexible to place
the “CLUB TOASTING SLOT” either toward the
primary or secondary side, depending on store
management’s preference. Another factor to
consider is cord placement in the assembly line.
B. NOTE: This bracket is installed by Prince Castle for
shipping purposes only.
1. Remove two screws securing the shipping
stiffener bracket.
2. Repeat step 1 for the other shipping stiffener.
3. Discard the two shipping stiffeners.
Screws
3
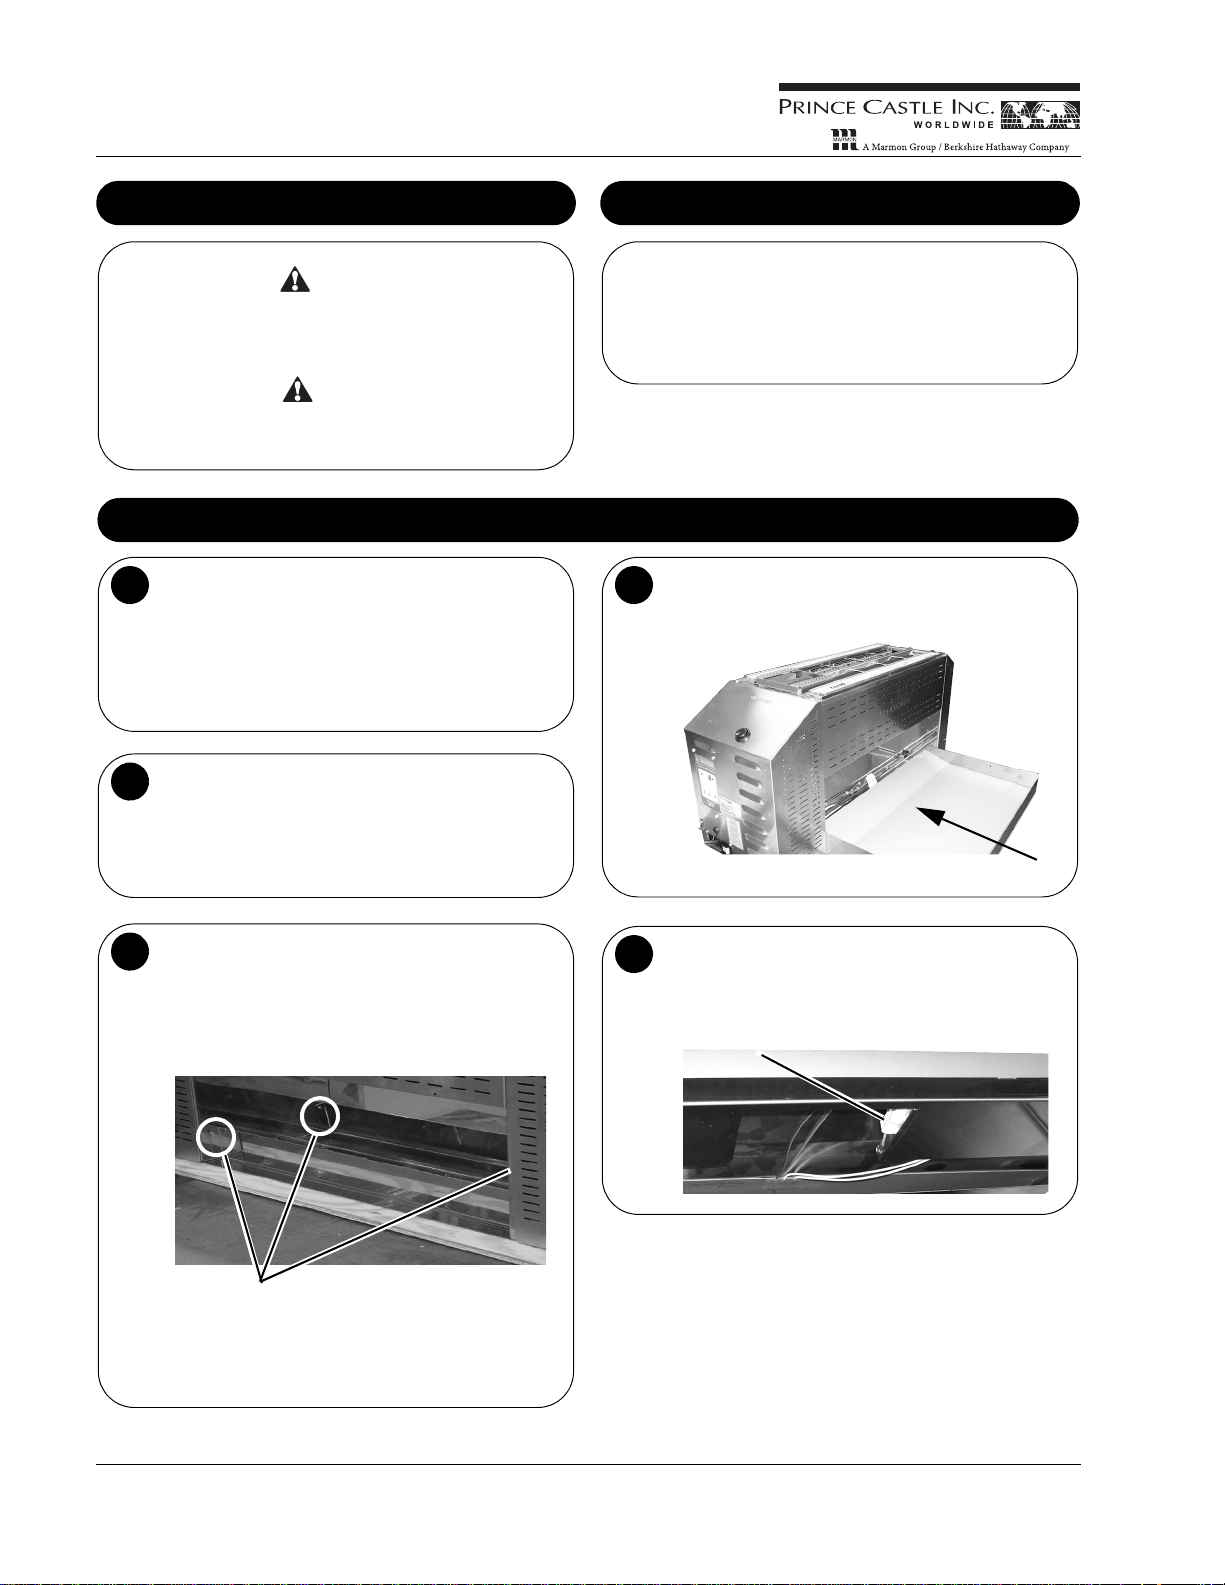
Slide the BBLZ into the front chamber of a two-unit
assembly by pushing the BBLZ into the unit from the
front towards the back.
4
Push the BBLZ about halfway into position and
connect the wire assembly from underneath the BBLZ
to the connectors on the base of the unit and the BBLZ.
This connection provides power to heat the BBLZ.
Wire Assembly Under BBLZ
5
340-URT
Printed in USA 06/09 © 2009 2 340-500revH-EN
Universal Rapid Toaster
Installation (continued)
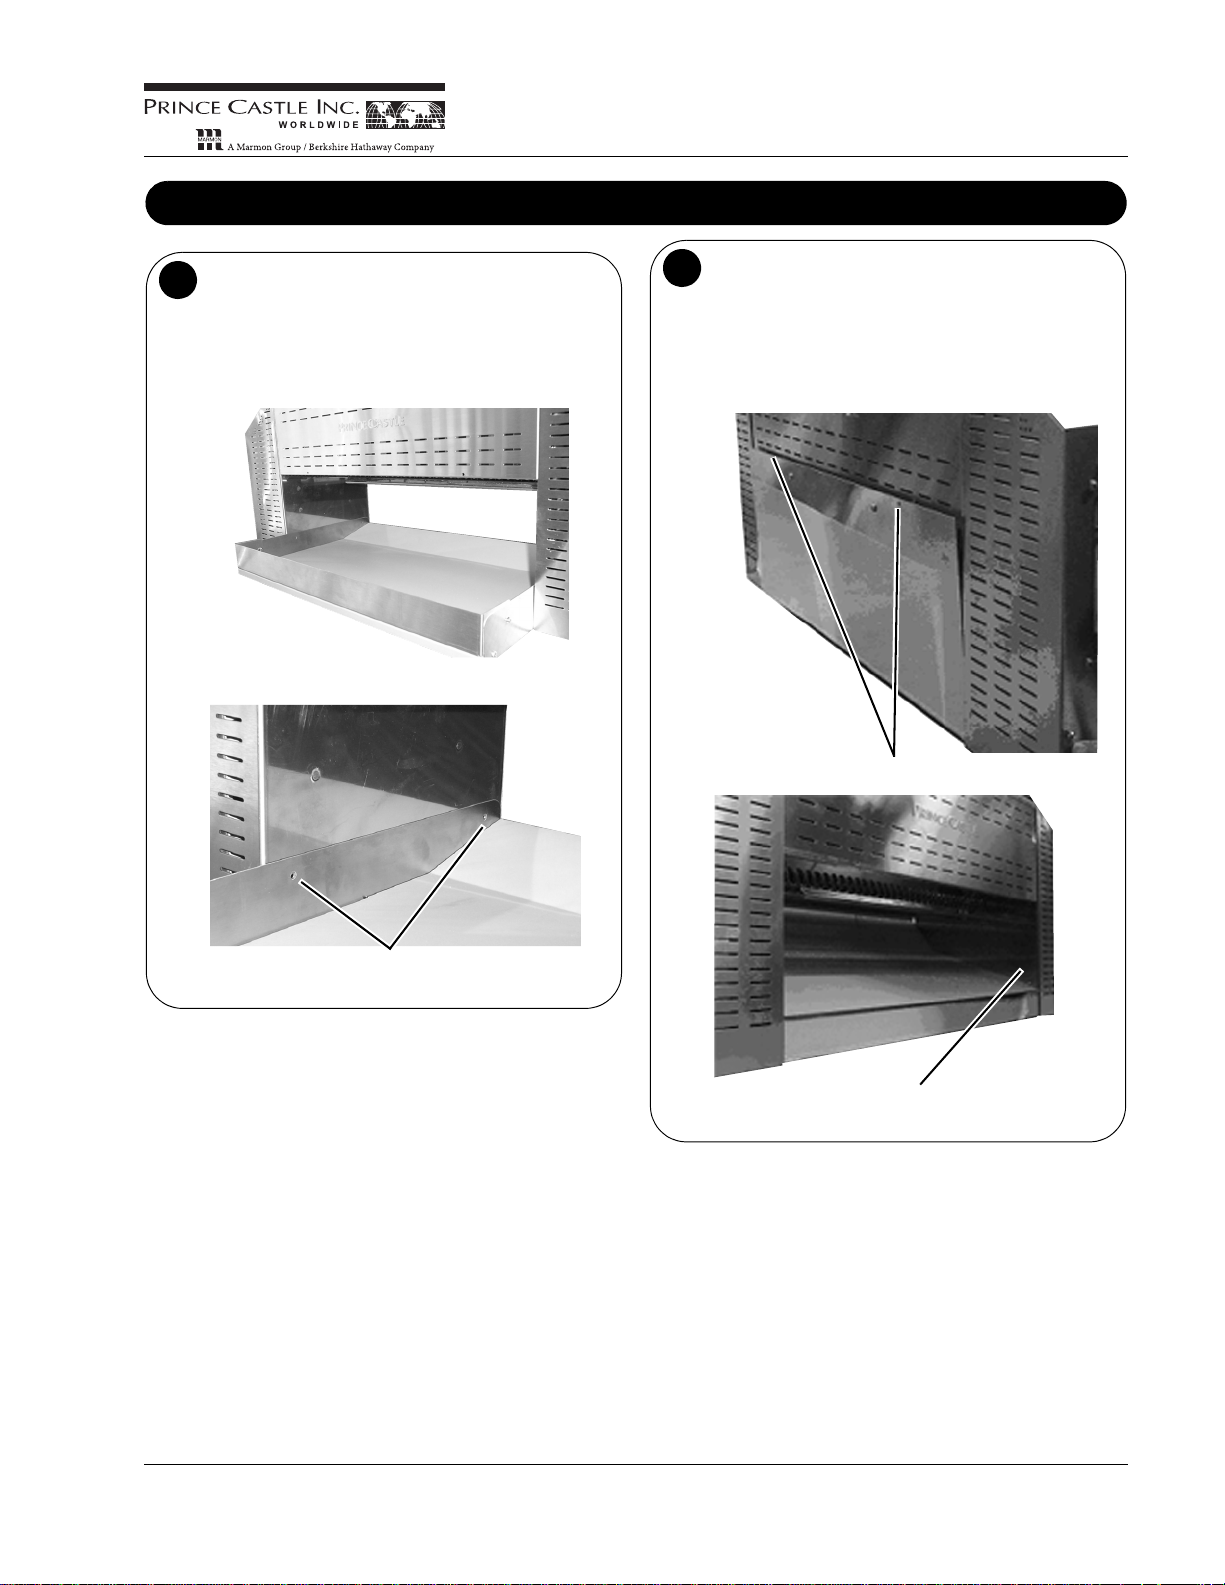
A. Push the BBLZ into position. The BBLZ is in the
correct position when the mounting holes on the
BBLZ align with the mounting holes on the toaster
unit.
B. Insert screws to hold BBLZ in position.
C. Ensure all wiring is beneath the BBLZ and is not
outside the toaster.
Mounting Holes Align
BBLZ Pushed Back into Position
6
A. On the “rear” chamber, push the bun chute into the
toaster from the back toward the front, aligning the
bun chute with the mounting holes on the back of
the toaster unit.
B. Insert 2 screws into the back of the unit to hold the
bun chute into position.
C. Insert 2 screws into the inside walls at the front of
the chute.
Rear Mounting Screws
Front Mounting Screws
7
340-URT
06/09340-500revH-EN 3 Printed in USA 06/09 © 2009
Universal Rapid Toaster
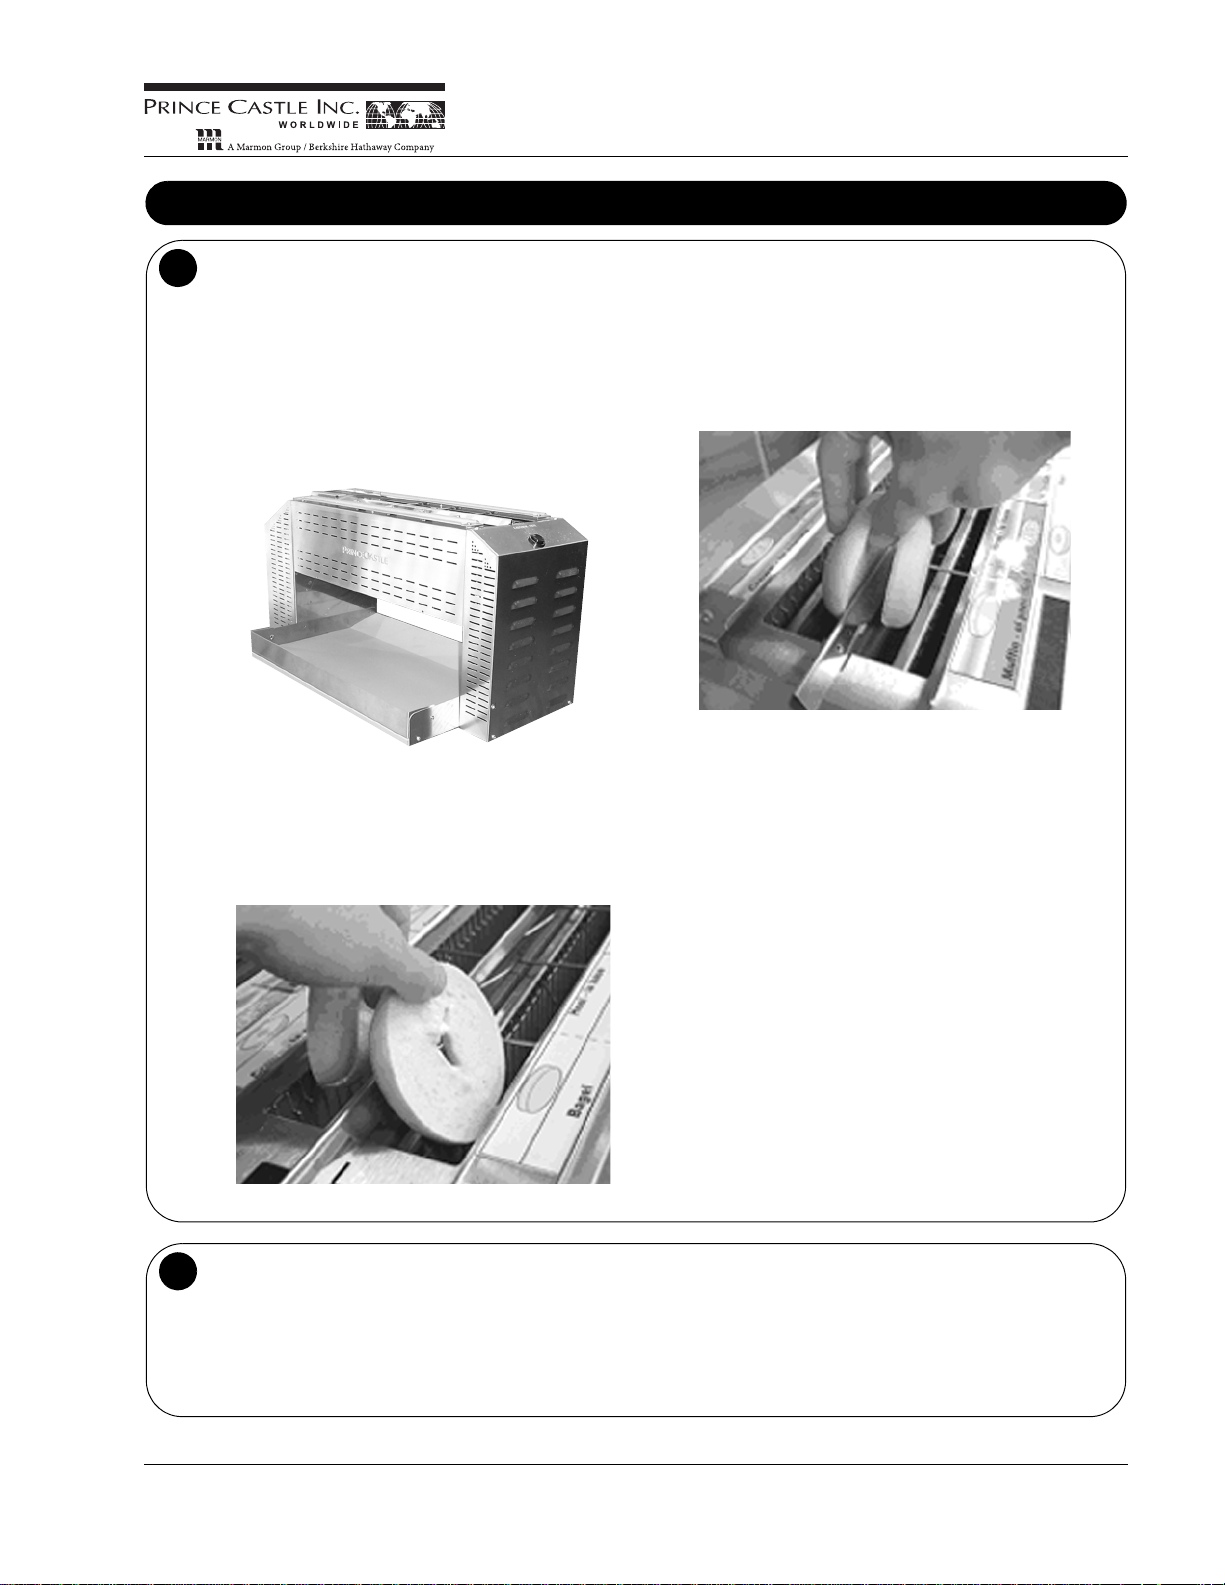
Installation (continued)
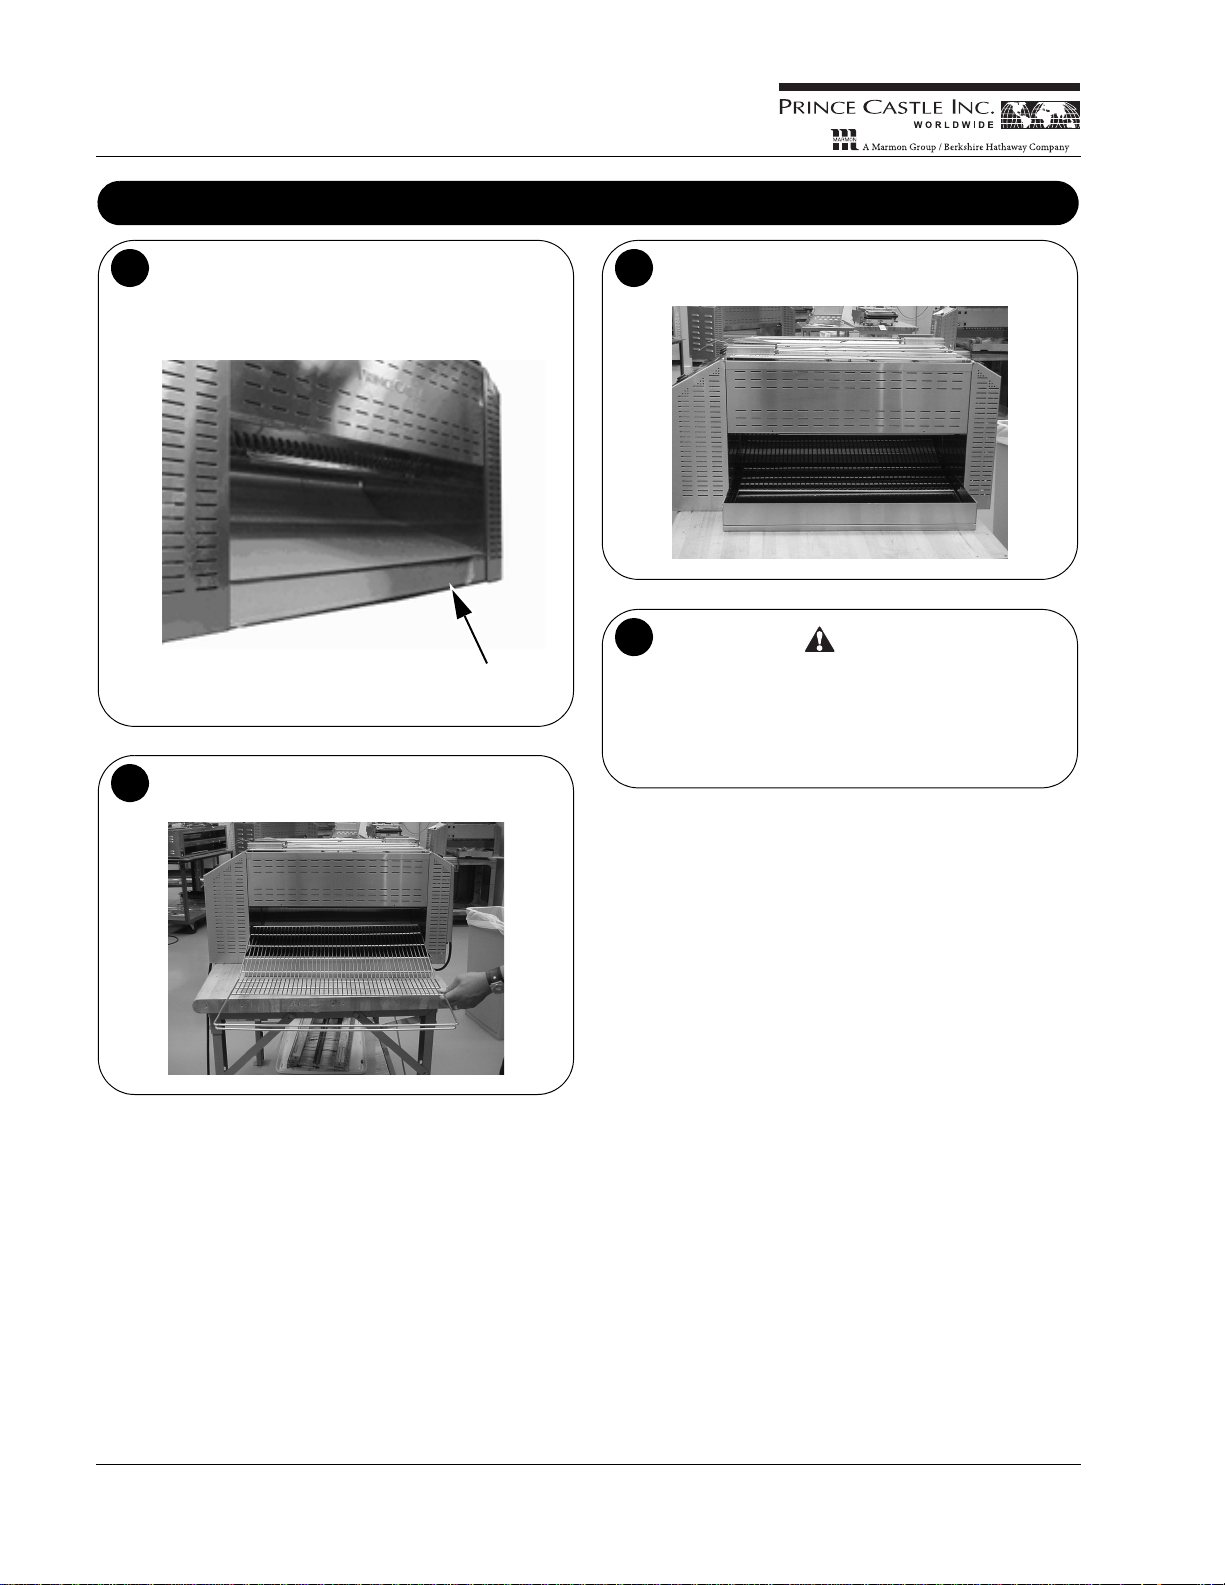
To connect toaster units, push the rear toaster unit
behind the front toaster unit, tilting the rear unit back
and raising the bun chute of the rear unit slightly so
that it slides over the BBLZ of the front unit.
Tilt back the rear chamber so the front edge of
the rear bun chute slides over the front chamber’s BBLZ.
8
Insert the Wire Chute, ensuring the large open area
before the grid is facing the Crumb Release Bar.
9
Ensure all edges of the Wire Chute are inside the
toaster and place on top of the BBLZ.
10
All electrical connections must be in accordance with
local electrical codes and any other applicable codes.
A. Ensure that there are no wires or cords above the
unit.
B. Plug the unit into an applicable electrical
receptacle.
CAUTION
11
340-URT
Printed in USA 06/09 © 2009 4 340-500revH-EN
Universal Rapid Toaster
Installing New Riser and Rear Chute
Remove the wire rack from the toasters and then
move the rear toaster off the table.
Next, place the larger riser piece, with the rubber mat
facing down on the table, where the rear toasting
chamber was.
Front Chamber
1
Place the smaller riser piece inside the larger piece so
they sit flat on one another behind the front chamber.
Front Chamber
2
Remove the four screws (two at each side) at the
bottom of the rear chamber. Set the rear chamber on
the riser so the toaster sits inside all four flanges —
see step 4.
Screw Locations
3
With the rear toasting chamber sitting inside the riser’s
flanges, insert the four screws at the bottom of the
toaster to secure it to the riser base.
The two other screws are at
the opposite side of the
toasting chamber.
4
340-URT
06/09340-500revH-EN 5 Printed in USA 06/09 © 2009
Universal Rapid Toaster
Installing New Riser and Rear Chute (continued)
Insert the NEW rear chute into the rear chamber,
ensuring that the chute fits inside the riser’s flanges.
5
Insert the two screws, connecting the chute to the
toaster, and then re-insert the wire rack.
6
Operation
Your Universal Rapid Toaster consists of two independent toasting chambers which, when positioned together, operate as one
toaster. Each chamber has its own power switch and Control Panel.
A. Turn the On/Off switch(es) located below the control panel on the side of the unit(s) to ON. Display will read “wait” for
approximately 10 seconds. After 20 seconds, the unit(s) will complete its internal setup, and the Control Panel screen will
display OFF.
B. Wait for warm-up. This should take 20 minutes for muffins or bagels and 25 minutes for buns.
1
BURN/ELECTRICAL SHOCK HAZARD! Heating
elements are HOT and can cause severe burns or severe
shock! Keep hands and objects out of the toaster unit!
Failure to exercise caution may result in serious injury!
Turn the unit off, unplug it and let it cool down
completely before touching or working on internal
apparatus.
A. Use only the front toaster for Bagels.
B. On the Control Panel, press the PRODUCT button to
select the desired bread product (i.e., bagel, muffin, bun).
The display shows the product selected.
C. Wait for warm-up. This should take 20 minutes for
muffins or bagels and 25 minutes for buns.
WARM-UP TIMES
Cold Start to Breakfast – 20 minutes
Cold Start to Buns – 25 minutes
Breakfast to Buns – 15 minutes
Buns to Breakfast – 20 minutes
WARNING
2
340-URT
Printed in USA 06/09 © 2009 6 340-500revH-EN
Universal Rapid Toaster
Operation (continued)
NOTE: To cancel any operation in progress and release
the bread product inside a chamber, press and hold the
START button for 2 seconds, then release it to cycle the
bun release doors. Gates will remain open while button
is depressed.
A. Begin by loading bread into the top of the unit (see
Loading Diagram on Page 8).
B. Press START button to toast the loaded product. The
bread is toasted and discharged into the Buffered Bun
Landing Zone (BBLZ).
TIP: During breakfast, place the UHC tray on the BBLZ, so
that it is easier to load the product.
BREAKFAST LOADING
Whether you are toasting bagels or muffins, the loading
process is similar.
A. Pre-split the breakfast product. This ensures that every
bagel or muffin is toasted consistently.
B. Load the product with the cut side facing the outside
heaters (cut side-out).
C. Press START button to begin the toasting cycle.
LUNCH LOADING
A. The toaster can be easily loaded from either side of the
prep table. Load the buns so that the cut-side makes
contact with the grey platen (cut side-in). There is a
separate slot for the club/flatbread section that allows
toasting on both sides. Any combination of buns can be
toasted at any time. Regular, Big Mac, Quarter, and
Premium Chicken Roll all fit into any slot.
B. Press START button to begin the toasting cycle.
NOTE: The walls may move out during the cycle. This is
normal; it helps to retain the shape of the bun.
BUZZ SOUND
A buzz is heard when product is caught in the release gate.
It also may be heard at the end of the toast cycle. This
sound is normal and the toaster is operating normally.
3
CHANGEOVER
The URT needs 15 minutes for temperatures to stabilize at the new set points while transitioning from breakfast to lunch. Since
most stores will be using two URT units locked together, one suggested procedure is:
A. Toast additional product of the lower volume breakfast items and hold in UHC.
B. Convert one toaster to buns at 10:15 AM, so that it is ready to toast buns for lunch. Keep the other toaster in its current
breakfast mode, so you can continue to sell the higher volume sandwich.
C. Convert the other toaster at 10:30 AM and then begin using it at 10:45 AM.
NOTE: There is no transition time going from BAGEL to MUFFIN or vice versa.
4
340-URT
06/09340-500revH-EN 7 Printed in USA 06/09 © 2009
Universal Rapid Toaster
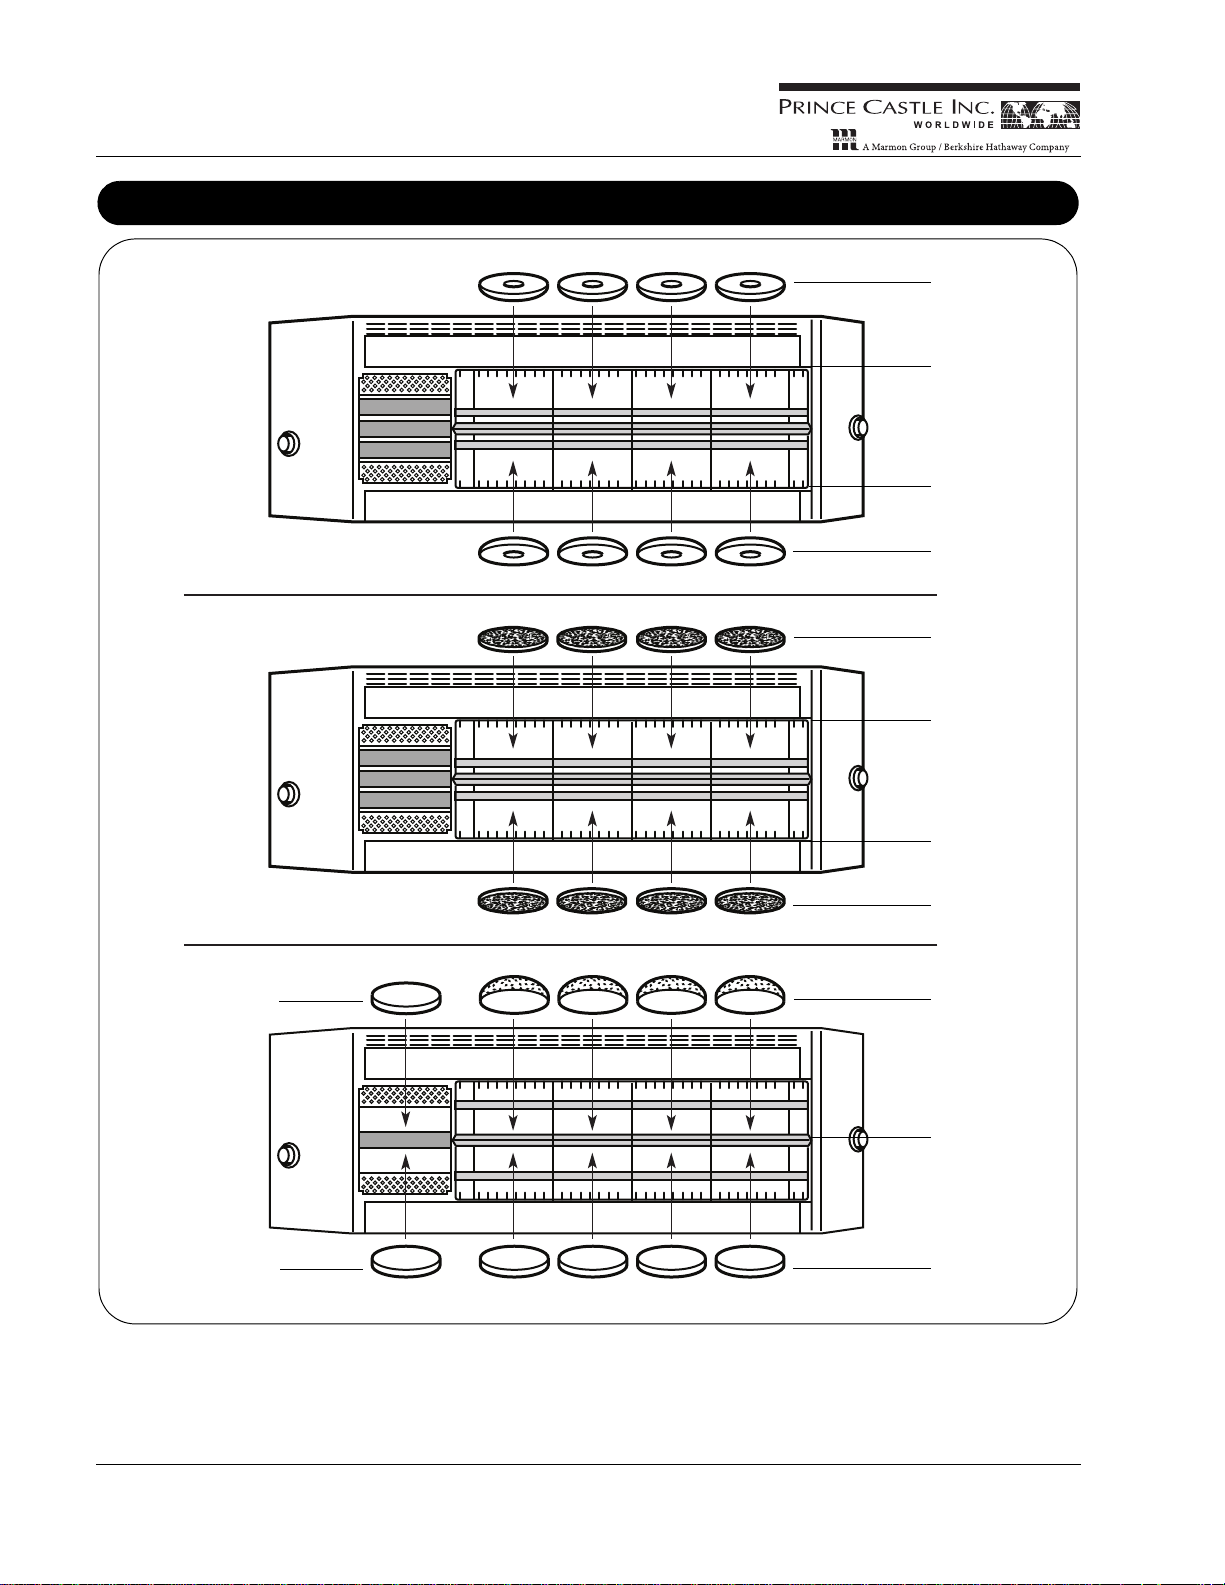
Loading Diagram
Radiant Heater
Radiant Heater
Cut Side-Out
Cut Side-Out
Radiant Heater
Radiant Heater
Cut Side-Out
Cut Side-Out
Crown
Cut Side-In
Heel
Cut Side-In
Platen
Club
Club
Bagel
Muffin
Bun
340-URT
Printed in USA 06/09 © 2009 8 340-500revH-EN
Universal Rapid Toaster
Operation Tips
BREAKFAST MENU
The toaster can be set up to optimize its use based on sales product mix.
Equal Bagel to Muffin Counts
• Set the rear toasting chamber to MUFFIN and the front chamber to BAGEL.
• 15 minutes before changeover, toast extra of the lower-demand product (usually bagels) and hold in UHC to last until
breakfast ends.
– Immediately after toasting, convert that toasting chamber to BUNS so that chamber is ready for lunch.
– If you need more of the lower-demand product, simply switch to that product. There is no transition time between BAGEL
and MUFFIN settings.
High Muffin Counts
• Set both sections to MUFFIN.
– Place all the muffin heels (up to eight) in the front section and press the START button, then place the crowns in the back
section and press the START button.
– The heels will come out first so you can load the heels in two trays. When the crowns are discharged, then you can load
those atop the heels.
• When Bagels are to be toasted, change one chamber to BAGEL and begin the toasting process.
• 15 minutes before changeover, convert one chamber to BUNS.
REGULAR MENU
Bun Loading
Unlike other rapid toasters where buns can come out at different times, in the Prince Castle URT, all the buns come out at
once. If you are preparing two sandwiches, you will not have to wait for the second bun to fall.
In addition, you never have to wait to load a bun. You can load up to eight buns at one time (when using a two-unit assembly).
When loading the toaster, you should consolidate multiple screens/orders so you can toast those buns in the same chamber,
saving you more assembly time.
Bun Organization
The Prince Castle URT is naturally organized so that you can toast “in lanes.” Use the two slots closest to the START button to
toast Regular buns and the two slots furthest for Quarters. Then when buffering buns, these buns are already in their “buffering
locations.”
The buns are discharged as they are loaded into the toaster. For example, if you place the crowns on top and the heels on the
bottom, they will land and sit on the BBLZ similarly.
TWO-UNIT ASSEMBLY TIPS
• During less busy times, you can turn off the rear chamber to save energy.
• Since you will naturally use one chamber more than another, swap the chambers (rear to front; front to rear) periodically to
balance the cycles.
• Any combination of buns can be toasted at any time (1 regular, 1 Quarter, 1 Big Mac and 1 Premium Chicken Roll).
340-URT
06/09340-500revH-EN 9 Printed in USA 06/09 © 2009
 Loading...