

Prince Castle 296-T14YUMH Installation Manual

OPERATING
This product is warranted to be free from defects in material
and/or workmanship for a period of 1 year from date of original
installation, not to exceed 18 months from the date of
manufacture.
Any component which proves to be faulty in material and/or
workmanship will be replaced or repaired (at the option of
Prince Castle, Inc.) without cost to the customer for parts and
labor. This warranty covers on-location service (i.e. trip
charges and/or mileage). Travel mileage is limited to 100 miles
(200 Kilometers) round trip (one trip warranty) from an
authorized service agency or its sub-service agency.
This warranty is subject to the following exceptions/conditions:
• Use of any non-genuine Prince Castle parts voids this
warranty.
• All labor to be performed during regular work hours.
Overtime premium (the incremental amount) will be charged
to the customer.
• Damage caused by carelessness, neglect and/or abuse
(e.g., dropping, tampering or altering parts, equipment
damaged in shipment, by fire, flood or an act of God) is not
covered under this warranty.
• All problems due to operation at voltages other than that
specified on equipment nameplates are not covered by this
warranty. Conversion to correct voltage is the customer’s
responsibility.
• This equipment must be serviced by Prince Castle
Authorized Service Agency or a Prince Castle Service
Technician during the warranty period.
LIMITED WARRANTY
INSTRUCTIONS
INSTRUCTIONS
Vertical Contact Toaster
296-T14YUMH
ELECTRICAL SPECIFICATIONS
Volts Hz Watts Amps Weight
TABLE OF CONTENTS PAGE
Installation.................................................................... 2
Operation ...................................................................... 2
Adjustments ................................................................. 3
Cleaning ....................................................................... 4
Parts List ................................................................... 5-8
Troubleshooting ........................................................... 8
Wiring Diagram ............................................................ 8
115 50/60 1550 13.5 82 lbs
355 East Kehoe Blvd. z Carol Stream, IL 60188
Tel: (630) 462-8800
296-506revA Printed in USA 3/06 © 2006
Toll Free: 1-800-PCASTLE
z Fax: (630) 462-1460
INSTALLATION
1. After you have removed the toaster from the carton,
inspect the unit for signs of damage. If there is
damage to the unit:
z Notify carrier within 24 hours after delivery.
z Save carton and packing material for inspection
purposes.
z Contact your Prince Castle dealer or the Prince
Castle Customer Sales Department at 1-630-4628800 if purchased directly.
2. Verify that all parts have been received.
z Slim-Line Bun Toaster and conveyor assembly.
z Release Sheet Kit–located in a 14” box.
z Crumb Tray–taped to the front of the conveyor.
3. Place toaster on flat surface. Remove protective
covering.
4. Lift conveyor off conveyor guide rails and set aside.
Remove all packing materials (nylon tape, foam block,
plastic coating on sheet metal, and black rubber
packaging spacers) from conveyor and conveyor
guides.
7. Attach conveyor to the toaster by sliding the four pins
(conveyor slides) on the conveyor housing into the
four conveyor guides. Lower the conveyor housing
until it is securely in place.
8. Hook the back end of the crumb tray onto the bar
located below the conveyor assembly.
9. Plug unit into a properly grounded receptacle.
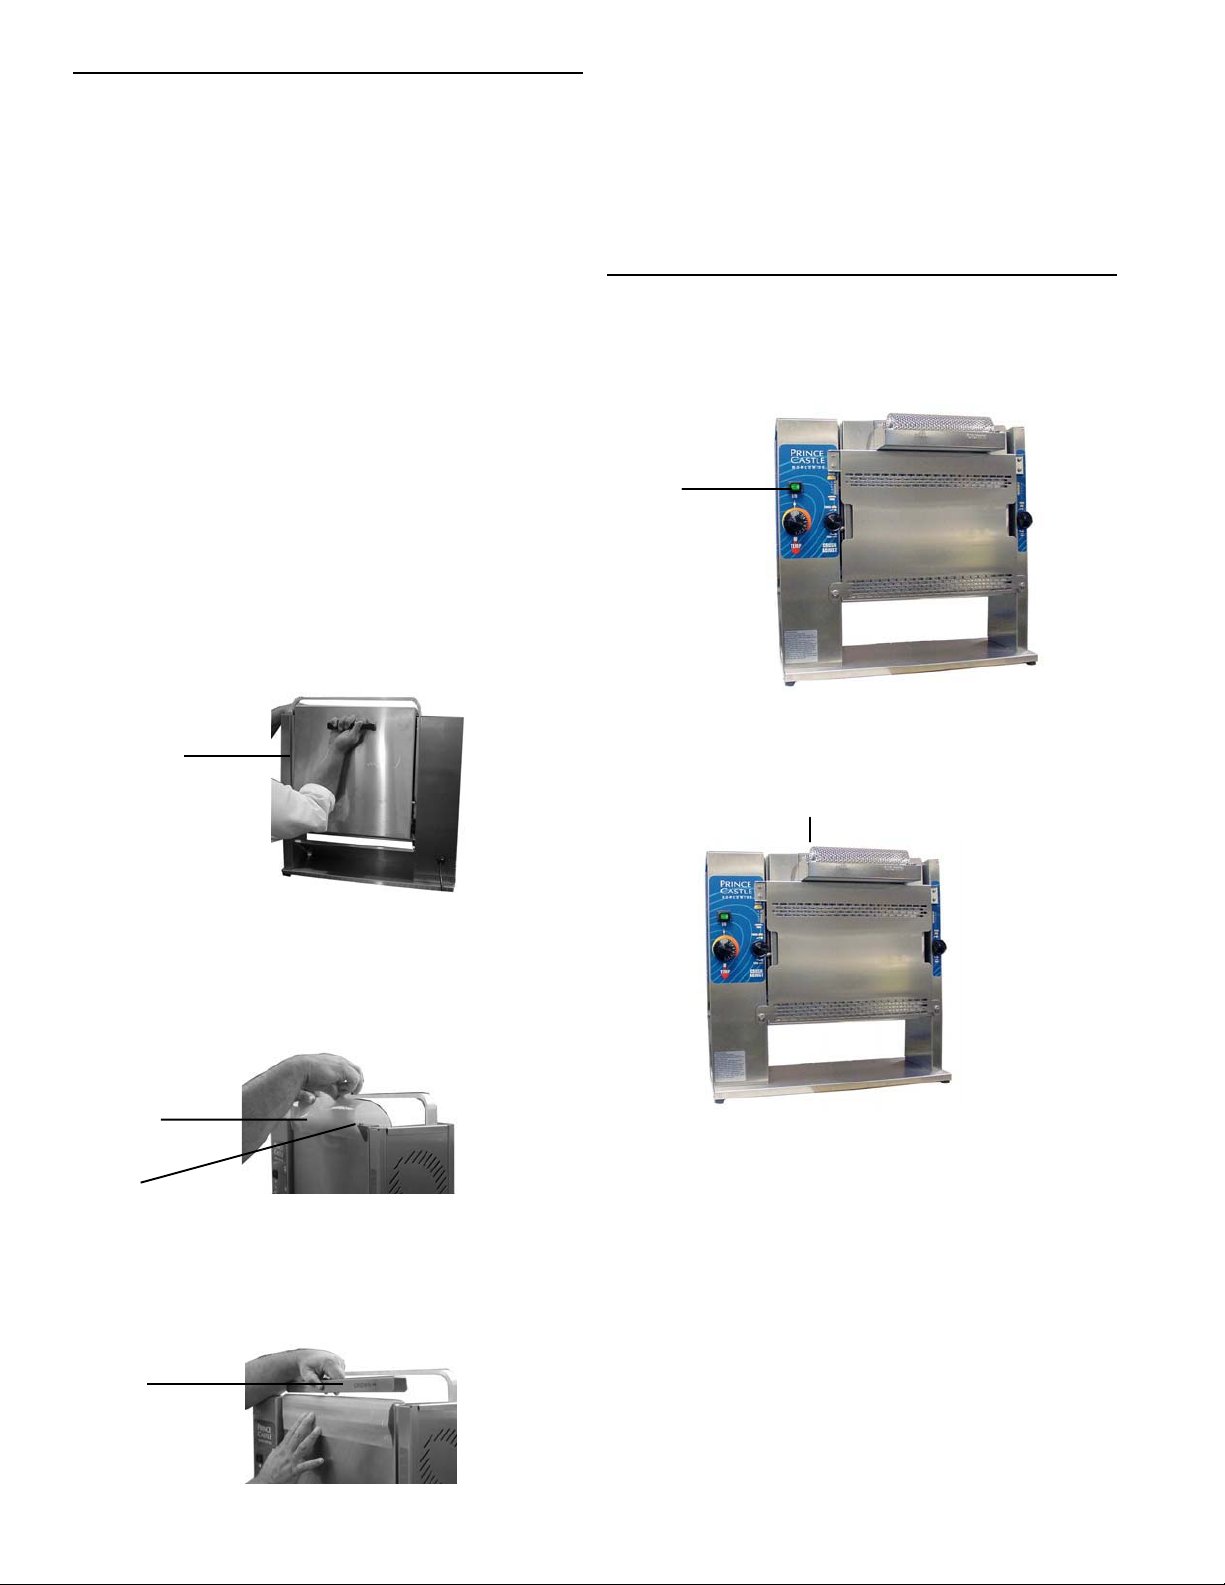
OPERATION
1. Turn the Power switch to the “On” position. The
orange indicator light will illuminate. Allow 45 minutes
for platen to reach operating temperature.
Power
Switch
Conveyor
Guides
5. Place the teflon sheet over the top of the platen
housing, making sure to have three inches of overhang.
3-inch
Overhang
Release
Sheet
6. Slide the release sheet holding bracket onto the top of
the platen housing.
2. Place a sample run of the product being toasted into
the top of the conveyor housing. The side to be
toasted should face the platen.
Cut Side
Facing Front
3. The toasted product will be dispensed automatically
from the bottom of the conveyor assembly
.
4. Verify that product meets acceptable standards. If not,
see adjustment section.
Holding
Bracket
Printed in USA 3/06 © 2006 296-506revA
2
 Loading...