

Page 1
OPERATING
INSTRUCTIONS
Batch Bun Toaster
Model No. 212-M
TABLE OF CONTENTS PAGE
Warranty Page 1
Side view Page 2
Front view Page 3
Rear view Page 3
Internal View Page 4
Equipment Set-up Page 5
Programming Page 6
Cleaning Page 8
Troubleshooting Page 8
Diagnostic troubleshooting Page 9-10
Wiring diagram Page 11
LIMITED WARRANTY
This product is warranted to be free from defects in
material and/or workmanship for a period of (2) years
from date of original installation not to exceed 30
months from date of shipment from our factory. Printed
circuit boards and platen are warranted for a period of
(3) years from date of original installation not to exceed
42 months from date of shipment from our factory. Any
part or component which proves to be faulty in material
and/or workmanship within the warranty period will be
replaced or repaired without cost to the customer for
parts or labor. (At the option of Prince Castle, Inc.)
Electrical Specifications
Model Volts Amps Hz.
212-M 110 16 60
212-MF 220-240 9 50/60
212-MFCE 230 10 50/60
This warranty is subject to the following exceptions/
conditions:
Any use of Non-genuine Prince Castle spare parts
voids this warranty, and all work must be performed
by an authorized Prince Castle Service Agent.
All labor should be performed during regular
working hours. Overtime premium will not be
covered.
The equipment is portable. Charges for on location
service (e.g. trip charges, milage) are only included
in the provisions of this warranty for a failure which
occurs within 30 days of installation.
Damage caused by carelessness, neglect, and/or
abuse (e.g., using wrong current, dropping , tampering with or altering electrical components, or
improper cleaning) is not covered.
Equipment damaged in shipment, by fire, flood or
an act of God.
Printed in 1999
Prince Castle Inc.
355 East Kehoe Blvd. Carol Stream, IL 60188
Tel: (630) 462-8800 Fax: (630) 462-1460
Toll Free: 1-800-PCASTLE
212-581
Page 2
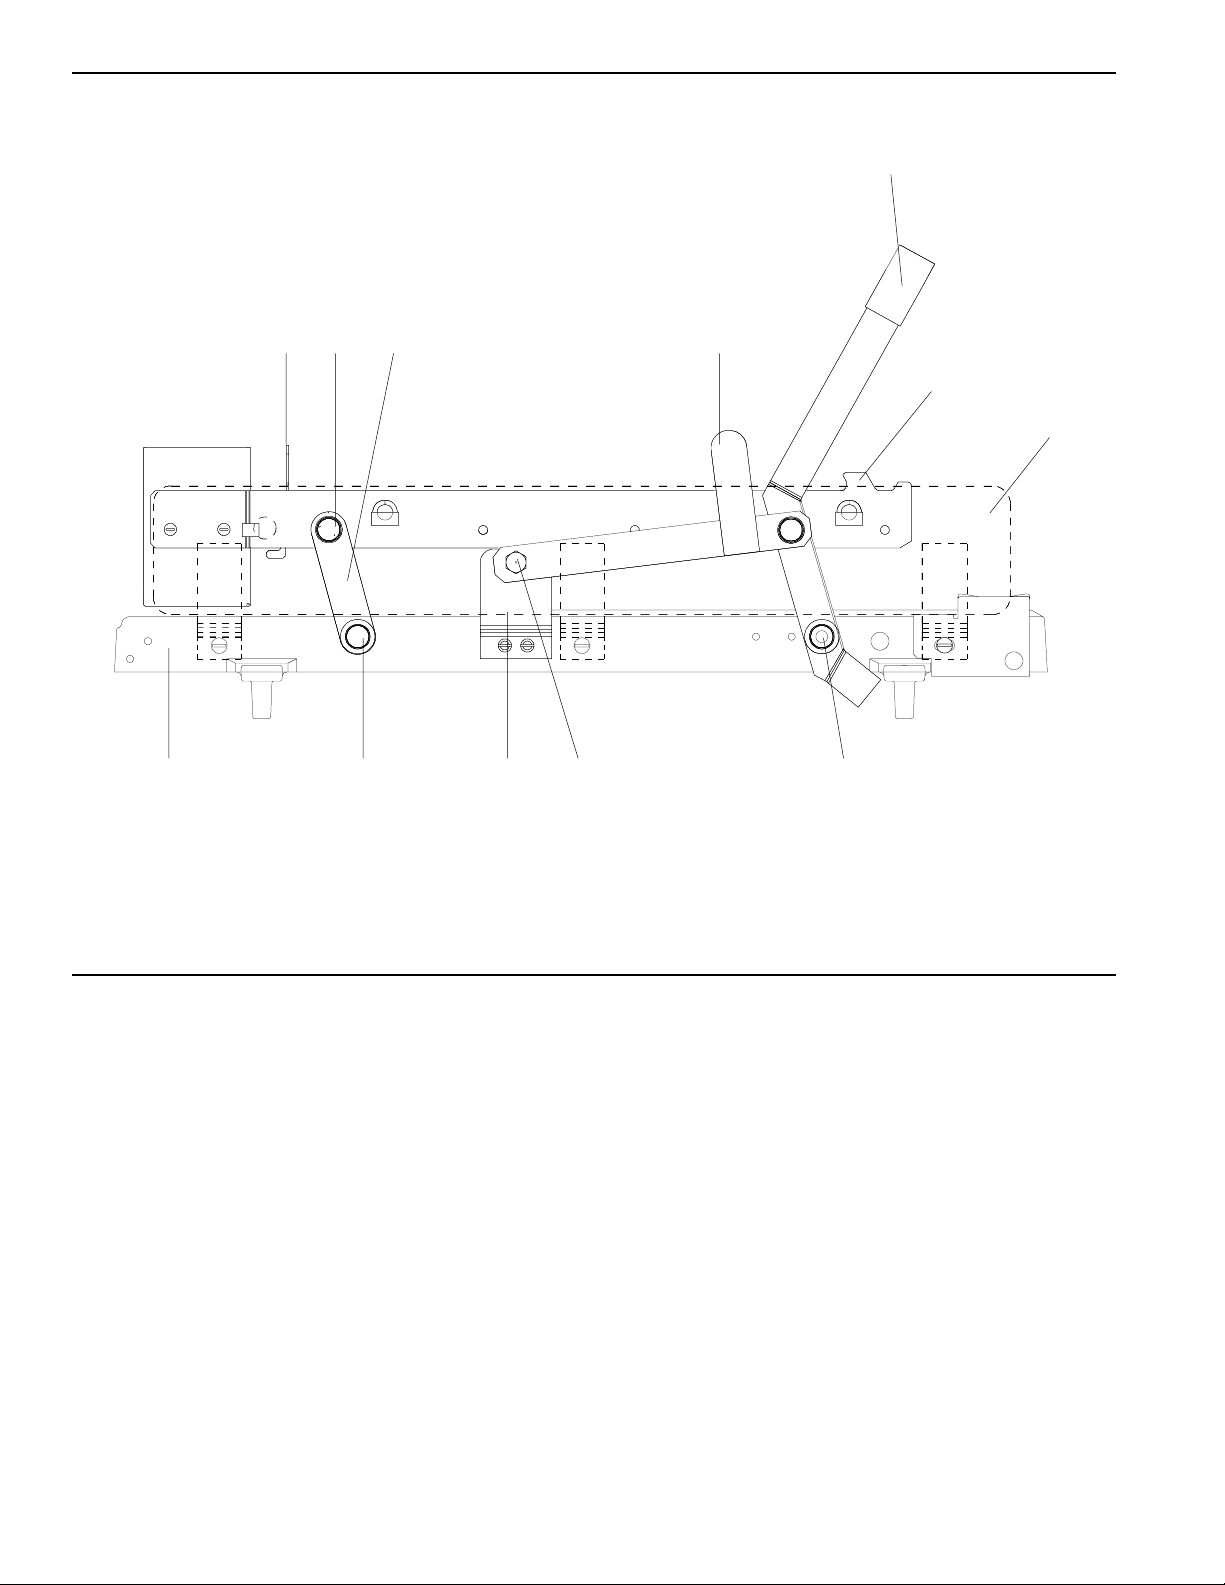
SIDE VIEW
1
23 4
5
6
7
PARTS LIST
10811
ITEM PART NUMBER DESCRIPTION
1 212-612 Rear Bun Fence
2 212-285 Platen Stud, Rear
3 212-229 Front Lever Assy. Right
212-230 Front Lever Assy. Left
4 213-303 Safety Latch
5 212-168 Handle and Lever Assy. w/Bearings
6 212-632 Left Hand Bun Fence
212-631 Right Hand Bun Fence (Not shown)
7 213-416 Side Panel (Both Sides)
8 212-284 Base Studs
9 213-301 Safety Latch, Pivot Bolt
10 213-305 Safety Latch Bracket
11 213-413S Base w/Feet
9
8
2
Page 3
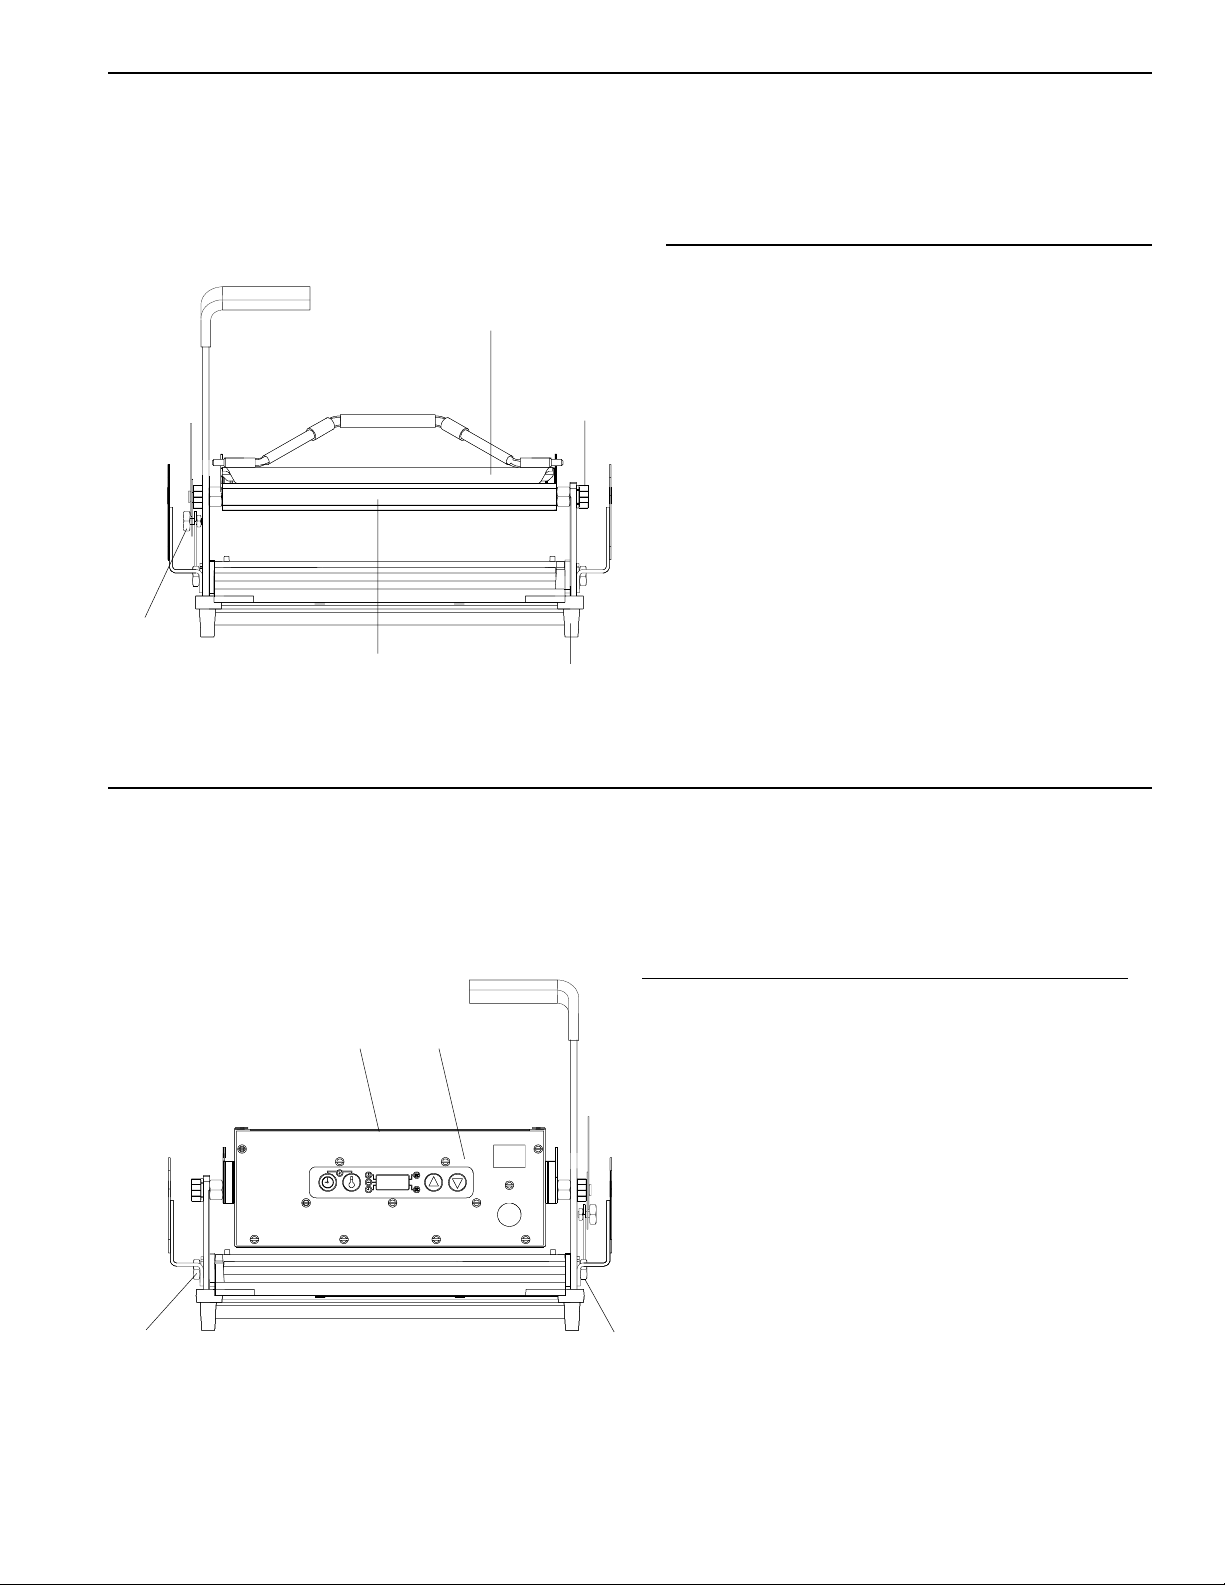
FRONT VIEW
PARTS LIST
1
ITEM PART NUMBER DESCRIPTION
5
REAR VIEW
2
4
3
1 212-290 Bun Board
2 212-286 Platen Stud, Front
3 89-959S Black Rubber Foot
(Pkg of 4)
4 213-83 Platen (120 V)
213-84 Platen (220-240 V)
5 213-304 Platen Stud,
Safety Latch
12
PARTS LIST
ITEM PART NUMBER DESCRIPTION
1 213-712 Cover
2 213-703 Face Plate
3 416-27 Cam Stop
4 416-27 Cam Stop
Not Shown 215-7 Spring, Extention
Not Shown 81-009 Spring, Compression
34
3
Page 4
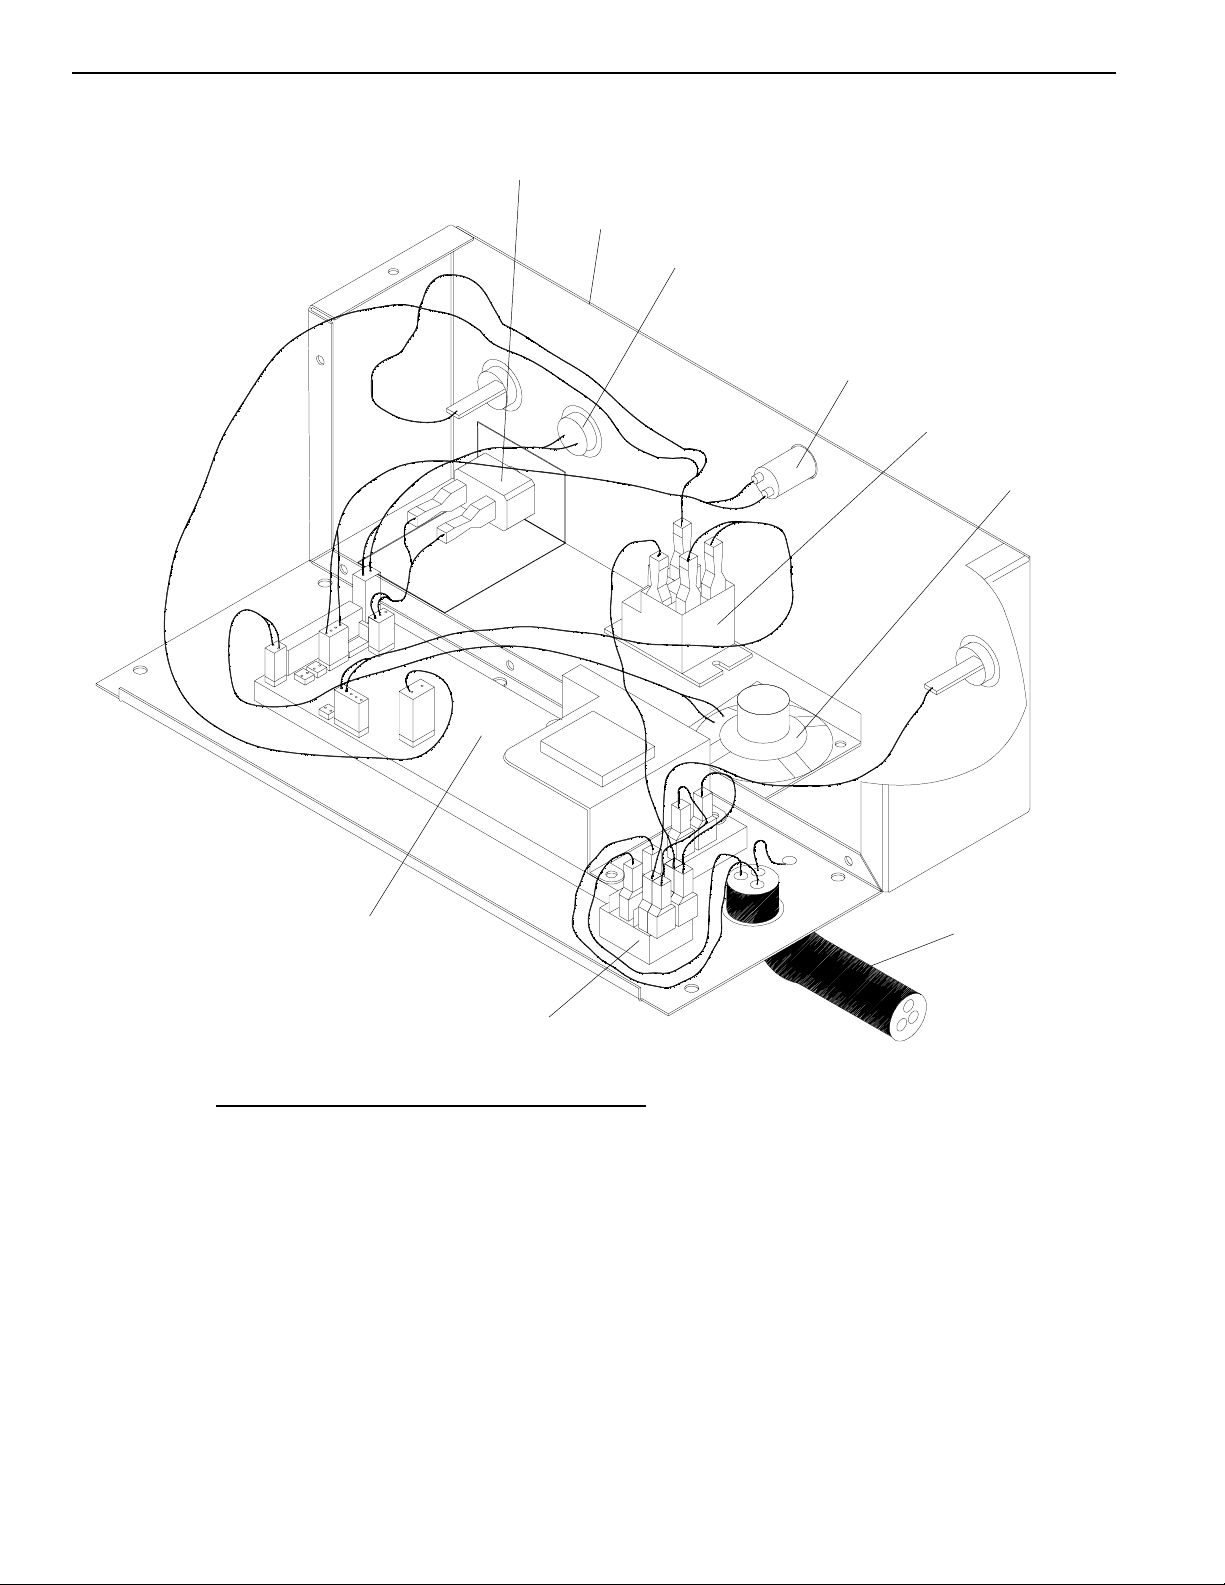
INTERNAL VIEW UPPER CONTROL BOX
1
2
3
4
5
6
9
8
PARTS LIST
ITEM PART NUMBER DESCRIPTION
1 78-146S Timer Activating Switch
2 213-661 Chasis
3 213-700S Temperature Probe
4 213-257S Bun Done Light
5 65-039S Relay
6 213-229S Speaker Assy.
7 72-308S Power Cord (110 Volt)
72-302 Power Cord (220 Volt)
72-298 Power Cord (230 Volt)
8 78-166S Rocker Switch
9 411-427-02S Control/Display PCB Assy. (220-240 V)
411-426S Control/Display PCB Assy. (110 V)
7
4
Page 5

SYMBOLS & TERMS
C - - A Toaster is set on Celsius.
F - - A Toaster is set on Fahrenheit.
A L - Alarm Level setting 1-4.
figure 1
F - -
Sound Button: Used with timer button
and temperature button to set alarm level.
Timer Button: Used to view time in run
mode. Used to set time in program
mode.
Temperature Button: Used to view set
point temperature in run mode, and used
to set the set point temperature in program mode.
Up Arrow: Used to set time, sound and
temperature in program mode.
Down Arrow: Used to set time, sound,
and temperature in program mode.
FACTORY PRE-SET
Prince Castle’s Solid State Digital Display toasters are
pre-set at the factory.
If your toaster model is set for a 35 second toast time,
then the temperature is pre-set and calibrated to 425°F
215°C.
If your toaster model is set for a 55 second toast time,
then the temperature is pre-set and calibrated to 400°F
204°C.
SET-UP
1. Refer to the nameplate on the control box for the
proper operating voltage. Connect the toaster to a
grounded receptacle that matches the nameplate
voltage information. Press the power switch to the
on position, allow the unit 30 minutes to reach
operating temperature.
3. During the pre-heat cycle, the display will read L O -. When the platen temperature reaches
300° F (149° C), the display will begin to show
the actual platen temperatures throughout the
figure 2
- L O -
3 0 0
toasting cycles. See figure 2.
Sound Level Adjustment
The audio alarm has four sound levels.
1. Press and hold the time button and temperature
buttons simultaneously. The display will show the
current sound level. The toasters are factory set
at level 4, and the display will read, A L 4 for
Alarm Level 4. See figure 3.
figure 3
A L 4
2. The toaster is factory-set to display temperatures
reading in Fahrenheit. When the toaster is turned
on, the digital display on the controll box will read
F--A for Fahrenheit, and the “A” will begin to count
down 9 seconds. During this countdown, you can
change the temperature display from Fahrenheit to
Celsius readings. To change temperature display,
press and hold the temperature button for six
seconds. See figure 1.
5
Page 6

2. While holding the time and temperature buttons,
press the up or down arrow buttons to adjust the
sound level. A continuous tone will sound.
Release all buttons when the desired sound level
is reached. The display will show the current
sound level. See figure 4.
figure 4
figure 6
SET TIME
2 0
A L 2
VIEW SET POINT TEMPERATURE
1. Press and release the temperature button. (Do not
hold for more than 6 seconds.) A beep will sound,
the temperature indicator will turn on, and the
display will show the set point temperature for three
seconds. The display will then change to show the
actual temperature. See figure 5.
figure 5
SET POINT TEMPERATURE
4 2 5
ACTUAL TEMPERATURE
PROGRAMMING
The programming modes are used for setting individual
set point temperature, and setting toast times.
Programming the Set Point Temperature
1. Press and hold the temperature button for six
seconds. A beep will sound, the temperature
indicator light will blink, and the display will show
the current set point temperature. See figure 7.
figure 7
4 2 5
2. To change the set point temperature, use the up
or down arrow. Once the desired temperature is
displayed, press the temperature button to store
the new setting. See figure 8.
figure 8
ADJUST SET POINT TEMPERATURE
4 2 6
VIEW TIMER SETTING
1. Press and release the time button. (Do not
press the time button for more than 6 seconds.)
The set time will be displayed for three seconds.
If the timer is activated and is in a countdown
sequence, the time remaining will be displayed,
and will continue to countdown to zero. After
three seconds, the display will change to show
actual platen temperature. See figure 6.
4 2 0
STORE SET POINT TEMPERATURE
4 2 0
6
Page 7

3. To cancel the set point programming mode at any
time, press and release the time button. The
display will change to show the actual platen
temperature. See figure 9.
figure 9
4 2 5
Programming Toast Times
1. Press and hold the time button for 6 seconds. A
beep will sound, and the time indicator light will
blink. Release the time button to show the
current toast time. See figure 10.
figure 10
5 5
3. To cancel the time set function at any time, press
and release the temperature button. The time
indicator light will turn off, and the display will
change to show the actual platen temperature.
See figure 12.
figure 12
4 2 5
SETTING STOP BLOCKS
Stop blocks allow for proper crush when toasting
buns. The toaster leaves the factory with the stop
blocks set on number 3. The stop blocks are located
toward the front of the toaster on the right and left
sides of the base. To increase the crush, set the
stop blocks to the number 2 setting. To decrease
the crush, set the stop block to the number 4 setting. See figure 13.
2. Use the up and down arrow buttons to set your
desired toast time. The range is from 20 seconds
to 1 minute, 30 seconds. When desired time is
reached, press and release the time button to
store the new time. See figure 11.
figure 11
SETTING THE NEW TIME
3 5
STORING THE NEW TIME
3 5
figure 13
STOP
BLOCK
SETTING
IMPORTANT: The stop blocks are set at the number
that is touching the lever. The example in figure 13
shows a stop block setting of 1.
1. To change the stop block setting, depress the
right stop block and disengage the locking pin.
Turn stop block to correct setting.
7
Page 8

CLEANING
1. Press the power switch to the off position.
2. Unplug toaster.
3. Allow toaster and platens to cool down.
4. Wipe entire platen with clean, damp grill cloth.
Full toaster cleaning must be done in the morning when toaster is cold.
IMPORTANT: Do not drape cord over hot toaster bun
board or platen. This will cause cord to burn.
TROUBLESHOOTING GUIDE
PROBLEM CAUSE SOLUTION
Platen loose. Platen bolts loose. Tighten platen bolts.
Speaker sounds, but no Done light burned out. Replace done light.
bun done light comes on.
No speaker sounds Defective timer switch. Replace timer switch.
and bun done light. Timer connection shorted Replace power board.
does not come on. on power board.
Timer switch not activating. Check actuating bracket to
make sure it pushes
timer switch all the way in.
Buns being crushed. Stop blocks not adjusted Adjust stop blocks.
properly.
Warped bun trays. Straighten or replace bun
trays.
Buns cut improperly. Contact bakery.
Platen does not heat. No power. Check power source.
Power switch defective. Replace power switch.
Shorted power board. Replace power board.
Platen burned out or shorted. Check platen with ohmmeter
for 11 ohms, if reading is less
than 7 ohms or more than 14
ohms, replace platen.
No Display. Fuse Defective. Check fuse with ohmmeter,
reading should be 1-2 ohms.
8
Page 9

DIAGNOSTIC TROUBLESHOOTING
If the toaster malfunctions, the display will flash an error code E and a number between 1-9, or a letter between AF. Below are different error codes and their solutions.
1. Relay contacts are shorted. Check if relay is open.
E O 1
Platen over heating. Check platen circuit on power
If it is replace relay.
board. If bad replace board.
E O 2
E O 3
E O 4
E O 5
2. Probe open or shorted. Replace probe.
Check probe connection.
3. Failures 1and 2 combined.
4. Platen Under Heating. Replace Relay
(Cold Air Blowing On Platen Check Platen Resistance
Causing a Substantial Drop Replace P.C. Board
In Platen Temperature).
Low Voltage Applied To Unit.
Toasting Multiple Runs Of Buns In A Short Time Period Will
Cause The Platen Temperature To Drop Too Far Below The Set
Point Temperature.
5. Failures 1and 4 combined.
E O 6
E O 7
E O 8
6. Failures 2 and 4 combined.
7. Failures 1, 2, and 4 combined.
8. Probe amplifier circuit failure. Replace power/display.
9
Page 10

E O 9
E O A
E O b
Failures 1 and 8 combined.
Failures 2 and 8 combined.
Failures 1, 2, and 8 combined.
E O C
E O d
E O E
Failures 4 and 8 combined
Failures 1, 4, and 8 combined.
Failures 2, 4, and 8 combined.
.
10
Page 11

WIRING DIAGRAM
11
 Loading...