

Page 1
OPERATING
INSTRUCTIONS
Mustard Dispenser
Model 141-H
TABLE OF CONTENTS PAGE
Installation ......................................................................2
Operating ........................................................................2
Cleaning..........................................................................2
Troubleshooting .............................................................3
Parts List.........................................................................4
LIMITED WARRANTY
This product is warranted to be free from defects
in material and/or workmanship for a period of one
(1) year from date of original installation, not to
exceed 18 months from date of shipment from our
factory. Any part or component which proves to be
faulty in material and/or workmanship within the
warranty period will be replaced or repaired without cost to the customer for parts or labor (at the
option of Prince Castle, Inc.).
This warranty is subject to the following exceptions/conditions:
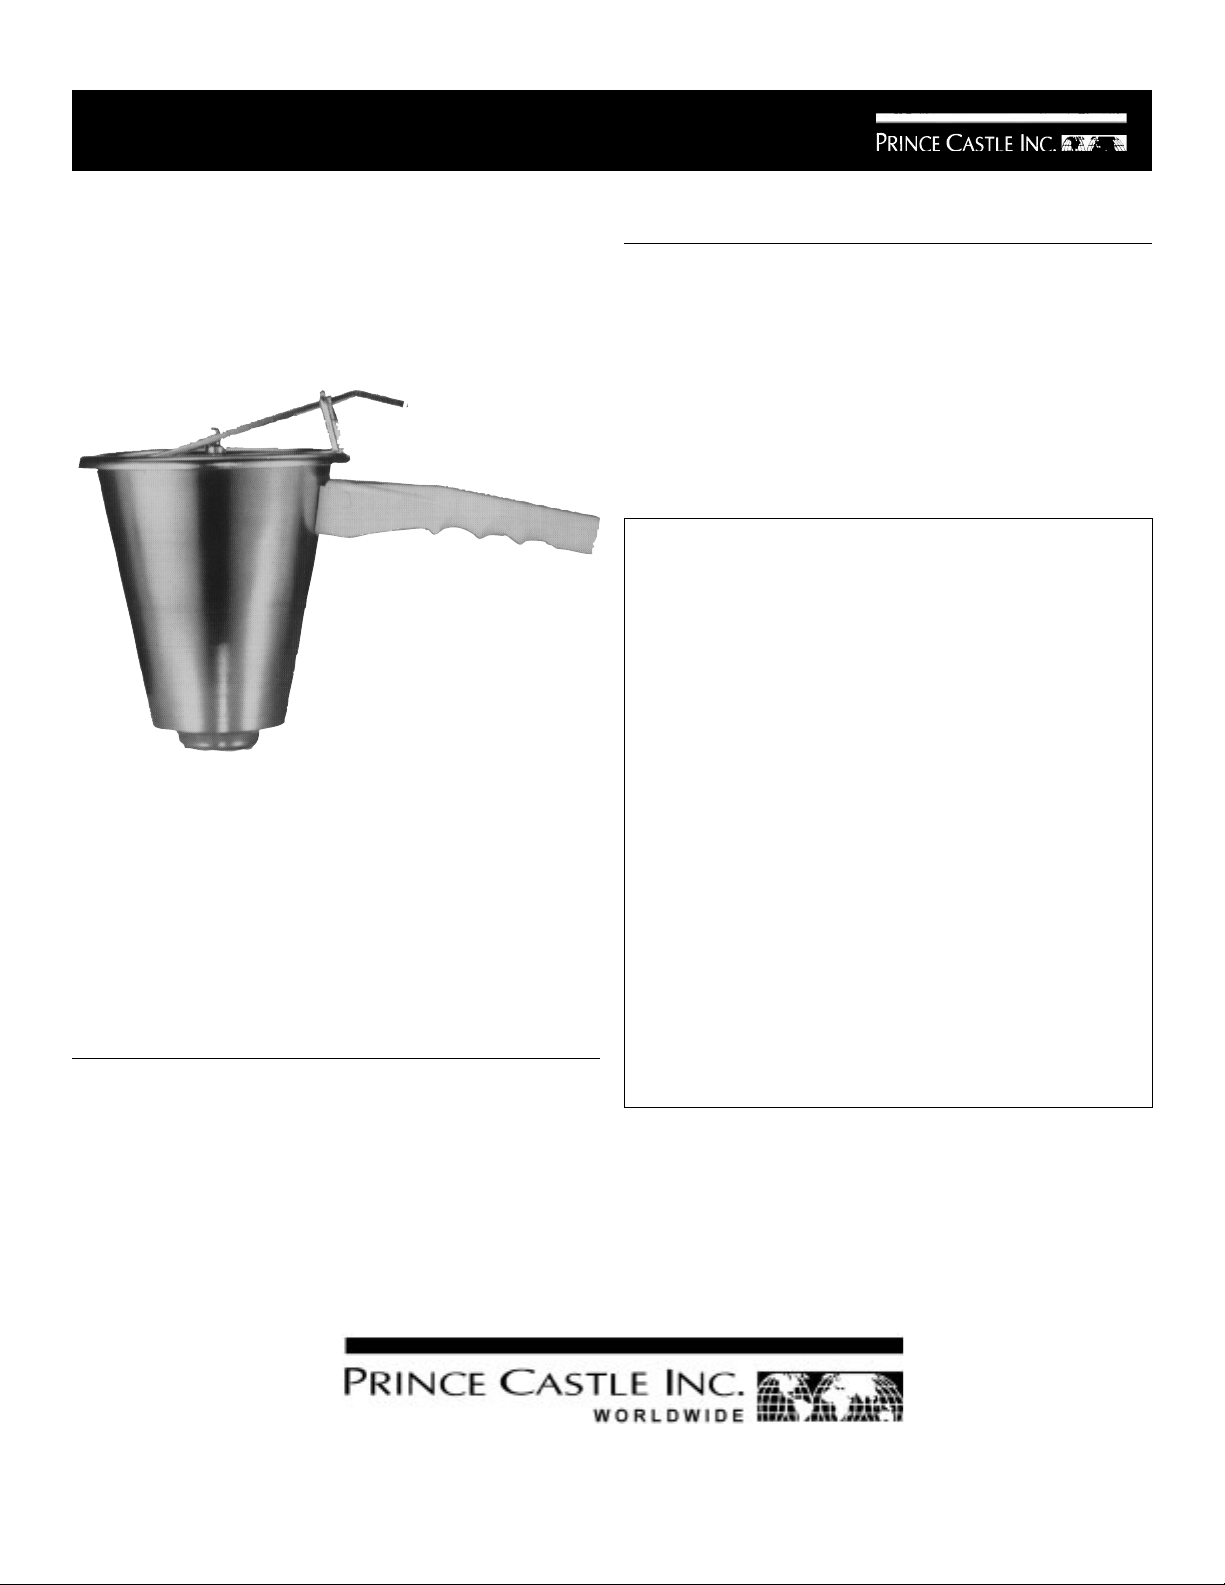
Prince Castle's Mustard Dispenser is portion control
at its finest. The Mustard Dispenser allows for precise
portion control by dispensing an equal amount of
mustard on each sandwich.
PRODUCT SPECIFICATIONS
Dimensions:
Height Width Length
7-5/8" (19.3cm) 6-3/4" (17.1cm) 12-5/8"(32.0cm)
Shipping Weight: 4lbs (1.8kg)
l Any use of non-genuine Prince Castle spare
parts voids this warranty.
l All labor shall be performed during regular work-
ing hours. Overtime premium will not be covered.
l Damage caused by carelessness, neglect, and/
or abuse is not covered by the terms of this
warranty. Equipment damaged in shipment, by
fire, flood or an act of God is not covered.
Printed in 2001
355 East Kehoe Blvd. l Carol Stream, IL 60188
Tel: (630) 462-8800 l Fax: (630) 462-1460
Toll Free: 1-800-PCASTLE
141-511
Page 2
When your equipment arrives:
INSPECT
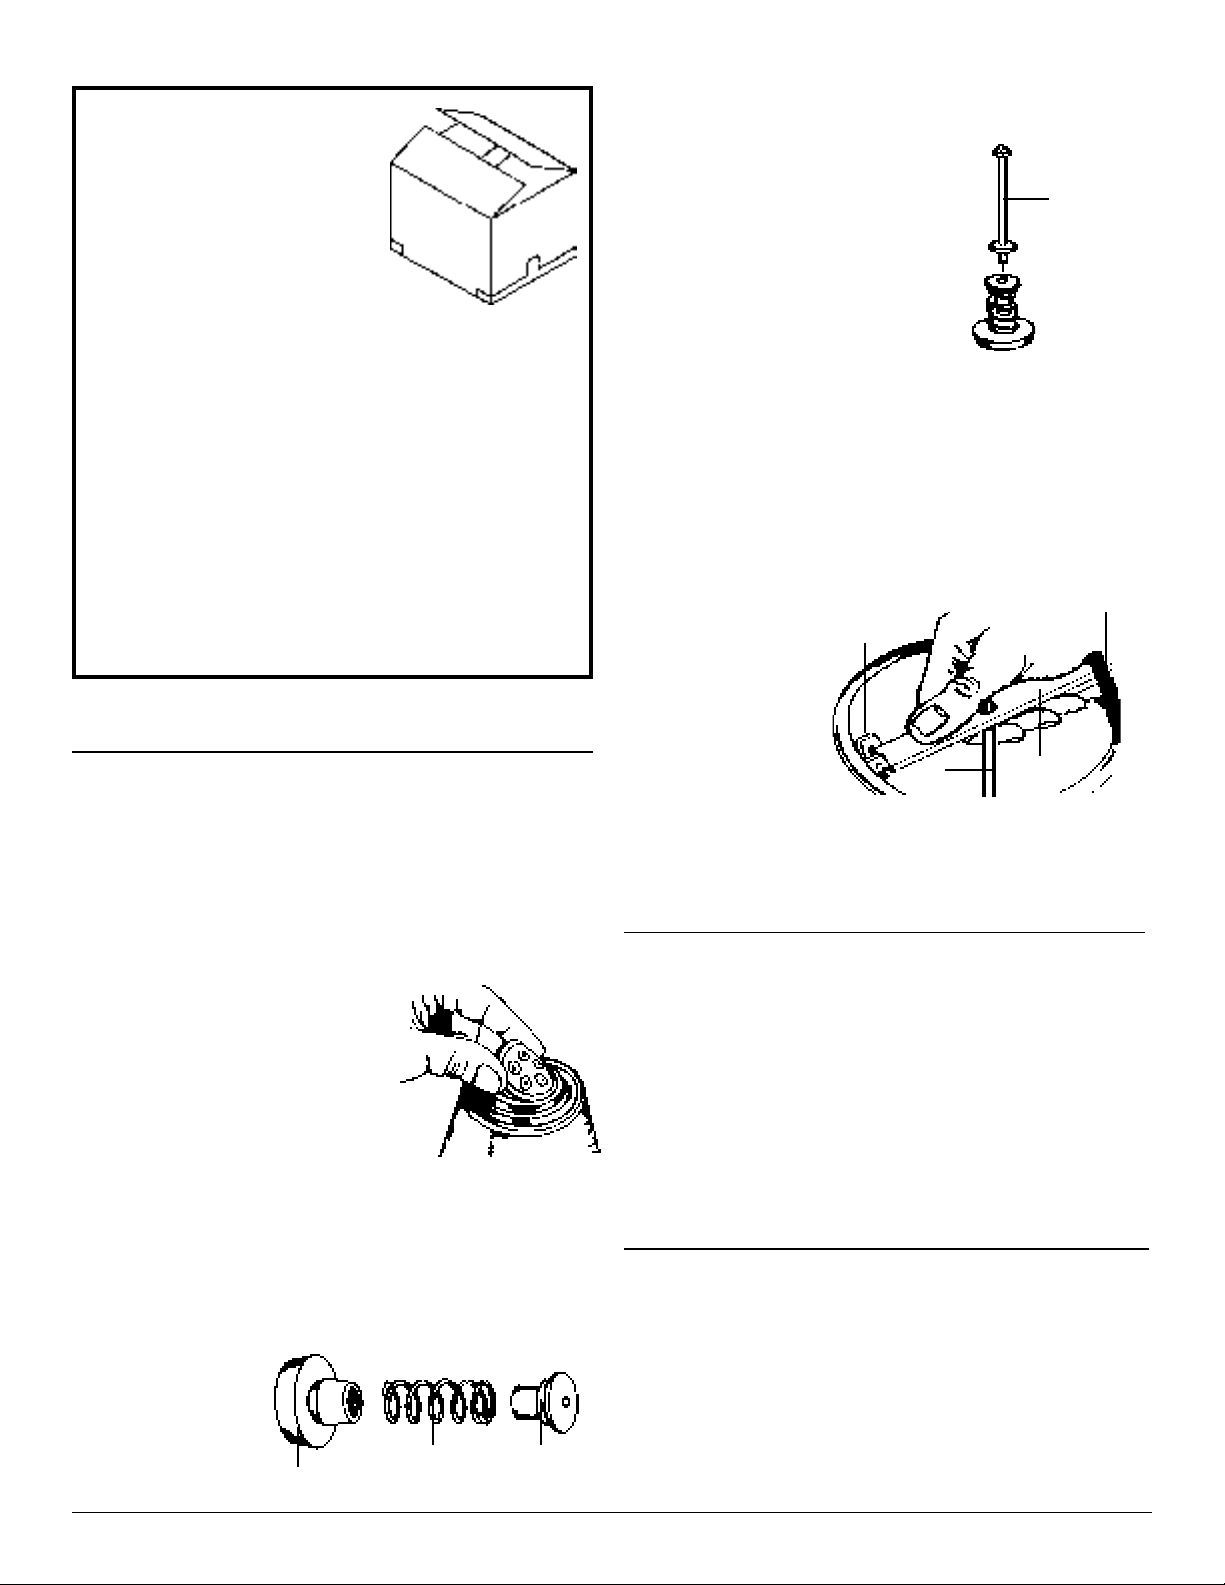
5. Assemble plunger rod (A) to the piston by pressing
the rod into the hole on top of the piston. Lower the
assembled parts into the dispenser. (Figure 3)
CARTON
Remove product from carton.
If damaged:
l Notify carrier within 24 hours.
l Save carton and packing material.
l If you find a part, or parts missing contact your
local Prince Castle Service Center.
PARTS
1. Always refer to the Parts List in this manual.
You will then have a part number for reference
when ordering.
2. All replacement parts should be purchased from
your local Prince Castle Service Center (see
enclosed list). Outside the U.S.A., contact your
local Prince Castle Distributor.
3. Returns: All inoperable warranty parts must be
returned to the Service Center.
INSTALLATION
figure 3
Note: When pushing the assembled parts into the
mustard, slowly rotate them. This will eliminate air
pockets in the mustard.
6. Assemble the activating lever (A) through the lever
stop (B). Guide the plunger rod (C) into the center
hole. Push down against the springing action of the
piston, then guide the end of the lever into the slots
(D) at the rim of the container. (Figure 4)
A
B
D
figure 4
C
A
1. Wash and sanitize all parts before using.
2. Install diffuser, by bending it between the thumb and
forefinger, so that it is bent into an oval shape over
the middle finger. Work the crease in the side of the
diffuser around the rim of the opening in the bottom
of the container. (Figure 1)
figure 1
Note: The convex side of the diffuser should extend downward.
3. Pour 1-1/2" of mustard into the dispenser.
4. Assemble cylinder (A), spring (B), and piston (C).
(Figure 2)
figure 2
7. Be sure cylinder, spring and piston are nested properly over diffuser.
OPERATING
1. The dispenser must be primed after filling with mustard. To prime, hold lever down to force air out of
cylinder, then shake side to side to remove air trapped
around spring and cylinder area due to thickness of
mustard.
2. Pump dispenser a number of times to prime and to
make sure it is working properly. If any air is in the
piston, cylinder and diffuser area, the dispenser will
not portion correctly and dribble after each shot.
CLEANING
1. To clean dispenser, remove mustard from container,
fill with warm water and press actuating lever a few
times, pumping water through the dispenser. Disassemble all parts and wash thoroughly.
B
C
A
2
Page 3

PREVENTIVE MAINTENANCE
Correct
l Use mustard which is at room temperature.
l Rotate all rubber parts twice a week allowing one set
to dry out while other one is in use.
l Once each week, assemble the mustard dispenser
but do not add any mustard. Turn the dispenser
upside down. Press down on the center of the diffuser. There should not be any movement between
the diffuser and the center of the plastic cylinder. If
there is any movement, replace the diffuser as the
dispenser will not dispense properly. (Figures 5 & 6
figure 5
NO SPACE FOR
DIFFUSER TO MOVE
DIFFUSER FEELS FIRM
Incorrect
figure 6
SPACE ALLOWS
DIFFUSERTO MOVE
AGAINST END OF
CYLINDER UNDER
FINGER PRESSURE.
DISPENSER WILL
NOT WORK.
DIFFUSER FEELS SOFT
TROUBLESHOOTING
PROBLEM: PROBABLE CAUSE: REMEDY:
Will not dispense.
Does not dispence
full portion.
Mustard pattern is
irregular.
A) Rubber parts worn out.
B) Shell deformed.
C) Rubber parts incorrectly installed.
A) Rubber parts have lost resiliency.
B) Lever stop on top of shell bent.
C) Shell deformed.
A) Hole in diffuser is plugged.
B) Diffuser is worn out/swollen or
torn.
C) Diffusser is improperly installed.
D) Dispenser being held at an angle
when being used.
A) Replace rubber parts.
B) Replace shell.
C) Check for proper installation of all rubber parts.
A) Air dry parts and alternate parts twice a week.
B) Rebend lever stop as close as possible or
replace shell.
NOTE: Original position of lever stop is bent 13
degrees toward center of shell.
C) Replace shell.
A) Remove and clean.
B) Replace diffuser.
C) Reinstall diffuser.
D) Dispenser should be held vertical.
3
Page 4

EXPLODED VIEW
1
2
3
4
5
PARTS LIST
6
7
8
ITEM PART NUMBER DESCRIPTION
1 141-33 Activating Lever
2 141-32 Handle
3 101-12 Container
4 101-7 Plunger Rod
5 141-51S Piston
6 141-5 Spring
7 141-2 Cylinder
8 141-4YS Diffuser (pkg of 3)
 Loading...