

Page 1
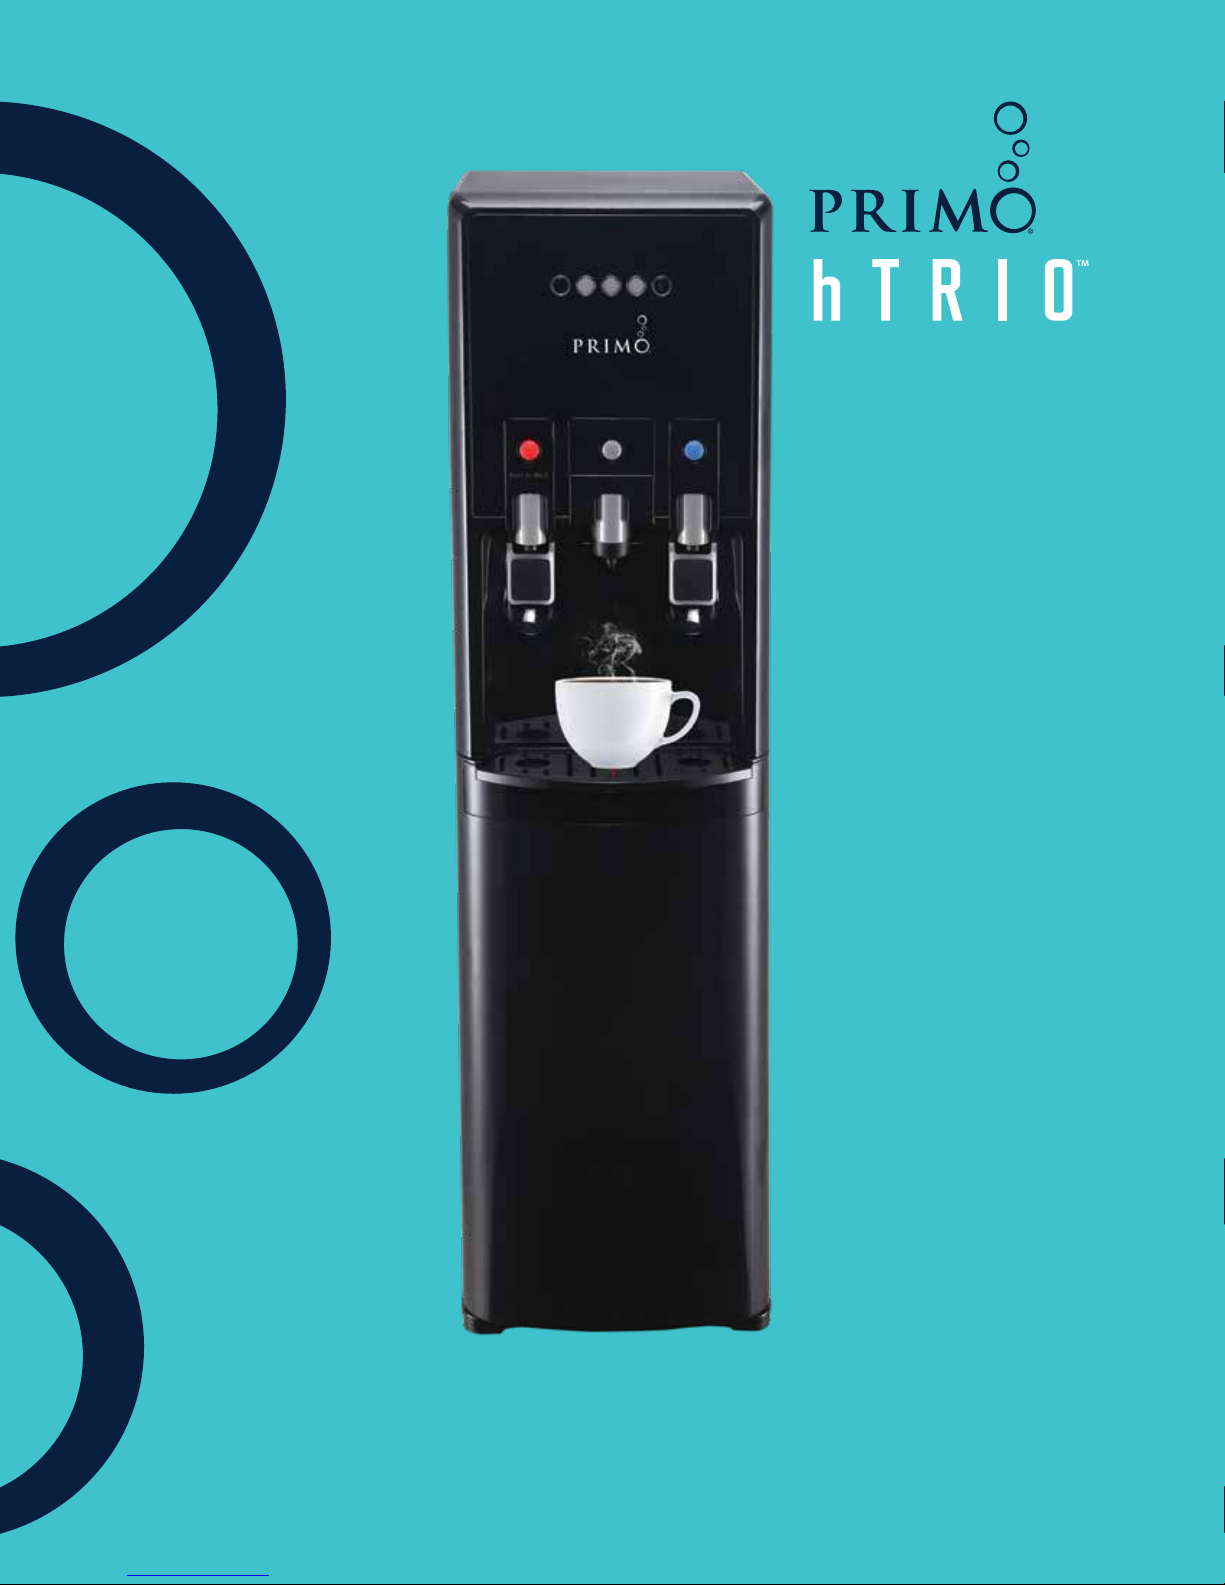
hTRIO® BOTTOM-LOADING WATER
DISPENSER WITH SINGLE SERVE BREWING
B385K
Page 2
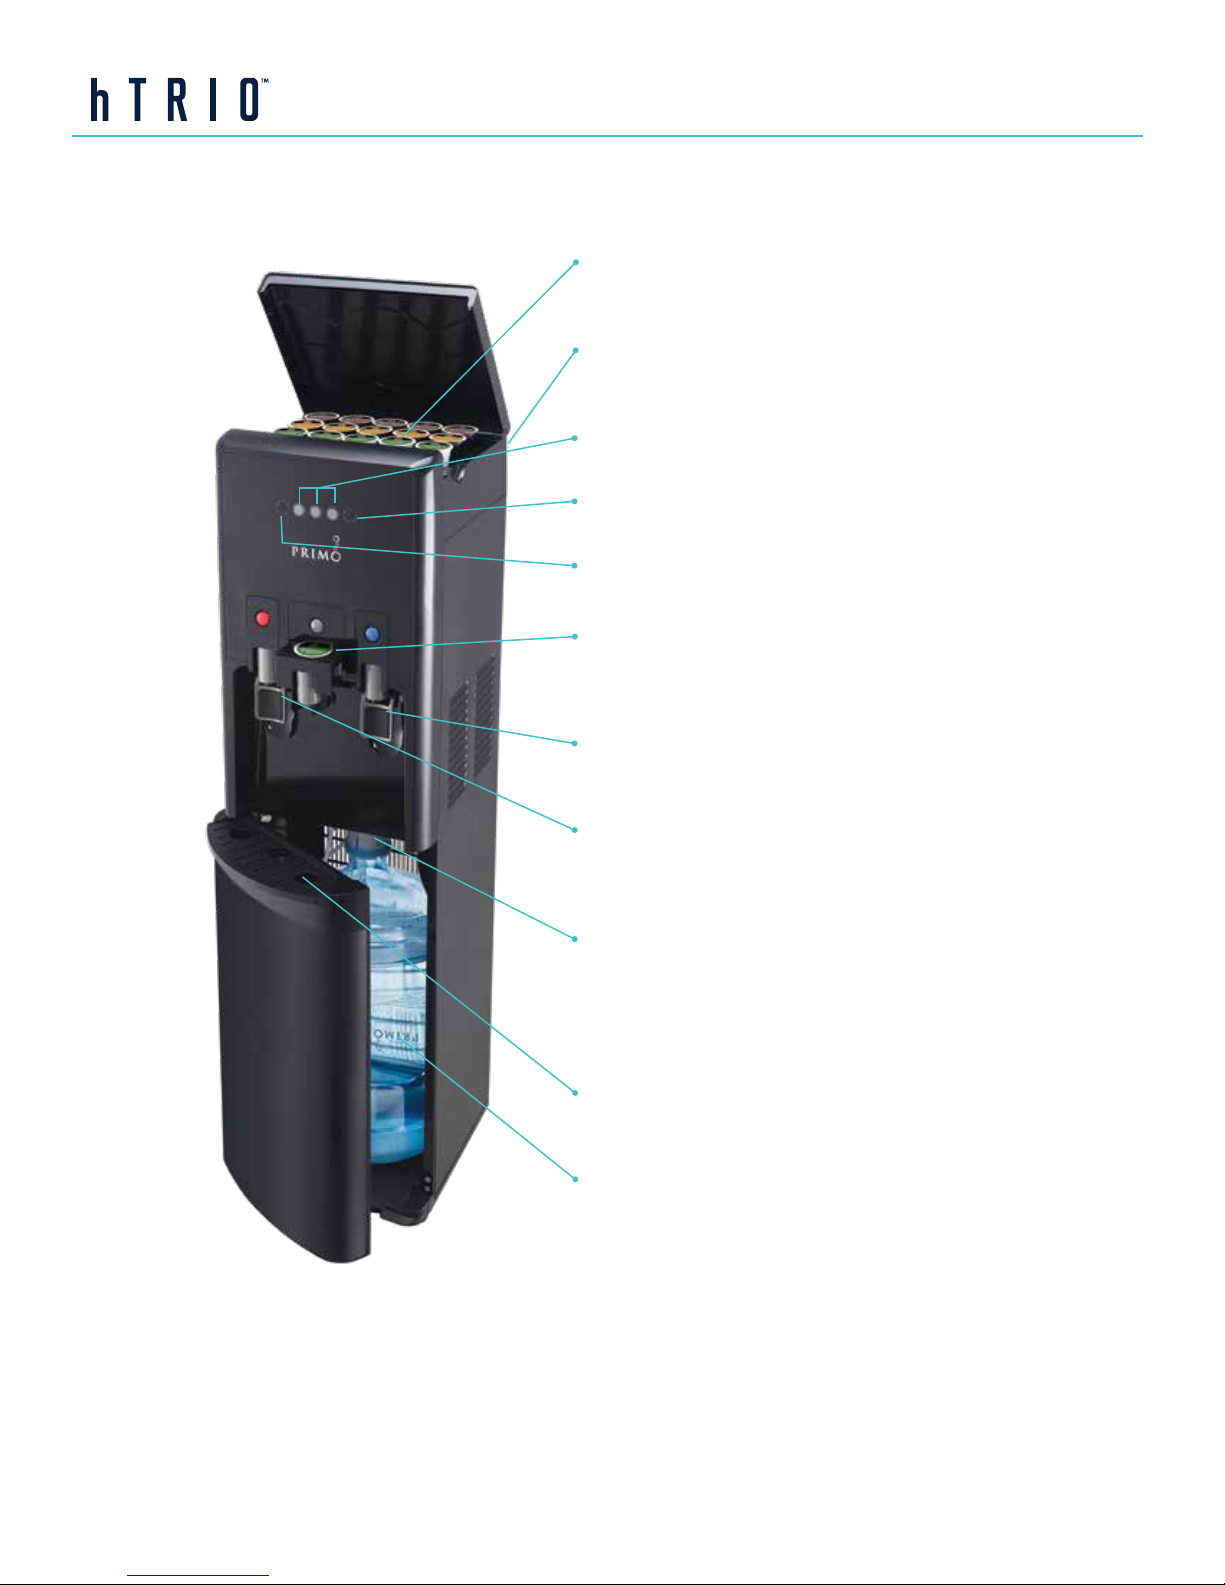
FEATURES
#860011 B385K
STORAGE COMPARTMENT – Removable tray
keeps single-serve brewer pods organized. (Pods sold
separately.)
CONVENIENCE SWITCHES – On/off switches for
heating, cooling and nightlight are located on the back
of the dispenser.
BREW CONTROLS for single-serve beverage
dispensing – Select 6, 8 or 10 ounce serving size.
EMPTY BOTTLE LIGHT – Blinks red when the bottle
is empty and needs to be replaced.
HEATING LIGHT – Flashes when the water is heating.
Stops flashing when water is fully heated.
BREWER CUP DRAWER – Brews single-serve
beverage pods. Press gray button to remove drawer.
CAUTION: Keep fingers clear of sharp needle inside
drawer.
COLD WATER PADDLE CONTROL – Press drinking
glass or container against the paddle to dispense.
Release to stop.
HOT WATER PADDLE CONTROL with child-resistant
safety feature – Push red button and press mug or
container against the paddle to dispense. Release to
stop.
PROBE ASSEMBLY – Probe pumps water from the
bottle into the hot and cold reservoirs.
•
PROBE HANGER – Rest probe assembly on the
hanger (located inside the cabinet door) to keep it clean
while replacing bottles.
DRIP TRAY with Full Indicator – Removable and
dishwasher-safe. Red indicator rises when it’s time to
empty.
WATER BOTTLE – Sold separately. Uses 11.3 or
18.9-liter bottles. Visit PrimoWater.ca to find Primo®
water at the store nearest you.
Page 3
QUICK START GUIDE
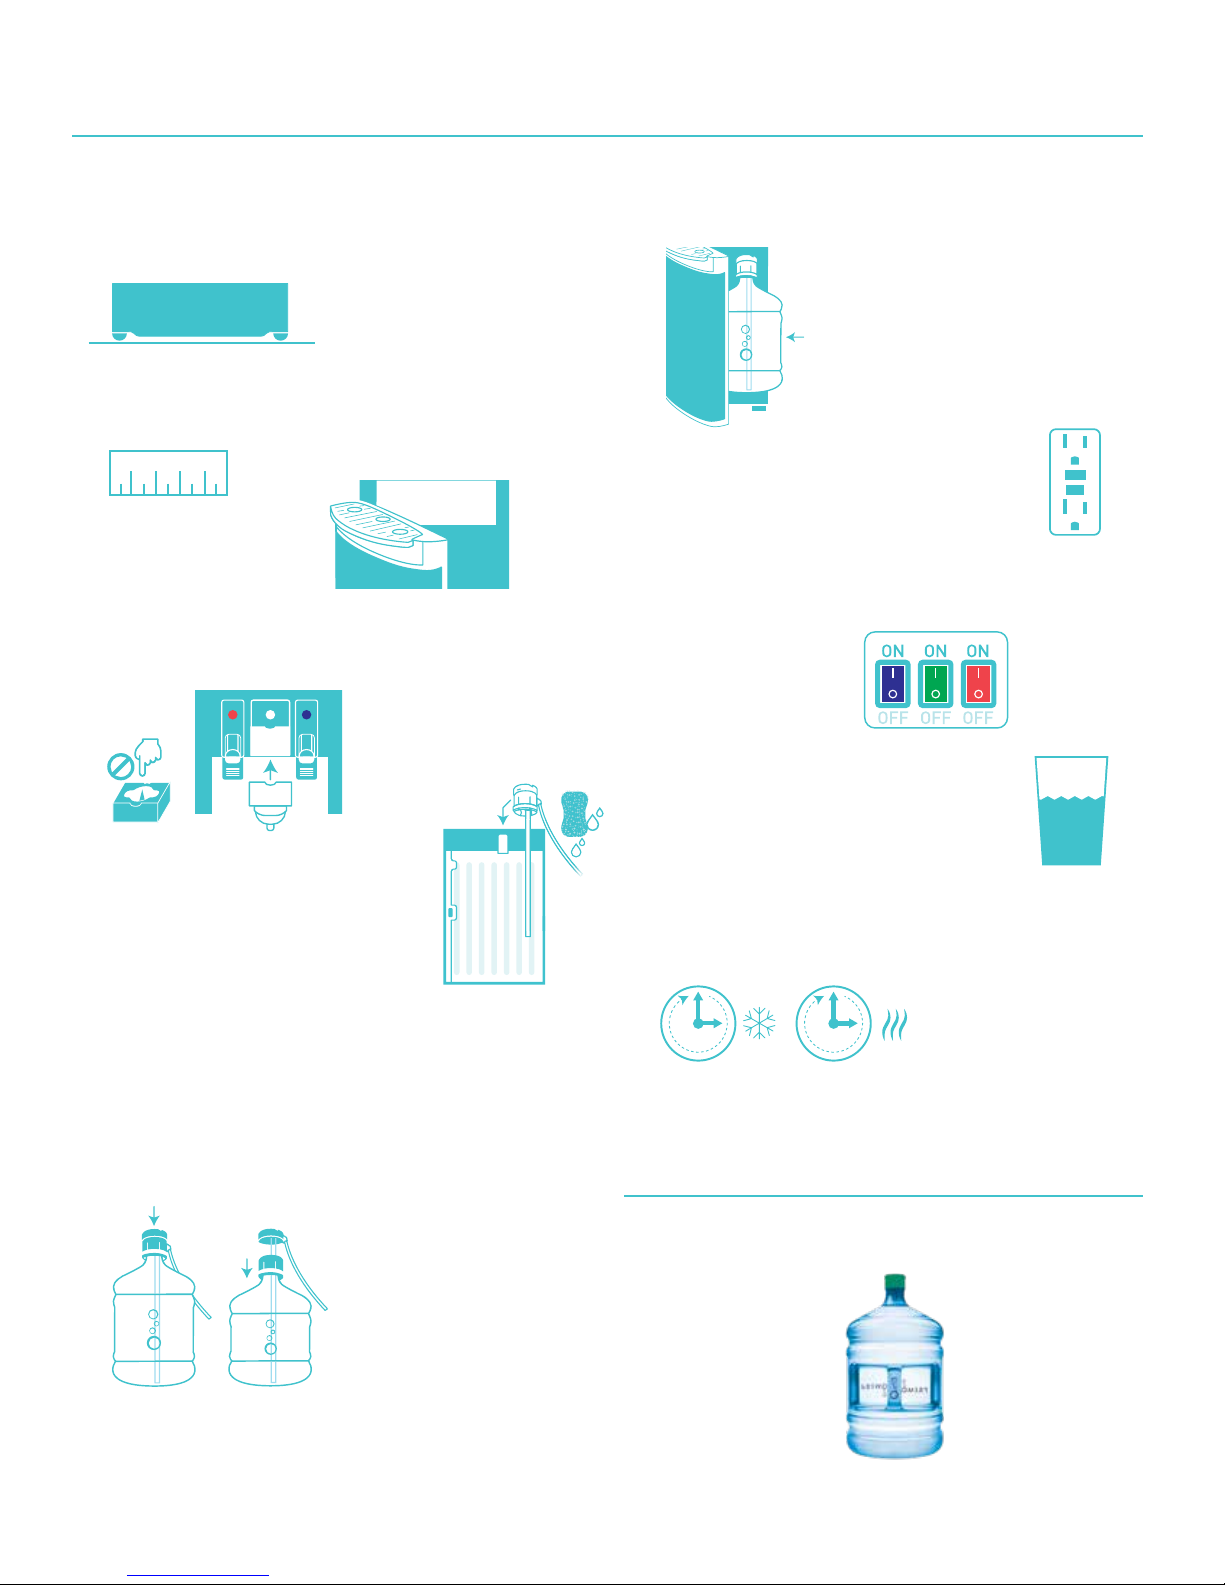
1. Place the dispenser on a level floor surface in the
desired location in your home. Product is intended for
indoor use only. [Note: Do NOT plug power cord into
wall outlet until instructed.]
2. Position dispenser so the back is at least 4 inches
from wall and there are at least 4 inches of clearance
on both sides.
1 2 3 4
3. Slide drip tray into place.
4. Slide brewer cup drawer into the slot until it clicks.
CAUTION: Keep fingers away from the inside of the
tray as the needle is very sharp.
Press to Unlock
7. Slide bottle inside the cabinet and close cabinet door.
[Note: Water will not pump from bottle unless door is
fully closed.]
®
8. Plug dispenser into a ground fault circuit
interrupting (GFCI) outlet. You will hear the
dispenser begin to pump water to fill the
internal hot and cold reservoirs.
9. Turn on desired functions by flipping the switches on
the back of the dispenser to the ON position.
Blue – nightlight
Green – chills water
Red – heats water
5. Clean probe with a damp cloth and
dish soap. (Visit PrimoWater.ca for
detailed cleaning instructions.)
Place probe assembly on hanger
inside door to keep it clean.
Inside of door
6. Grab a bottle of Primo® water (sold separately) and
fully remove the cap. Insert probe assembly into bottle.
Press firmly to secure assembly over bottle opening.
For 11.3-liter bottles, squeeze the tabs on the top of
the probe assembly to separate the probe cap from
the collar and press the collar securely over the
bottle opening.
®
®
10. Once the dispenser has stopped filling
the internal reservoirs, dispense and
dispose at least 1 quart (approximately
2 pint glasses) of water from both the
hot and cold spouts.
1
QT
11. Your water will be ready to dispense fully chilled in
approximately 1 hour or piping – hot in approximately
12 minutes.
HR
1
12MIN
12. Register your dispenser at PrimoWater.ca to
activate your warranty, which runs for 1 year from
date of purchase.
Primo® 18.9-Liter Bottled Water or Self-Service Refill Water
(sold separately)
18.9 Liter
11.3 Liter
Available at numerous locations.
Find the store nearest you at PrimoWater.ca.
Page 4
OPERATING INSTRUCTIONS
DISPENSING COLD WATER
1. Water will take approximately 1 hour after initial set up to become
completely chilled.
2. Press drinking glass or container against the paddle beneath the blue
circle to dispense cold water. Release to stop dispensing.
DISPENSING HOT WATER
1. Water will take approximately 12 minutes after initial set up to reach its
hottest temperature. Heating light will stop flashing once the water has
been fully heated.
2. This water dispenser is equipped with a child-resistant feature in
order to prevent inadvertent dispensing. To enable dispensing of hot
water, press the red lock button, then press mug or container against
the paddle directly beneath the red lock button. Release to stop
dispensing.
CAUTION: This unit dispenses water at temperatures that can cause severe burns. Avoid direct
contact with hot water. Keep children and pets away from the unit while dispensing. Never allow
children to dispense hot water without proper and direct supervision. Disable the heating feature
by switching the heating convenience switch on the back of the unit to the off position or unplug the
unit. Product is intended for water dispensing only. Do not use with other liquids.
PREPARING SINGLE-SERVE BEVERAGES
1. Press gray button to eject the brewer cup drawer and remove it
completely from the dispenser.
2. Insert K-Cup
into place until the needle has fully punctured the bottom of the pod,
and the top of the pod is level with the top of the drawer.
CAUTION: Keep fingers away from the inside of the
drawer as the needle is very sharp.
3. Slide drawer into the dispenser and press until it clicks.
Serving size buttons will light up green.
4. Press the button for your desired serving size –
6 ounces, 8 ounces or 10 ounces.
5. If you haven’t made a serving selection within 5 seconds, the serving
size buttons will shut off to prevent inadvertent dispensing of hot water.
To reactivate the serving selection buttons, simply remove and reinsert
the brewer cup drawer and make your selection.
6. After brewing, eject the drawer by pushing the gray button directly
above the drawer opening, carefully remove and discard the empty
K-Cup
7. Approximately three 6 ounce servings or two 8-10 ounce servings
may be brewed consecutively. The red heating light will flash when
water is heating.
K-Cup® is a registered trademark of Keurig Green Mountain, Inc. Use of the K-Cup
trademark does not imply any affiliation with or endorsement by Keurig Green
Mountain, Inc.
LIMITED WARRANTY
Primo Water Corporation, (“Vendor”) warrants to the original purchaser of this dispenser, and to
no other person, that if this dispenser is assembled and operated in accordance with the printed
instructions accompanying it, then for a period of one (1) year from the date of purchase, all parts
in such dispenser shall be free from defects in material and workmanship. Vendor may require
reasonable proof of your date of purchase from an authorized retailer or distributor. Therefore,
you should retain your sales slip or invoice. The Limited Warranty shall be limited to repair or
replacement of parts which prove defective under normal use and service and which Vendor shall
determine in its reasonable discretion upon examination to be defective. Before returning any
parts, you should contact Vendor’s Customer Service Department using the contact information
listed below. If Vendor confirms, after examination, a defect covered by this Limited Warranty in any
returned part, and if Vendor approves claim, Vendor will replace such defective part without charge.
If you return defective parts, transportation charges must be prepaid by you. Vendor will return
replacement parts to original purchaser, freight or postage prepaid. For units purchased outside
of the continental US (limited to Hawaii, Alaska, and Puerto Rico), dispensers determined to be
defective by the Vendor should be returned or exchanged at the original point of purchase within the
warranty period.
®
pod of your choice (sold separately) and press it firmly
®
pod and return the drawer to the dispenser.
®
USING THE REUSABLE COFFEE FILTER
1. Twist the coffee filter lid counter-clockwise to remove.
2. Add your favorite coffee grounds (sold separately) up to the fill line
above the filter screen.
3. Replace the coffee filter lid and twist clockwise to tighten.
4. Align the indentation on the bottom of the reusable coffee filter with
the needle inside the brewer cup drawer.
5. Slide the brewer cup drawer into the dispenser and press
until it clicks.
NOTE: Fine grounds, tea leaves, cocoa and other powdered beverages are not
recommended as they may clog the filter screen.
REPLACING THE BOTTLE
When your bottle is empty, the empty bottle light will flash. To prevent
freeze-up or over-heating, the dispenser will not heat or cool water when
the bottle light is flashing. Replace the bottle as soon as possible to
re-enable cooling and heating.
1. Open dispenser cabinet door and slide empty
bottle out of cabinet.
2. Remove probe assembly from the empty bottle
and place it on the probe hanger.
3. Set empty bottle aside.
4. Remove the entire plastic cap from the new bottle.
5. Place probe into the new bottle and slide the collar down until it clicks
into place. Press on the top of the probe until the tube touches the
bottom of the bottle. For 11.3-liter bottles, squeeze the tabs on the
top of the probe assembly to separate the probe cap from the collar
and press the collar securely over the bottle opening.
6. Slide the bottle into the cabinet and close the door.
CLEANING & MAINTENANCE
For best taste, performance and hygiene, clean your cabinet, controls,
bottle probe and spout regularly. Use a clean, soft cloth, and food-grade
sanitizer or bleach.
Empty and clean drip tray as needed. Remove and clean brewer cup
drawer regularly. (Keep fingers clear of needle inside drawer.) Drip tray
and brewer cup drawer are dishwasher safe.
Clean the cold reservoir regularly.
Visit PrimoWater.ca for detailed cleaning instructions.
The Limited Warranty does not cover any failures or operating difficulties due to accident, abuse,
misuse, alteration, misapplication, improper installation or improper maintenance or service by
you or any third party, or failure to perform normal and routine maintenance on the dispenser, as
set out in the User’s Manual. In addition, the Limited Warranty does not cover damage to the finish
after purchase, including without limitation scratches, dents, discoloration or rust.
The Limited Warranty is in lieu of all other express warranties. Vendor disclaims all warranties
for products that are purchased from sellers other than authorized retailers or distributors.
AFTER THE PERIOD OF THE ONE (1) YEAR EXPRESS WARRANTY, VENDOR DISCLAIMS ANY AND
ALL IMPLIED WARRANTIES, INCLUDING WITHOUT LIMITATION THE IMPLIED WARRANTIES OF
MERCHANTABILITY AND FITNESS FOR A PARTICULAR PURPOSE. FURTHER, VENDOR SHALL
HAVE NO LIABILITY WHATSOEVER TO PURCHASER OR ANY THIRD PARTY FOR ANY SPECIAL,
INDIRECT, PUNITIVE, INCIDENTAL, OR CONSEQUENTIAL DAMAGES. Vendor assumes no
responsibility for any defects caused by third parties. This Limited Warranty gives the purchaser
specific legal rights; a purchaser may have other rights depending upon where he or she lives.
Some jurisdictions do not allow exclusions or limitation of special, incidental or consequential
damages, or limitations on how long a warranty lasts, so the above exclusions and limitations may
not apply to you.
For warranty information, additional assistance, or instructional videos for maintaining or operating your dispenser, visit
our customer support page at PrimoWater.ca.
Primo Water Corporation, 101 N. Cherry St. Suite 501, Winston-Salem, NC 27101
© 2018 Primo Water Corporation
 Loading...