

Page 1
Instruction Manual
1-16Model #: 63063
Page 2

CLEANING CAMERA: Do not use window or any chemical cleaner to clean any part of the
camera. Only use a water dampened cloth and wipe gently.
DO NOT COVER UP LIGHT SENSOR ON THE FRONT OF THE CAMERA HOUSING (see pg. 8). This
light detects light conditions for camera exposure.
The PIR/Battery Indicator LED (pg. 8) lights to verify triggers (PIR sensor activity)
during rst 10 seconds after power/mode switch is move to PIC or MOV, and lights when
capturing a photo or video during rst 3 minutes of operation. At 3 minutes after power
on, the camera will no longer illuminate this LED for ultimate stealth during operation.
The PIR/Battery Indicator LED will blink if battery power drops to a low level.
IMPORTANT
For your protection, please carefully read these warnings, precautions and safety/operating
instructions completely before operating this product. Follow these instructions closely and keep
this manual for future reference.
WARNING
To reduce the risk of re, electrical shock or product damage/failure:
• Do not expose unit with the battery door open to rain, moisture, dripping or splashing. Do not
open or close the battery door with wet hand. Completely wipe o water on unit and door
before opening.
• Do not lay product on moist ground or submerge in water (this unit is designed for upright
outdoor use). - DO NOT OPEN CASE HOUSING. UNINSULATED, ‘DANGEROUS VOLTAGE’ WITHIN
PRODUCTS ENCLOSURE. DO NOT REMOVE HOUSING COVER. THERE ARE NO USER - SERVICEABLE
PARTS INSIDE, REFER SERVICING TO PRIMOS® CUSTOMER SERVICE.
• Only use batteries as specied in this user manual and install according to correct polarization.
Failure to follow may result in leaking or exploding batteries, damage to product, re or
personal injury. Do not handle damaged or leaking batteries.
• Do not expose to extreme heat. Do not leave product and/or batteries exposed in direct
sunlight inside a vehicle, or other contained environment for a long period of time.
• Only use accessories as recommended in this manual
3
Page 3
CARE & CAUTION
• Transport and handle with care. Do not strongly shake, bump, hit, drop or otherwise cause
impact to the product – can result in product malfunction or damage to key components.
Additionally, damage to the case could result in imperfections to water-resistant properties.
• Take extra care when handling or using product in places with sand and dust. Sand, dust
and foreign substances exposed to product, especially in extreme proportions, may result in
poor speaker quality, damage to the external jacks or internal components and could cause
malfunction of the product. If exposed to any of these elements, please carefully wipe o
completely before continued use.
MODIFICATION WARNING
You are cautioned that any changes or modications not expressly approved in this manual could
void your warranty of this equipment.
OPERATING TEMPERATURE
• Recommended storage temperature range -10°F to 140°F
• Recommended operating temperature range -5°F to 140°F
WARNING
To avoid possible product damage and/or injury, NEVER INSTALL DIFFERENT TYPES OF BATTERIES in
the product at the same time. Failure to follow may result in leaking or exploding batteries, damage
to product, re or personal injury. Do not handle damaged or leaking batteries.
4
Page 4

Page Index
7
Introduction
Parts & Controls Guide
Battery and SD Card Installation
Date & Time Imprint Feature
Power On
Set Up
Viewing Pthe hotos
Glossary
Technical Specications
Troubleshooting/FAQ
8-9
10
11-13
13
14-15
15
16
17
18-20
5
Page 5

IMPORTANT NOTE
Congratulations on your purchase of one of the best Game Cameras on
the market! Primos is very proud of this camera and we are sure you will
be pleased with yours as well. We appreciate your business and want to
earn your trust. Please refer to the notes below and the instructions in
this manual to ensure that you are completely satised with this product.
If your Primos BULLET PROOF 2 Game Camera does not seem to be
functioning properly or if you are having photo/video quality issues,
please check the Troubleshooting/FAQ section on pages 17-19.
Problems are often due to something simple that was overlooked, or
require only changing one setting to solve.
Primos recommends using 4 Energizer® Lithium AA batteries in this
BULLET PROOF 2 Game Camera to obtain maximum battery life.
Do Not Mix Old and New Batteries
Do not mix battery types-use ALL lithium or ALL alkaline.
Rechargeable batteries are not recommended.
Primos recommends using SanDisk® SD and SDHC Cards
(up to 32GB capacity) in this BULLET PROOF 2 Game Camera.
6
Page 6

INTRODUCTION
Congratulations on your purchase of a Primos BULLET PROOF 2 Game
Camera. This camera, with its weatherproof, rugged construction, is
designed to record animal activity in the outdoors. Your BULLET PROOF 2
Game Camera features a compact, portable size and an extra long battery
life.
Main Features:
• 8MP image resolution
• 720p HD Video (10 sec per clip)
• Compact Size
• Trigger Time=1.0 second or less
• Automatic IR Filter
• 14 Night Vision LEDs
• Supports up to 32 GB SD Card
• Date, Time & Moon Phase Imprint
• Auto Exposure
• Auto White Balance
• Power Supply: 4 AA batteries (lithium or alkaline)
• Mounting Strap Supplied
• Weatherproof
7
Page 7
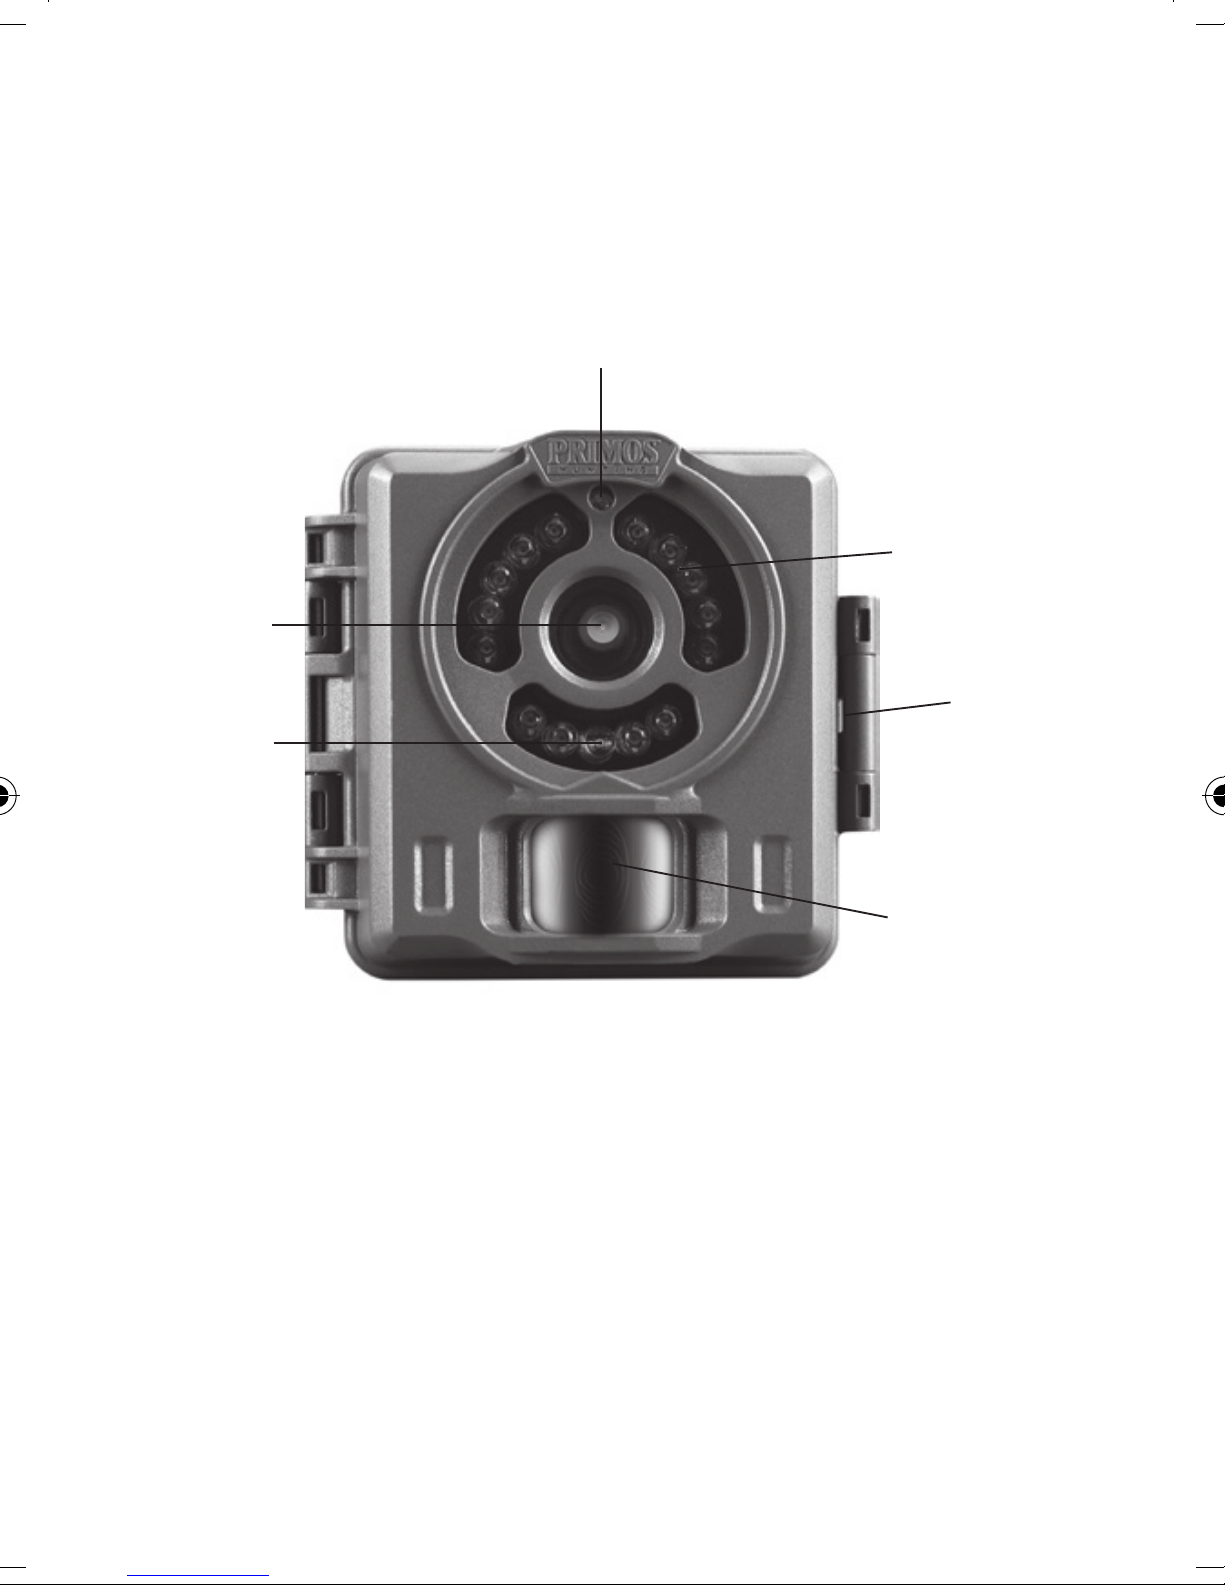
Camera
Lens
Parts and Controls Guide
PIR/Battery Indicator LED Light
Infrared
LED Array
Latch
Light
Sensor
PIR Motion
Sensor
Front of Camera
PIR/Battery Indicator LED:
• Lights when PIR sensor is triggered
during rst 10 sec after power on.
• Lights when capturing photo or video
during rst 3 minutes after power on.
• Blinks to indicate low battery level.
8
Page 8
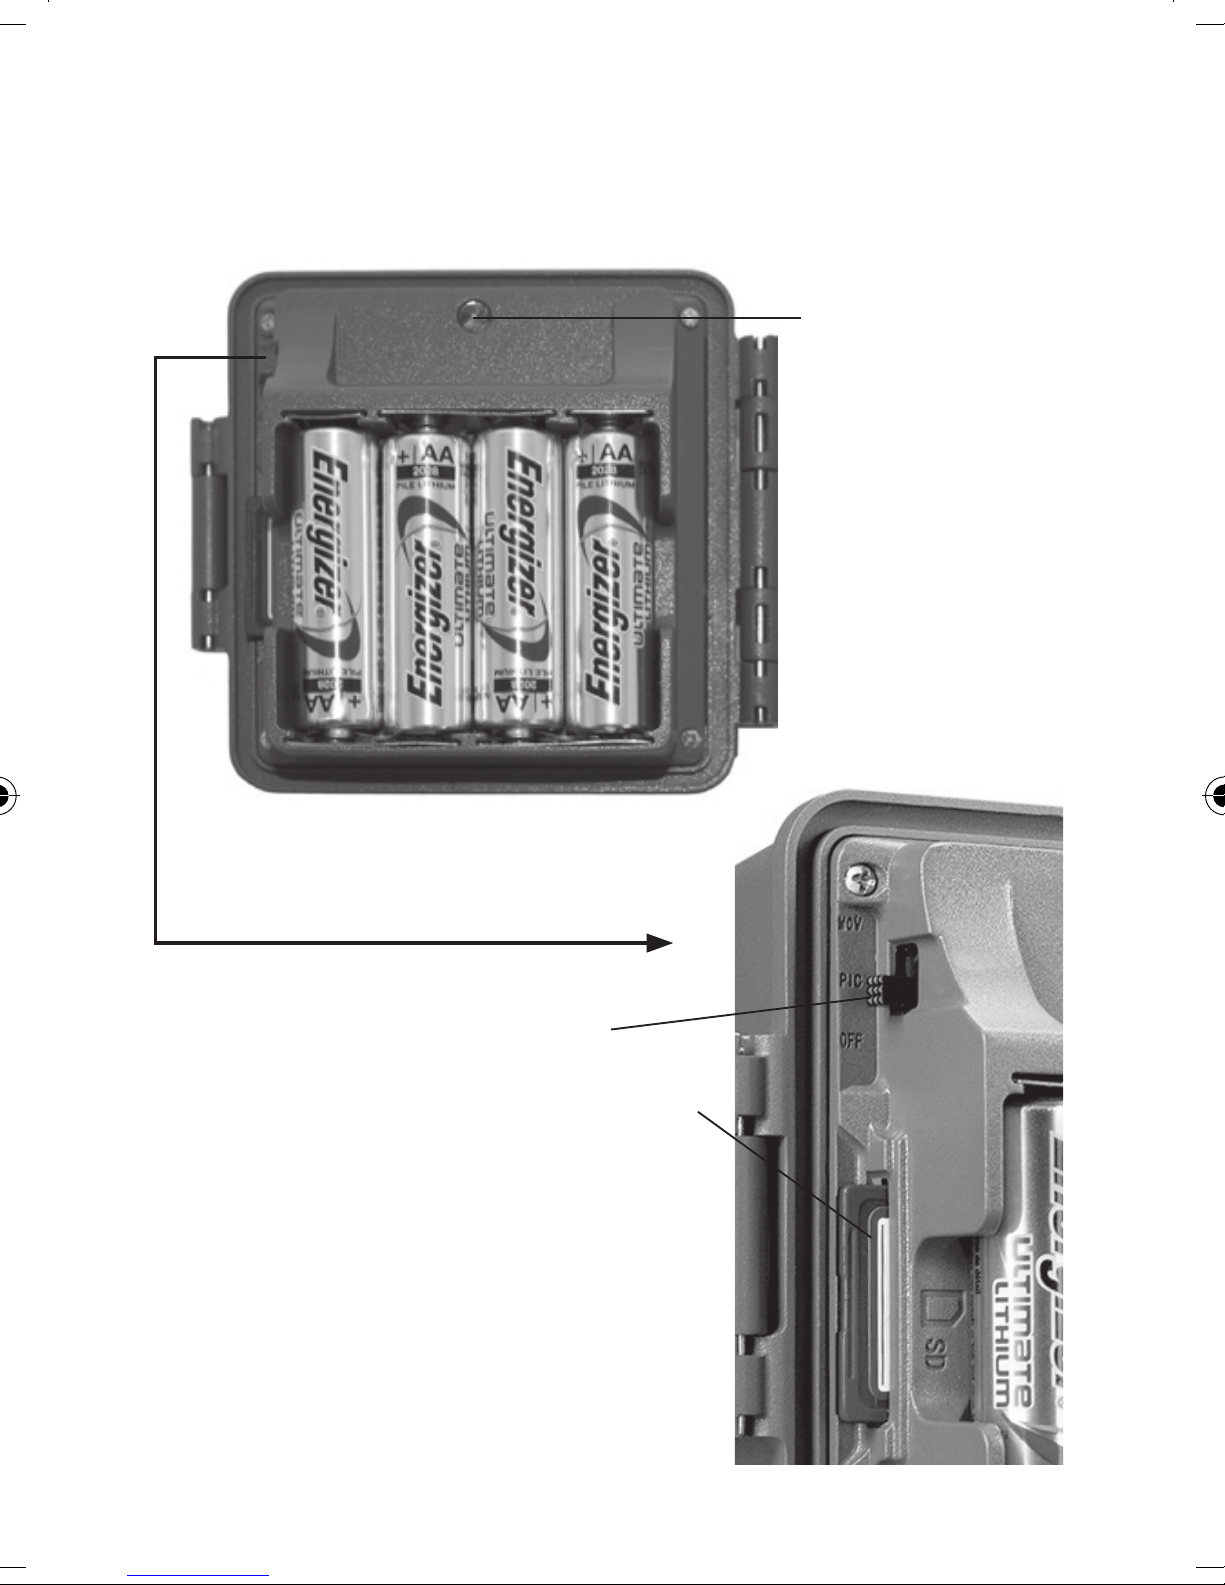
Parts and Controls Guide
+ - + -
Operating Status
Indicator LED Light
Interior View
(Unlatched)
Battery
Compartment
(note orientation for
correct polarity)
+ - + -
Power/Mode
Switch
SD Card Slot
Operating Status Indicator LED:
• Lights when Timetool software has
nished saving to SD card (see pg. 11).
• Lights while capturing photo or video
(do not switch power o when lit).
• Blinks to indicate SD card is locked or
Side View
full (unable to save photos/videos).
9
Page 9

BATTERY INSTALLATION
To maximize battery life, you should install a set of 4 AA lithium (for
longest life) or alkaline batteries.
NOTE: Always set the power switch to the OFF position when installing or
removing batteries.
Please make sure the batteries are inserted correctly, as indicated inside
the battery compartment. Incorrect voltage or polarity (+/-) will damage
the camera.
Do not mix old and new batteries.
Do not mix battery types-use ALL lithium or ALL alkaline.
Rechargeable batteries are not recommended.
SD CARD INSTALLATION
Memory
Your BULLET PROOF 2 Game Camera has a memory card slot, to accept
SD cards up to 32 GB max. capacity (not included). When the SD card is full,
the camera will stop capturing images and the Operating Status Indicator
LED will blink.
Inserting an SD card
• Make sure the power switch is in the OFF position whenever adding
or removing memory.
• Insert an SD card into the card slot completely and oriented correctly
as shown by the icon above the slot (label up, contacts facing down
and notched corner on the right).
• To remove the SD memory card, depress the SD card and pull out
the card gently.
Using a new, blank SD card is recommended. If the SD card has been used
in another device, please be sure to do a “full” format (FAT 32) using your
computer before you set the camera to capture photos. If you experience
problems with a new SD card, do a full format from a computer and try
again.
10
Page 10
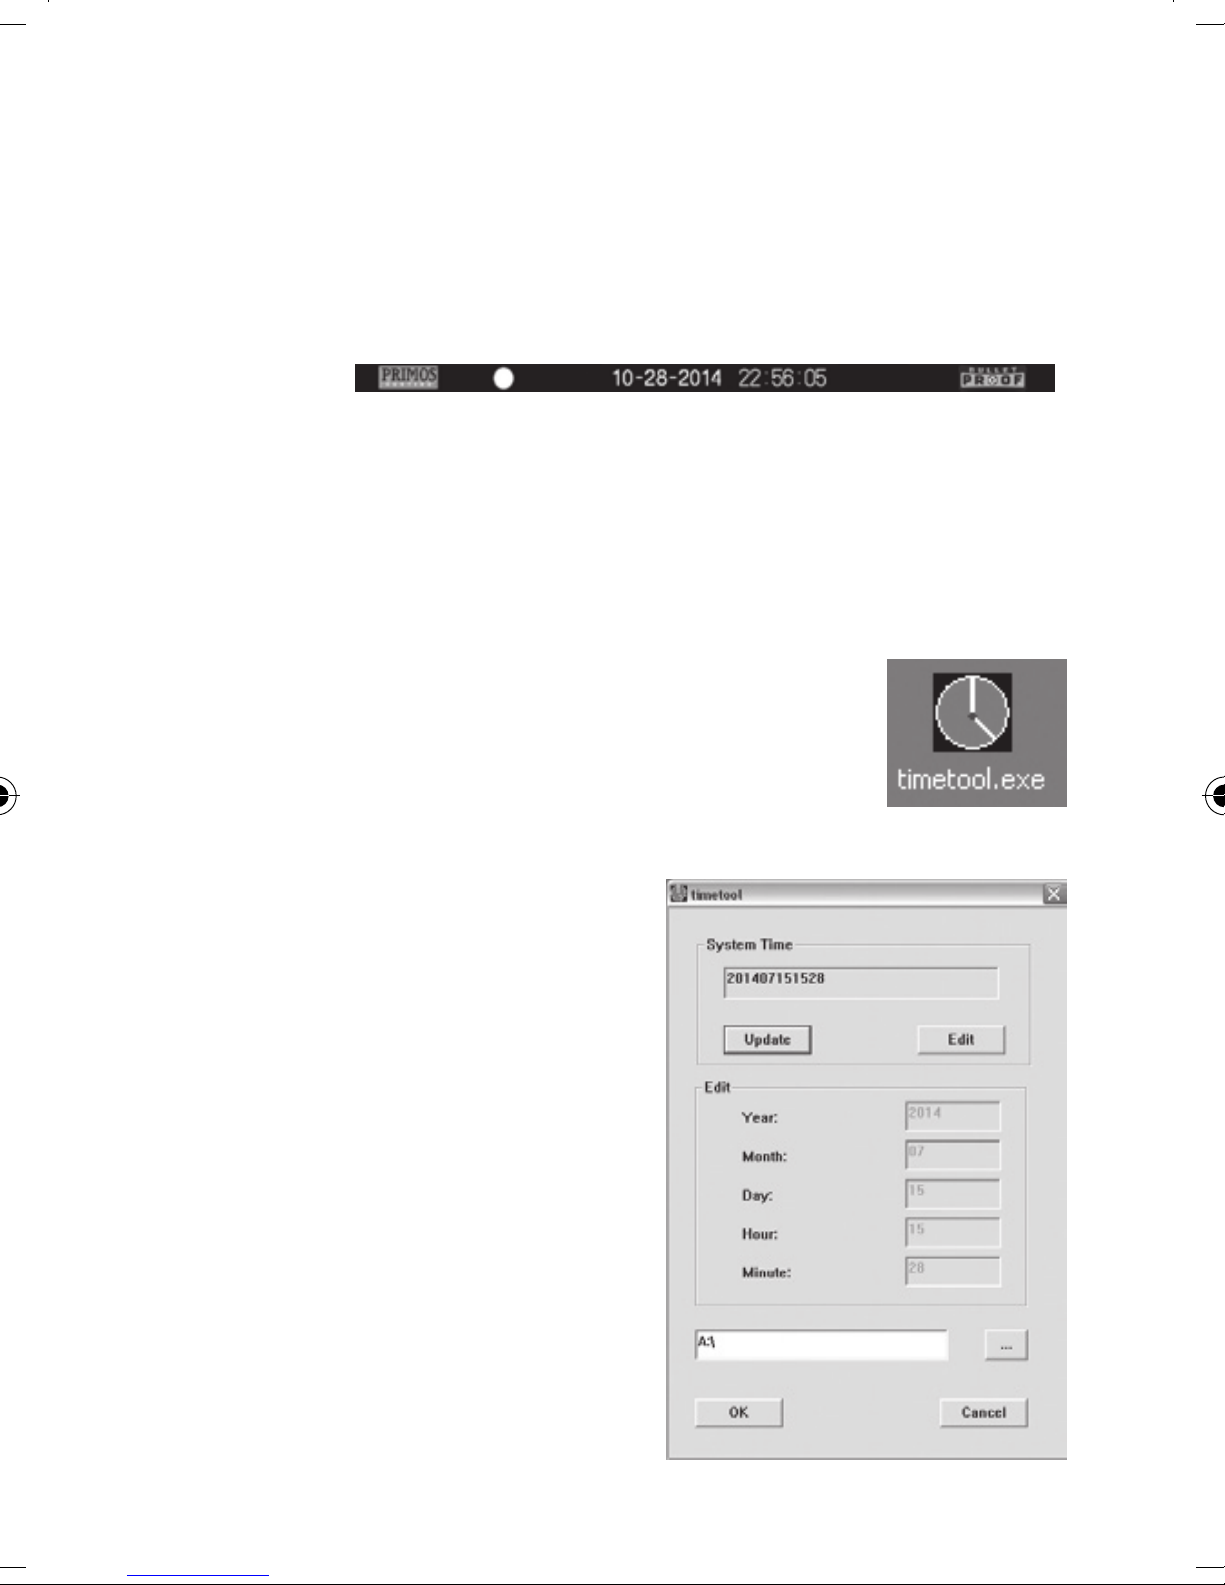
DATE AND TIME IMPRINT FEATURE
Your Digital BULLET PROOF 2 Game Camera will automatically imprint
the date, time and moon phase on each photo it captures, based on the
initial date and time data in a text le you can generate and save on the
SD card, as described below. If no text le with date/time is found on the
card when the camera is turned on, only “Primos” will be imprinted on
the photos.
Requirements:
• A PC computer with an internal SD card slot, or an external USB
card reader.
• The “Timetool” application (Windows only-Mac users see next page),
which is provided by the camera-see details below.
Steps:
1. Insert a new SD card in the camera’s card slot.
Switch the BULLET PROOF 2 Game Camera
to “PIC”. The “Timetool.exe” software will be
automatically saved to the card. The Operating
Status indicator LED (pg. 9) will go out when this
is done. Do not remove the card while the LED is on.
2. Turn o the camera and
remove the SD card. Insert
the card in your computer’s
SD card slot or a compatible
USB connected card reader.
2
View the SD card contentsdouble click to open the le
“timetool.exe”. Note: if the
Timetool window doesn’t pop
up after inserting the card, go
1
to Start>Computer, and double
click “Removable Storage” to
view the SD card contents.
3. Click “Update” in the Timetool
window to automatically ll in
the date and time from your
3
4
11
Page 11

computer’s clock. If this is not the correct date and time, click
“Edit” and make changes as needed.
4. Click the “...” button above Cancel and select the SD card location
(drive letter). Or, if you know the drive letter for the SD card (e.g.
“D:\”), change the “A” in the white box to the correct letter.
5. Once the date/time data is correct and you’ve selected your SD
card location, click OK to save the text le.
6. Remove the SD card (eject it rst if necessary) and insert it into
your BULLET PROOF 2 Game Camera (label side up as previously
described). The date and time data will be automatically loaded
into the camera, and the text le (txt) will be deleted. It is
important to get the card from computer to camera as soon as
possible to ensure the initial time is still accurate.
Note: it is not necessary to reinstall Timetool before inserting another
(new) SD card, as long as battery power is maintained.
Setting Up The Date & Time Imprint Feature
For Mac Users
Since the Timetool software built into the camera is Windows only, you
will need to create a compatible text le using your Mac, save it on an SD
card and load it into the camera. This only needs to be done once, unless
the camera’s batteries are not replaced before they are completely dead.
1. Insert a new, unused SD card (up to 32GB) into a compatible USB
card reader connected to your Mac (most Mac laptops have an
SD card slot built-in, please consult your computer manual if
necessary).
2. Open the TextEdit application on your Mac. This is the default
simple text editing program included with the Mac operating
system. A quick way to locate and open it is to click the
“magnifying glass” icon at the top right of your screen (Spotlight)
and type “text edit”-you will see it listed under “Application”-click
the “TextEdit” line to open it.
3. In the blank TextEdit window, type (only) the current date and
time using this format: “TIME”YYYYMMDDHHMM (include the
word “TIME” with quote marks. Do not add spaces, hyphens or
slashes. Do not use bold type). For example, if the current date is
12
Page 12

October 6, 2015 and the time is 10:38 AM, you would enter this:
“TIME”201510061038. Note that the time format is 24 hour, not
12, so enter the hour of 1:00 PM as “13”, etc.
4. Under the File menu in TextEdit, select “Save As”, and select the
SD card slot or reader as the save location. If you don’t see it in the
“Where” list, click the down arrow to the right of “Save As” to see
a complete list of Devices-the SD card should be on there. Make
sure the File Format is “Rich Text Format” (.rtf). Name the TextEdit
le “TIMESYNC” and click Save to save it to the SD card.
5. Eject the SD card (right click, select “Eject (name of card)_”, and
wait for the card icon to disappear from your Mac desktop).
6. Make sure the Primos cam’s power switch is o. Insert the SD card
into the camera’s card slot, then switch on the camera. Test the
date imprint by waving a hand in front of the camera a few times
during a minute or two.
7. Switch o the camera and remove the card. Insert the card in
your Mac’s card slot or USB card reader. Double click to view
the card contents. The .jpg photos or .avi videos are in the DCIM
folder. Open a few to verify that the correct date and time are
being imprinted at the bottom of each photo.
8. If the correct date and time are not imprinted on the photos,
repeat these steps exactly as written. The SD card can be
reformatted (erasing all previous contents) on your Mac by using
the default Disc Utility app. Select the name of the card, select
“Erase” and select the Format “MS-DOS (FAT), then click “Erase…”
POWER ON / MODE SELECT
After inserting batteries and an SD card (w/date & time le at your option),
slide the power switch to the PIC (Picture) position if you wish to capture
still photos, or all the way up to the MOV (Movie) position if you prefer to
capture videos. The PIR/Battery and Operating Status indicator lights(LED
below Primos logo) will warn of problems with the SD card or battery.
• If the Operating Status indicator LED (pg. 9) blinks, there is a problem
with the SD card. Check the card (make sure it’s inserted correctly
and protect switch is not locked) or switch to a new card if it is full.
• If the PIR/Battery indicator LED (pg. 8) blinks, battery power levels
13
Page 13

are low. The batteries should be changed to ensure continued
operation.
• During a video recording, the Operating Status indicator LED will
glow a steady green. DO NOT switch o the camera while this is on,
or the video le may become damaged and unplayable.
To capture photos/videos of activity in the area you choose to locate your
Primos BULLET PROOF 2 Game Camera, follow the steps listed next in
“SET UP”:
SET UP
1. Mount the Camera
It is recommended that you mount the camera about 3 or 4 feet (0.9~1.2
meters) o the ground. It’s best to avoid mounting the camera facing east
or west as the rising and setting of the sun could produce false triggers
and overexposed images. Clear branches and other debris away from the
front of the camera so as not to block the camera lens or PIR sensor.
To mount the camera in place, insert the strap through the strap slots on
the rear housing. Wrap the strap around the mounting surface. Secure
the strap and tighten the buckle in order to secure the camera.
Make sure that the camera’s latch is securely locked in place, to ensure
proper weather resistance.
2. Power On the Camera
If both SD card and batteries are good, the camera will begin taking
photos or videos 10 seconds after you move the switch to PIC or MOV,
whenever it is triggered by the PIR sensor’s heat/motion detection. Each
time the PIR sensor is triggered, the camera will take a new photo or video
following a 10 second delay. For the rst three minutes of operation, the
PIR indicator LED will light for about 3 seconds when it senses animal or
human activity within the PIR coverage area. See “Test the Coverage Area”
below.
14
Page 14
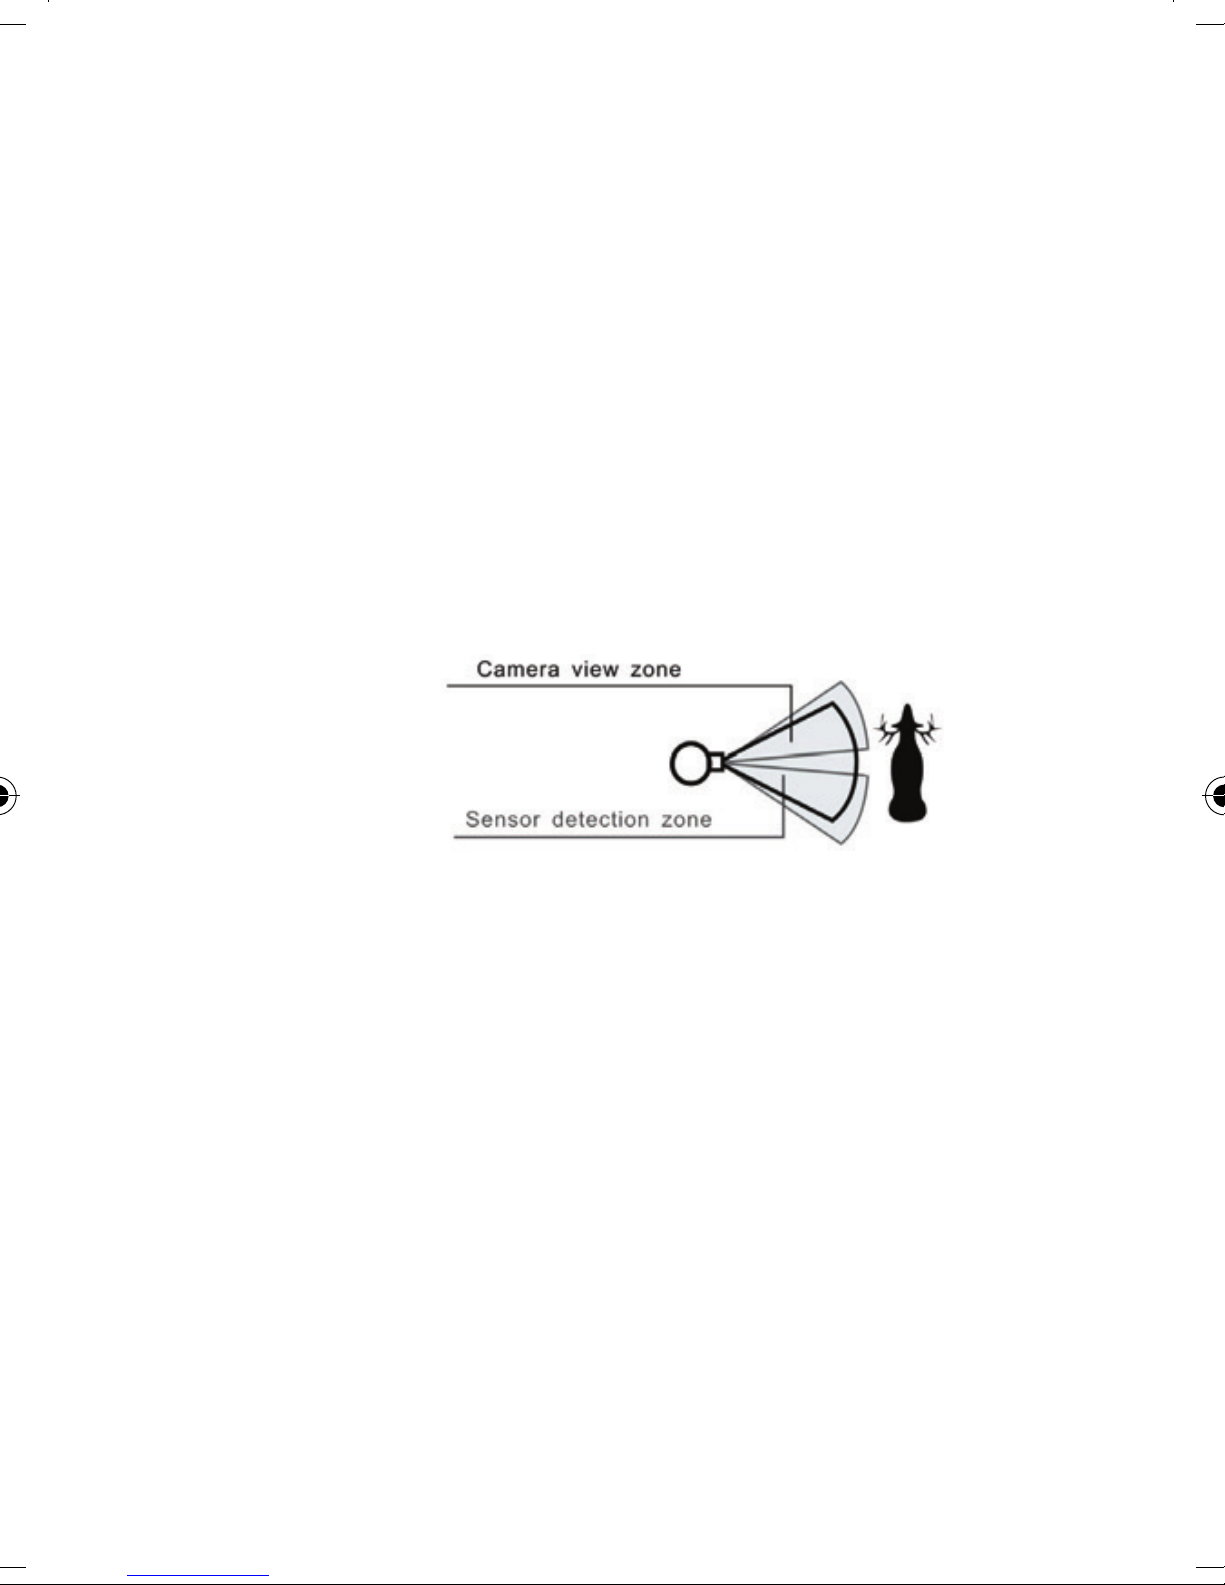
3. Test the Coverage Area
One of the BULLET PROOF 2 Game Camera’s most useful features is the
ability to test the coverage area.
• After mounting the camera, open the front housing and slide the
Power switch to the “PIC” position.
• The red Indicator LED above the lens will glow for 3 seconds when
you trigger the PIR by entering the coverage area.
• Adjust the camera position as needed and repeat the test until the
desired coverage area is achieved.
• After three minutes, the PIR indicator will not glow when you are
in the coverage area (to avoid being seen by animals or potential
thieves. The camera is now “sleeping” and waiting for the PIR sensor
to trigger the an image capture.
• Maximum PIR sensor range is approx. 13 meters (42 ft).
Angle of PIR Coverage=42 degrees
Lens Angle of View=40 degrees
4. Secure the Camera
A standard padlock may be used in the camera’s lock hole to secure it and
prevent theft.
VIEWING THE PHOTOS/VIDEOS
After your camera has been operating for awhile, you will of course
want to review the photos it has been capturing. This can be done by
either of two methods, according to your preference or the availability of
accessory equipment:
Using an SD Card Reader
1. Push the SD card in slightly to release it, then pull it out of the
camera gently.
2. Put the SD card into a USB connected SD card reader (either a
dedicated SD card reader or “multi-card reader” that features slots
for dierent types of memory cards, including SD) or the SD card
slot on your computer if it has one.
15
Page 15

3. The SD card or card reader should appear on your desktop or list of
connected “drives”. Double click it to view or download the photo
les (.jpg) and/or video les (.avi) on the SD card.
Note: while it may be possible to view the les on many digital cameras,
it is not recommended. If you do insert the SD card in a digital camera,
we recommend you perform a full format of the card using a computer
before re-inserting the card into the Game Camera.
GLOSSARY
PIR (Passive Infrared Sensor): Senses motion like a typical security motion
detector. Requires infrared energy (heat) in addition to motion to trigger
the sensor to help limit detection to live subjects (rather than leaves, etc).
Moon Phase: The BULLET PROOF 2 Game Camera has a feature which
imprints a moon phase stamp on each photo for reference. The moon
phase is based on the date/time settings.
IR Flash: Also called IR LED Array. This is a “night vision” feature, which
emits a burst of infrared light, invisible to the human eye. Especially
useful for night photos when a visible ash may be undesirable.
Battery Life: Time that camera will function in the eld. Dependent on
ambient temperature, number of images taken and number of times the
IR ash res. When the battery voltage drops below 4.5v, the IR ash stops
ring. When battery voltage is below 3.5v, the camera stops working.
16
Page 16

TECHNICAL SPECIFICATIONS
Model Number 63063
Image Sensor Type 1/2.7 Inch CMOS
Sensor Resolution 2 million pixels
Eective Focal Length 7.6 mm
Lens Aperture f/2.5
IR Filter Automatic IR Filter
PIR Sensor Yes
Trigger Speed <1.0 second
Number of IR LED 14 LEDs
Max Night Vision Lighting Distance 45 feet
Storage SD Card, up to 32 GB Capacity
PIR Indicator Yes, red LED above lens
Image Resolution (photos) 8.0 MP*
Video Resolution 1280x720 (720p HD), 30 fps
Video Clip Time 10 seconds ea.
File Format JPEG (photos) /AVI (videos)
Date/Time Imprint Yes (data input via text le on SD card)
Moon Phase Imprint Yes (data input via text le on SD card)
Exposure Auto
White Balance Auto
Power Supply 4 AA cell batteries (alkaline or lithium)
Power Consumption <200ma (<600ma w/LED ash)
Average Continuous Running Time
Water Resistant Yes
approx 2 mo. (+/- 1 mo. depending on # of
photos using LED ash)
* 8 MP resolution via software interpolation
17
Page 17

Troubleshooting / FAQ
Battery life is shorter than expected
1. Battery life will vary with operating temperature and the number
of images taken over time.
2. Check to make sure you have used new alkaline or lithium
batteries. Primos recommends using 4 Energizer® Lithium AA
batteries in this BULLET PROOF 2 Game Camera to obtain
maximum battery life.
3. Make sure that you are using a good quality name brand SD card
in your camera. Primos recommends SanDisk® brand SD Cards
up to 32GB. Our experience indicates that poor quality SD cards
can sometimes reduce your BULLET PROOF 2 Game Camera’s
battery life.
Camera stops taking images or won’t take images
1. Please make sure that the SD card is not full. If the card is full, the
camera will stop taking images.
2. Check the batteries to make sure that they are new alkaline or
lithium AA batteries. See note above about short battery life.
3. Make sure that the camera power/mode switch is in the “PIC” or
“MOV” position and not in the “OFF” position.
4. Make sure that you are using a good quality SD card in your
camera. Primos recommends SanDisk® SD Cards up to 32GB.
5. If the SD card has its write protect switch in the lock position, the
camera will not take images.
6. In some cases, other devices may change the formatting of the
SD card so that it will not work properly with the BULLET PROOF
2 Game Camera. If you have used an SD card in another device
before inserting it in your BULLET PROOF 2 Game Camera, you
might want to try formatting the card on your computer (make
sure you have backed up any important les rst, as formatting
will erase all previous les). Be sure to use a “full” or standard
formatting procedure-do not use partial or “quick format” options
(make sure “Quick Format” is unchecked). Use the “FAT32” format,
not “NTFS” format, to ensure the camera will recognize the card.
18
Page 18

Troubleshooting / FAQ
Camera won’t power up
1. Make sure that the batteries are installed correctly, observing
proper polarity. Always place the negative (at) end of each
battery in contact with the spring tab side of its slot inside the
camera.
Do not mix old and new batteries.
Do not mix battery types-use ALL lithium or ALL alkaline.
Rechargeable batteries are not recommended.
Still Photo and/or Video Quality Problems
1. Night photos appear too dark
a. Try using a set of new batteries. The ash will stop operating
near the end of the battery life.
b. You will get the best results when the subject is within the
ideal ash range, no farther than 45’ from the camera. Subjects
may appear too dark at greater distances.
2. Daytime photos appear too dark
a. Make sure that the camera is not aimed at the sun or other
light sources during the day, as this may cause the auto exposure
to produce darker results.
3. Night photos appear too bright
a. You will get the best results when the subject is within the
ideal ash range, no closer than 10’ (3m) from the camera.
Subjects may appear too light at closer distances.
4. Daytime photos appear too bright
a. Make sure that the camera is not aimed at the sun or other
light sources during the day.
5. Red , green or blue color cast
a. Under certain lighting conditions, the sensor can become
confused resulting in poor color images.
b. If this is seen on a consistent basis, then the sensor may need
servicing. Please contact Primos customer service.
6. Video le won’t play
a. If the camera was powered o during a video recording (green
LED on), the le may have been corrupted.
19
Page 19

Troubleshooting / FAQ
Photos Do Not Capture Subject of Interest
1. Try to set your camera up in an area where there is not a heat
source in the camera’s line of sight.
2. In some cases, setting the camera near water will make the
camera take images with no subject in them. Try aiming the
camera over ground.
3. Try to avoid setting the camera up on small trees that are prone
to being moved by strong winds.
4. Remove any limbs, grass, brush, etc. which are right in front of the
camera lens.
PIR Sensor LED Flashes/Doesn’t Flash
1. For the rst three minutes after the camera is switched on, the PIR
Indicator LED on the front of the camera will light for 3 seconds
whenever it senses motion. This is for setup purposes only and
will help the user aim the camera.
2. During use, the PIR Indicator LED will not ash when the camera
takes an image. This is to help keep the camera hidden from
game.
Time/Date Imprint is Not Accurate
1. If you let any signicant amount of time elapse between setting
and saving the current time on the SD card using your computer
(following the Timetool directions on pg. 11) and inserting it back
into the camera, the time will be o by that amount. If you don’t
put the card back into the camera until two days after you saved
the text le on it with the time & date, the camera will “think”
the current date is still the same as it was two days ago, and the
imprint on your photos will be o by that much.
20
Check out the collection of hunting gear we offer.
 Loading...