

Page 1
User's Guide for PRIMOS
Mug Shot Trial Camera
Model#65063 / 6506
Thanks for purchasing this Primos Mug Shot Trail
Camera. Please read this user's guide c arefully
before your use.
Product overview
4
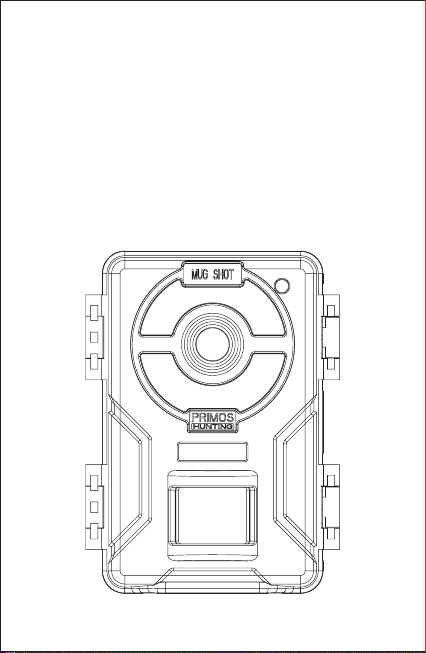
Fig.1
05-19
Page 2
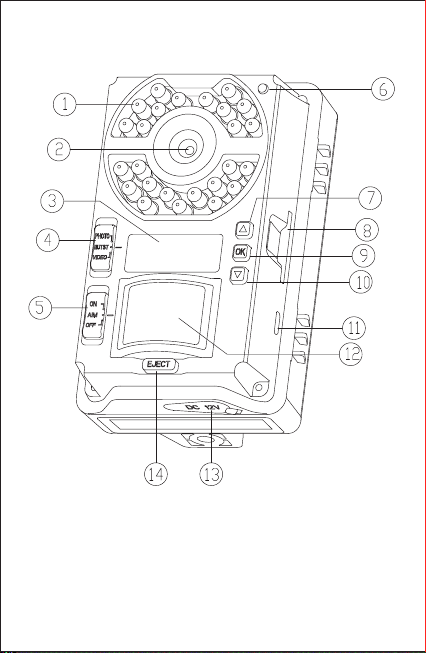
Fig.2
1.LED
2.Lens
3.LCD Disp la y
4.Wor ki ng m od e switch
5.ON/SETUP/O FF
6.Light se ns or
7.UP
8.SD CARD SLOT
9.OK button
10.Down
11.U SB
12.PIR
13.DC Port
14.Battery com pa rt me nt
Page 3
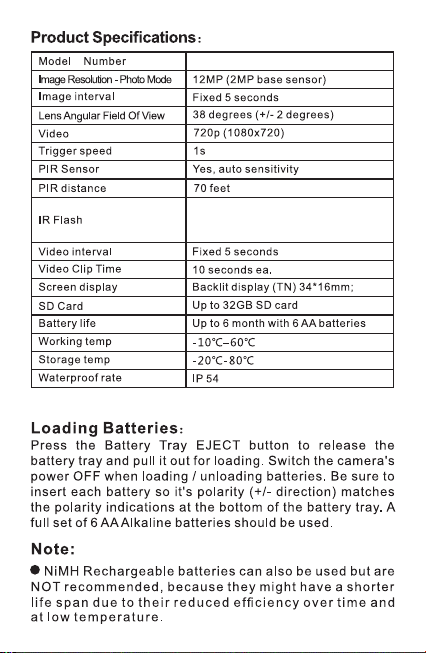
65063, 65064
:24
3
6506
pcs85 0
4: 24
6506
cs940
p
nmLED
nmLED
s
s,50
7
,
flash ran
0
'
flash ran
'
g
e
g
e
Page 4

6 NE W b att eri es ar e r eco mme nde d b ec a us e m ix e d o ld
and ne w bat ter ies may re sul t in sho rter wor king tim e.
The camera d is pl ay w il l sh ow “ LO BT ” wh en t he
battery is l ow.
Inse rti ng SD Car d:
Th e Pr imo s Mu g Sh o t ca me r a us es a s tan da r d SD
memory card to s av e your ph ot os (.jp g fo rm at ) or vi de os
(.avi for ma t) . SD a nd SDH C (high cap ac it y) c la ss 6 or
high er s p e e d c ards, up to a ma ximum 32 GB a r e
supporte d. A Class 10 m em or y card is recommended
when the cam er a wo rk s at b ur st m od e.
M ak e su re that t he w ri te -p ro te ct switch o n th e s id e of
the car d is “off ” (N OT in t he “L oc k” pos it io n) . Wi th the
power sw it ch i n the OFF p os it io n, i ns er t the S D ca rd i
slot on th e ri gh t si de o f th e ca me ra u nt il i t cl ic ks i n place. If
the wr on g si de o f the c ar d is f ac in g up , you w il l no t be able
to in se rt it w it ho ut for ce -t he re is only on ce c or re ct wa y to
insert car ds .
If the SD c ar d is n ot insert c or re ct ly, o r no c ar d is in the
slot, “ CA rd” wi ll appe ar on the LCD di sp la y (F ig . 3) ., a nd
the came ra w il l no t op er at e. O th er c ar d st at us disp la y
messages :” FU LL ” in di ca te s th e card's me mo ry i s fu ll , wi th
no rem ai ni ng roo m to s to re file s. “Er r” mean s ther e is a
ding error ( tr y a di fferent SD card).
card rea
F or ma tt in g the S D ca rd before u si ng i t for t he fi rs t time
is reco mm en de d, especiall y wh en a c ar d has been used
in ot he r dev ic es. This ca n be do ne us in g the cam er a' s
“Format” fu nc ti on . M ak e sure yo u h av e b ac ke d up (s av ed
to yo ur com put er ) an y files yo u wa nt to kee p on a
previous ly u se d ca rd , as f or ma tt in g er as es AL L files.
To tak e ou t the S D ca rd , ju st g en tly pus h in t he c ar d (do
not try to pu ll it out without pus hi ng it first ). The car d is
eased from th e s lo t a nd re ad y t o b e rem ov ed when you
rel
hear the click. Be sure th e cam er a' s pow er is sw it ch ed
OFF before remov in g or i ns er ti ng S D ca rd s.
n th e
Page 5

SETU P MO DE
Once batt er ie s are inst al le d a nd an SD car d is inserted,
you’re re ad y t o go in to th e Se tu p M od e to ge t t he camera
ready to u se , wi th a ll o pt io ns s et t o yo ur p re ferences.
While this c an b e do ne i n th e fie ld ( no c om pu te r or i nt ernet
access i s needed) , mo st us er s wi ll li ke ly w an t t o se tu p t he
ca me ra at hom e, in adv an ce . Ther e are onl y a f e w
settings to ma ke , so the pr oc es s is quick and ea sy. To
start settin g up y ou r Pr im os M ug S ho t Tra il C am er a:
1.To ente r Setup Mod e, m ov e the P ow er Sw it ch t o
middle (AIM ) p os it io n. The display will co me on an d s ho w
the initia l Se tu p sc re en ( Fi g. 4) .
2.Press the OK key to begi n. Whe n the dis pl ay flas he s,
you c an us e the U P a nd DO WN ke y to ch an ge th e setting
of the curre nt ly s el ec te d op ti on o r it em .
3.When you fi nish chan gi ng a s et ti ng (o r l ea vi ng it se t “ as
is”), press OK to lock in t he sett in g an d mo ve t o the next
option / i te m. If the re is a s et ti ng tha t y ou don’t need or
want to ch an ge fr om the de fa ul t o r c ur re nt setting, s im pl y
press OK to confirm and s
Once you go th ro ug h t he Se tu p M od e i te ms an d cha ng e a
few settings , yo u’ ll q ui ck ly s ee h ow t hi s wo rk s.
kip to the next ite m / opti on .
the
Sett ing Tim e and Dat e (Fi g.5)
After the in it ia l Se tu p sc re en , th e ne xt f ew d is play screens
will all ow y ou t o se t th e cu rr en t ti me a nd d at e, s o th e time /
date s ta mp i mp rinted on a ll your p ho to s and v id eo s wi ll be
accurate wh en captured by the camer a. To chan ge the
Tim e an d Da te t o be c ur re nt , st ar ti ng a t th e de fa ult “12:00”
screen:
1. Pr es s OK an d use UP /D OWN to se t the hou r (24
hr/milit ar y ti me f or ma t) . Pr es s O
2.Use UP/D OW N to s et t he m in ut e. P re ss O K to c on fir m.
3.Use UP/DOWN to s et t he m on th . Pr es s OK t o co nfi rm .
4.Use UP/DOWN to set t he d at e. P re ss O K to c on fir m.
5.Use UP /D OWN t o s et th e year. Pr es s O K t o c on fir m and
move on to the n ex t Se tu p it em , Ca me ra I D# .
K to confirm.
Page 6

Sett ing Ca ptu re Mode ( 1 p hot o, 3 phot os, or
vide o) (F ig.6)
Use UP/DOWN to select your pr eferred image capture
mode: S in gl e Phot o per t ri gger ( di sp la y show s 1 + a
camera ic on ), R ap id S eq ue nc e of 3 Ph ot os per tr ig ger
(display sh ow s a st il l c am er a i co n + 3) or Vi de o C li ps th at
are 10 s ec on ds long at 7 20 p re so lu ti on (dis play shows a
movie came ra i co n) . Pr es s OK a ft er s et ti ng .
Se t t in g C a m e r a I D # (i f u s in g m u l t i p l e
came ras ) (Fig. 7)
Use UP/ DO WN t o select a re fe re nc e ID# (fr om “ 01 ” to
“99” ) for this came ra , whi ch wi ll be im pr in te d on all
photos/v id eo s alon g wit h the tim e& da te . If you are onl y
using a sing le came ra t o monitor a n ar ea , si mp ly leav e it
set to the de fa ul t “ Id :0 1” . Se t a s ec ond c am er a that wi ll be
used i n a g ro up o f m ul ti pl e ca me ra s t o “0 2” , e tc . Pr es s OK
after setting.
SD Car d For mat (de let e all fi le s) (F ig.8)
This dis pl ay wil l sho w “FOr N” . CAUTION : be s ur e to
backup and sa ve any /a ll fil es you want to kee p firs t, as
formatti ng wil l clea r the car d comp letely of al l files
will t he n be di ffi cu lt o r imp os si bl e to reco ve r from th e
card.
If y ou ar e s ur e y ou wa nt to fo rm at a pre vi ou sl y u se d car d,
use UP /D OW N to change t he “ N” af te r “F Or _” to “ Y” ( Yes),
then press O K to c on fir m an d de le te a ll fi le s fr om t he c ar d.
-they
Rest ore Def ault Sett ing (in itial ize cam era
setu p) (F ig.9)
The di sp la y wi ll s ho w “dEFN”. To re tu rn t he C am er a ID# to
their o ri gi na l, “f ac to ry defau lt ” s et ti ng s, us e UP/DOWN t o
change t he “N ” a ft er “ dEF_” t o “ Y” (Yes ), then p re ss OK to
confi rm. No te : y ou r time
changed from th e c ur re nt se tt in gs to th e ori gi na l defau lt s,
and y ou r SD c ar d w ill no t be formatted. O nl y th e Ca me ra
ID# will be re st or ed t o th ei r de fa ul ts .
and da te sett in gs will not b e
Page 7

MOUN TIN G AND AIMING T HE CA MERA
Moun tin g
After th e s et ti ng the ca me ra 's ti me /d at e a nd other op ti on s
to you r preferences, you' re ready to take it outside and
begin ca pt ur in g i ma ge s o f animals i n t he area y ou wa nt to
monitor. When sett in g up the Primos Mug Sh ot Tra il
Camera for sc ou ti ng game or o th er outdoor application s,
you must be sure too moun t i t i n p la ce corr ec tly a nd
securely.
There ar e two w ay s to mo un t the Primos Mu g Shot Trai l
Camera: usin g the pr ov id ed adjustab le web be lt ,
tripod soc ke t.
Using the adjustable web belt:
through the two bra ck et on the bac k of the Pri mo s Mug
Shot Trail Cam era. Thre ad th e end of the belt secu re ly
around the tree trunk by pullin g the end of the strap fi rmly
so ther e is no slac k left . No te : it i s n ot poss ib le to us e a
cable lo ck (in th e up pe r part of the br ac ke t) and the w eb
belt at the sa me t im e.
Using t he tr ip od s oc ke t: Th e c am er a is eq ui pp ed with a
socket a t th e bo tt om e nd t o enable mo un ti ng o n a tr ip od o r
other mou nt in
thread.
Sens ing Angle a nd Dist anc e Tes t
To te st wh et he r the Pri mo s Mug Shot Trai l Cam er a can
eff ect iv el y mon ito r the ar ea yo u choo se , thi s tes t is
recommen de d t o c he ck th e s en si ng an gl e and monitorin g
distance o f th e Pr im os Mug Sh ot Tr ai l Camera. To perfor m
the test:
Switc h the cam er a’ s Powe r Switch to AI M. You ca n
ignore th e Se tu p d is play, n o n ee d to change a ny setti ng s
(provide d yo u alre ad y set the t im e/ da te and othe r Setup
Mode optio ns i n ad
Mak e mo ve me nt s in fr ont of t he c am er a as several
position s with in the are a wher e you expe ct the gam e or
subjects t o be .
Try d iffere nt d is ta nc es a nd a ng le s fr om t he c am er a.
If t he AIM/Status LE D blinks, i t indica te s t ha t posi ti on
can be sensed. If it doesn’t bli nk , th at p os it io n is outs id e
of the sendi ng a re a.
g acc es so ri es th at us e a sta nd ar d 1/4 -2 0
vance).
Push one end of the belt
or the
Page 8

The re su lt s o f you r te st in g w il l h el p you fi nd the b es t
placemen t when mount in g an d aimi ng the Primos Mug
Shot Trail Came ra . T he vert ic al hei gh t a wa y f ro m t he
ground fo r p la ci ng the de vi ce sh ould v ar y w it h the a ni ma l
size appro pr ia te ly. In general, 3 to 6 fe et i s pr ef er re d.
You can a vo id poten ti al fa ls e tr ig ge rs due to tempera tu re
and motion di st ur bances in fr on t of t he c am er a by not
aiming it at a he at so urce or nea rl y tree br an ch es and
brush (esp ec ia ll y on w in dy d ay s) .
Swit chi ng On the c ame ra
Once you mo ve the Powe r Sw it ch to ON , th e A IM /S tatus
L E D wi ll bl in k fo r se ve r al s e co n d s (1 0 se co nd s
countdow n) . Thi s gi ve s yo u time to c lo se a nd l oc k the
front co ve r o f the P ri mo s M ug Sh ot Trail C am er a a nd then
walk away. D ur in g t hi s t im e, th e AI M/ St at us LE D w il l b li nk
continuo us ly. Af te r it stop s bl in ki ng, t he P IR sens or i s
active, an d an y mo tion th at i s de te ct ed by i t wi ll t ri gg er the
capture o f p ho to s or vi deos a s p ro gr am me d in Se tup
Mode.Be su re you have re ad t he came ra Setu p
section. Pleas e n ot e, the PIR is stro ng ly sen si ti ve t o
am bie nt te m per atu re. Th e gr e a ter th e te mpe rat ure
diffe re nc e b et we en the en vi ro nm en t a nd your s ub je ct , t he
farther the po ss ib le s en si ng d is ta nc e.
Before leav in g t he came ra una tt en de d, plea se che ck for
the follow in g:
Are th e batt eri es ins ert ed with correct pola rity and is their
power leve l su ffi cient?
Does the SD ca rd h av e su ffi cient avai la bl e sp ac e an d
it's write -p ro te ct io n (l oc k) s wi tc h of f?
Is the Power swi tc h in t eh O N po si ti on ? (d o no t le av e
it set to AIM)
Mode
Fig. 3
Fig. 4
Page 9

Fig. 5
Fig. 6
Fig. 7 Fig. 8
Fig. 9
Page 10

FCC COMPLIANCE
STATEMENT:
This equipment has been tested and found to comply with the
limits for a Class B digital device, pursuant to Part 15 of the FCC
Rules. These limits are designed to provide reasonable
protection against harmful interference in a residential
installation. This equipment generates, uses and can radiate
radio frequency energy and, if not installed and used in
accordance with the instructions, may cause harmful
interference to radio communications. However, there is no
guarantee that interference will not occur in a particular
installation. If this equipment does cause harmful interference to
radio or television reception, which can be determined by turning
the equipment off and on, the user is encouraged to try to correct
the interference by one or more of the following measures:
• Reorient or relocate the receiving antenna.
• Increase the separation between the equipment and receiver.
• Connect the equipment into an outlet on a circuit different from
that to which the receiver is connected.
• Consult the dealer or an experienced radio/TV technician for
help.
Shielded interface cable must be used with the equipment in
order to comply with the limits for a digital device pursuant to
Subpart B of Part 15 of FCC Rules. Specifications and designs
are subject to change without any notice or obligation on the part
of the manufacturer.
 Loading...