

Page 1
Page 2
Page 3
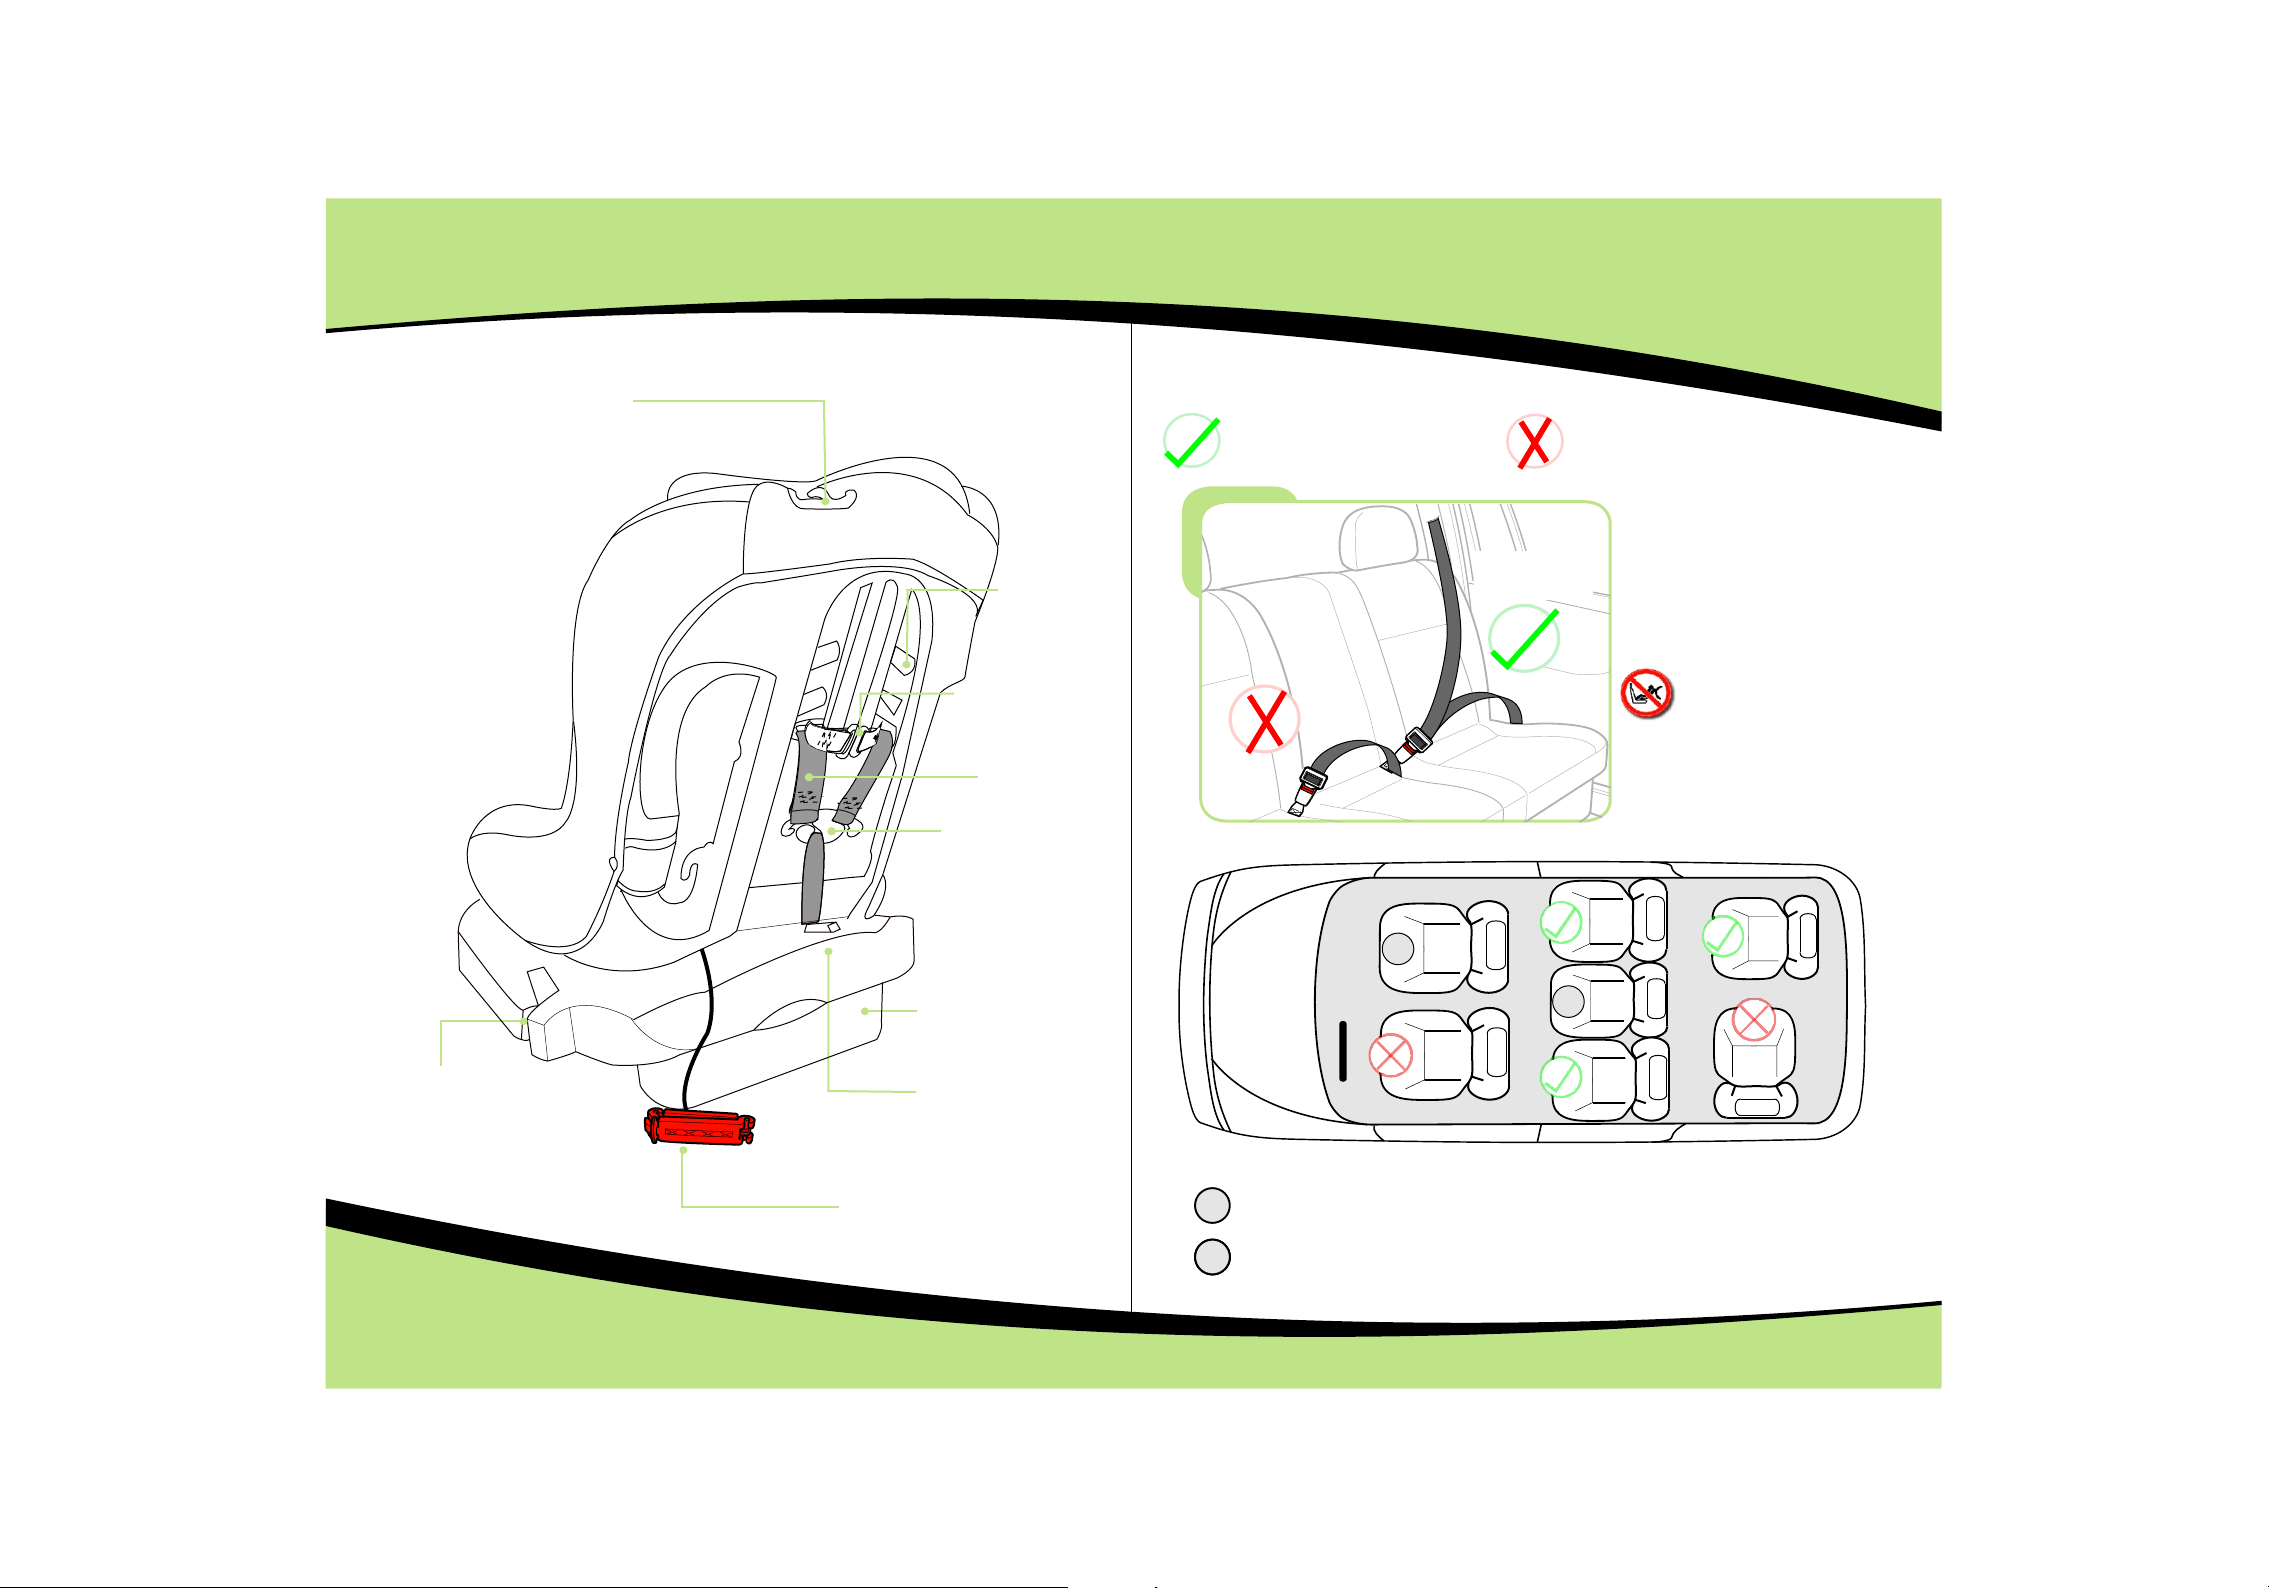
Apertura per la guida della cintura
Applicazione al veicolo
Apertura
per la
cintura
delle spalle
Morsetto della
spallina imbottita
Cinture di
imbracatura
Morsetto
dell'imbracatura
Supporto ribaltabile
Montaggio corretto / Idoneo
Cintura addominale
A
Montaggio non corretto / Non idoneo
Lap Cintura
addominale e
cintura diagonale
B
Adatto solo per l’uso nei veicoli
a listino con cintura di
sicurezza a 3 punti, approvato
dal regolamento ECE No.16 o
altre norme equivalenti.
Attenzione:
NON posizionare il
seggiolino rivolto
all’indietro sul sedile
anteriore con airbag.
ESTREMAMENTE
PERICOLOSO PER
IL BA MB IN O.
Apertura per la guida
della base
Base del seggiolino
Gancio di sicurezza rosso
Non deve essere utilizzato su questo sedile se l’airbag anteriore del passeggero è attivo.
A
B
BB
Utilizzare solo su questo sedile se dotato di cintura addominale e diagonale.
43
Page 4
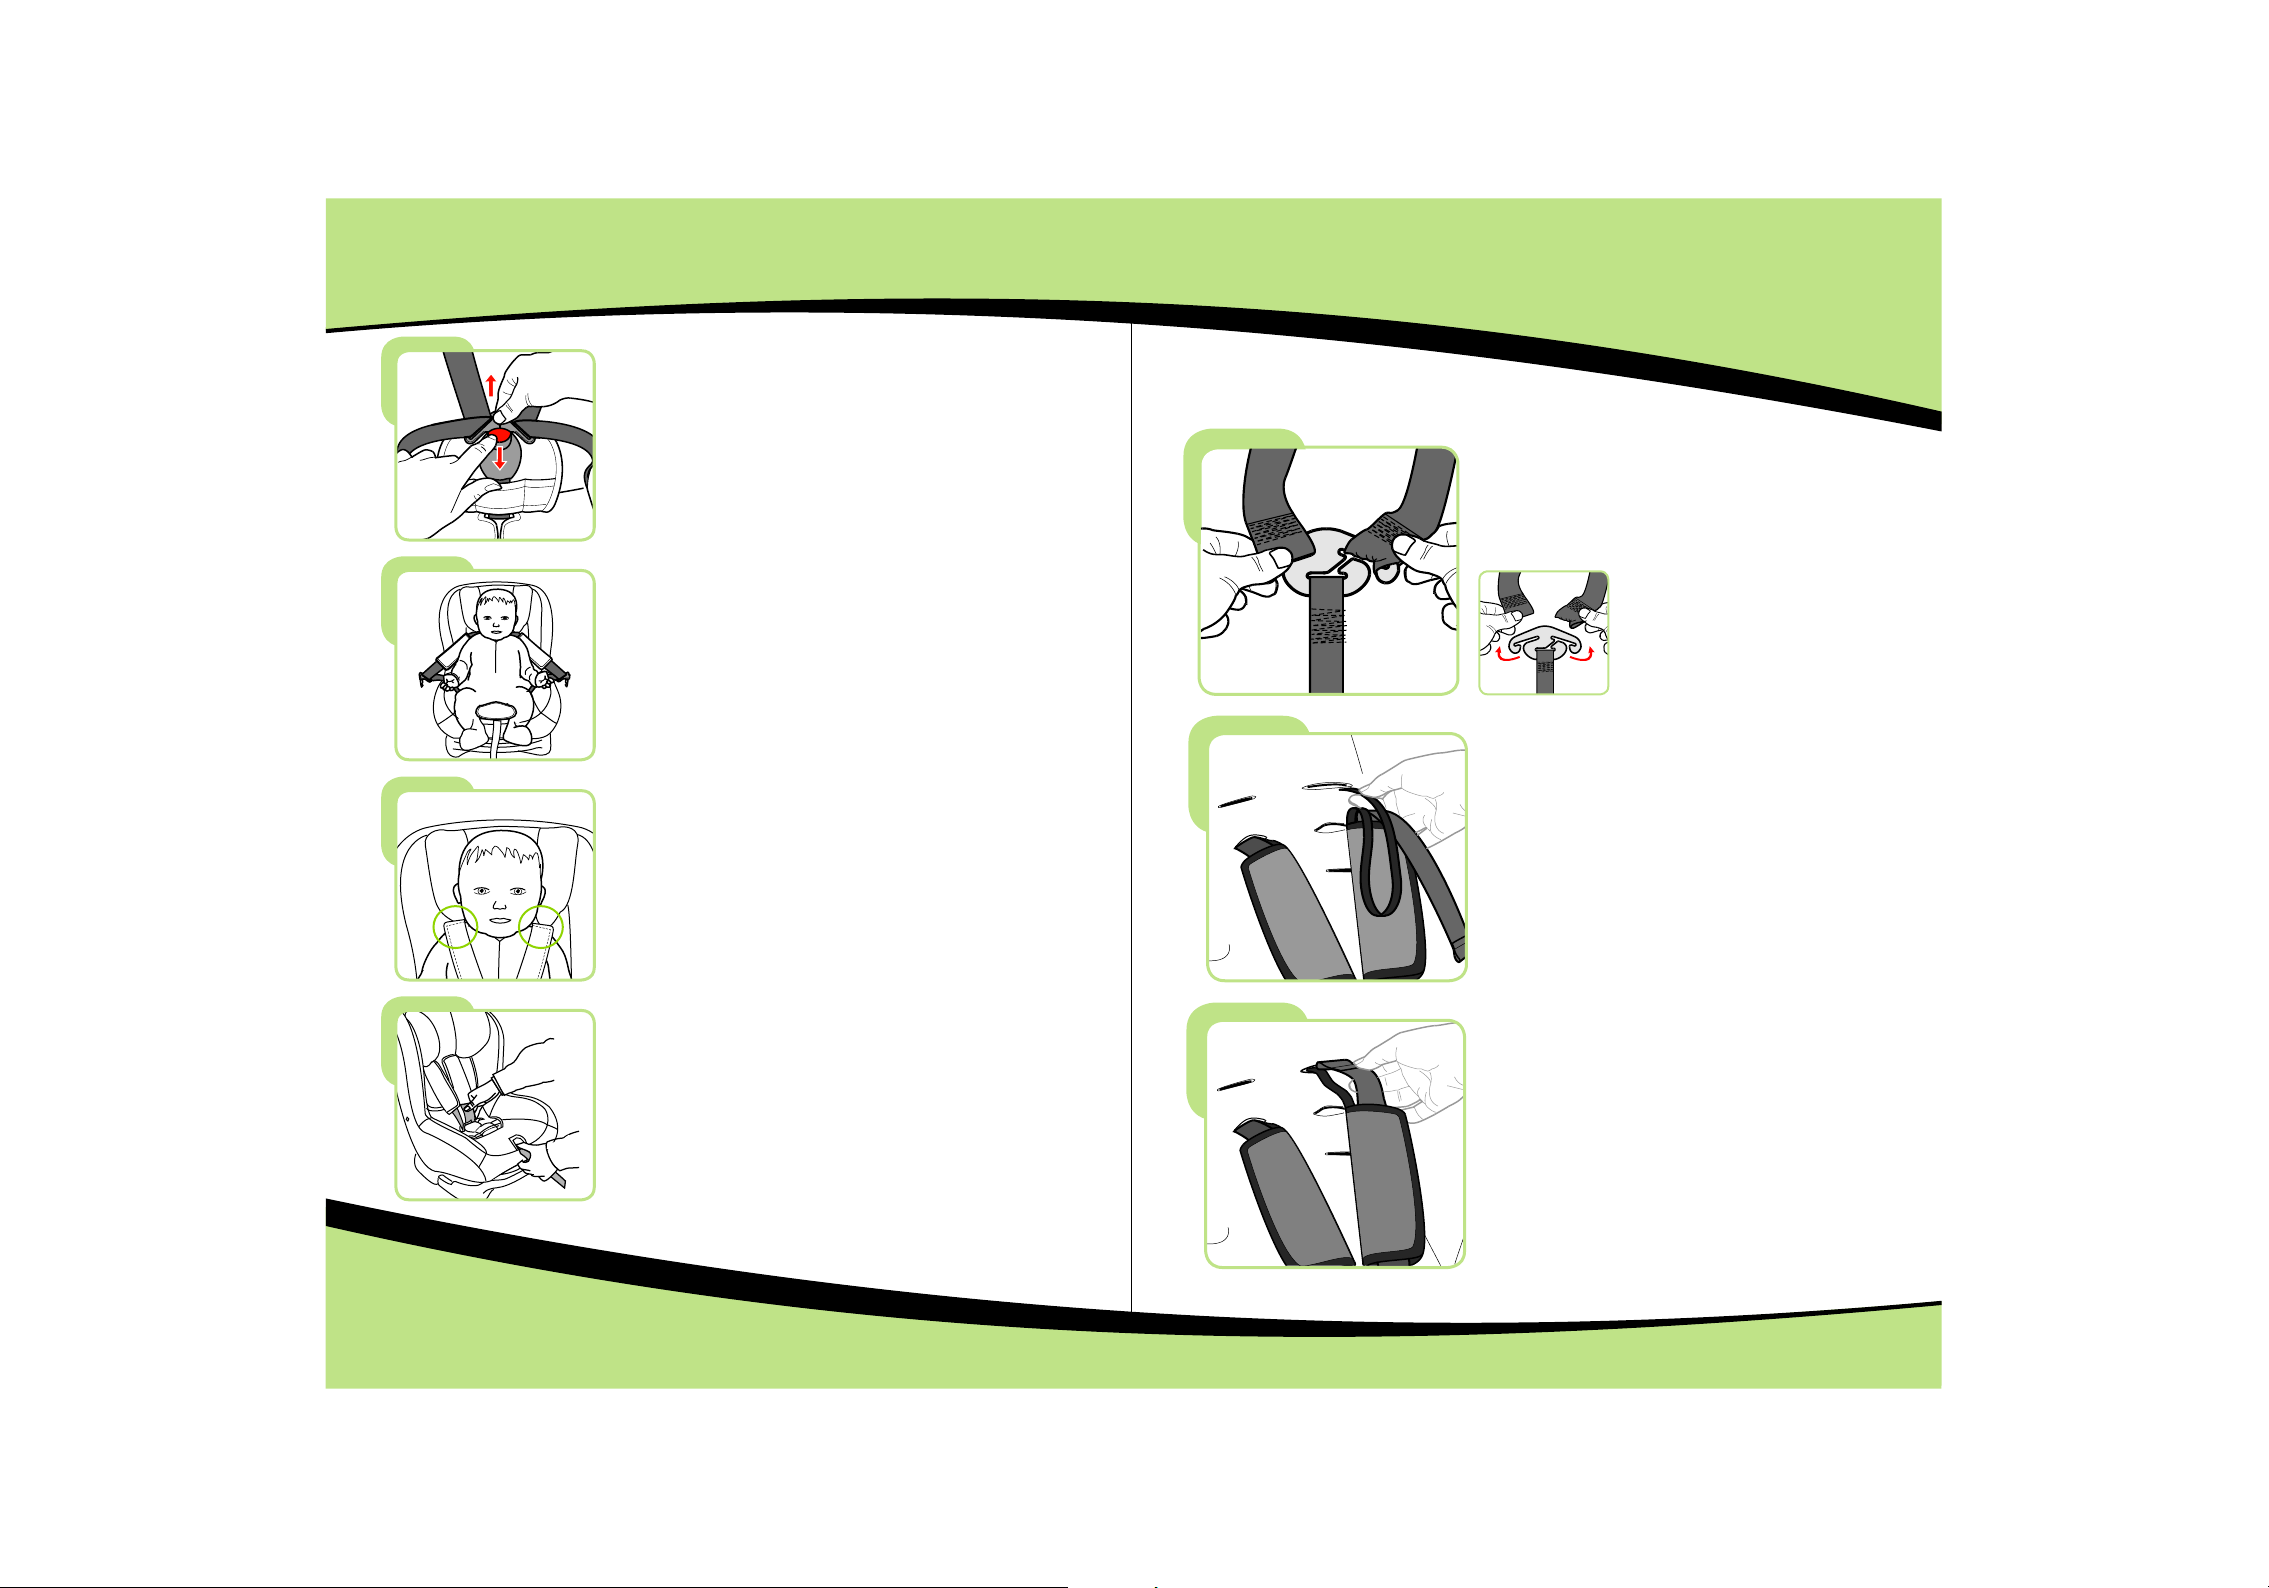
Regolazione del sistema cinghia in base
alla grandezza del bambino
Rilasciare la fibbia facendo scorrere il pulsante
rosso verso il basso e allo stesso tempo estrarre
l’imbracatura.
Mettere il bambino sul seggiolino e controllate
l’altezza delle cinture delle spalle per una corre tt a
posizione.
Le cinture delle spalle devono essere infilate nel le
aperture della fodera e della spalliera più vici ni a ll a
parte superiore delle spalle del vostro bambino.
Da dietro il seggiolino, sganciare le cinture
dell’imbracatura dal morsetto e tirarle verso la
parte anteriore del seggiolino fino al cavo delle
spalline imbottite e tirarle verso la parte
anteriore del seggiolino.
Infilare dietro le cinture delle spalle
attraverso le aperture poste alla stessa
altezza nella fodera del seggiolino e fare in
modo che le cinture non siano attorcigliate e
che entrambe siano alla stessa altezza.
Per regolare l’altezza delle cinture delle spall e,
premere la leva di sgancio argentata
dell’imbracatura e tirare avanti entrambe le cinture
dell’imbracatura per allentarle.
Agganciare le cinture delle spalle in modo
sicuro al morsetto e riallacciare i ganci.
Importante:
spalle non siano attorcigliate.
assicurarsi che le cinture delle
65
Page 5
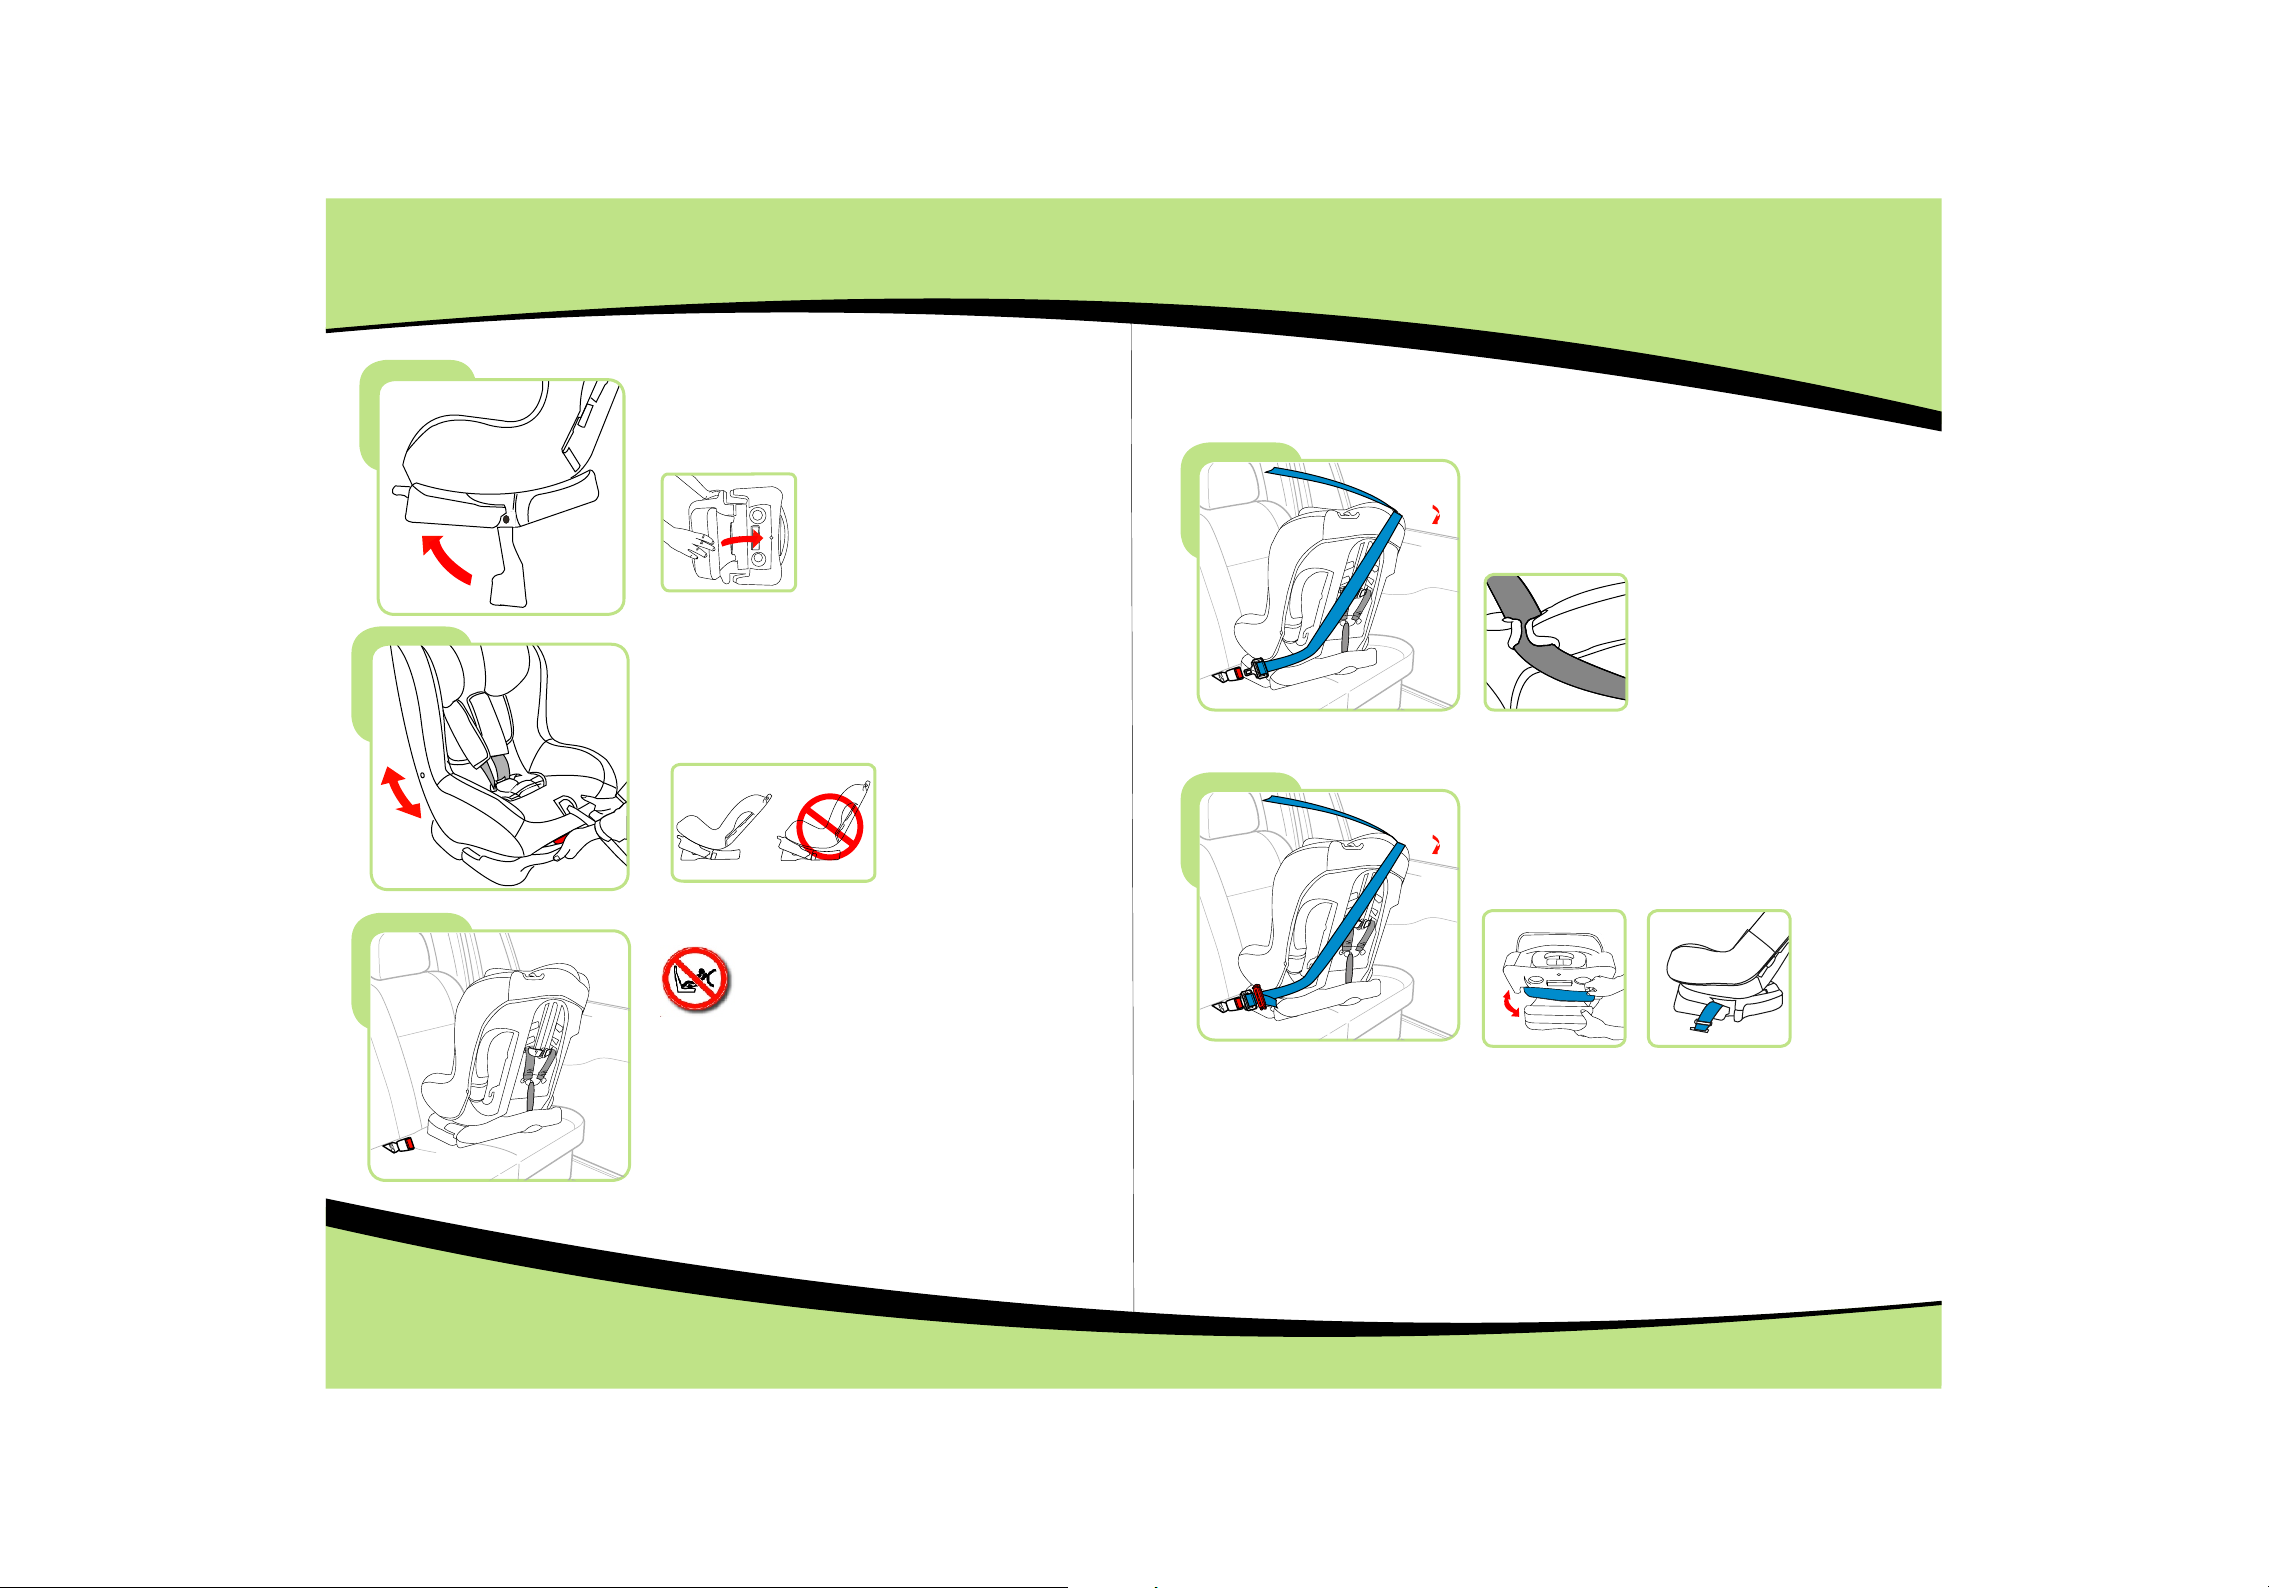
Installazione del seggiolino - Rivolto all’indietro
Per l’uso con il gruppo 0+ - meno di 13 kg (dalla nascita a 18 mesi approssimativamente)
Spostare il s upporto rib altabile su lla disposi zi one
frontale de l fondo del sed ile e fare in mod o che il
supporto ri baltabile s ia tenuto vic ino al fondo de l
sedile.
Regolare la p osizione re clinabile d el seggioli no , tirare
la maniglia r ossa avanti f ino a raggiun gere la
posizione r ichiesta.
Allacciate il seggiolino con la cintura
addominale e la cintura diagonale attraverso
l’apertura di guida della cintura.
Infilate la cintura diagonale nell’apertura con
la freccia blu sul retro, e infilare la cintura
addominale nell’apertura con la freccia blu
sulla base. Inserire la cintura addominale e
diagonale nella fibbia della cintura, si sente
un clic quando è correttamente inserita. Poi
regolare la tensione delle cinture.
Attenzione:
NON posizionare il seggiolino rivolto
all’indietro sul sedile anteriore con
airbag: ESTREMAMENTE
PERICOLOSO PER IL BAMBINO.
7
8
Page 6

Tir are le cinture addominale e diagonale
ben tese e attaccare il gancio alle cinture
delle spalle il più vicino possibile alla fibb ia
della cintura del seggiolino ma senza
toccarla.
Infine controllare che il seggiolino sia
stabile e sicuro, se è traballante o
allentato è necessario stringere entrambe
le cinture di nuovo finché il seggiolino è
sicuro.
Punti di controllo dell’installazione – Rivolto all’indietro
Controllo :
La cintura de l sedile del
veicolo dev e essere
ben tesa e non
attorcigl iata.
Controllo :
Assicurar si che il
seggiolin o sia montato
saldament e sul sedile
del veicolo .
Controllo :
Assicurar si che il blocc o
della cingh ia sia chiuso
in modo appro priato (si
sente un clic q uando si
chiude)
Controllo :
La parte addo minale dell a
cintura del s edile deve es sere
sotto il segg iolino pass ando
attravers o l’apertur a segnata in
blu e non deve es sere
attorcigl iata.
Controllo :
Il seggioli no deve esser e nella
posizione c ompletame nte reclina ta.
9
Controllo :
Il seggioli no e il sedile de l veicolo
devono esse re tenuti sal damente
insieme.
10
Page 7
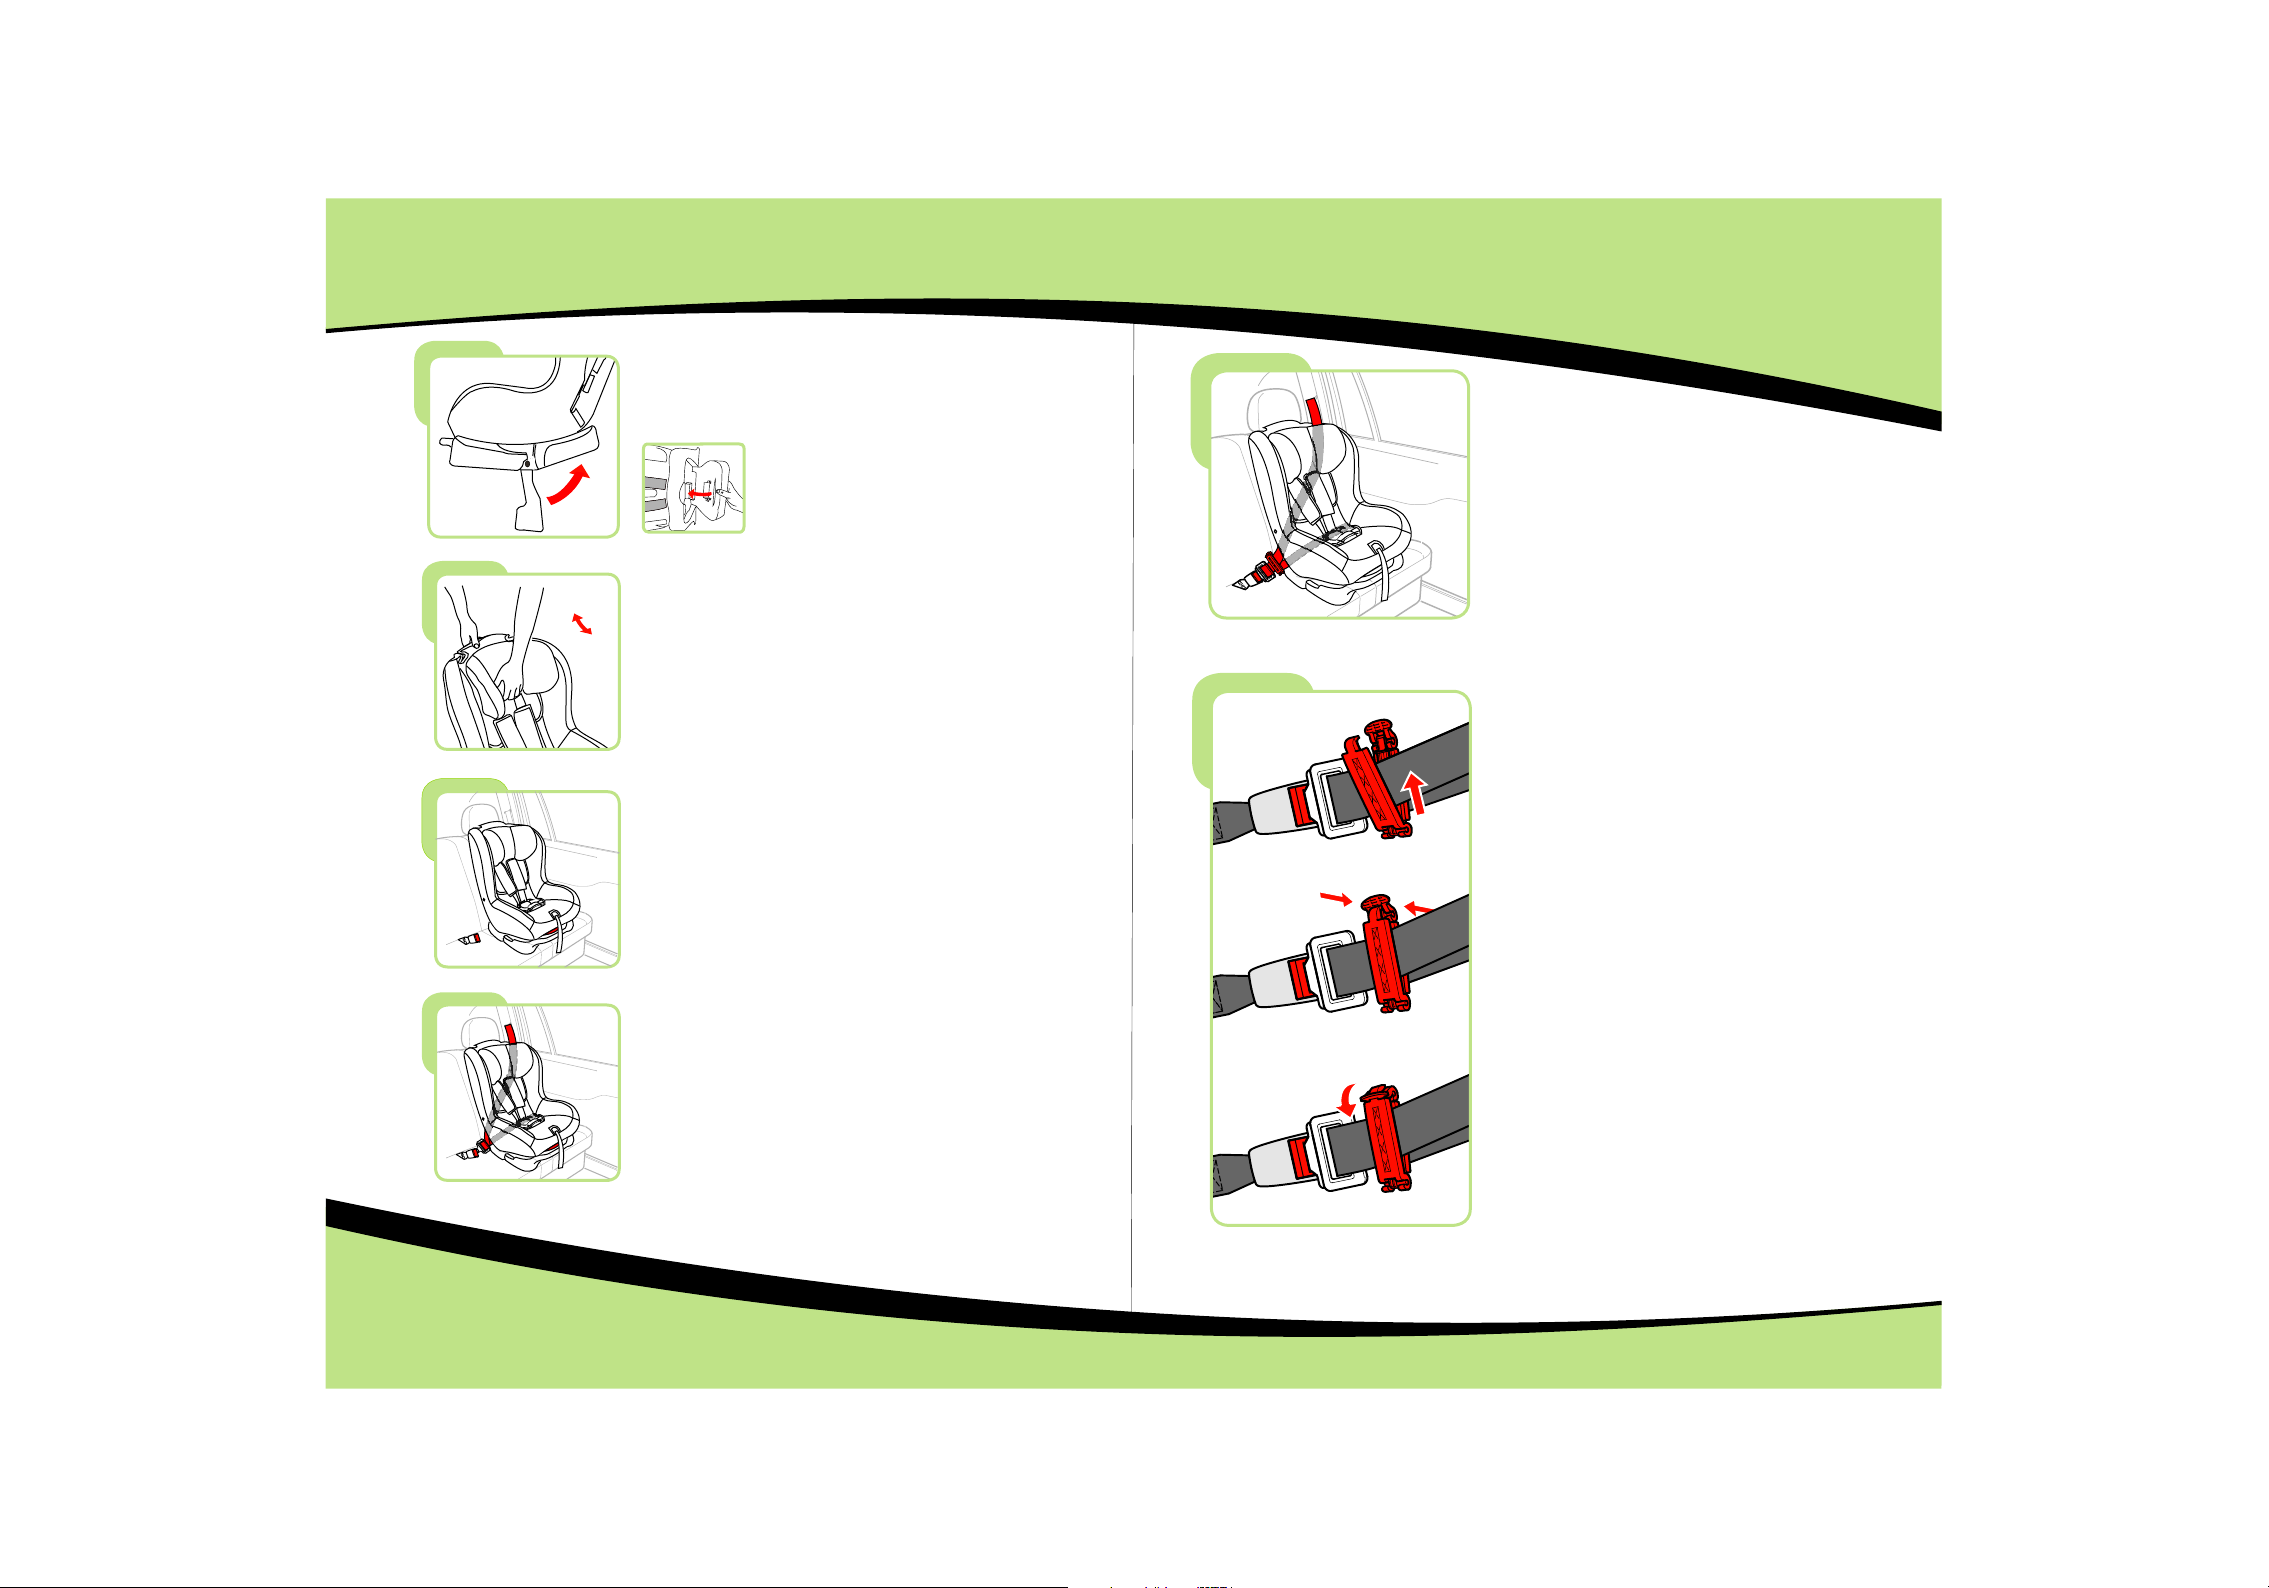
Installazione del seggiolino - Rivolto in avanti
Solo per l’uso con il gruppo 1 - da 9 a 18 kg (10 mesi – 4 anni approssimativamente)
Spostare il supporto ribaltabile sulla
disposizione posteriore del fondo del sedile , e
fare in modo che il supporto ribaltabile sia tenuto
vicino al fondo del sedile.
Regolare il poggiatesta in base all’altezza de l
vostro bambino.
Posizionare il seggiolino saldamente contro lo
schienale del sedile del veicolo.
Inserire la cintura addominale e diagonale
nella fibbia, si sentirà un clic quando è
correttamente inserita. Tiratela per
controllare che sia saldamente fissata. Poi
regolare la tensione delle cinture.
Tir are le cinture addominale e diagonale
ben tese e attaccare il gancio alle cinture
delle spalle il più vicino possibile alla fibb ia
della cintura del sedile ma senza toccarla.
Infine controllare che il sedile sia stabile e
sicuro, se è traballante o allentato è
necessario stringere entrambe le cinture di
nuovo finché il sedile è sicuro e saldamente
ancorato.
La cintura delle spalle e la cintura addominale
passano attraverso la parte posteriore del
seggiolino.
11
12
Page 8
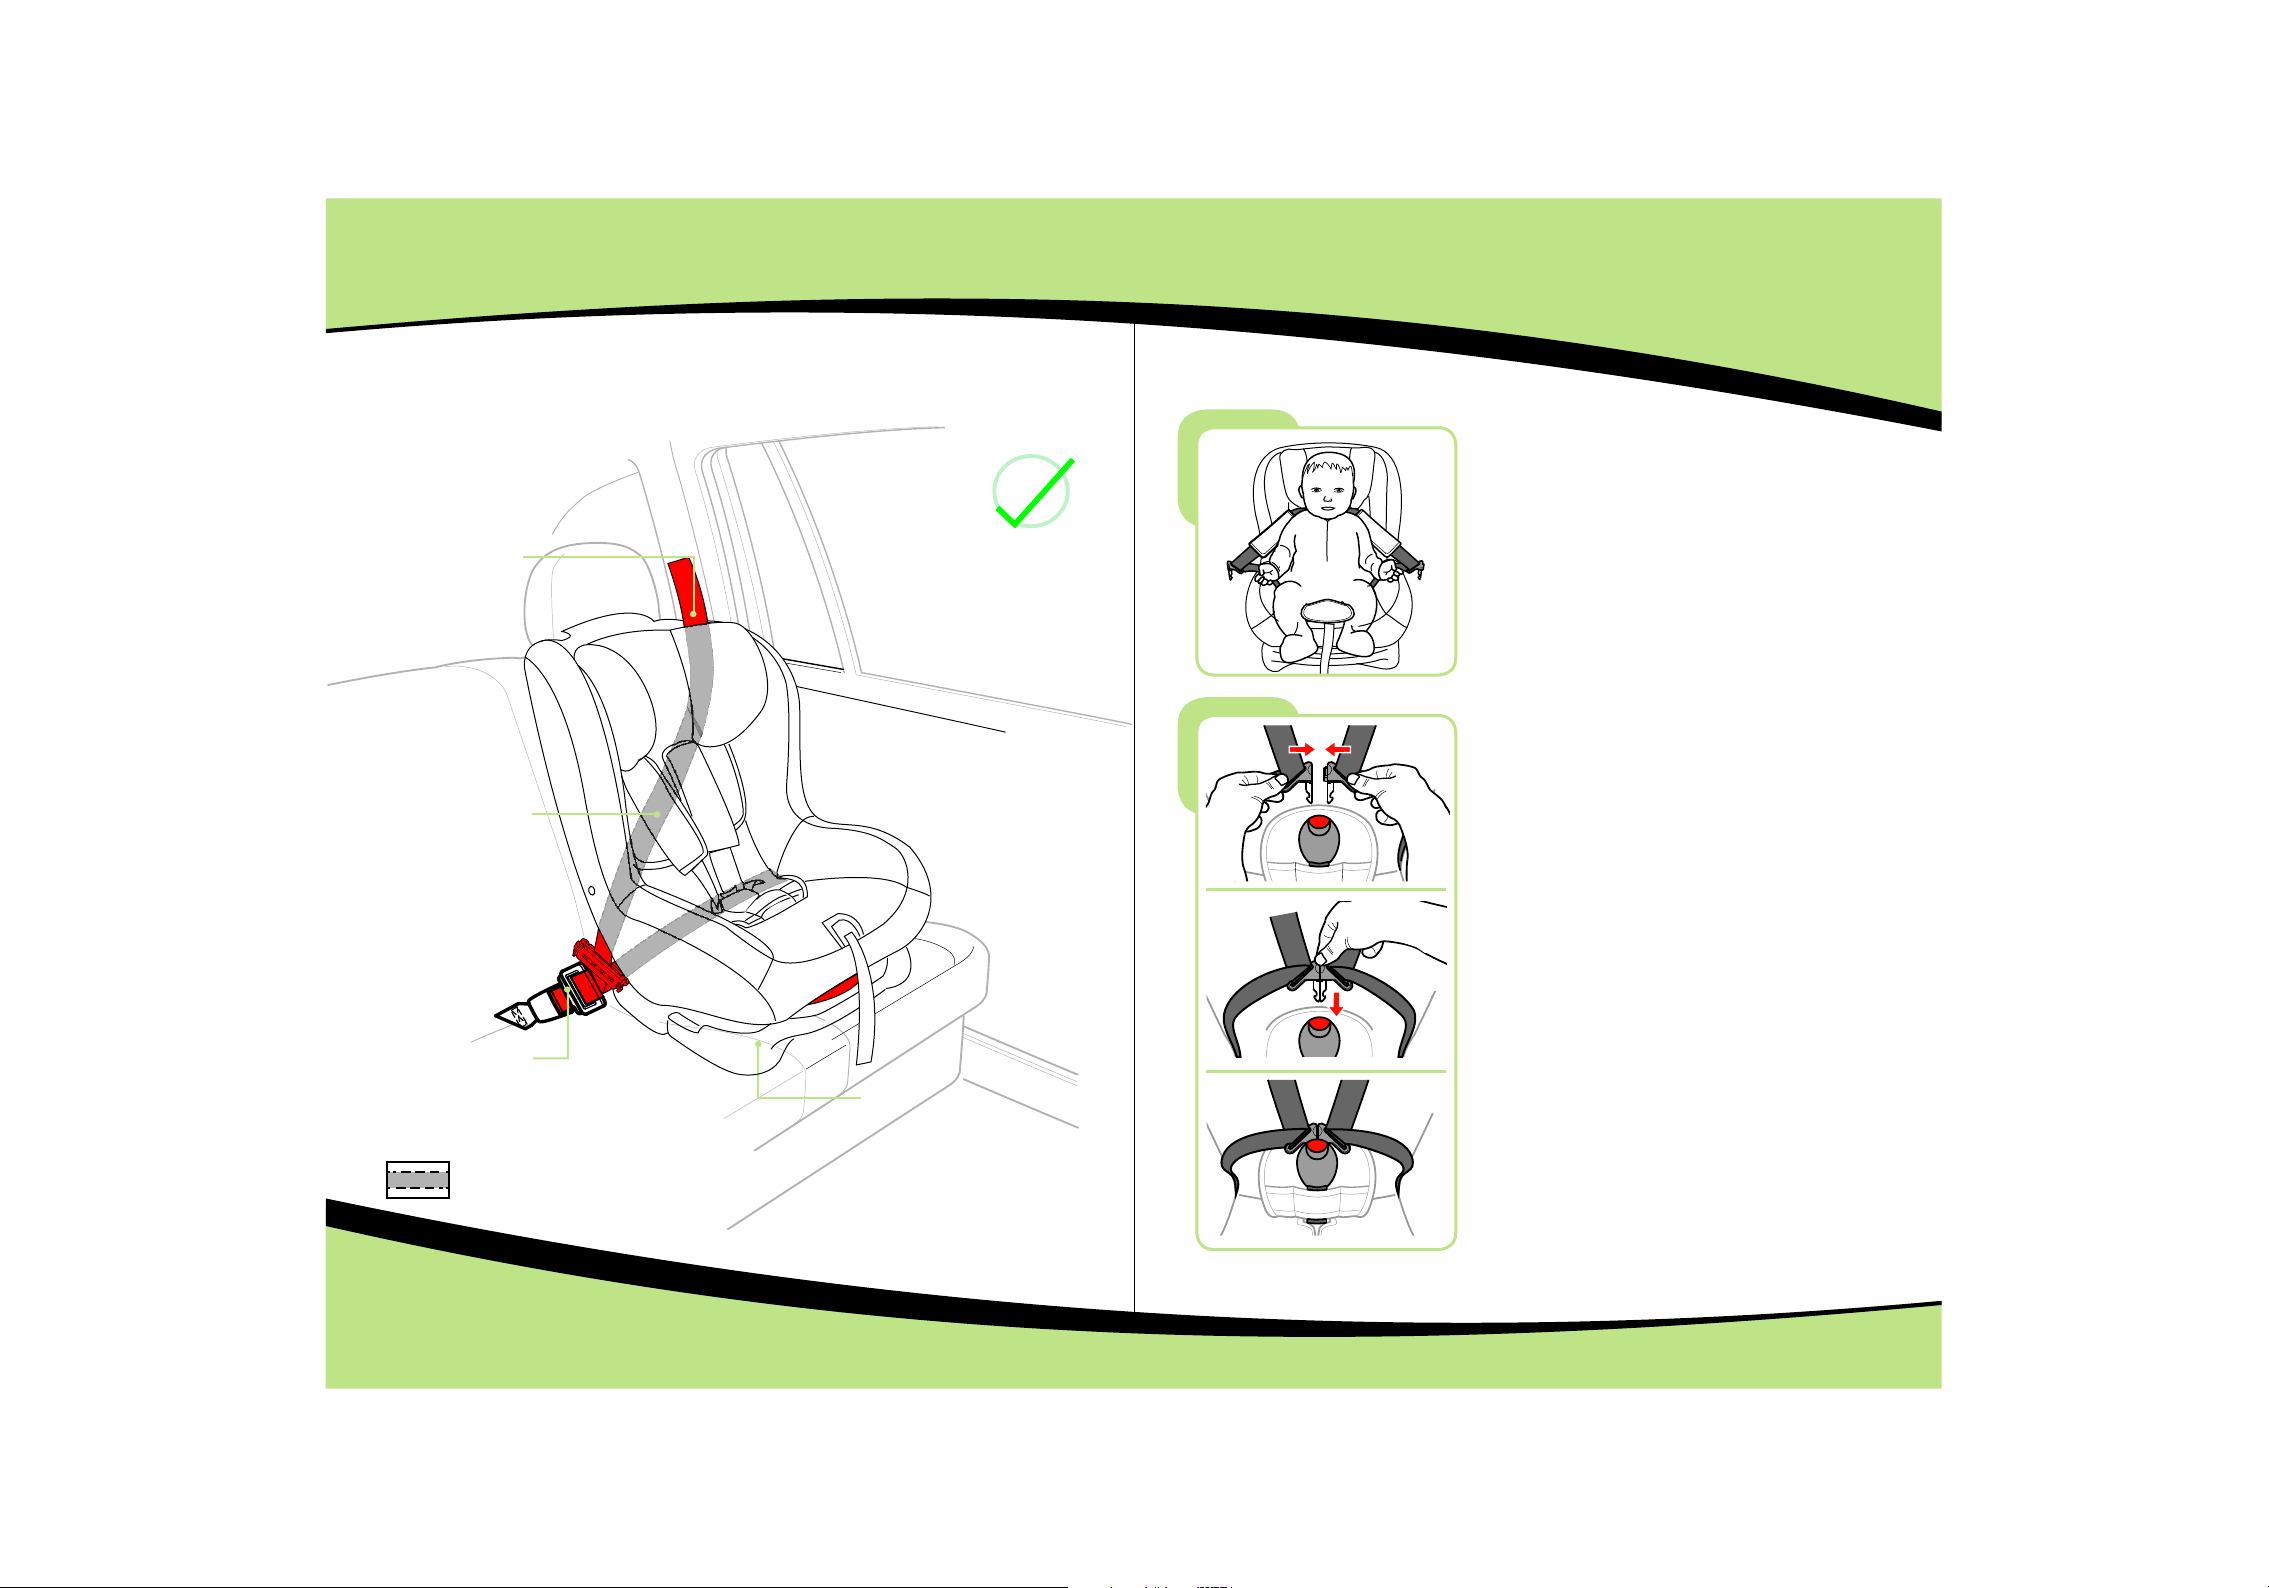
Punti di controllo dell’installazione – Rivolto in avanti
Controllo :
La cintura de l
sedile del ve icolo
deve essere b en
tesa e non
attorcigl iata.
Controllo :
La cintura de l
sedile del ve icolo
deve passar e
attravers o le
aperture de lla
spalliera d el
seggiolin o.
Come allacciare il bambino
Rilasciare le cinture di sicurezza e posizionare
il bambino sul seggiolino, allacciare le cintu re
sulle spalle del bambino.
Allacciare la fibbia mettendo insieme i due
perni delle cinture di imbracatura e spingere la
fibbia finché si sente un clic.
Controllo :
Assicurar si che il
blocco dell a cinghia
sia chiuso in m odo
appropria to (si sente
un clic quand o si
chiude)
La cintura de l sedile trat teggiata in dica la parte d ietro
il seggioli no
13
Controllo :
Il seggioli no deve esser e
spinto cont ro lo schiena le
del sedile de l veicolo.
14
Page 9
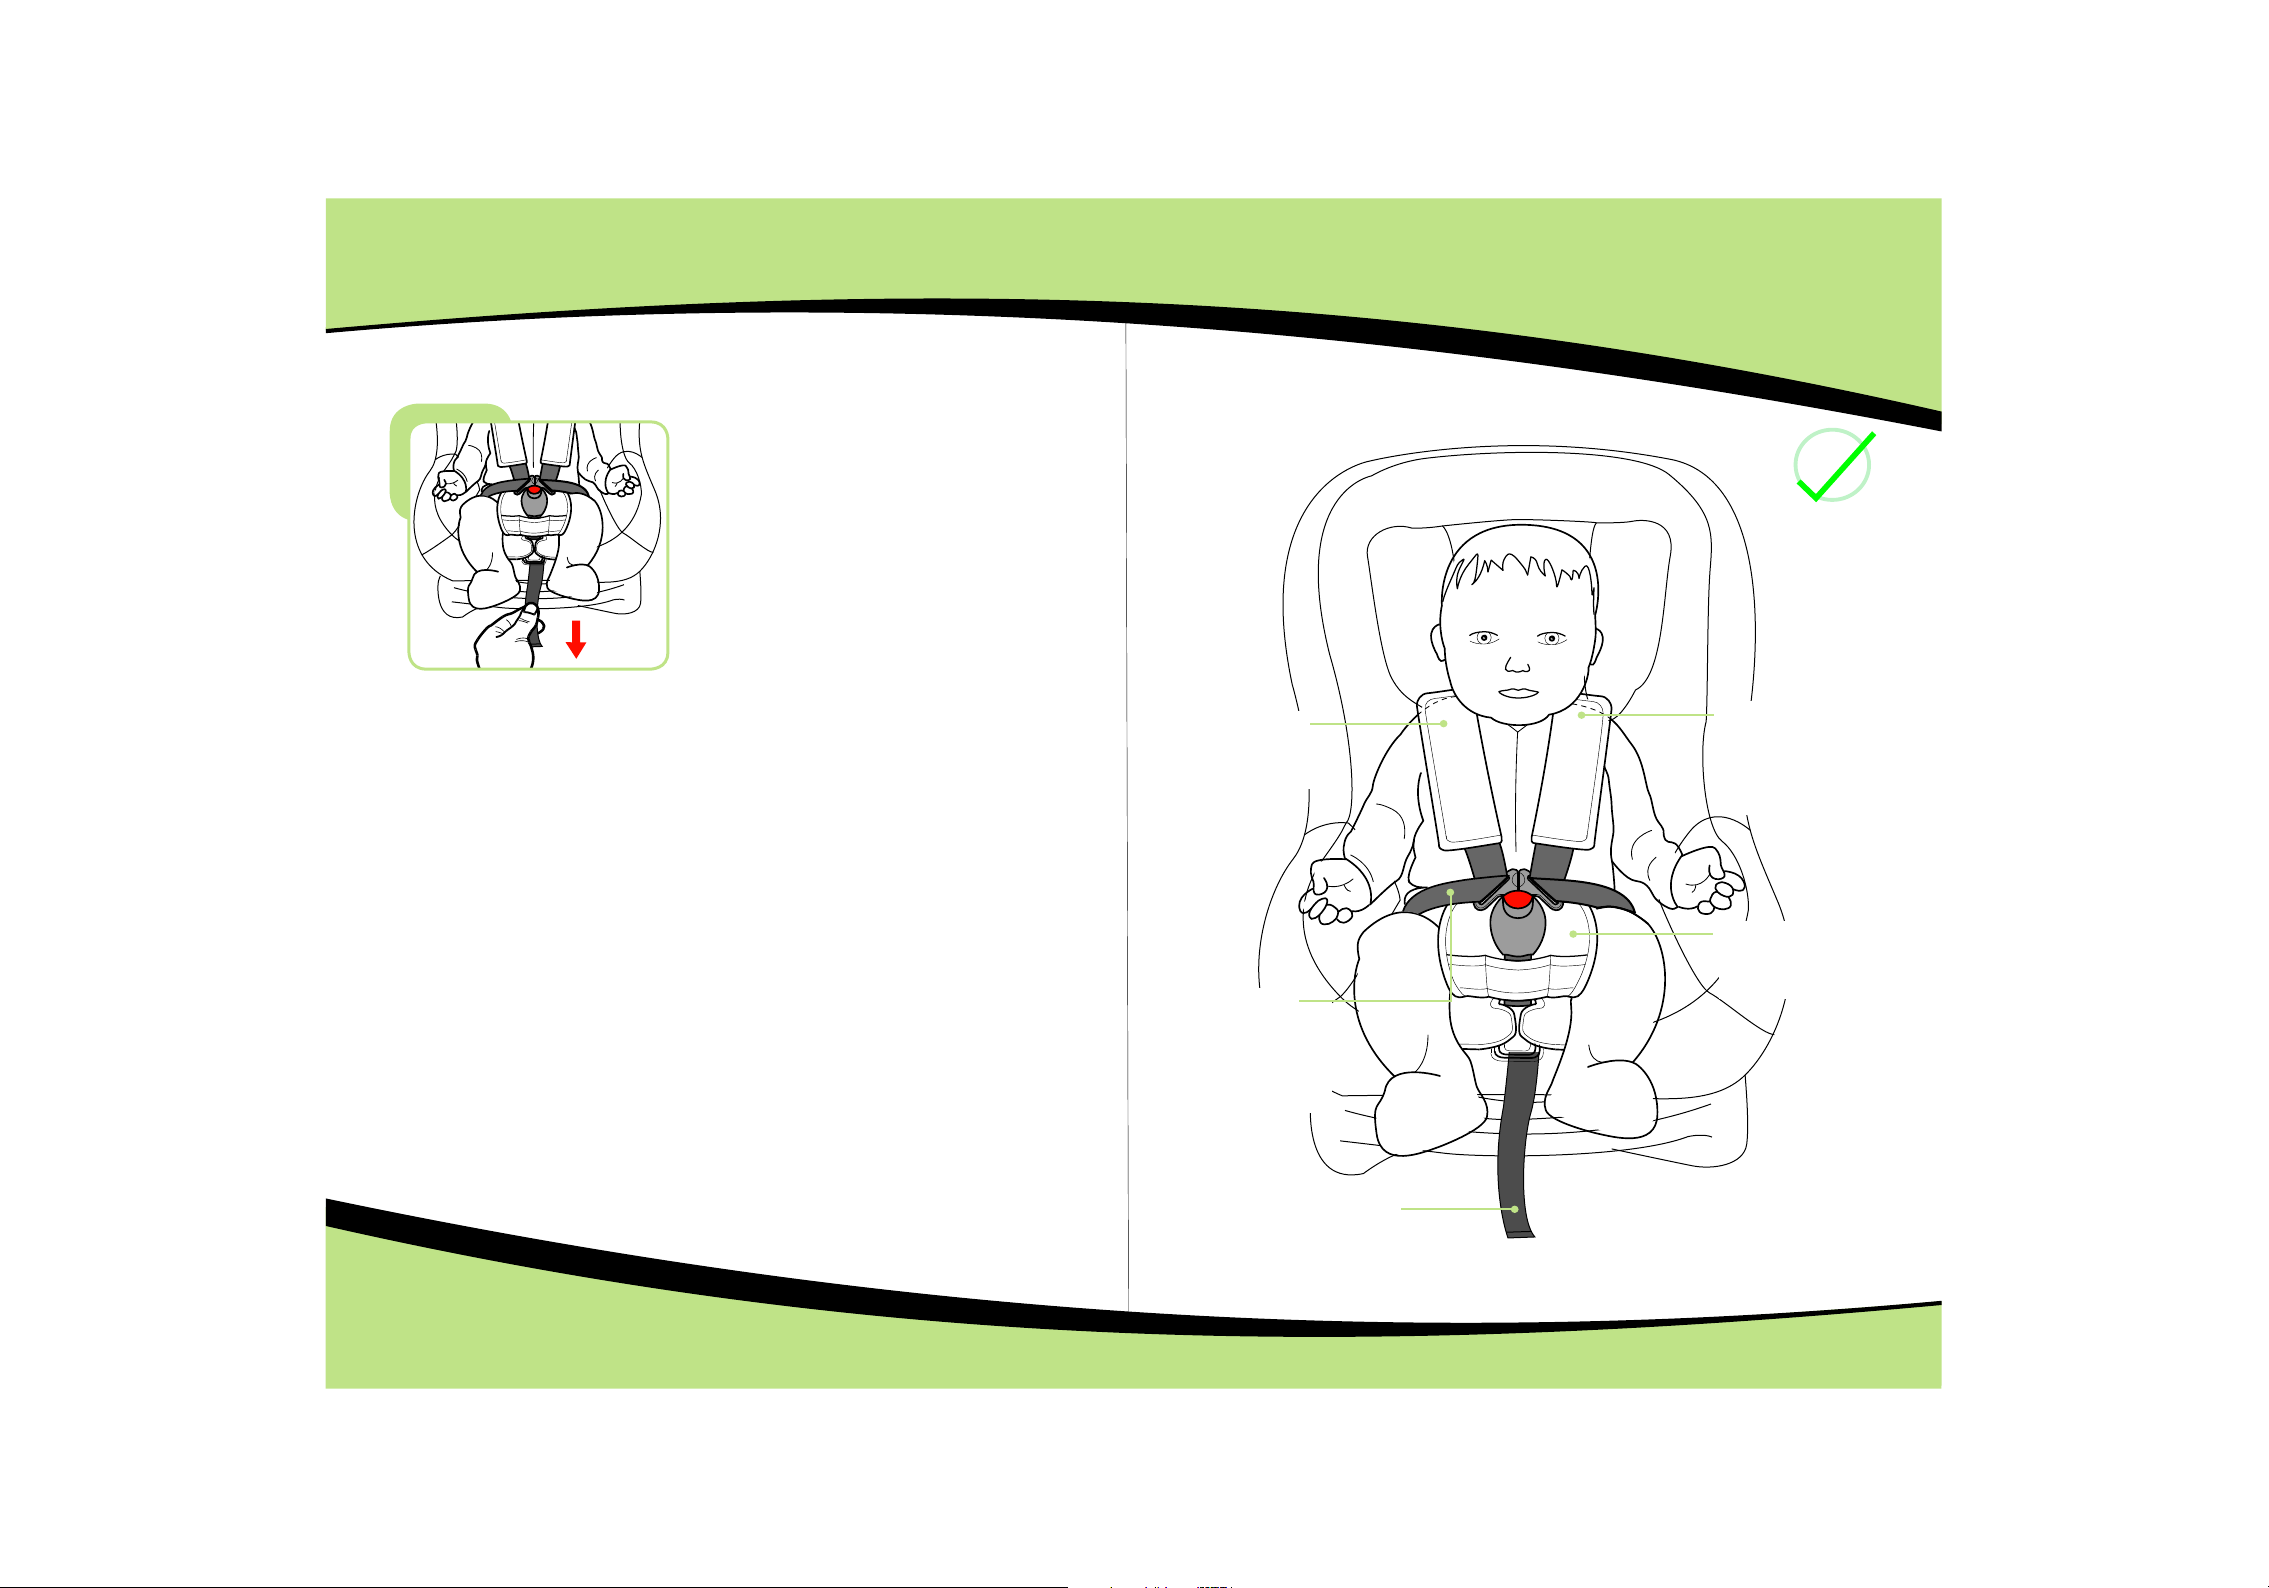
Regolare gli spallacci così che si appoggino
correttamente sulle spalle del vostro
bambino. Stringere le cinture delle spalle
tirando la cintura di imbracatura regolabile.
Il vostro bambino deve essere comodo ma
allacciato in modo sicuro.
Punti di controllo
Controlla re:
Che le spalli ne
coprano le sp alle.
Controlla re:
che la cintur a delle spall e
non sia più bas sa delle
spalle del ba mbino, se no,
spostate la c intura dell e
spalle nell a prossima
apertura.
Controlla re:
che l’imbra catura si tro vi
sopra i fianc hi e non sopra
lo stomaco e ch e sia tesa
saldament e.
Controlla re:
che il comodo
cuscinett o sia
posiziona to e la fibbia
vi sia agganc iata.
Controlla re:
che la cintur a di
imbracatu ra regolabi le
sia stata tes a
saldament e.
1615
Page 10
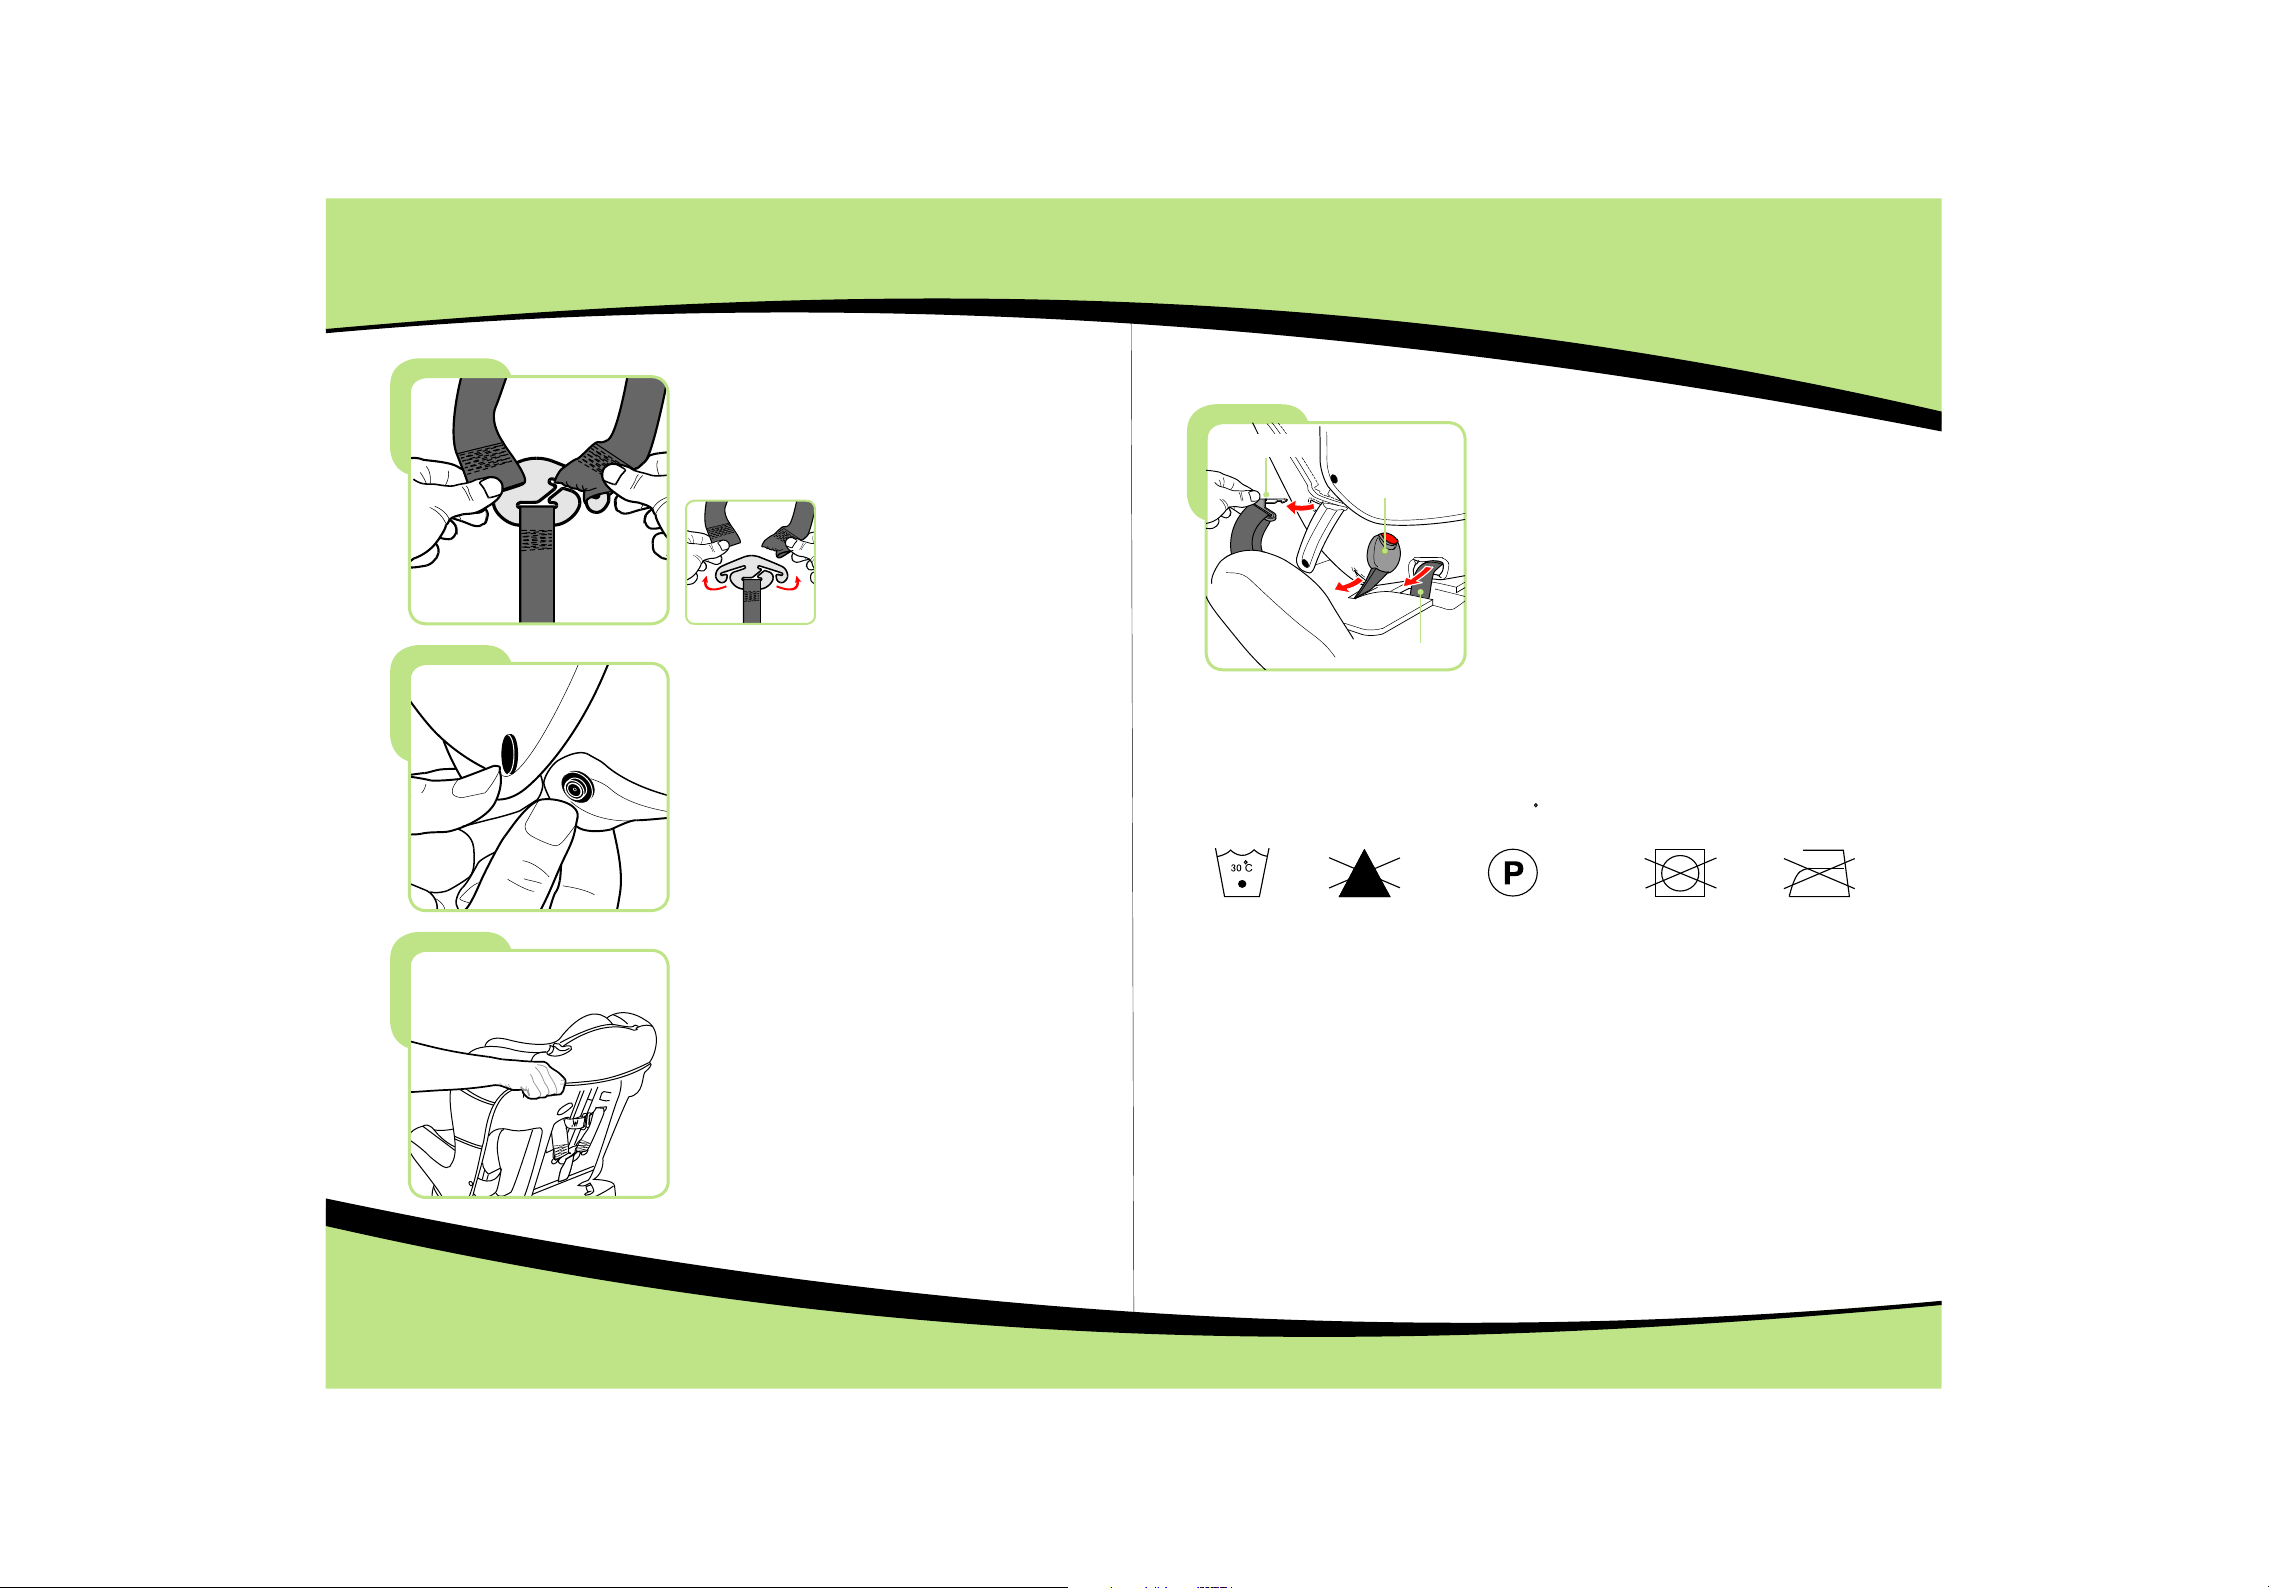
Pulizia e manutenzione
Per rimuovere la fodera per la pulitura,
dovete allentare le cinture delle spalle dal
morsetto, e finché i ganci sono nella parte
posteriore del seggiolino, tiratele verso la
parte frontale del sedile.
Perni della cinture
Cintura regolabile di imbracatura
Spingere la f ibbia e le cint ure attrave rso le apertu re
della foder a da rimuover e e sfilarla.
Fibbia di imbracatura
Sganciare l e borchie su en trambi i lati p osteriori
del seggiol ino.
Con attenzione tirate giù la fodera dall’alto.
Important e
La fodera è una c aratteris tica di sicur ezza, mai usa re il seggiol in o senza di es sa . Non
mettere a ris chio il vostr o bambino uti lizzando fo dere di altre m ar che in sost it uzione, i l
seggiolin o potrebbe sm ettere di pro teggere il ba mbino così co me d ovrebbe .
Istruzion i di lavagg io
La fodera è sta ccabile e lav abile a 30°, as ciugare sol o sul filo.
Lavar e in
lavat rice a fr eddo
Se siete in dub bio circa l’u tilizzo o il mo ntaggio di qu es to prodot to o a vete biso gn o di una
qualunque p arte di ricam bio si prega di c ontattare i l nostro nume ro v erde.
Avv iso
1.Questo è un d ispositiv o di sicurezz a per bambini “ Universal e” . E’ ap provato d al la
Normativa N .44, emenda menti serie 0 4, per uso gene rale nei veic ol i e compati bi le con la
maggior par te dei sedili d elle auto, ma n on tutti.
2.La compat ibilità è pro babile se il co struttore d el veicolo ha d ic hiarato n el m anuale ch e il
veicolo è in gr ado di accett are un dispos itivo di sicu rezza “Univ er sale” per i b am bini di
questo grup po di età.
3.Questo di spositivo d i sicurezza p er bambini è cl assificat o co me “Unive rs ale” in
condizion i più severe ri spetto a quel le applicat e ai m odelli pr ec edenti ch e no n dispong on o
del seguent e avviso.
4.In caso di du bbio, consu ltate il cost ruttore del s eggiolino d i si curezza p er b ambini o il
rivendito re.
Non can deggi are
Lavar e a secco c on
quals iasi so lvent e tra nne
il tric loroe tilen e
Non usa re l’as ciuga tri ce
Non sti rare
1817
Page 11
Page 12
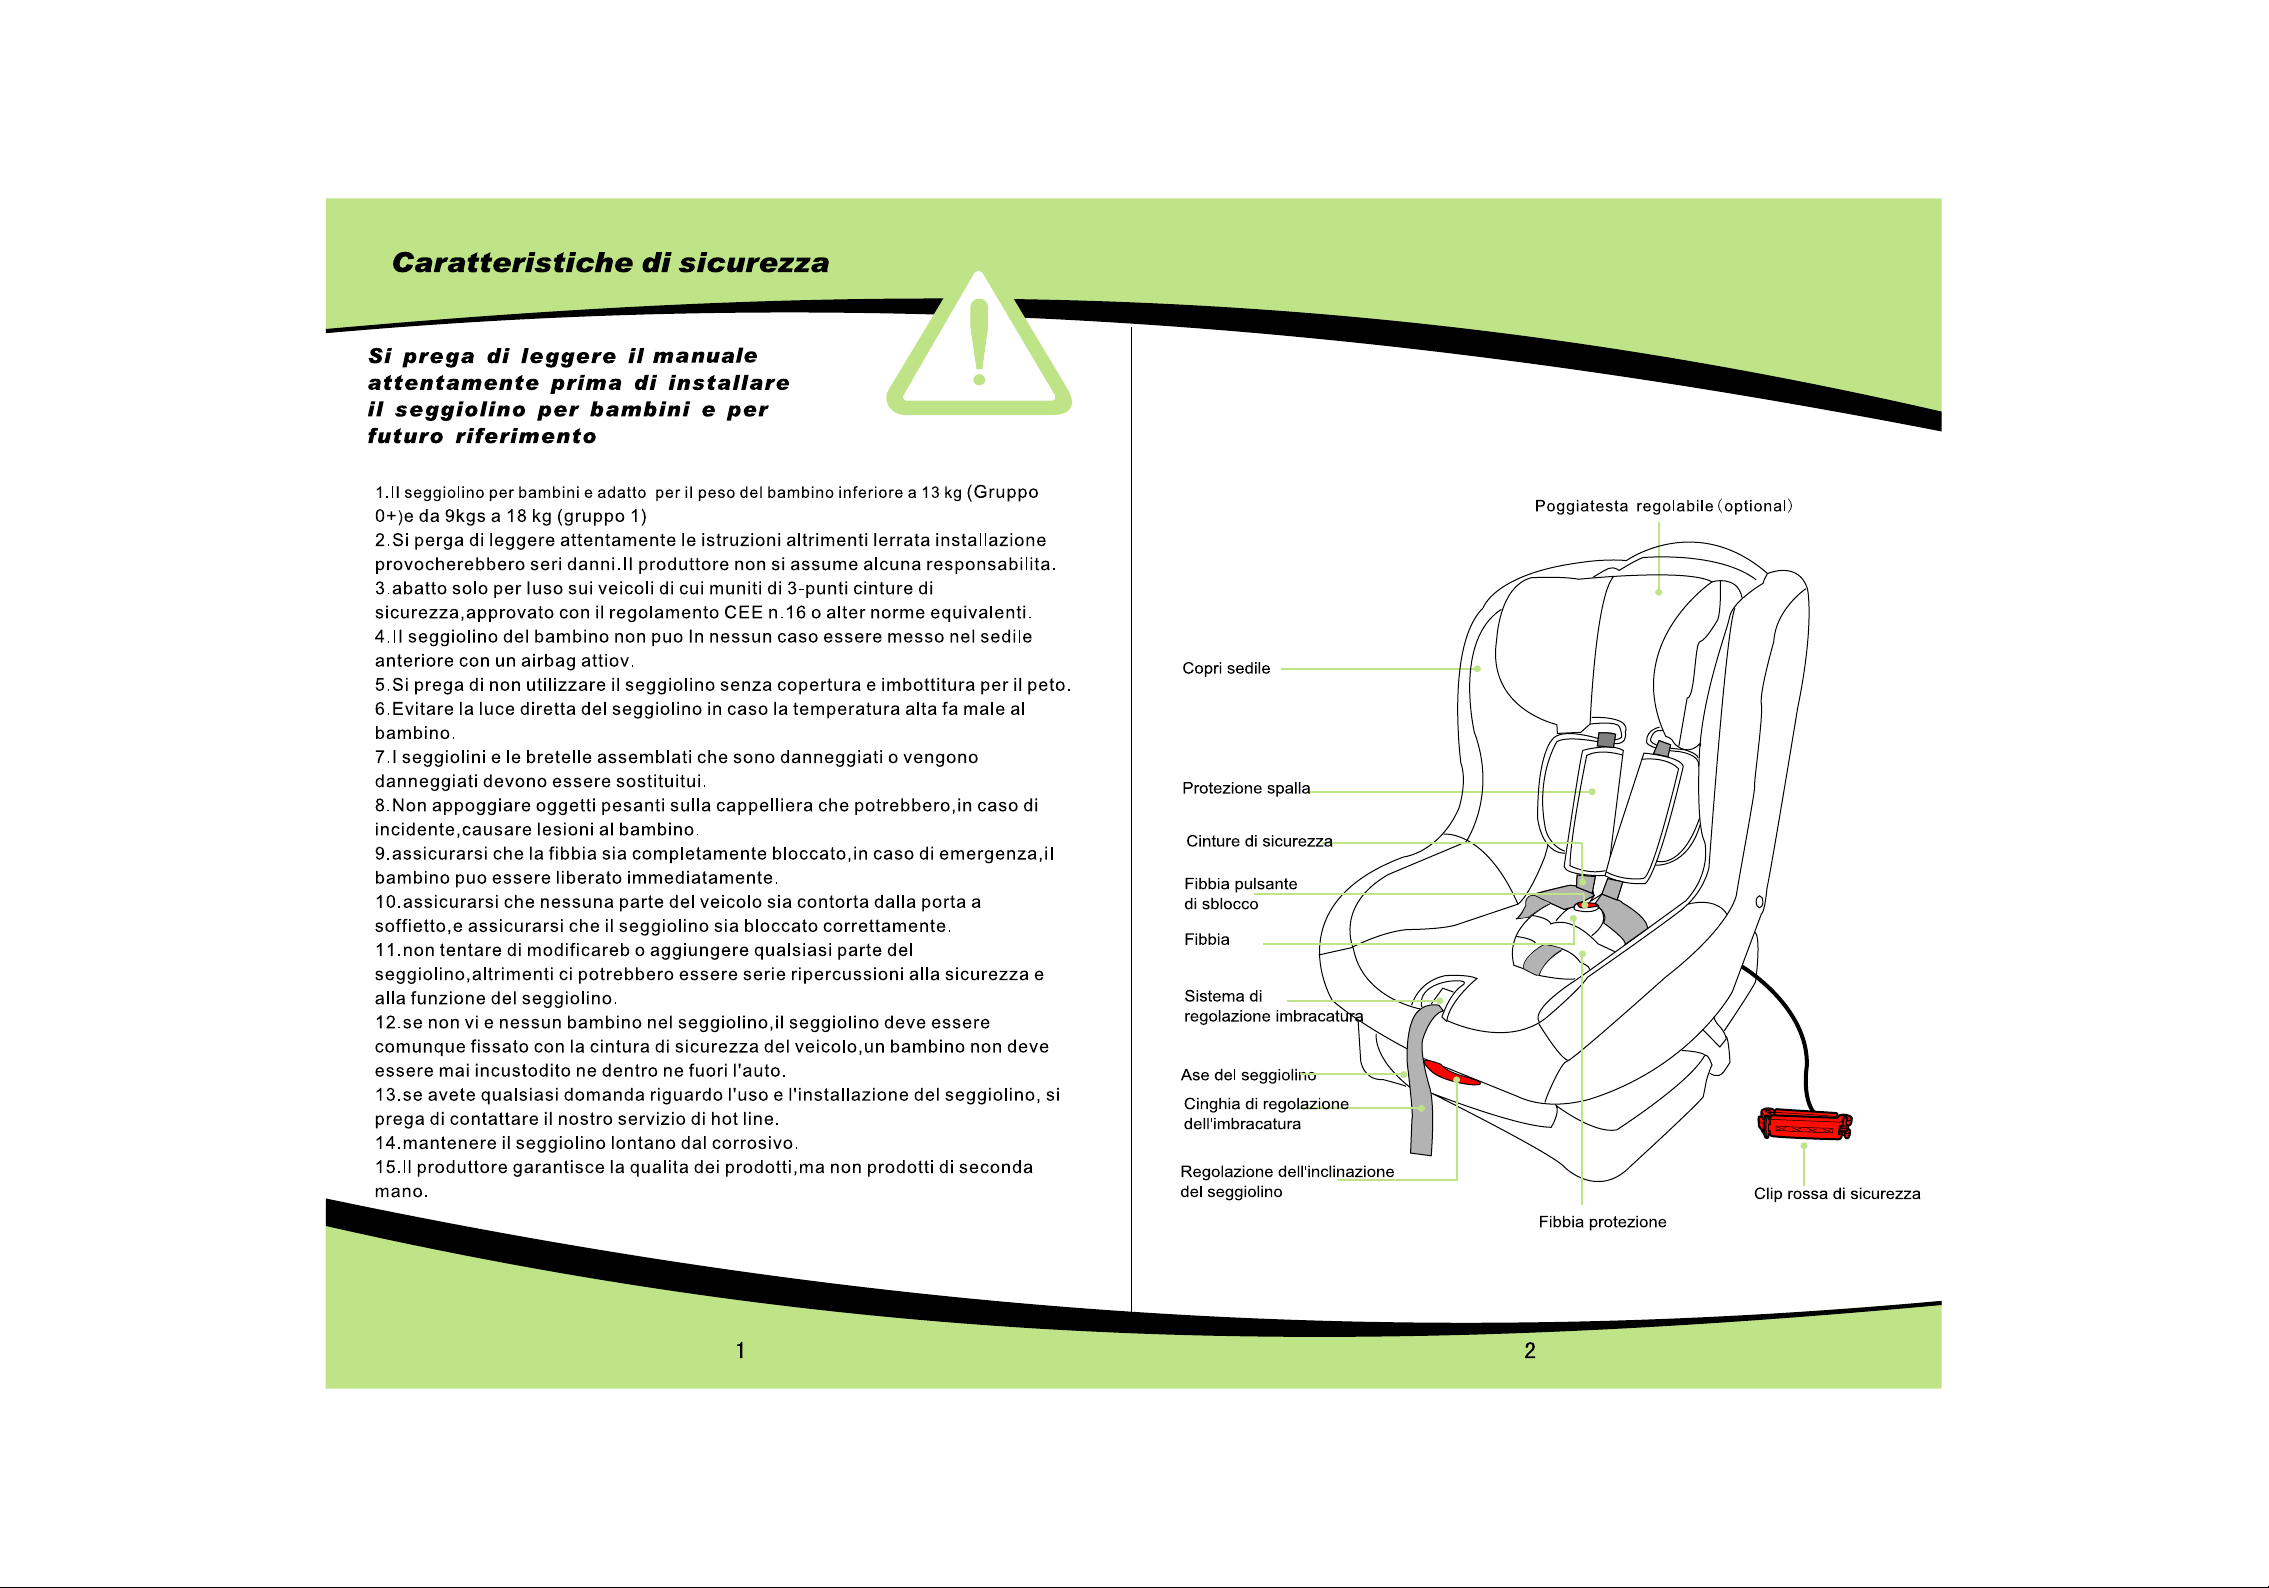
Safety
Please read this user guide carefu lly
before install the child seat and for
future reference .
1.This child seat is suitable for child's weight less than 13 kgs( Group 0+) and from
9kgs to 18kgs ( Group 1 )
2. Please read this instruction carefully otherwise incorrect installation will cause
seriously hurt. In this case. The manufacturer will not take any responsibility.
Only suitable for use in the listed vehicles fitted with 3 point safety-belts,approved to
3.
ECE Regulation No.16 or other equivalent standards.
4. In any circumstance, the child seat can not be used in the front passenger seat with
an active airbag.
5. Please don't use the child seat without the cover and chest pad.
6. Avoid the direct sunlight from the child seat in case the high temperature hurt the child.
7. Seat and harness assemblies which get damaged or become badly must be replaced.
8. Do not place heavy objects on the parcel shelf. Which could, in the event of an
accident, cause injury to the child.
9. Make sure the harness buckle was completely locked. In the event of an emergency,
the child can be released quickly.
10. Make sure any part of the vehicle is not twisted by the folding door, and make sure
the child seat is locked correctly
11. Do not attempt to modify or add to any part of the child seat. Otherwise it will
seriously effect its safety and function.
12. If there were no child placed in the child seat. The child seat still should be fastened
by the vehicle safety belt. a child must never be left unattended with restrained ,in or
out of the vehicle .
13. If you have any question about the using and installation of the child seat. Please
contact our service hotline
14. Keep the child seat away from the corrosive.
15. The manufacturer guarantee the quality of the products. But not for the second
hands product.
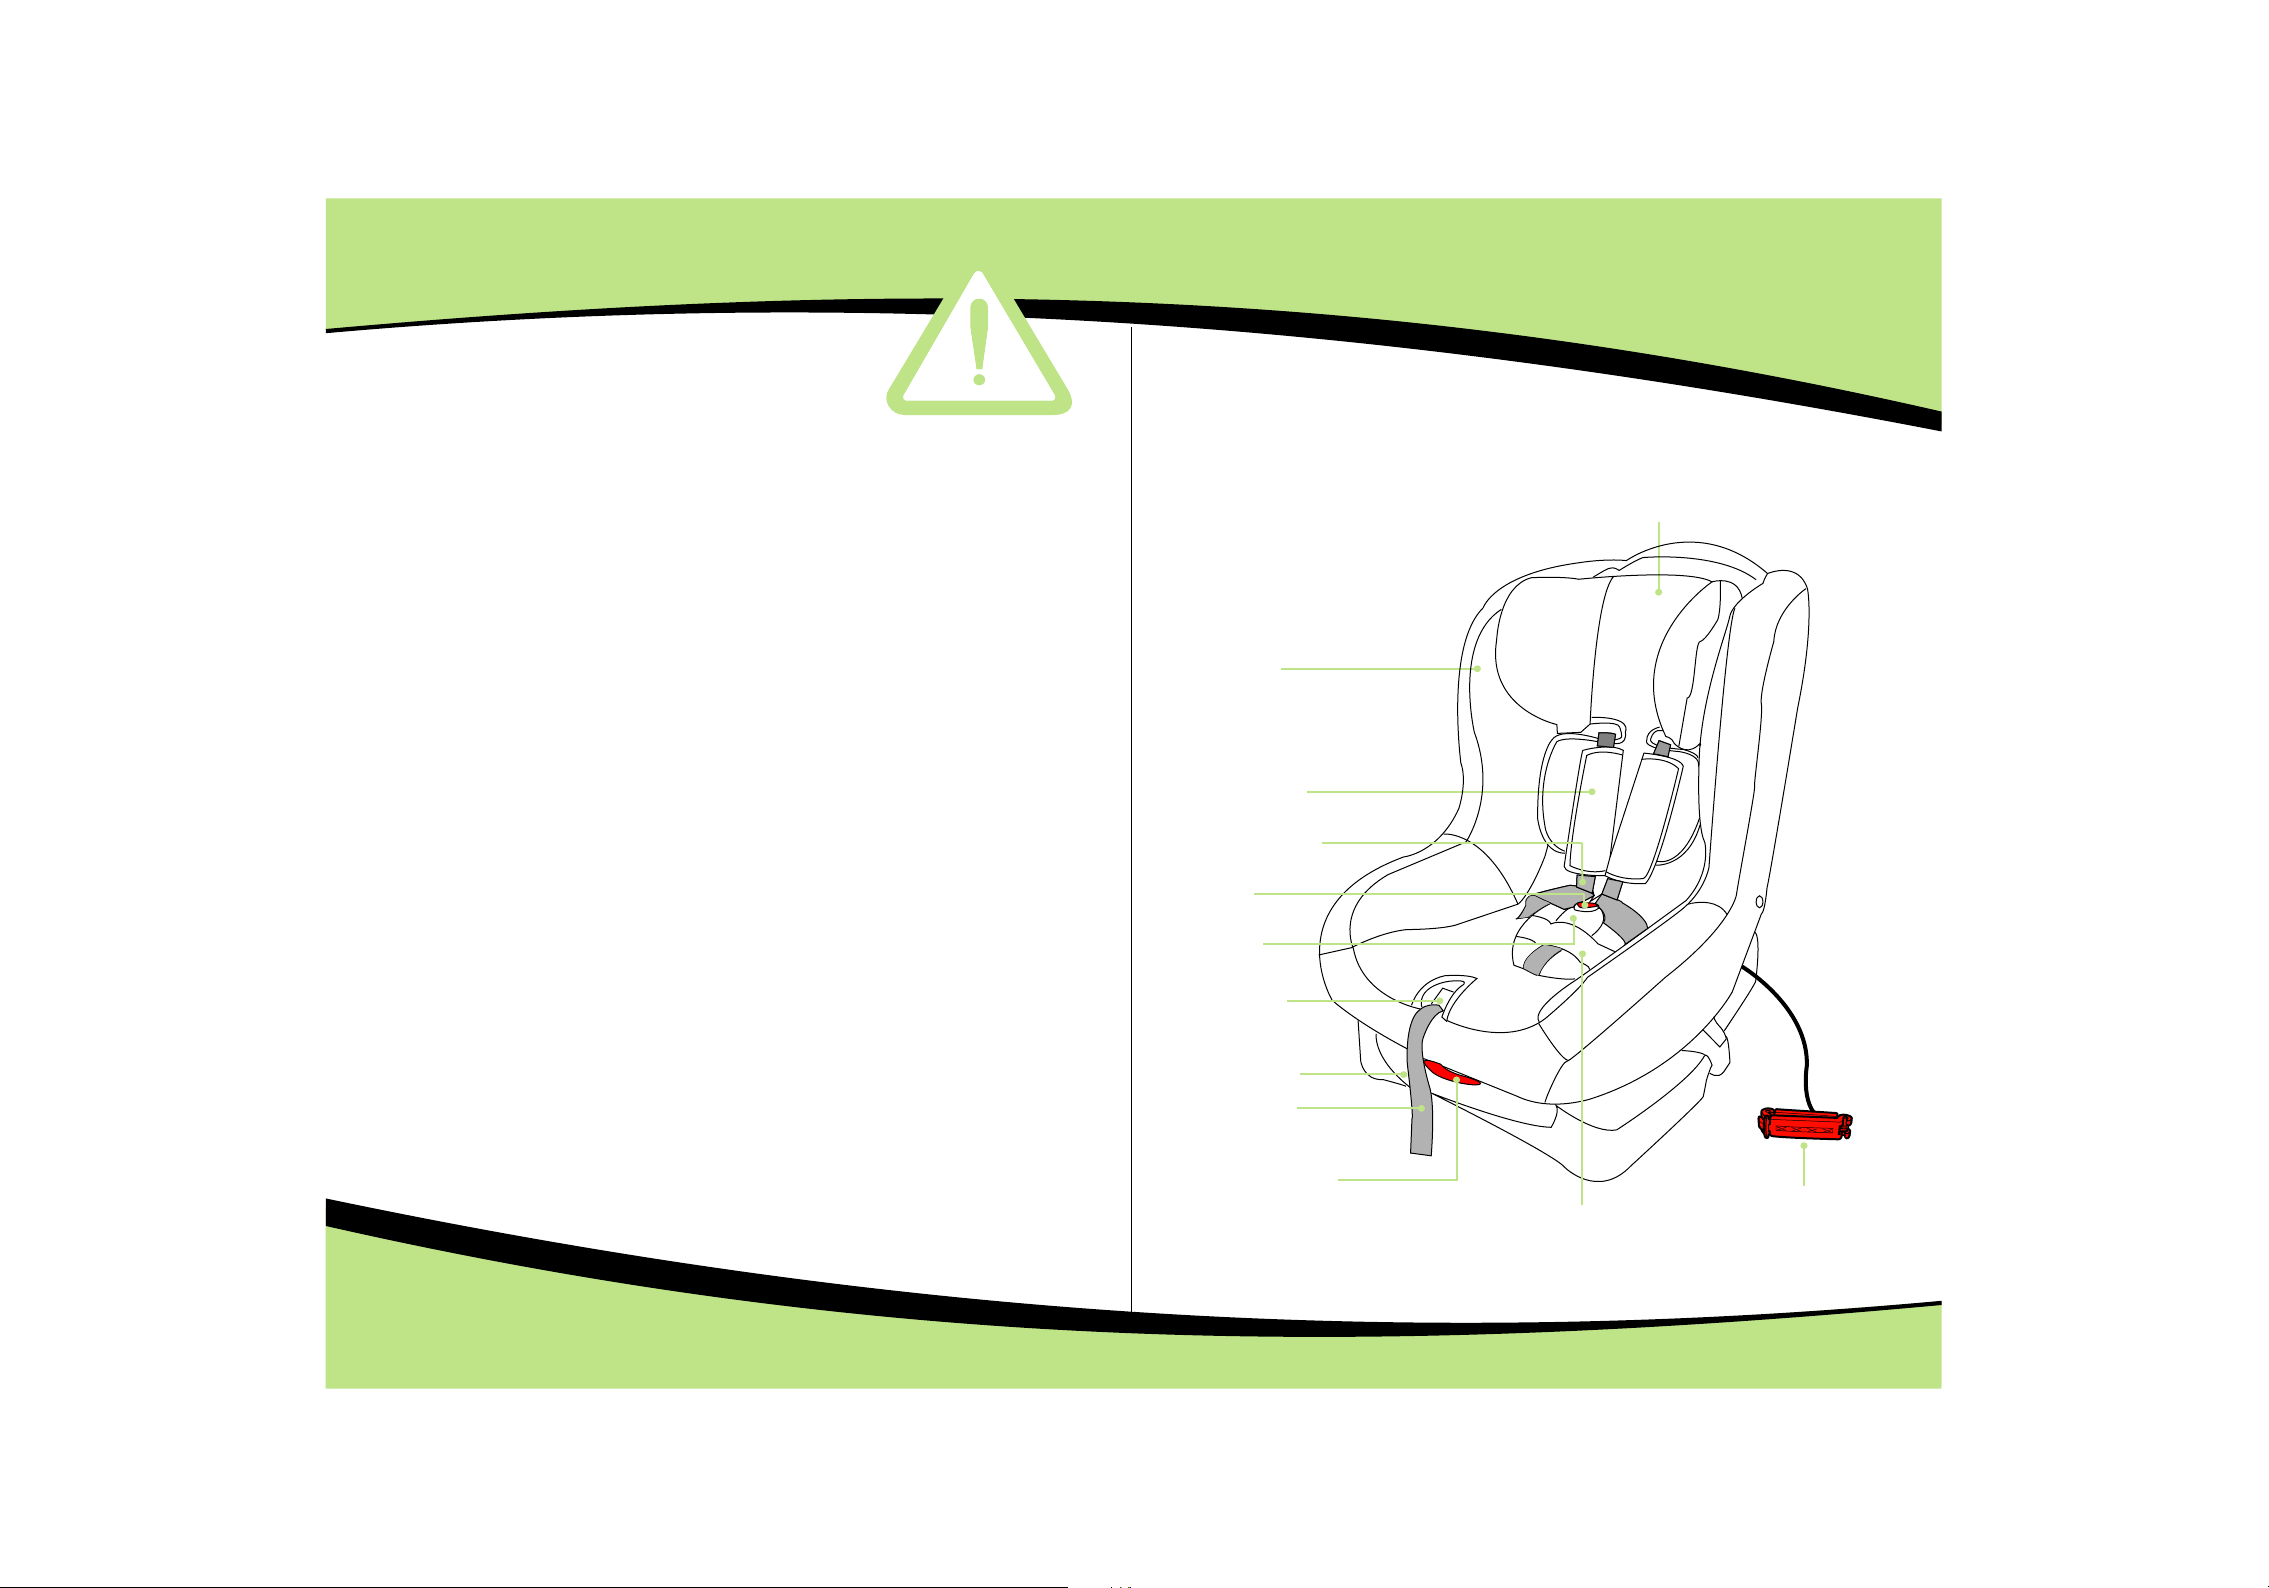
Features
Seat Cover
Shoulder pad
Harness strap
Buckle release
button
Harness
buckle
Harness
adjustment button
Child seat base
Harness
adjustment strap
Child seat gradient
adjuster
Adjustabl e head rest (Op tional)
Red safety clip
Buckle pad
21
Page 13
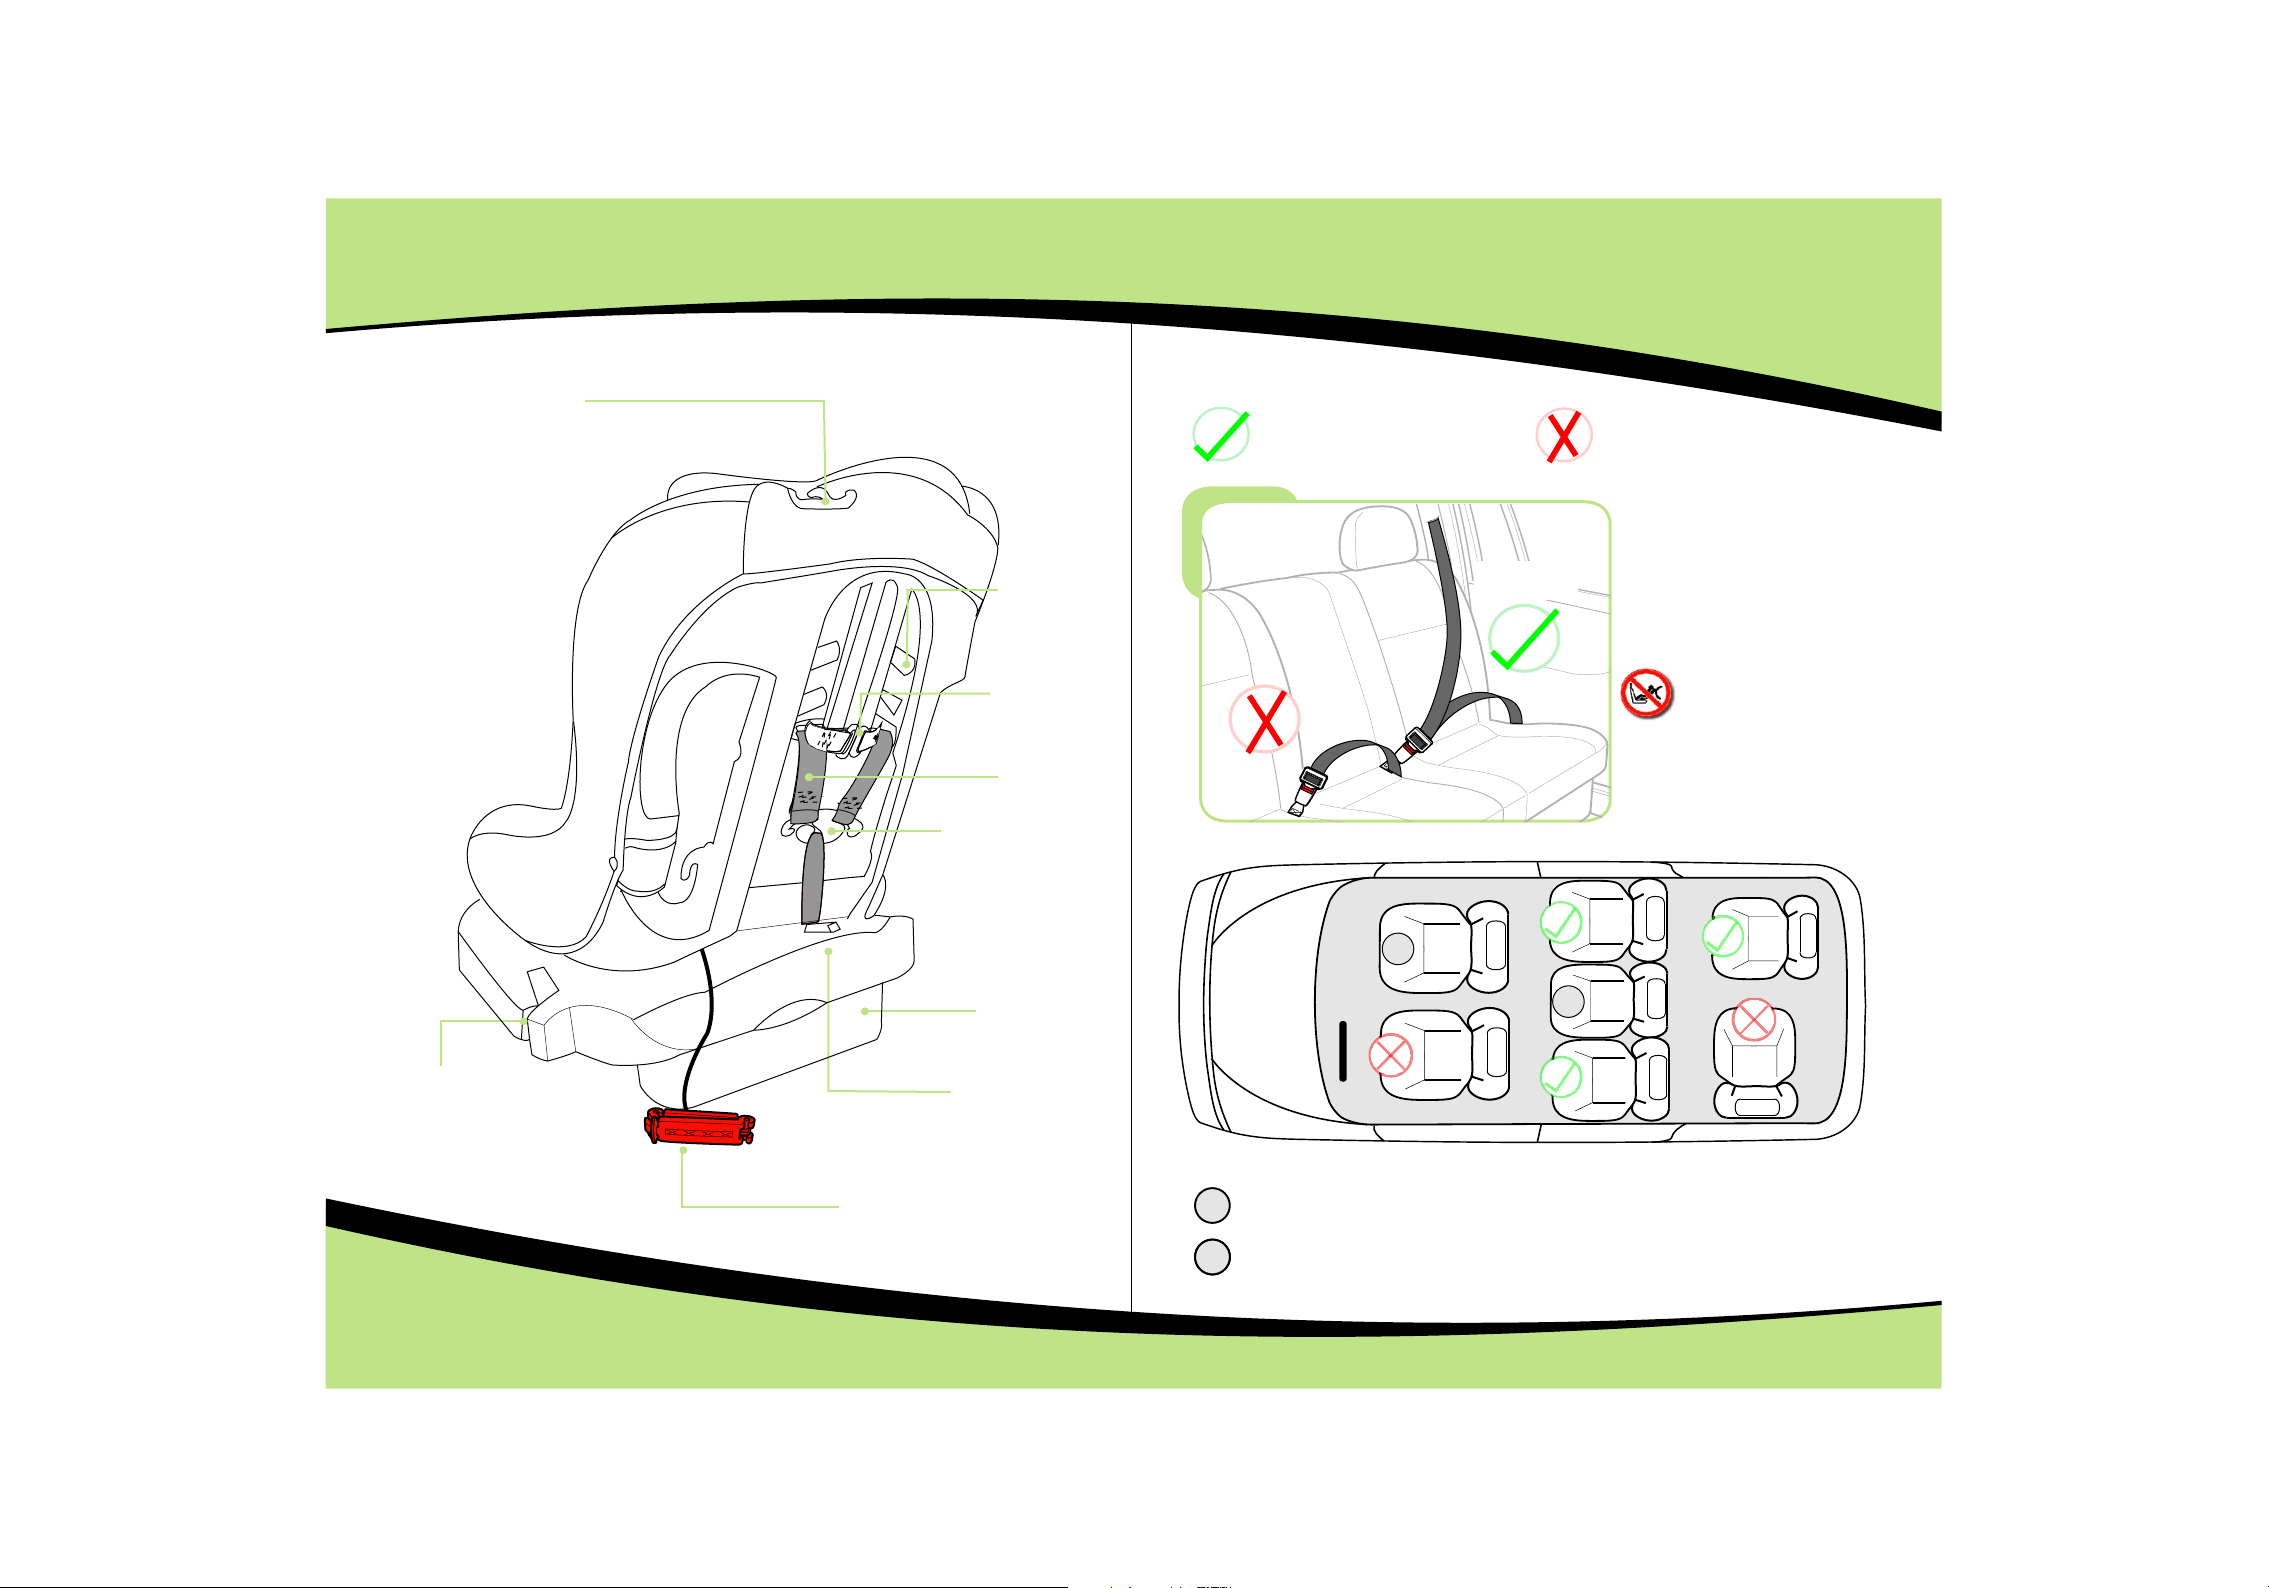
Features
Belt guide slot
Shoulder
belt slot
Vehicle Application
Correct fitting/Suitable Incorrect fitting/ Not suitable
Lap belt and
diagonal belt
Only suitable for use in the
listed vehicles fitted with 3
point safety-belts,approved to
ECE Regulation No.16 or
other equivalent standards.
Base guide slot
Red safety clip
Shoulder
pad yoke
Harness
straps
Harness yoke
Flap support
Child seat base
Lap belt
A
B
Not to be used on this seat if a Passenger front airbag is active.
A
War ning:
DO NOT pl ac e rear-fa ci ng
child seat on f ront seat wit h
airbag.
DEATH OR S ER IOUS
INJURY ca n occur.
B
BB
Only use on this Seat if a lap and diagonal Seat belt is fitted.
43
Page 14
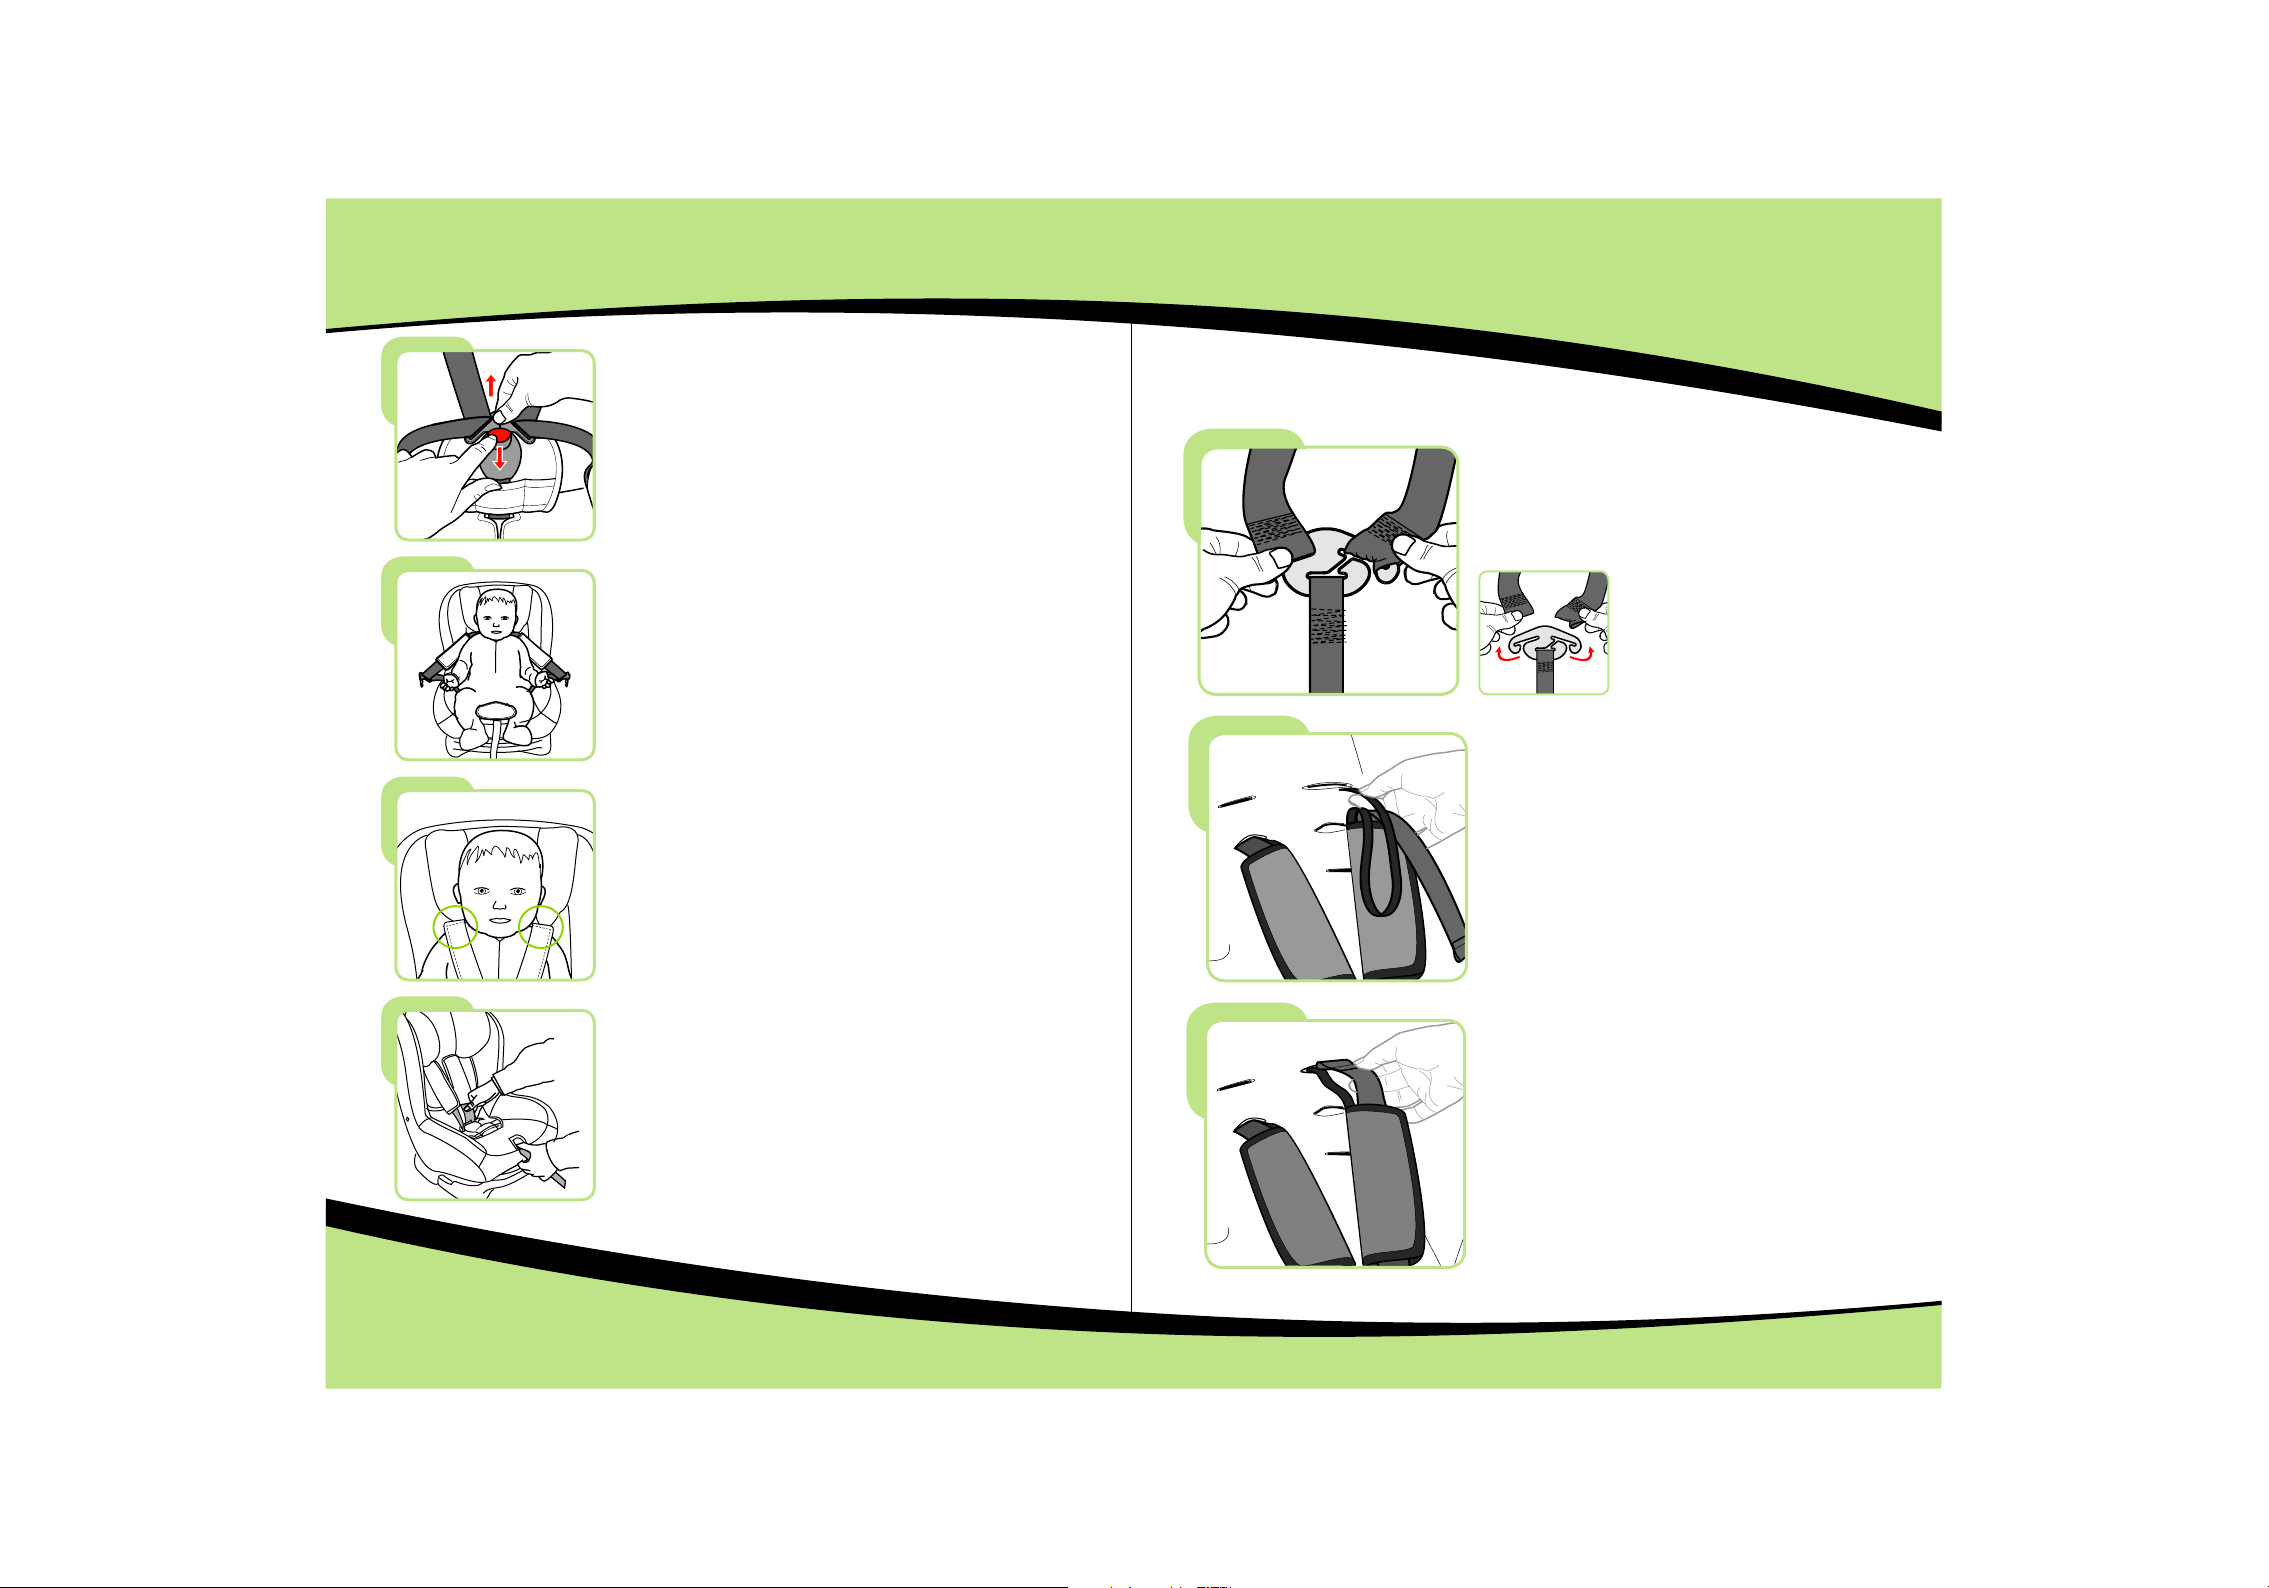
Adjusting the Belt System
to Size of your child
Release the buckle by sliding the red
button downwards and at the same
time pulling out the harness.
Place your child on the child seat and
check the height of the shoulder straps
for correct position.
The shoulder straps must be thread
through the slots in the cover and seat
shell that are closest to the top of your
child's shoulders .
From behind the seat ,unhitch the harness
straps from the yoke and pull the straps
through to the front of the seat .untie the
shoulder pad cords and pull these through
to the front of the seat.
Thread the shoulder straps back through
the same height slots in the seat cover
and shell making sure the straps are not
twisted and both straps are at the same
height.
To adjust the height of the
shoulder straps ,press the silver
harness release lever and pull both
harness straps forward to create slack .
Attach the shoulder straps securely to the
yoke and refasten the shoulder strap cords.
Important:
are not twisted .
Make sure the shoulder straps
65
Page 15
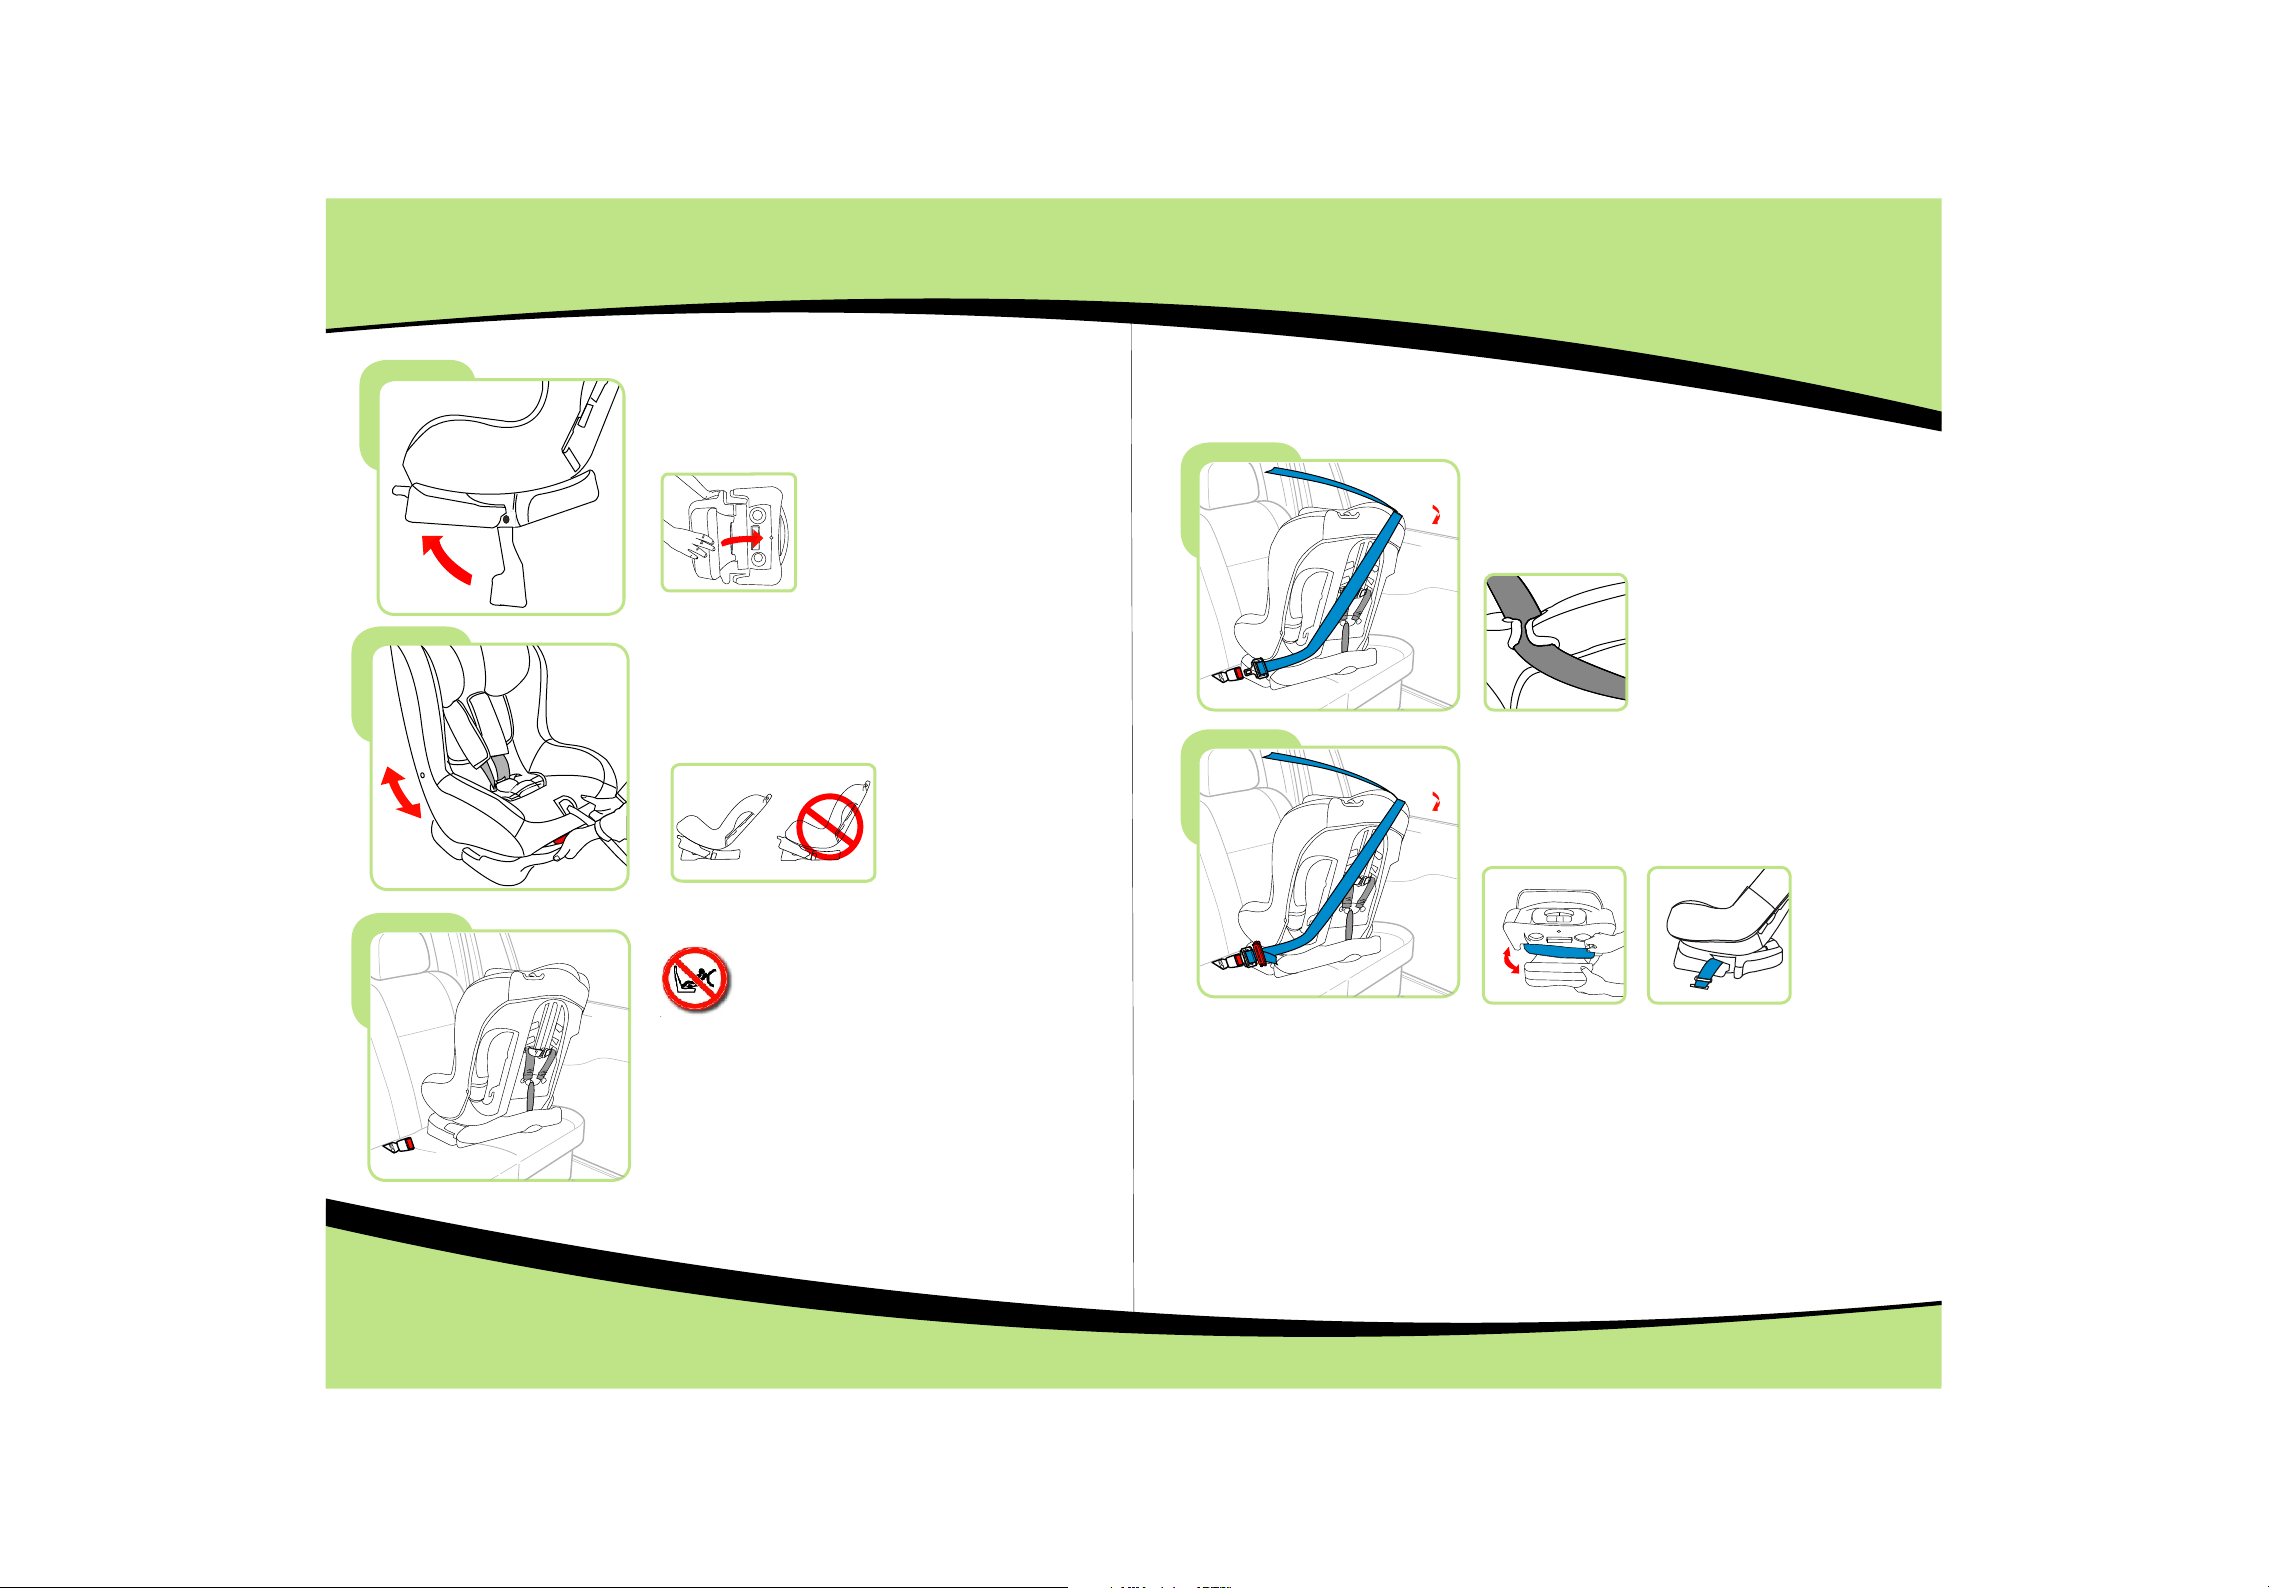
Installing your child seat - Rearward Facing
For use with group 0+ -less than 13kg(birth to 18months approx.)
Move the flap s upport to the f ront lay of the b ottom of
the seat ,and m ake the flap su pport botto m of the seat
,and make the f lap support k eep close to th e the
bottom of the s eat.
To adjust the reclining position of the
child seat , pull the red handle forward until you
reach the required position
Fasten the child seat by thread the
lap belt and the diagonal belt through
the belt guide slot.
hread the diagonal belt through the slot with blue
T
arrow on the back , and thread the lap belt through
the slot with blue arrow on the base ,
and the diagonal belt into the belt buckle ,you will
hear a click when is correctly inserted.
the tightness f the belts.
o
Insert the lap
then adjust
War ning:
DO NOT pl ac e rear-fa ci ng child se at
on front seat w ith airbag.
DEATH OR S ER IOUS INJU RY can occu r.
7
8
Page 16
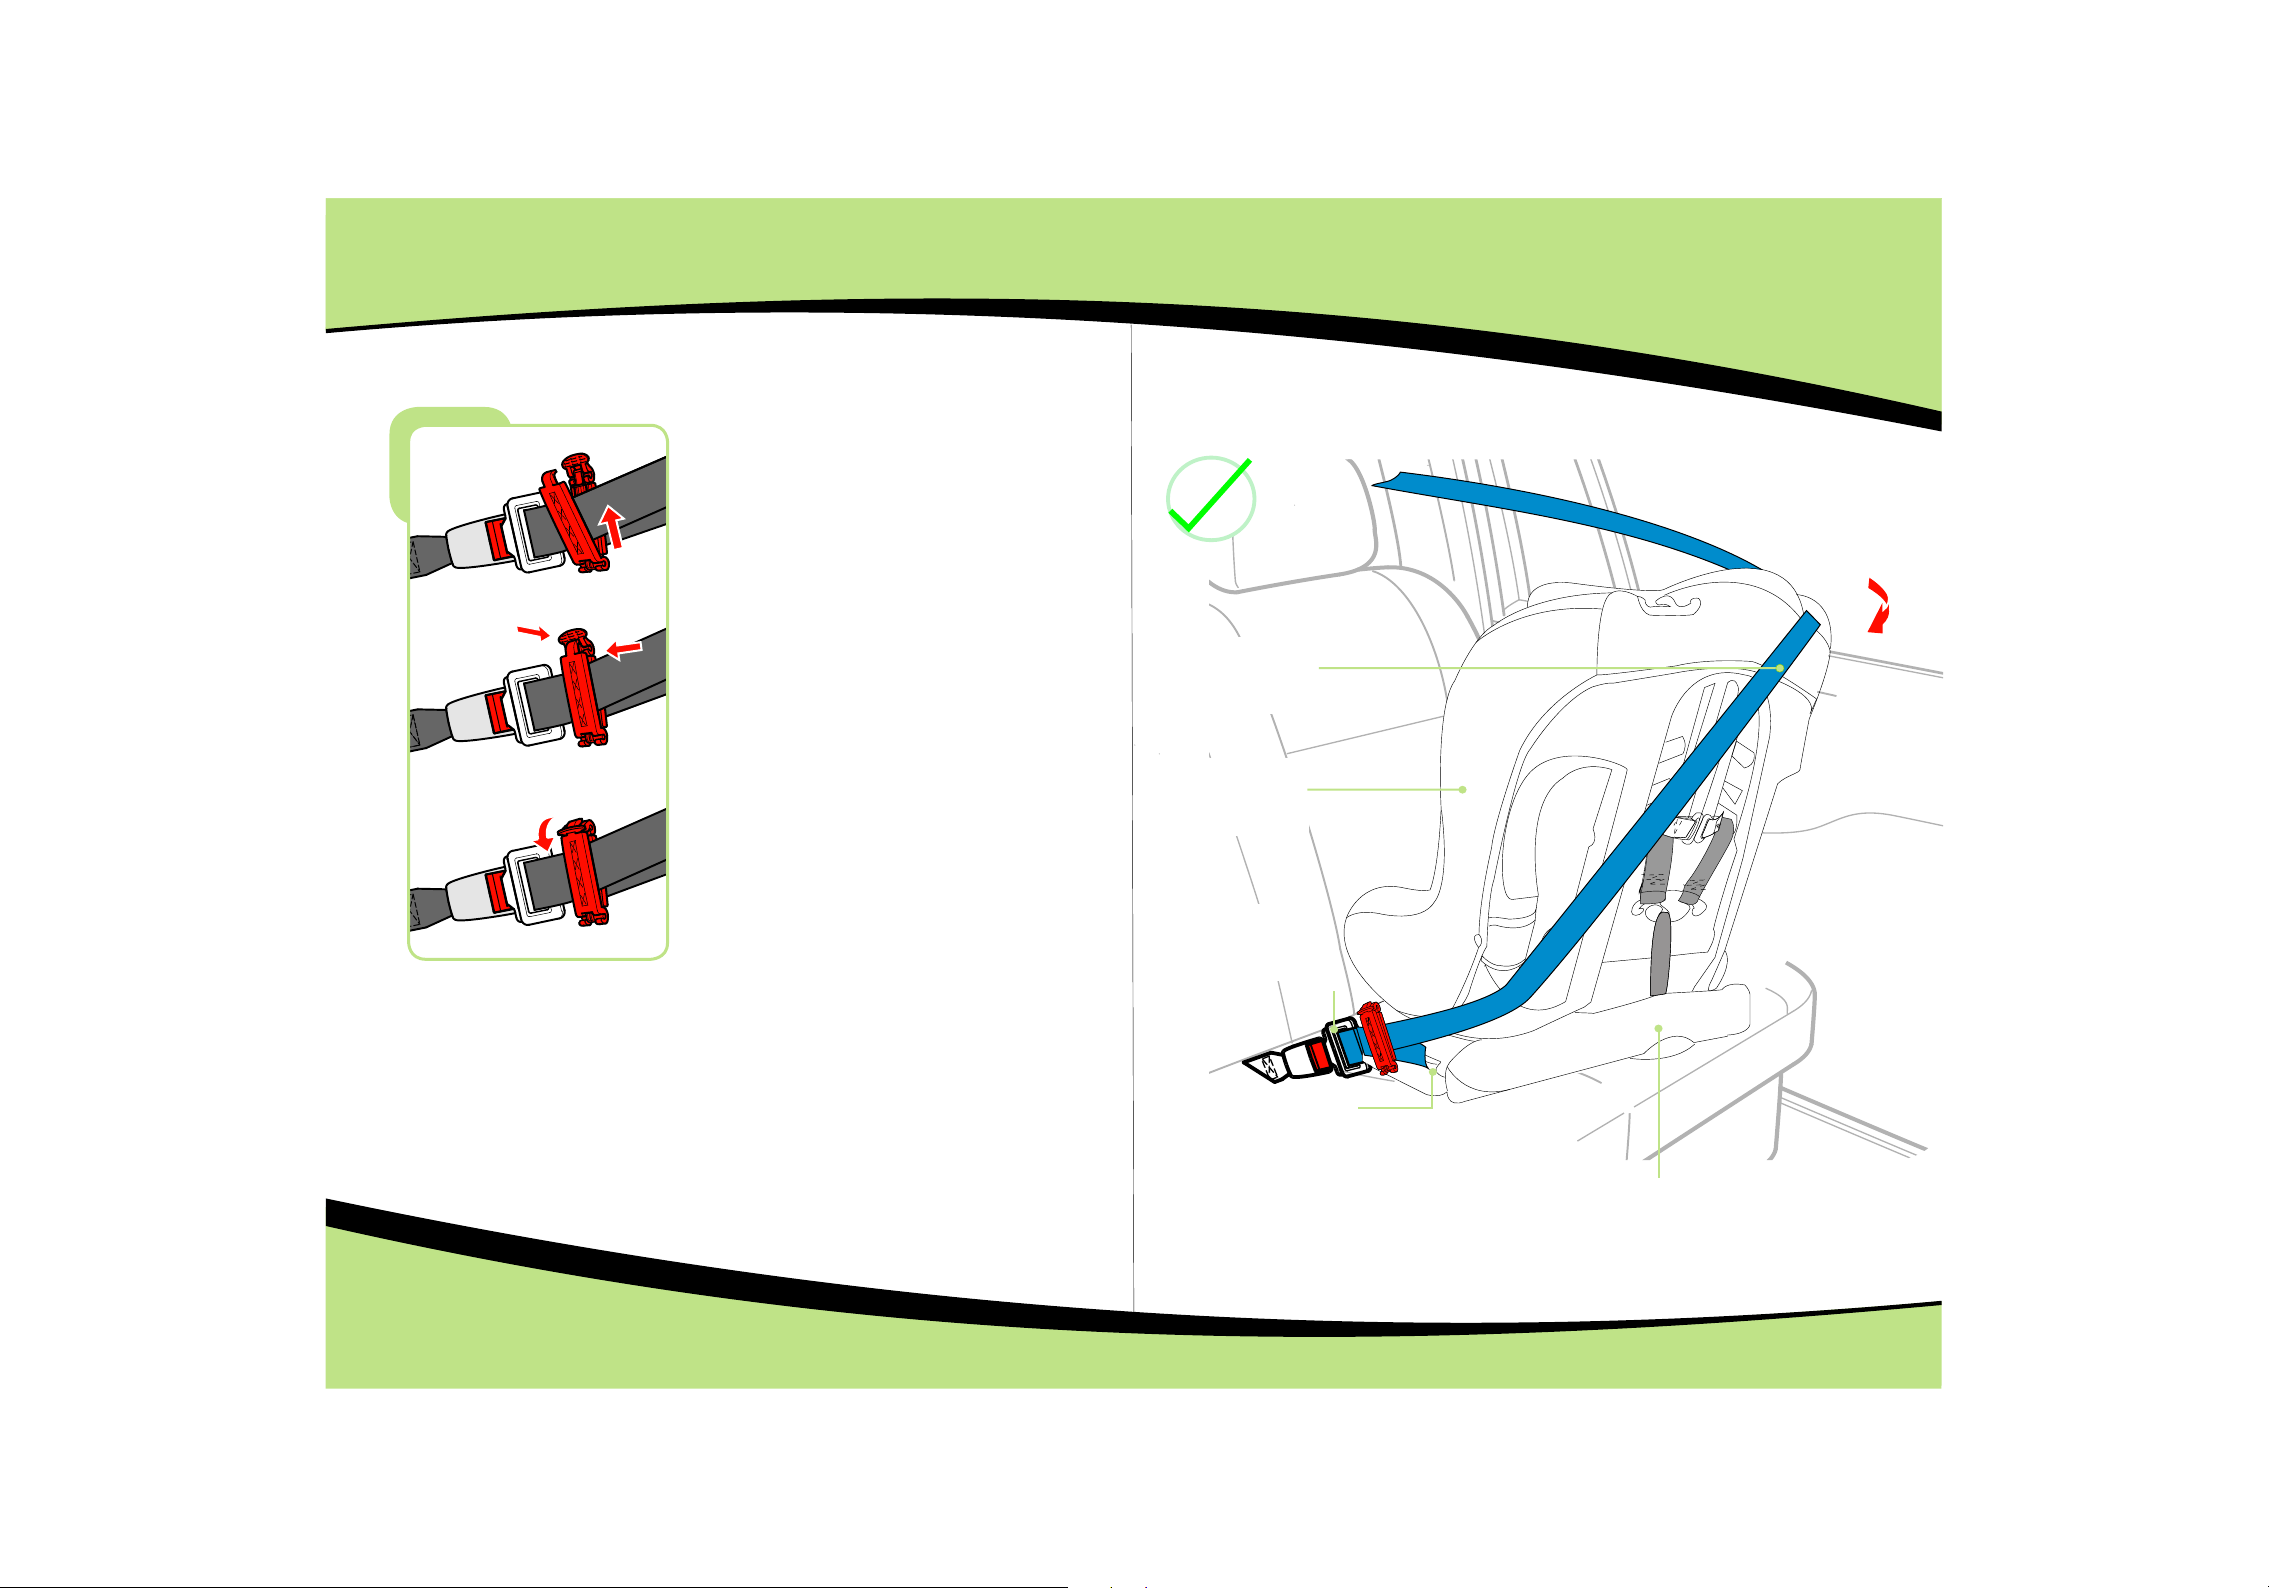
Pull the lap and diagonal belt tightly and attach
the belt clip to shoulder straps as closely as you
can to the seat belt buckle but not touching it .
Finally check the seat is firm and secure ,if it is
wobbly or slack ,you must tighten both belts
again until the seat is secure.
Installation Checkpoints - Rearward Facing
Check:
The vehicle s eat belt
has been pull ed tightly
and is not twis ted.
Check:
Make sure the c hild
seat is fitte d firmly
on the vehicl e seat.
Check:
Make sure the b elt
lock is close d properly
(clicks whe n locked)
Check:
The lap secti on of the
seat belt is un der the seat an d
through the b lue marked op ening
and is not twis ted .
Check:
The child seat must be in the
fully reclined position .
9
Check:
The child sea t and the vehic le
seat are push ed tightly to gether.
10
Page 17
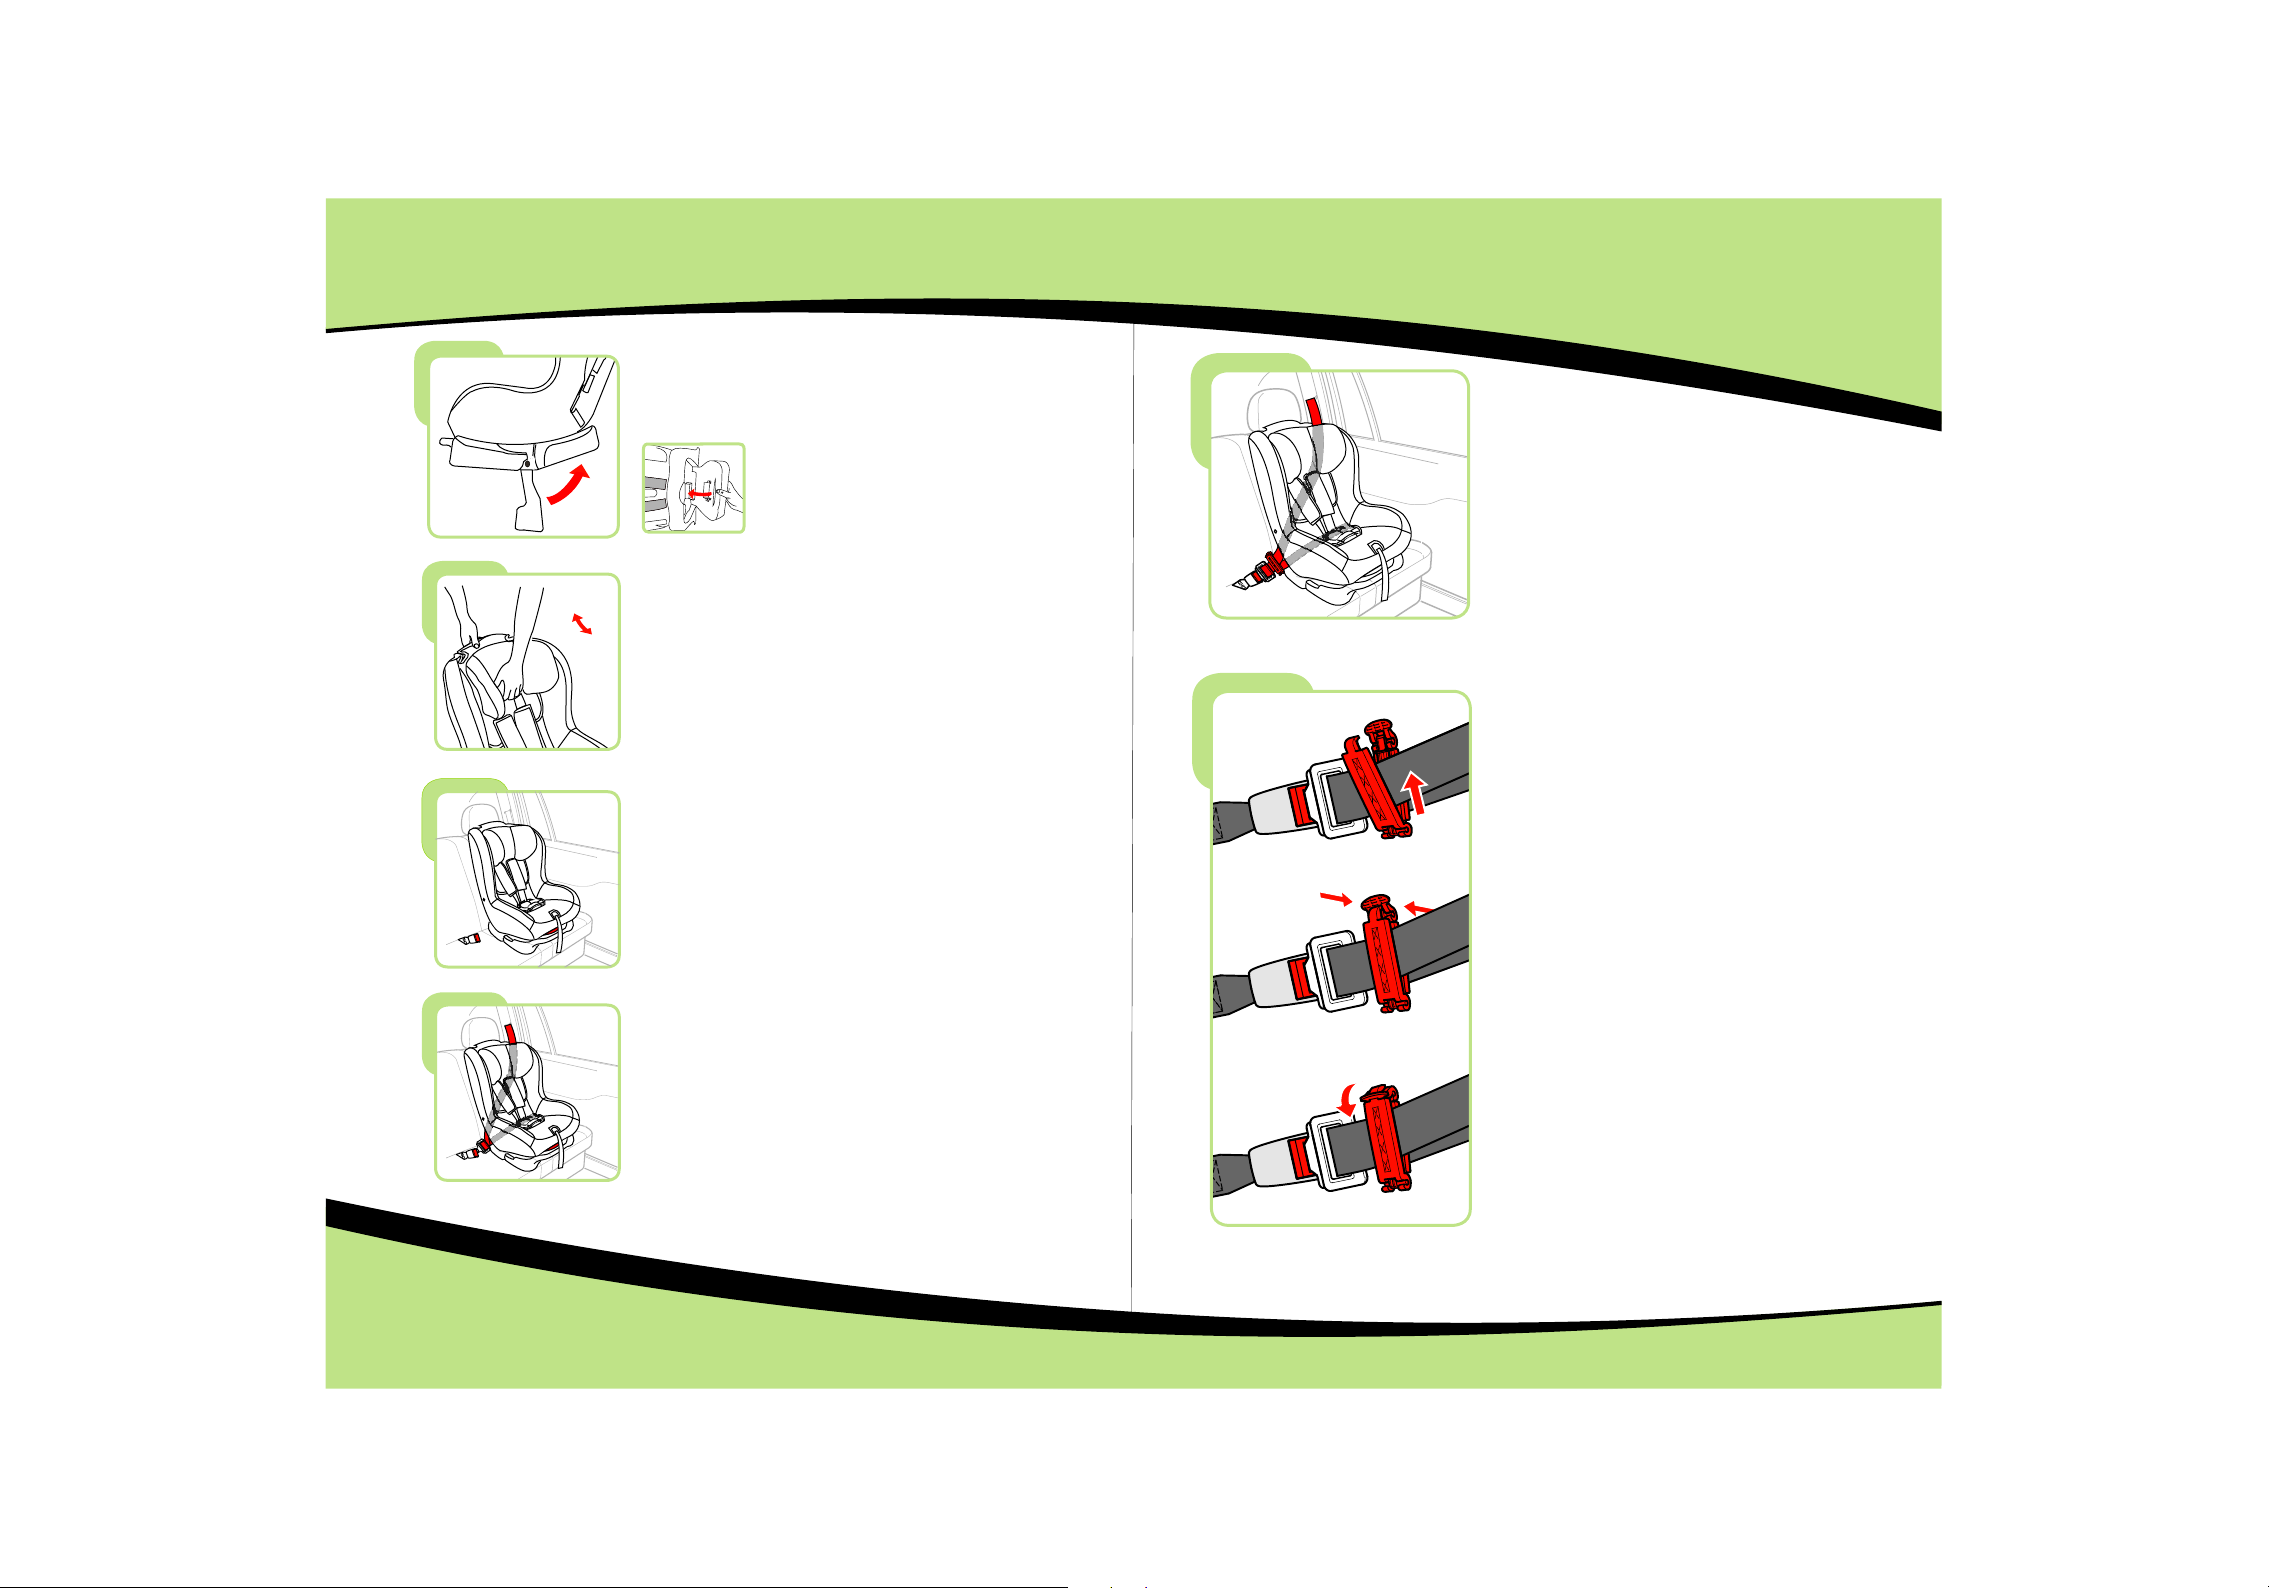
Installing your child seat - Forward Facing
Only for use with group 1 - from 9 to 18 kgs(10months - 4years approx.)
Move the flap support to the back lay of the
bottom of the seat ,and make the flap
support keep close to the the bottom of the
seat.
Adjust the head rest according to your child’s height.
Insert the lap and the diagonal
belt into the belt buckle ,you will
hear a click when is correctly inserted.
pull on it to check it is securely fitted.
Then adjust the tightness of the belts.
Pull the lap and diagonal seat belt tightly
and attach the belt clip to shoulders straps
as closely as you can to the seat belt buckle,
but not touching it .
Place the child seat firmly against the
back of the vehicle seat.
Shoulder belt and lap belt go through the back
part of car seat.
11
Finally check that the seat is firm and
secure ,if it is wobbly or slack ,you must
tighten both again until the seat is secure.
12
Page 18
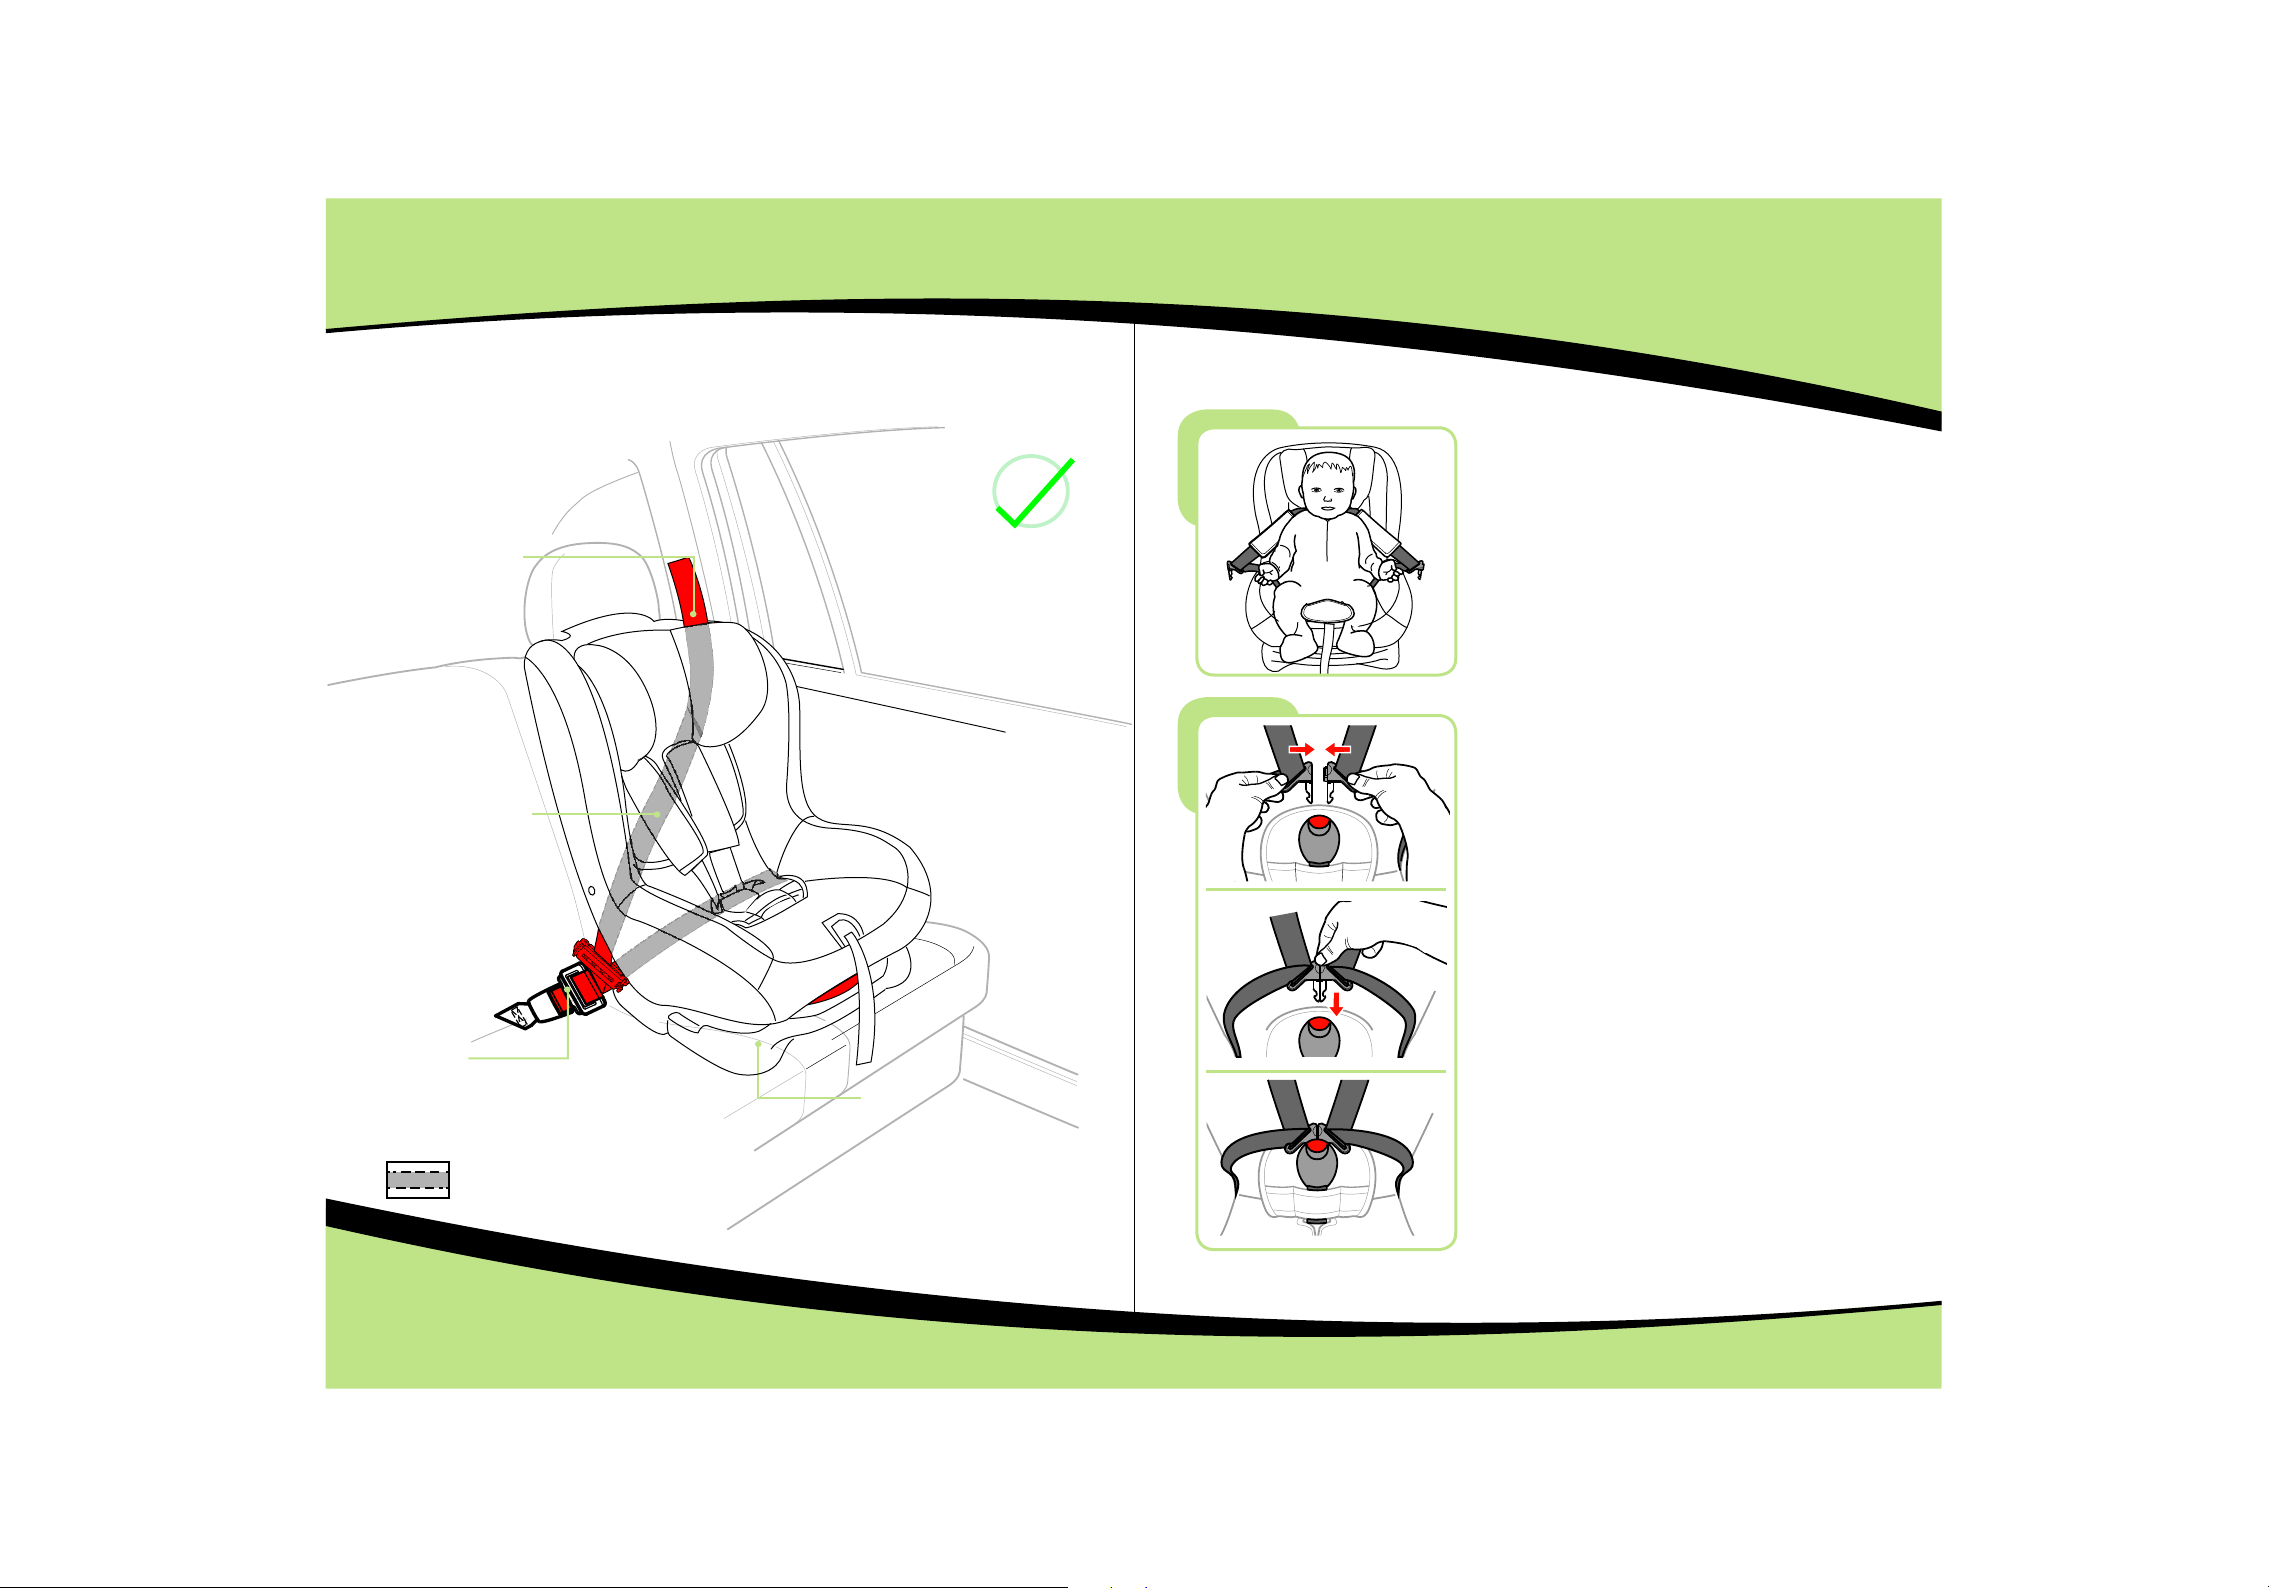
Check:
The vehicle s eat
belt has been
pulled tigh tly and
is not twiste d.
Check:
The vehicle s eat belt
is fed throug h the
slots in the sh ell of
the child sea t.
How to fasten the childInstalling Checkpoints - Forward Facing
Release the safety belts and
place the child on the child seat ,
fasten the shoulder straps on the
shoulder of the child .
Fasten the buckle by bringing together
the two prongs of the harness strap and
push the buckle until you hear a click.
Check:
Make sure the b elt
lock is close d properly
(clicks whe n locked)
Seat belt rou te shown behi nd child seat
13
Check:
That the chil d seat is
pulled back i nto the
vehicle sea t .
14
Page 19
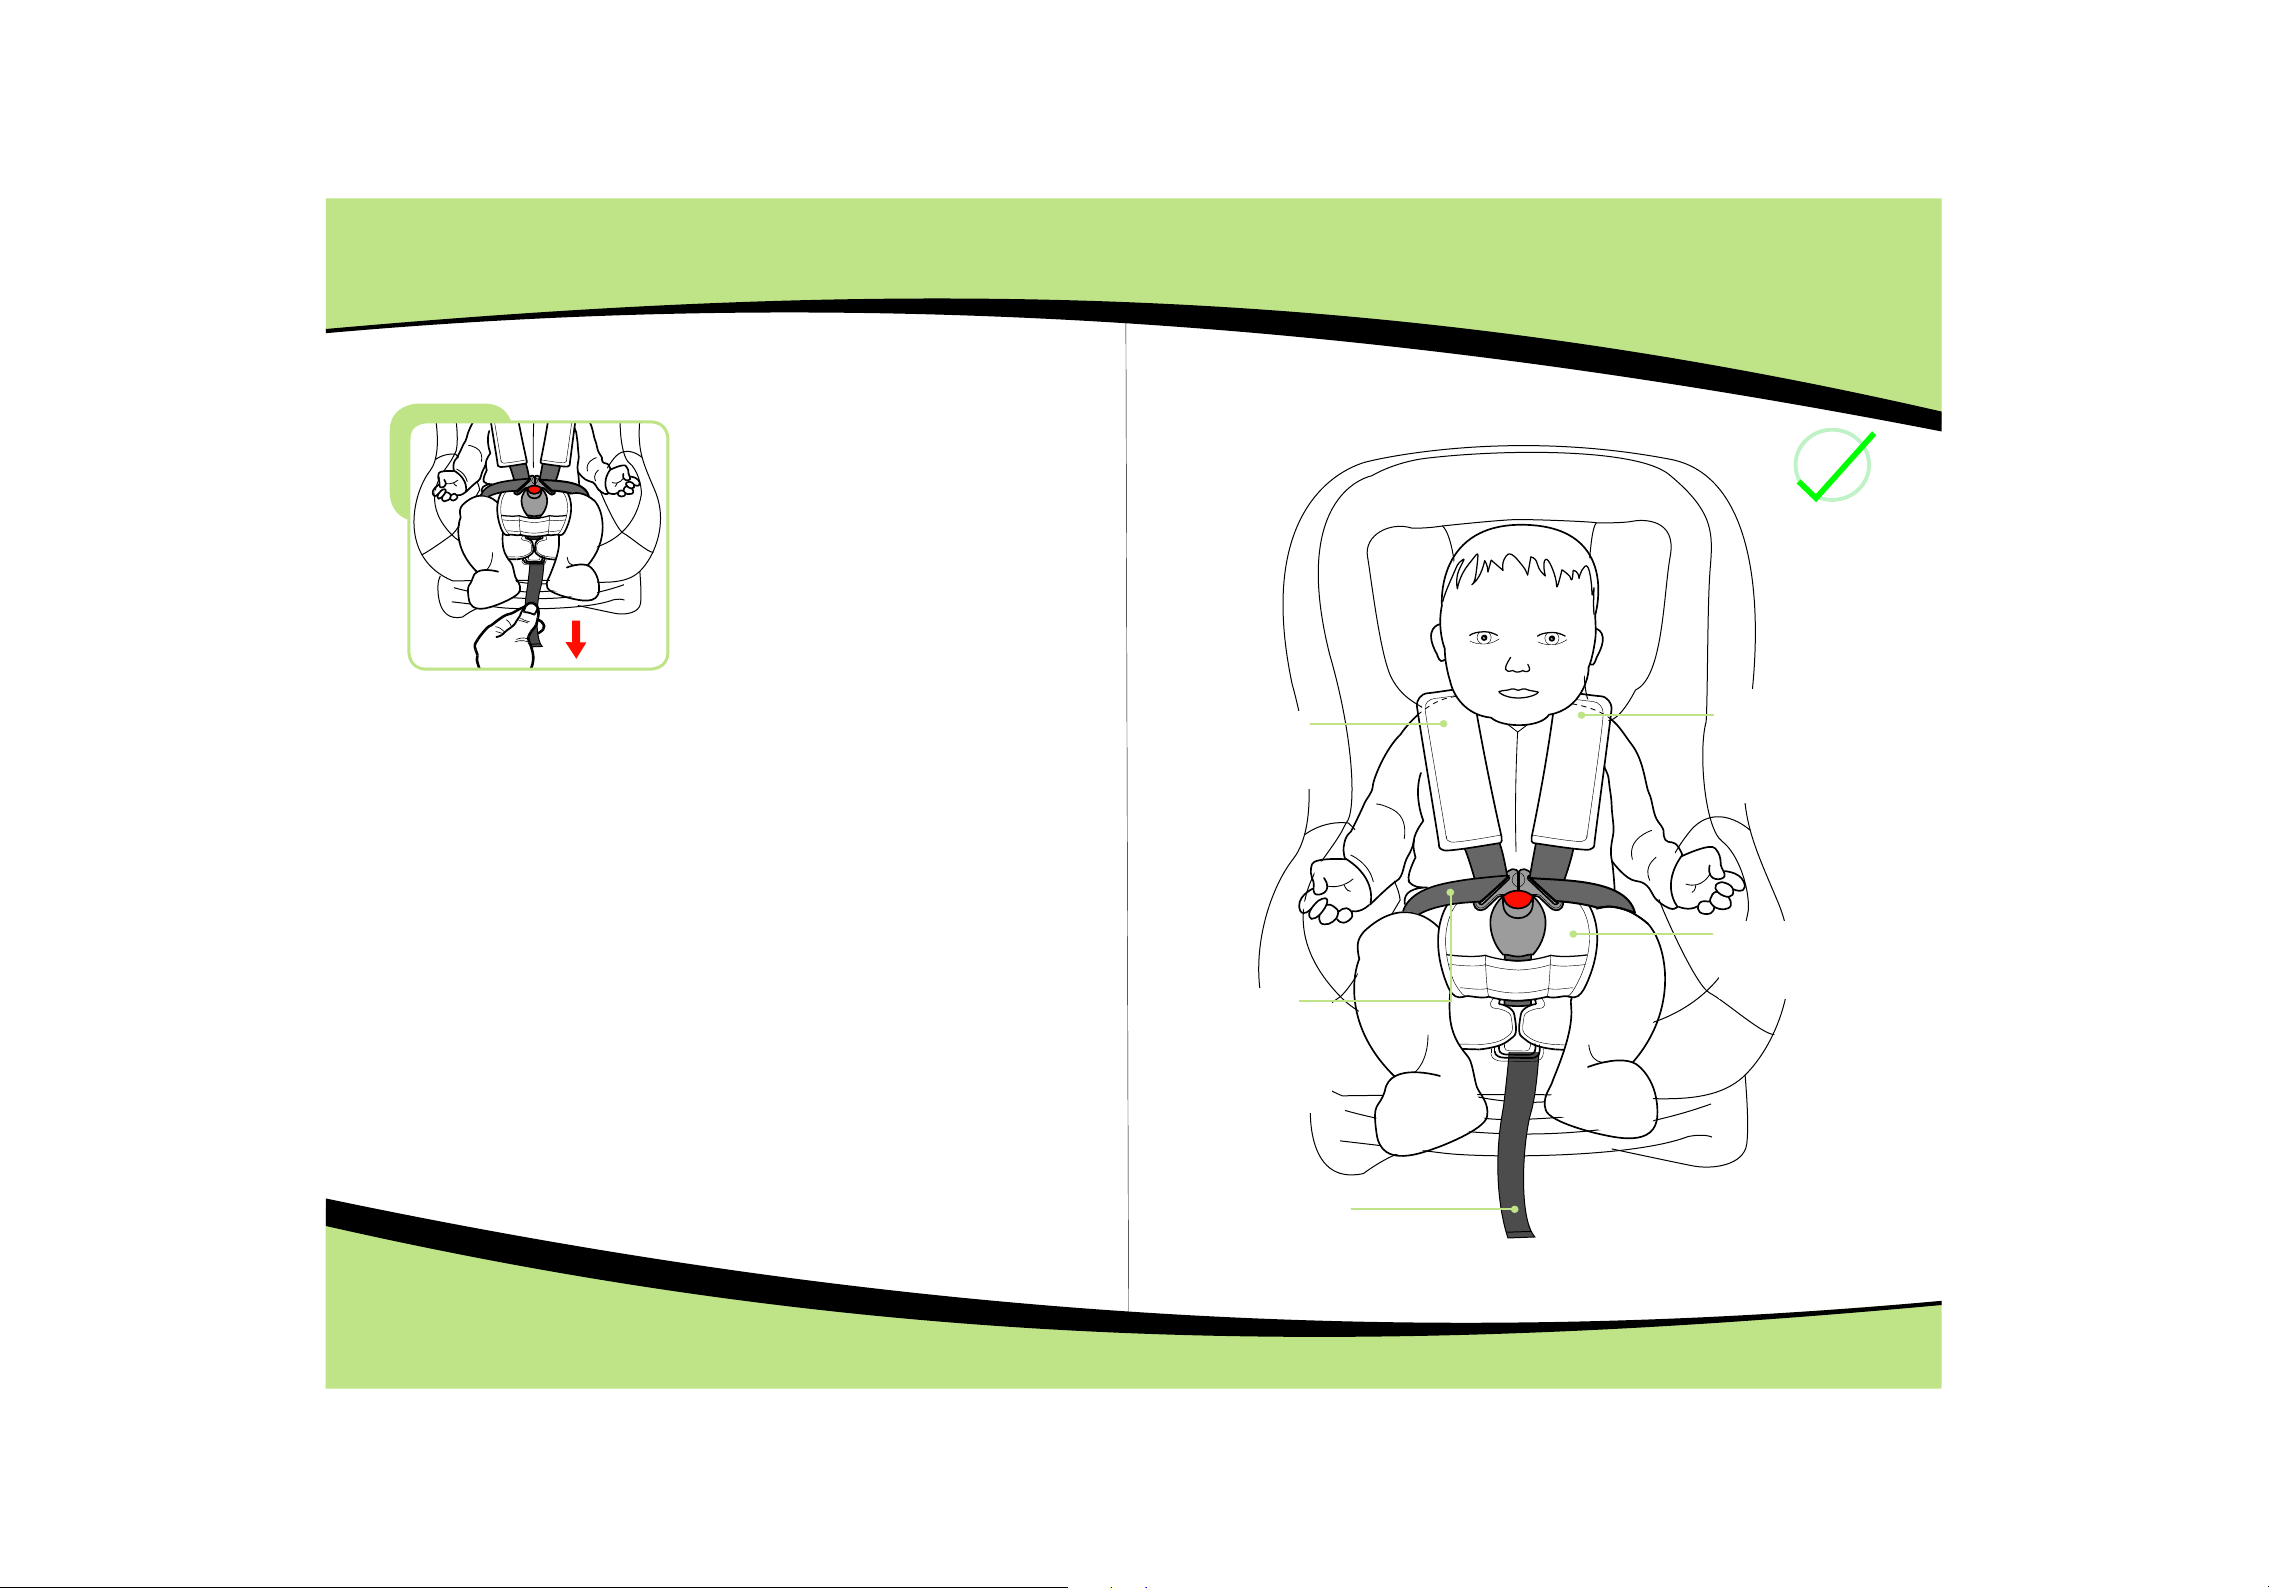
Adjust the shoulder pads so that they
sit correctly on your child's shoulders.
Tig hten the shoulders straps by pulling
the harness adjuster strap ,your child
must be comfortable but securely
fastened in .
Check points
Check:
That the shou lder
pads are cove ring
the shoulde rs .
Check:
The shoulde r strap
is not lower th an the
child's sho ulders ,if
it is not , mov e th e
shoulder st rap to
the next slot .
Check:
The harness l ies
over the hips a nd not
over the stom ach and
is pulled tig htly.
Check:
That the harn ess
adjuster st rap has
been pulled t ight.
Check:
The comfort able pad
is in place and t he
buckle is cli pped in.
1615
Page 20
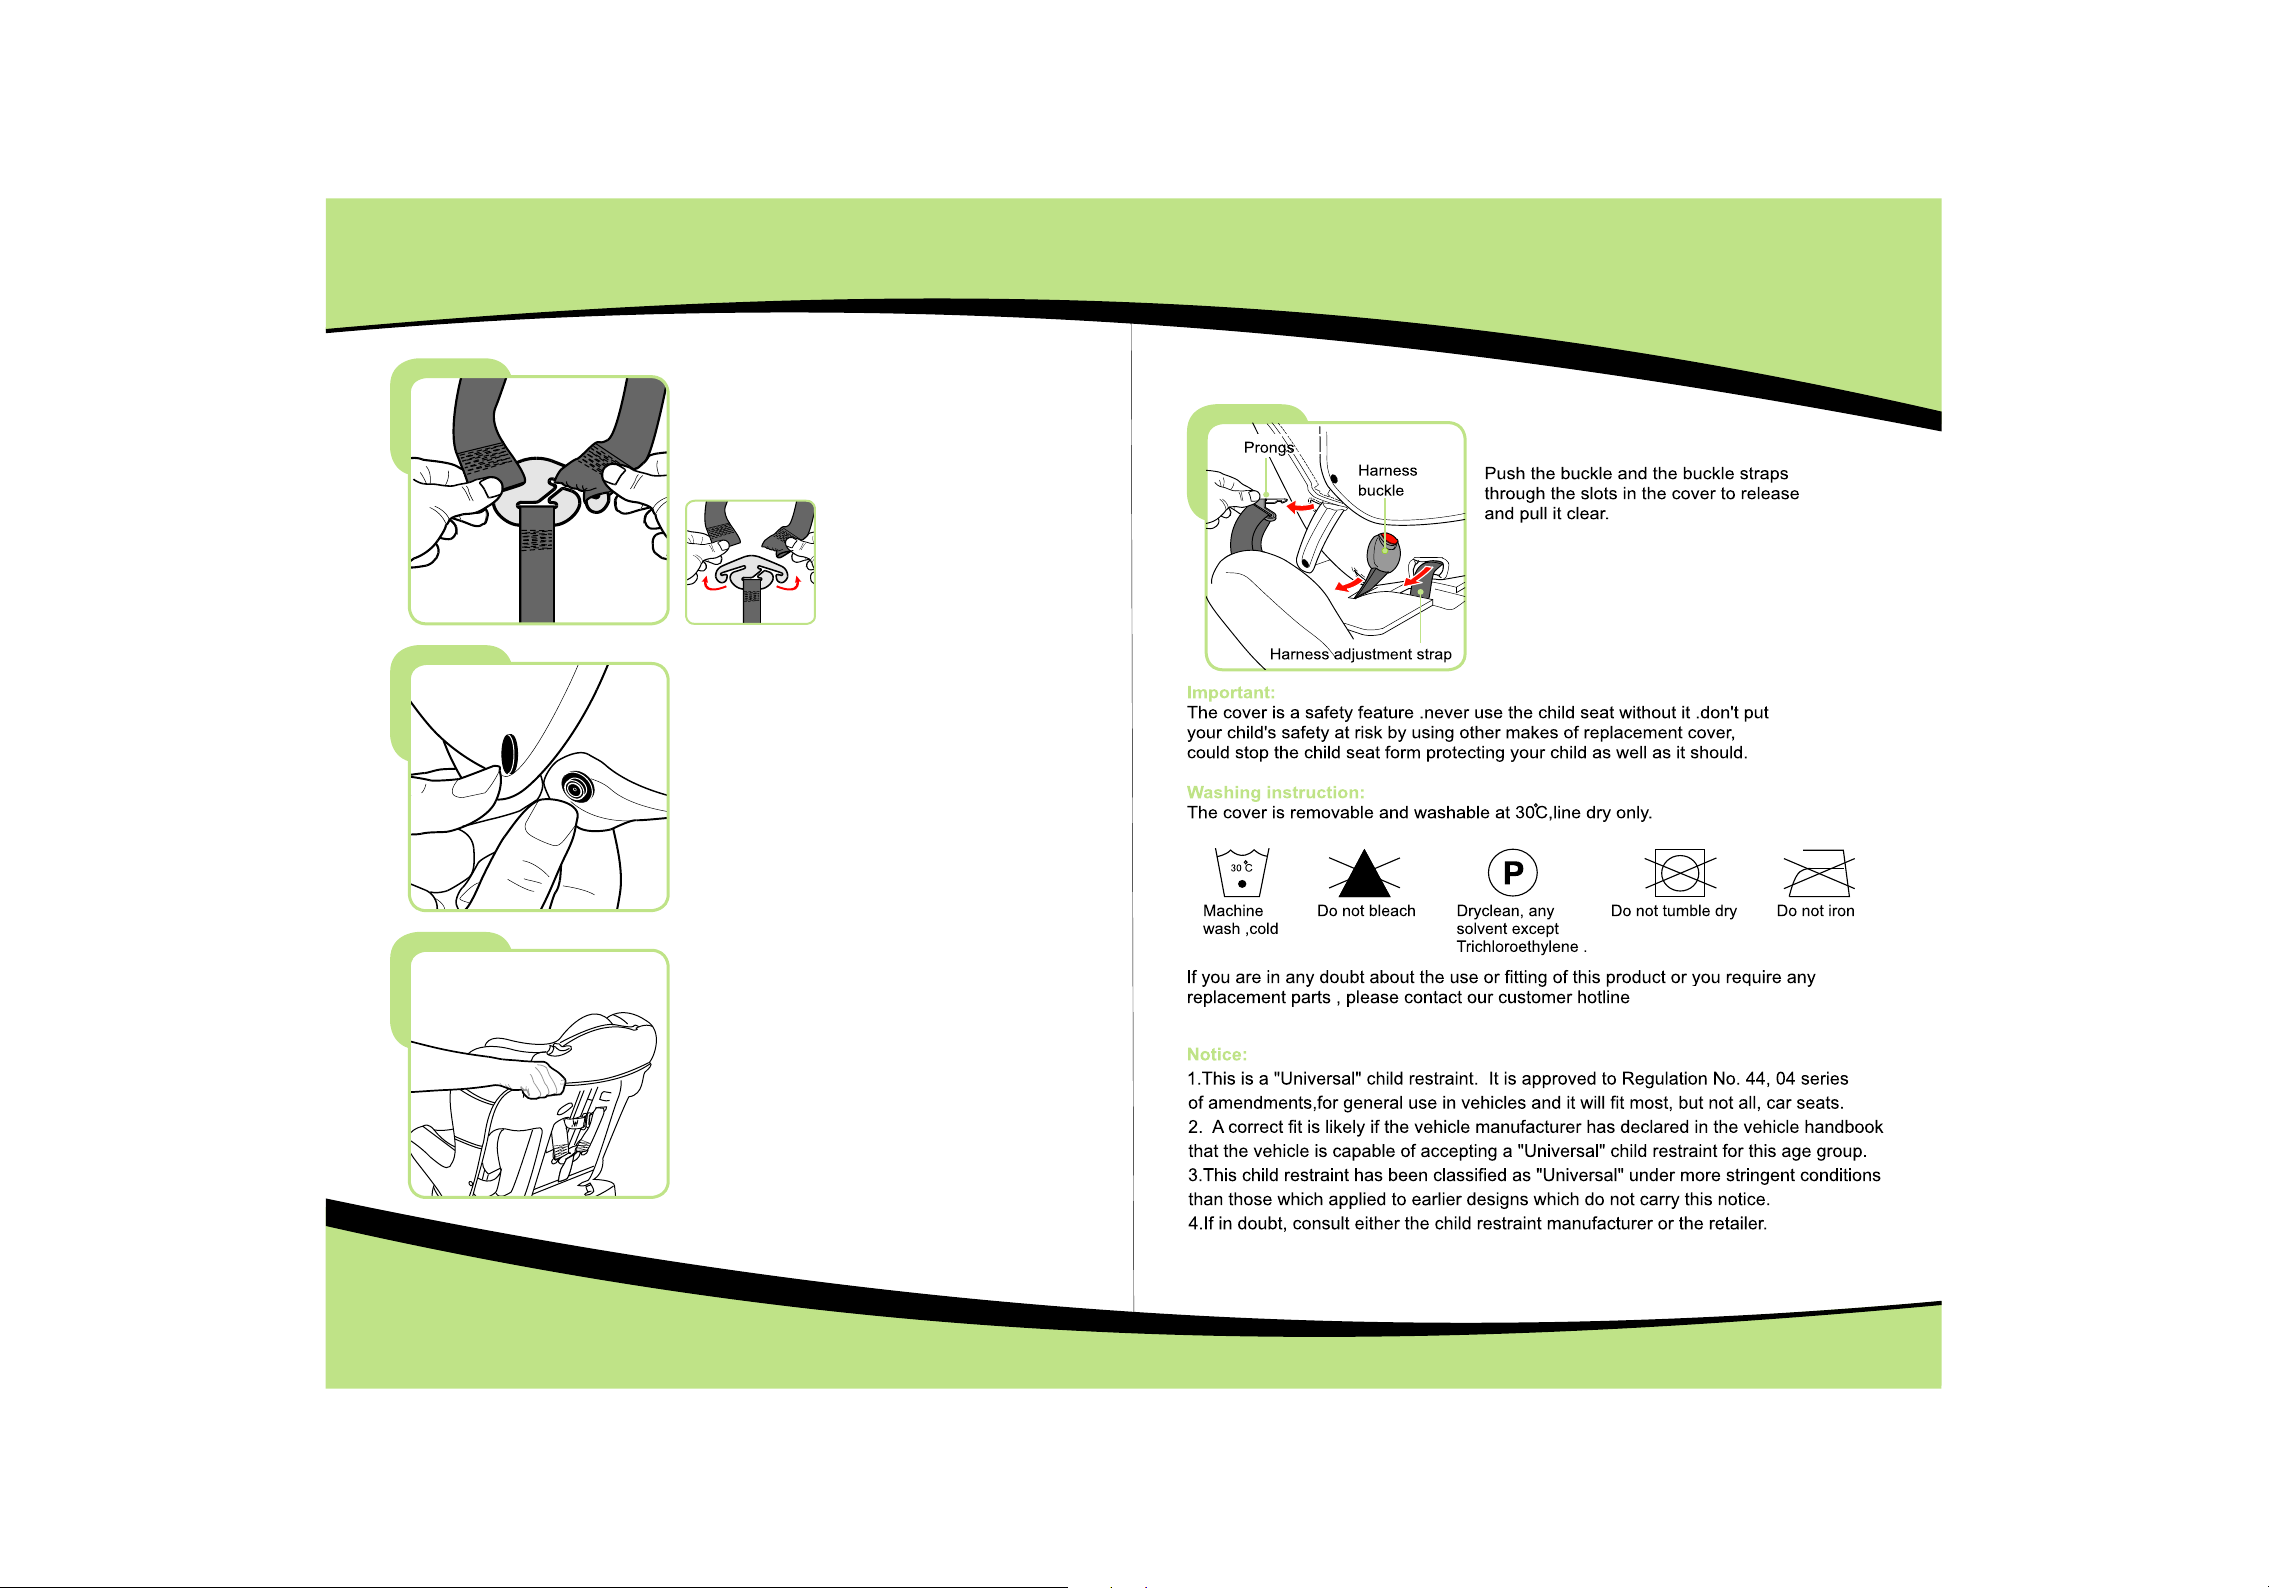
Cleaning &Maintenance
To remove the cover for cleaning , you must
release the shoulder straps from the yoke
and until the cords at the back of the child
seat ,pull these through to the front of the
seat .
Unclip the studs on both rear sides
on the seat.
Carefully pull down the cover from the top.
1817
 Loading...