

Page 1
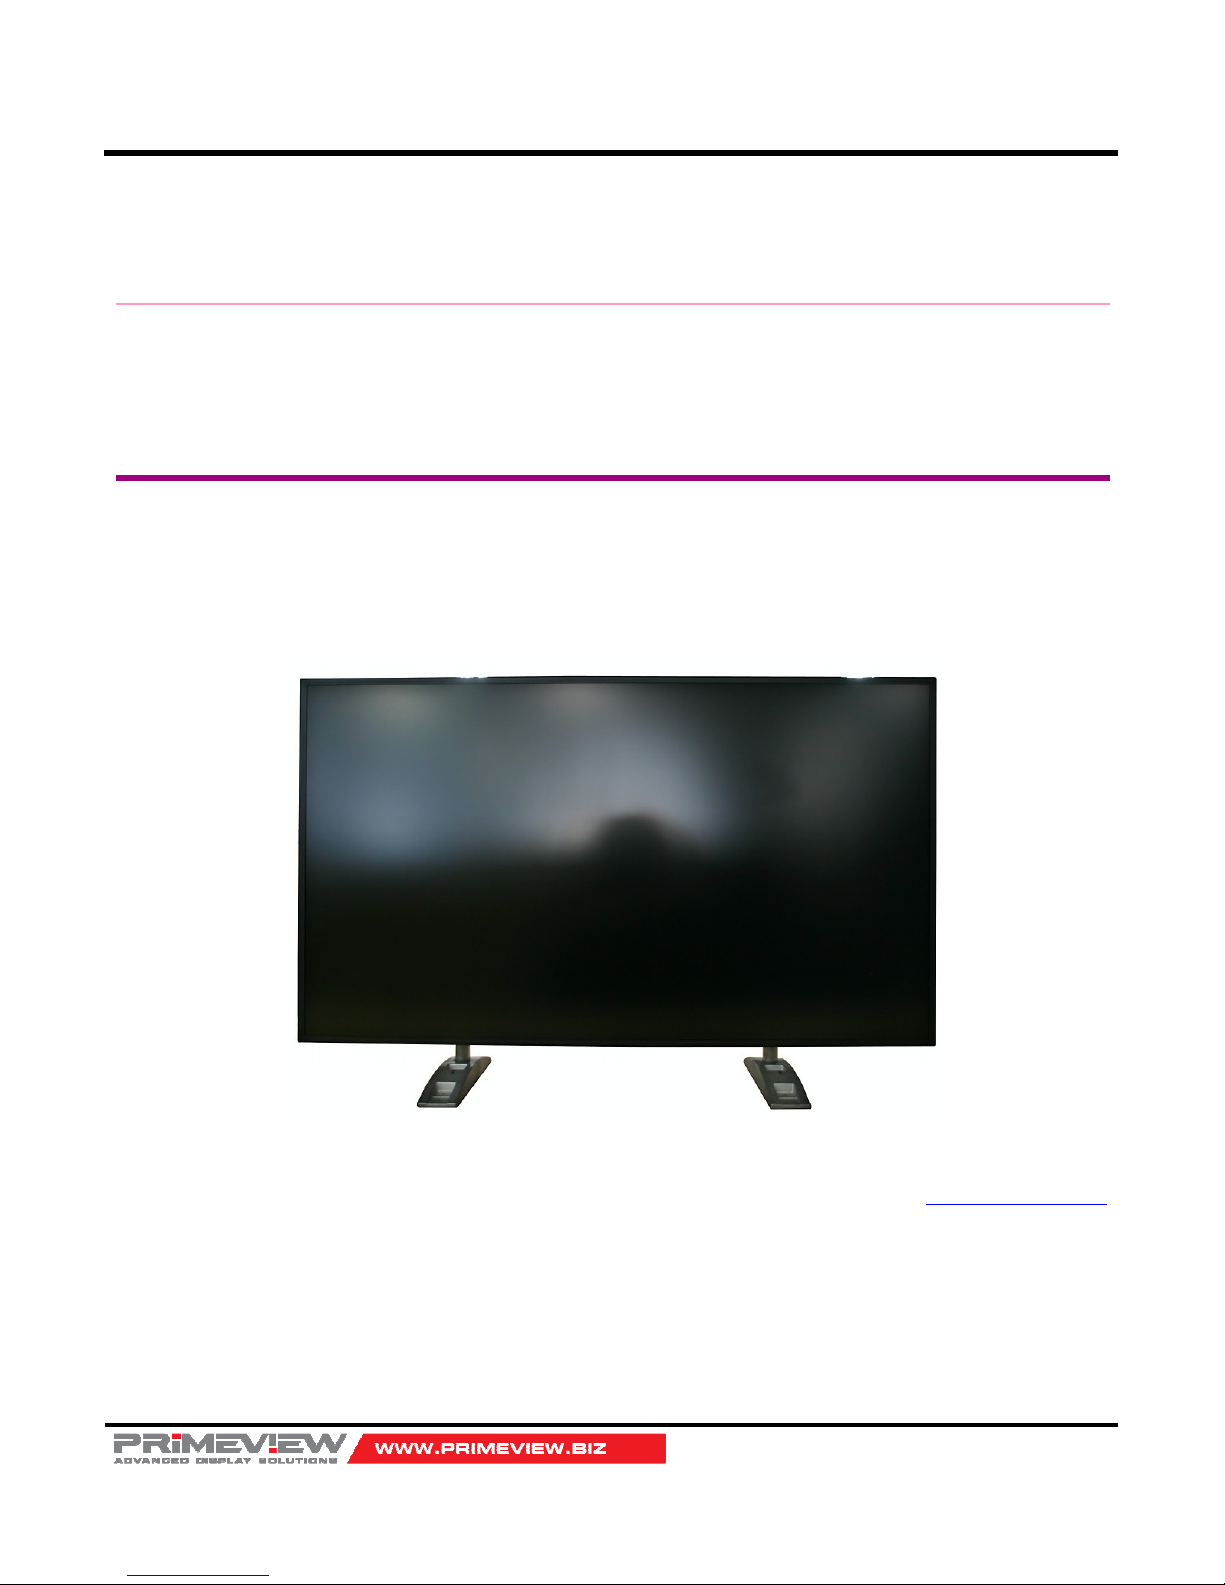
40”/46”/46”HB Slim Video Wall Monitor
User’s Guide
Page 1
40
4040
40””””/46
/46/46
/46””””/46
/46/46
/46””””HB
HBHB
HB
Slim Video Wall
Slim Video Wall Slim Video Wall
Slim Video Wall Monitor
MonitorMonitor
Monitor
User’s Guide
PrimeView Inc.
http://www.primeview.biz
Notice
Contents of this document can be changed without any notice for the purpose of functional improvement.
Making a copy of contents and distribution is not allowed without any permission by PRIMEVIEW, Inc!
Copyright is owned by PRIMEVIEW, Inc.
Page 2
40”/46”/46”HB Slim Video Wall Monitor
User’s Guide
Page 2
Table of Contents
PRECAUTION ...................................................................................................... 3
INCLUDING ........................................................................................................ 6
S
UPPLIED ACCESSORIES
.................................................................................................................... 6
R
EMOTE CONTROLLER
....................................................................................................................... 6
OPERATIONS ...................................................................................................... 7
C
ONNECTION DETAILS
...................................................................................................................... 7
I
NTERFACE DESCRIPTION
................................................................................................................... 7
I
NFRA-RED REMOTE CONTROLLER
......................................................................................................... 8
F
RONT PANEL
LED O
PERATIONS
........................................................................................................... 9
F
RONT PANEL KEY DESCRIPTIONS
......................................................................................................... 9
MENU OPERATION ............................................................................................ 10
BASIC OPERATION ..................................................................................................................... 11
ON S
CREEN MENUS SELECTION AND ADJUSTMENT
................................................................................... 12
S
ELECT VIDEO INPUT
..................................................................................................................... 13
P
ICTURE MENU OPTIONS
................................................................................................................. 14
S
OUND MENU OPTIONS
(AV E
XTENSION
) ............................................................................................. 19
S
ETUP MENU OPTIONS
.................................................................................................................... 22
SPECIFICATIONS & RATINGS ........................................................................... 31
S
PECIFICATIONS
........................................................................................................................... 31
S
UPPORTED VIDEO TIMING
............................................................................................................... 33
M
ECHANICAL DIMENSION
................................................................................................................. 34
TROUBLE SHOOTING ........................................................................................ 36
SERIAL CONTROL PROTOCOL ........................................................................... 38
S
ERIAL SETUP
.............................................................................................................................. 38
P
ROTOCOLS
................................................................................................................................. 38
C
ONTROL COMMAND PACKET
............................................................................................................. 40
S
YSTEM PARAMETER DIRECT SETTINGS/READ PACKET
............................................................................... 41
C
ONTROL EXAMPLES AT MASTER
PC .................................................................................................... 43
Page 3
40”/46”/46”HB Slim Video Wall Monitor
User’s Guide
Page 3
Precaution
Before operating the set, please read this manual carefully.
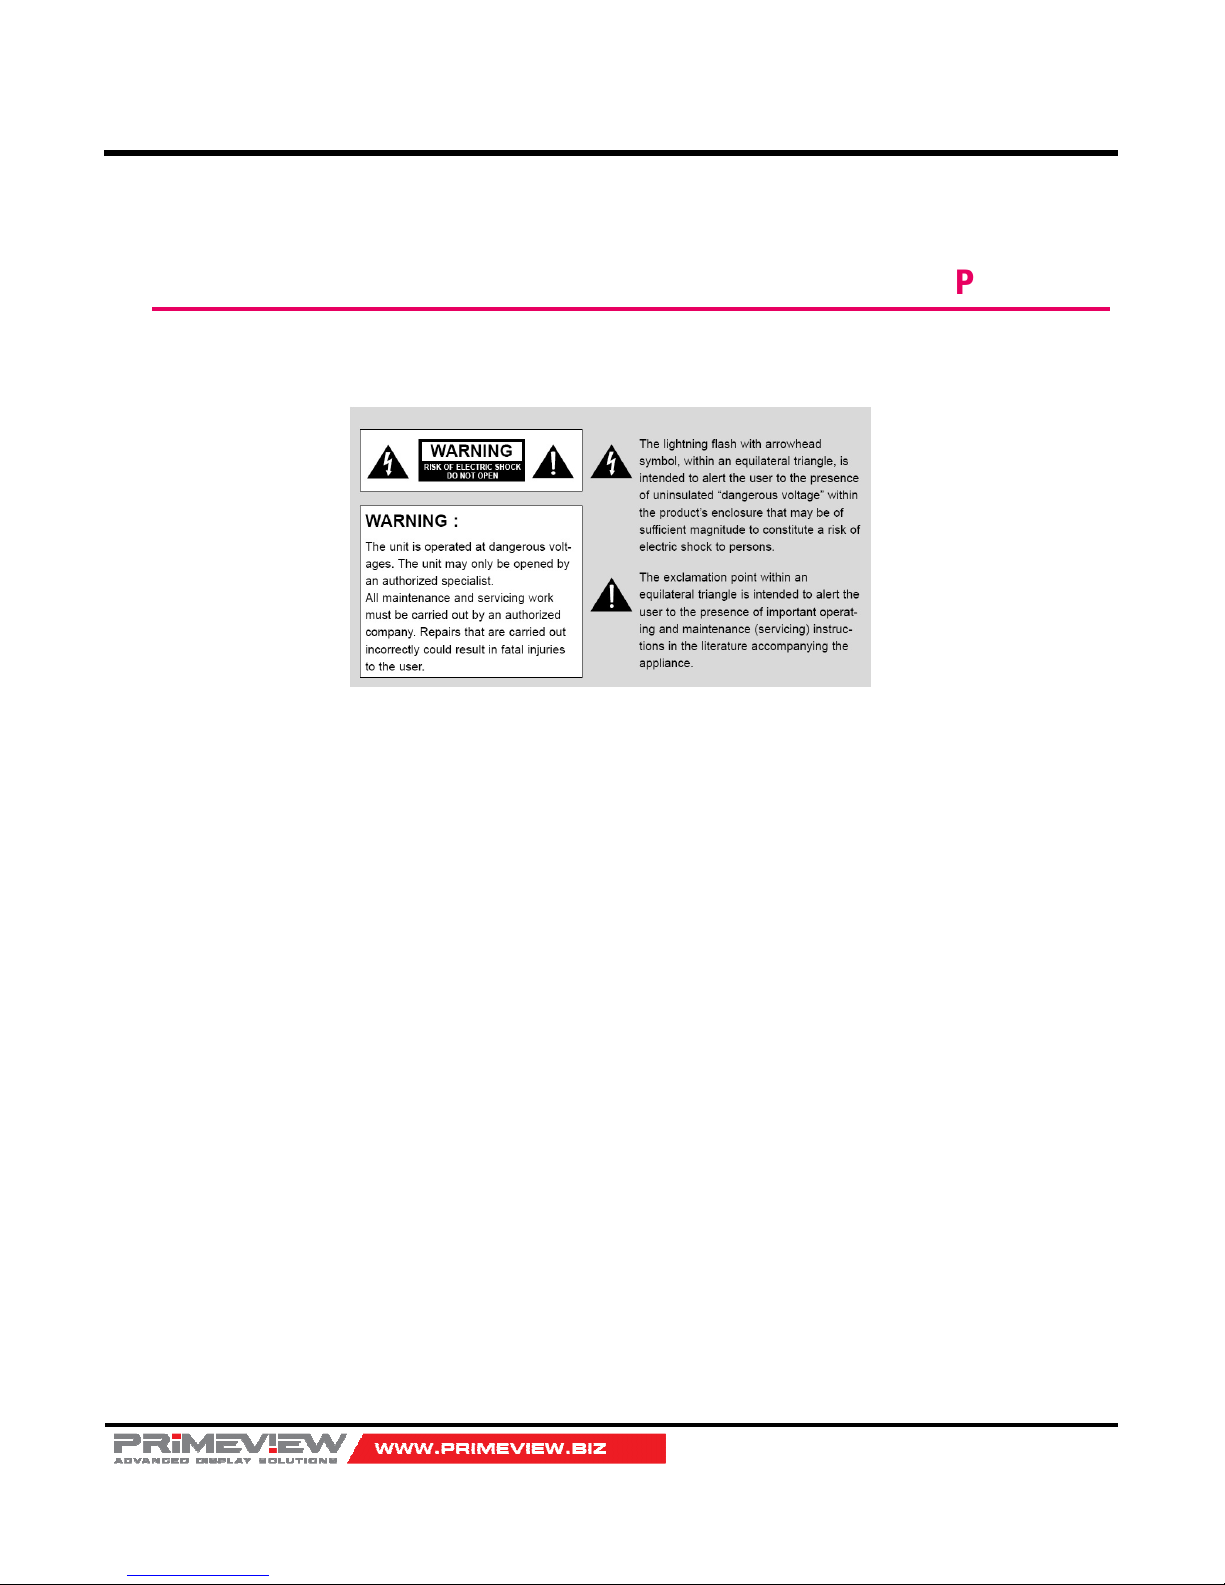
WARNING:
To reduce the risk of electric shock does not remove cover (or back). No user serviceable parts inside. Refer servicing to
qualified service personnel. To prevent fire or shock hazard, do not expose the rear of the set to rain or moisture. Do not
rub or strike the Active Matrix LCD with anything hard as this may scratch, mark, or damage the Active Matrix LCD
permanently.
CAUTION:
Unauthorized tampering with the inside of the monitor invalidates the warranty.
The manufacturer shall not warrant for any damage caused by improper maintenance and/or repair work by third parties.
Important safeguards for you and your new product:
Your product has been manufactured and tested with your safety in mind. However, improper use can result in potential
electrical shock or fire hazards. To avoid defeating the safeguards that have been built into your new product, please read
and observe the following safety points when installing and using your new product and save them for future reference.
1. Read Instructions
2. Follow Instructions
All operating and use instructions should be followed.
3. Retain Instructions
The safety and operating instructions should be retained for future reference.
4. Heed Warnings
All warnings on the product and in the operating instructions should be adhered to.
5. Cleaning
Disconnect the unit from the electricity supply before cleaning. Do not use abrasive cleaners. Use a damp cloth
for cleaning.
6. Water and Moisture
Do not use this apparatus near water.
7. Transporting Product
Page 4
40”/46”/46”HB Slim Video Wall Monitor
User’s Guide
Page 4
A product and cart combination should be moved with care. Quick stops, excessive force and uneven surfaces
may cause the product and cart combination to overturn.
8. Attachments
Do not use attachments not recommended by PRIMEVIEW, Inc. as they may cause hazards.
9. Ventilation
Do not block any of the ventilation openings.
Install in accordance with the manufacturer’s instructions.
10. Power Sources
This product should be operated only from the type of power source indicated on the marking label. If you are not
sure of the type of power supply to your home, consult your supplying dealer.
11. Power Lead Polarization
This product is equipped with a three-wire grounding-type cord. This is a safety feature. Do not defeat the safety
purpose of the grounding-type cord.
12. Power Cord Protection
Power-supply cords should be routed so that they are not likely to be walked on or pinched by items placed upon
or against them, paying particular attention to cords at plugs, convenience receptacles and the point where they
exit from the product.
13. Outdoor Cable Grounding
If an outside antenna or cable system is connected to the product, be sure the antenna or cable system is
grounded so as to provide some protection against voltage surges and built-up static charges. A “face plate” also
needs to be installed with an isolating capacitor to prevent any damage from static.
14. Lightning
For added protection for this product during a lightning storm, or when it is left unattended and unused for long
periods of time, unplug it from the wall outlet and disconnect the antenna or cable system. This will prevent
possible damage to the product due to lightning and power-line surges.
15. Power Lines
An outside antenna system should not be located in the vicinity of overhead power lines or other electric light or
power circuits, or where it can fall into such power lines or circuits. When installing an outside antenna system,
extreme care should be taken to avoid contact with such power lines or circuits, as contact with them might be
fatal.
16. Earthling the product
This product must be earthed properly to comply with the safety regulations in the country of use. If you are
unsure of these regulations, please consult a qualified electrician.
17. Servicing
Do not attempt to service this product yourself as opening or removing covers may expose you to dangerous
voltages or other hazards. Refer all servicing to qualified service personnel. If the Set does not operate properly,
switch it off and call your dealer.
18. Damage Requiring Service
Isolate this product from the mains supply and refer servicing to qualified service personnel under the following
conditions:
A. If the power-supply cord or plug is damaged.
B. If the glass front has been damaged.
C. If there is ingress of water between the glass and the LCD screen.
D. If the product does not operate normally by following the operating instructions. Adjust only those controls
that are covered by the operating instructions as an improper adjustment of other controls may result in
damage and will often require extensive work by a qualified technician to restore the product to its normal
operation.
Page 5
40”/46”/46”HB Slim Video Wall Monitor
User’s Guide
Page 5
E. If the product has been dropped or the cabinet has been damaged.
F. If the product exhibits a distinct change in performance.
19. Safety Check
Upon completion of any service or repairs to this product, ask the service technician to perform safety checks to
determine that the product is in proper operating condition and the front seal is in tact.
20. Mounting
The product should be mounted on a wall only as recommended in the instructions.
21. Power
This set operates on an AC supply; the voltage is as indicated on the label on the Manual. This appliance must
be earthed at all times through the chassis as well as through the power lead.
22. Location
Do not install on an unstable location with support area smaller than the DID SET.
Please secure enough space for safety use.
Page 6
40”/46”/46”HB Slim Video Wall Monitor
User’s Guide
Page 6
Including
Supplied Accessories
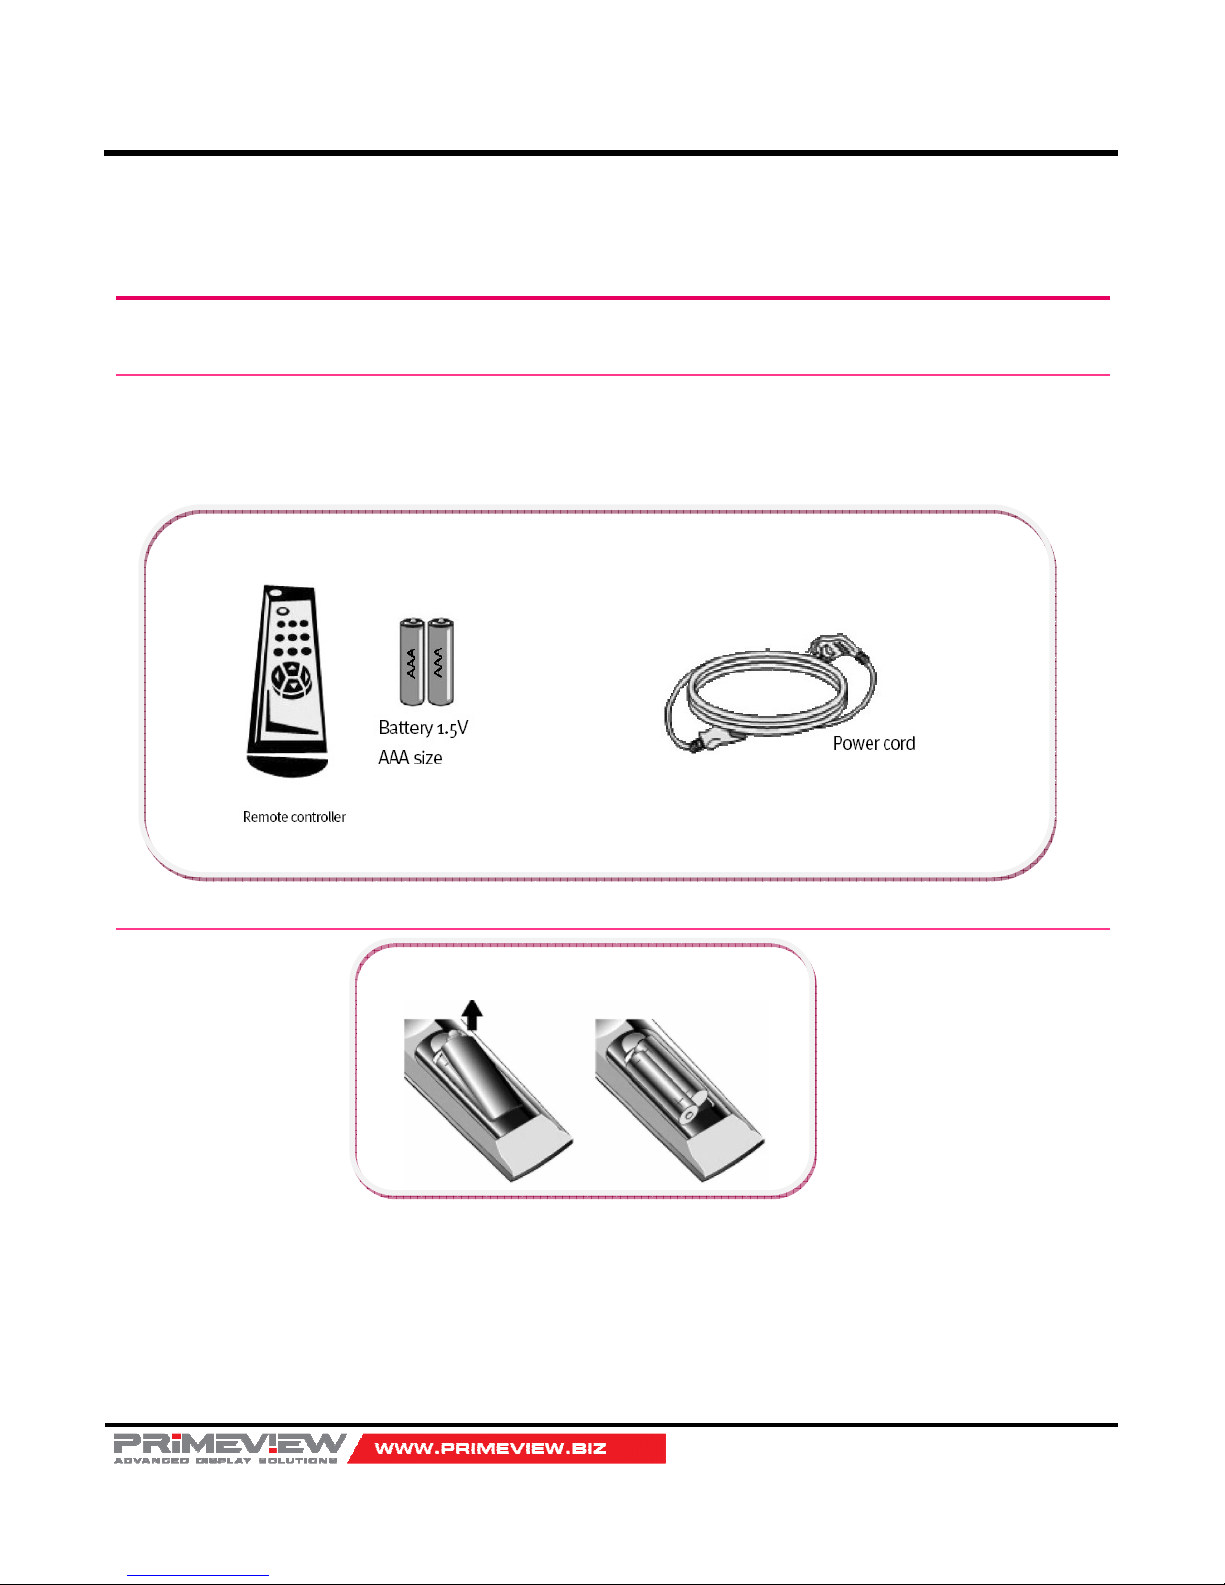
Make sure the following accessories are provided with your product. These should all be included in the box with the main
LCD screen
DEFECT PIXEL THAT CAN BE SEEN ON LCD MONITOR SCREEN
Remote Controller
Remove the rear cover of the remote controller by pressing the arrow Symbol downwards and then
pulling firmly to remove it.
Insert two supplied batteries (1.5V of AAA type).
Ensure that the polarities (+ and -) of the batteries are aligned correctly. Close the cover.
Page 7
40”/46”/46”HB Slim Video Wall Monitor
User’s Guide
Page 7
Operations
Connection Details
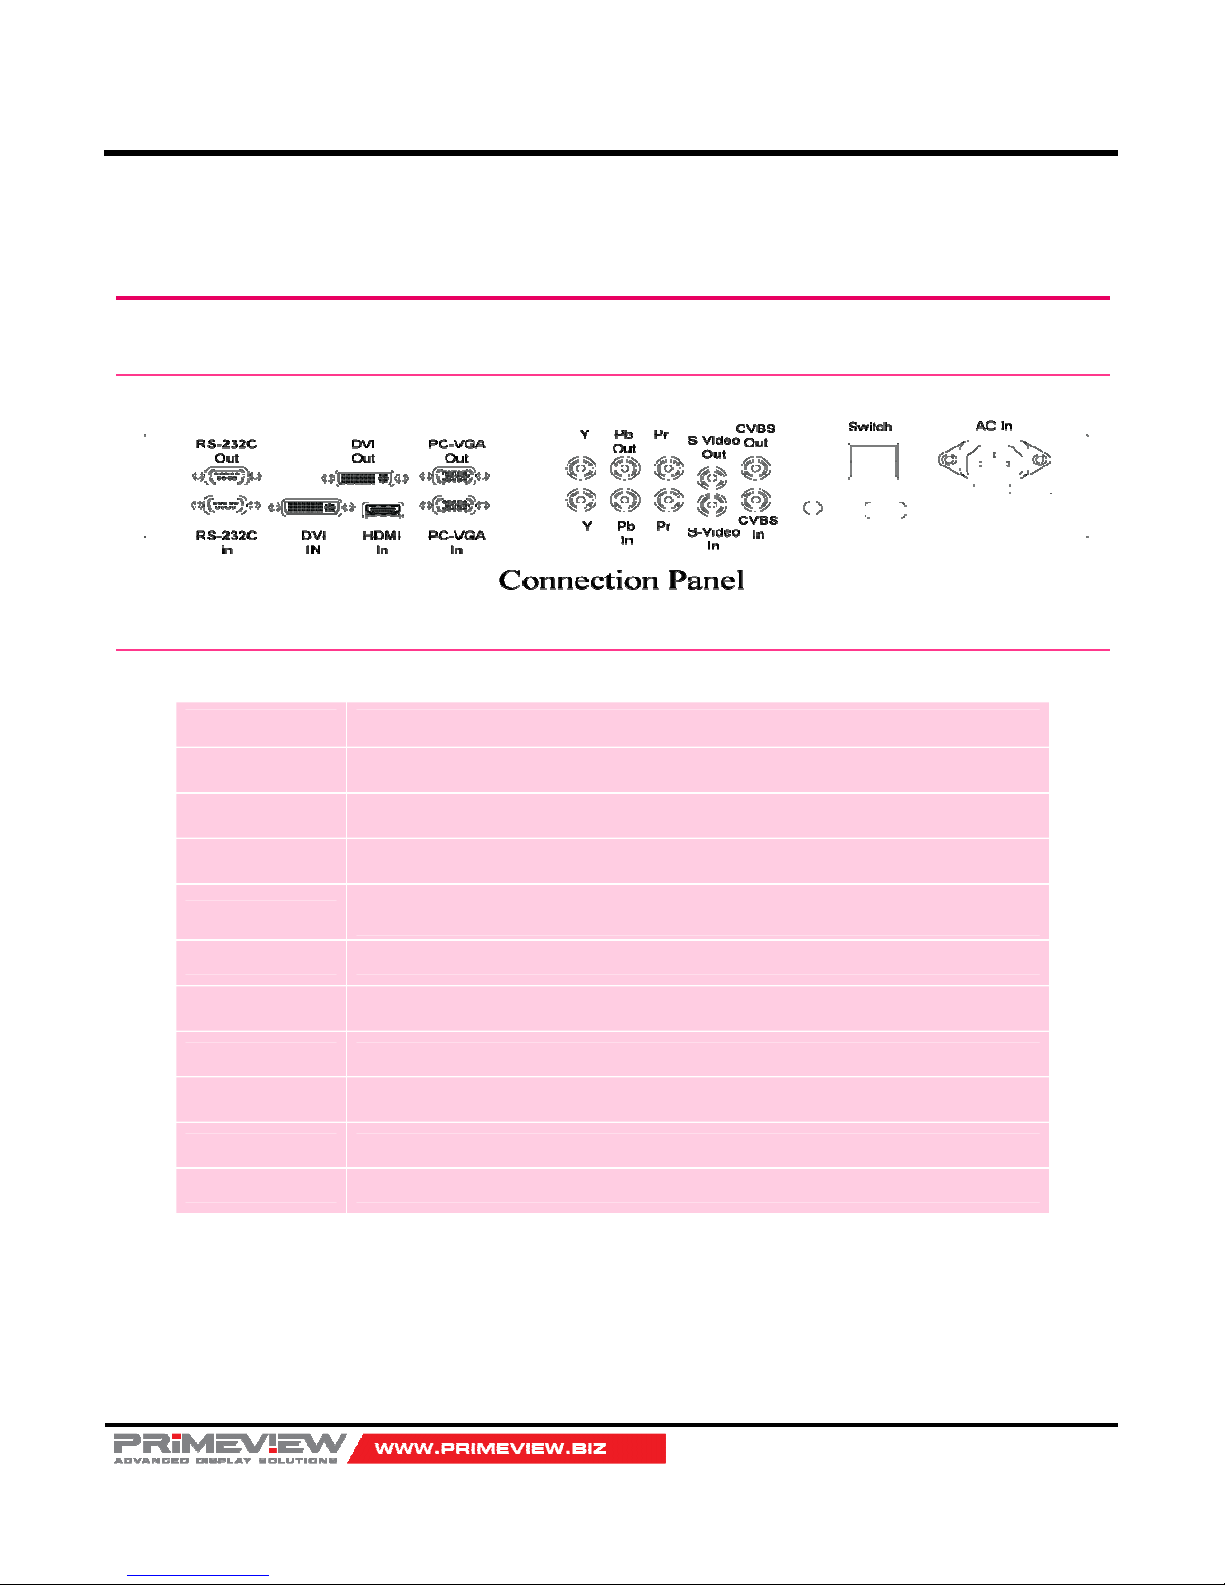
Interface description
Interface Description
AC Inlet AC90V ~ 240V, 50Hz/60Hz
AC Switch Main Isolating Switch
HDMI High Definition Multimedia Input
DVI-I
DVI-I Type Digital / Analog PC Video Input
High Definition Multimedia Input Compatible
SPDIF Optical HDMI Digital Optical Audio Output
RS-232 Facility to control the screen via RS232 protocol
Component Y(RCA green), Pb(RCA blue), Pr(RCA red) Component Video Input
AV1, AV2 CVBS / Composite Input
S-Video Y, C Input
Audio in Each Source Audio Input
Page 8
40”/46”/46”HB Slim Video Wall Monitor
User’s Guide
Page 8
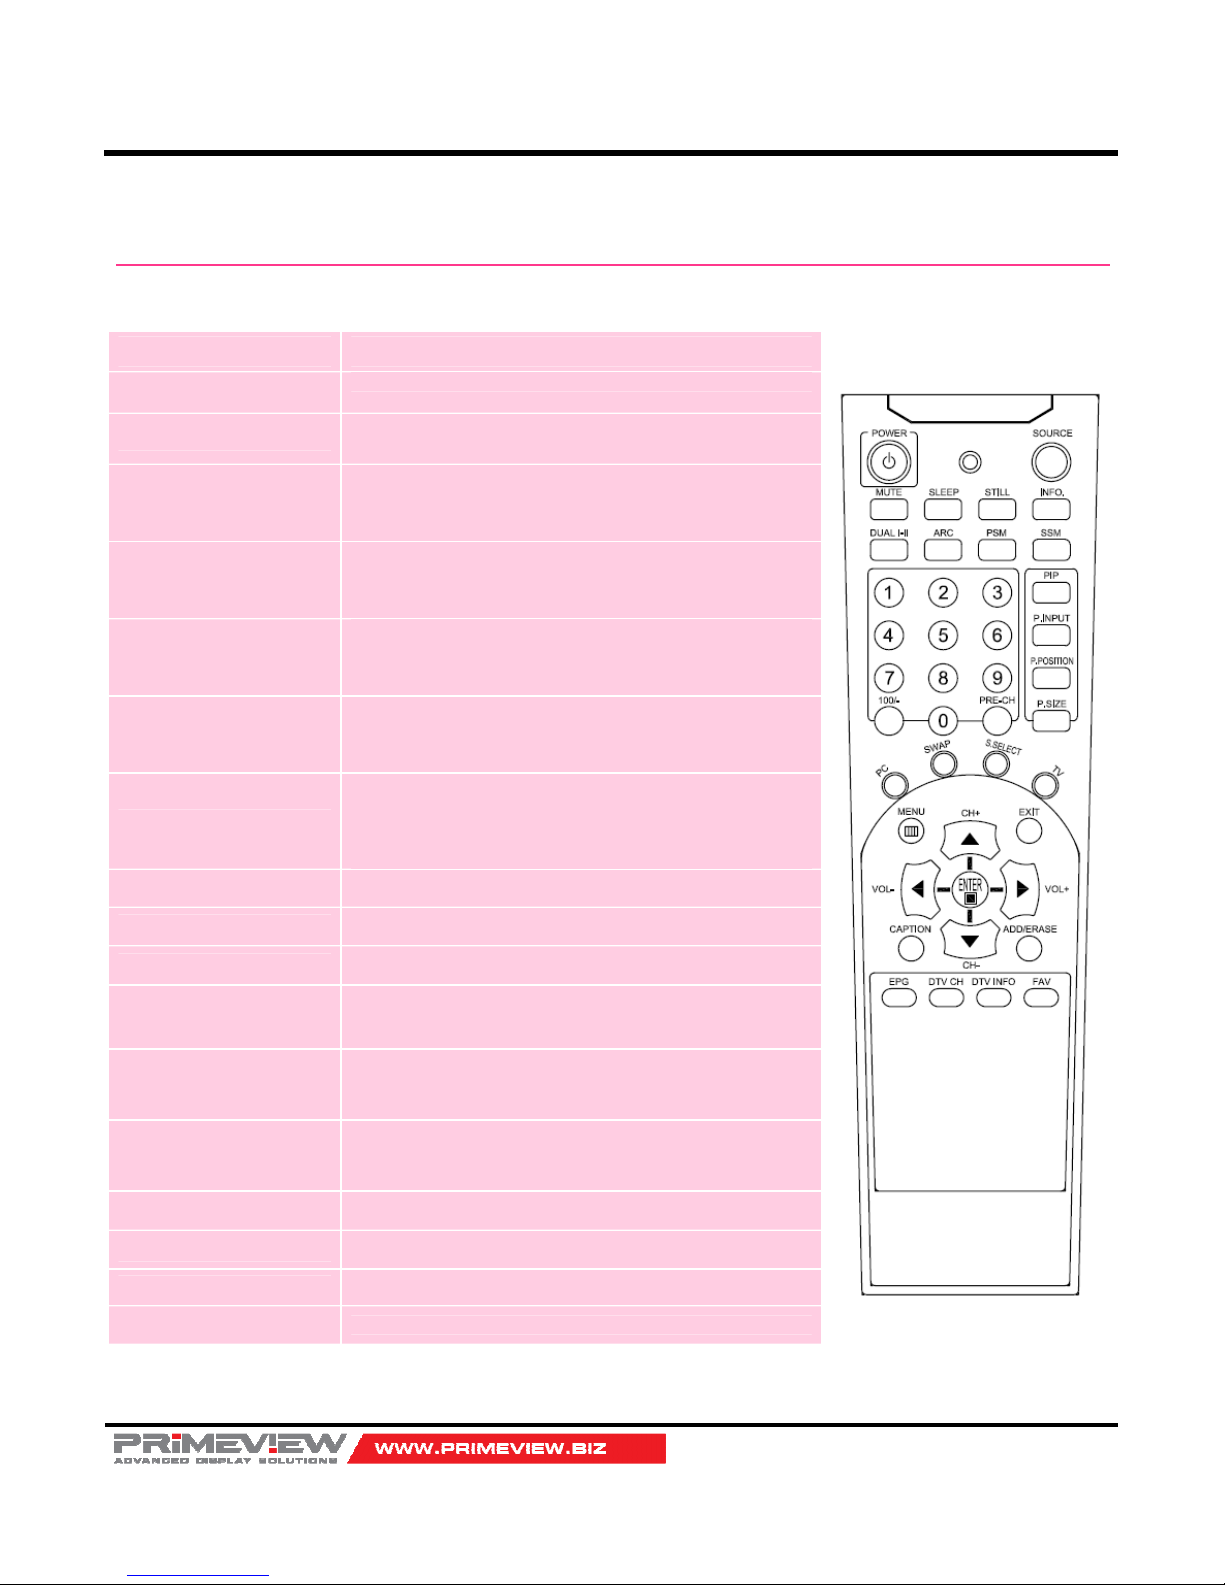
Infra-Red Remote Controller
Key Name Descriptions
Power
Power On/Off
Menu
Activates main OSD menu.
Navigates higher menu in main OSD menu.
Up
Navigates input source.
Executes function (by OSD help commands) in main OSD
menu.
Navigates previous menu in main OSD menu.
Down
Navigates input source.
Executes function (by OSD help commands) in main OSD
menu.
Navigates next menu in main OSD menu.
Right
Increases sound volume of speaker/headphone.
Executes function by OSD help commands in main OSD
menu.
Increases values of user menu in main OSD menu.
Left
Decreases sound volume of speaker/headphone.
Executes function (by OSD help commands) in main OSD
menu.
Decreases values of user menu in main OSD menu.
Enter
Activates OSD menu of input source selecting.
Changes input source by selecting.
Executes functions (by OSD help commands) in main OSD
menu.
Activates Child menu.
EXIT
Exit OSD menu
Info
Displays input source information
Mute
Toggles sound status of speaker/headphone in mute.
Source
Activates OSD of source change.
Deactivates OSD of source change.
PSM
(Picture Standard
Mode)
Selects pre-set picture standard mode.
SSM
(Sound Standard
Mode)
Selects pre-set sound standard mode.
ARC
Selects aspect ratio of display image
STILL
Toggles picture status between motion and still image.
Dual I-II / MTS
Selects mono/stereo sound.
PC
Selects input source of PC.
Page 9
40”/46”/46”HB Slim Video Wall Monitor
User’s Guide
Page 9
Front panel LED Operations
Status Color Operation
Power Off Red On
Normal Green On
Power Save Red Blinking
No Signal Green Blinking
Front Panel Key Descriptions
Key Name Operation
Power Key
Power On/Off.
Menu Key
Activates main OSD menu.
Navigates higher menu in main OSD menu.
Select Key
Activates OSD menu of input source selecting.
Changes input source by selecting.
Executes functions (by OSD help commands) in main OSD menu.
Activates Child menu.
Up Key
Navigates input source.
Executes function (by OSD help commands) in main OSD menu.
Navigates previous menu in main OSD menu.
Down Key
Navigates input source.
Executes function (by OSD help commands) in main OSD menu.
Navigates next menu in main OSD menu.
Left Key
Decreases sound volume of speaker/headphone.
Executes function (by OSD help commands) in main OSD menu.
Decreases values of user menu in main OSD menu.
Right Key
Increases sound volume of speaker/headphone.
Executes function by OSD help commands in main OSD menu.
Increases values of user menu in main OSD menu.
Page 10
40”/46”/46”HB Slim Video Wall Monitor
User’s Guide
Page 10
Menu Operation
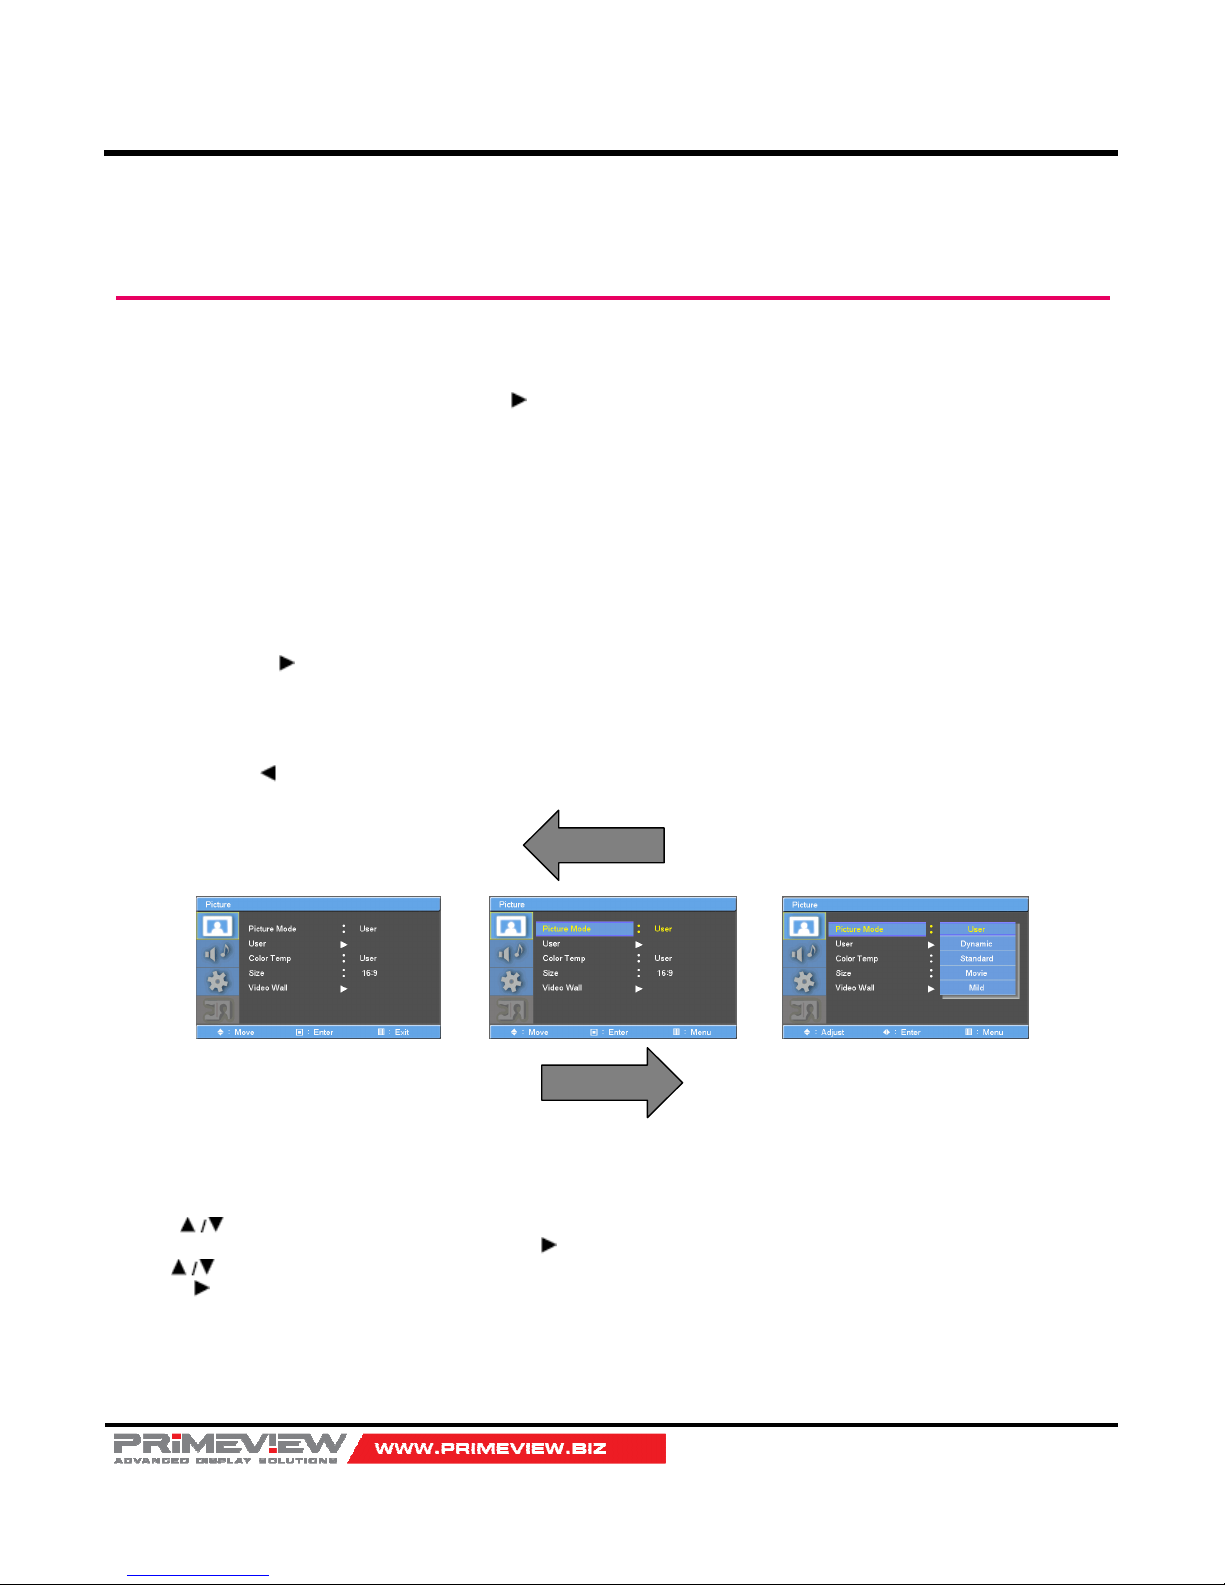
In this menu system, there are several ways to customize the menu settings provided.
Most menus consist of three levels to set up the options, but some require greater depth for the variety of settings. If you
press the MENU button, only the first and second level of the menu system will appear on the monitor screen. The third
level can be displayed by pressing SELECT (or ). If a menu has more than three levels, the pop-up dialogue box will be
displayed as the fourth or fifth level.
To show and remove the Menu:
Press the MENU button on the Remote Control to display the menu. A second press of the MENU button or a press of the
EXIT button will take you back to monitor viewing.
To go to the next level:
Press SELECT (or ) on the Remote Control.
To go back to the previous level:
Press MENU (or ) on the Remote Control.
Typical Menu Operation
1. Press MENU button: The main menu will appear.
2. Use to select the desired menu option (icon).
3. While the desired menu option is selected, press or (SELECT) to move to the second level.
4. Use to select the second menu option.
5. Press or (SELECT) to move to the third level: Some menu options require additional steps.
6. Press MENU to return to the previous menu or press EXIT on the Remote Control to return to monitor viewing.
Page 11
40”/46”/46”HB Slim Video Wall Monitor
User’s Guide
Page 11
BASIC OPERATION
Turning On the Monitor
1. First, connect power cord correctly. At this moment, the monitor switches to standby or power on mode. In standby
mode, in order to turn monitor on, press the POWER button on the remote control.
2. Select the viewing source by using SOURCE button on the remote control.
Volume Adjustment (A/V extension option)
1. Press the VOL+/- button to adjust the volume.
2. If you want to switch the sound off, press the MUTE button on the remote control.
3. You can cancel this function by pressing the MUTE or VOL+/- button.
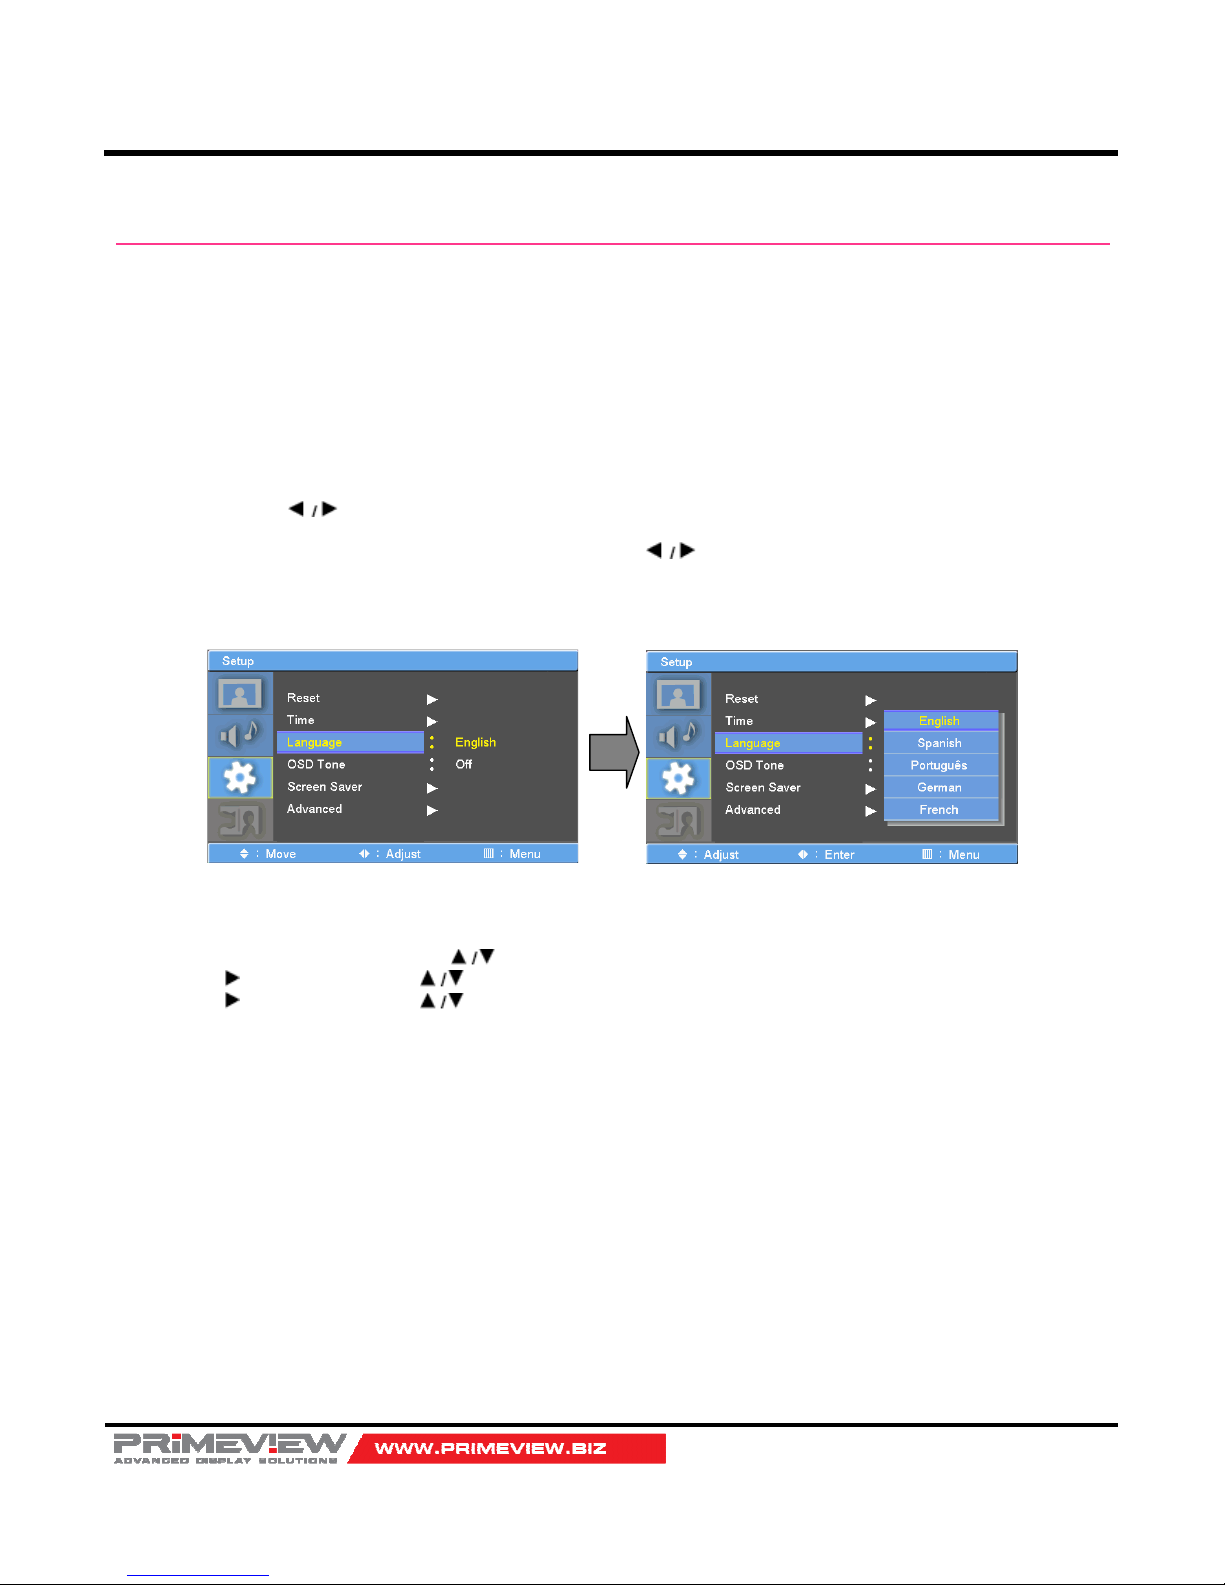
On Screen Menu’s Language Selection
- The menus can be shown on the screen in the selected language. First select your language.
1. Press the MENU button and then use button to select the SETUP icon.
2. Press the button and then use button to select Menu Language menu.
3. Press the button and then use button to select your desired language:
From this point on, the on-screen menus will be shown in the selected language.
4. Press EXIT button to return to monitor viewing or press MENU button to return to the previous menu.
Page 12
40”/46”/46”HB Slim Video Wall Monitor
User’s Guide
Page 12
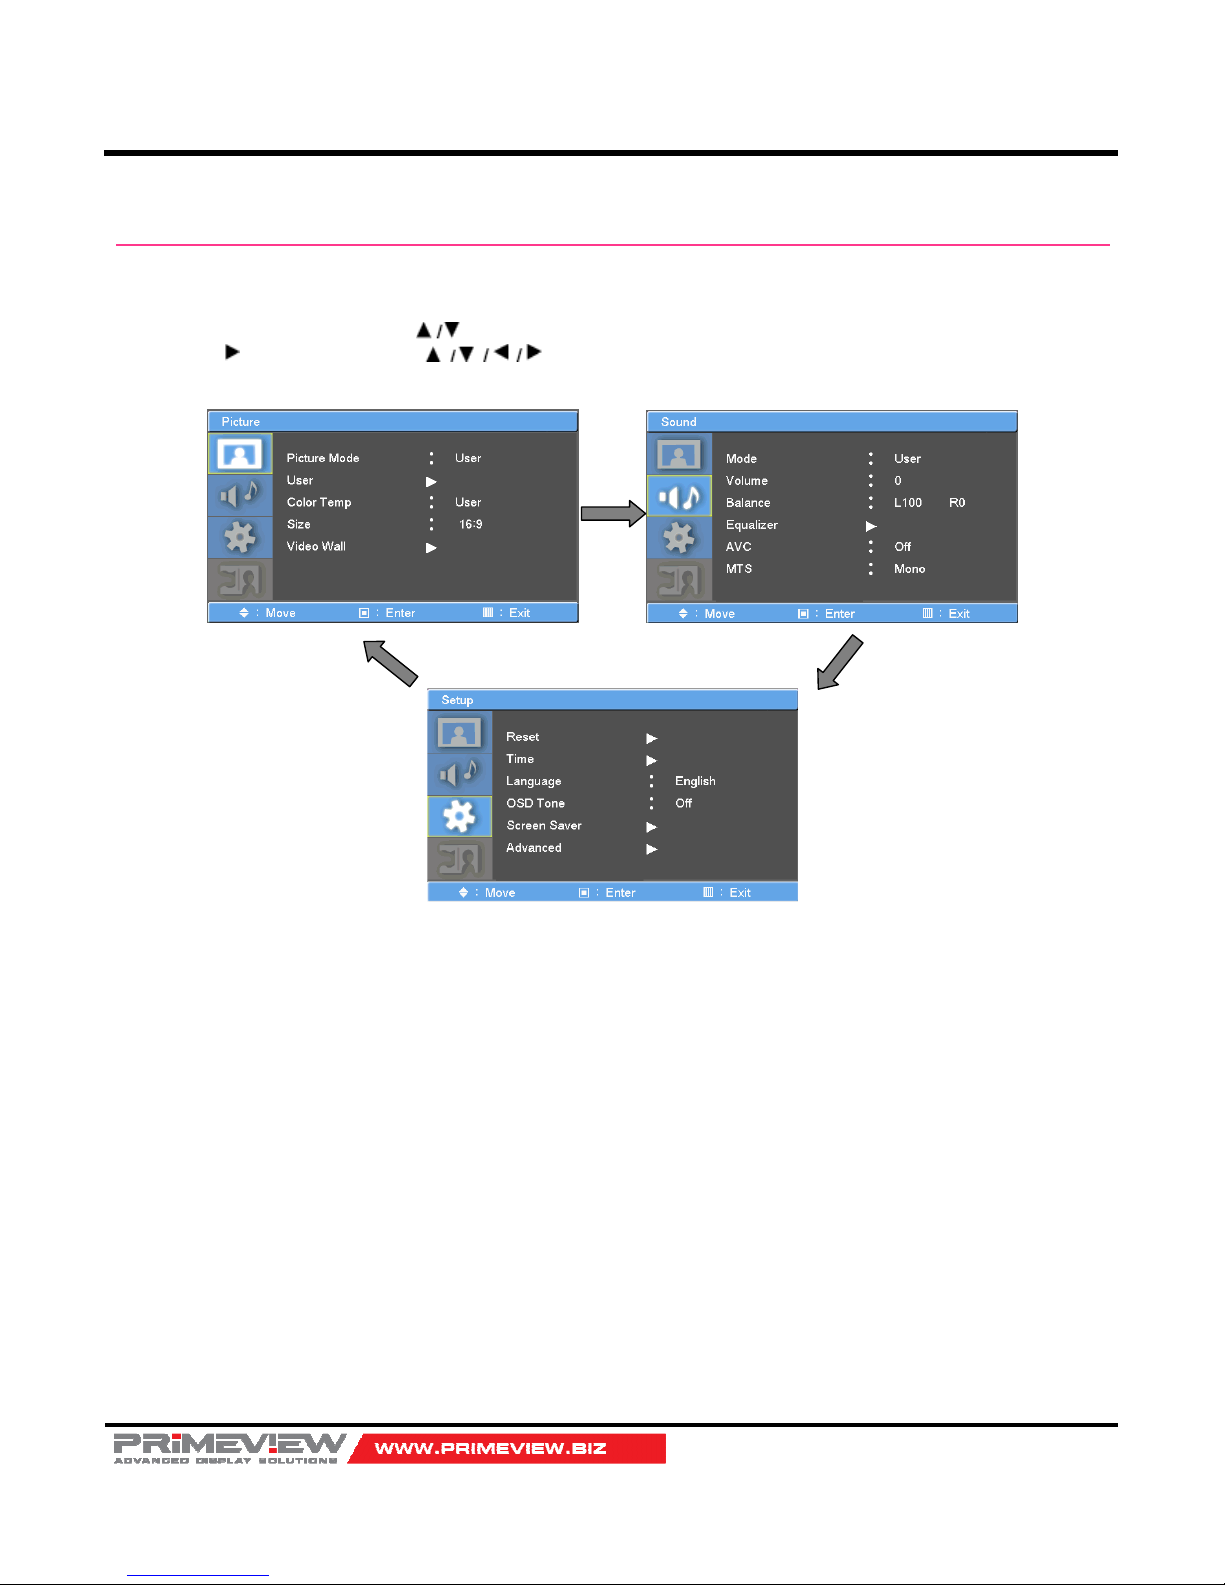
On Screen Menus Selection and Adjustment
How to adjust the OSD screen
1. Press the MENU button and then button to select each menu.
2. Press the button and then use button to display the available menus.
• Your monitor's OSD (On Screen Display) may differ slightly from what is shown in this manual.
Page 13
40”/46”/46”HB Slim Video Wall Monitor
User’s Guide
Page 13
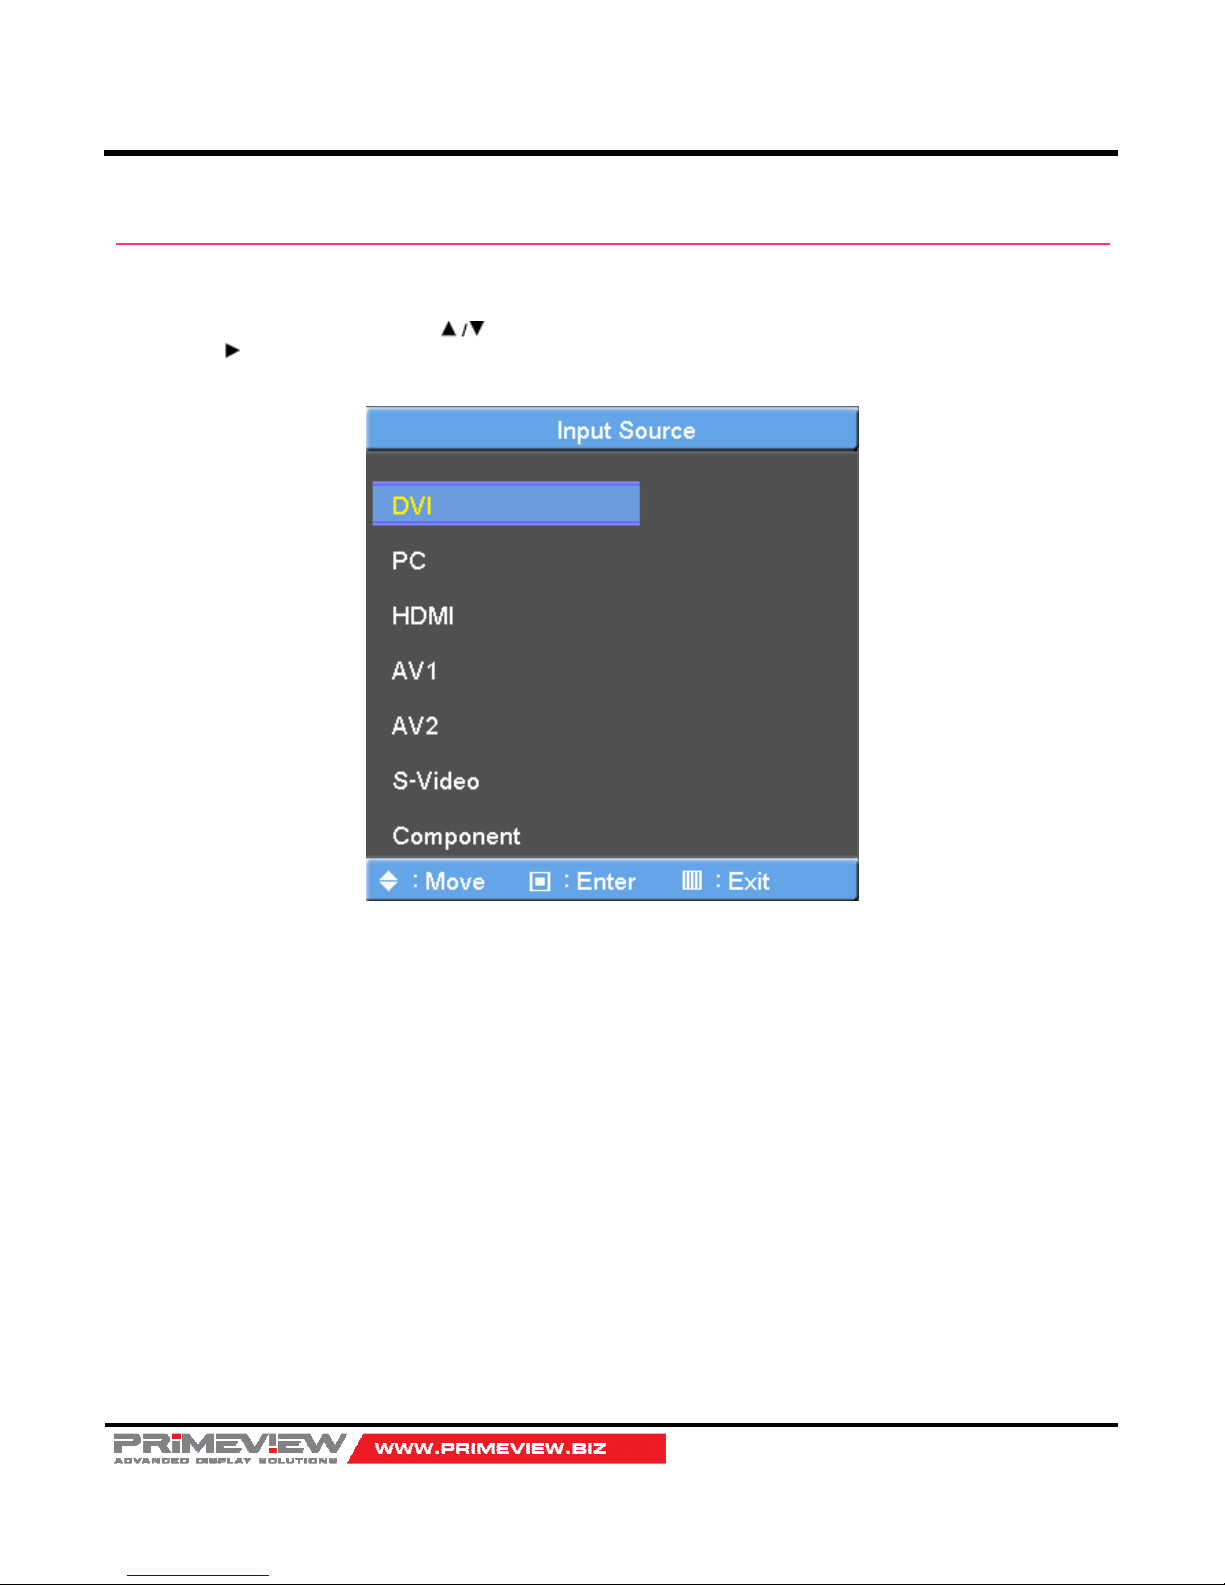
Select Video Input
How to Select Video Source by OSD (AV extension option)
1. Press the SOURCE button and then button to select each video source.
2. Press the / SELECT button to go to desired video source
How to Select Video Source Directly (in case of no AV Extension)
1. Press the SOURCE button.
2. Whenever pressing the SOURCE button, monitor will show and change the current video source.
3. When the video source changes as desired, stop pressing the SOURCE button.
Page 14
40”/46”/46”HB Slim Video Wall Monitor
User’s Guide
Page 14
Picture Menu Options
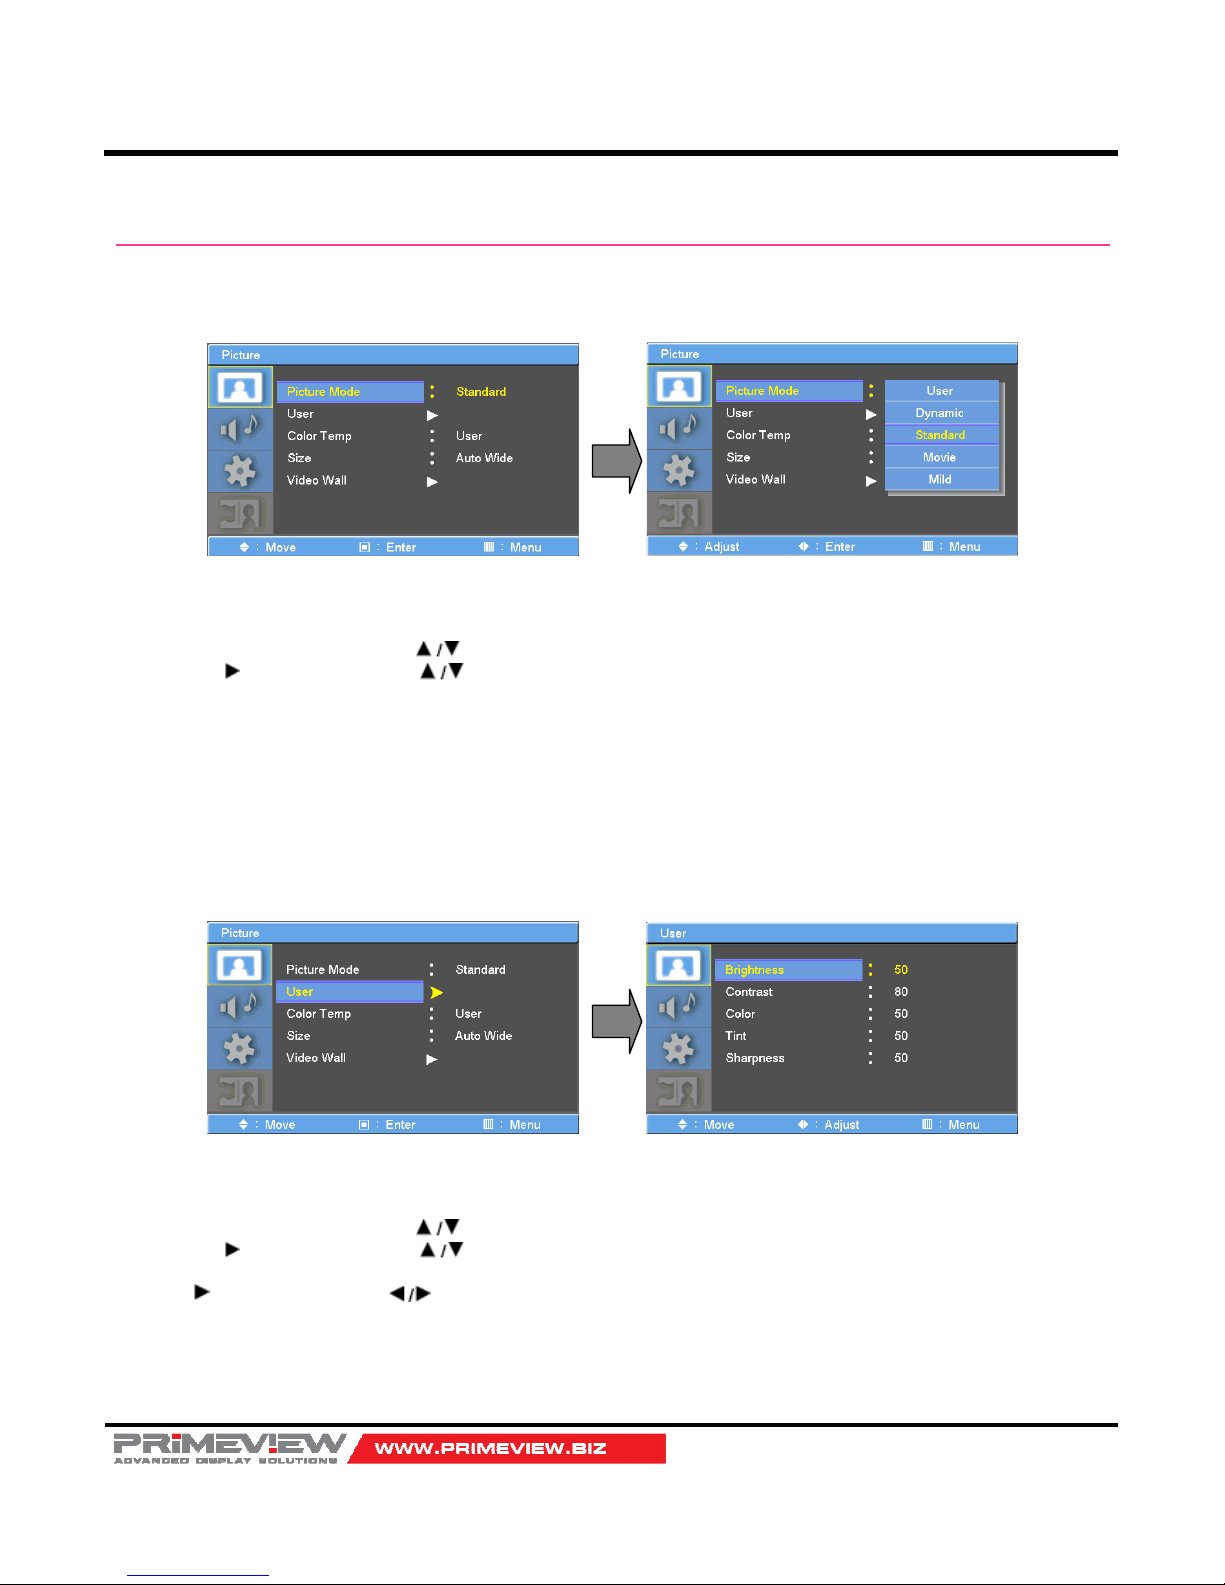
Picture Mode
- Select the picture appearance to suit your preference and viewing situations.
1. Press the MENU button and then button to select the PICTURE icon.
2. Press the button and then use button to select the desired picture option;
User, Dynamic, Standard, Movie, Mild.
3. Press EXIT button to return to monitor viewing or press MENU button to return to the previous menu.
User Control
- Adjust the picture appearance to suit your preference and viewing situations.
1. Press the MENU button and then button to select the PICTURE icon.
2. Press the button and then use button to select the desired picture option;
Contrast, Brightness, Sharpness (All Sources),Color (Video/Component), Tint(NTSC), Phase(Component).
3. Press button and then use button to make appropriate adjustments.
4. Press EXIT button to return to monitor viewing or press MENU button to return to the previous menu.
Page 15
40”/46”/46”HB Slim Video Wall Monitor
User’s Guide
Page 15
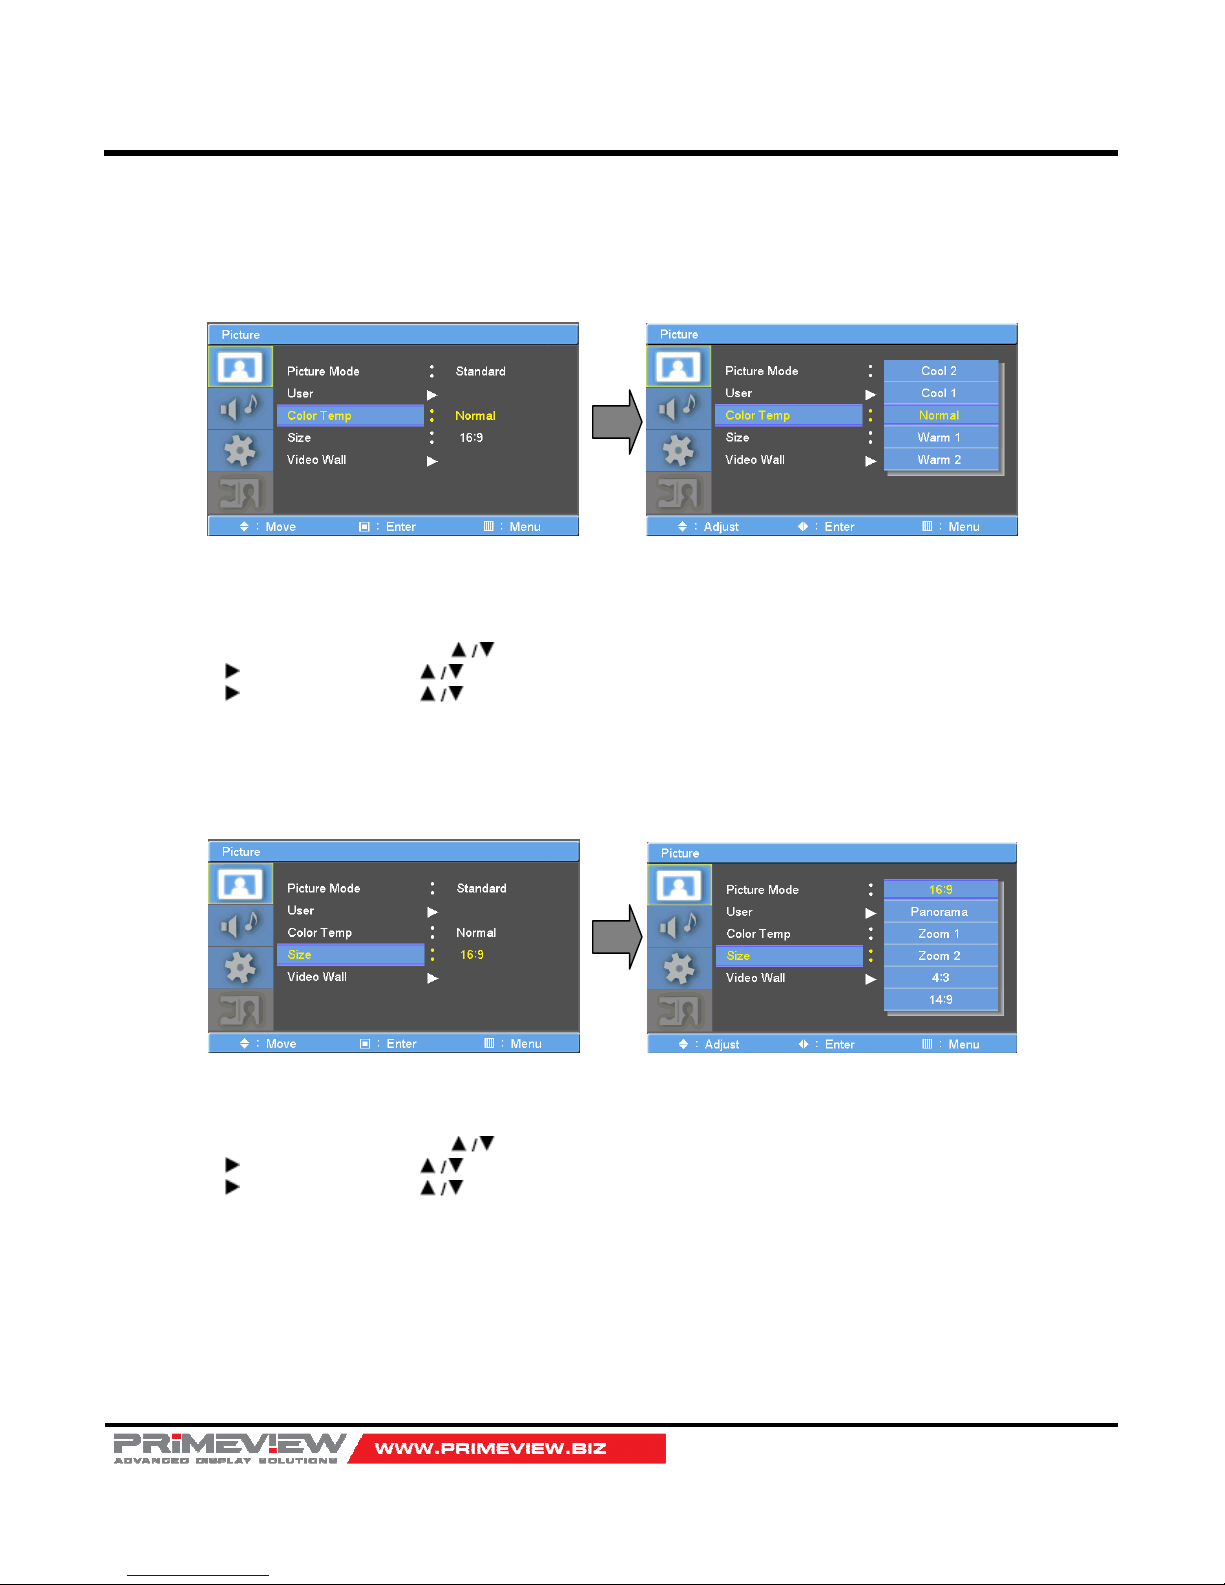
Color Temperature Control
- Choose one of five automatic color adjustments. Set to warm to enhance hotter colors such as red, or set to cool to see
less intense colors with more blue.
1. Press the MENU button and then use button to select the PICTURE icon.
2. Press the button and then use button to select Color Temperature menu.
3. Press the button and then use button to select desired option:
Cool2, Cool1, Normal, Warm1, Warm2.
4. Press EXIT button to return to monitor viewing or press MENU button to return to the previous menu.
Aspect Ratio
- Selects the screen format.
1. Press the MENU button and then use button to select the PICTURE icon.
2. Press the button and then use button to select Aspect Ratio menu.
3. Press the button and then use button to select desired option:
For Video Input - 16:9, Panorama, Zoom1, Zoom2, 4:3, 14:9.
For DVI/PC Input - 16:9, 4:3, 1:1.
4. Press EXIT button to return to monitor viewing or press MENU button to return to the previous menu.
Page 16
40”/46”/46”HB Slim Video Wall Monitor
User’s Guide
Page 16
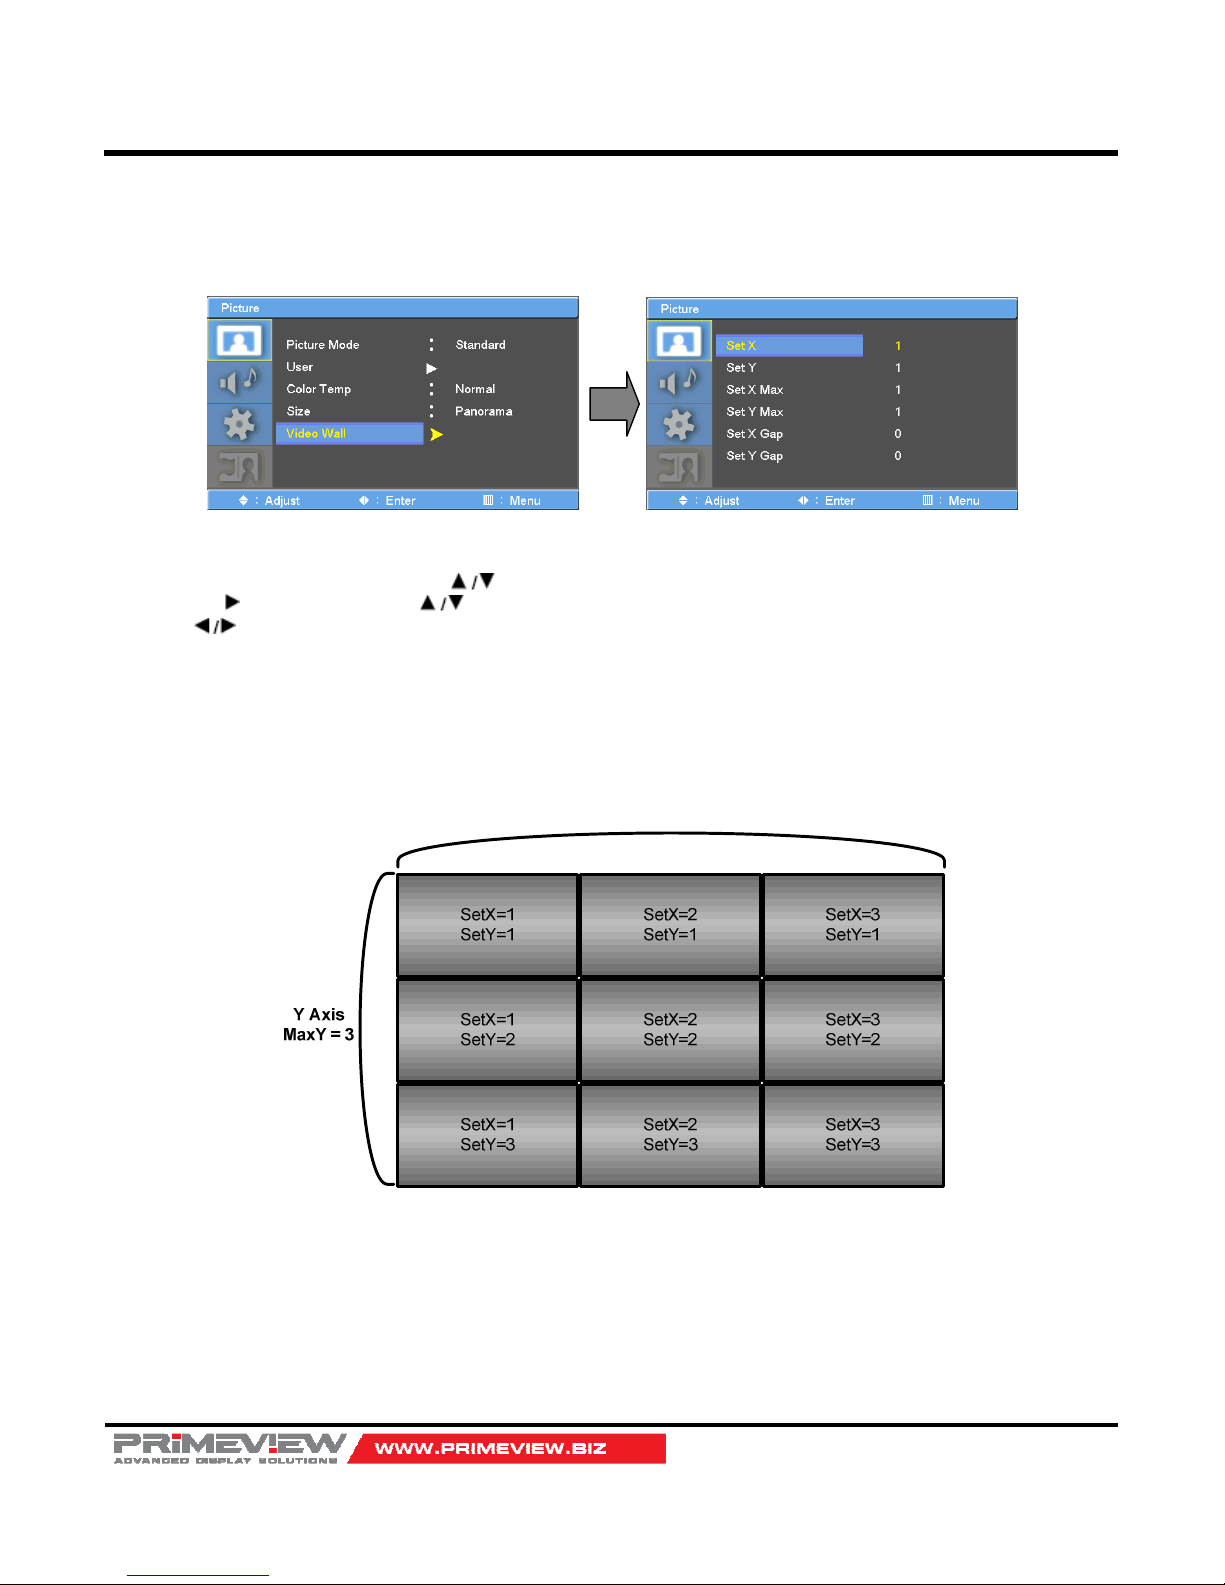
Video Wall
- For quick reset of all the Video menu options to their original factory preset values.
1. Press the MENU button and then use button to select the PICTURE icon.
2. Press the button and then use button to select Video Wall menu.
3. Press button to make appropriate adjustments.
4. Press EXIT button to return to monitor viewing or press MENU button to return to the previous menu.
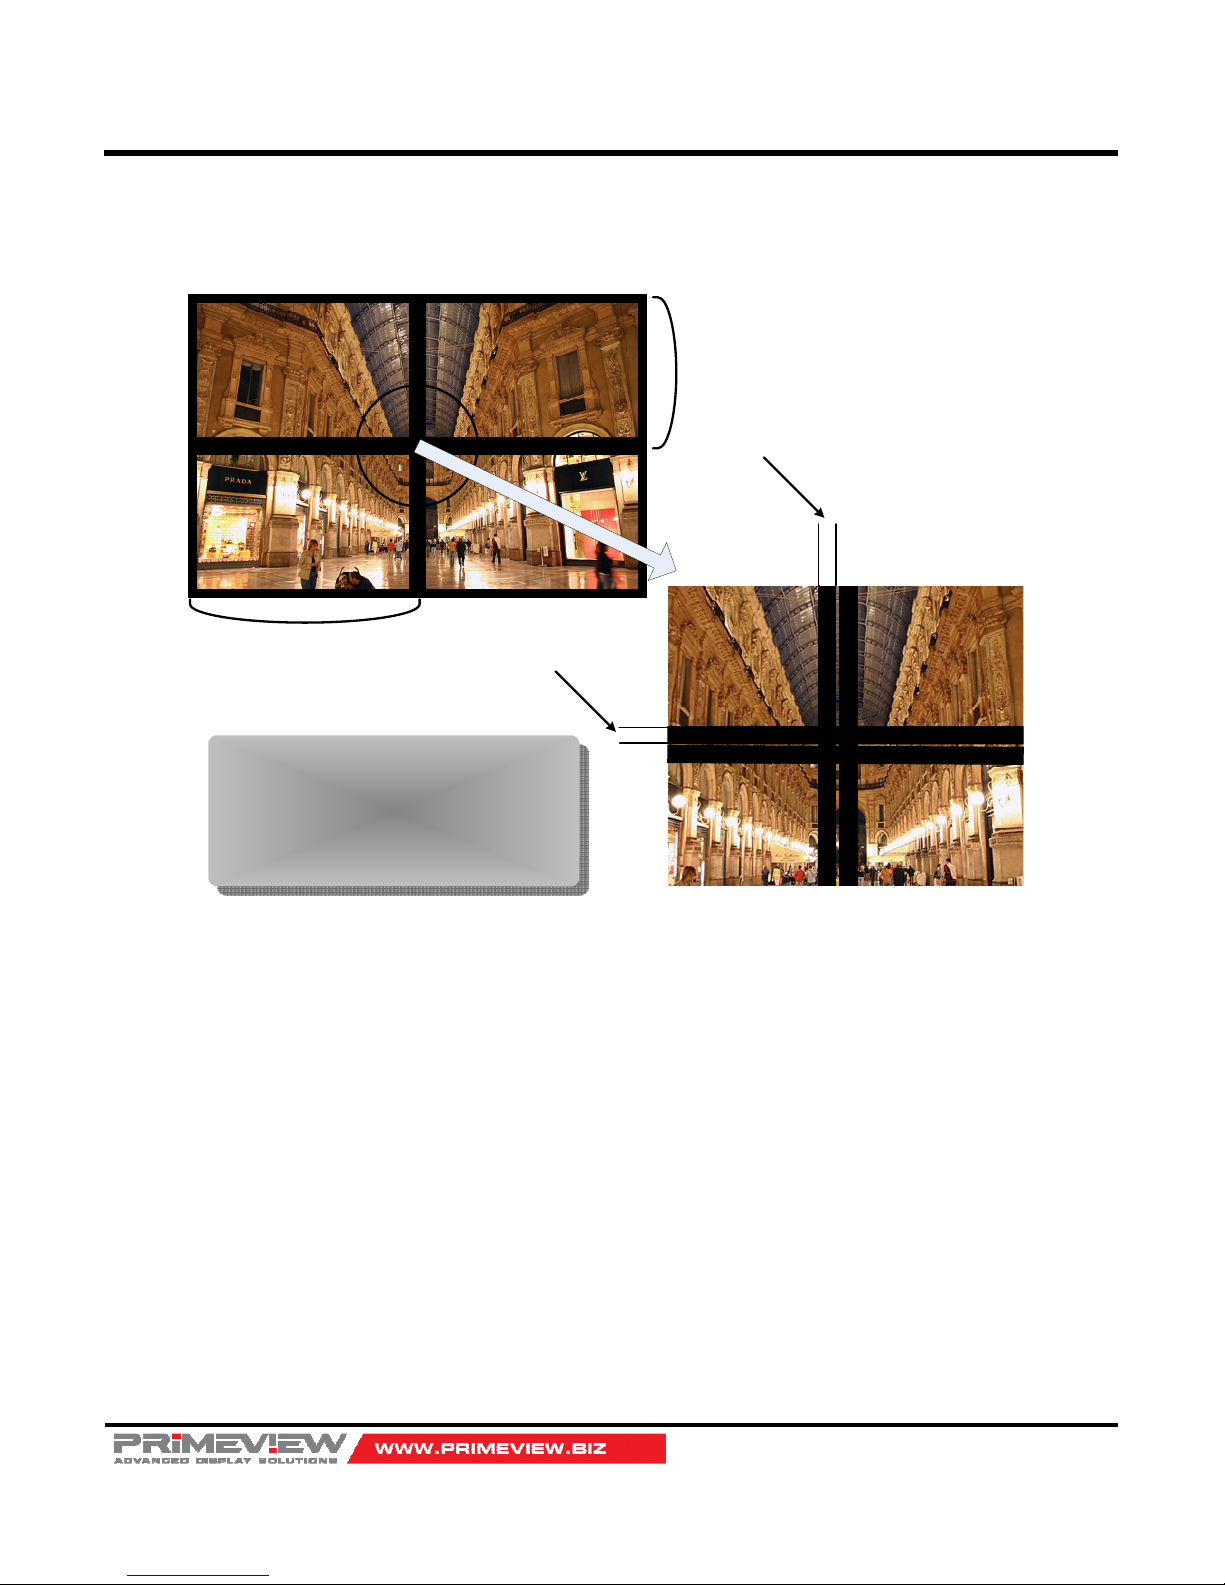
Video Wall Layout Settings
X Axis
MaxX = 3
X Max : Maximum number of column tiles to divide video image.
Y Max : Maximum number of row tiles to divide video image.
Set X : Coordinate of video image’s column position.
Set Y : Coordinate of video image’s row position.
Page 17
40”/46”/46”HB Slim Video Wall Monitor
User’s Guide
Page 17
Setting the Bezel Corrections for Natural Tiled Image
Panel Y
Panel X
Bezel X
Bezel Y
X Gap (‰) = 1000 x Bezel X / Panel X
Y Gap (‰) = 1000 x Bezel Y / Panel Y
Bezel Correction
for Natural Video Wall Settings
X Gap : Proportional Value of Vertical Bezel to Panel size by Per-mil unit.
Y Gap : Proportional Value of Horizontal Bezel to Panel size by Per-mil unit.
Page 18
40”/46”/46”HB Slim Video Wall Monitor
User’s Guide
Page 18
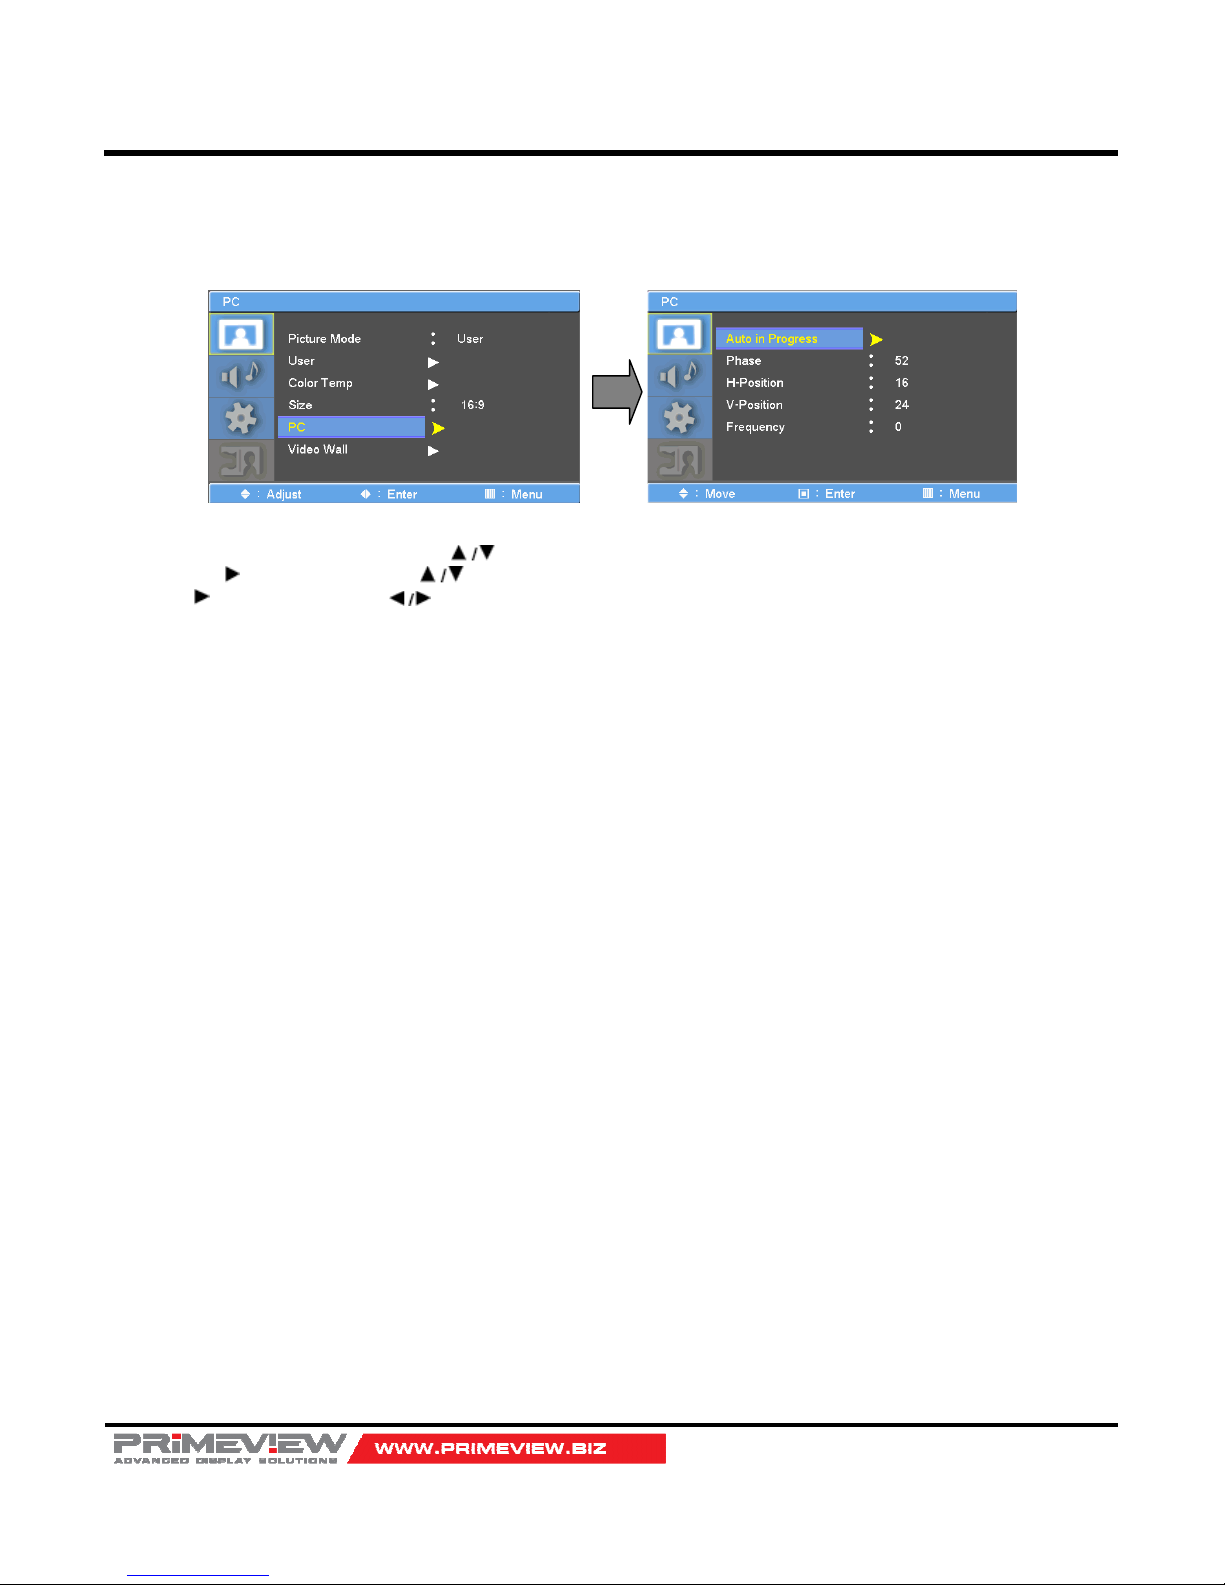
PC Menu
1. Press the MENU button and then use button to select the PICTURE icon.
2. Press the button and then use button to select PC Menu.
3. Press button and then use button to make appropriate adjustments.
4. Press EXIT button to return to monitor viewing or press MENU button to return to the previous menu.
Page 19
40”/46”/46”HB Slim Video Wall Monitor
User’s Guide
Page 19
Sound Menu Options (AV Extension)
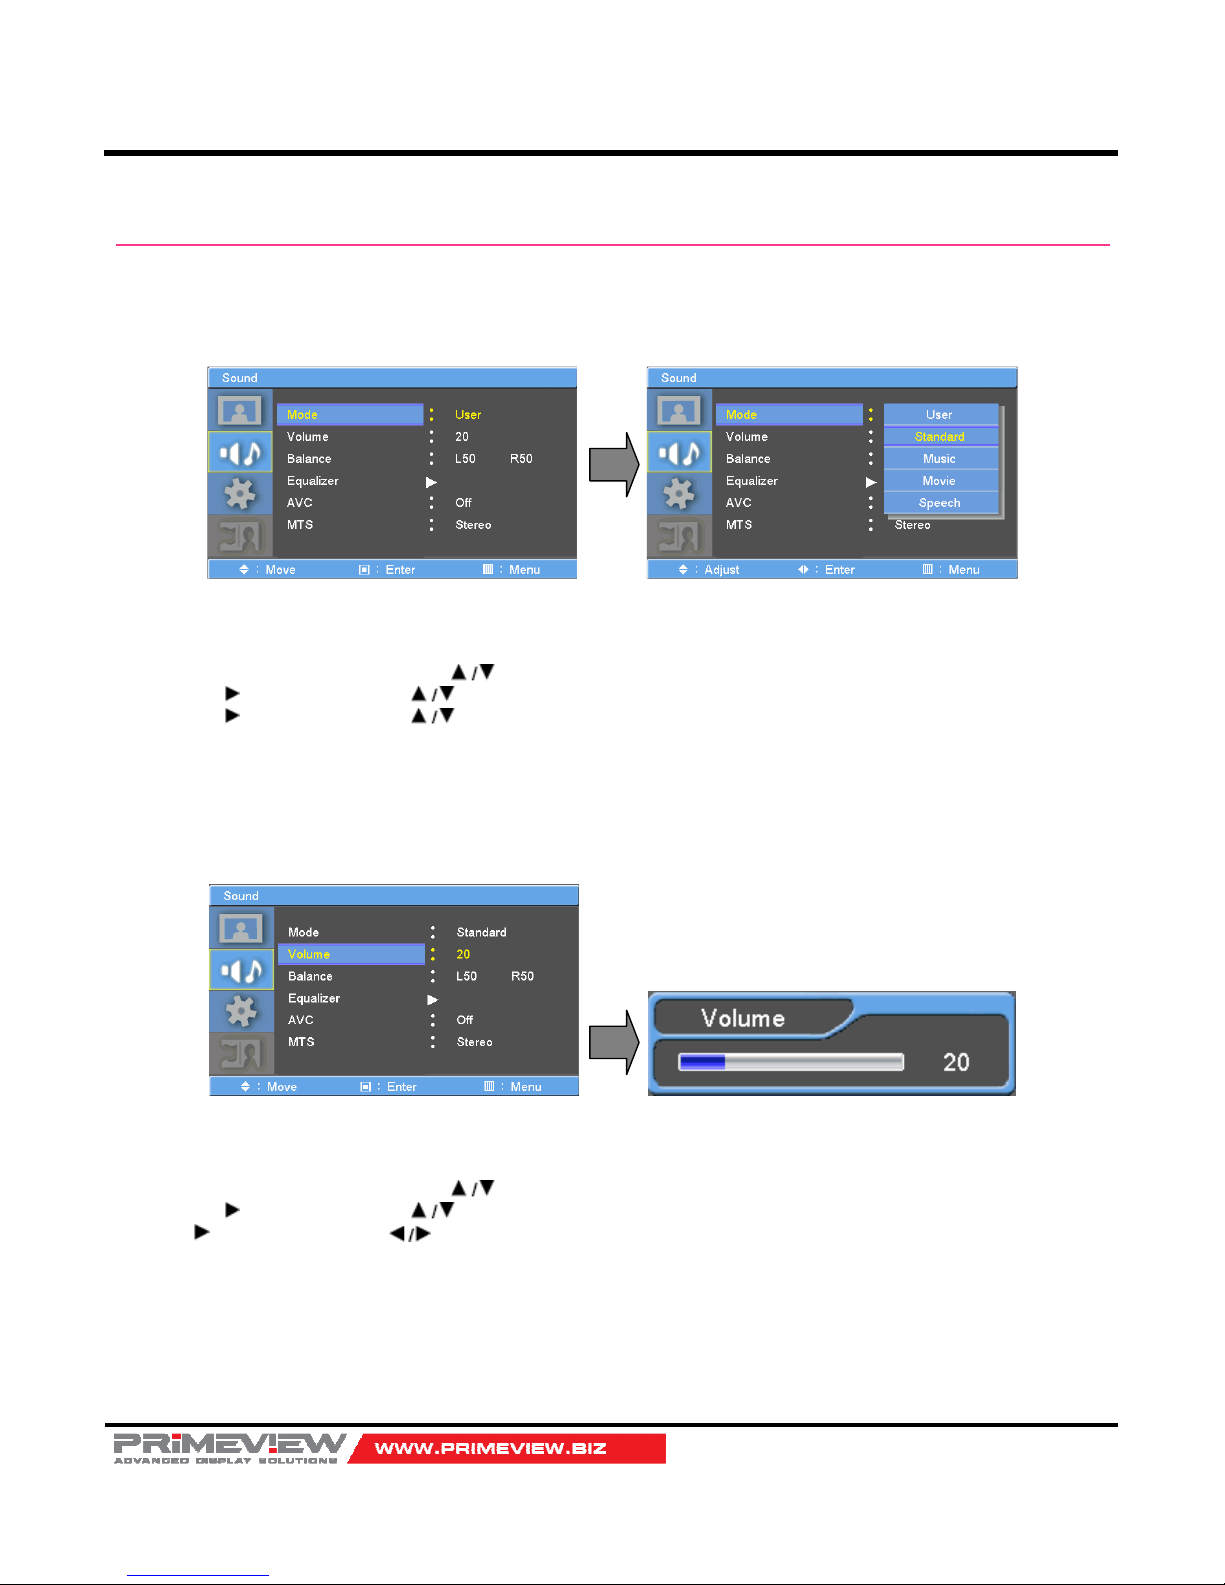
Sound Standard Mode
- Adjust the sound to suit your taste and room situations.
1. Press the MENU button and then use button to select the SOUND icon.
2. Press the button and then use button to select Mode menu.
3. Press the button and then use button to select: User, Standard, Music, Movie and Speech.
4. Press EXIT button to return to monitor viewing or press MENU button to return to the previous menu.
Volume
- Adjust the sound to suit your taste and room situations.
1. Press the MENU button and then use button to select the SOUND icon.
2. Press the button and then use button to select the Volume menu.
3. Press button and then use button to make appropriate adjustments.
4. Press EXIT button to return to monitor viewing or press MENU button to return to the previous menu.
Page 20
40”/46”/46”HB Slim Video Wall Monitor
User’s Guide
Page 20
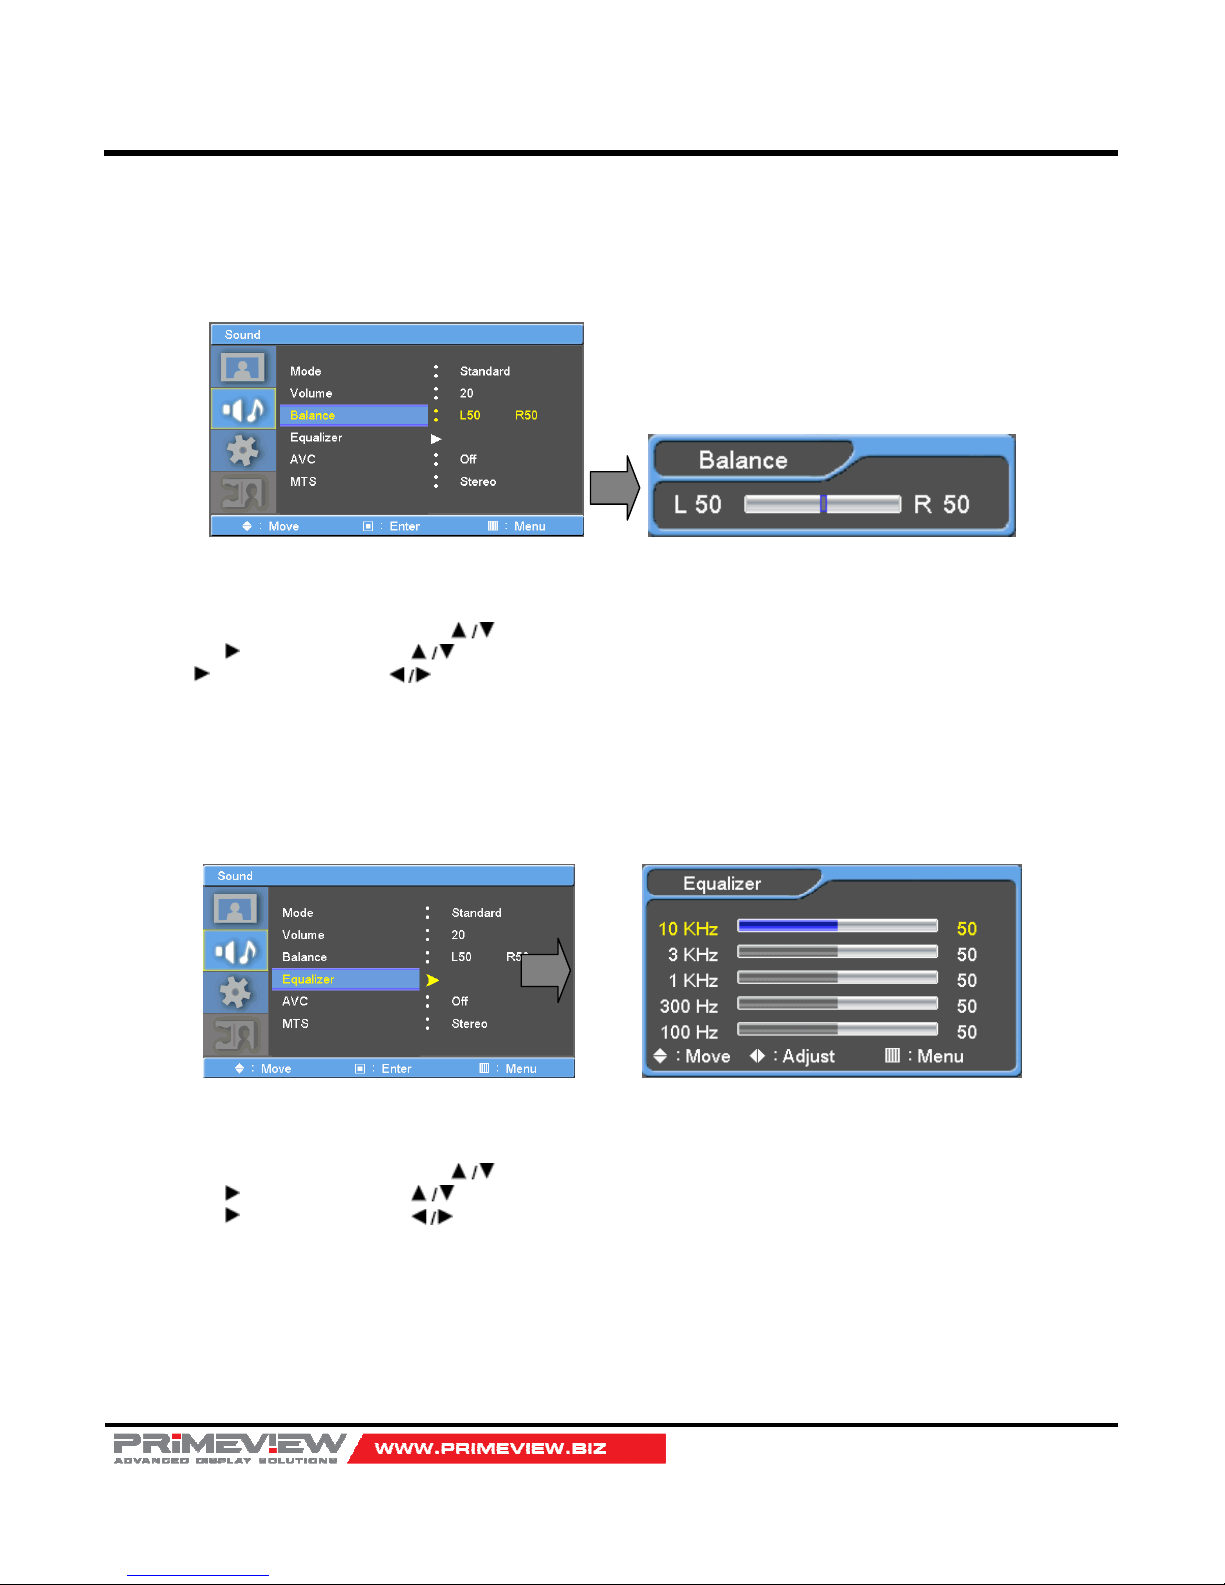
Sound Balance
- Adjust the sound to suit your taste and room situations.
1. Press the MENU button and then use button to select the SOUND icon.
2. Press the button and then use button to select the Balance menu.
3. Press button and then use button to make appropriate adjustments.
4. Press EXIT button to return to monitor viewing or press MENU button to return to the previous menu.
User Control for 5 Bands Equalizer
- If the Equalizer settings are changed, sound mode setting goes to User automatically.
1. Press the MENU button and then use button to select the SOUND icon.
2. Press the button and then use button to select the Equalizer menu.
3. Press the button and then use button to make appropriate adjustments;
10 KHz, 3 KHz, 1 KHz, 300 Hz, 100 Hz Sound Band
4. Press EXIT button to return to monitor viewing or press MENU button to return to the previous menu.
Page 21
40”/46”/46”HB Slim Video Wall Monitor
User’s Guide
Page 21
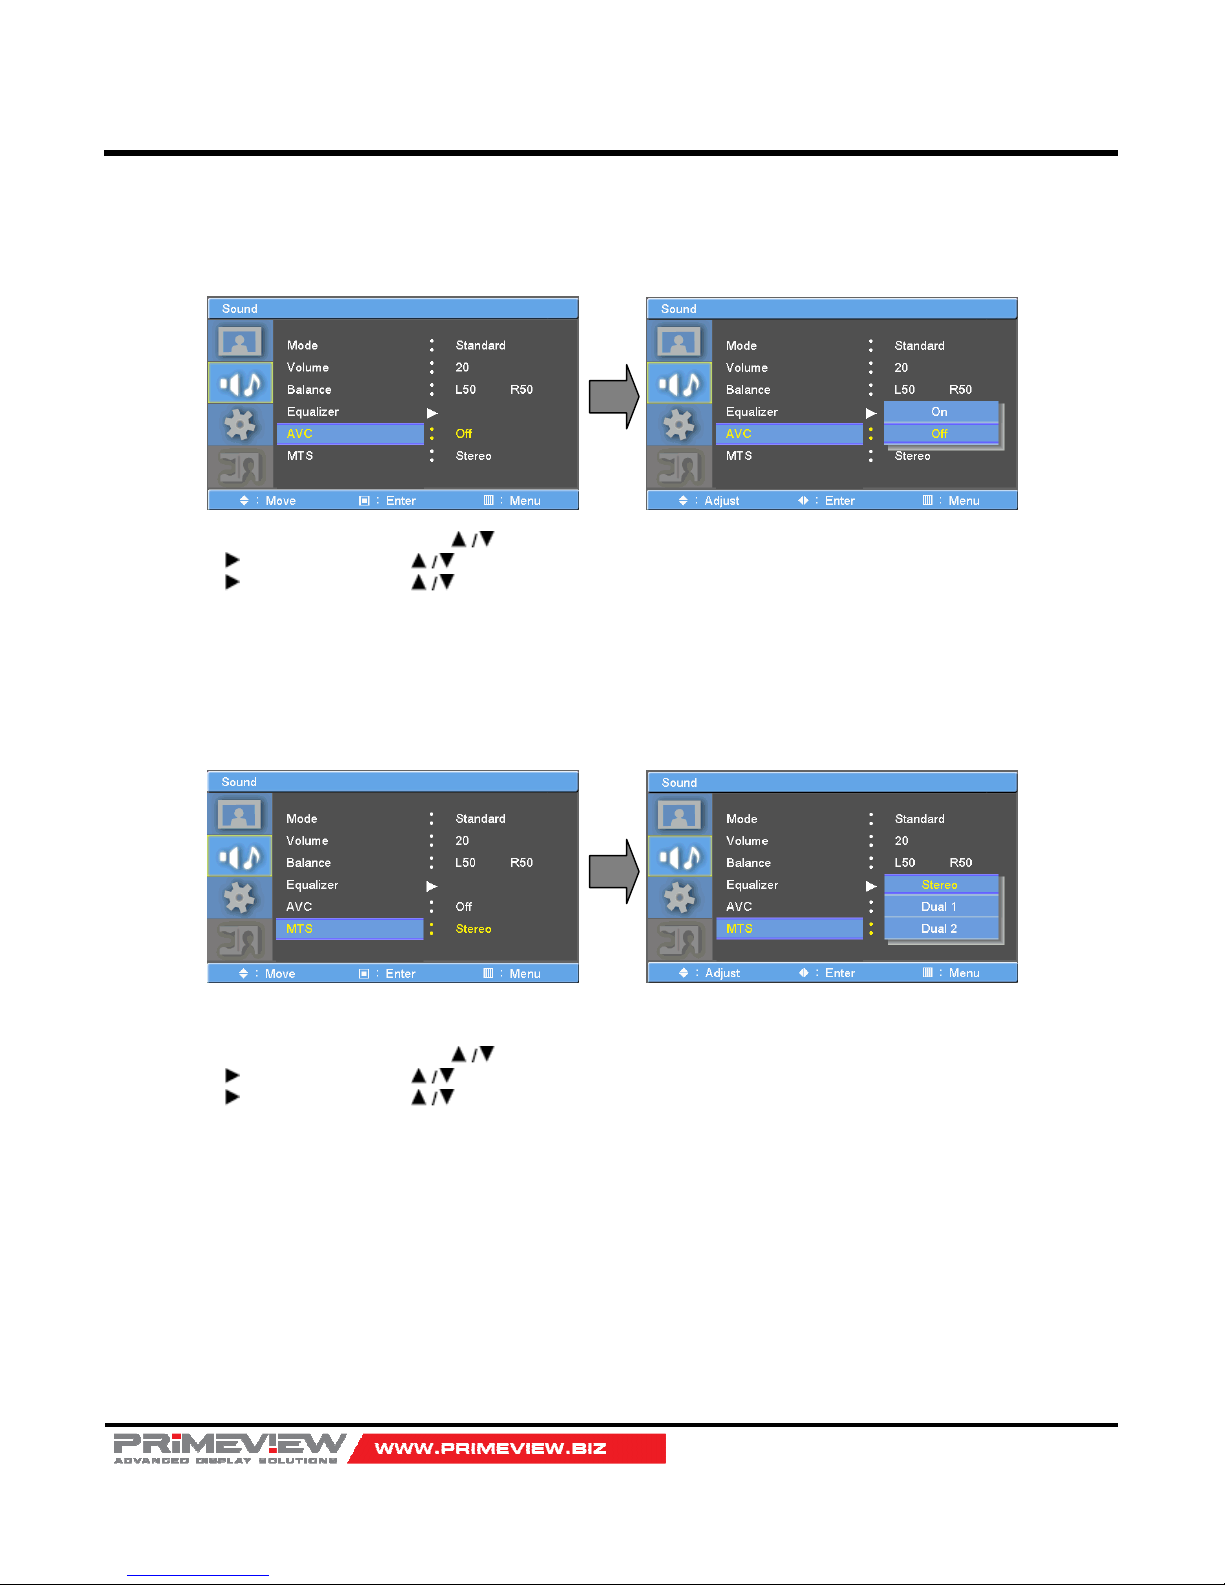
AVC (Automatic Volume Level Control)
1. Press the MENU button and then use button to select the SOUND icon.
2. Press the button and then use button to select AVC menu.
3. Press the button and then use button to select: On, Off
4. Press EXIT button to return to monitor viewing or press MENU button to return to the previous menu.
MTS (Multi Channel Sound Control)
- MTS feature is selecting one(L or R) or both(L+R) channel of sound input generating bilingual stereo sound output.
1. Press the MENU button and then use button to select the SOUND icon.
2. Press the button and then use button to select MTS menu.
3. Press the button and then use button to select: Stereo, Dual 1, Dual 2
4. Press EXIT button to return to monitor viewing or press MENU button to return to the previous menu.
Page 22
40”/46”/46”HB Slim Video Wall Monitor
User’s Guide
Page 22
Setup Menu Options
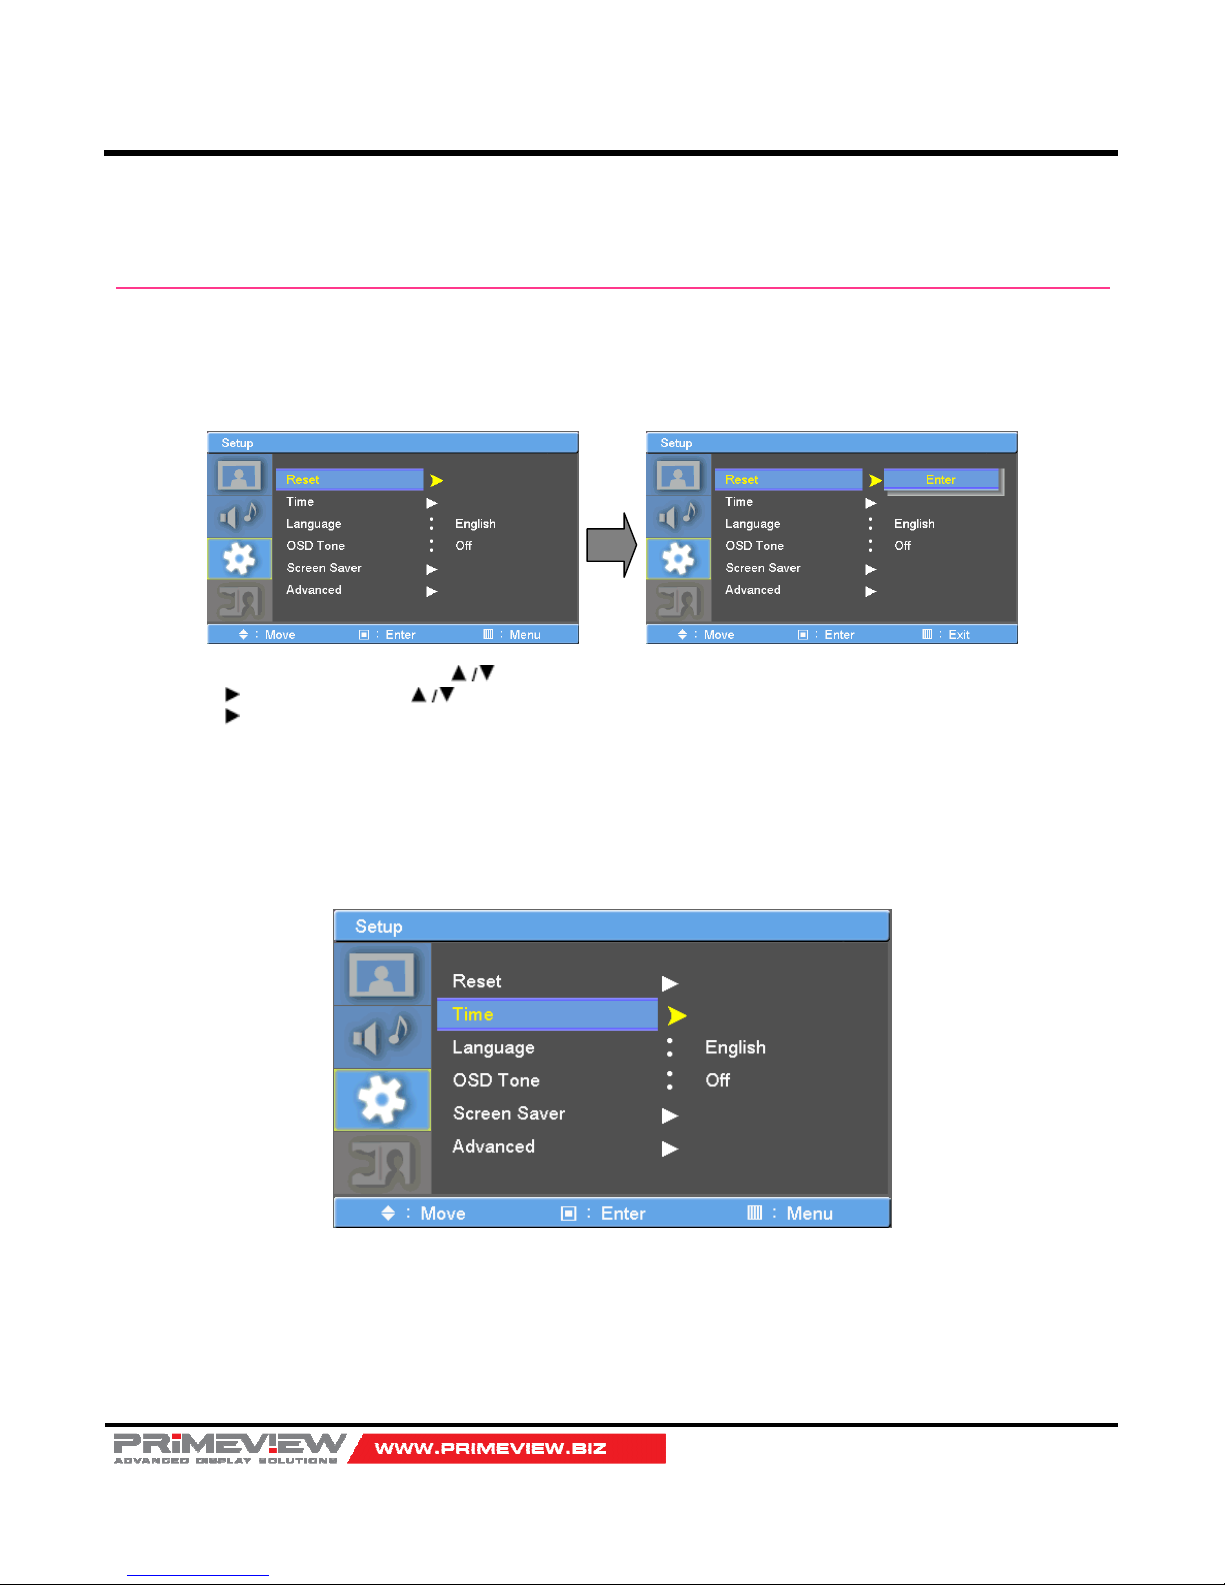
Reset
Resets user setting values as default
1. Press the MENU button and then use button to select the SETUP icon.
2. Press the button and then use button to select the Reset menu.
3. Press the or SELECT button and then monitor’s user settings are reset as default.
Time Settings
Enable the user to set up the clock information.
Page 23
40”/46”/46”HB Slim Video Wall Monitor
User’s Guide
Page 23
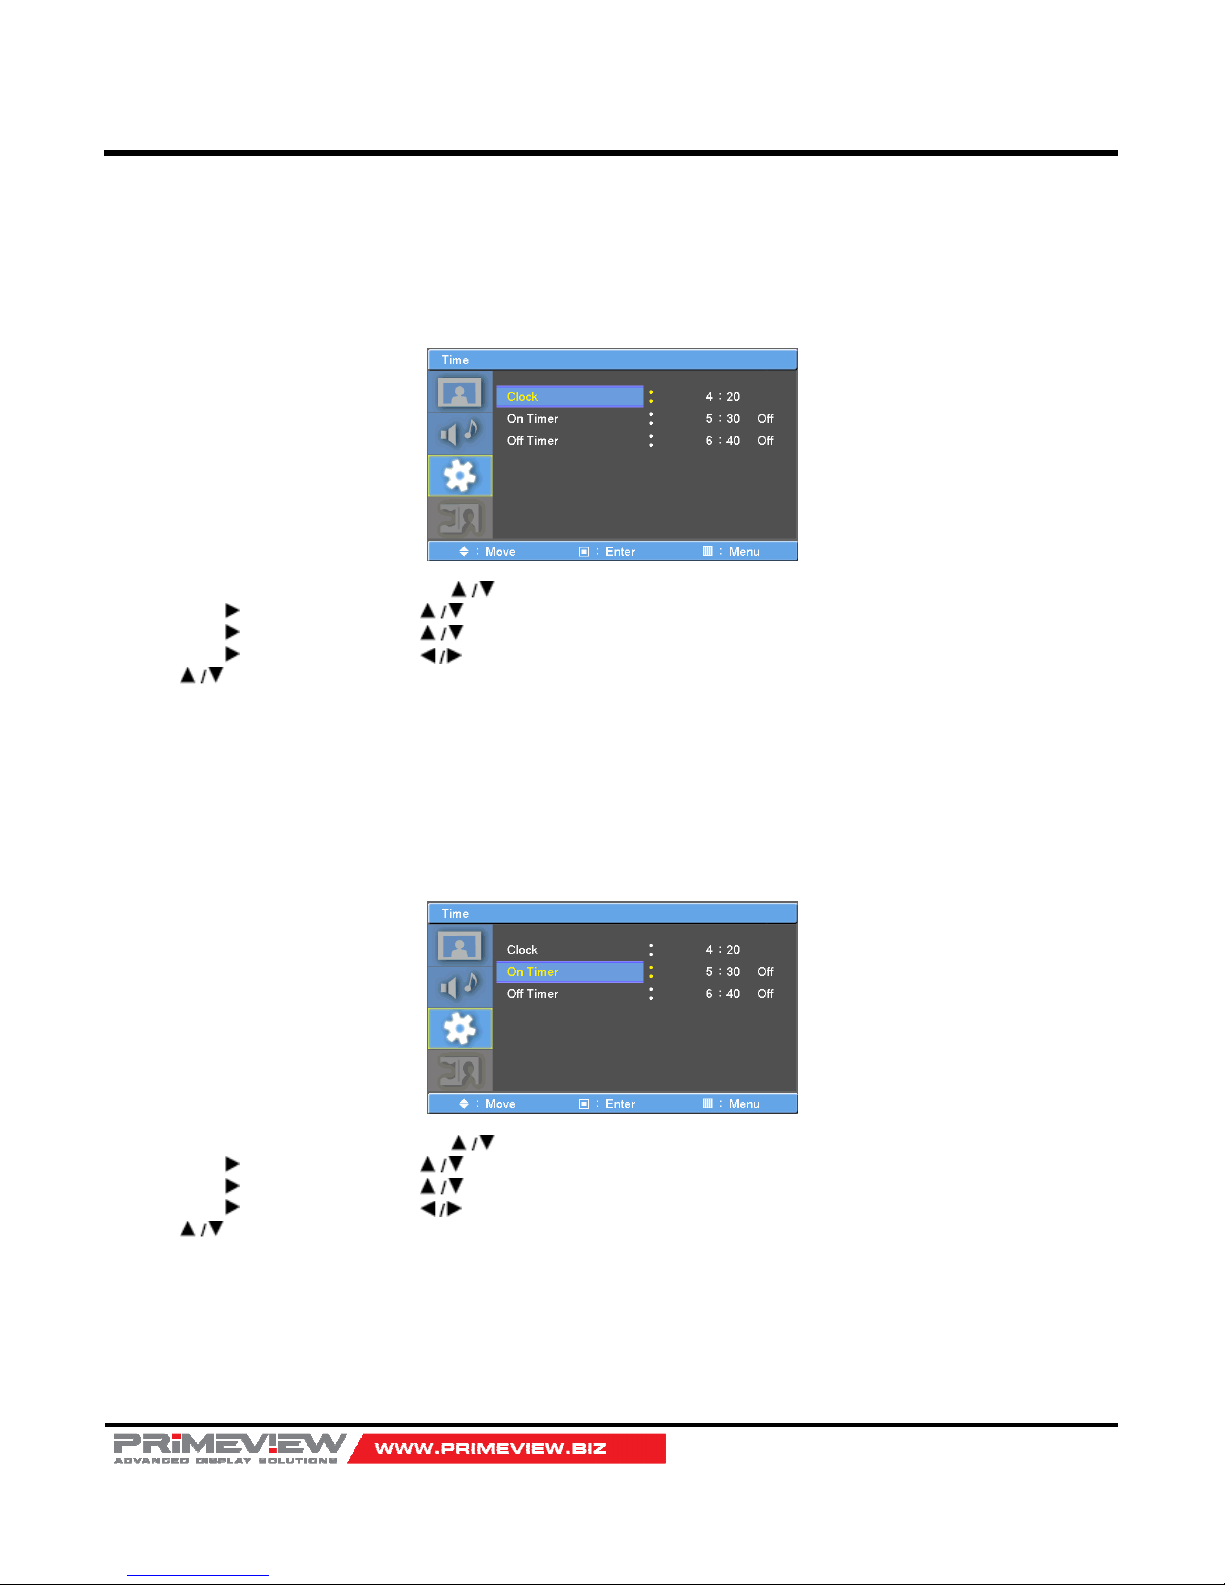
Clock
If current time setting is wrong, reset the clock manually.
1. Press the MENU button and then use button to select the SETUP icon.
2. Press the button and then use button to select Time.
3. Press the button and then use button to select Clock.
4. Press the button and then use button to select the Hour, Minute.
5. Use button to adjust clock.
6. Press EXIT button to return to monitor viewing or press MENU button to return to the previous menu.
On Timer
Timer function operates only if current time has been set.
1. Press the MENU button and then use button to select the SETUP icon.
2. Press the button and then use button to select Time.
3. Press the button and then use button to select On Timer.
4. Press the button and then use button to select the Hour, Minute, Activation.
5. Use button to adjust on time schedule and activation.
6. Press EXIT button to return to monitor viewing or press MENU button to return to the previous menu.
Page 24
40”/46”/46”HB Slim Video Wall Monitor
User’s Guide
Page 24
Off Timer
Timer function operates only if current time has been set.
1. Press the MENU button and then use button to select the SETUP icon.
2. Press the button and then use button to select Time.
3. Press the button and then use button to select Off Timer.
4. Press the button and then use button to select the Hour, Minute, Activation.
5. Use button to adjust off time schedule and activation.
6. Press EXIT button to return to monitor viewing or press MENU button to return to the previous menu.
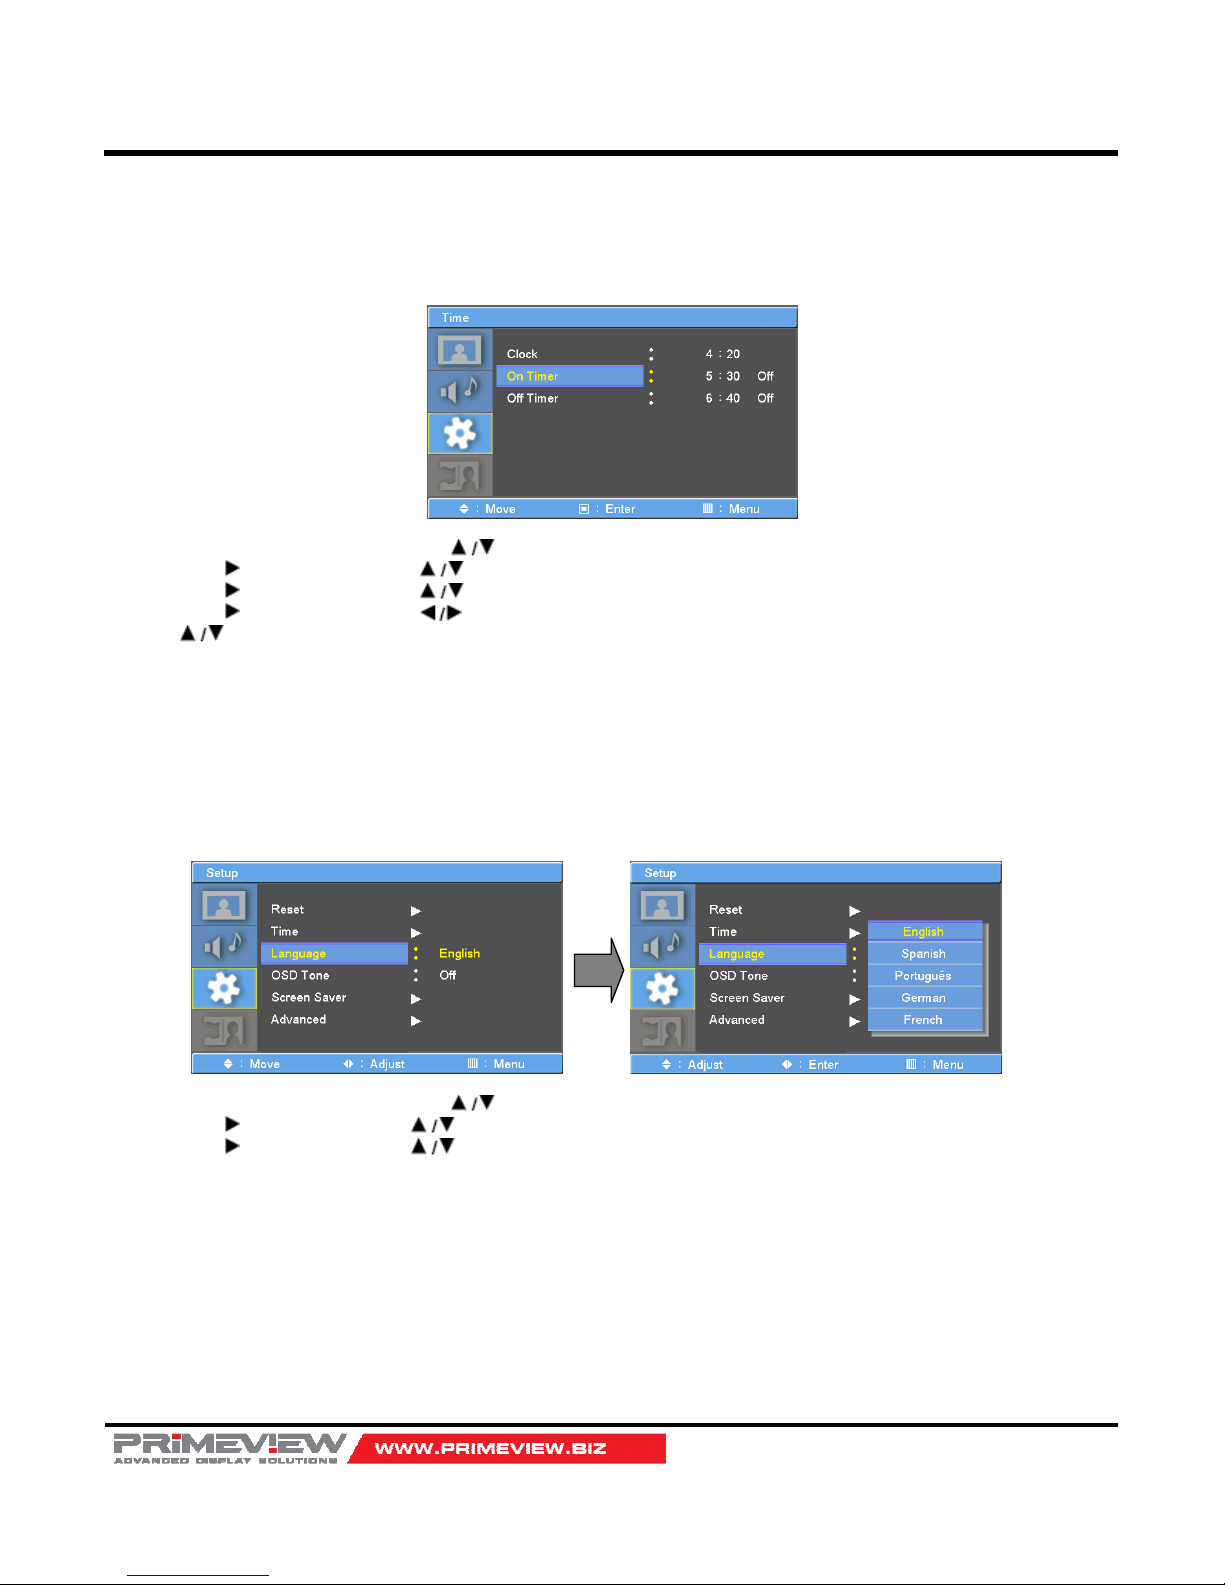
Language
- Select a language for the menus to appear in.
1. Press the MENU button and then use button to select the SETUP icon.
2. Press the button and then use button to select the Menu Language menu.
3. Press the button and then use button to select the desired option:
English, Spanish, Portuguese, German, French.
4. Press EXIT button to return to monitor viewing or press MENU button to return to the previous menu.
Page 25
40”/46”/46”HB Slim Video Wall Monitor
User’s Guide
Page 25
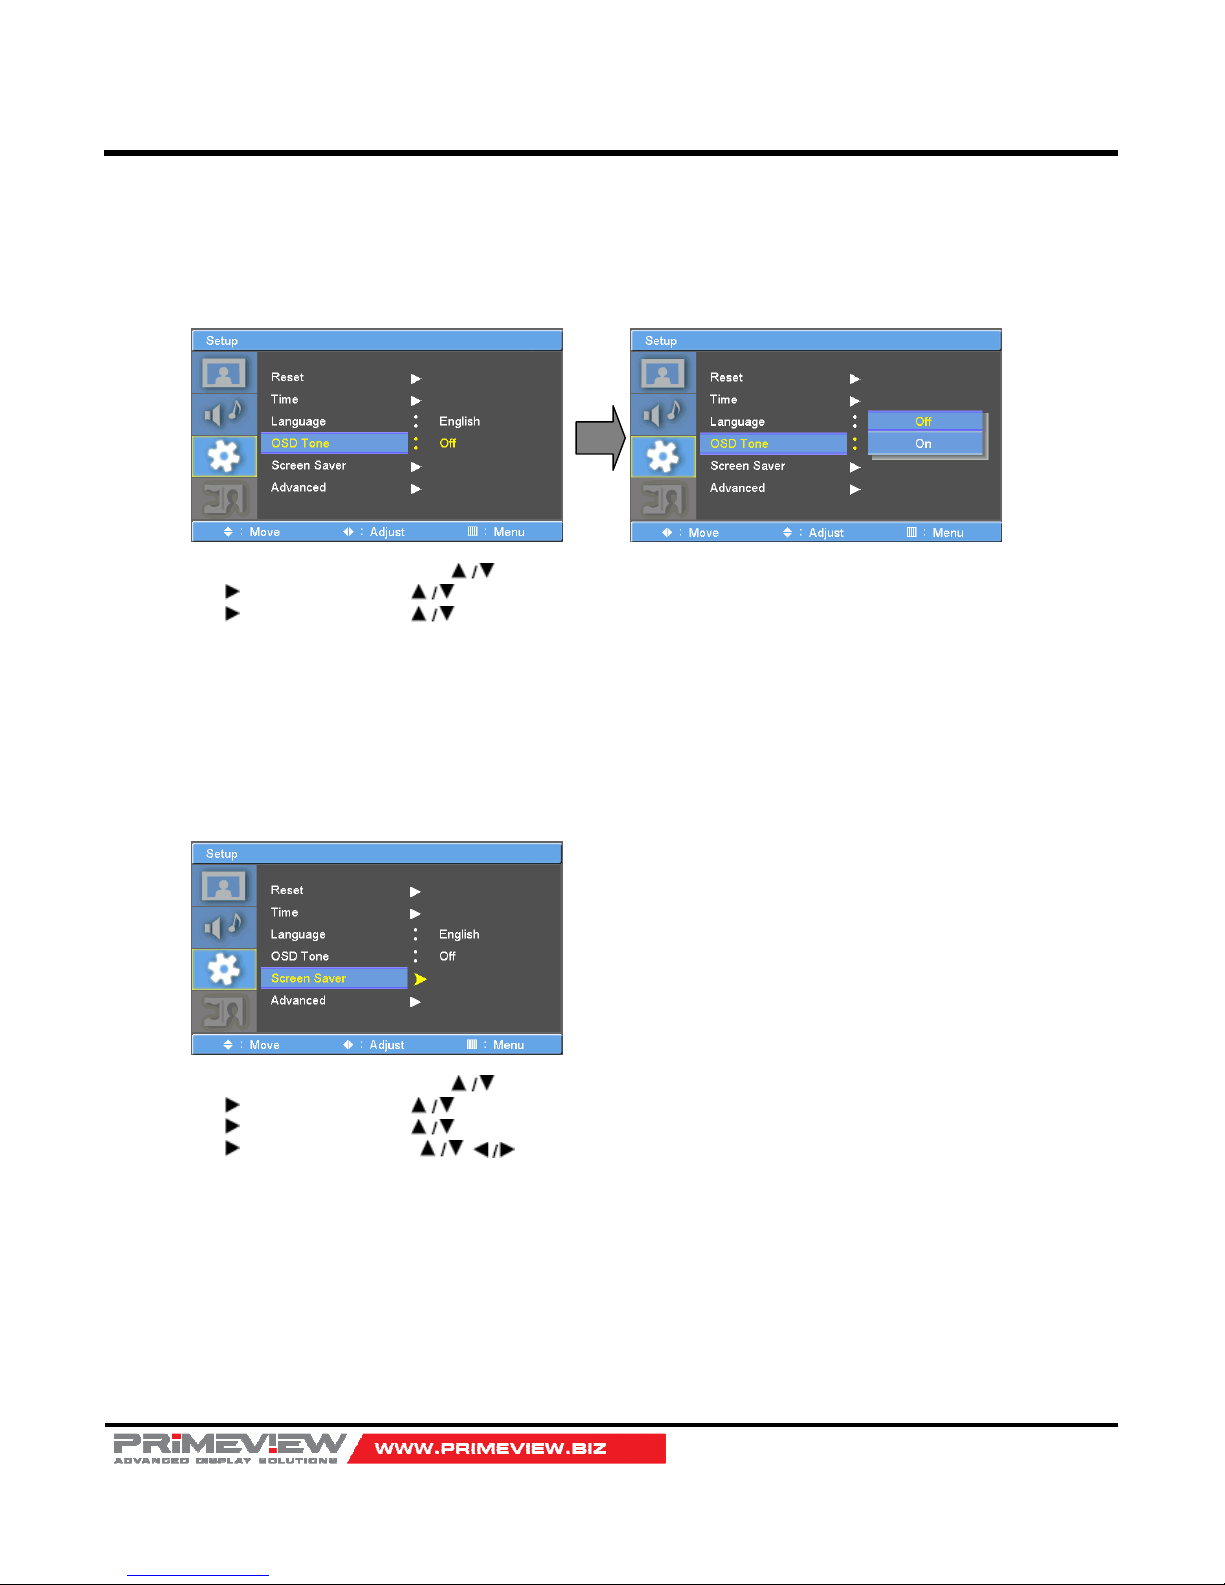
OSD Tone Control
- Disable blending OSD background with video image.
1. Press the MENU button and then use button to select the SETUP icon.
2. Press the button and then use button to select the OSD Tone menu.
3. Press the button and then use button to select the desired option: Off, On.
4. Press EXIT button to return to monitor viewing or press MENU button to return to the previous menu.
Screen Saver
- Enables screen saver functions to avoid panel burning.
1. Press the MENU button and then use button to select the SETUP icon.
2. Press the button and then use button to select the Screen Saver Menu.
3. Press the button and then use button to select the desired functions.
4. Press the button and then use button to set Screen Saver options.
5. Press EXIT button to return to monitor viewing or press MENU button to return to the previous menu.
Page 26
40”/46”/46”HB Slim Video Wall Monitor
User’s Guide
Page 26
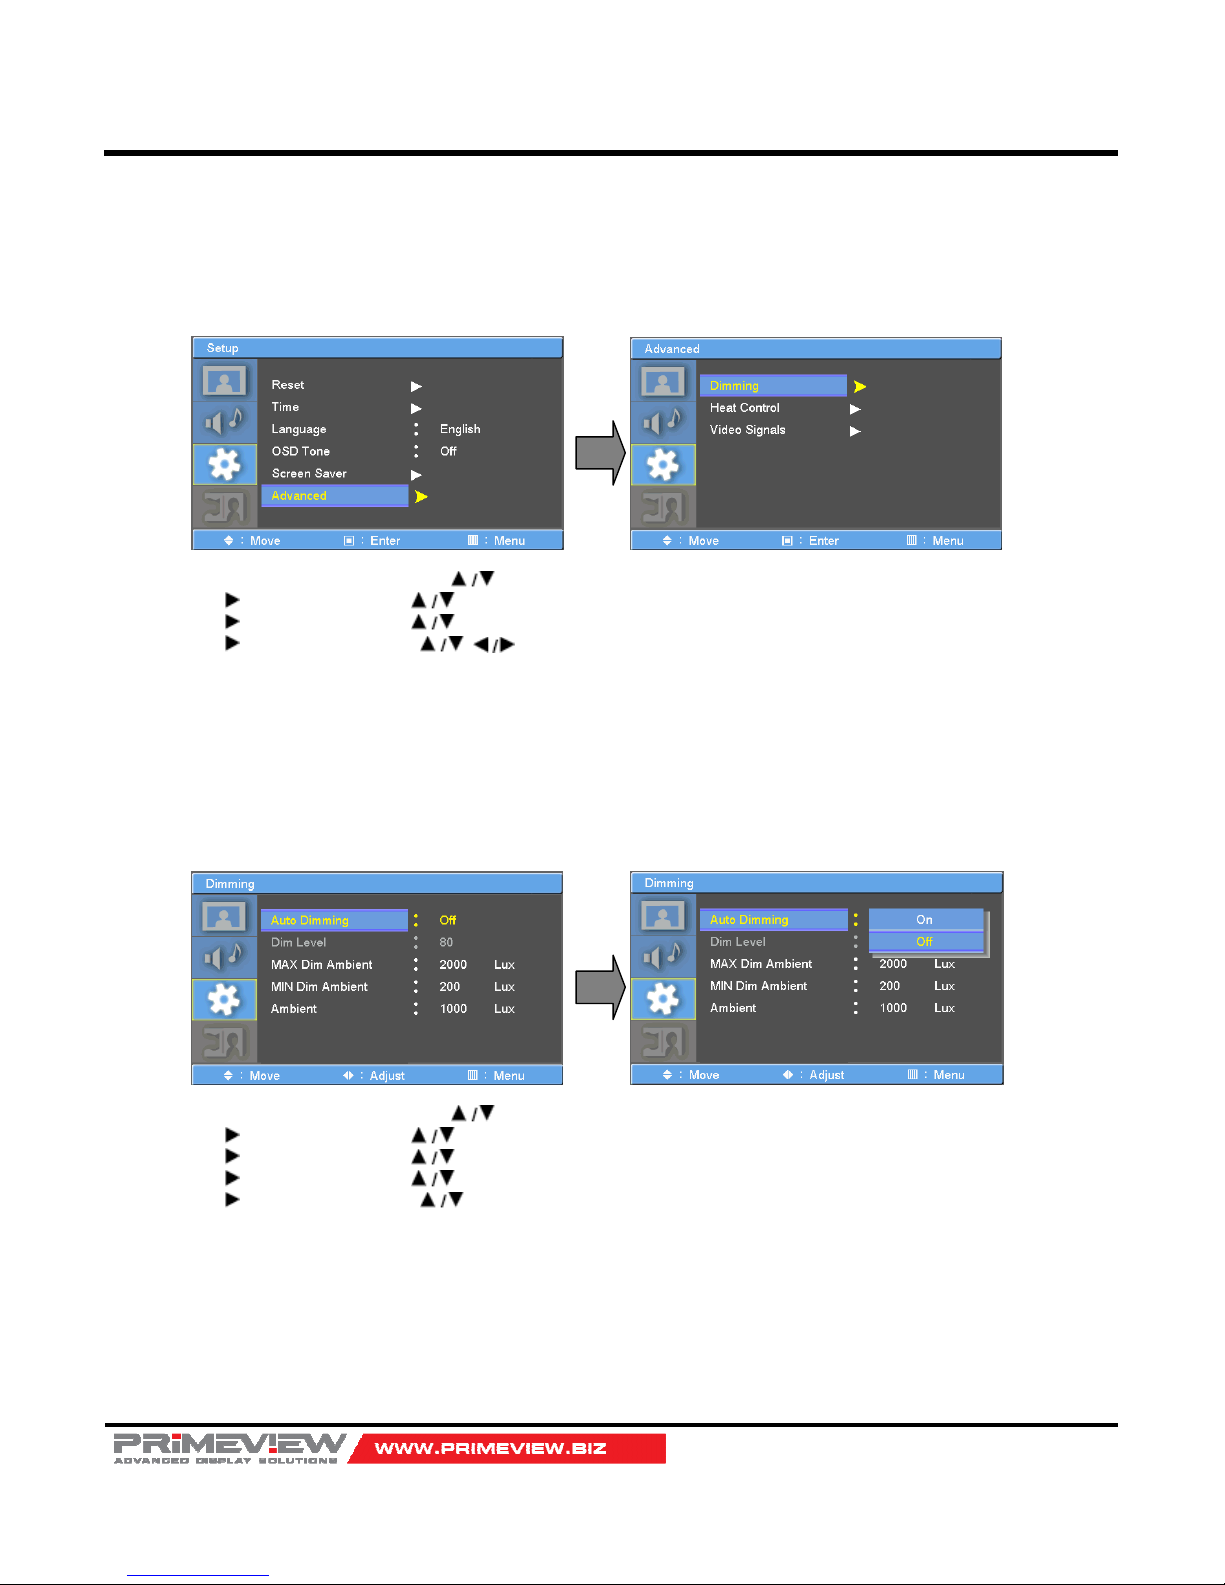
Advanced Menu – Dimming (Light Ambient Sensor Option only)
- Automatic dimming controls by light sensor in Dimming menu.
1. Press the MENU button and then use button to select the SETUP icon.
2. Press the button and then use button to select the Advanced Menu.
3. Press the button and then use button to select the Dimming Menu.
4. Press the button and then use button to set Dimming options.
5. Press EXIT button to return to monitor viewing or press MENU button to return to the previous menu.
Dimming Menu – Auto Dimming (Light Ambient Sensor Option only)
- Enable/disables auto dimming control by light ambient sensor
1. Press the MENU button and then use button to select the SETUP icon.
2. Press the button and then use button to select the Advanced Menu.
3. Press the button and then use button to select the Dimming Menu.
4. Press the button and then use button to select the Auto Dimming functions.
5. Press the button and then use button to set Auto Dimming options.
6. Press EXIT button to return to monitor viewing or press MENU button to return to the previous menu.
Page 27
40”/46”/46”HB Slim Video Wall Monitor
User’s Guide
Page 27
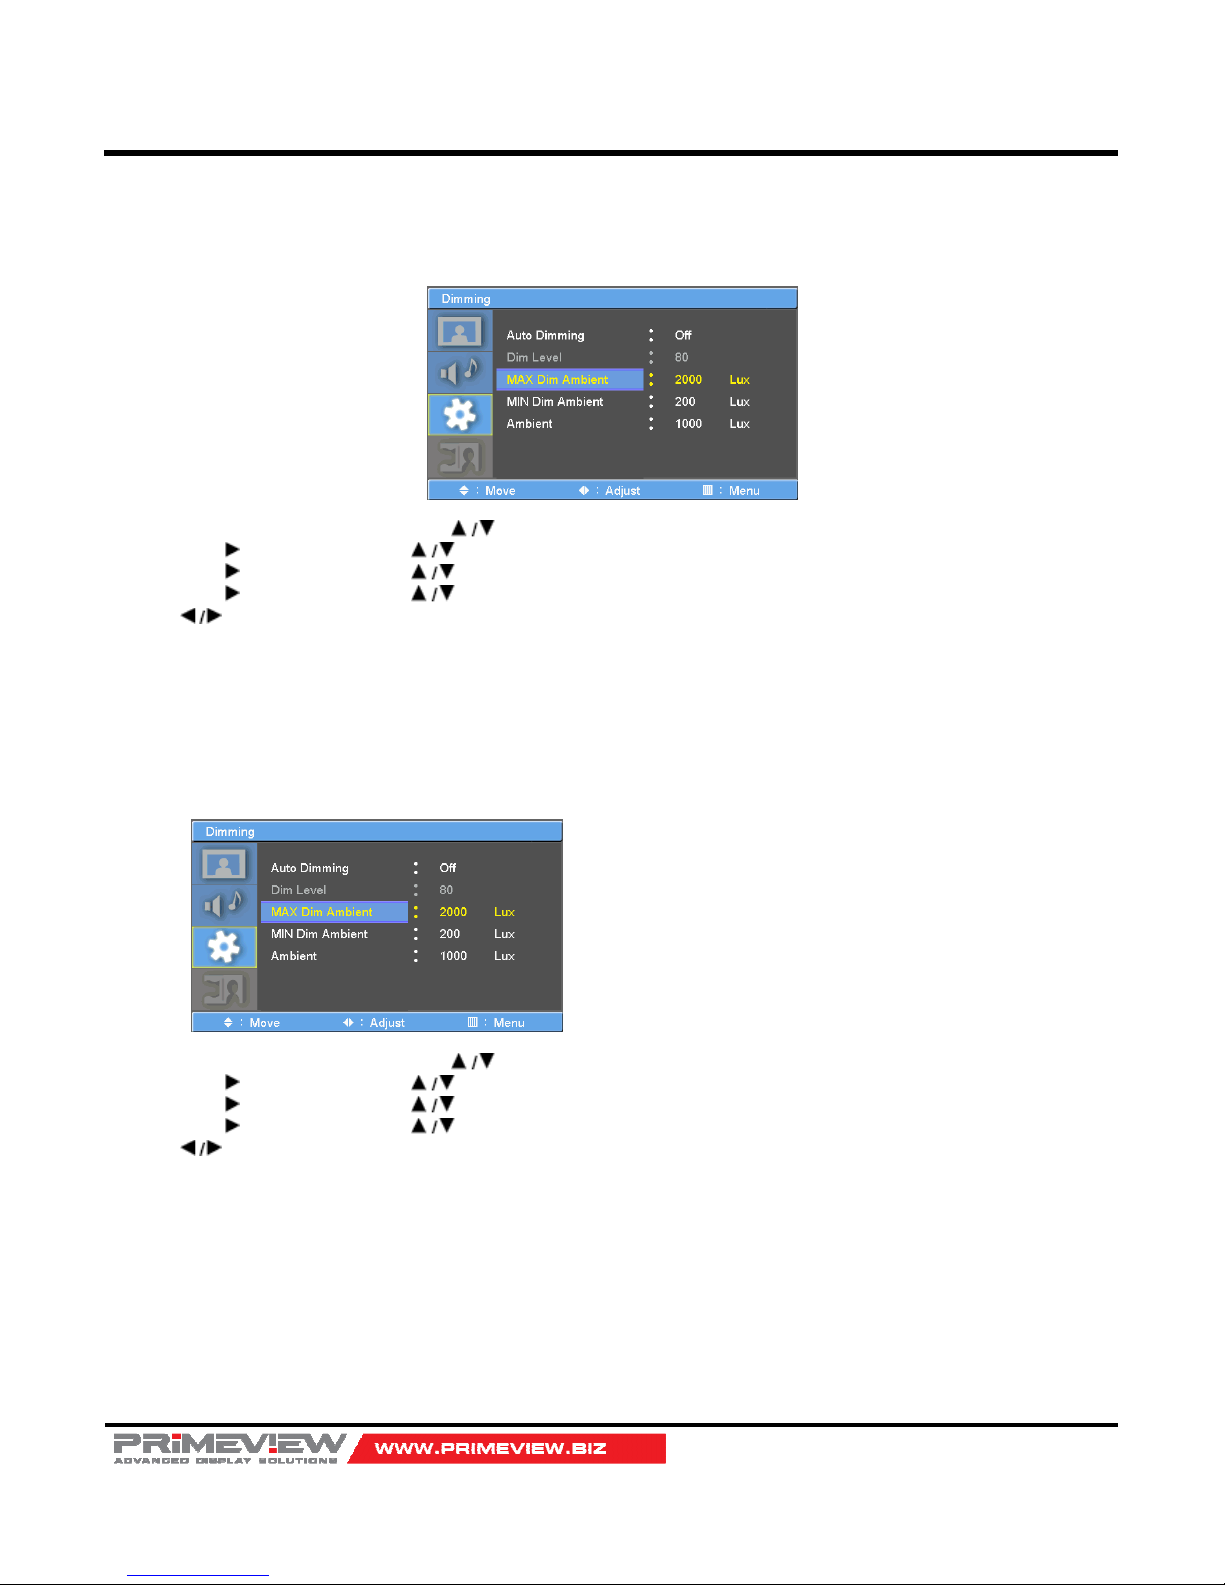
Dimming Menu – MAX Dim Ambient (Light Ambient Sensor Option only)
- Adjusts detected light ambient to set the maximum dimming
1. Press the MENU button and then use button to select the SETUP icon.
2. Press the button and then use button to select the Advanced Menu.
3. Press the button and then use button to select the Dimming Menu.
4. Press the button and then use button to select the MAX Dim Ambient functions.
5. Use button to set detected light ambient value by LUX unit.
6. Press EXIT button to return to monitor viewing or press MENU button to return to the previous menu.
Dimming Menu – MIN Dim Ambient (Light Ambient Sensor Option only)
- Adjusts detected light ambient to set the minimum dimming
1. Press the MENU button and then use button to select the SETUP icon.
2. Press the button and then use button to select the Advanced Menu.
3. Press the button and then use button to select the Dimming Menu.
4. Press the button and then use button to select the MIN Dim Ambient functions.
5. Use button to set detected light ambient value by LUX unit.
6. Press EXIT button to return to monitor viewing or press MENU button to return to the previous menu.
Dimming Menu – Ambient (Light Ambient Sensor Option only)
- Displays current detected light ambient level by LUX unit.
Page 28
40”/46”/46”HB Slim Video Wall Monitor
User’s Guide
Page 28
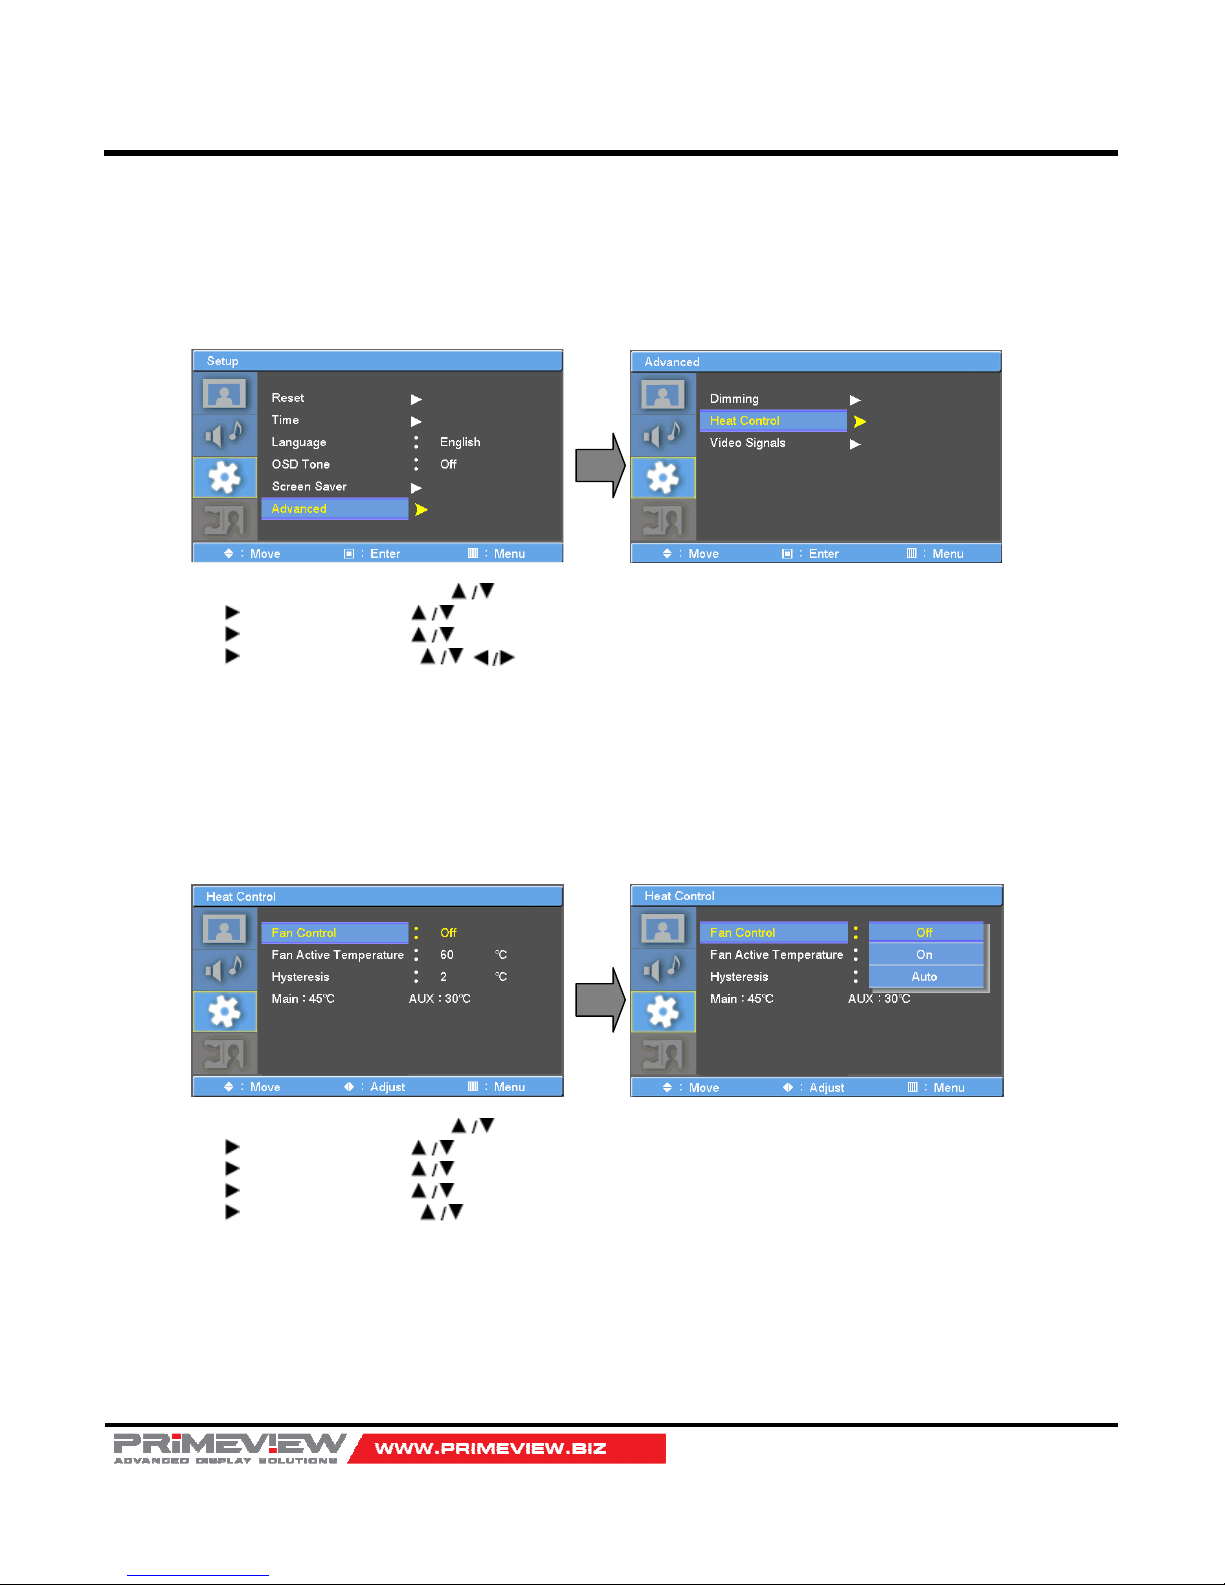
Advanced Menu – Heat Control
- Automatic Fan controls by internal/external temperature sensor in Dimming menu.
1. Press the MENU button and then use button to select the SETUP icon.
2. Press the button and then use button to select the Advanced Menu.
3. Press the button and then use button to select the Heat Control Menu.
4. Press the button and then use button to set Heat Control options.
5. Press EXIT button to return to monitor viewing or press MENU button to return to the previous menu.
Heat Control Menu – Fan Control
- Controls fan driving option by temperature sensor / force on / force off
1. Press the MENU button and then use button to select the SETUP icon.
2. Press the button and then use button to select the Advanced Menu.
3. Press the button and then use button to select the Heat Control Menu.
4. Press the button and then use button to select the Fan Control functions.
5. Press the button and then use button to set Off, On, Auto options.
6. Press EXIT button to return to monitor viewing or press MENU button to return to the previous menu.
Page 29
40”/46”/46”HB Slim Video Wall Monitor
User’s Guide
Page 29
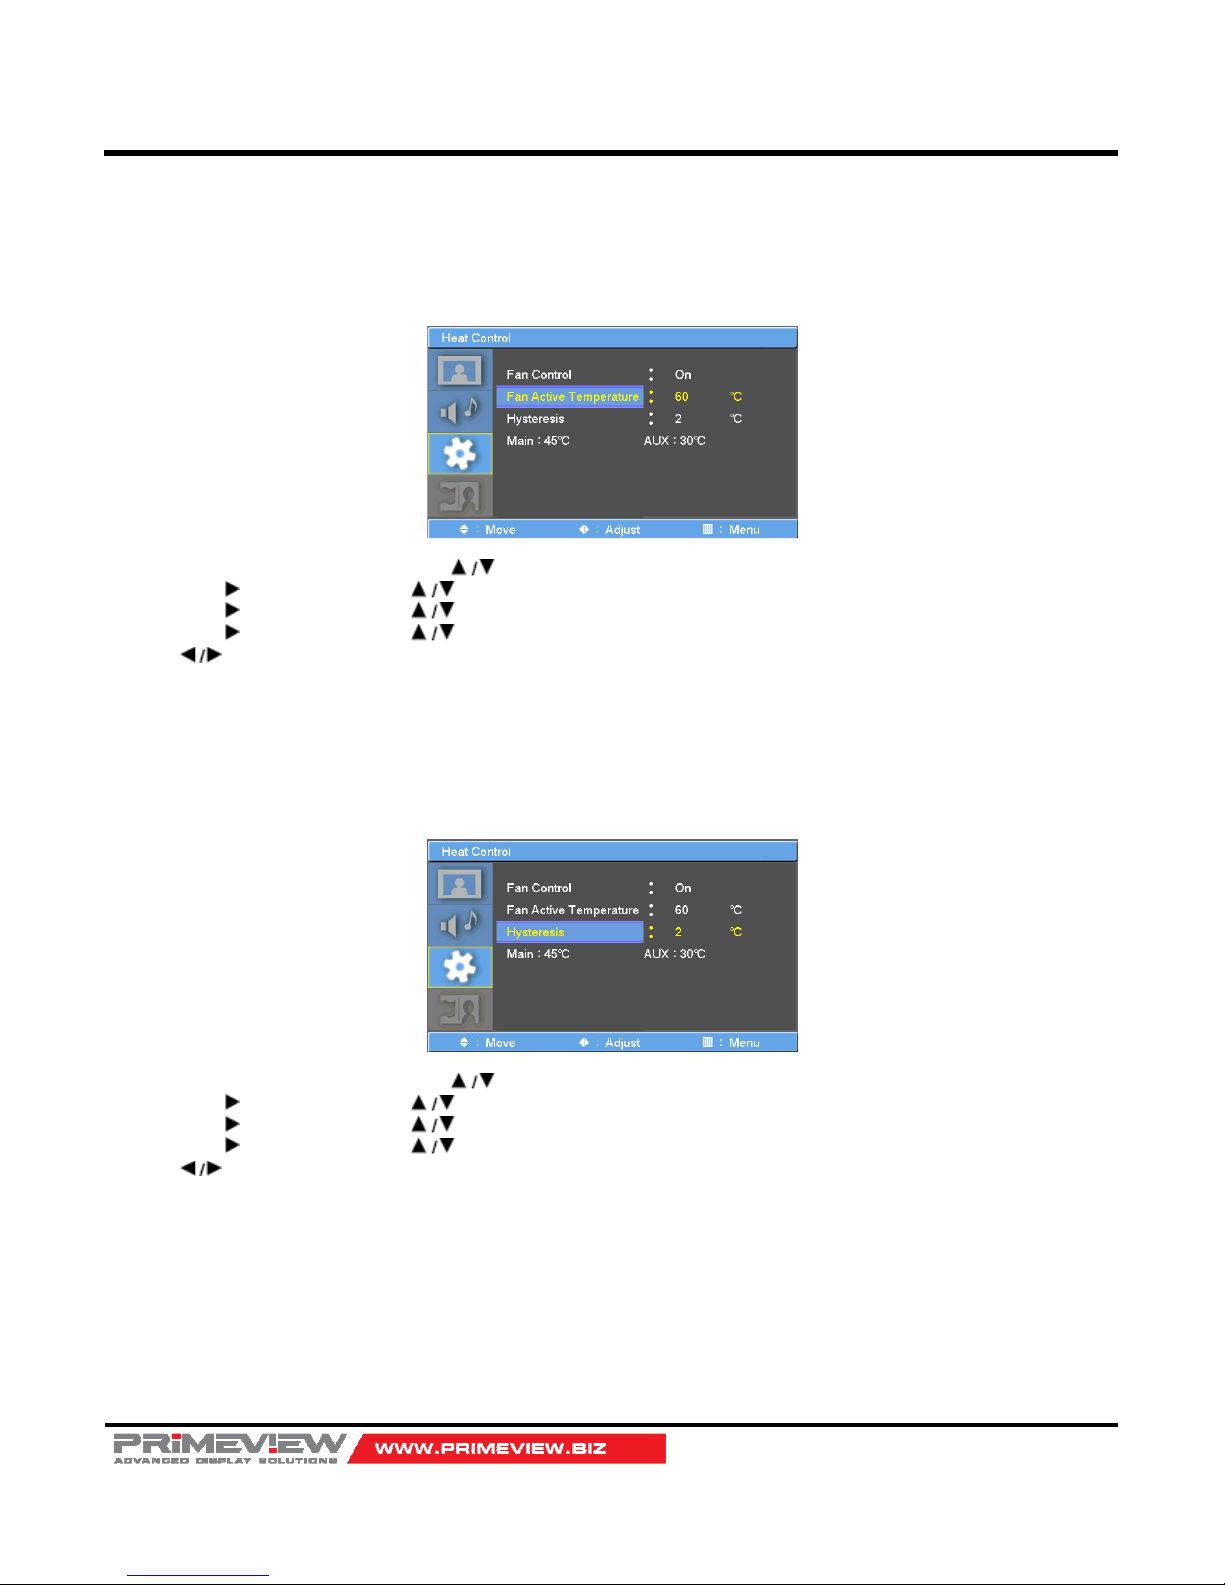
Heat Control Menu – Fan Active Temperature
- Adjusts fan driving temperature by Celsius degree. It works only when the Fan Control setting is Auto.
1. Press the MENU button and then use button to select the SETUP icon.
2. Press the button and then use button to select the Advanced Menu.
3. Press the button and then use button to select the Heat Control Menu.
4. Press the button and then use button to select the Fan Active Temperature Menu.
5. Use button to set fan driving temperature by Celsius degree unit.
6. Press EXIT button to return to monitor viewing or press MENU button to return to the previous menu.
Heat Control Menu – Hysteresis
- Adjusts fan driving hysteresis temperature by Celsius degree.
1. Press the MENU button and then use button to select the SETUP icon.
2. Press the button and then use button to select the Advanced Menu.
3. Press the button and then use button to select the Heat Control Menu.
4. Press the button and then use button to select the Hysteresis Menu.
5. Use button to set fan driving hysteresis temperature by Celsius degree unit.
6. Press EXIT button to return to monitor viewing or press MENU button to return to the previous menu.
Heat Control – Current temperature
- Displays current detected main sensor’s temperature and auxiliary sensor’s (option) temperature
Page 30
40”/46”/46”HB Slim Video Wall Monitor
User’s Guide
Page 30
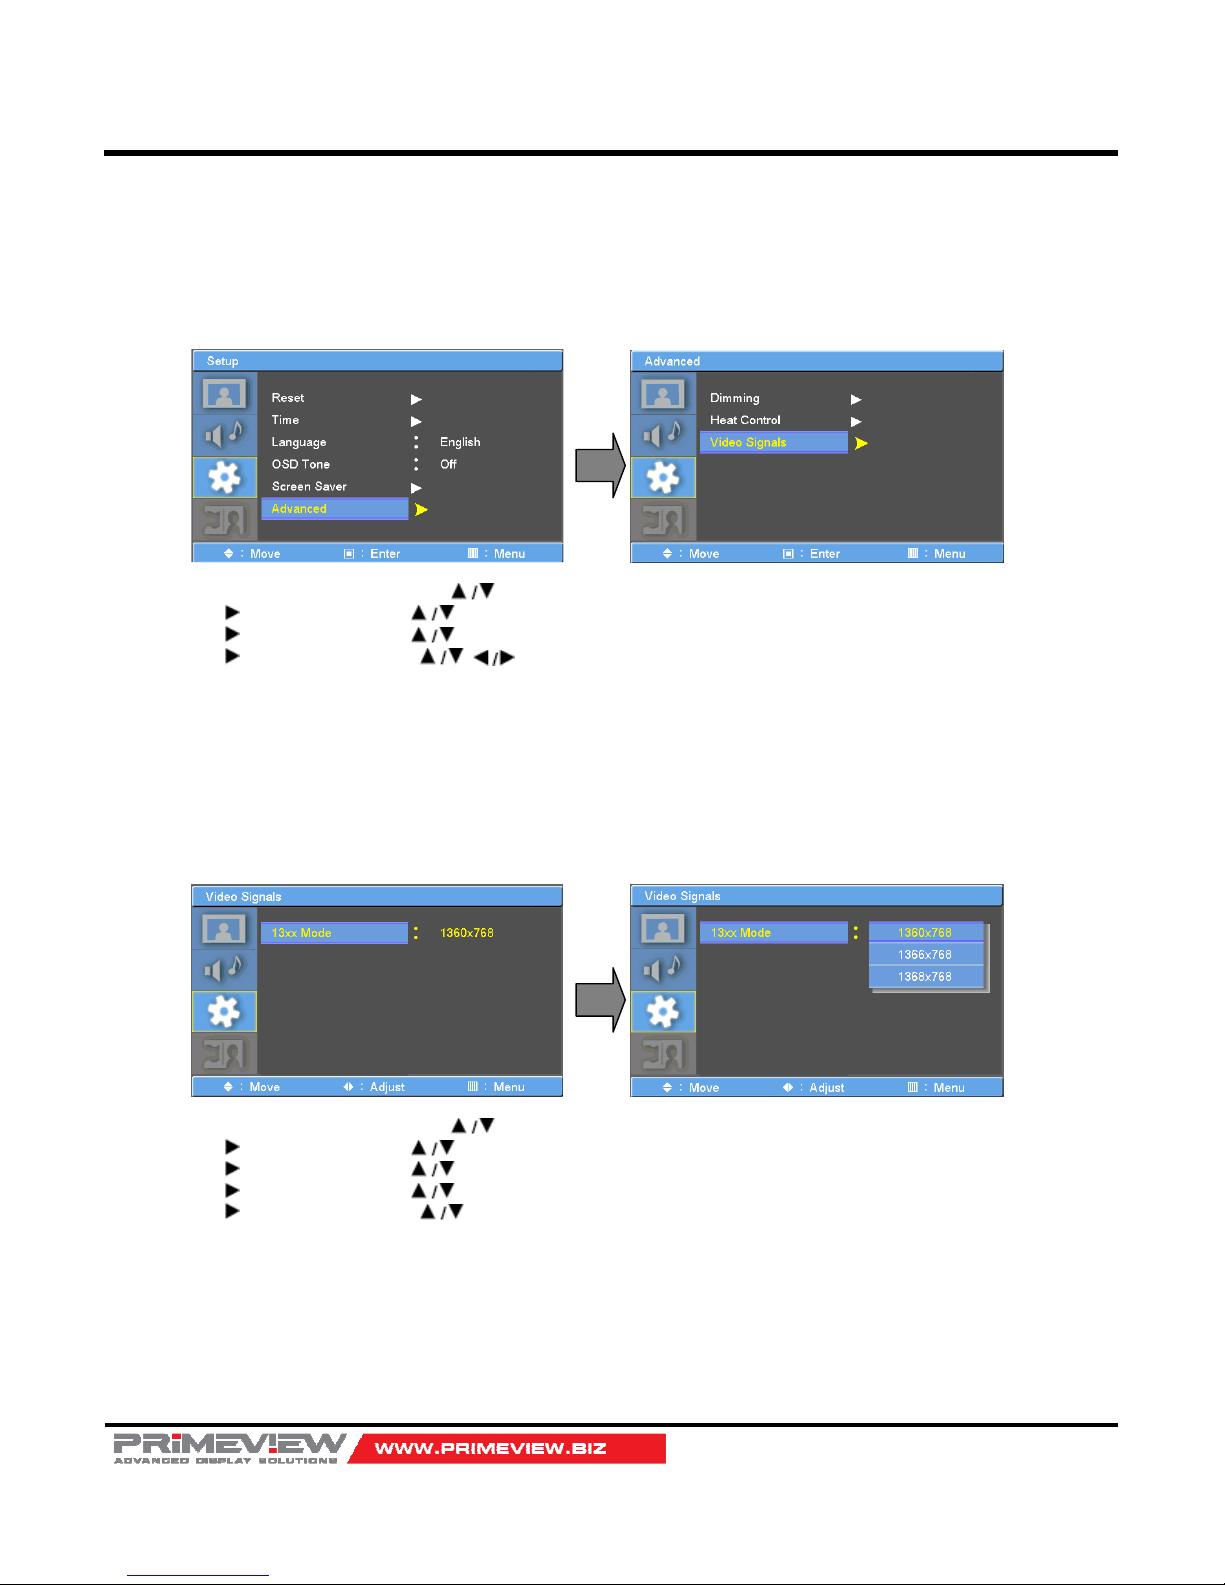
Advanced Menu – Video Signals
- Settings of PC native video signal detection timing.
1. Press the MENU button and then use button to select the SETUP icon.
2. Press the button and then use button to select the Advanced Menu.
3. Press the button and then use button to select the Video Signals Menu.
4. Press the button and then use button to set video signal detection options.
5. Press EXIT button to return to monitor viewing or press MENU button to return to the previous menu.
Video Signals Menu – 13xx Mode
- Selects 13xx native PC video timings.
1. Press the MENU button and then use button to select the SETUP icon.
2. Press the button and then use button to select the Advanced Menu.
3. Press the button and then use button to select the Video Signals Menu.
4. Press the button and then use button to select the 13xx Mode Menu.
5. Press the button and then use button to set 1360x768, 1366x768, 1368x768 options.
6. Press EXIT button to return to monitor viewing or press MENU button to return to the previous menu.
Page 31
40”/46”/46”HB Slim Video Wall Monitor
User’s Guide
Page 31
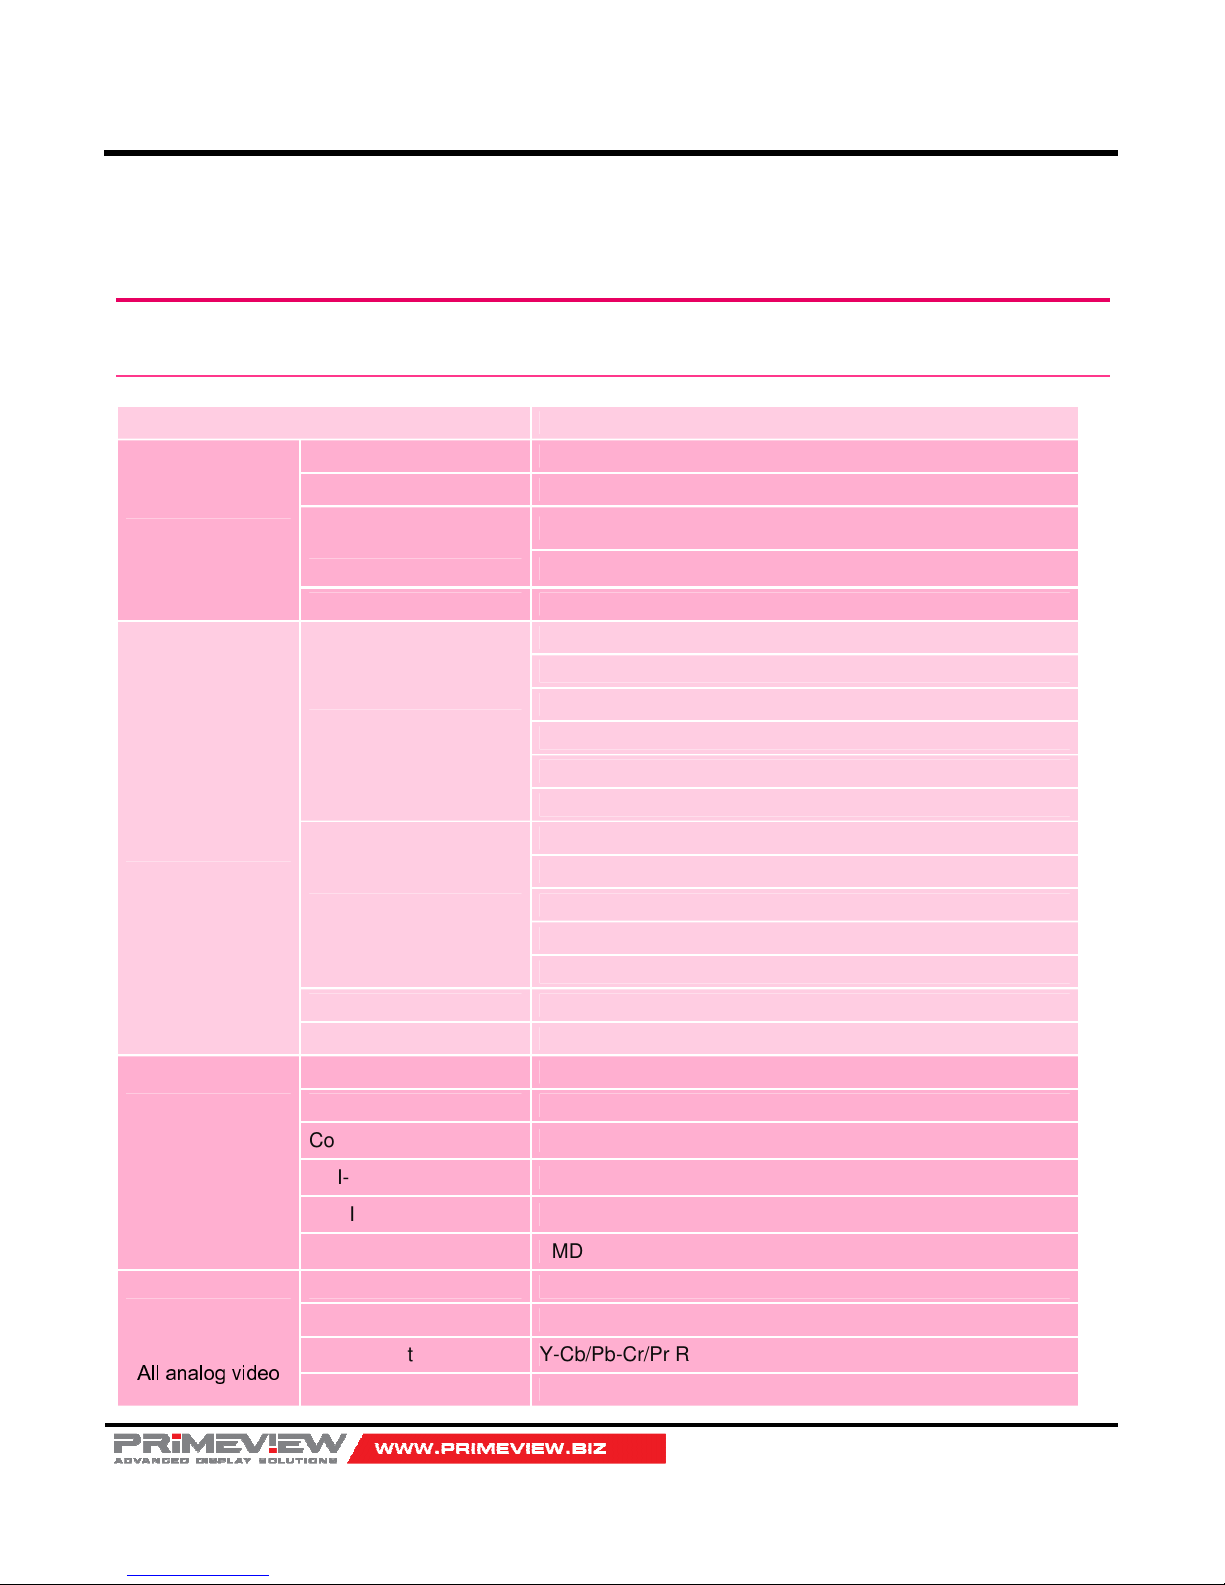
Specifications & Ratings
Specifications
Items Specifications
Display
Panel 40” / 46” / 46” HB DID Full HD panel
Resolution 1920 (Horizontal) x 1080 (Vertical) Full HD Resolution
Brightness
40”/46”: 700cd (3,000:1 Contrast Ratio)
46” HB: 1,500cd (3,500:1 Contrast Ratio)
Viewing Angle 178 (Horizontal) / 178 (Vertical)
Supportable
Signals
Analog PC
H Frequency Range : 20~82 kHz
V Frequency Range : 55 ~ 90 Hz
Maximum resolution :1920x1080 60Hz
Maximum pixel rate : 170 MHz
DTV mode support : 720P, 1080i, 1080p
Separate / Composite / SOG sync support
Digital PC / HDMI
H Frequency Range : 20~82 kHz
V Frequency Range : 55 ~ 90 Hz
Maximum resolution : 1920x1080 60Hz
Maximum pixel rate : 170 MHz
DTV mode support: 720P/1080i/1080p
Component(DTV/DVD) 1080p / 1080i / 720p / 576p / 576i / 480p / 480i
CVBS, S-Video NTSC, PAL Standard
Connector
AV RCA CVBS In (75 ohm, 1.0Vp-p)
(Video Input)
S-Video SVHS Y/C In (75 ohms, 1.0/0.3 Vp-p)
Component Y-Cb/Pb-Cr/Pr RCA In (75 ohms, 0.7Vp-p)
DVI-I (Analogue) DSUB In (Analogue: 75 ohms ±10%, 0.7Vp-p ±5%)
DVI-I (Digital) TMDS In (Digital Signal)
HDMI TMDS In (Digital Signal)
Connector
AV RCA CVBS In (75 ohm, 1.0Vp-p)
(Video Output)
S-Video SVHS Y/C In (75 ohms, 1.0/0.3 Vp-p)
All analog video
Component Y-Cb/Pb-Cr/Pr RCA In (75 ohms, 0.7Vp-p)
DVI-I (Analogue) DSUB In (Analogue: 75 ohms ±10%, 0.7Vp-p ±5%)
Page 32
40”/46”/46”HB Slim Video Wall Monitor
User’s Guide
Page 32
can be converted
to DVI out (No
Signal Loss)
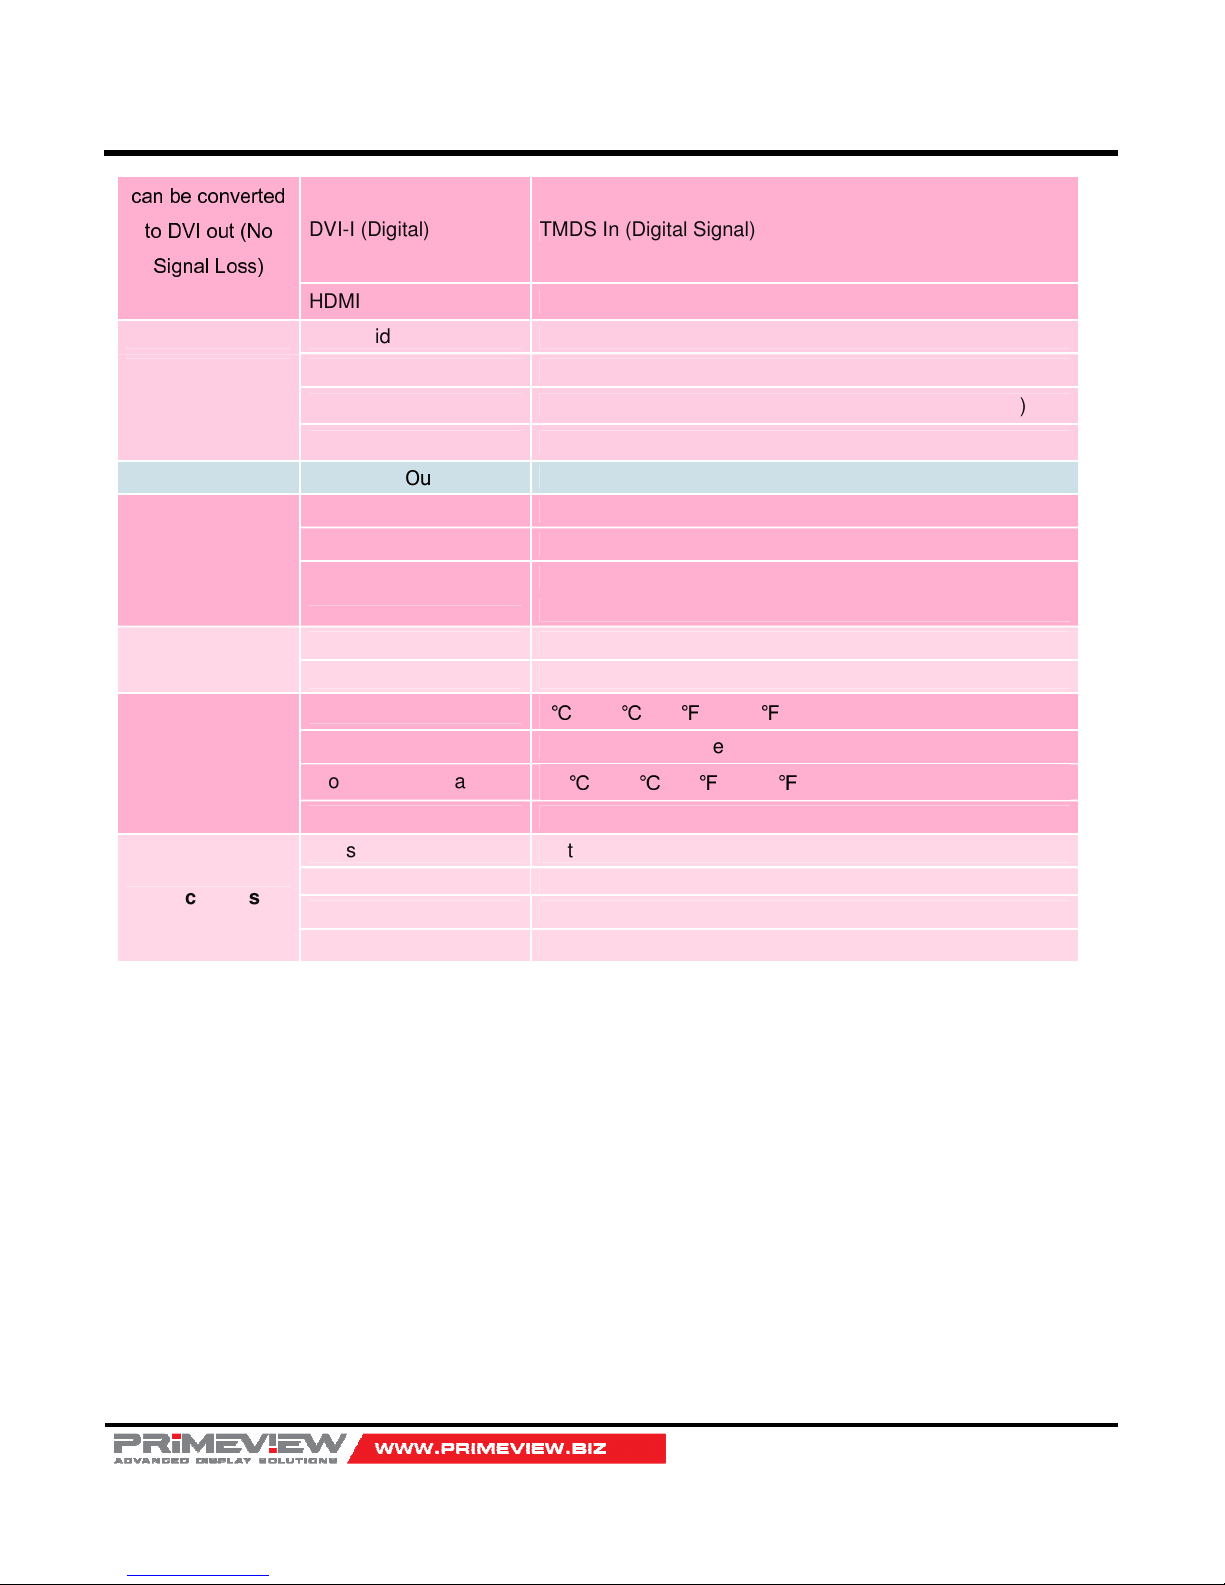
DVI-I (Digital) TMDS In (Digital Signal)
HDMI TMDS In (Digital Signal)
Connector
AV/S-Video RCA Stereo Audio Line In (500mVrms)
(Audio Input)
Component RCA Stereo Audio Line In (500mVrms)
DVI-I 3.5mm JACK Stereo PC/DVI COMMON (500mVrms)
SPDIF OUT HDMI => Optical
Control Port RS-232 In/Out D-sub (9Pin), IR remote control in/out (daisy chained)
OSD
Color 8Bit color (16,256 Colour Palette)
OSD Type Graphic & text
Language Support
Unicode string format
English, German, French, Spanish, Portuguese.
Power
AC Input Voltage AC 110 V - 240 V (60/50 Hz)
Power Consumption 570 Watt
Conditions
Operating Temperature
0℃ ~ 40℃ (32℉ ~ 104℉)
Operating Humidity 20% ~ 85% (Non Dew)
Storage Temperature
-10℃ ~ 50℃ (14℉ ~ 122℉)
Storage Humidity 10% ~ 90% (Non Dew)
Mechanics
Housing Metal Rear Cover
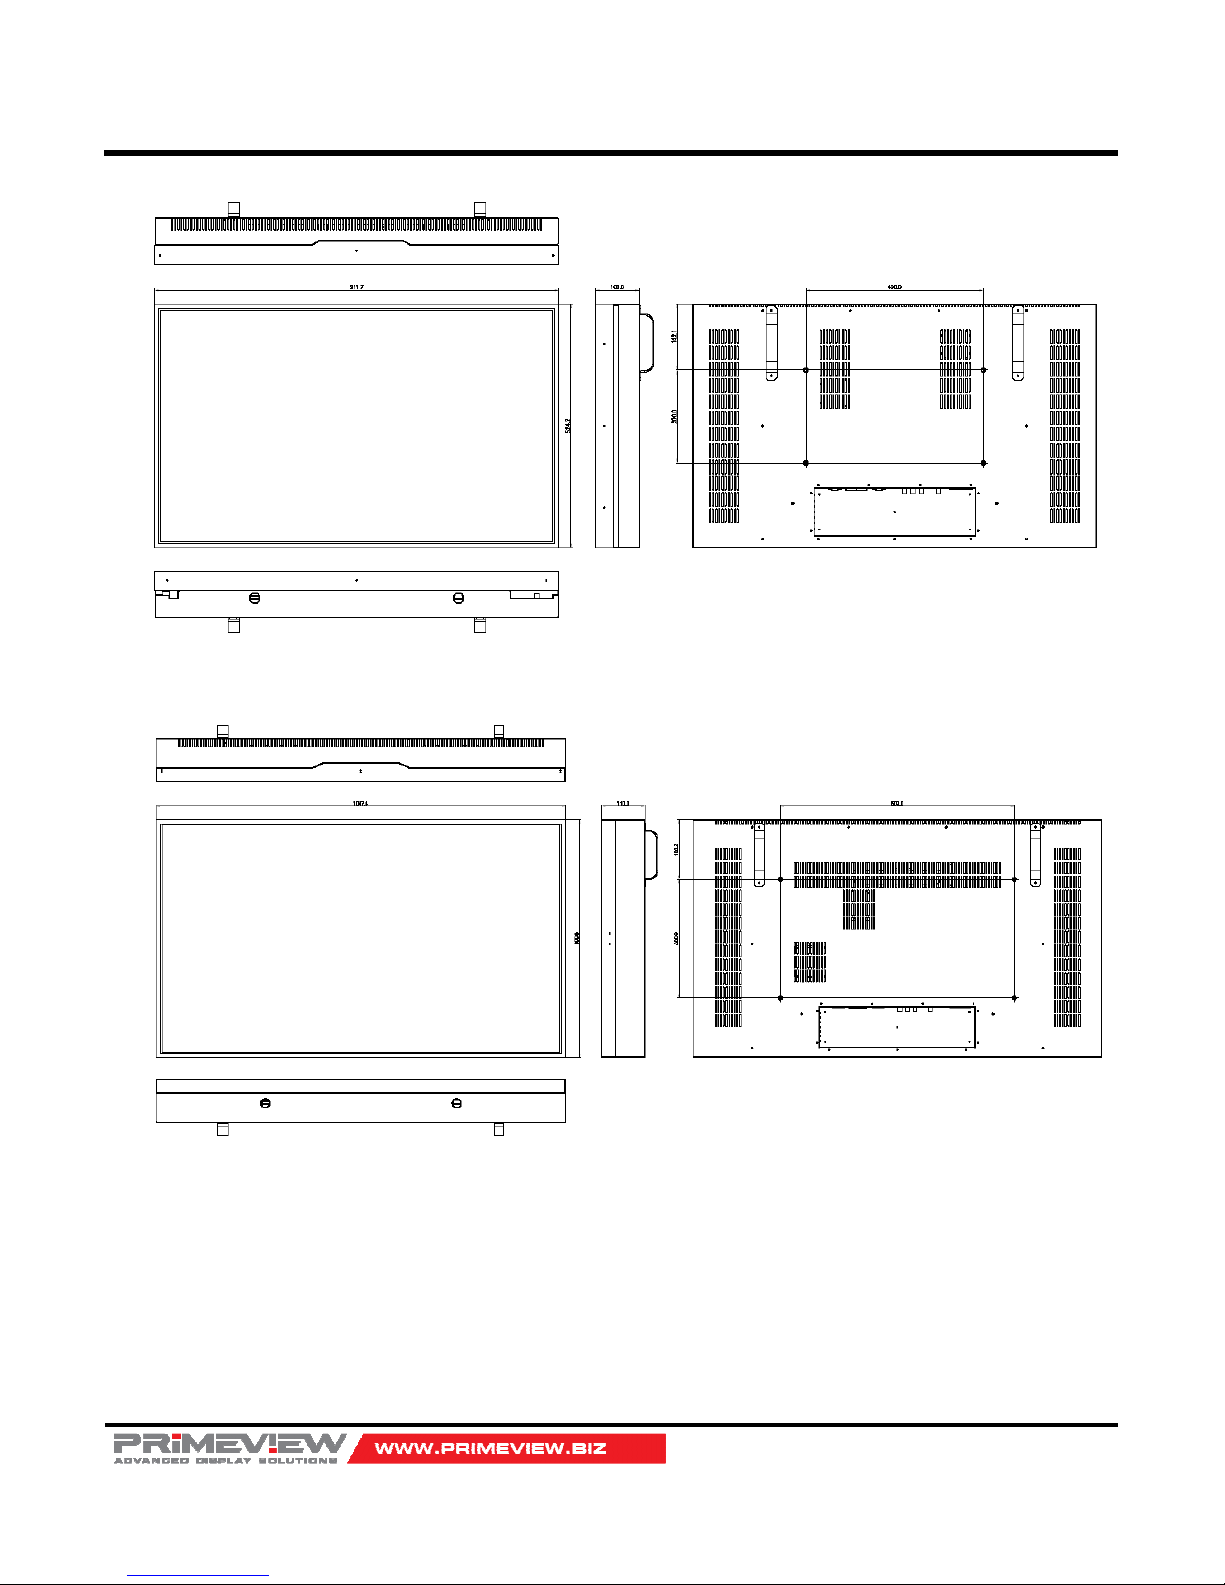
Net Dimension 911.7 x 524.2 x 100 (40”) /1047.4 x 600.6 x 110 (46”)
Net Weight 23Kg (without Stand)
Packing Weight 32Kg (without Stand)
Page 33
40”/46”/46”HB Slim Video Wall Monitor
User’s Guide
Page 33
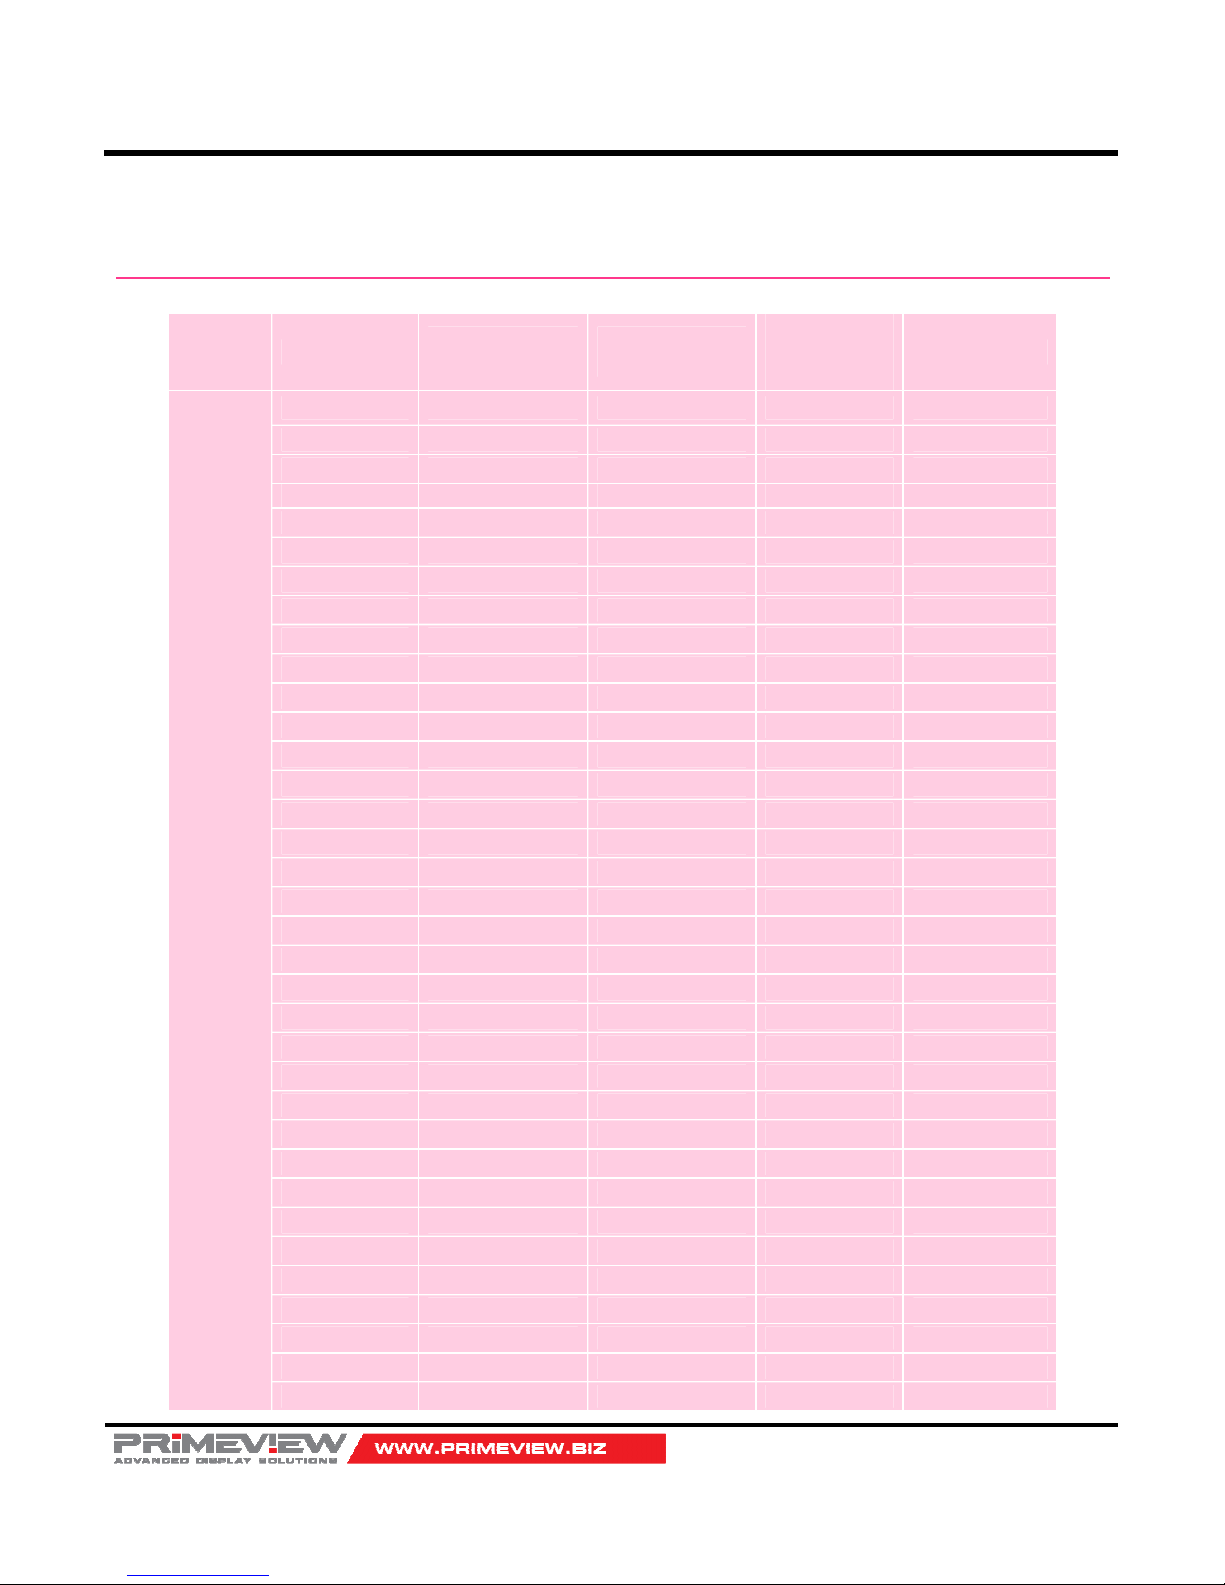
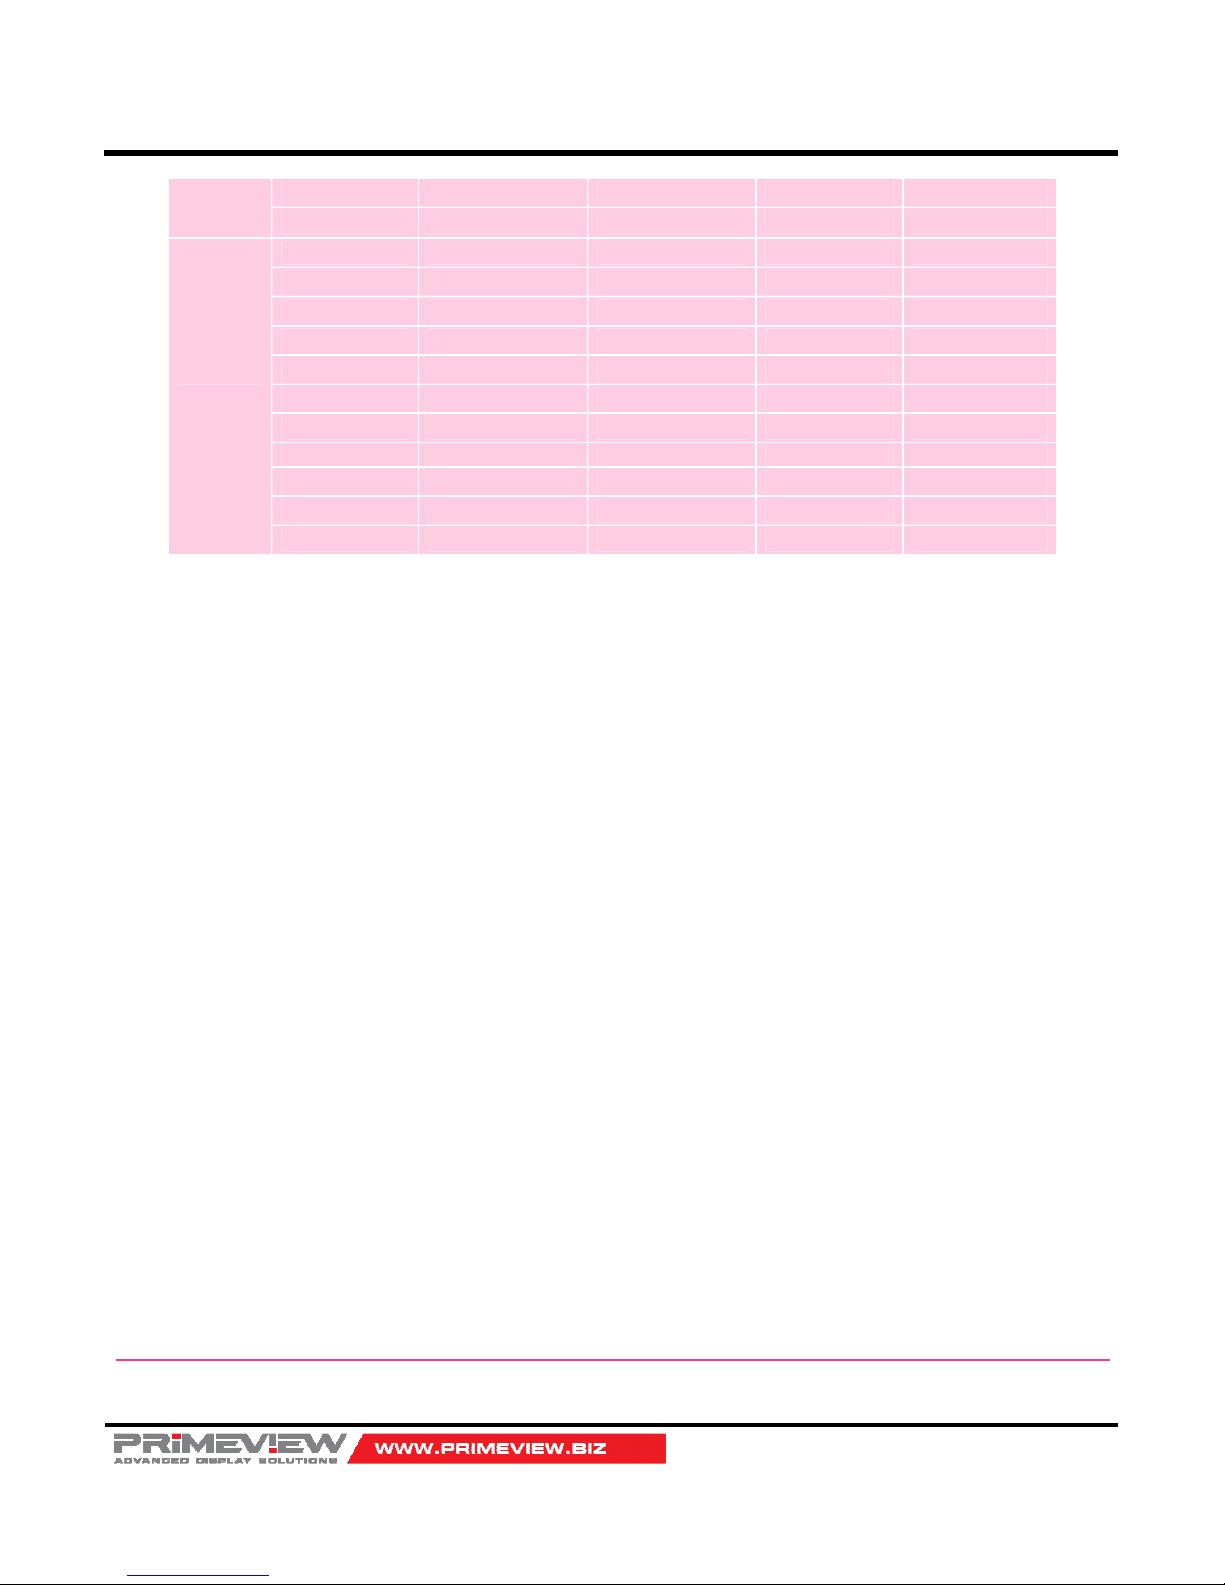
Supported Video Timing
Section Resolution
H Frequency
( kHz )
V Frequency
( Hz )
Pixel
Frequency
( MHz )
Comment
PC
640x400 37.861 85.08 31.5
640x350 31.469 70.087 25.175
640x350 37.861 85.08 31.5
640x480 31.469 59.94 25.175
640x480 35.000 66.667 30.24
640x480 37.861 72.809 29.765
640x480 37.500 75.0 31.5
640x480 43.269 85.008 36.0
640x480 45.540 90.0 37.889
720x400 31.469 70.087 28.322
720x400 37.927 85.039 35.5
800x600 35.156 56.25 36.0
800x600 37.879 60.317 40.0
800x600 43.764 70.02 45.513
800x600 48.077 72.188 50.0
800x600 46.875 75.0 49.5
800x600 53.674 85.061 56.25
800x600 56.250 90.0 60.065
1024x768 48.780 60.001 64.11
1024x768 48.363 60.004 65.0
1024x768 56.476 70.069 75.0
1024x768 57.703 72.039 78.476
1024x768 60.241 74.927 81.724
1024x768 60.030 75.029 78.75
1024x768 68.677 84.997 94.5
1152x864 67.500 75.0 104.993
1152x870 68.681 75.062 100.0
1152x900 61.846 66.0 94.787
1280x720 47.760 60.0 74.481
1280x768 60.150 75.0 102.977
1280x960 60.000 60.0 102.104
1280x1024 63.337 59.978 108.18
1280x1024 63.981 60.02 108.0
1280x1024 63.600 60.0 108.883
1280x1024 64.754 60.06 108.992
Page 34
40”/46”/46”HB Slim Video Wall Monitor
User’s Guide
Page 34
1360x768 47.700 60.0 84.700
1600x1200 75.000 60.0 162.000
4:3 Mode Only
DTV
720x480 15.735 59.94 13.500 Interlaced
720x576 15.735 50.0 13.595 Interlaced
720x480 31.469 59.94 25.175
720x576 31.250 50.0 26.566
1280x720 44.964 59.94 74.176
1280x720 37.500 50.0 60.466
1920x1080 33.750 60.0 74.25 Interlaced
1920x1080 28.125 50.0 70.723 Interlaced
1920x1080 31.250 50.0 72.000 Interlaced
1920x1080 67.5 60 148.5
1920x1080 67.5 50 148.5
Mechanical Dimension
Page 35
40”/46”/46”HB Slim Video Wall Monitor
User’s Guide
Page 35
1. 40” Slim Video Wall
2. 46”/46” HB Slim Video Wall
Page 36
40”/46”/46”HB Slim Video Wall Monitor
User’s Guide
Page 36
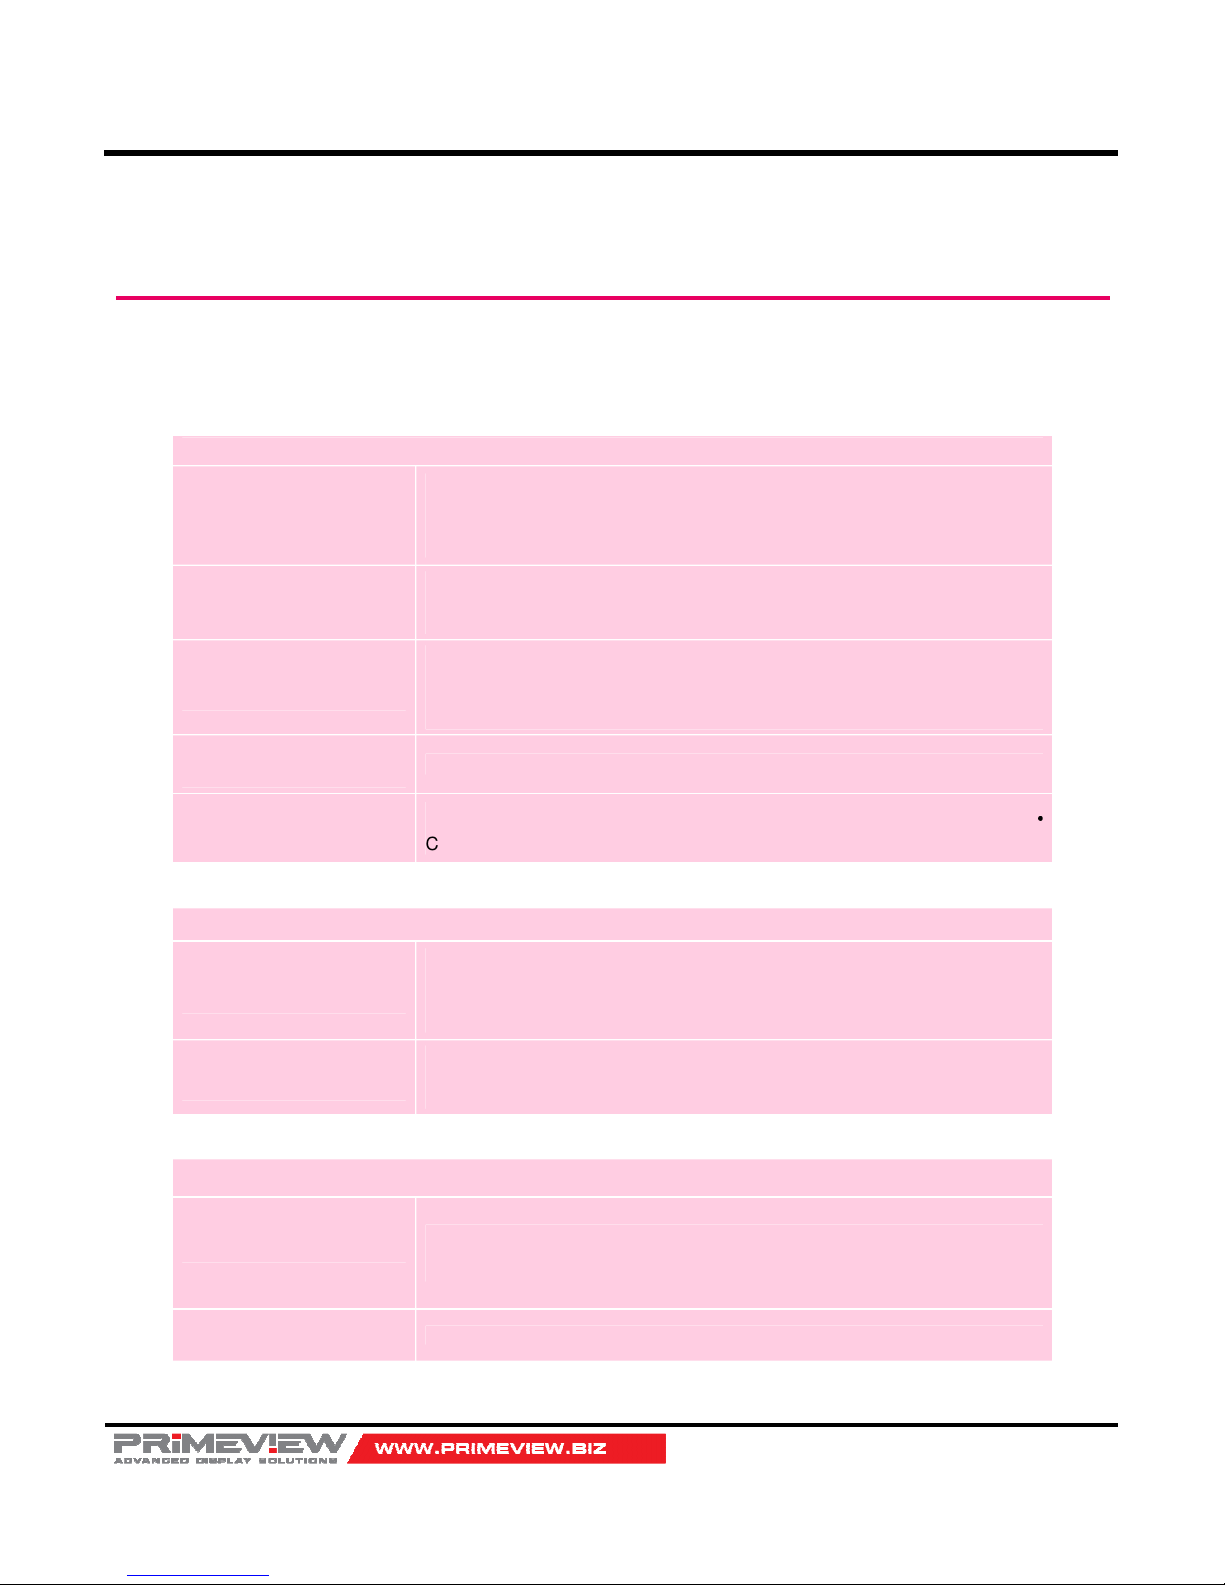
Trouble Shooting
If Slim Video Wall monitor seems to have a problem, first check the following list of possible problem and solutions before
contacting a service center. If none of these troubleshooting tips apply, do not attempt to service the product by yourself.
Call service center.
The video function does not work.
No picture & No sound.
Check whether the product is turned on.
Is the power cord inserted into wall power outlet?
Test the wall power outlet, plug another product’s power cord into the outlet
where the product’s power cord was plugged in.
Picture appears slowly
after switching on.
This is normal; the image is muted during the product startup process.
Please contact your service center, if the picture has not appeared after five
minutes.
No or poor color or poor
picture.
Adjust Color in menu option.
Keep a sufficient distance between the product and the devices.
Are the source cable installed properly?
Activate any function to restore the brightness of the picture.
Horizontal / Vertical bars
or picture shaking.
Check for local interference such as an electrical appliance or power tool.
Poor reception on some
channels.
Station or cable product experiencing problems, tune to another station.
•
Check for sources of possible interference.
The operation does not work normally
The remote control
doesn’t not work
Check to see if there is any object between the product and the remote
control causing obstruction.
Are batteries installed with correct polarity (+ to +, - to -)?
Install new batteries.
Power is suddenly turn
off.
Is the sleep timer set?
Check the power control settings. Power interrupted.
No source on station turned with Auto off activated.
The audio function does not work.
Picture OK & No sound.
Press the VOL or VOLUME button Sound muted? Press MUTE button Try another
channel. The problem may be with the broadcast Are the audio cables installed
properly?
No output from one of the
speakers.
Adjust Balance in menu option.
Page 37
40”/46”/46”HB Slim Video Wall Monitor
User’s Guide
Page 37
Unusual sound from inside the
product.
A change in ambient humidity or temperature may result in an unusual noise when
the product is turned on or off and does not indicate a fault with the product.
There is a problem in PC mode. ( Only PC mode applied)
The signal is out of range.
Check the specification of graphic card. Check it whether the signal cable is
connected or loose. Check the input source.
Vertical bar or stripe on
background & Horizontal
Noise & Incorrect position.
Work the Auto adjust, or phase, or H/V position, Frequency.
Screen color is unstable or
single color.
Check the signal cable. Reinstall the PC video card.
Page 38
40”/46”/46”HB Slim Video Wall Monitor
User’s Guide
Page 38
Serial Control Protocol
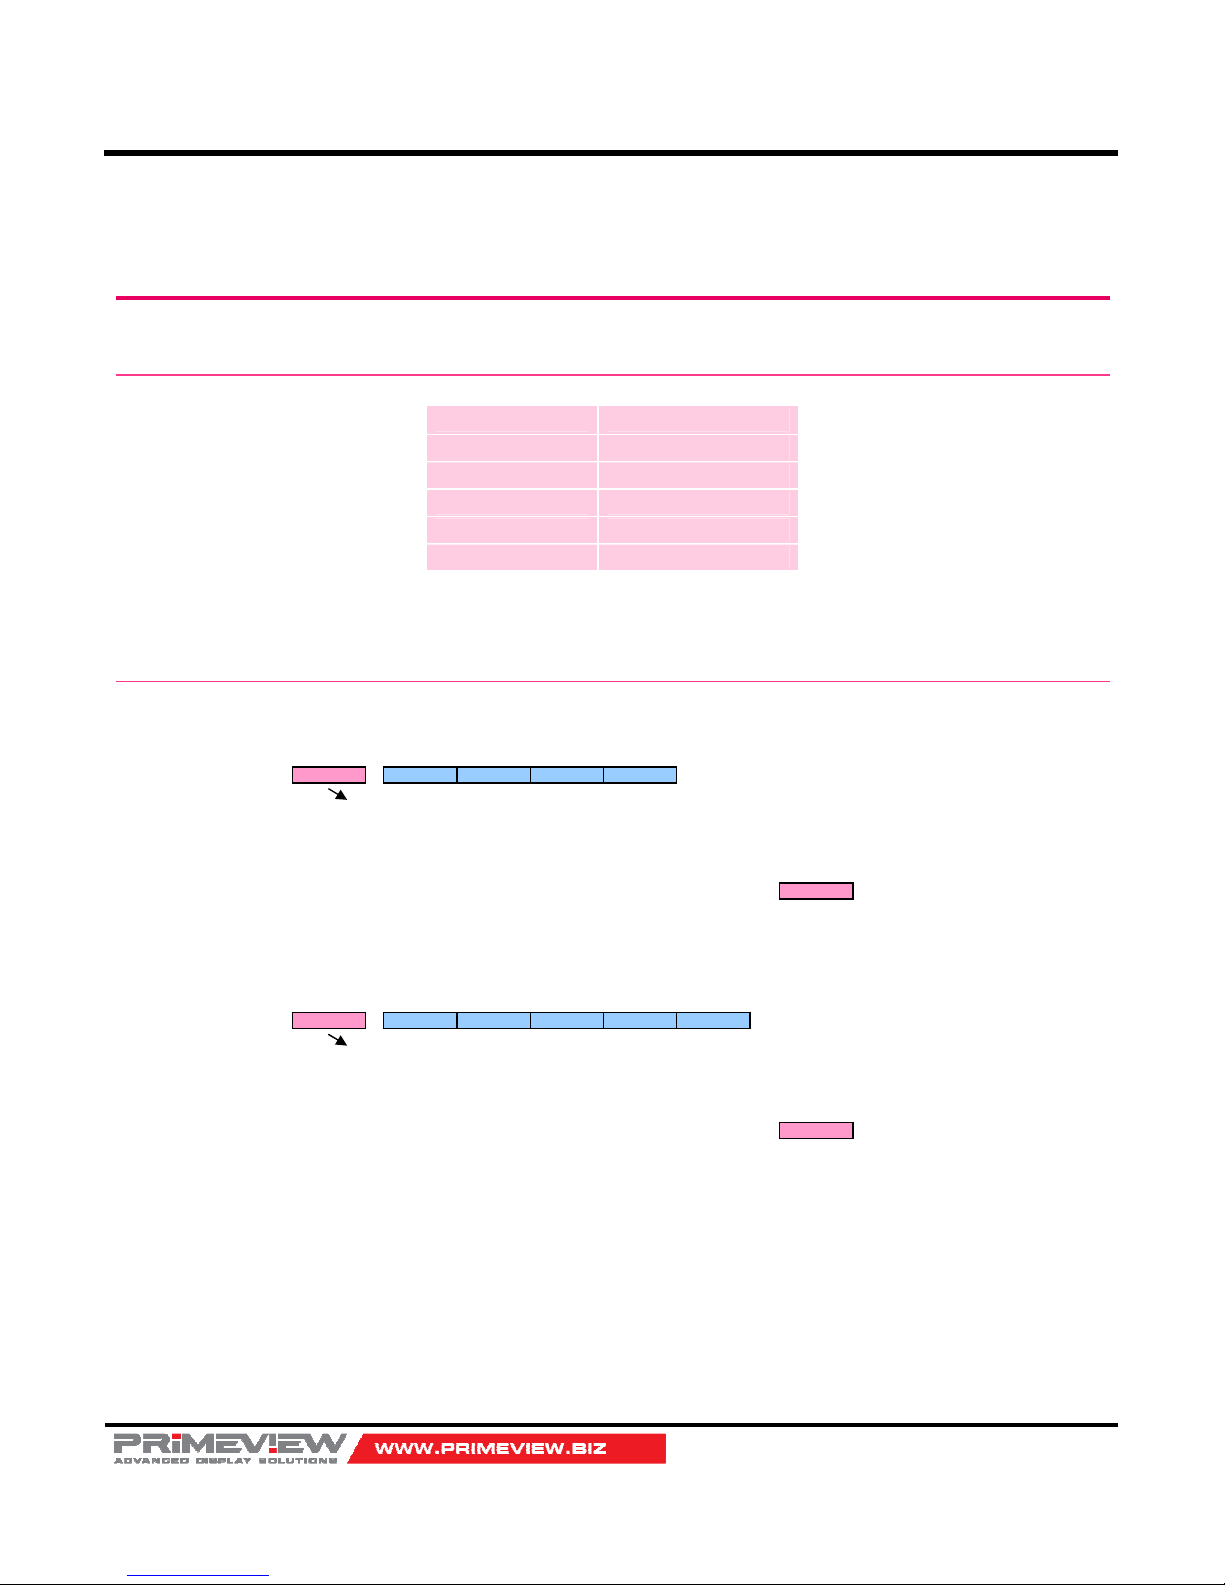
Serial Setup
Item Settings
Baud rate 19200bps
Data Bit 8bit
Stop Bit 1bit
Parity Bit None
Stream Control None
Cable: null modem (Rx-Tx crossed - DSUB9 Female), active connections Rx, Tx, Signal GND.
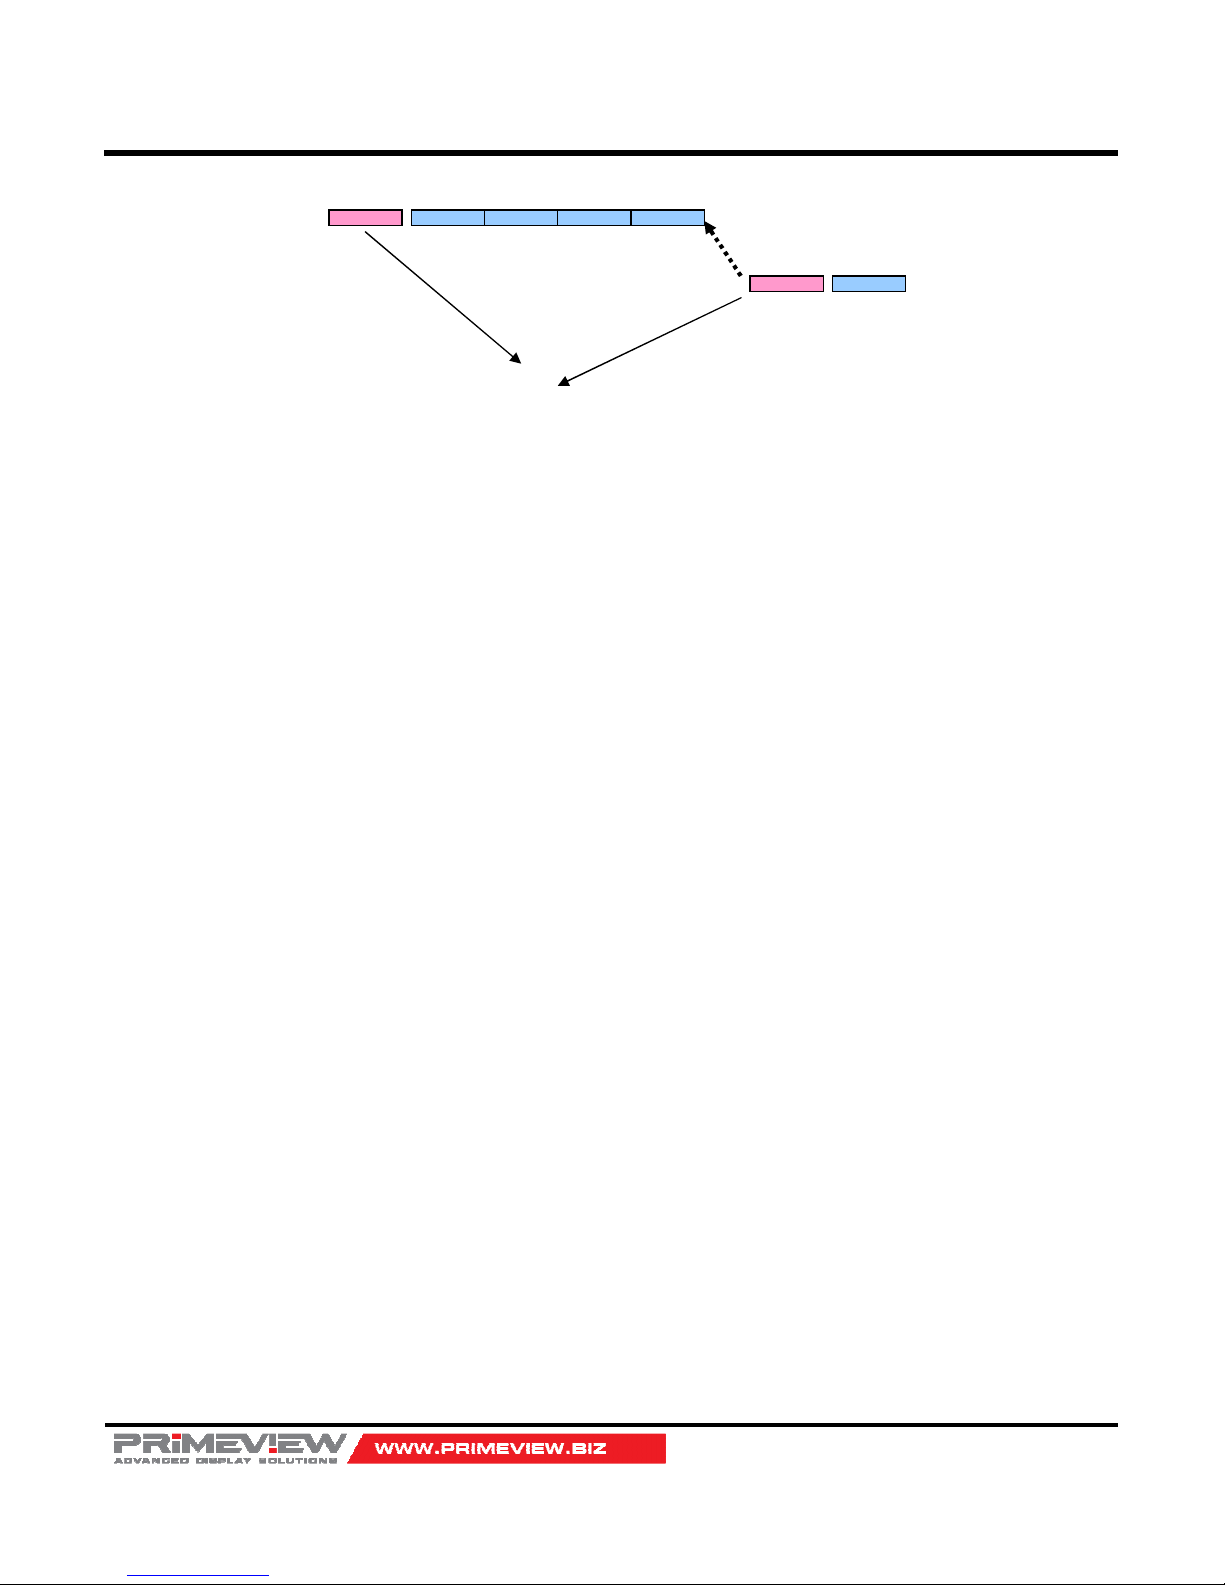
Protocols
Virtual Remote Control
Setting Parameters to Monitor
Read Parameters from Monitor
0xF5 0x88 ID(0~0xFE) FE PARM. VALUE
PC
CMD Packet (5Bytes)
Command Format
0xFX : F = Command Send Start , X = No of Byte to Send
Current Example (0xF5) : Start Send 5 Byte of Packet Data
0xF0
Response
ACK
0xF4 0x88 ID(0~0xFE) 0xFD Key Code.
PC
CMD Packet (4Bytes)
Command Format
0xFX : F = Command Start Sending , X = No of Byte to Send
Current Example (0xF4) : Start Sending 4 Bytes of Packet Data
0xF0
Response
ACK
Page 39
40”/46”/46”HB Slim Video Wall Monitor
User’s Guide
Page 39
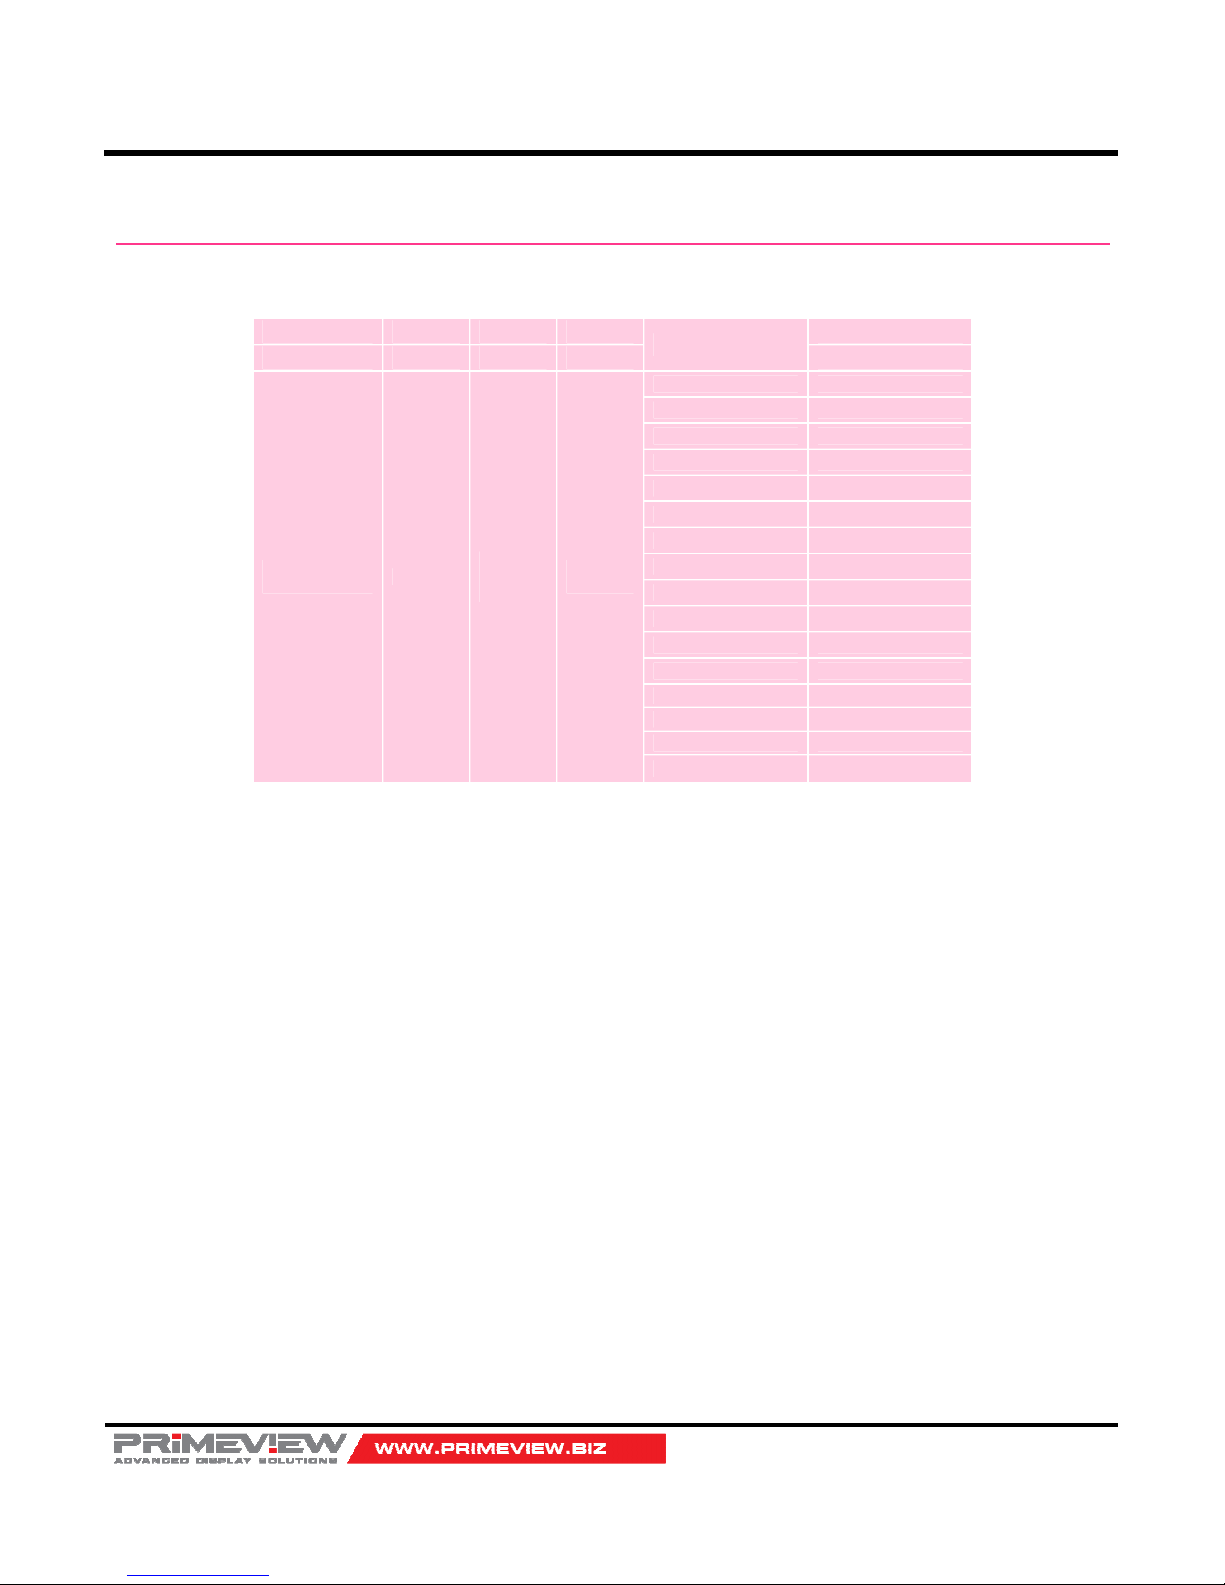
0xF4 0x89 ID(0~0xFE) 0xFE PARM
VALUE 0xF1
PC
CMD
Packet(4Bytes)
JUNO
(Response)
CMD
Packet(1Byte)
Command Format
0xFX : F = Command Start Sending , X = No of Byte to Send
Example
0xF4 : Start Sending 4 Bytes of Packet Data
0xF1 : Start Sending 1 Byte of Packet Data
Page 40
40”/46”/46”HB Slim Video Wall Monitor
User’s Guide
Page 40
Control Command Packet
Virtual RCU (Remote Control Unit): Emulates the Infra Red Remote Control
CMD Data1 Data2 Data3
Description
Data4
Command Target ID CMD Key Code
0xF4
(Start Sending)
0x88
0xXX
(0x00~0x
FE)
0xFD
(RCU)
KEY_INPUT
0x13
KEY_POWER
0x11
KEY_POWER_ON
0x80
KEY_POWER_OFF
0x81
KEY_VOLUP
0x53
KEY_VOLDN
0x57
KEY_MUTE
0x03
KEY_SNDSTD
0x4A
KEY_PICSTD
0x07
KEY_MENU
0x43
KEY_INFO
0x06
KEY_STILL
0x0A
KEY_PICSIZE
0x5A
KEY_EXIT
0x50
KEY_PC
0x58
KEY_ENTER
0x04
Page 41
40”/46”/46”HB Slim Video Wall Monitor
User’s Guide
Page 41
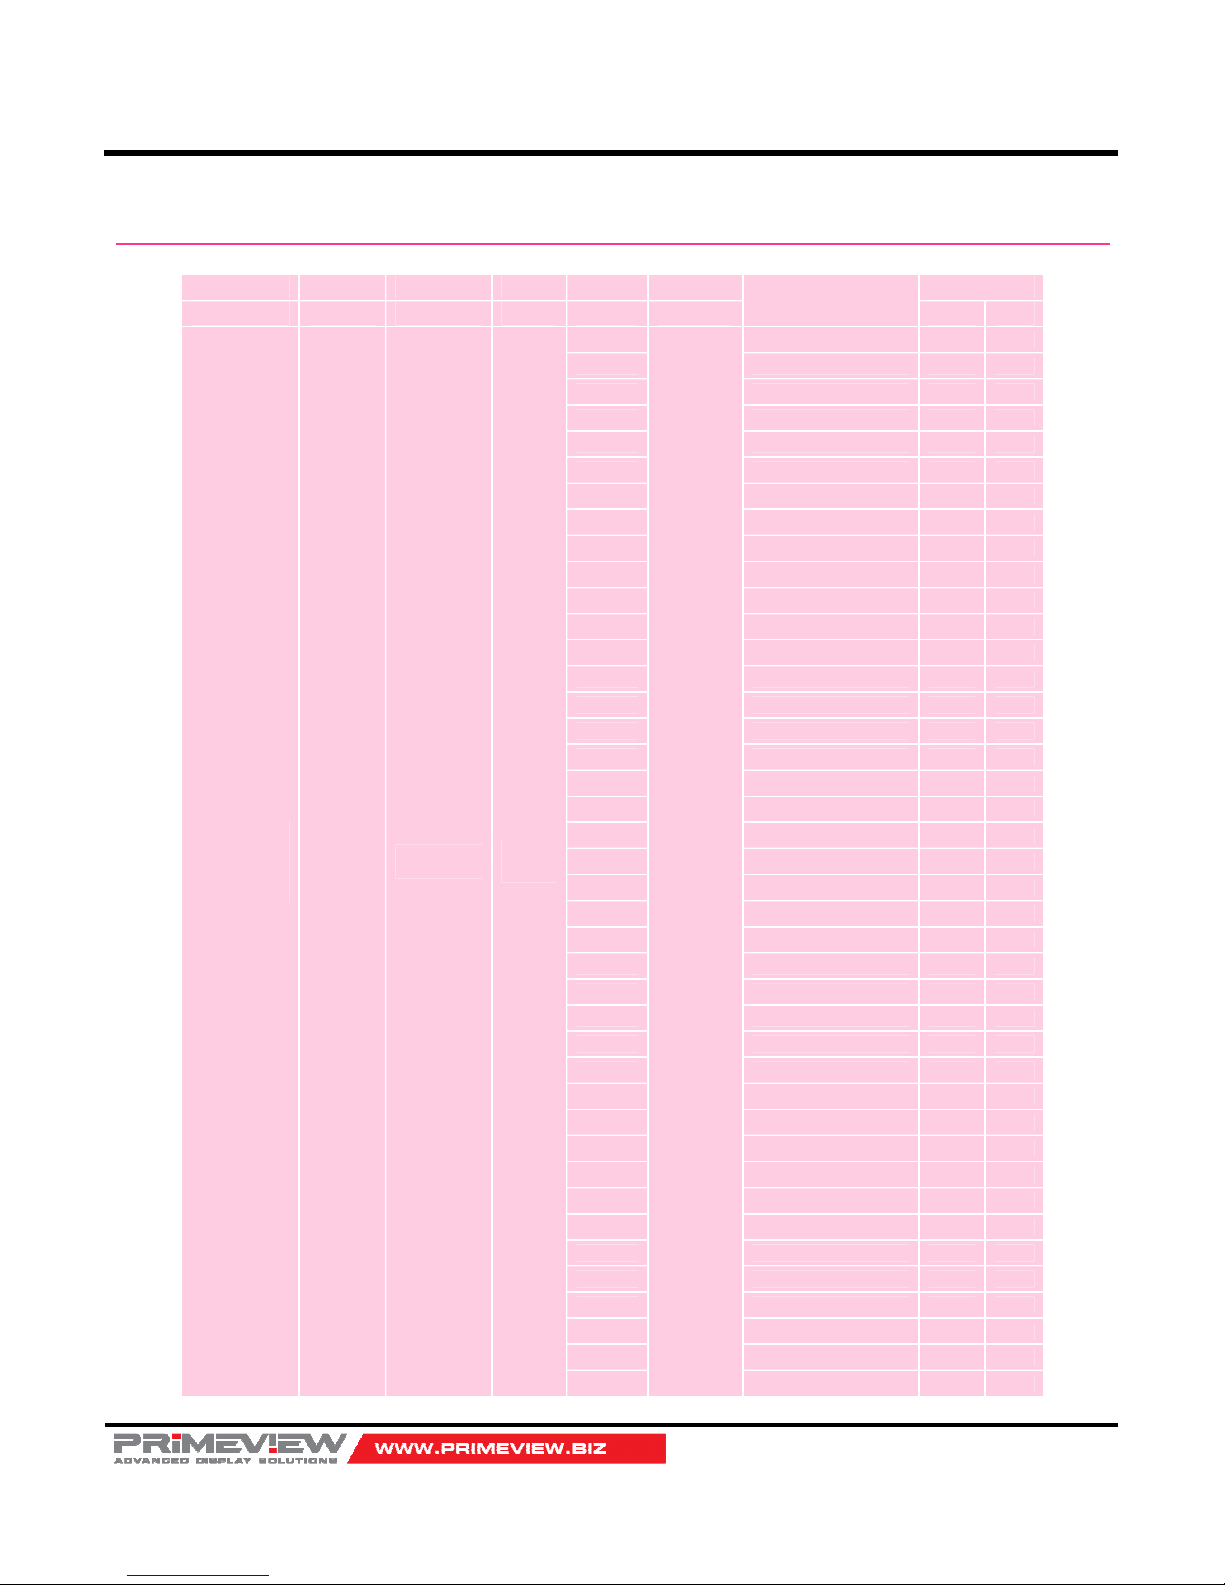
System Parameter Direct Settings/Read Packet
CMD Data1 Data2 Data3 Data4 Data5
Description
Range
Command Target ID CMD Param Value Min Max
0xF5
(Start Set)
0xF4
(Start Get)
0x88(Set)
0x89(Get)
0xXX
(0x00~0xFE)
0xFE
Set /Get
Param.
0x00
0x00~0xFF
(By Min-Max)
Not Send
in Get Mode
LANGUAGE 0 5
0x01
CURRENTSOURCE
(1)
0 10
0x02
PC_PICTUREMODE 0 4
0x03
COLORTEMP 0 5
0x04
CONTRAST 0 100
0x05
BRIGHTNESS 0 100
0X06
SHARPNESS 0 100
0x07
RF_PICTUREMODE 0 4
0x08
RF_COLORTONE 1 5
0x09
RF_CONTRAST 0 100
0x0A
RF_BRIGHTNESS 0 100
0x0B
RF_COLOR 0 100
0x0C
NTSC_TINT 0 100
0x0D
RF_SHARPNESS 0 100
0x0E
SCALEMODE 0 -
0x0F
USERRED 0 100
0x10
USERGREEN 0 100
0x11
USERBLUE 0 100
0x16
MUTE 0 1
0x17
SOUNDSTD 0 2
0x18
AUTOVOLUME 0 1
0x1A
VOLUME 0 100
0x1C
BALANCE 0 100
0x1D
EQ100HZ 0 20
0x1E
EQ300HZ 0 20
0x1F
EQ1KHZ 0 20
0x20
EQ3KHZ 0 20
0x21
EQ10KHZ 0 20
0x22
ONHOUR 0 23
0x23
ONMINUTE 0 59
0x24
ONTIMEONOFF 0 1
0x25
ONTIMEVOL 0 23
0x26
OFFHOUR 0 59
0x27
OFFMINUTE 0 1
0x28
OFFTIMEONOFF 0 1
0x2A
HALFTONE 0 1
0x2B
BLUESCREEN 0 1
0x2C
PIXELSHIFT_EN 0 1
0x2D
WIPER_EN 0 1
0x2E
BGGRAY 0 7
0x2F
POWER(read only) 0 1
Page 42
40”/46”/46”HB Slim Video Wall Monitor
User’s Guide
Page 42
0x30
CURHOUR 0 23
0x31
CURMINUTE 0 59
0x32
ILLUMINANCE 0 -
0x33
MAX_ILLUMINANCE
(2)
0 200
0x34
MIN_ILLUMINANCE
(3)
0 200
0x35
AUTO_DIM 0 1
0x36
DIM_LEVEL
(4)
0 100
0x37
CURTEMP_MAIN 0 -
0x38
CURTEMP_AUX 0 -
0x39
TEMP_THRESHOLD
(5)
60 200
0x3A
TEMP_HYSTERESIS
(6)
2 20
0x3B
FAN_CONTROL 0 2
0x3C
FAN_ACTIVE 0 1
0x3D
SETX 0 2
0x3E
SETY 0 2
0x3F
SETXMAX 1 3
0x40
SETYMAX 1 3
0x41
SETXGAP 0 200
0x42
SETYGAP 0 200
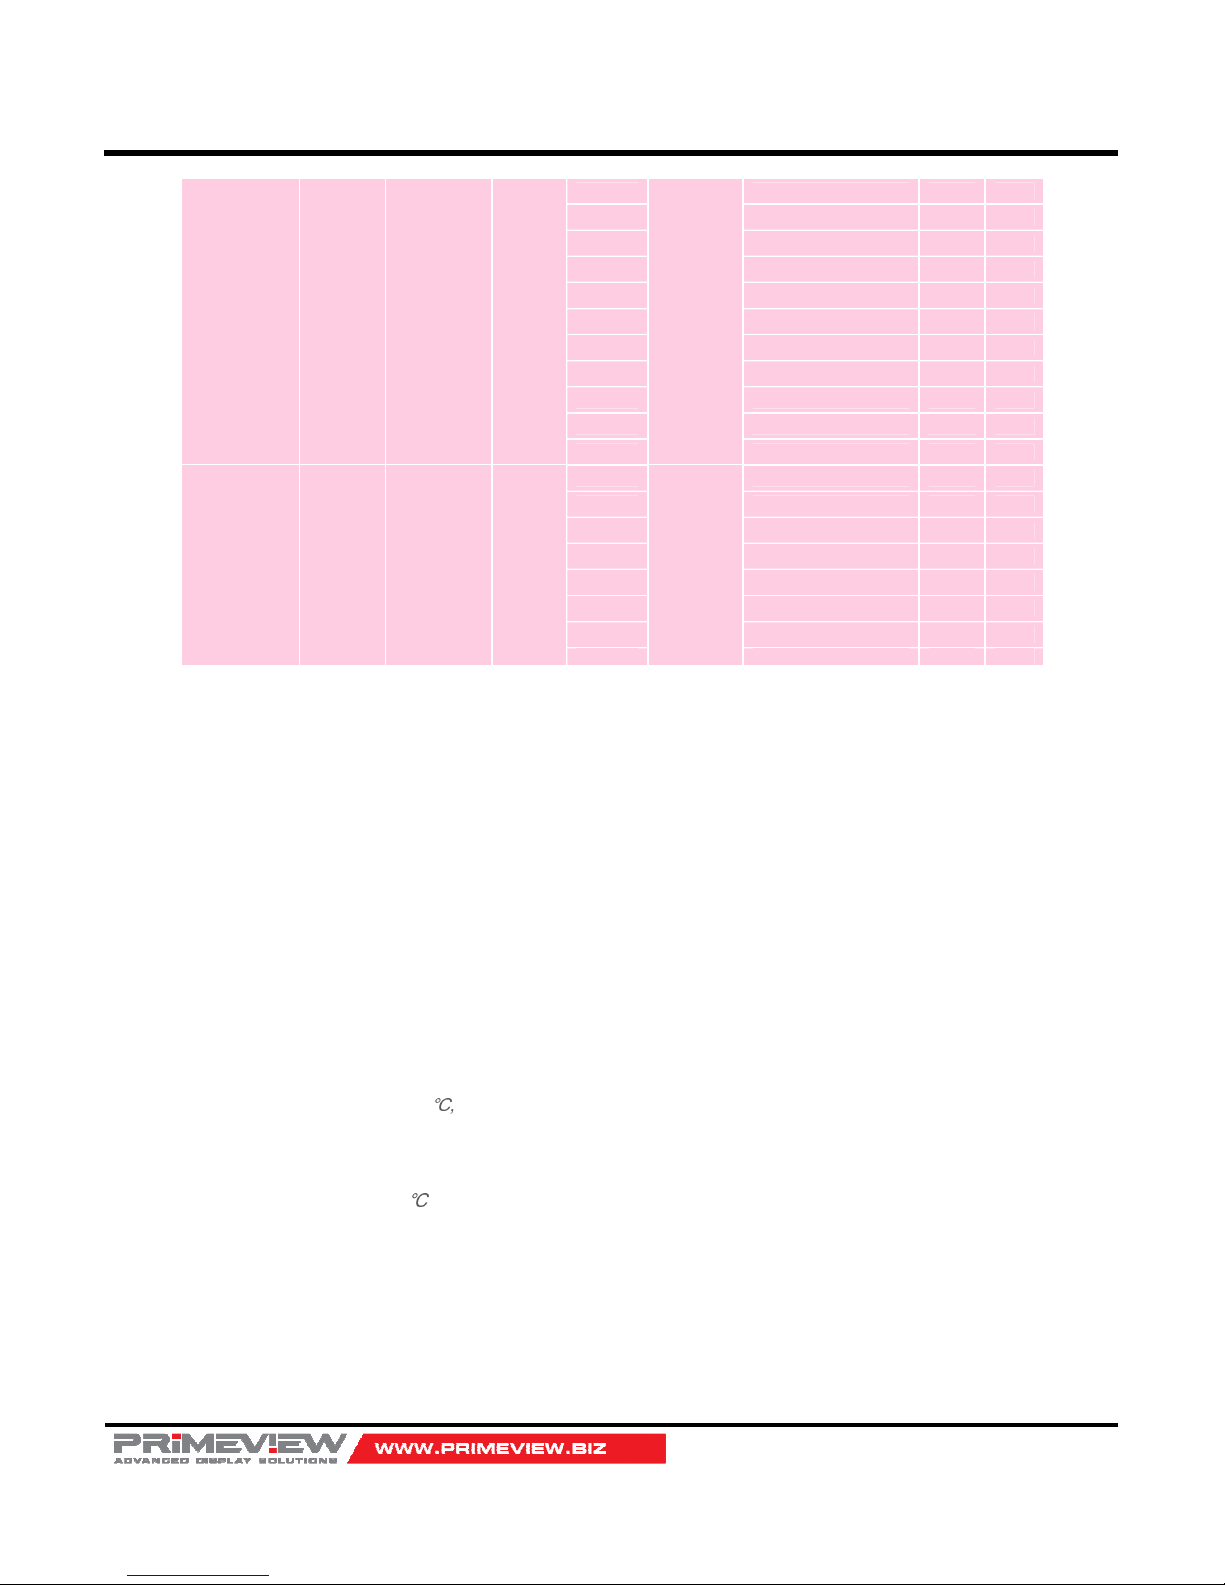
Notice
(1) CURSOURCE Setting Value
AV1:0, AV2:1, AV3:2, COMP1:6, DVI:9, DSUB:10, HDMI:11
(2) MAX_ILLUMINANCE Settings
Setting Value = Ambient Level (by LUX) / 100
Ex) Desired Ambient is 10000 Lux, Setting is 100 (= 10000 / 100)
(3) MIN_ILLUMINACE Settings
Setting Value = Ambient Level (by LUX) / 10
Ex) Desired Ambient is 200 Lux, Setting is 20 (= 200 / 10)
(4) DIM_LEVEL Settings
Dimming is controlled by Brightness Settings. Not working even set.
(5) TEMP_THRESHOLD Settings
Setting Value = Desired temperture(by Celsius) x 2 + 60
Ex) Desired temperature is 60℃, Setting is 180 (= 60 x 2 + 60)
(6) TEMP_HYSTERESIS Settings
Setting Value = Desired Hysteresis(by Celsius) x 2
Ex) Desired Hysteresis is 2℃, Setting is 4 (= 2 x 2)
Page 43
40”/46”/46”HB Slim Video Wall Monitor
User’s Guide
Page 43
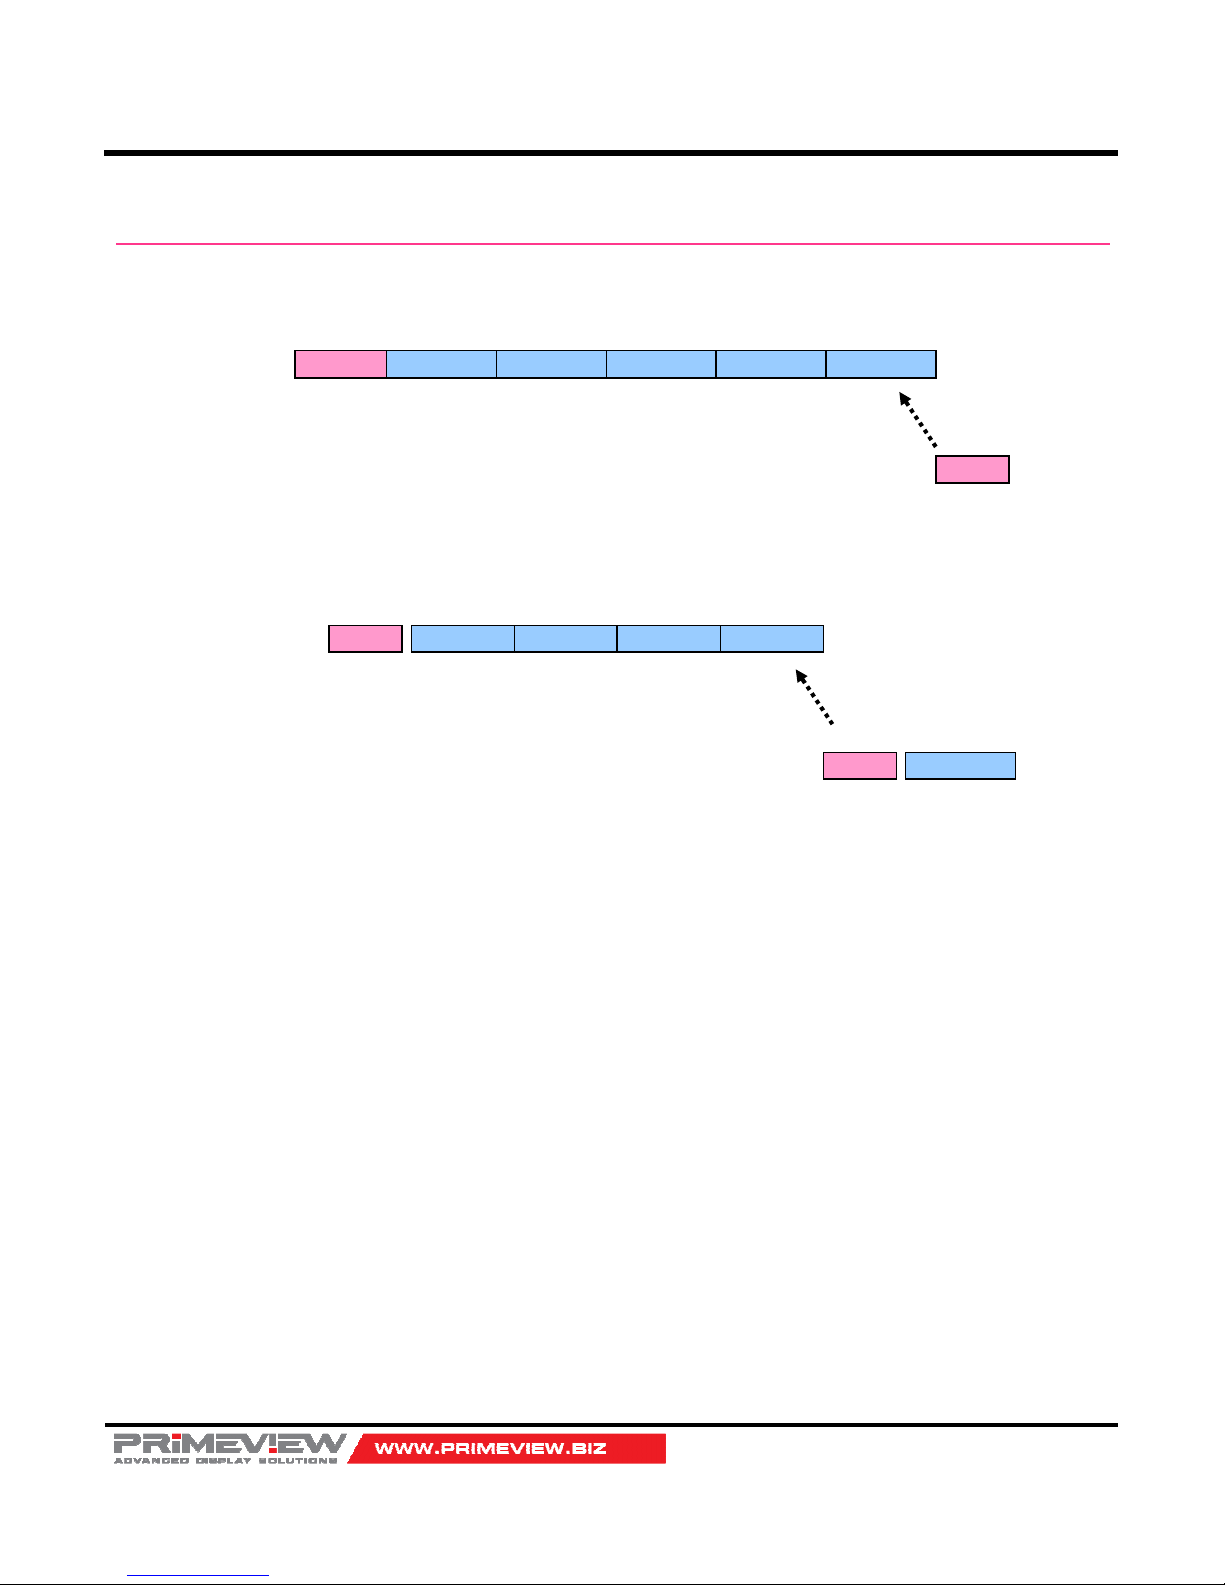
Control Examples at Master PC
Set Input Source to RGB Input
v
Read Power State
0xF4
Start Send
0x89
Target
0
ID
0xFE
Set Param CMD
0x2F
POWER STS
1(on) or 0(0ff)
Value
0xF1
Start Send
PC
CMD
Packet(4Bytes)
Monitor
(Response)
CMD
Packet(1Byte)
0xF5
Start Send
0x88
Target
0
ID
0xFE
Set Param CMD
0x01
CURRENTSOURCE
10
RGB(=10)
CMD Packet (5Bytes)
0xF0
ACK
Monitor
(Response)
PC
 Loading...