


The genesig® q16
Instruction
Manual

The genesig
®
q16
instruction manual
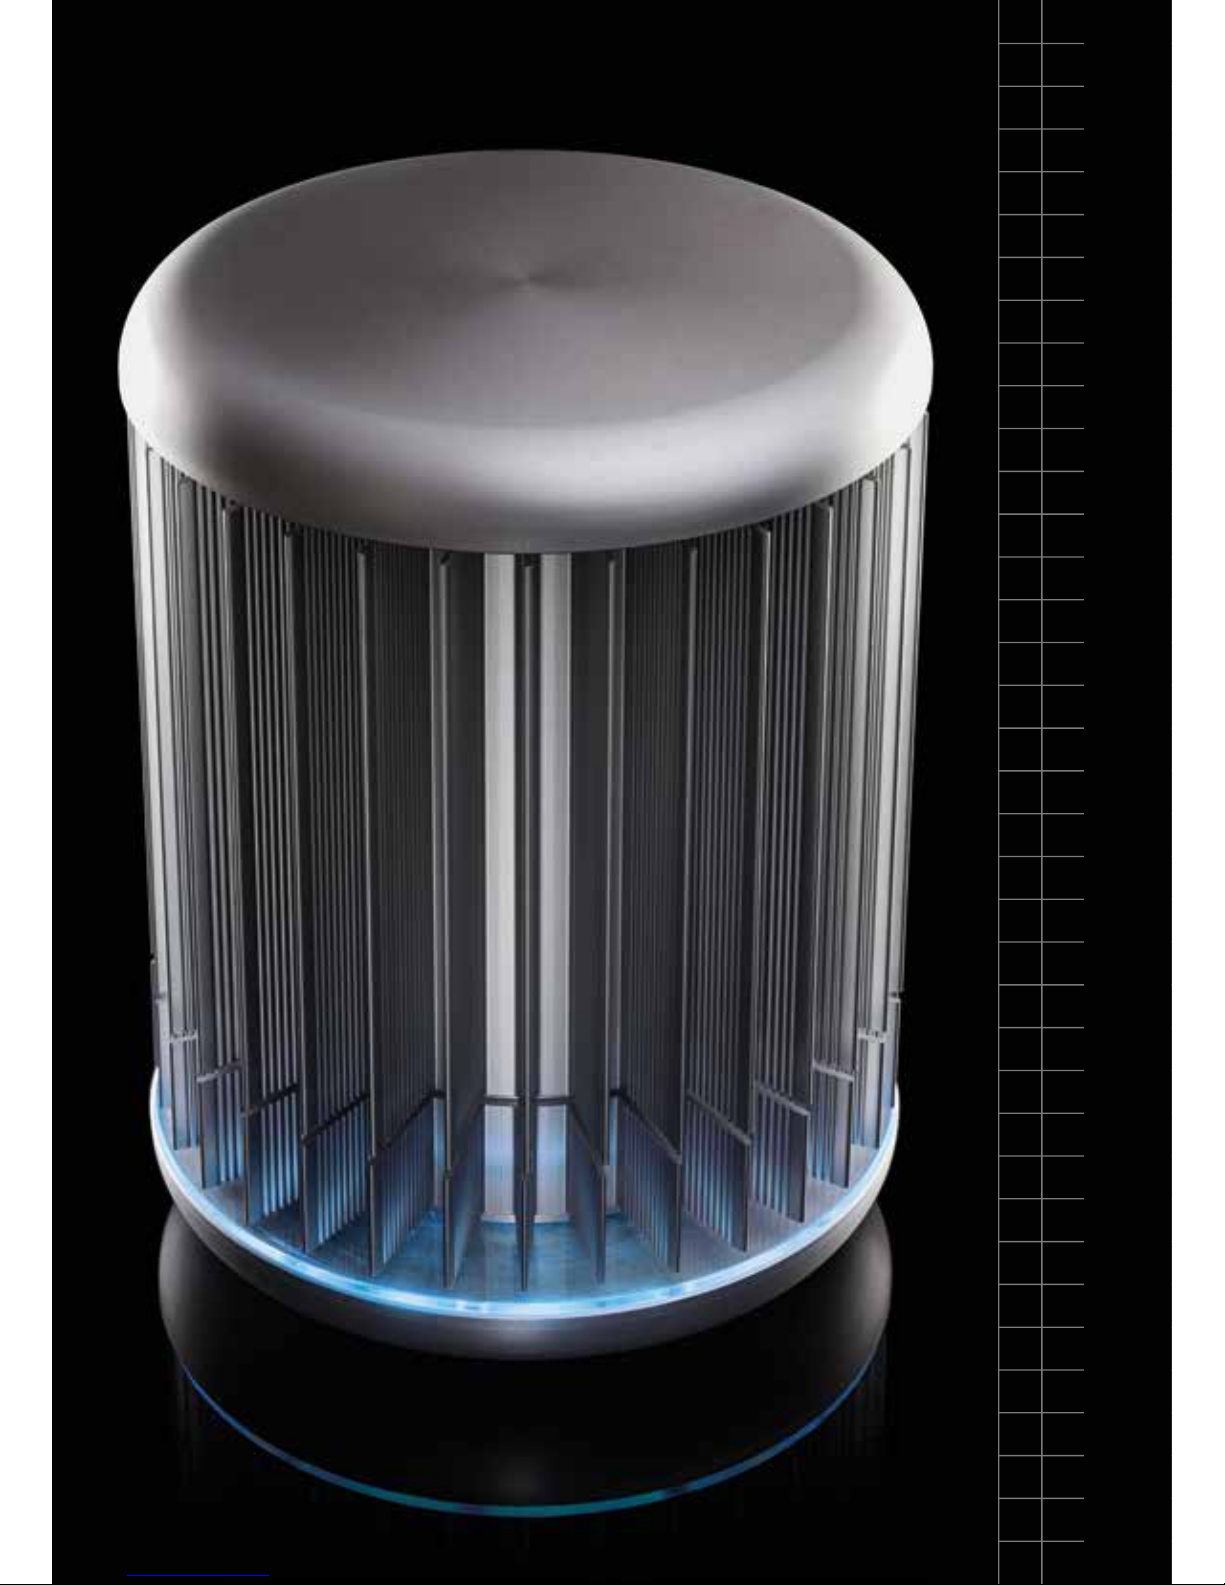
Congratulations on purchasing the
genesig q16. The q16 is a revolutionary
instrument that brings the 21st century
technology of DNA testing to everyone.
As well as being beautiful and highly
portable, the q16 is powerful. In
combination with the genesig Easy kit
range the genesig q16 can be used to
detect and quantify over 450 different
DNA/RNA targets.
2

1|
Connecting the machine and
installing the software 04
2|
General operation
of the instrument 08
3|
Opening the software and
selecting a test type 10
4|
The main screen
layout 12
5|
Results
24
6|
Exporting
results 30
7|
What do my
results mean? 32
8|
Troubleshooting
40
3

Section 1
Unpack your genesig q16 and remove all packaging.
Insert the power cable in to the power jack in the base of
the instrument and plug into a power source.
The q16 can be operated in three ways.
If you are planning to run the instrument via a direct
connection to Mac/PC, plug in the Ethernet cable to the
base of the instrument and connect to a spare Ethernet
port on your Mac/PC. Ideally your Mac/PC should run
the most recent version of the operating system. The
genesig q16 will run on OS X version 10.7.3 and newer
releases for Mac and Windows Vista or 7, 8, 8.1 and 10
for PC.
If you have multiple genesig q16 instruments you can
connect them all to the same Mac/PC via a network
switch.
Direct connection to Mac/PC
If you are planning to run the instrument via a local area
network, plug in the Ethernet cable to the base of the
instrument and connect to a spare Ethernet port on your
network.
Direct connection to a local area network
Connecting the machine
4

Section 1
If you are planning to run the instrument in standalone
mode no Ethernet cable connection is required. Instead
a USB drive is loaded with the experiment setup data
and then inserted in to the base of the q16 via an
extension cable, which is supplied, to initiate a run.
Please ensure that you use the USB drive provided with
your instrument.
If using a USB drive from an alternative supplier the
strict minimum speed limit for compatibility with the
q16 software is 0.2MiB/s average over 10MiB of data (a
10MiB le should be written in 50 seconds or less).
Standalone operation via a USB drive
5
Section 1
Installation of software
The software requires a JavaScript runtime environment
to operate successfully. If your PC/Mac does not
currently support a current Java run-time environment
you will be prompted to download and install an update.
Follow the onscreen instructions to download and install
the update and then re-start your computer.
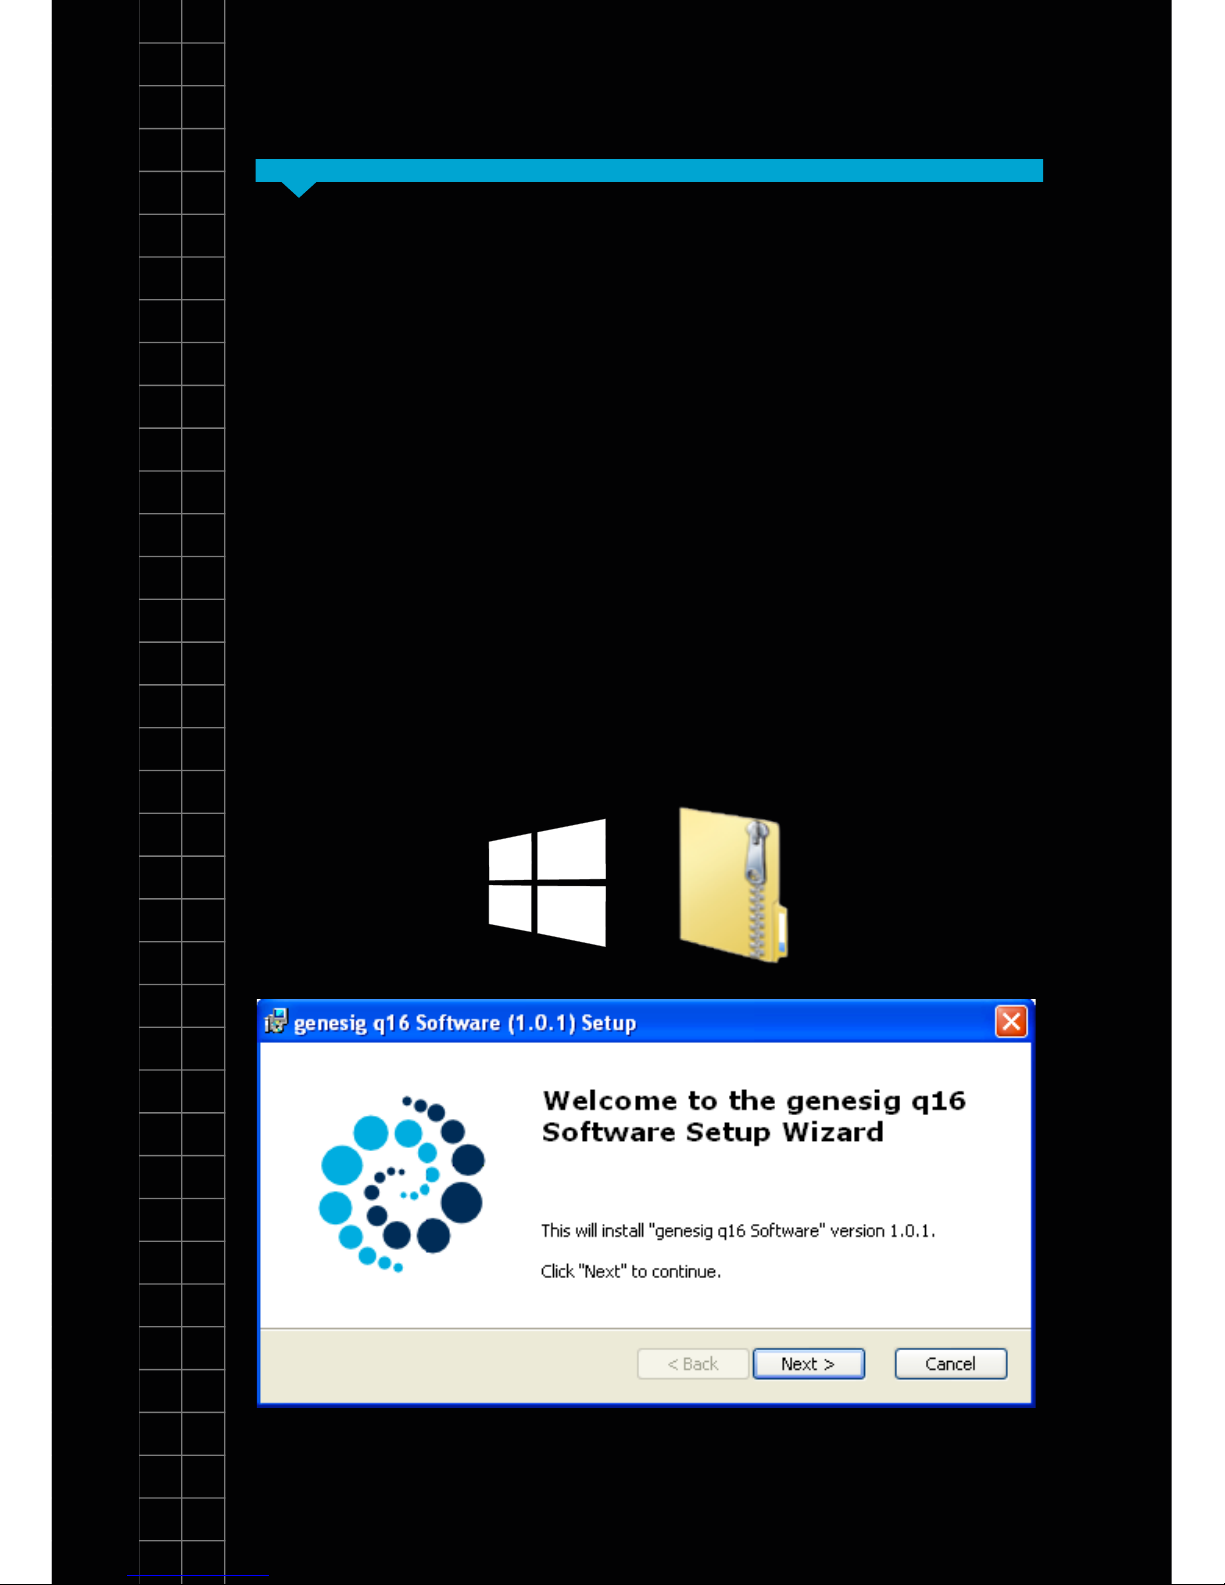
The q16 software is provided on the USB drive
shipped with your instrument. The latest software is
always available from http://www.genesig.com/q16software. Open the installer le and follow the onscreen
instructions.
6

Section 1
7

General operation
of the instrument
Section 2
To open the q16 twist the lid a quarter turn anticlockwise and lift. The lid is replaced by repeating this
operation in reverse.
The genesig q16 uses low prole 0.2ml reaction tubes
that are supplied as part of each genesig EASY kit.
Do not use alternative reaction tubes as this may
damage your instrument.
NEVER open a genesig q16 reaction tube after an
analysis run has completed. Dispose of them carefully
and ensure that they do not open by accident, as this
risks contaminating your working area and may affect
future test results.
8
Section 2
9

Section
Open the software
Section 3
Once installed double click on the q16 software icon to
open the software.
Click the ‘New’ button to begin a new test.
10
Section
Selecting a test type
Section 3
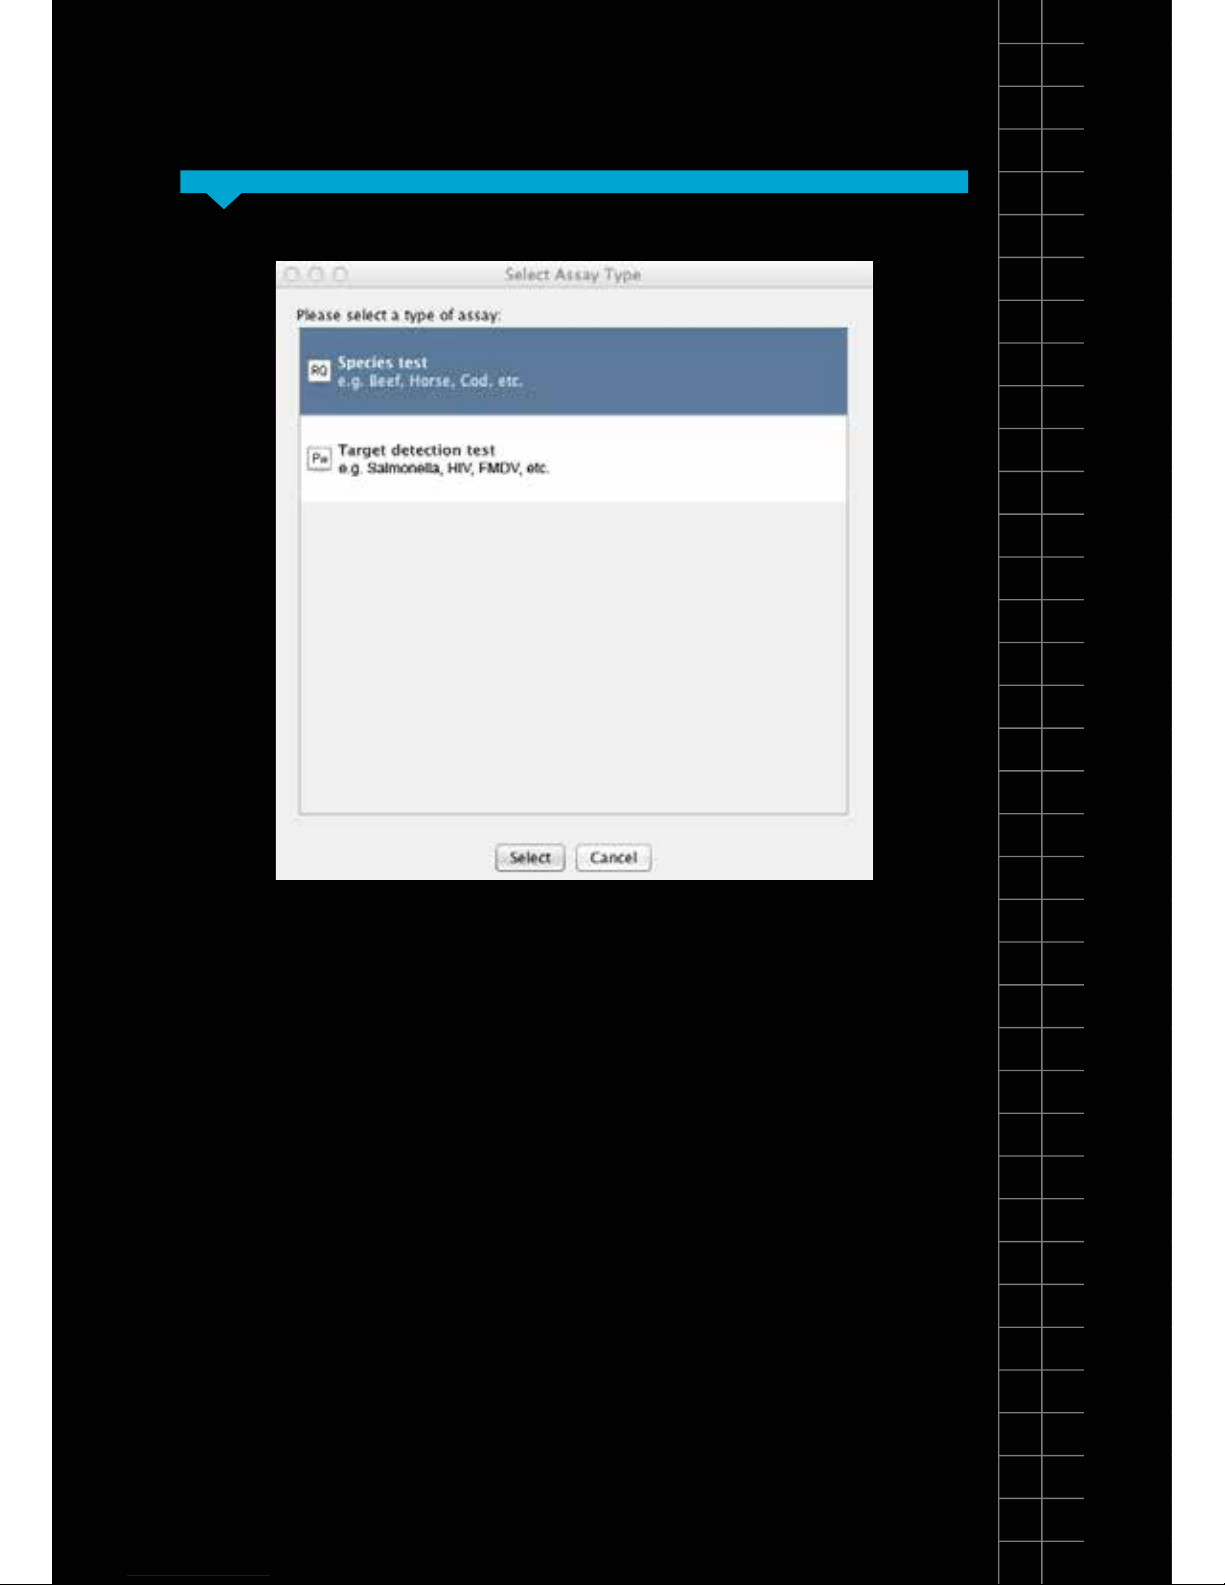
Select the type of test you wish to perform:
Species test
Select this if you wish to use a genesig EASY speciation
kit. This test will calculate the percentage of your sample
that is a particular species e.g. you can calculate what
percentage of your beefburger is horse meat.
Target detection test
Select this if you are using a genesig EASY kit for the
detection of a particular target e.g. you can test for the
presence of Salmonella, HIV or FMDV. This test will also
approximate the quantity of the target DNA present.
11
Section
The main screen layout
Section 4
There are 2 tabs in the view. One for setting up your test
and a second where your results will be displayed after
the analysis is complete:
In the setup screen there are 5 simple panels to consider;
1. Notes:
12

SectionSection 4
Your test will be given a default name but this can be
changed by clicking in the name eld and entering new
text. The Notes eld allows you to make notes on your
test if required.
2. Samples:
13
Section
The main screen layout
Section 4
In this panel you can dene how many samples you
wish to test. Use the + button to add more, and the –
button to remove them. You can alter the order of the
samples using the up and down arrows. The software
automatically limits the number of samples you can have
dependent on the capacity of the instrument.
You can alter the name of your samples by clicking in the
“Name” eld and adding new text. You can also attach
more detailed notes to a sample by clicking in the notes
eld and adding text.
Samples are coloured to make visual identication
easier. You can alter the colour associated with each
sample by double-clicking on the coloured square next
to it.
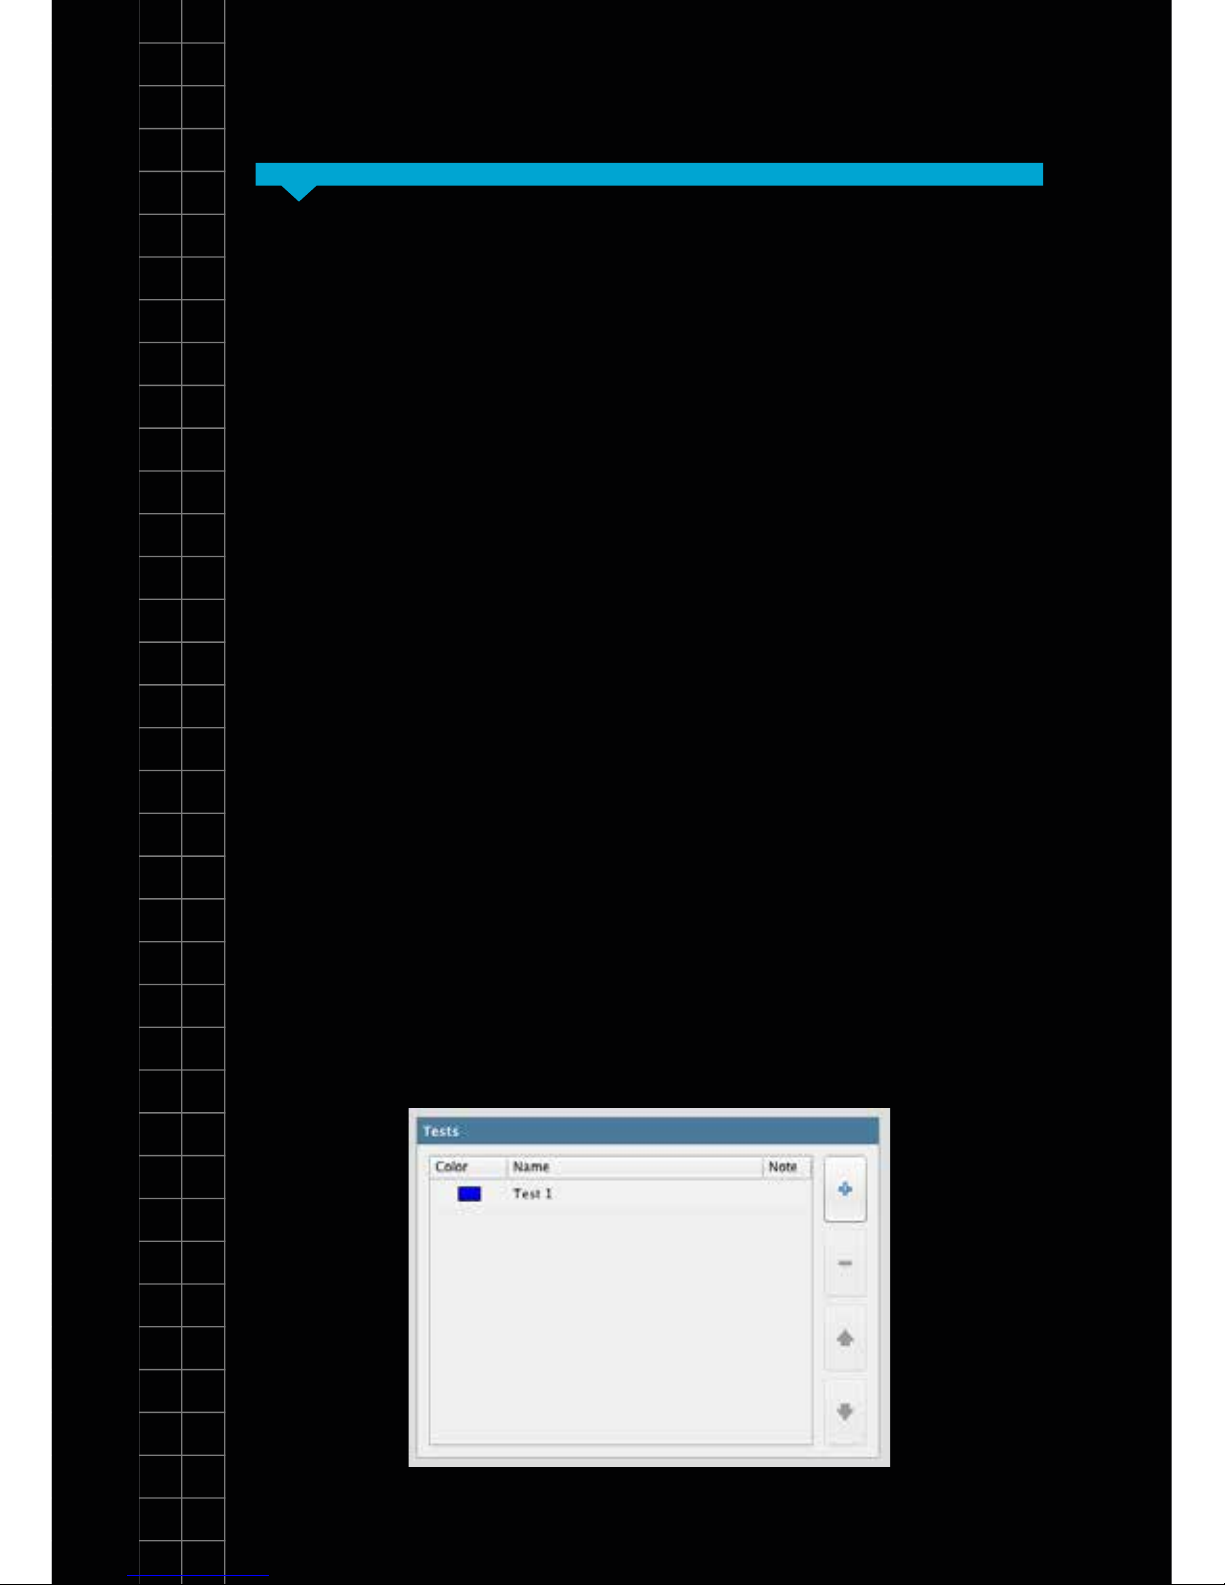
3. Tests:
2. Samples cont...
14

SectionSection 4
You can perform multiple tests on the genesig q16.
In this panel you can dene how many tests you wish
to perform. Use the + button to add more and the –
button to remove them. You can alter the order of the
tests using the up and down arrows. The software
automatically limits the number of tests you can perform
dependent on the capacity of the instrument.
You can alter the name of your tests by clicking in the
“Name” eld and adding new text. You can also attach
more detailed notes to a test by clicking in the notes eld
and adding text.
Tests are coloured to make visual identication easier.
You can alter the colour associated with each test by
double-clicking on the coloured square next to it.
15

Section
The main screen layout
Section 4
Taking in to consideration the number of tests and the
number of samples you have specied, the software
automatically allocates the well position within the
genesig q16 in which each sample is to be placed.
Similarly the well-position of the Positive and Negative
Controls are also dened automatically. Be sure to
follow this carefully when loading your samples in to the
instrument.
Once all of your samples have been loaded in to the
instrument and the lid closed, click the “Start Run”
button.
4. Well contents
5. Starting the analysis
16

SectionSection 4
From the list select the q16 instrument that you are using
and analysis will begin automatically.
The run can be stopped at any time by clicking the
“Abort Run” button. N.B. if you abort the run, discard
your samples as they may be affected by the run
beginning.
The status of the run and the remaining time is displayed
in this panel during the analysis.
If your instrument is not displayed you will need to
manually register the q16. Please follow the instructions
overleaf:
17

Section
The main screen layout
Section 4
A selection of connected q16 instruments should
appear, choose the instrument you wish to connect.
If the software does not detect any unregistered
instruments, you will be prompted to manually input
the 9 digit/letter serial id no. of your q16 (this can be
found on the underside of the machine).
•
•
Click “Conguration” at top right hand corner of
software screen.
Select the “genesig q16” tab at the left hand side of
the pop-up.
Click on the “Add” button now displayed at the
bottom of the pop-up window.
•
•
•
18

SectionSection 4
Wait for a few minutes. If your q16 becomes
designated as “Available”, then close the
conguration pop-up. You will now be able to start a
run.
If your instrument does not become “available”, and
is designated as “Not Connected” instead, please
check the wires and ports, then repeat all of the steps
above.
If your instrument continues to be displayed as
“Not Connected”, please see the Troubleshooting
section of this handbook and contact your network
administrator as it likely that your network security is
preventing a proper connection.
Primerdesign can provide your I.T. department with
the recommended protocols for manually conguring
the instrument connection.
•
•
•
•
In order to conduct a successful USB run, please follow
the steps below:
6. Standalone operation from a USB drive
19

Section
The main screen layout
Section 4
Setup your experiment as normal
Connect the USB stick to the PC
Click ‘Start Run’
Select ‘Start run from USB’
In the navigation window that appears, select the
drive associated with the USB
Wait until the ‘Testing USB drive speed’ pop-up
disappears
Safely remove USB drive from PC (use proper USB
eject protocol to ensure that the le ‘USBRUN’ has
been transferred to your USB)
Connect the USB to the q16 and the run should start
automatically . The q16 will say ‘analysis starting’ and
the LED light indicators will change to green.
During the run the LEDs will hold red for a several
minutes then begin cycling between red and blue until
the analysis is complete
•
•
•
•
•
•
•
•
•
In order to conduct a successful USB run, please follow
the steps below:
6. Standalone operation from a USB drive
20

SectionSection 4
The USB should not be removed until the run is
completed as indicated by the q16 saying ‘analysis
complete’ and the LED light indicators changing to
rainbow colours.
•
21

Section 4
22

Section 4
23

Section
Results
Section 5
If you are running the instrument direct from a USB drive,
the results will be stored as a .USB le on the USB drive.
This can be opened in the software on your Mac or PC.
Insert the USB in to your Mac/PC. Open the genesig q16
software and click “Open” then change the ‘Files of Type’
selection (underneath the le name) from ‘Experiment
File (.ppf)’ to ‘genesig q16 Data File (.USB).
Your USB run will now be viewable in the appropriate
folder (the rst USB run is typically named ‘PCR01.
USB’).”
If you are running the
instrument via a direct
connection or over a LAN
simply click the “Results” tab
to view the results.
24

SectionSection 5
Summary view:
The results window has 2 further tabs. The rst shows
a summary of the results complete with automated
analysis. The second gives a more detailed view
showing the underlying raw data and is designed for
advance users or for troubleshooting.
A text based summary of the entire analysis is displayed
in the top left panel.
More detailed information is displayed in the top right
panel.
25
Section
Results
Section 5
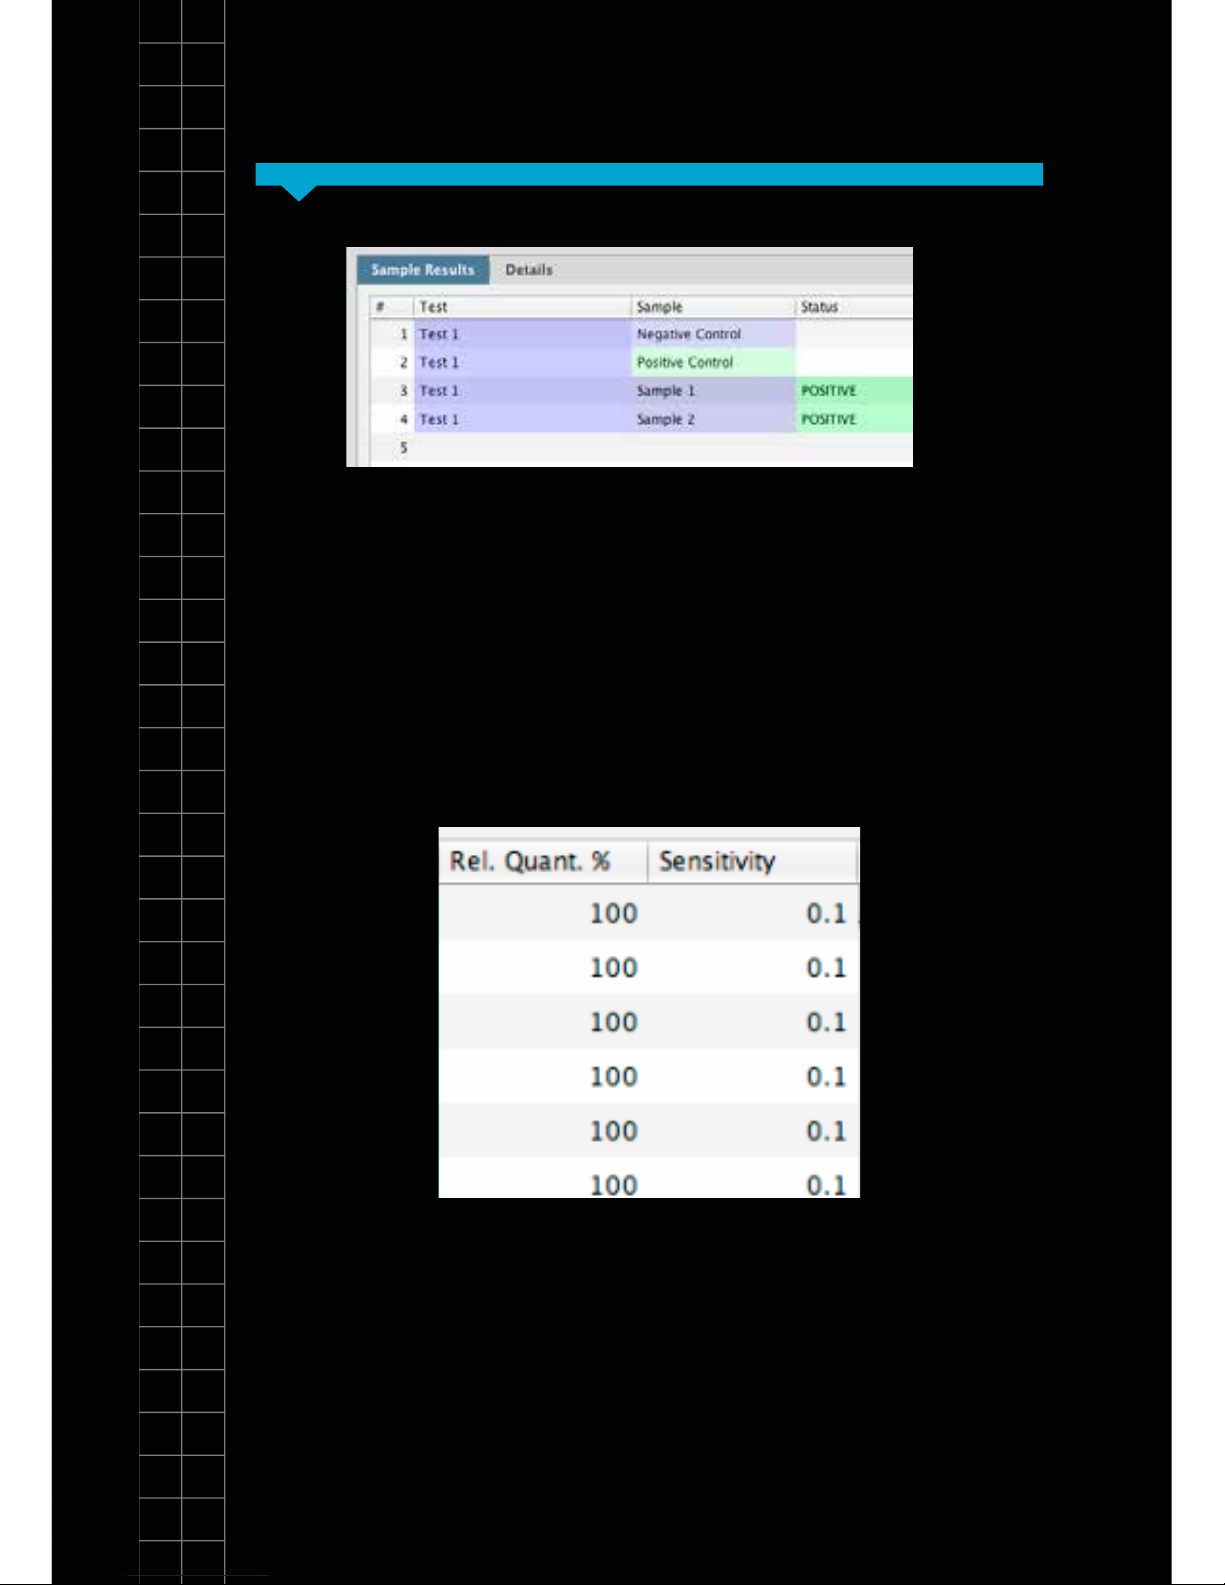
In the summary view the samples are listed exactly as
you set them up in the previous screen. The status eld
shows the test result as a simple, automatically analysed
status.
Species test results
When carrying out a genesig EASY speciation test
quantitative analysis is carried out automatically. The
percentage of your sample that is the species of interest
is displayed e.g. if your beefburger contains 10% horse
meat a result of 10% will be displayed.
26

SectionSection 5
The q16 also automatically calculates the sensitivity
of the test. The quality of your DNA sample will affect
the sensitivity of testing that is possible. With a good
quality sample, highly sensitive testing is possible.
With a poor quality sample then testing becomes less
sensitive. The gure displayed in the “Sensitivity” eld
shows the minimum percentage level at which results
should be considered reliable. e.g. If the test sensitivity
is 0.1 then any result reporting a % of target >0.1 can be
considered accurate. But if less than 0.1% of the target
species is reported the result may not be accurate and
the software will not produce a report.
See page 32 to understand “What do my results mean?”
and for a troubleshooting guide.
When carrying out a genesig
EASY detection test, quantitative
analysis is carried out
automatically. The number of
copies of the target genome
for each positive sample is
calculated and displayed in the
“Copy number” eld.
Detection test results
27

Section
Results
Section 5
The detailed results view shows the raw underlying
data and is designed for advanced users and for
troubleshooting.
Detailed results view:
Amplication plots are visible in the top left panel. The
drop down menu allows you to view the amplication
plots derived from the test reaction or the Internal
Extraction Control/Universal target reaction.
Amplication plots can be selected by clicking
and dragging the curser over the plot of interest.
Alternatively individual tests and samples can
be selected from the table below to highlight the
amplication plot for a given reaction.
28

SectionSection 5
Zooming: Click the magnifying glass icon to
select it. To zoom into the graph, move the
mouse to the top left of the area you wish to
zoom to. Hold down the left mouse button, and
move the mouse to the bottom right of the area
you wish to zoom to, and release. To zoom out
again, move the mouse anywhere over the data
area of the graph, then hold down the left mouse
button, move the mouse a short distance up and
to the left, and release the mouse button.
Cq values can be read by hovering the curser
over a given amplication plot. Cq values can
also be seen in the export le.
29

SectionSection 5
Exporting results
Detailed results can be exported by
clicking the export button. A choice of
export formats are available. e.g. .pdf
.csv.
An image le version of the amplication plots
can be exported by clicking the graph export
icon.
30
SectionSection 5
31

Section
What do my results mean?
Section 6
Analysis of your data is carried out automatically by the
genesig q16. The following information is designed to
help you fully understand a result or to troubleshoot:
Explanation
Your sample has produced a result. Your target of
interest is present and you can use the reported quantity/
percentage.
“Positive”
Explanation
Your sample has produced a negative result. The target
is not present in your sample.
“Negative”
Explanation
The Negative Control should be completely free of any
DNA/RNA. If you see this warning message it means
that at some point during the setup, the Negative Control
has been contaminated with DNA/RNA and has given
a positive signal. This contamination has invalidated
the test. The Positive Control and your test samples
are both possible sources of contaminating DNA/RNA.
The PCR tubes from previous runs will also contain
very high amounts of DNA so it is important that these
are carefully disposed of after each run is completed
and NEVER OPENED. It may be the case that your kits
have become contaminated which will lead to the same
problem occurring repeatedly.
“Test Contaminated”
32

SectionSection 6
Solutions
Clean your working area using a commercial solution
such as PCR Clean™ to ensure the area is DNA free
at the start of your run and re-run the test.
If the problem persists then the kit has become
contaminated and it will have to be discarded and
replaced with a new kit. When you open the new
kit, run a simple experiment to show that changing
the kit has solved the problem. Prepare a test which
includes only the Positive Control, the Negative
Control and one ‘mock sample’. For the ‘mock
sample’ add water instead of any sample DNA/
RNA. The result for the Negative Control and the
mock sample should be negative indicating that
contamination is no longer present.
1.
2.
Preventive action
An ideal lab set-up has a ‘Clean area’ where the test
reagents are prepared and a ‘sample area’ where
DNA/RNA samples and the Positive Control DNA/
RNA are handled. The best workow involves setting
up all the test components in the clean area and then
moving the tests to the sample area for sample and
Positive Control addition. If this method is followed
then the kit components are always kept away from
possible sources of contamination. For extra security
the Negative Control can be completely prepared and
sealed in the clean area. The clean area should be
decontaminated regularly with DNA remover to keep it
clean.
33

Section
What do my results mean?
Section 6
Explanation
The test has failed because the quality of the sample
was not high enough. The Internal Extraction Control
component identies whether the sample has been
prepared correctly or if the sample is of low quality. This
error message means that this quality control test has
failed and the sample is not t for analysis.
“Sample preparation failed”
Solutions
Examine the DNA/RNA extraction protocol for any
user errors, then repeat.
Poor samples can result from overloading the DNA/
RNA extraction procedure with too much starting
material. Try reducing the amount of starting material
and repeat.
Failing to add the Internal Control Template to your
sample during the DNA/RNA extraction process can
also lead to a reported result of “Sample preparation
failed”. Ensure that this step has not been
overlooked or forgotten. If your samples are derived
from an archive store or from a process separate from
your genesig EASY kit; you must add in 5µl of Internal
Control Template in to each 500µl of your sample to
make it suitable for use on the q16.
1.
2.
3.
34

SectionSection 6
Explanation
The test is positive so if you are only interested in
obtaining a ‘present or absent’ answer for your sample
then your result is secure. However, the test contains
an Internal Extraction Control component that identies
if the sample is of high quality. This quality control test
has failed and the sample is not therefore of high enough
quality. The exact copy number of DNA/RNA present
cannot be accurately calculated in this instance. If you
require quantitative information for your sample then
proceed with the solutions below.
“Positive result, poor quality sample”
Solutions
Examine the DNA/RNA extraction protocol for any
user errors, then repeat.
Poor samples can result from overloading the DNA/
RNA extraction procedure with too much starting
material. Try reducing the amount of starting material
and repeat.
Failing to add the Internal Control Template to your
sample during the DNA/RNA extraction process can
also lead to this error. Ensure that this step has not
been overlooked or forgotten. If your samples have
derived from an archive store or from a process
separate from your genesig EASY kit; you must add
in 5µl of Internal Control Template in to each 500µl of
your sample to make it suitable for use on the q16.
1.
2.
3.
35

Section
What do my results mean?
Section 6
Explanation
The Positive Control is present to show that all aspects
of the test are working correctly together. This error
message shows that the quality control test has failed
and the test as a whole is invalidated. This nding
indicates that a problem has occurred in the reaction
set-up part of the experiment and has nothing to do with
sample preparation.
“Test failed”
Solutions
Check the entire workow to look for any user errors
during test set-up and repeat the test e.g. have the
right colour pipettes and solutions been used with the
correct tubes?
A component of the test may have ‘gone off’ due to
handing errors, incorrect storage or exceeding the
shelf life. Open a new kit and run a simplied test
which includes only the Positive Control, the Negative
Control and one ‘mock sample’. For the ‘mock
sample’ add water instead of any sample DNA/RNA.
If the Positive Control works, the mock sample will
now be called as a negative result indicating that all
the components of this kit are working correctly.
Ensure the positive and negative controls are inserted
into the correct wells of your q16.
1.
2.
3.
36

SectionSection 6
Explanation
The test is positive so if you are only interested in
obtaining a ‘present or absent’ answer for your
sample then your result is secure as a positive test.
However, if the calculated percentage falls outside
the accurate range for the test the exact percentage
cannot accurately be calculated. Nonetheless a
semi-quantitative result can be reported based on the
“test sensitivity” column. e.g. If the “test sensitivity” is
reported at “1%” then the sample can be reported as
“positive test with less than 1% contamination”.
“Positive result lower than test sensitivity”
Solutions
A higher quality of sample containing more DNA will
yield a more sensitive test. Try increasing the amount
of sample that is added to the reaction.
If this is not possible, check the sample preparation
protocol to check for any user errors during reaction
setup and repeat the sample preparation.
Poor samples can result from overloading the DNA/
RNA extraction procedure with too much starting
material. Try reducing the amount of starting material
and repeat the sample preparation.
1.
2.
3.
37

Section
What do my results mean?
Section 6
Solutions
Try increasing the amount of sample that is added to
the reaction.
If this is not possible, check the DNA/RNA extraction
protocol for any user errors and repeat.
1.
2.
Explanation
The test has failed because neither the sample quality
nor quantity was high enough. The universal target
component identies the total quantity of sample from
which the species percentage is calculated. This signal
may be low if the sample is of low quality, or if a low
amount of sample was tested. In either case the sample
will not be t for analysis.
“Low level of sample DNA ”
Solutions
For appropriate solutions, read both the “Test failed”
and “Test Contaminated” sections of this handbook.
1.
Explanation
The Positive Control is indicating test failure, and the
Negative Control is indicating test contamination.
Please read the “Test Failed” and “Test Contamination”
sections of this technical support handbook for a further
explanation.
“Test failed and is contaminated”
38

SectionSection 6
Poor samples can result from overloading the DNA/
RNA extraction protocol with too much starting
material. Try reducing the amount of starting material
and repeat the sample preparation.
3.
39

Troubleshooting
Network connection problems:
USB run fails to start:
Troubleshooting
40

Solution
The software can connect to one or more instruments via
an Ethernet network. There are two ways of conguring
the network to allow this:
Standard Network: The software and instruments will
connect automatically to a standard network, where
TCP/IP addresses are assigned automatically by a
DHCP server. Connect the instrument to the network
in the same way you would connect a printer, using the
supplied Ethernet cable to connect to a wall socket or
network switch/hub. The software will automatically
connect to the instrument when it has been turned on.
Direct Network: The software and instruments can
also be used on a local network that does NOT have
automatic address assignment. Ask your network
administrator to help you set up in this instance.
IP address “169.254.88.1” / Subnet Mask “255.255.0.0”.
The full protocol on manually conguring q16
instruments can be found at http://www.genesig.com/
q16-troubleshooting.
Check that you have the latest version of the q16
software. To do this click ‘Conguration’ at the top right
hand corner of the software screen. Underneath the
q16 insignia the version number of the software will be
displayed. Check that this matches the version number
specied on the genesig website: http://www.genesig.
com/q16-software. If it does not then the latest version
of the software can be downloaded from this page.
If the experiment still fails to start check that your USB
drive has not been corrupted. If it has been then use a
different USB drive.
Troubleshooting
41

Troubleshooting
Unusual looking data:
If your test results are not as you expect and you can
see that the raw data looks unusual – poor quality
amplication plots etc.
Failed results:
The instrument is reporting failed results.
Troubleshooting
42

Solution
Bubbles in your reaction tubes can cause problems.
Tap the tubes on a work surface or shake them down
to burst any bubbles before placing them in to the q16.
Make sure that the contents of each tube have collected
at the base of the tube.
Check that you have put all reaction tubes in the correct
wells. If the positive and negative controls are in the
wrong place this will cause problems. Please contact
Primerdesign technical support for advice or manual
data interpretation.
Troubleshooting
43

For more information please
visit www.genesig.com
genesig kits are sold for general laboratory and
research use only. Please feel free to contact us
for free advice or technical support.
Primerdesign Ltd, York House, School Lane,
Chandlers Ford, United Kingdom, SO53 4DG
Telephone +44 (0)23 8074 8830
Fax +44 (0)870 836 2155
Orders: orders@primerdesign.co.uk
Enquiries: enquiry@primerdesign.co.uk
Technical support: support@primerdesign.co.uk
HB20.01.03
 Loading...