

Page 1
User Manual
MACHINES FOR THE INDUSTRIAL LAUNDRY
WASHER EXTRACTOR
Page 2

Page 3
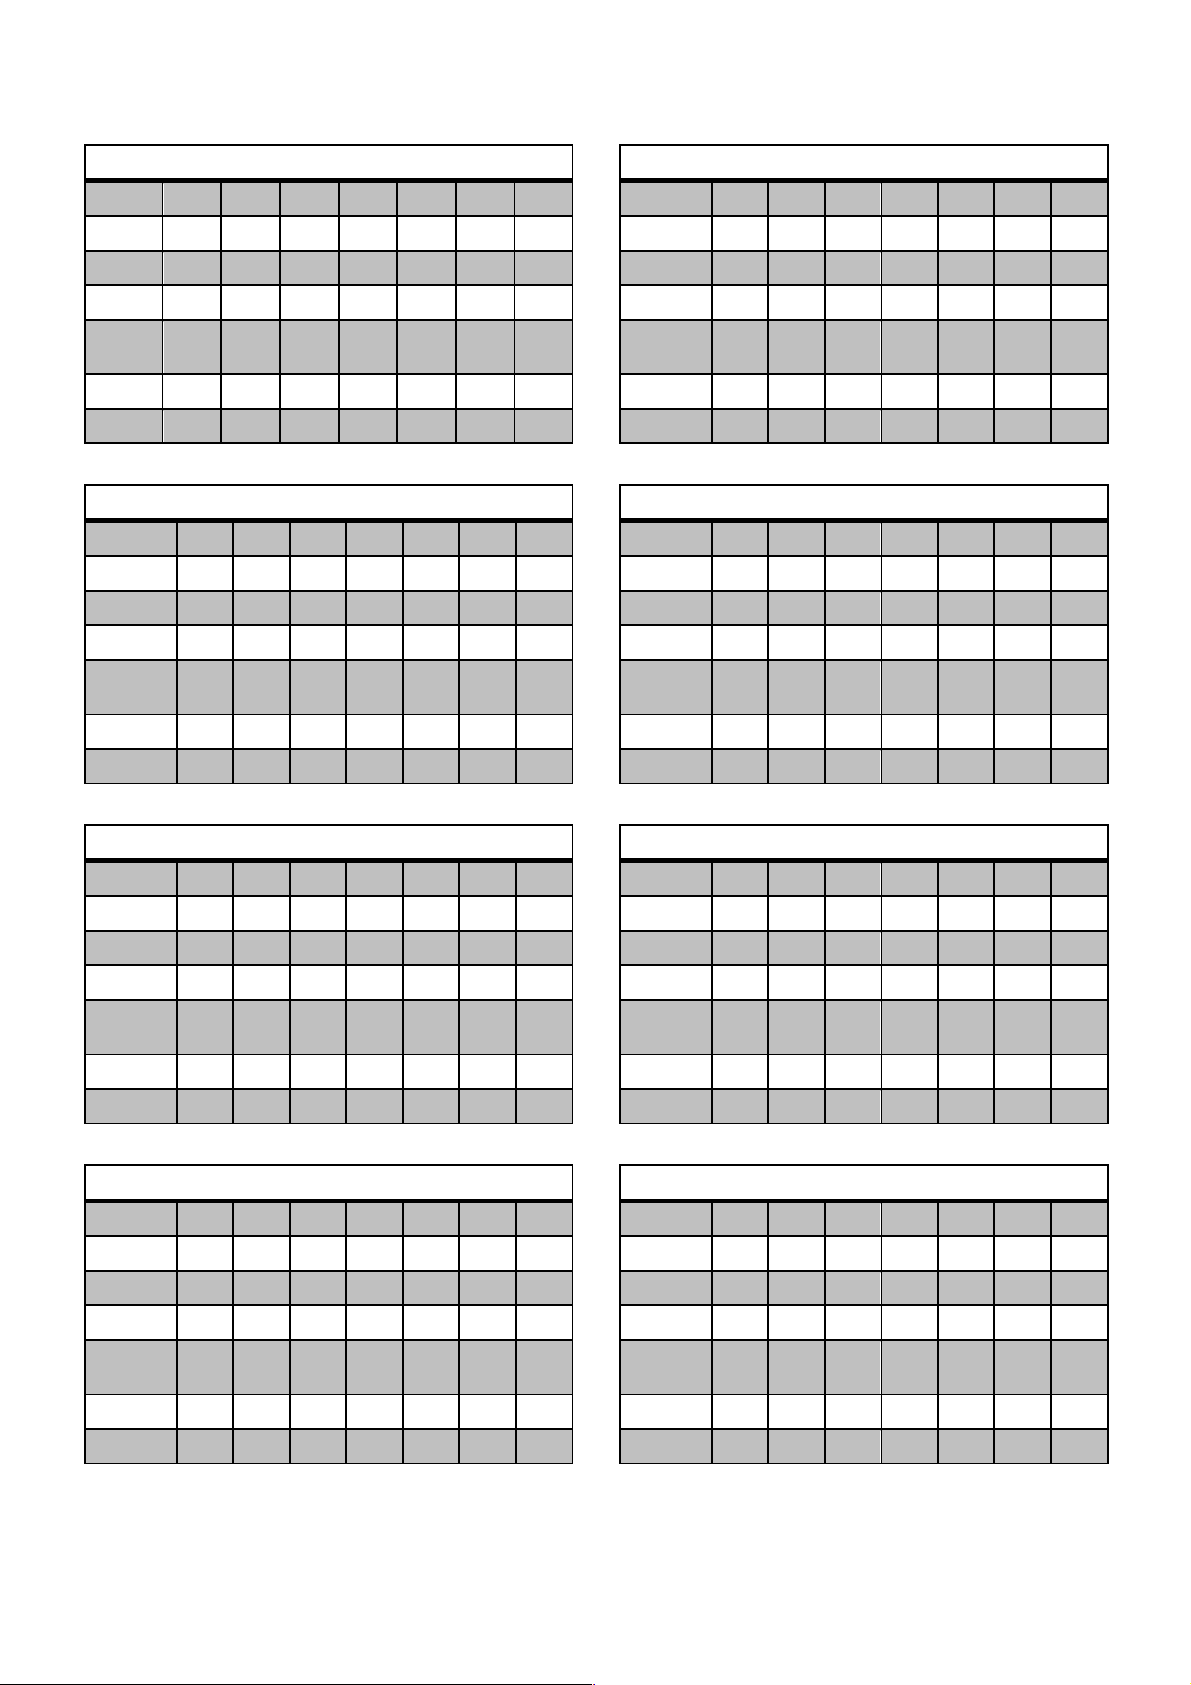
P1
PH 1 2 3 4 5 6 7
BL 1 2 3 3 4 5 6
SP 1 1 1 1 2 1 3
LV 1 1 3 3 --- 3 ---
ºC
ºF
40
104
90
194 --- --- --- --- ---
TM(min) 6 12 3 3 2 3 6
MT 1 1 1 1 --- 1 ---
P2
PH 1 2 3 4 5 6 7
BL 7 9 3 3 4 5 6
SP 1 1 1 1 2 1 3
LV 1 1 3 3 --- 3 ---
ºC
ºF
30
86
60
140 --- --- --- --- ---
TIME(min) 6 15 3 3 2 3 6
MOTION 1 1 1 1 --- 1 ---
P3
PH 1 2 3 4 5 6 7
BL 8 11 3 3 4 5 6
SP 1 1 1 1 2 1 3
LV 1 1 3 3 --- 3 ---
ºC
ºF ---
30
86 --- --- --- --- ---
TIME(min) 6 12 3 3 2 3 6
MOTION 1 1 1 1 --- 1 ---
P4
PH 1 2 3 4 5 6 7
BL 8 12 3 3 4 5 6
SP 1 1 1 1 2 1 3
LV 1 1 3 3 --- 3 ---
ºC
ºF --- --- --- --- --- --- ---
TIME(min) 6 12 3 3 2 3 6
MOTION 1 1 1 1 --- 1 ---
P5
PH 1 2 3 4 5 6 7
BL 13 15 19 19 4 20 21
SP 1 1 1 1 2 1 3
LV 2 2 3 3 --- 3 ---
ºC
ºF
30
86
60
140 --- --- --- --- ---
TIME(min) 6 15 3 3 2 3 4
MOTION 1 1 1 1 --- 1 ---
P6
PH 1 2 3 4 5 6 7
BL 14 18 19 19 4 20 21
SP 1 1 1 1 2 1 3
LV 2 2 3 3 --- 3 ---
ºC
ºF --- --- --- --- --- --- ---
TIME(min) 6 12 3 3 2 3 4
MOTION 1 1 1 1 --- 1 ---
P7
PH 1 2 3 4 6 7
BL 22 23 26 26 27 34
SP 1 1 1 1 1 4
LV 3 3 4 4 4 ---
ºC
ºF ---
40
104 --- --- --- ---
TIME(min) 6 12 3 3 3 4
MOTION 2 2 2 2 2 ---
P8
PH 1 2 3 4 6 7
BL 22 25 26 26 27 34
SP 1 1 1 1 1 4
LV 3 3 4 4 4 ---
ºC
ºF --- --- --- --- --- ---
TIME(min) 6 12 3 3 3 4
MOTION 2 2 2 2 2 ---
Page 4
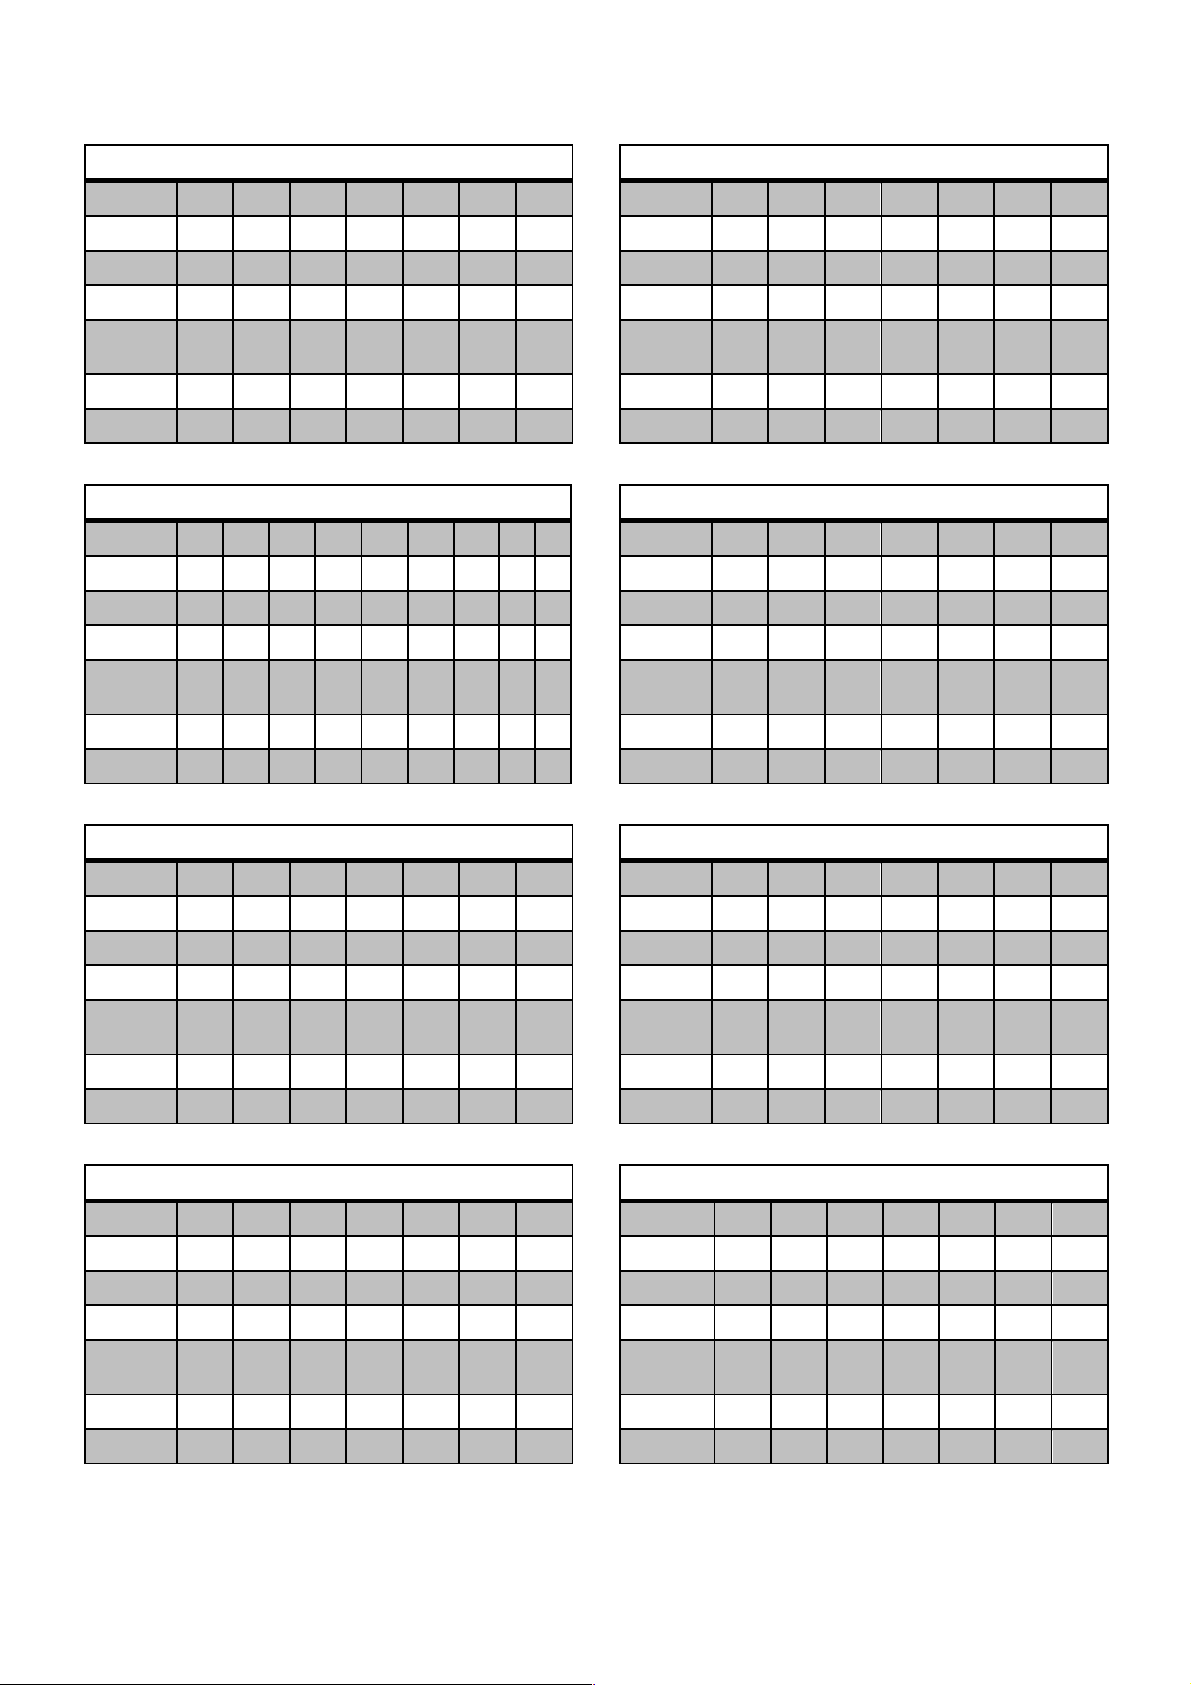
P9
PH 2 3 4 6 7
BL 29 30 30 31 32
SP 1 1 1 1 2
LV 3 4 4 4 ---
ºC
ºF --- --- --- --- ---
TIME(min) 12 3 3 3 3
MOTION 3 3 3 3 ---
P10
PH 0 1 2 3 5 4 5 6 7
BL 3 35 36 3 4 3 4 5 6
SP 1 1 1 1 2 1 2 1 3
LV 3 1 3 3 --- 3 --- 3 ---
ºC
ºF ---
65
149
71
160 --- --- --- --- --- ---
TIME(min) 3 5 5 3 2 3 2 3 6
MOTION 1 1 1 1 --- 1 --- 1 ---
P11
PH 2 3 4 6 7
BL 10 24 24 5 6
SP 1 1 1 1 3
LV 1 3 3 --- 3 ---
ºC
ºF --- --- --- --- ---
TIME(min) 8 2 2 3 6
MOTION 1 1 1 1 ---
P12
PH 2 3 4 6 7
BL 16 24 24 5 6
SP 1 1 1 1 3
LV 1 3 3 --- 3 ---
ºC
ºF
40
104 --- --- --- ---
TIME(min) 10 2 2 3 6
MOTION 1 1 1 1 ---
P13
PH 2 3 4 6 7
BL 17 24 24 5 6
SP 1 1 1 1 3
LV 1 3 3 --- 3 ---
ºC
ºF
60
140 --- --- --- ---
TIME(min) 10 2 2 3 6
MOTION 1 1 1 1 ---
P14
PH 2 3 4 6 7
BL 28 26 26 27 32
SP 1 1 1 1 2
LV 3 4 4 --- 4 ---
ºC
ºF --- --- --- --- ---
TIME(min) 8 3 3 3 6
MOTION 2 2 2 2 ---
P15
PH 6
BL 6
SP 3
LV ---
ºC
ºF
---
---
TIME(min) 6
MOTION ---
P16
PH 4
BL 33
SP 2
LV ---
ºC
ºF
---
---
TIME(min) 2
MOTION ---
Page 5
ENGLISH
3
INTERPRETATION OF TABLES: SYMBOLS AND VALUES
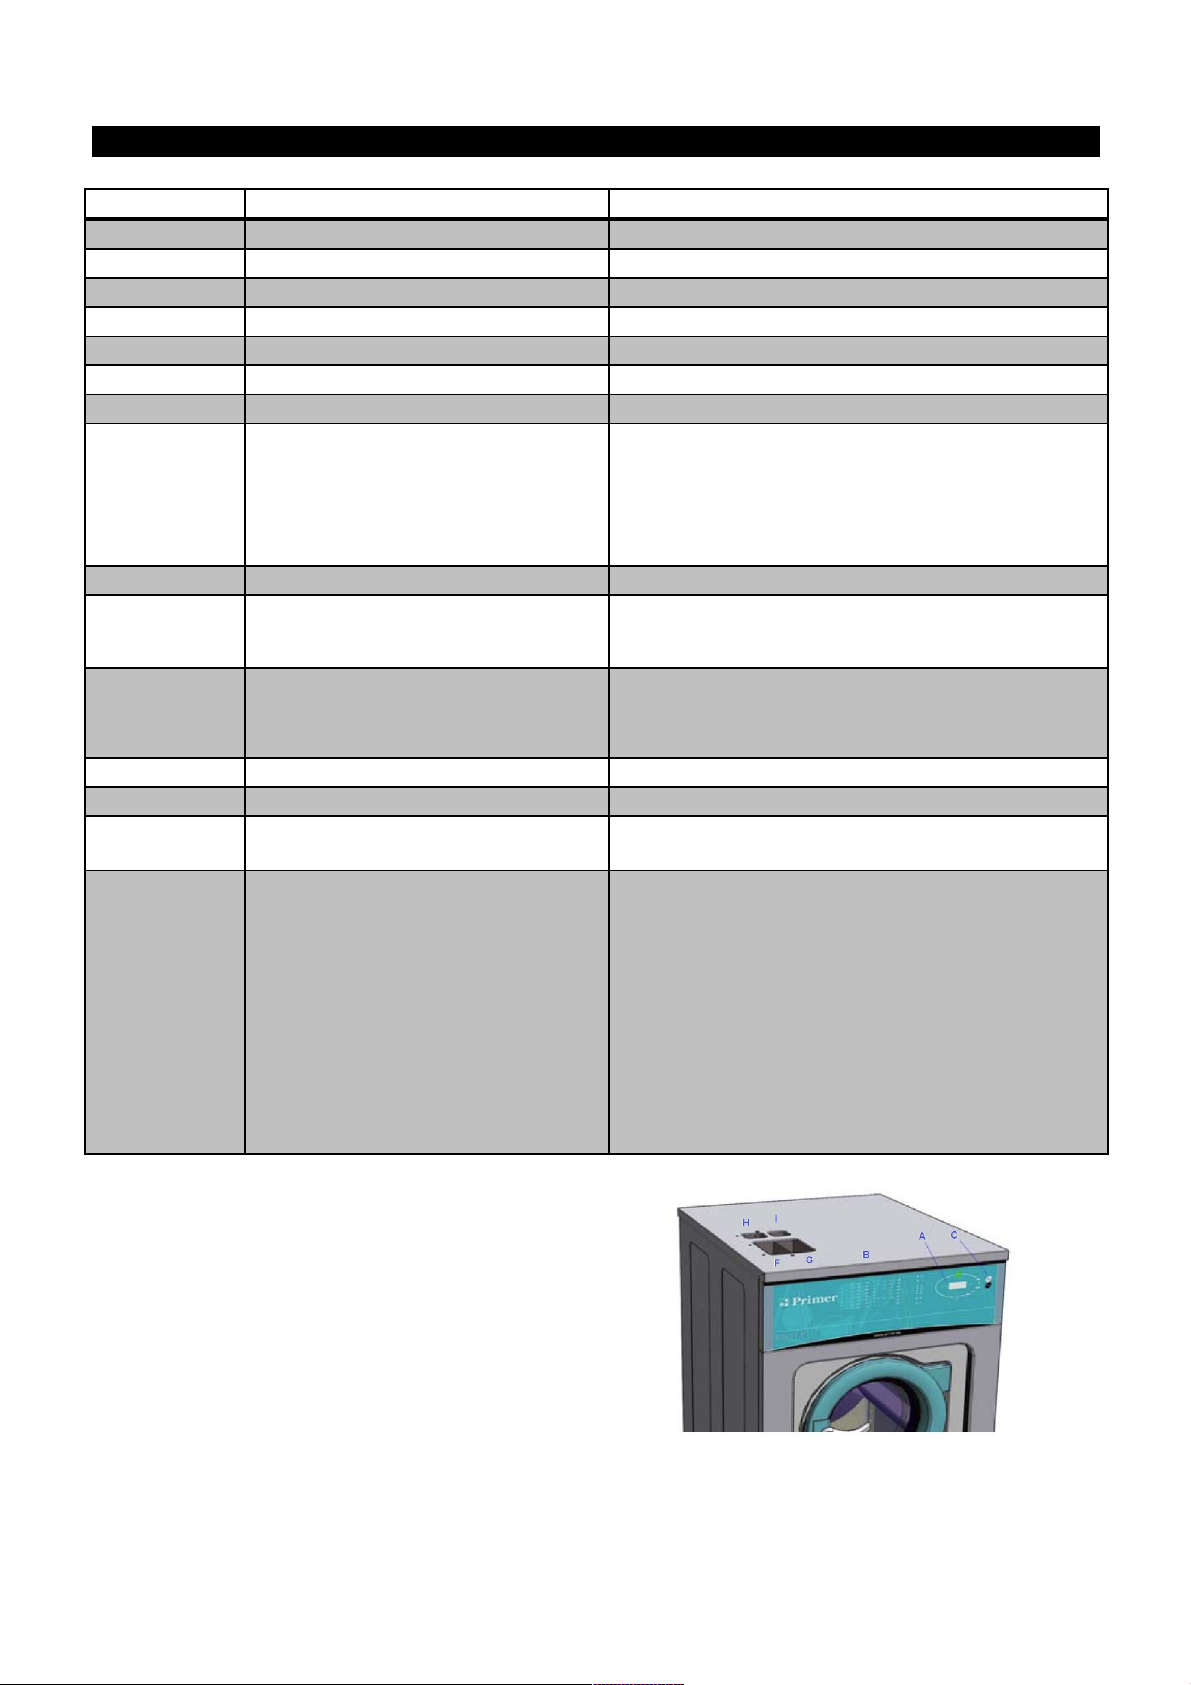
SYMBOL MEANING VALUES
A CONTROLS
B TRAY
C POWER SWITCH
F PREWASH
G SYSTEMS
H SOFTENER
I BLEACH
PH PHASE
0: Soak
1: Pre-wash
2: wash
3: Rinse 1
4: Rinse 2
5: Short spin
6: Final rinse (softener)
7: Long spin
BL BLOCK NO.
SP* SPEED
SP1: SYSTEMS
SP2: SHORT SPIN
SP3: LONG SPIN (MAX)
SP4: DELICATES SPIN
LV* WATER LEVEL
LV1: MINIMUM
LV2: LOW
LV3: MEDIUM
LV4: HIGH
LV5: MAXIMUM
T TEMPERATURE
TM: TIME
MT DRUM MOVEMENT
1: ENERGETIC
2: NORMAL
3: DELICATES
P* PROGRAMMES
P1: WHITES 90C/194F
P2: WHITES/COLOUREDS 60 ºC/140F
P3: WHITES/COLOUREDS 30ºC/86F
P4: WHITES/COLOUREDS COLD WASH
P5: SYNTHETICS 60º/140
P6: SYNTHETICS COLD WASH
P7: DELICATES 40ºC/104F
P8: DELICATES COLD WASH
P9: WOOL COLD WASH
P10: SANITARY WASH
P11: FAST COLD WASH
P12: FAST WASH 40ºC/104
P13: FAST WASH 60º/140F
P14: FAST DELICATES
P15: LONG SPIN
P16: SHORT SPIN
Page 6

ENGLISH
4
IMPORTANT INSTRUCTIONS REGARDING SAFETY AND USE
WARNING: To reduce the risk of electrical shocks
or injury when using the appliance, the basic
precautions should be observed, including the
following:
1- READ all the instructions prior to using the
appliance and KEEP THEM in an easily
accessible place for reference in the event of
doubt.
2- Do NOT wash clothes which have been
previously treated, washed, soaked or stained
with petrol, dry cleaning solvents, or other
inflammable or explosive substances, as these
give off vapours which may catch fire or
explode.
3- Do NOT add petrol, dry cleaning solvents or
other inflammable substances to the washing
water. These substances give off vapours
which could catch fire or explode.
4- In some conditions, hydrogen gas may be
produced in a hot water system which has not
been used for more than two weeks. Hydrogen
gas is explosive. If the hot water system has
not been used for a while, before using the
washing machine turn on all the hot water taps
and let the water run for a few minutes. This
will release any accumulated hydrogen gas.
As the gas is inflammable, do not smoke or
use naked flames during this operation.
5- Do NOT allow children to play in or on the
appliance. Children should be strictly
supervised when in the vicinity of a machine
which is operating.
6- Remove the door from the appliance before
disposal or before leaving it out of service.
7- DO NOT TRY TO OPEN THE DOOR if the
drum is moving.
8- Do NOT install or store the appliance in the
open.
9- Do NOT try to force the controls.
10- Do not repair or replace parts of the
appliance or carry out any servicing unless
recommended to do so in the User Instruction
Manual. Make sure that you fully understand
the instructions and have the necessary skills
to carry out the operations described.
11- Do NOT remove any safety device or modify
any components in the washing machine. DO
NOT INSTALL components not belonging to
the machine in the appliance.
12- Failure to comply with any of the instructions
given in the Instruction Manual may result in
personal injury to the user. It is no possible to
provide for all possible situations and
contingencies with warnings about risk and
hazards. Therefore, any person involved in the
transportation, installation, use or maintenance
of the machine should always employ
common sense, caution and care.
13- Do NOT use the machine unless all the covers
and guards are correctly fitted and secured.
14- The distributor (vendor) MUST correctly
instruct the user during commissioning.
15- Pour the correct doses of detergent, fabric
softener and lay into the dispenser drawer, as
indicated by the manufacturer. Heed tips
concerning the treatment of different materials
given by the manufacturers.
16-
Daily remove
any traces of detergent or liquids
from the dispenser drawer. Never use
powdered or abrasive detergents for cleaning;
use only water and soap.
17- Clean the water inlet filters and the external
dispenser conducts once a month.
18- Never clean the exterior by water injection;
functional parts of the machine could damage.
19- If the washing machine is to be idle for long
periods, apply a coat of Vaseline oil to all its
stainless steel surfaces.
20- An annual general revision is recommended.
Page 7

ENGLISH
5
CONTENTS
INTERPRETATION OF TABLES: SYMBOLS AND VALUES ....................................................................................... 3
IMPORTANT INSTRUCTIONS REGARDING SAFETY AND USE .............................................................................. 4
1 INTRODUCTION ....................................................................................................................................................... 6
2 USE ............................................................................................................................................................................ 7
2.1 Controls ............................................................................................................................................................. 7
2.2 Programmes ...................................................................................................................................................... 7
2.3 Operation ........................................................................................................................................................... 9
2.3.1 Programme execution ................................................................................................................................. 9
2.3.2 Programme end ........................................................................................................................................... 9
3 CONFIGURATION (advanced) ................................................................................................................................ 10
3.1 Prg (programme selection) .............................................................................................................................. 10
3.2 AVAN(advance) ............................................................................................................................................... 10
3.3 ECO..................... . . . . . . . . . . . . . . . . . . . . . . . . . . . . . . . . . . . . . . . . . . . . . . . . . . . . . . . . . . . . . . . . . . . . . . . . . . . . . . . . . . . . . . . . . . . . . . . . . . . . . . . . . . . . . . . ............................. 10
3.4 ACLA (Extra rinse) .......................................................................................................................................... 10
3.5 Stop (Thermal stop switch) ............................................................................................................................. 10
3.6 LEuL (Configuration of levels) ......................................................................................................................... 10
3.7 bLOC (Modify/delete blocks) ........................................................................................................................... 11
3.8 Timr (Remaining time) ..................................................................................................................................... 11
3.9 Parameters (In run mode) ............................................................................................................................... 11
4 SELF-SERVICE ....................................................................................................................................................... 12
4.1 Operation ......................................................................................................................................................... 12
4.2 Pay centre/card ............................................................................................................................................... 12
4.3 COIN ............................................................................................................................................................... 12
5 MAINTENANCE ....................................................................................................................................................... 14
5.1 Electrical and mechanical irregularities ........................................................................................................... 14
5.2 Error messages ............................................................................................................................................... 14
Page 8

ENGLISH
6
IMPORTANT INSTRUCTIONS REGARDING SAFETY AND USE
WARNING: To reduce the risk of electrical shocks
or injury when using the appliance, the basic
precautions should be observed, including the
following:
1- READ all the instructions prior to using the
appliance and KEEP THEM in an easily
accessible place for reference in the event of
doubt.
2- Do NOT wash clothes which have been
previously treated, washed, soaked or stained
with petrol, dry cleaning solvents, or other
inflammable or explosive substances, as these
give off vapours which may catch fire or
explode.
3- Do NOT add petrol, dry cleaning solvents or
other inflammable substances to the washing
water. These substances give off vapours
which could catch fire or explode.
4- In some conditions, hydrogen gas may be
produced in a hot water system which has not
been used for more than two weeks. Hydrogen
gas is explosive. If the hot water system has
not been used for a while, before using the
washing machine turn on all the hot water taps
and let the water run for a few minutes. This
will release any accumulated hydrogen gas.
As the gas is inflammable, do not smoke or
use naked flames during this operation.
5- Do NOT allow children to play in or on the
appliance. Children should be strictly
supervised when in the vicinity of a machine
which is operating.
6- Remove the door from the appliance before
disposal or before leaving it out of service.
7- DO NOT TRY TO OPEN THE DOOR if the
drum is moving.
8- Do NOT install or store the appliance in the
open.
9- Do NOT try to force the controls.
10- Do not repair or replace parts of the
appliance or carry out any servicing unless
recommended to do so in the User Instruction
Manual. Make sure that you fully understand
the instructions and have the necessary skills
to carry out the operations described.
11- Do NOT remove any safety device or modify
any components in the washing machine. DO
NOT INSTALL components not belonging to
the machine in the appliance.
12- Failure to comply with any of the instructions
given in the Instruction Manual may result in
personal injury to the user. It is no possible to
provide for all possible situations and
contingencies with warnings about risk and
hazards. Therefore, any person involved in the
transportation, installation, use or maintenance
of the machine should always employ
common sense, caution and care.
13- Do NOT use the machine unless all the covers
and guards are correctly fitted and secured.
14- The distributor (vendor) MUST correctly
instruct the user during commissioning.
15- Pour the correct doses of detergent, fabric
softener and lay into the dispenser drawer, as
indicated by the manufacturer. Heed tips
concerning the treatment of different materials
given by the manufacturers.
16-
Daily remove any traces of detergent or liquids
from the dispenser drawer. Never use
powdered or abrasive detergents for cleaning;
use only water and soap.
17- Clean the water inlet filters and the external
dispenser conducts once a month.
18- Never clean the exterior by water injection;
functional parts of the machine could damage.
19- If the washing machine is to be idle for long
periods, apply a coat of Vaseline oil to all its
stainless steel surfaces.
20- An annual general revision is recommended.
Page 9
ENGLISH
7
2 USE
2.1 Controls
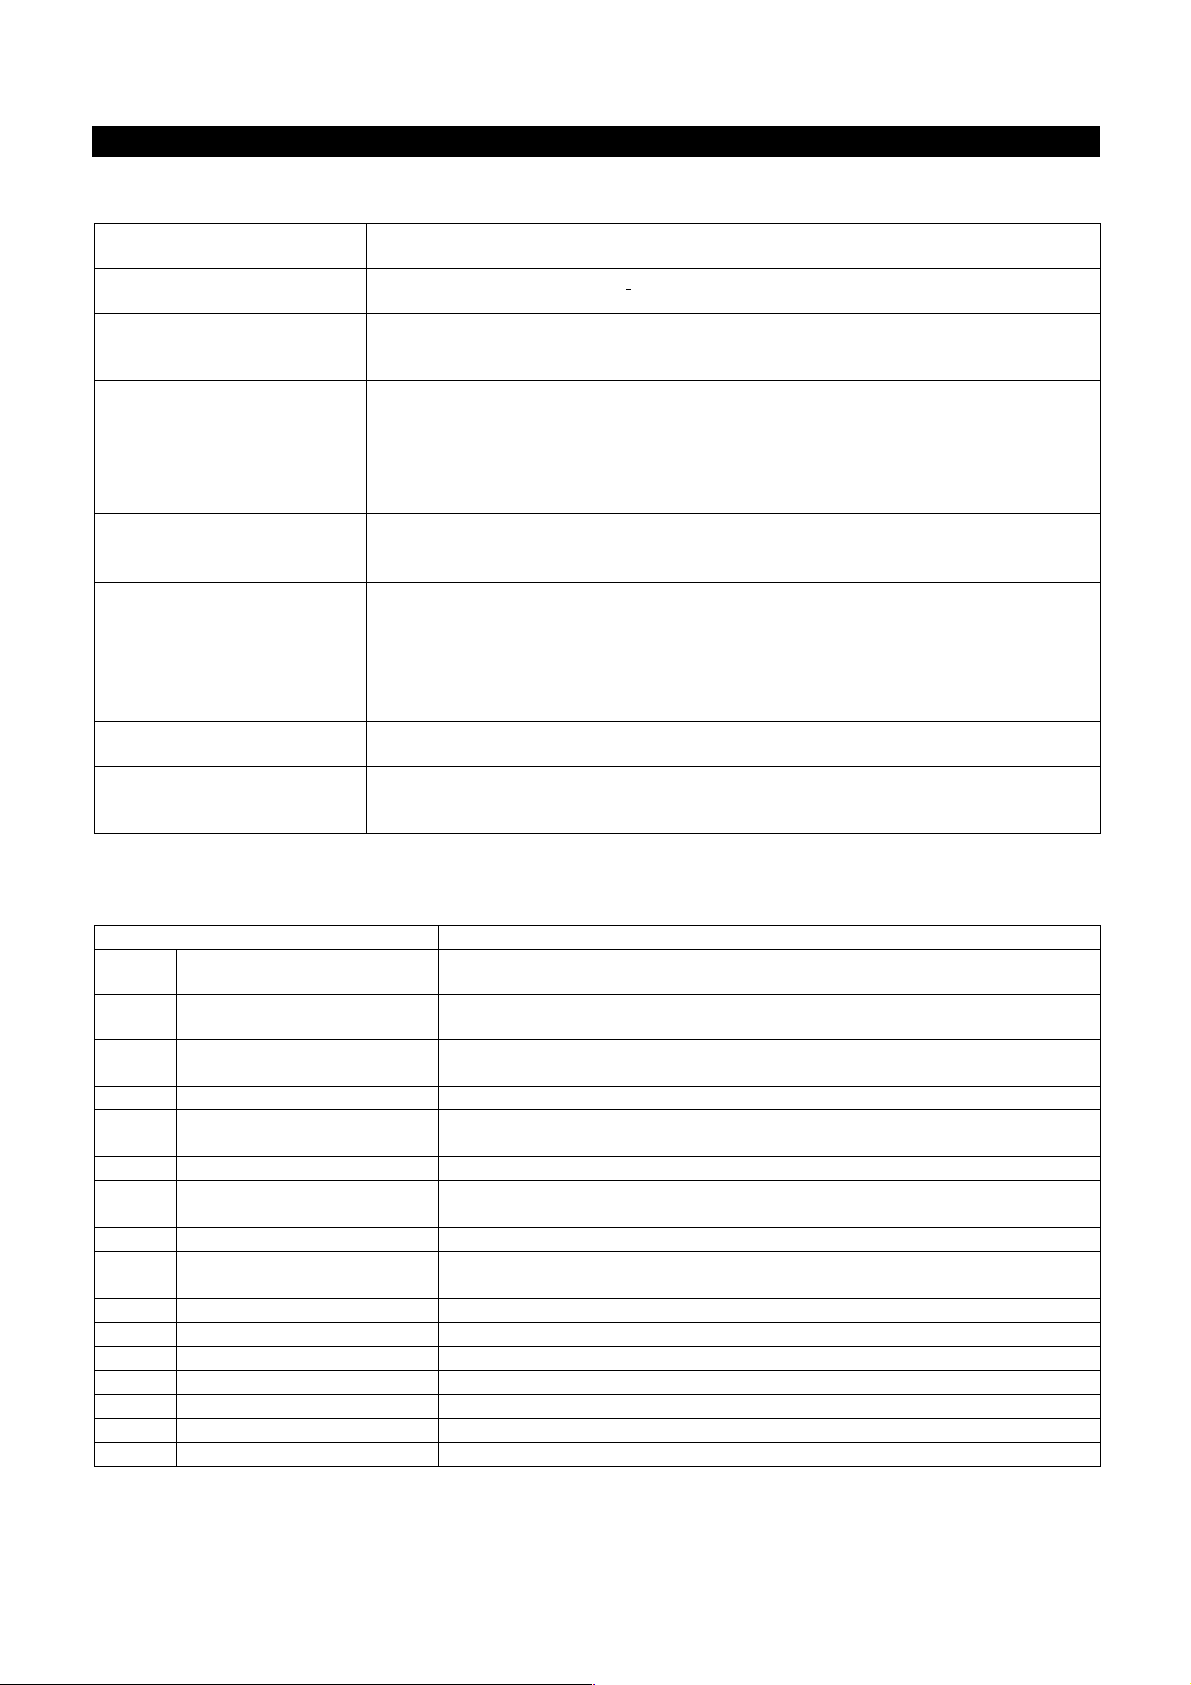
Screen (2)
The screen has 4 displays with 7 segments each and gives information regarding
the current operation.
Mains switch (4) On/Off
The switch has two positions. Press “I” to switch on the washing machine and “O” to
switch it off.
START key
Press Start to start a programme, pause or continue the programme after the
pause. In the menu navigation use the ENTER function to enter or go the next level
in a menu.
ADVANCE (>>) key
Press advance to accelerate a programme. When this key is pressed the
programmer goes directly to run the next phase of the programme; where the phase
currently running is the last, the programme ends. Please note that if you press this
key during a spin cycle, the machine will not move to the next phase until
completion of the required safety time to permit the drum to come to a complete
standstill.
INC ( ) and DEC ( ) keys The INC () and DEC () keys have different functions depending on the screen
and the programmer operating mode. Use these keys to select a wash programme
or to scroll through different menus.
ECO Key
Press ECO to reduce the time each programme runs. The following table shows
the effect of the “eco” key on the different programmes.
When the ECO key is pressed, the letter S appears next to the programme,
indicating tha
t the
eco mode is on.
When scrolling through the menus, use the Return function to exit or go to the
higher level.
Extra Rinse Key Press this key to add an additional rinse to the current washing programme. When it
is pressed, the additional Extra Rinse LED lights up.
Phase indicators (LEDS) The programmer has 7 amber LEDs that indicate the status of the washing machine
and the washing programme progress in its different phases. The eighth LED is
green and shows the door status.
2.2 Programmes
(S) E
CO mode on
Programme
“ECO” Effect
P1 (S)
Whites 90ºC The complete prewash cycle is cancelled and the wash cycle lasts 8
minutes instead of 12.
P2 (S)
Whites/coloureds 60 ºC The complete prewash cycle is cancelled and the wash cycle lasts 10
minutes instead of 15.
P3 (S)
Whites/coloureds 30 ºC The complete prewash cycle is cancelled and the thermal stop is
deactivated in the wash cycle
P4 (S)
Whites/coloureds cold wash The complete prewash cycle is cancelled.
P5 (S)
Synthetics 60ºC The complete prewash cycle is cancelled and the wash cycle lasts 10
minutes instead of 15.
P6 (S)
Synthetics cold wash The complete prewash cycle is cancelled.
P7 (S)
Delicates 40ºC The complete prewash cycle is cancelled and the thermal stop is
deactivated in the wash cycle
P8 (S)
Delicates cold wash The complete prewash cycle is cancelled.
P9 (S)
Cold woollens The complete prewash cycle is cancelled and the wash cycle lasts 8
minutes instead of 12.
P10 (S)
Sanitary There is no change.
P11 (S)
Fast cold wash There is no change.
P12 (S)
Fast wash 40ºC There is no change.
P13 (S)
Fast wash 60ºC There is no change.
P14 (S)
Fast delicates There is no change.
P15 (S)
Long spin There is no change.
P16 (S)
Short spin There is no change.
Page 10

ENGLISH
8
NOTE:
When the thermal stop is deactivated, the programmed wash time starts to run immediately without waiting for the programmed water
temperature to be reached
Page 11

ENGLISH
9
2.3 Operation
This machine has been designed to wash or treat most
materials. Its use for other purposes than those given
is considered as undue and dangerous.
The machine should be loaded with the nominal load,
smaller or bigger loads should be avoided.
Clothes should not be washed in sacks or cloth bags.
If this is absolutely necessary, make sure the machine
is loaded to the nominal load to avoid possible
unbalanced loads.
Canvas, waterproof items, mops, carpets or rugs
should not be spun.
The machine is controlled using a microprocessor able
to adapt to the needs of each user.
There are 16 programmes for which the times and
temperatures can be changed. They are divided into
four sections with different spin settings and
treatments: Normal, Delicates, synthetics and fast. For
further details, please see the sections Configuration
(page 68) and Standardised Programmes (page 68).
The machine has an intelligent control to control the
water temperature; if hot water is available, it should
be connected. The machine adjusts the different water
inputs to maintain the programmed temperature.
It has intelligent control for spin cycle management.
The washing machine controls any unbalanced loads
and manages the spin to ensure a good spin, reducing
noise and extending the useful life of wearable
components, thus significantly reducing fatigue in the
mechanical components.
The machine offers the “E
CO” system. By pressing
one key
you automatically reduce the programme time,
thus adapting to user requirements without needing to
change the machine configuration.
Extra rinse option. Press one key to add another rinse
to the programme, thus adapting to user requirements
without needing to change the machine configuration.
2.3.1 Programme execution
In order to carry out a wash programme, the following
steps should be followed:
1- Put dirty clothes in washing machine drum
2- Close washing machine door.
3- Add detergent
4- Select desired programme.
5- Press START key.
After starting a programme, the LEDs indicate its
condition and evolution.
With the START key the programme stops, and
pauses. If you want the programme to continue, press
the Start key again. If the programme is in spin mode,
it is not possible to pause the machine, and therefore
pressing the START key will have no effect.
2.3.2 Programme end
The programme can finish in several ways:
Normal end: the programme finishes when all cycles
have been carried out.
Pressing the ECO key when the washing
machi
ne is in PAUSE mode.
By pressing the ADVANCE key from any point in
the programme, repeatedly, the end of the programme
can be reached. If a spin is being carried out, the
ADVANCE key will not respond until the braking safety
time has finished (approx 1 min.).
When a programme ends, before allowing the door to
be opened, the clothes are untangled during 30
seconds. An acoustic signal when the door can be
opened after this process.
Page 12

ENGLISH
10
3 CONFIGURATION (advanced)
To go to the menu, while the machine is on and
stopped, press the INC and DEC (,) keys together
for 2 seconds. The two main menus of the machine
are shown below.
CONF Configuration
MANT Maintenance
The maintenance menu is exclusively for use
by the technical service, user options are included in
the configuration menu. To go to configuration, press
START and enter the code, 3489. The different options
are displayed below:
MOD. Model (technical service)
Grd Temperature unit (Cº or Fahrenheit)
Pay Self-service (Off/Coin/CP) Only for
self-service models (see point 2.9)
Prg Programme selection
AVAN Advance (On/Off)
ECO - > ECO (On/Off)
ACLA Extra rinse (On/Off)
Stop Thermal stop switch (On/Off)
LEuL Configuration of water level
bLOC bLOC (Modify/delete blocks)
TimR Remaining time
Div Currency (only self-service/coin
slot) (see point 2.9)
Pric Price (only self-service/coin slot)
(see point 2.9)
3.1 Prg (programme selection)
Press start to access the programme selection; the
programmes are displayed followed by ‘y’ or ‘n’
(yes/no) indicating which programmes are activated.
Use the INC () and DEC () keys to change the
yes/no, press >> (advance) to change the programme
and Start to end. If no programme is selected, the
defect programme, P1 is active. If, for example,
programmes P1, P4, P5, P8 and P14 are selected,
correlative numbers are displayed on the operation
screen: P1, P2, P3, P4, P5.
3.2 AVAN(advance)
The key >> can be deactivated, to prevent the
advance of a cycle thus ensuring the wash programme
is completed correctly. ON activated, OFF deactivated
(activated by defect)
3.3 ECO
The ECO function may be switched off. This
function slightly alters the wash cycles and times to
give shorter cycles. ON activated, OFF deactivated
(activated by defect)
3.4 ACLA (Extra rinse)
The extra rinse key can be switched off, eliminating the
option to add an extra rinse. ON activated, OFF
deactivated (activated by defect)
3.5 Stop (Thermal stop switch)
When the thermal stop switch is activated, the cycle
time does not start until the programmed temperature
has been reached in order to guarantee the wash
cycle is correctly completed; this switch can be
deactivated so that the time is counted from the
moment the programmed level is reached. ON
activated, OFF deactivated (activated by defect)
3.6 LEuL (Configuration of levels)
The water levels can be varied; there are three
different settings:
1- Low (factory setting)
2- Intermediate
3- Height
If the configuration is modified, this will affect all the
levels of water used. Press start and the current level
is displayed (Leu1), use the INC and DEC (,) keys
to change the level to suit your needs. Press Start
again to confirm the level selected.
Page 13

ENGLISH
11
3.7 bLOC (Modify/delete blocks)
It is possible to modify the time and temperature of
each phase and even delete phases.
First, refer to the table of Standardised Programmes
to confirm which blocks are in the programme you wish
to modify.
Next, enter this block and modify the parameters as
follows:
1- When bLOC is displayed on the screen,
press Start.
2- B 1 is displayed, press the INC and DEC
(,) keys to go to the block you wish to
modify. Press Start.
3- “tIME” is displayed on the screen, press
the INC or DEC (,) keys to go to “tEMP”
(temperature). To modify the time, press
Start when “tIME” is displayed and the
default time setting will be shown. Use the
INC and DEC (,) keys to modify this
value and press Start to confirm. Press
E
CO to exit.
4- To modify the temperature, go to “tEmP”,
press Start and the default temperature
setting is displayed, modify the value using
the INC and DEC (,) keys and press
Start to exit.
5- If the time is set to 0 seconds, the block is
cancelled and will not run, i.e. the next
phase will be run. It is not possible to
cancel the last spin of each programme
and therefore this is limited to a time of
one minute.
6- Warning! Please note that some blocks
are used in more than one programme at a
time and, if these block are changed, all
the programmes in which they are used
will be changed.
3.8 Timr (Remaining time)
The timer can be activated to display the time
remaining for each programme, provided that the
thermal stop, E
CO and extra rinse functions are
swit
ched off. ON activated, OFF deactivated
(deactivated by defect)
3.9 Parameters (In run mode)
To go to the menu and view the real data while the
machine is running, press INC and DEC (,) together
for 2 seconds.
PARA Parameters: Temperature, level of
water and remaining time.
IN Inputs (technical service)
OUT Outputs (technical service)
Page 14
ENGLISH
12
4 SELF-SERVICE
4.1 Operation
The configuration of the machine is different for selfservice models.
There is no mains switch on the control panel. To
switch the machine on and off, use the switch (circuit
breaker) at the rear of the machine.
Only those keys required to run a programme are
displayed; the “ECO”, “extra rinse” and advance
“>>”
keys are switched off although they can be
activated in the configuration menu (page 9).
Warning!
For safety reasons, access to configuration is not
the same as in non-self-service machines. Please
ask your distributor (vendor) for details on the
corresponding method.
Remember that these
keys are used in the
configuration menus,
therefore you should
know exactly which
function each key
corresponds to.
The “Timr” (time
remaining) option is activated by default, it can be
switched off in the configuration menu (see section
3.8).
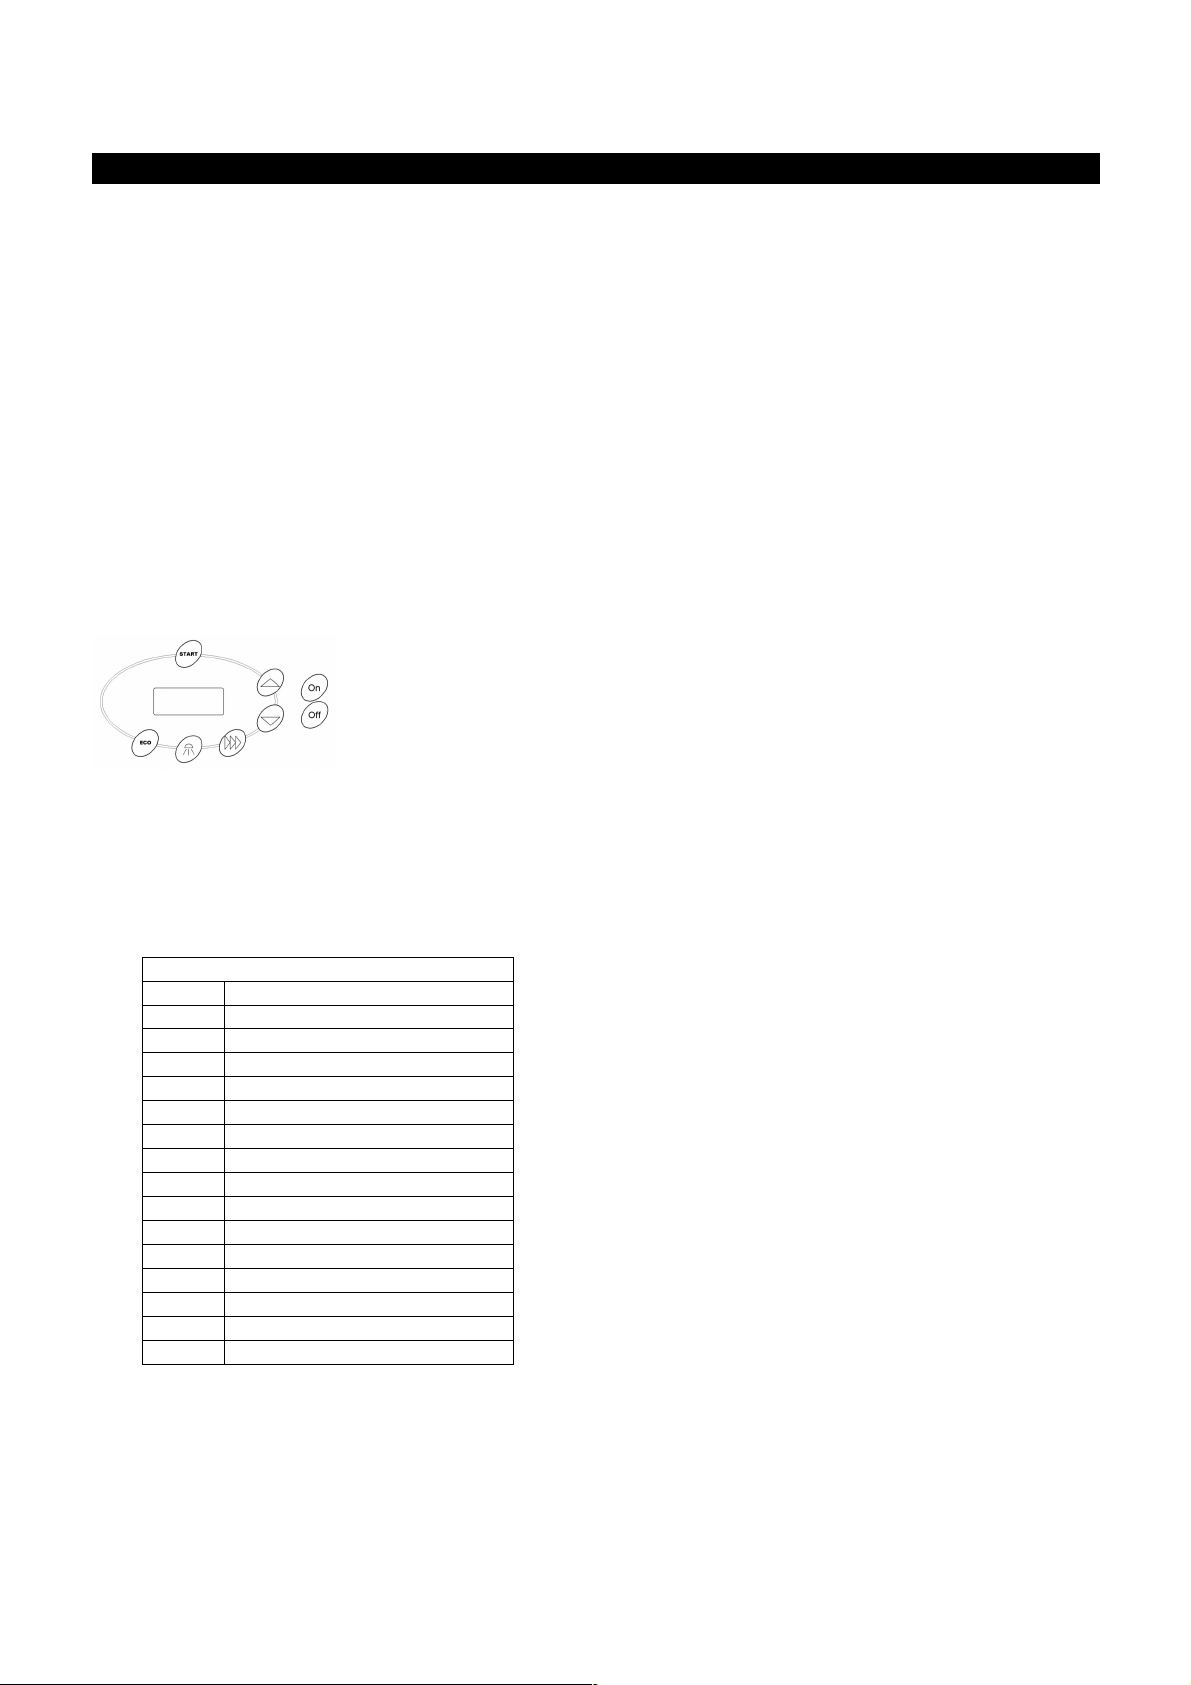
By defect, only 4 programmes are activated:
Self-service programmes
P1
Whites 90ºC
P2
Whites/coloureds 60 ºC
P3
Whites/coloureds 30 ºC
P4
Whites/coloureds cold wash
P5
Synthetics 60ºC
P6
Synthetics cold wash
P7
Delicates 40ºC
P8
Delicates cold wash
P9
Cold woollens
P10
Sanitary
P11
Fast cold wash (P1)
P12
Fast wash 40ºC(P2)
P13
Fast wash 60ºC(P3)
P14
Fast delicates (P4)
P15
Long spin
P16
Short spin
The programme selection can be configured (See
section 3.1)
Remember that the customer is only shown the active
programmes, and these are always shown in
correlative order beginning with P1.
Self-service machines can be operated using different
devices:
1- Pay centre (standard configuration)
2- Coin slot.
3- Card
The self-service washing machine is delivered with
Pay Centre configuration (CP). For the coin and card
operated options, it is necessary to install the
corresponding “kits” sold separately. Please ask your
distributor for further information.
To change the washing machine configuration, go to
CONF/PAY (see section 3) and select the required
option. There are two operating modes:
The different functions in each case are shown below:
4.2 Pay centre/card
Use this option if the washing machine is a pay centre
model or the card kit has been installed.
Programme execution
In order to carry out a wash programme, the following
steps should be followed:
1- Place dirty washing in the machine.
2- Close the door
3- Add detergent
4- Insert card or coins in the pay centre
5- Select programme
6- Press Start
The price rate is the same for all the programmes. To
change the price, please see the pay centre manual or
the card reader if using card payments.
4.3 COIN
Use this option if the machine has been installed with
the coin kit.
In order to carry out a wash programme, the following
steps should be followed:
1- Place dirty washing in the machine.
2- Close the door
3- Add detergent
4- Select programme
5- Confirm price
6- Insert the coins
7- Press Start
The programme number and price are shown on the
screen intermittently; use the INC and DEC (,) keys
to change the programme and the price will be
updated. If there is no activity to the keys or in the coin
Page 15
ENGLISH
13
slot after 30 seconds, the word “FREE” is displayed on
the screen, indicating that the machine is available.
Press any button to view the programmes.
With this type of coin-operated machine, a different
price can be allocated to each programme. Two new
submenus, DIV and Pric, are displayed in the
configuration menu and can be used to allocate the
corresponding currency and price.
Div: The coin slot has a different setting for each
currency. Please refer to the coin kit manual and
confirm that the installed coin kit accepts your
currency. Allocate the currency to the washing
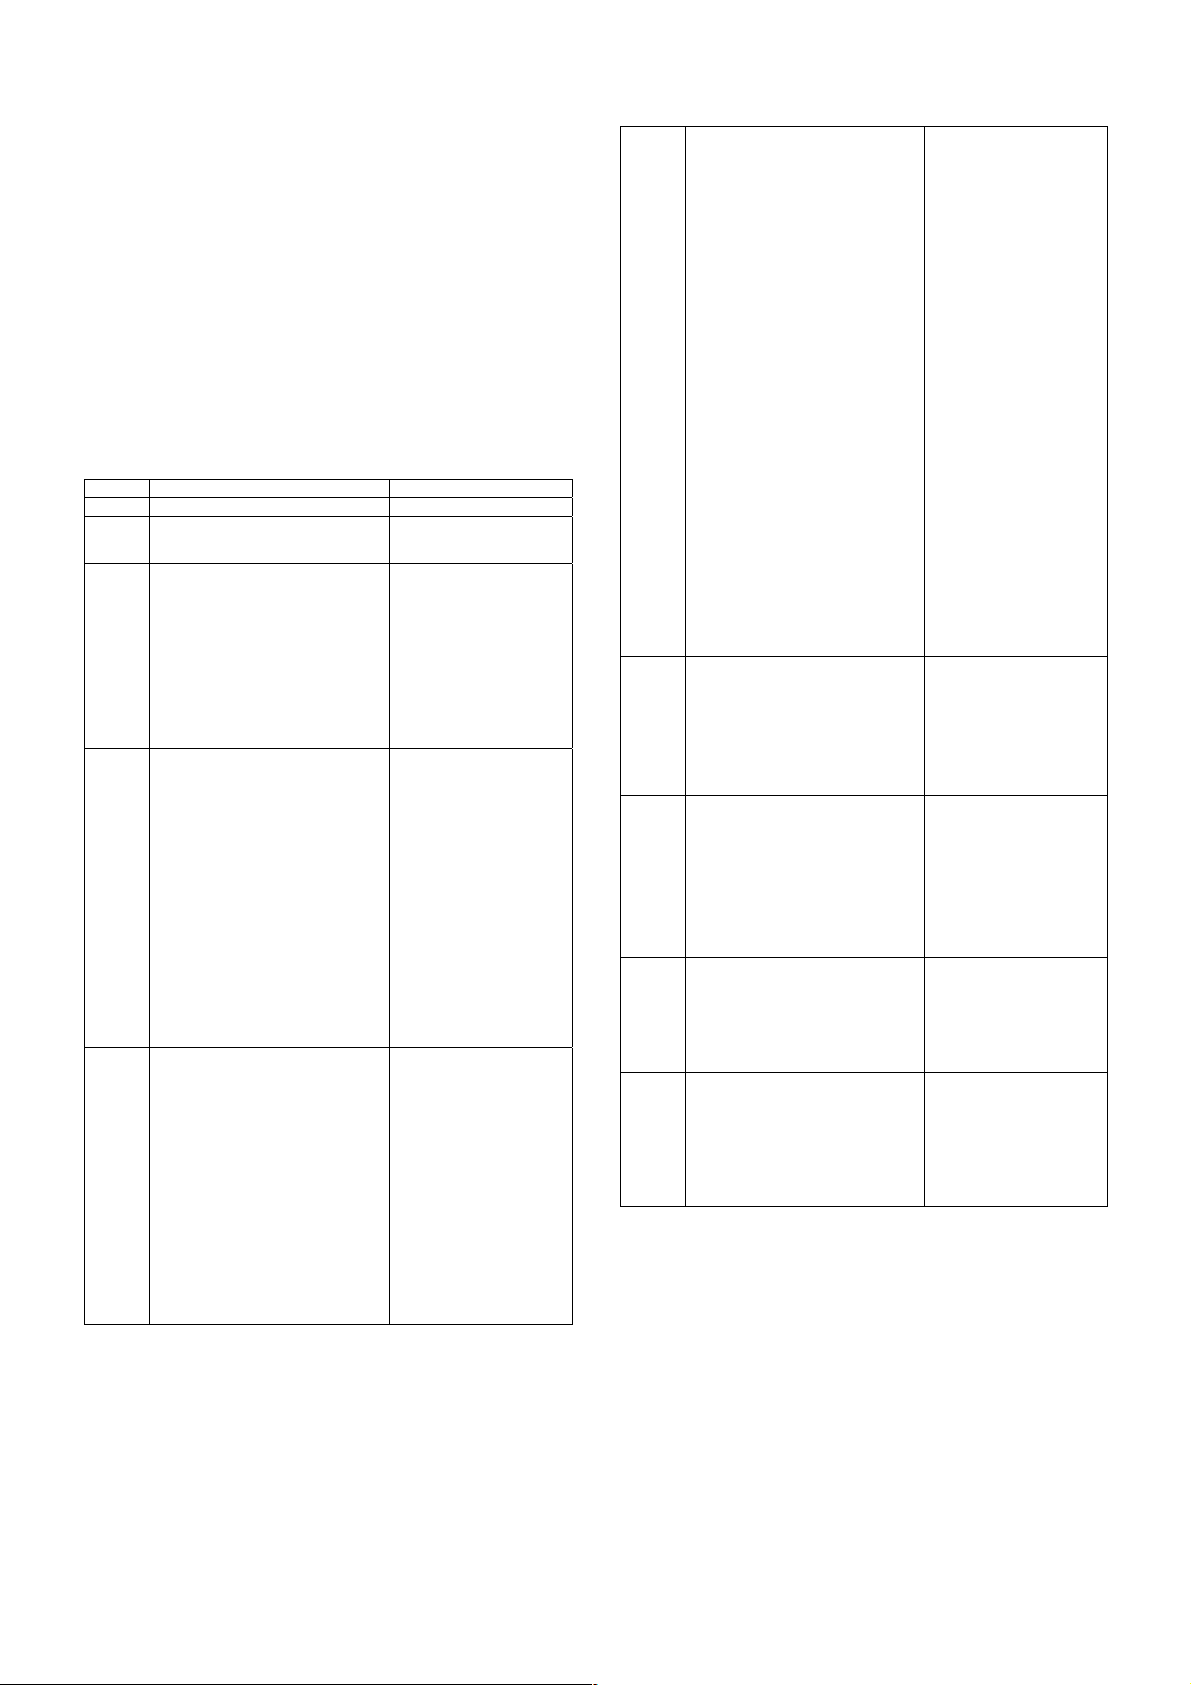
machine programmer. The table below shows the
available currencies:
CODE COUNTRY MINIMUN PRICE
0 Ficha/Token 1
1 Kuwait
Oman
0.05
2 Azerbaijan
Bulgaria
Bahrain
China
Fiji
Malaysia
Panama
Singapore
0.1
3 Argentina
Bermuda
Brazil
Canada
Ecuador
Egypt
Ethiopia
Guatemala
Cayman Islands
Saudi Arabia
El Salvador
Turkey
United States
0.25
4 United Arab Emirates
Bolivia
Estonia
Euro-Countrys
United Kingdom
Georgia
Ghana
Croatia
Latvia
New Zealand
Qatar
Ukraine
0.5
5 Bosnia and Herzegovina
Bangladesh
Switzerland
Dominican Republic
Hong Kong
Israel
India
Sri Lanka
Lithuania
Morocco
Macedonia
Peru
Philipines
Poland
Russian Federation
Sweden
Slovakia
Thailand
Tunisia
Uruguay
Yugoslavia
South Africa
Australia
1
6 Czech Republic
Denmark
Kenya
Mexico
Norway
Romania
5
7 Algeria
Guyana
Hungary
Iceland
Kazakhtan
Slovenia
Taiwan
10
8 Chile
Costa Rica
Iran, Islamic Republic of
Paraguay
French Polynesia
50
9 Colombia
Indonesia
Japan
South Korea
Uganda
Venezuela
100
NOTE: This list is continuously updated, if you cannot find your country in the
list, please ask your distributor for the latest available update.
PRIC: Allocate the price to each programme. Press
Start to go to the programmes, in this menu only the
active programmes are displayed ( but with their
original numbering) (please see the table on page 11).
Press Start to access the price. The price is
conditioned by the currency selected; if the currency is
changed, the prices will be reset, therefore it is
IMPORTANT to select the currency first. If a
programme is added to the list (section 3.1) the default
price for this currency will be allocated to the
programme, the price should be allocated after it has
been activated.
Page 16
ENGLISH
14
5 MAINTENANCE
5.1 Electrical and mechanical irregularities
Before calling the Technical Service Centre, check the
following:
That power is supplied to the machine.
The condition of the fuses.
That the voltage is correct for the machine.
If the washing machine fails to get the required
level of water, check:
The water mains tap is open.
The water inlet filter is not blocked.
That the water pressure is between 2 and 4 kg/cm 28
(28 and 56 psi).
If the washing machine vibrates excessively,
check:
None of the panel screws is loose.
If a power cut occurs, check:
The tub is drained and the door is blocked. If you want
to take the clothes out of the washing machine, unlock
the door by pulling down the belt located behind the
front panel.
5.2 Error messages
On the washing machine screen, warning or fault
messages may be displayed during or after the
execution of a wash programme. Except in the event
of a power cut, the washing machine will be paused
(drain pipe valve off, motor off, etc.), awaiting user
action.
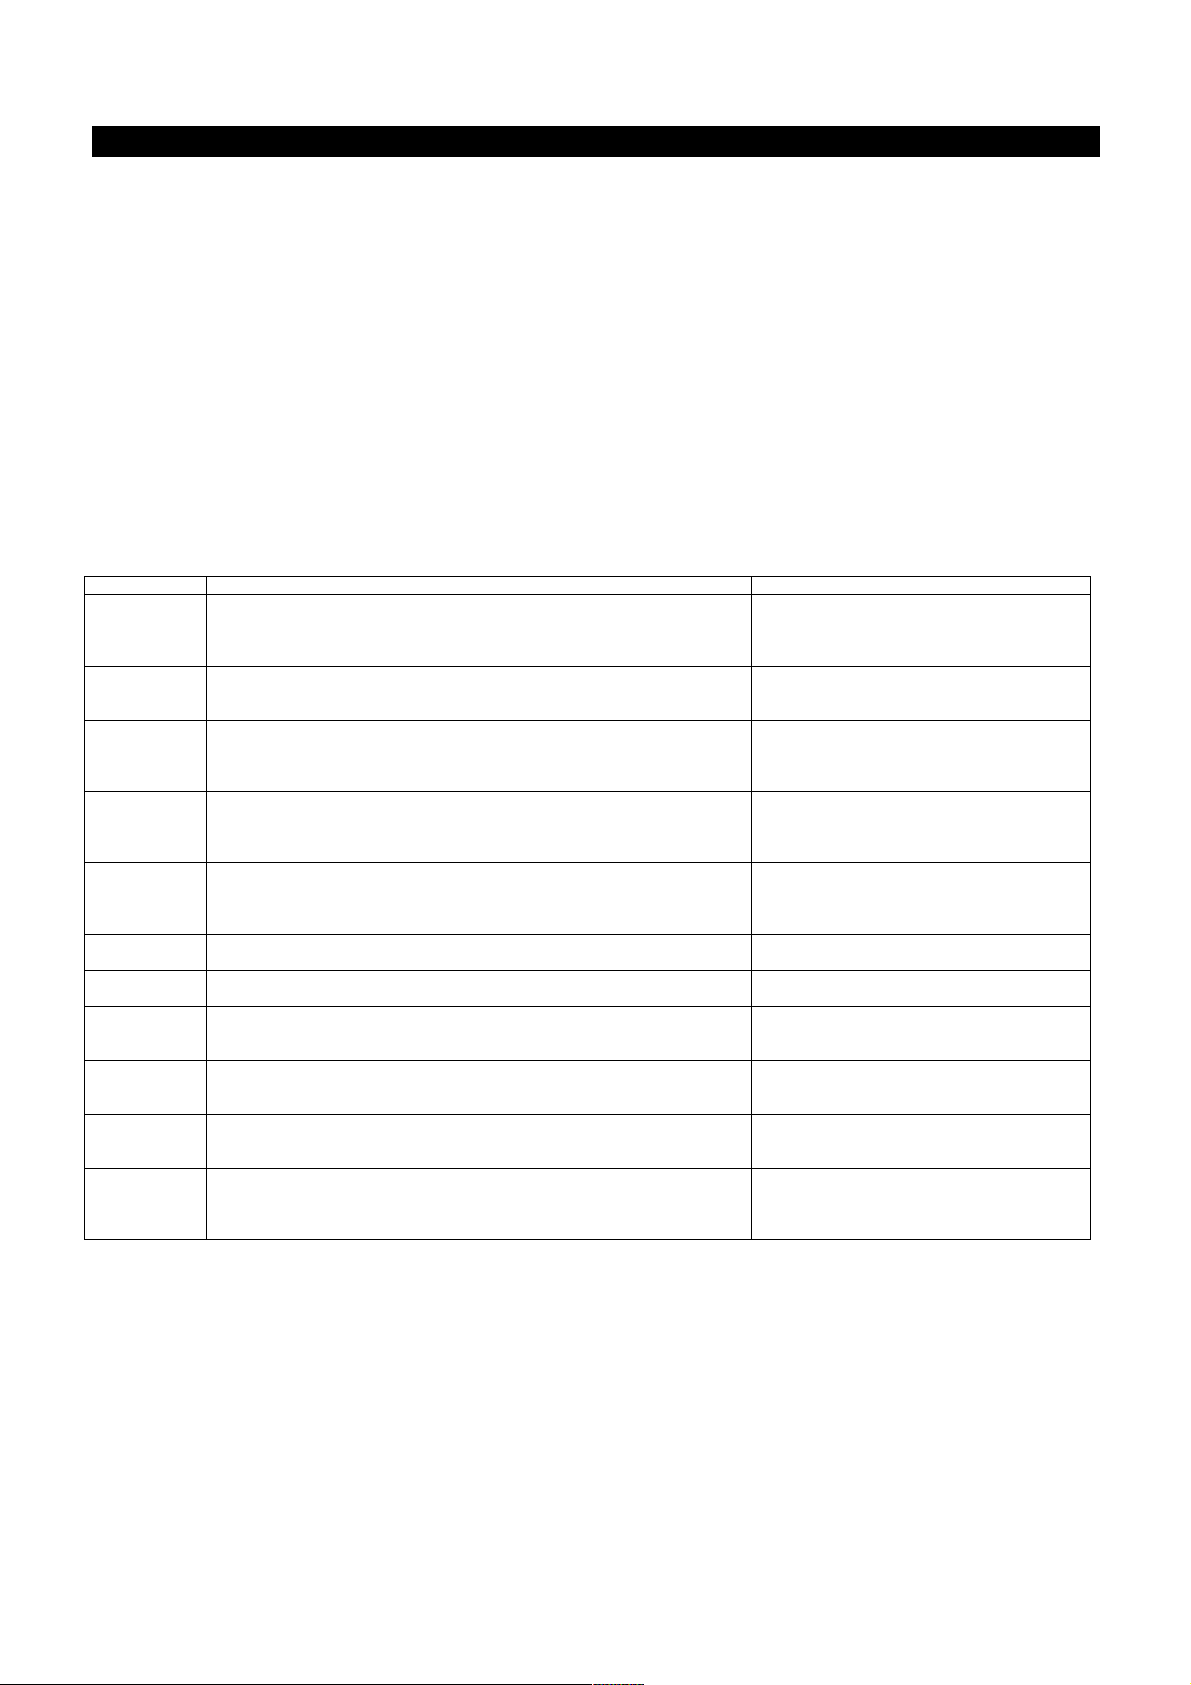
Message Possible causes Action
PWR FAUL
UAIT
This message appears on recovering the power after having been cut-off.
If the power cut occurs during the spin cycle, the message "WAIT" is
displayed. For safety reasons, wait approximately 1.5 minutes without
pressing anything until "PWR FAULT" is displayed.
Press START: the programme continues to
operate in the same phase as before the
power cut.
Press ECO: the programme ends.
E2
FAULT LOCK
This message appears when it is detected that the door can not be unlocked
at the end of the programme or that it has unlocked during the programme
Press ESC: the programme ends.
E3
FAULT DRAIN PIPE
This message is displayed when, in spite of deactivating the emptying valve
output, the water level inside the drum has not decreased for a preestablished period of time.
Press START: the programme continues.
Press ECO: the programme ends.
E4
FAULT WATER INLET
This message appears when, in spite of activating the corresponding
solenoid valves' outputs, the water level inside the tub has not increased
during a certain pre-established period of time.
Press START: the programme continues.
Press ECO: the programme ends.
E5
HEATING FAULT
This message is shown when, in spite of activating the heating output, the
water temperature has not increased for a certain pre-established period of
time.
Press START: the programme continues.
Press ECO: the programme ends.
E6
MAX. TEMP
This message is displayed when the water temperature has exceeded 95 ºC.
Press START: the programme continues.
Press E
CO: the programme ends.
E7
THERMOSTAT OPEN
This message appears when the water exceeds 95 ºC
Press START: the programme continues.
Press E
CO: the programme ends.
E9
MOTOR HEATING
This message appears when the thermal protection of the washing
machine's motor is detected to have not been activated.
Press START: the programme continues.
Press ECO: the programme ends.
E10
UNBALANCE
This message appears when the final spin activates the unbalance micro
three times.
Press ECO: the programme ends.
E11
CLOTHES HOT
This message is displayed when a programme execution finishes but the
water temperature inside the tub exceeds 50 ºC.
Press E
CO: the programme ends.
E12
WATER IN TUB
This message is displayed when a programme execution is finished but there
is still water inside the tub. The door can not be opened until the water is
drained from the tub.
Press ECO: the programme ends.
Page 17

 Loading...