

Page 1
Página 1 de 1
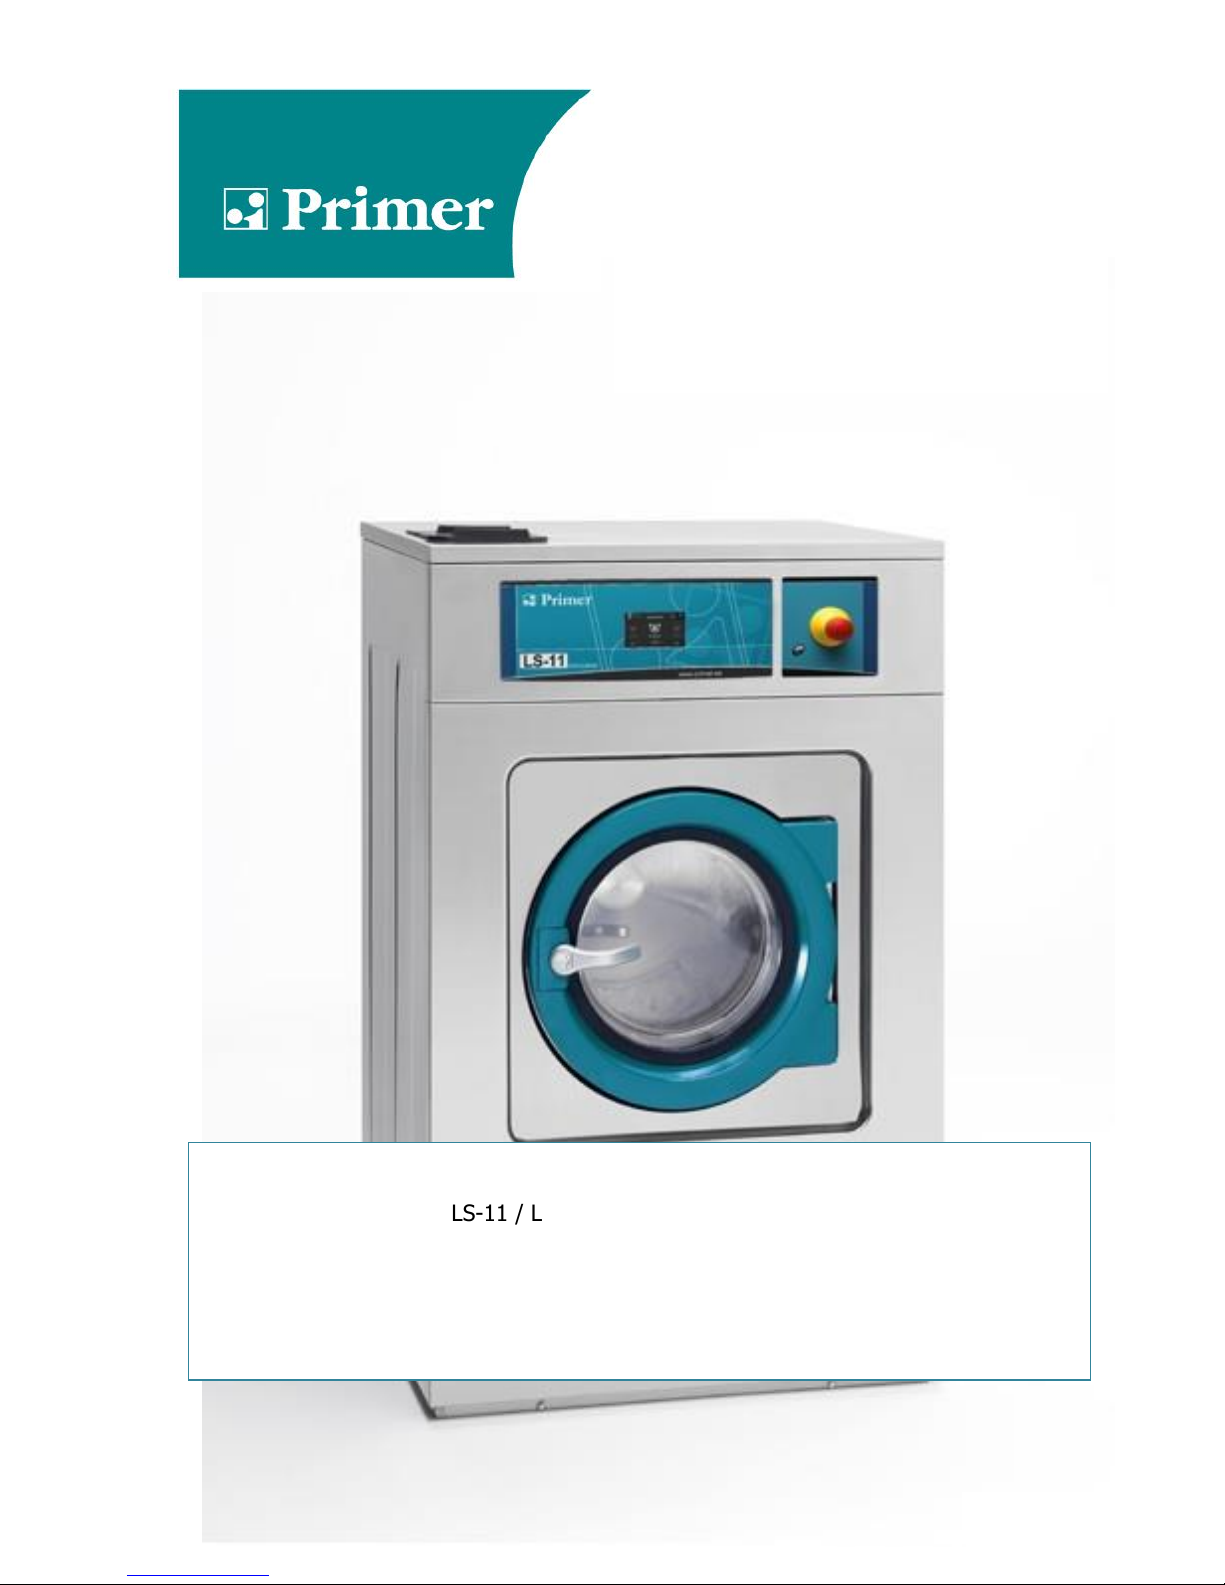
LS-11 / LS-14 / LS-19 / LS-26 / LS-36 / LS-45 / LS-62 / LS-125
TS-11 / TS-14 / TS-19 / TS-26
RS-11 / RS-14 / RS-19 / RS-26 /RS-36 / RS-62
INSTRUCTION MANUAL
MACHINES
12132021
Page 2

Page 3

EN
Página 1 de 43
0 SAFETY INSTRUCTIONS ....................................................................................................... 2
1 INTRODUCTION ....................................................................................................................... 3
2 USE ............................................................................................................................................. 3
2.1 Recomendations for use ............................................................................................... 3
2.2 Using the dispenser ....................................................................................................... 3
2.3 Machine features ............................................................................................................. 3
3 INTERFACE ............................................................................................................................... 4
3.1 Screen OFF OPL .............................................................................................................. 4
3.2 Main Screen OPL ............................................................................................................. 4
3.3 Run screen OPL............................................................................................................... 5
4 PROGRAMMES ........................................................................................................................ 8
4.1 Cycle parameters ............................................................................................................ 8
4.1.1 Parameters for soak, prewash, wash or rinse cycles: ......................................... 8
4.1.2 Parameters for spin cycles: ..................................................................................... 9
4.2 Cycle library .................................................................................................................... 10
4.3 Programme library ........................................................................................................ 12
4.4 Model parameters ......................................................................................................... 17
4.5 Template for customized programs ......................................................................... 18
5 CONFIGURATION .................................................................................................................. 19
5.1 Programme management ............................................................................................ 19
5.1.1 My programmes ....................................................................................................... 20
5.1.2 Programme library ................................................................................................... 20
5.1.3 Cycle library .............................................................................................................. 22
5.2 Configure System ......................................................................................................... 22
5.2.1 HUD configuration ................................................................................................... 24
6 MAINTENANCE ...................................................................................................................... 26
6.1 Electrical and mechanical irregularities ................................................................. 26
6.2 Warnings ......................................................................................................................... 26
7 NAVIGATION CAM ................................................................................................................ 30
Page 4

EN
Página 2 de 43
0 SAFETY INSTRUCTIONS
In order to reduce the risk of electrical shocks or injury when using the appliance, the basic
precautions should be observed, including the following:
READ all the instructions prior to using the appliance and KEEP THEM in an easily accessible
place for reference in the event of doubt.
Do NOT wash clothes which have been previously treated, washed, soaked or stained with
petrol, dry cleaning solvents, or other inflammable or explosive substances, as these give off
vapours which may catch fire or explode.
Do NOT add petrol, dry cleaning solvents or other inflammable substances to the washing water.
These substances give off vapours which could catch fire or explode.
In some conditions, hydrogen gas may be produced in a hot water system which has not been
used for more than two weeks. Hydrogen gas is explosive. If the hot water system has not been
used for a while, before using the washing machine turn on all the hot water taps and let the
water run for a few minutes. This will release any accumulated hydrogen gas. As the gas is
inflammable, do not smoke or use naked flames during this operation.
Do NOT allow children to play in or on the appliance. Children should be strictly supervised when
in the vicinity of a machine which is operating.
Remove the door from the appliance before disposal or before leaving it out of service.
DO NOT TRY TO OPEN THE DOOR if the drum is moving.
Do NOT install or store the appliance in the open.
Do NOT try to force the controls.
Do not repair or replace parts of the appliance or carry out any servicing unless recommended to
do so in the User Instruction Manual. Make sure that you fully understand the instructions and
have the necessary skills to carry out the operations described.
Do NOT remove any safety device or modify any components in the washing machine. DO NOT
INSTALL components not belonging to the machine in the appliance.
Failure to comply with any of the instructions given in the Instruction Manual may result in
personal injury to the user. It is no possible to provide for all possible situations and contingencies
with warnings about risk and hazards. Therefore, any person involved in the transportation,
installation, use or maintenance of the machine should always employ common sense, caution
and care.
Do NOT use the machine unless all the covers and guards are correctly fitted and secured.
The distributor (vendor) MUST correctly instruct the user during commissioning.
Pour the correct doses of detergent, fabric softener and lay into the dispenser drawer, as
indicated by the manufacturer. Heed tips concerning the treatment of different materials given by
the manufacturers.
Daily remove any traces of detergent or liquids from the dispenser drawer. Never use powdered
or abrasive detergents for cleaning; use only water and soap.
Clean the water inlet filters and the external dispenser conducts once a month.
Never clean the exterior by water injection; functional parts of the machine could damage.
If the washing machine is to be idle for long periods, apply a coat of Vaseline oil to all its stainless
steel surfaces.
An annual general revision is recommended.
Page 5
EN
Página 3 de 43
1 INTRODUCTION
Dear customer,
Thank you for the confidence you have placed in our product. We hope it meets your needs.
The guarantee does not cover damage to glass components, or consumables (seals, bulbs, etc.) nor
damage to insulation material or damage due to the incorrect installation of the appliance, or to
inappropriate use, inadequate maintenance or poor repair processes.
This appliance is subject to changes and modifications for its technical progress.
2 USE
2.1 Recomendations for use
This machine has been designed to wash or treat most materials. Its use for other purposes than
those given is considered as undue and dangerous.
The machine should be loaded with the nominal load, smaller or bigger loads should be avoided.
Clothes should not be washed in sacks or cloth bags. If this is absolutely necessary, make sure the
machine is loaded to the nominal load to avoid possible unbalanced loads.
Canvas, waterproof items, mops, carpets or rugs should not be spun.
When a programme ends, before allowing the door to be opened, the clothes are untangled during 30
seconds. An acoustic signal when the door can be opened after this process.
2.2 Using the dispenser
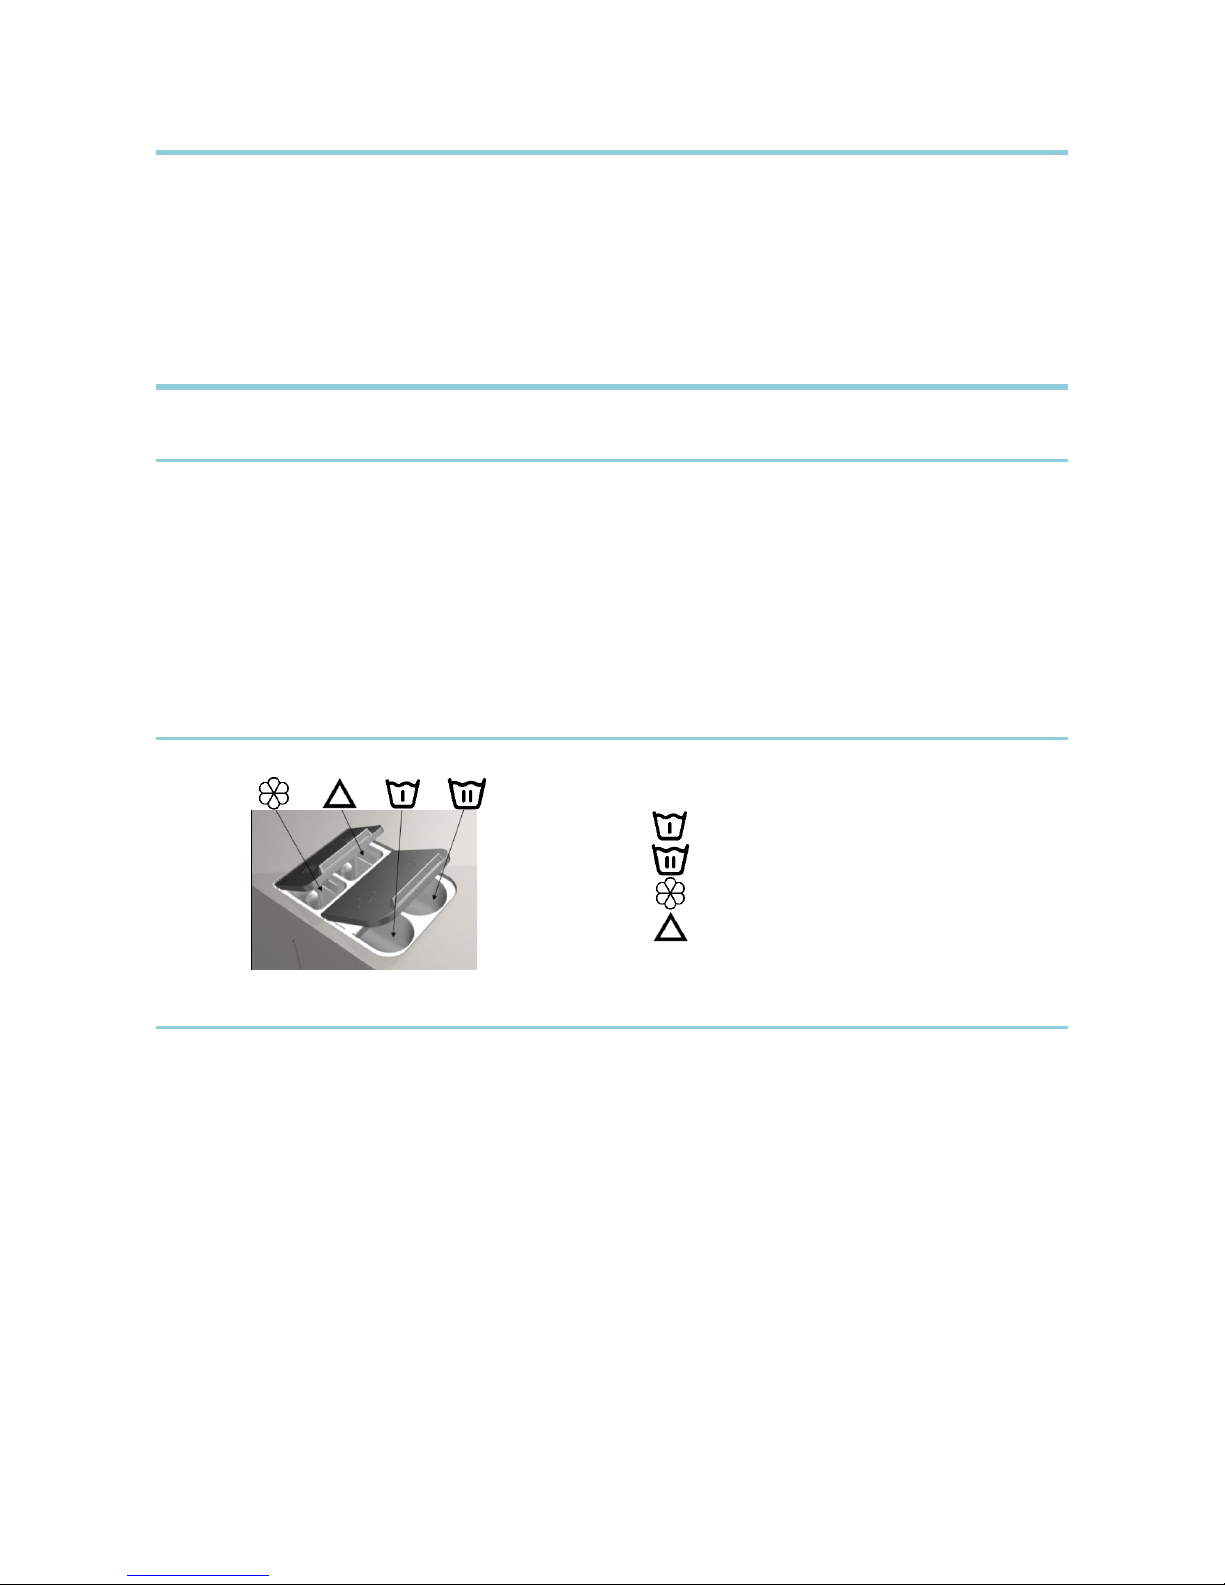
Add washing products to each compartment and close dispenser cover.
2.3 Machine features
The machine is controlled using a microprocessor able to adapt to the needs of each user.
The machine has an intelligent control to control the water temperature; if hot water is available, it
should be connected. The machine adjusts the different water inputs to maintain the programmed
temperature.
It has intelligent control for spin cycle management. The washing machine controls any unbalanced
loads and manages the spin to ensure a good spin, reducing noise and extending the useful life of
wearable components, thus significantly reducing fatigue in the
Powdered detergent for prewash
Powdered detergent for wash
Liquid softener
Liquid whitener (bleach)
Page 6
EN
Página 4 de 43
3 INTERFACE
All the washing machines have a touch screen displaying all the information and from where it is
possible to select all the controls shown on the screen.
When the machine is switched on, Screen Off is displayed. The ON/OFF button takes the user to the
Main screen, from where it is possible to run a programme or go to the main menu. Press START to
go to the Run screen, which displays all the relevant information about the screen.
Press ON/OFF to return to Screen Off from the current screen.
The information displayed on each of the screens can be omitted or enabled from the HUD menu (See
section 5.2.1)
3.1 Screen OFF OPL
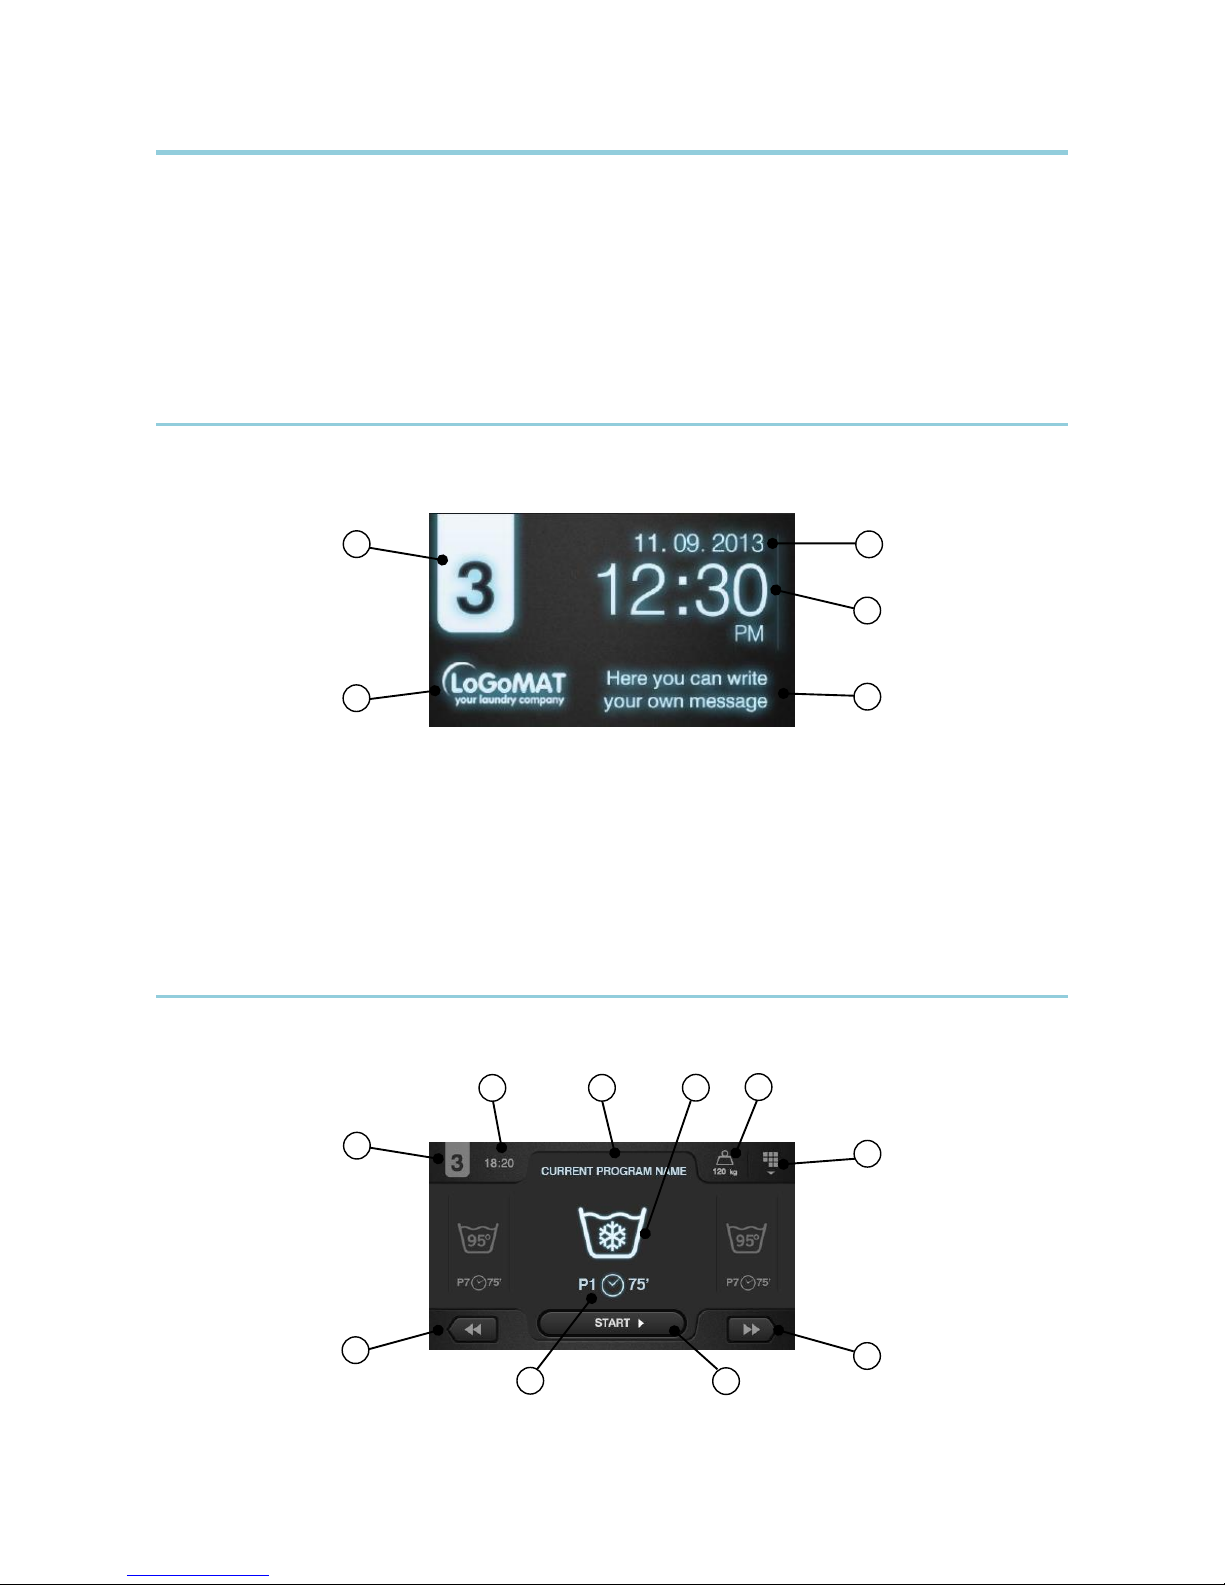
This screen is displayed when the washing machine is switched off, showing the parameters
configured by the user.
5
4
1
2
3
1. Date: Date in the selected format (if enabled in HUD).
2. Time: Time and minutes in the selected format.
3. Laundrette message: Message configured by the user (if enabled).
4. Logo: The logo is displayed (if enabled).
5. Machine identifier: Label identifying the machine (if enabled).
If the option “energy saving” is active, 10 minutes after switching off the washing machine, the screen
backlight will go off. If any part of the screen is touched, the backlight will light up again. Likewise, if
the ON/OFF button is pressed, the backlight comes on and the main screen is opened.
3.2 Main Screen OPL
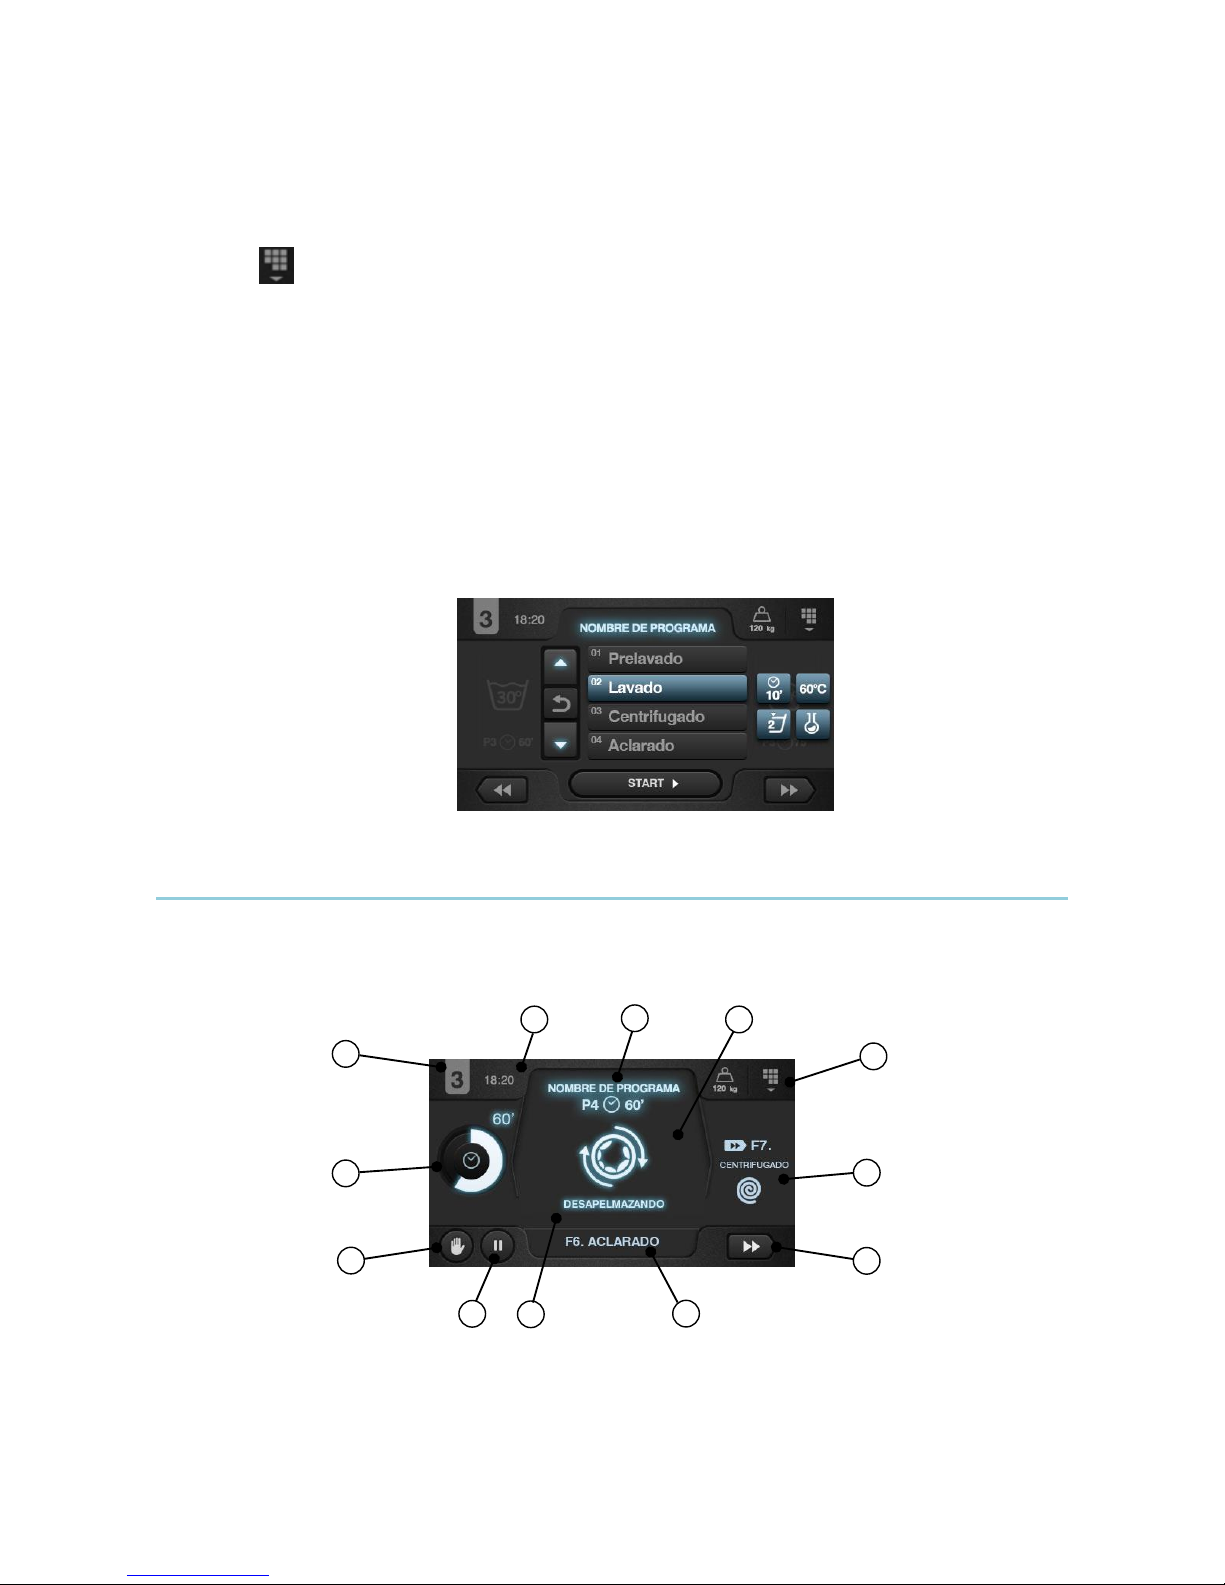
The Main screen of the washing machine is as follows, and displays each of the available options.
Some of the options may be omitted from the HUD menu.
1
8
2 5 6 3
7 9
4
8
Page 7
EN
Página 5 de 43
1. Machine identifier: Label identifying the machine.
2. Time: Time and minutes in the selected format.
3. Weight of clothes: The weight of the clothes in the machine is displayed (if the weighing kit is
active) or the nominal load for the selected model (if the kit is not active), and the weight of the
load entered can be edited. Option to enable/omit in HUD. Once the programme has ended or
been aborted, the nominal load of the machine is selected again.
4. Main menu: Access to washing machine main menu, where the different machine
parameters can be configured.
5. Programme name: Name configured for the selected programme.
6. Programme temperature: Maximum temperature of the different cycles of the programme.
7. Programme number and length: Position of the programme in the list of programmes (My
Programmes), and the estimated length in minutes for the programme selected.
8. Increase/decrease programme number: Permits user to scroll up or down the list of selected
programmes. As well as using the buttons, the programme can be increased/decreased by
pressing directly on the programme information (just above the button).
9. Start: Button to start running the selected programme from the cycle indicated.
10. Programme cycles: Press on the selected programme, the programme cycles are displayed
and the cycle you wish to start with can be selected.
In addition, it is possible to configure a programme instantly, that is, change the parameters of a
cycle (time, temperature, level and dosage) for the current programme. These values are not
saved for future programme runs.
3.3 Run screen OPL
When START is pressed, the programme begins and all the relevant programme information is
displayed on this screen. Some of the options may be omitted from the HUD menu.
1
4
11
2 3 5
10 6 7
12
8
9
1. Machine identifier: Label identifying the machine.
2. Time: Time and minutes in the selected format.
3. Programme running: Programme name, Programme number, Programme length.
Page 8
EN
Página 6 de 43
4. Remaining time: Minutes estimated for the completion of the programme. Status of programme
progress, relation between total time and time remaining for programme.
5. Status (drawing): Animated drawing showing the current cycle of the washing machine (filling,
draining, washing, rinsing, spinning or untangling).
6. Status (text): General text for any message to be displayed. If everything is correct, the text for
the status in question is displayed.
In the event of an error, the cycle and status information is maintained in order to determine
exactly where the error has occurred.
7. Currently running cycle: Identifier and name of currently running cycle.
8. Next cycle: Identifier, name and drawing of next cycle (if the current cycle is the last cycle,
nothing is displayed).
9. Advance cycle: Button to go to next cycle (if the current cycle is the last cycle, nothing is
displayed). As well as using the button, the cycle can be advanced by pressing directly on the
information for the next cycle (just above the button).
10. Pause: Button to pause the current programme. If the programme is paused, the pause icon will
change to the play icon. The programme can be restarted from where it was interrupted.
11. Stop: Button to stop and cancel the programme. A confirmation message will be requested.
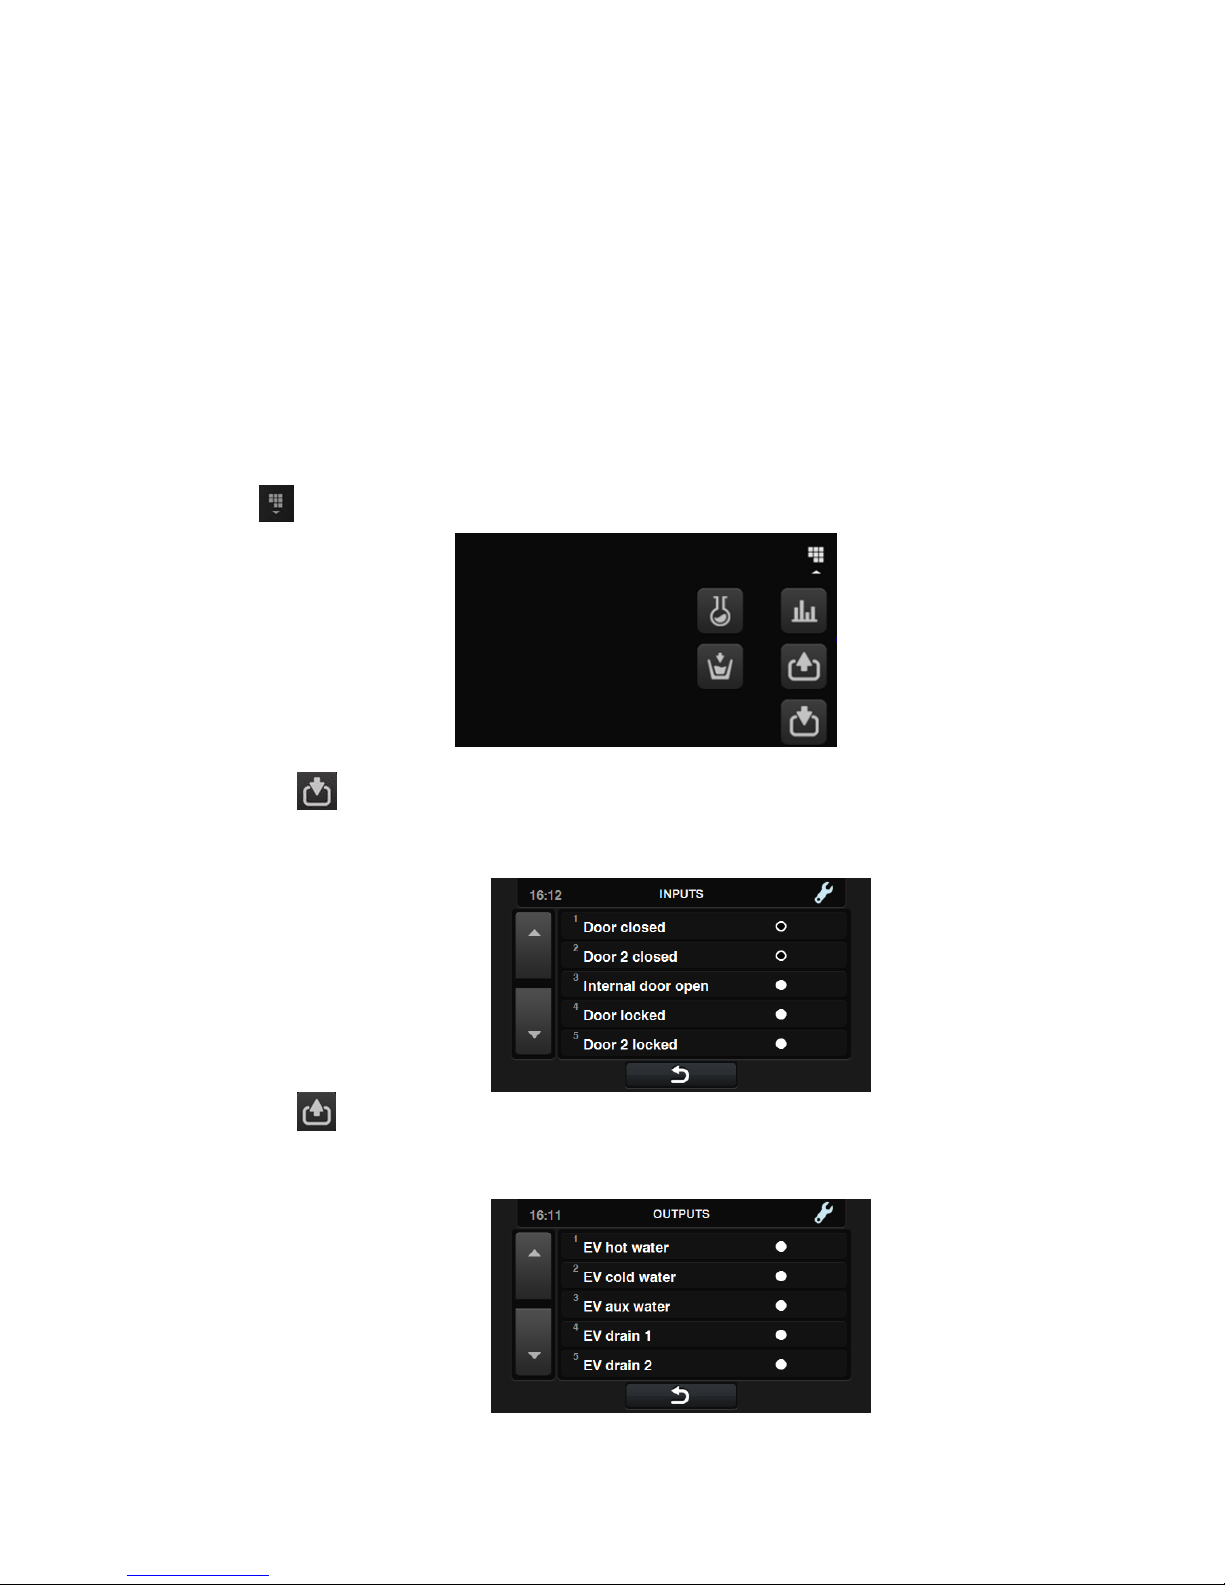
12. Run menu: Access to the current parameters.
Inputs: The status of each of the inputs is displayed. The inputs which are available in
all the machines are always displayed. The inputs which are exclusive to a particular feature
(for example, Self-service, Sanitary, Extra dispensers, Tanks (T1, T2, T3), Tilting…) will only
be available if this feature is activated.
Outputs: The status of each of the outputs is displayed. The outputs which are
available in all the machines are always displayed. The outputs which are exclusive to a
particular feature (for example, Self-service, Sanitary, Extra dispensers, Tanks (T1, T2, T3),
Tilting…) will only be available if this feature is activated.
Page 9
EN
Página 7 de 43
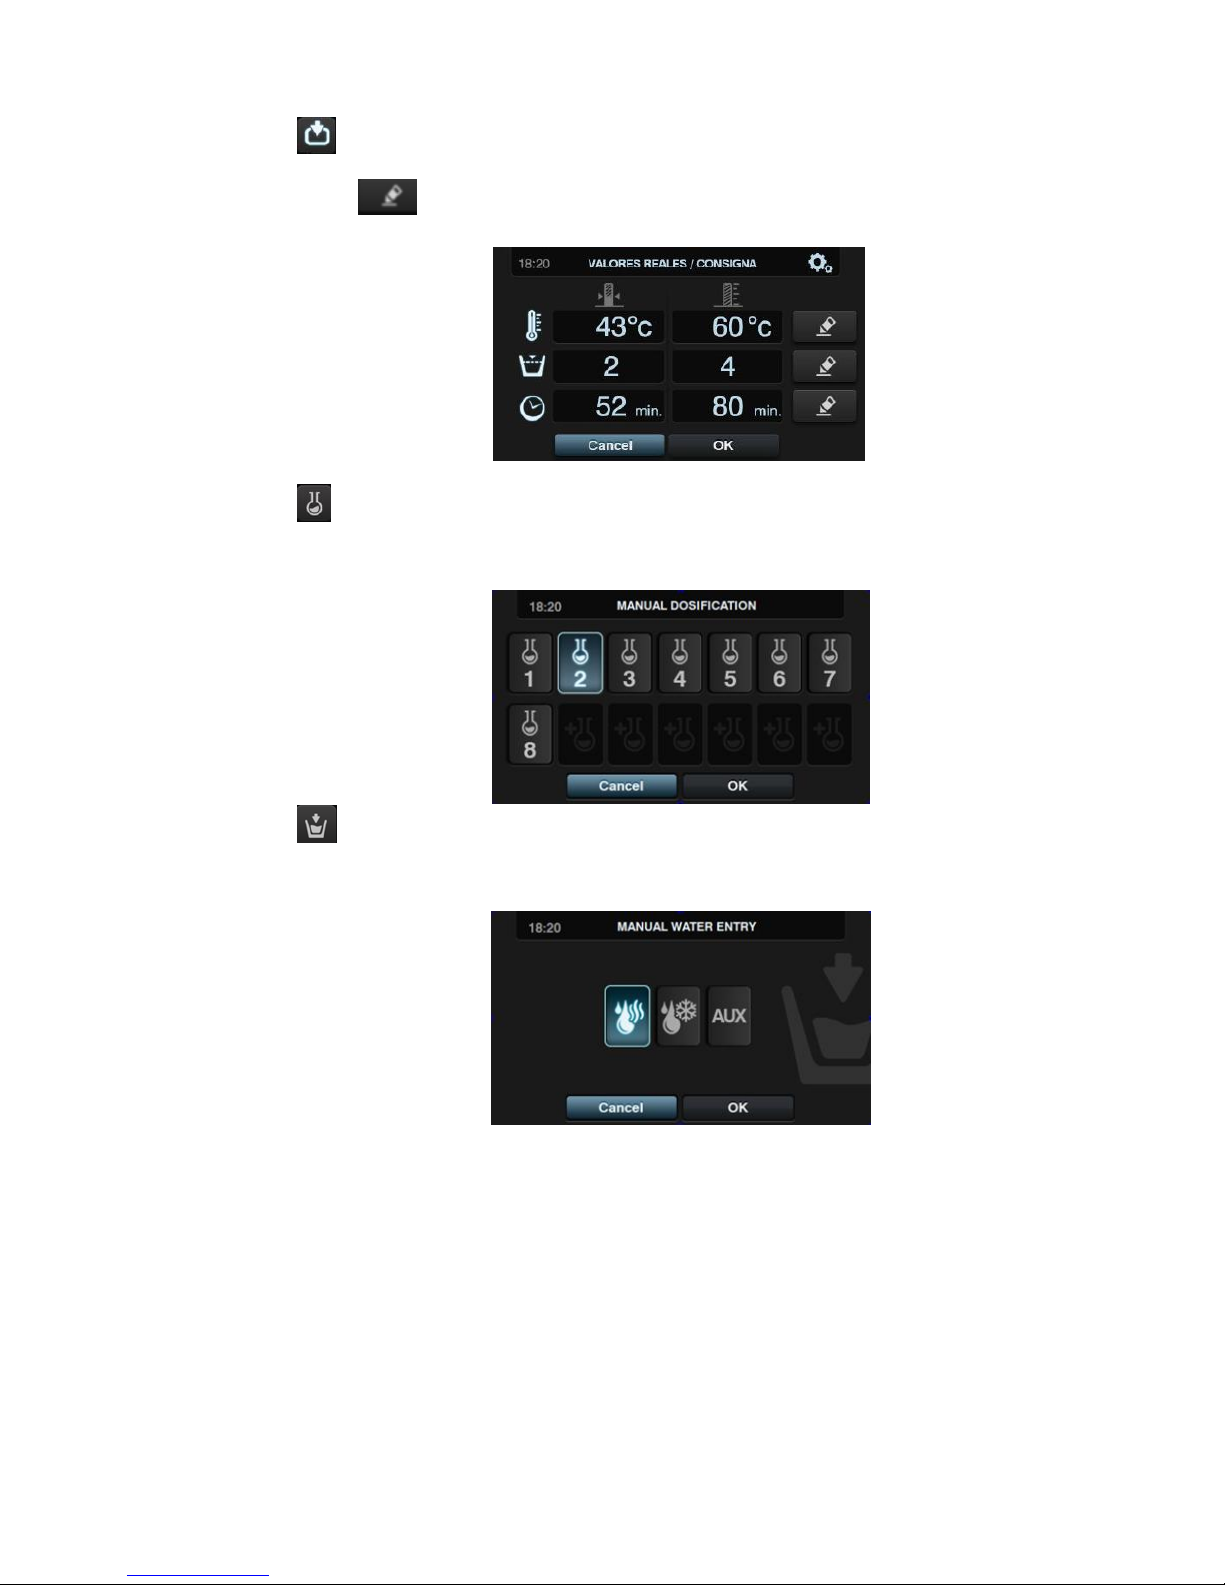
Settings/values: Display of settings and true values for the current cycle
(Temperature, Level, Time remaining).
Allows setting values to be edited, but is only effective for currently running
programme.
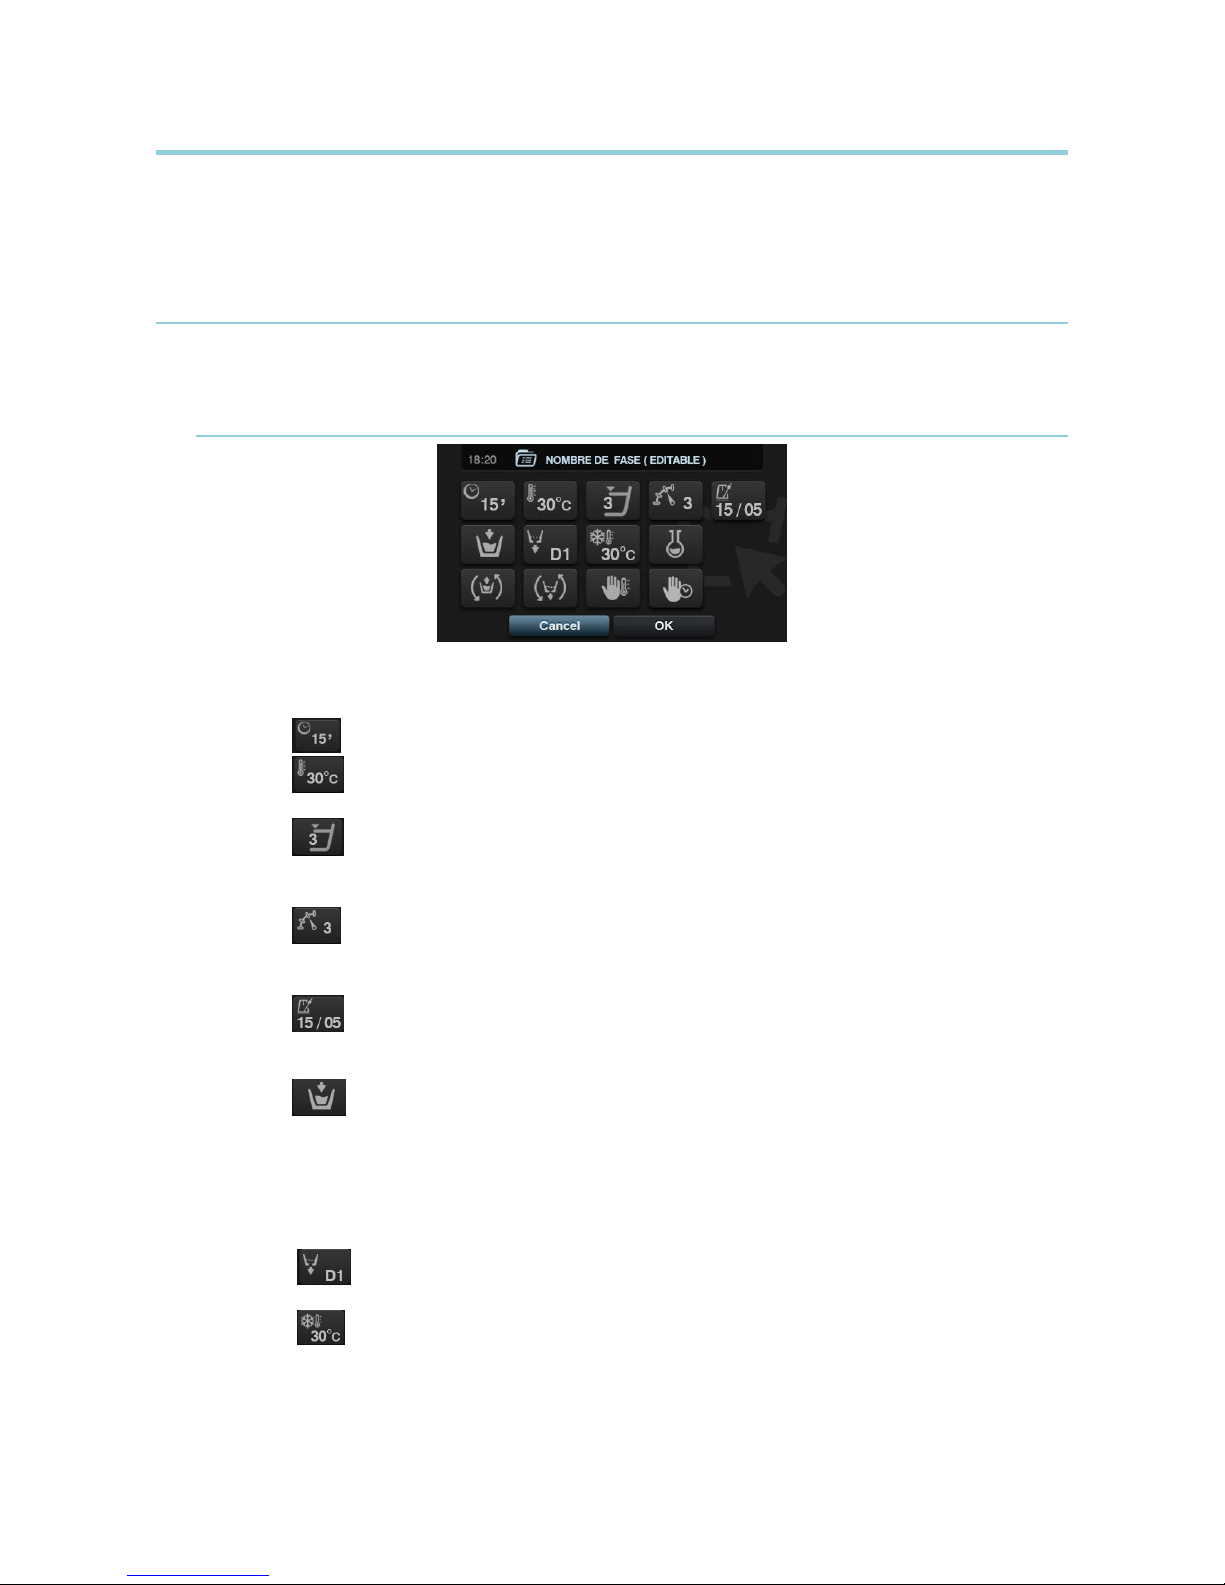
Manual dosing: This section can be accessed, the state of each dispenser (ON /OFF)
is displayed, and the required dose can be activated/deactivated. The available options will
be based on the configuration of existing kits. On exiting the dosing window, all the
dispensers are deactivated.
Manual water inlet: This section can be accessed, the state of each water inlet (ON
/OFF) is displayed, and the required inlet can be activated/deactivated. The water inlet that
has been activated by the fill logarithm cannot be deactivated. On exiting the water inlet
window, all the manually activated water inlets will be deactivated.
Page 10
EN
Página 8 de 43
4 PROGRAMMES
There is a programme library consisting of all the programmes installed by default, together with the
programmes created by the user.
Before explaining the programme management (see section 5.1), details are given of their parameters
and of the standard programmes found in the library.
4.1 Cycle parameters
Each programme is made up of a series of cycles, consisting of a set of parameters which can be
configured, depending on the cycle type in question.
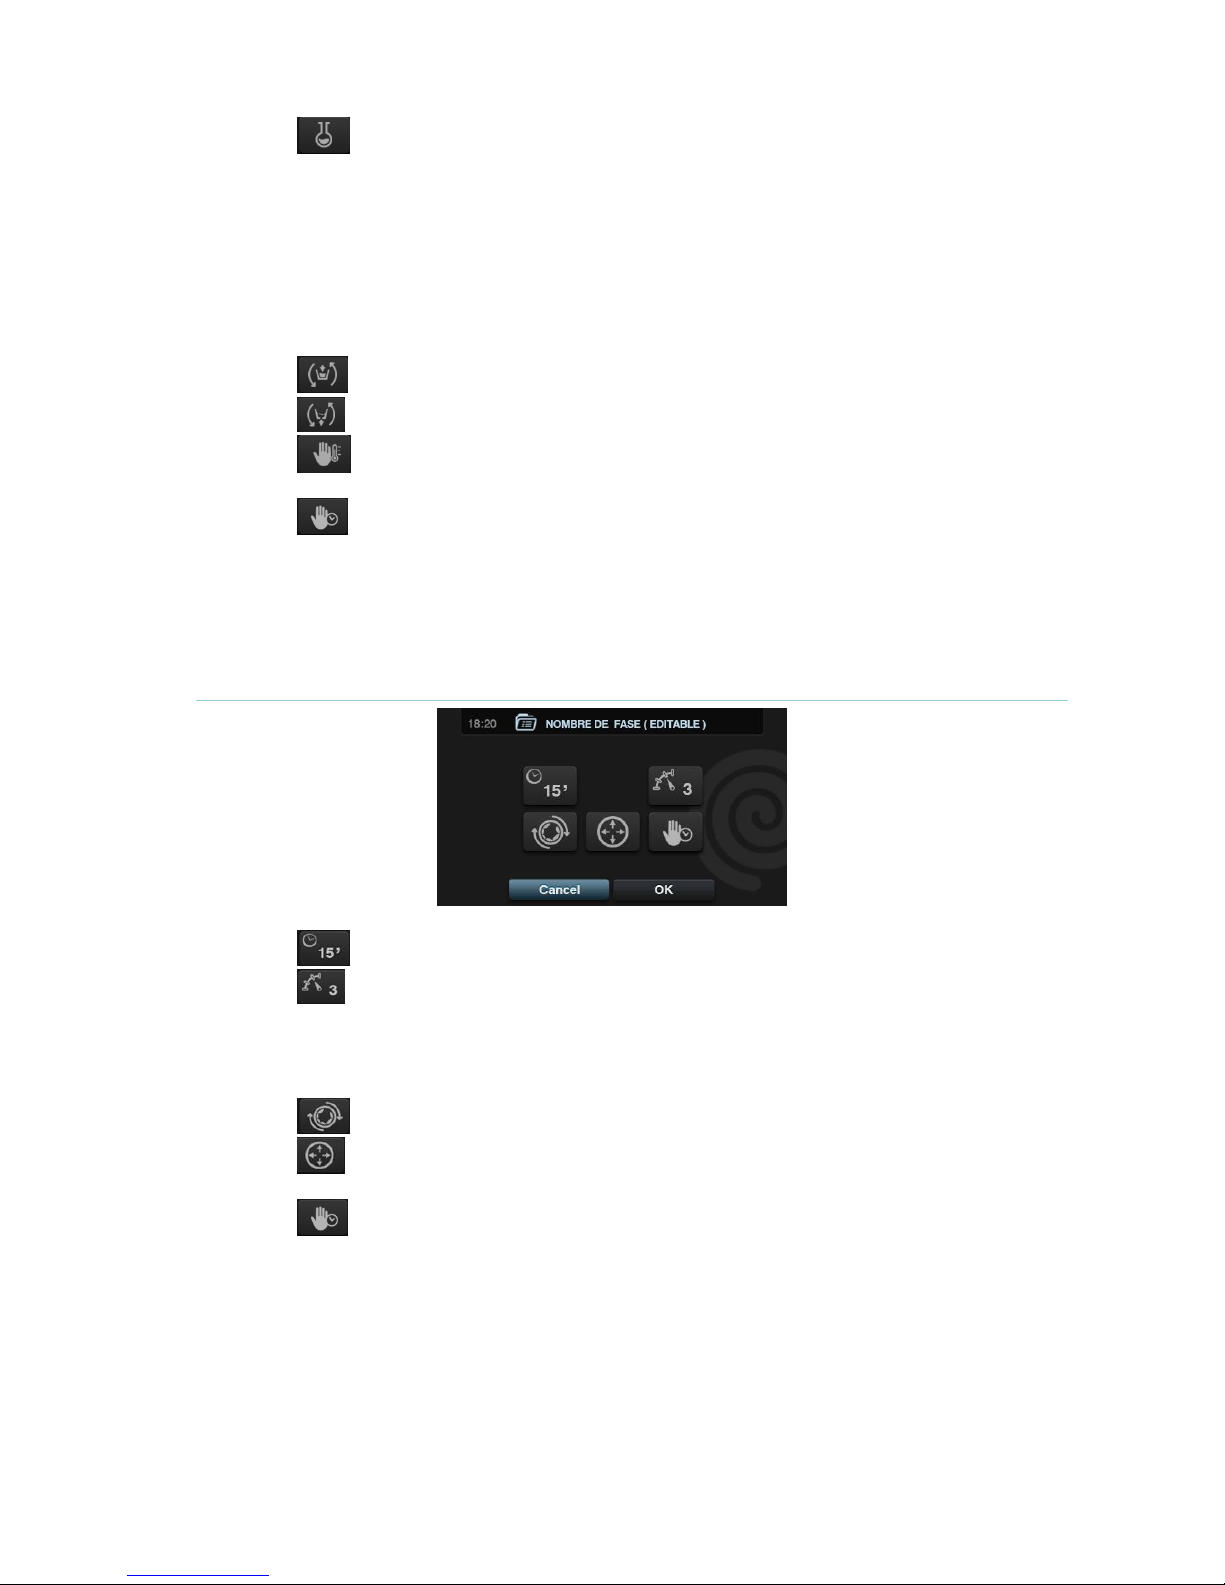
4.1.1 Parameters for soak, prewash, wash or rinse cycles:
Cycle name: Name identifying the cycle. This is not the text displayed on the Run screen,
but the text which identifies a created cycle.
Time: Value, in minutes, of the cycle length. Range can be configured from 1 to 99.
Temperature: Temperature, ºC or ºF, of current cycle.
Range can be configured from 20ºC to 90ºC.
Level: Water level at which cycle should be run.
There are 5 types of level: Minimum (1), Low (2), Medium (3), High (4), Maximum (5)
Please refer to table of levels by model (see section 4.4.). Range can be configured.
Speed: Speed of current cycle. There are 4 different speeds to select from: Minimum
(1), Low (2), Normal (3), High (4).
Please refer to table of speeds by model (see section 4.4.). Range can be configured.
Wash rate: Sequence of movement that washing machine must follow (run time
(seconds) / stop time (seconds)). Range can be configured from 1 to 99.
The drum alternately turns to the left and to the right.
Water inlet: This indicates the selection of the required water inlet.
Hot water: Load water from the hot water inlet (Yes/No).
Cold water: Load water from the cold water inlet (Yes/No).
Auxiliary: Load water from the auxiliary water inlet (Yes/No).
Water adjustment: Load water from one or other inlet depending on the temperature
(Yes/No).
T1, T2, T3: Load water from any of the tanks if recovery KIT is fitted.
Drainage: This displays whether the water should be drained at the end of the cycle,
indicating which outlet should be used if the recovery kit is active.
Cooling: Option that permits the temperature in a cycle to be lowered before
drainage or going to the next cycle. Configurable parameter only if the cycle temperature is
equal to or higher than 40ºC. Range can be configured from 30ºC to cycle setting.
In addition to selecting the cooling value, there is a button to enable or disable this option.
Page 11
EN
Página 9 de 43
Dispenser 1.8: Each dispenser can be activated independently, and the following
parameters must be configured if it is activated:
Start: If dispenser X is active, indicate when this dispenser should start dosing.
Safety level (ML): Start dosing when the safety level is reached.
Level (L): Start dosing when the defined level is reached.
Temperature (T): Start dosing when the defined temperature is reached.
Time: Time, in seconds, of dispenser X. Range can be configured from 0 to 99.
Delay: Delay, in seconds, of dispenser X. From the moment the programme reaches the
start point indicated, the dosing will be delayed for the time indicated. Range can be
configured from 0 to (cycle time-dosing time).
Move while filling: Rotate drum while machine is filling (Yes/No).
Movement while draining: Rotate drum while machine is draining (Yes/No).
Thermal stop: Indicate the moment from which the time stipulated for the cycle is
counted (Yes/No).
Pause programme: This allows you to pause the programme before the cycle in
question starts running. The pause will be indicated on the screen and an acoustic signal is
emitted. (Yes/No)
If this parameter is active, before starting the cycle, the machine will go to pause status, and
the message “Pause programmed” is displayed on the screen. To continue running the
programme, press the PLAY button.
4.1.2 Parameters for spin cycles:
Time: Value, in minutes, of the spin length. Range can be configured from 1 to 99.
Speed: Spin speed. There are 4 different speeds to select from: Minimum (1), Normal
(2), Medium (3), Maximum (4).
The Medium (3) and Maximum (4) values are only available in high- and medium-speed
machines respectively.
Please refer to table of speeds by model (see section 4.4.). Range can be configured.
Untangling: Untangle at the end of the spin cycle (Yes/No).
Optimum distribution: If this option is active, the machine does not drain in the
previous cycle.
Pause programme: This allows you to pause the programme before the cycle in
question starts running. The pause will be indicated on the screen and an acoustic signal is
emitted. (Yes/No).
Page 12
EN
Página 10 de 43
4.2 Cycle library
These are the cycles found by default in the cycle library. These cycles can be used to form new
programmes.
Soak cycles
F1: Soak
Prewash cycles
F2: Normal Prewash Cold
F3: Normal Prewash 40ºC
F4: Delicate Prewash Cold
F5: Delicate Prewash 40ºC
F6: Very Delicate Prewash Cold
F7: Very Delicate Prewash 40ºC
F8: Wet Prewash
Wash cycles
F9: Normal Wash Cold
F10: Normal Wash 60ºC
F11: Normal Wash 90ºC
F12: Delicate Wash Cold
F13: Delicate Wash 40ºC
F14: Very Delicate Wash Cold
F15: Very Delicate Wash 40ºC
F16: Wet Wash Cold
F17: Wet Wash 40ºC
Rinse cycles
F18: Normal Rinse
F19: Normal Final Rinse
F20: Delicate Rinse
F21: Delicate Final Rinse
F22: Very Delicate Rinse
F23: Very Delicate Final Rinse
F24: Wet Rinse
F25: Wet Final Rinse
Spin cycles
F26: Short Spin
F27: Long Spin
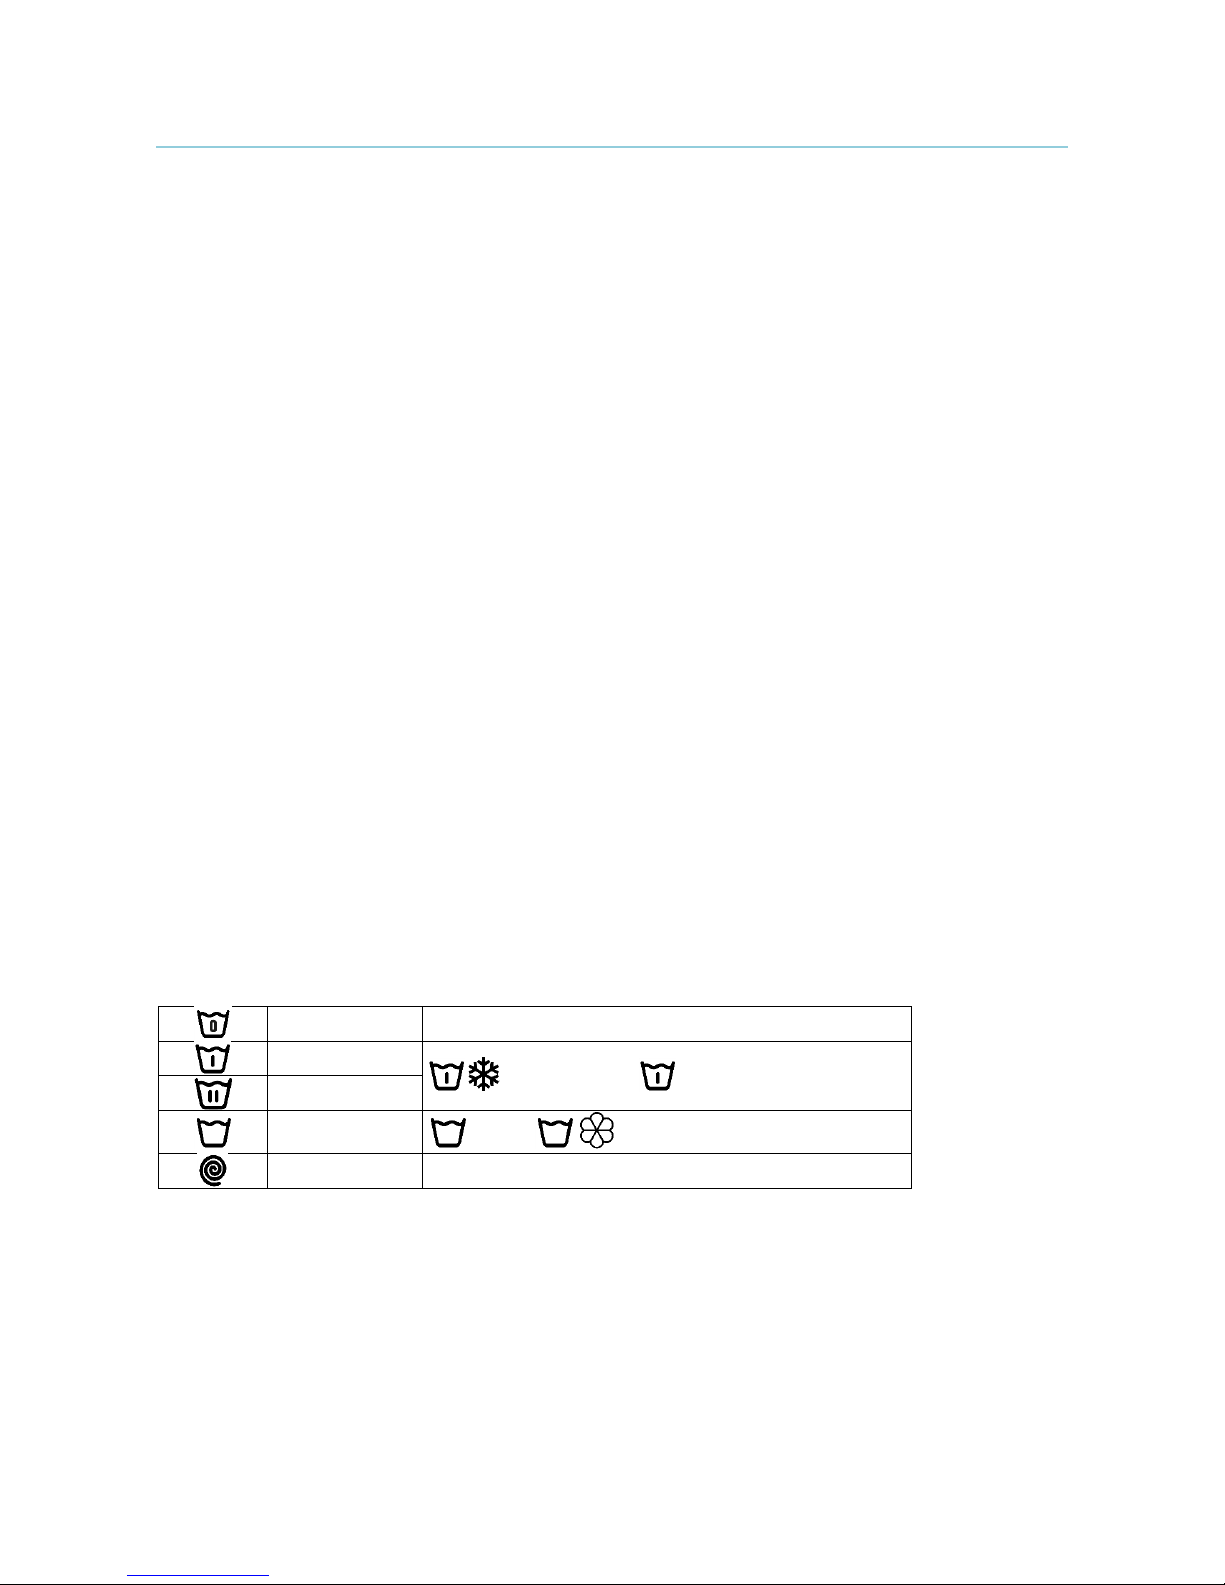
Cycle symbols:
Soak cycles
Prewash cycles
: Prewash cold, 40: Pre-wash 40 ºC,...
Wash cycles
Rinse cycles
: Rinse, : Final rinse with softener
Spin cycles
Page 13
EN
Página 11 de 43
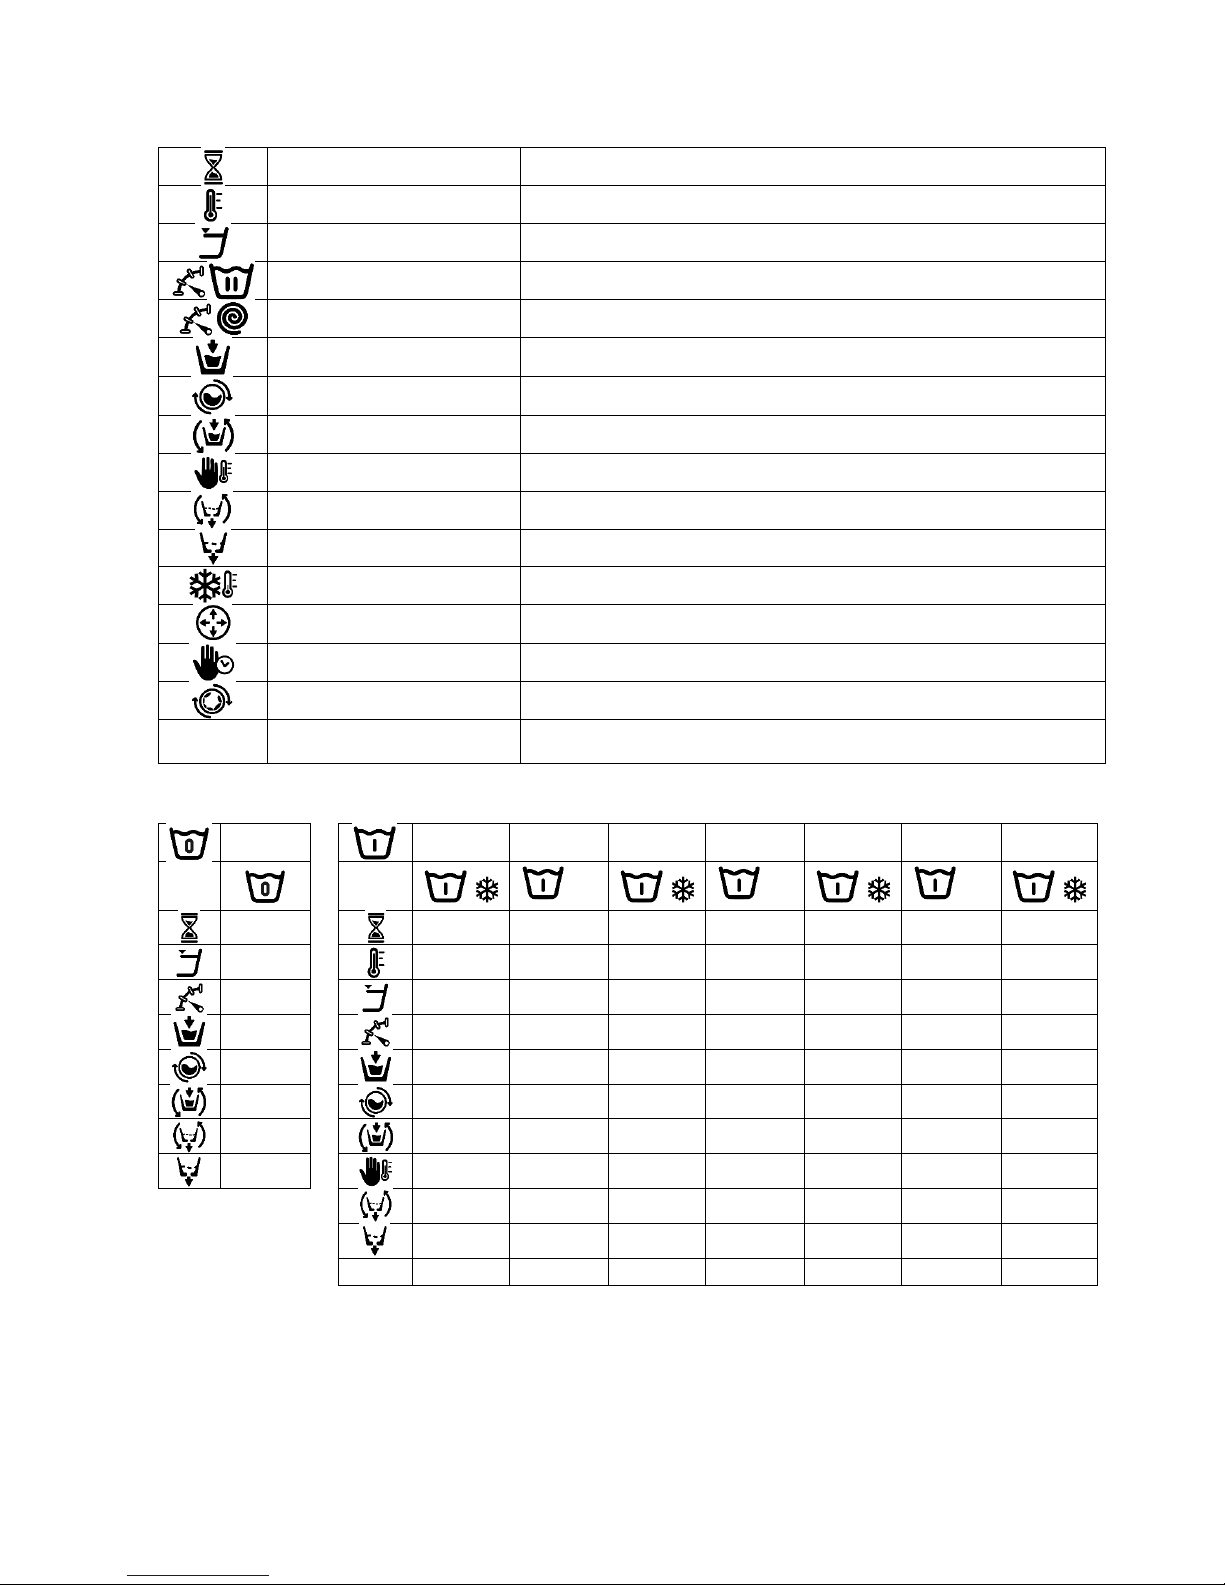
Symbols and values of the parameters:
Time
Value in minutes
Temperature
Value in ºC
Level
1:Minimum, 2:Low, 3: Medium, 4:High, 5:Maximum
Wash speed
1:Minimum, 2:Low, 3:Normal, 4:High,
Spin speed
2:Normal, 3:Rapid, 4:Maximum
Water inlet
0:Cold, 1:Cold/Hot according to adjustment
Wash rate
Run time (seconds) Stop time (seconds)
Move while filling
: Yes
Thermal stop
: Yes
Movement in drainage
: Yes
Drainage
: Yes
Cooling
: Yes
Optimum distribution
: Yes
Stop programme
: Yes
Untangling
: Yes
D
Dispenser
with the START/TIME/DELAY programmed at ML/0/30
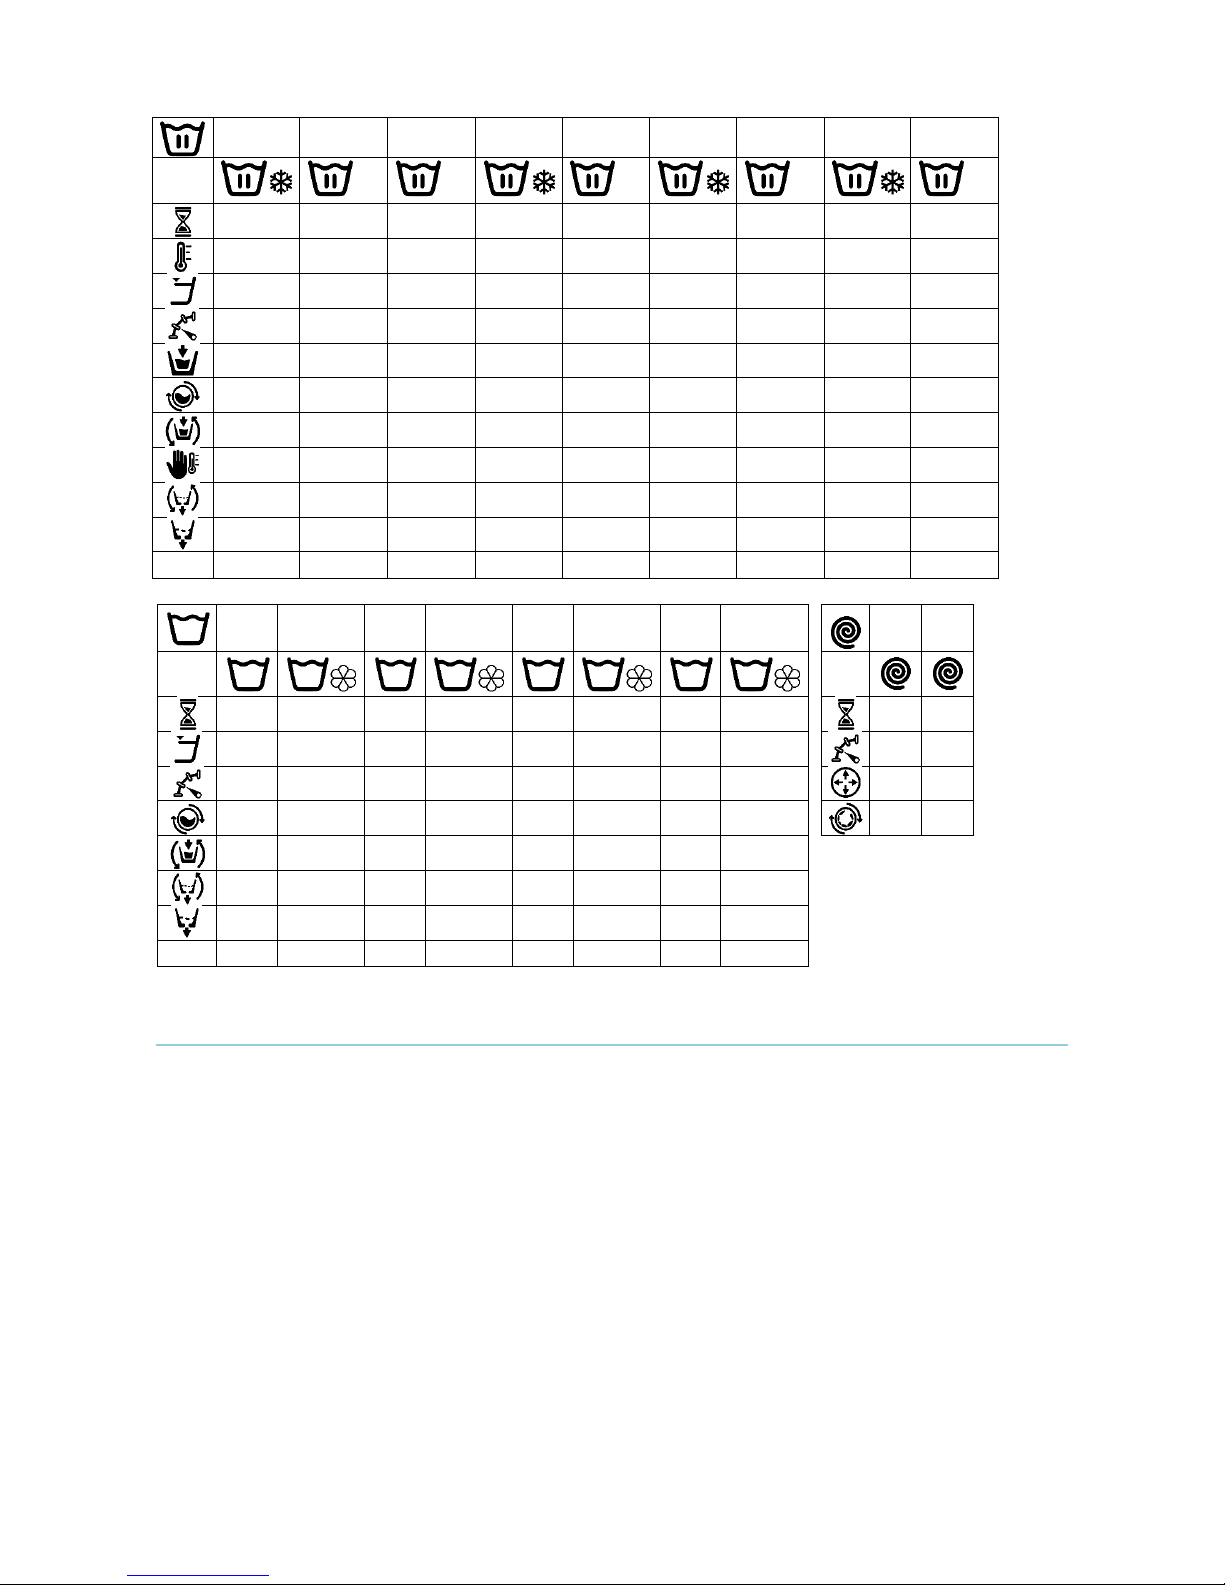
Tables of cycles with their parameters:
F1
F2
F3
F4
F5
F6
F7
F8
40
40
40
3
5 5 6 6 6 6 5
3
40 40 40
3
1 1 3 3 3 3 3 0
3 3 2 2 2 2 1 15;05
0 1 0 1 0 1 0
15;05
15;05
10;08
08;06
5;15
5;15
02;02
D
D1
D1
D1
D1
D1
D1
D1
Page 14
EN
Página 12 de 43
F9
F10
F11
F12
F13
F14
F15
F16
F17
60
90 40 40 40
10
10
10
12
12
12
12
10
10
60
90 40 40 40 1 1 1 1 1 1 1 2 2 3 3 3 2 2 2 2 1 1 0 1 1 0 1 0 1 0 1
15;05
15;05
15;05
10;08
10;08
05;15
05;15
02;02
02;02
D
D2, D3
D2, D3
D2, D3
D2
D2
D2
D2
D2
D2
F18
F19
F20
F21
F22
F23
F24
F25
F26
F27
2 2 3 3 3 3 2
2
2
6 4 4 4 4 4 4 4
4
2
4 3 3 2 2 2 2 1
1
15;05
15;05
10;08
10;08
05;15
05;15
02;02
02;02
D
D4
D4
D4
D4
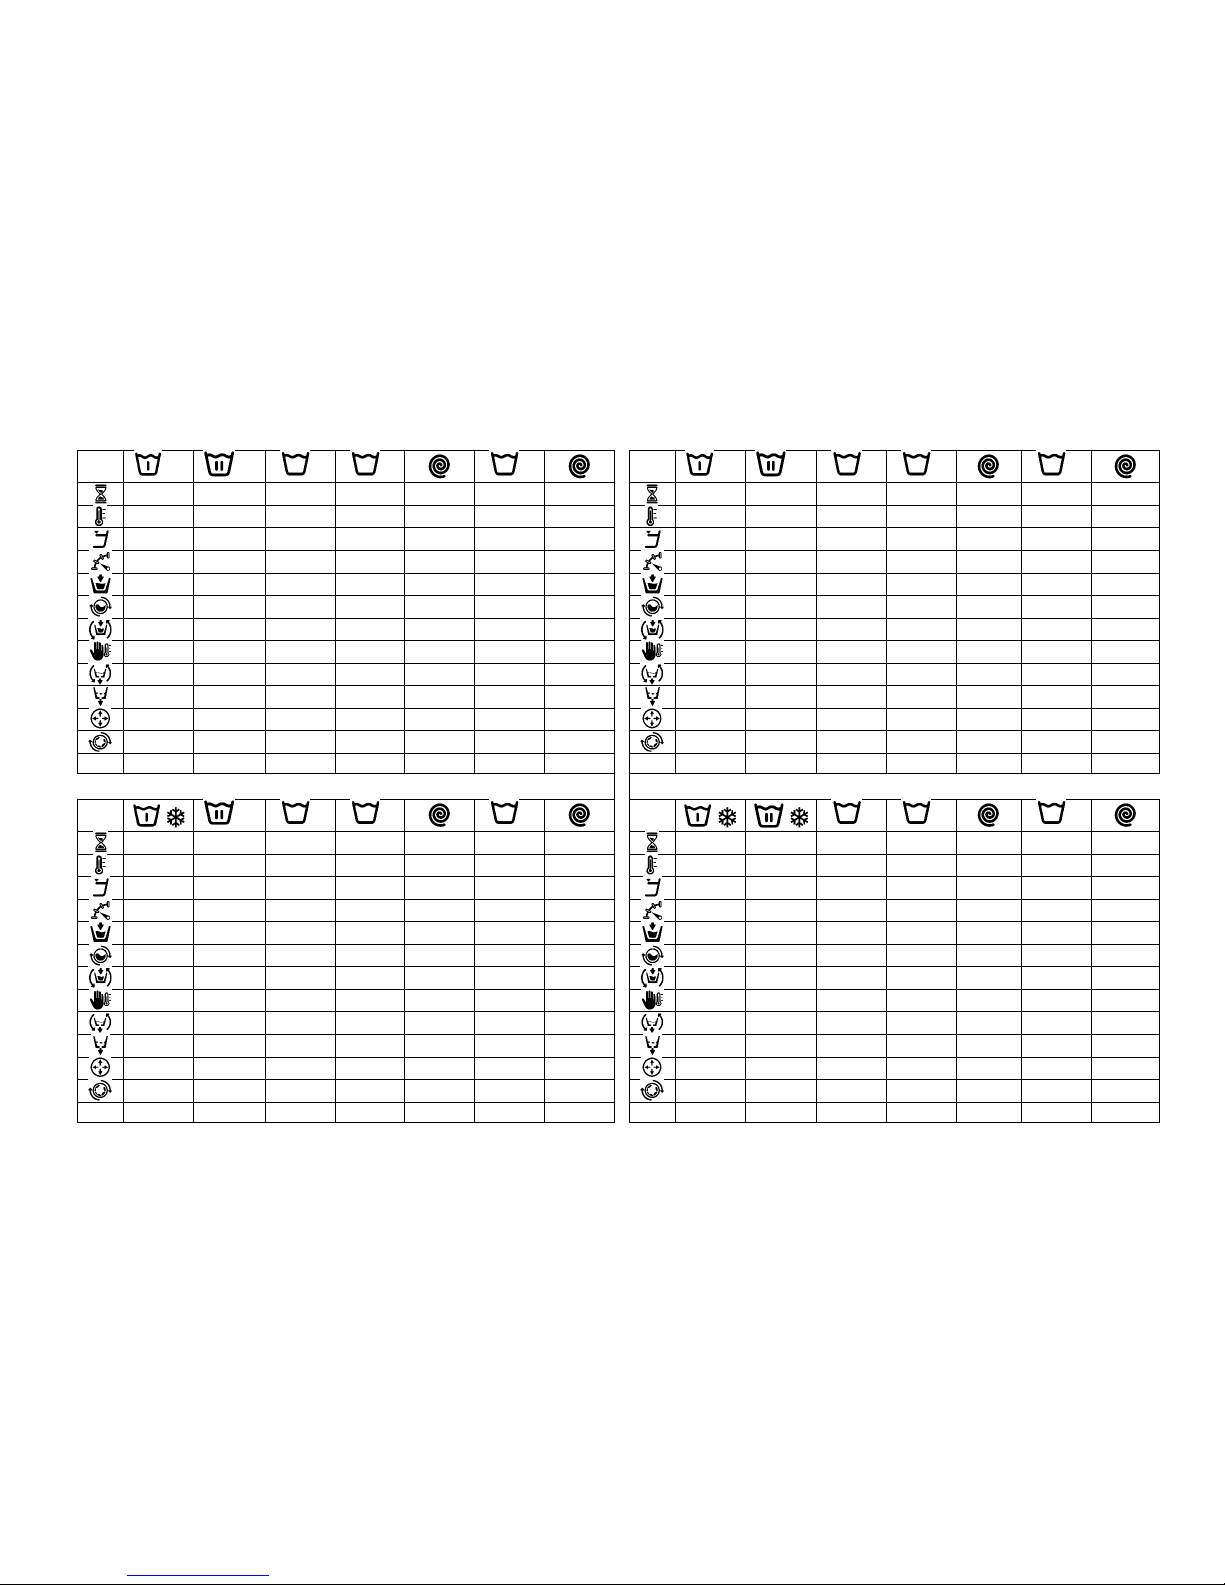
4.3 Programme library
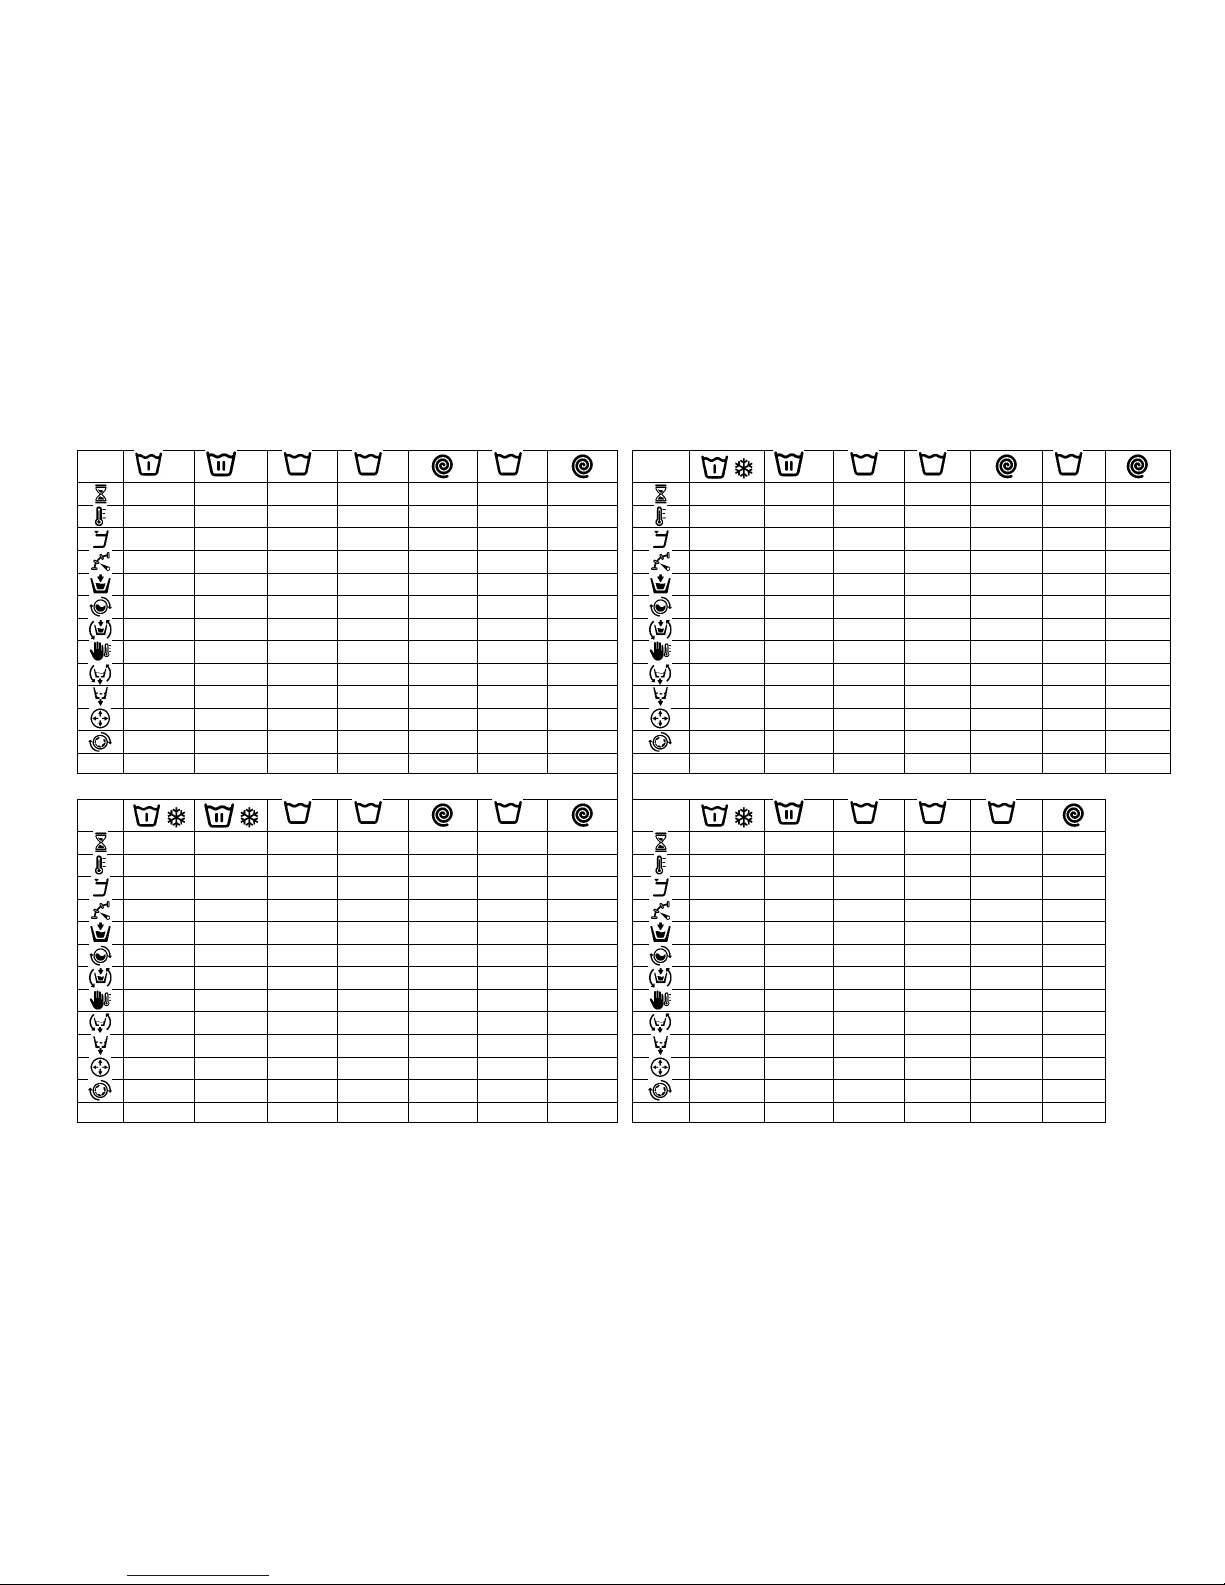
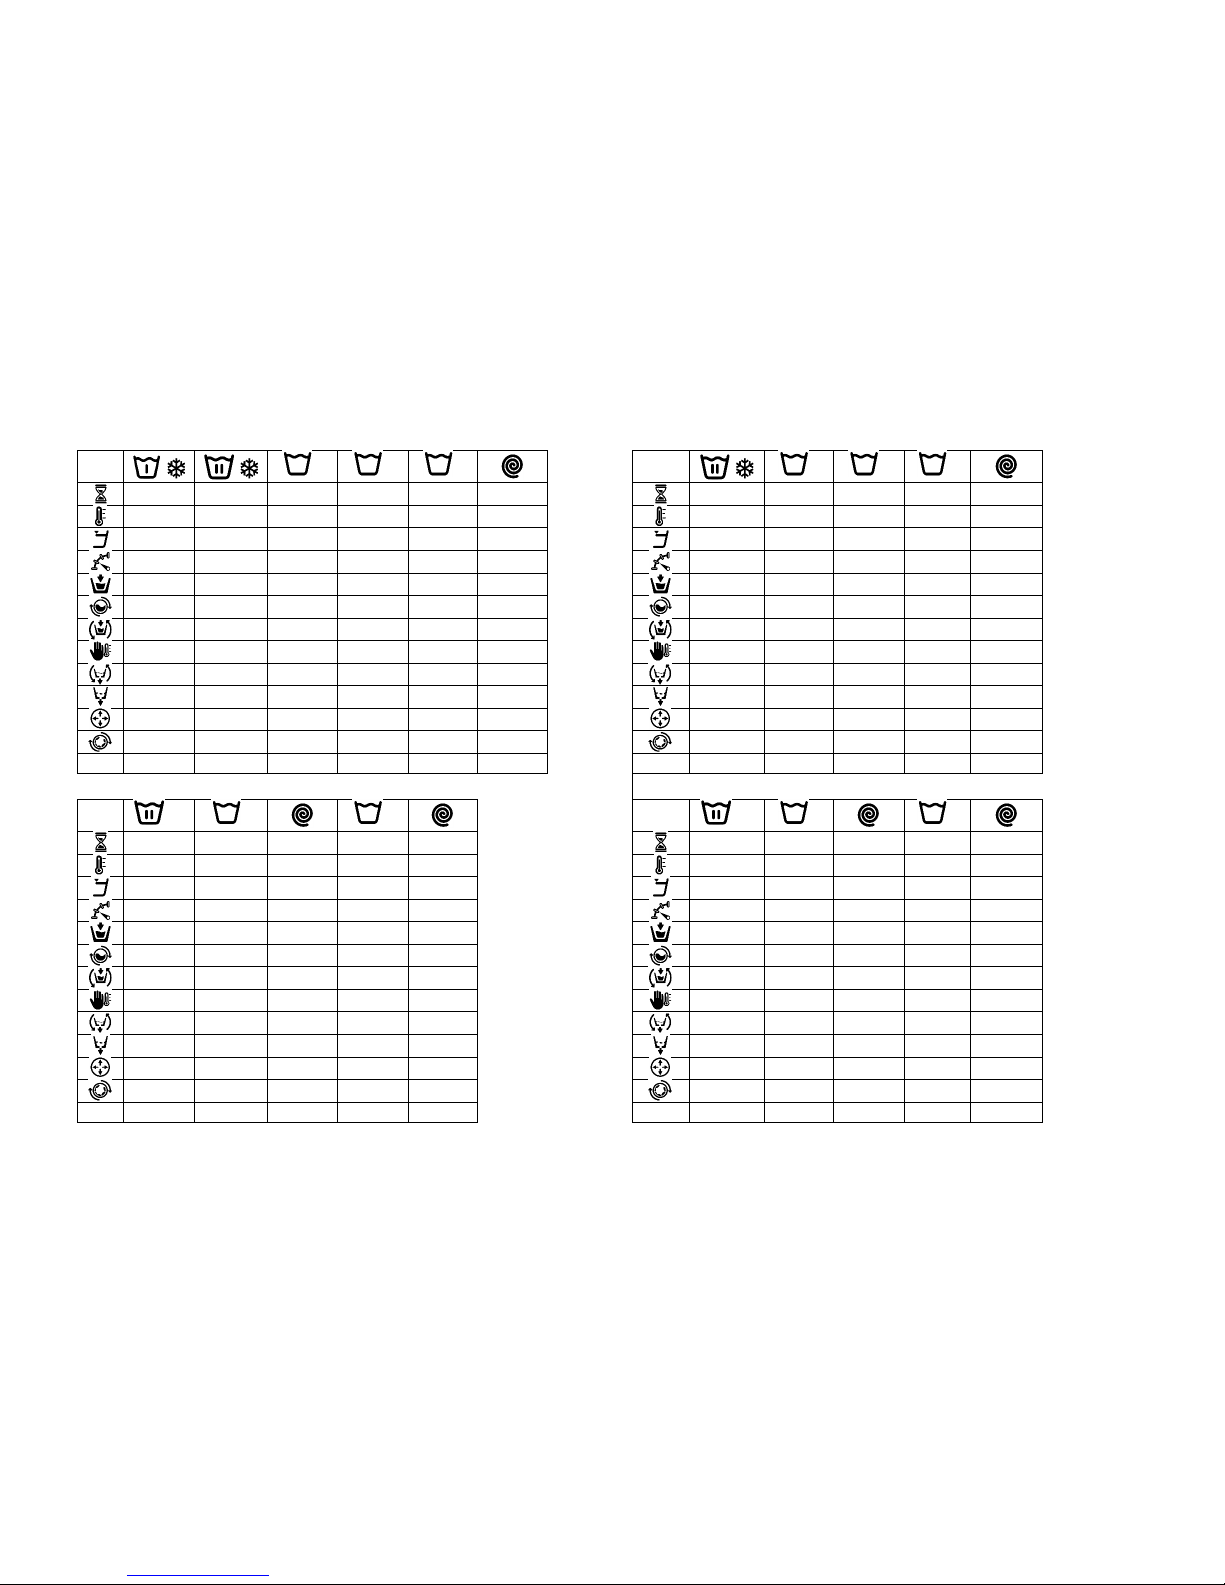
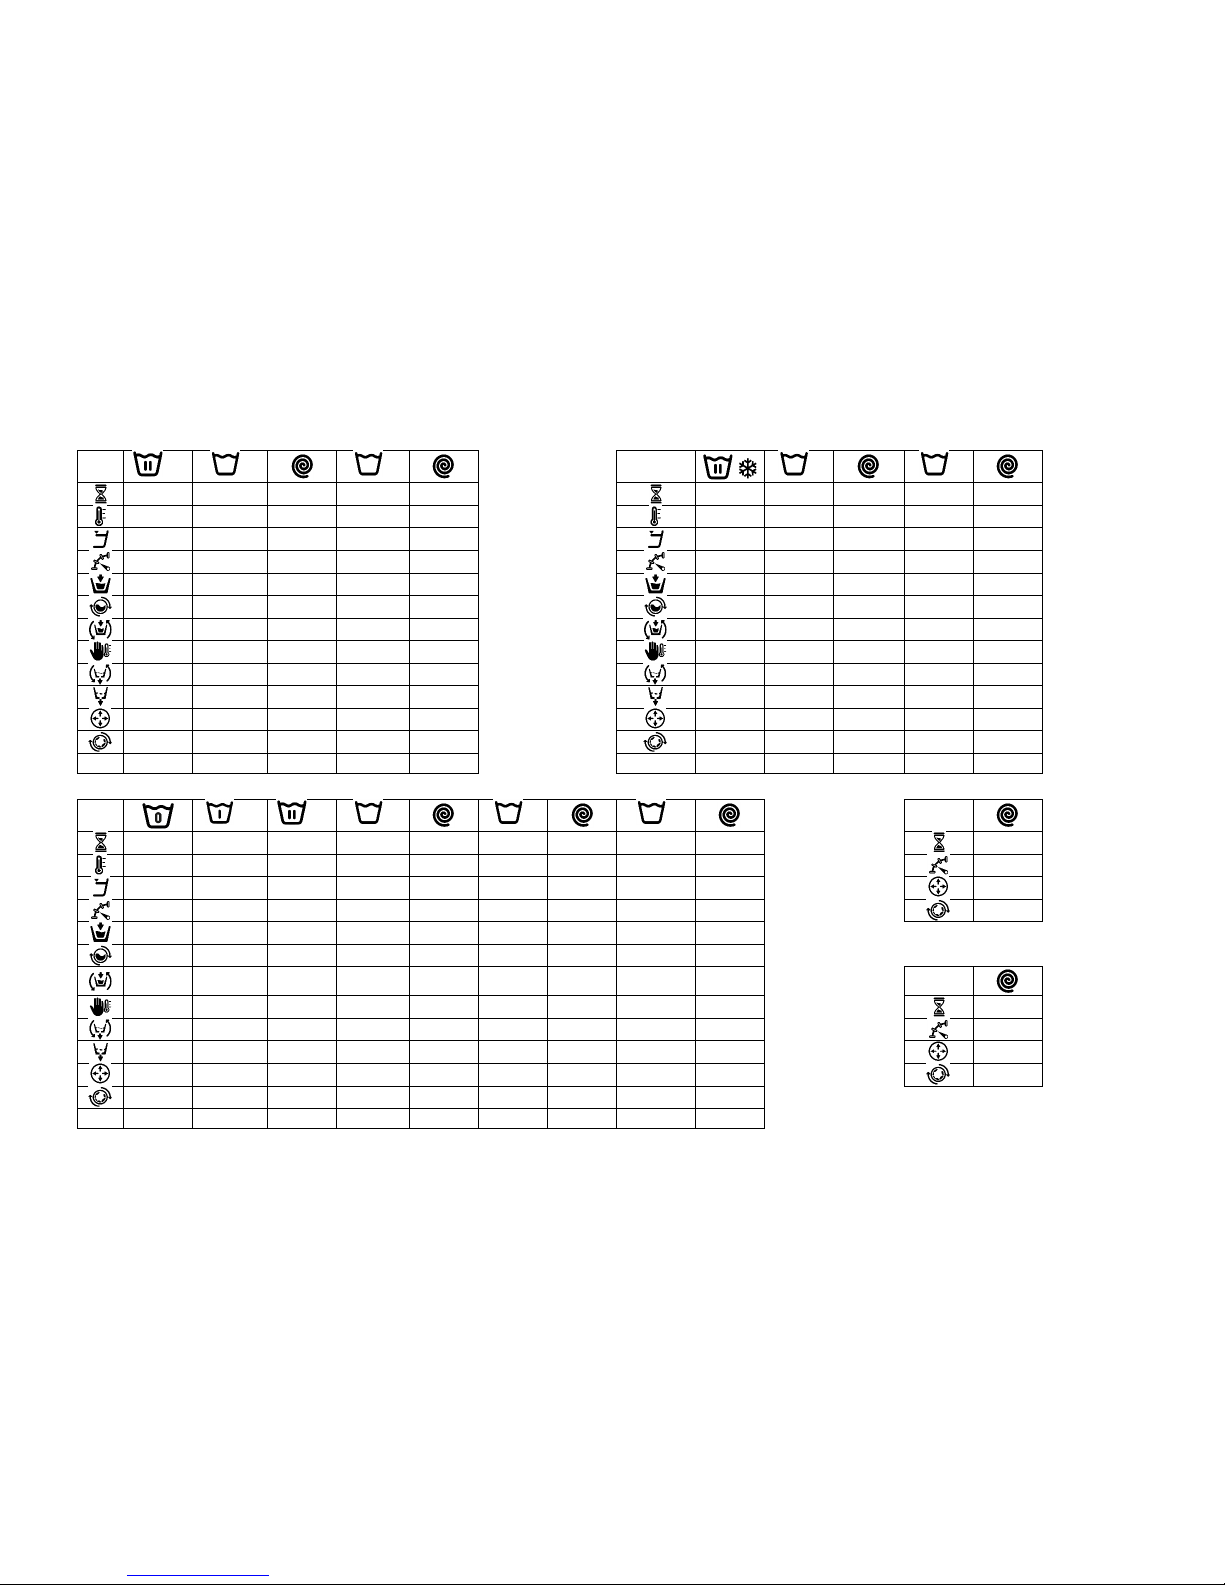
These are the programmes that are found by default in the programme library:
P1: Energetic 90ºC
P2: Energetic 60ºC
P3: Energetic 30ºC
P4: Energetic cold
P5: Normal 60ºC
P6: Normal 30ºC
P7: Normal cold
P8: Delicates 40ºC
P9: Delicates cold
P10: Extra delicates Cold
P11: Economy 90ºC
P12: Economy 60ºC
P13: Economy 30ºC
P14: Economy cold
P15: Sluice
P16: Long spin
P17: Short spin
Page 15
EN
Página 13 de 43
P1
40
90 1 2 3
P2
30
60 1 2 3
6
15 3 3 2 3
6 6
15 3 3 2 3
6 40
90 30
60
1 1 3 3 3 1 1 3 3 3
3 3 3 3 3 3 4 3 3 3 3 3 3 4 1 1 0 0 0 1 1 0 0 0 15;05
15;05
15;05
15;05
15;05
15;05
15;05
15;05
15;05
15;05
D
D1
D2, D3
D4, D5 D D1
D2, D3 D4, D5
P3
30 1 2 3
P4
1
2 3
6
15 3 3 2 3
6 6
15 3 3 2 3
6
30
1 1 3 3 3 1 1 3 3 3 3 3 3 3 3 3 4 3 3 3 3 3 3 4 0 1 0 0 0 0 0 0 0 0
15;05
15;05
15;05
15;05
15;05
15;05
15;05
15;05
15;05
15;05
D
D1
D2, D3 D4, D5
D D1
D2, D3 D4, D5
Page 16
EN
Página 14 de 43
P5
30
60 1 2 3
P6
30 1 2 3
6
15 3 3 2 3
6 6
15 3 3 2 3
6 30
60
30
2 2 4 4 4 2 2 4 4 4
3 3 3 3 3 3 4 3 3 3 3 3 3 4 1 1 0 0 0 0 1 0 0 0 15;05
15;05
15;05
15;05
15;05
15;05
15;05
15;05
15;05
15;05
D
D1
D2, D3 D4, D5
D D1
D2, D3 D4, D5
P7
1
2 3
P8
40 1 2
3
6
15 3 3 2 3
6 6
12 3 3 3 6
40
2 2 4 4 4 2 2 4 4 4 3 3 3 3 3 3 4 2 2 2 2 2 3 0 0 0 0 0 0 1 0 0 0
15;05
15;05
15;05
15;05
15;05
10;08
10;08
10;08
10;08
10;08
D
D1
D2, D3 D4, D5
D D1
D2
D4, D5
Page 17
EN
Página 15 de 43
P9
1 2 3
P10
1 2 3
6
10 3 3 3 4
12 3 3 3 3 3 3 4 4 4 1 4 4 4
2 2 2 2 2 3 2 2 2 2 2 0 0 0 0 0 0 0 0 0 10;08
10;08
10;08
10;08
10;08 05;15
05;15
05;15
05;15
D
D1
D2
D4, D5 D D2
D4, D5
P11
90
1 2
P12
60
1 2
15 3 2 3 6 15 3 2 3 6 90 60
1 3 3 1 3 3 3 3 3 3 4 3 3 3 3 4 1 0 0 1 0 0
15;05
15;05
15;05
15;05
15;05
15;05
D
D2, D3
D4, D5
D D2, D3
D4, D5
Page 18
EN
Página 16 de 43
P13
30
1 2
P14
1 2
15 3 2 3 6 15 3 2 3 6
30
1 3 3 1 3 3
3 3 3 3 4 3 3 3 3 4
1 0 0 0 0 0
15;05
15;05
15;05
15;05
15;05
15;05
D
D2, D3
D4, D5
D D2, D3
D4, D5
P15
65
71
1 2 3
P16
3 6 15 3 2 3 2 3 6
6
65
71
4
3 1 1 3 3 3
3 3 3 3 3 3 3 3 4
0 1 1 0 0 0
15;05
15;05
15;05
15;05
15;05 15;05
P17
2
2
D
D1
D2, D3
D4, D5
Page 19
EN
Página 17 de 43
4.4 Model parameters
MINIMUM
LOW
MEDIUM
HIGH
INTERMEDIATE
MINIMUM
NORMAL
MEDIUM
HIGH
RPM
Max
RPM
450G
0,2V (rpm)
0,4V (rpm)
0,5V (rpm)
0,6V (rpm)
0,8V (rpm)
1V (rpm)
5V (rpm)
3,5V (rpm)
5V (rpm)
7,5V (rpm)
10V
(rpm)
LS -11
1000
1245
20
40
50
60
80
100
500
350
500
750
1000
LS -14
1000
1150
20
40
50
60
80
100
500
350
500
750
1000
LS -19
950
1080
19
38
47
57
76
95
475
332
475
712
950
LS -26
900
1035
18
36
45
54
72
90
450
315
450
675
900
LS -36
860
975
17
34
43
51
68
86
430
301
430
645
860
LS -45
840
16
33
42
50
67
84
420
294
420
630
840
LS -62
760
15
30
38
45
60
76
380
266
380
570
760
LS -120
680
13
27
34
40
54
68
340
238
340
510
680
TS -11
760
20
40
50
60
81
102
507
354
507
760
TS -14
760
20
40
50
60
81
102
507
354
507
760
TS -19
720
19
38
48
57
76
96
480
336
480
720
TS -26
690
18
36
46
55
73
92
460
322
460
690
RS-11
540
21
43
54
64
86
108
540
378
540
RS -14
540
21
43
54
64
86
108
540
378
540
RS -19
510
20
40
51
61
81
102
510
357
510
RS -26
490
19
39
49
58
78
98
490
343
490
RS -36
460
18
36
46
55
73
92
460
322
460
RS -62
420
16
33
42
50
67
84
420
294
420
Page 20
EN
Página 18 de 43
LS
TS
RS
11
14
19
26
36
45
62
125
11
14
19
26
11
14
19
26
36
62
0
mm
13
16
14 6 7
-70
-70
-80
13
16
14 6 13
16
14 6 7
-70
1
mm
70
75
85
95
125
150
160
200
70
75
85
95
70
75
85
95
125
125
2
mm
90
105
115
125
155
190
210
250
90
105
115
125
90
105
115
125
155
155
3
mm
110
135
145
155
175
230
260
300
110
135
145
155
110
135
145
155
175
175
4
mm
130
165
175
185
205
270
310
350
130
165
175
185
130
165
175
185
205
205
5
mm
180
225
240
260
290
450
500
650
180
225
240
260
180
225
240
260
290
290
6
mm
40
20
40
10
40
20
40
20
40
40
7
mm
250
300
320
350
400
650
700
800
250
300
320
350
250
300
320
350
400
400
8
mm
35
40
45
50
65
75
80
100
35
40
45
50
35
40
45
50
65
65
(Level 0: Offset level, Level 6: Minimum safety level, Level 7: Maximum safety level, Level 8: Weighing level)
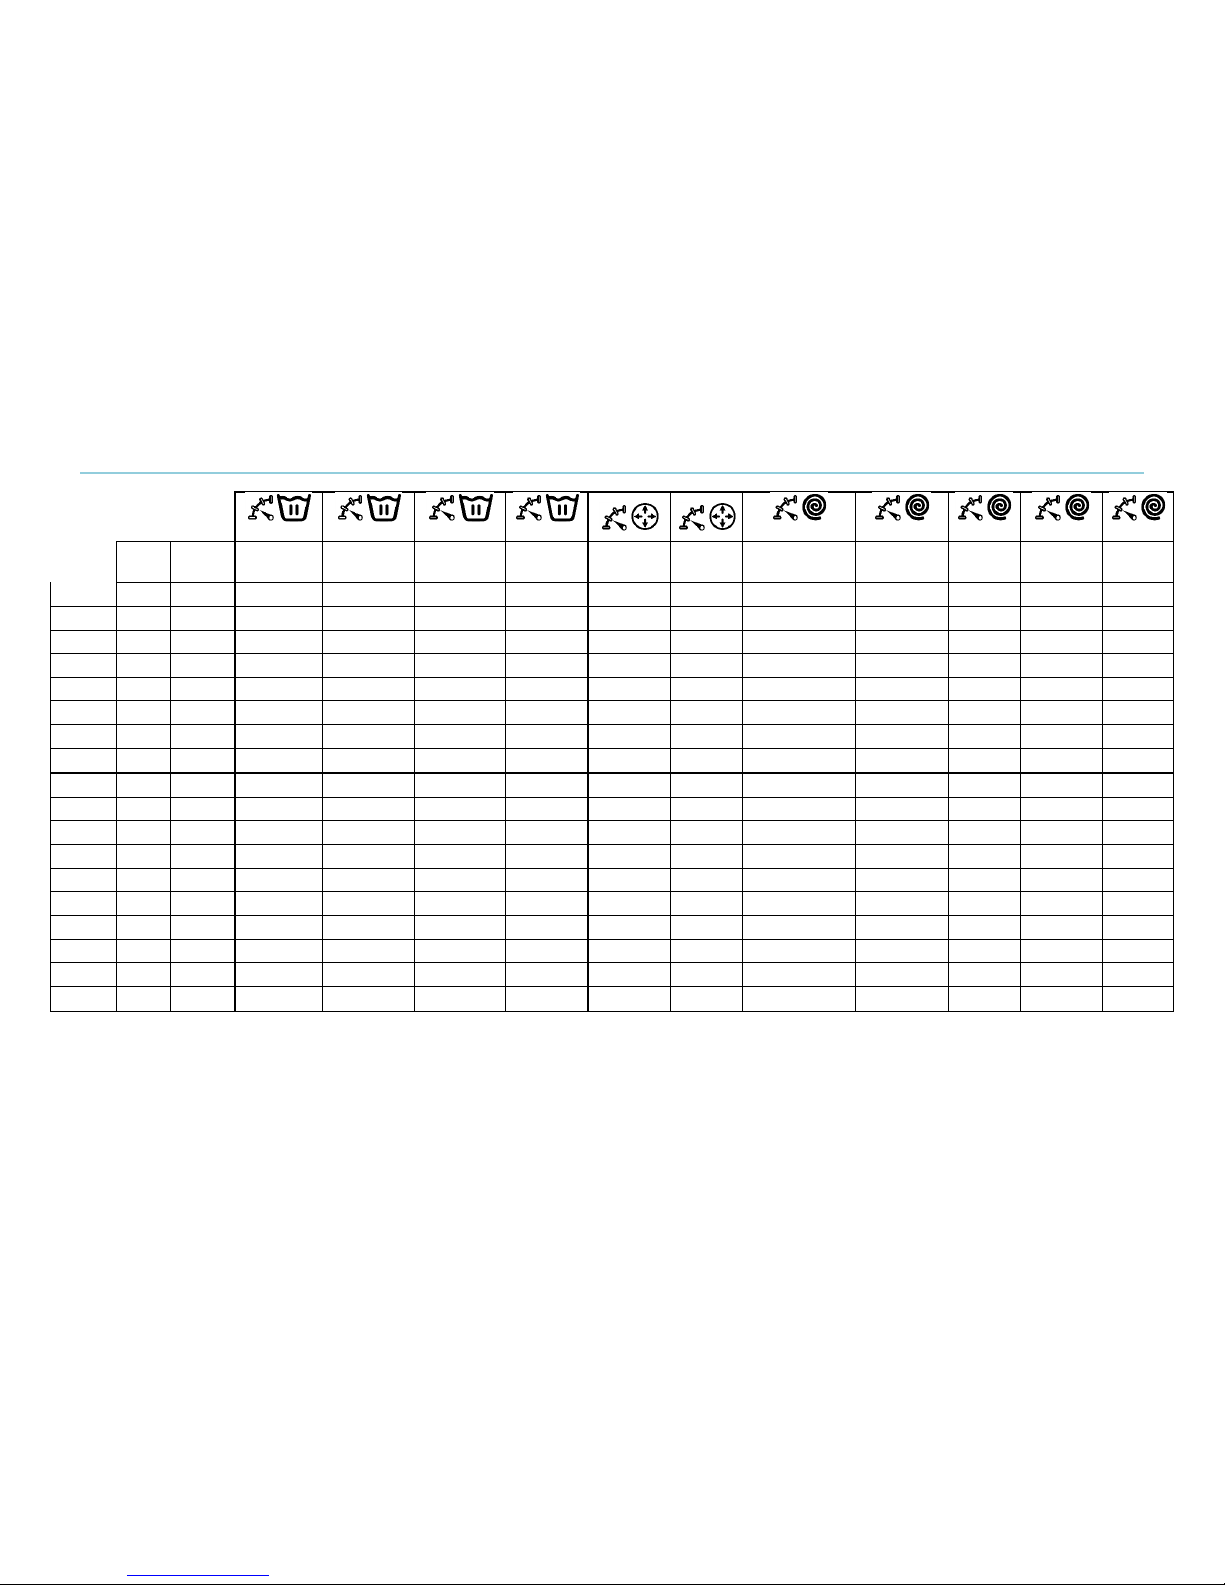
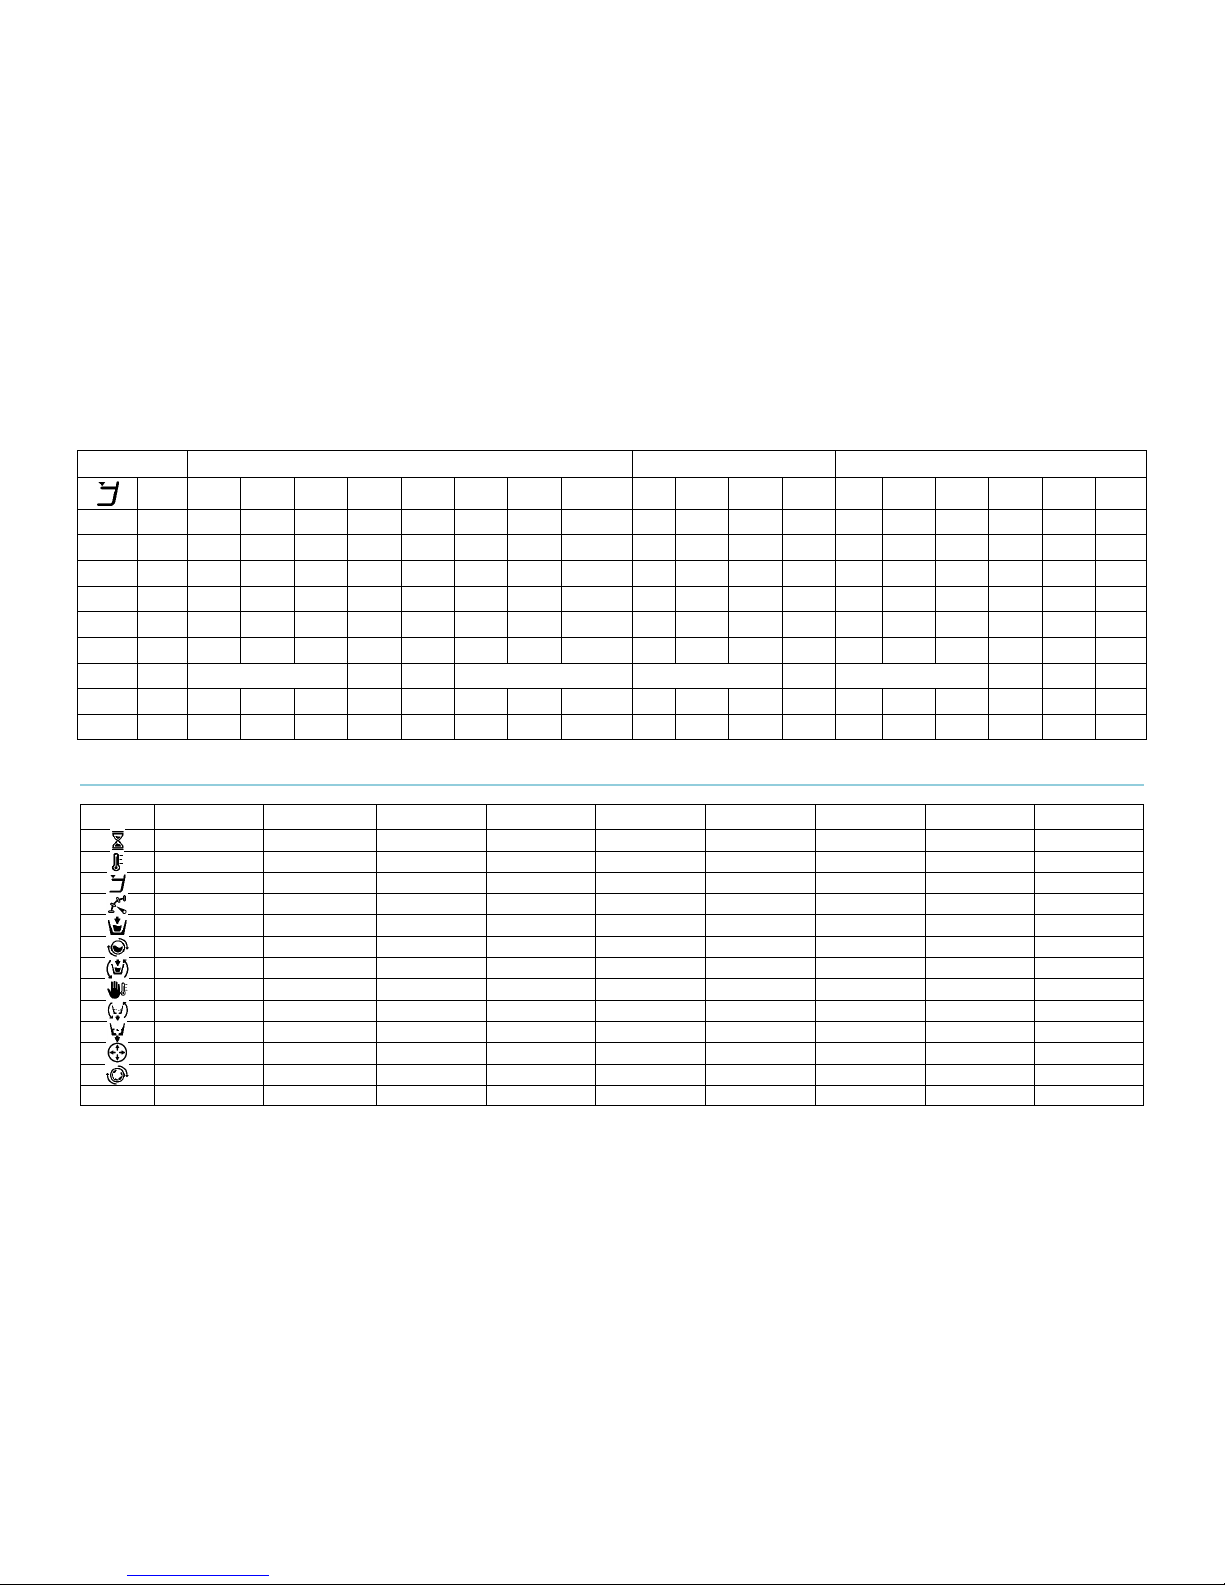
4.5 Template for customized programs
P
D
Page 21
EN
Página 19 de 43
5 CONFIGURATION
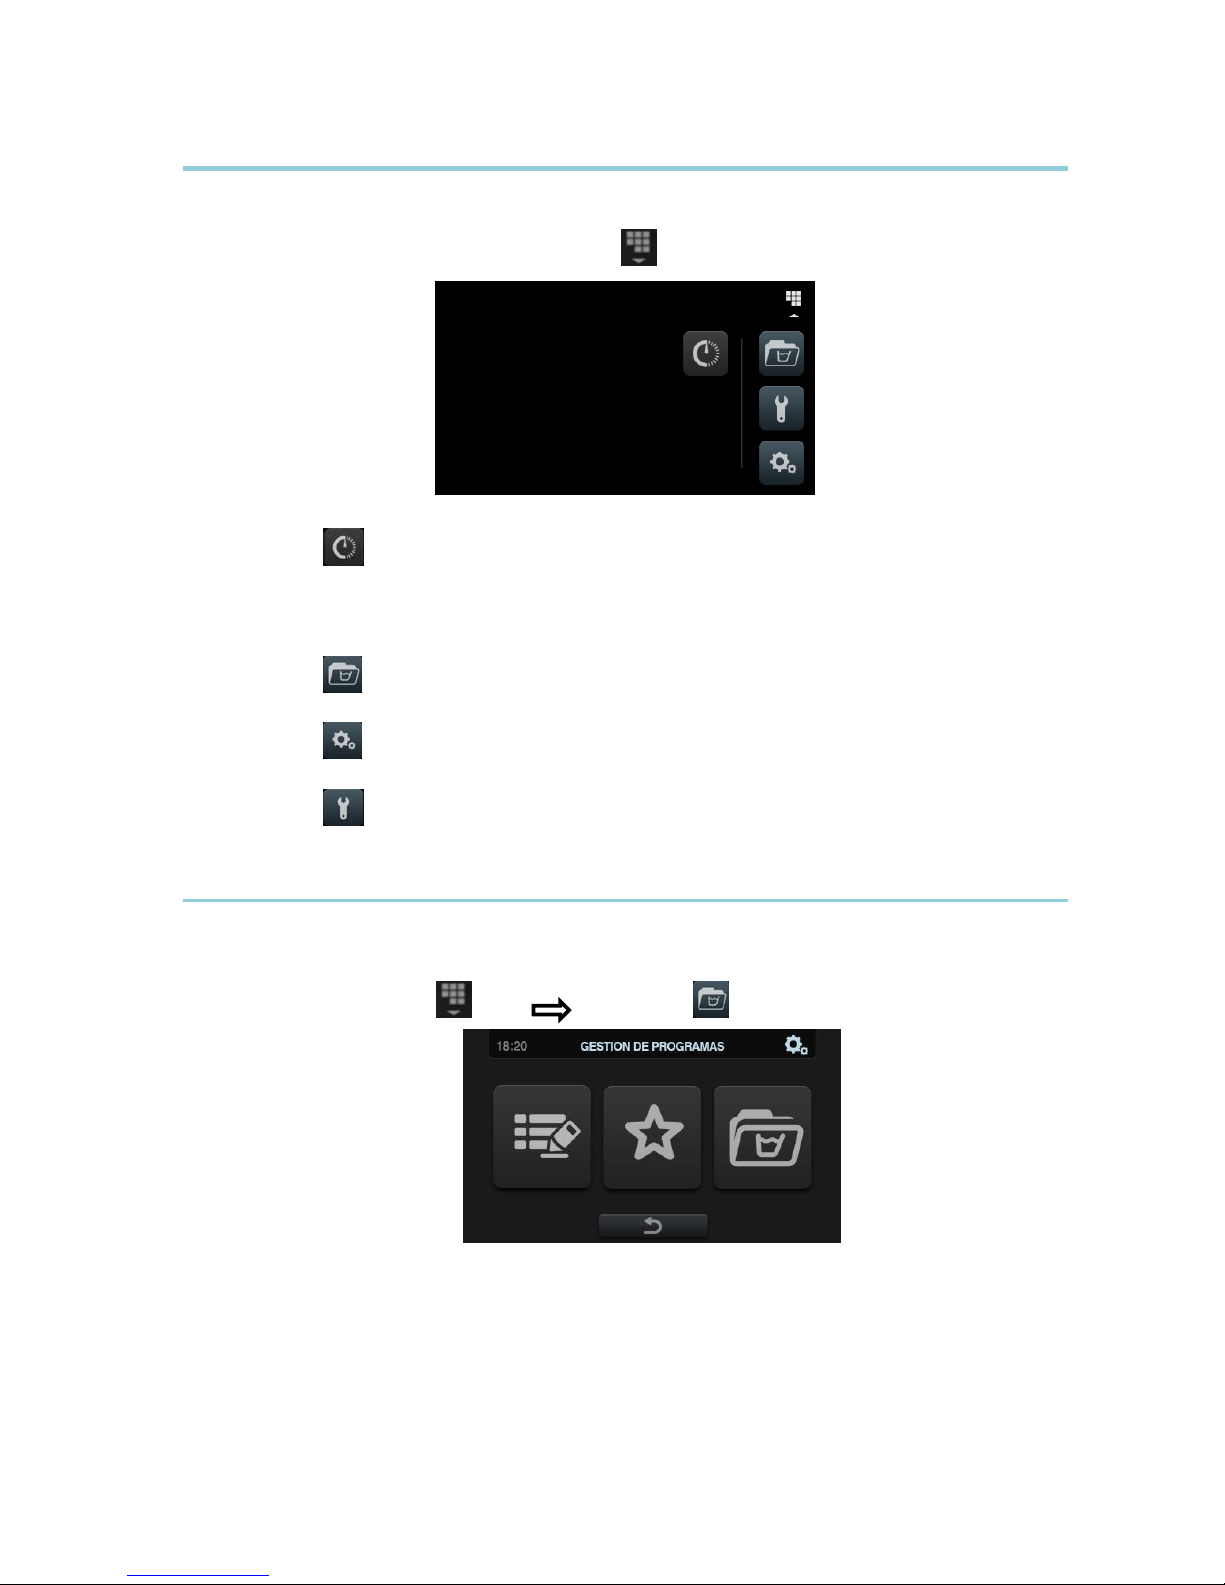
The main configuration menu of the washing machine is shown below. Here, it is possible to
configure different washing machine parameters, and display or download stored data.
This menu is entered from the icon in the Main screen (see section 3.2.).
Delayed programming: This allows a wash to be delayed so that it runs on the
date/at the time required. On pressing the “delayed programming” button, the user is
asked to enter the required date/time, and taken to a screen showing the programme
date/time, together with the programme number and name. It is only possible to select to
run the programme before the due time or to cancel the programming.
Programme management: Management of all the stored programmes, and all the
currently active programmes. (See section 5.1.).
Configure system: Configuration of different sections of the washing machine.
(See section 5.2.).
Maintenance: Various password-protected options for the technician.
5.1 Programme management
From this submenu it is possible to manage all the programmes, both those selected by the user
and those that are in the library. To do so, select between “Cycle library”, “My programmes”, and
“Programme library”.
Access: [Main screen] [Main Menu]
There is a library in which all the programmes and cycles are stored, including programmes stored
by default and programmes created/imported by the user.
Page 22
EN
Página 20 de 43
5.1.1 My programmes
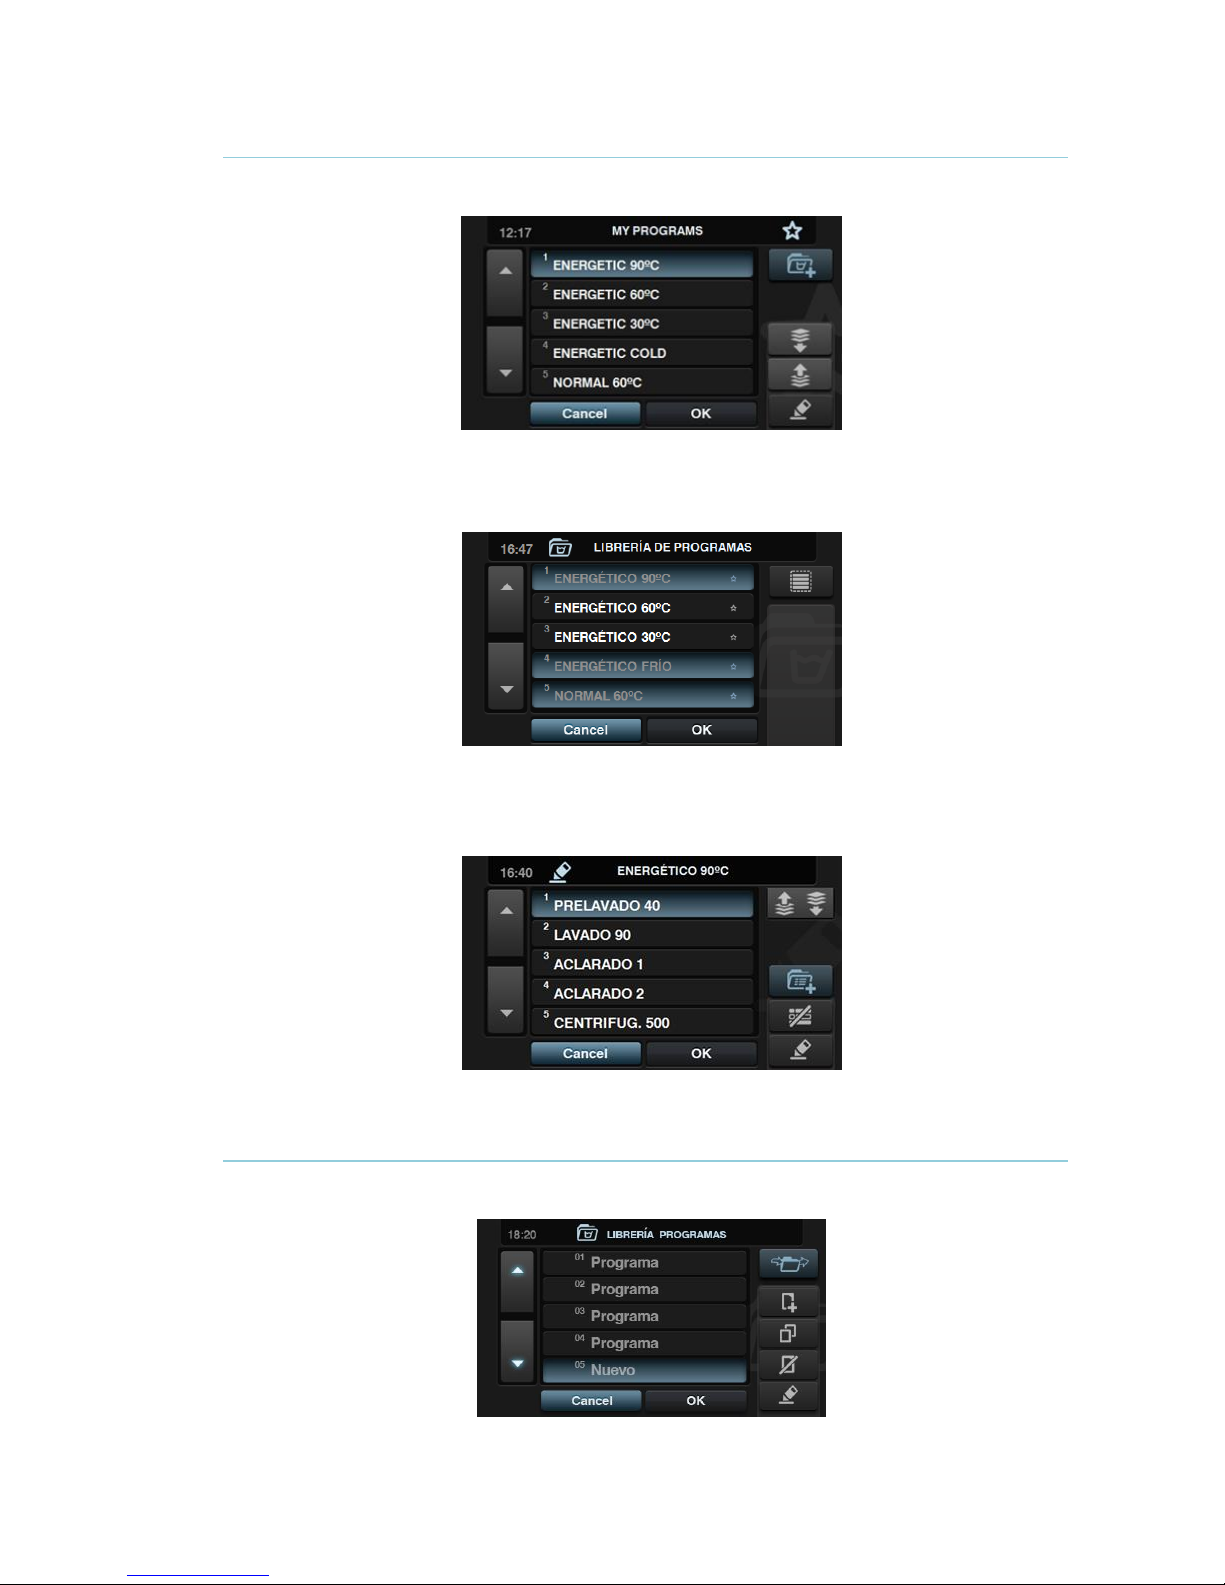
The programmes in the folder “My programmes” are those which are available on the OPL Main
Screen.
Press the button to add/remove programmes, and the screen goes to the programme library. Here,
the programmes which are currently included in “My programmes” are highlighted, and it is
possible to select/deselect each of the programmes to be added to/removed from the list of
favourites.
Press the “arrow up” and “arrow down” buttons to change the position of any programme in the list
of favourites, which can be put in any order as required.
Press the edit button to be able to modify the selected programme as if editing it from the
programme library.
Press OK or Cancel to return to My Programmes.
5.1.2 Programme library
Programmes can be added, copied, modified or deleted, new programmes can be imported or
programmes can be exported to a USB flash drive.
Page 23
EN
Página 21 de 43
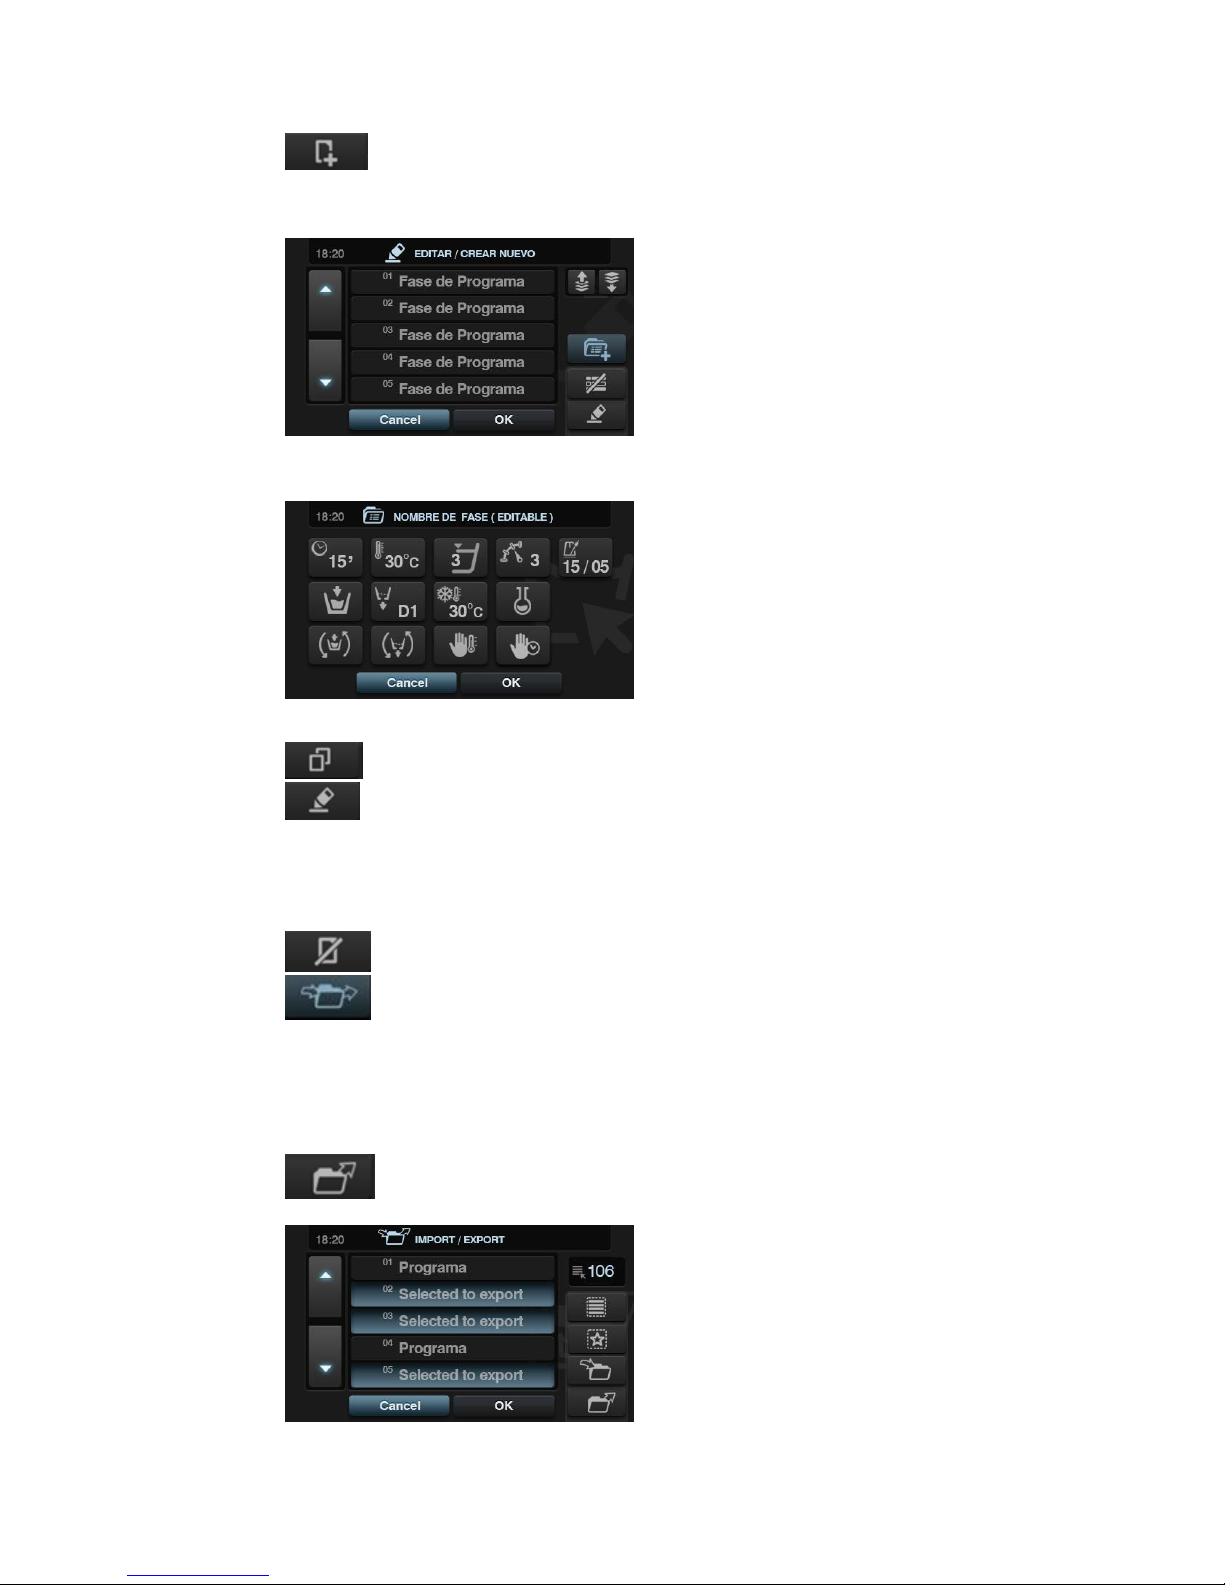
Create programme: Creation of new wash programmes using cycles existing in the
library. When this button is pressed, the user is asked to enter the name of the new
programme. Next the following screen is displayed (without any cycles) in order to include
cycles from the cycle library.
Cycles can be added from the cycle library. The cycles you wish to view can be filtered by
cycle type. After selecting the cycle, the library cycle parameters can be consulted before
including them in the programme you are creating.
Each programme is a set of parameters grouped by cycles that are not linked to any of the
cycles found in the library.
Copy programme: Copy of a programme found in the library, giving it a new name.
Modify programme: Modification of the name of the programme and the cycles in
the programme. It is possible to add, modify, delete or change the order of existing cycles.
Just as when a new programme is created, when it is modified it is possible to add/delete
cycles from the cycle library.
When creating programmes, the cycle parameters can only be consulted. The cycles already
in the programme can only be modified when modifying the programmes.
Delete programme: Delete programmes stored in the library.
Import programme: Permits new programmes to be imported from a USB flash
drive.
When the USB is opened, only files with the extension “.prg” are displayed, in addition to the
folders. There is a button for selecting all the programmes in the currently open folder.
If a programme is imported with the same name as an existing programme, you will be asked
whether you wish to replace the programme in question or cancel the operation. As there
may be many programmes in this situation, there is a box to select “do the same in all cases”.
Export programme: Export programmes existing in the library to a USB flash
drive.
It is possible to select the programmes you wish to export.
Page 24
EN
Página 22 de 43
It is possible to select all the programmes or the programmes which are saved in favourites,
indicating the number of programmes selected at all times.
The set of programmes selected will be saved in a folder (model+SerialNo) and each
programme will be a file.
5.1.3 Cycle library
The name of each cycle can be modified from the cycle library. Once included in a programme,
when displaying the cycle information, the name displayed for the cycle will be different. It will be a
dynamic name consisting of the phase type and a parameter (Temp, rpm).
The cycle library will be editable, and the existing cycles can be created, modified, copied or
deleted.
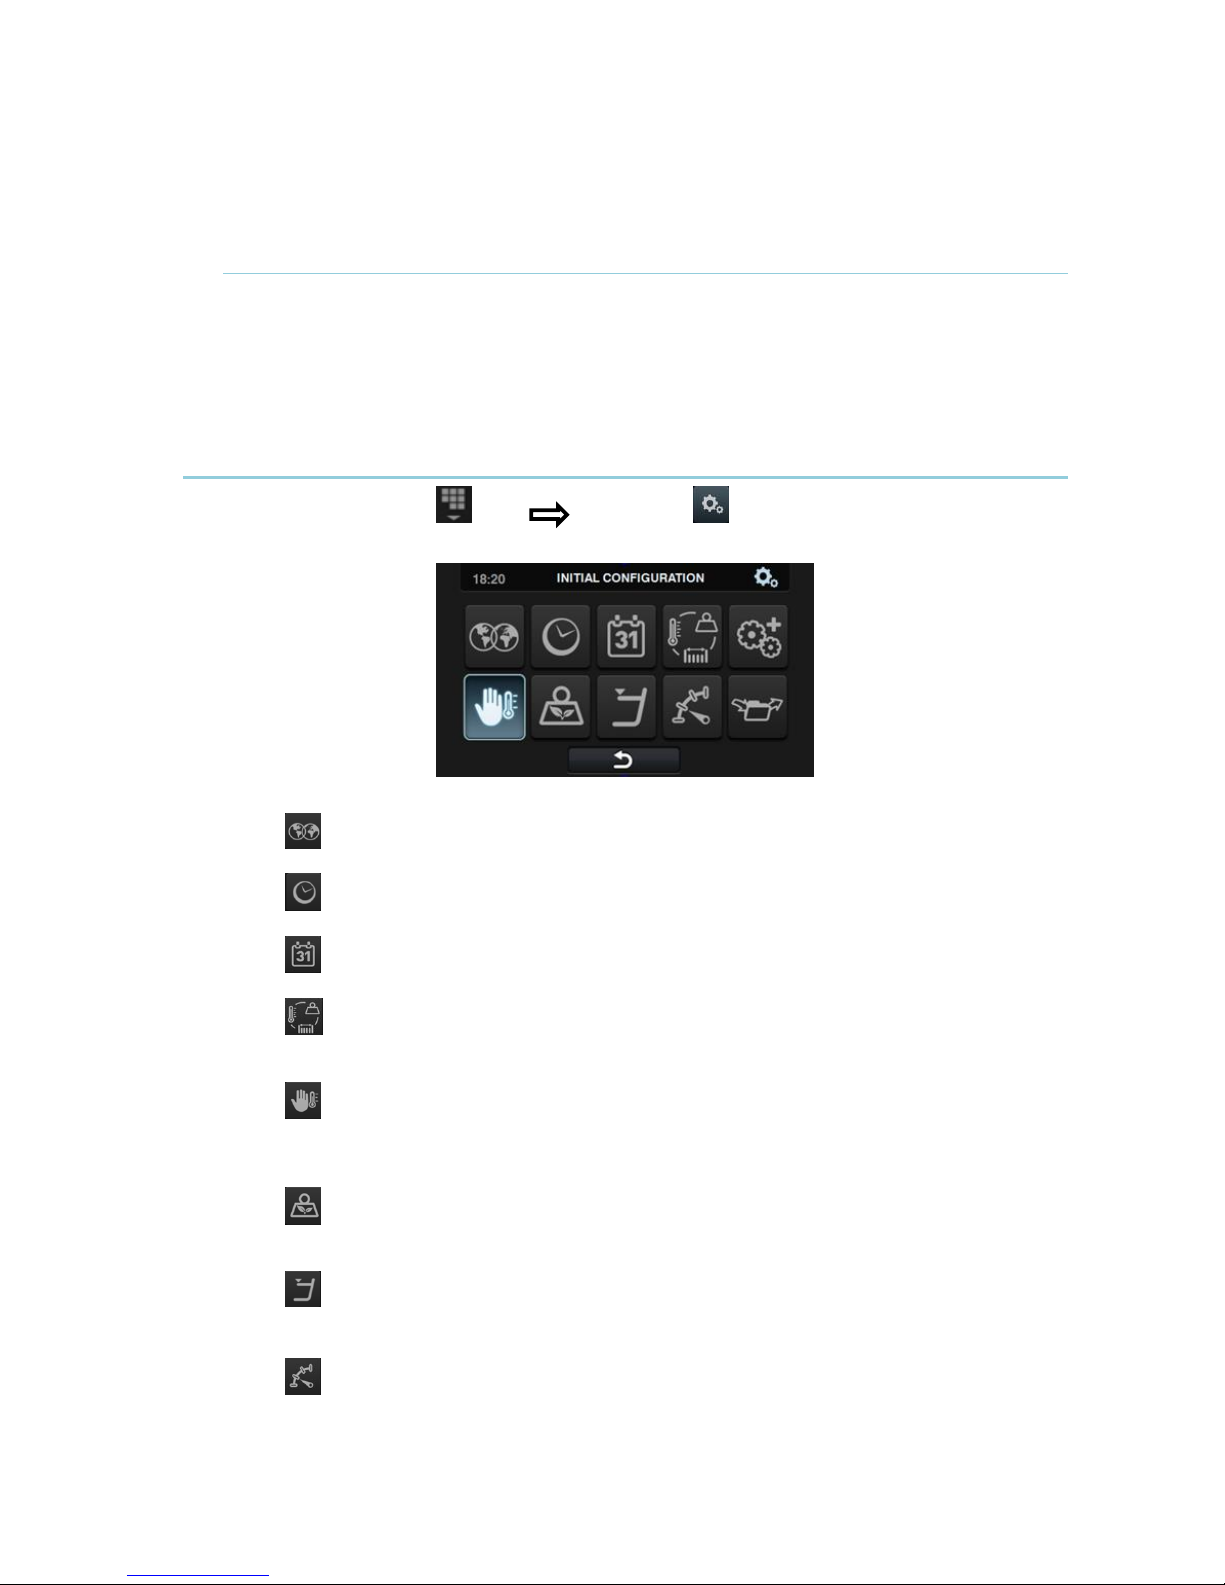
5.2 Configure System
Access: [Main screen] [Main Menu]
The following sections can be modified in the system configuration:
Language: The washing machine texts can be displayed in 34 different languages,
although the texts can only be edited using Western character sets.
Time: Configuration of the current time. The display format (12 hour / 24 hour (default
setting)) can be selected.
Date: Configuration of the current date. The display format (dd/mm/yyyy (default setting)
/ yyyy/mm/dd / mm/dd/yyyy) can be selected.
Units of measurement: The unit of measurement in which the temperature (ºC (default
setting) or ºF), the weight (Kg (default setting) or lb) and the size (mm (default setting) or in)
can be selected.
Thermal stop: General configuration of the thermal stop. If this is disabled, the thermal
stop does not take place even if this parameter is active in the currently running cycle. If,
however, it is enabled, the configuration of each cycle is respected and the consequent action
is taken. By default it is active.
Water saving by weight: The required water saving for the weight can be configured.
Three different options can be selected (1 feather: low saving, 2:medium, 3:high).
Depending on the load, there will be a reduction in the water level and detergent dose.
Levels: This enables the configuration in mm of the 5 configurable levels. Each level
type will have a default value and configuration range. These values will depend on the model
selected. (See table of levels by model)
Speed: This enables the configuration in RPM of the different types of speed existing, in
both the wash and spin cycles. Each speed type has a minimum and maximum configuration
value. (See table of RPM/V equivalences by model)
Page 25
EN
Página 23 de 43
Import/Export Configuration: It is possible to import a machine configuration from a
USB memory stick or to export the current machine configuration to a memory stick. When
this button is pressed, an intermediate window is displayed where we select whether to
import or export (as in programmes).
If IMPORT is selected, the same window as in programmes is displayed in order to browse
through the USB, but only configuration files (with extension .cfg) can be selected.
If EXPORT is selected, the current machine configuration is saved to the root directory of the
USB.
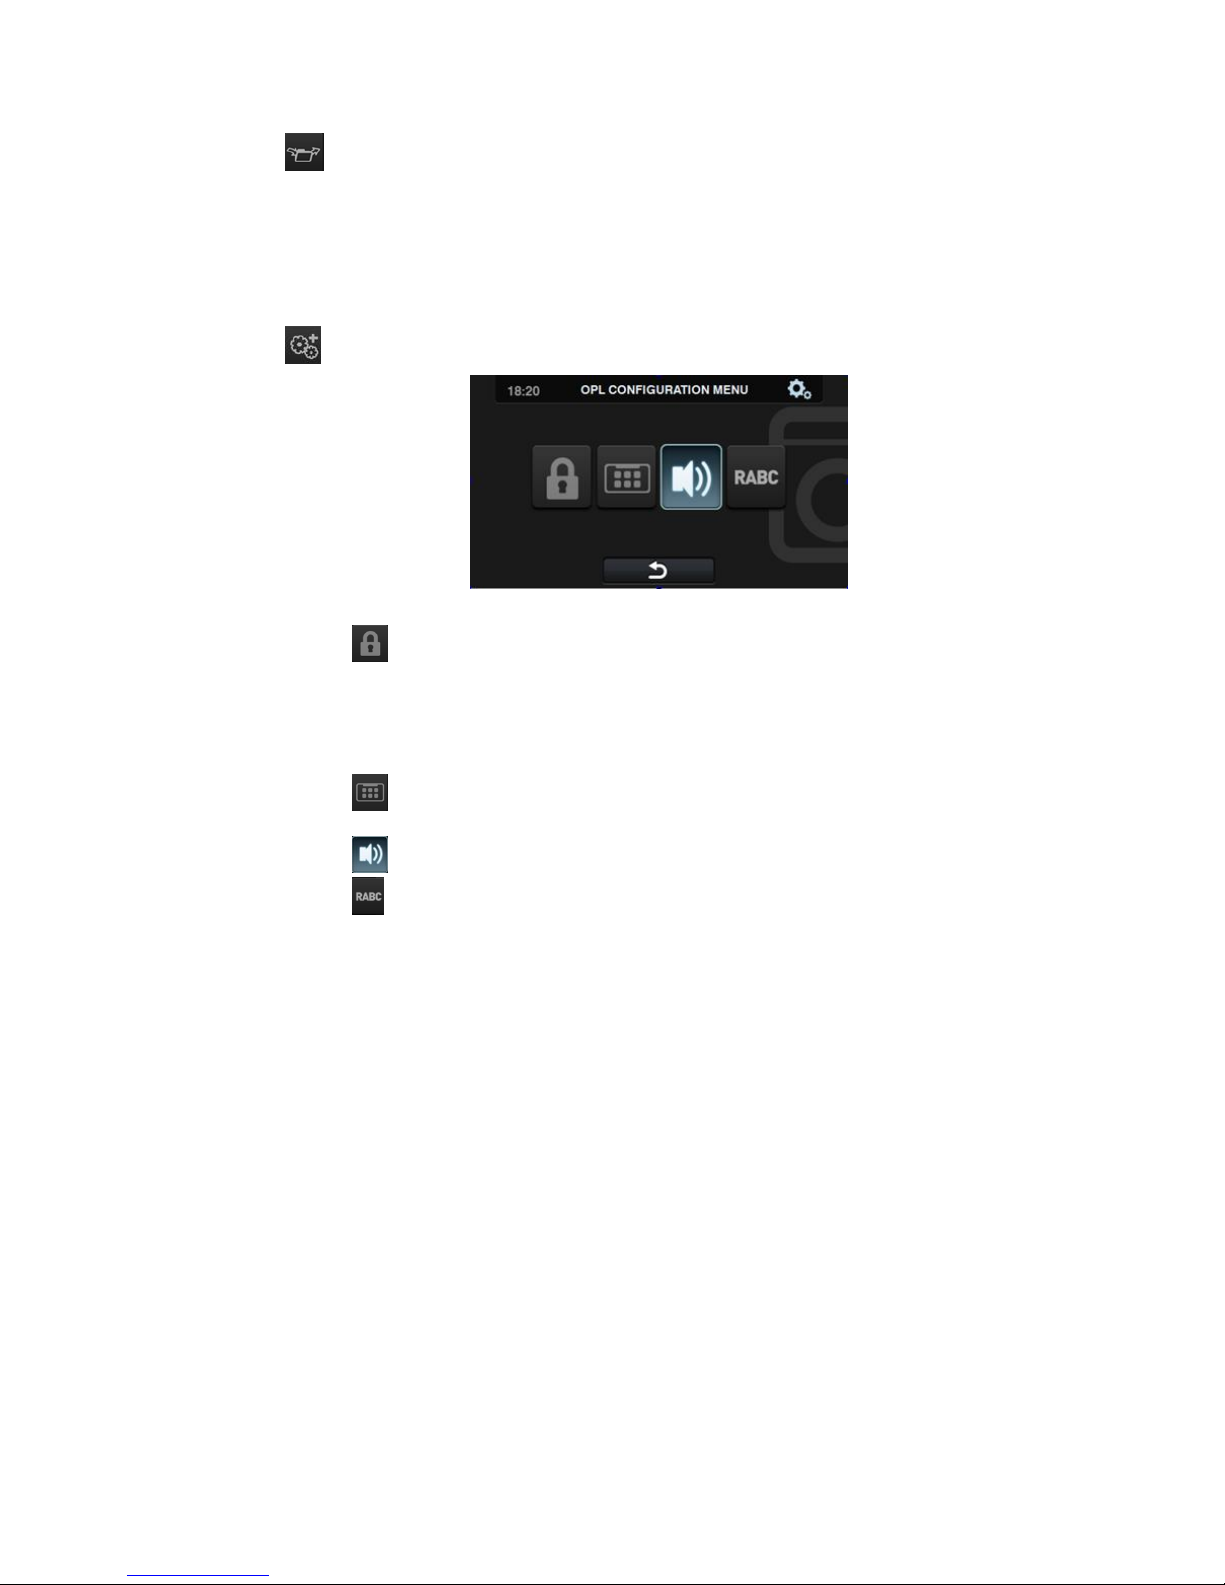
Advanced configuration
Restricted access: This allows the washing machine configuration to be
restricted, by establishing a password to enter the main menu. The default setting is
deactivated.
The required password (1234 by default) for entering the main menu can be
configured. There is also a master password in the event that the user forgets the
established password (0777).
HUD: The HUD configuration activates/deactivates the display of the parameters
on the different screens.
Beep: Option permitting the buzzer to be disabled. By default it is enabled.
RABC/Traceability: The information for each wash is registered, and the
following information saved:
At the start of each cycle: Programme, start time, weight (where applicable). During
the programme, every 15 seconds: Level, temperature and error (where applicable).
When downloading the data, the required period must be selected (by default, start
date and end date, today's date).
The data will be saved for a minimum of 15 days.
Every time a download is made, a folder is created with
NumSeries_Date_Time_RABC, creating a “.rabc” file for each of the programmes
that has been run.
Page 26
EN
Página 24 de 43
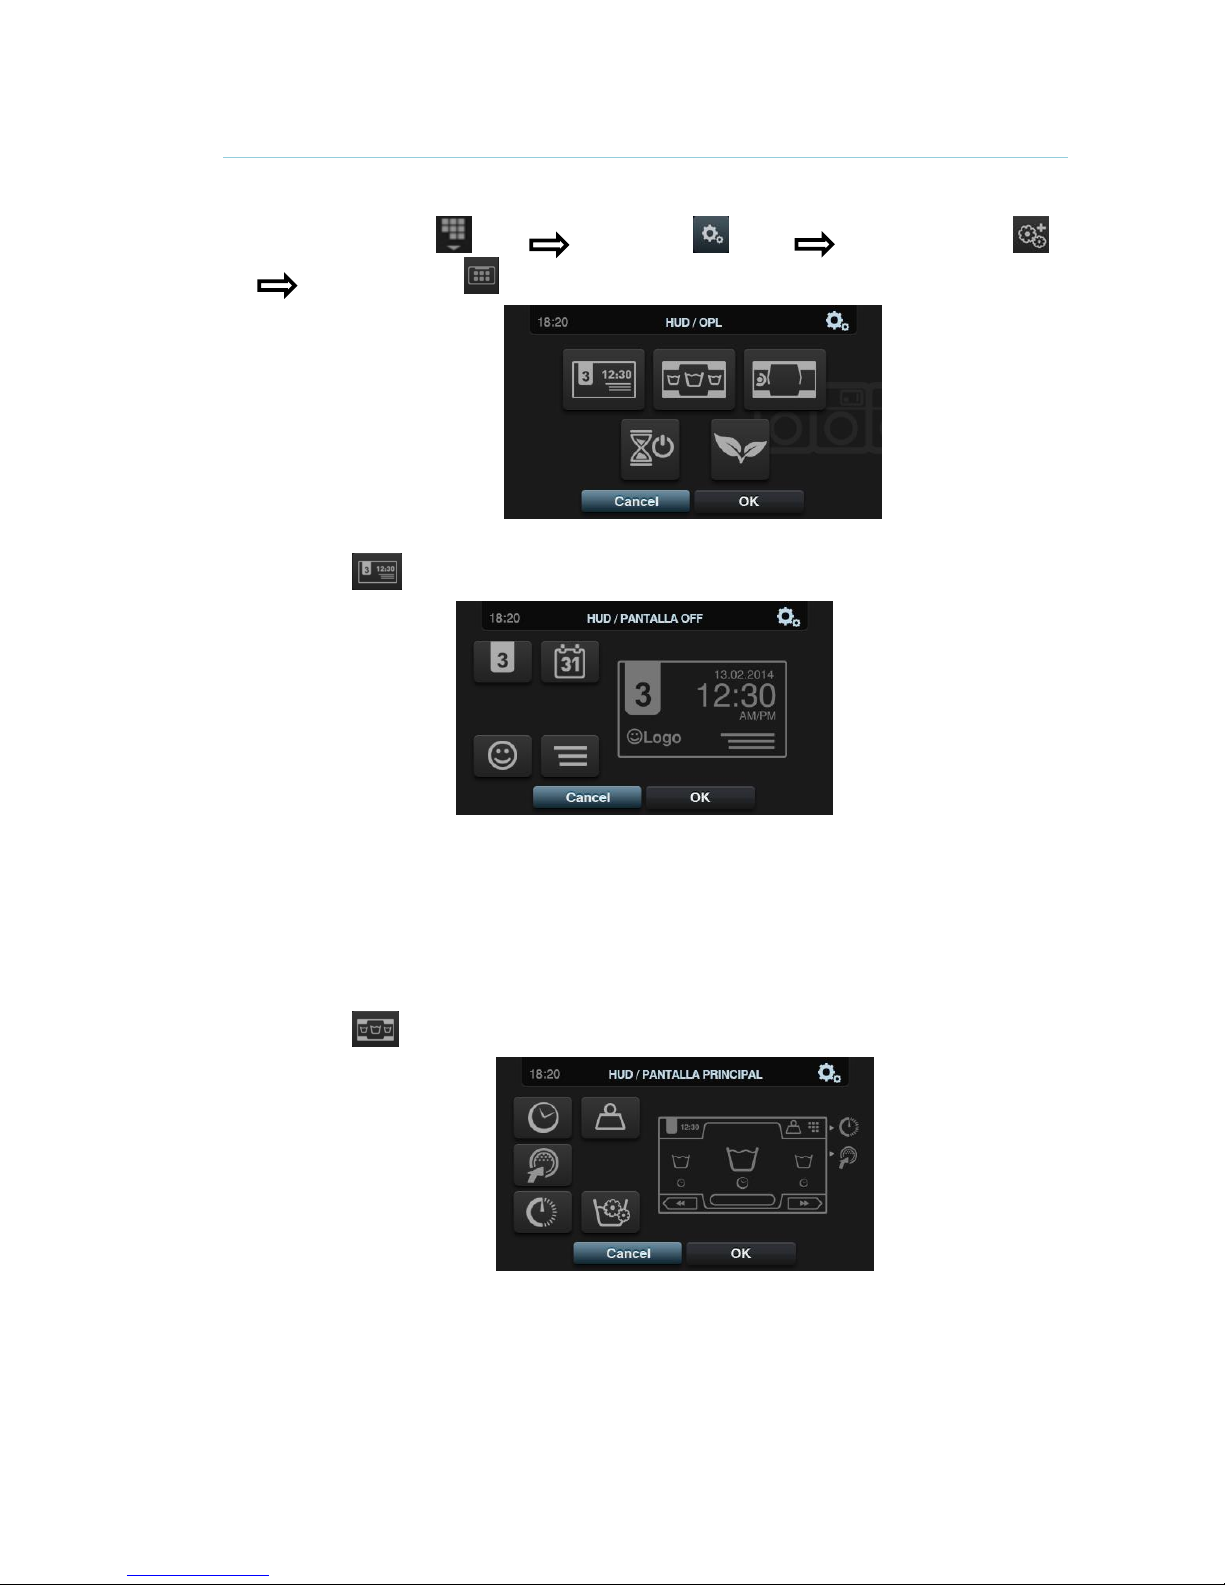
5.2.1 HUD configuration
Configuration of the parameters to be displayed on the OFF screen, main screen and run screen,
in addition to configuration of the automatic shutdown and energy saving.
Access: [Main screen] [Main Menu] [Configure system]
[Advanced configuration]
OFF screen: These are the parameters that can be configured:
o Machine identifier: The machine identifier can be enabled/disabled, and the
number to be allocated to the identifier can be edited (between 1 and 99). By
default it is disabled.
o Date: Option that can be enabled/disabled. By default it is enabled.
o Logo: This allows the user to select whether or not to display the logo. By
default it is enabled.
o Laundrette message: Start message that can be edited by the user (Max. 40
characters). By default it is disabled.
Main screen: The configurable parameters are listed below:
o Time: Option permitting time to be displayed/hidden. By default it is enabled.
o Weight of clothes. If this option is disabled, the weight icon is not displayed.
By default it is disabled.
o Instant programming. If instant programming is disabled, the parameters for
each cycle can be viewed but cannot be edited. By default it is enabled.
o Delayed programming. Option permitting the delayed programming option to
tbe displayed/hidden in the main menu. By default it is enabled.
Page 27
EN
Página 25 de 43
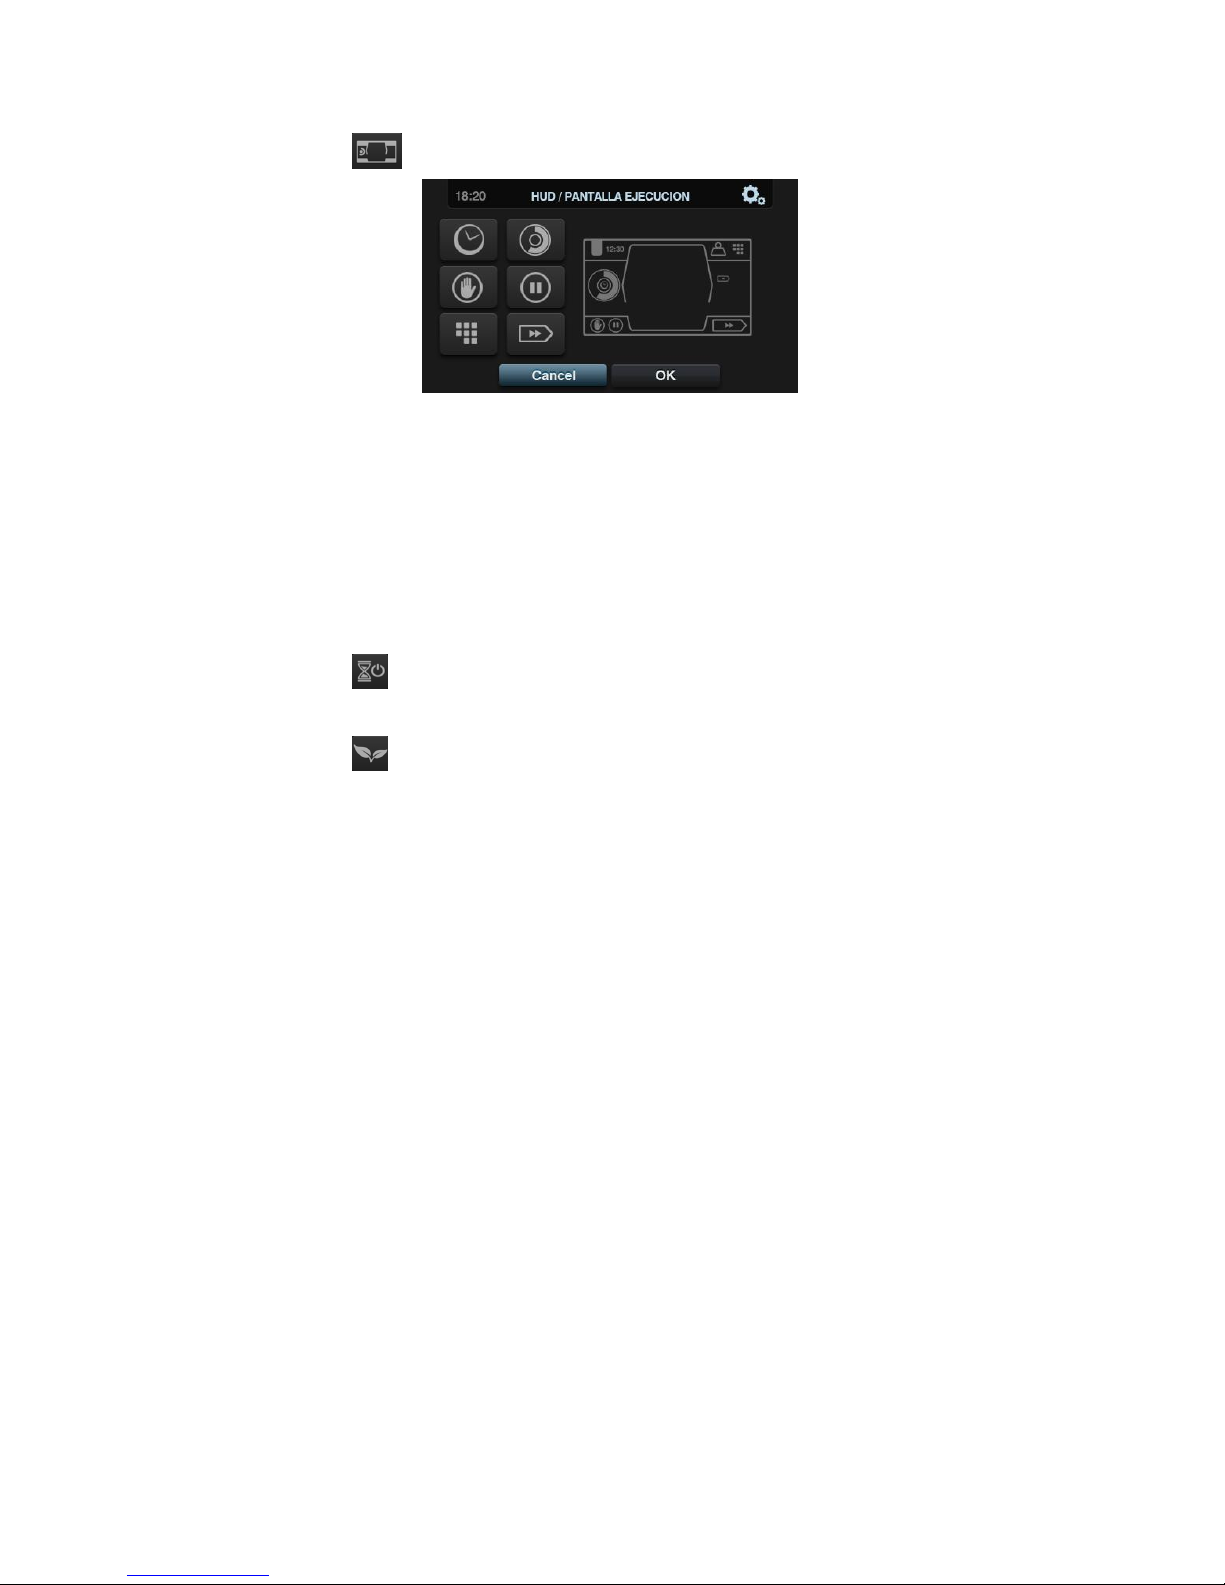
Run screen. These are the options permitted on the run screen:
o Time: Option permitting time to be displayed/hidden. By default it is enabled.
o Remaining time: Option to display/hide the total time remaining and the
programme progress indicator on the run screen. By default it is enabled.
o Stop button, STOP: This allows the stop button to be hidden. By default it is
enabled.
o PAUSE button: This allows the pause button to be hidden. By default it is
enabled.
o Menu button. Option that permits the run menu icon to be displayed/hidden,
by default it is enabled.
o Advance button: This permits the advance button and the information
referring to the next cycle to be hidden. By default it is enabled.
Automatic shutdown: If this option is activated and the main screen is open,
the machine will switch to Screen Off after 30 minutes of inactivity. By default it is
enabled.
Energy saving: Option that enables energy savings by switching off the screen
backlight 10 minutes after switching off the washing machine. If any part of the
screen is touched, the backlight will light up again. Likewise, if the ON/OFF button is
pressed, the backlight comes on and the Main screen is opened. By default it is
enabled.
Page 28
EN
Página 26 de 43
6 MAINTENANCE
6.1 Electrical and mechanical irregularities
Before calling the Technical Service Centre, check the following:
That power is supplied to the machine.
The condition of the fuses.
That the voltage is correct for the machine.
If the washing machine fails to get the required level of water, check:
The water mains tap is open.
The water inlet filter is not blocked.
That the water pressure is between 2 and 4 kg/cm 28 (28 and 56 psi).
If the washing machine vibrates excessively, check that none of the panel screws is loose.
If a power cut occurs, check that the tub is drained and the door is blocked. If you want to take the
clothes out of the washing machine, unlock the door by pulling down the belt located behind the
front panel.
6.2 Warnings
All warnings and errors are reported on screen together with an acoustic alarm. In the event of an
error, the cycle and status information is maintained in order to determine exactly where the error
has occurred.
The following warnings may be found in a washing machine:
DESCRIPTION
CAUSE AND ACTION
OPEN DOOR
If the door is open at the start of a programme, the message “DOOR OPEN” is displayed on
screen and the buzzer will buzz for 30 seconds and no more.
Only the option "end" is given. The programme will end and the user can try again.
WATER IN TUB
At the end of a programme, if the water level is not 0 mm, the message “WATER IN TUB” is
displayed on screen.
The 2 options "continue" or "end" are displayed. If we press “continue” the machine checks
again for a level of 0 mm. If this is the case, the door is unlocked, if not the error is reported
again. If we press “end”, the programme will end and the door unlocks.
LOAD POSITION /
UNLOAD POSITION
If the weighing kit is active and at the start of a programme the washing machine is not in the
rest position, this warning is given and the following message displayed “WARNING! WASHING
MACHINE IN LOAD POSITION” or “WARNING! WASHING MACHINE IN UNLOAD POSITION”
depending on whether the micro switch is active. The buzzer will buzz for 30 seconds and no
more.
Only the option "end" is given. The programme will end and the user can try again.
SWITCH OFF MACHINE
When a programme is running, if the ON/OFF button is pressed, the message “SWITCH OFF
MACHINE” is displayed with the text “Programme running. Switch off machine?"
OPL actions: The 2 options "cancel" or "OK" are displayed. If “OK” is pressed, the machine will
switch off in the programme normally. The open door warning will be given and go off after 3
seconds. If we press “cancel”, the programme will continue to run from the point at which it left
off.
Page 29

EN
Página 27 de 43
The following errors may be found in a washing machine:
ERROR
DESCRIPTION
CAUSE AND ACTION
E1
POWER CUT DETECTED
When the power supply is restored after a power cut has been detected while a
programme is running.
The options "continue" or "end" are displayed. If continue is pressed, the cycle that
was running when the power cut occurred will continue, starting from the
beginning of the cycle again. If “end” is pressed, the programme will end, and the
door is unlocked.
E2
FAULT IN LOCKING
The machine detects that the door cannot be locked at the start of a programme
or that it has unlocked during the programme This error occurs after 3 attempts to
lock the door every 20 seconds.
The programme will end and the user can try again.
E3
DRAINAGE FAILURE /
WATER IN TUB
The machine detects that although the “EV drain” or “EV drain 2” output is
activated, the water level in the washing machine tub does not reach "0" within 10
minutes (time can be configured).
The 2 options "continue" or "end" are displayed. If we press continue, the machine
will continue trying to drain but at the end of the established time, the error
message will be displayed again. If we press "end", the door unlocks but the
following warning is given "WATER IN TUB".
E5
FAULT WATER INLET
The machine detects that although the corresponding solenoid valve outputs are
activated, the water level in the washing machine has not risen 1 mm in 5 minutes
(time can be configured).
The 2 options "continue" or "end" are displayed. If we press continue, the machine
will continue trying to fill but at the end of the established time, the error message
will be displayed again. If we press “end”, the programme will end and the door
unlocks.
E6
HEATING FAULT
The machine detects that, in spite of activating the heating output, the water
temperature has not increased by 1ºC within 30 minutes.
It is possible to cancel this error. In this case, instead of triggering an error, the
machine will continue running as if the temperature had been reached.
The 2 options "continue" or "end" are displayed. If we press continue, the machine
does not continue trying to heat the water and the cycle continues as if the
temperature had been reached. If there are more heating phases in the same
programme, the error will be detected again. If we press “end”, the programme will
end and the door unlocks.
E7
“MAXIMUM
TEMPERATURE
REACHED”
The machine detects that the water temperature has exceeded 95 ºC.
Only the option "end" is given. When it is pressed, the programme will end, and
the door is unlocked if the temperature is less than 50º. If this is not the case, the
E11 error is triggered: CLOTHES HOT.
E9
UNBALANCED LOAD
This message appears when the unbalanced load micro switch is activated once
during the spin cycle.
Only the option "end" is given. When this is pressed, the programme will end, and
the door is unlocked. In addition, the text "TRY TO REDISTRIBUTE LOAD"
appears in the error message.
E10
MAX UNBALANCED
LOAD
The unbalanced load micro switch is activated once during the spin cycle.
Only the option "end" is given, the programme ends, and the door is unlocked
when this button is pressed.
Page 30

EN
Página 28 de 43
E11
CLOTHES HOT
A programme execution finishes but the water temperature inside the tub exceeds
50 ºC.
The 2 options "continue" or "end" are displayed. If we press continue, the machine
again checks the temperature, unlocking the door only if it has dropped below
50ºC. The same message is displayed again if the temperature has not
decreased. If we press “end”, the programme will end and the door unlocks.
E12
UNLOCK ERROR
The machine detects that the door cannot be unlocked at the end of a programme.
This error occurs after 3 attempts to unlock the door every 20 seconds.
Only the option "end" is given. When this option is pressed, the machine repeats
the 3 attempts to unlock and if it cannot unlock the door the error is given with the
following text: “DO NOT FORCE THE DOOR. CALL THE TECHNICAL SERVICE”.
E13
MODEL ERROR
On trying to select the model, the machine does not detect an activated range
input (low, medium, high, sanitary) or more than one range is activated.
The option "back" is given to exit the menu, returning to the screen where the
model code is entered.
E14
WEIGHING ERROR
When the weighing kit is active, the inputs “front pressure switch” and “Rear
pressure switch” are found to be deactivated.
The option “end” is displayed if the machine is currently running a programme.
E15
FRONT INFLATION
ERROR
While the weighing kit is active, when the output “front inflation” is activated and
the input “Front pressure switch” is not opened for 5 minutes.
E16
REAR INFLATION ERROR
While the weighing kit is active, when the output “rear inflation” is activated and
the input “Rear pressure switch” is not opened for 5 minutes.
E17
T1 FULL
When the water recovery kit is activated and the machine detects that the input
“Max level Tank 1” has activated while draining to T1.
Buzzer is activated for 20 seconds. The machine stops draining to T1 and
switches to normal drainage. The warning disappears when the next cycle starts.
E18
T1 EMPTY
When the water recovery kit is activated and the machine detects that there is no
“Min level Tank 1” while filling from T1.
Buzzer is activated for 20 seconds. The machine stops filling from T1 and
switches to filling normally with cold water. The warning disappears when the next
cycle starts.
E19
T2 FULL
When the water recovery kit is activated and the machine detects that the input
“Max level Tank 2” has activated while draining to T2.
Buzzer is activated for 20 seconds. The machine stops draining to T2 and
switches to normal drainage. The warning disappears when the next cycle starts.
E20
T2 EMPTY
When the water recovery kit is activated and the machine detects that there is no
“Min level Tank 2” while filling from T2.
Buzzer is activated for 20 seconds. The machine stops filling from T2 and
switches to filling normally with cold water. The warning disappears when the next
cycle starts.
E21
T3 FULL
When the water recovery kit is activated and the machine detects that the input
“Max level Tank 3” has activated while draining to T3.
Buzzer is activated for 20 seconds. The machine stops draining to T3 and
switches to normal drainage. The warning disappears when the next cycle starts.
Page 31

EN
Página 29 de 43
E22
T3 EMPTY
When the water recovery kit is activated and the machine detects that there is no
“Min level Tank 3” while filling from T3.
Buzzer is activated for 20 seconds. The machine stops filling from T3 and
switches to filling normally with cold water. The warning disappears when the next
cycle starts.
E23
ERROR IN WEIGHT
This message appears when the machine detects that there is no signal from the
weight sensor, the weight is less than 0 or more than 20% of the nominal load of
the model configured, provided the weight control kit is active.
The programme will be allowed to run normally without a weight control.
E24
TRANSFER ERROR
If the transfer between the PC and USB is not completed correctly, this warning is
displayed.
OK to accept.
E25
COMMUNICATION
ERROR CONTROLCONTROL AUX.
This warning is triggered when no communication is detected between the main
control card and the auxiliary control card.
If the washing machine is not running, the error is displayed but the programmes
which do not involve the auxiliary control card can be run.
If the error is triggered while the machine is running, the warning is displayed
together with the message “end”, ending the programme and unlocking the door
when the button is pressed.
E26
MOTOR HOT WIRE /
VARIATOR ERROR
This error occurs when at any time of the execution of a program, the entry
"Thermal Motor" is opened.
Only the option "end" is given, the programme ends, and the door is unlocked
when this button is pressed.
E27
ERROR NTC OUT OF
RANGE
This error occurs when a temperature value is measured that is above the
configured range (currently the maximum valid value is 110 ºC). This means that
the NTC is broken or disconnected. On detecting that the NTC is out of range, "- -"
is displayed instead of the temperature value.
The 2 options "OK" or "Cancel" are displayed. Press "OK" to continue with the
programme as if the temperature had been reached and consequently skip the
heating phase. Press “Cancel” to end the programme, and unlock the door.
E28
ERROR PRESSURE
SENSOR OUT OF RANGE
This error occurs when a voltage value is measured of less than 0.4 V or more
than 3.8 V. This means that the pressure sensor is broken or disconnected.
Only the option “OK” exists. Press “OK” to end the programme, and unlock the
door.
Page 32
EN
Página 30 de 43
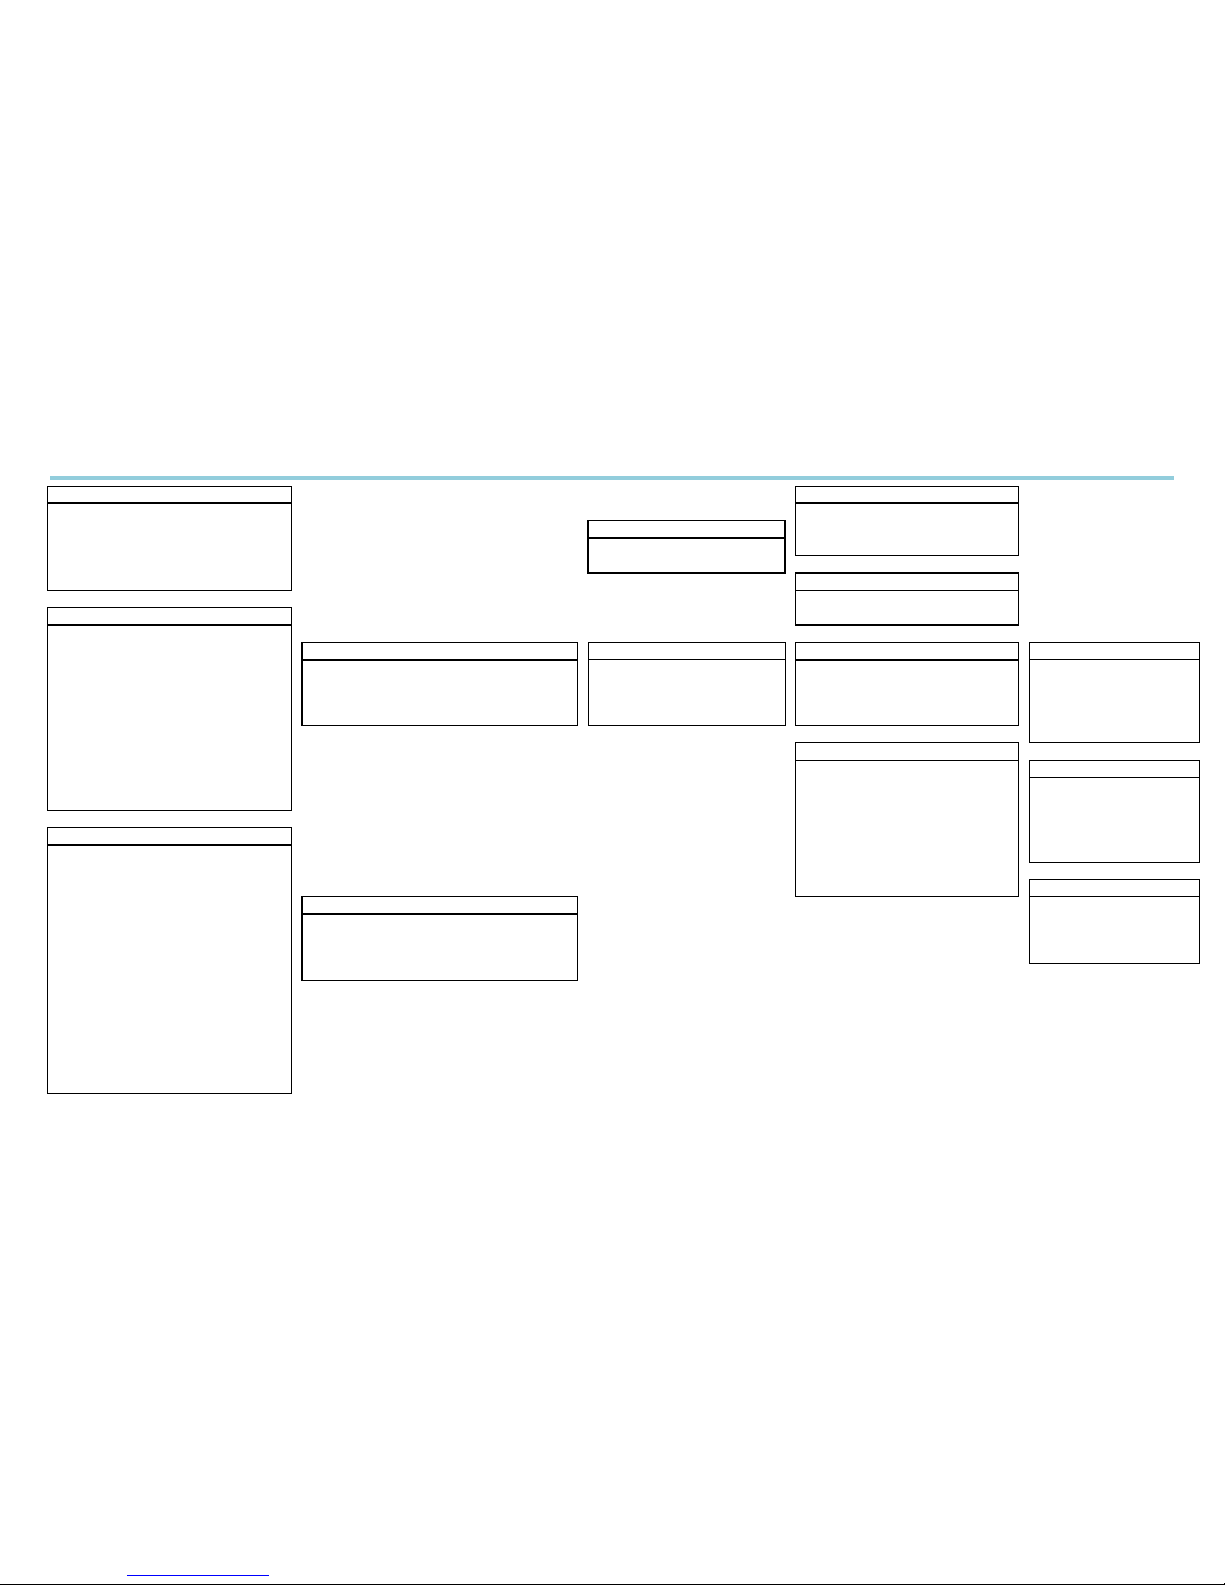
7 NAVIGATION CAM
SCREEN OFF OPL
LIBRARY
Date
Create/Copy/Modif/Delete prog./cycles
Time
PROGRAMME MANAGEMENT
Import programmes
Laundrette message
LIBRARY
Export programmes
Logo
MY PROGRAMMES
Machine identifier
MY PROGRAMMES
Select Active programmes
MAIN SCREEN OPL
Create/Modify programmes
Machine identifier
Time
MAIN MENU
CONFIGURE SYSTEM
HUD/SOUND
HUD
Weight of clothes (If weigh clothes is active)
Delayed programming (Select Time)
Language
HUD
Screen OFF / Standby
MAIN MENU
PROGRAMME MANAGEMENT
HUD/SOUND
Beep (On/Off)
Main screen
Programme name
CONFIGURE SYSTEM
Import/export config.
RABC (Download period)
Run screen
Programme temperature
MAINTENANCE
GENERAL
Restricted access
Automatic shutdown (On/Off)
Programme number (My programmes)
Energy saving (On/Off)
Programme length
GENERAL
Increase/decrease programme number
Date/Time
LEVELS
Start Temperature scale (ºC/ºF)
Minimum level
Programme cycles (Instant Programming)
LEVELS
Low level
SPEED
Medium level
RUN SCREEN OPL
Weighing coefficient (If weight is active)
High level
Machine identifier
Thermal stop (Yes/No)
Maximum level
Time
Software version
RUN MENU
Update software (via USB)
SPEED
Programme name
RUN MENU
Minimum
Programme number
View inputs
Low
Programme length
See outputs
Normal
Remaining time
View settings/true values (Level, Temp, T Remain)
Height
Progress indicator
Manual dosing
Status (drawing+text)
Currently running cycle
Next cycle
Advance cycle
Pause
Stop
Display warnings/errors
Page 33

EN
Página 31 de 43
SELF SERVICE
1 INTRODUCTION ................................................................................................................ 32
2 INTERFACE ........................................................................................................................ 32
2.1 Standby Screen ......................................................................................................... 32
2.2 Direct selection Screen ........................................................................................... 32
2.3. Main Screen ............................................................................................................... 33
2.4 Run Screen ................................................................................................................. 35
3 PROGRAMMES ................................................................................................................. 36
3.1 Programme library ................................................................................................... 36
4 CONFIGURATION ............................................................................................................. 37
4.1 Programme management ....................................................................................... 37
4.2 Configure System ..................................................................................................... 37
4.2.1 Advanced configuration ..................................................................................... 37
4.2.2 HUD programming.............................................................................................. 39
4.2.3 Table of currencies ............................................................................................. 40
5 MAINTENANCE ................................................................................................................. 42
5.1 Errors ........................................................................................................................... 42
6 NAVIGATION CAM ............................................................................................................ 43
Page 34
EN
Página 32 de 43
1 INTRODUCTION
This section lists the characteristics which are exclusive to self-service washing machines. The
safety warnings must be read and it is advisable to read the rest of the manual in order to fully
understand how the machine operates.
2 INTERFACE
2.1 Standby Screen
While the washing machine is waiting for the money to be inserted, the Standby Screen is
displayed. When the money has been inserted or if the touch screen is touched this changes to the
self-service Main Screen.
3
2
4
5
1
1. Laundrette message: The message configured by the user (if enabled) is displayed.
2. Logo: Depending on the make selected, the corresponding logo will be displayed (if
enabled).
3. Machine identifier: The label identifying the appliance based on the existing
configuration is displayed (if enabled).
4. Date: The current date is displayed in the format selected by the user (provided this is
enabled in HUD).
5. Time: The current time is displayed in the format selected by the user.
6. Model, Heating and SW version: This indicates the model configured and the SW
version. Behind the model identifier a letter is displayed indicating the type of heating
configured (No letter – Hot water, E – Electric, S – Steam).
On completion of a programme, the machine goes directly to this screen.
In addition, even if the screen has been touched, or the money has been inserted, if there is no
activity within 30 minutes, the machine returns directly to this screen, resetting the amount which
might have been inserted.
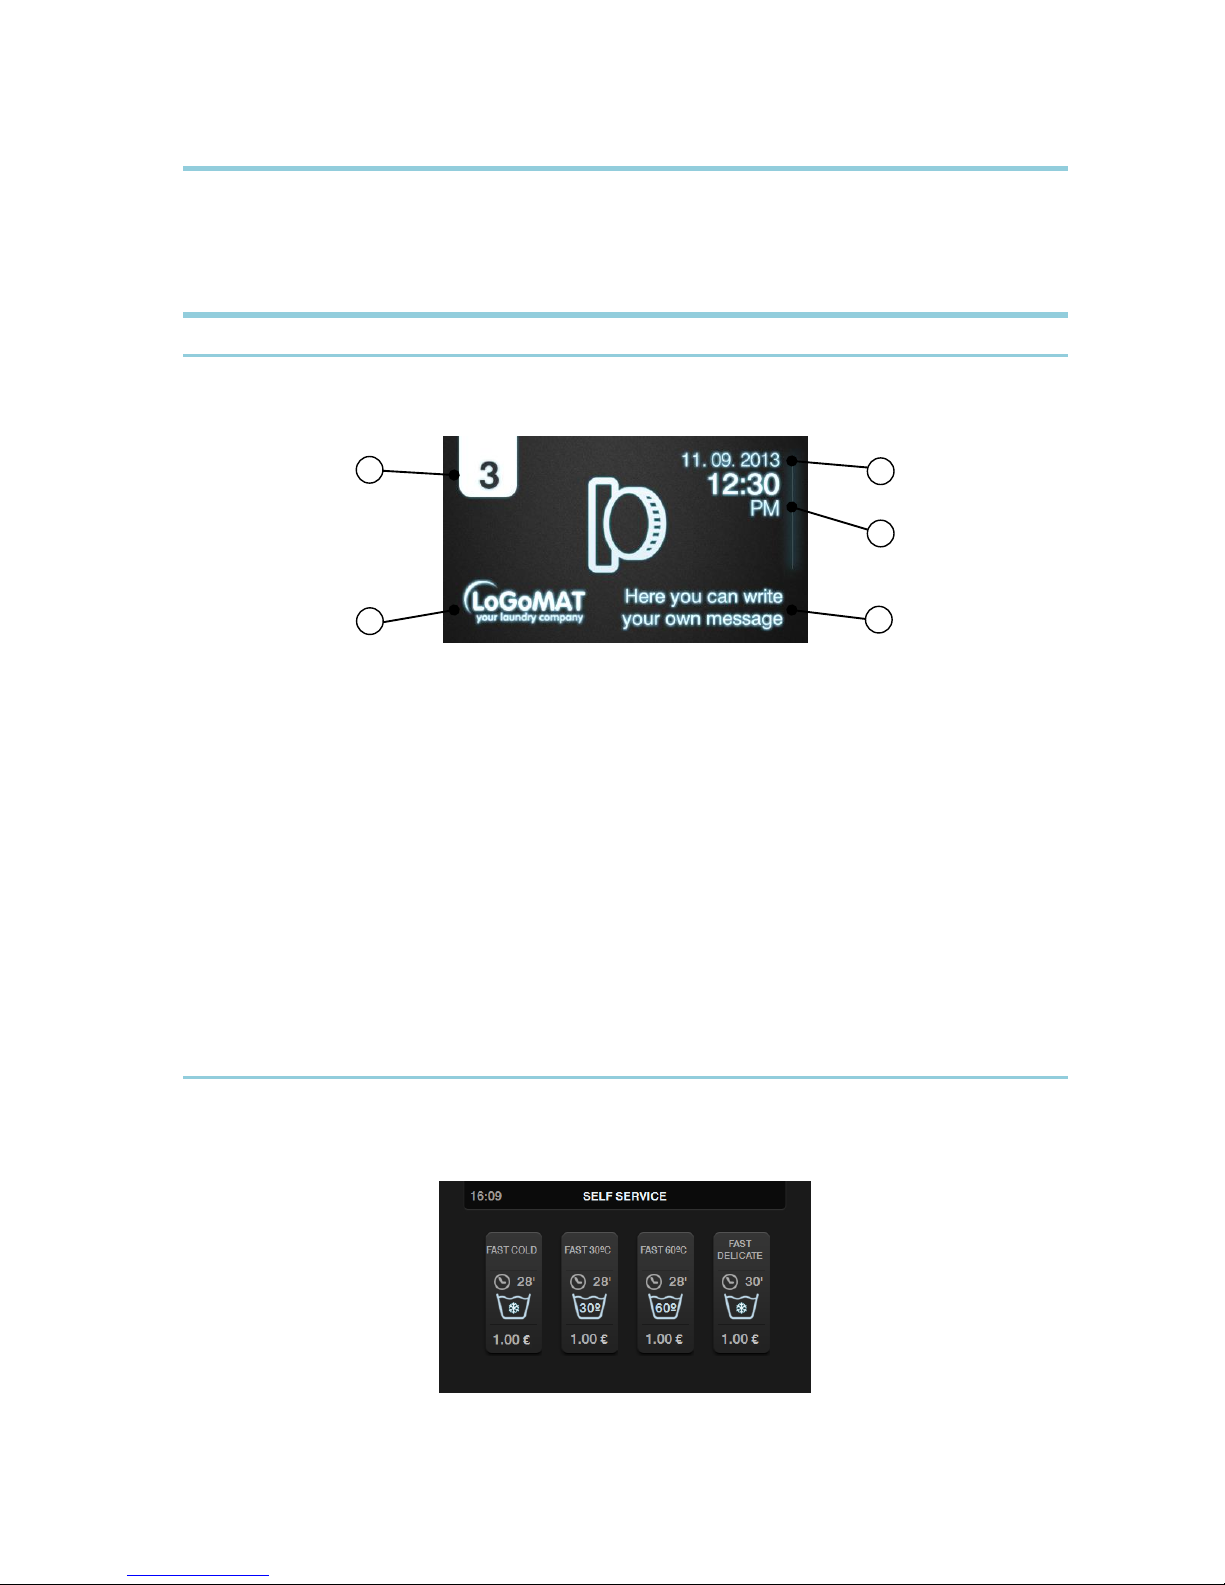
2.2 Direct selection Screen
Click in the self-service Standby Screen to go to the Direct selection Screen for this programme.
The characteristics of the programmes are displayed in this screen: Name, Length, Temperature,
Price (only in COIN mode, in CP and CR no).
Page 35
EN
Página 33 de 43
This screen has at least one button and a maximum of six buttons (these buttons are always the
same size and are in the centre of the window). The number of available buttons depends on the
number of programmes stored in favourites. For example, if there are four programmes in
favourites, the layout is as shown in the diagram. If there are more than six programmes in
favourites, only the first six programmes are displayed.
This screen is not displayed in “Credit Mode”, and the display goes directly from the Stand-By
screen to the main screen. In addition, if while in this screen, we go to “Credit Mode”, the display
switches to the main screen.
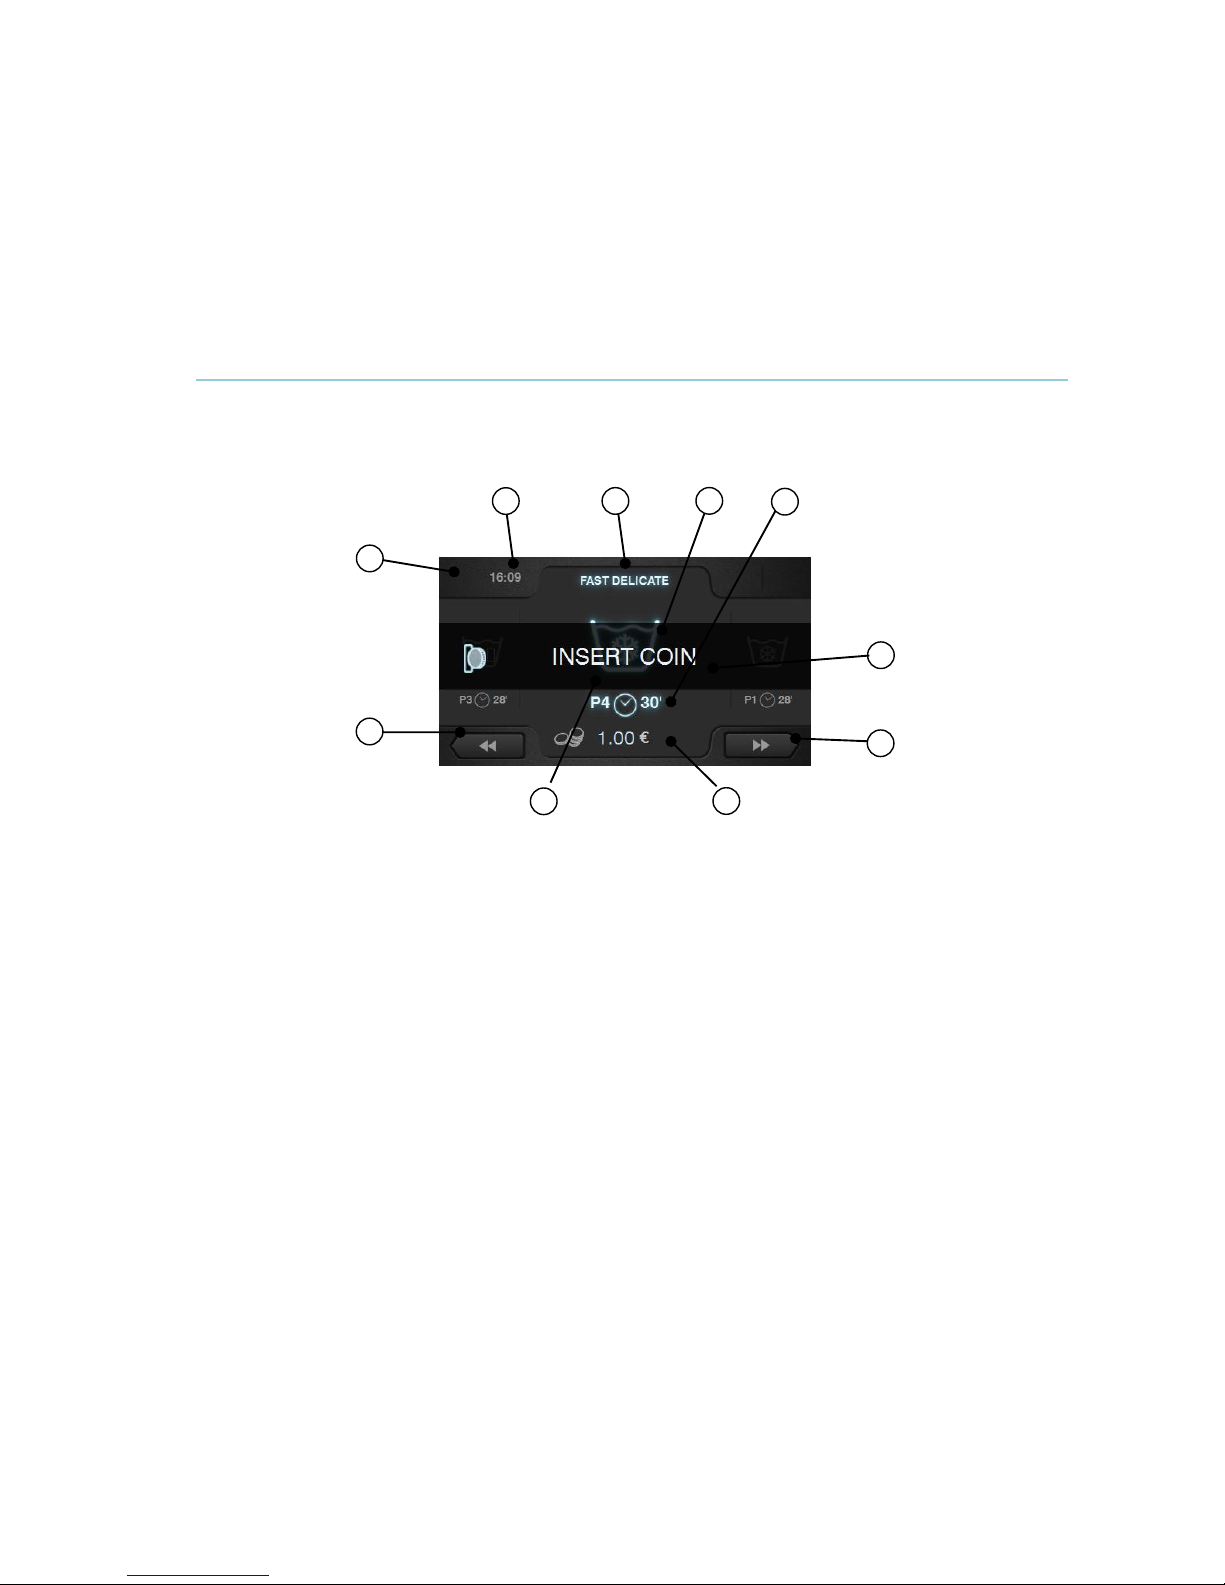
2.3. Main Screen
The self-service Main Screen allows management of the payment in order to run the selected
programme.
Some of the options may be omitted from the HUD menu.
1
6
2 3 4 5
7 8
9
6
1. Machine identifier: Label identifying the machine with the number selected by the user.
2. Time: Time and minutes in the selected format.
3. Programme name: Name configured for the selected programme.
4. Programme temperature: Programme temperature. The maximum temperature is taken
from among the different cycles of the programme.
5. Programme number and length: Position of the programme in the list (My
programmes).
Estimated length, in minutes, for the selected programme.
To calculate the length of a programme, the average is taken of the last three run times
for the programme in question.
6. Increase/decrease programme number: These buttons permit user to scroll up or down
the list of selected programmes.
If the programme number is increased while the machine is in the last programme, this
programme is maintained. Similarly, if it is decreased while the machine is in the first
programme, this programme is maintained.
As well as using the buttons, the programme can be increased/decreased by pressing
directly on the programme information (just above the button).
7. Price: If the COIN option is selected in self-service mode, the price of the selected
programme is displayed with the corresponding symbol (See currency table).
If the option CP or CR is selected, the text “INSERT COIN” or “INSERT PAYMENT” is
displayed.
8. Start/Amount remaining: Button to start running selected programme, provided the
corresponding amount for the programme in question has been inserted in the machine.
If full payment for the programme has not been made, the START button is replaced by
the amount remaining for the programme (COIN mode).
If the amount defined has not been reached and the machine is in CP or CR mode, the
respective icon is displayed alone.
Page 36

EN
Página 34 de 43
9. Central Message: Until the full payment for the programme has been made, the
message "INSERT COIN", "INSERT CARD" or "MAKE PAYMENT", depending on the
selected mode, is displayed in the centre of the window. This message will disappear on
completion of the payment.
To run any programme, the corresponding payment must first be made. Depending on the existing
self-service configuration, the machine controls the insertion of coins (COIN mode) or receives the
corresponding signal in CP or CR mode via the “coin slot micro” input to allow the selected
programme to run.
If the machine is configured in COIN mode, as the coins are inserted, the price decreases. It is
possible to change programme after the user has started to insert coins. The amount inserted is
stored and then deducted from the price of the new programme selected. When the amount
reaches 0, the START button is displayed to permit the programme to be run.
The last coin may exceed the amount remaining. If the programme is run, the extra amount will be
lost. But if the programme is changed, the machine stores the total amount inserted and deducts it
from the price of the new programme.
If there is no activity within 30 minutes, the machine automatically switches to the Standby Screen,
resetting any credit that may be stored.
While in self-service mode, it is possible to go to “Credit mode”. If the “top open” input is
activated, a password is requested to enter “Credit mode”.
When the machine enters “Credit mode”, it automatically exits self-service mode and behaves as if
it were in normal mode, displaying the information defined on the OPL Main Screen and offering
the option to perform all the actions defined on this screen. The programmes selected for selfservice and the programmes defined for Credit Mode are displayed.
On going to the main menu, all the available options for self-service washing machines are
displayed.
If the “top open” input is deactivated, the machine exits from “Credit mode” automatically. If the
machine is in a secondary screen of the main menu (configuration, maintenance…) and it exits
“Credit Mode”, it acts as if it were in this mode until exiting the Main Menu (saving the changes).
Once the machine has reached the Main Screen, it exits credit mode.
Page 37
EN
Página 35 de 43
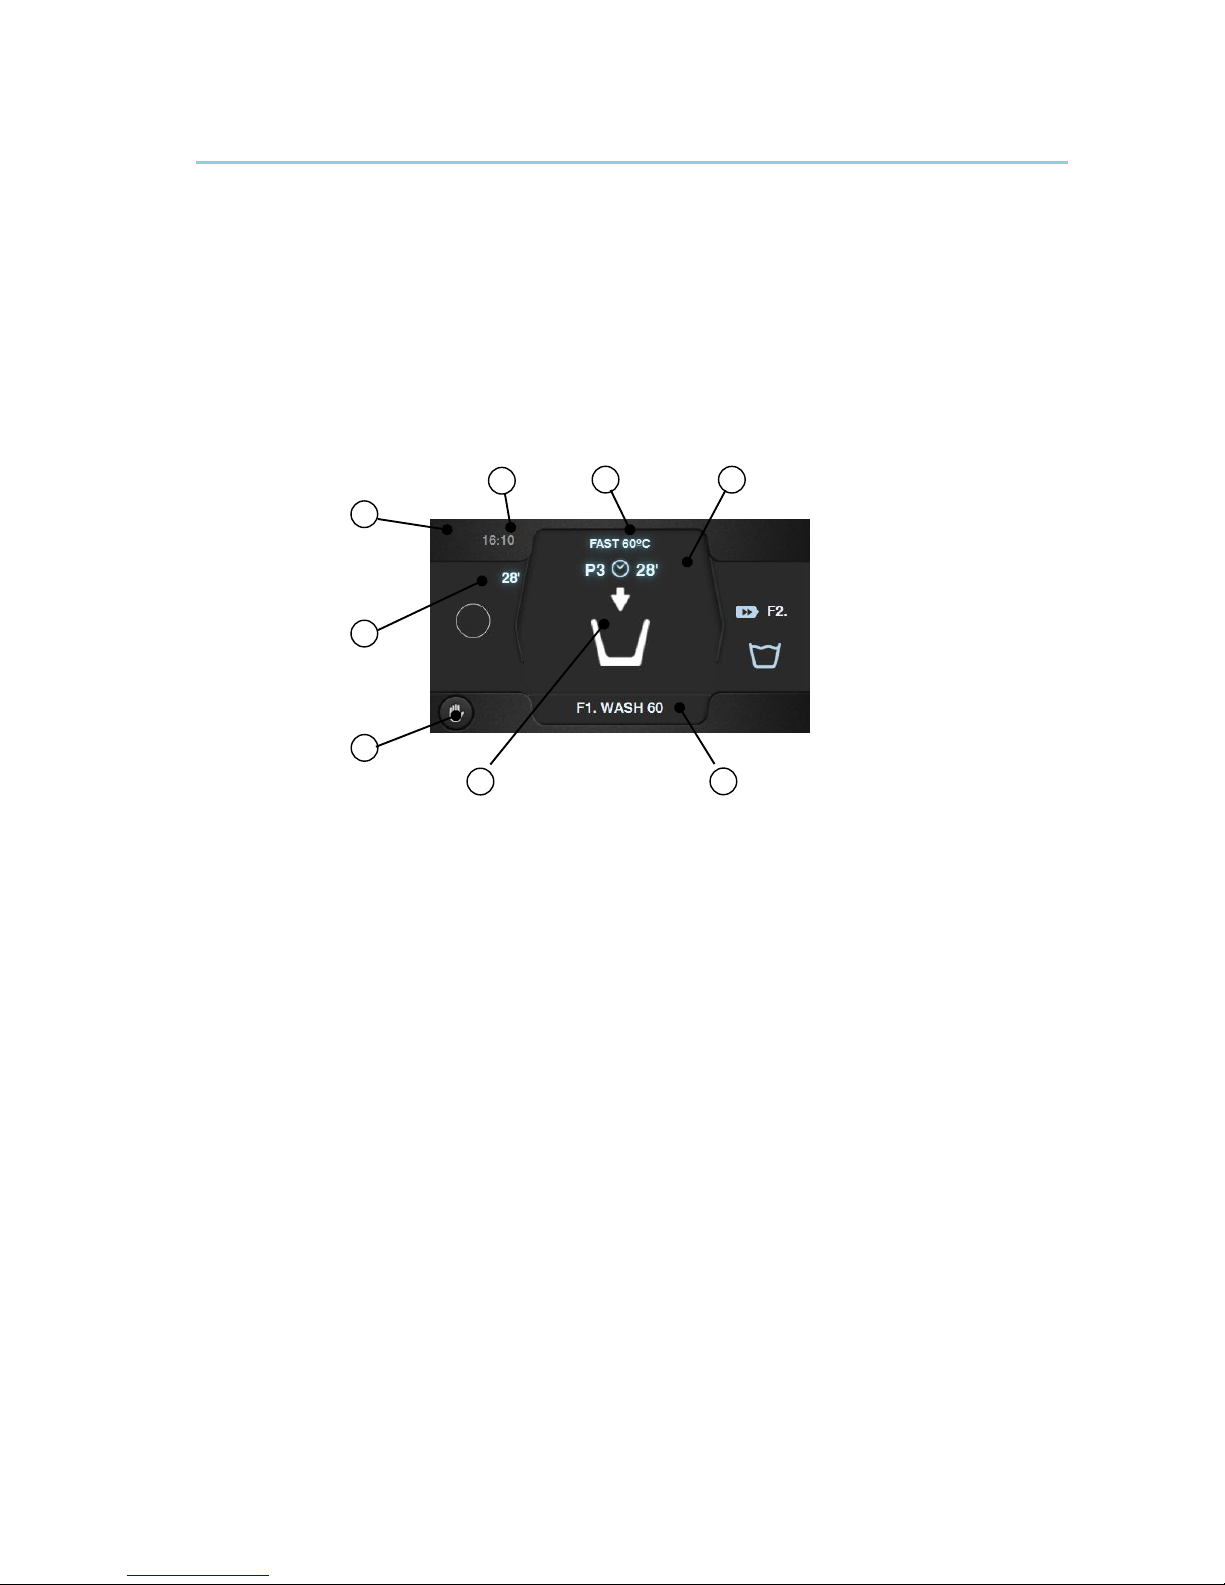
2.4 Run Screen
When START is pressed, the programme begins and the Run Screen is displayed.
While in run mode, it is also possible to enter “Credit mode” as described above. If this mode is
entered, it automatically exits self-service mode and behaves as if it were in OPL mode, displaying
the information defined on the OPL Run Screen and offering the option to perform all the actions
defined on this screen.
In self-service mode, the option to forward or pause the programme does not exist unless “Credit
mode” is entered.
Nor is the STOP button for aborting a programme there by default, although it can be activated
using the HUD.
If the STOP button is activated in self-service mode, it is necessary to hold the button down for 3
seconds until the machine off confirmation message is displayed.
1
5
8
2 3 4
6 7
1. Machine identifier: Label identifying the machine.
2. Time: Time and minutes in the selected format.
3. Programme name: Name configured for the selected programme.
4. Programme number and length: Position of the programme in the list of programmes (My
Programmes), and the estimated length in minutes for the programme selected.
5. Programme progress indicator: Status of programme progress, relation between total time
and time remaining for programme.
6. Status (drawing): Animated drawing showing the current cycle of the washing machine
(filling, draining, washing, rinsing, spinning or untangling).
7. Currently running cycle: Identifier and name of currently running cycle.
8. Stop (default setting disabled): Button to stop and cancel the programme. A confirmation
message will be requested.
Page 38
EN
Página 36 de 43
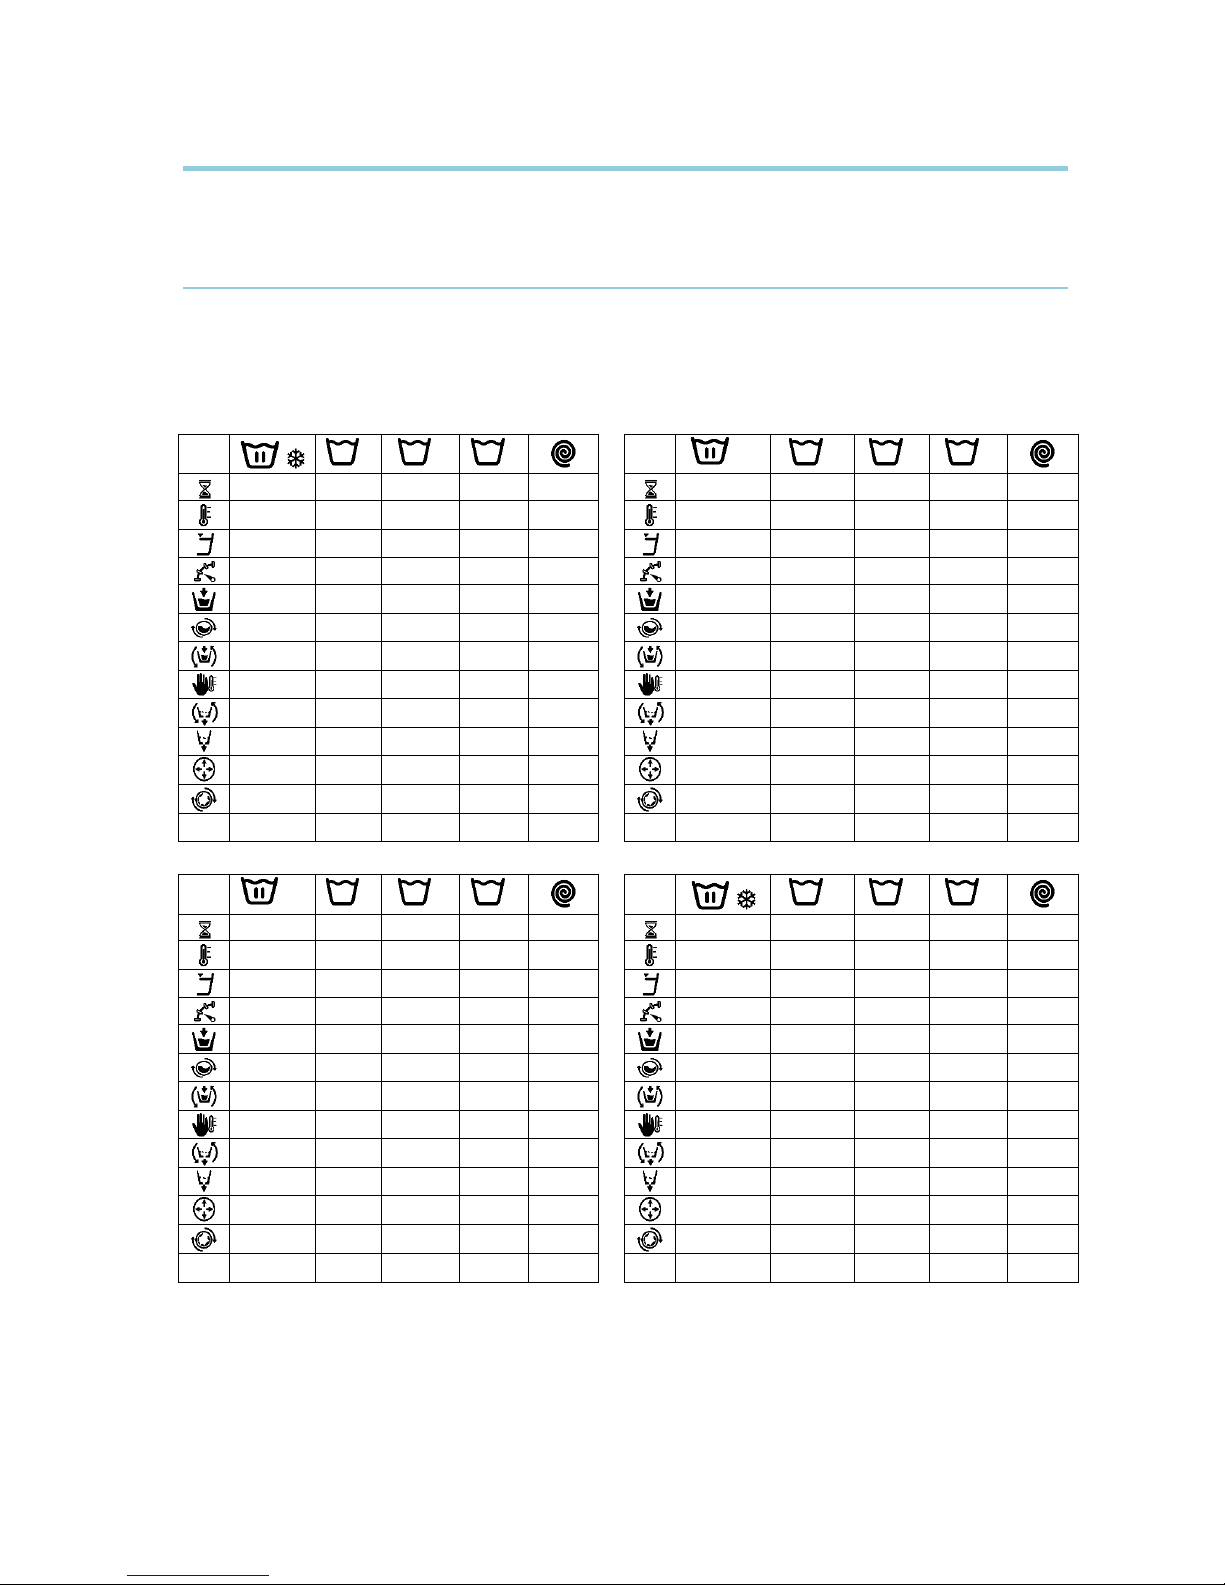
3 PROGRAMMES
There is a programme library consisting of all the programmes installed by default, together with
the programmes created by the user.
3.1 Programme library
These are the programmes that are found by default in the programme library:
P1: Fast cold wash
P2: Fast wash 40ºC
P3: Fast wash 60ºC
P4: Fast delicates
P1
1 2 3
P2
30 1 2
3
8 2 2 2 6
8 2 2 2 6
30
1 3 3
3
1 3 3
3
3 3 3 3 4
3 3 3 3 4
0 0 0
0
1 0 0
0
15;05
15;05
15;05
15;05
15;05
15;05
15;05
15;05
D
D2, D3
D4, D5
D
D2, D3
D4, D5
P3
60 1 2
3
P4
1 2 3
8 2 2 2 6
8 2 2 2 6
60
1 3 3
3
2 4 4
4
3 3 3 3 4
2 2 2 2 3
1 0 0
0
0 0 0
0
15;05
15;05
15;05
15;05
08;06
08;06
08;06
08;06
D
D2, D3
D4, D5
D
D2, D3
D4, D5
Page 39
EN
Página 37 de 43
4 CONFIGURATION
4.1 Programme management
If the washing machine is configured in self-service mode, only the first 6 programmes will be
available, the remaining programmes become available on entering Credit Mode.
4.2 Configure System
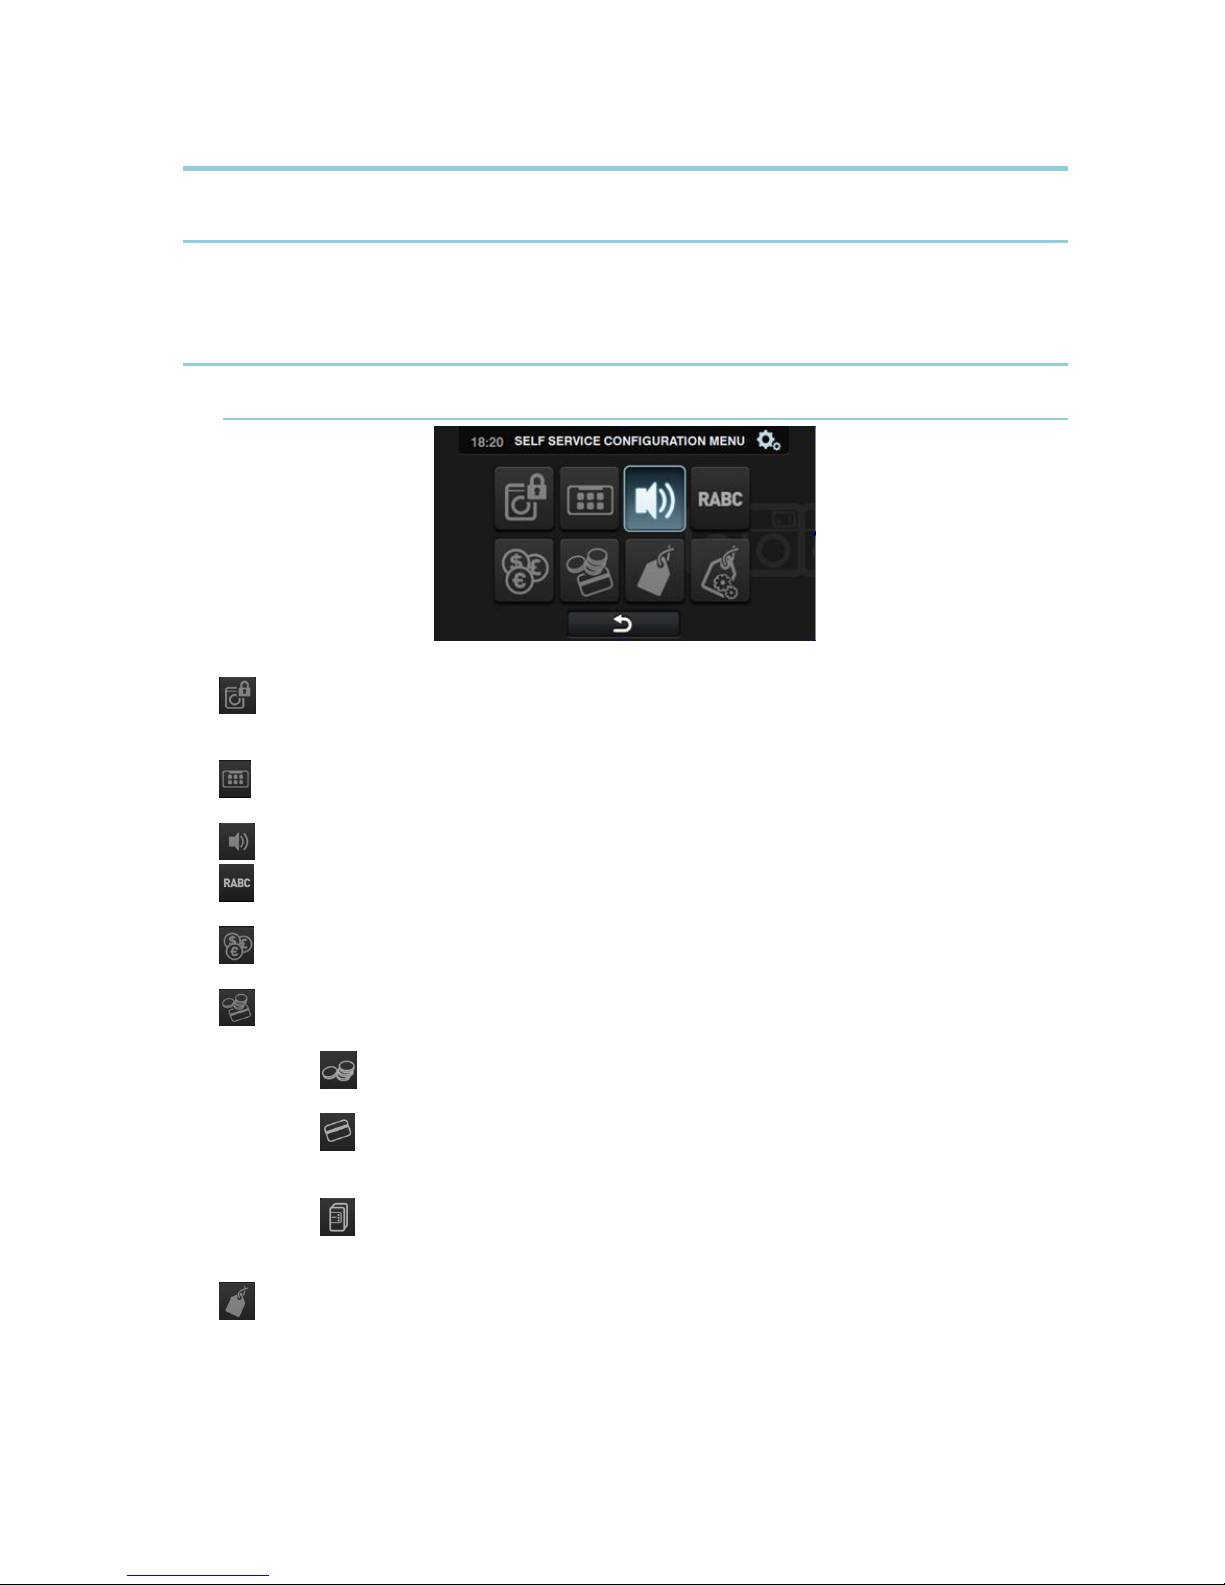
4.2.1 Advanced configuration
Credit Mode: If the washing machine is in self-service mode, the password for Credit Mode
(1234 by default) can be configured. Make a note of the password in a safe place. If you lose it,
please contact the technical support service.
HUD: In self-service mode it is also possible to configure the Standby Screen, the Main Screen
and the Run Screen. (See section 2).
Beep: Option permitting the buzzer to be disabled. By default it is enabled.
RABC/Traceability: See advanced OPL configuration. In self-service mode, this should function
in the same way.
Currency: Select currency with which you wish to operate (see section 4.2.3.). If the currency is
changed, all the prices will be reset, by default to token.
Payment Method: There are 3 different modes for operating in self-service mode.
COIN: The currency and price of each programme must be configured, using the
coin slot pulses to enable a set programme to be run.
Central Payment: The washing machine receives a pulse from a payment centre to
release the washing machine and permit a programme to be run. Default setting.
The currency, price and price programming options are disabled.
Card reader: Same compartment as the “Central Payment” option. The currency,
price and price programming options are disabled.
Prices: The prices of all the selected programmes can be configured in “My Programmes”. The
minimum value of the programme will be the multiple defined in the currency, and the maximum will
be 100 times the value of the multiple. The default setting is the minimum configurable value.
Page 40
EN
Página 38 de 43
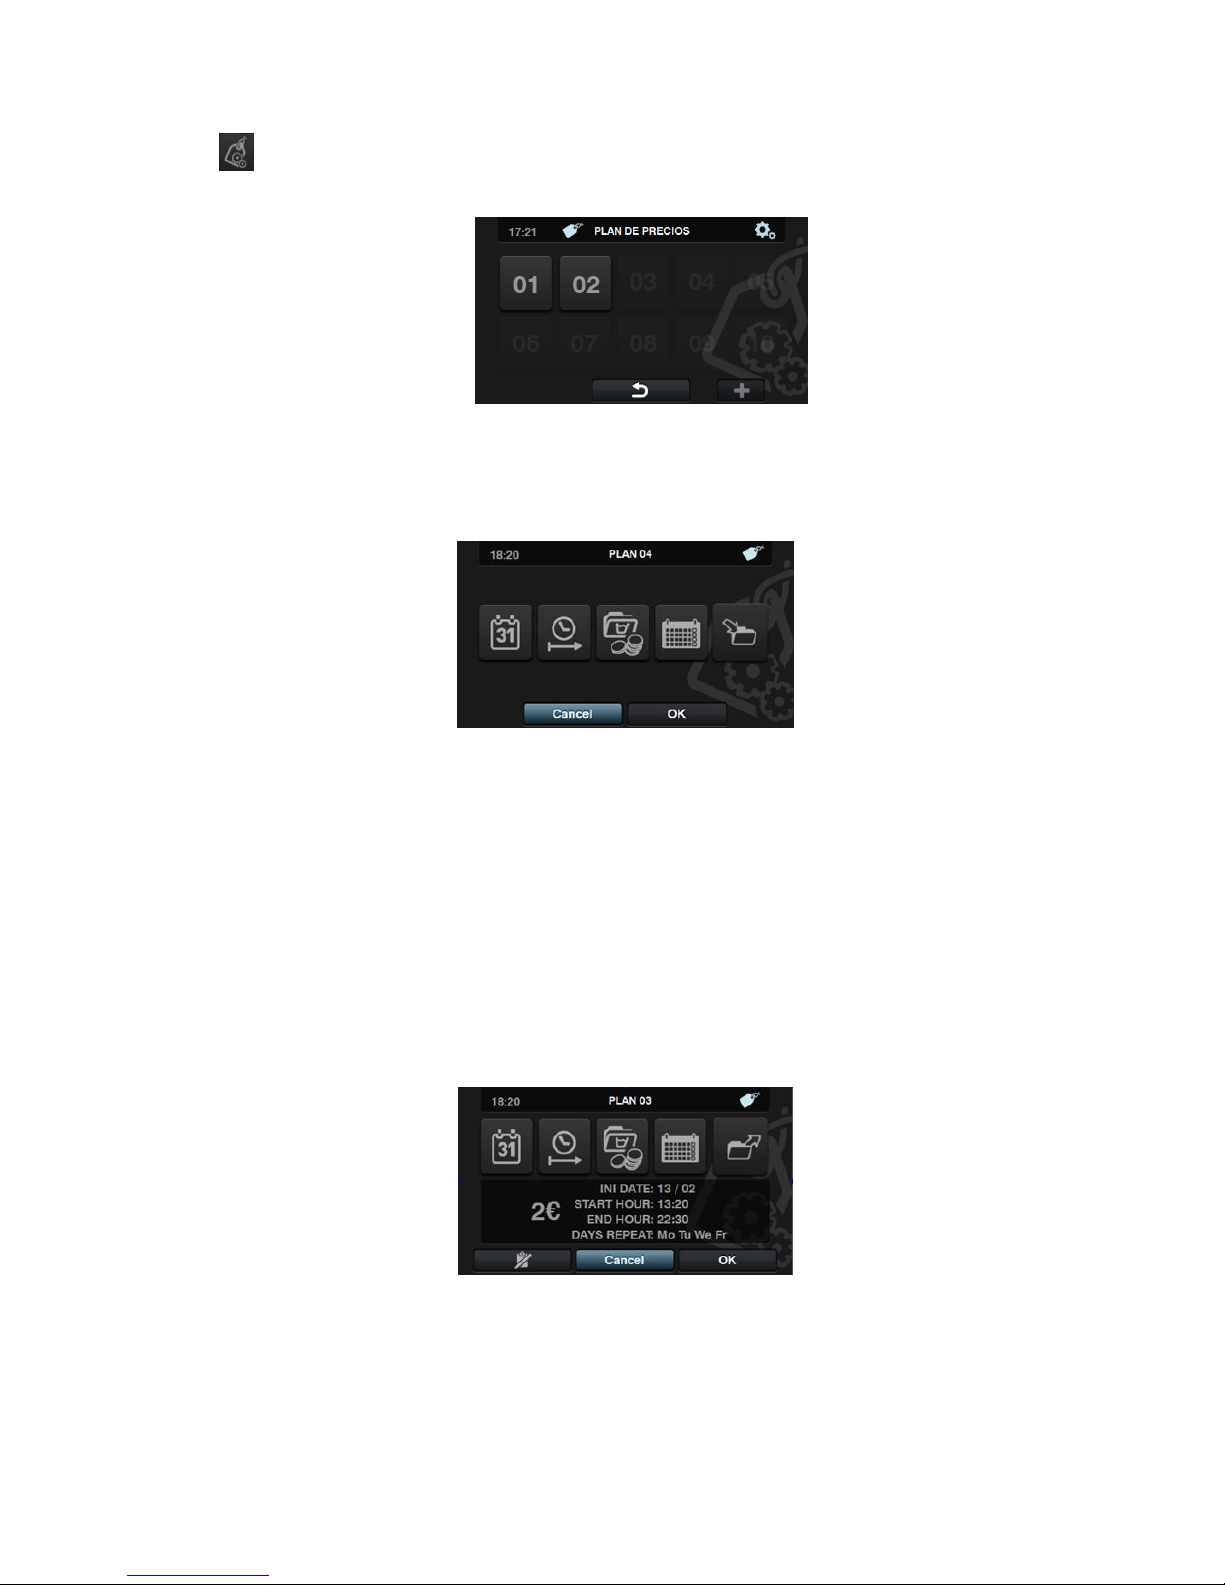
Price programming: In addition to the basic price configuration, it is possible to define a price
programming. That is, periods of specific time for which you wish to change the defined programme
price. Maximum, 10 simultaneous programmings.
The programmed prices are valid for the configured time slot. The prices return to the general prices
outside the configured time slot.
If there is a conflict between different programmings, the condition of the first plan will be applied. In
addition, plans can only be created from the current date.
On pressing “+” to create a new plan, these are the fields that must be completed when preparing a
programming:
Date: Time period in which programming is to be made.
Start/end time: Start and end time of the programming.
Programme(s) & Prices: Price or discount to be allocated to each of the existing
programmes in “My Programmes”.
A set price can be allocated or a discount applied to the selected programmes.
Calendar: Within the selected time period, days on which the programming is to be
applied.
Import: In addition to entering the fields one by one, it is also possible to import an
existing plan from a USB memory stick.
If IMPORT is selected, the same screen as in programmes is displayed in order to
browse through the USB, but only plan files (with extension .plan) can be selected. It is
only possible to import one plan when importing.
On pressing OK and importing the plan, the display returns to the main window of price
plans.
On pressing the number of an active plan, a summary of the configured parameters is
displayed.
The parameters described above can be changed one by one by pressing the corresponding button.
In addition, there is an “Export” button for exporting this plan (in a file with a .plan extension) to the
root directory of the USB memory stick.
Page 41
EN
Página 39 de 43
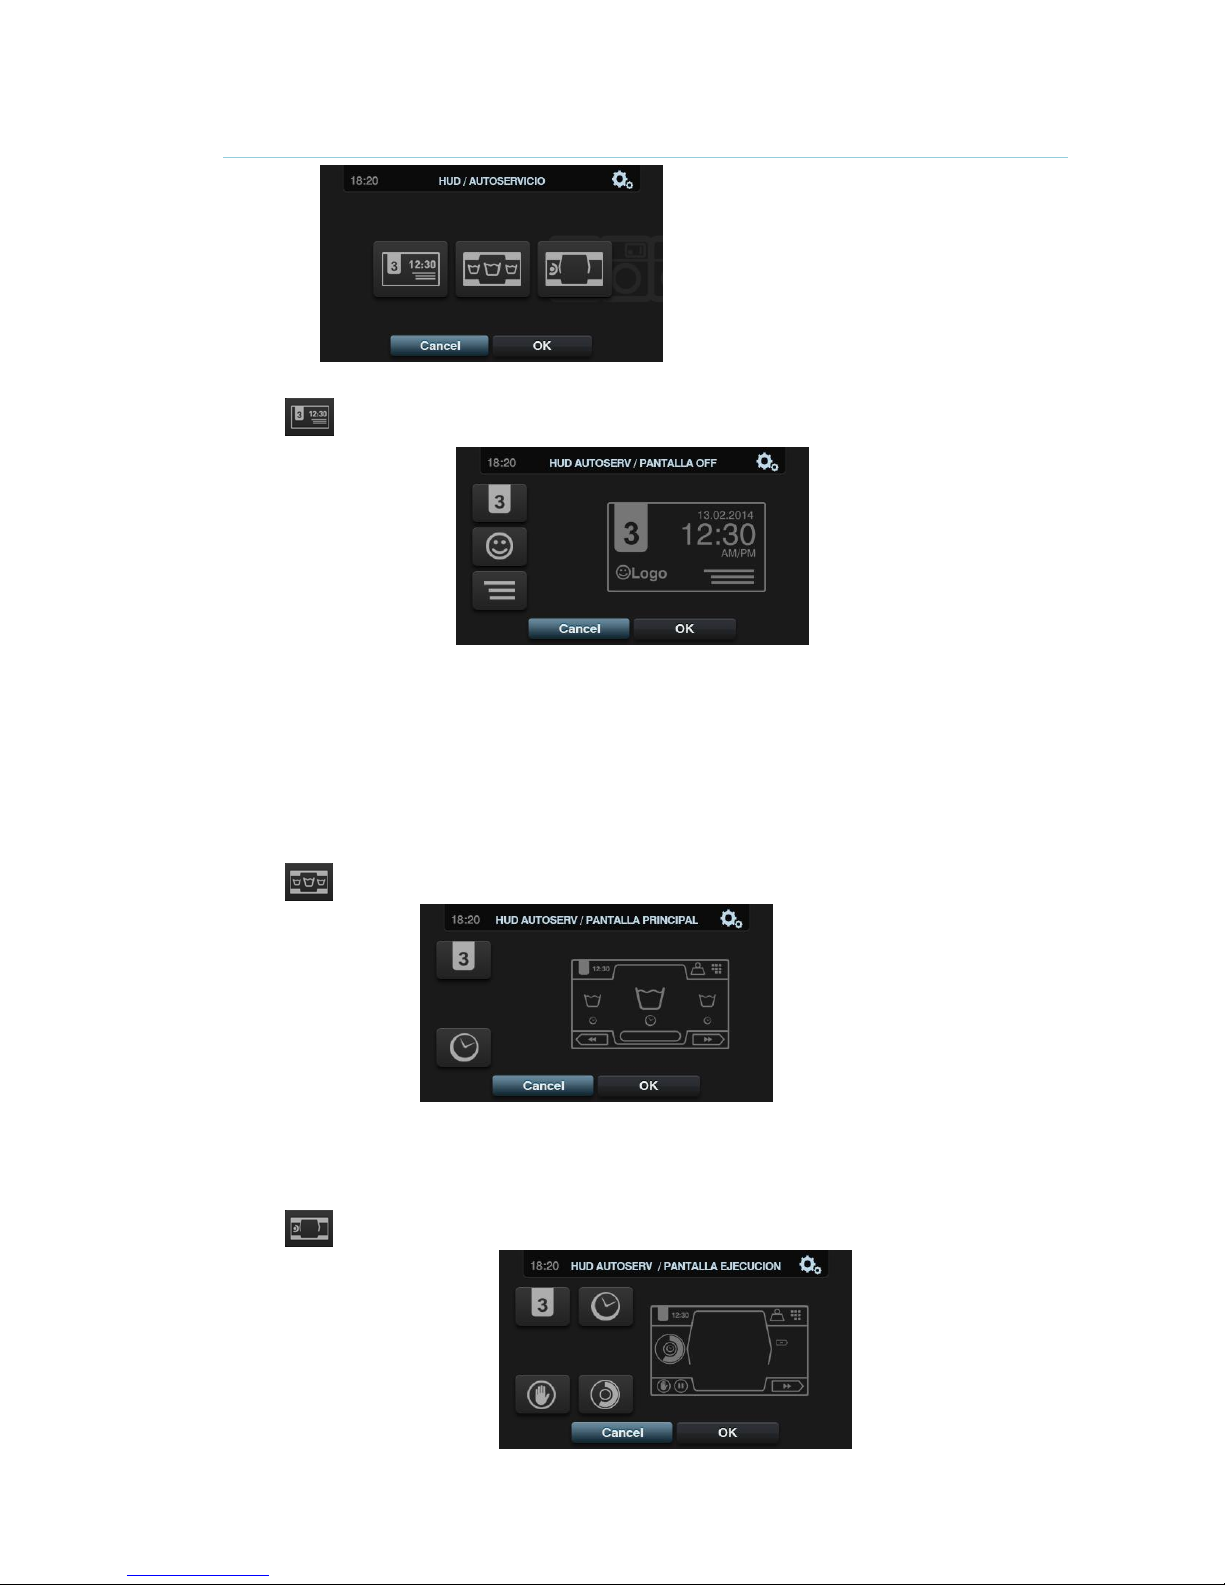
4.2.2 HUD programming
Standby Screen: These are the parameters that can be configured:
o Machine identifier: The machine identifier can be enabled/disabled, and the number
to be allocated to the identifier can be edited (between 1 and 99). By default it is
disabled.
o Logo: This allows the user to select whether or not to display the logo. By default it is
enabled.
o Laundrette message: Start message that can be edited by the user (Max. 40
characters). By default it is disabled.
o Date: Option that can be enabled/disabled. By default it is enabled.
Main Screen: This allows the following parameters to be configured:
o Machine identifier: The machine identifier can be enabled/disabled. By default it is
disabled.
o Time: Display/hide current time. By default it is enabled.
Run Screen: The configurable options are listed below:
Page 42
EN
Página 40 de 43
o Time: Option permitting time to be displayed/hidden. By default it is enabled.
o Remaining time: Option to display/hide the total time remaining and the programme
progress indicator. By default it is enabled.
o Machine identifier: The machine identifier can be enabled/disabled. By default it is
disabled.
o STOP: This allows the stop button to be displayed. By default it is disabled.
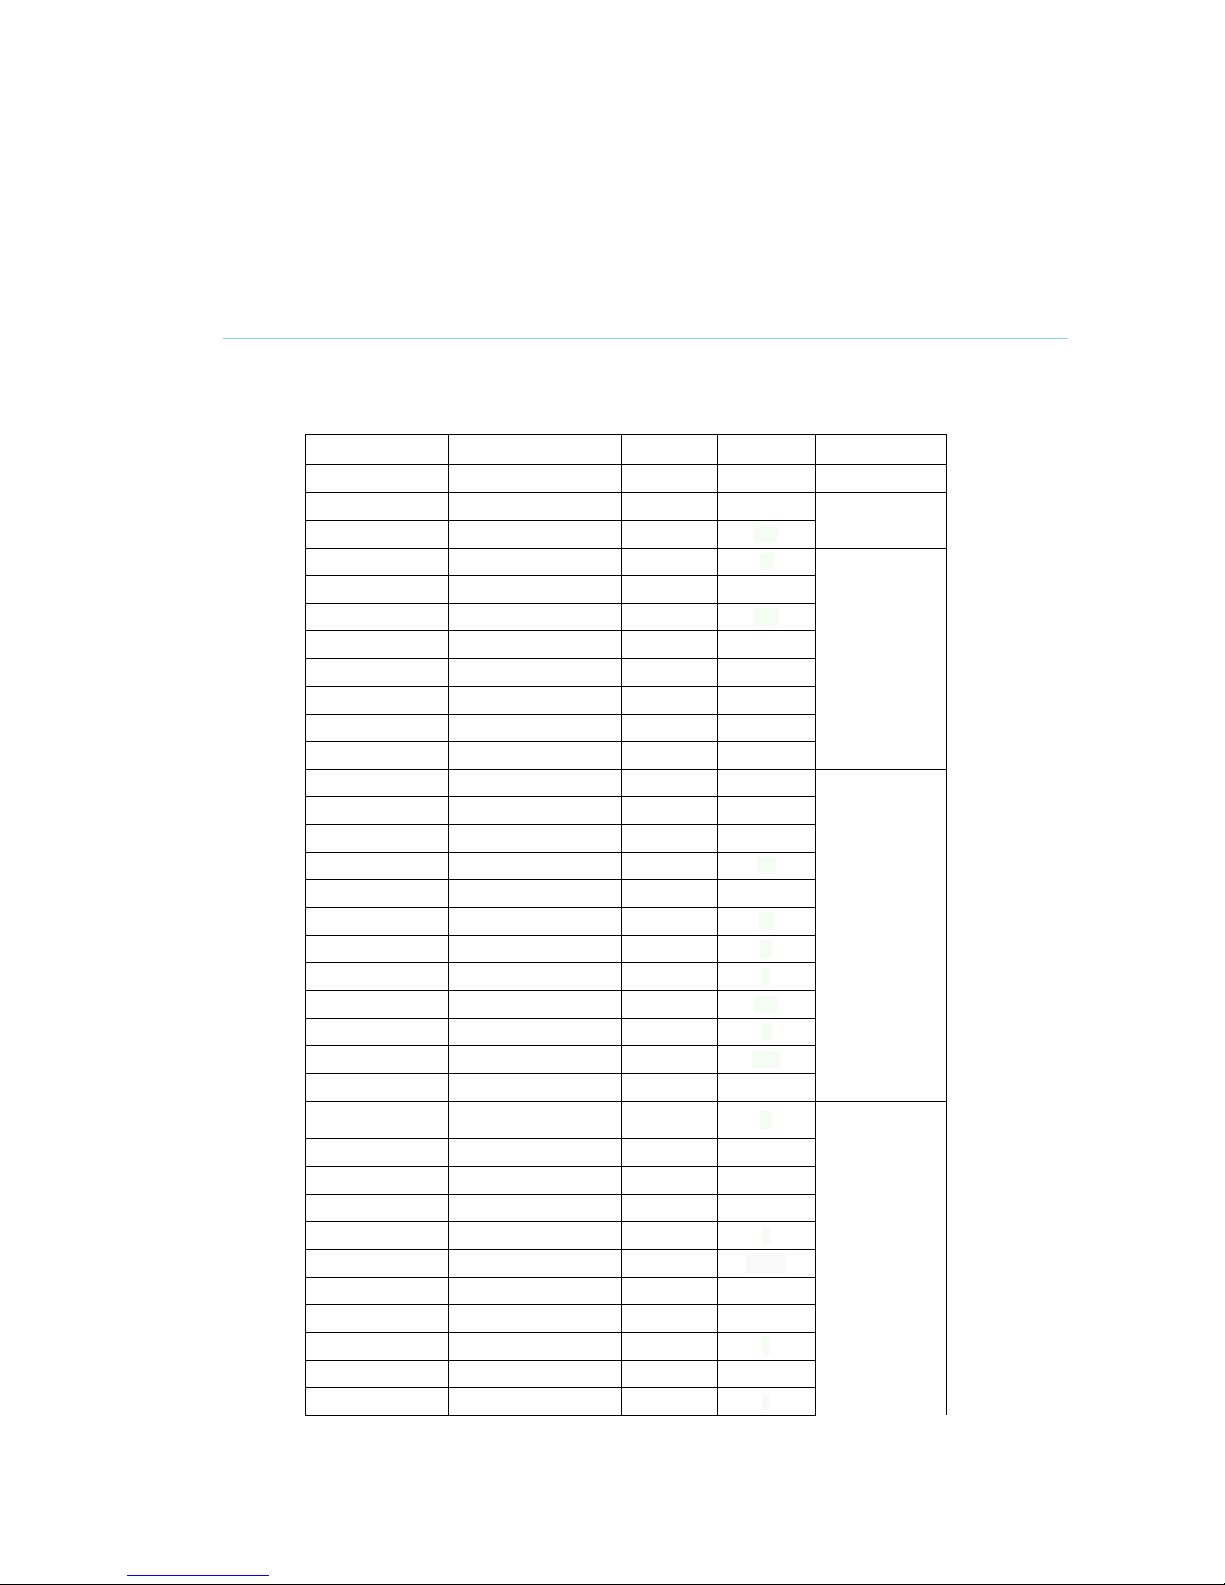
4.2.3 Table of currencies
This is the table of all the currencies available with the corresponding symbol and pulse
(multiple):
COUNTRY
CURRENCY
SYMBOLS
SYMBOL
Value /PULSE
Token
Token
TOK $ 1
Kuwait
Kuwaiti Dinar
KWD
.
0.05
Oman
Omani Rial
OMR
..
Azerbaijan
Manat
AZN
m
0.1
Bulgaria
Lev
BGN
Bahrain
Bahraini Dinar
BHD
..
China
Chinese Yuan
CNY
¥
Fiji
Fiji Dollar
FJD
FJ$
Malaysia
Malaysian Ringgit
MYR
RM
Panama
Panamanian Balboa
PAB
B
Singapore
Singapore Dollar
SGD
S$
Argentina
Argentine Peso
ARS
$
0.25
Bermuda
Bermudian Dollar
BMD
BD$
Brazil
Real
BRL
R$
Canada
Canadian Dollar
CAD
C$
Egypt
Egyptian Pound
EGP
.
Ethiopia
Ethiopian Birr
ETB
Br
Guatemala
Quetzal
GTQ
Q
Cayman Islands
Cayman Islands Dollar
KYD
$
Saudi Arabia
Saudi Riyal
SAR
.
El Salvador
Salvadoran Colon
SVC
Turkey
Turkish Lira
TRY
YTL
United States
US Dollar
USD
$
United Arab
Emirates
UAE Dirham
AED
.
0.5
Bolivia
Boliviano
BOB
Bs
Estonia
Estonian Kroon
EEK
EEK
Euro-Countries
Euro
EUR
United Kingdom
Pound sterling
GBP
£
Georgia
Lari
GEL
ლარი
Ghana
Ghanaian Cedi
GHS
GHS
Croatia
Croatian Kuna
HRK
kn
New Zealand
New Zealand Dollar
NZD
$
Qatar
Qatari Riyal
QAR
.
Ukraine
Ukrainian Hryvnia
UAH
Page 43
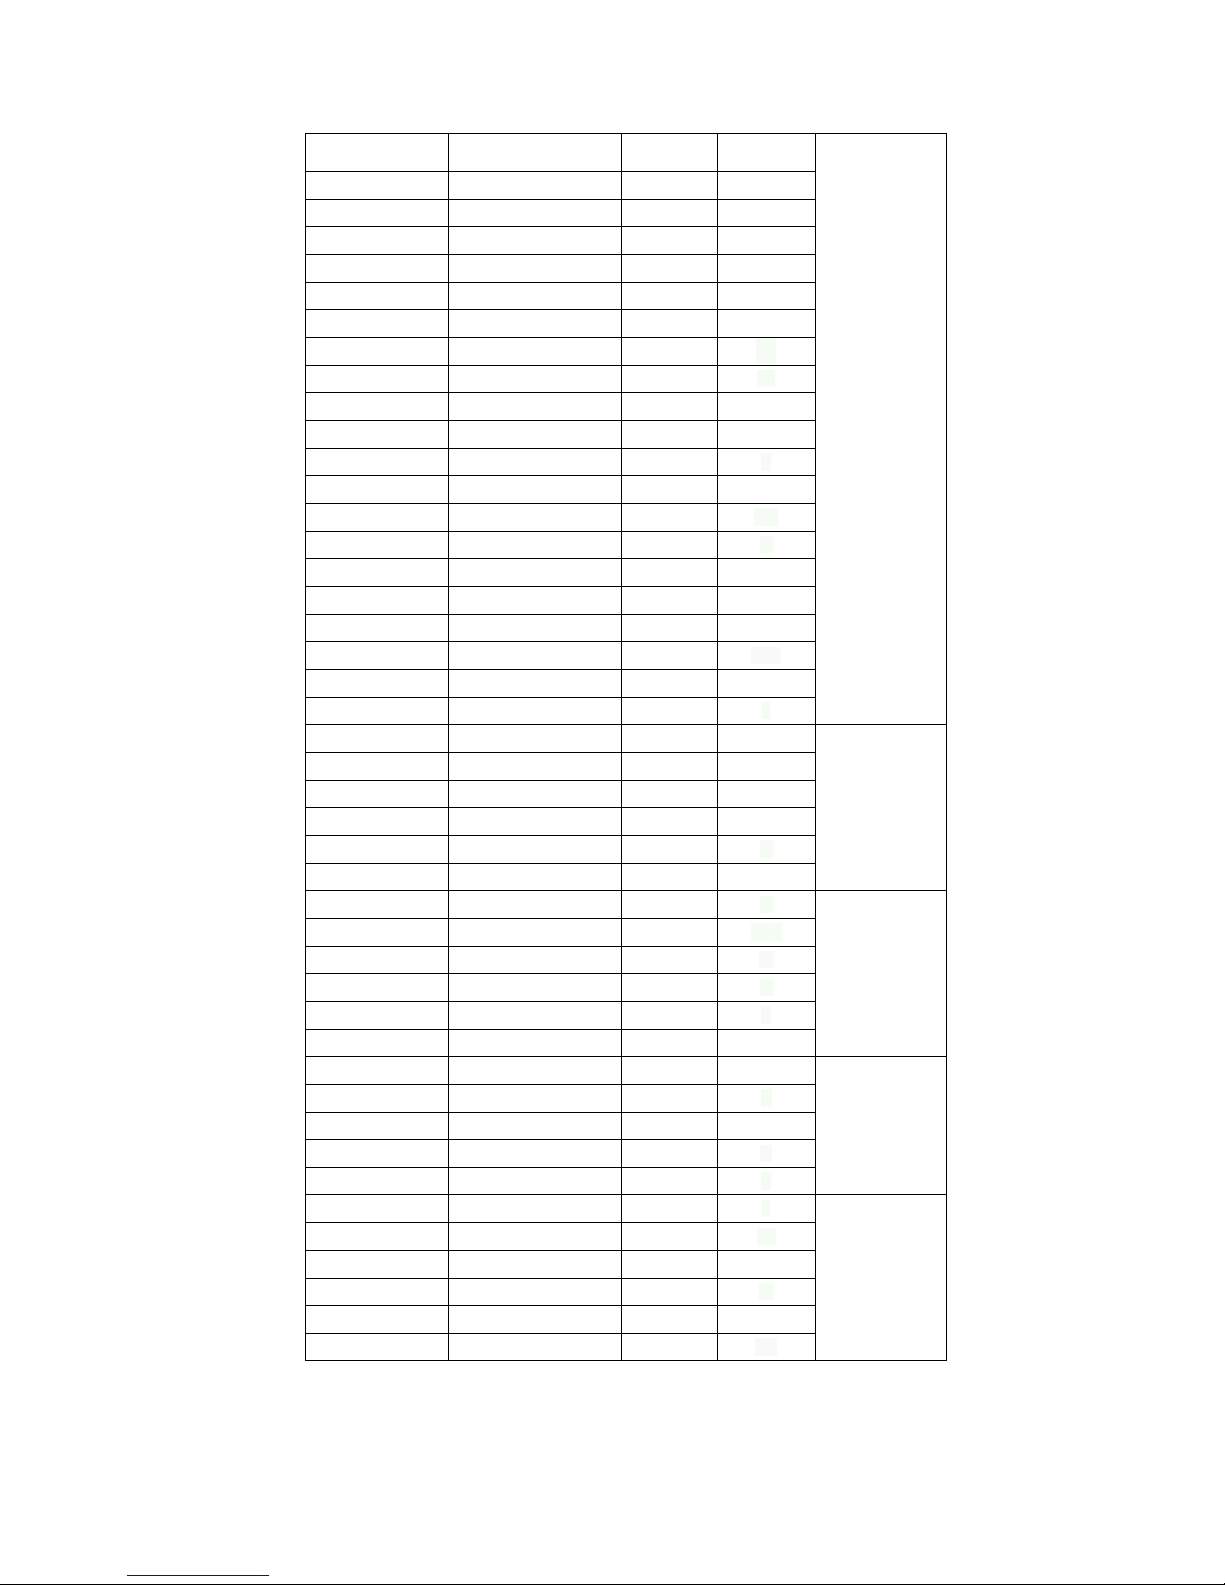
EN
Página 41 de 43
Bosnia and
Herzegovina
Convertible Mark
BAM
KM
1
Bangladesh
Bangladeshi Taka
BDT
Tk
Switzerland
Swiss Franc
CHF
CHF
Dominican Republic
Dominican Peso
DOP
RD$
Hong Kong
Hong Kong Dollar
HKD
HK$
Israel
Israeli Shekel
ILS
₪
India
Indian Rupee
INR
Rs.
Sri Lanka
Sri Lankan Rupee
LKR
Morocco
Moroccan Dirham
MAD
..
Macedonia
Macedonian Denar
MKD
MKD
Peru
Peruvian Nuevo Sol
PEN
S/.
Philippines
Philippine Peso
PHP
Poland
Polish Zloty
PLN
Russian Federation
Russian Ruble
RUB
Sweden
Swedish Krona
SEK
kr
Thailand
Thai Baht
THB
฿
Tunisia
Tunisian Dinar
TND
.
Uruguay
Uruguayan Peso
UYU
$
Serbia
Serbian Dinar
RSD
South Africa
South African Rand
ZAR
R
Australia
Australian Dollar
AUD
$
Czech Republic
Czech Koruna
CZK
5
Denmark
Danish Krone
DKK
kr
Kenya
Kenyan Shilling
KES
KSh
Mexico
Mexican Peso
MXN
$
Norway
Norwegian Krone
NOK
kr
Romania
Romanian Leu
RON
L
Algeria
Algerian Dinar
DZD
10
Guyana
Guyanese Dollar
GYD
GY$
Hungary
Hungarian Forint
HUF
Ft
Iceland
Icelandic Krona
ISK
kr
Kazakhstan
Kazakhstan Tengue
KZT
T
Taiwan
Taiwanese Dollar
TWD
NT$
Chile
Chilean Peso
CLP
$
50
Costa Rica
Costa Rican Colon
CRC
Iran
Iranian Rial
IRR
Paraguay
Paraguayan Guarani
PYG
French Polynesia
French Pacific Franc
XPF
F
Colombia
Colombian Peso
COP
$
100
Indonesia
Indonesian Rupee
IDR
Rp
Japan
Japanese Yen
JPY
¥
South Korea
Korean Won
KRW
Uganda
Ugandan Shilling
UGX
USh
Venezuela
Venezuelan Bolivar
VEF
Bs.
Page 44
EN
Página 42 de 43
5 MAINTENANCE
5.1 Errors
The errors with different actions for Self-service are listed below. The others are the same.
ERROR
DESCRIPTION
CAUSE AND ACTION
E6
HEATING FAULT
The machine detects that, in spite of activating the heating output, the water
temperature has not increased by 1ºC within 30 minutes.
It is possible to cancel this error. In this case, instead of triggering an error, the
machine will continue running as if the temperature had been reached.
A warning is displayed but the machine does not stop. It continues with the
programme but the warning remains until the programme ends and the door is
opened.
E9
UNBALANCED LOAD
In the final spin distribution, the input “Unbalanced load switch” is activated 5
times.
An error is not triggered and the machine spins at low speed. The programme
ends normally without warnings.
Page 45
EN
Página 43 de 43
6 NAVIGATION CAM
STANDBY SCREEN
LIBRARY
Laundrette message
Create/Copy/Modify/Delete prog./cycles
Logo
PROGRAMME MANAGEMENT
Import programmes
Machine identifier
LIBRARY
Export programmes
MY PROGRAMMES
MY PROGRAMMES
DIRECT SELECTION SCREEN
Select Active programmes
Create/Modify programmes
MAIN SCREEN
MAIN MENU
CONFIGURE SYSTEM
HUD/SOUND
HUD
Machine identifier
Delayed programming (Select Time)
Language
HUD Screen OFF / Standby
Time PROGRAMME MANAGEMENT
HUD/SOUND
Beep (On/Off)
Main screen
Programme name
CONFIGURE SYSTEM
RABC (Download period)
Run screen
Programme temperature
MAINTENANCE
GENERAL
GENERAL
Programme number (My programmes)
MODE (Only self-service)
Date/Time
Programme length
Currency (Only self-service and COIN)
Temperature scale (ºC/ºF)
LEVELS
Increase/decrease programme number
Prices (Only self-service and COIN)
LEVELS
Minimum level
Price (COIN/CP/CR)
Price programming (Only self-service and COIN)
SPEED Low level
Start/Amount remaining
Weighing coefficient (If weight is active)
Medium level
Central message
Thermal stop (Yes/No)
High level
Software version
Maximum level
Update software (via USB)
RUN SCREEN
SPEED
Machine identifier
Minimum
Time
RUN MENU
Low
Programme name
View inputs
Normal
Programme number
See outputs
Height
Programme length
View settings (Level, Temp, T Remain)
Remaining time
Manual dosing
Progress indicator
Status (drawing+text)
Currently running cycle
Stop
Display warnings/errors
 Loading...