

Page 1

OPERATING INSTRUCTIONS
MODEL DS60A DOUBLE SHEET CONTROLLER
CALIBRATE
PUSHBUTTON
MULTI-FUNCTION
INDICATOR (RED,
GREEN, AMBER)
POWER
INDICATOR
(GREEN)
SENSOR
RECEPTACLE
The Prime Controls Model DS60A Double Sheet Controller comprises a microcontrollerbased control module in an 18 mm threaded aluminum housing that can be connected
to a family of permanent magnet sensors through a 12 mm receptacle at the face end.
A four-pin connector at the rear end provides connections for power, ground, sourcing
output, and sinking output. Status and setup controls on the face include a green power
indicator, a multi-color multi-function indicator and a pushbutton switch.
The DS60A requires a dc power source in the voltage range of 12 to 24 volts at 100
mA.
The pin-out is as follows:
Pin 1 - Power Brown wire on standard cable
Pin 2 - Sourcing Output White wire on standard cable
Pin 3 - Common Blue wire on standard cable
Pin 4 - Sinking Output Black wire on standard cable
When power is applied, the green power indicator is solidly ON.
During normal sensing operation, the multi-color indicator tracks the state of the sinking
and sourcing outputs. When the outputs are off, the indicator is green. When the
outputs are on, i.e. the sinking output is low (sinking current) and the sourcing output is
high (sourcing current), the indicator is red. In meter mode, the multi-function indicator
flashes at a rate proportional to the strength of the signal from the attached sensor. It
flashes green if the signal is in the nominal range and red when double thick material is
sensed. During calibration, the multi-function indicator flashes different colors at various
rates to indicate the status of the process as described later in this document.
The small calibrate pushbutton mounts flush with the face of the unit to insure no
inadvertent activations that can cause loss of calibration.
December 18,2007
Page 2
PROBES
The DS60A operates with several different Prime magnetic probes including Models
PM4, PM10, and PM15. All probes are potted and completely sealed. The probes do
not respond to small amounts of fine metal filings, oil or dirt.
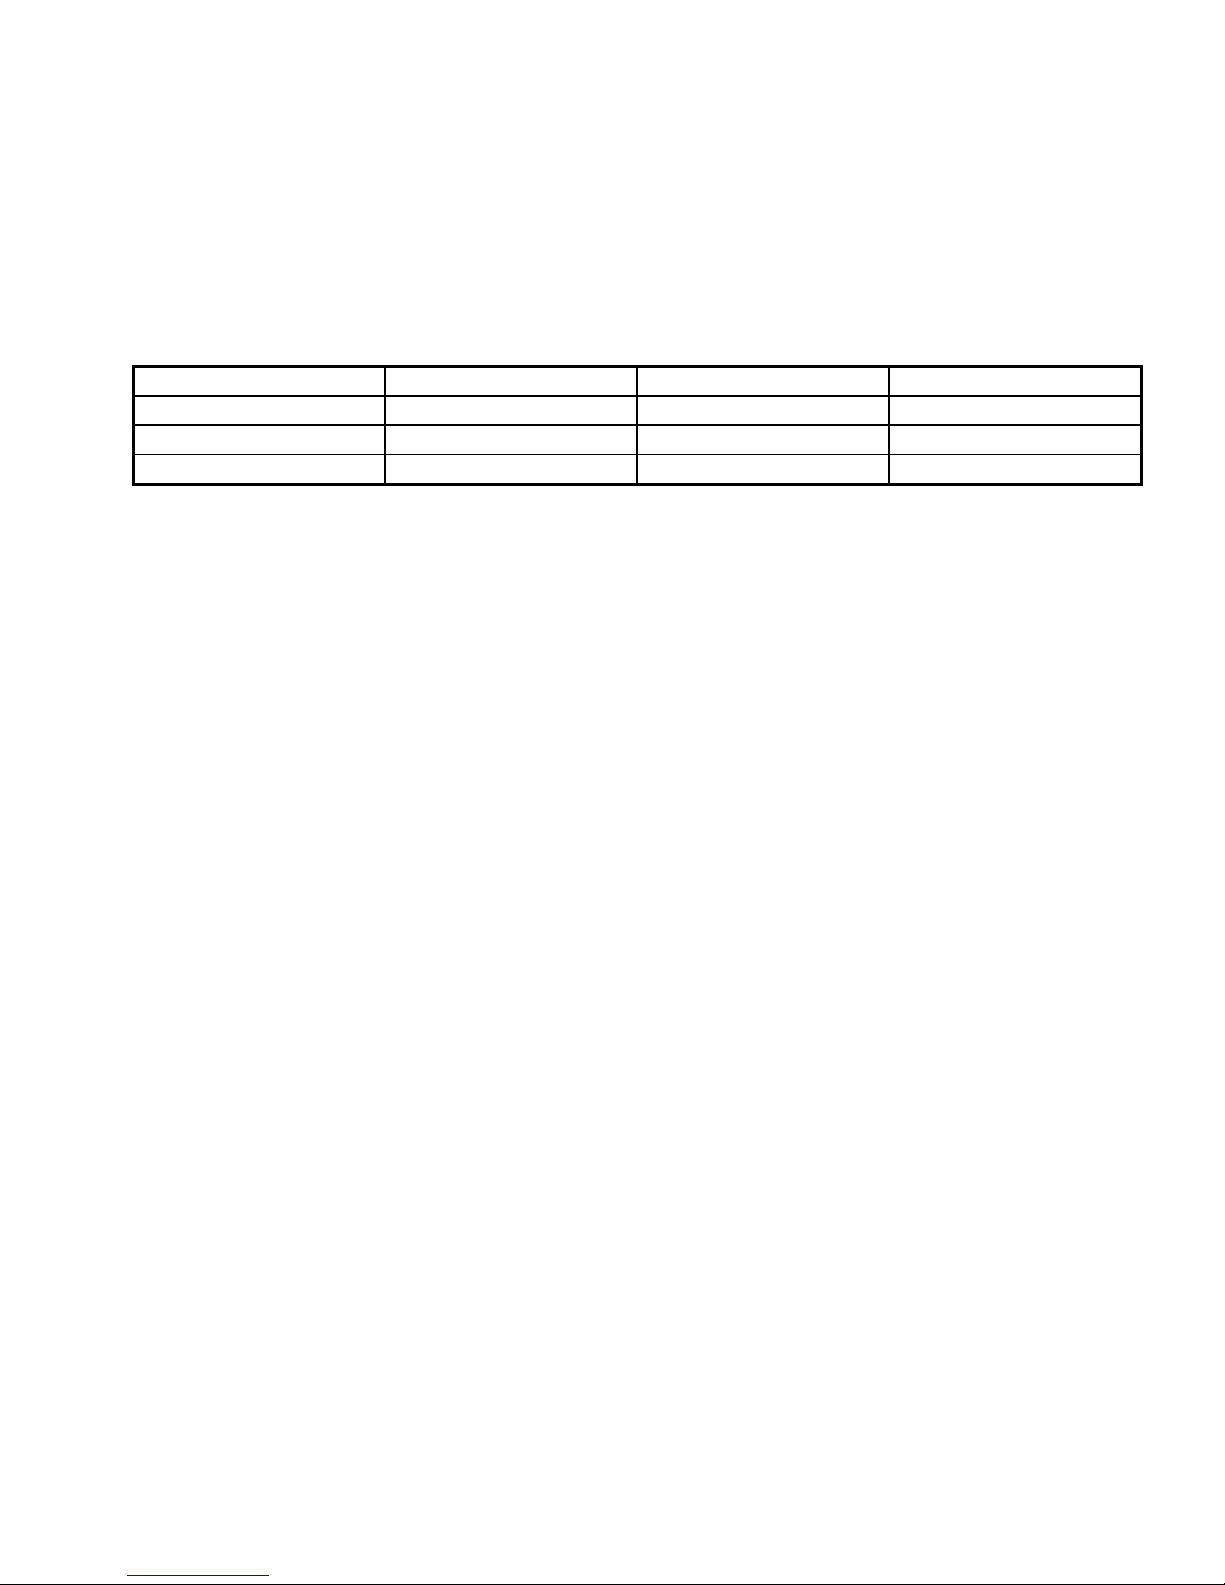
Probe Model Min thickness Max thickness Probe Diameter
PM4 .04 mm (.0015”) .40 mm (.015”) 18 mm (0.70”)
PM10 .10 mm (.004”) 1.0 mm (.040”) 30 mm (1.18”)
PM15 .15 mm (.006”) 1.5 mm (.060”) 36 mm (1.42”)
INSTALLATION
Installation of the individual components of the DS 60A system is covered in the
following paragraphs:
DS60A Control Module
The control module is designed to mount with a simple bracket where convenient
between the probe and a higher level controller such as a PLC. Avoid mounting
locations with excessive heat and vibration.
Probes
The probe must be mounted so that the sheet is in contact with the probe face as it
passes. The face of the probe is made of magnetic material and will last for many years
of operation.
The Model DS60A Double Sheet Detector can operate with no contact between the
sheet material and the probe if the gap is kept very small and is held constant. A
constant gap is very important since a small change in gap causes significant change in
the sensor signal. If the system is to be operated with a gap between the probe and the
sheet material, the unit must be calibrated after the gap is established. If the gap is too
large, the unit will not calibrate.
Electrical Wiring
The connection between the probe and the DS60A Controller requires a Prime Controls
adapter cable model CBL110-X where X indicates length.
Power to the controller and the outputs from the controller connect through an industry
standard male, four-pin “Micro” style connector. For this connection use Prime Controls
cable CBL104-3.
2
Page 3

METER MODE
The DS60A Controller provides a feature for monitoring the sensitivity to the target
materials. To invoke “meter” mode, press and hold the pushbutton switch for three or
more seconds. When the switch is released, the multi-function indicator begins flashing
at a rate proportional to the strength of the sensor signal. For minimum or no signal, the
flash rate is approximately 1 Hz. For maximum signal, the flash rate is approximately
25 Hz. The color of the indicator is green if the signal is below the current calibration
threshold and red if above the threshold.
Press and release the pushbutton to exit meter mode. The indicator reverts to following
the outputs.
The gauging function of the controller remains active during meter mode. As the sensor
signal moves above and below the calibration threshold, the outputs switch accordingly
as indicated by the color of the indicator.
MULTI-FUNCTION INDICATOR INTERPRETATION
The multi-function indicator provides information about the state of the controller.
During normal gauging, the state of the indicator follows the outputs directly. When the
outputs are ON (sourcing output high, sinking output low), the indicator is red, and when
the outputs are OFF, the indicator is green.
In meter mode, the indicator flashes at a rate proportional to the strength of the signal
from the attached sensor. For minimum or no signal, the flash rate is approximately 1
Hz. For maximum signal, the flash rate is approximately 25 Hz. The color of the
indicator is green if the signal is below the current calibration threshold and red if above
the threshold.
During one-sample calibration, the indicator turns off momentarily, and then if calibration
is successful, the indicator flashes amber 4 times in succession at a 5 Hz rate then
reverts to following the state of the outputs. If calibration is not successful (the sensor
signal is too weak), the indicator flashes red at a 10 Hz rate for 15 seconds or until the
pushbutton is pressed again. If 15 seconds elapse with no repress, the indicator reverts
to tracking the outputs.
When two-sample calibration is invoked, the indicator begins flashing amber indefinitely
at a 2.5 Hz rate until the pushbutton is pressed for recording of the second calibration
point. After the pushbutton is pressed for recording the second point, the indicator
flashes amber 4 times in succession at a 5 Hz rate then reverts to following the state of
the outputs.
3
Page 4

PUSHBUTTON OPERATION
The calibration pushbutton allows control of the operational mode of the DS60A
controller as follows:
1. From gauge mode, tap and release within 0.7 seconds to calibrate on current
conditions. If bad calibration (e.g. no metal against the probe face), unit enters
error reporting mode.
2. From error mode, tap the pushbutton once to retry calibration.
3. From gauge mode, tap the pushbutton twice within 0.7 seconds to enter twosample calibration mode and record the first point. LED flashes amber until a
third tap records the second calibration point. If good calibration, LED flashes
amber 4 times and returns to gauge mode. If bad calibration (e.g. no difference
in thickness between first and second samples), unit enters error reporting mode.
4. From error mode, tap the pushbutton once to restart calibration.
5. From gauge mode, hold the pushbutton in for at least three seconds, the
controller enters meter mode.
6. From meter mode, tap the pushbutton once to exit meter mode.
CALIBRATION
The DS60A Controller offers two modes of calibration or “teach”, a one-sample mode
and a two-sample mode. Both are invoked through the pushbutton on the face of the
unit.
The one-sample mode simply sets the gauge threshold at 125% of the signal present at
the time the pushbutton switch is pressed.
The latest calibration information is always stored in non-volatile memory and is
restored at power-up.
One-sample Calibration
1. Mount the sensor and place the material to be sensed against the face of the
probe.
2. Tap the calibration pushbutton.
If the calibration is successful, the indicator flashes amber 4 times at a 5 Hz rate and
then reverts to following the output. If calibration is successful, the new calibration
value is stored in non-volatile memory. The outputs turn ON for double and OFF for
single.
4
Page 5

If the sensor signal is too weak or too strong, the calibration will fail. The controller
indicates the failure by flashing the indicator red at a 10 Hz rate for 15 seconds or until
the pushbutton is pressed again. If the pushbutton is not pressed within 15 seconds,
the controller aborts calibration and re-installs the previous calibration parameters.
Two-sample calibration
Two-sample calibration may be used for two purposes: for looser or tighter control of the
positioning of the gauge threshold and and/or to reverse the operational logic of the
outputs. Two-sample calibration places the gauge threshold at the midpoint between
the two recorded samples. Whereas the single-sample calibration always discriminates
on a 25% change in signal relative to the sample point, the separation of sample points
in the two-sample mode may vary according to the user’s needs.
Inverting the gauge logic works as follows:
Outputs ON with Thinner Material (Single)
1. Place the thicker material or double sample against the probe face.
2. Tap the pushbutton twice in succession within 0.7 seconds. The first sample is
taken and the indicator flashes amber indefinitely at a 2.5 Hz rate.
3. Place the thinner material or single sample against the probe face.
4. Tap the pushbutton once. The second sample is taken, the new threshold
installed, and the indicator flashes amber four times at a 5 Hz rate and then
reverts to following the outputs.
After this calibration, the outputs turn ON for a single and OFF for a double. Note that
for double detection this mode reports a double when power is lost to the sensor.
Outputs ON with Thicker Material (Double)
1. Place the thinner material or single sample against the probe face.
2. Tap the pushbutton twice in succession within 0.7 seconds. The first sample is
taken and the indicator flashes amber indefinitely at a 2.5 Hz rate.
3. Place the thicker material or double sample against the probe face.
4. Tap the pushbutton once. The second sample is taken, the new threshold
installed, and the indicator flashes amber four times at a 5 Hz rate and then
reverts to following the outputs.
The outputs turn ON for a double and OFF for a single.
5
Page 6

DS60A DRIVE CIRCUITRY
V+
1
3
COM
30V
50 mA
50 mA
CONTROLLER
CONTROLLER DIMENSIONS
30V
30V
CONTROLLER RECEPTACLE
(Micro Style)
SOURCE
2
SINK
4
23.80
(0.938)
SET
PWR OUT
SENSOR RECEPTACLE
(Pico Style)
18 mm x 1 mm THREAD
15.85
(0.625)
DS60 CONTROLLER HOUSING
51.0
(2.00)
8.90
(.350)
12mm x 1mm THREAD
6
Page 7

SPECIFICATIONS
Power
Type: DC
V+ Connection: 12 mm Connector, Pin 1
Common 12 mm Connector, Pin 3
Voltage: 12 to 24 volts
Max Current: 25 milliamps + sourcing output load
Protection: Reverse polarity protected.
Logic Output Electrical Specifications
Sinking Output
Open Drain
Connection: 12 mm Connector, Pin 4
Max. applied voltage: 30 Volts, TVS limited
Max. current, momentary: 40 Amps
Max. current, sustained: 50 mA, fuse limited
Max. off state leakage @ 30 V: 25 uA
Over-current protection: Self resetting 50 mA fuse.
ESD protection: Transient Voltage Suppressor @ 30 Volts
Sourcing Output
Connection: 12 mm Connector, Pin 2
Max. source current: 50 mA, fuse limited
Output Voltage High: Supply Volt age less 1 volt
Over-current protection: Self resetting fuse
ESD protection: Transient Voltage Suppressor @ 30 Volts
7
Page 8

LIMITATION AND EXCLUSION OF WARRANTIES
All goods purchased form PRIME CONTROLS, INC. shall be free from defects in
materials, design and workmanship under normal conditions of use for one year from
the date of shipment. THIS WARRANTY IS THE SOLE WARRANTY AND IS
EXPRESSLY IN LIEU OF ALL OTHER WARRANTIES, EXPRESS OR IMPLIED,
INCLUDING BUT NOT LIMITED TO ANY IMPLIED, WARRANTY OF
MERCHANTABILITY OF FITNESS FOR A PARTICULAR PURPOSE. THE LIABILITY
OF PRIME CONTROLS TO ANY PURCHASER SHALL BE LIMITED EXCLUSIVELY
TO THE COST OF REPLACEMENT OR REPAIR OF DEFECTIVE PARTS, AND
SHALL NOT INCLUDE LIABILITY FOR ANY DIRECT, CONSEQUENTIAL OR
INCIDENTAL DAMAGES WHATSOEVER, WHETHER FORESEEN OR
UNFORESEEN, INCLUDING BUT NOT LIMITED TO LOST PROFITS, LOST SALES,
OR INJURY TO PERSONS OR PROPERTY
8
 Loading...