

PrimeCables Cab-CIS316-L Operator's Manual

T O O L S
MODEL: Cab-CIS316-L
20V
20V CORDLESS IMPACT DRIVER
Operator’s Manual
SAVE THIS MANUAL
You will need this manual for safety instructions, operating procedures and warranty.
Put it and the original sales receipt in a safe dry place for future reference.

2
!
IMPORTANT SAFETY INSTRUCTIONS
WORK AREA SAFETY
1. Keep your area well lit and clear of clutter that can invite accidents.
2. Operate your tools in a safe area free of the presence of flammable liquids, gases,
dust or potentially explosive atmospheres. Power tools can create sparks
can
combust.
3. Keep all distractions such as children away while operating the power tool.
Distractions can cause accidents or cause you to lose control.
PERSONAL SAFETY
1. Stay alert when operating this machinery to avoid the possibility of personal injury.
Do not use these tools if you are under the influence of drugs, alcohol, or medication.
Do not operate this machinery if you are tired.
2. Use adequate personal protection - always wear eye protection. Suggested protective
equipment include nonskid safety shoes, dust mask, hearing protection and/or a hard
hat.
3. Prevent unintentional starting - ensure that the power switch is off before plugging
into a power source or connecting the battery. Don’t carry the tool by the trigger.
Remove adjusting keys or switches before turning the tools on. A wrench or a key
that is left attached to a rotating part of the tools may result in personal injury.
Do not overreach. Keep proper footing and balance at all times. Proper footing and
balance enables better control of the tools in unexpected situation.
Dress properly. Loose clothing or long hair can become entangled in the moving
parts of this machine - keep your clothes, gloves, hair or jewelry away from any moving
machinery.
Be sure to properly connect and use any devices that extract and collect dust.
When used properly, dust collection can reduce situations related to dust and debris
hazards.
Do not run the cordless drill while carrying it at your side. A spinning socket or bit could
become entangled with clothing and injury may result.
Disconnect the plug or remove the battery from tool and place the switch in the locked
or “OFF” position before making any assembly adjustments, changing accessories,
performing any inspection, maintenance or cleaning procedures. Such preventive safety
measures reduce the risk of starting the tool accidentally.
Do not use the tool if it has been damaged, left outdoors in the rain, snow, wet or damp
environments, or immersed in liquid.
ELECTRICAL SAFETY
1. To reduce the risk of electrical shock power tool plugs must match the outlet. Double
insulated tools are equipped with a polarized plug (one blade is wider than the other). The
plug is designed to fit into a polarized outlet only one way. If the plug does not fit properly
into the out t, try reversing the plug - if it still does not, you need to find an outlet that is
polarized, or contact a qualified electrician to install a polarized outlet. Don't modify the plug
and don't use any plug adapters with earth grounded power tools. Double insulation
eliminates the need for the three wire grounded power cord and grounded power supply
system.
2. Avoid bodily contact with grounding services such as ranges, refrigerators, pipes, radiators;
there is a higher risk of electrical shock if your body is grounded.
3. Don't expose your power tools to wet conditions or rain. Water entering a power tool will
increase the risk of electrical shock.
WARNING: When using electric tools, machines or equipment, basic safety
precautions should always be followed to reduce the risk of fire, electric shock,
and personal injury.

3
IMPORTANT SAFETY INSTRUCTIONS
SAFETY PRECAUTIONS FOR IMPACT DRIVER
4. Do not abuse the cord. Never use the cord to carry the tools or pull the plug from
an outlet. Keep cord away from heat, oil, sharp edges or moving parts. Replace
damaged cords immediately. Damaged cords increase the risk of electric shock.
5. Be sure to use electrical supplies that are suitable for the conditions. If working
outdoors, use extension cords rated for outdoor use, - this reduces the risk of
electrical shock.
6. If you have to work in a damp location, be sure to use a ground fault circuit
interrupter (GFCI) protected supply. This will help reduce the risk of electrical
shock.
ELECTRICAL SAFETY (CONT.) - EXTENSION CORD USE
Make sure the cord is clear and secure - do not step on, trip or otherwise damage
or stress the cord.
Don’t use an extension cord unless you have to - use of an improper extension
cord can result in re, shock or electrocution.
Two-wire cords can be used with 2-wire or 3-wire extension cords. Only round
jacketed U.L. (Underwriters Laboratories) listed extension cords should be used.
If you are going to use an extension cord outside, make sure the cord is
manufactured for outdoor use.
NOTE: Most cords used for outdoor use can also be used indoors. The letters
“W” or “WA” on the cord jacket mean the cord is suitable for outdoor use.
An extension cord must be of the proper gauge (wire size) - AWG or American
Wire Gauge to be used safely, prevent power loss, and prevent overheating.
NOTE: the smaller the wire gauge number, the greater the capacity of that cable;
for instance, 16 gauge has more capacity than 18 gauge. If you must use more
than one extension cord, be sure each extension has at least the minimum
required gauge size.
CHARGING THE TOOL
Please use the correct voltage.
BEFORE ATTEMPTING TO CHARGE YOUR TOOL, THOROUGHLY READ ALL
THE SAFETY INSTRUCTIONS.
1. The tool is not fully charged. Before first use, the tool requires 5-7 hours charge
time to be fully charged. Subsequent recharging needs 3-5 hours for the tool to
be fully charged.

4
5. Store idle tools out of reach of children and other untrained persons. Tools are dangerous
in the hands of untrained users.
6. Maintain tools with care. Keep cutting tools sharp and clean. Properly maintained tools
with sharp cutting edges are less likely to bind and are easier to control.
7. Check for misalignment or binding of moving parts, breakage of parts and any other
condition that may affect the tools operation. If damaged, have the tools serviced before
using. Many accidents are caused by poorly maintained tools.
8. Use only accessories that are recommended by the manufacturer for your model.
Accessories that may be suitable for one tool, may become hazardous when used on
another tool.
9. Use this power tool and accessories in accordance with the instructions; always take into
account the work to be performed and the conditions in which the work will be performed.
Use of this tool for anything other than what it was designed could be harmful.
10. Hold tool by insulated gripping surfaces when performing an operation where the cutting
tool may contact hidden wiring or its own cord. Contact with a “live” wire will make exposed
metal parts of the tool “live” and shock the operator.
Longest life and best performance of the battery is obtained when charging between air
temperatures of 41°F and 95°F (5°C - 35°C). DO NOT charge the battery in air temperatures
below 41°F (5°C) or above 95°F (35°C). This is important and will prevent serious damage to
the battery.
Never over-discharge a battery by using the tool even after tool performance has decreased.
When tool performance begins to diminish, stop the tool and recharge the battery for optimal
performance.
Allow the tool to cool down after use; avoid placing the charger and tool in a warm
environment.
The charger and battery may become warm to touch while charging. This is normal and does
not indicate problem.
Batteries will reach full performance after about five charge/discharge cycles.
Caution: Place and charge the tool on a dry reproof location in a room where the temperature is
from +41°F (5°C)–95°F (35°C).
During charging, the tool and power supply become warm when you touch it. This is a
normal condition, and does not indicate a problem.
Always unplug the power supply when charging completed.
Be sure the tool is cool before using it.
POWER TOOL USE AND CARE
1. Use clamps or other practical way to secure and support the work piece to a stable platform.
Holding the work by hand or against your body is unstable and may lead to loss of control.
2. Do not force tool. Use the correct tools for your application. The correct tools will do the job
better and safer at the rate for which it is designed.
3. Do not use tools if switch does not turn it on or off . Any tool that cannot be controlled with
the switch is dangerous and must be repaired.
4. Disconnect the plug from the power source before making any adjustments, changing
accessories or storing the tool. Such preventive safety measures reduce the risk of starting
the tools accidentally.
SAFETY PRECAUTIONS FOR IMPACT DRIVER
!
5
SPECIFICATIONS
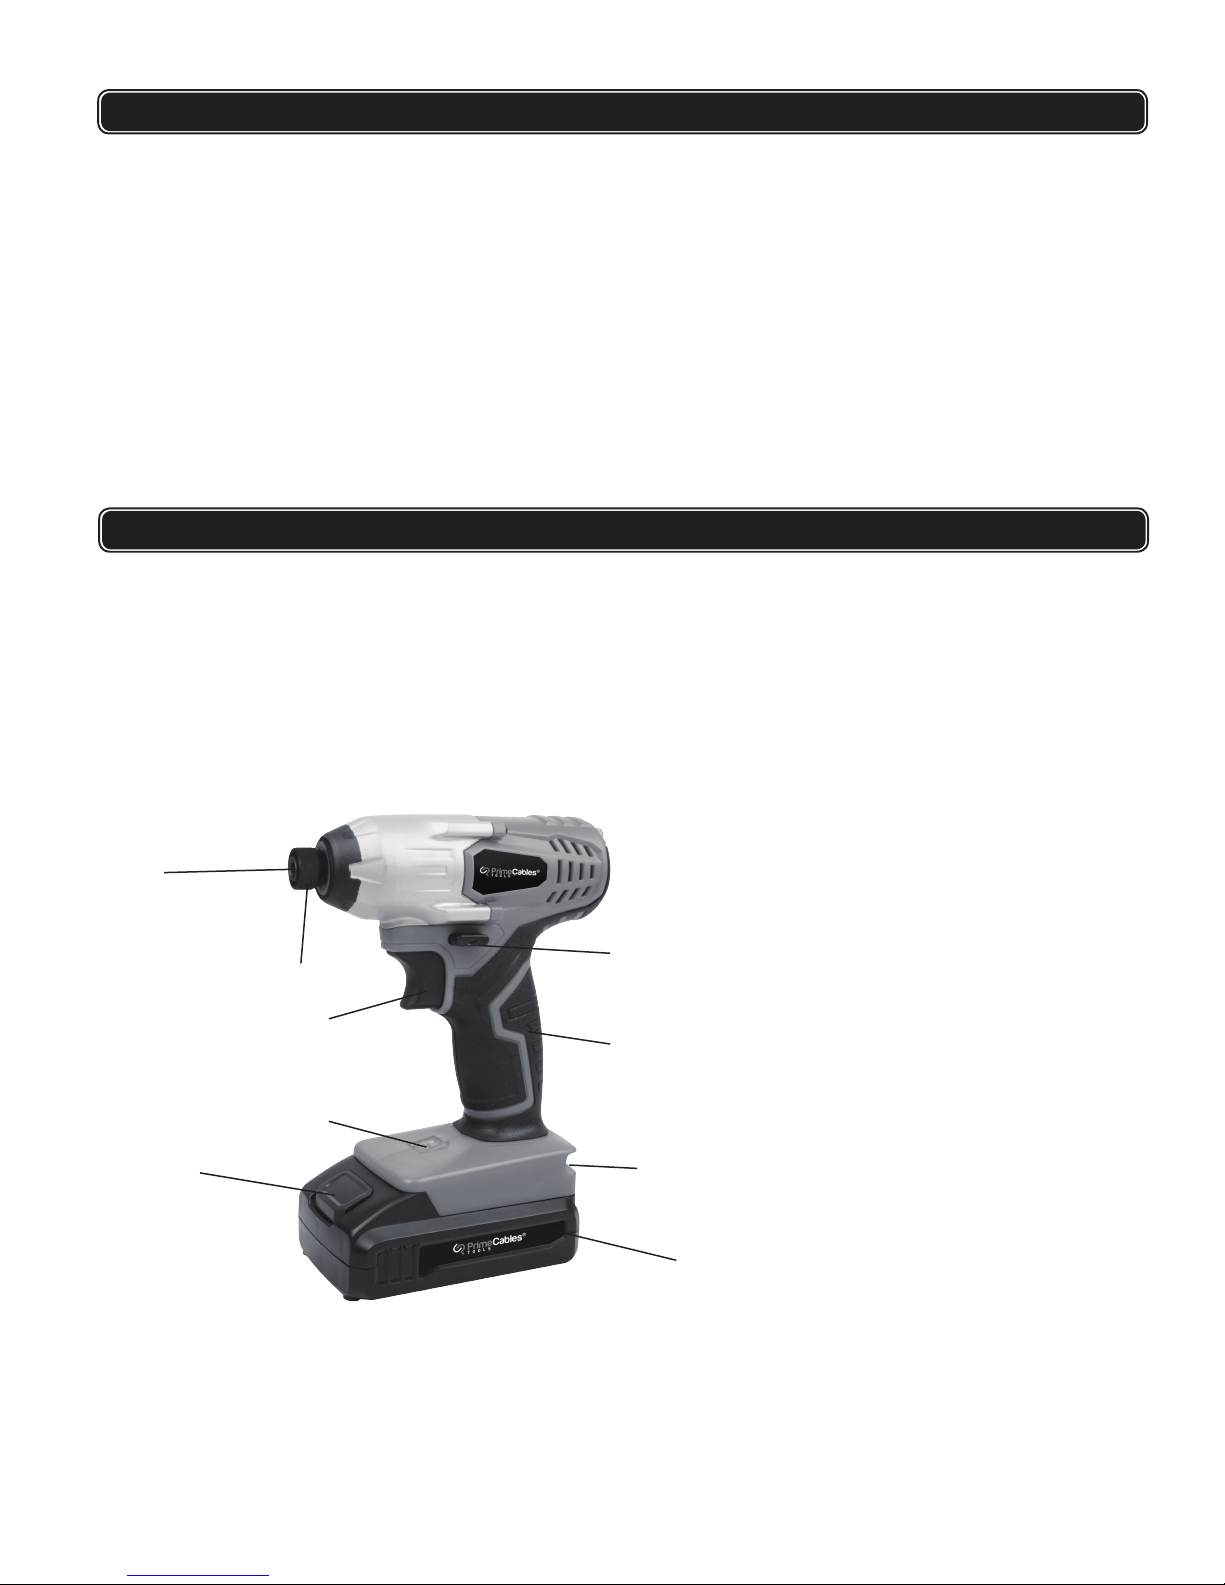
FUNCTIONAL DESCRIPTION
1.Chuck sleeve
2.1/4” Fast load chuck
3.Forward / reverse switch
4.Variable speed trigger switch
5.Rubber-covered handle
6.LED work light
7.Battery lock button
8.#2 Phillips bit storage
9.Battery
• 1/4” fast load chuck
• No load speed: 0-2,700 RPM
• Variable speed reversible trigger with
electric brake
• Comfortable rubber-covered handle
• Bright LED work light
• 3-5 hours charging time
1
2
4
3
5
6
7 8
9

6
OPERATION
!
BATTERY PACK
WARNING:
1.
2.
3.
The battery is not fully charged. efore first use, the battery pack requires 5-7
hours charging time to be fully charged. Subsequent recharging needs 3-5
hours for the battery to be fully charged.
Always switch to a fresh battery when tool performance begins to diminish.
Severe heat is most destructive to a battery; the more heat generated,
the faster the battery loses power. A battery that gets too hot can have a
shortened life.
Never over-discharge a battery by using the tool even after tool performance
has decreased. Do not attempt to discharge a tool’s battery by continuing to
pull on the tool trigger. When tool performance begins to diminish, stop the
tool and recharge the battery for optimal performance.
5.
6.
Always have drill rotation switch in neutral/lock position when removing or
inserting battery to avoid unintentional starting.
To remove battery pack from the tool, press the lock spring buttons and pull
out.
To insert, simply push pack in until lock spring clicks.
The battery charger consists of two parts:
A. a switching adapter
B. a charging stand
To recharge battery, connnect the switching adapter/plug low-voltage lead to
the charging stand.
1.
2.
3.
4.
The green light is the charge indicator. When the charger is connected to AC
household current, the green light is on.
The green light is the power indicator. When the battery is properly inserted into
the charger and charging, the red light is on.
Normal charging time is 3 to 5 hours. The charger will charge the battery at the
normal rate until charging is complete. The red light will turn off once charging is
complete. After the battery is fully charged according to the charging time provided
in the instructions, remove the battery pack from the charging stand immediately.
Battery temperature will cool to normal.
When charging more than one battery pack, allow 15 minutes between
charges.
After many charge/discharge cycles, your battery will lose its ability to hold
a charge. It should then be replaced. Dispose of batteries at an appropriate
waste disposal facility. Do not throw batteries away
in common trash receptacles.
Insert the switching adapter/plug into a correct household current receptacle.
The end of the battery pack has positive and negative terminal markings on
it. Align these with the identical markings on the top of the charging stand and
insert pack into base. (Pack will not insert properly if reversed)
7.
8.
9.
10.
11.
12.
13.
 Loading...