

Page 1
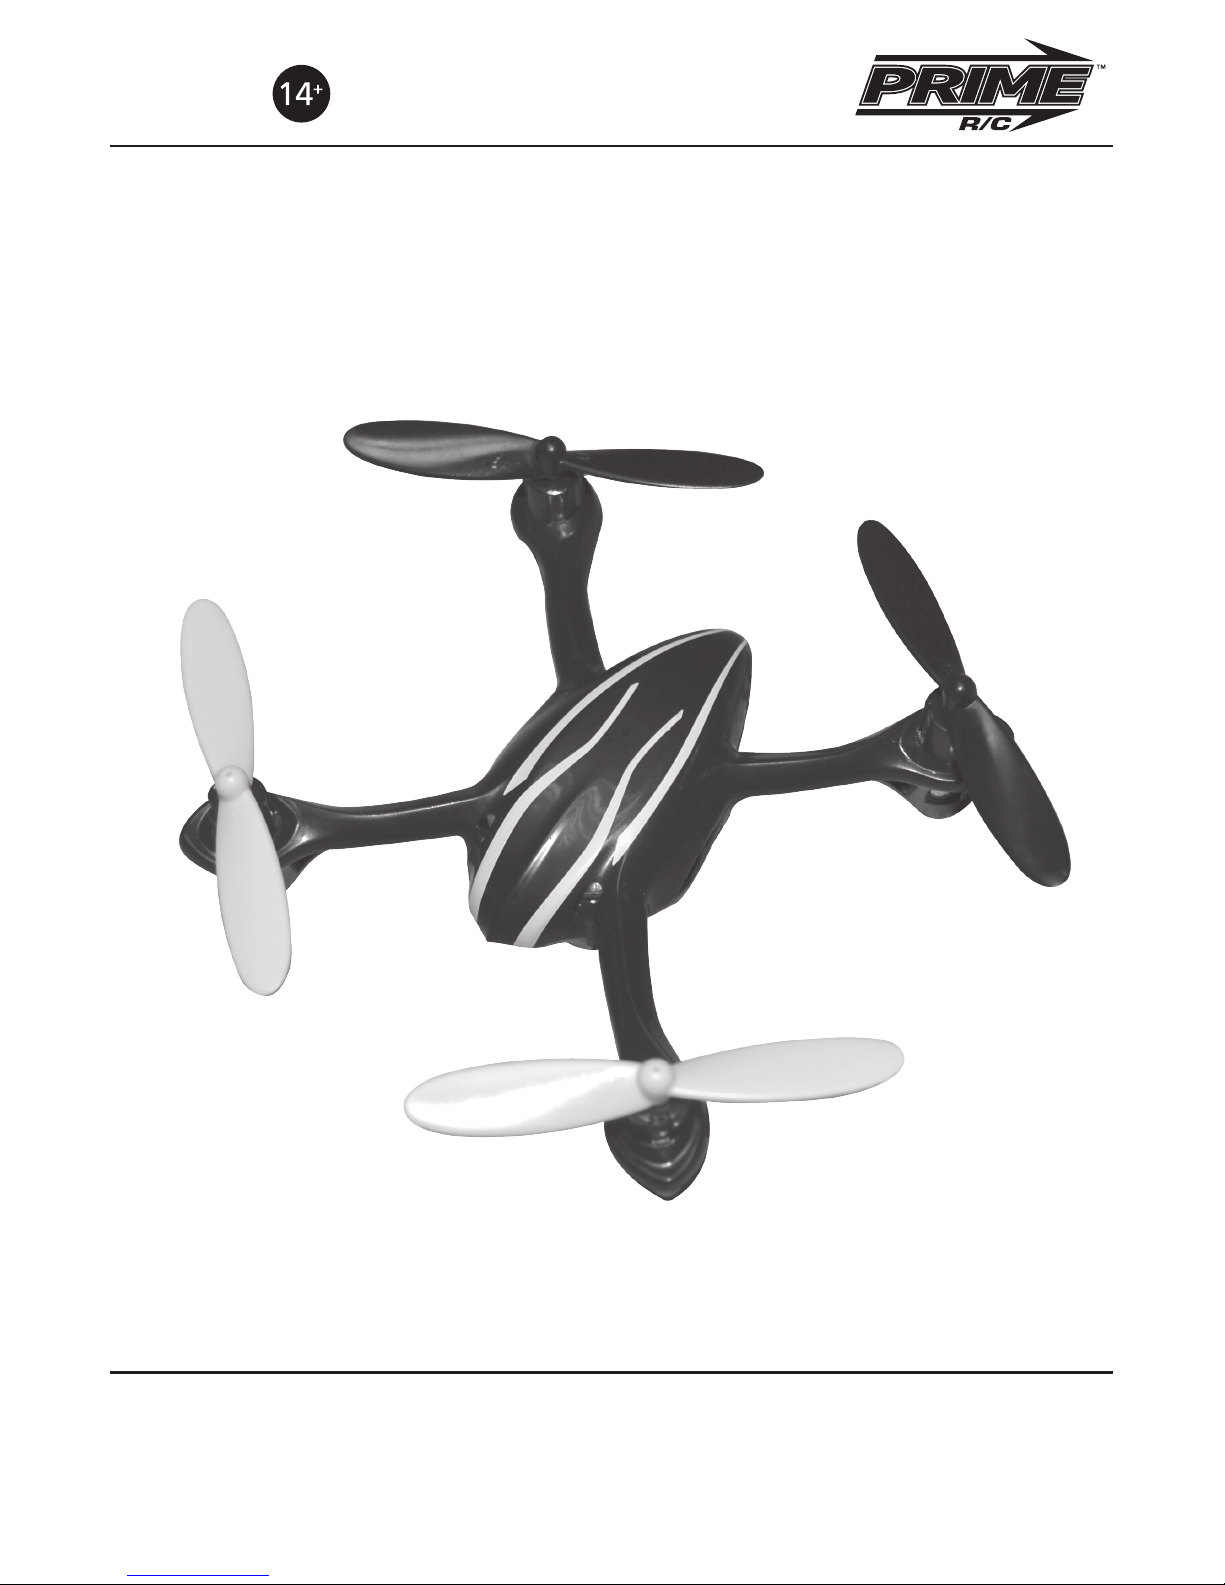
MQ4D User’s Guide
FOR AGES
-Although capable of ying outdoors, the MQ4D is not cleared for ight
operations in winds above 10MPH.
-Read this manual thoroughly prior to rst ights.
ATTENTION
Page 2
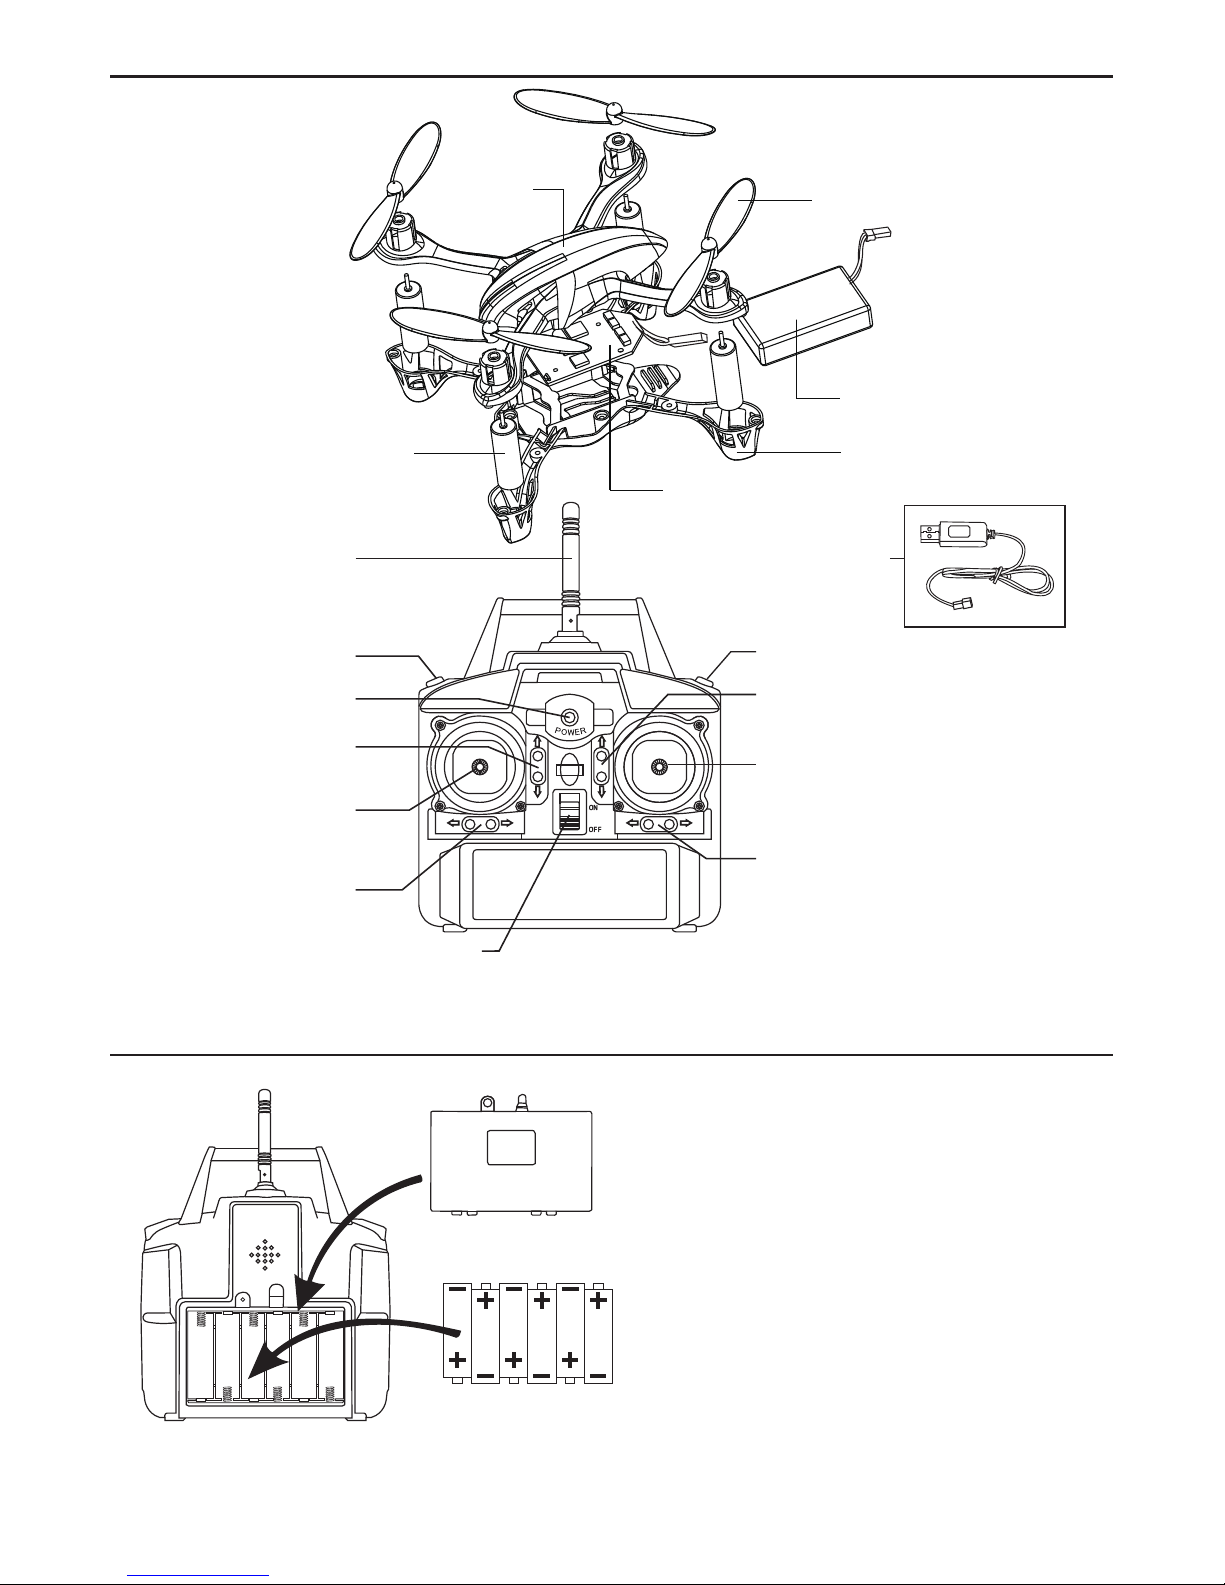
PMQ1105
PMQ1106
PMQ1107
PMQ1105
PMQ1108
PMQ1109/10
Battery Cover
1.5V AA Batteries
2
2.4GHZ Antenna
Active Response
Control button
Electronic Trim Adjuster
Throttle (Altitude)
4D Flip Control Button
Electronic Trim Adjuster
Pitch (Forward/Backward)
Pitch (Forward/Backward) and
Roll (Bank Right/Left) Control Stick
Electronic Trim Adjuster
Roll (Bank Right/Left)
Electronic Trim Adjuster
Yaw (Rotate L/R)
Throttle (Altitude)
Yaw (Rotate L/R)
Control Stick
Power On/Off Switch
Power Light
USB CHARGER
PMQ1111
EXPLODED VIEW / TRANSMITTER CONTROLS
TRANSMITTER BATTERY INSTALLATION
Remove battery compartment cover using
a Phillips-head screwdriver. Install 6 AA
alkaline batteries noting the proper
polarity as shown. FAILURE TO INSTALL
BATTERIES CORRECTLY WILL CAUSE
DAMAGE AND VOID ANY WARRANTY.
CAUTION:
Make sure to install batteries correctly.
Use alkaline batteries only for best
performance.
Do not mix old and new alkaline batteries.
Do not mix brands of batteries.
Page 3
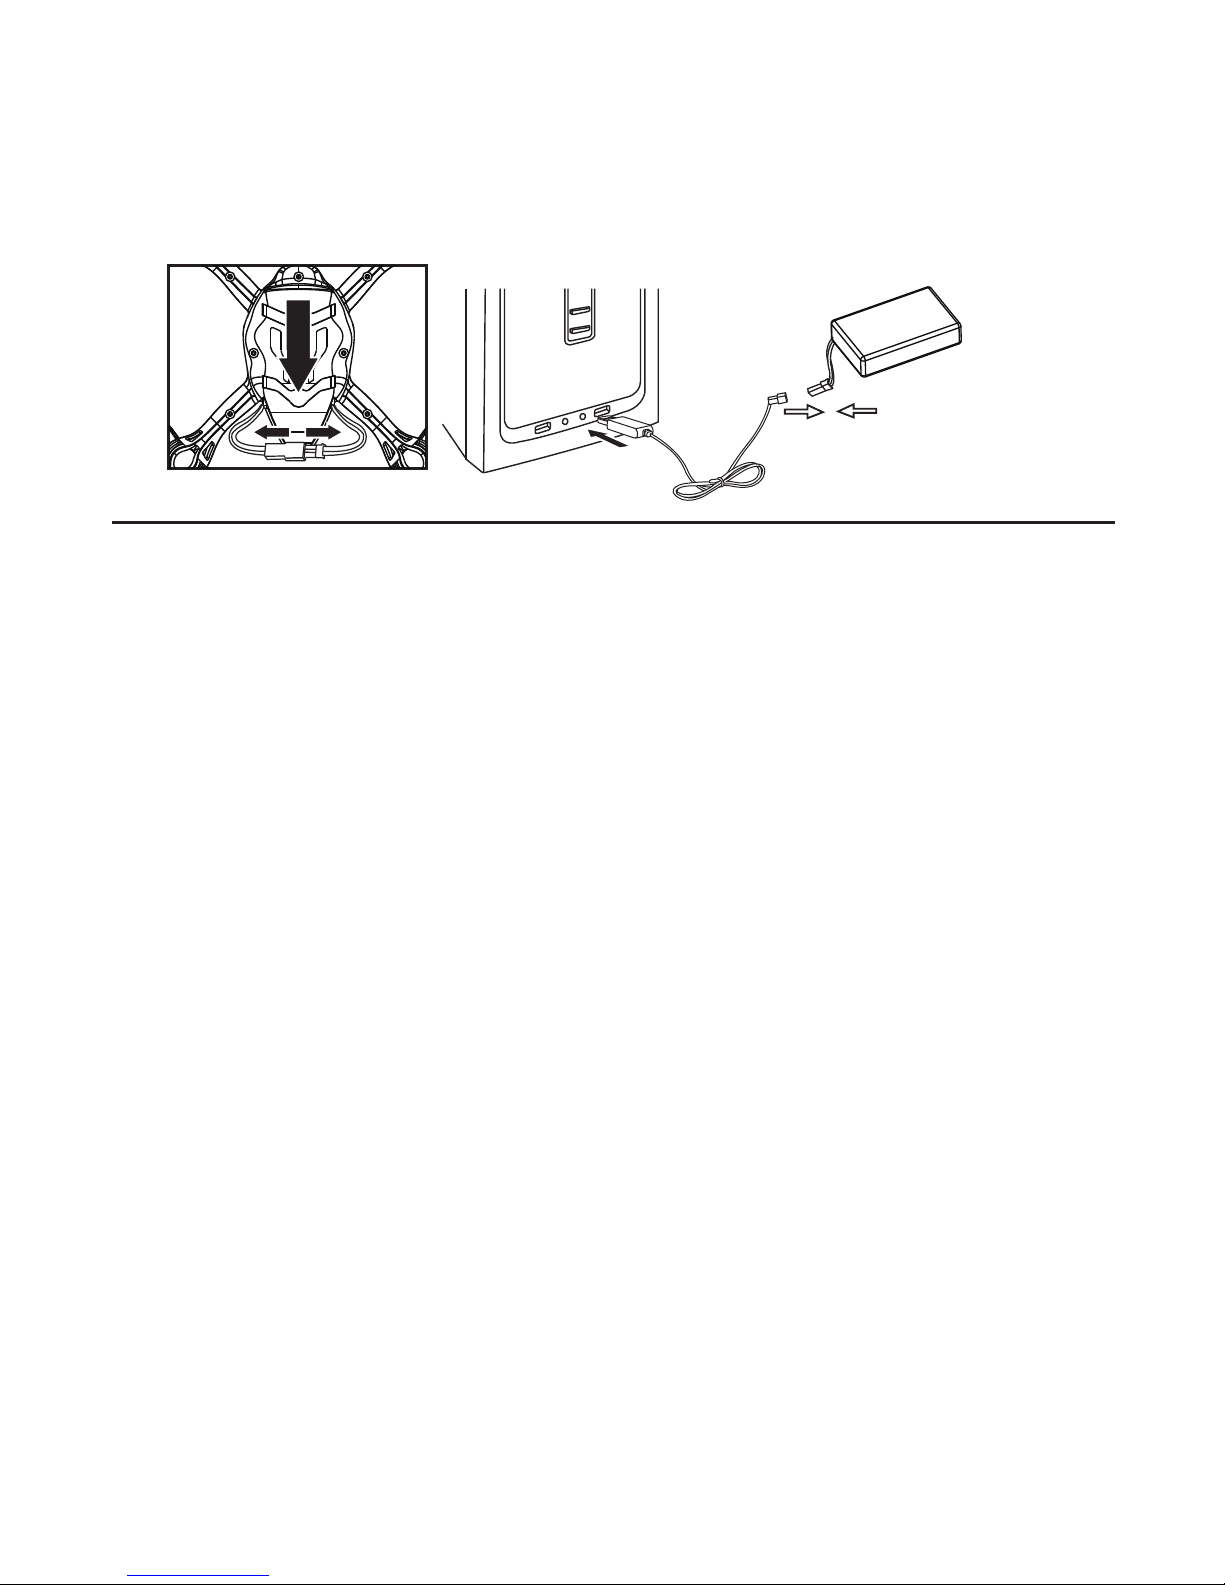
Plug the USB charger into a device, computer, or other suitable power source. Carefully
plug the battery connector into the charge plug. Note the orientation of the battery plug
to the receptacle, it will only plug together one way so be gentle and don’t force it!
You’ll notice that the red LED is illuminated once the battery pack is properly connected
to the charge lead. When the LED is lit, the battery is charging. Once it goes out, the
battery is charged and ready for use. Depending on the device (computer, phone charger,
etc.) charging times will vary from 20-40 minutes.
IMPORTANT NOTES ABOUT LITHIUM-POLYMER BATTERIES
• Space-Age Lithium Polymer (Li-Po) batteries are amazing in their ability to store energy. However,
they must be treated with care. Even the tiny battery in this helicopter has the energy potential to
cause an explosion or re if mishandled or abused, so please treat it accordingly.
• Misuse or abuse of LiPo batteries can cause personal injury, property damage, and bodily harm.
Purchaser assumes all risk in use of this product. If purchaser is unable or unwilling to assume such
risk, please return this product to its original place of purchase.
• Should battery electrolyte escape and get onto skin or in eyes, do not rub but instead rinse
vigorously with clean water and seek immediate medical assistance.
• NEVER leave batteries unattended when charging.
• Immediately disconnect battery and charger if smoke or any peculiar smell is generated by the
battery pack or charger.
• Follow all instructions for use of this product.
CHARGING
• NEVER leave batteries unattended while charging
• ALWAYS use only the original included Prime R/C USB charger to charge batteries for the MQ4D.
• NEVER overcharge the battery pack. Disconnect the charger once the red LED is extinguished.
• NEVER charge the battery on a ammable surface like paper or carpeting. Instead, place the
battery on a concrete oor, ceramic tile, or other non-ammable material.
• NEVER charge a battery that is worn out or physically damaged.
• ALWAYS wait until the battery cools after ight prior to recharging.
USE and STORAGE
• NEVER leave batteries in direct sunlight, in hot automobiles, or other extreme temperature
environments.
• NEVER allow batteries to come into contact with heat, open ame, moisture, chemicals, solvents,
or children under 14 years of age.
• NEVER dispose of batteries in re. Recycle through your local government or retailer that supports
battery recycling efforts in your community.
• NEVER touch the red and black wires together, as short-circuits cause res!
• ALWAYS store the battery and helicopter at room temperature.
• ALWAYS remove the battery from the model before storage.
• ALWAYS remove the USB charger from the host device when nished charging for the day.
• NEVER leave the helicopter, radio, battery pack, or charger in extremely hot or cold conditions.
• ALWAYS disconnect the battery pack from the helicopter when not in use. Leaving the battery
connected to the helicopter will eventually cause terminal damage to the battery pack.
3
Page 4
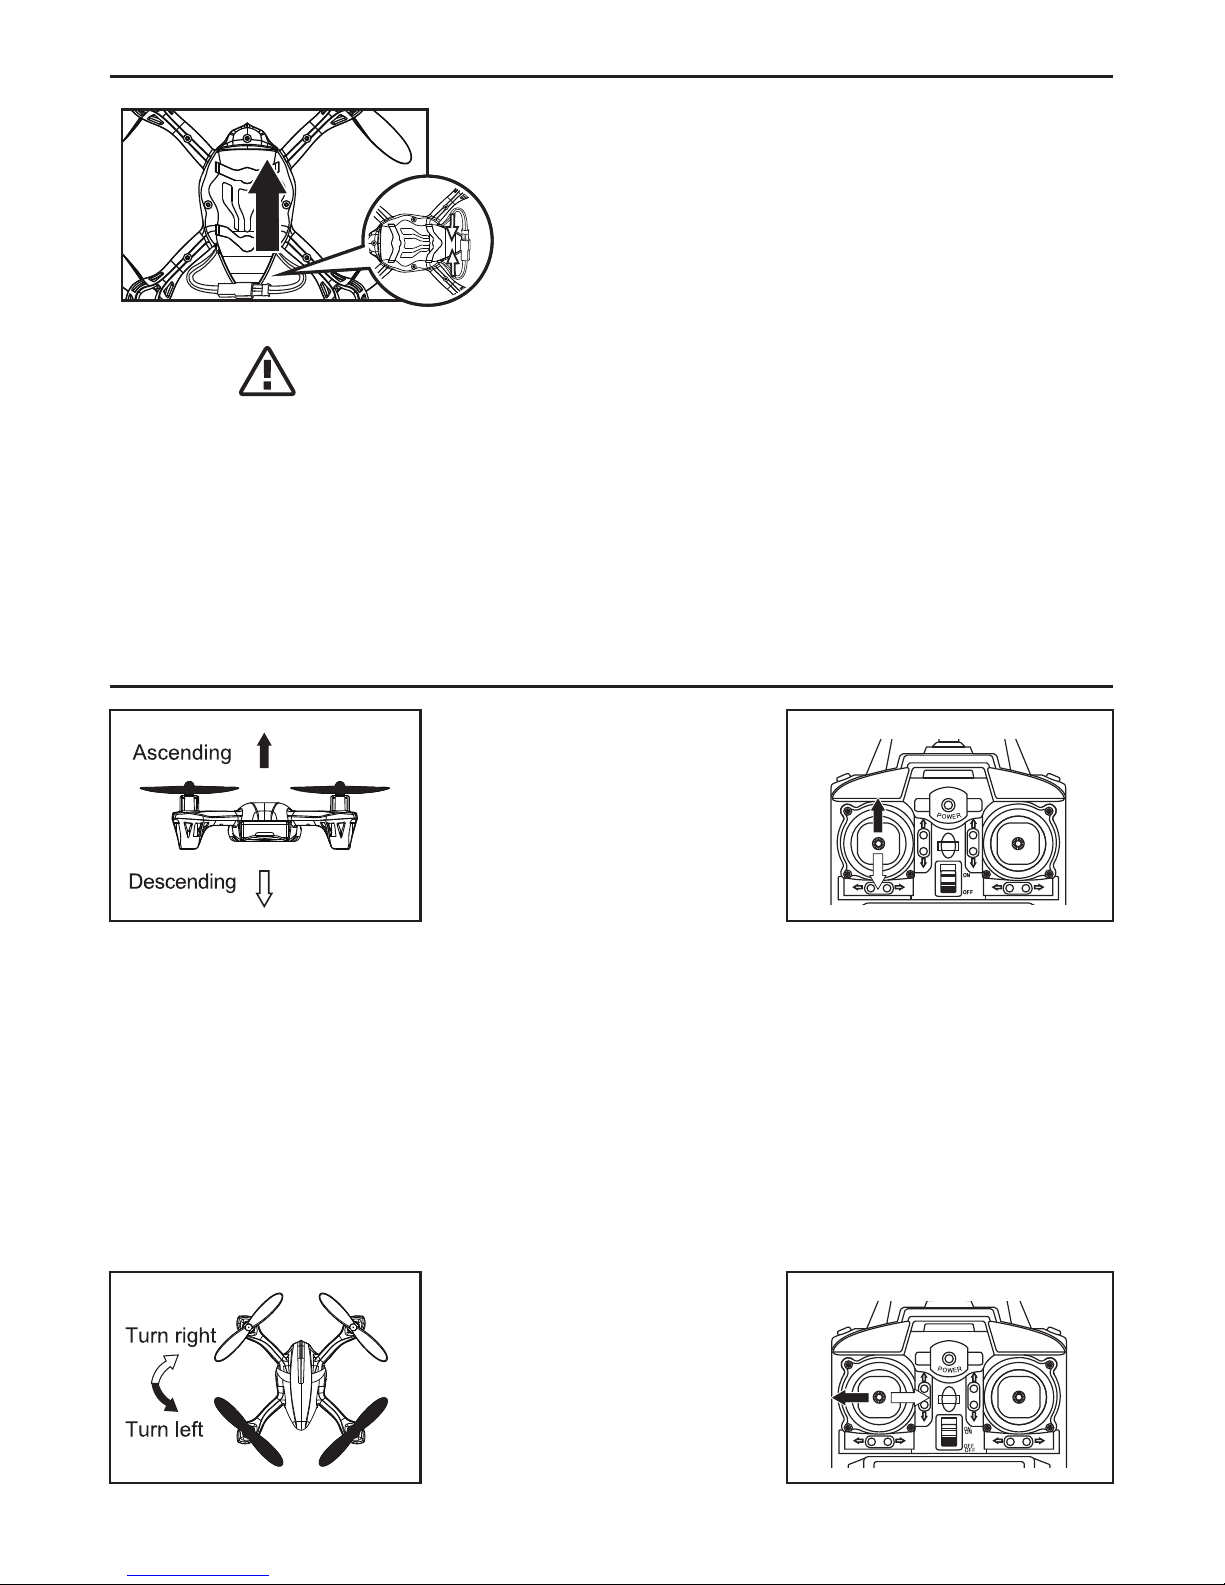
FIRST FLIGHTS
1.) Install the LiPo battery by carefully inserting it into the
battery slot below the circuit board. Make sure that the
battery is slid all the way to the rear of the battery
compartment. Note the wire orientation as shown in the
drawing.
2.) Carefully align the battery plugs, noting the polarity (red
to red, black to black). Once connected, the LED lamps on
the MQ4D will blink. Immediately place the MQ4D on a at,
level surface. This is important, as the placement on a level
surface sets the electronics in the gyro system to recognize
neutral and allows the transmitter to “talk” properly to the
quadcopter. Should you make a mistake, or the MQ4D y
erratically, many times resetting the electronics in this
matter can cure the problem.
3.) Make sure the throttle stick is all the way toward the
bottom (0%) and turn on the transmitter. The Power On/Off
LED should be ashing red.
4.) Move the throttle stick from 0%-100%-0%. You should
hear a beep from the transmitter, the Power LED should
glow solid red and the LEDs on the MQ4D should glow solid
blue. If not, disconnect the battery from the MQ4D, turn
off the transmitter, and repeat steps 2-4.
Let’s Lift Off!
Grasp the transmitter
comfortably using both hands.
Some pilots use their thumbs to
control the sticks while others
use their thumb and index
nger. Use whichever method
feels more natural for you.
Begin applying a small amount
of throttle, to about 50-60%.
The MQ4D should lift off and
hover. You want to hover more
than 12” (30cm) above the
ground to eliminate “ground
effect”, which negatively
impacts performance.
Concentrate on making sure the
MQ4D lifts off vertically and will
comfortably remain in a hover.
Concentrate on keeping the
quadcopter level, with the white
blades away from you. Gently
push the left (rudder/yaw) stick
to the right, then to the left
during hover and the MQ4D will
rotate right or left along the
yaw axis.
WARNING
IMPORTANT NOTE:
Always disconnect the battery from
the MQ4D when not in ight.
The MQ4D ies in an “X”
conguration, which means the
white blades are forward and
the black are aft.
4
Page 5
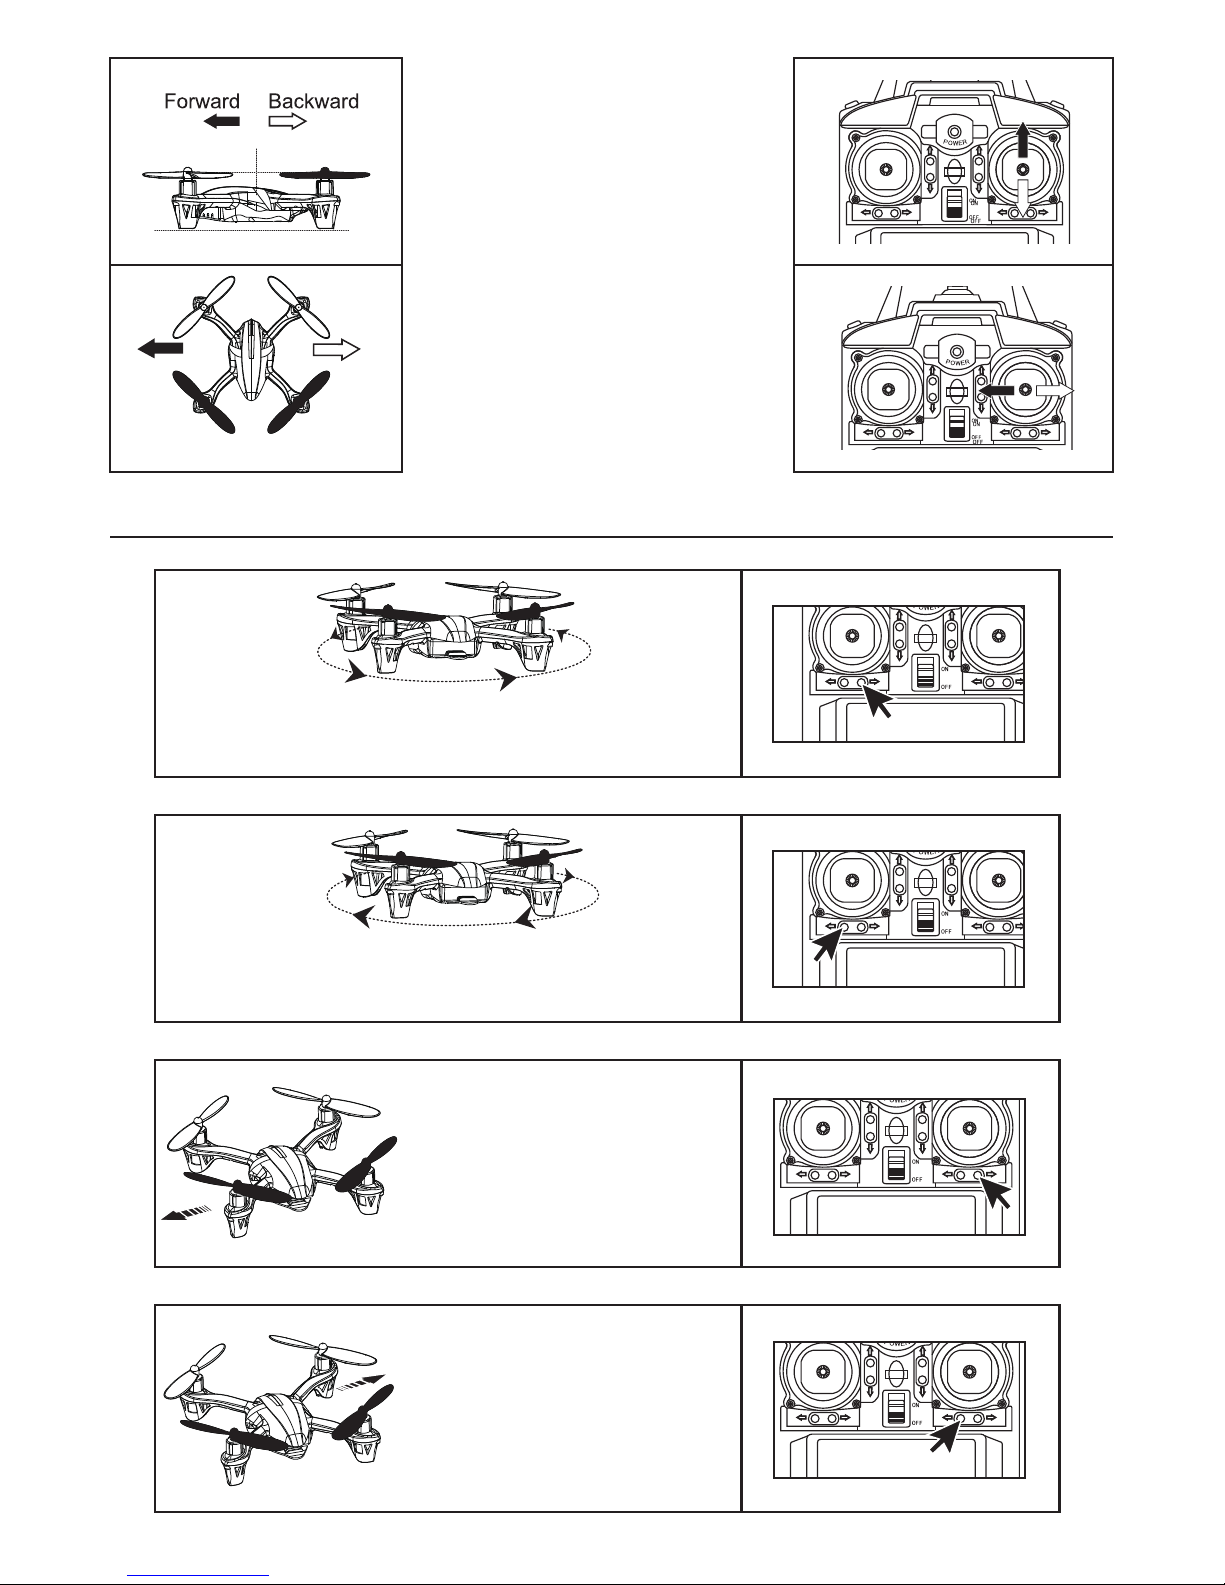
Using Electronic Trims for Stable Flight
Concentrate on hovering the
quadcopter level, with the white
blades away from you. Gently push
the right (pitch) stick to the left,
then to the right and the MQ4D will
y sideways to the left and right
matching your stick movement.
If the MQ4D wants to rotate (spin) left with no control input, press
the right rudder trim button as shown in the illustration. Add right
trim until the MQ4D becomes stable and no longer rotates by itself.
If the MQ4D wants to rotate (spin) right with no control input, press
the left rudder trim button as shown in the illustration. Add left trim
until the MQ4D becomes stable and no longer rotates by itself.
If the MQ4D wants to y sideways
(roll) left with no control input, press
the right roll trim button as shown in
the illustration. Add right trim until the
MQ4D becomes stable and no longer
ies sideways by itself.
If the MQ4D wants to y sideways
(roll) right with no control input, press
the left roll trim button as shown in
the illustration. Add right left until the
MQ4D becomes stable and no longer
ies sideways by itself.
Concentrate on hovering the
quadcopter level, with the white
blades away from you. Gently push
the right (pitch) stick forward, then
backward during hover and the
MQ4D will pitch forward and
backward matching your stick
movement.
Left roll
toward
sideways
ight
Right roll
toward
sideways
ight
5
Page 6
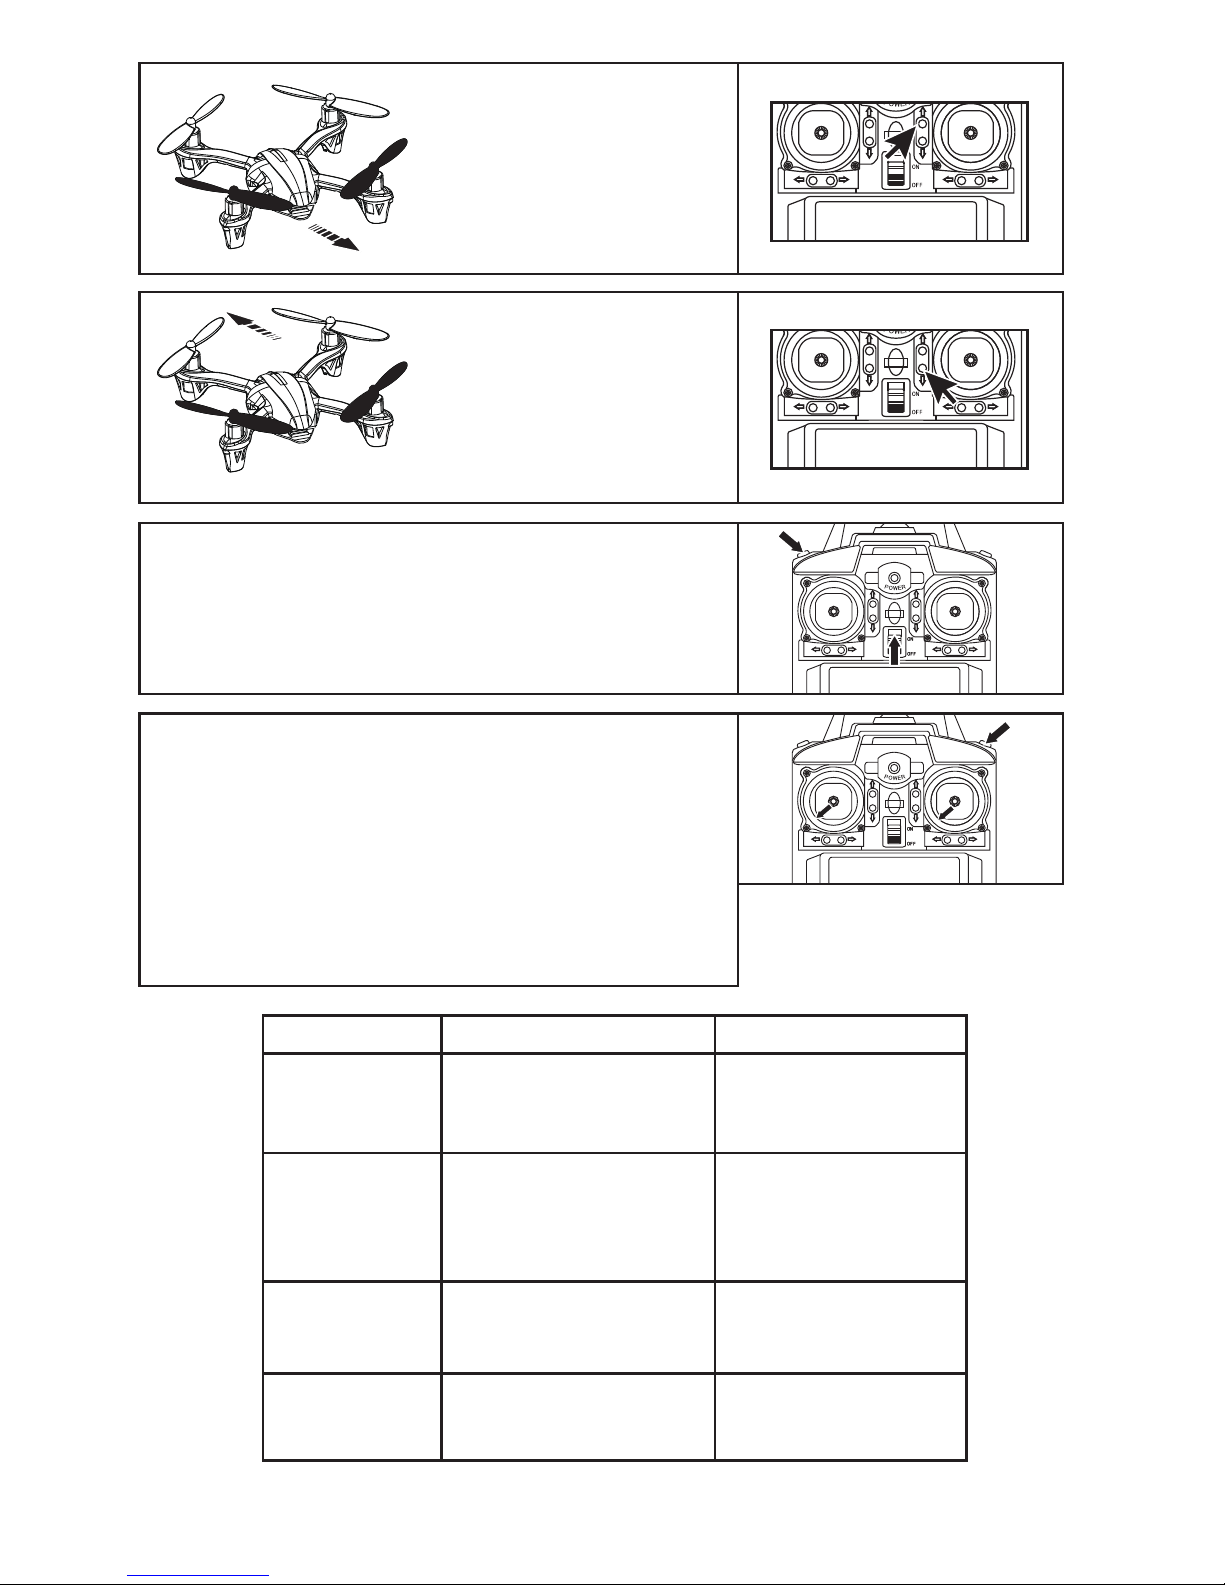
If the MQ4D wants to y backward
(pitch) with no control input, press the
forward pitch trim button as shown in
the illustration. Add forward trim until
the MQ4D becomes stable and no
longer ies backwards by itself.
If the MQ4D wants to y forward
(pitch) with no control input, press the
back pitch trim button as shown in the
illustration. Add backward trim until
the MQ4D becomes stable and no
longer ies forward by itself.
TRIM RESET FUNCTION:
To reset all trims to neutral (default) settings-
1.) Make certain the battery is unplugged from the MQ4D.
2.) Turn the transmitter off.
3.) Turn on the power while depressing the ARC control button.
4.) Trims are now set to factory defaults.
STILL HAVING TROUBLE?
If all attempts to make a vertical takeoff and hold a stable hover are
unsuccessful, you can reset the gyro stabilization electronics by following
the following steps:
1.) Make sure the MQ4D is powered up and sitting on a level surface.
2.) Turn on the transmitter.
3.) While holding down the 4D Flip control button, move both sticks to
their respective bottom left hand corners are shown in the illustration.
The red LED will ash.
4.) Allow the sticks to return to neutral.
5.) The LED will glow solid and the re-calibration is then complete.
6
Problem
Transmitter Not
Working
Transmitter switch turned off
Batteries improperly installed
Worn out batteries
Turn switch on
Check polarity of
transmitter dry cells
Replace with new batteries
Turn switch on
Connect LiPo battery to
MQ4D
Try ying indoors or in
calmer wind
Increase amount of throttle
applied
Charge the LiPo battery
Check motors or propellers
for damage
Charge the LiPo battery
Transmitter switch turned off
Battery not plugged into
MQ4D
Wind is too strong
Not enough throttle is being
applied
Battery pack needs recharged
Electrical problem
Battery not charged
Control Failure
Flight Time
Too Short
Will Not Take Off
Potential Cause Possible Solution
Page 7
WHERE TO FLY
PRACTICE YOUR FLYING Below are some exercises to improve your ying skills
1.) Ideally, the MQ4D should be initially own indoors in zero wind with as much clear space
away from people, pets, and furniture as possible. An open family room or other area with tall
ceilings is desired.
2.) Flying outdoors in any winds above 10MPH (17KPH) is not recommended.
3.) Do not y in temperatures below 32 degrees F (0 degrees C) or above 95 degrees F (35
degrees C)
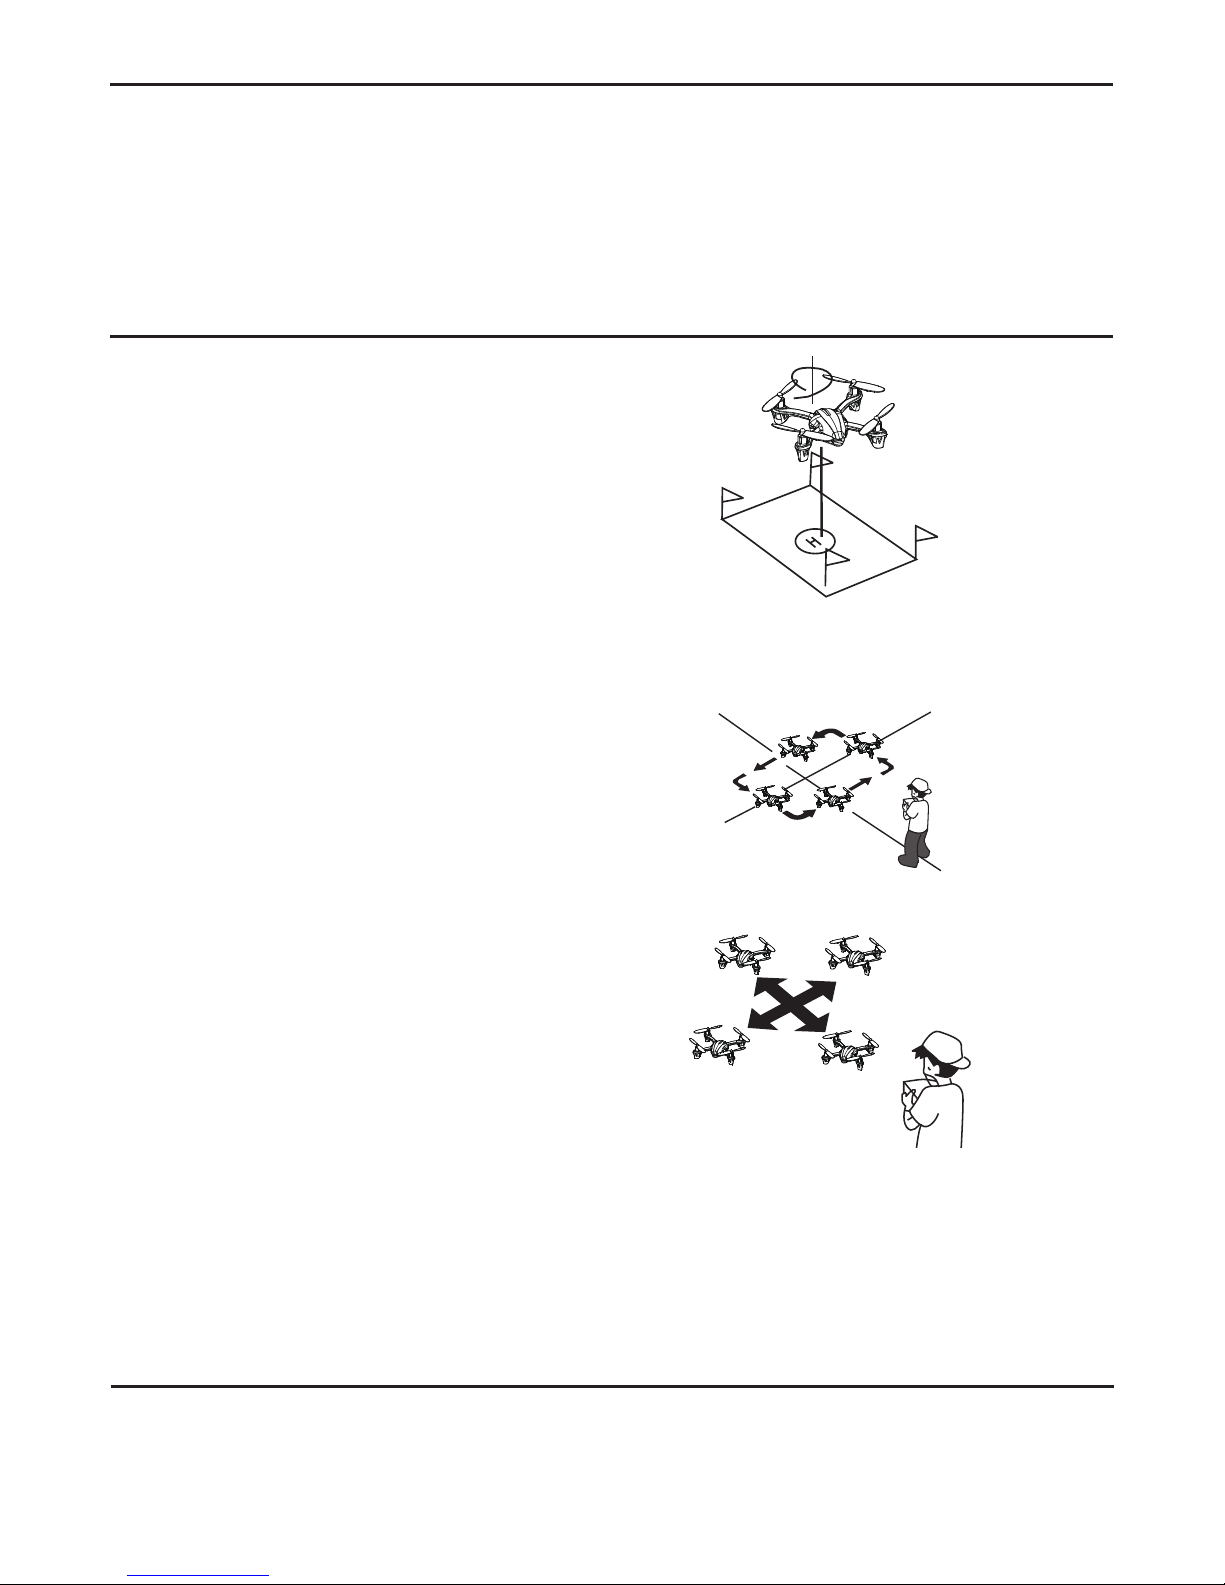
Practice hovering over a xed point,
at a consistent altitude above the
surface. Imagine that you are ying in
a silo of 1m (3’) in diameter and you
must keep the MQ4D within this
space. Concentrate on smooth
application and reduction of throttle
for gentle takeoffs and landings.
Practice ying in a square pattern while
keeping the MQ4D orientation perfectly
“away” from you with the white blades
always pointing forward.
Practice ying in an “X” pattern while
keeping the MQ4D orientation perfectly
“away” from you with the white blades
always pointing forward.
Remember, smooth is best. Apply throttle and control inputs smoothly and gently to avoid
over-controlling which leads to disorientation and crashes.
NOTE:
If you nd yourself hopelessly disoriented or out of control, immediately lower throttle to
zero in order to minimize any crash damage. The MQ4D is unusually durable!!!
Practice landing in a small circle.
7
BATTERY FAILSAFE
The MQ4D is equipped with a battery safety circuit that automatically powers off the MQ4D
during ight to protect the battery against over-discharging. You will notice a reduction in
prop speed and control response prior to the model powering off. Consider ending your
ights before the battery failsafe engages.
Page 8
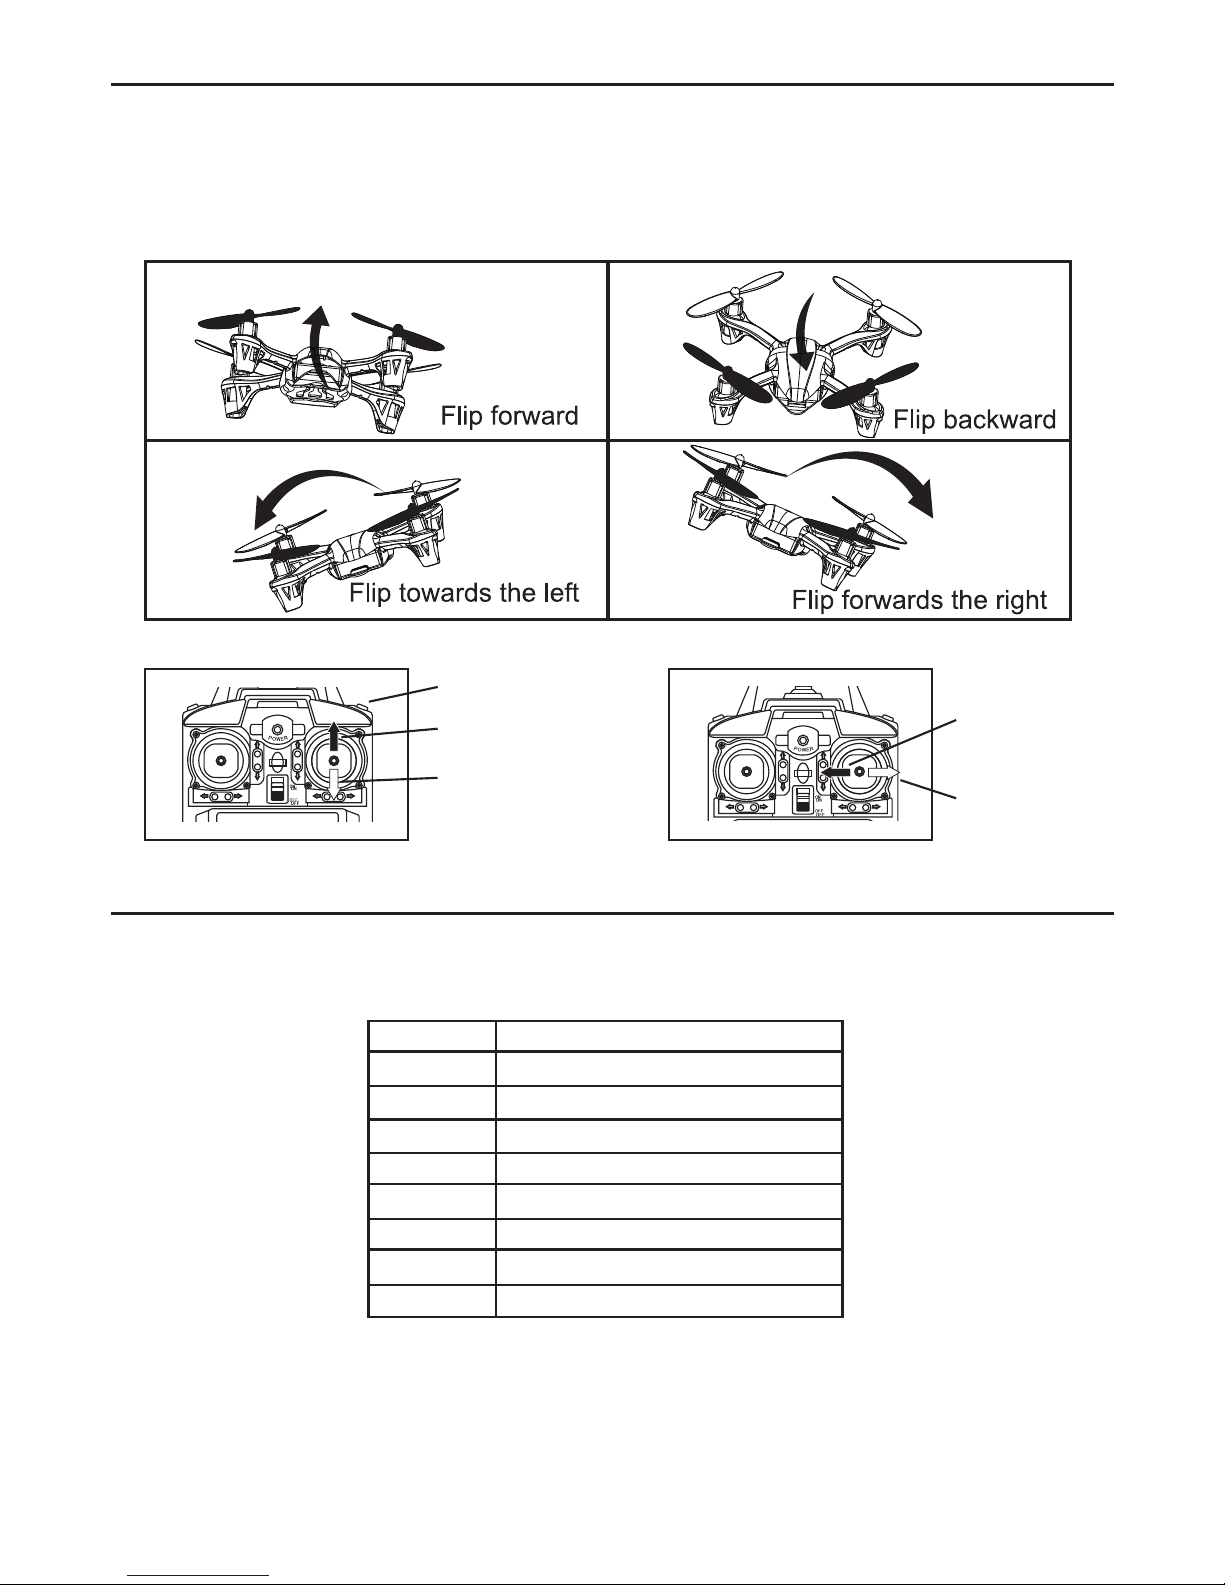
4D FLIP FLYING
Pilots can easily perform 4D ip stunts using the ip control button on the right hand topside
of the transmitter.
From a level, stable hover about 2m (6’) off the ground, hold the 4D Flip Control button while
quickly moving the stick to the right and then back to neutral. The MQ4D will perform a fast
right ip. Make sure to remove your nger from the button once the maneuver starts!
4D Flip Button
Flip Forward
Flip Backward
Flip Left
Flip RIght
8
© 2013 by Prime R/C, a brand of The Jeric Group, LLC
42 N Central Ave
Upland, CA 91786
USA
www.primerc.net
No portion of this instruction manual may be reproduced our reprinted without the express written consent of The Jeric Group, LLC.
SPARE PARTS
Although incredibly durable, should your MQ4D require spare parts they are available directly
from Prime R/C or at your favorite retailer.
PMQ1105 Plastic Body Set (Top/Bottom): MQ4D
PMQ1106 Propeller Set (4 pcs.): MQ4D
PMQ1107 Li-Po Battery Pack 3.7v : MQ4D
PMQ1108 Complete Receiver PCB: MQ4D
PMQ1109 Forward (white) motor set: MQ4D
PMQ1110 Backward (black) motor set: MQ4D
PMQ1111 USB Charger: MQ4D
PMQ1112 10 pc. Screw set: MQ4D
PMQ1113 Protective Canopy: MQ4D
 Loading...